

Page 1

INSTRUCTION MANUAL
Sonics & Materials, Inc.
Model FM Power Supply
Page 2

• • • • • • • • • • • • • • • • • • • • • • • • • • • • • • • • • • • • • • • • • • • • • • • • • • • • • • • • • • • • • • • • • • • • • • • • • • • • • • • • • • • • • • • • • • • • • • • • • • • • • • • • • • • •
INSTRUCTION MANUAL • MODEL FM POWER SUPPLY
1
WARNING
SAFETY PRECAUTIONS
READ BEFORE INSTALLING OR USING THE EQUIPMENT
This system has been designed to assure maximum operator safety.
However, no design can completely protect against improper usage. For
maximum safety and equipment protection, observe the following warnings at
all times and read the instruction manual carefully before you attempt to
operate the equipment.
– High voltage is present in the equipment.Disconnect plug before removing
cover or servicing.
– Make sure equipment is properly grounded with a 3-prong plug. Before
plugging in equipment, test outlet for proper earth grounding.
– Ultrasonic welders operate above normal audibility for most people. Ear
protection is recommended.
Sonics & Materials, Inc.
Corporate Headquarters European Office
53 Church Hill Road • Newtown, CT 06470 USA 22 ch du Vernay • CH - 1196 Gland, Switzerland
203.270.4600 • 800.745.1105 • 203.270.4610 fax (41) (0) 22/364 1520 • (41) (0) 22/364 2161 fax
Information contained in this manual is subject to change without notice. Sonics & Materials, Inc. is not responsible for any typographic errors.
© Sonics & Mater ials, Inc. 2001 Printed in U.S.A. Part No.381-0039
Rev 00 8/01
Page 3

TABLE OF CONTENTS
IMPORTANT SERVICE LITERATURE . . . . . . . . . . . . . . . . . . . . . . . . . . .4
Manual Change Information . . . . . . . . . . . . . . . . . . . . . . . . . . . . .4
UNPACKING AND INSPECTION . . . . . . . . . . . . . . . . . . . . . . . . . . . . . . .5
Visible Loss or Damage . . . . . . . . . . . . . . . . . . . . . . . . . . . . . . . .5
Concealed Loss or Damage . . . . . . . . . . . . . . . . . . . . . . . . . . . . .5
INTRODUCTION . . . . . . . . . . . . . . . . . . . . . . . . . . . . . . . . . . . . . . . . . . .6
OVERVIEW OF ULTRASONIC PLASTICS ASSEMBLY . . . . . . . . . . . . . .6
What is Ultrasonics? . . . . . . . . . . . . . . . . . . . . . . . . . . . . . . . . . .6
Principal of Ultrasonic Assembly . . . . . . . . . . . . . . . . . . . . . . . . .6
Ultrasonic Assembly Systems . . . . . . . . . . . . . . . . . . . . . . . . . . .6
GLOSSARY OF ULTRASONIC TERMS . . . . . . . . . . . . . . . . . . . . . . . . . .8
INSTALLATION . . . . . . . . . . . . . . . . . . . . . . . . . . . . . . . . . . . . . . . . . . . .9
Electrical Power Requirements . . . . . . . . . . . . . . . . . . . . . . . . . . .9
Setting Up . . . . . . . . . . . . . . . . . . . . . . . . . . . . . . . . . . . . . . . . . .9
Electrical Connections . . . . . . . . . . . . . . . . . . . . . . . . . . . . . . . .10
Cable Connections . . . . . . . . . . . . . . . . . . . . . . . . . . . . . . . . . . .11
Available Converters . . . . . . . . . . . . . . . . . . . . . . . . . . . . . . . . .12
OPERATING PROCEDURES . . . . . . . . . . . . . . . . . . . . . . . . . . . . . . . . .13
Front Panel Controls and Indicators . . . . . . . . . . . . . . . . . . . . . .13
OPERATIONAL SIGNALS . . . . . . . . . . . . . . . . . . . . . . . . . . . . . . . . . . .15
Operational Features . . . . . . . . . . . . . . . . . . . . . . . . . . . . . . . . .15
Starting up the Power Supply . . . . . . . . . . . . . . . . . . . . . . . . . . .15
Initial Operation . . . . . . . . . . . . . . . . . . . . . . . . . . . . . . . . . . . . .16
BASIC MODES OF OPERATION . . . . . . . . . . . . . . . . . . . . . . . . . . . . . .17
Time-Based Modes . . . . . . . . . . . . . . . . . . . . . . . . . . . . . . . . . .17
Energy-Based Modes . . . . . . . . . . . . . . . . . . . . . . . . . . . . . . . .17
Mode Codes Display . . . . . . . . . . . . . . . . . . . . . . . . . . . . . . . . .18
TIME-BASED MODES . . . . . . . . . . . . . . . . . . . . . . . . . . . . . . . . . . . . . .19
Selecting and Setting Timers in a Time-Based Cycle . . . . . . . . .19
Selecting and Setting the Afterpulse Timer . . . . . . . . . . . . . . . . .20
Selecting and Setting Process Control Tolerance Limits
in a Time-based Cycle . . . . . . . . . . . . . . . . . . . . . . . . . . . . . . . .21
Selecting and Adjusting Variable Force Trigger Actuation
in a Time-Based Cycle . . . . . . . . . . . . . . . . . . . . . . . . . . . . . . . .21
• • • • • • • • • • • • • • • • • • • • • • • • • • • • • • • • • • • • • • • • • • • • • • • • • • • • • • • • • • • • • • • • • • • • • • • • • • • • • • • • • • • • • • • • • • • • • • • • • • • • • • • • • • • •
2
INSTRUCTION MANUAL • MODEL FM POWER SUPPLY
Page 4

• • • • • • • • • • • • • • • • • • • • • • • • • • • • • • • • • • • • • • • • • • • • • • • • • • • • • • • • • • • • • • • • • • • • • • • • • • • • • • • • • • • • • • • • • • • • • • • • • • • • • • • • • • • •
INSTRUCTION MANUAL • MODEL FM POWER SUPPLY
3
ENERGY-BASED MODES . . . . . . . . . . . . . . . . . . . . . . . . . . . . . . . . . . .23
Constant Energy-Based Cycle with Time Delay Triggering . . . . .23
Constant Energy-Based Cycle with Variable Force Triggering . . .24
Timer 5 . . . . . . . . . . . . . . . . . . . . . . . . . . . . . . . . . . . . . . . . . . .24
Selecting and Setting the Maximum Weld Time . . . . . . . . . . . . .24
OVERVIEW OF OPERATIONS AND LCD DISPLAYS . . . . . . . . . . . . . .25
OVERVIEW OF SET-UP PROCEDURES AND DISPLAYS . . . . . . . . . . .27
ADDITIONAL FEATURES AND FUNCTIONS . . . . . . . . . . . . . . . . . . . .29
Program Version Designation . . . . . . . . . . . . . . . . . . . . . . . . . . .29
Cancel Number of Welds . . . . . . . . . . . . . . . . . . . . . . . . . . . . . .29
Cancel Number of Rejects . . . . . . . . . . . . . . . . . . . . . . . . . . . . .29
Job Storage . . . . . . . . . . . . . . . . . . . . . . . . . . . . . . . . . . . . . . . .29
Job Sequence . . . . . . . . . . . . . . . . . . . . . . . . . . . . . . . . . . . . . .31
Cal Pulse . . . . . . . . . . . . . . . . . . . . . . . . . . . . . . . . . . . . . . . . . .32
KEYPAD SECURITY . . . . . . . . . . . . . . . . . . . . . . . . . . . . . . . . . . . . . . .33
PRINTER INTERFACE AND OPERATION . . . . . . . . . . . . . . . . . . . . . . .34
Printer Operation . . . . . . . . . . . . . . . . . . . . . . . . . . . . . . . . . . . .34
Printout of the Weld Energy Curve . . . . . . . . . . . . . . . . . . . . . . .34
Printer Displays . . . . . . . . . . . . . . . . . . . . . . . . . . . . . . . . . . . . .35
Graph Header . . . . . . . . . . . . . . . . . . . . . . . . . . . . . . . . . . . . . .37
Reject Printouts . . . . . . . . . . . . . . . . . . . . . . . . . . . . . . . . . . . . .38
SYSTEM STATUS TESTS AND FUNCTIONS . . . . . . . . . . . . . . . . . . . .39
Power Supply Test and Display . . . . . . . . . . . . . . . . . . . . . . . . .39
Operation Sequence Display . . . . . . . . . . . . . . . . . . . . . . . . . . .39
System Status Tests and Miscellaneous Functions . . . . . . . . . . .39
Printer Test . . . . . . . . . . . . . . . . . . . . . . . . . . . . . . . . . . . . . . . .40
Coupling Force Measurement . . . . . . . . . . . . . . . . . . . . . . . . . .41
Clear Parameters . . . . . . . . . . . . . . . . . . . . . . . . . . . . . . . . . . . .41
SYSTEM STATUS TESTS . . . . . . . . . . . . . . . . . . . . . . . . . . . . . . . . . . .42
System Status Tests and Miscellaneous Functions . . . . . . . . . . .42
Overload Protection . . . . . . . . . . . . . . . . . . . . . . . . . . . . . . . . . .43
MAINTENANCE . . . . . . . . . . . . . . . . . . . . . . . . . . . . . . . . . . . . . . . . . . .44
General . . . . . . . . . . . . . . . . . . . . . . . . . . . . . . . . . . . . . . . . . . .44
Repairs / Service . . . . . . . . . . . . . . . . . . . . . . . . . . . . . . . . . . . .44
WARRANTY . . . . . . . . . . . . . . . . . . . . . . . . . . . . . . . . . . . . . . . . . . . . .45
Limitation of Warranty . . . . . . . . . . . . . . . . . . . . . . . . . . . . . . . .45
APPENDIX . . . . . . . . . . . . . . . . . . . . . . . . . . . . . . . . . . . . . . . . . . . . . .46
Page 5

• • • • • • • • • • • • • • • • • • • • • • • • • • • • • • • • • • • • • • • • • • • • • • • • • • • • • • • • • • • • • • • • • • • • • • • • • • • • • • • • • • • • • • • • • • • • • • • • • • • • • • • • • • • •
4
INSTRUCTION MANUAL • MODEL FM POWER SUPPLY
IMPORTANT SERVICE LITERATURE
The system supplied with this instruction manual is constructed of the finest
material and the workmanship meets the highest manufacturing standards. It
has been thoroughly tested and inspected before leaving the factory and
when used in accordance with the procedures outlined in this manual, will
provide you with many years of safe and dependable service.
MANUAL CHANGE INFORMATION
We continually strive to be at the forefront of the latest electronic
developments by adding circuit and component improvements to our
equipment as soon as they are developed and tested.
Sometimes, due to printing and shipping requirements, we cannot incorporate
these changes immediately into printed manuals. Hence, your manual may
contain new change information. Change information, if any, is located in the
Appendix.
We reserve the right to make any changes in the design or construction of our
equipment at any time, without incurring any obligation to make any change
whatsoever in units previously delivered.
The technical data and schematics in the manual are for informational
purposes only and may not reflect the current configuration being shipped
from our factory. Upon formal request, complete and up-to-date information
can be provided from the factory free of charge.
NOTE: Please read
carefully before
operating the
equipment, then
forward to your service
department.
Page 6

• • • • • • • • • • • • • • • • • • • • • • • • • • • • • • • • • • • • • • • • • • • • • • • • • • • • • • • • • • • • • • • • • • • • • • • • • • • • • • • • • • • • • • • • • • • • • • • • • • • • • • • • • • • •
INSTRUCTION MANUAL • MODEL FM POWER SUPPLY
5
UNPACKING AND INSPECTION
Before unpacking the equipment, check the shipping carton for any visible
damage. If you see any, be sure to follow the procedures described below
under “Visible Loss or Damage.”Otherwise, proceed to remove the equipment
from the carton. Before storing any packing material, check it carefully for
small parts. Then perform a visual inspection of the equipment to detect any
evidence of damage which might have occurred during shipment. Check the
following:
1. all components against the enclosed packing list,
2. all module plug-in units,
3. all wire plug-in connections.
The equipment was carefully packed and thoroughly inspected before leaving
our factory. All units are tested and checked for problems prior to shipping. It
is asked that when a problem does occur that all parts and components be
inspected for damage (especially when the unit is not in working order when
received). Responsibility for safe delivery was assumed by the carrier upon
acceptance of the shipment. Claims for loss of damage sustained in transit
must therefore be made upon the carrier, as follows:
VISIBLE LOSS OR DAMAGE
Any external evidence of loss or damage must be noted on the freight bill or
express receipt, and signed by the carrier’s agent. Failure to adequately
describe such external evidence of loss or damage may result in the carrier’s
refusal to honor a damage claim.The form required to file such a claim will be
supplied by the carrier.
CONCEALED LOSS OR DAMAGE
Concealed loss or damage means loss or damage which does not become
apparent until the merchandise has been unpacked.The contents might have
been damaged in transit due to rough handling even though the container
may not show external damage. When the damage is discovered upon
unpacking, make a written request for inspection by the carrier’s agent within
48 hours of the delivery date. Then file a claim with the carrier since such
damage is the carrier’s responsibility. The form required to file such a claim
will be supplied by the carrier. Do not destroy packing materials, or move
material from one location to another before the carrier makes their
inspection.
If the system or any unit is damaged, notify “Sonics.” “Sonics” will arrange for
repair or replacement of damaged equipment without waiting for the claim
against the carrier to be settled, provided a new purchase order is issued to
cover the repair or replacement costs. Should any damage, shortage or
discrepancy exist, please notify us immediately.
NOTE: We recommend
keeping all carton(s)
and packing material in
case it might be
necessary to move the
equipment, or to ship it
for repair.
Page 7

• • • • • • • • • • • • • • • • • • • • • • • • • • • • • • • • • • • • • • • • • • • • • • • • • • • • • • • • • • • • • • • • • • • • • • • • • • • • • • • • • • • • • • • • • • • • • • • • • • • • • • • • • • • •
6
INSTRUCTION MANUAL • MODEL FM POWER SUPPLY
INTRODUCTION
The FM model power supply is an auto-tuned ultrasonic generator with a builtin Microprocessor that allows time and energy-based control. The
Microprocessor is programmed with a multi-function keypad and information
is displayed on the bac k-lit liquid crystal display (LCD).This power supply can
be used with a pneumatic actuator or with a stand-alone converter.
OVERVIEW OF ULTRASONIC PLASTICS
ASSEMBLY
WHAT IS ULTRASONICS?
Ultrasonics refers to vibrational waves with a frequency above the human
audible range which is usually above 18,000 cycles per second (Hz).
PRINCIPLE OF ULTRASONIC ASSEMBLY
The basic principle of ultrasonic assembly involves conversion of high
frequency electrical energy to high frequency mechanical energy in the form
of reciprocating vertical motion which, when applied to a thermoplastic,
generates frictional heat at the plastic/plastic or plastic/metal interface. In
ultrasonic welding, this frictional heat melts the plastic, allowing the two
surfaces to fuse together; in ultrasonic staking or insertion, the controlled flow
of molten plastic is used to capture or lock another material in place (staking)
or encapsulate a metal insert (inser tion).
ULTRASONIC ASSEMBLY SYSTEMS
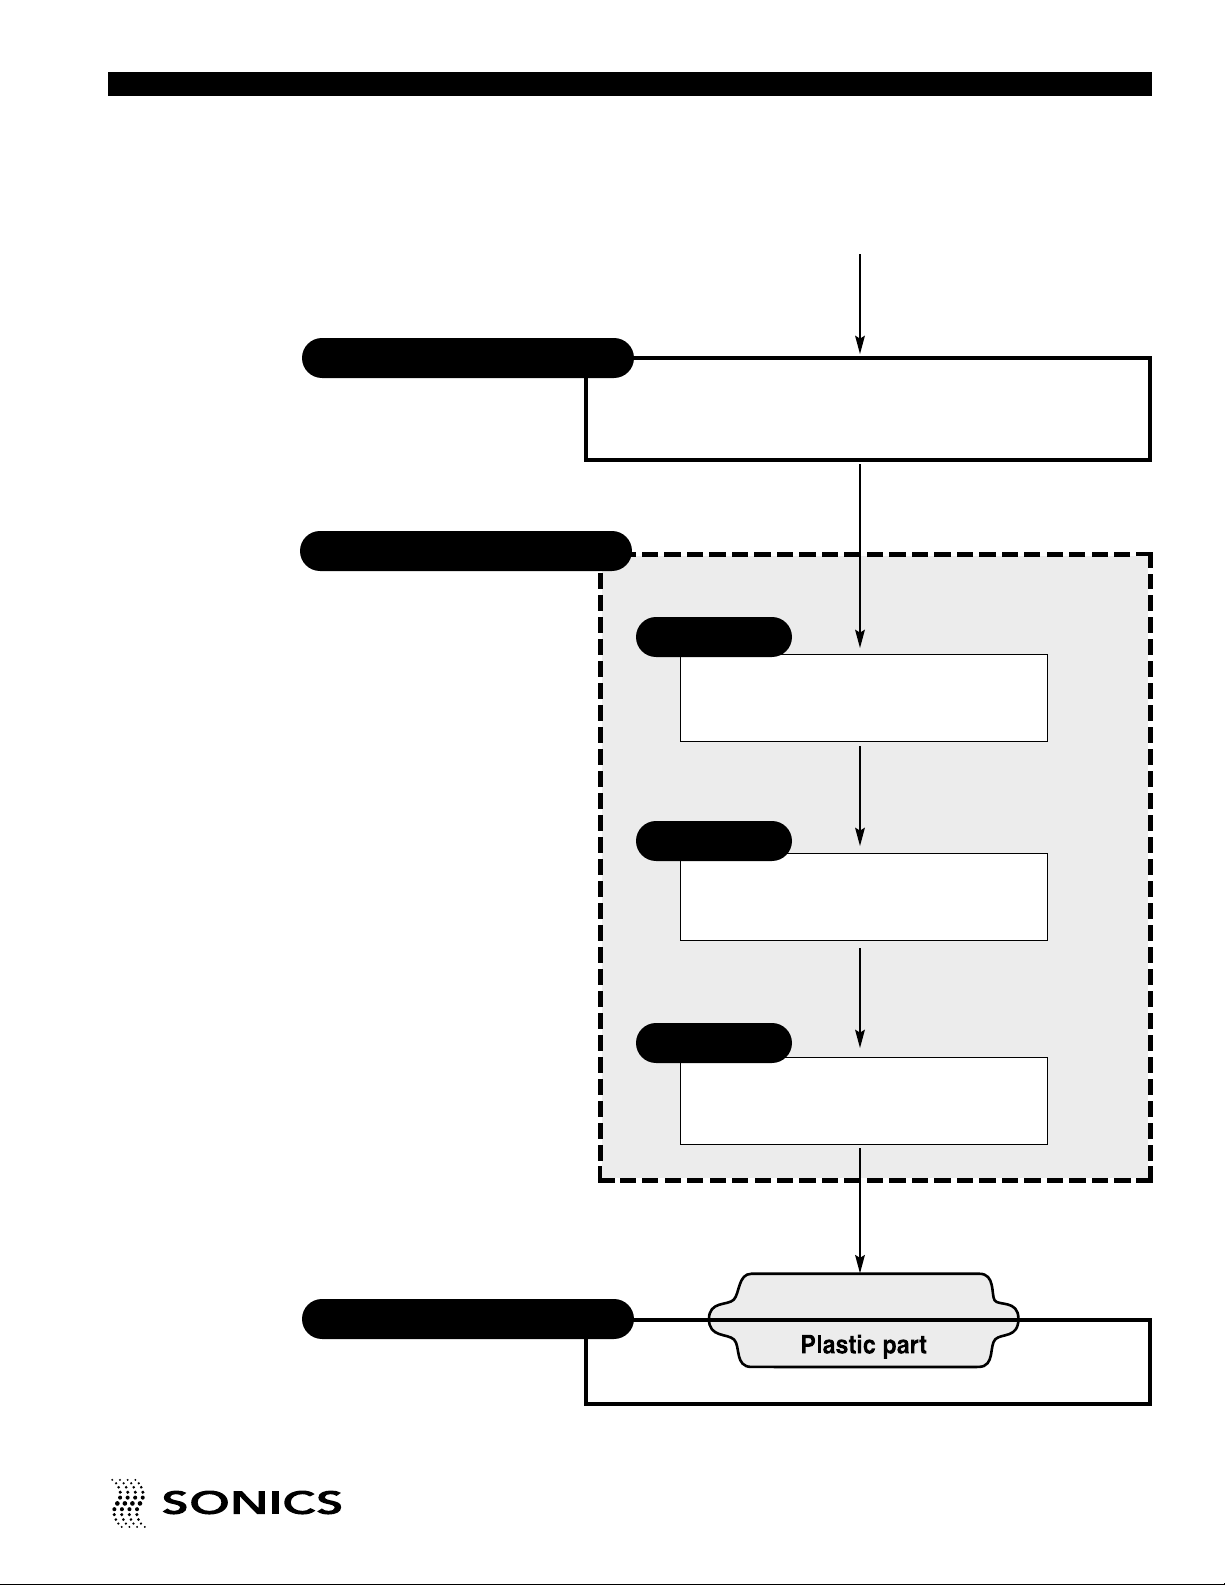
“Sonics” ultrasonic assembly systems are generally composed of the
following major elements:a power supply , conv erter, booster, horn, pneumatic
press and holding fixture, as detailed in the diagram on the next page. A
review of this diagr am will help y ou understand the basic elements in volved in
the assembly process and their relation to each other.
Page 8
• • • • • • • • • • • • • • • • • • • • • • • • • • • • • • • • • • • • • • • • • • • • • • • • • • • • • • • • • • • • • • • • • • • • • • • • • • • • • • • • • • • • • • • • • • • • • • • • • • • • • • • • • • • •
INSTRUCTION MANUAL • MODEL FM POWER SUPPLY
7
“SONICS” ULTRASONIC ASSEMBLY SYSTEMS
Generates ultrasonic electrical energy
(15/20/40 kHz)
50/60 Hz
Electrical power
Ultrasonic
electrical energy
Ultrasonic Vibrations
Provides compressive force
and mounting for Converter,
Booster, Horn assembly
Aligns and supports par t
Transforms ultrasonic electrical energy
to ultrasonic mechanical vibrations
Increases or decreases amplitude
Contacts and transfers vibrational
energy to plastic part
Converter
Booster
Horn
Ultrasonic Vibrations
Ultrasonic Vibrations
Power Supply/Generator
Actuator/Press
Holding Fixture
Page 9

• • • • • • • • • • • • • • • • • • • • • • • • • • • • • • • • • • • • • • • • • • • • • • • • • • • • • • • • • • • • • • • • • • • • • • • • • • • • • • • • • • • • • • • • • • • • • • • • • • • • • • • • • • • •
8
INSTRUCTION MANUAL • MODEL FM POWER SUPPLY
GLOSSARY OF ULTRASONIC TERMS
POWER SUPPLY/GENERATOR – The solid state power supply converts
standard 50/60 Hz electrical energy to 15,000 Hz, 20,000 Hz or 40,000 Hz
(15/20/40 kHz) electrical energy.
ACTUATOR/WELDING PRESS – The pneumatic actuator provides compressive force and mounting for the converter, booster and horn assembly.
The tabletop press consists of a base assembly, column and actuator (head).
CONVERTER – The converter changes the high frequency electr ical energy
supplied by the power supply to high frequency mechanical vibrations.
BOOSTER – Successful ultrasonic welding often depends on having the right
amplitude at the horn face.Often it is not possible to design a horn which has
both the necessary shape and required gain (ratios of input amplitude to
output amplitude). In such cases, a booster is placed between the converter
and the horn to either increase or decrease the amplitude of the horn. In
addition to changing/maintaining the amplitude, the booster provides support
and alignment in the welding system.
HORN – The horn is a tuned component of the system which comes in
contact with the parts to be assembled. The horn 1) transfers the ultrasonic
vibrations produced from the converter to the parts being welded, and 2)
applies necessary force to the assembly while the material resolidifies.
HOLDING FIXTURE – The holding fixture or nest assures proper alignment
and support of the par ts being assembled.
Page 10
• • • • • • • • • • • • • • • • • • • • • • • • • • • • • • • • • • • • • • • • • • • • • • • • • • • • • • • • • • • • • • • • • • • • • • • • • • • • • • • • • • • • • • • • • • • • • • • • • • • • • • • • • • • •
INSTRUCTION MANUAL • MODEL FM POWER SUPPLY
9
INSTALLATION
ELECTRICAL POWER REQUIREMENTS
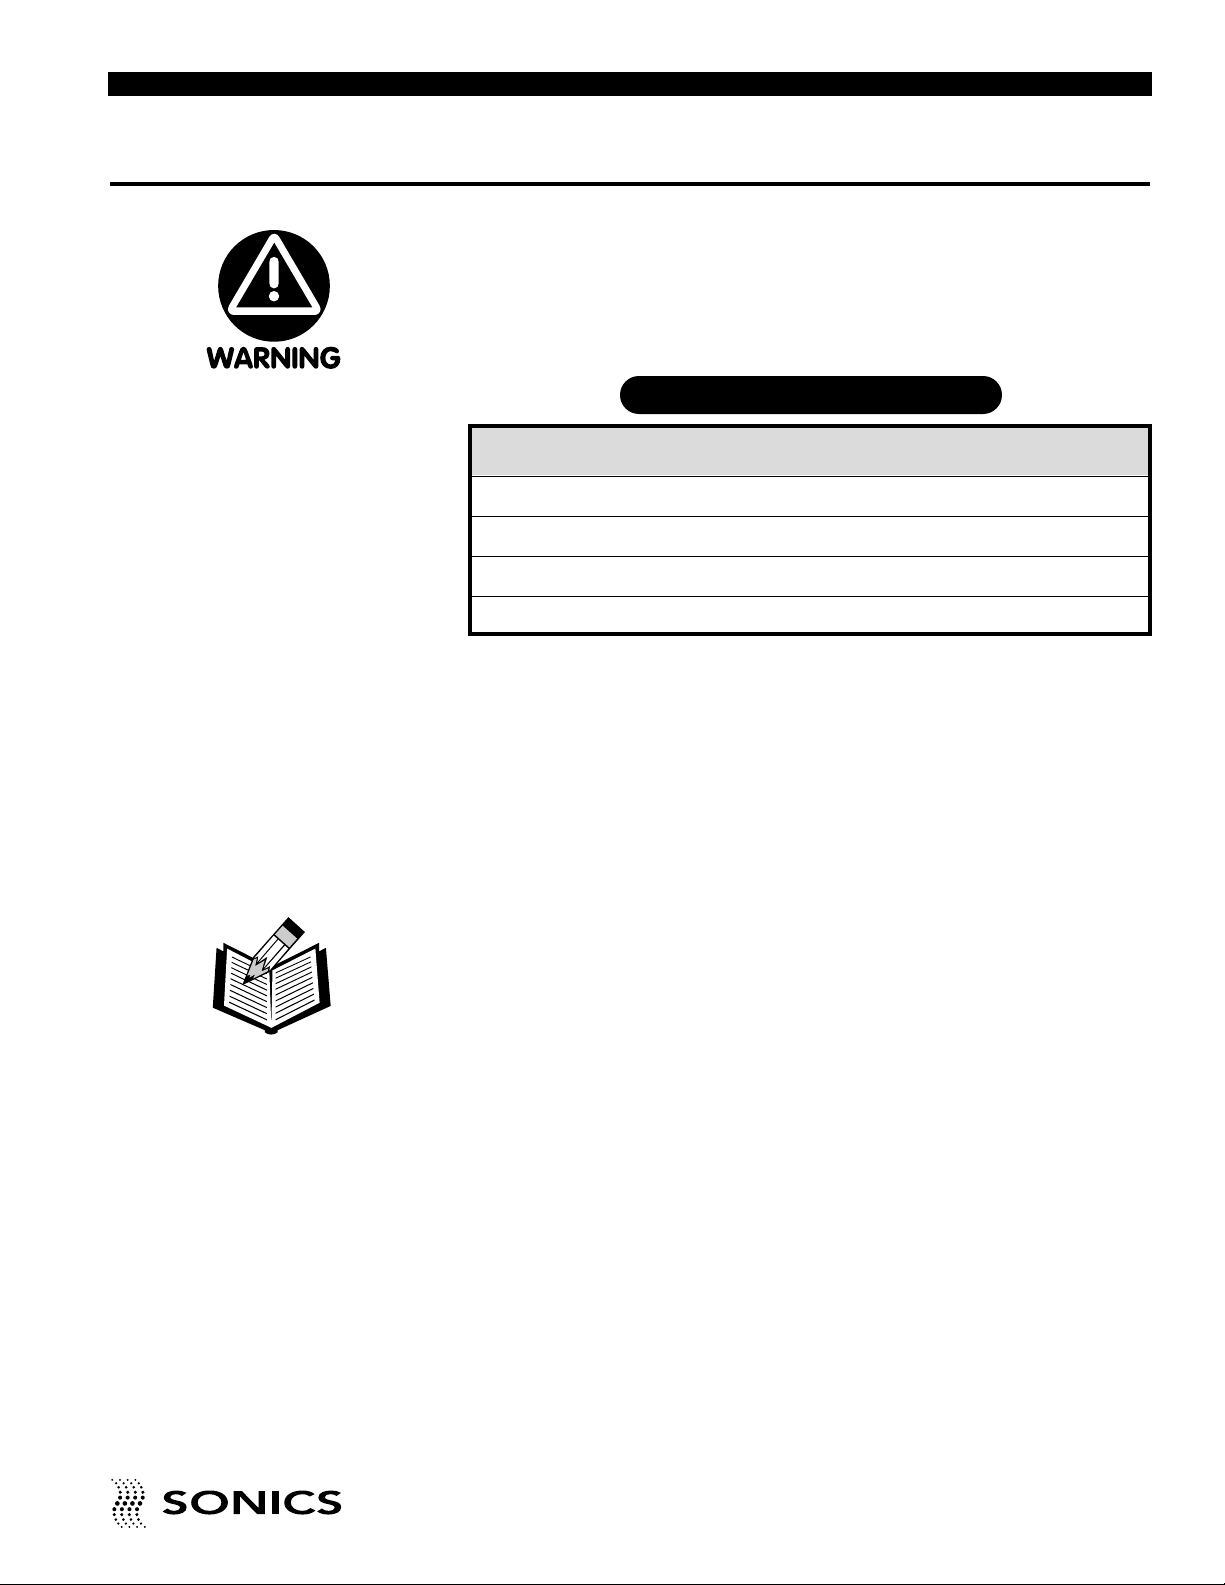
The power supply requires a fused, single-phase, standard 3-terminal
grounding type receptacle capable of supplying the requisite voltage and
current. Refer to the table below for power specification.
SETTING UP
The power supply is a free-standing assembly. It should be installed in a clear,
uncluttered location that is free from excessive dirt, dust, corrosive fumes, and
temperature and humidity extremes.The selected installation site should be
near the electrical power source and away from equipment that generates
abnormally high electrical transients. Observe the following additional
instructions when installing the equipment:
a. Allow at least 6 inches (152.4mm) at the rear of the power supply for cable
connections.
b. Position the power supply so that the front panel controls are visible and
readily accessible.
c. The power supply is air cooled; allow sufficient space around the assembly
to ensure adequate ventilation. If the power supply must be housed in a
confined space, forced air cooling may be necessary to keep surrounding
air within acceptable ambient temperature limits. Periodically check the
ventilation grille and clean as necessary.
The line cord of the
controller/power supply is
equipped with a 3-prong,
grounding plug. Do not,
under any circumstances,
remove the ground prong.
The plug must be plugged
into a mating 3-prong,
grounding type outlet.
POWER SPECIFICATIONS
NOTE: If power supply is
to be run continuously, air
cooling of the converter
and horn is required. Use
clean, dry compressed air
filtered down to 5 microns
(supplied to converter
fitting – see page 12).
Model Power Rating 115 vac 230 vac
FM740 700w 15 amps 10 amps
FM1020 1000w 15 amps 10 amps
FM1520 1500w N/A 15 amps
FM2020 2000w N/A 20 amps
Page 11

• • • • • • • • • • • • • • • • • • • • • • • • • • • • • • • • • • • • • • • • • • • • • • • • • • • • • • • • • • • • • • • • • • • • • • • • • • • • • • • • • • • • • • • • • • • • • • • • • • • • • • • • • • • •
10
INSTRUCTION MANUAL • MODEL FM POWER SUPPLY
ELECTRICAL CONNECTIONS
The standard cable supplied with a “Sonics” press is 10 feet. Optional
extension cables are available up to 15 feet without modification.
When making the initial electrical connections, make sure the power is
disconnected and follow these precautions.
1. Do not strain or kink the cables.When going around corners, allow as wide
a bend as possible.Do not run the cables parallel to any power line within
a distance of less than 1 foot (305mm).
2. To prevent the possibility of an electrical shock, ensure that the power
supply line cord is properly grounded. Also make sure that the voltage
rating of the electrical power source matches the power supply
requirement (refer to the “Power Specifications” table on preceding page).
3. Check with your electrician if you have any wiring questions.
NOTE: Do not plug
the power supply into
an electrical outlet
until all other
connections have
been made.
Page 12
CABLE CONNECTIONS:
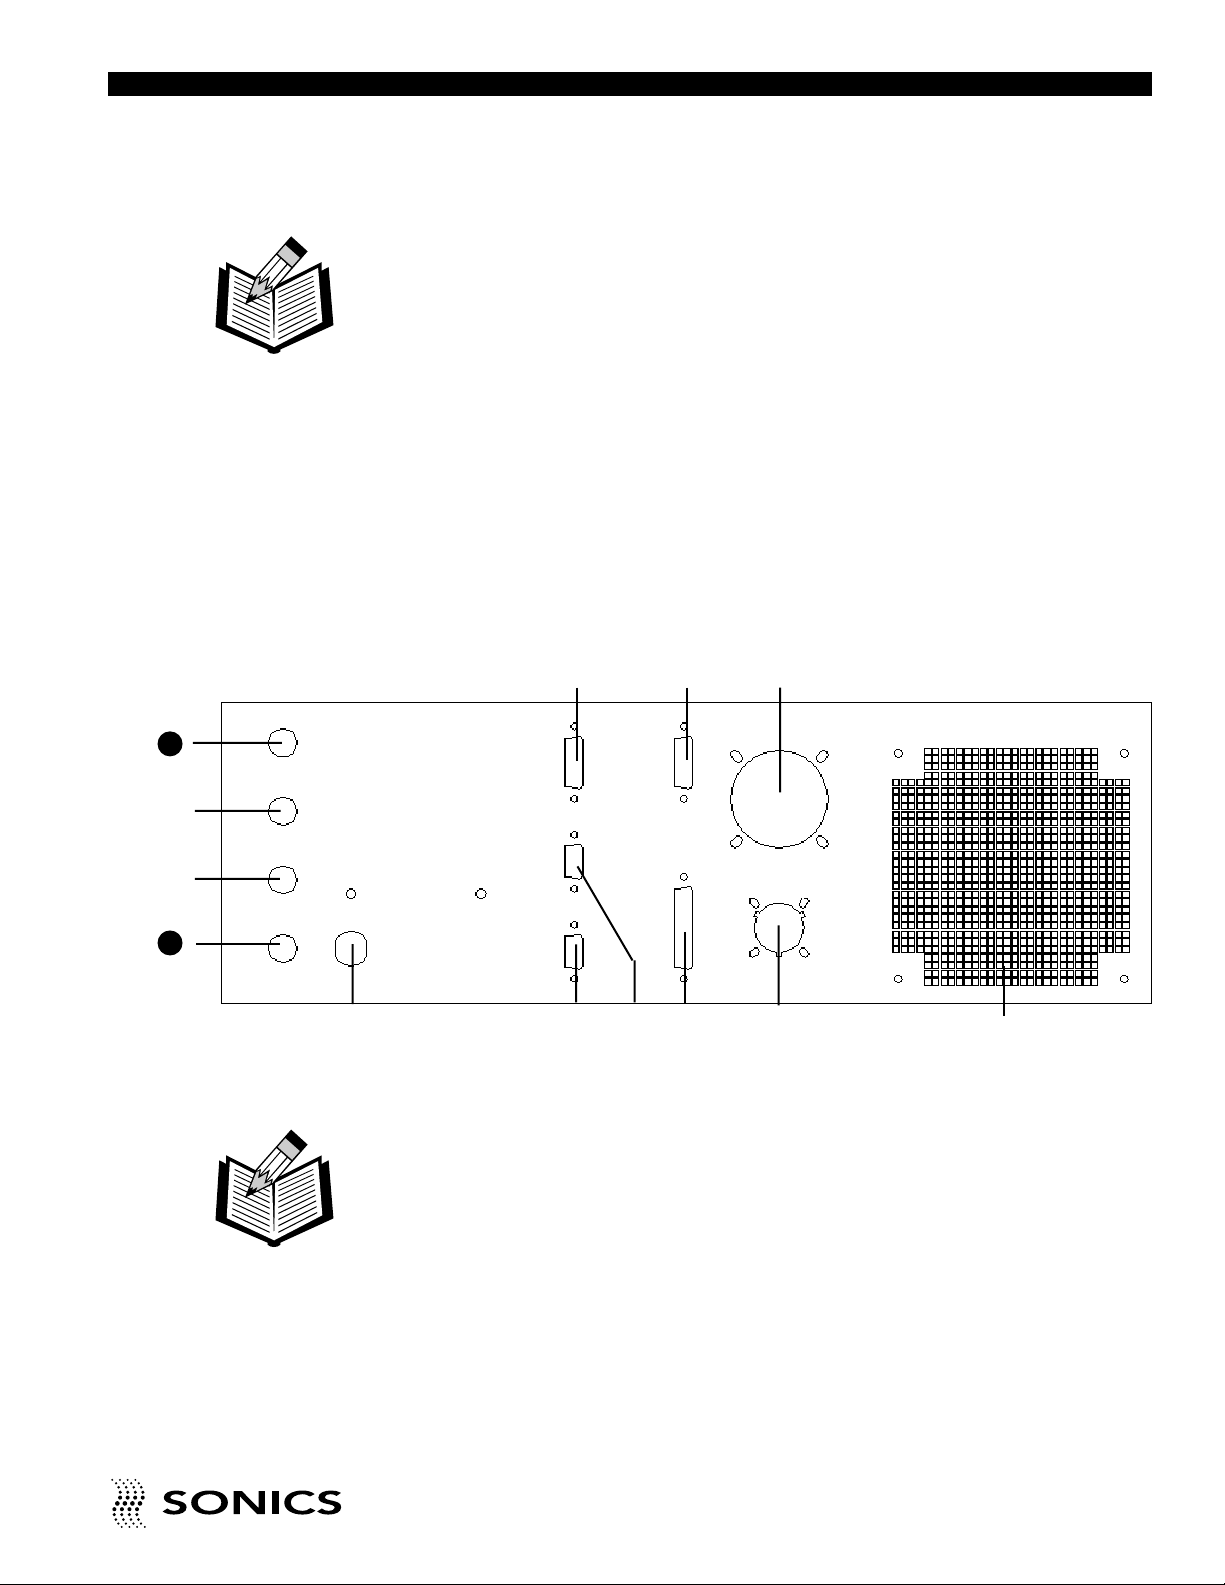
Located at the rear of the power supply are the cable connections as
illustrated below. (The interconnecting cables will be supplied with your
system.)
1. J1, a round, 12-pin RF cable that connects the welding press or converter
to the power supply.
2. J2, an actuation cable that connects the power supply to a trigger source
(refer to wiring diagrams in Appendix).
3. The power line cord that plugs into the appropriate electrical outlet.
Once these connections have been made, the power supply is ready for
operation. If applicable, be sure to consult your welding press instruction
manual to insure that all connections on the press side are correct, and that
the press is ready for operation.
Also located at the rear of the power supply are the following:
4. J3 Printer Output
5. fuse (based on requirements listed in “Power Specifications” table, p. 9),
6. J6 Rotary Table Output (see wiring diagrams in Appendix),
7. J7 I/O (see wiring diagrams in Appendix),
8. J8 I/O(see wiring diagrams in Appendix),
9. J9 Reject Output
10. fuse (based on requirements listed in “Power Specifications”table, p.9),
11. fuse (fixed 0.5 amp),
12. fuse, not optional (based on requirements listed in “Power Specifications”
table, p. 9)
11
• • • • • • • • • • • • • • • • • • • • • • • • • • • • • • • • • • • • • • • • • • • • • • • • • • • • • • • • • • • • • • • • • • • • • • • • • • • • • • • • • • • • • • • • • • • • • • • • • • • • • • • • • • • •
INSTRUCTION MANUAL • MODEL FM POWER SUPPLY
11
❷
❶
❸
❽
❺
➏
❼
❹
NOTE: Detailed wiring
diagrams are supplied
in the Appendix at the
back of this manual.
❿
❾
12
Fan
NOTE: To see a list of
converters that can be
connected to the power
supply, see the table on
the following page.
Page 13
• • • • • • • • • • • • • • • • • • • • • • • • • • • • • • • • • • • • • • • • • • • • • • • • • • • • • • • • • • • • • • • • • • • • • • • • • • • • • • • • • • • • • • • • • • • • • • • • • • • • • • • • • • • •
12
INSTRUCTION MANUAL • MODEL FM POWER SUPPLY
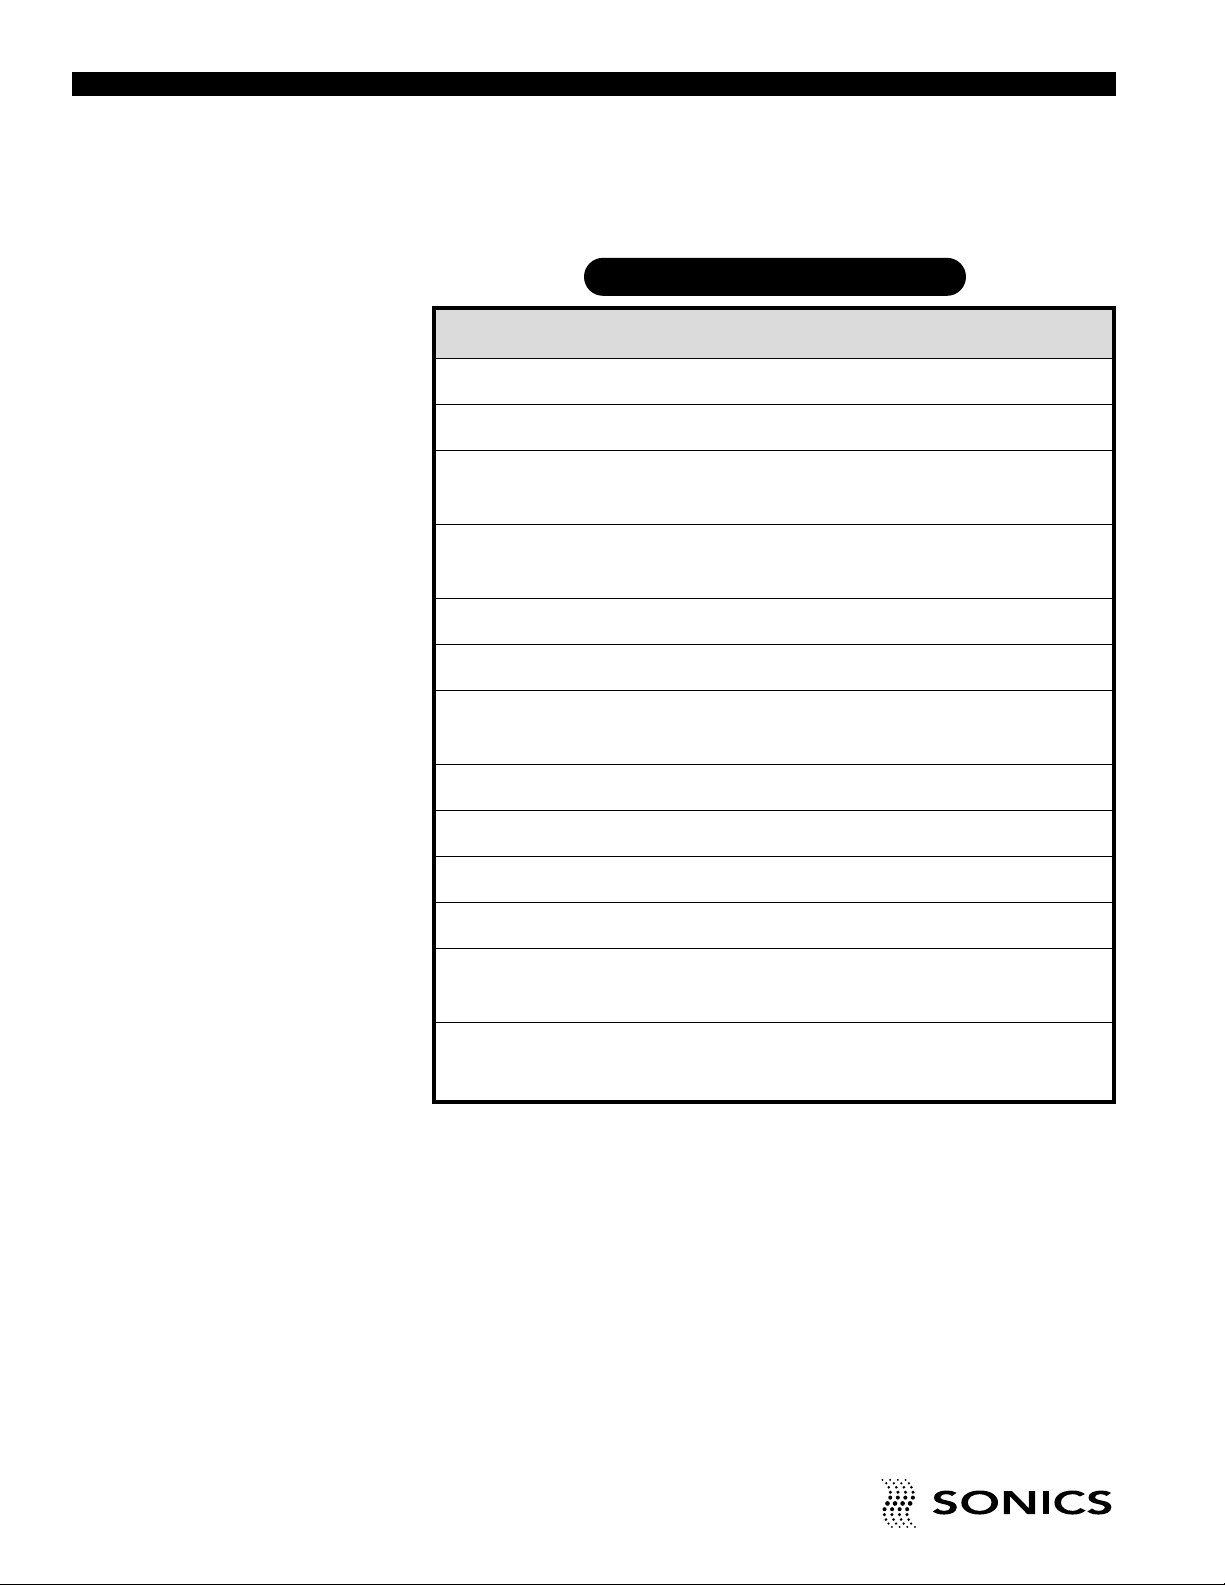
AVAILABLE CONVERTERS
Item No. Description
CV00015 20 kHz with Button connector
CV00151 20 kHz with Lemo connector
CV00154 20 kHz with Lemo connector and fitting for
air cooling
CV00157 20 kHz with Button connector and fitting for
air cooling
CV00158 20 kHz Hand Gun with handles and cables
CV00331 20 kHz with Fischer connector
CV00334 20 kHz with Fischer connector and fitting for
air cooling
CV00023 40 kHz with Button connector
CV00231 40 kHz with Lemo connector
CV00232 40 kHz with SHV connector side mounted
CV00234 40 kHz with Lemo connector and fitting for
air cooling
CV00238 40 kHz Hand Gun with trigger switch and
cable
Page 14
• • • • • • • • • • • • • • • • • • • • • • • • • • • • • • • • • • • • • • • • • • • • • • • • • • • • • • • • • • • • • • • • • • • • • • • • • • • • • • • • • • • • • • • • • • • • • • • • • • • • • • • • • • • •
INSTRUCTION MANUAL • MODEL FM POWER SUPPLY
13
OPERATING PROCEDURES
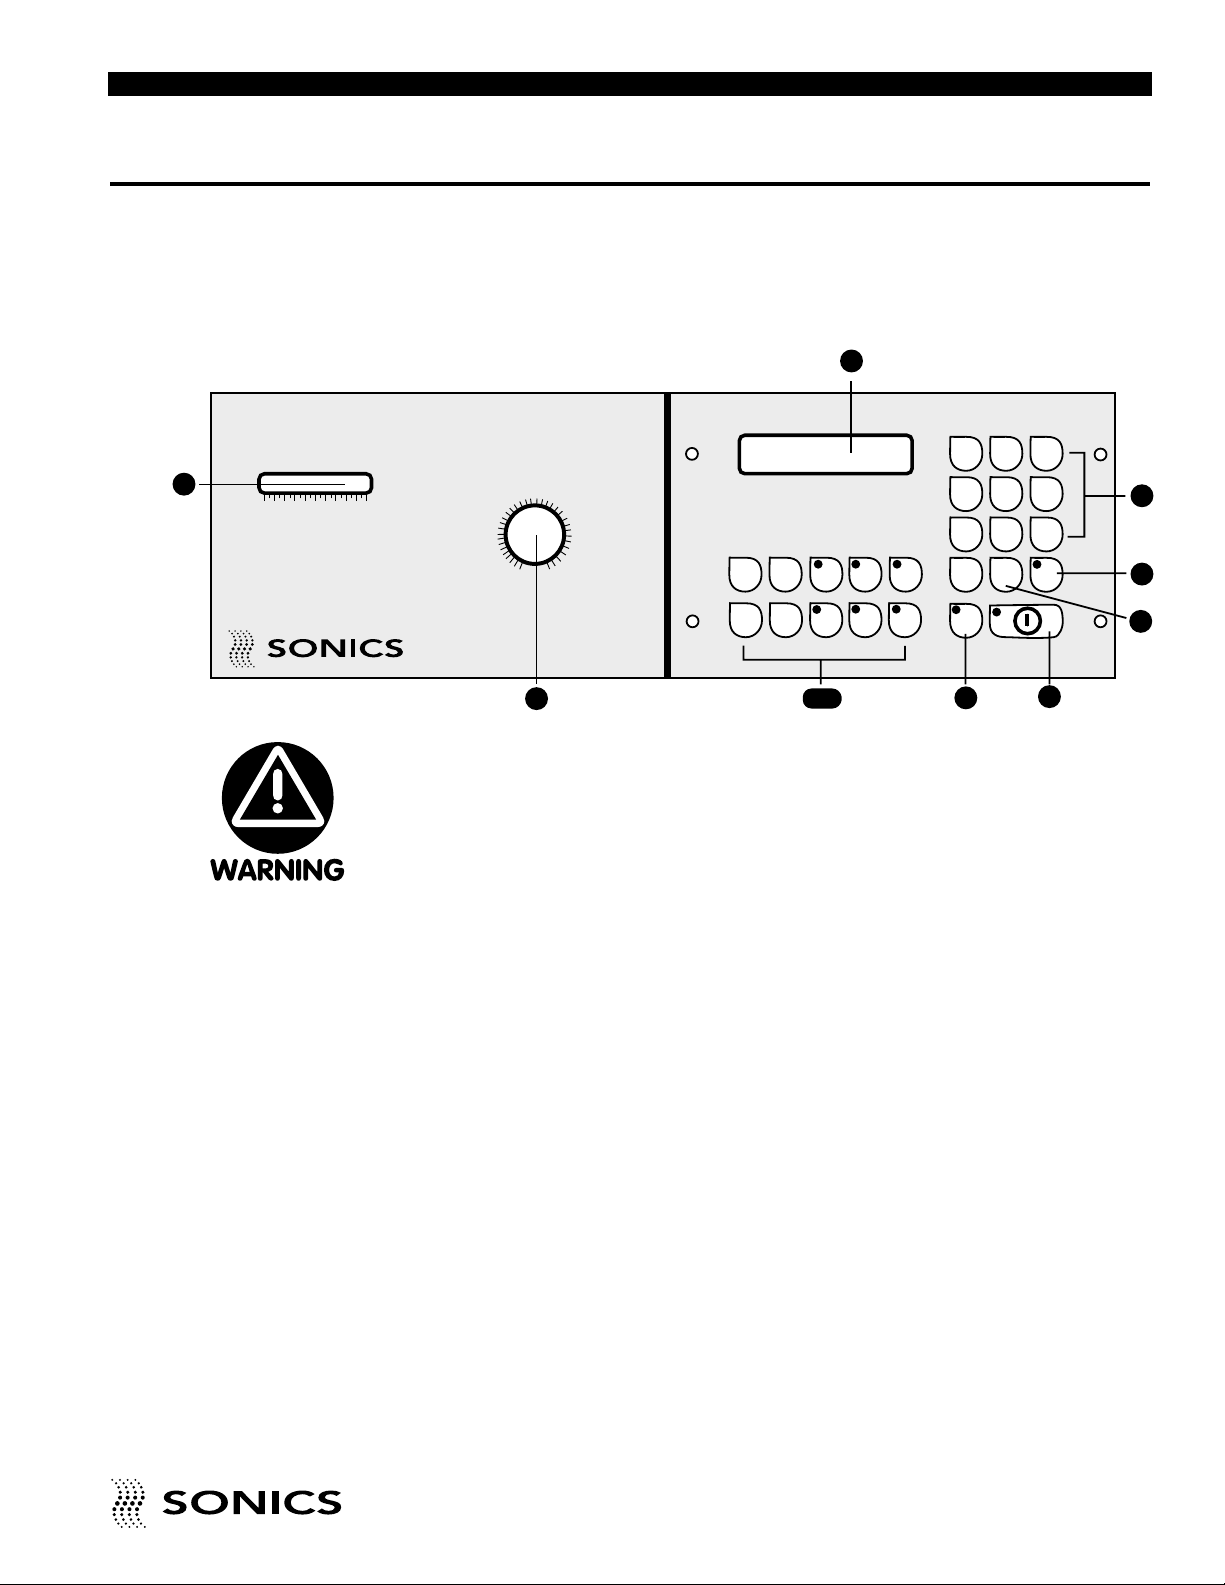
FRONT PANEL CONTROLS AND INDICATORS
Located on the front panel of the power supply are the following controls and
indicators:
1. ON/OFF key which turns the unit on and off.Red LED in upper left corner
indicates unit is ON.
2. OUTPUT CONTROL DIAL which controls fine adjustment of the amplitude of the system’s high-frequency vibrations o ver the full oper ating range.
(Major adjustments of amplitude are made through the use of different
boosters – consult your press manual for further information.)
3. LED LOAD METER which indicates the power lev el of ultrasonics that is
being delivered to the welding press.
4. LCD SCREEN which displays various settings, parameters and prompts
as detailed in the following pages.
5. TIMER key which selects and displays timer settings and permits
adjustment of timer duration in .01 second increments (from 0.00 to 9.99
seconds) for five timers as follows:
T1: Delay Timer (for normal delay triggering or pre-triggering).
T2: Weld Timer (in time-based operation).
T3: Hold Timer (in both time- and energy-based operation).
T4: Afterpulse Timer (to release assemblies adhering to horn).
T5: Abort Cycle Timer (limits maximum weld time permitted for an
assembly).
6. F-TRIGGER key which displays and permits adjustment of triggering
force as a percentage of maximum force. When used in conjunction with
Head Advance Control (1098 Model only) actual horn coupling force can
be displayed.
OUTPUT CONTROL
100
90
80
70
60
50
40
30
40 60 80 100200
MICROSONIC PROCESSOR™
+LIM
TIMER
F
TRIGGER
REF
INFO PRT AUTO
O.L.
RESET
0
1
4
7 8
5
2 3
6
9
ENTER
CE
TEST
MAN
–LIM
3
2
4
14
15
16
17
1
5-13
The RESET button is a
built-in safety feature.When
the power supply is
connected to a press, be
sure the press head
actuation signals are not
activated (or closed). If they
are activated, the press
head will descend
immediately when the
RESET button is
depressed.
Page 15

• • • • • • • • • • • • • • • • • • • • • • • • • • • • • • • • • • • • • • • • • • • • • • • • • • • • • • • • • • • • • • • • • • • • • • • • • • • • • • • • • • • • • • • • • • • • • • • • • • • • • • • • • • • •
14
INSTRUCTION MANUAL • MODEL FM POWER SUPPLY
7. REF key which displays energy in Watt Seconds (Ws) when the constant
energy mode has been selected, and permits adjustment of the set value
in .1 Ws increments. Green LED in the upper left corner indicates
completion of an acceptable process cycle.
8. +LIM / -LIM keys which display and establish upper and lower quality
control tolerance limits in time (sec.) when energy mode is selected and in
energy (Ws) when time mode is selected. Red LEDs in upper left corner
indicate when rejects occur because either time or energy is above or
below set limits.
9. TEST key which can be used to test ultrasonic operation and displays idle
losses of converter/booster/horn as a percentage of maximum power when
key is depressed.
10. INFO key which displays data (or parameters) on the LCD screen.Can be
pressed up to eight times to display the follo wing data (in the order sho wn):
— Number of cycles
— Number of rejects
— Rated output power of system
— Mode Codes (functions selected)
— Length of Graph Time Axis when printed out on optional printer
— SAVE RECALL OTHER options
— Job Sequencing
— Calibration Pulse (activation or deactivation).
11. PRT key which permits display of parameters and dynamic process
conditions when optional CRT monitor or printer is used. Green LED in
upper left corner indicates when data is being transmitted to a peripheral
accessory.
12. MAN key which is only used with rotary table operation to select normal
single cycle indexing (the default mode).
13. AUTO key which is only used with rotary table operation to select
continuous cycling.
14. 0-9 Numeric key pad which allows input of numeric data or numeric
selection options by pressing the keys.
15. ENTER key which enters data into the system as keyed in with numerical
keys and displayed on the LCD screen.
16. CE key which cancels a prior parameter value when a new value is to be
entered. Red LED in upper left corner indicates key is functional and will
cancel a value displayed when depressed.
17. O.L. RESET key which resets the power supply following an overload
condition. Red LED in upper left corner indicates an overload condition
exists.
Page 16

• • • • • • • • • • • • • • • • • • • • • • • • • • • • • • • • • • • • • • • • • • • • • • • • • • • • • • • • • • • • • • • • • • • • • • • • • • • • • • • • • • • • • • • • • • • • • • • • • • • • • • • • • • • •
INSTRUCTION MANUAL • MODEL FM POWER SUPPLY
15
OPERATIONAL SIGNALS
Valid parameter entries and/or selections are verified by an audible signal of
short duration. Invalid entries and/or selections (fault conditions) are signaled
by an audible signal of longer duration.
OPERATIONAL FEATURES
– Adjustable Afterpulse Timer to separate parts from horn.
– Adjustable tolerance limits in energy (Ws) or time (sec) with visual and
audible alarms.
– Information displays including: number of assemblies, number of rejects,
power supply rated output, Mode Codes (functions selected) and length of
time axis for optional power curve printout.
– Fault displays: CHECK PRESS, CHECK PRESSURE OR b8, FORCE
MISSING, PRESS VALVE FAILURE.
– Keypad security to prevent unauthorized adjustment of parameters.
– Self diagnostic input test.
– Display of coupling force measurement (Model 1098 only).
– Storage capabilities of up to 9 programs.
– Job sequence of up to 9 programs.
– Deactivation of calibration pulse (i.e., when utilizing vacuum horns).
– Variable weld time in constant energy mode.
– Printer/CRT monitor interface permits connection to an optional CRT
and/or printer or computer.
STARTING UP THE POWER SUPPLY
Press the ON/OFF key to turn the power supply on.The red LED will light up
indicating the unit is on.
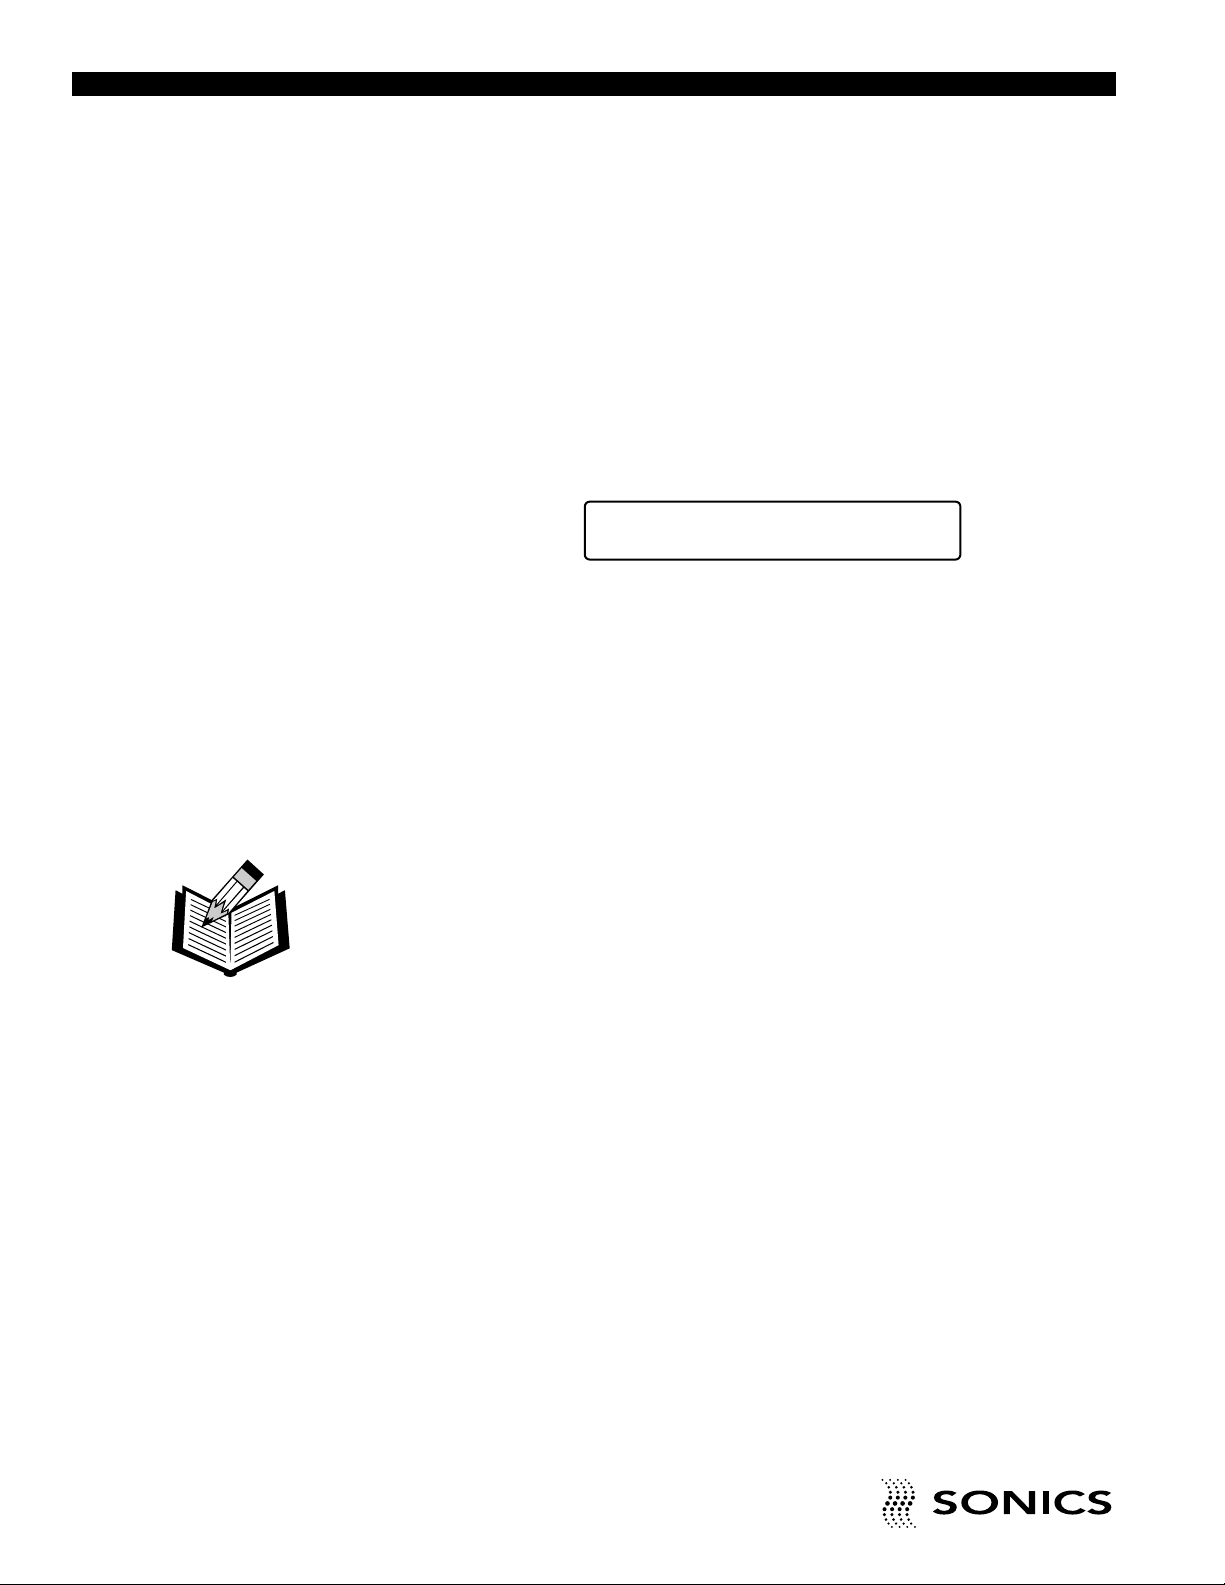
The LCD screen will briefly display “Sonics & Materials.” If a printer or CRT is
not connected to the system, the following message will also be displayed
briefly:
Then the LCD screen will display “READY.”
* * * NO PRINTER! * * *
Page 17
• • • • • • • • • • • • • • • • • • • • • • • • • • • • • • • • • • • • • • • • • • • • • • • • • • • • • • • • • • • • • • • • • • • • • • • • • • • • • • • • • • • • • • • • • • • • • • • • • • • • • • • • • • • •
16
INSTRUCTION MANUAL • MODEL FM POWER SUPPLY
INITIAL OPERATION
After the power supply is turned on (as described above), follow these steps:
1. Make sure that all necessary preparations have been made with regard to
the ultrasonic system and tooling, and that the items to be welded are in
position.
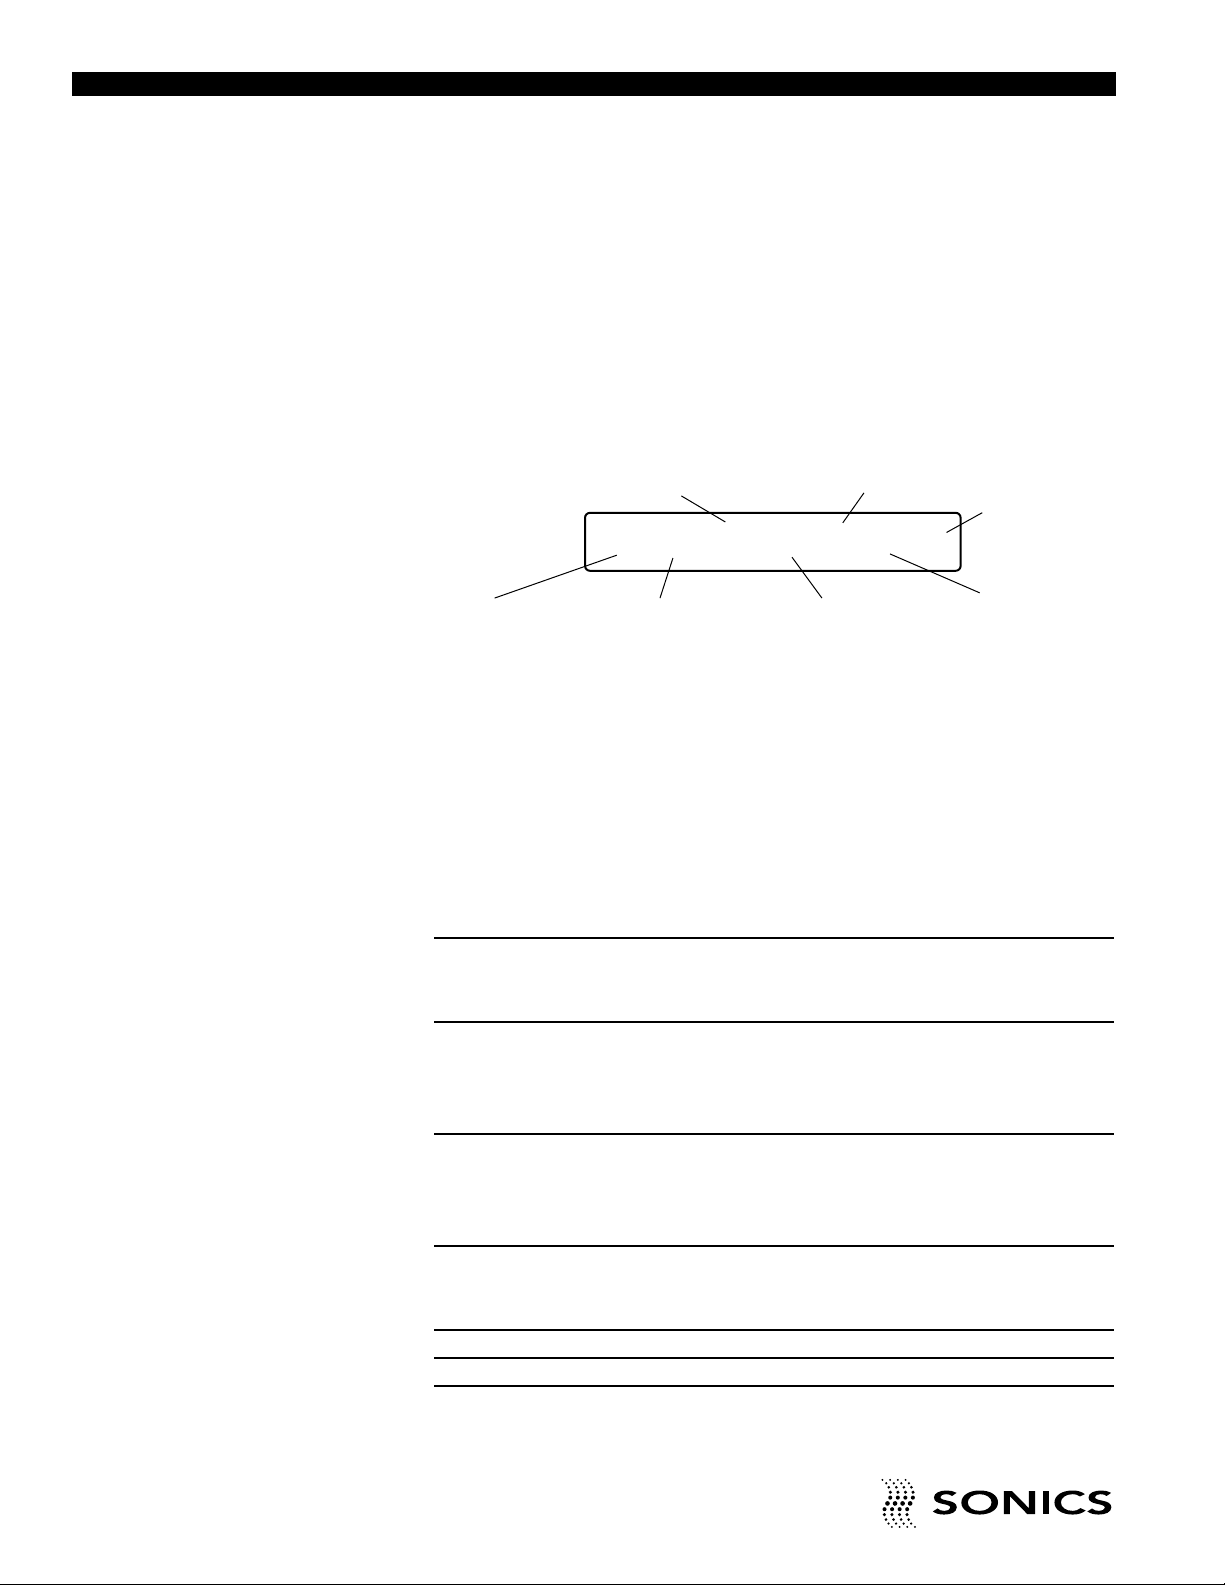
2. Press and hold the TEST button. While depressing the TEST button,
check the LCD reading. Make sure the reading on the LCD display (see
example below) does not exceed 10%.
a) If the display is above 10%, contact Sonics immediately for further
instructions before proceeding.
b) If the display is below 10%, you can proceed with operation.
During the testing process, keep in mind that the ultrasonics are only
activated as long as the TEST button is depressed – once you release the
TEST button, ultrasonics is terminated.
3. The power supply is now ready for operation.
NOTE: The TEST and
Load Meter check
should always be done
for all cold start-ups,
and for any start-up
after the system has
been idle for 20 minutes
or more.
US-TEST = 05%
Page 18

• • • • • • • • • • • • • • • • • • • • • • • • • • • • • • • • • • • • • • • • • • • • • • • • • • • • • • • • • • • • • • • • • • • • • • • • • • • • • • • • • • • • • • • • • • • • • • • • • • • • • • • • • • • •
INSTRUCTION MANUAL • MODEL FM POWER SUPPLY
17
BASIC MODES OF OPERATION
The FM power supply’s built-in microprocesor allows the use of either timebased or energy-based cycles in four basic modes, as follows:
1. Time-based cycle with time delay triggering or pre-triggering.
2. Time-based cycle with variable force triggering.
3. Constant energy-based cycle with time delay triggering or pre-triggering.
4. Constant energy-based cycle with variable force triggering.
TIME-BASED MODES
In a Time-Based Cycle with Time Delay Triggering, the Weld and Hold
timers are actuated following the termination of a pre-determined delay
period. This delay period is initiated when the horn contacts the par t to be
welded.
In a Time-Based Cycle with Variable Force Triggering, the Weld and Hold
Timers are actuated after a pre-determined coupling force is exerted on the
components.
For both of these time-based modes of operation, upper and lower tolerance
limits in energy (Ws) can be adjusted.
ENERGY-BASED MODES
In a Constant Energy-Based Cycle with Time Delay Triggering, the weld
cycle follows the termination of a pre-determined delay period.The weld cycle
continues until a pre-selected amount of energy in Watt seconds (Ws) is
delivered to the components.The duration of the weld cycle may vary, but the
energy delivered is constant.
In a Constant Energy-Based Cycle with Variable Force Triggering, the
Weld cycle is initiated after a pre-selected Trigger Force is reached. Once
again, the duration of the weld cycle is dependent upon the pre-selected
amount of energy delivered to the components.
In the case of energy-based modes of operation, the upper and lower
tolerance limits are adjustable in time (seconds).
Page 19
• • • • • • • • • • • • • • • • • • • • • • • • • • • • • • • • • • • • • • • • • • • • • • • • • • • • • • • • • • • • • • • • • • • • • • • • • • • • • • • • • • • • • • • • • • • • • • • • • • • • • • • • • • • •
18
INSTRUCTION MANUAL • MODEL FM POWER SUPPLY
MODE CODES DISPLAY
The power supply is shipped with blank programs , so all data and par ameters
must be input by the customer. On initial start-up, the default mode selected
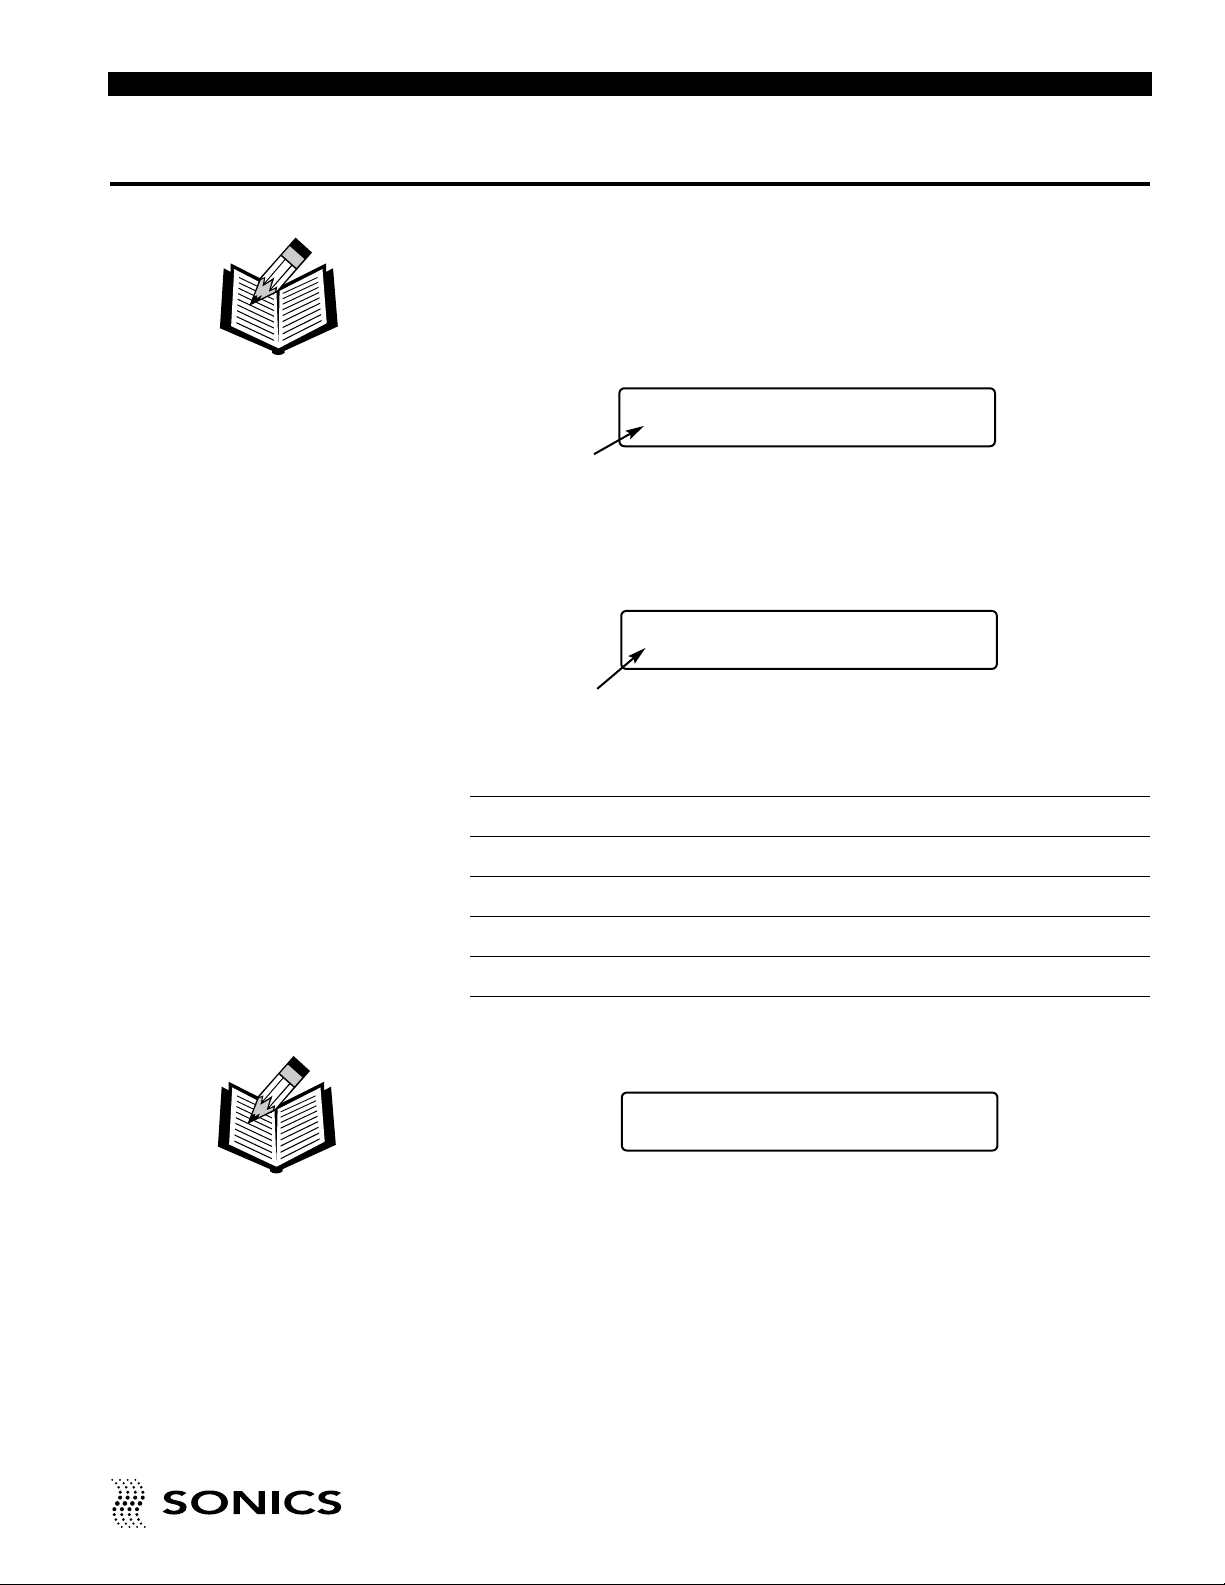
is the Time-Based cycle. Press the INFO key four times and the following
“Mode Codes” display will appear on the LCD screen:
DEFAULT SETTINGS
MODE CODES: FUNCTION ABBREVIATIONS
Following is a complete list of mode code abbreviations that will appear in
eight positions on the LCD display and their corresponding meanings.
1st Position T1 = Ultrasonics are tur ned on following termination of delay
time or pre-trigger
or
FT = Ultrasonics actuated when trigger force has been
reached
2nd Position ZT = Time-based welding
or
EN = Constant energy welding
3rd Position NB = Nor mal operation (no rotar y table)
or
RT = Rotary table control and operation provided by
microprocessor
4th Position IS = Rotar y table pulse control
or
DS = Rotary table continuous signal control with
acknowledgement
5th Position U = After pulse Timer (T4) operational (Not a default)
or
blank
6th Position 1 = Normal Timer operation
7th Position 48 = Baud rate of 4800 for optional printer
8th Position M = Manual, dual palm switch actuation
or
A = Automatic impulse actuation
FT ZT NB IS 1 48 M
Force
Triggering
Time-Based
Welding
Rotary T ab le
Pulse Control
Baud Rate of
4800 for Printer
Manual Palm
Button Start
Normal Timer
Operation
Normal
Operation
Page 20
• • • • • • • • • • • • • • • • • • • • • • • • • • • • • • • • • • • • • • • • • • • • • • • • • • • • • • • • • • • • • • • • • • • • • • • • • • • • • • • • • • • • • • • • • • • • • • • • • • • • • • • • • • • •
INSTRUCTION MANUAL • MODEL FM POWER SUPPLY
19
TIME-BASED MODES
SELECTING AND SETTING TIMERS IN A TIME-BASED
CYCLE (with delay triggering)
As described on the previous pages, the default mode is the Time-Based
cycle. Pressing the INFO key four times would display the following codes on
the LCD Screen:
The mode code “ZT” would be displayed in the second position, indicating
time-based operation.
To change from Force Triggering (FT) to Time Delay Trigger ing (T1), press
numerical key 1.The following display will appear:
As mentioned previously, the five timers are:
Timer Timer Number (NR) Mode Code
Delay Timer = Timer 1 = T1
Weld Timer = Timer 2 = ZT
Hold Timer = Timer 3 = T3
Afterpulse Timer = Timer 4 = U
Abort Timer = Timer 5 =
Press the TIMER key and the following display will appear:
Press the appropriate numerical key to select a timer value to be displayed or
set; i.e., press key 1 to display the set-value of the Delay Timer (T1);key 2, to
display the set-value of the Weld Timer (T2); and so on.
Once a timer number has been selected, the red LED in the upper corner of
the CE key will light up, indicating that the CE key is functional and must be
depressed to enter a new time value, regardless of whether or not a
previously established value is displayed.After depressing the CE key, which
cancels the prior time value, key in a new value using the numeric keys and
press the ENTER key to set the value, or wait thirty seconds and the value
will be automatically accepted.
FT ZT NB IS 1 48 A
T1 ZT NB IS 1 48 A
NOTE: When the TimeBased mode is in effect,
the percentage of
maximum power and
energy (Ws) used are
displayed on the LCD
immediately following
completion of the
process cycle.
TIMER NR = (1-5)
NOTE: If you do not
press the ENTER key
to enter in new data
within 30 seconds, the
new data will be
automatically entered in
by the system.
Page 21
• • • • • • • • • • • • • • • • • • • • • • • • • • • • • • • • • • • • • • • • • • • • • • • • • • • • • • • • • • • • • • • • • • • • • • • • • • • • • • • • • • • • • • • • • • • • • • • • • • • • • • • • • • • •
20
INSTRUCTION MANUAL • MODEL FM POWER SUPPLY
Pre-triggering is accomplished by setting T1 to 0.00 sec, thus continuing the
calibration pulse until T2 is actuated by the horn contacting the workpiece.
The Delay Timer (T1) can only be set or changed when Delay Timer
Trigger ing (T1) has been selected. The Delay Timer is not operational when
the Force Trigger ing function (FT) has been selected. Attempts to access T1
when the Force Trigger function has been selected will result in the following
display:
The W eld Timer (T2) can only be set or changed when Time-Based operation
(ZT) has been selected.The Weld Timer is not operational when the Constant
Energy function (EN) has been selected. Attempts to access T2 when the
Constant Energy function has been selected will result in the following
display:
If no timer values are to be changed, press the ENTER key twice (providing
that a time value is displayed) to return to system status READY.
SELECTING AND SETTING THE AFTERPULSE TIMER
In some applications involving staking, spot welding, or a vacuum horn, the
completed assembly may remain attached to the horn. In such instances, the
Afterpulse Timer (T4) can be used to actuate the ultrasonics briefly to release
the assembly as the press retracts to rest position.
To use the Afterpulse Timer (T4), press the INFO k ey four times to display the
current Mode Codes, for e xample , T1 ZT NB IS 1 48 M. Press the numerical
key 5 and the letter “U” will appear in the fifth position of the LCD display
between “IS” and “1,” indicating that the Afterpulse Timer (T4) is operational.
The new display will now appear as follows:
Once the Afterpulse Timer is operational, parameters for it may be entered in
the same manner as for all timers: press the Timer key and when prompted,
press the corresponding numerical key (4); then use the CE and numerical
keys to select the value desired.
To cancel operation of the After pulse Timer (T4), follow the same procedure
described above to select the function.(The numerical key 5 acts as a toggle
NOTE: T1 should be
selected and set at 0.00
seconds only when pretriggering is required. Pretriggering during nor mal
welding operations can
result in surface marking.
TIMER 1 MODE IS OFF!
US-TIME MODE IS OFF!
FT EN NB IS 1 48 A
NOTE: If the Afterpulse
Timer is not in use, (which
is the case if the Mode
Code function “U” is not
displayed), T4 should be
cleared so that the
displayed value is 0.00 sec.
Although the Afterpulse
Timer is not operational,
any value set for T4 will
extend the Hold Timer (T3)
duration by that value.
Page 22

• • • • • • • • • • • • • • • • • • • • • • • • • • • • • • • • • • • • • • • • • • • • • • • • • • • • • • • • • • • • • • • • • • • • • • • • • • • • • • • • • • • • • • • • • • • • • • • • • • • • • • • • • • • •
INSTRUCTION MANUAL • MODEL FM POWER SUPPLY
21
key to activate and cancel the Afterpulse function.) When the Afterpulse Timer
is cancelled, the function letter “U” will no longer appear in the Mode Codes
display.
SELECTING AND SETTING PROCESS CONTROL
TOLERANCE LIMITS IN A TIME-BASED CYCLE
The process control tolerance limits are established in energy (Ws) when the
Time-Based mode (ZT) is in effect.
If tolerance reject limits have not pre viously been set, or if all parameters ha v e
been cleared, the system will automatically display the default limits. For
example, at 1500 watts, the display will show 0 Ws and 14,985.0 Ws for the
lower and upper limits respectively.
Press the – LIM key to display the lower limit value on the LCD. The red LED
on the CE key will light up indicating that the CE key is functional and must
be depressed if a new lower limit value is to be entered.
Press the CE key to clear the displayed value, key in the new value with the
numeric keys and set it by pressing the ENTER key. (If the ENTER key is not
depressed, the value is accepted automatically after 30 seconds.)
Selection and adjustment of the upper tolerance limit is accomplished in the
same manner once the + LIM key is pressed.
If entry of an improper limit value is attempted, i.e., a lower limit value that
exceeds the upper limit value, the following display will appear on the LCD
screen.
SELECTING AND ADJUSTING VARIABLE FORCE TRIGGER
ACTUATION IN A TIME-BASED CYCLE
Press the INFO key four times to view the Mode Codes display. If FT is not
displayed as the first setting, press the numerical key 1 to change the setting
to Force Trigger ing.
Then, press the ENTER key to return to the READY display. Press the F
TRIGGER key to display the existing Force Trigger value on the LCD. A red
LED will indicate that the CE key is operational and must be depressed if a
new Force Trigger value is to be entered.
Press the CE key to clear the display and key in the desired Force Trigger
value.The force value can be established from 1% to 99% of the maximum
press force (100% = 50 PSIG). A force of 0% cannot be entered.
+ LIMIT<–LIMIT!
Page 23

• • • • • • • • • • • • • • • • • • • • • • • • • • • • • • • • • • • • • • • • • • • • • • • • • • • • • • • • • • • • • • • • • • • • • • • • • • • • • • • • • • • • • • • • • • • • • • • • • • • • • • • • • • • •
22
INSTRUCTION MANUAL • MODEL FM POWER SUPPLY
Press the ENTER key or any other key to enter the new Force Trigger set
value, or wait 30 seconds for automatic acceptance.
The Force Trigger (FT) value can only be set or changed when the Force
Trigger ing (FT) mode is in effect. It is not operational when the Time Delay
Triggering function (T1) has been selected. Attempts to access FT by
depressing the F Trigger Key when the Time Delay Trigger ing (T1) function is
in effect will result in this display:
If the required coupling force is not reached because air pressure is not
sufficient, the head will retract after five seconds and the following message
will be displayed:
An assembly cycle can be completed only when the fault has been corrected,
either by increasing gauge pressure or decreasing the Force Trigger value.
The actual horn coupling force can be determined (Model 1098 only) by
following the procedures explained on page 41.
FORCE-TRIG. MODE OFF
FORCE MISSING
Page 24

• • • • • • • • • • • • • • • • • • • • • • • • • • • • • • • • • • • • • • • • • • • • • • • • • • • • • • • • • • • • • • • • • • • • • • • • • • • • • • • • • • • • • • • • • • • • • • • • • • • • • • • • • • • •
INSTRUCTION MANUAL • MODEL FM POWER SUPPLY
23
ENERGY-BASED MODES
CONSTANT ENERGY-BASED CYCLE WITH TIME DELAY
TRIGGERING
When the CONSTANT ENERGY function (EN) has been selected, the weld
cycle follows the termination of a predetermined delay period (T1) and
continues until a pre-selected amount of energy (Ws) has been delivered to
the components being assembled. When the Constant Energy function is in
effect, the percentage of maximum power used and actual w eld cycle duration
are displayed on the LCD immediately following completion of the cycle.
To change from Time-based operation to the Constant Energy mode (EN),
first press the INFO key four times to display the current Mode Codes. Press
the numerical key 2 to change the Constant Time mode (ZT) to the alternate
Constant Energy function (EN). To return to the READY display, press the
ENTER key. Press the REF key to display any previously entered energy
value on the LCD. A red LED will indicate that the CE key is functional and
must be pressed in order to enter a new energy value.
Press the CE key to clear the current display values and use the numerical
keys to set the new energy value. Press the ENTER key, or wait 30 seconds
for automatic acceptance.
The REF value in (Ws) can only be set or changed when Constant Energy
(EN) is in effect. It is not operational when the Time Based function (ZT) is
in effect. Pressing the REF key when the Time Based function (ZT) is in use
will result in the following display:
If the selected energy level is not reached within 10 seconds as a result of lo w
coupling force or the absence of components in the part holding fixture, the
cycle is terminated automatically and the following message will be display ed:
Quality Control Tolerance Limits
When the Constant Energy mode (EN) is in effect, the quality control
tolerance limits are measured in time (sec).
If tolerance reject limits have not pre viously been set, or if all parameters ha v e
been cleared, the power supply will automatically display the default values of
0.00 sec and 9.99 sec for the lower and upper limits respectively.
ENERGY MODE IS OFF
(X)%Pmax 0.00 sec
Page 25

• • • • • • • • • • • • • • • • • • • • • • • • • • • • • • • • • • • • • • • • • • • • • • • • • • • • • • • • • • • • • • • • • • • • • • • • • • • • • • • • • • • • • • • • • • • • • • • • • • • • • • • • • • • •
24
INSTRUCTION MANUAL • MODEL FM POWER SUPPLY
CONSTANT ENERGY-BASED CYCLE WITH VARIABLE
FORCE TRIGGERING (Refer to page 27 for keystroke
sequence guide.)
This mode of operation utilizes both the Force Trigger (FT) and Constant
Energy (EN) functions to assure consistent triggering and energy delivery.
To change from Time-based operation, press the INFO key four times to
display the current Mode Codes, i.e., T1 ZT NB IS 1 48 A. Press the numerical
keys 1 and 2 to select the alternate functions FT and EN. The new mode
codes (in the first and second positions of the LSD display) will now appear
as follows:
The Delay Timer (T1) and Weld Timer (T2) are not active in this mode
(because triggering is initiated by the piezoelectric load cell and weld cycle
duration is determined by the pre-selected level of energy delivered to the
components being assembled).The Hold Timer (T3) is active and can be set
in the usual manner.
Force Trigger (FT) and the quality control tolerance limits (+LIM/-LIM) are also
active in this mode and can be set in the usual manner.
TIMER 5
Timer #5 is an abort cycle timer that can override the hard coded value of 9.99
seconds as an absolute time out when in the Energy mode.
Timer 5 is set in the same manner as the other timers l through 4. If the abort
cycle feature is not to be used, Timer 5 should be set to 9.99 sec. If Timer 5
were set to zero (0), then welding in the Energy mode could not occur
because the counters start simultaneously. The weld cycle will be terminated
by whichever applicable time limit is reached first. Again, timer 5 can only be
used when welding in the Energy mode. Timer 2 and Timer 5 cannot be
utilized simultaneously.
SELECTING AND SETTING THE MAXIMUM WELD TIME (in
Constant Energy Mode)
In the Constant Energy Mode, the Abort timer (T5) overrides the actual weld
cycle time and can therefore limit the maximum ultrasonic weld time permitted
for an assembly. That is, if the value set for the Abort timer (T5) is reached
before the programmed energy v alue is met, sonics will be terminated and the
hold cycle will be initiated.
T1 ZT NB IS U 1 48 A
Page 26
• • • • • • • • • • • • • • • • • • • • • • • • • • • • • • • • • • • • • • • • • • • • • • • • • • • • • • • • • • • • • • • • • • • • • • • • • • • • • • • • • • • • • • • • • • • • • • • • • • • • • • • • • • • •
INSTRUCTION MANUAL • MODEL FM POWER SUPPLY
25
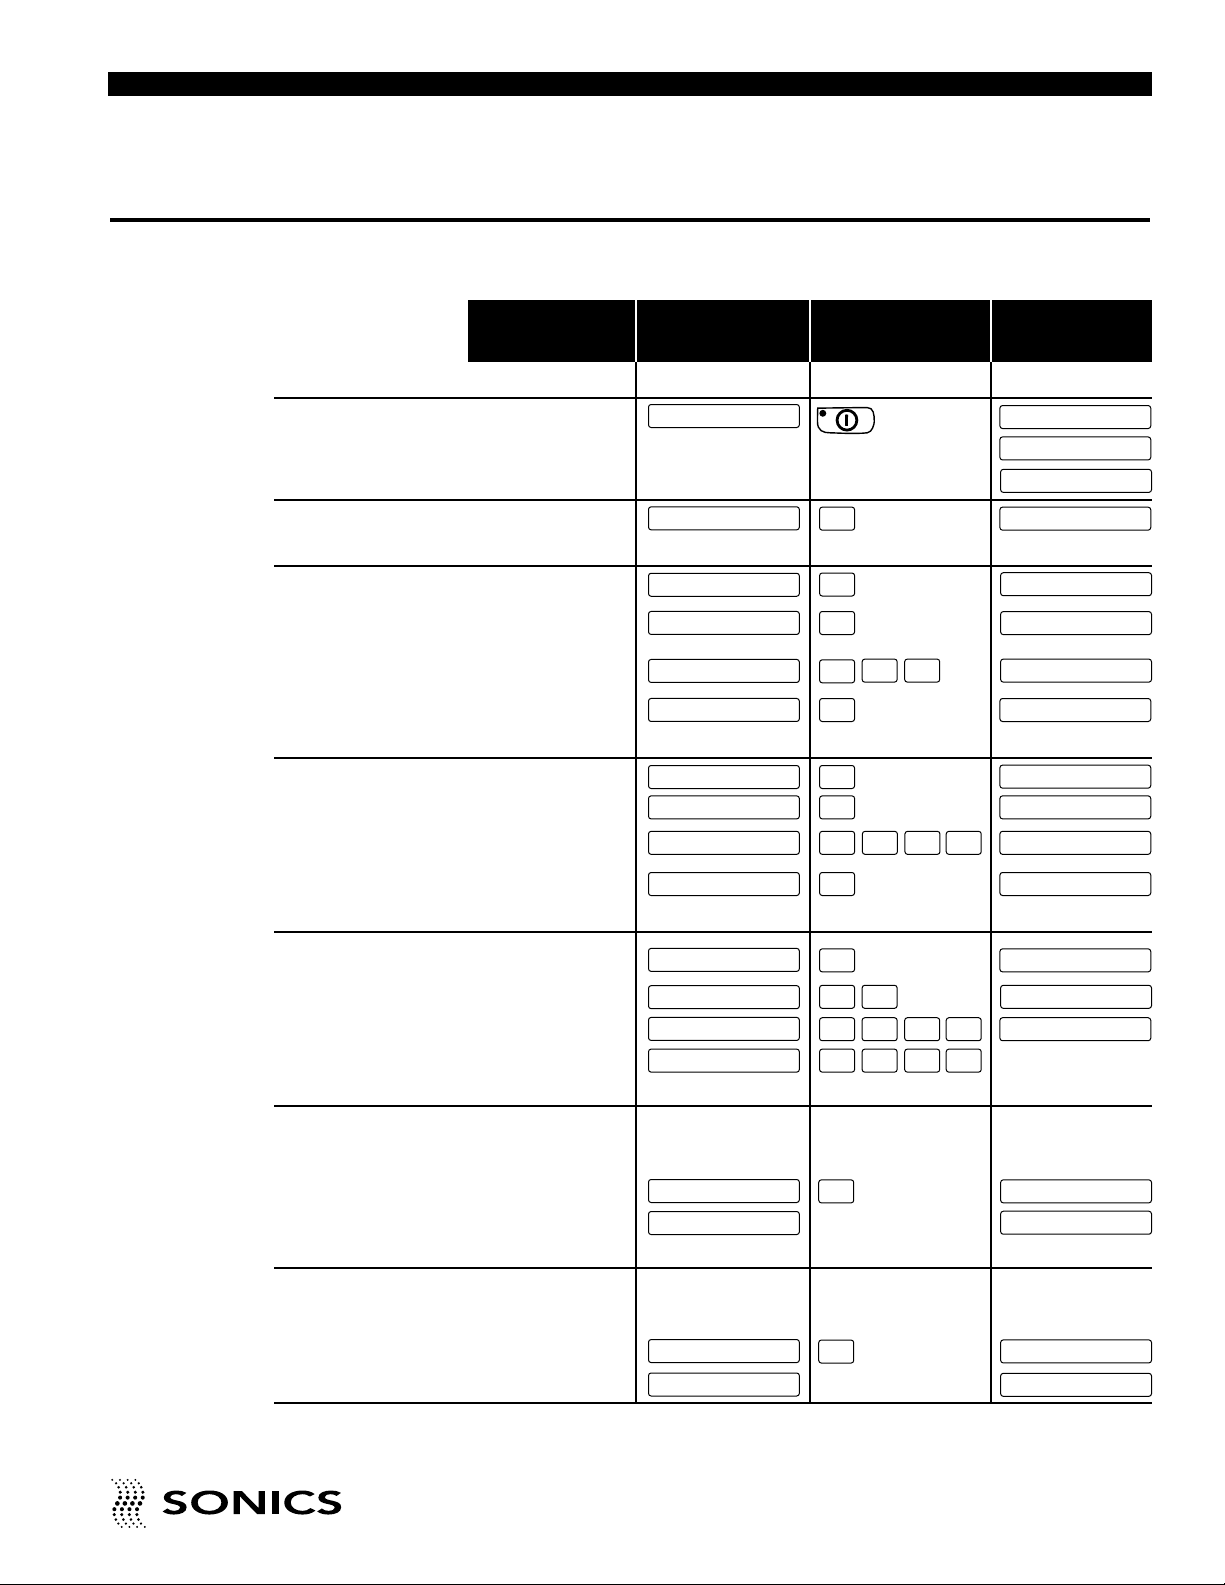
OVERVIEW OF OPERATIONS AND LCD
DISPLAYS
MICROSONIC PROCESSOR™ OPERATING INSTRUCTIONS
FUNCTION
DISPLAY KEY OPERATION DISPLAY
BEFORE SEQUENCE AFTER
START-UP Start power supply
and Microsonic
Processor™
TEST
Test for idle losses in air
TIMER
Select Timer Function
Select Timer
ex: Delay Trigger Timer
Set Timer 1
ex: 0.25 sec.
Enter set value
LIMIT
Select Upper Limit
Cancel Value
Set Upper Limit
ex: 115.0 Ws
Enter set value
WELDS
Display number of welds
completed
Display number of rejects
DIsplay rated power
Display Mode Codes
DELA Y TIMES
Select either Delay Timer
Triggering or Force
Triggering Functions
If Delay Triggering (T1):
If Force Triggering (FT):
ENERGY
Select either Time Based
function or Constant
Energy Function
If Time Based (ZT):
If Constant Energy (EN):
READY
READY
READY
READY
READY
READY
READY
—
TIMER NR = (1-5)?
TIMER 1 = 0.00 sec
TIMER 1 = 0.25 sec
+ LIM = 14985.0 Ws
+ LIM = 00000.0 Ws
+ LIM = 115.0 Ws
T1 ZT NB IS 1 48 M
FT ZT NB IS 1 48 M
T1 ZT NB IS 1 48 M
T1 EN NB IS 1 48 M
READY
READY
SONICS AND MATERIALS
•••• NO PRINTER ••••
US - TEST = 5%
TIMER NR = (1-5)?
TIMER 1 = 0.00 sec
TIMER 1 = 0.25 sec
TIMER NR = (1-5)?
+ LIM = 14985.0 Ws
+ LIM = 00000.0 Ws
+ LIM = 115.0 Ws
WELD CYCLES = 0
REJECTS = 0
RATED POWER = 1500W
T1 ZT NB IS 1 48 M
FT ZT NB IS 1 48 M
T1 ZT NB IS 1 48 M
T1 EN NB IS 1 48 M
1
2
TEST
TIMER
1
CE
ENTER
2 5
+ LIM
CE
1 1 5 0
ENTER
INFO
INFO INFO
INFO INFO INFO INFO
INFO INFO INFO INFO
Page 27
• • • • • • • • • • • • • • • • • • • • • • • • • • • • • • • • • • • • • • • • • • • • • • • • • • • • • • • • • • • • • • • • • • • • • • • • • • • • • • • • • • • • • • • • • • • • • • • • • • • • • • • • • • • •
26
INSTRUCTION MANUAL • MODEL FM POWER SUPPLY
FUNCTION
DISPLAY KEY OPERATION DISPLAY
BEFORE SEQUENCE AFTER
AFTERPULSE
Select Afterpulse Timer
(T4) or cancel Afterpulse
Timer (T4).
TRIGGER FORCE
Select Trigger Force
Set Trigger Force
ex: 25%
Enter set value
REF
Select and clear energy
(REF) set value
Set REF value
ex: 100.0 Ws
Enter REF Value
SECURITY
Secure keypad to prevent
unauthorized adjustment
of parameters.
Release keypad security
PRINT
Continuous sequential
display or printout of
dynamic operating
conditions on
optional CRT or printer
Printout of weld curve by
optional printer
READY
READY
READY
TRIGGER (F) = 1%
READY
T1 ZT NB IS 1 48 M
TRIGGER (F) = 25%
REF = 100.0 Ws
REF = 00000.0 Ws
READY
READY
FT ZT NB IS 1 48 M
F
TRIG
GER
CE
ENTER
2 5
017
5
0
ENTER
T1 ZT NB IS 1 48 M
READY
TRIGGER (F) = 1%
TRIGGER (F) = 25%
REF
CE
0 0 REF = 100.0 Ws
REF = 00000.0 Ws
READY
READY
* DATA TO PRINTER *
PRT
ENTER
Depress and hold
for two seconds
Page 28
FUNCTION
DISPLAY KEY OPERATION DISPLAY
BEFORE SEQUENCE AFTER
START-UP
Start power supply
TEST
Test for idle losses in air
FORCE TRIGGER
Determine whether
Force Trigger function
has been selected
If not:
CONSTANT
Determine whether
ENERGY
Constant Energy function
has been selected
If not:
TRIGGER FORCE
Select Trigger Force
Set Trigger Force
ex: 25%
Enter set-value
REF
Select and clear
energy set value
Set REF value
ex: 100.0 Ws
Enter REF value
TIMERS
Select Timer Function
Select Hold Timer (T3)
Set Hold Timer
ex: 25 sec.
Enter set-value (T3)
AFTERPULSE
Cancel Afterpulse
Timer (T4)
READY
READY
REF = 00000.0 WS
REF = 1000 WS
READY
READY
READY
—
T1 EN NB IS 1 48 M
FT ZT NB IS 1 48 M
READY
READY
SONICS AND MATERIALS
•••• NO PRINTER ••••
US - TEST = 5%
FT EN NB IS 1 48 M
FT EN NB IS 1 48 M
TIMER 3 = 0.25 sec
TIMER NR = (1-5)?
TRIGGER (F) = 00%
3
TEST
TIMER
1
CE
ENTER
00
CE 215
0
ENTER
INFO INFO INFO INFO
2
INFO INFO INFO INFO
FT EN NB IS 1 48 M
FT EN NB IS 1 48 M
TRIGGER (F) = 25%
F
TRIG
GER
TRIGGER (F) = 00%
TRIGGER (F) = 25%
REF
CE
READY
REF = 00000.0 W
REF = 1000 W
READY
TIMER 3 = 0.00 sec 2 5
ENTER
TIMER NR = (1-5)?
TIMER 3 = 0.25 sec
TIMER 3 = 0.00 sec
TIMER NR = (1-5)?
TIMER NR = (1-5)? CE4
ENTER
TIMER NR = (1-5)?
• • • • • • • • • • • • • • • • • • • • • • • • • • • • • • • • • • • • • • • • • • • • • • • • • • • • • • • • • • • • • • • • • • • • • • • • • • • • • • • • • • • • • • • • • • • • • • • • • • • • • • • • • • • •
INSTRUCTION MANUAL • MODEL FM POWER SUPPLY
27
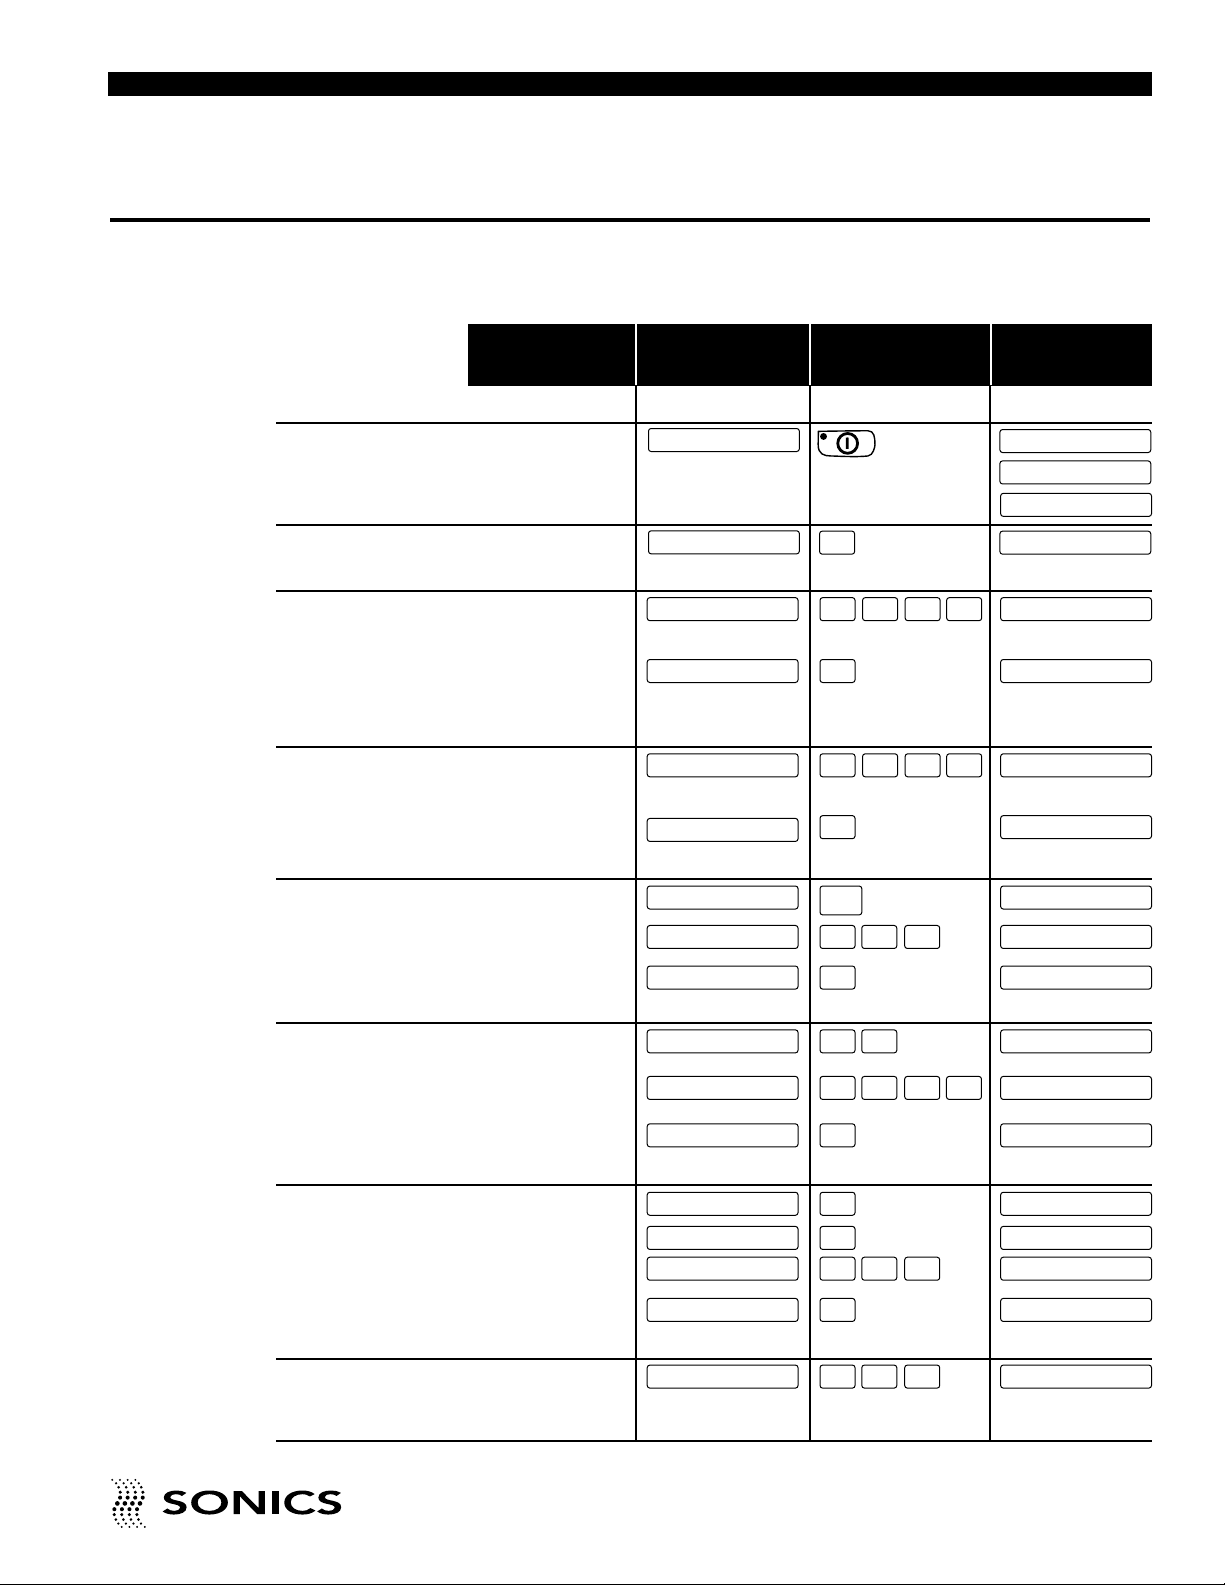
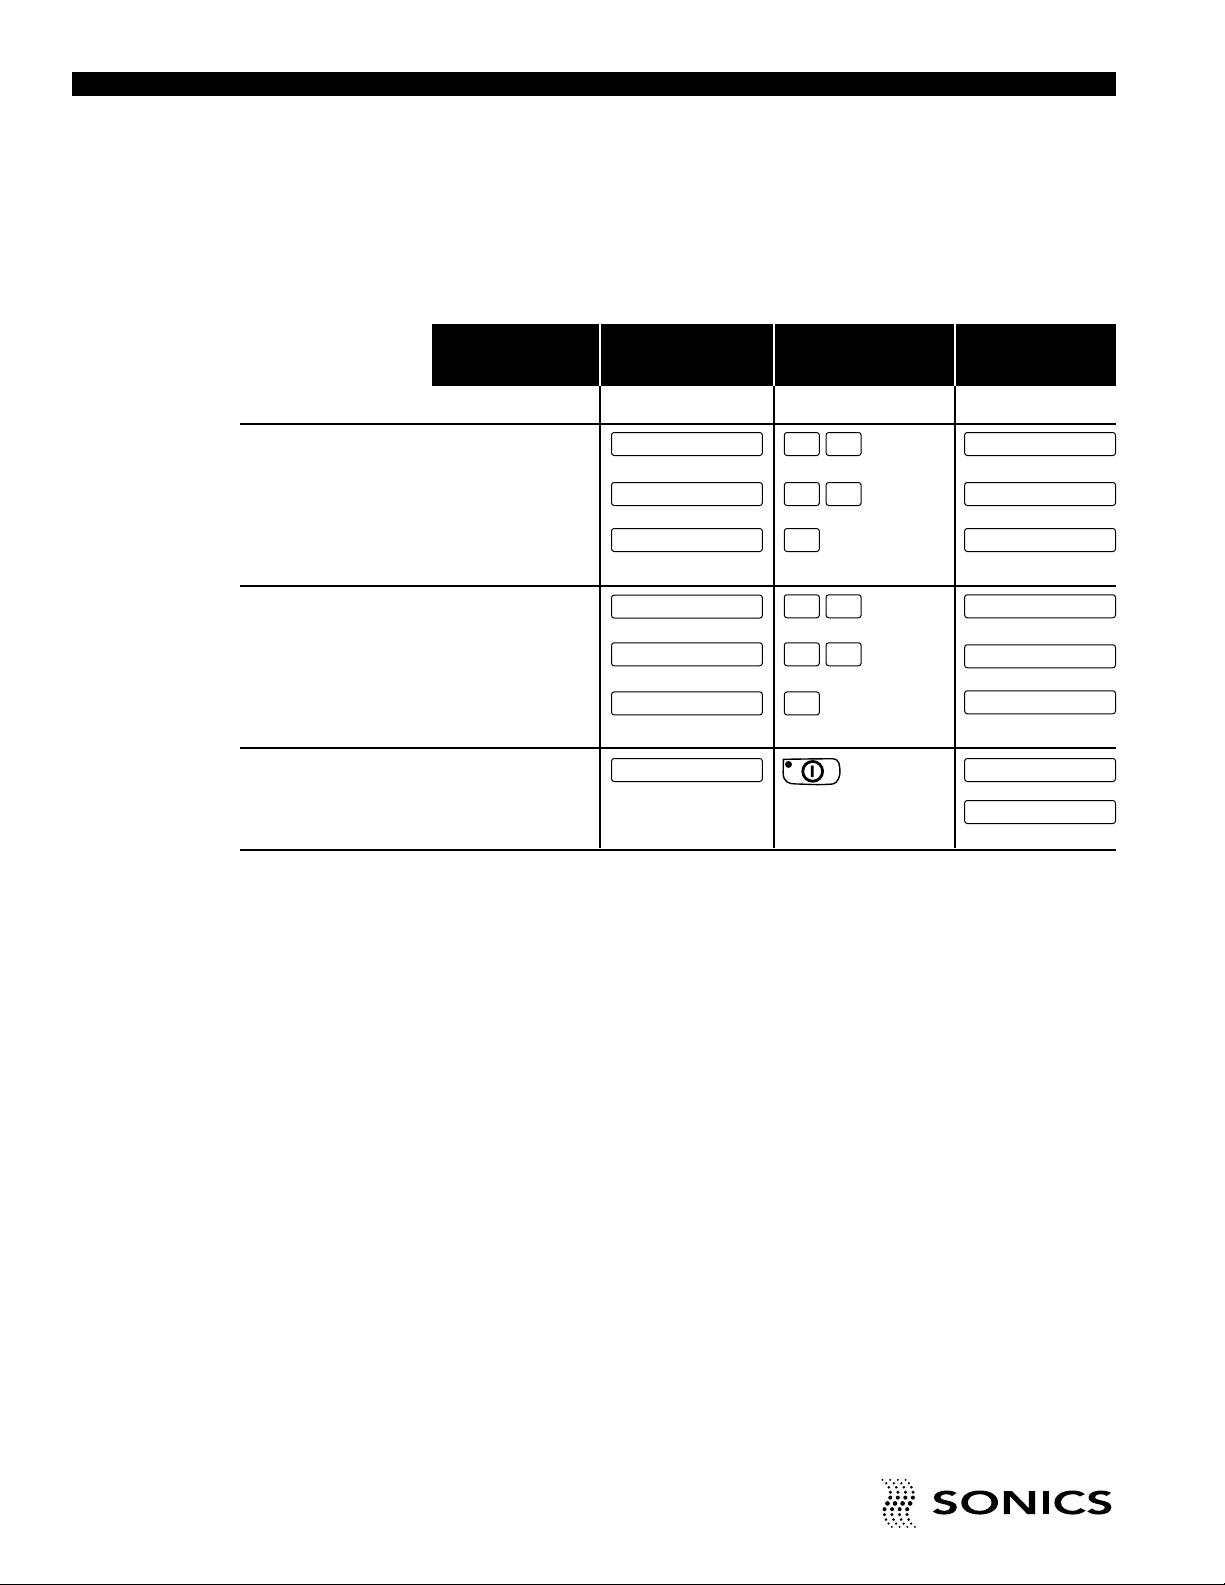
OVERVIEW OF SET-UP PROCEDURES AND
DISPLAYS
CONST ANT ENERGY WITH VARIABLE FORCE
TRIGGERING
Page 29
• • • • • • • • • • • • • • • • • • • • • • • • • • • • • • • • • • • • • • • • • • • • • • • • • • • • • • • • • • • • • • • • • • • • • • • • • • • • • • • • • • • • • • • • • • • • • • • • • • • • • • • • • • • •
28
INSTRUCTION MANUAL • MODEL FM POWER SUPPLY
FUNCTION
DISPLAY KEY OPERATION DISPLAY
BEFORE SEQUENCE AFTER
UPPER LIMIT
Select Upper Limit
function
Set Upper Limit
ex: 0.90 sec.
Enter set-value
LOWER LIMIT
Select Lower Limit
function
Set Lower Limit
ex: 0.60 sec.
Enter set-value
OFF
Turn off power supply
and Microsonic
Processor™
READY
READY
0
CE
ENTER
9+ LIM = 0.00 sec
+ LIM = 0.90 sec READY
+ LIM = 0.90 sec
READY
– LIM = 0.00 sec
– LIM = 0.60 sec
0
CE
ENTER
6
+ LIM = 0.00 sec
READY
– LIM = 0.60 sec
– LIM = 0.00 sec
+ LIM
– LIM
(Or any other display
when power supply is
ON.)
—
* * * OFF * * *
Page 30

ADDITIONAL FEATURES AND FUNCTIONS
PROGRAM VERSION DESIGNATION
To review the program version number, press and hold the TEST and REF
keys simultaneously when “SONICS & MATERIALS” appears on the LCD
DISPLAY at start-up.The display will then show the program version number
i.e., V2.6 845-19 1500W. To retur n to system status READY, simply release
the TEST and REF keys.
CLEAR WELD COUNTER
As described earlier, the number of welds or process cycles can be displa yed
by pressing the INFO key once when the system status READY is displayed.
To clear the displayed value at the end of a shift or when otherwise required,
press the CE key once. The LCD screen display will change to “DELETE =
CE?” Press the CE key once to clear the number of welds display and change
to the number of rejects display, i.e., “REJECTS = 5.”
CLEAR REJECT COUNTER
Also as described earlier, the number of rejects can be display ed b y pressing
the INFO key twice, when the system status READY is displayed, (or by using
the procedure described directly above to Clear the Weld Counter.
To clear the displayed value of rejects when required, press the CE key twice.
The LCD screen display will change to “DELETE = CE?” Press the CE key
once to cancel the number of rejects display and return to the system status
READY display.
JOB STORAGE
Up to 9 different jobs may be stored and recalled or changed upon demand.
Typical information stored includes timers (T1-T5), Force Trigger, Energy
Reference, +/-Limits, Booster Gain, Horn Number, Air Pressure (reference
only), and Cal Pulse ON/OFF.
Save
To use the job storage feature, press the INFO key six times.The LCD screen
display will show the following message:
From this display, jobs can be saved or recalled. To save a job, press
numerical key 1(as “SAVE” is in the first display position). A new display will
appear:
• • • • • • • • • • • • • • • • • • • • • • • • • • • • • • • • • • • • • • • • • • • • • • • • • • • • • • • • • • • • • • • • • • • • • • • • • • • • • • • • • • • • • • • • • • • • • • • • • • • • • • • • • • • •
INSTRUCTION MANUAL • MODEL FM POWER SUPPLY
29
SAVE RECALL OTHER
Page 31
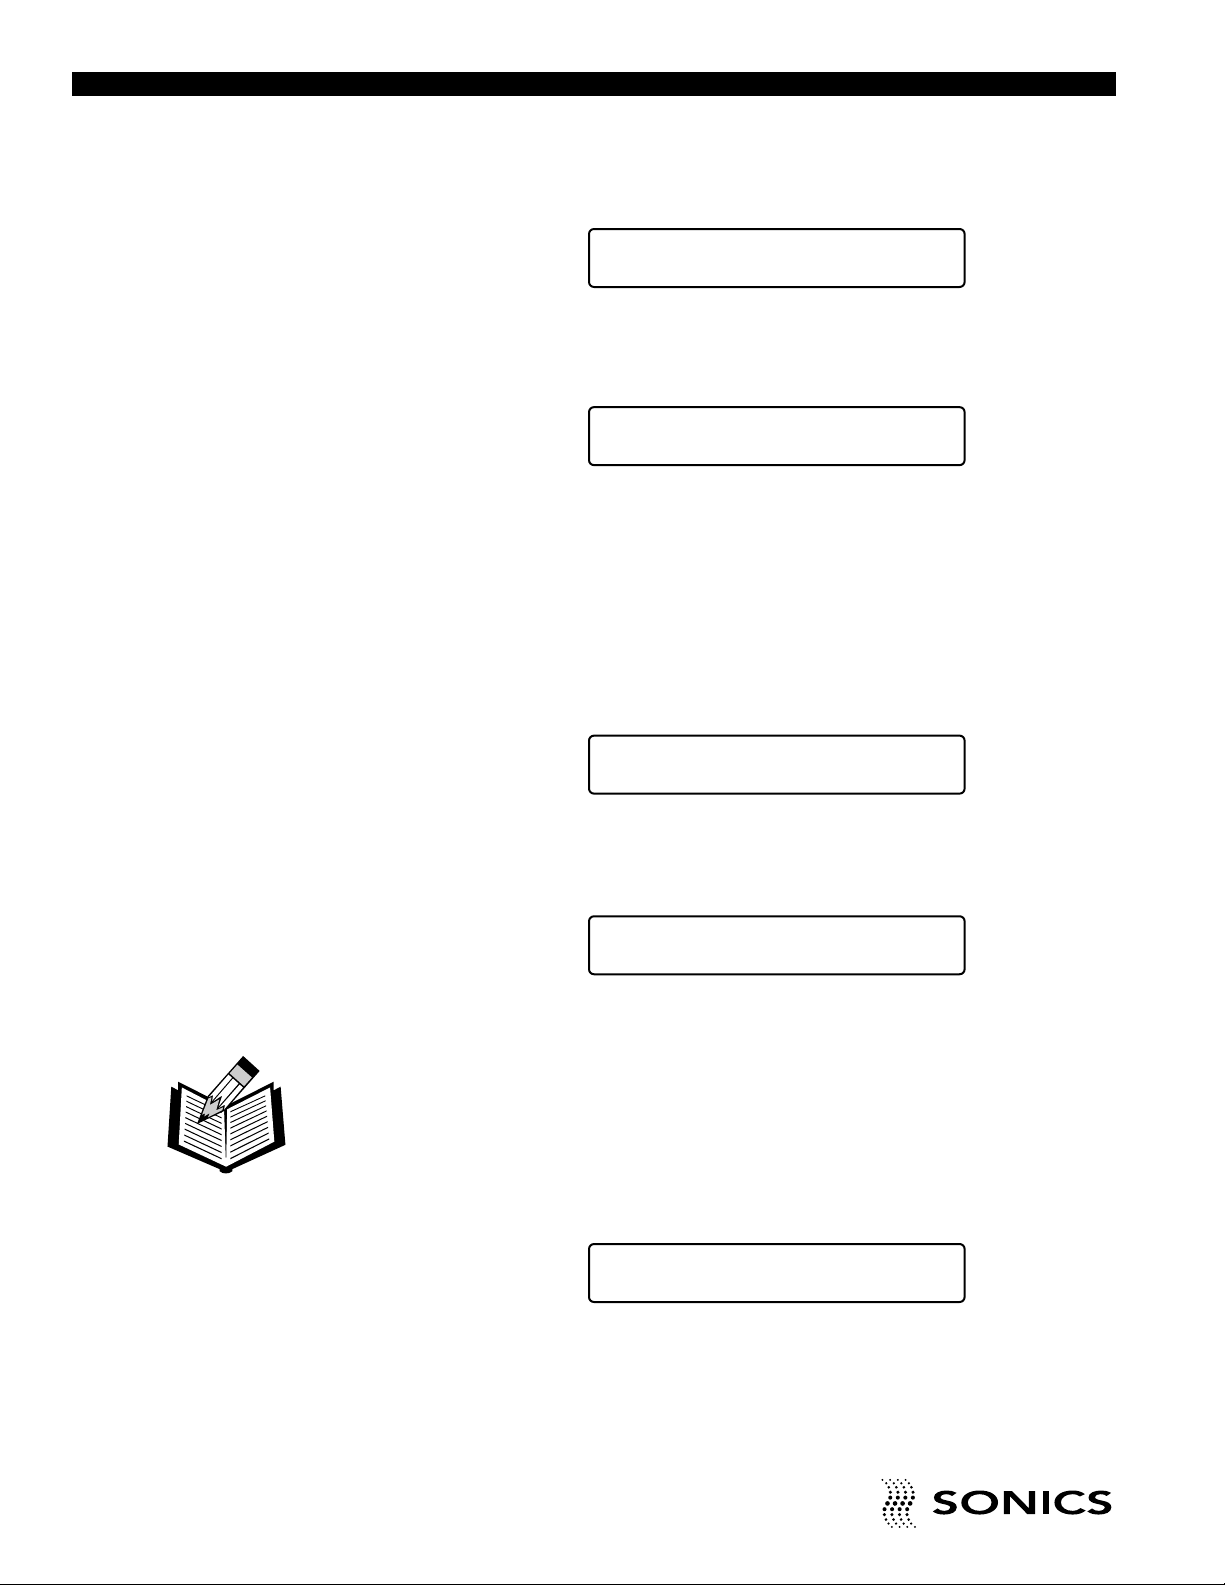
Saved jobs will be numbered 1 through 9. Use the numerical keys to enter in
the desired job number (1 - 9). Once the job number is keyed in, press the
ENTER key. The following message will be displayed on the LCD screen:
All the parameters for that job will be saved under the number keyed in. To
return to system status READY, press the ENTER key.
Recall
To recall a job that has been saved, first access the “SAVE RECALL
OTHER” display (by pressing the INFO key 6 times). Then, press numerical
key 2 (since recall is in the second display position). The following message
will appear on the LCD screen display:
Use the numerical keys to enter in the number (1 through 9) of the job to be
recalled. Once the number is keyed in, press the ENTER key. The LCD
screen will display:
The system will not respond if there is no job saved under a number
corresponding to the numerical key pressed.
Other
The “OTHER” option in the “SAVE RECALL OTHER” display allows the
storage of Pressure, Booster Gain and Horn Number parameters. To record
these values, press the numerical key 3 on the keypad. The display will
change to:
To record a pressure, first press the CE key. This will clear out the current
entry.
• • • • • • • • • • • • • • • • • • • • • • • • • • • • • • • • • • • • • • • • • • • • • • • • • • • • • • • • • • • • • • • • • • • • • • • • • • • • • • • • • • • • • • • • • • • • • • • • • • • • • • • • • • • •
30
INSTRUCTION MANUAL • MODEL FM POWER SUPPLY
JOB NUMBER: __
SAVE O.K.! __
RECALL O.K.! __
JOB NUMBER: __
PRESSURE 000.00 Psig
NOTE: Pressure is
reference only, this does
not change the actual air
pressure.
Page 32
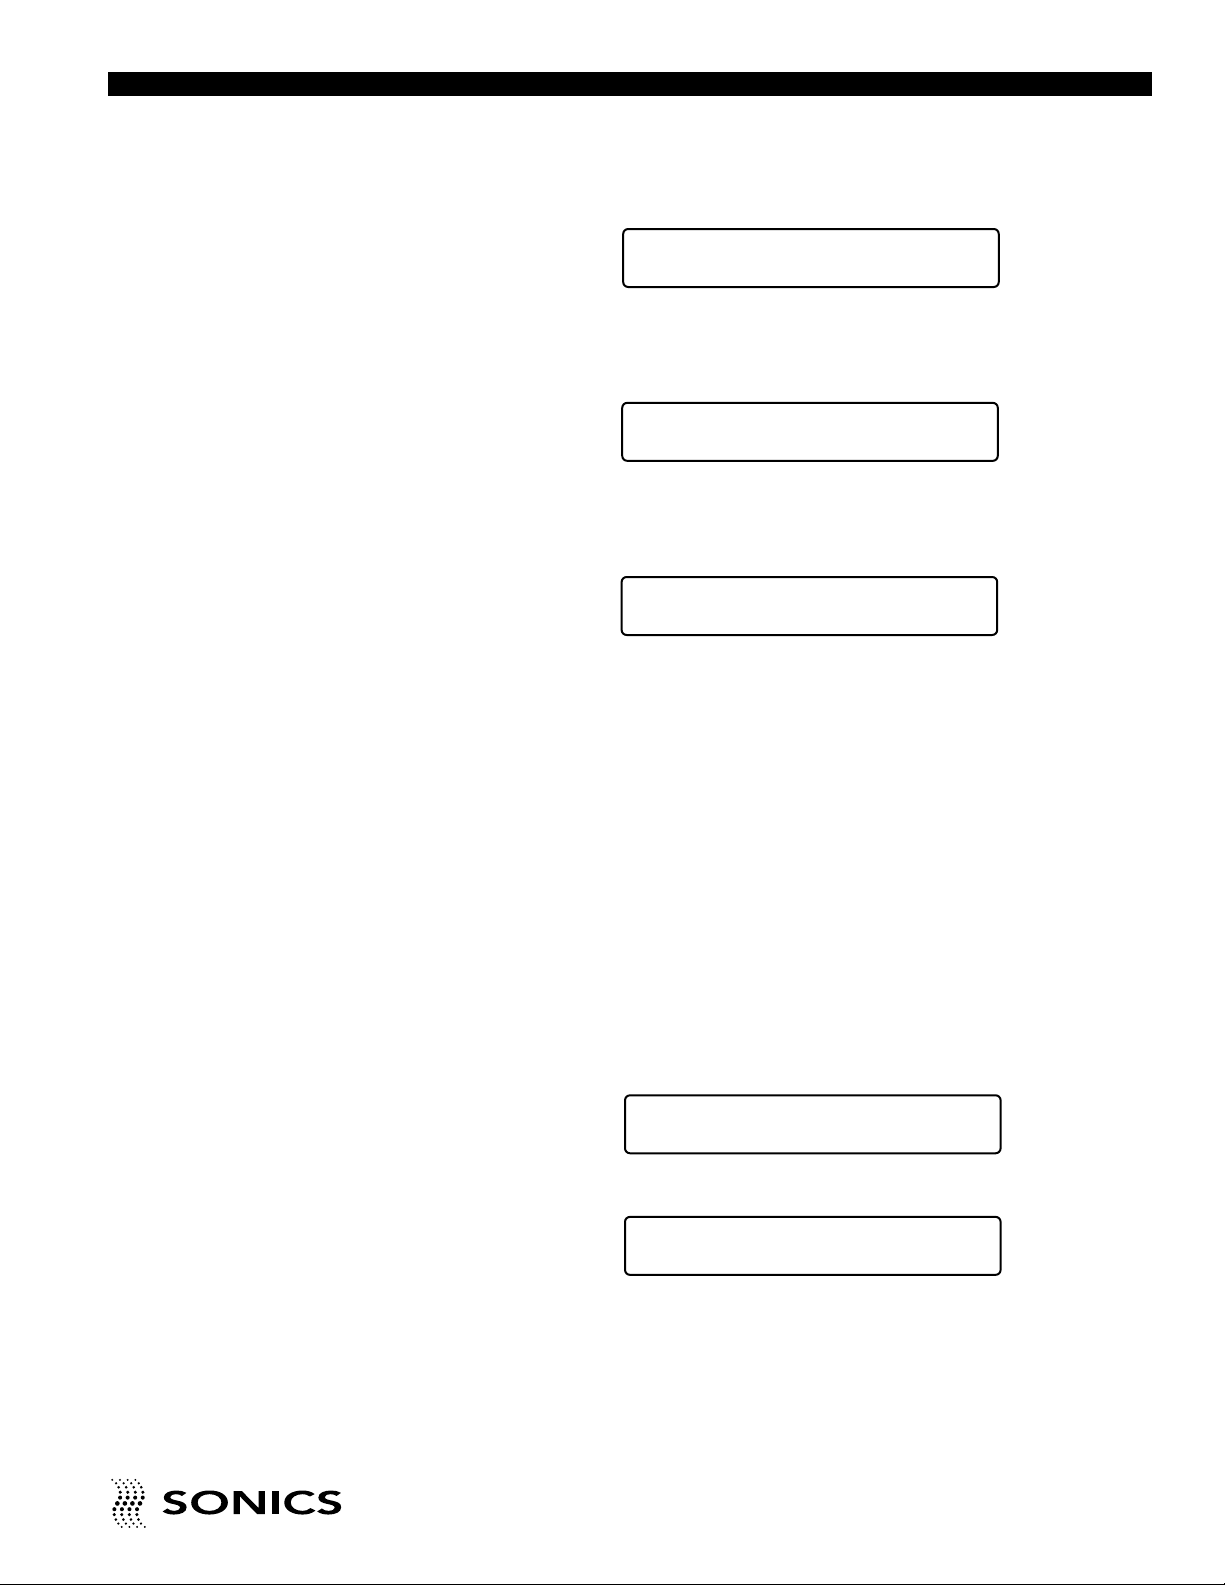
Use the numerical keys to enter in the new pressure v alue . When the desired
pressure is displayed on the LCD screen, press the ENTER key. The LCD
screen display will show the following:
To set a new Booster Gain ratio, use the CE and numerical keys in the same
manner described above for recording the Pressure value.Upon completion,
press the ENTER key and the LCD display will change to:
To record a new Horn Number, follow the same procedures as for recording
Pressure and Booster Gain.
JOB SEQUENCE
Once jobs have been stored, they can be sequenced in accordance with
application requirements. Saved jobs can be sequenced in any order and
may be repeated in the sequence up to a maximum of 9 steps. Each job in
the sequence is considered one step, with a maximum of 9 steps in a
sequence before the sequence is repeated. The weld line report to the
printer/CRT will include the step number in the sequence. The LCD screen
display will indicate the step in the sequence that will be performed in the next
weld operation.
To use the job sequence feature, press the INFO key 7 times (from the
READY 1 mode). The LCD display will show the following:
To sequence, first press the CE key. The LCD display will change to:
Use the numerical keypad to enter in the numbers corresponding to the
sequence of stored jobs to be utilized. For example, a displa y of “SEQ UENCE
1324182” will sequence Job l, then Job 3, Job 2, and so on. If the system
does not respond to (and display) an entry, it is because there is no job saved
under that number.
• • • • • • • • • • • • • • • • • • • • • • • • • • • • • • • • • • • • • • • • • • • • • • • • • • • • • • • • • • • • • • • • • • • • • • • • • • • • • • • • • • • • • • • • • • • • • • • • • • • • • • • • • • • •
INSTRUCTION MANUAL • MODEL FM POWER SUPPLY
31
PRESSURE 0.00 Psig
HORN NUMBER: 000000 __
SEQUENCE OFF
SEQUENCE
BOOSTER GAIN = 0.00 __
Page 33

The following is an e xample where four jobs are to be sequenced and one set
of parameters (Job 1) is to occur twice in the sequence. The sequence is as
follows:
The LCD screen will show the following displays as the jobs are sequenced:
Display for first cycle READY 1 STEP #1
second cycle READY 2 STEP #2
third cycle READY 1 STEP #3
fourth cycle READY 5 STEP #4
NOTE: Sequence repeats, going back to first cycle.
CAL PULSE
The microprocessor controlled welder calibrates itself prior to each weld
cycle. The use of the calibrator (cal) pulse enables the machine to
automatically monitor the idle losses in the converter/ booster/horn assembly
just as the head begins its descent to the part. The system adds the energy
necessary to vibrate the horn in air, to the total energy programmed to weld
a part. The cal pulse is utilized only in the Constant Energy mode, although
it is activated during all modes of operation. Occasionally, it is necessary to
turn the cal pulse off. For example, in order to place a part into the horn prior
to welding (i.e.; vacuum horns), the cal pulse can be turned on and off from
the front panel.
Press the INFO key 8 times from the READY 1 mode. The display will read
either “CAL PULSE IS ON”or CAL PULSE IS OFF. ” Press the CE key , (which
will act as a toggle) and the cal pulse will be either turned on or turned off.
The system will acknowledge by showing the new (on or off) setting on the
LCD display.
• • • • • • • • • • • • • • • • • • • • • • • • • • • • • • • • • • • • • • • • • • • • • • • • • • • • • • • • • • • • • • • • • • • • • • • • • • • • • • • • • • • • • • • • • • • • • • • • • • • • • • • • • • • •
32
INSTRUCTION MANUAL • MODEL FM POWER SUPPLY
SEQUENCE 1 2 1 5
Page 34

KEYPAD SECURITY
The keypad can be “loc k ed”so that all operating parameters that are selected
and set with the keypad are locked in, preventing unauthorized cancellation
or adjustment.
To activate the security feature, first press the INFO key 4 times to displa y the
current Mode Codes (i.e., T1 ZT NB IS 1 48 M, or other variation). Then,
press the numerical keys 0 and 7 in sequence within one second to lock the
keypad. When the keypad is secured in this manner, all parameter values
can still be displayed, but the CE key is not functional (the red LED will not
light up and parameters cannot be cancelled or changed). Any attempt to
change or enter parameters with the CE key will result in the following
message being displayed on the LCD screen:
To return to normal operation and unlock the keypad, repeat the lock
procedure - press the numerical keys 0 and 7 (within one second) while the
Mode Codes are displayed.The red LED in the upper corner of the CE key
will be illuminated again to prompt and permit cancellation.
• • • • • • • • • • • • • • • • • • • • • • • • • • • • • • • • • • • • • • • • • • • • • • • • • • • • • • • • • • • • • • • • • • • • • • • • • • • • • • • • • • • • • • • • • • • • • • • • • • • • • • • • • • • •
INSTRUCTION MANUAL • MODEL FM POWER SUPPLY
33
KEYBOARD IS LOCKED
Page 35
PRINTER INTERFACE AND OPERATION
PRINTER OPERATION
If a printer is to be used for documentation of the dynamic process conditions,
it must have an RS232 serial port interface, a buffer of 2K bytes and be
capable of accepting a transmission rate of 4800 Baud. Following completion
of an assembly cycle, the assembly number, percentage of maximum power
used, energy level, weld cycle duration and reject status can be printed.
When the number of welds or number of rejects is displayed on the LCD, as
a result of pressing the INFO key the requisite number of times, that same
information can be printed.
The green LED in the upper corner of the PRT key must be illuminated for a
printout of process conditions to occur.Press the PRT key to obtain a printout.
Refer to the printer displays shown on the next pages for examples.
PRINTOUT OF THE WELD ENERGY CURVE
A graphic display of the actual weld curve can also be printed out if a printer
with a serial port interface and a buffer of 2K bytes, such as an Epson Model
LX-810 or comparable, unit is used.
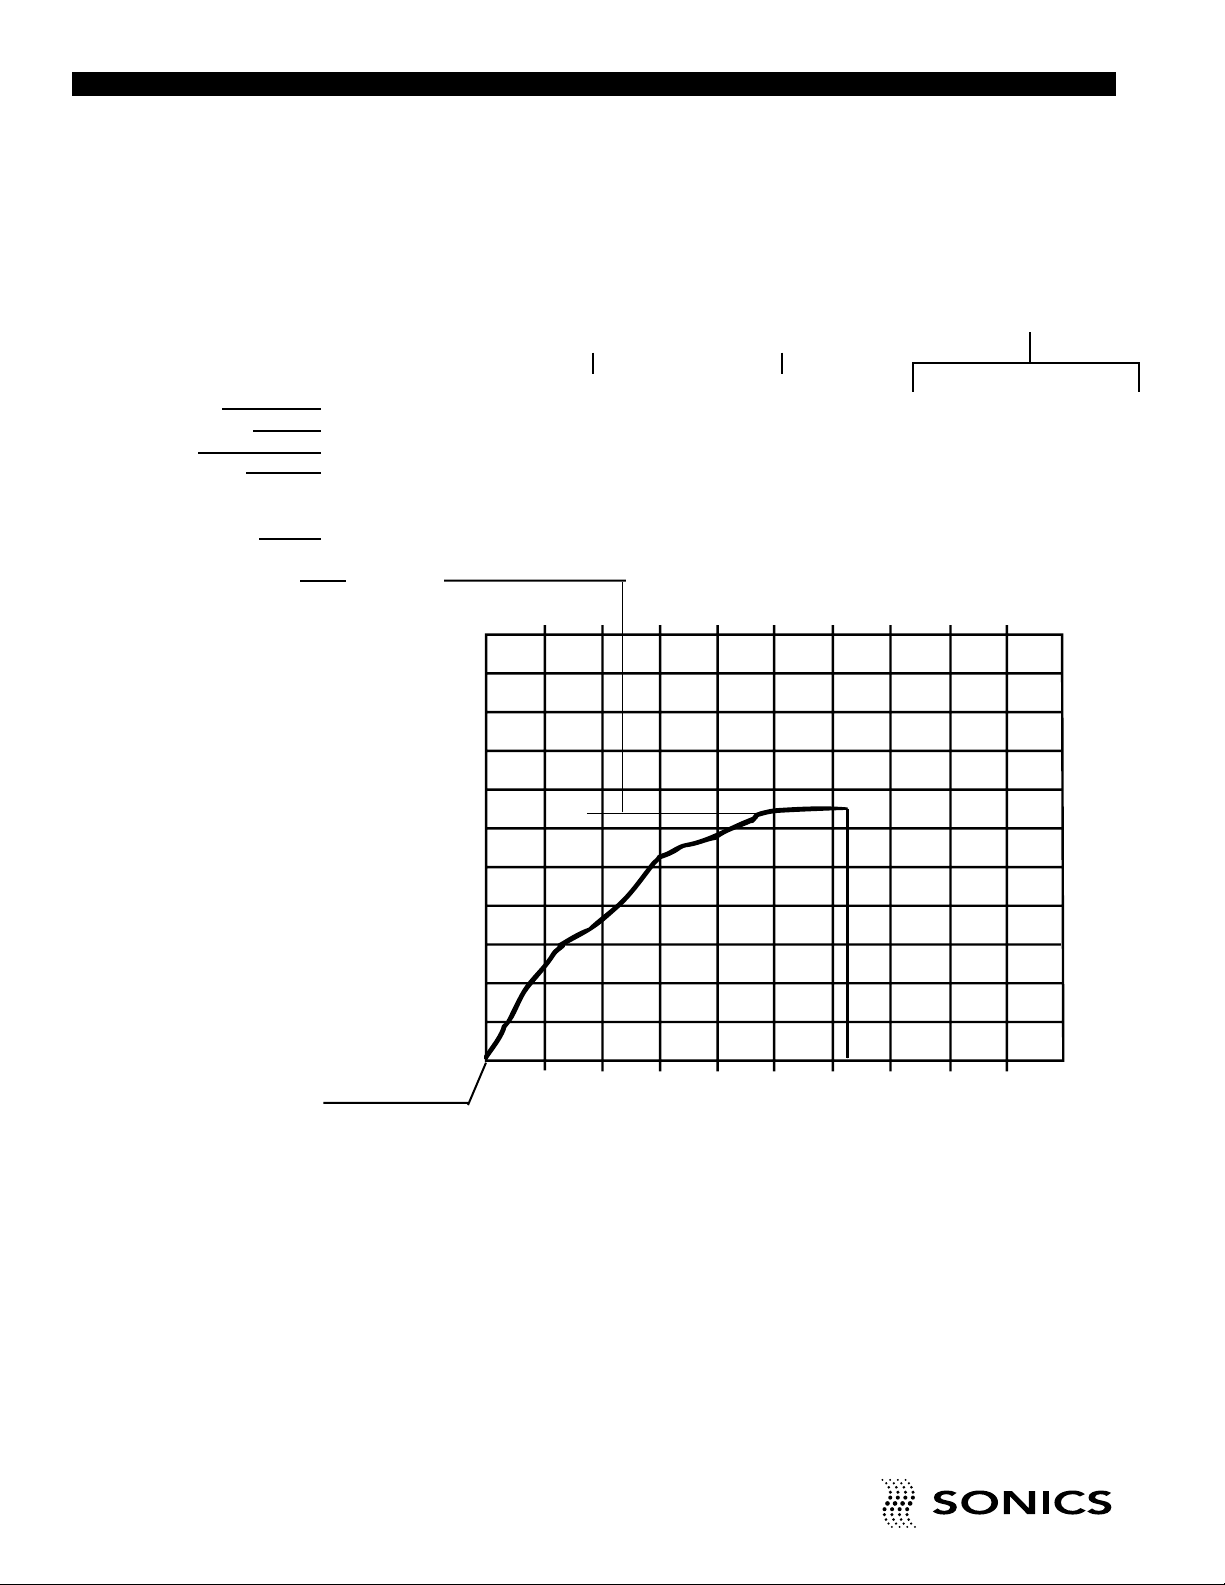
The printout of the weld curve plots the actual pattern of instantaneous
loading as a function of time. The vertical line at the beginning of the printout
indicates the idle losses of the converter, booster and horn in air;and the area
under the curve corresponds to the energy delivered throughout the cycle.
(Refer to the sample printer displays on the next page for examples.)
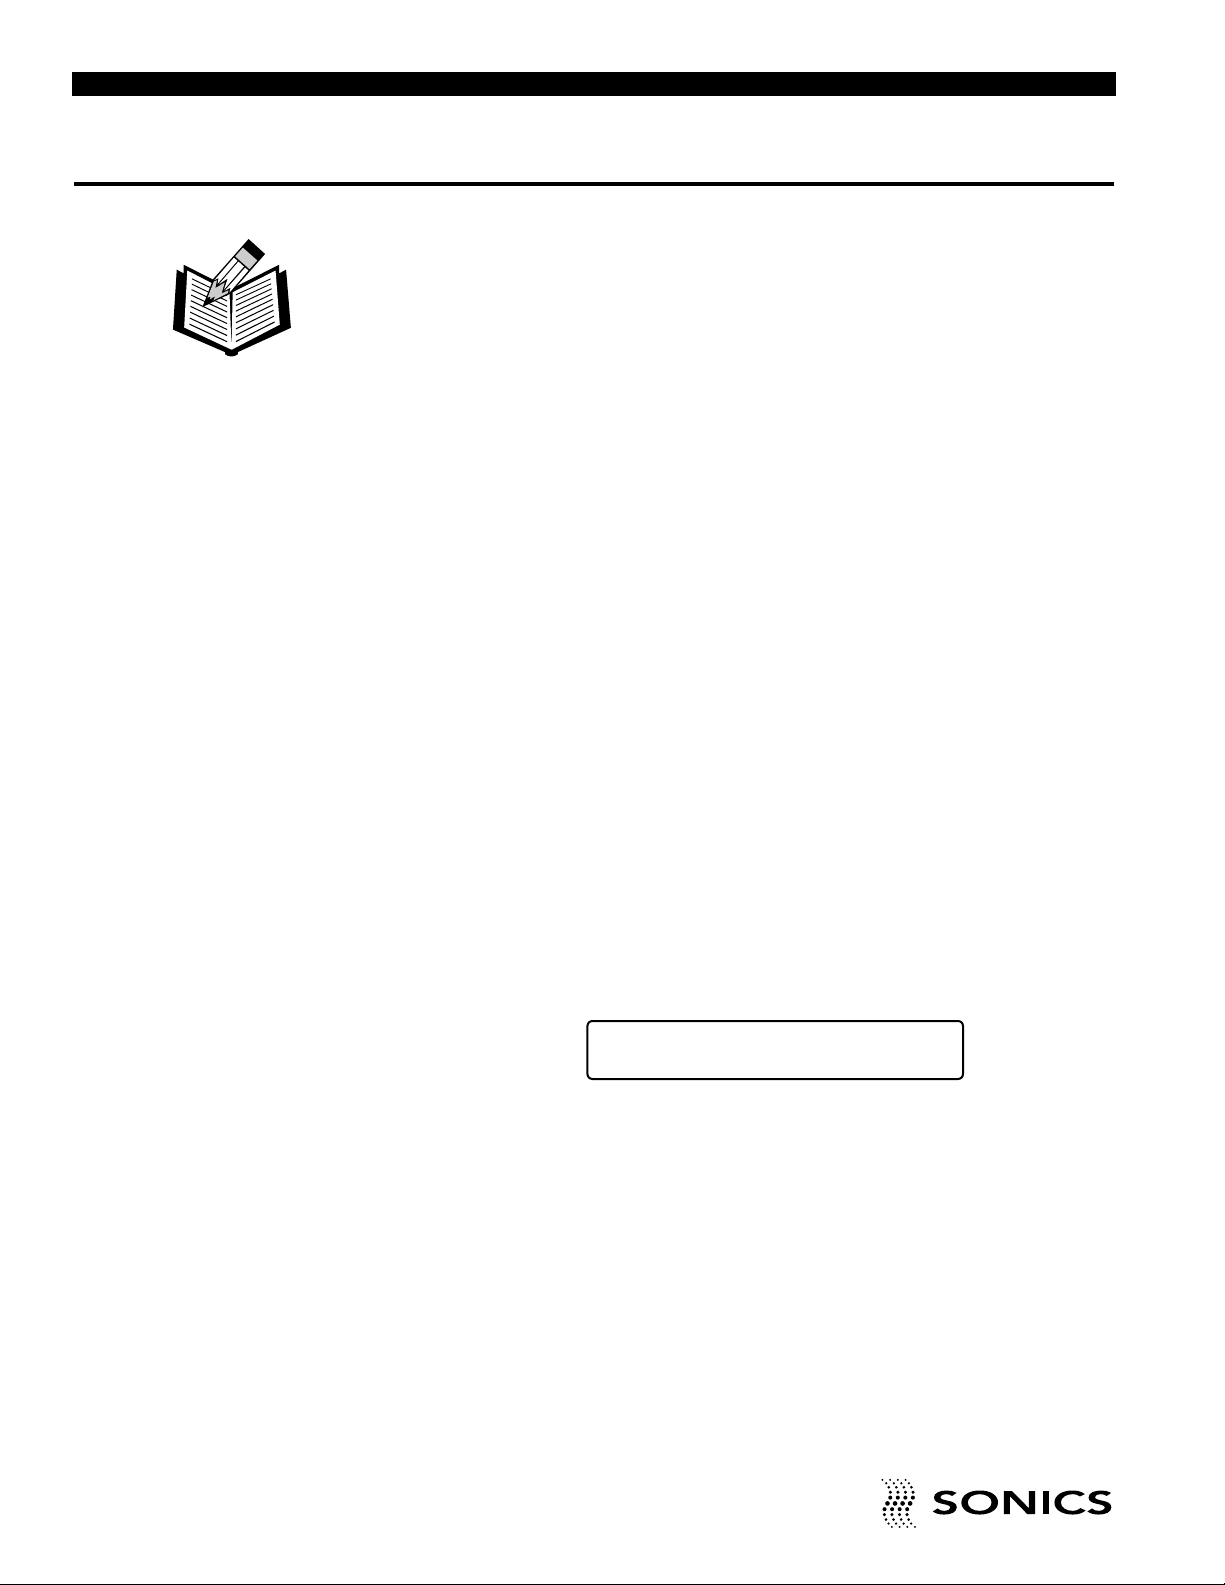
The printout of the weld curve is initiated by pressing the ENTER key for
approximately 1 second until an audible alarm sounds and the following
message appears on the LCD screen:
The printout requires approximately 70 seconds to complete, with a Baud rate
of 4800.
• • • • • • • • • • • • • • • • • • • • • • • • • • • • • • • • • • • • • • • • • • • • • • • • • • • • • • • • • • • • • • • • • • • • • • • • • • • • • • • • • • • • • • • • • • • • • • • • • • • • • • • • • • • •
34
INSTRUCTION MANUAL • MODEL FM POWER SUPPLY
NOTE: Use of a
printer causes the
cycle to be extended
by approximately
200 ms.
* DATA TO PRINTER *
Page 36
• • • • • • • • • • • • • • • • • • • • • • • • • • • • • • • • • • • • • • • • • • • • • • • • • • • • • • • • • • • • • • • • • • • • • • • • • • • • • • • • • • • • • • • • • • • • • • • • • • • • • • • • • • • •
INSTRUCTION MANUAL • MODEL FM POWER SUPPLY
35
PRINTER DISPLAYS
Time Based mode with delay timer triggering
Power Supply Mode Codes
Program Ver sion Output Rating
SONICS AND MATERIALS V3.0 845-73 1500W T1 ZT NB IS 1 48 M
Delay Timer Timer 1 = 0.25 sec
Weld Timer Timer 2 = 0.15 sec + LIM = 105.0 Ws Upper tolerance limit (energy)
Hold Timer Timer 3 = 0.25 sec – LIM = 90.0 Ws Lower tolerance limit (energy)
Afterpulse Timer Timer 4 = 0.00 sec CAL PULSE = ON
Timer 5 = 0.00 sec BOOSTER GAIN = 1.50 HORN NUMBER: 123
Pressure 30.00 Psig 0.15 sec Predetermined Weld Cycle
Assembly Number 98 90.8 Ws Actual energy delivered
Percentage of available 64%P max
power used
Idle Losses For Converter,
Booster and Horn
P
100%
50%
0%
Page 37
• • • • • • • • • • • • • • • • • • • • • • • • • • • • • • • • • • • • • • • • • • • • • • • • • • • • • • • • • • • • • • • • • • • • • • • • • • • • • • • • • • • • • • • • • • • • • • • • • • • • • • • • • • • •
36
INSTRUCTION MANUAL • MODEL FM POWER SUPPLY
Constant energy mode with variable force triggering
Power Supply Mode Codes
Program Ver sion Output Rating
SONICS AND MATERIALS V3.0 845-73 1500W FT EN NB IS 1 48 M
Tr igger Force Trigger (F) = 2%
Energy Set-Value REF = 91.0 Ws + LIM = 0.20 sec Upper Limit (Time)
Hold Timer Timer 3 = 0.25 sec – LIM = 0.10 sec Lower Limit (Time)
Afterpulse Timer Timer 4 = 0.00 sec CAL PULSE = ON
Timer 5 = 0.25 sec BOOSTER GAIN = 1.50 HORN NUMBER: 123
Pressure 30.00 Psig 0.17 sec Actual Weld Cycle Duration
Assembly Number 100 91.2 Ws Actual energy delivered
Percentage of available 65%P max
power used
P
100%
50%
0%
0 0.05 0.10 0.15 0.20 0.25 Sec
Idle Losses For Converter,
Booster and Horn
Page 38
• • • • • • • • • • • • • • • • • • • • • • • • • • • • • • • • • • • • • • • • • • • • • • • • • • • • • • • • • • • • • • • • • • • • • • • • • • • • • • • • • • • • • • • • • • • • • • • • • • • • • • • • • • • •
INSTRUCTION MANUAL • MODEL FM POWER SUPPLY
37
The keypad is not functional during the time a printout is being made until a
short audible tone is heard and the LCD returns to system status “READY.”
Printing can be stopped at any time by pressing any key. The printer will
continue printing, howev er , until the data stored in the b uff er has been printed.
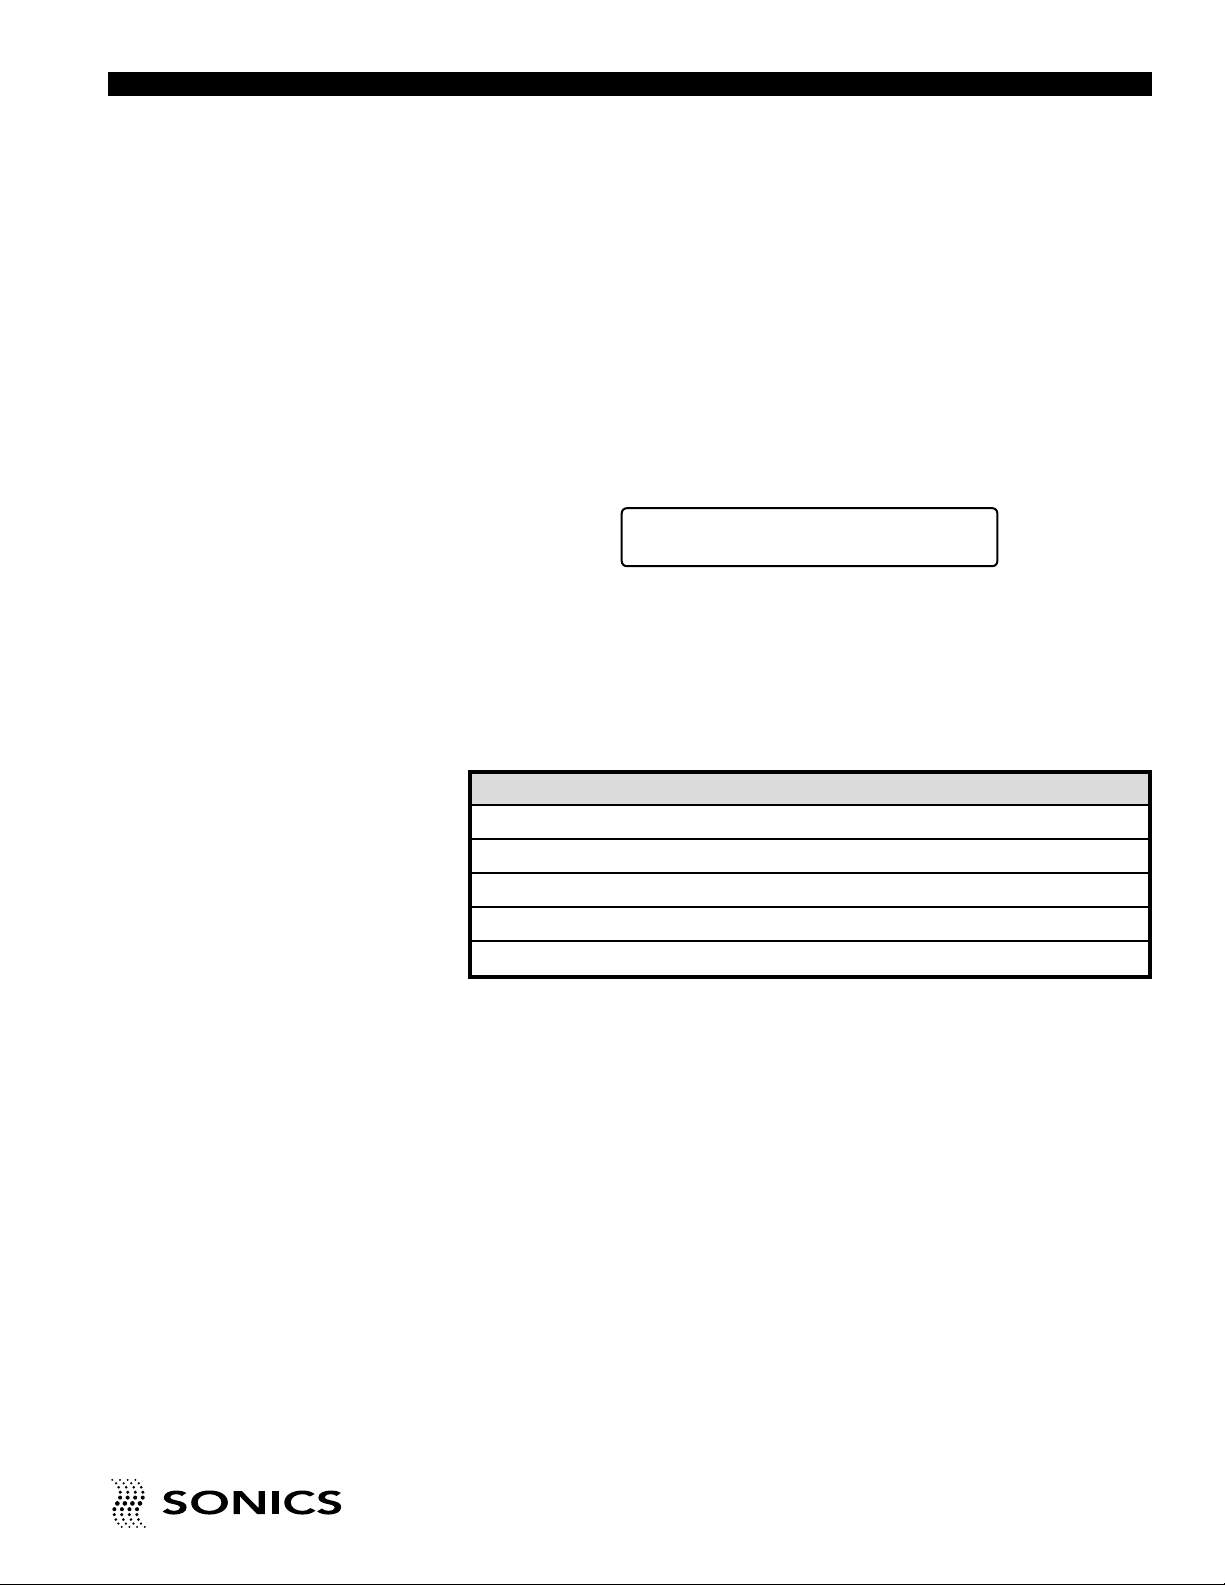
Time axis plot lengths of 250 ms, 500 ms, 1 second, 5 seconds and 10
seconds are available for printout. The time axis desired must be specified
prior to the assembly cycle, as follows.
Press the INFO key five times until the following display appears on the LCD
screen:
The red LED in the corner or the CE key indicates that it is functional and
therefore, the displayed value can be cancelled and changed.
Press the CE key and then ke y in the appropriate numerical code (see below)
for the Time Axis Plot Length desired. Acknowledge the entry by pressing the
ENTER key or wait 30 seconds for automatic acceptance.
GRAPH HEADER
In addition to cycle parameters, the printout will also include readings for Air
Pressure, Cal Pulse, Booster Gain and Horn Number. These values may be
entered through the keypad. The printout readings are reference values only;
i.e., if the gauge pressure setting reads 45 psig and the printout reads
“PRESSURE 20 PSIG”, the parts will be welded with 45 psig. The same
applies for “Booster Gain”and “Horn Number.”
GRAPH TIME AXIS
CODE TIME AXIS LENGTH
02 250ms
05 500ms
10 1 sec
50 5 sec
99 10 sec
Page 39

REJECT PRINTOUTS
The reason for a reject, such as ± LIM or T5, will be printed out for each weld.
If the Timer 5 limit is exceeded, then the printout will read as follows:
For the example above, the printout indicates that this cycle was rejected
because the Timer 5 setting (0.40 sec.) was exceeded. In this case, the red
LED’s in the corners of both the +LIM and -Lim keys will be illuminated.
• • • • • • • • • • • • • • • • • • • • • • • • • • • • • • • • • • • • • • • • • • • • • • • • • • • • • • • • • • • • • • • • • • • • • • • • • • • • • • • • • • • • • • • • • • • • • • • • • • • • • • • • • • • •
38
INSTRUCTION MANUAL • MODEL FM POWER SUPPLY
25 76/o 176.6 ws 0.40 sec. **** Reject T5
Page 40

• • • • • • • • • • • • • • • • • • • • • • • • • • • • • • • • • • • • • • • • • • • • • • • • • • • • • • • • • • • • • • • • • • • • • • • • • • • • • • • • • • • • • • • • • • • • • • • • • • • • • • • • • • • •
INSTRUCTION MANUAL • MODEL FM POWER SUPPLY
39
SYSTEM STATUS TESTS AND FUNCTIONS
POWER SUPPLY TEST AND DISPLAY
The ultrasonic power supply can be actuated briefly and tested by pressing
and holding the TEST k e y. The value displayed on the LCD screen should not
exceed 10% or 20% on the LED bar graph.
OPERATION SEQUENCE DISPLAY
The operation sequence, which includes the trigger, time and energy functions
in use during a process cycle, can be displayed on the LCD screen during
subsequent cycles. To display the sequence, press the numerical k e y 4 when
the Mode Codes are displayed.
Each function abbreviation is displayed as it is actuated, and all function
abbreviations are retained in display until the cycle is completed, i.e., T1 T2
T3, T1 T2 T3 T4, T1 T2 T3 T4+ US, FT T2 T3, FT EN T3 and other variations.
The power supply can be returned to the system status READY display during
the process cycle by repeating the procedure used above to select the
operation sequence display (press the numerical ke y 4 when the Mode Codes
are displayed).
SYSTEM STATUS TESTS AND MISCELLANEOUS
FUNCTIONS
In addition to the basic modes and functions described in the preceding
sections, the power supply provides additional testing and operating functions ,
as listed below.
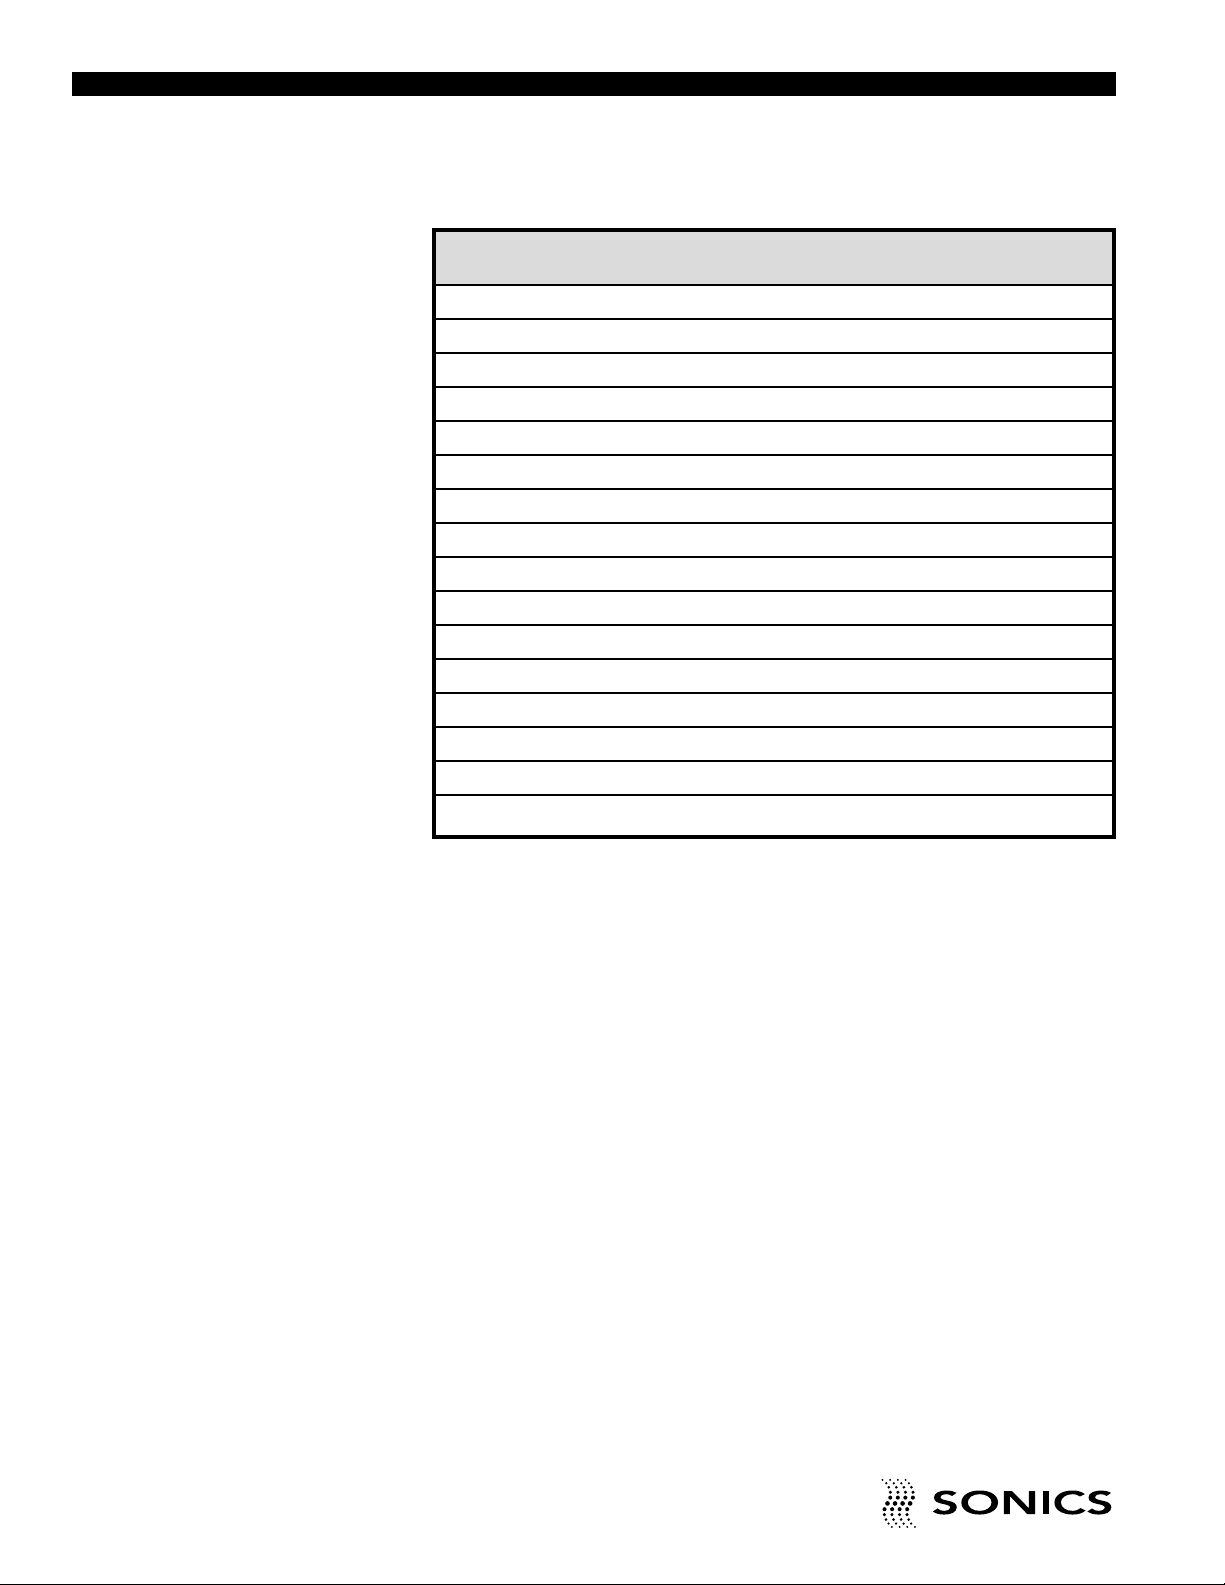
Input Test
To display the status of the various system inputs, press the TEST and AUTO
keys simultaneously when “SONICS & MATERIALS” appears on the LCD
screen at start-up. The display will change to “INPUT TEST.” When the TEST
and AUTO keys are released, the status of the v arious inputs will be displa y ed
in an alphabetical code. From left to right, the inputs are as follows (see next
page):
NOTE: Refer to page 42 for
an overview of system status
tests displays.
Page 41
Input Alphabetical
No. Function Status Codes
1. Emergency stop/converter door interlock A = ON a = OFF
2. Not used at present time B = ON b = OFF
3. Stop timer 2 C = OFF c = ON
4. Not used at present time D = OFF d = ON
5. Stop timer 3 E = OFF e = ON
6. Stop timer 4 F = OFF f = ON
7. Rotary table valve monitoring G = Missing g = OK
8. Press valve monitoring H = Missing h = OK
9. Head advance control I = OFF i = ON
10. External Star t J = OFF j = ON
11. L H Palm Switch K = OFF k = ON
12. R H Palm Switch L = OFF l = ON
13. Rotary table acknowledgement 1 M = OFF m= ON
14. Rotary table acknowledgement 2 N = OFF n = ON
15. Press upper limit switch O = OPEN o = CLOSED
16. Horn contact acknowledgement P = OFF p = ON
To ter minate the test and clear the display, press the ON/OFF key.
PRINTER TEST (only with Optional Peripherals)
To access the Printer Test feature, first ensure that the optional printer is “ON.”
Then, press the TEST and PRINT keys simultaneously when “SONICS AND
MATERIALS” appears on the LCD screen at start-up. The display will change
to “PRINTER TEST” and a test sample will be printed on the printer.
To ter minate the test, press the ON/OFF key.
• • • • • • • • • • • • • • • • • • • • • • • • • • • • • • • • • • • • • • • • • • • • • • • • • • • • • • • • • • • • • • • • • • • • • • • • • • • • • • • • • • • • • • • • • • • • • • • • • • • • • • • • • • • •
40
INSTRUCTION MANUAL • MODEL FM POWER SUPPLY
Page 42

COUPLING FORCE MEASUREMENT (Model 1098 only)
To measure the actual hor n coupling force, turn the head down key switch
clockwise.Then, as the head is descending, press the F TRIGGER key and
keep it depressed until the horn contacts the parts.
The coupling force will be displayed on the LCD screen as a percentage of
the maximum available force.(100% = 50 Psig = 245 Ibs. =1,090 Newtons)
Release the head advance control(s) to terminate measurement.
Because of the characteristics of the piezoelectric load cell, the display will be
accurate only if the temperature remains constant and the period of
measurement does not exceed 30 seconds. If a 30 second duration is
exceeded, release the head advance control and repeat the procedure abo ve .
CLEAR PARAMETERS
To cancel all variable parameters and release keypad security, press the
INFO and F TRIGGER keys simultaneously when “SONICS & MATERIALS”
appears on the LCD screen at start-up.The power supply will return to normal
Force Trigger Operation with Delay Triggering mode.
All keypad LED’s will light up and stay illuminated until the INFO and F
TRIGGER keys are released and the unit is turned Off.
• • • • • • • • • • • • • • • • • • • • • • • • • • • • • • • • • • • • • • • • • • • • • • • • • • • • • • • • • • • • • • • • • • • • • • • • • • • • • • • • • • • • • • • • • • • • • • • • • • • • • • • • • • • •
INSTRUCTION MANUAL • MODEL FM POWER SUPPLY
41
The F TRIGGER key must
be depressed before the
horn makes contact or an
invalid force measurement,
or the value “0%,” will be
displayed.
Page 43

• • • • • • • • • • • • • • • • • • • • • • • • • • • • • • • • • • • • • • • • • • • • • • • • • • • • • • • • • • • • • • • • • • • • • • • • • • • • • • • • • • • • • • • • • • • • • • • • • • • • • • • • • • • •
42
INSTRUCTION MANUAL • MODEL FM POWER SUPPLY
SYSTEM STATUS TESTS
SYSTEM STATUS TESTS AND MISCELLANEOUS
FUNCTIONS
FUNCTION
DISPLAY KEY OPERATION DISPLAY
BEFORE SEQUENCE AFTER
Input Test
CRT Monitor/Printer
Test
Cancel Parameters
Program V ersion
Designation
Cancel Number
of Welds
Cancel Number
of Rejects
Select Time Axis
Length (power curve)
Set Plot Length
ex: 500 ms.
Enter Plot Length
Advance Head For
Set-Up
Force Measurement
READY
READY
GRAPH-TIME-AXIS: 02
READY
* * PRINTER TEST * *
SONICS AND MATERIALS
ABCDEFGhIJKLMNoP
* * * * OFF * * * *
* * * ADJUST * * *
TRIGGER TEST = 15%
TEST
ENTER
5
CE
INFO
INFO
INFO INFO
INFO
WELD CYCLES = 100
DELETE = CE?
F
TRIG
GER
REJECTS = 5
READY
READY
AUTO
+
SONICS AND MATERIALS INFO PRT
+
SONICS AND MATERIALS
+
SONICS AND MATERIALS
V2.6 845-19 1500W
TEST
REF
+
Typical
Display
CE
WELD CYCLES = 100
DELETE = CE?
REJECTS = 5
DELETE = CE?
CE
INFO
CE
READY
REJECTS = 5
DELETE = CE?
GRAPH-TIME-AXIS: 02
GRAPH-TIME-AXIS: 05
GRAPH-TIME-AXIS: 05
INFOINFO INFO
CE
Depress Head
Advance Control
* * * ADJUST * * *
F
TRIG
GER
INPUT TEST
Page 44

• • • • • • • • • • • • • • • • • • • • • • • • • • • • • • • • • • • • • • • • • • • • • • • • • • • • • • • • • • • • • • • • • • • • • • • • • • • • • • • • • • • • • • • • • • • • • • • • • • • • • • • • • • • •
INSTRUCTION MANUAL • MODEL FM POWER SUPPLY
43
OVERLOAD PROTECTION
The overload protection circuit will terminate sonics when the system is
operated under adverse conditions, i.e., improper tuning, excessive power
supply loading, loose or failed horn or booster, thereby protecting the power
supply and other system components.When an overload condition exists, the
RESET button will illuminate and remain lit until the button is pressed
(regardless of whether the condition is corrected or not). If a repeated
overload condition exists, resolve the problem before a failure of the power
supply occurs.
If an overload condition exists, try the following:
—decrease horn force
—decrease amplitude (change booster or decrease output control)
—decrease downspeed
—check for loose or broken studs
—check the coupling surfaces between horn/booster and booster/converter
—check for cracked horn or booster
—check to see if the load meter exceeds 100% during weld process (if so, a
higher powered unit is needed)
If you cannot remedy the situation, contact Sonics’ Service Department at
1-800-745-1105.
NOTE: System will still
cycle even though the
power supply is in
overload condition, but
sonics will not be
delivered.
Page 45

• • • • • • • • • • • • • • • • • • • • • • • • • • • • • • • • • • • • • • • • • • • • • • • • • • • • • • • • • • • • • • • • • • • • • • • • • • • • • • • • • • • • • • • • • • • • • • • • • • • • • • • • • • • •
44
INSTRUCTION MANUAL • MODEL FM POWER SUPPLY
MAINTENANCE
GENERAL
1. Always make sure the power supply has adequate ventilation by keeping
sufficient space around the assembly.
2. Periodically check the ventilation grilles and clean as necessary.
REPAIRS / SERVICE
If problems are encountered, contact our Service Department at 1-800-745-
1105.
It is suggested that a system in need of repair be sent back to the factory with
a written description per taining to the nature of the problem.
Always contact the factory for return authorization before shipping any
instrument. Include date of purchase, model number, and serial number. For
units not covered by the warranty, a purchase order should be forwarded to
avoid unnecessary delay. Care should be exercised to provide adequate
packing to insure against possible damage in shipment. The system should
be sent with all transportation charges prepaid and return method of shipment
indicated.
NOTE: If packing unit
for return shipment,
DO NOT use
styrofoam “peanuts.”
Page 46

• • • • • • • • • • • • • • • • • • • • • • • • • • • • • • • • • • • • • • • • • • • • • • • • • • • • • • • • • • • • • • • • • • • • • • • • • • • • • • • • • • • • • • • • • • • • • • • • • • • • • • • • • • • •
INSTRUCTION MANUAL • MODEL FM POWER SUPPLY
45
WARRANTY
Sonics & Materials, Inc., hereinafter referred to as “Sonics,” warrants its
products for a period of one year from the date of shipment against defect in
material and workmanship under normal installation, use, and maintenance
as described in the operating instructions which accompany such equipment.
During the warranty period, “Sonics” will, at its option, as the exclusive
remedy, either repair or replace without charge for material and labor, the
part(s) which prove upon our examination to be defective, provided the
defective unit is returned to us properly packed with all transportation charges
prepaid.
LIMITATION OF WARRANTY
This warranty is in lieu of any other warranties, either express, implied, or
statutory. “Sonics” neither assumes nor authorizes any person to assume for
it any other obligation or liability in connection with the sale of its products.
“Sonics” hereby disclaims any warranty or merchantability or fitness for a
particular purpose.No person or company is authorized to change, modify , or
amend the terms of this warranty in any manner or fashion whatsoe v er.Under
no circumstances shall “Sonics” be liable to the purchaser or to any other
person for any incidental or consequential damages or loss of profit or product
resulting from any malfunction or failure of this “Sonics” product.
This warranty does not apply to equipment which has been subject to
unauthorized repair, misuse, abuse, negligence or accident. Equipment
which, in our judgment, shows evidence of having been used in violation of
operating instructions, or which has had the serial number altered or
removed, will be ineligible for service under this warranty.
No liability is assumed for expenses or damages resulting from interruptions
in operation of the product or damages to material in process.
“Sonics” equipment is designed for maximum operator safety and
incorporates built-in safety devices .Any modifications to these safety features
will void the warranty. “Sonics” assumes no responsibilities for consequential
damages incurred due to modifications to the said equipment.
“Sonics” reserves the right not to warrant horns of unusual or experimental
design which in our judgment are more likely to fail in use.
Data supplied in the instruction manual has been verified and validated and
is believed adequate for the intended use of the equipment. If the equipment
or procedures are used for purposes other than those specified herein,
confirmation of their validity and suitability should be obtained in writing from
“Sonics.”
Page 47
• • • • • • • • • • • • • • • • • • • • • • • • • • • • • • • • • • • • • • • • • • • • • • • • • • • • • • • • • • • • • • • • • • • • • • • • • • • • • • • • • • • • • • • • • • • • • • • • • • • • • • • • • • • •
46
INSTRUCTION MANUAL • MODEL FM POWER SUPPLY
SWITCH POS. OFF POS. ON DEFAULT
DIP-1 Force Trigger Mode (FT) T1 (ZT) Model OFF
DIP-2 Weld by Timer 2 (T2) Weld by Energy (EN) OFF
DIP-3 Normal mode without Rotar y table Rotary table mode to DIP-4 OFF
DIP-4 Rotar y table mode with pulse control Rotary table mode with continuous OFF
control and ackn.
DIP-5 Timer 4 adds to hold time Timer 4 as shake off pulse OFF
during press return
DIP-6 N/A N/A OFF
DIP-7 Printer output 1,200 Baud Printer output 4,800 Baud ON
DIP-8 Alternate start method Two-hand star t only ON
APPENDIX
DIP SWITCH DEFAULT SETTINGS
Refer to p.18 for function abbreviations.
Page 48
• • • • • • • • • • • • • • • • • • • • • • • • • • • • • • • • • • • • • • • • • • • • • • • • • • • • • • • • • • • • • • • • • • • • • • • • • • • • • • • • • • • • • • • • • • • • • • • • • • • • • • • • • • • •
INSTRUCTION MANUAL • MODEL FM POWER SUPPLY
47
Wiring Actuation I/O I/O I/O I/O I/O
Model Diagram J2 J3 J6 J7 J8 J9
FM E-2952 E-2703 E-2480 E-2483 E-3014 E-3013 E-2902
Drawing Description
E-2480 Printer Cable
E-2483 Rotary Table Cable
E-2703 Impulse Actuation Cable
E-2902 Good Part/Bad Part and Abor t Cable. Special*
E-2952 FM Wiring Diagram
E-3013 F-Series General I/O
E-3014 F-Series General I/O
APPENDIX
EQUIPMENT WIRING DIAGRAMS AND ASSOCIATED I/O
*Pin 3 has 24 vdc for the reject output and pin 2 has a switched return on standard machines.Good part/Bad part and
Abort is a special modification.
Page 49
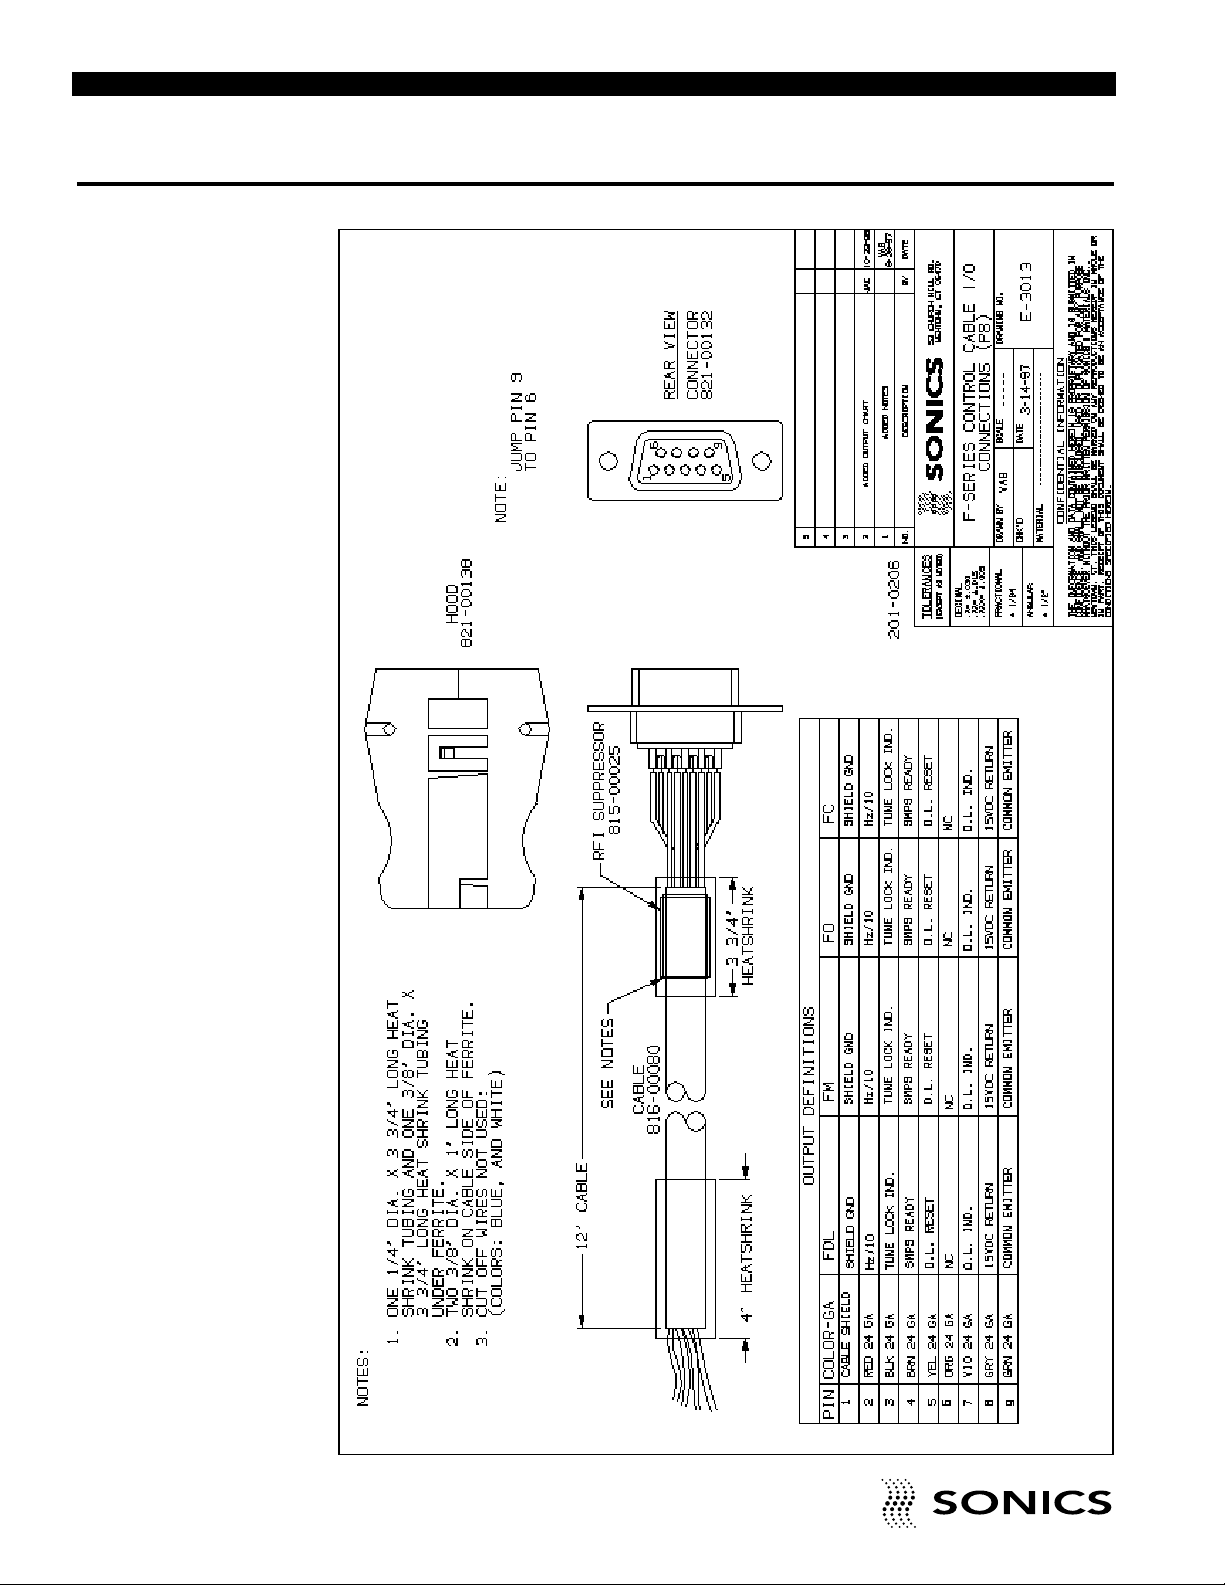
• • • • • • • • • • • • • • • • • • • • • • • • • • • • • • • • • • • • • • • • • • • • • • • • • • • • • • • • • • • • • • • • • • • • • • • • • • • • • • • • • • • • • • • • • • • • • • • • • • • • • • • • • • • •
48
INSTRUCTION MANUAL • MODEL FM POWER SUPPLY
APPENDIX
Page 50
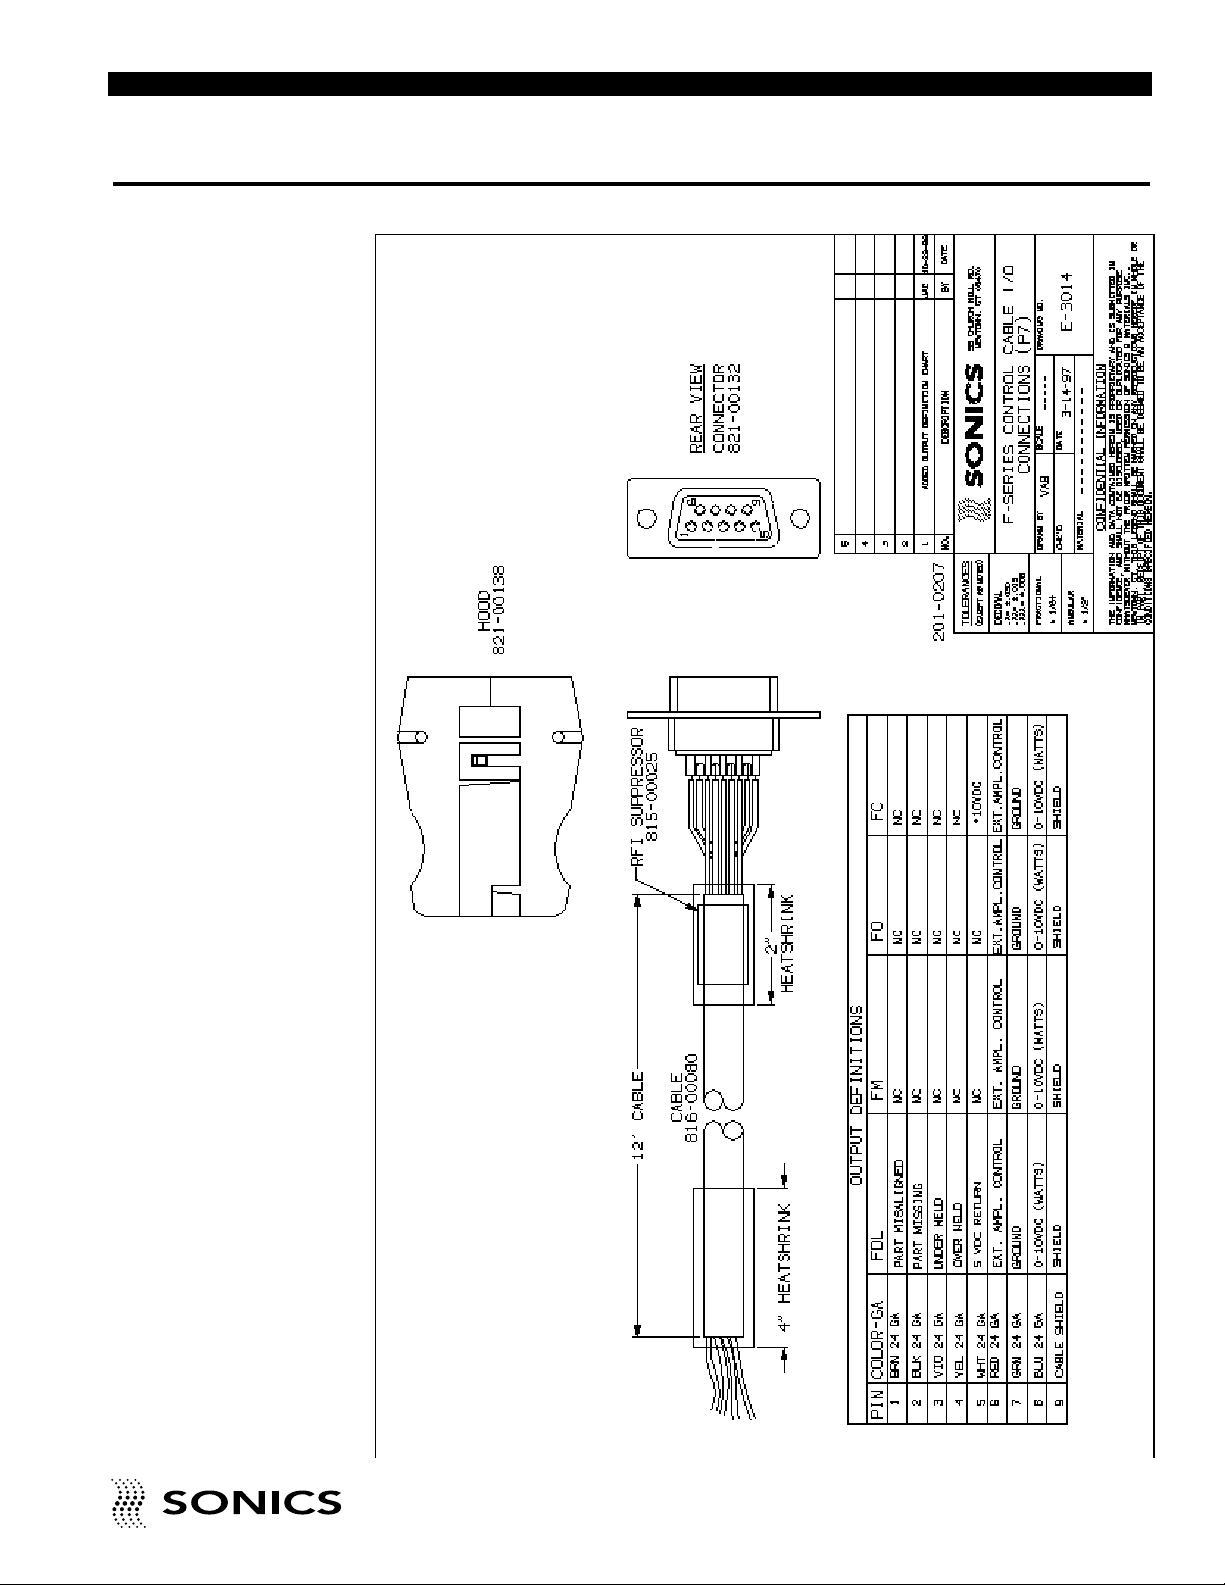
• • • • • • • • • • • • • • • • • • • • • • • • • • • • • • • • • • • • • • • • • • • • • • • • • • • • • • • • • • • • • • • • • • • • • • • • • • • • • • • • • • • • • • • • • • • • • • • • • • • • • • • • • • • •
INSTRUCTION MANUAL • MODEL FM POWER SUPPLY
49
APPENDIX
Page 51
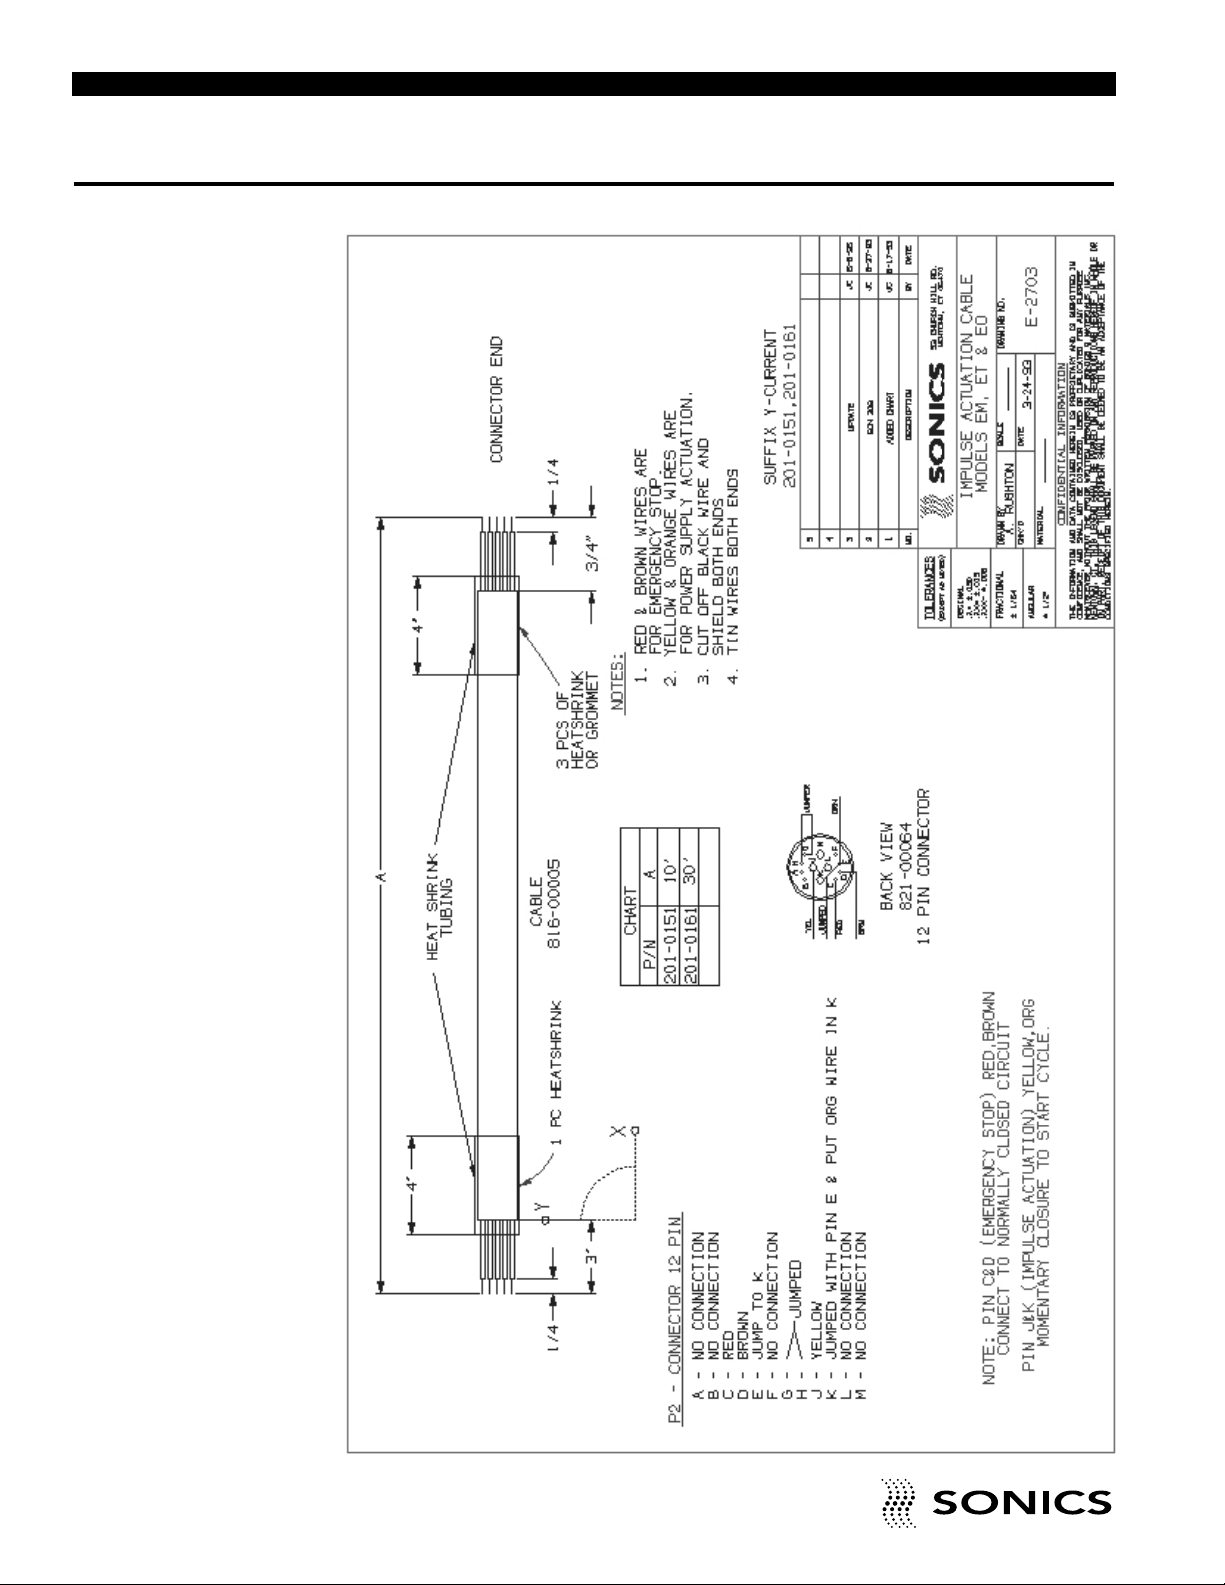
• • • • • • • • • • • • • • • • • • • • • • • • • • • • • • • • • • • • • • • • • • • • • • • • • • • • • • • • • • • • • • • • • • • • • • • • • • • • • • • • • • • • • • • • • • • • • • • • • • • • • • • • • • • •
50
INSTRUCTION MANUAL • MODEL FM POWER SUPPLY
APPENDIX
Page 52
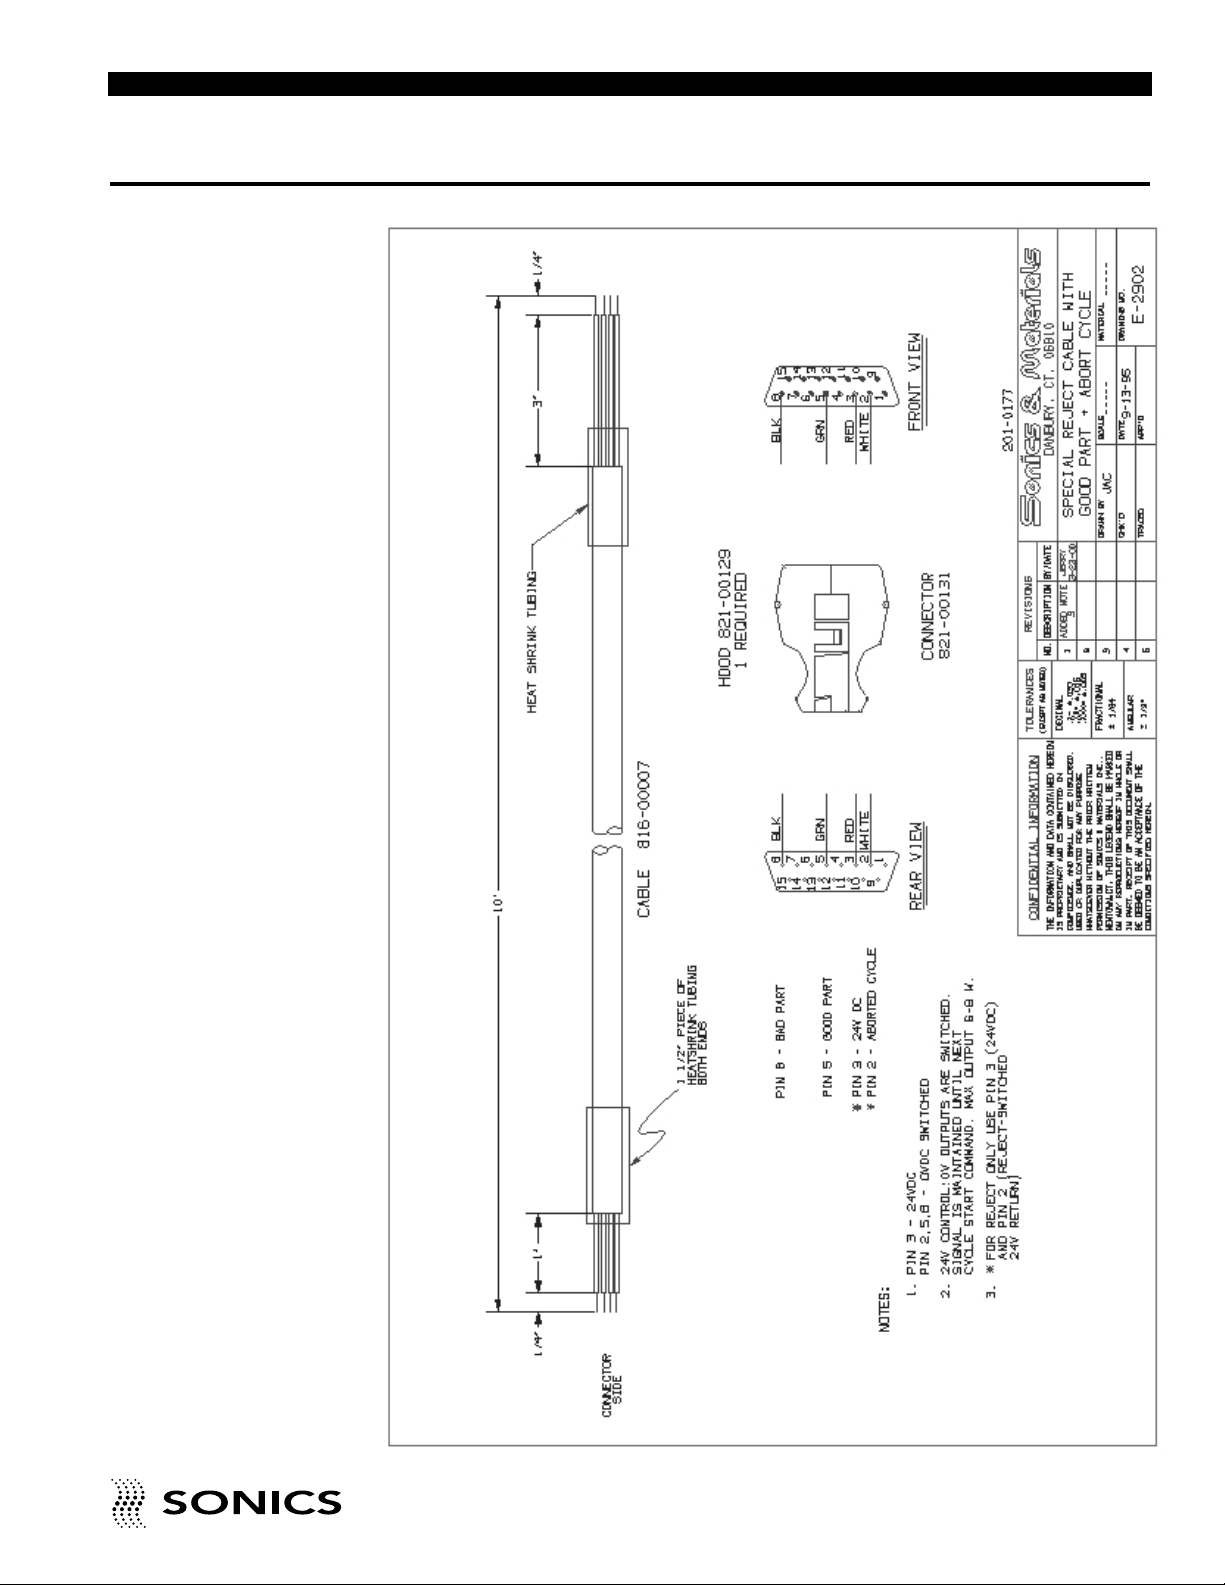
• • • • • • • • • • • • • • • • • • • • • • • • • • • • • • • • • • • • • • • • • • • • • • • • • • • • • • • • • • • • • • • • • • • • • • • • • • • • • • • • • • • • • • • • • • • • • • • • • • • • • • • • • • • •
INSTRUCTION MANUAL • MODEL FM POWER SUPPLY
51
APPENDIX
Page 53
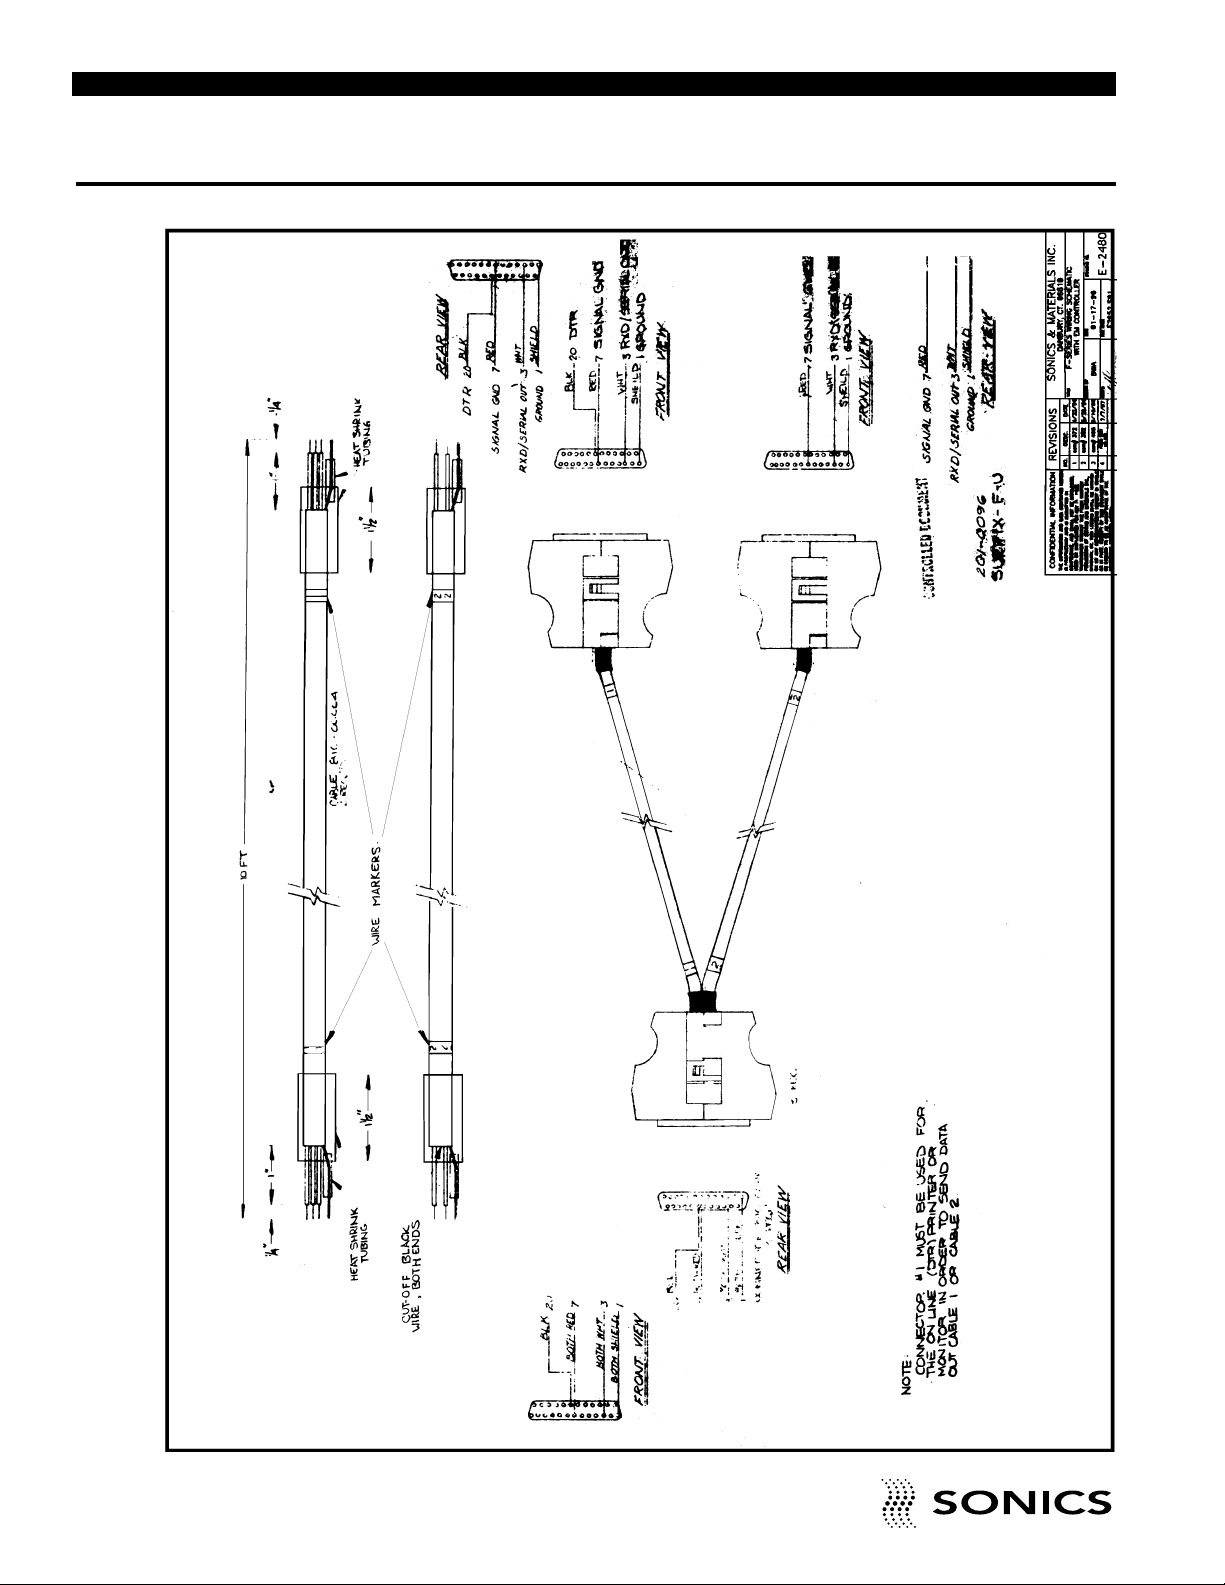
• • • • • • • • • • • • • • • • • • • • • • • • • • • • • • • • • • • • • • • • • • • • • • • • • • • • • • • • • • • • • • • • • • • • • • • • • • • • • • • • • • • • • • • • • • • • • • • • • • • • • • • • • • • •
52
INSTRUCTION MANUAL • MODEL FM POWER SUPPLY
APPENDIX
Page 54
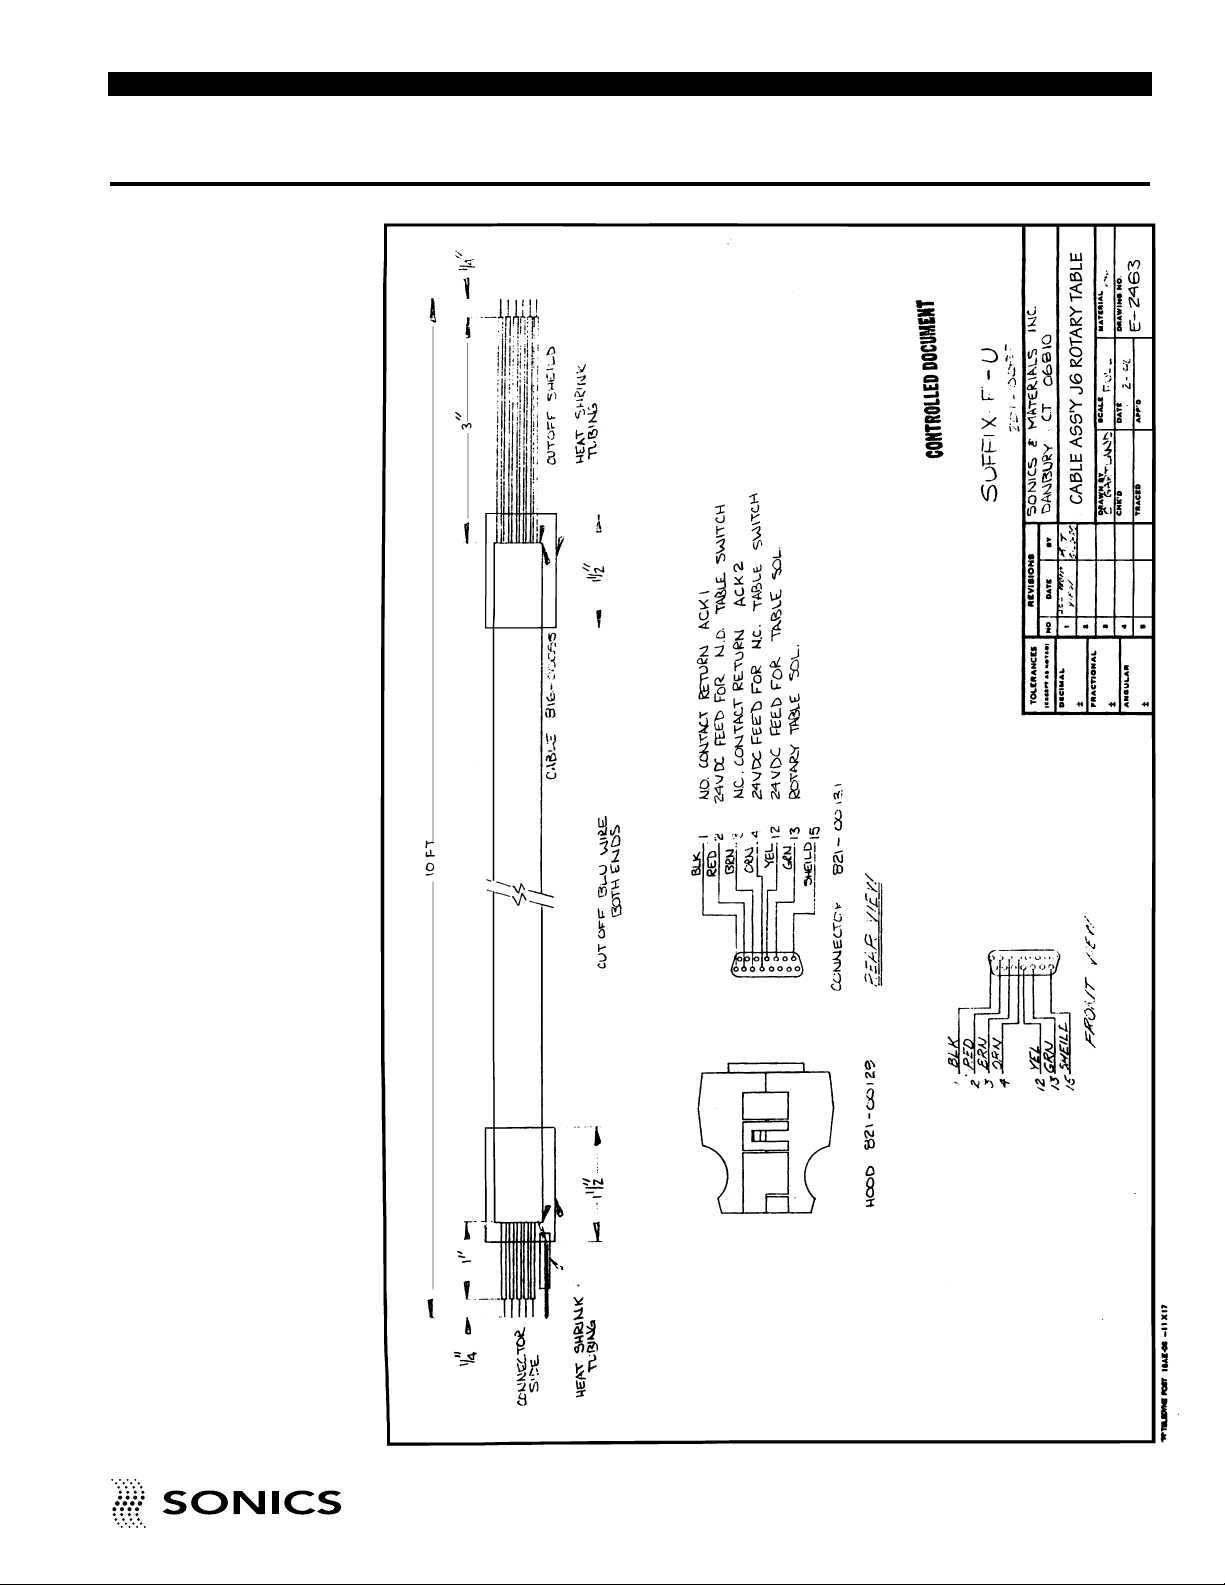
• • • • • • • • • • • • • • • • • • • • • • • • • • • • • • • • • • • • • • • • • • • • • • • • • • • • • • • • • • • • • • • • • • • • • • • • • • • • • • • • • • • • • • • • • • • • • • • • • • • • • • • • • • • •
INSTRUCTION MANUAL • MODEL FM POWER SUPPLY
53
APPENDIX
Page 55

Sonics & Materials, Inc.
Corporate Headquarters European Office
53 Church Hill Road • Newtown, CT 06470 USA 22 ch du Vernay • CH - 1196 Gland, Switzerland
203.270.4600 • 800.745.1105 • 203.270.4610 fax (41) (0) 22/364 1520 • (41) (0) 22/364 2161 fax
 Loading...