

Page 1
Manuel d’utilisation p.25
CL Bluehook
User Guide p.1
Benutzerhandbuch S. 43
CL BLUEHOOK
Page 2

CONTENTS CONTENTS
CONTENTS 1
INTRODUCTION 3
Unpacking 4
DESCRIPTION 5
General Description 5
LED Description 6
INSTALLATION 7
Setting Up 7
USING THE CL BLUEHOOK 11
Wearing the CL Bluehook 11
Turn the CL Bluehook On 11
Turn the CL Bluehook Off 12
Volume Adjustment 12
Receiving a Call 12
Ending a Call 13
Reject an Incoming Call 13
Making a Call 14
Last Number Redial 14
Voice Transfer 15
SPECIFICATIONS 16
TROUBLESHOUTING 17
SAFETY INFORMATION 19
GUARANTEE 20
RECYCLING DIRECTIVES 23
1 2
Page 3

INTRODUCTION INTRODUCTION
Congratulations on purchasing your Geemarc CL Bluehook.
The CL Bluehook uses Bluetooth technology. Bluetooth is an
industrial specification for wireless personal area networks
(PANs). Bluetooth uses short-range radio links (up to 10
metres) in the 2.4gHz Instrumentation Scientific and Medical
(ISM) "free band". Hence, this short-range radio technology
allows the wireless networking of devices such as a mobile
phone and the CL Bluehook.
The CL Bluehook is a standard headset in accordance with
Bluetooth 2.0+EDR.
Note: users of digital hearing aids must make sure their
aids have been programmed for use with the ‘T’ setting.
This product is ONLY suitable for use when using a
hearing aid with a T-coil.
It is important that you read the instructions below in order to
use your Geemarc CL BLuehook its full potential. Keep this
user guide in a safe place for future reference.
Unpacking
When unpacking the CL Bluehook, you should find the following
in the box:
• 1 CL Bluehook
• 1 set of Charging Units
For product support and help visit our website at
3
www.geemarc.com
Telephone 01707 384438
Or fax 01707 372529
4
Page 4
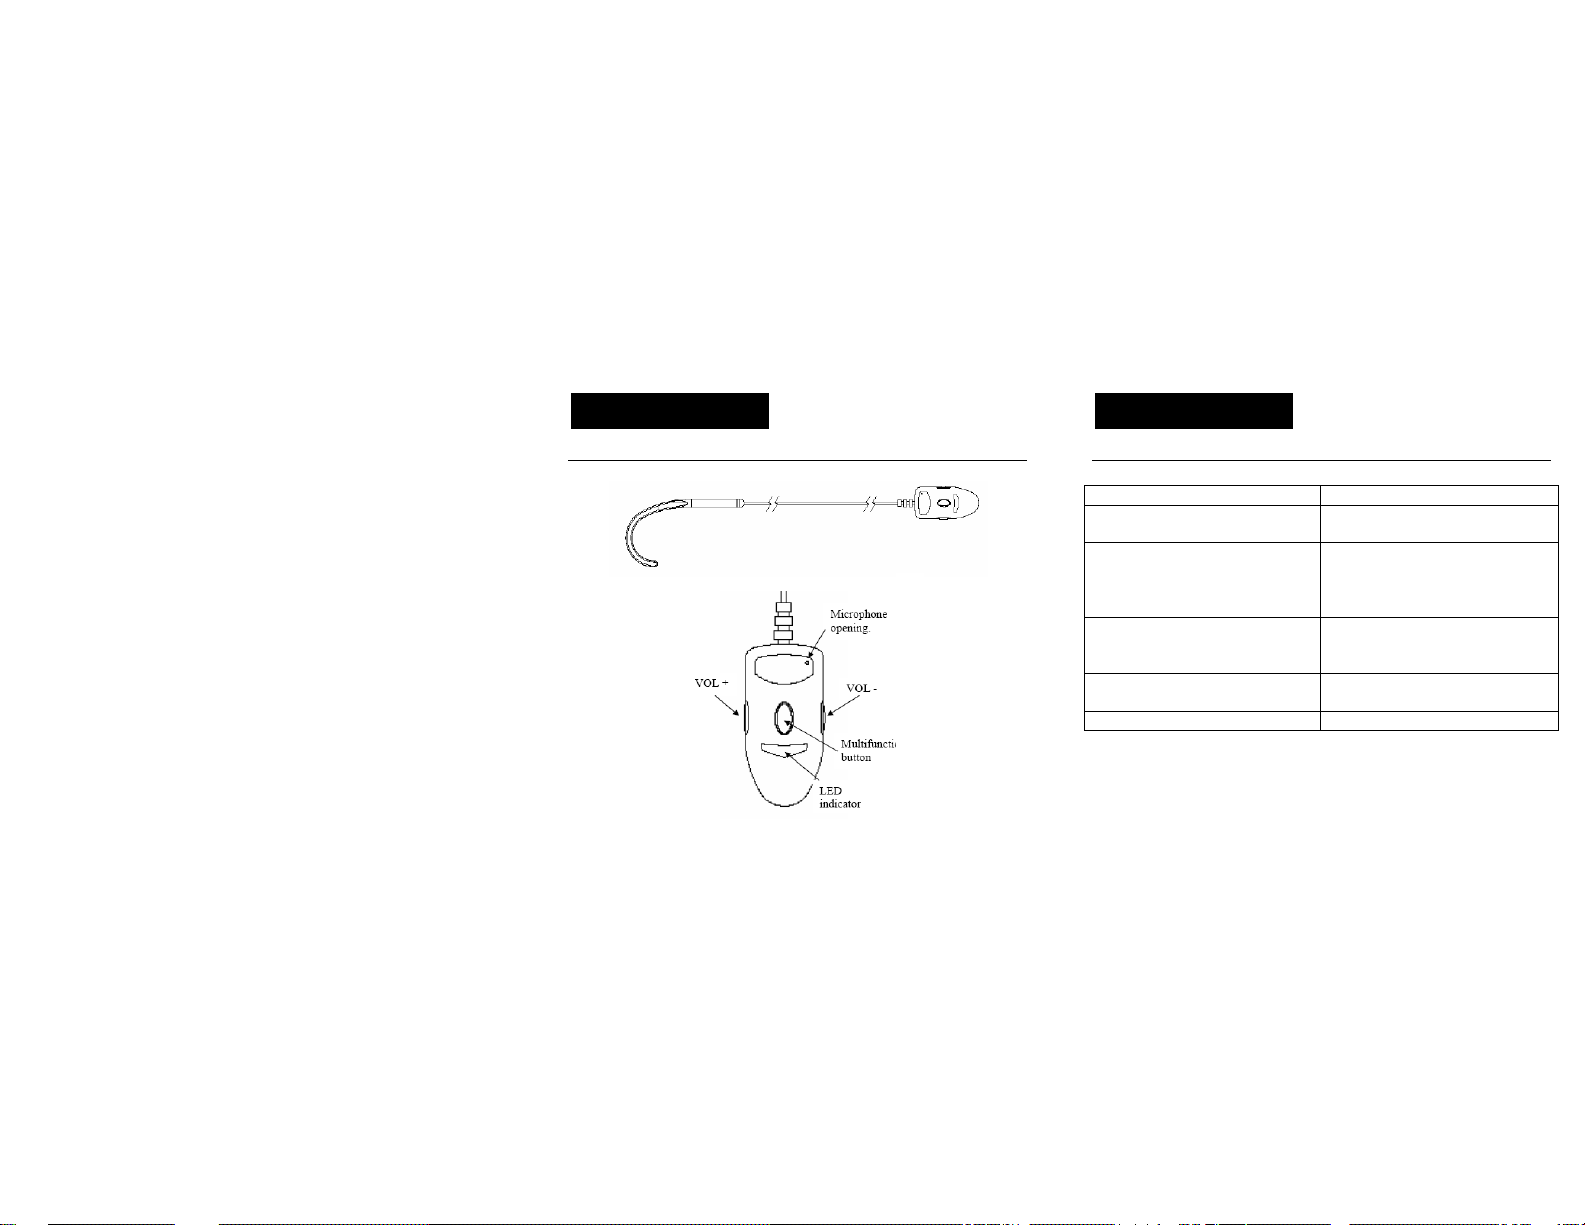
DESCRIPTION DESCRIPTION
General Description
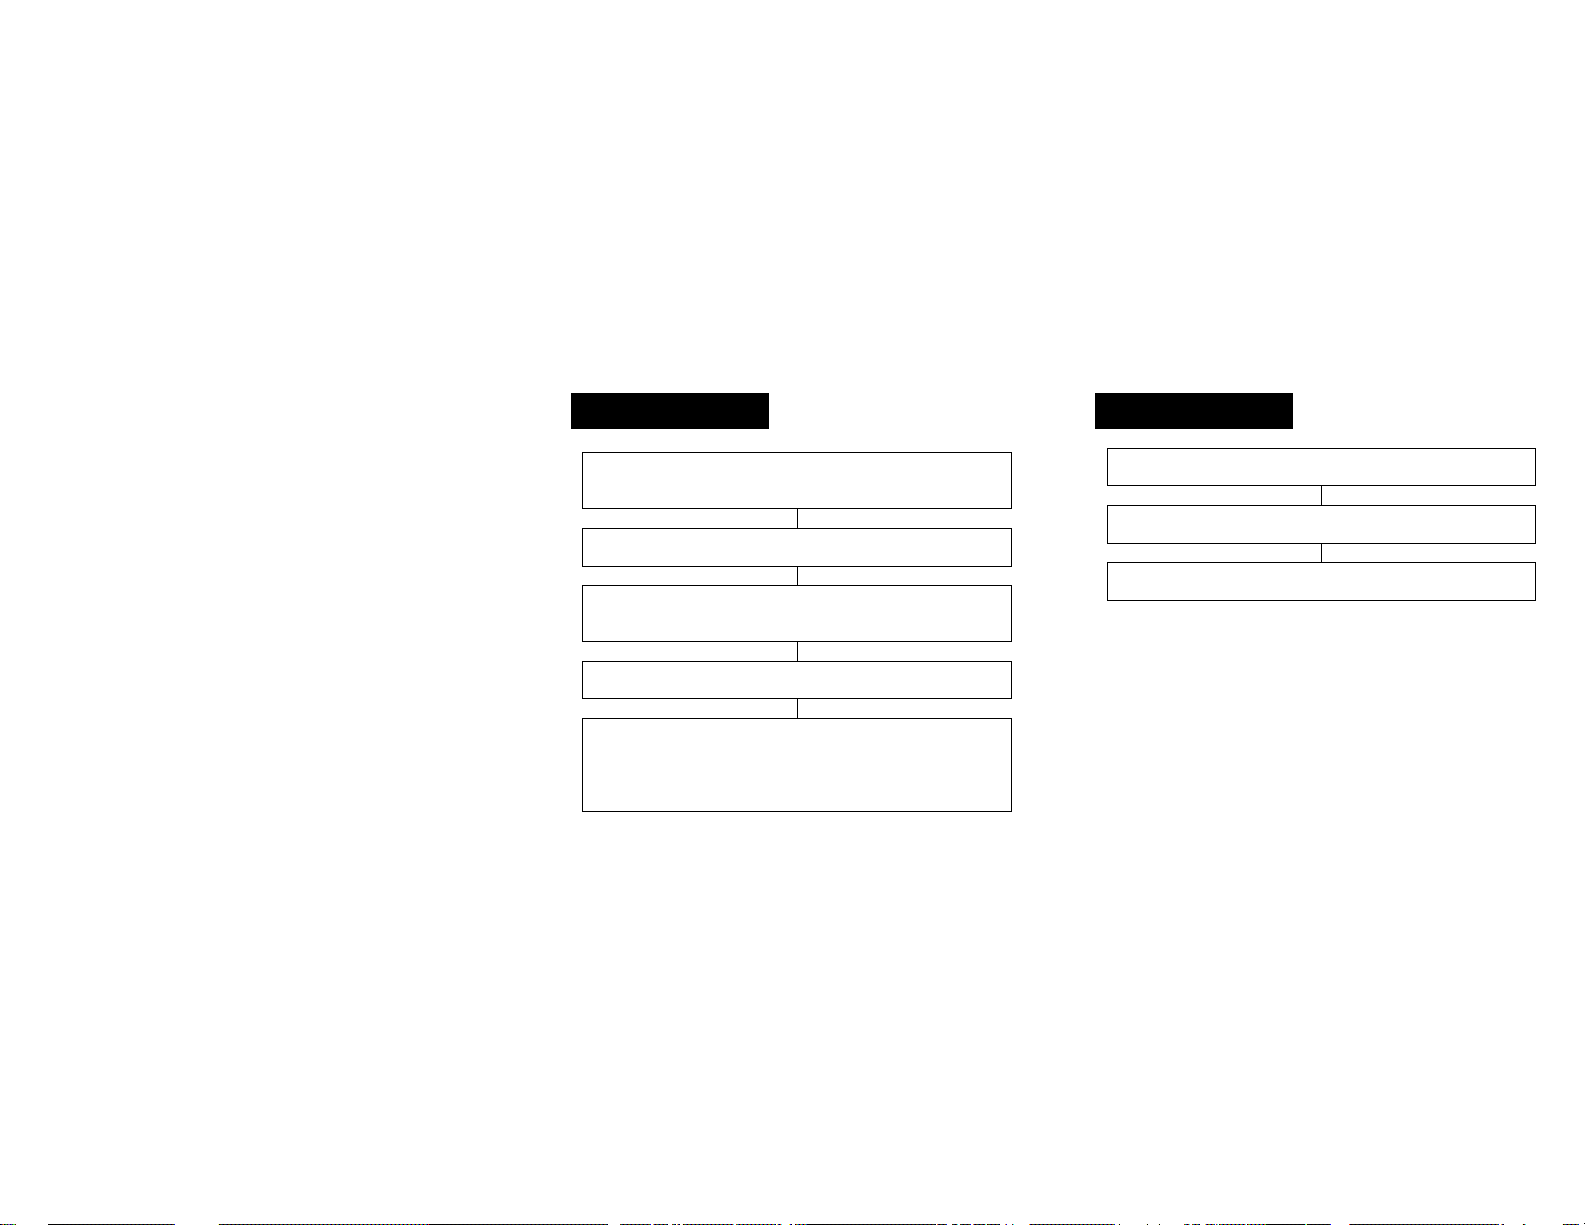
LED Description
LED flashes blue once every
3 seconds
LED flashes blue and red
alternately
LED CL Bluehook Mode
After LED flashes blue and
red alternately, it flashes blue
8 times
LED flashes blue once every
2 seconds
LED flashes red CL Bluehook battery is low
5 6
CL Bluehook is on but ready
for use
CL Bluehook in waiting mode.
Ready to be paired with
another Bluetooth device
(mobile phone)
Connection between CL
Bluehook and mobile phone is
being established
CL Bluehook is paired and
ready to be used
Page 5

INSTALLATION INSTALLATION
Setting Up
Before you use the CL Bluehook, please take the following two
steps:
1.Charge the battery
2. Pair the CL Bluehook with your mobile phone
(Bluetooth connectivity feature turned on)
If the RED LED flashes whilst in standby, the CL Bluehook
needs recharging.
Note :
Do not overcharge the CL Bluehook. Once the RED LED is no
longer displayed, remove the charging unit.
Do not use the CL Bluehook whilst it is being charged.
Battery Charging
Plug the battery charger into the mains supply and switch the
supply on. Connect the other end of the battery charger into the
charging port on the right hand side of the clip.
During charging a RED LED will be displayed. When charging
is complete, the LED will be turned off.
When using the CL Bluehook for the first time,
charging could take up to three hours. Please wait
until the RED LED is turned off.
CL Bluehook Pairing
In order to use the CL Bluehook, it must be paired with a mobile
phone.
Pairing is the process of associating Bluetooth devices with
each other. When two devices are paired, they establish a
permanent, secure link with each other. Paired devices remain
paired even when one of the devices is off or the service
connection is stopped/interrupted. Therefore, pairing only
needs to take place once.
7 8
Page 6
INSTALLATION
Set the CL Bluehook to power-on mode (press
Multifunction Speaking Button for 5 seconds until the
BLUE LED flashes every 3 seconds)
Ensure there are no other Bluetooth devices in pairing
mode within a 10 metre range of the CL Bluehook
Press and hold VOL+ and VOL-simultaneously for about
3 seconds until the BLUE and RED LED flash alternately.
You are now in waiting mode.
Select Bluetooth for the connectivity type on your mobile
phone
Set the mobile phone to search and add a new paired
device (see mobile phone user guide).
N.B. When the mobile phone finds the CL Bluehook, it
may appear as BT019 in the list of paired devices – this
is ok.
9
INSTALLATION
On finding the the CL Bluehook, the mobile phone will
ask for an input ID code. Enter the PIN code of “0000”
The BLUE LED should now flash slowly to indicate
The CL Bluehook is now in standby and can be used as
successful pairing.
required.
10
Page 7

USING THE CL BLUEHOOK USING THE CL BLUEHOOK
Wearing the CL Bluehook
You can clip the CL Bluehook onto your clothes and place the
hook over your left or right ear.
Note: users of digital hearing aids must make sure their
aids have been programmed for use with the ‘T’ setting.
Turn the CL Bluehook On
Press Multifunction Speaking Button for 5 seconds until the
BLUE LED flashes. If there is a successful connection, the
BLUE LED will start to flash once every 3 seconds.
If you have already paired the CL Bluehook with a mobile
phone, the CL Bluehook and the mobile phone will connect
automatically when the CL Bluehook is turned on.
11 12
Turn the CL Bluehook Off
Press Multifunction Speaking Button for 3 seconds until the
RED LED flashes. A voice or a beep will be heard from the CL
Bluehook. Release the Multifunction Speaking Button and the
CL Bluehhok will now turn off.
Volume Adjustment
To increase the volume during a call, press VOL+ gently. To
decrease the volume during a call, press VOL- gently.
Receiving a Call
Press Multifunction Speaking Button to receive the call. The
microphone on the clip will pick up your voice and you will hear
everything via the ear hook.
Page 8

USING THE CL BLUEHOOK USING THE CL BLUEHOOK
Ending a Call
When your conversation has ended, press Multifunction
Speaking Button to end the call.
Reject an Incoming Call
Press VOL-for 3 seconds until you hear a beep, then release
the button. This will reject an incoming call.
13
Making a Call
Dial the telephone number on the mobile phone as normal.
Once the call is placed, the CL
conversation.
You can make a call via voice command if your mobile phone
supports this function. The mobile phone must be set to hands
free mode. Press and hold VOL+ until you hear a prompt. Say
the required name or telephone number loudly and clearly
towards the microphone on the CL Bluehook. The required
telephone number will be dialed automatically.
Bluehook will carry the
Last Number Redial
Press VOL-for 3 seconds until you hear a beep, then release
the button to perform last telephone number redial.
Note: This can only take place when in standby mode.
This function only works correctly if the mobile phone has been
set to hands free mode.
14
Page 9

USING THE CL BLUEHOOK SPECIFICATION
Voice Transfer
If you need to make a call using the mobile phone without the
CL Bluehook, press VOL+ for 3 seconds.
Working Frequency 2.4-2.4835 gHz ISM Band
Bluetooth Criterion V2.0+EDR
RF Output Power -6 - +4dBm (class2)
RF Sensitivity Superior -75dBm
Effective Distance maximum without obstacle 10m
Working Indication 2 LED (blue and red)
Battery Rechargeable Lithium Polymer
Battery
Speaking Time Approx 12 hours
Standby time Approx 250 hours
Charging Time Approx 2-3 hours
Audio Output Power (RL=32ohm) 2.5mw
Working temperature -10C - +45C
Storage Temperature -20C - +65C
Size 54 x 25.5 x 24 mm
Weight 22.5g
15 16
Page 10

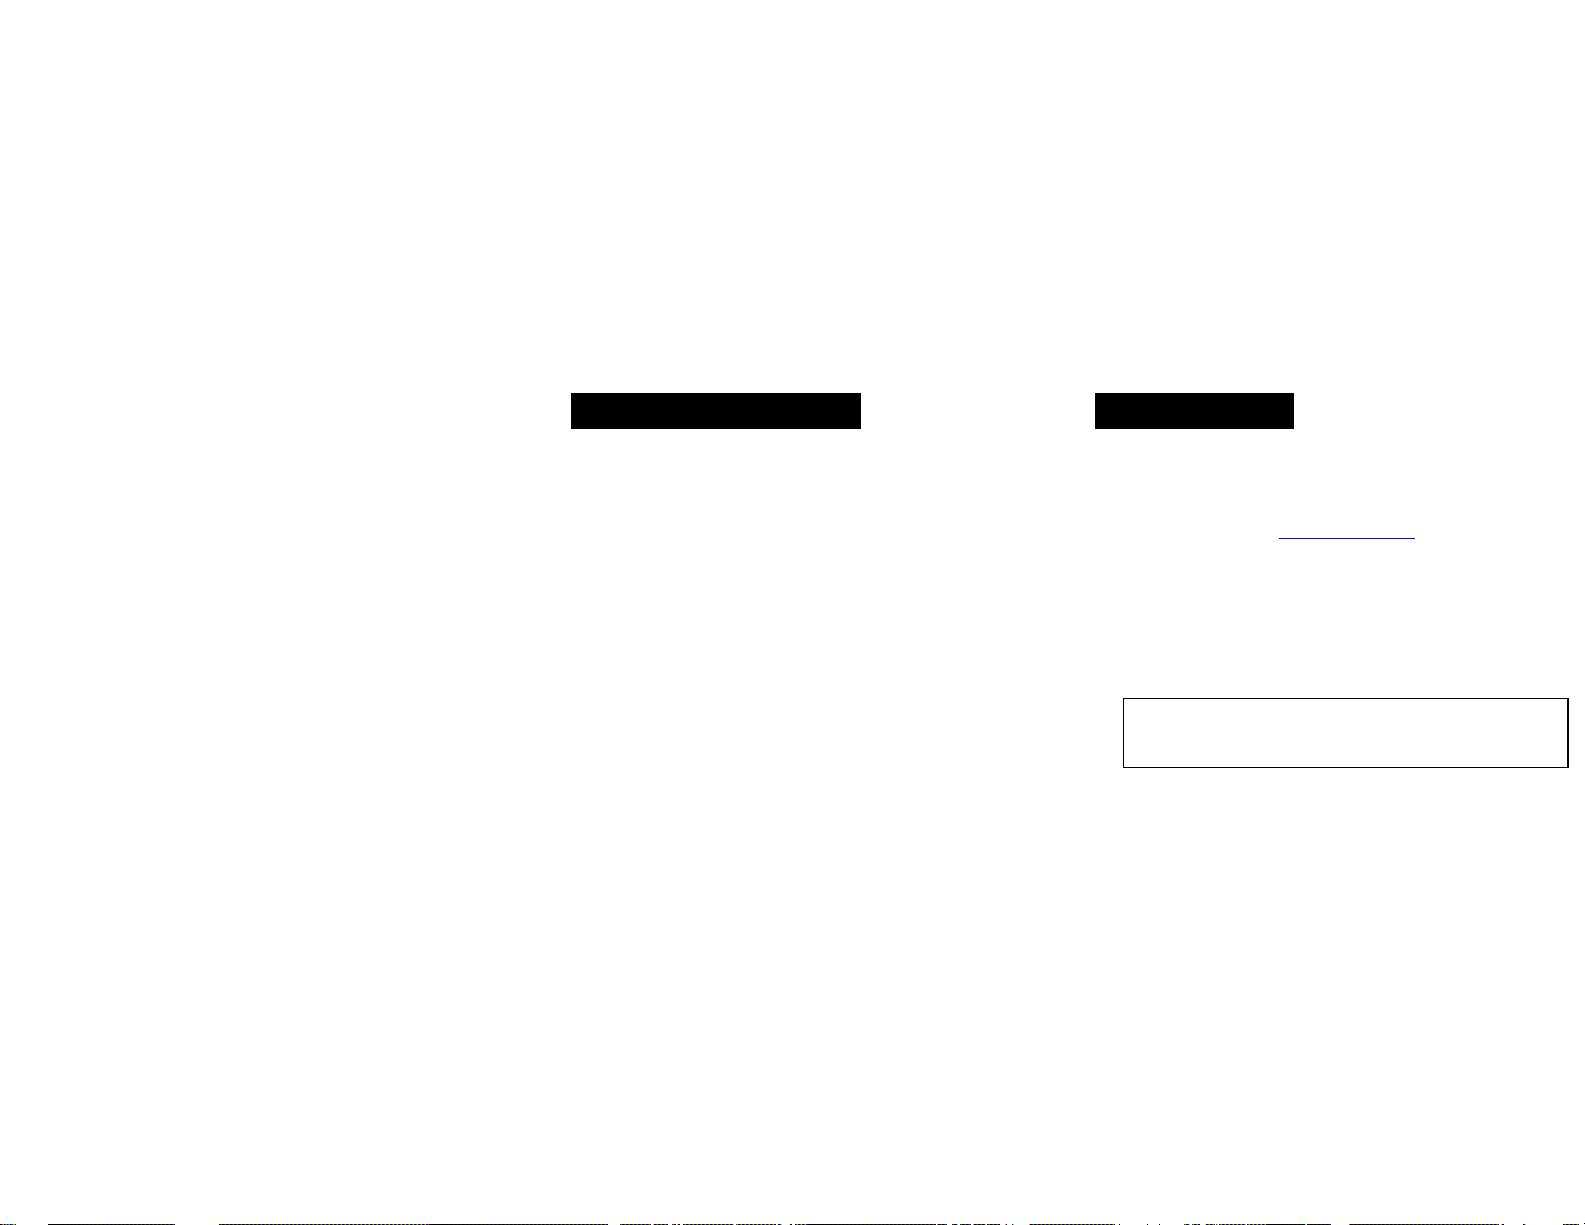
TROUBLESHOOTING TROUBLESHOOTING
The RED LED is flashing
• Charge the battery
The CL Bluehook keeps on switching off
• Make sure that the batteries are fully charged
• Make sure you are within a 10 meter range of the
mobile phone
Experiencing interference when using the CL
Bluehook
• Wireless telephones and wireless networks may
cause interference. Keep as far away as possible
from these devices whilst using the CL Bluehook.
Mobile phone has shown connection with the
CL Bluehook, however, the CL Bluehook
appears not to work
• Ensure the mobile phone is switched to Bluetooth
setting
• Switch the CL Bluehook off and then on again
• Delete the existing Bluetooth connection, then pair
the devices together again
• Make sure you are within 10 meter range of the
mobile phone
• Make sure that the batteries are fully charged
17 18
Page 11
SAFETY INFORMATION GUARANTEE
General
Do not open the unit. Contact the helpline for all repairs.
Cleaning
Clean the CL Bluehook with a soft cloth. Never use polishes or
cleaning agents - they could damage the finish or the electrics
inside.
Environmental
Do not expose to direct sunlight.
Always ensure there is a free flow of air over the surfaces of the
CL Bluehook.
Do not place any part of your product in water and do not use it
in damp or humid conditions e.g. bathrooms.
Do not expose your product to fire or other hazardous
conditions.
From the moment your Geemarc product is purchased,
Geemarc guarantee it for the period of one year. During this
time, all repairs or replacements (at our discretion) are free of
charge. Should you experience a problem then contact our help
line or visit our website at www.geemarc.com
does not cover accidents, negligence or breakages to any
parts. The product must not be tampered with or taken apart by
anyone who is not an authorized Geemarc representative. The
Geemarc guarantee in no way limits your legal rights.
IMPORTANT: YOUR RECEIPT IS PART OF YOUR
GUARANTEE AND MUST BE RETAINED AND PRODUCED
IN THE EVENT OF A WARRANTY CLAIM.
Please note: The guarantee applies to
19 20
. The guarantee
the United Kingdom only
Page 12
GUARANTEE GUARANTEE
DECLARATION: Geemarc Telecom SA hereby declares
that this product is in compliance with the essential
requirements and other relevant provisions of the Radio
and Telecommunications Terminal Equipment Directive
1999/5/EEC and in particular article 3 section 1a, 1b and
section 3.
Electrical connection: The apparatus is designed to operate
from a 230V 50Hz supply only. (Classified as ‘hazardous
voltage’ according to EN60950 standard). The apparatus does
not incorporate an integral power on/off switch. To disconnect
the power, either switch off supply at the mains power socket or
unplug the AC adaptor. When installing the apparatus, ensure
that the mains power socket is readily accessible.
Telephone connection: Voltages present on the
telecommunication network are classified TNV-3
(Telecommunication Network Voltage) according to the
EN60950 standard.
21 22
Page 13

RECYCLING DIRECTIVES
The WEEE (Waste Electrical and Electronic Equipment) has
been put in place for the products at the end of their useful life
are recycled in the best way.
When this product is finished with, please do not put it in your
domestic waste bin.
Please use one of the following disposal options:
- Remove the batteries and deposit them in an appropriate
WEEE skip. Deposit the product in an appropriate WEEE skip.
- Or, hand the old product to the retailer. If you purchase a new
one, they should accept it.
Thus if you respect these instructions you ensure human health
and environmental protection.
23
For product support and help visit our website at
www.geemarc.com
Telephone 01707 384438
Or fax 01707 372529
24
Page 14

X
X
INDE
INTRODUCTION 27
DESCRIPTION 29
Description générale 29
Indicateur lumineux 30
INSTALLATION 31
UTILISATION 35
Porter le CL Bluehook 35
Mettre en service le CL Bluehook 35
Arrêter le CL Bluehook 36
Réglage du volume 36
Recevoir un appel 36
Mettre fin à un appel 37
Rejeter un appel 37
25 26
INDE
Appeler 37
Rappel du dernier numéro composé 38
SPECIFICATION 39
INFORMATIONS GENERALES 40
Page 15

INTRODUCTION INTRODUCTION
Le CL Bluehook utilise la technologie Bluetooth (spécification
industrielle pour les réseaux sans fil domestiques). Le système
Bluetooth utilise la fréquence radio 2.4gHz et fonctionne jusqu’à
10m. Cette technologie sans fil permet de communiquer entre
votre CL Bluehook et votre téléphone sans fil par exemple.
Le CL Bluehook est compatible avec Bluetooth 2.0+EDR.
Le CL Bluehook est compatible avec les appareils auditifs.
Contenu de la boîte
Lors du déballage, vous trouverez les éléments suivants:
• 1 CL Bluehook
• 1 jeux de chargeurs
Note: les utilisateurs de prothèse auditive doivent
basculer cette dernière en mode « T ».
Ce produit peut UNIQUEMENT être utilisé par des
personnes possédant une aide auditive avec bobine T.
Avant utilisation, lisez attentivement les instructions contenues
dans ce manuel.
Pour tout renseignement technique ou commande, visitez notre
27
site web: www.geemarc.com
Tél. service après vente:
03 28 58 75 99
28
Page 16

DESCRIPTION DESCRIPTION
Description générale
29
Indicateur lumineux
Indicateur lumineux Etat du CL Bluehook
S’allume une fois toutes les 3
secondes
S’allume alternativement bleu
et rouge
Clignote bleu 8 fois après
s’être allumé alternativement
bleu et rouge
S’allume une fois toutes les 2
secondes
S’allume rouge (clignote) La batterie est faible
Le CL Bluehook est en
marche
Le CL Bluehook est en veille
et prêt à être associé à un
autre système Bluetooth
(téléphone mobile par
exemple)
La connexion entre le CL
Bluehook et votre téléphone
mobile est établie
Le CL Bluehook est prêt à
être utilisé
30
Page 17

INSTALLATION INSTALLATION
Installation
Avant toute utilisation, assurez-vous que:
1. La batterie soit chargée
2. Le CL Bluehook soit associé à votre téléphone
mobile
Note :
Ne pas surcharger votre CL Bluehook.
Lorsque le voyant rouge ne clignote plus, vous pouvez arrêter
la charge.
Ne pas utliser le CL Bluehook pendant la charge.
Associer le CL Bluehook
Charger la batterie
Branchez l’adaptateur (secteur+câble USB ou voiture).
Branchez la fiche dans le CL Bluehook.
Durant la charge, l’indicateur lumineux est rouge.
Lorsque le CL Bluehook est chargé, l’indicateur lumineux
s’éteint.
La première charge peut prendre trois heures.
Si le voyant rouge clignote en veille, cela signifie
que votre CL Bluehook doit être rechargé.
Pour permettre au CL Bluehook de fonctionner, il faut l’associer
à votre téléphone mobile.
L’association des deux systèmes se fait par Bluetooth. Un lien
permanent et sécurisé est établi lorsque les deux systèmes
sont associés. Les systèmes restent associés même lorsqu’ils
sont éteints ou déconnectés.
31 32
Page 18

INSTALLATION
Mettez en service le CL Bluehook (appuyez sur la touche
multifonction pendant 5 secondes, l’indicateur lumineux
bleu s’allume une fois toutes les 3 secondes).
Assurez-vous qu’il n’y a pas d’autre système Bluetooth
dans un rayon inférieur à 10 mètres autour de votre
pendant 3 secondes. L’indicateur lumineux s’allume
alternativement bleu et rouge. Le CL Bluehook est en
Lorsque votre mobile trouve le CL Bluehook, BT019
CL Bluehook.
Appuyez et maintenez les touches VOL+ et VOL-
veille.
Sélectionnez le mode Bluetooth sur votre mobile.
Associez votre mobile au CL Bluehook.
apparaît dans la liste des systèmes détectés.
33 34
INSTALLATION
Lorsque le CL Bluehook est détecté, saisissez le code
L’indicateur lumineux clignote bleu lorsque le lien entre le
Le CL Bluehook est maintenant en veille et prêt à être
PIN « 0000 » sur votre mobile.
CL Bluehook et le mobile est établi.
utilisé.
Page 19

UTILISATION UTILISATION
Porter le CL Bluehook
Vous pouvez porter le CL Bluehook sur vous. Utilisez la pince
pour l’attacher à un vêtement. Placez le crochet à votre oreille
droite ou gauche.
Note: les utilisateurs de prothèse auditive doivent
basculer cette dernière en mode « T ».
Mettre en service le CL Bluehook
Appuyez sur la touche multifonction pendant 5 secondes
jusqu’à ce que l’indicateur bleu commence à clignoter. Si la
connexion est établie, l’indicateur bleu clignote une fois toutes
les 3 secondes.
Si le CL Bluehook est déjà associé à un téléphone mobile, ils
se connectent automatiquement ensemble lorsque vous
allumez le CL Bluehook.
35
Arrêter le CL Bluehook
Appuyez et maintenez la touche multifonction pendant 3
secondes jusqu’à ce que l’indicateur lumineux rouge clignote.
Un « bip » ou une voix est émis. Relâchez la touche
multifonction, le CL Bluehook est arrêté.
Vous pouvez alors utiliser votre mobile sans votre CL Bluehook.
Réglage du volume
Appuyez sur la touche VOL+ ou VOL- pour augmenter ou
diminuer le volume.
Recevoir un appel
Appuyez sur la touche multifonction pour recevoir un appel. Un
microphone situé en haut de la pince capte votre voix et vous
entendez votre interlocuteur par l’intermédiaire du crochet placé
sur votre aide auditive.
36
Page 20

UTILISATION
Mettre fin à un appel
Pour mettre fin à la communication, appuyez sur la touche
multifonction.
Rejeter un appel
Appuyez sur la touche VOL- pendant 3 secondes jusqu’à
entendre un bip, relachez la touche.
L’appel est rejeté.
Appeler
Composez le numéro de téléphone à l’aide de votre mobile.
La conversation engagée, le CL Bluehook transmet le signal à
votre aide auditive.
Si vous possédez un mobile à reconnaissance vocale, votre CL
Bluehook peut être utilisé pour composer un numéro dans ce
mode (le mobile doit être en position mains libres). Appuyez et
maintenez la touche VOL+ jusqu’à entendre un bip.
UTILISATION
Enoncez clairement le nom ou le numéro de téléphone près du
microphone de votre CL Bluehook. Le numéro est composé
automatiquement. Reportez vous à la notice de votre téléphone
mobile pour plus de détails.
Rappel du dernier numéro composé
Appuyez sur la touche VOL- pendant 3 secondes jusqu’à
entendre un bip, relachez la touche, le dernier numéro
composé est rappelé automatiquement.
Note: cette fonction est utilisable uniquement en mode veille et
avec votre téléphone est en mode mains libres.
37
38
Page 21

SPECIFICATIONS
Fréquence de fonctionnement 2.4-2.4835 gHz ISM Bande
Version Bluetooth V2.0+EDR
Puissance émise -6 - +4dBm (classe2)
Sensibilité -75dBm
Portée 10m sans obstacle
Indicateur lumineux bleu et rouge
Batterie Lithium rechargeable
Autonomie en communication 12 heures environ
Autonomie en veille 250 heures environ
Temps de charge 2 à 3 heures
Sortie audio (RL=32ohms) 2.5mW
Température d’utilisation -10C / +45C
Température de stockage -20C / +65C
Dimensions 54 x 25.5 x 24 mm
Poids 22.5g
INFORMATIONS GENERALES
Garanti :
Cet appareil est garanti 1 an pièces et main-d'oeuvre. La date
d'achat figurant sur le ticket de caisse fera foi. Cette garantie
s'exerce sous réserve d'une utilisation normale de l'appareil.
Les dommages occasionnés par les surtensions électriques, la
foudre ou par un choc sur l'appareil ne peuvent en aucun cas
être couverts par la garantie. En cas de problème fonctionnel,
rapprochez-vous de votre point de vente.
Recommandations pour le recyclage :
La directive DEEE (Déchet d'Equipement Electrique et
Electronique) a été mise en place dans le but d'assurer la
collecte sélective en vue de la valorisation, réutilisation ou
recyclage des produits en fin de vie.
Lorsque votre produit ne fonctionne plus, ne le jetez pas dans
votre poubelle ménagère.
Suivez l'une des procédures décrites ci-dessous:
- Déposez les batteries et votre ancien appareil dans un lieu de
collecte approprié.
39
40
Page 22

INFORMATIONS GENERALES
- Ou rapportez votre ancien appareil au magasin ou vous
acheterez le nouveau. Il devra l'accepter.
Ainsi, si vous respectez ces instructions vous faites un geste
pour l'environnement et vous contribuez à la préservation des
ressources naturelles et à la protection de la santé humaine.
Raccordement électrique :
L’appareil est prévu pour fonctionner avec un adaptateur
secteur 230V 50Hz. (Tension classée “dangereuse” selon les
critères de la norme EN60950). Par précaution en cas de
danger, le bloc alimentation secteur sert de dispositif de
sectionnement de l’alimentation 230V. Il doit être installé à
proximité du matériel et être aisément accessible.
41
Ce produit respecte les exigences de compatibilité électromagnétique et de sécurité électrique demandées par la
directive européenne RTTE.
Pour tout renseignement technique ou commande, visitez notre
site web: www.geemarc.com
Tél. service après vente:
03 28 58 75 99
Page 23

INHALT INHALT
INHALT 43
EINLEITUNG 45
Auspacken 46
BESCHREIBUNG 47
Allgemeine Beschreibung 47
Beschreibung LED-Lämpchen 48
EINRICHTUNG 49
Aufbau 49
VERWENDUNG DES CL BLUEHOOK 53
Tragen des CL Bluehook 53
Das CL Bluehook einschalten 53
Das CL Bluehook ausschalten 54
Lautstärkeregelung 54
Einen Anruf annehmen 54
Ein Telefonat beenden 55
Einen eingehenden Anruf ablehnen 55
Einen Anruf tätigen 56
Wahlwiederholung 56
Sprachübertragung 57
TECHNISCHE BESCHREIBUNG 58
PROBLEMBEHANDLUNG 59
SICHERHEITSHINWEIS 61
GEWÄHRLEISTUNG 62
RECYCLING-RICHTLINIEN 65
44 43
Page 24

EINLEITUNG EINLEITUNG
Wir gratulieren Ihnen zum Kauf Ihres Geemarc CL Bluehook.
Das CL Bluehook nutzt die Bluetooth-Technologie. Bluetooth
ist eine industrielle Anwendung für drahtlose persönliche
Netzwerke (wireless personal area networks - PANs).
Bluetooth nutzt Funkverbindungen mit kurzer Reichweite (bis zu
10 Metern) im “freien Band” 2,4 gHz ISM (Instrumentation
Scientific and Medical). Demzufolge ermöglicht die
Funktechnologie mit kurzer Reichweite kabellose Konnektivität
von Geräten wie Mobiltelefonen und dem CL Bluehook.
Das CL Bluehook ist ein Standard-Headset gemäß Bluetooth
2.0+EDR.
Hinweis: Wenn Sie ein digitales Hörgerät tragen, muss
dieses auf die T-Position eingestellt werden. Dieses
Produkt ist NUR mit Hörgeräten kompatibel, die mit TCoil ausgerüstet sind.
Es ist wichtig, dass Sie untenstehende Anweisungen lesen, um
die Funktionen Ihres Geemarc CL Bluehook voll nutzen zu
können. Bewahren Sie dieses Benutzerhandbuch an einem
sicheren Ort auf, damit Sie später darauf zurückgreifen können.
Auspacken
Wenn Sie die Verpackung Ihres CL Bluehook öffnen, finden Sie
Folgendes vor:
• 1 CL Bluehook
• 1 Set zum Aufladen
Für Produktsupport und Hilfe besuchen Sie bitte unsere
45
Website unter www.geemarc.com
Telefon 069-96 21 76 35
oder Fax 069-96 21 76 20
Page 25

BESCHREIBUNG BESCHREIBUNG
Allgemeine Beschreibung
Beschreibung LED-Lämpchen
LED blinkt alle drei
Sekunden blau auf.
LED blinkt abwechselnd
blau und rot auf.
LED CL Bluehook Modus
Nachdem das LED
abwechselnd blau und rot
aufgeblinkt hat, blinkt es
achtmal blau auf.
Das LED-Lämpchen blinkt
alle zwei Sekunden blau
auf.
Das LED-Lämpchen blinkt
rot auf.
47
CL Bluehook ist angeschaltet,
aber nicht funktionsbereit.
Das CL Bluehook befindet
sich im Wartemodus. Bereit
für die Paarung mit einem
anderen Bluetooth-Gerät
(Mobiltelefon).
Es wird eine Verbindung
zwischen dem CL Bluehook
und dem Handy hergestellt
Das CL Bluehook ist gepaart
und funktionsbereit.
Der Akkustand des CL
Bluehook ist niedrig.
Page 26

EINRICHTUNG
Aufbau
Bevor Sie das CL Bluehook verwenden, führen Sie bitte die
beiden folgenden Schritte durch:
1. Laden Sie den Akku auf
2. Paaren Sie das CL Bluehook mit Ihrem Handy (die
Bluetooth Konnektivitätsfunktion ist aktiviert).
Akku aufladen
Stecken Sie den Stecker des Akkuladegerätes in eine
Steckdose und schalten sie die Stromversorgung an. Verbinden
Sie das andere Ende des Akkuladegerätes mit dem
Ladeanschluss an der rechten Seite des Clips.
Während dem Aufladen leuchtet das ROTE LED-Lämpchen
auf. Wenn der Ladevorgang abgeschlossen ist, schaltet sich
das LED-Lämpchen aus.
Wenn Sie das CL Bluehook zum ersten Mal verwenden, kann
der Ladevorgang bis zu drei Stunden dauern. Bitte warten Sie,
bis sich das ROTE LED-Lämpchen ausschaltet.
49
EINRICHTUNG
Wenn das ROTE LED-Lämpchen im Stand-By-Modus aufblinkt,
muss das CL Bluehook weiter aufgeladen werden.
Hinweis:
Überladen Sie das CL Bluehook nicht. Sobald das LEDLämpchen nicht mehr rot aufleuchtet, entfernen Sie das
Ladegerät.
Verwenden Sie das CL Bluehook nicht, während es aufgeladen
wird.
CL Bluehook Paarung
Um das CL Bluehook verwenden zu können, muss es mit
einem Handy gepaart werden.
Paarung (Pairing) ist der Vorgang des Verbindens von
Bluetooth-Geräten untereinander. Wenn zwei Geräte gepaart
werden, bauen Sie miteinander eine dauerhafte, sichere
Verbindung auf. Gepaarte Geräte bleiben gepaart, auch wenn
eines der Geräte ausgeschaltet ist oder die Dienste-Verbindung
gestoppt/unterbrochen wurde. Daher muss das Paaren nur
einmal erfolgen.
50
6
Page 27

EINRICHTUNG
Stellen Sie das CL Bluehook an (drücken und halten
Sie die Multifunktionstaste fünf Sekunden lang, bis
das BLAUE LED-Lämpchen alle drei Sekunden
Stellen Sie sicher, dass sich während dem
Paarungsvorgang in einem Umkreis von 10 Metern
keine weiteren Bluetooth-Geräte befinden.
Drücken und halten Sie für etwa drei Sekunden
gleichzeitig VOL+ and VOL-, bis das BLAUE und das
ROTE LED-Lämpchen abwechselnd aufleuchten.
Sie befinden sich jetzt im Wartemodus.
Wählen Sie auf Ihrem Mobiltelefon den
Verbindungstyp Bluetooth aus.
Stellen Sie Ihr Handy so ein, das ein neues zu
paarendes Gerät gesucht und hinzugefügt wird
(siehe Benutzerhandbuch Ihres Handys).
N.B. Wenn das Handy das CL Bluehook ortet, kann
dies in der Liste der zu paarenden Geräte als BT019
erscheinen – dies ist in Ordnung.
aufblinkt).
51
EINRICHTUNG
Sobald das CL Bluehook gefunden wurde, verlangt
Ihr Handy eventuell die Eingabe eines ID-Codes.
Jetzt sollte das BLAUE LED-Lämpchen langsam
aufblinken, um das erfolgreiche Paaren anzuzeigen.
Geben Sie den Pin-Code “0000” ein.
Das CL Bluehook befindet sich jetzt in Standby-
Position und kann verwendet werden.
52
Page 28

V
V
ERWENDUNG DES CL BLUEHOOK
Tragen des CL Bluehook
Sie können das CL Bluehook mit dem Clip an Ihrer Kleidung
befestigen und den Bügel über Ihr linkes oder rechtes Ohr
legen.
Hinweis: Wenn Sie ein Hörgerät tragen, muss dieses
auf die T-Position eingestellt werden.
ERWENDEN DES CL BLUEHOOK
Das CL Bluehook ausschalten
Drücken und halten Sie die Multifunktions-Sprechtaste drei
Sekunden lang, bis das ROTE LED-Lämpchen aufblinkt. Aus
dem CL Bluehook ertönt eine Stimme oder ein Tonsignal.
Lassen Sie die Multifunktions-Sprechtaste los, dann schaltet
sich das CL Bluehook aus.
Das CL Bluehook anschalten
Drücken und halten Sie die Multifunktions-Sprechtaste fünf
Sekunden lang, bis das BLAUE LED-Lämpchen aufblinkt.
Wenn eine erfolgreiche Verbindung hergestellt wurde, beginnt
das BLAUE LED-Lämpchen alle drei Sekunden aufzublinken.
Wenn Sie das CL Bluehook bereits mit einem Handy gepaart
haben, werden das CL Bluehook und das Handy automatisch
verbunden, sobald das CL Bluehook angestellt ist.
53
Lautstärkeregelung
Um während eines Telefonats die Lautstärke zu erhöhen,
drücken Sie leicht auf VOL+. Um während eines Telefonats die
Lautstärke zu verringern, drücken Sie leicht auf VOL-.
Einen Anruf annehmen
Um einen Anruf anzunehmen, drücken Sie die Multifunktionstaste. Das Mikrofon am Clip empfängt Ihre Stimme und Sie
hören Ihren Gesprächspartner über den Ohrbügel.
54
Page 29

V
V
ERWENDEN DES CL BLUEHOOK
Ein Telefonat beenden
Wenn das Telefonat beendet ist, drücken Sie die
Multifunktionstaste, um den Anruf zu beenden.
Einen eingehenden Anruf ablehnen
Drücken und halten Sie drei Sekunden lang die Taste VOL-, bis
Sie ein Tonsignal hören und lassen Sie dann die Taste los.
Damit wird ein eingehendes Telefonat abgelehnt.
55
ERWENDEN DES CL BLUEHOOK
Einen Anruf tätigen
Wählen Sie auf Ihrem Handy wie gewohnt die Telefonnummer.
Sobald die telefonische Verbindung hergestellt ist, wird das CL
Bluehook die Unterhaltung übertragen.
Sie können, wenn Ihr Handy diese Funktion unterstützt, einen
Anruf über einen Sprachbefehl tätigen. Das Handy muss auf
den Freisprechmodus eingestellt werden. Drücken und halten
Sie VOL+, bis Sie eine Aufforderung hören. Sprechen Sie den
gewünschten Namen und die zugehörige Telefonnummer laut
und klar in das Mikrofon des CL Bluehook. Die gewünschte
Telefonnummer wird automatisch gewählt.
Wahlwiederholung
Drücken und halten Sie drei Sekunden lang die Taste VOL-, bis
Sie ein Tonsignal hören und lassen Sie dann die Taste los, um
die zuletzt gewählte Rufnummer erneut zu wählen.
Hinweis: Dies kann nur im Standby-Modus erfolgen.
Diese Funktion kann nur dann korrekt genutzt werden, wenn
das Handy auf Freisprechmodus eingestellt wurde.
56
Page 30

V
ERWENDEN DES CL BLUEHOOK TECHNISCHE DATEN
Sprachübertragung
Wenn Sie über das Handy einen Anruf tätigen möchten, ohne
das CL Bluehook zu verwenden, drücken und halten Sie drei
Sekunden lang die Taste VOL+.
Arbeitsfrequenz 2,4-2,4835 gHz ISM Band
Bluetooth Version V2.0+EDR
RF Ausgangsleistung -6 - +4dBm (Klasse2)
Höchste RF-Empfindlichkeit -75dBm
Effektive Distanz ohne Hindernis maximal 10m
Funktionsanzeige 2 LED-Lämpchen (blau und rot)
Batterie Aufladb. Lithium Polymer Akku
Sprechzeit Etwa 12 Stunden
Standby-Zeit Etwa 250 Stunden
Ladezeit Etwa 2-3 Stunden
Audio-Ausgangsleistung (RL=32 Ohm) 2,5mw
Funktionstemperatur -10C - +45C
Aufbewahrungstemperatur -20C - +65C
Größe 54 x 25,5 x 24 mm
Gewicht 22,5g
57 58
Page 31

PROBLEMBEHANDLUNG PROBLEMBEHANDLUNG
Das ROTE LED-Lämpchen blinkt auf
• Laden Sie den Akku auf
Das CL Bluehook schaltet sich ständig aus
• Stellen Sie sicher, dass der Akku vollständig
aufgeladen ist
• Stellen Sie sicher, dass Sie sich in höchstens 10
Meter Entfernung vom Handy befinden.
Auftreten von Störgeräuschen bei Verwendung
des CL Bluehook
• Schnurlostelefone und Drahtlosnetzwerke können
Störungen verursachen. Halten Sie sich bei der
Verwendung des CL Bluehook so weit wie möglich
von solchen Geräten fern.
Auf dem Handy wird eine Verbindung zum CL
Bluehook angezeigt, das CL Bluehook scheint
jedoch nicht zu funktionieren
• Stellen Sie sicher, dass das Handy auf Bluetooth-
Funktion geschaltet ist
• Schalten Sie das CL Bluehook aus und dann wieder
an
• Löschen Sie die bestehende Bluetooth-Verbindung
und paaren Sie die Geräte erneut
• Stellen Sie sicher, dass Sie sich in höchstens 10
Meter Entfernung zum Handy befinden.
• Stellen Sie sicher, dass der Akku vollständig
aufgeladen ist.
59 60
Page 32

SICHERHEITSHINWEIS
Allgemeines
Öffnen Sie das Gerät nicht. Rufen Sie für Reparaturen die
Hotline an.
Reinigung
Reinigen Sie das CL Bluehook mit einem weichen Tuch.
Benutzen Sie nie Polier- oder Reinigungsmittel – diese könnten
die Oberfläche oder die Elektronik beschädigen.
Umgebung
Setzen Sie das Gerät keiner direkten Sonnenbestrahlung aus.
Stellen Sie stets sicher, dass über dem CL Bluehook
ausreichend Freiraum ist.
Bringen Sie keinen Teil des Produkts mit Wasser in Kontakt
und verwenden Sie das Produkt nicht in feuchter Umgebung,
wie in einem Badezimmer.
Setzen Sie das Produkt weder Feuer noch anderen
gefährlichen Bedingungen aus.
61
GARANTIE
Von dem Zeitpunkt an, an dem Sie Ihr Geemarc Produkt
erwerben, übernimmt Geemarc ein Jahr Garantie. Alle
Reparaturen und Ersatzteile (nach unserem Ermessen) sind
innerhalb dieser Zeit kostenfrei. Sollte ein Problem auftreten,
kontaktieren Sie bitte unsere Hotline oder besuchen Sie unsere
Website unter www.geemarc.com
durch Unfälle oder Fahrlässigkeit entstandene Schäden oder
Bruchschäden an allen Teilen. Das Produkt darf nur von
autorisierten Geemarc-Vertretern repariert werden. Die
Geemarc Garantie beschränkt in keinem Fall Ihre Rechte.
WICHTIG: IHR KASSENBON IST TEIL IHRER GARANTIE
UND MUSS IM FALL EINES GARANTIEANSPRUCHS
VORGELEGT WERDEN.
. Die Garantie umfasst keine
62
Page 33

GARANTIE GARANTIE
ERKLÄRUNG: Geemarc Telecom AG erklärt hiermit,
dass dieses Produkt gemäß den erforderlichen
Vorgaben und anderen wichtiger Bestimmungen der
Radio- und Telekommunikations-EndgeräteBestimmungen 1999/5/EEC und im Besonderen der
Artikel 3 Absatz 1a, 1b und Absatz 3 hergestellt wurde.
63 64
Telefonanschluss: Die Spannungen auf dem
Telekommunikationsnetz werden gemäß Standard EN60950
als TNV-3 (Netzspannung Telekommunikation) eingestuft.
Page 34

RECYCLING-RICHTLINIEN
Die WEEE-Richtlinie (Elektro- und Elektronikaltgeräte) wurde
aufgestellt, damit Altgeräte auf beste Art und Weise verwertet
werden.
Wenn dieses Produkt defekt ist, werfen Sie es bitte nicht in
Ihren Hausmüll.
Bitte nutzen Sie eine der folgenden Entsorgungsmöglichkeiten:
- Entfernen Sie die Batterien und entsorgen Sie diese in einen
geeigneten Rücknahmecontainer. Geben Sie das Produkt bei
einer geeigneten Altgerätesammelstelle ab.
- Oder geben Sie das alte Produkt dem Händler zurück. Bei
Kauf eines neuen Gerätes, sollte das alte Gerät angenommen
werden.
Wenn Sie sich an diese Anweisungen halten, stellen Sie den
Schutz der Gesundheit und Umwelt sicher.
65 66
Für Produktsupport und Hilfe besuchen Sie bitte unsere
Website unter www.geemarc.com
Telefon 069-96 21 76 35
oder Fax 069-96 21 76 20
UGCLBLUEHOOK_UK_F_GE ED.01
 Loading...