

Page 1
Page 2

CONTENTS
CONTENTS 2
DESCRIPTION 3
INTRODUCTION 6
Unpacking the Telephone 7
INSTALLATION 8
Location 8
Belt Clip Use 8
Setting Up 9
Battery Use 10
BASE SETTINGS 11
Base Ringer Volume 11
HANDSET SETTINGS 12
Handset Registration 12
Ringer Settings 12
Screen Contrast 12
Area Code 13
Timer Settings 13
Handset Shaker Settings 14
VOLUME AND TONE 15
Receiving Volume and
Tone Adjustment 15
PHONE BOOK 18
Create a Phone Book Entry 18
VIP and Reject Functions 19
Review Numbers and
Names in the Phone Book 19
Dialing Phone Book Entry 20
Modify a Phone Book Entry 20
Delete a Phone Book Entry 21
Save Numbers and Names from
Caller Display to Phone Book 21
CALLER DISPLAY 22
View Caller Display List 22
Dial a Number from the
Caller Display List 23
Delete an Entry from the
Caller Display List 23
Delete all Enties from the
Caller Display List 23
Call Waiting 23
NEW MESSAGE 24
Call Waiting 24
ADDITIONAL HANDSETS
Using Several Handsets 25
Call Transfer 25
25
USING THE TELEPHONE 16
Making a Call 16
Receiving a Call 16
Last Number Redial 17
Paging the Handset 17
Multi Channel Access 17
Use with a Hearing Aid 17
2
OPTIONAL ACCESSORIES 26
Headset & Magnetic Loop 26
Shaker 26
TROUBLESHOOTING 27
SAFETY INFORMATION 29
REGULATORY COMPLIANCE 30
GUARANTEE 32
Page 3
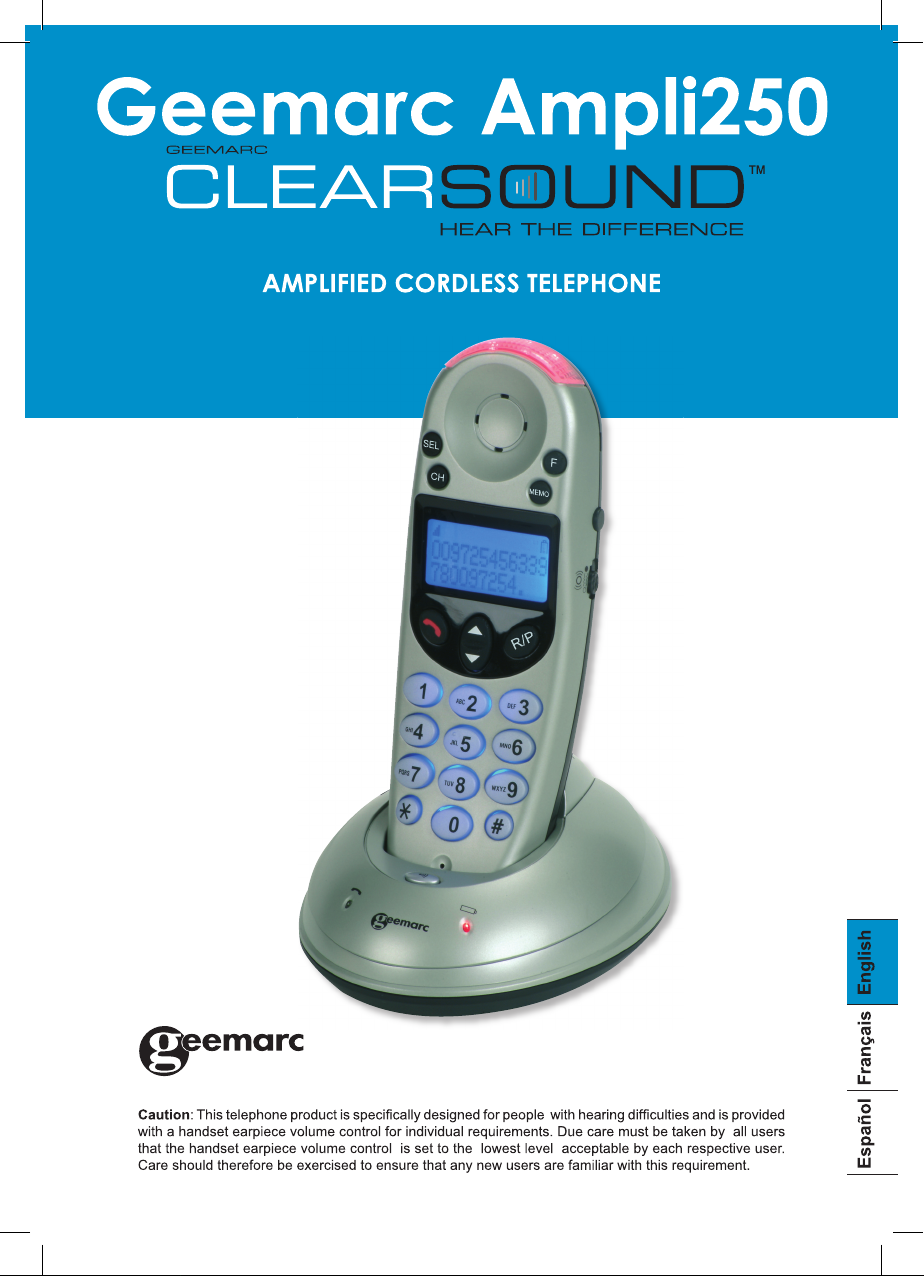
Handset
DESCRIPTION
14
13
12
11
10
9
8
SEL
MEMO
1
2
3
4
5
6
7
1. Visual Ringer indicator: A bright flashing light that flashes with each
ring of the telephone.
2. F button (FLASH/DELETE): Press to answer an incoming call if you
have Call Waiting or to be used to cancel an action/entry or clear a
stored Caller ID call.
3. MEMO button (PROGRAM): Press to store numbers in memory or to
call a number you have previously stored.
4. LCD display: The screen shows the activity and programming of your
handset. The Caller ID feature is optional.
5. R/P button (REDIAL/PAUSE): Both the last number redial and the
pause feature. Press to redial the last number you’ve dialed
6. Lighted keypad: The keypad stays lit up for 15 seconds after removing
the handset from the base. To reactivate the feature while in standby,
press arrow up keyor the “MEMO” button. To activate while the phone
is in use, press any key.
3
Page 4
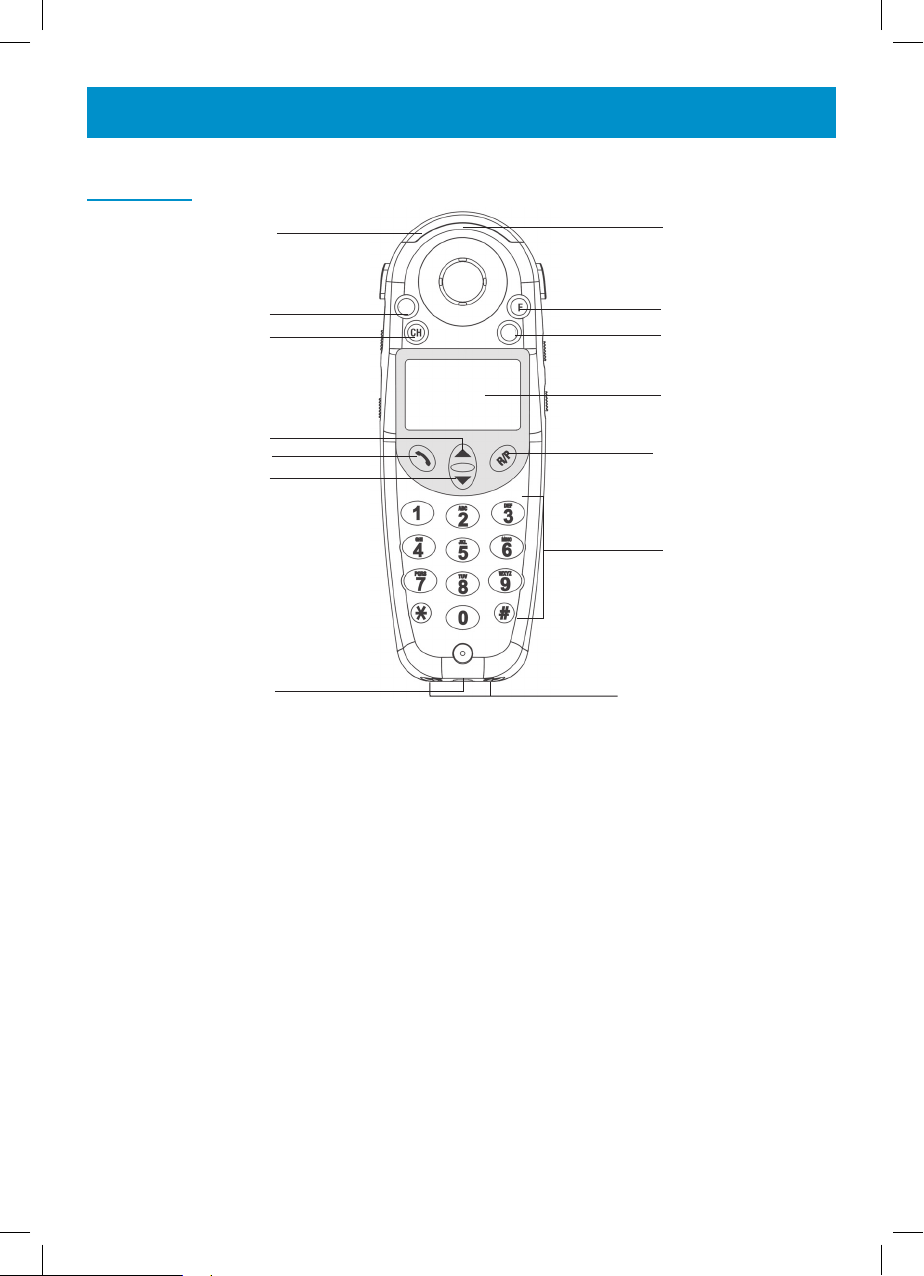
DESCRIPTION
7. Charge pins: Enables charging.
8. 2.5mm headset jack: To connect your hands-free headset.
9. Arrow DOWN button: Use to highlight or scroll through the menu.
(TALK): Press to answer an incoming call, to place a call or to end a
10.
call.
11. Arrow UP button: Use to highlight or scroll through the menu.
12. CH button (Channel/Registration): Press to change the operating
channel if you notice interference.
13. SEL button (SELECT/CONFIRM): Use to confirm action or a choice
on the screen.
14. AMPLIFY ON indicator: Lights up (a single red light) when the AM
PLIFY mode is turned ON.
Handset Side View
1
3
4
5
6
2
1. Belt clip: Use to attach handset to the waist.
2. Auto Amplify switch: Use to AUTOMATICALLY return to your previous volume setting every time you use the handset without having to
press the “AMPLIFY” button.
3. Handset tone control: Adjust the incoming voice tone level on your
handset so you can clearly understand every word.
4. Handset volume control: Adjust the handset volume to your desired
hearing level.
5.
Amplify button: Use to turn ON/OFF the additional handset amplifica-
.
tion
6. Shake mode switch: Turns the handset shaker ON/OFF when the
telephone rings.
4
Page 5
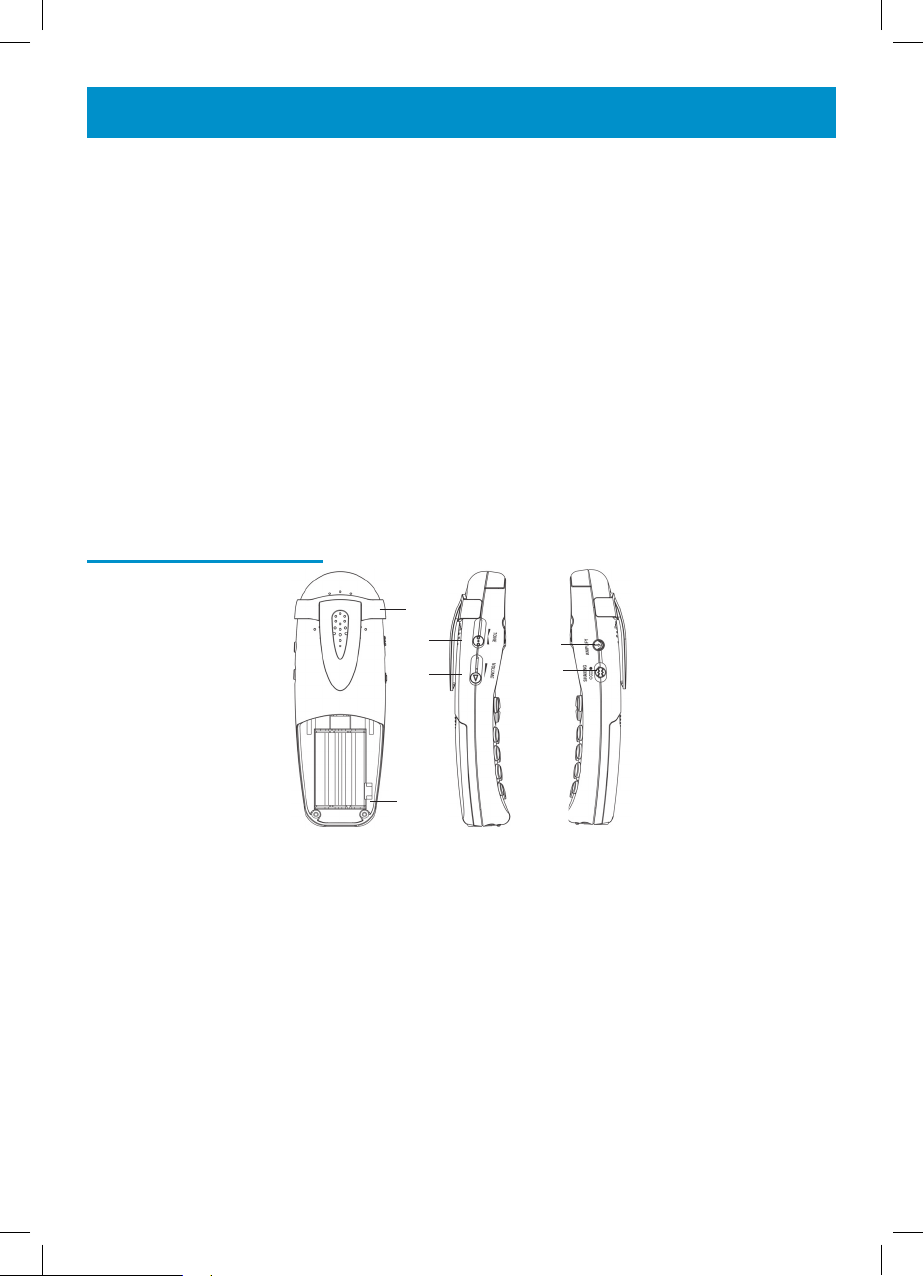
Base
DESCRIPTION
5
4
1
3
2
8
67
1. Page icon button (PAGE): Press to page the handset. The handset
will ring for about 25 seconds then end the paging automatically.
2. Charger indicator LED: Lights up when handset is placed on the
base for charging. (RED)
3. In use indicator LED: Lights up when the handset is in the TALK
mode. (RED)
4. Charging terminals / contacts: To charge the batteries in the handset.
For best performance, clean periodically with a damp cloth.
5. Telephone line connection jack: To connect to the telephone line
jack.
6. Shaker plug: To connect to an optional vibrating shaker.
7. Ringer volume switch: Set the base ringer HI/MED/LO/OFF.
8. Adapter plug-in connection: To connect the AC Adapter to the base.
5
Page 6

INTRODUCTION
Congratulations on purchasing your Geemarc AMPLI250 telephone. This
telephone offers all the advantages of cordless technology coupled with
features which maximize clarity and minimize feedback throughout a telephone call. These features include extra volume and tone together with
visual and vibrator ringer. Other features include caller display, phone book
and the ability to register to up to two handsets to the base.
Its is important that you read the instructions below in order to use your
Geemarc telephone to its full potential. Keep this user guide in a safe place
for future reference.
CAUTION: THIS TELEPHONE PRODUCT IS SPECIFICALLY DESIGNED
FOR PEOPLE WITH HEARING DIFFICULTIES. DUE CARE MUST BE
TAKEN BY ALL USERS THAT THE VOLUME CONTROL IS SET TO THE
LOWEST LEVEL ACCEPTABLE BY EACH RESPECTIVE USER. CARE
SHOULD THEREFORE BE EXERCISE TO ENSURE THAT ANY NEW
USERS ARE FAMILIAR WITH THIS REQUIREMENT.
6
Page 7

INTRODUCTION
Unpacking the Telephone
When unpacking the telephone, you should find the following in the box:
• 1 Handset
• 1 Base
• 1 AC Mains power adaptor
• 1 6ft Modular Telephone line cord
• 1Belt clip
• 3 x NiMH AAA rechargeable batteries
• 1 User Guide
7
Page 8

INSTALLATION
Location
Ensure you situate the telephone close enough to the power socket (120V
AC wall outlet) and telephone jack (RJ11C) so that the cables will reach
safely without stretching. Also, the mains power needs to be easily accessible in case you need to disconnect the power quickly.
Make sure the telephone is at least 1 metre away from other electrical
products e.g.TV, radio and monitors so as to avoid interference. Also, avoid
direct heat and sunlight.
We advise you to place the telephone on a stable surface.
Handset Range
The telephone has a large range. The range will be reduced when there
is no clear line of sight between the base and handset. Place the base as
high yet as practical as possible to ensure the best signal between the base
and the handset. Interference will be audible if you start to move out of
range during a call. A warning signal (beep) will be heard when the handset
is out of range, the call will be stopped if the handset is not brought nearer
to the base.
Belt Clip Use
To attach the optional belt clip, simply slide it down into the grooves on your
handset. Press the tabs into the slots on the handset.
To remove the belt clip, lift one side of it with your thumbnail and push
back.
8
Page 9
INSTALLATION
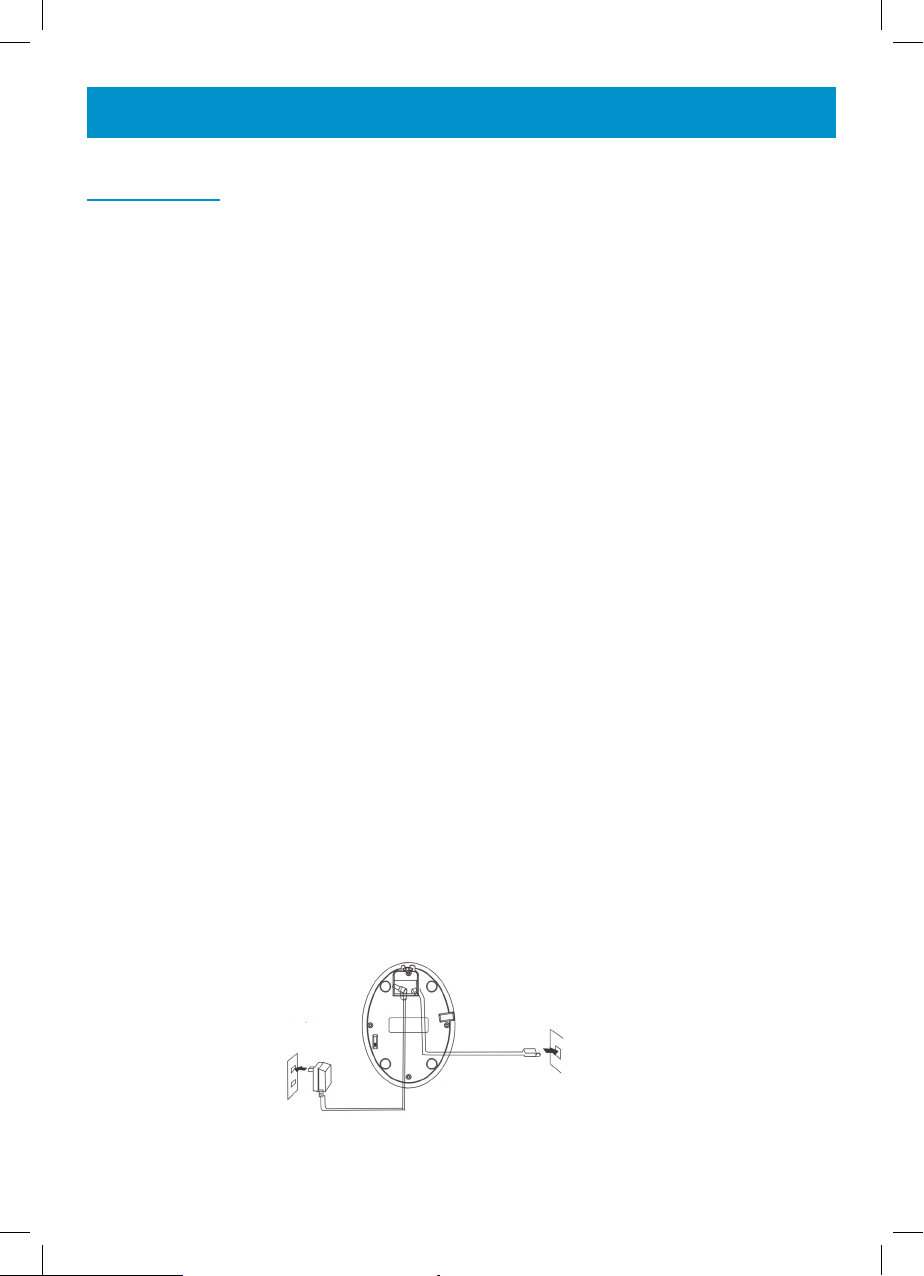
Setting Up
Plug the power cable into the jack (12V DC 500mA) on the base. Plug the
adaptor into the mains supply (standard 120V AC electrical outlet). The
Power/Charging indicator lights up (red).
Note: Always connect the AC Adapter to the telephone before you
plug it into the AC power outlet. Likewise, when disconnecting, unplug
the AC Adapter from the wall outlet before you disconnect it from the
telephone base.
Connect the modular line cord plug to the jack on the base. Connect the
other end of the modular line cord to the modular phone jack on the wall.
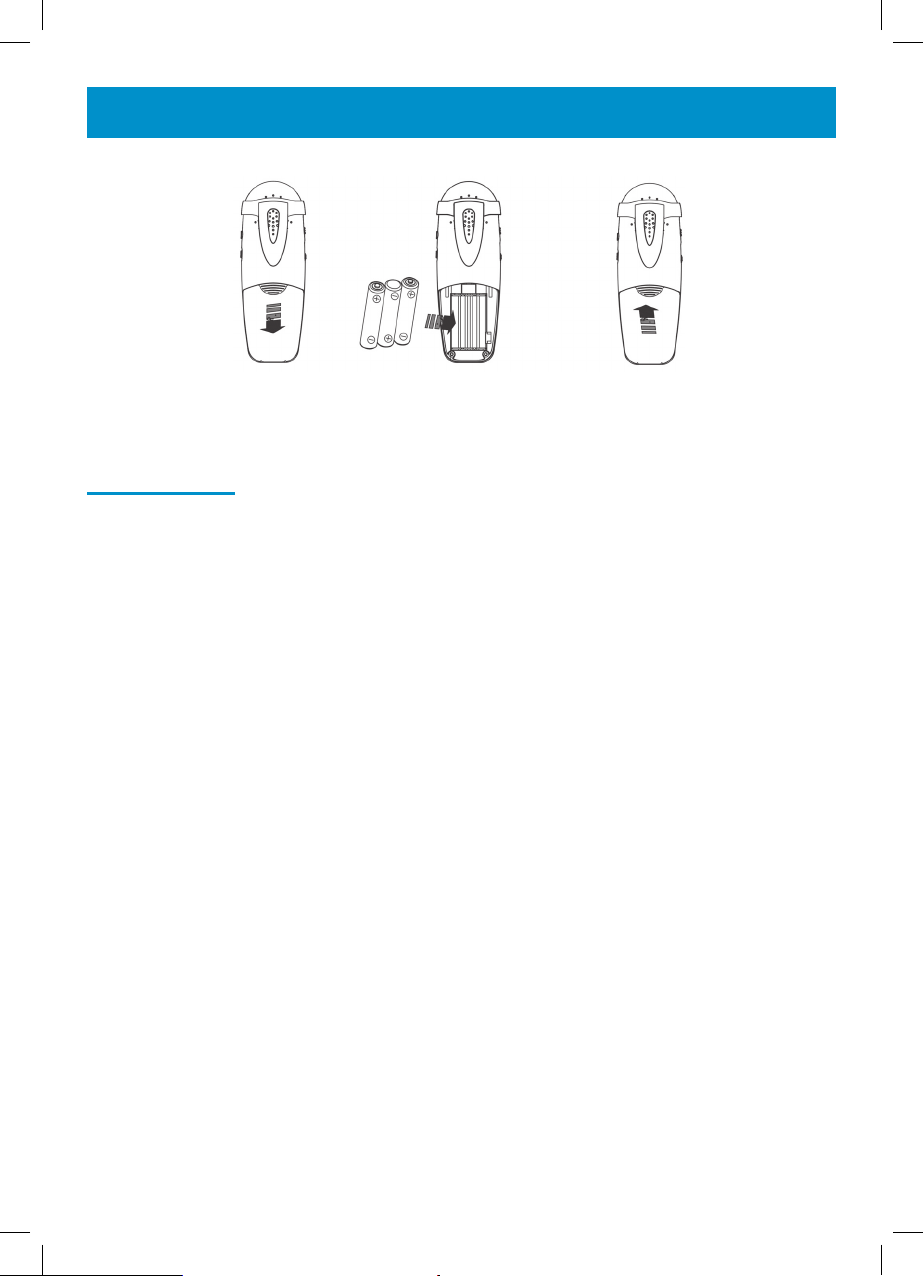
Remove the battery compartment cover – slide it downwards. Install the
rechargeable batteries in the handset. The handset requires three Nickel
Metal Hydride (NiMH) AAA batteries. These are supplied with your telephone. Check the battery polarity diagrams on the handset when inserting
the batteries. Fit the battery cover back into place.
Place the handset on the base. The Power/Charging indicator lights up
(red).
Before the handset can be used, the handset battery must be charged
for a minimum of 24 hours on the base.
Connection of the telephone line and AC adapter
Single Line Telepone Jack
AC Adapter
Telephone Line Cord
9
Page 10
INTRODUCTION
Note: Before replacing the battery compartment cover – you may
want to select setting for the AUTO AMPLIFY MODE
Battery Use
If the low battery icon is displyed and you hear the warning tone (3 beeps),
you will need to recharge your handset before you can use it. If the phone
does not have enough power, it will switch itself off automatically until it is
returned to the base .
The battery level of charge can be monitored via the battery charge icon
diplayed on the LCD display in standby mode.
Under ideal conditions, the handset battery should give about 4 hours
talktime or 192 hours standby on a single charge.
10
Page 11

BASE SETTINGS
Base Ringer Volume
A slider switch located on the bottom of the telephone base allows the
base ringer volume to be adjusted. The following settings are available
HI/MED/LO/OFF.
11
Page 12

HANDSET SETTINGS
Handset Registration
The handset that came with your base is already registered to the base
(factory setting). However, if it is not, follow this procedure:
Press and hold the PAGE button on the base unit. Keep this pressed
throughout the registration procedure. After 3 seconds, press the CH button on the handset. The unit will give a confirmation beep. HS-1 will be
seen in the LCD display – the handset has been registered.
If you have multiple handsets, press the CH button until you hear the beep
and HS-2 is seen on the LCD display.
Ringer Settings
Press SEL button on handset. LCD will display PROGRAM
Press 3. Current Ringer mode will be displayed
Use ▲ or ▼ to set the ringer on or off
Press SEL to confirm and exit. A confirmation beep will be heard
Note: If the base and handset ringer are off. The visual ringer will
flash when receiving an incoming call.
Screen Contrast
Your screen has a backlight that automatically switches off after 15 seconds
of inactivity. The contrast of the backlight can be decreased or increased.
There are 4 levels of contrast – the default is 4.
Press SEL button on handset. LCD will display PROGRAM
Press 2. Current CONTRAST ADJUST level will be displayed
Use ▲ or ▼to set the conatrast to the desired level
Press SEL to confirm and exit. A confirmation beep will be heard
12
Page 13

HANDSET SETTINGS
Area Code
When you use your phone for the first time or if you have moved to a different area code, you need to enter your area code into the phone.
Press SEL button on handset. LCD will display PROGRAM
Press 1. Current AREA CODE will be displayed
Use the numeric keypad to enter your area code number
(up to 4 digits). Use the F key to clear any errors
Press SEL to confirm and exit. A confirmation beep will be heard
Time Setting
If you subscribe to Caller Display, these parameters will usually be set
automatically when you receive your first call. However, if you do not, you
will need to set the time on your handset.
Press SEL button on handset. LCD will display PROGRAM
Press 4. The time will be displayed. The Month digit will be flashing.
Use ▲ or ▼ to get the desired month
Press SEL to confirm
To set the Day use ▲ or ▼ to get the desired day
Press SEL to confirm
To set the Hour use ▲ or ▼ to get the desired hour (12 hr)
Press SEL to confirm
To set the Minutes use ▲ or ▼ to get the desired minutes
Press SEL to confirm and exit. A confirmation beep will be heard
13
Page 14

HANDSET SETTINGS
Handset Shaker Settings
A switch located on the right side of the telephone handset allows the handset shaker to be activated when receiving an incoming call. The On/Off
switch can be found on the right hand side of the handset.
14
Page 15

VOLUME AND TONE
Receiving Volume and Tone Adjustment
You can increase the receiving volume and adjust the receiving tone according to your own hearing requirements. The AMPLIFY button on the
right side of the handset allows extra receiving and tone functions to be
activated during the conversation in an ad hoc fashion. When the function
is activated, the red light at the top of the handset is lit. Use the TONE and
VOLUME slider buttons on the left side of the handset to adjust the level
according to your own hearing requirements. When AMPLIFY is on, the
receiving volume adjustment is 30- 50dB. The tone control allows you to
either boost low or high frequency range. When AMPLIFY is off, the receiving volume adjustment is 0 - 30dB. The tone control cannot be used.
When the call is finished, the telephone will reset to standard mode i.e.
AMPLIFY turned off.
Extra Volume Adjustment Switch
In order to override the standard setting i.e. AMPLIFY switched off, turn
the AUTO AMPLIFY switch, located in the battery compartment of the telephone, to On. (Use the tip of a pencil or small screwdriver if necessary).
ON: When the switch is ON, the extra receiving volume and tone functions
are automatically activated each time you use the phone. You do not need
to use the AMPLIFY button. (During any call, you can temporarily switch off
and on the extra volume override by pressing the AMPLIFY button.)
OFF: When the switch is switched OFF, you will need to activate the function by pressing the AMPLIFY button in order to get use of the extra volume
and tone functions.
This override is useful if the person using the telephone will always need
the amplification setting.
Caution: Exposure to high amplification levels to people without
hearing loss may cause damage to hearing.
15
Page 16
USING THE TELEPHONE
Making a Call
When you hear dialing tone, dial the number on the keypad.
Pre-Dialling
Pick up handset. Press
You can press F to cancel an incorrect entry
To end the call simply press
again or place the handset on the base
Pick up handset. Dial the number on the keypad.
You can press F to cancel an incorrect entry
Press
To end the call simply press again or place the
, the number is automatically dialled
handset on the base
Receiving a Call
When an incoming call is received, proceed as follows:
Pick up handset. Press to take the line and speak
To end the call simply press again or place the
handset on the base
16
Page 17
USING THE TELEPHONE
Last Number Redial
Press and listen for the dialling tonE
Press the R/P button
The telephone will automatically redial the last
number dialled (up to 24 digits)
Paging the Handset
Press the PAGE button on the front of the base to start the handset ringing.
This will help you locate the handset if you have misplaced it. Press
again to cancel the paging feature. If you do not cancel it, the handset
ringing will stop after about 30 seconds.
Multi Channel Access
There are 40 frequencies available for use. If you notice interference during
a call, try changing to another channel by pressing CH.
Use with a Hearing Aid
The Geemarc AMPLI250 can be used with hearing aids. These hearing
aids must be equipped with a T-coil. Ensure you switch the hearing aid to
the T position and hold the handset close to your hearing aid.
17
Page 18

PHONE BOOK
Names and phone numbers can be stored in the phone book. The phone
book can contain 60 entries with the name and phone numbers of your
correspondents.
Create a Phone Book Entry
Enter the telephone number (and code) you wish to
store – up to 23 digits
Press MEMO. NAME will be displayed on the LCD
Enter a name corresponding to the telephone number.
The name can contain up to 11 characters
Select the desired letter by pressing on the corresponding key
on the numerical keypad You can use the table below or the letters
printed on the keypad to help you
Use F to correct an incorrect entry. Press 1 to insert a space
Press R/P to insert a pause of 2 seconds within a telephone
number e.g. when you dial an international number, some
telephone systems will not identify the entire number entry without
a pause between the prefix digits and the number itself. This allows
adequate timing for the sequence of the phone number to register
with the telephone system and complete the dialing successfully.
18
Press MEMO to store the entry. A beep will be heard to confirm storage
Key Characters Key Characters
1 (space) - 1 6 MNO6
2 ABC2 7 PQRS7
3 DEF3 8 TUV8
4 GHI4 9 WXYZ9
5 JKL5 0 0
Page 19
PHONE BOOK
VIP and Reject Functions
When storing a name, if you add “*” at the end – it will be labelled as a VIP
number. The handset ringer will always ring when a VIP call is received
irrespective of whether the ringer is set to On or Off.
When storing a name, if you add “
” at the end – it will be labelled as
a Reject number. The handset ringer will not ring when a Reject call is
received irrespective of whether the ringer is set to On or Off.
Review Numbers and Names in the Phone Book
Press MEMO when in standby to enter the Phone Book. The total number
of records stored in the phone book will be displayed
e.g. 04 MEMORY. Then use one of the following three methods to find the
desired entry in the Phone Book.
Use ▲ or ▼ to scroll through the phone book.
Or
Enter the required name followed by MEMO to view the
matching phone book entry.
Or
Enter the first character required name followed by MEMO
to view all the matching phone book entries. Use ▲ or ▼ to scroll
through the subset of numbers in the phone book to
find the required entry.
19
Page 20

PHONE BOOK
Dial a Phone Book Entry
Press MEMO then find the required phone book entry using one
of the methods used in Review Numbers and Names in the
Phone Book section above
Press . The number will be dialled automatically
Modify a Phone Book Entry
Press MEMO then find the required phone book entry using one
of the methods used in Review Numbers and Names
in the Phone Book section above
Press SEL
The number will be displayed. The last digit will be flashing.
Digits can be deleted pressing F
Enter the new number and press MEMO to store
20
The name will be displayed. Characters can be deleted pressing F
Enter the new name and press MEMO to store. A beep will be heard.
Page 21
PHONE BOOK
Delete a Phone Book Entry
Press MEMO then find the required phone book entry using
one of the methods used in Review Numbers and Names
in the Phone Book section above
Press F twice. The single record will be deleted.
Delete all Phone Book EntrieS
Delete all Phone Book Entries
Press MEMO when in standby. The total number of records
stored in the phone book will be displayed e.g. 04 MEMORY.
Press F twice. All records will be deleted.
Save Numbers and Names from Caller ID to Phone Book
Press ▲ or ▼ when in standby
Use ▲ or ▼ to scroll through the call log to find the
number you wish to store
If this number has an associated name, press MEMO to store
If this number does not have an associated name,
press MEMO and then enter the name
Press MEMO to store
21
Page 22

CALLER DISPLAY
The features described in this section are only available if you subscribe to
a Caller Display service from your network provider.
Caller Display means you can see who is calling on your handset display
(provided the number is not withheld, unavailable or is an international
call). If you have stored a name to go with the number in your handset
phonebook, the corresponding name will be displayed.
Whether you take a call or not, the caller’s details are stored in the Call log.
When the call list memory is full, a new call will take the place of the oldest
call. You can display, scroll through, dial and copy numbers in the list.
A call which was not answered and has not been reviewed in the Call Log
is deemed to be a new call. The NEW icon on the LCD display will blink.
The caller id record held in the call log consists of the following 3 lines of
information:
• Time and date of call
• Incoming telephone number
• Caller’s name or blank if this information is not available
When the new calls have been reviewed, the NEW icon on the LCD display
will stop blinking.
View Caller Display Log
Press ▲ or ▼ when in standby. The total amount of
Caller ID records and number of new calls will be
displayed e.g. ALL 10 NEW 2
Use ▲ or ▼ to scroll through the call log. Use ▼ to scroll down
from the most recent record. Use ▲ to scroll up from the oldest record
Use F to return to standby or the telephone will automatically
return to standby if no button is pressed for 30 seconds
22
Page 23
CALLER DISPLAY
Dial a Number from the Caller Display Log
Press ▲ or ▼ when in standby
Use ▲ or ▼ to scroll through the call log to find the
number you wish to dial
Press . The number will be dialled automatically
Delete an Entry from the Caller Display Log
Press ▲ or ▼ when in standby
Use ▲ or ▼ to scroll through the call log to find the
number you wish to delete
Press F twice. The single record will be deleted.
Delete all Entries from the Caller Display Log
Press ▲ or ▼ when in standby
Press F twice. The single record will be deleted.
Call Waiting
With this service, you are made aware that a new call is coming through
when you are in conversation. You can take this call and switch between
callers. To use this feature, you must have subscribed to this service with
your network provider. Use the F key to toggle between the two calls.
23
Page 24

NEW MESSAGE
Message Waiting
If you are connected to certain type of switchboards, you may get a message waiting/voicemail service. MESSAGE will flash on the LCD display.
Press F twice to delete the icon.
24
Page 25
ADDITIONAL HANDSETS
Up to 2 handsets can be registered to one base. This means you can
transfer an incoming call between handsets and answer a call anywhere in
the office or home as all the handsets will call at the same time.
Using Several Handsets
If you buy new handsets to use with your Geemarc AMPLI250 telephone,
they will have to be registered to the base before you can use them. See
Handset Registration section.
Transfer a Call between Handsets
During a call, press SEL and the handset number you wish to
transfer the call to
The other handset will ring. Press
However, if the other handset is not answered, simply press
to return to the caller
to answer the call
25
Page 26

OPTIONAL ACCESSORIES
Headset & Magnetic Loop
If you wish you can connect a headset or a neck loop to the jack located
on the bottom of the handset. You can still use all phone functions as
described before. To answer a call simply press
press a second time to release the line.
Note: Whilst the headset jack is being used, the microphone and
speaker of the handset are set to mute. You will need to unplug the
headset in order to use the handset as normal.
Shaker
If you would like to be alerted to incoming phone calls by a vibrating shaker,
you can use an optional shaker.
Connect the shaker into the shaker jack located at the left side of your
base. When an incoming call is received, the shaker will be activated and
vibrate while the phone rings.
to take the line and
26
Page 27

TROUBLESHOOTING
General Checks
• Make sure that the telephone line cord and adaptor are correctly
plugged in and they are not damaged.
• Make sure the batteries are inserted correctly.
• Make sure that the batteries are fully charged.
• Connect another telephone to the telephone PTT socket or move your
telephone to another socket to track if the failure is coming from your
telephone or your PTT socket.
• Adjust the volume
• Ensure you are in range of the base
Handset not registering
• Check that the base is plugged into the mains power and switched
on.
• Make sure the batteries are inserted correctly.
• Make sure that the batteries are fully charged.
No display
• Make sure the batteries are inserted correctly.
• Make sure that the batteries are fully charged.
No connection between handset and base
• You may be out of range of the base. Move closer to the base
Handset on the base does not charge
• Make sure the handset is placed properly on the base. When charging, the battery symbol should be shown filling up.
Handset does not ring
• Make sure the batteries are inserted correctly.
• Make sure that the batteries are fully charged.
• Make sure handset ringer is ON
27
Page 28

TROUBLESHOOTING
No tone when you press
• Make sure the batteries are inserted correctly.
• Make sure that the batteries are fully charged.
• Make sure handset is registered to the base
A warning tone is heard during a call:
• The batteries are empty. The handset needs to be replaced in the
base in order to recharge.
• You are over the base coverage area.
No number is displayed when the telephone rings:
• Please contact your telephone network provider to get the caller display service.
Consistently short battery life
• Clean the charge contacts
• Replace the batteries
Interference when using the telephone
• Move closer to the base
• Press and hold CH to change channel
• Move away from any electrical appliances
Error displayed on the LCD screen
• Even if you have subscribed to caller display, if the caller does not
want to show their number (private number) or the caller name or
number cannot be identified, the display will show ERROR.
• It could be a call from a PBX. Caller display may not work properly if
the telephone is connected to a PBX.
28
Page 29

SAFETY INFORMATION
General
Only use the correct Geemarc authorised power supply with the product.
Do not open the unit (except to replace the batteries). Contact the helpline
for all repairs.
Never dispose of batteries in a fire. There is a serious risk of explosion and/
or the release of toxic chemicals.
Cleaning
Clean the telephone with a soft cloth. Keep the base and handset charging
contacts clean. Never use polishes or cleaning agents - they could damage
the finish or the electrics inside.
Environmental
Do not expose to direct sunlight.
Always ensure there is a free flow of air over the surfaces of the telephone.
Do not place any part of your product in water and do not use it in damp or
humid conditions e.g. bathrooms.
Do not expose your product to fire or other hazardous conditions.
Unplug your phone from the telephone socket during thunderstorms because it could damage your telephone. Your guarantee does not cover
thunderstorm damage.
Do not use the telephone if there is a gas leak. Any spark that might be
created by the electrical contacts found in the telephone could ignite a large
amount of leaking gas.
The telephone is designed for working within a temperature range of 5°C
to 45°C .
29
Page 30

REGULATORY COMPLIANCE
Part 68 of FCC rules information
- This equipment complies with Part 68 of the FCC rules and the requirements adopted by the ACTA. On the bottom of this equipment is a label that
contains, among other information, a product identifier in the format US:
AAAEQ##TXXXX.
If requested, this number must be provided to the telephone company.
- All applicable certification jacks Universal Service Order Codes (USOC)
for the equipment is provided (i.e. RJ11C) in the package with each piece
of approved terminal equipment.
- A plug and jack used to connect this equipment to the premises wiring
and telephone network must comply with the applicable FCC Part 68 rules
and requirement adopted by the ACTA. A compliant telephone cord and
modular plug is provided with this product. It is designed to be connected
to a compatible modular jack that is also compliant. See installation instructions for details.
- The REN is used to determine the number of devices that may be connected to the telephone line. Excessive RENs on a telephone line may
result in the devices not ringing in response to an incoming call. In most but
not all areas, the sum of RENs should not exceed five (5.00). To be certain
of the number of devices that may be connected to a line, as determined
by the total RENs, contact the local telephone company. For products approved after July 23, 2001, the REN for this product is part of the product
identifier that has the format US:AAAEQ##TXXXX.
The digits represented by ## are the REN without a decimal point (e.g., 03
is a REN of 0.3).
For earlier products, the REN is separately shown on the label.
- If this equipment causes harm to the telephone network, the telephone
company will notify you in advance that temporary discontinuance of service may be required. But if advance notice isn’t practical, the telephone
company will notify the customer as soon as possible. Also, you will be
advised of your rights to file a complaint with the FCC if you believe it is
necessary.
- The telephone company may make changes in its facilities, equipment,
operation or procedures that could affect the operation of the equipment. If
this happens the telephone company will provide advance notice in order for
30
Page 31

REGULATORY COMPLIANCE
you to make necessary modifications to maintain uninterrupted service.
- If trouble is experienced with this equipment, for repair or warranty information, please contact our customer service staff at: 248-577-5400
If the equipment is causing harm to the telephone network, the telephone
company may request that you disconnect the equipment until the problem
is resolved.
- Please follow instructions for repairing if any; otherwise do not alter or
repair any part of device except as specified.
Opening the equipment or any attempt to perform repairs will void the
warranty.
For service or repairs, call 248-577-5400
- Connection to party line service is subject to state tariffs. Contact the
state public utility commission, public service commission or corporation
for information.
If your home has specially wired alarm equipment connected to the telephone line, ensure the installation of this telephone equipment does not
disable your alarm equipment. If you have questions about what will disable
alarm equipment, consult your telephone company or a qualified installer.
- This equipment is hearing aid compatible.
31
Page 32

GUARANTEE
Sonic Alert warrants the phone against any defect in materials or workmanship for the period of one year from the date of purchase.
Should you experience a problem, contact our customer service department.
Be sure to save your sales receipt as proof of purchase date should you
need warranty service.
Within a period of one year from purchase date, Sonic Alert will repair or
replace (our discretion) your phone at no cost, if a defect in materials or
workmanship is found. If we elect to replace your phone, we may replace it
with a new or reconditioned product of the same or similar design.
Repair or replacement will be warranted for a period of 90 days or the
original time on the original warranty, whichever is longer.
The warranty does not cover accidents, negligence or breakage to any
parts. This includes shipping damage, failure to follow instructions, misuse,
fire, floods, use of incompatible accessories, Acts of God or failure in your
phone service carrier’s line service. The product must not be tampered with
or taken apart by anyone who is not an authorized Sonic Alert representative. Tampering with the phone will void ant written or implied warranties
Sonic Alert shall not be responsible for loss of time, inconvenience, property
damage caused by your phone or any other accidental or consequential
damages
Warranty service is available only with proof of purchase.
Simply send the Ampli250 (postpaid) and a copy of your sales slip as
proof of purchase to:
Sonic Alert Inc., 1050 E. Maple Road, Troy MI 48083
IMPORTANT : YOUR RECEIPT IS PART OF YOUR WARRANTY AND
MUST BE RETAINED AND PRODUCED IN THE EVENT OF A WARRANTY
CLAIM
1050 East Maple Rd.
Troy, MI 48083
Ph: 248577 5400
Fax: 248-577-5433
UgAMpli250_En _Ed01
32
www.sonicalert.com
 Loading...