

SOMFY nina Instruction Manual
SUMMARY
1
WELCOME PAGE 2
1. SAFETY 3
2. NINA IO REMOTE CONTROL 5
3. USE NINA IO 13
Control an item of equipment 13
My function 15
Natural Control function 19
Load a scenario 22
Alarm function 23
4. CUSTOMIZE NINA IO 25
Customize equipment 25
Customize groups 29
Customize scenarios 35
Customize remote control 40
Naturally Intuitive Naturally Attractive
Instructions
Ref. 5126992A
Ref.
5. ADVANCED SETTINGS 46
6. TROUBLESHOOTING 57
7. ABOUT NINA IO 58

WELCOME PAGE
SUMMARY
WELCOME PAGE 2
1. SAFETY 3
2. NINA IO REMOTE CONTROL 5
3. USE NINA IO 13
Control an item of equipment 13
My function 15
Natural Control function 19
Load a scenario 22
Alarm function 23
4. CUSTOMIZE NINA IO 25
Customize equipment 25
Customize groups 29
Customize scenarios 35
Customize remote control 40
5. ADVANCED SETTINGS 46
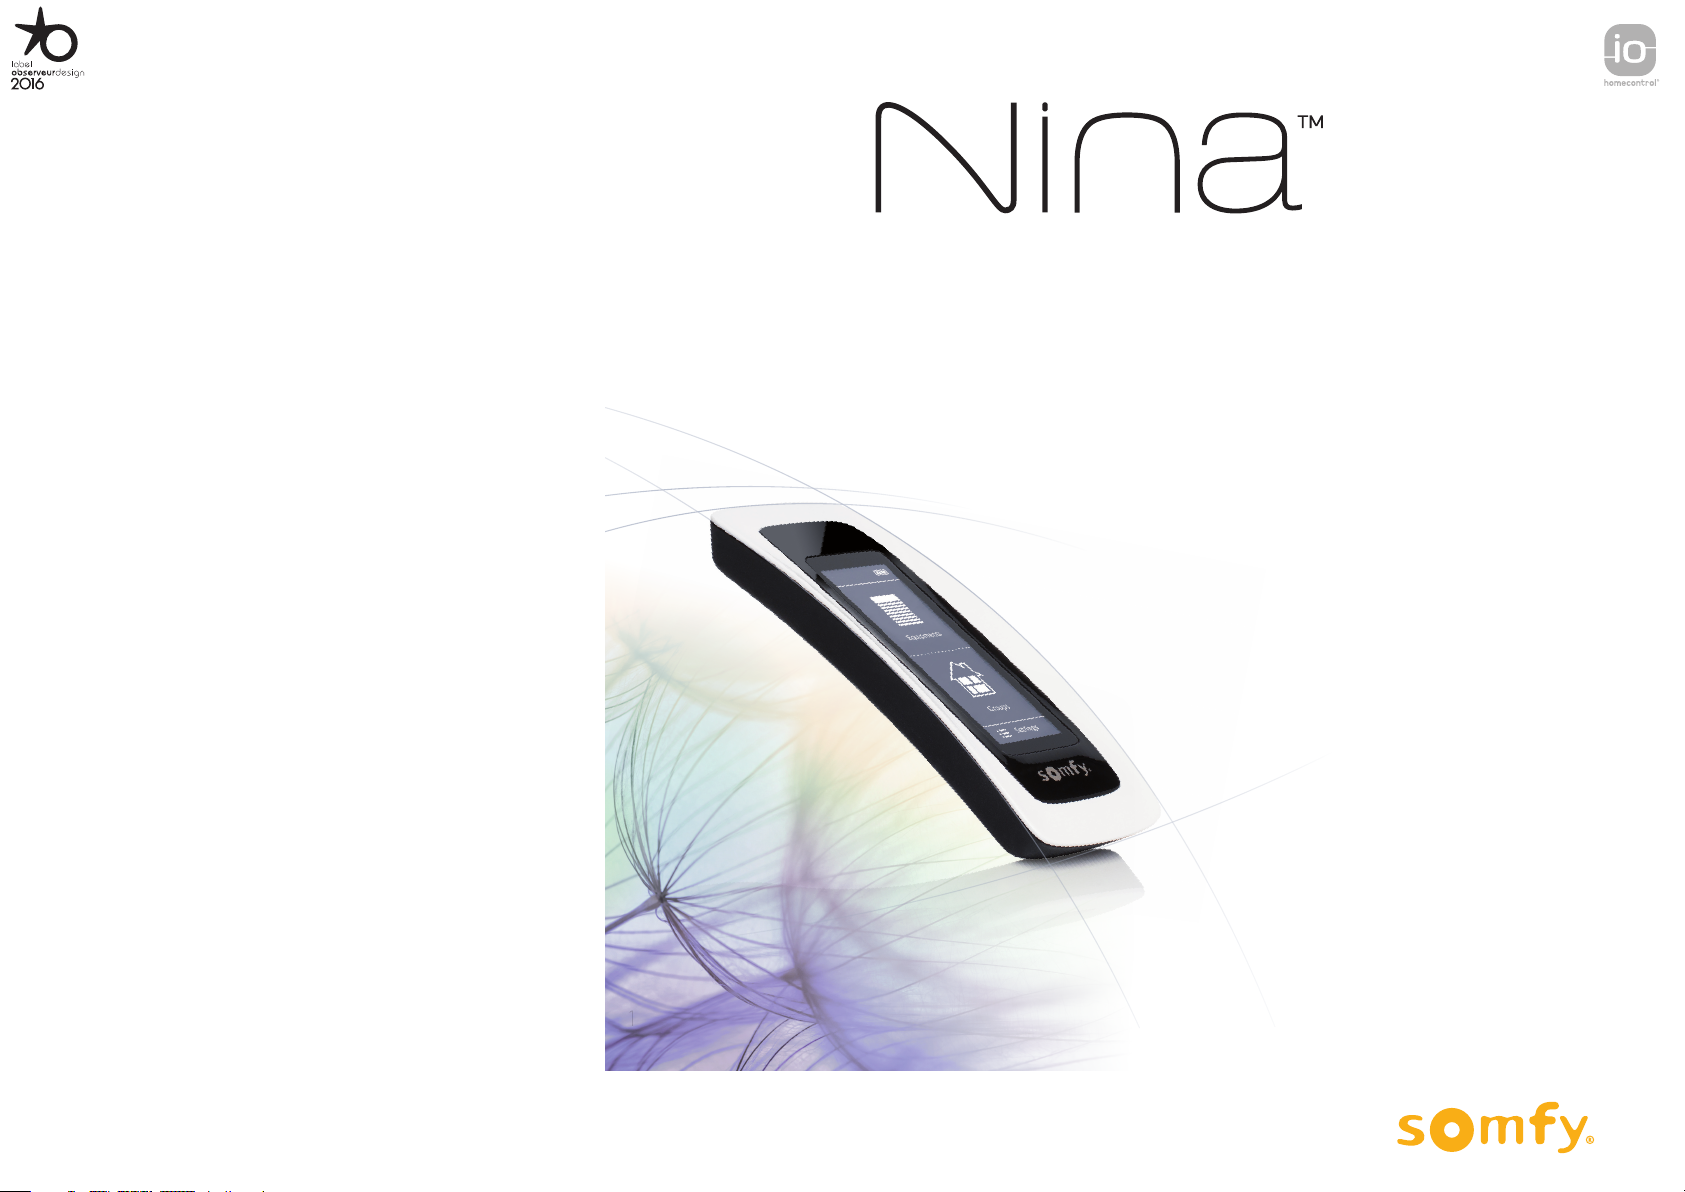
Move according to your intuition, manage without thinking, focus on essentials…
Nina io, a new personalized remote control with a touch screen that facilitates intuitive interaction, gives off new sensations
and lets your desires guide you. Naturally.
Naturally intuitive
Like a natural extension of your hand…
With a simple touch of the screen you can select, control, integrate, memorise, and position all of the equipment in your
home.
• Control equipment individually or as a group
• Configure to suit your house
• Precise control
• Creation of scenarios
Exclusive function of Somfy: Natural Control
Once you’ve set up the interface, pressing the screen for just 2 seconds is enough to control any piece of equipment.
With one simple gesture...like magic.
Naturally attractive
In perfect harmony with your aesthetics
A sleek and sensual object. With ergonomic curves and a so touch. A designer accessory that perfectly blends into your
environment.
Even the finishing touches can be personalized: choose from 5 different materials for the case, in chic and elegant shades.
6. TROUBLESHOOTING 57
7. ABOUT NINA IO 58
2
Non contractual pictures
Copyright © 2015-2016 Somfy SAS. All rights reserved.
Clearly adaptable
Nina io, evolving to meet your need
Blinds, shutters, garage door, gate, lights, alarm, Velux, pergola...Nina io recognizes and helps you adjust and control all
of your equipment, to provide ultimate comfort in your home.
Nina io uses io-homecontrol® technology for enhanced ease and performance.

1. SAFETY
SUMMARY
WELCOME PAGE 2
1. SAFETY 3
2. NINA IO REMOTE CONTROL 5
3. USE NINA IO 13
Control an item of equipment 13
My function 15
Natural Control function 19
Load a scenario 22
Alarm function 23
4. CUSTOMIZE NINA IO 25
Customize equipment 25
Customize groups 29
Customize scenarios 35
Customize remote control 40
5. ADVANCED SETTINGS 46
6. TROUBLESHOOTING 57
7. ABOUT NINA IO 58
Read the quick start guide and the safety instructions provided with product carefully before installation and use. These
instructions must be retained by the user.
Failure to follow these instructions or the use of the product outside its field of application is forbidden, and will invalidate
the warranty and discharge Somfy of all liability.
This Somfy product must be installed by a professional motorisation and home automation installer, for whom this guide
is intended. Moreover, the installer must comply with current standards and legislation in the country in which the product
is being installed, and inform his customers of the operating and maintenance conditions for the product.
Never begin installing without first checking the compatibility of this product with the associated equipment and
accessories. If in doubt when installing this product and/or to obtain additional information, contact Somfy adviser or go
to the website www.somfy.com.
General safety instructions
• Do not use or install this product outdoors.
• Keep the product out of reach of children.
• Do not use abrasive products or solvents to clean it. Use a so, dry cloth to clean its surface.
• Do not knock or drop the product, expose it to flammable materials or sources of heat or moisture, or splash or
immerse it.
• Do not attempt to repair it.
Electrical safety instructions
Charger:
• Only use the mains adapter provided with the product to connect the charger.
• The mains adapter must be connected to an electrical system in good condition and compliant with applicable
standards.
• Make sure the power supply voltage and frequency indicated on the mains adapter data plate match those of your
electrical installation.
• Unwind the electric cable fully before connecting it to the socket in order to avoid overheating.
• Always hold the adapter unit when connecting and disconnecting the mains adapter. Never pull on the cables.
3
Non contractual pictures
Copyright © 2015-2016 Somfy SAS. All rights reserved.

SUMMARY
WELCOME PAGE 2
1. SAFETY 3
2. NINA IO REMOTE CONTROL 5
3. USE NINA IO 13
Control an item of equipment 13
My function 15
Natural Control function 19
Load a scenario 22
Alarm function 23
• Never touch the mains adapter with damp or wet hands, as this could cause electrocution.
• The mains adapter and its cable must be kept out of the reach of children and away from pets, while remaining
accessible so that it can be disconnected quickly in case of emergency.
Remote control:
• Only use the battery provided with the product to power the remote control.
• When it needs replacing, contact your professional motorisation and home automation installer, use the battery
recommended by Somfy. Risk of explosion if a non-compliant battery is used.
• To recycle, ensure the battery is separated from other types of waste and recycled via your local recycling centre..
4. CUSTOMIZE NINA IO 25
Customize equipment 25
Customize groups 29
Customize scenarios 35
Customize remote control 40
5. ADVANCED SETTINGS 46
6. TROUBLESHOOTING 57
7. ABOUT NINA IO 58
4
Non contractual pictures
Copyright © 2015-2016 Somfy SAS. All rights reserved.

SUMMARY
2. NINA IO REMOTE CONTROL
Content of the package 6
WELCOME PAGE 2
1. SAFETY 3
2. NINA IO REMOTE CONTROL 5
3. USE NINA IO 13
Control an item of equipment 13
My function 15
Natural Control function 19
Load a scenario 22
Alarm function 23
4. CUSTOMIZE NINA IO 25
Customize equipment 25
Customize groups 29
Customize scenarios 35
Customize remote control 40
5. ADVANCED SETTINGS 46
Nina io remote control 7
Nina io navigation 8
Nina io charger 8
Nina io battery 9
What is an equipment? 10
What is a group? 11
What is a scenario? 12
6. TROUBLESHOOTING 57
7. ABOUT NINA IO 58
5
Non contractual pictures
Copyright © 2015-2016 Somfy SAS. All rights reserved.
SUMMARY
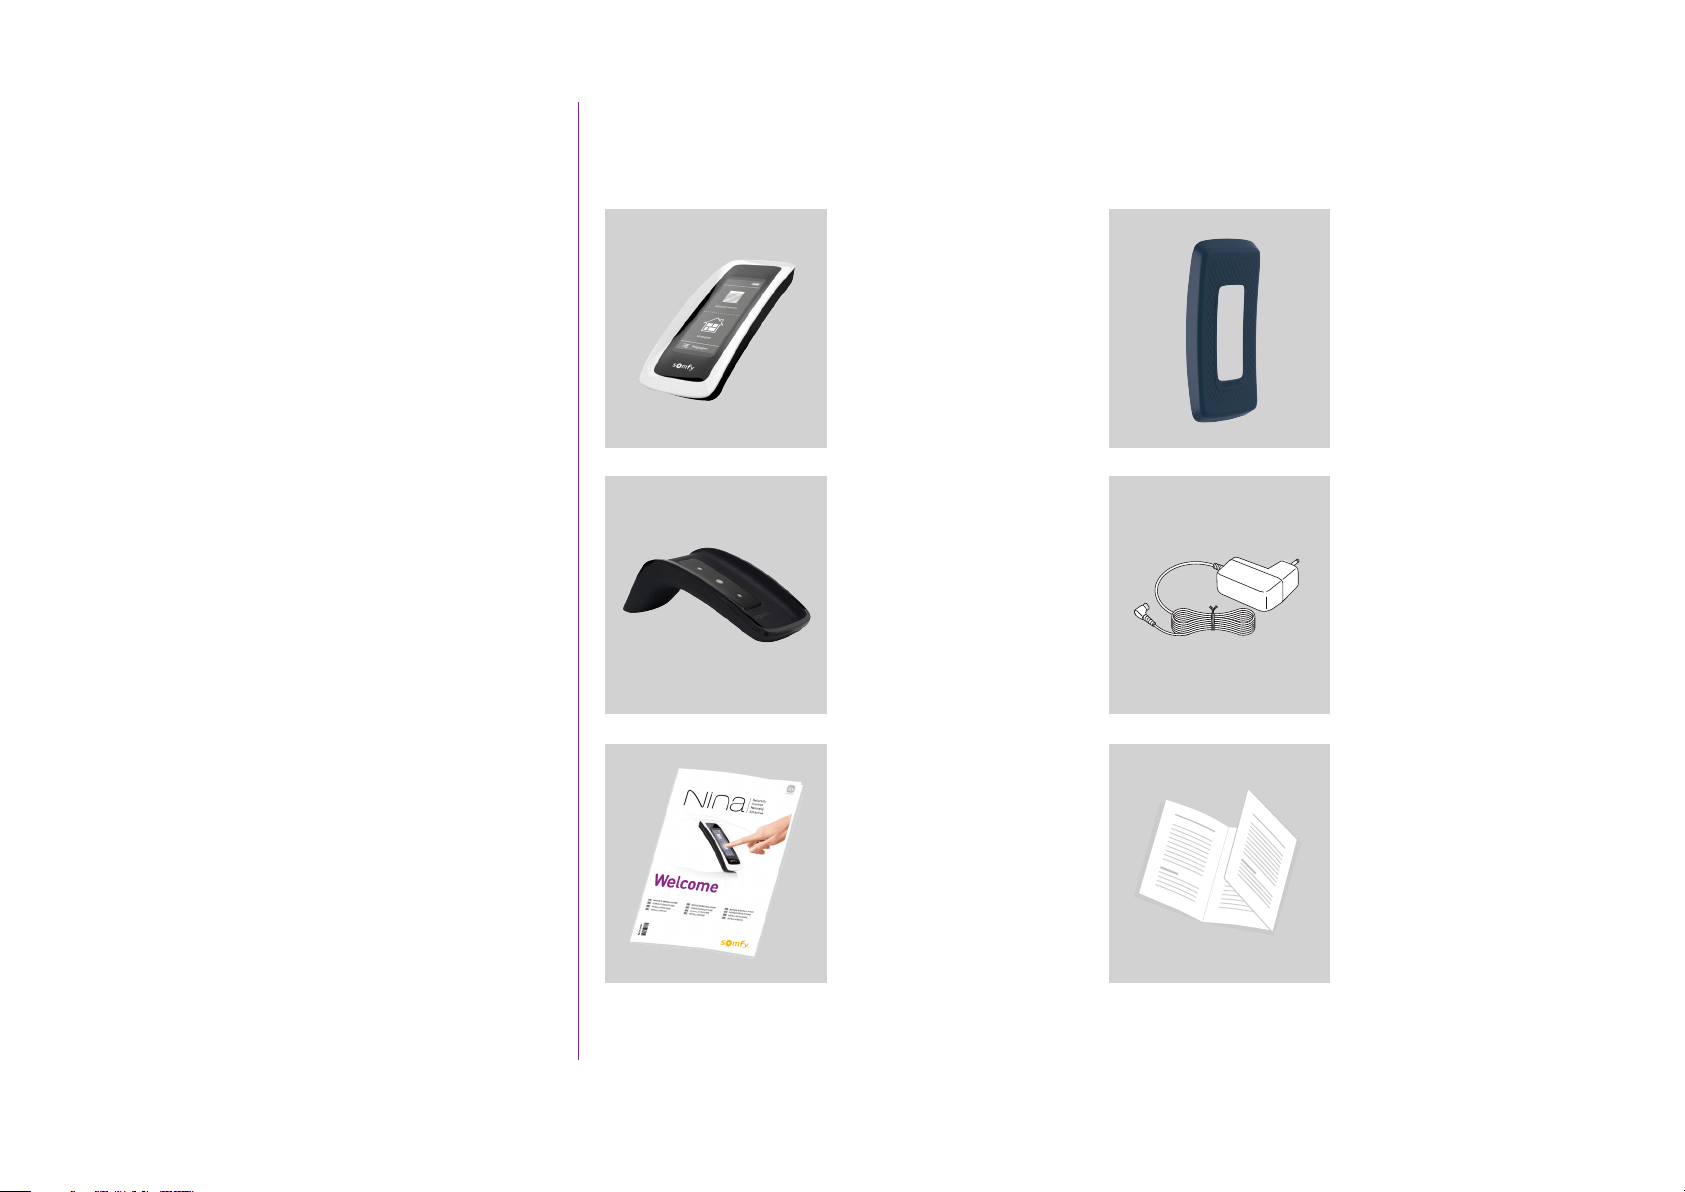
Content of the package
Discover the different elements and documents provided in the packaging:
WELCOME PAGE 2
1. SAFETY 3
2. NINA IO REMOTE CONTROL 5
3. USE NINA IO 13
Control an item of equipment 13
My function 15
Natural Control function 19
Load a scenario 22
Alarm function 23
4. CUSTOMIZE NINA IO 25
Customize equipment 25
Customize groups 29
Customize scenarios 35
Customize remote control 40
5. ADVANCED SETTINGS 46
6. TROUBLESHOOTING 57
7. ABOUT NINA IO 58
NINA IO REMOTE
CONTROL
Touch-screen remote
control (including
battery)
BASE
Holder of Nina io
remote control
QUICK START GUIDE
Guide to get started
with the product
BACK FACE OF
CUSTOMIZATION
Removable back face
to personalize Nina io
REMOTE CONTROL
CHARGER
Power cable to charge
Nina io remote control
IMPORTANT SAFETY
INSTRUCTIONS
Read safety
instructions carefully
before installation and
use. These instructions
must be retained by
the user.
6
Non contractual pictures
Copyright © 2015-2016 Somfy SAS. All rights reserved.
SUMMARY
WELCOME PAGE 2
Nina io remote control
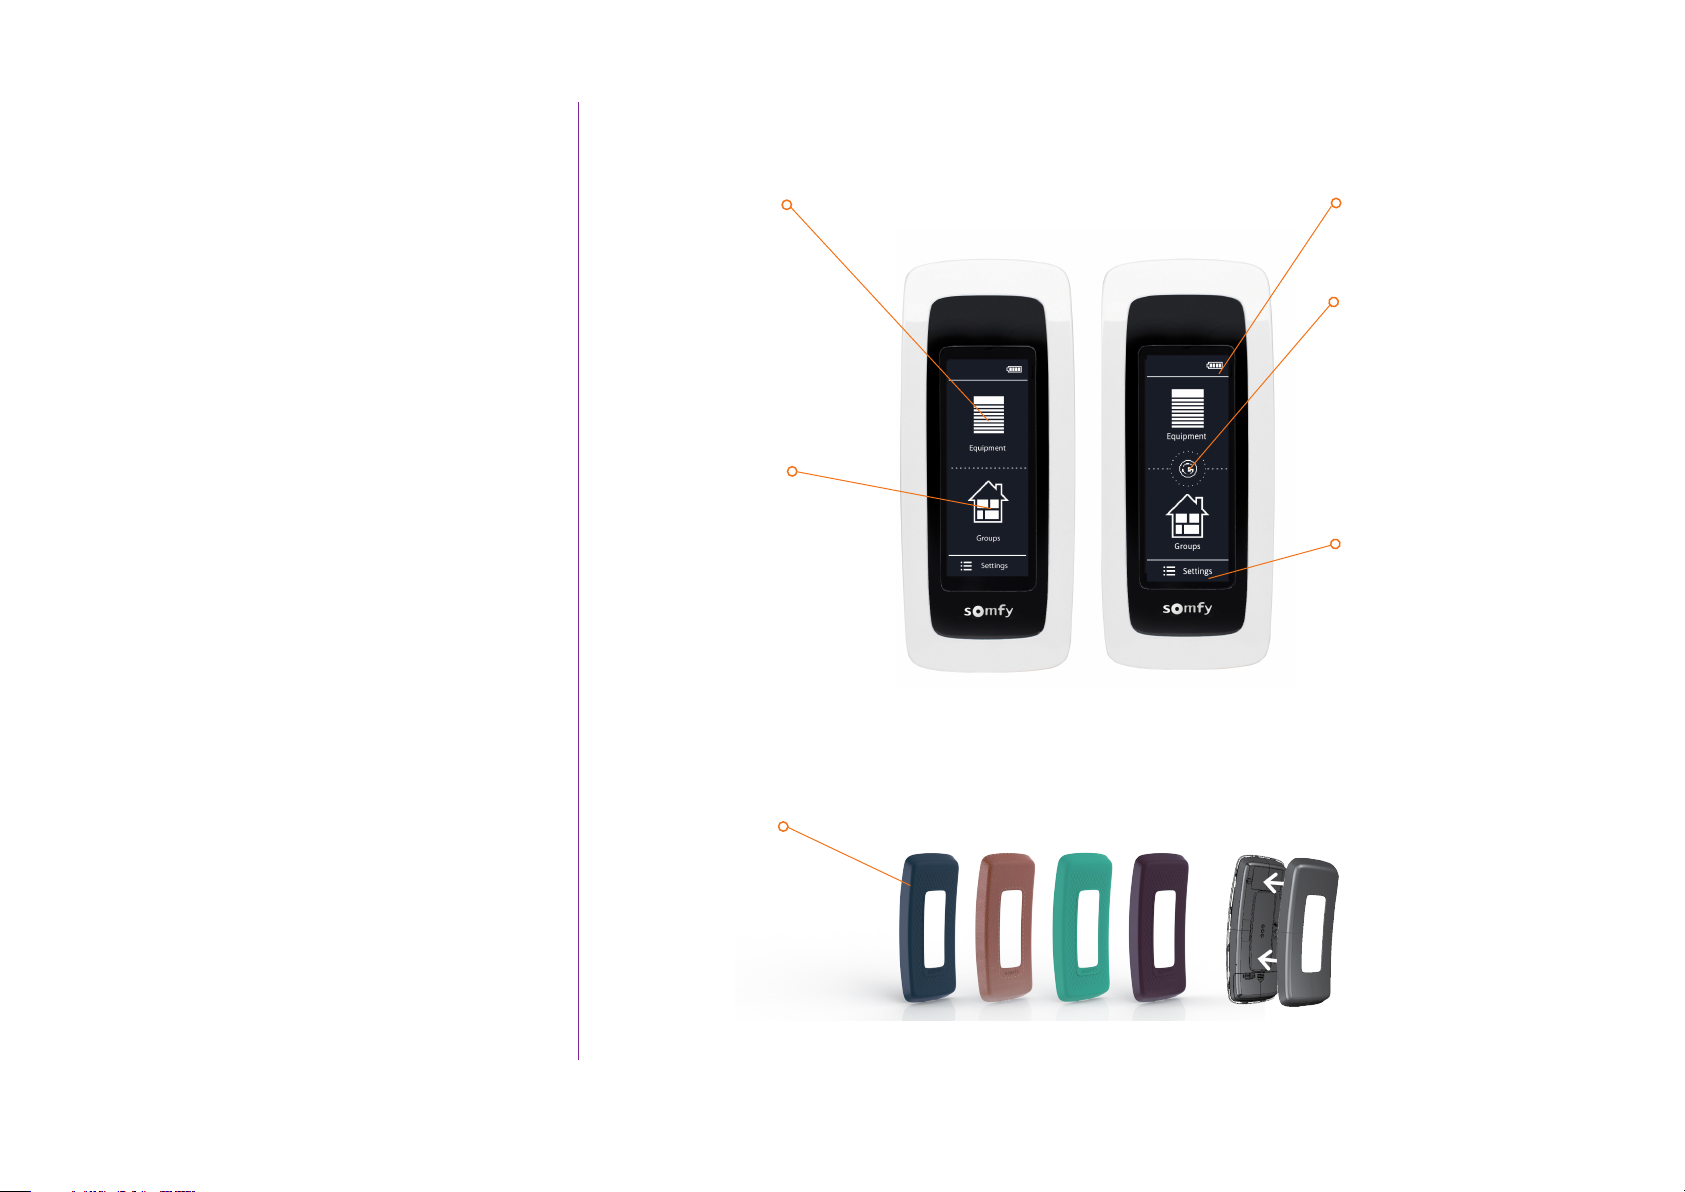
The home screen of Nina io remote control is composed of the following elements:
EQUIPMENT
ACCESS TO
EQUIPMENT
MANAGEMENT
BATTERY LEVEL
INDICATOR
NATURAL CONTROL
1. SAFETY 3
2. NINA IO REMOTE CONTROL 5
3. USE NINA IO 13
Control an item of equipment 13
My function 15
Natural Control function 19
Load a scenario 22
Alarm function 23
4. CUSTOMIZE NINA IO 25
Customize equipment 25
Customize groups 29
Customize scenarios 35
Customize remote control 40
5. ADVANCED SETTINGS 46
6. TROUBLESHOOTING 57
7. ABOUT NINA IO 58
List of equipment to
manage them one by one
GROUPS
ACCESS TO GROUPS
MANAGEMENT
List of groups to manage
equipment by groups, by
launching scenarios
CASES
COLLECTION OF CASES
Available cases (leather
or colored so touch) to
personalize Nina io
ACCESS TO NATURAL
CONTROL FUNCTION
Area to launch actions by
Up/Down movements
SETTINGS
ACCESS TO SETTING
MENUS
• Remote control settings:
languages, screen
parameters, management
by motion, sounds, about
Nina io, reset mode, alarm
code
• Groups/equipment
settings
• Installer settings:
functions only for a
professional motorisation
and home automation
installer
7
Non contractual pictures
Copyright © 2015-2016 Somfy SAS. All rights reserved.
SUMMARY
WELCOME PAGE 2
1. SAFETY 3
2. NINA IO REMOTE CONTROL 5
3. USE NINA IO 13
Control an item of equipment 13
My function 15
Natural Control function 19
Load a scenario 22
Alarm function 23
4. CUSTOMIZE NINA IO 25
Customize equipment 25
Customize groups 29
Customize scenarios 35
Customize remote control 40
Nina io navigation
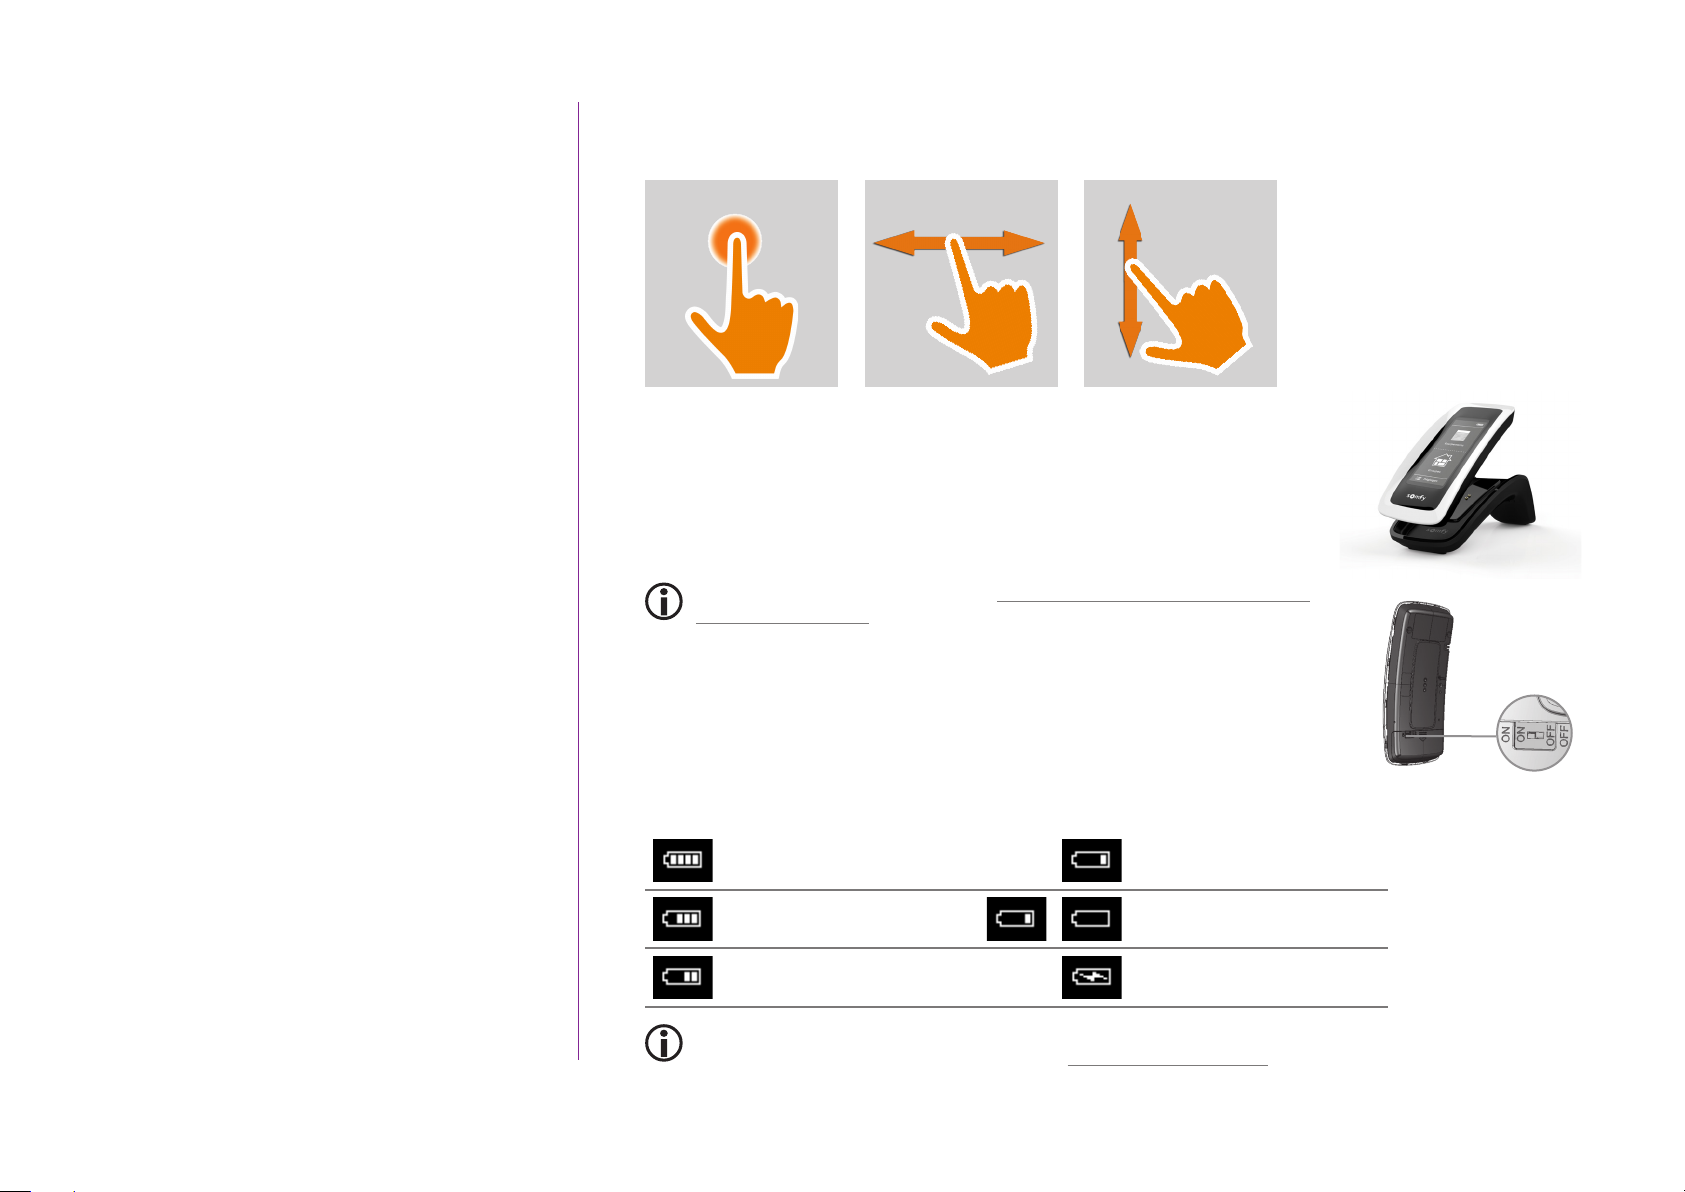
There are 3 types of gesture to navigate on the screen of Nina io:
Click Swipe*
Slide**
Nina io charger
To charge Nina io remote control, place it on its base.
Nina io remote control functioning when it is on the base: the screen is
always ON.
To deactive this function, refer to Manage state of screen when Nina
io on base, page 43.
If necessary, use the button at the back of the remote control to switch
ON/OFF Nina io.
• Battery level
The battery level is indicated by an evolutive icon as follows:
* Horizontal sweep
** Vertical sliding
5. ADVANCED SETTINGS 46
6. TROUBLESHOOTING 57
7. ABOUT NINA IO 58
8
Non contractual pictures
Copyright © 2015-2016 Somfy SAS. All rights reserved.
Battery full Battery 25%
Battery 75%
Battery 50% Battery in charge
When Nina io is in low battery, the intensity of backlight is reduced at 30%.
To charge or change the battery, refer to Nina io battery, page 9.
Battery <10% (flashing)
SUMMARY
WELCOME PAGE 2
1. SAFETY 3
2. NINA IO REMOTE CONTROL 5
3. USE NINA IO 13
Control an item of equipment 13
My function 15
Natural Control function 19
Load a scenario 22
Alarm function 23
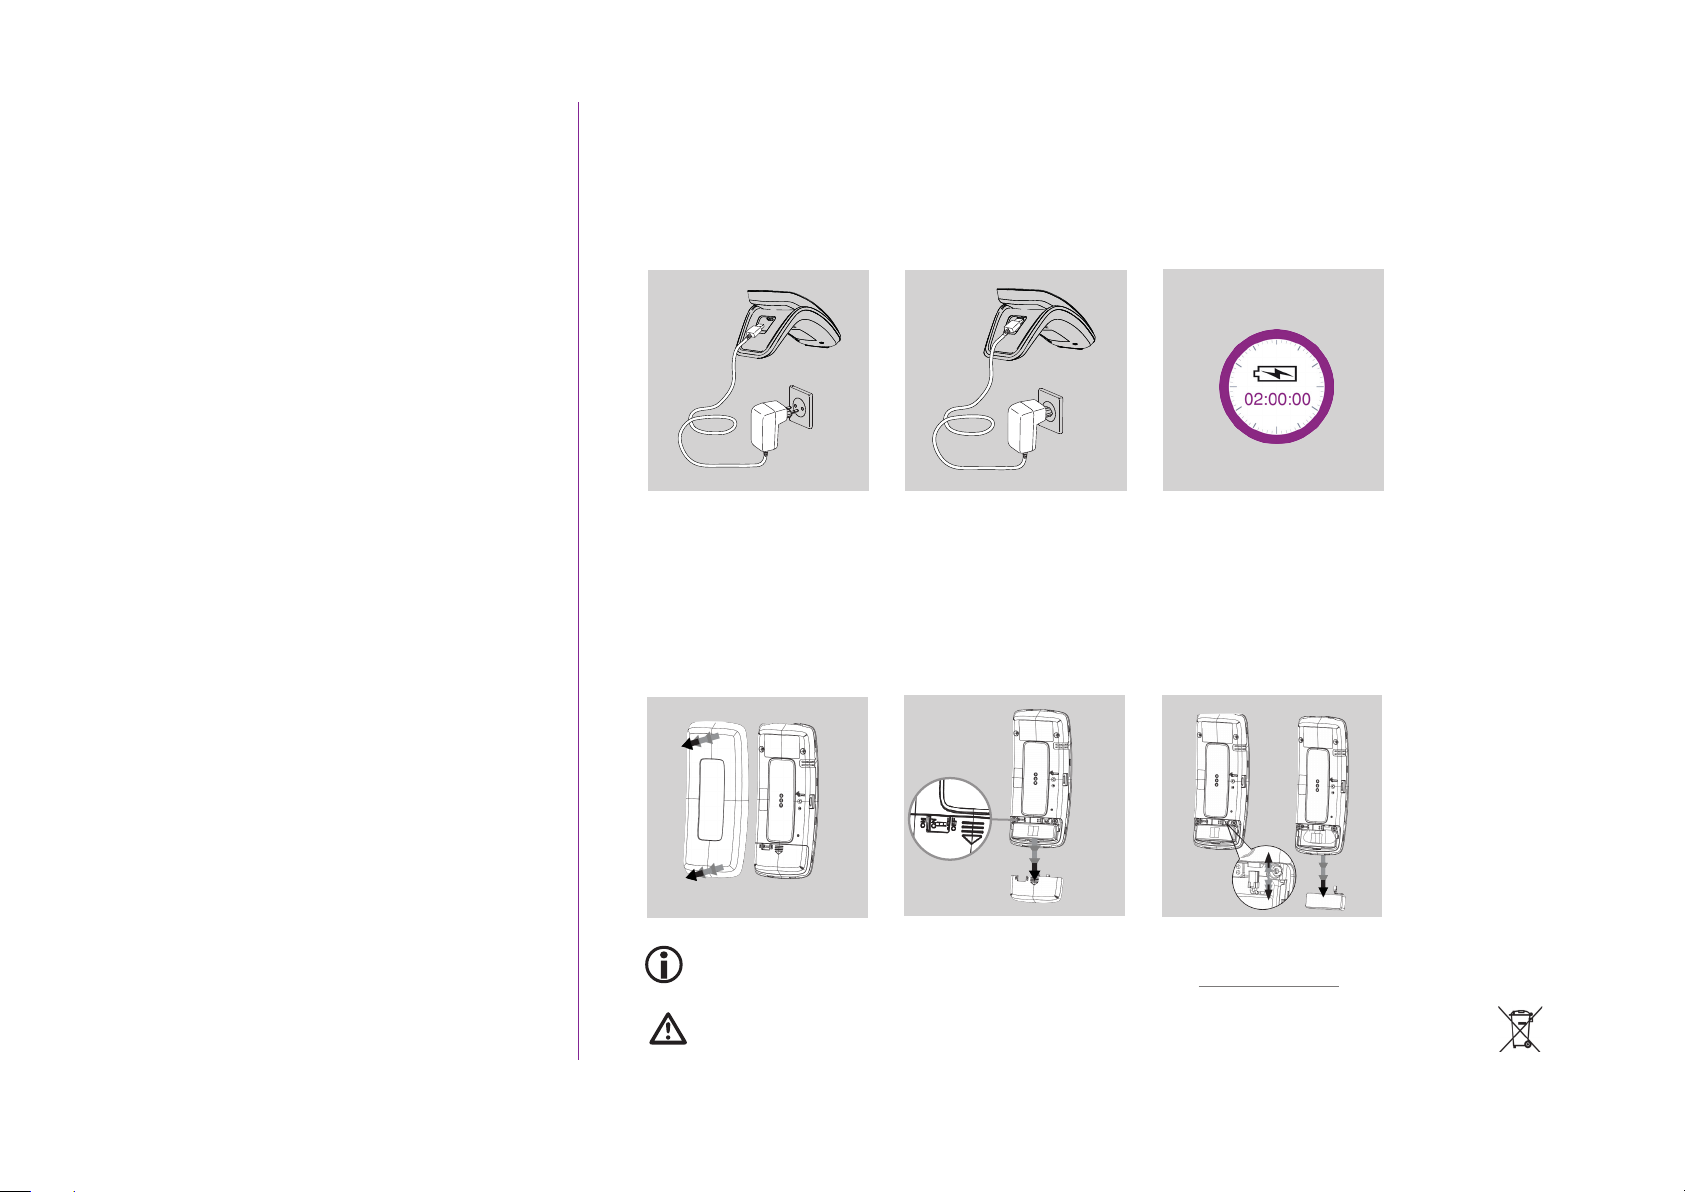
Nina io battery
• Charging the battery
1. Insert the extremity of the charger in the back of the base.
2. Plug the charger into an electrical outlet.
3. Wait about two hours when Nina io is fully discharged.
1
• Changing the battery
1. Remove the back face of the remote control to access the cover of the battery.
2. Turn off Nina io remote control and remove the cover of the battery by pushing it down.
3. Unplug the battery and then remove it from the remote control.
2
3
4. CUSTOMIZE NINA IO 25
Customize equipment 25
Customize groups 29
Customize scenarios 35
Customize remote control 40
5. ADVANCED SETTINGS 46
6. TROUBLESHOOTING 57
7. ABOUT NINA IO 58
9
Non contractual pictures
Copyright © 2015-2016 Somfy SAS. All rights reserved.
1
When the battery is removed, replace it with a new one, turn on Nina io and put on its battery
cover and its back face. Refer to the safety instructions SAFETY, page 3.
Ensure batteries are separated from other types of waste and are recycled via a local
recycling center.
2
3
SUMMARY
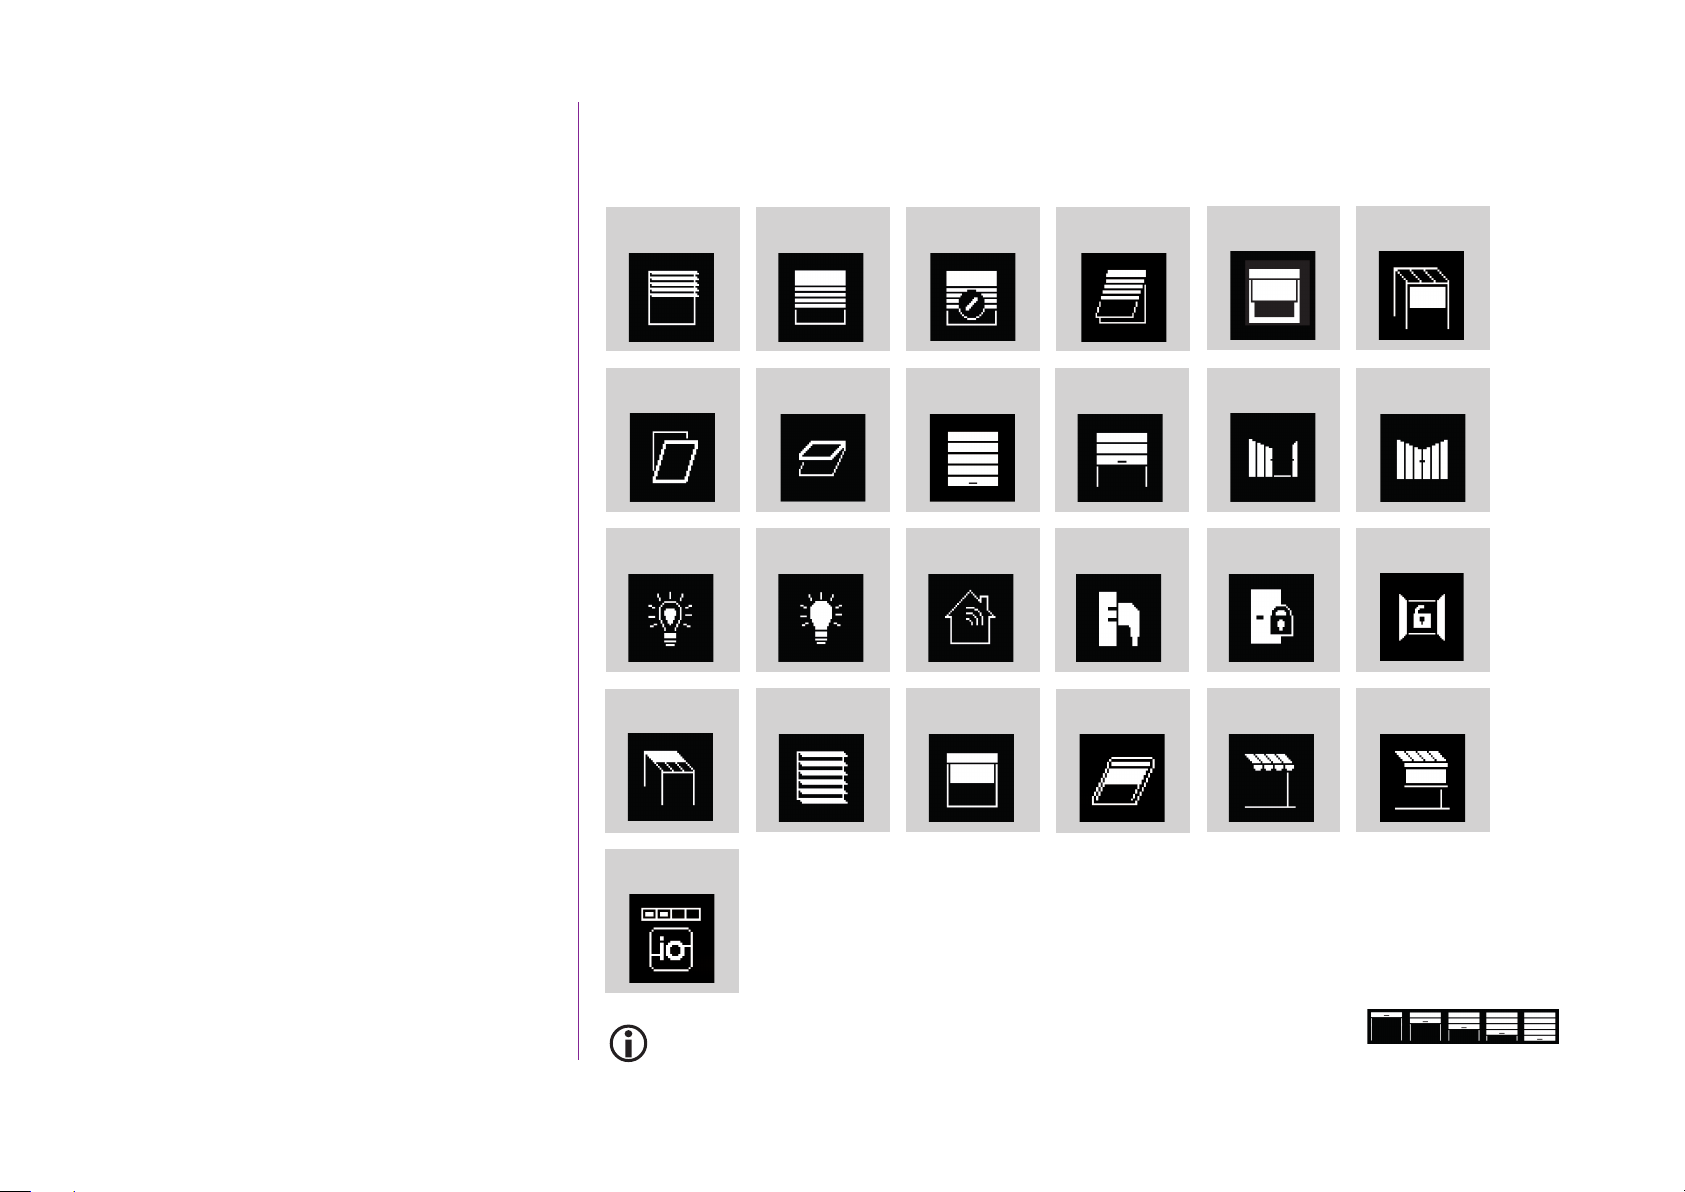
What is an equipment?
The Equipment menu allows to control and supervise the status of all equipment, one by one.
List of io compatible equipment and associated icons:
WELCOME PAGE 2
1. SAFETY 3
2. NINA IO REMOTE CONTROL 5
3. USE NINA IO 13
Control an item of equipment 13
My function 15
Natural Control function 19
Load a scenario 22
Alarm function 23
4. CUSTOMIZE NINA IO 25
Customize equipment 25
Customize groups 29
Customize scenarios 35
Customize remote control 40
Int. Venetian
Window
Light Dimmer Light On/Off
Horiz. Pergola
Roller
Shutter
Roof Window
Ext. Venetian
Tilt Rol.
Shutter
Garage Door
Alarm
Vertical Blind
Proj. Rol.
Shutter
Rolling Door
On Off Switch
Roof Screen
Ext. Vertical
Screen
Swinging Gate
Lock
Awning
Pergola
Screen
Gate
Open Close
Window Lock
Valance
5. ADVANCED SETTINGS 46
6. TROUBLESHOOTING 57
7. ABOUT NINA IO 58
10
Non contractual pictures
Copyright © 2015-2016 Somfy SAS. All rights reserved.
Generic io
equipment
Icons listed above are evolutive, their status differs according to their position:
Other io-homecontrol® actuators are available (Up / Stop / Down functions with generic icons)
SUMMARY
WELCOME PAGE 2
1. SAFETY 3
2. NINA IO REMOTE CONTROL 5
3. USE NINA IO 13
Control an item of equipment 13
My function 15
Natural Control function 19
Load a scenario 22
Alarm function 23
4. CUSTOMIZE NINA IO 25
Customize equipment 25
Customize groups 29
Customize scenarios 35
Customize remote control 40
5. ADVANCED SETTINGS 46
What is a group?
The Groups menu allows to group items of equipment together in order to simultaneously control
them.
A group can combine:
• A range of equipment (e.g. all the lights, rolling shutters or blinds of home),
• Items of equipment classified by rooms (e.g. all the equipment of the living room, the bathroom, etc.),
• Any group whatsoever (e.g north facade, south facade, etc.).
This way, it is easy to control all equipment by scenario with one click.
25 GROUPS ARE DEFINED BY DEFAULT AT INSTALLATION:
Home Bathroom Office
Living
room
Dining
room 1
Dining
room 2
Kitchen
5 NEW GROUPS CAN BE CREATED (MAXIMUM 30 GROUPS)
• Possibilities for customization:
Modify the equipment list of a group, page 29
Bedroom
1
Bedroom
2
Baby
room
Children’s
bedroom
Playground Outside Lights
Terrace Garage
Second
floor
First floor Facade 2
Create a new group, page 32
Ground
floor
Facade 1
Pergola
Rolling
shutters
Ext.
venetian
Zip
Screen
6. TROUBLESHOOTING 57
7. ABOUT NINA IO 58
11
Non contractual pictures
Copyright © 2015-2016 Somfy SAS. All rights reserved.
Rename a group, page 30
Change a group icon, page 31
To access all the customization functions of a group, refer to Customize groups, page 29.
Delete a group, page 33
Organize groups list, page 34
SUMMARY
WELCOME PAGE 2
1. SAFETY 3
2. NINA IO REMOTE CONTROL 5
3. USE NINA IO 13
Control an item of equipment 13
My function 15
Natural Control function 19
Load a scenario 22
Alarm function 23
4. CUSTOMIZE NINA IO 25
Customize equipment 25
Customize groups 29
Customize scenarios 35
Customize remote control 40
5. ADVANCED SETTINGS 46
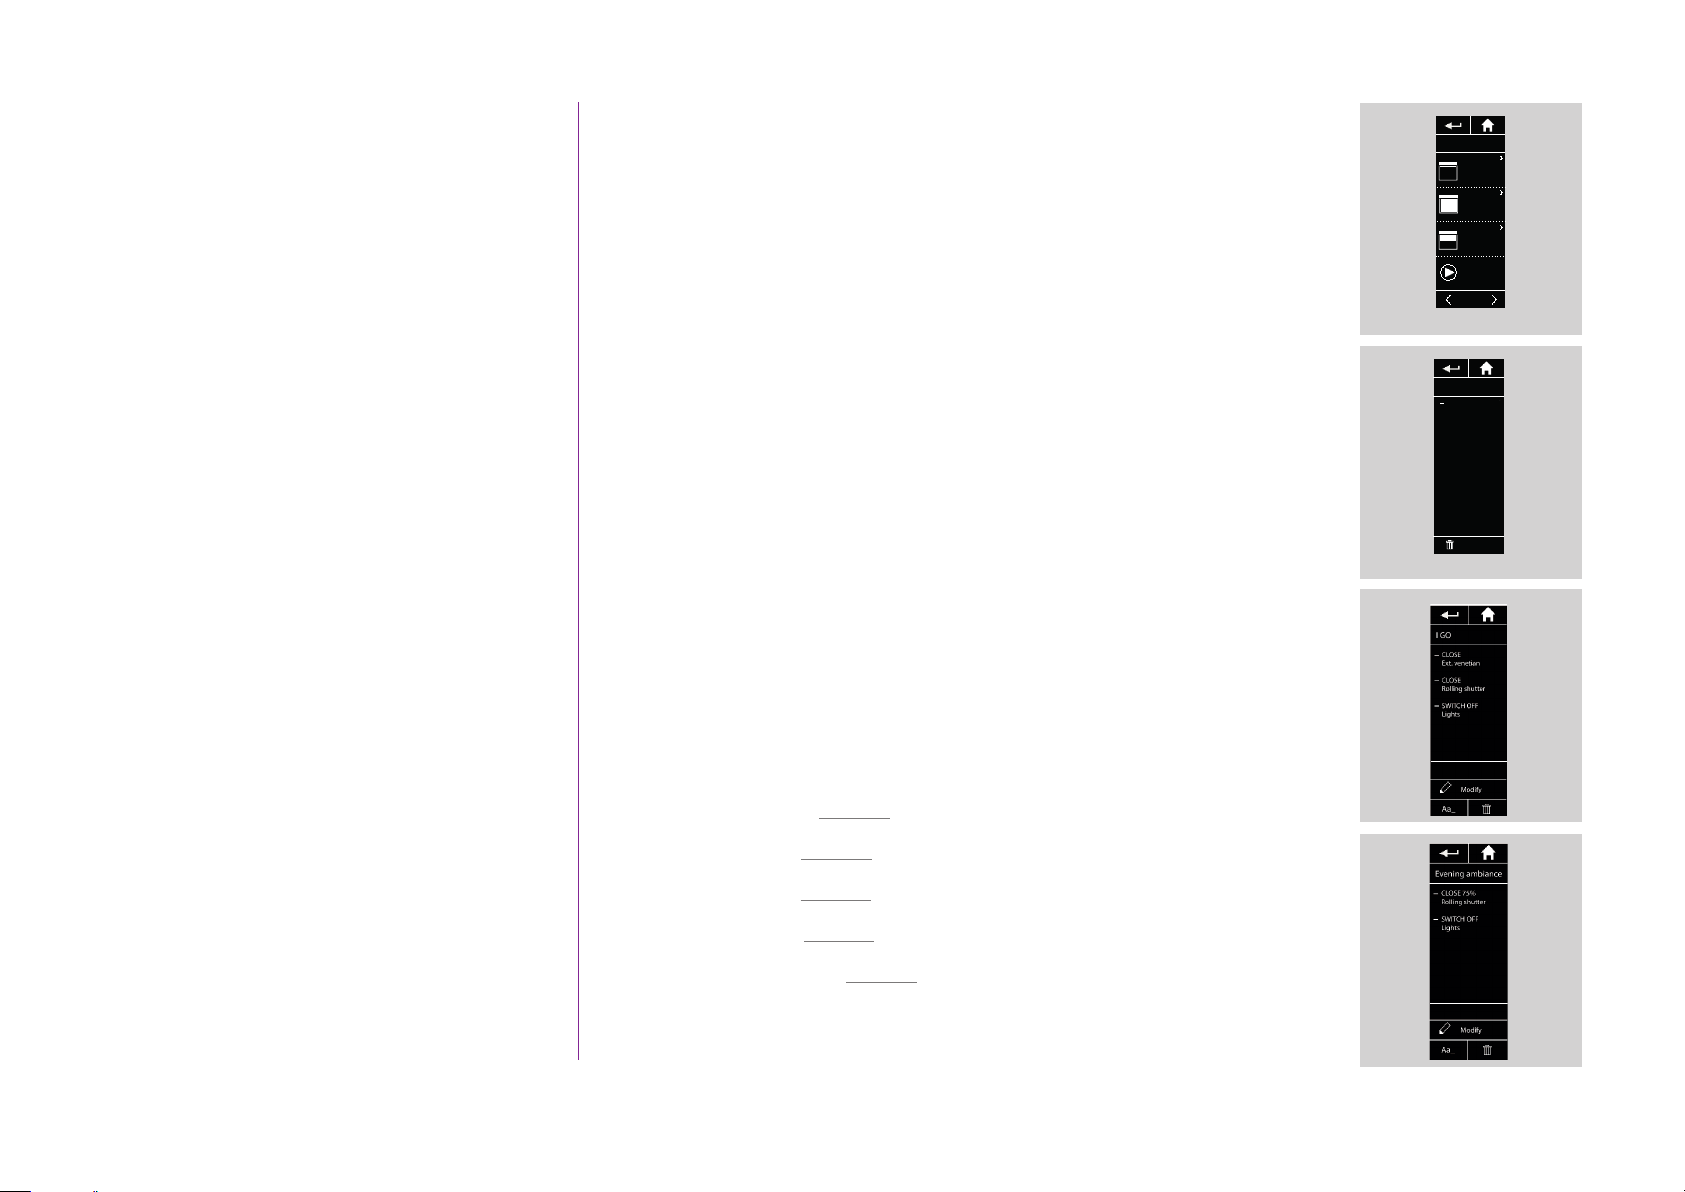
What is a scenario?
The Groups menu allows to launch predefined actions, called scenarios,
associated to one or more items of equipment of the selected group (e.g
open the vertical blind of the living room, switch on the light of the bedroom,
place the rolling shutter of the kitchen in My position, etc.).
It is also possible to create new scenarios by programing one or more items
of equipment of a group at the same time. For example, the ‘I go’ scenario
can regroup the closing of the exterior venetian, the closing of the rolling
shutter and the extinction of the lights.
In the created scenarios, the position of each equipment is configurable to
completely personalize the home ambiance in one click. For example, the
‘Evening ambiance’ scenario can program at the same time the closing of
the rolling shutter to 75% and the extinction of the lights.
• Scenarios defined by default at installation
Open/Close
Switch ON/OFF
My position
Up/Down
• Possibilities for customization:
Rename a scenario, page 36
Create a scenario, page 36
Modify a scenario, page 37
Living room
OPEN
Vertical Blind
CLOSE
Vertical Blind
MY
Vertical Blind
I GO
1/3
OPEN Vertical Blind
Vertical Blind
1/1
Delete
1/1
6. TROUBLESHOOTING 57
7. ABOUT NINA IO 58
12
Non contractual pictures
Copyright © 2015-2016 Somfy SAS. All rights reserved.
Delete a scenario, page 38
Organize scenarios list, page 39
1/1
3. USE NINA IO
SUMMARY
WELCOME PAGE 2
1. SAFETY 3
2. NINA IO REMOTE CONTROL 5
3. USE NINA IO 13
Control an item of equipment 13
My function 15
Natural Control function 19
Load a scenario 22
Alarm function 23
4. CUSTOMIZE NINA IO 25
Customize equipment 25
Customize groups 29
Customize scenarios 35
Customize remote control 40
5. ADVANCED SETTINGS 46
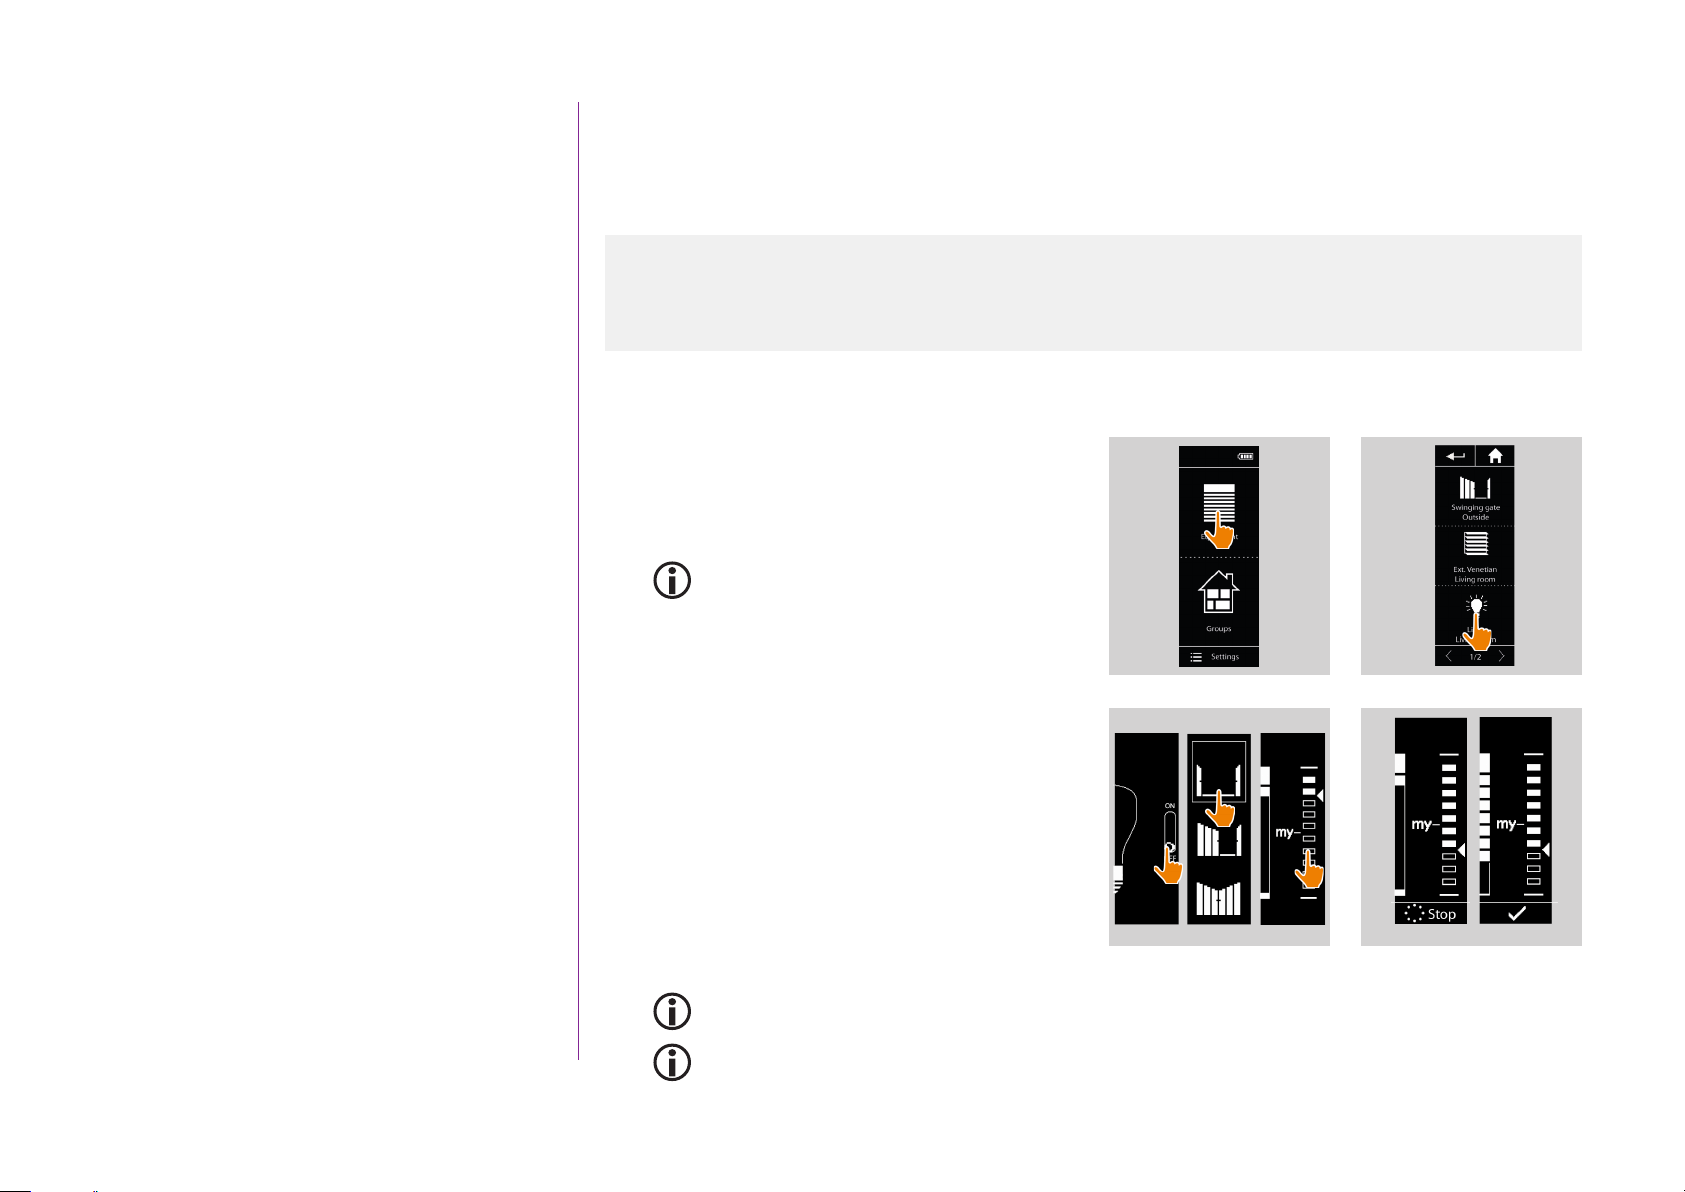
Control an item of equipment
Select an item of equipment 13 Control the equipment 13 Possibilities for control 14 Other available options 14
• Select an item of equipment
1. Select the Equipment menu by clicking on the
corresponding icon.
2. Select the equipment to control by clicking on
the corresponding icon.
All equipment is available using the
navigation buttons or the swipe.
> The available levels for the control of the
selected equipment are displayed.
• Control the equipment
3. Select the desired setting level by clicking or
sliding on the corresponding position (A, B or C).
4. The action starts once the button is released:
> A wheel and a Stop button are displayed when
the action is ongoing (E). Click on this button
to stop the action at any time.
1 2
3
4
6. TROUBLESHOOTING 57
7. ABOUT NINA IO 58
13
Non contractual pictures
Copyright © 2015-2016 Somfy SAS. All rights reserved.
> A checkmark is displayed when the action is
achieved (F).
If a problem occurs, the detected default is displayed and it is possible to start again the control
of the equipment.
By returning to the list of equipment, the icon of the selected equipment is changed according to
its new position.
A B C
E F
SUMMARY
WELCOME PAGE 2
Select an item of equipment 13
Control the equipment 13
Possibilities for control 14
Other available options 14
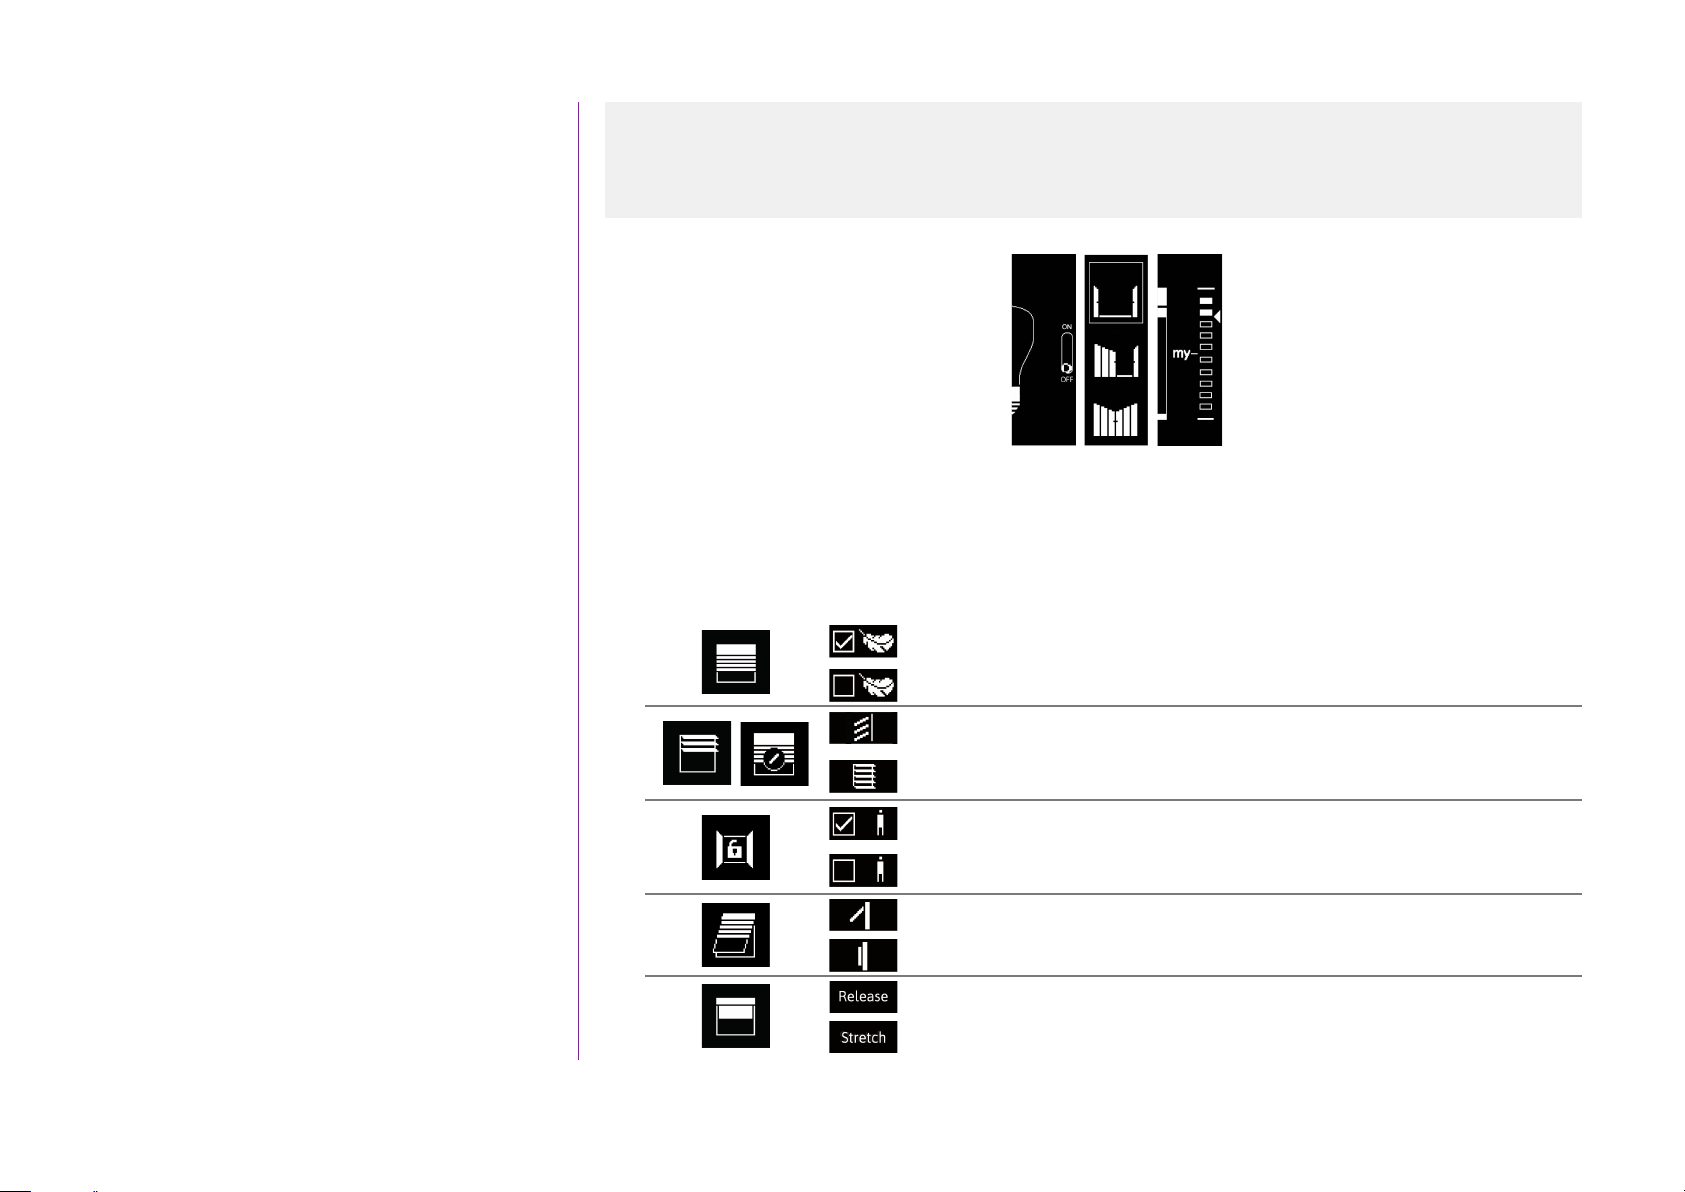
• Possibilities for control
Open/ Close (A)
1. SAFETY 3
2. NINA IO REMOTE CONTROL 5
3. USE NINA IO 13
Control an item of equipment 13
My function 15
Natural Control function 19
Load a scenario 22
Alarm function 23
4. CUSTOMIZE NINA IO 25
Customize equipment 25
Customize groups 29
Customize scenarios 35
Customize remote control 40
5. ADVANCED SETTINGS 46
6. TROUBLESHOOTING 57
Adjust (B)
Switch ON/OFF or Lock/Unlock (C)
• Other available options
Other options can be used to customize the control of equipment. These options are available
according to the selected equipment and are displayed at the bottom of the level scale.
Click on the following icons or checkboxes to activate the corresponding options before or during the
control of equipment:
To activate the discrete mode: slows the movement of the roller shutter
RS100 through its full travel.
To deactivate the discrete mode of the roller shutter RS100.
To control the orientation of the slats on venetian (exterior and interior)
and roller shutters with tilting slates (gradhermetic).
To control the raising/lowering of the slats on venetian blinds (exterior
and interior) and roller shutters with tilting slates (gradhermetic).
To activate the people option of the window lock: allows the opening of
the house from the inside if a person is present inside.
To deactivate the people option of the window lock: does not allow the
opening of the house from the inside.
To angle out the roller shutter.
To angle in the roller shutter.
A B C
7. ABOUT NINA IO 58
14
Non contractual pictures
Copyright © 2015-2016 Somfy SAS. All rights reserved.
To release the canvas of the vertical blind when it is in low position.
To stretch the canvas of the vertical blind when it is in low position.
My function
SUMMARY
WELCOME PAGE 2
1. SAFETY 3
2. NINA IO REMOTE CONTROL 5
3. USE NINA IO 13
Control an item of equipment 13
My function 15
Natural Control function 19
Load a scenario 22
Alarm function 23
4. CUSTOMIZE NINA IO 25
Customize equipment 25
Customize groups 29
Customize scenarios 35
Customize remote control 40
5. ADVANCED SETTINGS 46
Use the My function 15 Memorize the My position 16 Modify the My position 17 Delete the My position 18
The My function is used to memorize the favorite position of equipment, to customize the control of
home according to the preferences of the user.
• The My function is available on most equipment. If the function is not available for an equipment, the
My icon does not display.
• If the My position is already set, the My icon is displayed next to the memorized level. To modify or
delete this position, see page 17.
• If the My position is not preset, the My icon is dimmed at the top of the level scale. To memorize a My
position, see page 16.
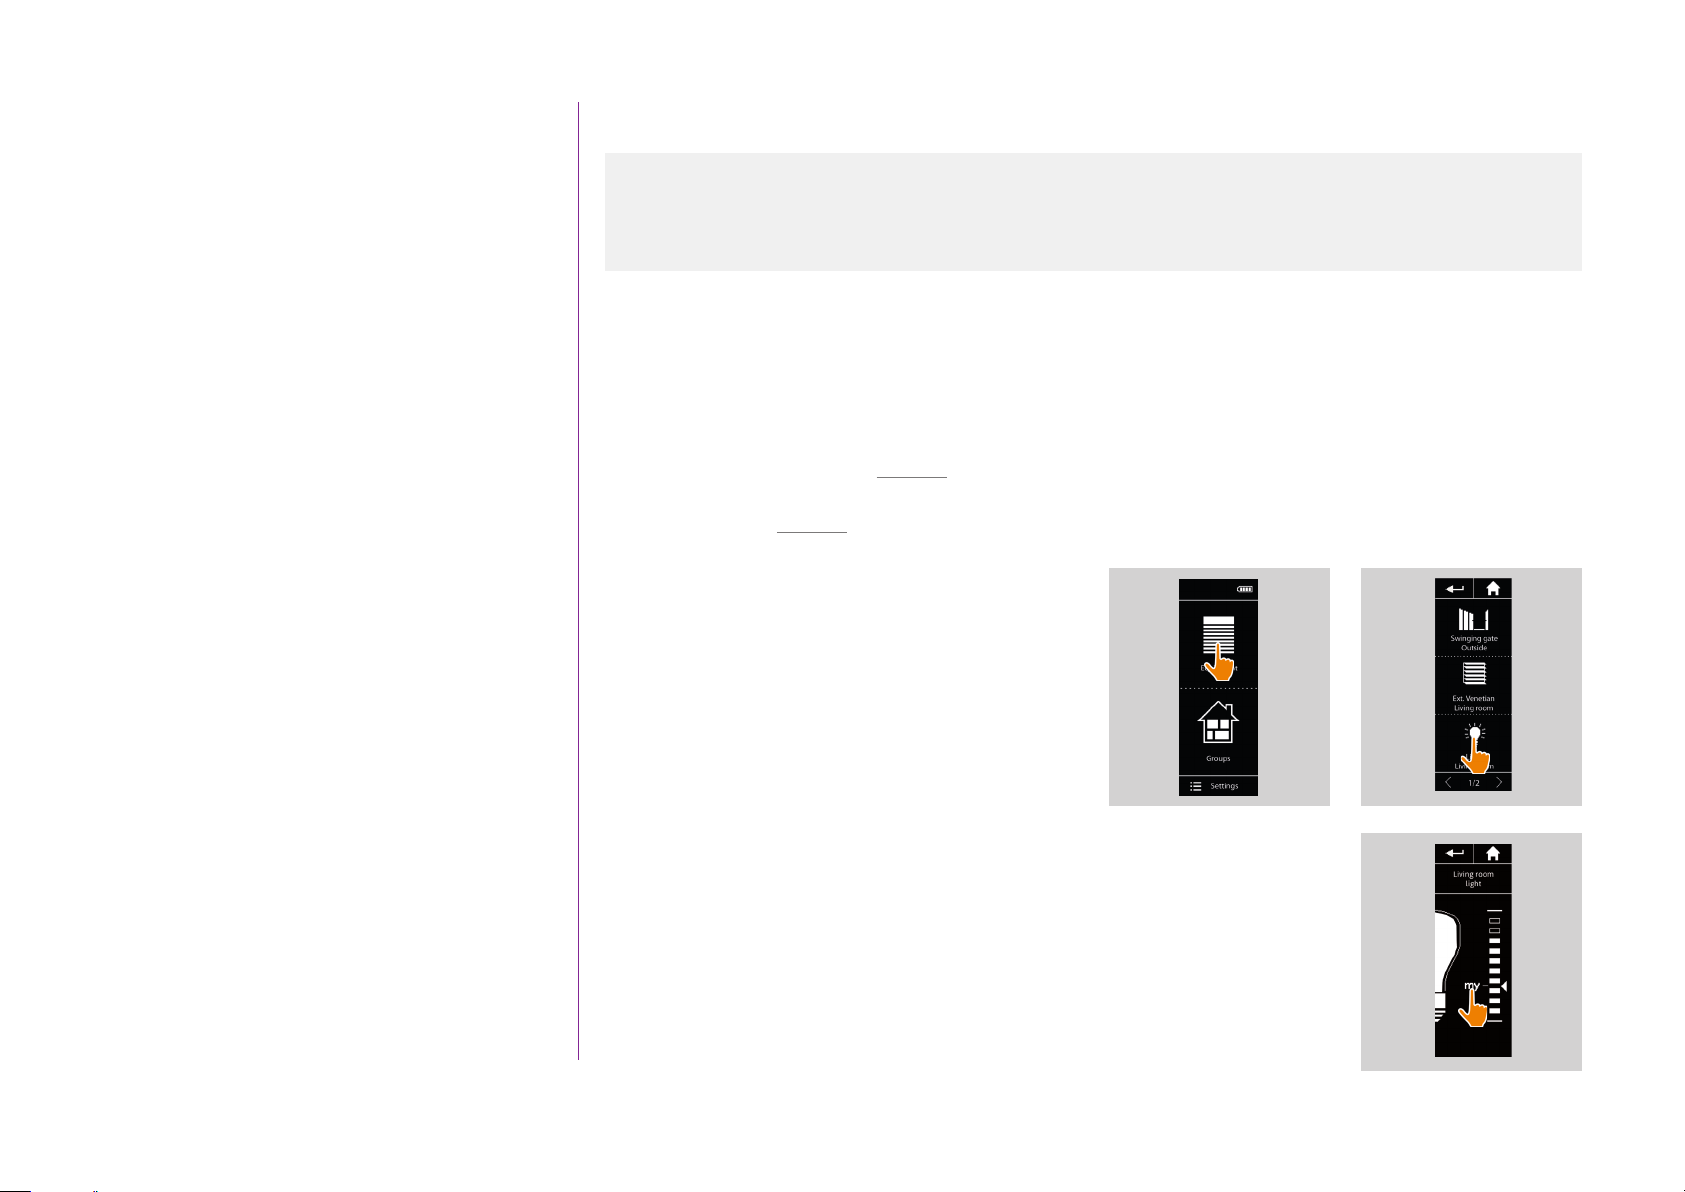
• Use the My function
Once the setting of the My level is performed,
the equipment can automatically be placed in
its favorite position, in only one click.
1. Select the Equipment menu by clicking on the
corresponding icon.
2. Select the desired equipment by clicking on the
corresponding icon.
> The My position of the selected equipment is
already set: the My icon is displayed next to the memorized level.
3. Briefly click on the My icon to place the selected equipment in the My position.
1 2
3
6. TROUBLESHOOTING 57
7. ABOUT NINA IO 58
15
Non contractual pictures
Copyright © 2015-2016 Somfy SAS. All rights reserved.
> The My button becomes outlined.
> A wheel and a Stop button are displayed when the action is ongoing. Click
on this button to stop the action at any time.
> A checkmark is displayed when the action is achieved.
SUMMARY
WELCOME PAGE 2
1. SAFETY 3
2. NINA IO REMOTE CONTROL 5
3. USE NINA IO 13
Control an item of equipment 13
My function 15
Natural Control function 19
Load a scenario 22
Alarm function 23
4. CUSTOMIZE NINA IO 25
Customize equipment 25
Customize groups 29
Customize scenarios 35
Customize remote control 40
Use the My function 15
Memorize the My position 16
Modify the My position 17
Delete the My position 18
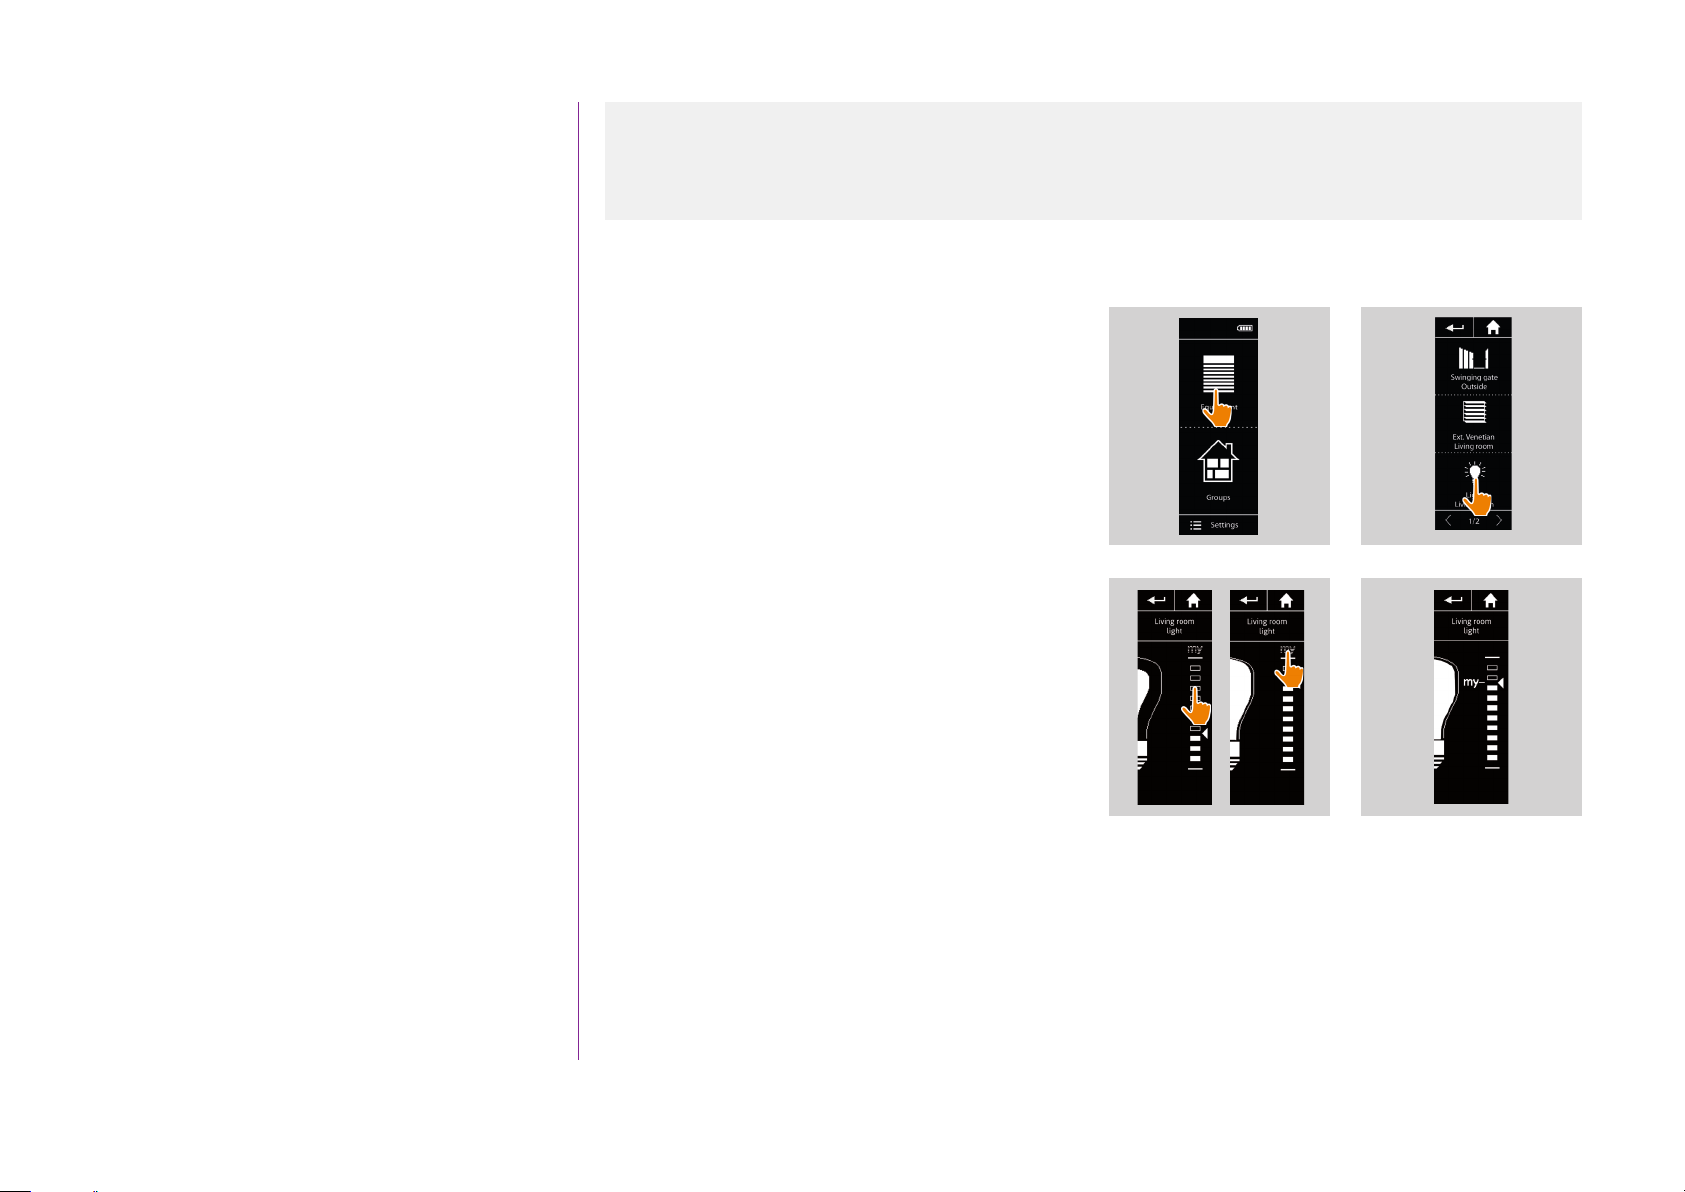
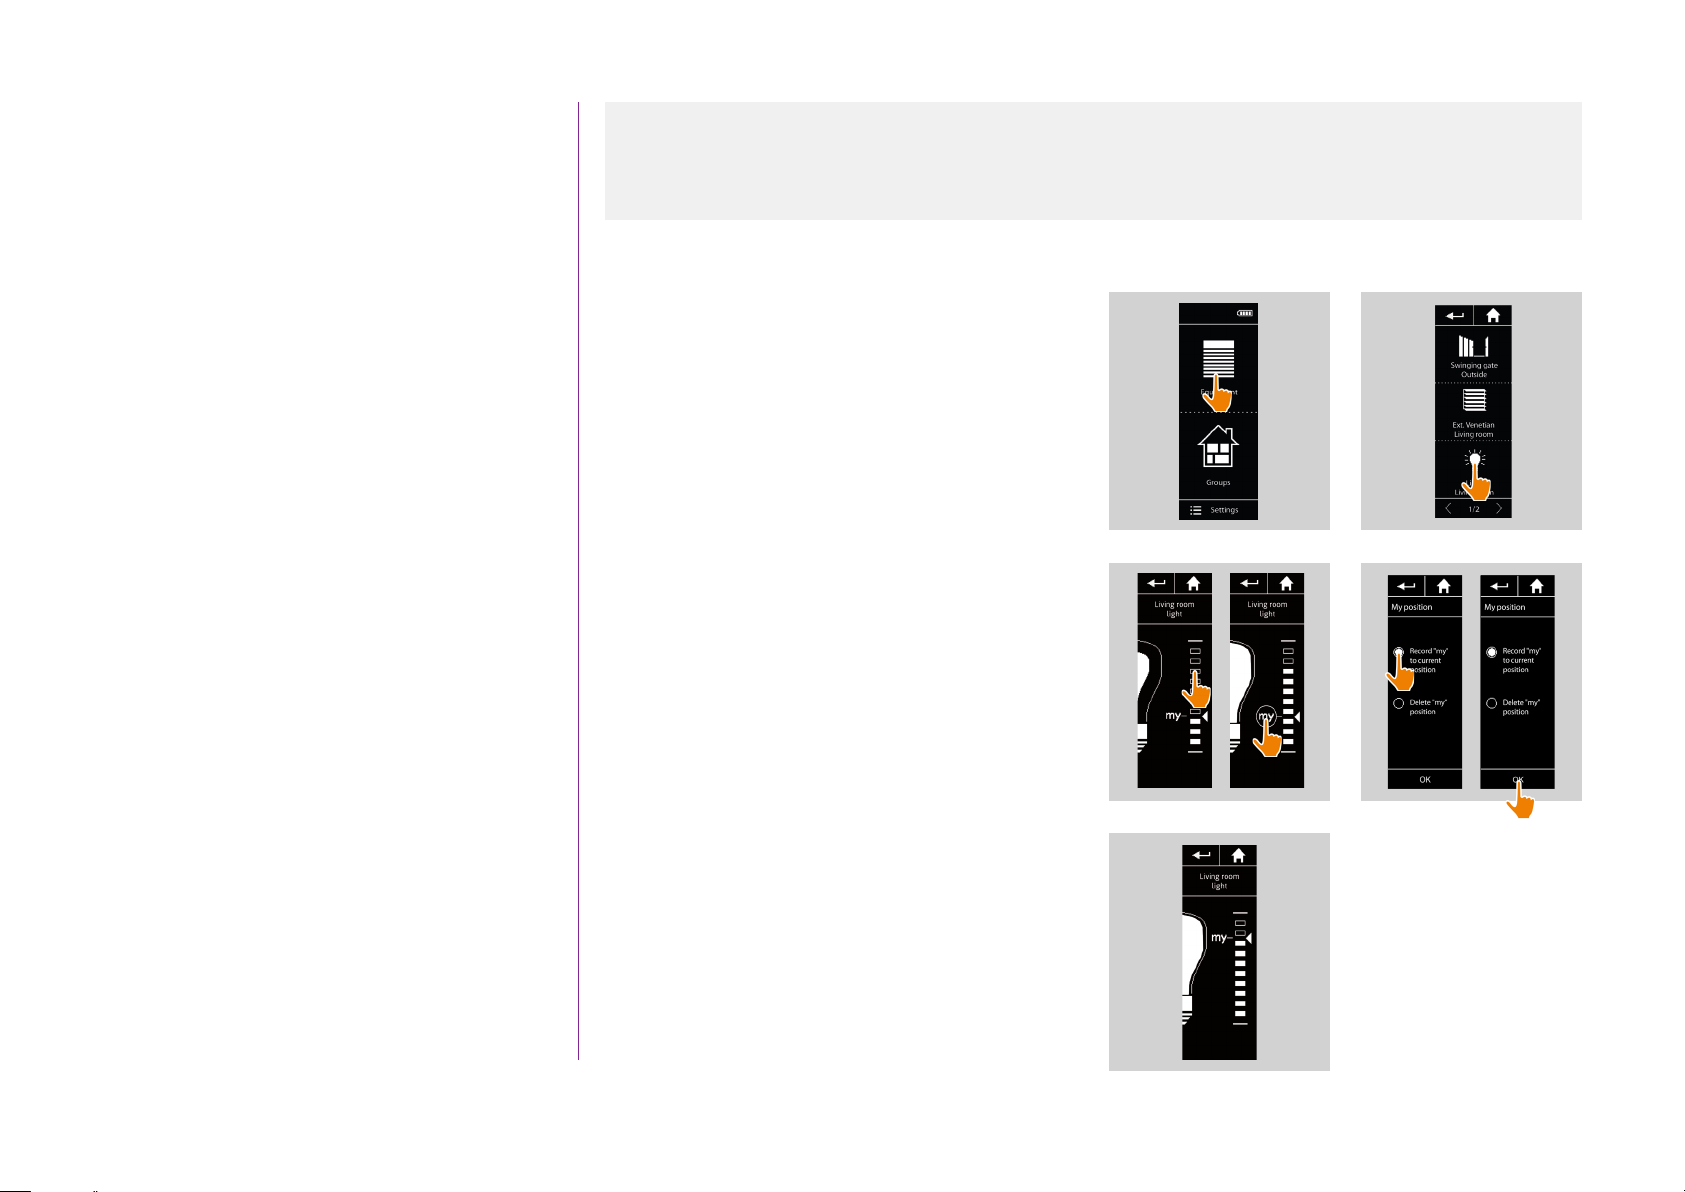
• Memorize the My position
1. Select the Equipment menu by clicking on the
corresponding icon.
2. Select the desired equipment by clicking on the
corresponding icon.
> The My position of the selected equipment is
not set: the My icon is dimmed at the top of
level scale.
3. Select the setting level of the selected equipment
by clicking or by sliding on the corresponding
position and then press and hold the dimmed
My icon for at least 5 seconds.
4. Aer this delay, the My icon is automatically
placed next to the predefined setting level.
> The My position is memorized.
1 2
3
4
5. ADVANCED SETTINGS 46
6. TROUBLESHOOTING 57
7. ABOUT NINA IO 58
16
Non contractual pictures
Copyright © 2015-2016 Somfy SAS. All rights reserved.
SUMMARY
WELCOME PAGE 2
1. SAFETY 3
2. NINA IO REMOTE CONTROL 5
3. USE NINA IO 13
Control an item of equipment 13
My function 15
Natural Control function 19
Load a scenario 22
Alarm function 23
Use the My function 15
Memorize the My position 16
Modify the My position 17
Delete the My position 18
• Modify the My position
1. Select the Equipment menu by clicking on the
corresponding icon.
2. Select the desired equipment by clicking on the
corresponding icon.
> The My position of the selected equipment is
already set: the My icon is displayed next to
the memorized level.
3. Select a new setting level by clicking or sliding
on the corresponding position and then press
and hold the My icon for at least 5 seconds.
4. Select the option ‘Record "my" to current
position’, then click on OK.
1 2
3
4
4. CUSTOMIZE NINA IO 25
Customize equipment 25
Customize groups 29
Customize scenarios 35
Customize remote control 40
5. ADVANCED SETTINGS 46
6. TROUBLESHOOTING 57
7. ABOUT NINA IO 58
17
Non contractual pictures
Copyright © 2015-2016 Somfy SAS. All rights reserved.
5. Aer this validation, the My icon is placed next
to the new predefined setting level.
> The new My position is memorized.
5
SUMMARY
WELCOME PAGE 2
1. SAFETY 3
2. NINA IO REMOTE CONTROL 5
3. USE NINA IO 13
Control an item of equipment 13
My function 15
Natural Control function 19
Load a scenario 22
Alarm function 23
4. CUSTOMIZE NINA IO 25
Customize equipment 25
Customize groups 29
Customize scenarios 35
Customize remote control 40
5. ADVANCED SETTINGS 46
Use the My function 15
Memorize the My position 16
Modify the My position 17
Delete the My position 18
• Delete the My position
1. Select the Equipment menu by clicking on the
corresponding icon.
2. Select the desired equipment by clicking on the
corresponding icon.
> The My position of the selected equipment is
already set: the My icon is displayed next to
the memorized level.
3. Click on the My icon for at least 5 seconds to
remove its memorized position.
4. Select the option ‘Delete "my" position’, then
click on OK.
5. Aer this validation, the My icon is automatically
dimmed and placed at the top of level scale.
> The My position is deleted.
1 2
3
5
4
6. TROUBLESHOOTING 57
7. ABOUT NINA IO 58
18
Non contractual pictures
Copyright © 2015-2016 Somfy SAS. All rights reserved.
Natural Control function
SUMMARY
WELCOME PAGE 2
1. SAFETY 3
2. NINA IO REMOTE CONTROL 5
3. USE NINA IO 13
Control an item of equipment 13
My function 15
Natural Control function 19
Load a scenario 22
Alarm function 23
4. CUSTOMIZE NINA IO 25
Customize equipment 25
Customize groups 29
Customize scenarios 35
Customize remote control 40
Use the Natural Control function 20
Associate equipment to the Natural Control function 21
Activate the Natural Control function 21
The Natural Control function allows to control all favorite equipment in only one click and a single
gesture, directly from the home screen.
No need to select the equipment or the group, or to enter the functionalities of Nina io. Aer having
associated one or more items of equipment to the Natural Control function, intuitively adjust their
position, simply by touching the central area of the screen and by orienting the remote control.
There are two possibilities of position for all equipment: up and down.
‘Up’ and ‘Down’, depending on the type of equipment will mean:
• To open/close (door, blind, portal, window, etc.)
• To turn on/off (light, plug)
• To unlock/lock (window)
All equipment may be associated to this function, except the alarm.
5. ADVANCED SETTINGS 46
6. TROUBLESHOOTING 57
7. ABOUT NINA IO 58
19
Non contractual pictures
Copyright © 2015-2016 Somfy SAS. All rights reserved.
 Loading...