

SOMFY Movelite RTS, Movelite Instructions Manual
www.somfy.com
Movelite
TM
RTS
INSTRUCTIONS
EN
NOTICE
FR
ANLEITUNG
DE
HANDLEIDING
NL
MANUALE
IT
GUÍA
ES
INSTRUÇÕES
PT
ΕΓΧΕΙΡΙΔΙΟ
EL
BRUGSVEJLEDNING
DA
KÄYTTÖOHJE
FI
BRUKSANVISNING
SV
BRUKSANVISNING
NO
INSTRUKCJA
PL
РУКОВОДСТВО
RU
ÚTMUTATÓ
HU
UPUTE
HR
UPUTSTVA
SR
NÁVOD
CS
INSTRUCȚIUNI
RO
ĸdž
ZH
操作&取付説明書
JP
ຫဧ໕
KO
TALIMATLAR
TR
ϝΕωϝϱϡΕ
AR
Ref. 5037821B

EN
These instructions apply to all MoveliteTM RTS motors, in all torque/speed.
These instructions are also applicable for Irismo Plus RTS
CONTENTS
1. Prerequisite information 2
1.1 Fields of application 2
1.2 liability 2
2. Installation 4
2.1. Installation 4
2.2. Wiring 4
2.3. Commissioning 4
2.4. Tips and recommendations for
installation 5
3. Use and maintenance 6
3.1. Open and Close buttons 6
3.2. STOP function 6
3.3. Favourite position (my) 6
3.4. Additional settings 6
3.5. Tips and recommendations for use 6
4. Technical data 6
1. PREREQUISITE INFORMATION
1.1 FIELDS OF APPLICATION
The MoveliteTM motor is designed to drive all types of curtain track
1.2 LIABILITY
Any use outside the scope of application specified by SOMFY is
non-compliant. SOMFY cannot be held liable for any such use
or failure to observe these instructions, which will also result in
warranty being voided. Should any doubt arise during installation
of the drive or in order to obtain additional information, please
visit the www.Somfy.com website or refer to your SOMFY contact.
IMPORTANT SAFETY INSTRUCTIONS FOR INSTALLATION
WARNING: Important safety instructions. Follow all instructions,
since incorrect installation can lead to severe injury.
Please give these instructions to the user aer installation.
The drive must be installed by an installer who is qualified in
driveised systems and domestic automation.
The installer must inform the user of the need to arrange maintenance for the driveised unit and its associated accessories. He
must specify items that require maintenance, replacement or
checking.
Ensure that the weight and dimension of the product to be
driveised are compatible with the rated torque and rated operating
time. These information are available from your Somfy contact.
Use only accessories (Curtain track, brackets, etc.) listed by
SOMFY to fit to a unit. Part numbers for accessories are available
from your SOMFY contact.
Please refer to the SOMFY literature to ascertain the control
point(s) compatible with the actuator selected.
Fixed controls shall be clearly visible aer installation.
A suitable multi-pole switching device must be incorporated
upstream in the fixed wiring in accordance with the wiring rules.
2
Copyright © 2018 SOMFY ACTIVITÉS SA, Société Anonyme. All rights reserved.

EN
If the supply cord is damaged, it must be replaced by an identical
cord. If the cord is not removable, return the drive to aer sales
department to avoid a hazard.
To reduce the risk of electric shock, this equipment must have
a proper grounding. Some Drives versions are supplied with a
grounding type plug, that has a third (grounding) pin. This plug
will only fit into a grounding type outlet. If the plug does not fit
into the outlet, contact a qualified electrician to install the proper
outlet. Do not change the plug in any way.
The actuating member of a biased-off switch is to be located within direct sight of the driven part but away from moving parts. It
is to be installed at a minimum height of 1,5 m and not accessible
to the public.
IMPORTANT SAFETY INSTRUCTIONS
WARNING: Important safety instructions. It is important for the
safety of persons to follow these instructions.
Save these instructions.
WARNING: The drive shall be disconnected from its power source
during cleaning, maintenance and when replacing parts.
-Your installer should inform you of any maintenance required.
Do not allow children to play with fixed controls. Keep remote
controls away from children.
Watch the driveised installation while it is moving and keep
people away until the driveised installation is fully extended.
The drive shall be disconnected from its power source during
cleaning, maintenance and when replacing parts.
Frequently examine the installation for imbalance and signs of
wear or damage to cables and springs. Do not use if repair or
adjustment is necessary.
This appliance can be used by children aged from 8 years and
above and persons with reduced physical, sensory or mental
capabilities or lack of experience and knowledge if they have been
given supervision or instruction concerning use of the appliance in
a safe way and understand the hazards involved.
Cleaning and user maintenance shall not be made by children
without supervision.
Children shall not play with the appliance.
Before installing the drive, remove any unnecessary cords and
disable any equipment not needed for powered operation.
If the drive is fitted with a manual release, install its actuating
member at a height less than 1,8 m.
LpA ≤70 dB(A).
SOMFY ACTIVITÉS SA, Société Anonyme,, F-74300 CLUSES as manufacturer hereby declares
that the drive covered by these instructions when marked for input voltage 230V~50Hz and
used as intended according to these instructions, is in compliance with the essential requi-
rements of the applicable European Directives and in particular of the Machinery Directive
2006/42/EC, and the Radio Directive 2014/53/EU.
The full text of the EU declaration of conformity is available at www.somfy.com/ce.
Antoine Creze, Approval manager, acting on behalf of Activity director, Cluses, 01/2018
Copyright © 2018 SOMFY ACTIVITÉS SA, Société Anonyme. All rights reserved.
3
EN
Safety warning!
1
Caution!
Information
For the illustration, see page 122.
2. INSTALLATION
Instructions which must be followed by the drive and home automation professional installing the MoveliteTM
motor.
1
Never drop, knock, drill or submerge the drive.
Install a separate control point for each drive.
2.1. INSTALLATION
2.1.1. Installation of the rail (Fig A)
1) Mark the position of the brackets.
2) Drill the ceiling or the wall at the right places.
3) Attach the brackets.
4) Attach the rail on the brackets.
2.2. WIRING
Cables which pass through a metal wall must be protected and isolated using a sheath or sleeve.
Attach cables to prevent any contact with moving parts.
Leave the drive power supply cable accessible: it must be possible to replace it easily.
- Switch off the power supply.
- Connect the drive according to the information in the table below:
AC wiring
DCT wiring
(Fig C)
(Fig C1)
Wire 100V to 240V
1 Neutral Blue
2 Live Brown
3 Earth Yellow / Green
(Fig C2)
1 CCW (Open) NO Dry contact 4
2 5 Stop - NO Dry contact
3 Ground Common 6 CW (Close) NO Dry contact
2.1.2. Installation of the motor (Fig B)
1) Unlock the motor
2) Insert the motor sha into the drive pulley hole.
3) Lock the motor.
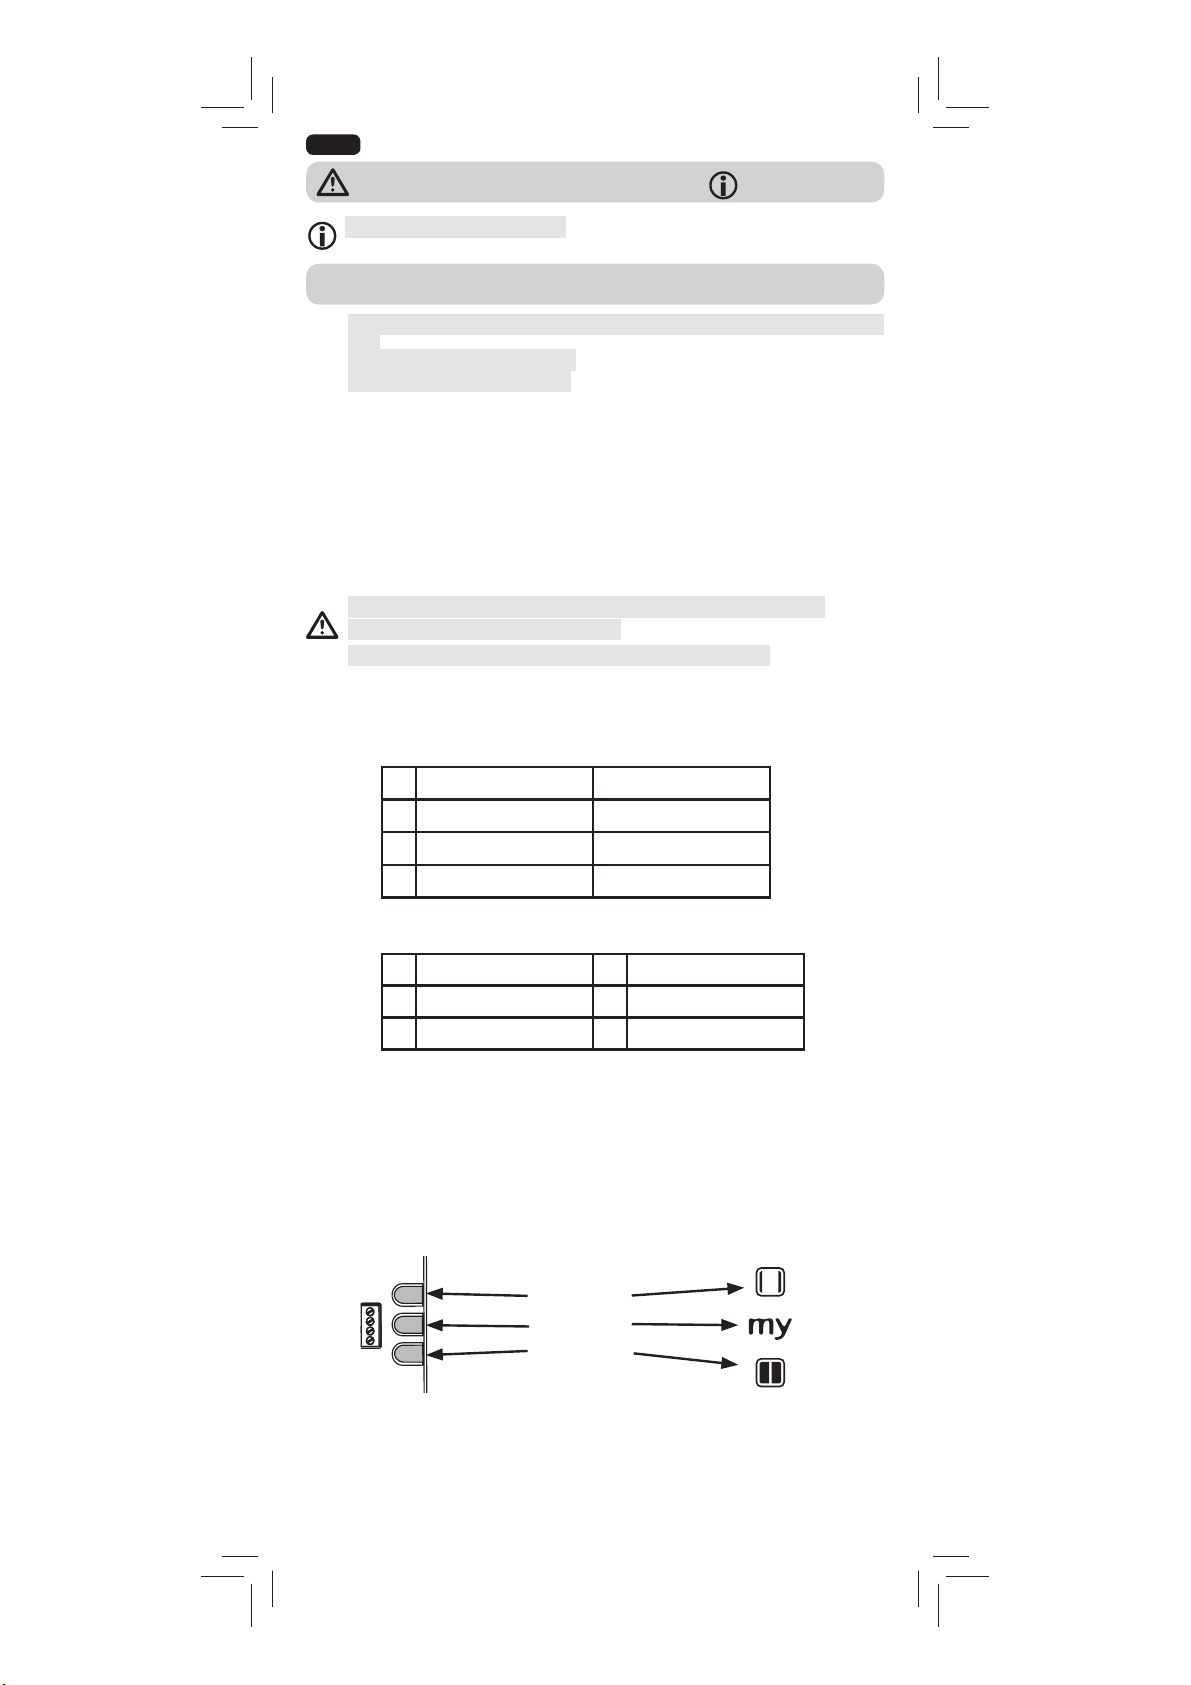
Compatible controls - Wiring of control
1) Setting tool
2) Centralis IB
3) 2 NO (Normally Open) Dry contact switch
(Fig D)
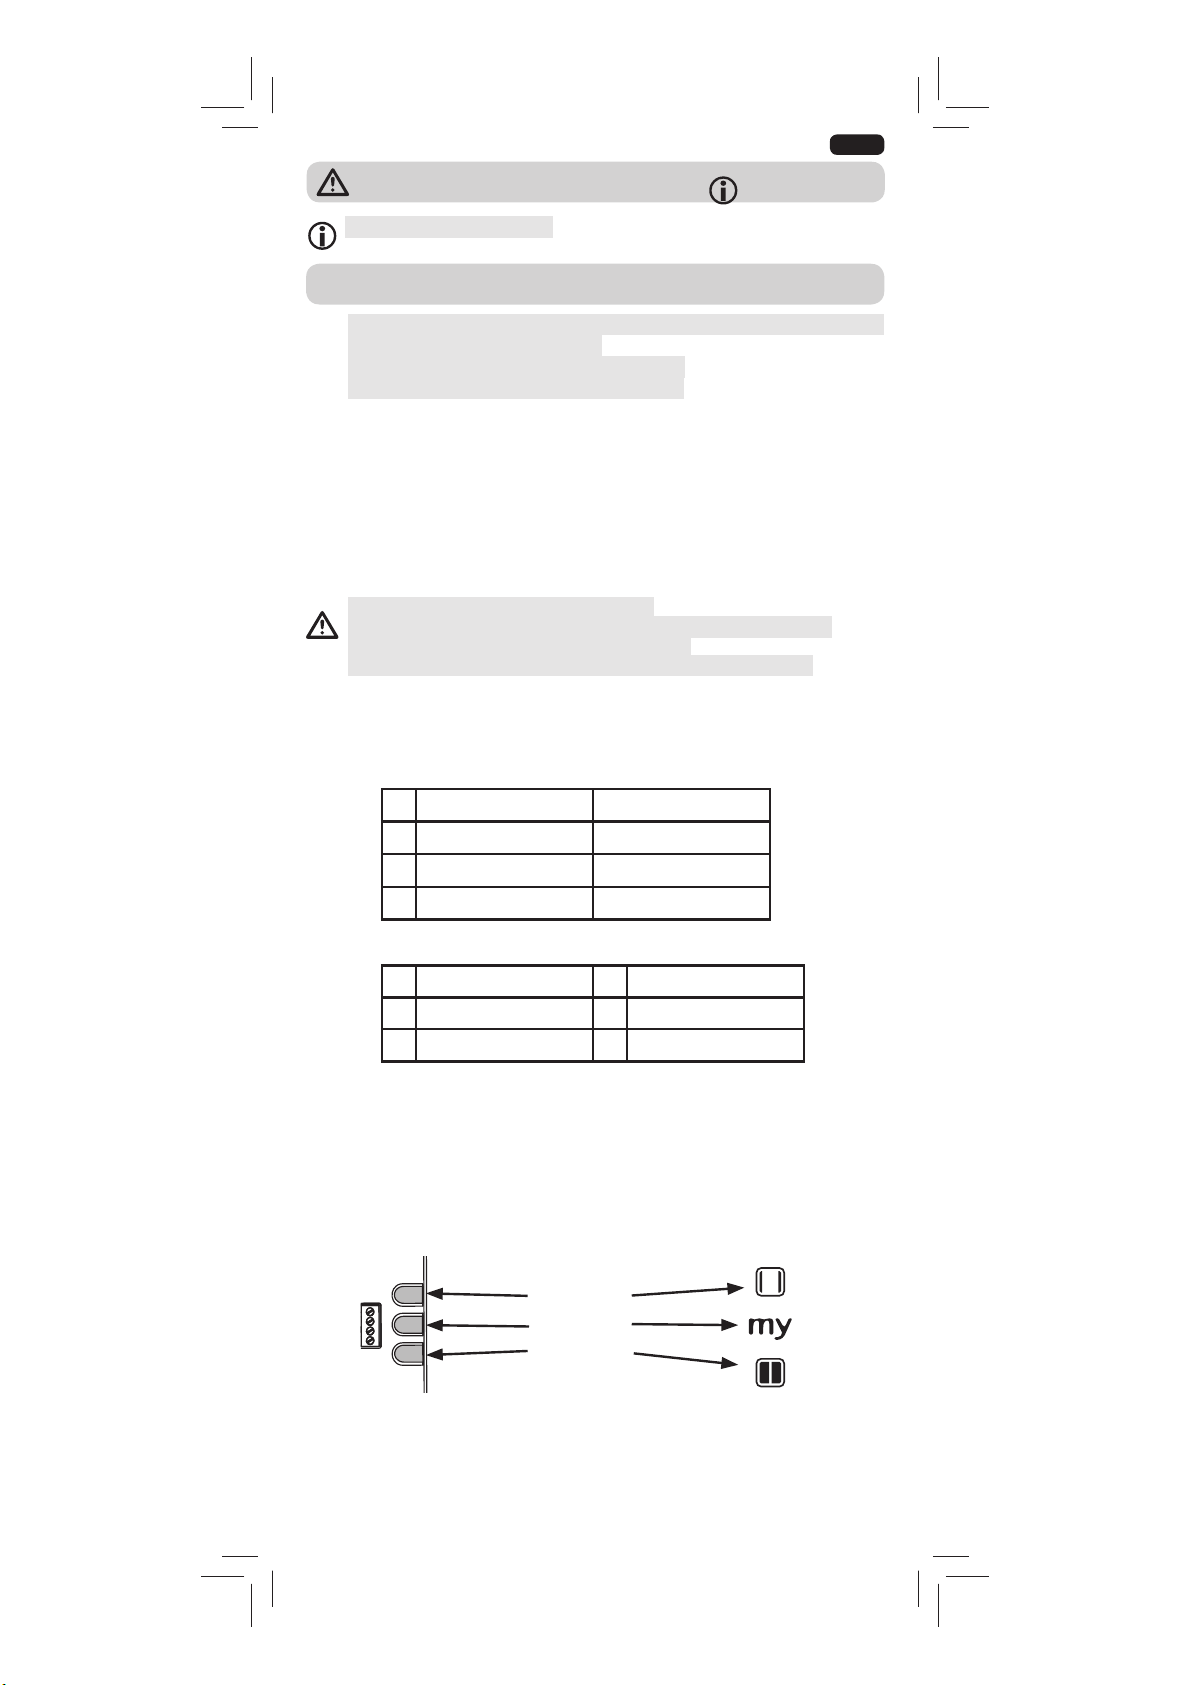
2.3. COMMISSIONING
DCT Setting tool RTS control point
Open
my/Stop
Close
2.3.1. Pre-programming the RTS control point (only for RTS version) (Fig E)
1)Switch on the power supply
2) Press the Open and Close buttons on the RTS control point at the same time: The motorised product moves up and
down, and the RTS control point is pre-programmed in the motor.
4
Copyright © 2018 SOMFY ACTIVITÉS SA, Société Anonyme. All rights reserved.
EN
2.3.2. Setting the end limits
At the first command Open or Close, the motorised product make a first run to record the hard stop position.
2.3.3. Checking the direction of rotation (Fig F)
1) Press the Open button on the RTS control point:
a) If the motorised product opens (a), the direction of rotation is correct.
b) If the motorised product closes (b), the direction of rotation is incorrect: Move onto the next step.
2) Press the my button on the RTS control point until the motorised product moves: The direction of rotation has been
modified.
3) Press the Open button on the RTS control point to check the direction of rotation.
2.3.4. Recording the RTS control point (Fig G)
Press the PROG button on the back of the control point until the motorised product moves. The remote control address
is permanently recorded.
2.3.5. Adjusting the Touch motion sensitivity (Fig H)
1) Press the Open and Close buttons of the RTS control point simultaneously until the motorised product moves.
2) Press the Open and Close buttons simultaneously until the motorised product moves to switch from high sensitivity,
to low sensitivity, to no touch motion, and back to high sensitivity.
3) Press the my button until the motorised product moves to confirm the setting.
2.3.6. Dry contact ergonomics setting : Standard or 2 buttons sequencing (Fig I)
1) Press the Open,Stop and Close buttons of the DCT setting tool simultaneously until the motorised product moves.
2) Press the Stop and Close buttons of the DCT setting tool simultaneously until the motorised product moves to
change the ergonomics.
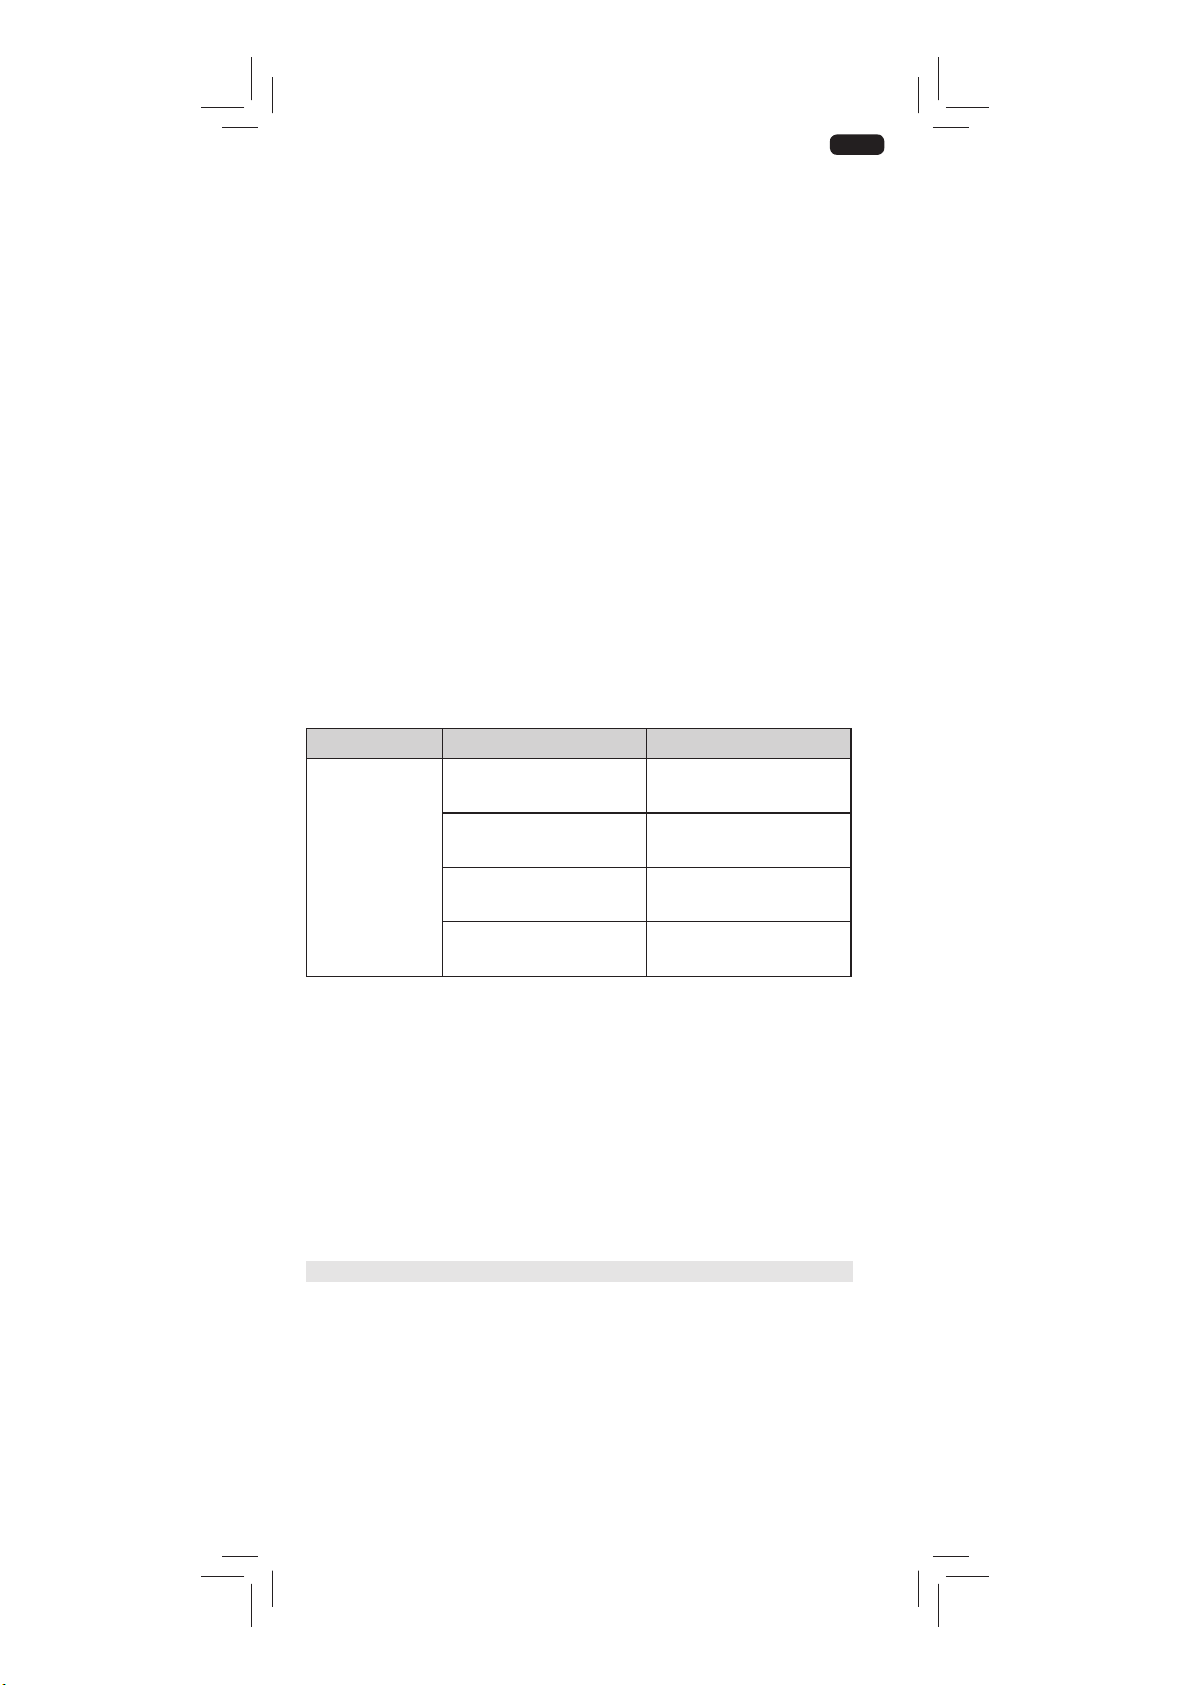
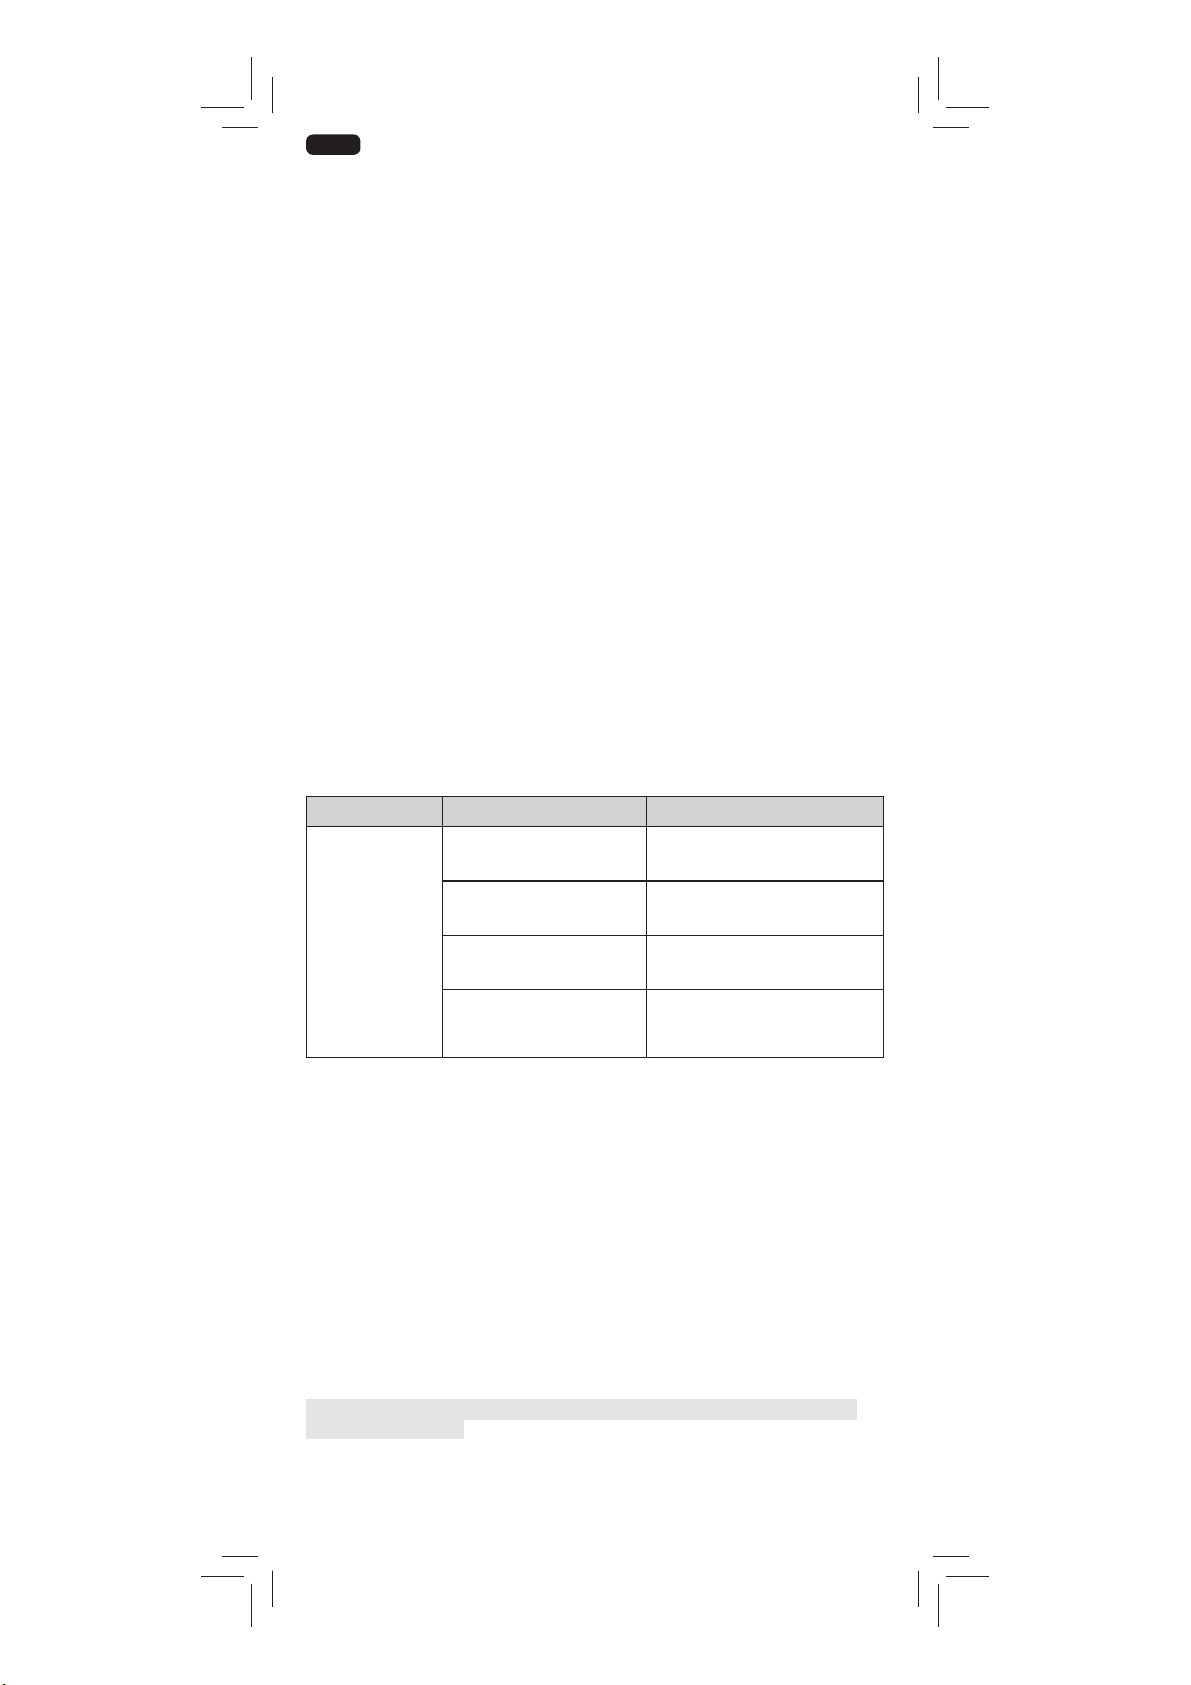
2.4. TIPS AND RECOMMENDATIONS FOR INSTALLATION
2.4.1. Questions about the MoveliteTM?
Observations Possible causes Solutions
The wiring is incorrect. Check and reconnect the power supply
The motorised product does
not operate.
The control point battery is weak.
The control point is not
compatible.
The control point used has not been
programmed into the motor.
Check whether the battery is weak and
replace it if necessary.
Check for compatibility and replace the
control point if necessary.
Use a programmed control point or program
this control point.
2.4.2. Re-setting the end limits
Readjusting the Open end limit (Fig J)
1) Press the Open button to move the motorised product to the end limit to be readjusted.
2) Press the Open and Close buttons of the RTS control point simultaneously until the motorised product moves.
3) Press the Open or Close button to move the motorised product to the new desired position.
4) To confirm the new end limit, press the my/Stop button until the motorised product moves.
Readjusting the Close end limit (Fig K)
1) Press the Close button to move the motorised product to the end limit to be readjusted.
2) Press the Open and Close buttons of the RTS control point simultaneously until the motorised product moves.
3) Press the Open or Close button to move the motorised product to the new desired position.
4) To confirm the new end limit, press the my/Stop button until the motorised product moves.
2.4.3. Erasing the control point from the memory of the motor (Fig L)
This reset deletes all the local control points, however the end limit settings and favourite position are retained.
To delete all the programmed control points, use a pin to press and hold the motor PROG button until the motorised
product moves twice.
All the control points are deleted.
Copyright © 2018 SOMFY ACTIVITÉS SA, Société Anonyme. All rights reserved.
5
EN
2.4.4. Erasing the memory of the motor (Fig M)
This reset deletes all control points, all the sensors and all the end limit settings, and resets the motor’s favourite
position (my).
To reset the motor, use a pin to press and hold the PROG button until the motorised product moves 3 times.
All the settings are erased.
3. USE AND MAINTENANCE
This drive is maintenance-free
3.1. OPEN AND CLOSE BUTTONS (Fig N)
Pressing the Open or Close button fully opens or closes the motorised product.
3.2. STOP FUNCTION (Fig O)
The motorised product is moving.
Briefly press my: the motorised product stops automatically.
3.3. FAVOURITE POSITION (my) (Fig P)
The motorised product is stopped.
Briefly press my: the motorised product starts to move, and stops in the favourite position (my).
To modify or delete the favourite (my) position, see the section entitled “Additional settings”
3.4. ADDITIONAL SETTINGS
3.4.1. Modifying the favourite position (my) (Fig Q)
1) Place the motorised product in the desired favourite position (my).
2) Press my for ≈5 seconds until the motorised productmoves: the desired favourite position (my) has been programmed.
3.4.2. Deleting the favourite position (my) (Fig R)
1) Press my: the motorised product starts to move, and stops in the favourite position (my).
2) Press my again until the motorised product moves: the favourite position (my) is deleted.
3.4.3. Adding/Deleting Somfy control points
Refer to the corresponding guide
3.4.4. Modifying the motor rotation direction (Fig S)
Move the motorised product away from the end limits.
1) Press the Open and Close buttons of the RTS control point simultaneously until the motorised product moves.
2) Press the my button until the motorised product moves to reverse the rotation direction.
3.5. TIPS AND RECOMMENDATIONS FOR USE
3.5.1. Questions about the MoveliteTM?
Observations Possible causes Solutions
The motorised product
does not operate.
If the motorised product still does not work, contact a motorisation and home automation professional.
3.5.2. Replacing a lost or broken Somfy control point
To replace a lost or broken control point, contact a Somfy motorisation and home automation professional.
The control point battery is weak.
The motorisation is in thermal protection mode. Wait for the motor to cool down.
Check whether the battery is weak and
replace it if necessary.
4. TECHNICAL DATA
Power supply
Radio frequency
Operating temperature 0°C to + 60°C
Index protection rating IP 30
Safety level Class I
100V - 240V
433.42 MHz
6
Copyright © 2018 SOMFY ACTIVITÉS SA, Société Anonyme. All rights reserved.

FR
Ces instructions s’appliquent à tous les moteurs MoveliteTM RTS, quelque soit le couple et la vitesse.
SOMMAIRE
1
. Informations préalables 7
1.1 Domaine d’application 7
1.2 Responsabilité 7
2. Installation 9
2.1. Montage 9
2.2. Câblage 9
2.3. Mise en service 9
2.4. Astuces et conseils d’installation 10
3. Utilisation et maintenance 11
3.1. Touches Ouverture et Fermeture 11
3.2. Fonction STOP 11
3.3. Position favourite (my) 11
3.4. Réglages supplémentaire 11
3.5. Astuces et conseils d’utilisation 11
4. Données techniques 11
1. INFORMATIONS PRÉALABLES
1.1 DOMAINE D’APPLICATION
Le moteur MoveliteTM est destiné à motoriser tous type de rail de rideau.
1.2 RESPONSABILITÉ
INSTRUCTIONS DE SÉCURITÉ OBLIGATOIRE.
Toute utilisation hors du domaine d’application défini par SOMFY
est non conforme. Elle entraînerait, comme tout irrespect des
instructions figurant dans cette notice, l’exclusion de la responsabilité et de la garantie SOMFY.
Si un doute apparaît lors de l’installation du moteur ou pour
obtenir des informations complémentaires, consulter le site web
www.somfy.com, ou contacter votre interlocuteur SOMFY
INSTRUCTIONS IMPORTANTES DE SÉCURITÉ POUR L’INSTALLATION
WARNING: Consignes de sécurité importantes. Suivez toutes les
instructions, car une mauvaise installation peut entraîner des
blessures graves.
Veuillez donner ces instructions à l’utilisateur après l’installation.
Le moteur doit être installé et réglé par un installateur, professionnel de la motorisation et de l’automatisation de l’habitat.
L’installateur doit informer l’utilisateur de la nécessité d’organiser
une maintenance pour le produit motorisé et les accessoires qui
lui sont associés. Il doit préciser les éléments qui nécessitent un
entretien, un remplacement ou une vérification.
Le couple, la durée de fonctionnement et la vitesse de la motorisation SOMFY doivent être compatibles avec les caractéristiques
du produit motorisé : votre interlocuteur SOMFY met à disposition
une méthode de sélection des moteurs par application.
Utiliser uniquement des accessoires (rails, supports, etc.)
référencés par SOMFY pour équiper le produit. Les références des
accessoires sont disponibles auprès de votre interlocuteur SOMFY.
Pour connaître le(s) point(s) de commande compatible(s) avec
la motorisation sélectionnée, se référencer à la documentation
SOMFY.
Installer les dispositifs de commande fixes visiblement.
Un dispositif de commutation multipolaire approprié doit être
incorporé en amont dans le câblage fixe en conformité avec les
règles de câblage.
Si le câble d’alimentation est endommagé, il doit être remplacé
par un câble identique. Si le câble n’est pas démontable,
retourner la motorisation au SAV pour éviter tout danger.
Copyright © 2018 SOMFY ACTIVITÉS SA, Société Anonyme. All rights reserved.
7

FR
Pour éviter les risques d’électrocution, la motorisation doit être
correctement reliée à la terre.
Certaines versions de moteur sont fournies avec une prise male
équipée d’un
connecteur de terre. Cette prise est uniquement prévue pour être
insérée dans une prise murale reliée à la terre. Si la prise du
moteur ne correspond pas à la prise murale, prenez
contact avec électricien certifié. Ne changez pas la prise vousmême.
-L’organe de maneuvre d’un interrupteur sans verrouillage doit
être en vue directe de la partie entraînée, mais éloigné des parties mobiles. Il doit être installé à une hauteur minimale de 1,5m
et non-accessible au public.
-La zone d’écrasement se trouve à une hauteur supérieure à 2,50
m par rapport au sol ou de tout autre accès.
INSTRUCTIONS IMPORTANTES DE SÉCURITÉ
MISE EN GARDE : il est important pour la sécurité des personnes
de suivre toutes les instructions.
Conserver ces instructions.
MISE EN GARDE : La motorisation doit être déconnectée de l’alimentation électrique lors d’opération de nettoyage, de maintenance ou lors de remplacement de pièces.
Votre installateur doit vous informer des opérations de maintenance nécessaires.
Ne pas laisser les enfants jouer avec les dispositifs de commande
fixes. Mettre les dispositifs de télécommande hors de portée des
enfants.
Surveiller l’appareil pendant qu’il est en mouvement et éloigner
les personnes jusqu’à ce qu’il soit complètement déroulé.
La motorisation doit être déconnectée de sa source d’alimentation
pendant les opérations de nettoyage, de maintenance et lors du
remplacement de pièces.
Vérifier fréquemment l’installation pour déceler tout mauvais
équilibrage ou tous signes d’usure ou de détérioration des câbles
et des ressorts.
Ne pas utiliser si une réparation ou un réglage est nécessaire.
Cet appareil peut être utilisé par des enfants âgés d’au moins
8 ans et par des personnes ayant des capacités physiques,
sensorielles ou mentales réduites ou dénuées d’expérience ou
de connaissance, s’ils (si elles) sont correctement surveillé(e)
s ou si des instructions relatives à l’utilisation en toute sécurité
de l’appareil ont été données et si les risques encourus ont été
appréhendés. Les enfants ne doivent pas jouer avec l’appareil. Le
nettoyage et l’entretien par l’usager ne doivent pas être effectués
par des enfants.
Le nettoyage et l’entretien par l’usager ne doivent pas être
effectués par des enfants sans surveillance.
Les enfants ne doivent pas jouer avec l’appareil.
Avant d’installer la motorisation, enlever toutes les cordes inutiles
et mettre hors service tout équipement qui n’est pas nécessaire
pour un fonctionnement motorisé.
Installer l’organe de manoeuvre du dispositif de dépannage à une
hauteur inférieure à 1m80.
LpA ≤70 dB(A).
Par la présente, SOMFY ACTIVITÉS SA, F-74300 CLUSES déclare en tant que fabricant que la
motorisation couverte par ces instructions, marquée pour être alimentée en 230V~50Hz et
utilisée comme indiqué dans ces instructions, est conforme aux exigences essentielles des
la Directive Radio 2014/53/EU.
Le texte complet de la déclaration de conformité à l’UE est disponible sur www.somfy.com/ce.
Antoine Creze, responsable des homologations, agissant au nom du Directeur de l’Activité, Cluses, 01/2018.
8
Directives Européennes applicables et en particulier de la Directive Machine 2006/42/EC et de
Copyright © 2018 SOMFY ACTIVITÉS SA, Société Anonyme. All rights reserved.
Avertissement Sécurité!
1
Attention!
Information
Pour les illustrations, voir p122.
2. INSTALLATION
Consignes à suivre impérativement par le professionnel de la motorisation et de l’automatisation de l’habitat
réalisant l’installation de la motorisation MoveliteTM.
1
Ne jamais laisser tomber, choquer, percer, immerger la motorisation.
Installer un point de commande individuel pour chaque motorisation.
FR
2.1. MONTAGE
2.1.1. Installation du rail (Fig A)
1) Marquer la position des supports.
2) Percer le plafond ou le mur aux endroits repérés.
3) Fixer les supports.
4) Fixer le rail sur les supports.
2.2. CÂBLAGE
Respecter la Norme NF C 15-100 pour les installations électriques.
Les câbles traversant une paroi métallique doivent être protégés et isolés par un manchon ou un fourreau.
Attacher les câbles pour éviter tout contact avec une partie en mouvement.
Laisser le câble d’alimentation de la motorisation accessible: il doit pouvoir être remplacé facilement.
- Couper l’alimentation secteur.
- Connecter la motorisation selon les informations du tableau ci-dessous :
Câblage AC
Câblage DCT
(Fig C)
(Fig C1)
Câble 100V à 240V
1 Neutre Bleu
2 Phase Marron
3 Terre Jaune / Vert
(Fig C2)
1
CCW (Ouverture) NO contact sec
2 5 Stop - NO contact sec
3 Terre commun 6 CW (Fermeture) NO contact sec
2.1.2. Installation du moteur (Fig B)
1) Déverrouiller le moteur
2) Insérer l’axe moteur dans le trou de la poulie.
3) Verrouiller le moteur.
4
Commandes compatibles - câblage des commandes
1) Outil de réglage DCT
2) Centralis IB
3) Commande contact sec 2 NO
(Fig D)
2.3. MISE EN SERVICE
OUTIL DE REGLAGE DCT POINT DE COMMANDE RTS
Ouverture
Stop
Fermeture
2.3.1. Pre-enregistrement du point de commande (Fig E)
Mettre sous tension.
1)
2)
Appuyer simultanément sur les touches Ouverture et Fermeture du point de commande RTS : Le
produit motorisé se déplace pendant quelques secondes et le point de commande est pré-enregistré dans
le moteur.
Copyright © 2018 SOMFY ACTIVITÉS SA, Société Anonyme. All rights reserved.
9
FR
2.3.2. Réglage des fins de courses
A la 1ere commande d’ouverture ou de fermeture, le produit motorisé réalise une course pour enregistrer les fin de
courses mécanique.
2.3.3. Contrôle du sens de rotation (Fig F)
1) Appuyer sur la touches Ouverture du point de commande RTS :
a) Si le produit motorisé s’ouvre (a), le sens de rotation est correct.
b) Si le produit motorisé se ferme (b), le sens de rotation est incorrect: passer à l’étape suivante.
2) Appuyer sur la touche my du point de commande RTS jusqu’au mouvement du produit motorisé: Le sens de rotation
est modifié.
3) Appuyer sur la touche Ouverture du point de commande RTS pour contrôler le sens de rotation.
2.3.4. Enregistrement du point de commande RTS (Fig G)
Appuyer sur le bouton PROG au dos du point de commande RTS jusqu’au mouvement du produit motorisé.
Le point de commande est enregistré de façon permanente.
2.3.5. Ajustement de la sensibilitée du Touch motion (Fig H)
1) Appuyer simultanément sur les touches Ouverture et Fermeture du point de commande RTS jusqu’au mouvement
du produit motorisé.
2) Appuyer simultanément sur les touches Ouverture et Fermeture jusqu’au mouvement du produit motorisé pour
passé de sensibilité haute vers sensibilité basse puis vers pas de touch motion, et revenir vers sensibilité haute.
3) Appuyer sur la touche my jusqu’au mouvement du produit motorisé pour confirmer le réglage.
2.3.6. Réglage de l’ergonomie Dry contact : Standard ou 2 buttons séquenciel (Fig I)
1) Appuyer simultanément sur les touches Ouverture, Stop et Fermeture de l’outil de réglage DCT jusqu’au mouvement du produit motorisé.
2) Appuyer simultanément sur les touches Stop et Fermeture de l’outil de réglage DCT jusqu’au mouvement du produit
pour changé l’ergonomie.
motorisé
2.4. ASTUCES ET CONSEILS D’INSTALLATION
2.4.1. Questions sur le MoveliteTM?
Constats Causes possibles Solutions
Le produit motorisé ne
fonctionne pas.
2.4.2. Re-réglage des fins de course
Re-réglage du fin de course ouverture (Fig J)
1) Appuyer sur le bouton Ouverture pour amener le produit motorisé jusqu’à la fin de course à réajuster.
2) Appuyer simultanément sur les touches Ouverture et Fermeture du point de commande RTS jusqu’au mouvement
du produit motorisé.
3) Appuyer sur la touche Ouverture ou Fermeture pour déplacer le produit motorisé vers la nouvelle position
souhaitée.
4) Pour confirmer la nouvelle fin de course appuyer sur la touche my jusqu’au mouvement du produit motorisé.
Re-réglage du fin de course fermeturet (Fig K)
1) Appuyer sur le bouton Fermeture pour amener le produit motorisé jusqu’à la fin de course à réajuster.
2) Appuyer simultanément sur les touches Ouverture et Fermeture du point de commande RTS ou Ouverture, Stop et
Fermeture
de l’outil de réglage DCT jusqu’au mouvement du produit motorisé.
3) Appuyer sur la touche Ouverture ou Fermeture pour déplacer le produit motorisé vers la nouvelle position souhaitée.
4) Pour confirmer la nouvelle fin de course appuyer sur la touche my/Stop jusqu’au mouvement du produit motorisé.
La batterie est faible.
La pile du point de commande est faible.
Le point de commande n’est pas compatible.
Le point de commande utilisé n’est pas
enregistré dans la motorisation.
Contrôler si la batterie est faible et la recharger
si besoin.
Contrôler si la pile est faible et la remplacer
si besoin.
Contrôler la compatibilité et remplacer le point de
commande si besoin.
Utiliser un point de commande enregistré ou
enregistrer ce point de commande.
Effacement des points de commandes de la mémoire du moteur
2.4.3.
(Fig L)
Cette remise à zéro supprime tous les points de commande locaux cependant les réglages de fin de course et la
position favorite sont conservés.
Pour effacer tous les points de commande appuyer sur le bouton prog du moteur jusqu’au double va-etvient du produit motorisé. Tous les points de commandes sont effacés
10
Copyright © 2018 SOMFY ACTIVITÉS SA, Société Anonyme. All rights reserved.
FR
2.4.4. Effacement de la mémoire du moteur (Fig M)
Cette remise à zéro supprime tous les points de commande, tous les capteurs, tous les réglages de fin de course et
réinitialise la position favorite (my) de la motorisation.
Pour effacer la memoire, appuyer sur le bouton prog du moteur jusqu’au triple va-et-vient du produit motorisé. Tous
les réglages sont supprimés.
3. UTILISATION ET MAINTENANCE
Cette motorisation ne nécessite pas d’opération de maintenance
3.1. TOUCHES OUVERTURE ET FERMETURE (Fig N)
Un appui bref sur la touche Ouverture ou fermeture provoque une ouverture ou une fermeture complète du produit motorisé.
3.2. FONCTION STOP(Fig O)
Le produit motorisé est en mouvement.
Faire un appui bref sur my/Stop : le produit motorisé s’arrête automatiquement.
3.3. POSITION FAVOURITE (my) (Fig P)
Le produit motorisé est arrêté.
Faire un appui bref sur my/Stop: le produit motorisé se met en mouvement et s’arrête en position favorite (my).
Pour modifier ou supprimer la position favorite (my), voir chapitre Réglages supplémentaires.
3.4. RÉGLAGES SUPPLÉMENTAIRES
3.4.1. Modification de la position favorite (my) (Fig Q)
1) Placer le produit motorisé dans la position favorite (my) souhaitée.
2) Appuyer sur la touche my pour ≈ 5 seconds jusqu’au mouvement du produit motorisé: la position favorite
(my) souhaitée est enregistrée.
3.4.2. Suppression de la position favorite (my) (Fig R)
1) Appuyer sur la touche my : le produit motorisé se met en mouvement et s’arrête en position favorite (my).
2) Appuyer sur la touche my jusqu’au mouvement du produit motorisé: la position favorite (my) est supprimée.
3.4.3. Ajout / Suppression d’un point de commande
Se référer à la notice correspondante.
3.4.4. Modification du sens de rotation (Fig S)
Déplacer le produit motorisé vers une position autre que les fins de courses.
1) Appuyer simultanément sur les touches Ouverture et Fermeture du point de commande RTS jusqu’au
mouvement du produit motorisé.
2) Appuyer sur la touche my jusqu’au mouvement du produit motorisé pour inverser le sens de rotation
3.5. ASTUCES ET CONSEILS D’UTILISATION
3.5.1.
Questions sur le
Observations Possible causes Solutions
Le produit motorisé ne
fonctionne pas.
Si le produit motorisé ne fonctionne toujours pas, contacter un professionnel de la motorisation et de
l’automatisation de l’habitat.
3.5.2. Remplacement d’un point de commande Somfy perdu ou cassé
Pour le remplacement d’un point de commande perdu ou cassé, contacter un professionnel de la
motorisation et de l’automatisation de l’habitat.
MoveliteTM?
La pile du point de commande est faible.
La motorisation est en protection thermique Attendre que le moteur refroidisse.
Contrôler si la pile est faible et la remplacer
si besoin.
4. DONNÉES TECHNIQUES
Alimentation
Fréquence radio
Température d’utilisation 0°C à + 60°C
Indice de protection IP 30
Niveau de sécurité Classe I
Copyright © 2018 SOMFY ACTIVITÉS SA, Société Anonyme. All rights reserved.
100V - 240V
433.42 MHz
11

DE
Diese Anleitung gilt für alle MoveliteTM RTS Motoren unabhängig von Drehmoment/Geschwindigkeit.
INHALT
1. Vorbemerkungen 12
1.1. Bestimmungsgemäße Verwendung 12
1.2. Haung 12
2. Installation 14
2.1. Montage 14
2.2. Verkabelung 14
2.3. Inbetriebnahme 14
2.4. Tipps und Empfehlungen für die
Installation 15
3. Anwendung und Wartung 16
3.1. Tasten Öffnen und Schließen 16
3.2. STOP-Funktion 16
3.3. Lieblingsposition (my-Position) 16
3.4. Weitere Einstellungen 16
3.5. Tipps und Empfehlungen für die Verwendung 16
4. Technische Daten 16
1. VORBEMERKUNGEN
1.1. BESTIMMUNGSGEMÄSSE VERWENDUNG
Der MoveliteTM Motor ist auf die Motorisierung aller Arten von Vorhangschienen ausgelegt.
1.2. HAFTUNG
WICHTIGE SICHERHEITSHINWEISE
Jede Anwendung, die nicht dem von SOMFY definierten
Einsatzbereich entspricht, ist unzulässig. SOMFY haet nicht
im Falle einer solchen missbräuchlichen Verwendung oder der
Nichtbeachtung dieser Hinweise, auch die Gewährleistungszusage
wird in diesen Fällen ungültig. Sollten Sie bei der Installation des
Antriebs Zweifel haben oder zusätzliche Informationen benötigen,
besuchen Sie bitte die Internetseite www.Somfy.com oder wenden
Sie sich an Ihren SOMFY Partner.
WICHTIGE SICHERHEITSANWEISUNGEN FÜR DIE INSTALLATION
WARNUNG: Wichtige Sicherheitshinweise. Beachten Sie
alle Anweisungen, da eine fehlerhae Installation schwere
Verletzungen zur Folge haben kann.
Übergeben Sie diese Anleitung nach Installation dem Benutzer.
Der Antrieb darf nur von einer Person installiert werden,
die über eine Qualifikation im Bereich Antriebssysteme und
Gebäudeautomatisierung verfügt.
Der Monteur muss den Kunden darauf hinweisen, dass das
Antriebssystem einschließlich aller Zubehörteile regelmäßig
gewartet werden muss. Er muss die Elemente nennen, die
gewartet, ausgetauscht oder überprü werden müssen.
Stellen Sie sicher, dass Gewicht und Abmessungen des
angetriebenen Produkts mit dem Nenndrehmoment und der
Nennbetriebszeit kompatibel sind. Diese Informationen erhalten
Sie von Ihrem Somfy-Partner.
Verwenden Sie nur Zubehör (Vorhangschienen, Halter usw.), die
in der SOMFY Liste passender Teile aufgeführt sind. Die ZubehörTeilenummern erhalten Sie von Ihrem SOMFY Partner.
Näheres zu den Bedieneinheiten, die zum gewählten Antrieb
passen, finden Sie in den SOMFY Unterlagen.
Fest installierte Bedieneinheiten müssen nach der Installation gut
sichtbar sein.
Gemäß den elektrotechnischen Vorschrien muss vor dem Antrieb
ein geeigneter mehrpoliger Schalter fest verdrahtet werden.
12
Copyright © 2018 SOMFY ACTIVITÉS SA, Société Anonyme. All rights reserved.

DE
Wenn das Netzkabel bestätigt ist, muss es durch ein identisches Kabel
ersetzt werden. Wenn das Kabel nicht vom Gerät getrennt werden
kann, senden Sie den Antrieb an den Kundendienst ein, um Gefahren
zu vermeiden.
Das System muss zur Vermeidung von Stromschlägen ordnungsgemäß
geerdet sein. Einige Antriebsversionen werden mit einem Stecker
geliefert, der einen dritten (Schutzleiter-) Sti hat. Dieser Stecker
passt nur in Steckdosen mit Schutzleiteranschluss. Wenn der Stecker
nicht in die Steckdose passt, sollten Sie von einem qualifizierten
Elektriker eine geeignete Steckdose montieren lassen. Keinesfalls
sollten Sie Änderungen am Stecker vornehmen.
Das Stellglied eines Totmannschalters muss sich in Sichtweite zur
angetriebenen Komponente, aber entfernt von den bewegten Teilen
befinden. Es muss in einer Höhe von mindestens 1,5 m zum Boden
installiert werden und darf für die Öffentlichkeit nicht zugänglich sein.
WICHTIGE SICHERHEITSHINWEISE
WARNUNG: Wichtige Sicherheitshinweise. Diese Anweisungen müssen
von jeder Person beachtet werden.
Bewahren Sie diese Anleitung auf.
WARNUNG: Vor Reinigungs- und Wartungsarbeiten sowie vor dem
Austausch von Teilen muss der Antrieb von der Spannungsversorgung
getrennt werden.
- Ihr Installateur sollte Ihnen erklären, welche Wartungsarbeiten
notwendig sind.
Lassen Sie nie zu, dass Kinder mit den fest installierten
Bedieneinheiten spielen. Bewahren Sie Fernbedienungen außerhalb der
Reichweite von Kindern auf.
Beobachten Sie die angetriebene Komponente, während sich diese
bewegt, und halten Sie Personen fern, bis die Bewegung beendet ist.
Der Antrieb muss bei Reinigung, Wartung und beim Austausch von
Komponenten von der Stromversorgung getrennt werden.
Überprüfen Sie die Anlage häufig auf Unwucht und Anzeichen von
Verschleiß oder Schäden an Kabeln und Federn. Verwenden Sie sie
nicht, wenn Reparaturen oder Anpassungen erforderlich sind.
Dieses Gerät ist geeignet für Kinder ab 8 Jahren und Personen, deren
physische, sensorische oder geistige Fähigkeiten eingeschränkt sind,
sowie Personen, die keine Erfahrung oder Kenntnisse im Umgang mit
dem Gerät haben, wenn sie in die sichere Verwendung des Geräts
eingewiesen wurden oder überwacht werden und die bestehenden
Gefahren verstehen.
Reinigung und Benutzerwartung sollten ohne Überwachung nicht durch
Kinder durchgeführt werden.
Kinder sollten nie mit dem Gerät spielen.
Entfernen Sie vor der Installation des Antriebs alle überflüssigen Kabel
und legen Sie alle Ausrüstungsteile still, die für den motorisierten
Betrieb nicht erforderlich sind.
Wenn der Antrieb eine Vorrichtung zur manuellen Notentriegelung hat,
installieren Sie den Griff hierfür in einer Höhe von weniger als 1,8 m.
LpA ≤70 dB(A).
SOMFY ACTIVITÉS SA, F-74300 CLUSES (Frankreich), erklärt hiermit als Hersteller, dass der in dieser
Anleitung beschriebene Antrieb bei bestimmungsgemäßem Einsatz und angeschlossen gemäß
Kennzeichnung an eine 230 V / 50 Hz-Stromversorgung die grundlegenden Anforderungen der
geltenden europäischen Richtlinien und insbesondere der Maschinenrichtlinie 2006/42/EG sowie der
Funkanlagenrichtlinie 2014/53/EU erfüllt.
Der vollständige Text der EU-Konformitätserklärung ist unter der Internetadresse www.somfy.com/ce verfügbar.
Christian Rey, Bevollmächtiger für Zulassungen, in Vertretung des Directeur de l‘Activité, Cluses, Frankreich, 01/2018.
Copyright © 2018 SOMFY ACTIVITÉS SA, Société Anonyme. All rights reserved.
13
 Loading...