

Page 1
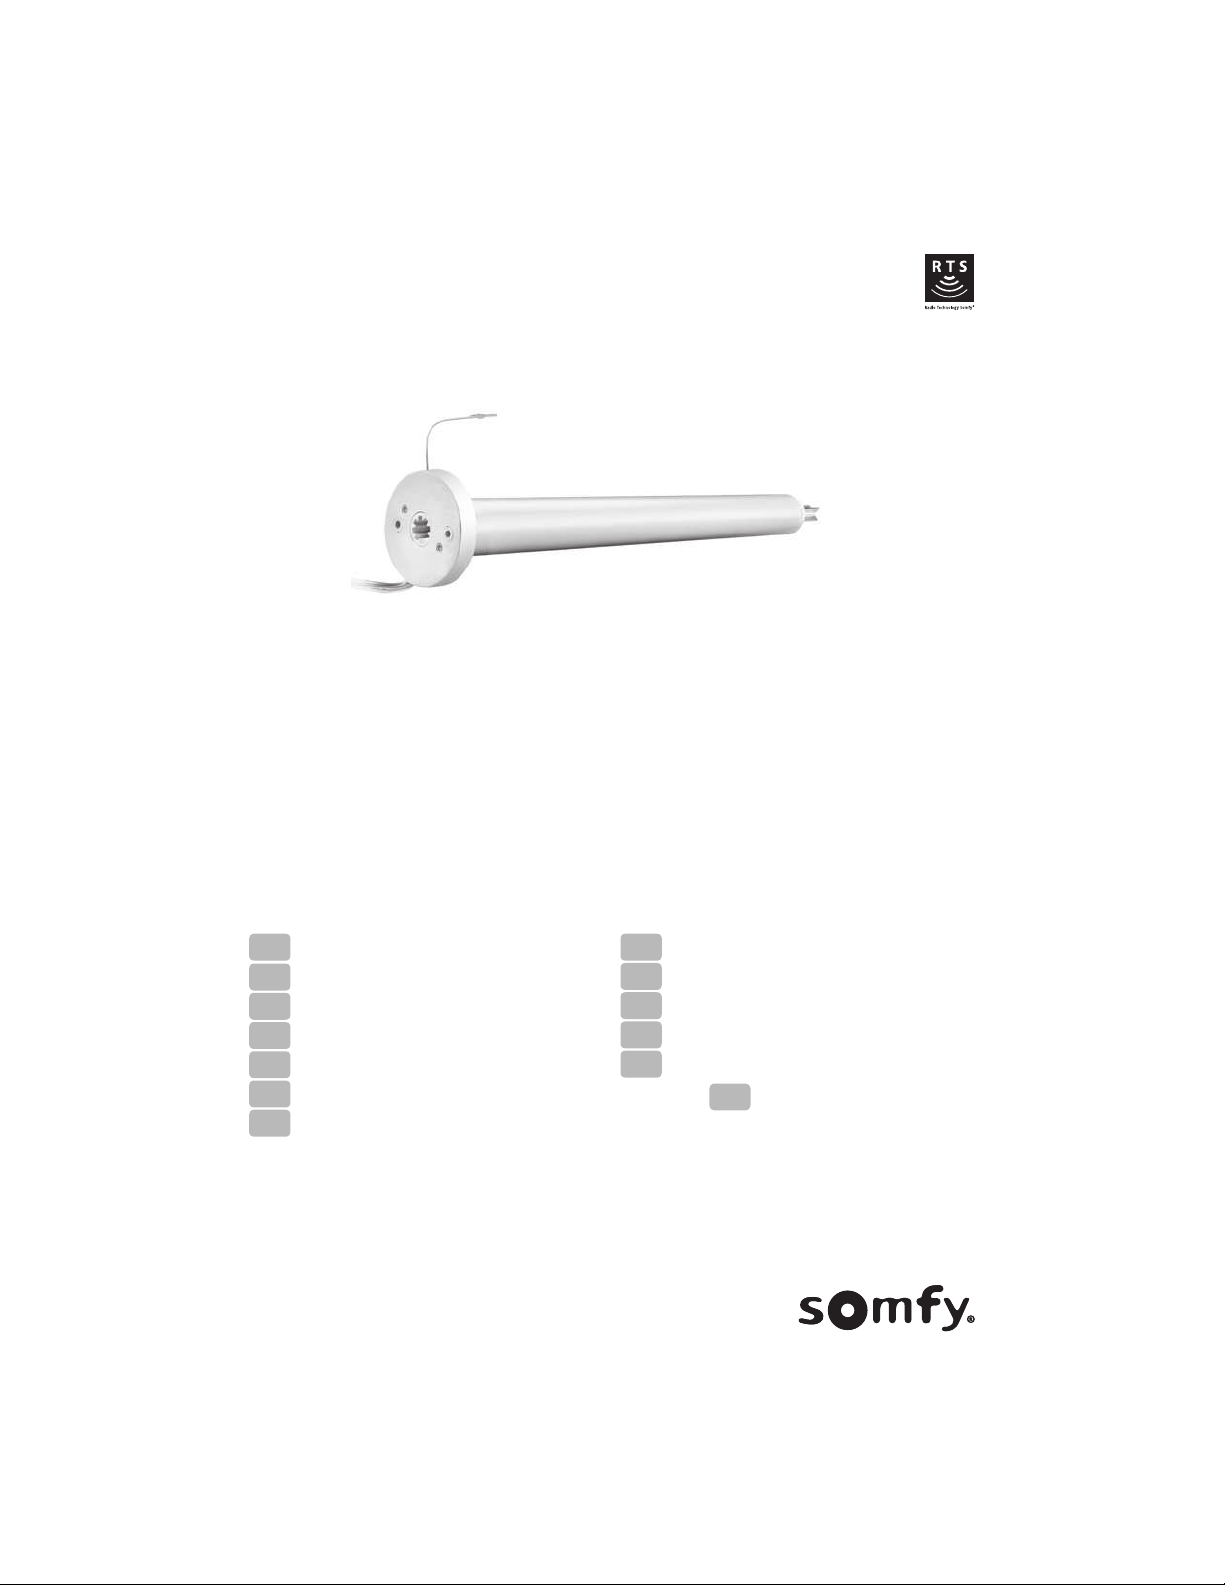
JR RU 30 RTS LI-ION
EN
Instructions
FR
Notice
DE
Anleitung
NL
Handleiding
DA
Brugsanvisning
FI
Käyttöohje
NO
Bruksanvisning
SV
Bruksanvisning
ES
Instrucciones
PT
Instruções
IT
Manuale
ZH
䇈ᯢ
ΏϳϛέΗϟϝϳϟΩ
AR
Page 2

EN
JR RU 30 RTS LI-ION
2
Copyright© 2017 SOMFY ACTIVITES SA, Société Anonyme. All rights reserved.
ORIGINAL INSTRUCTIONS
These instructions apply to all JR RU 30 RTS LI-ION drive, the different versions of which are available
in the current catalogue
CONTENTS
GENERAL INFORMATION
Safety intructions
Danger
Indicates a danger which may result in immediate death or serious injury.
Warning
Indicates a danger which may result in death or serious injury.
Precaution
Indicates a danger which may result in minor or moderate injury.
Attention
Indicates a danger which may result in damage to or destruction of the product.
1. Prior information 3
1.1. Sphere of application 3
1.2. Liability 3
2. installation 4
2.1. Assembly 4
2.2. Wiring 4
2.3. Commissioning 5
2.4. Tips and advice on installation 7
3. Use and maintenance 9
3.1. Favorite (my) position 9
3.2. Tips and advice on operation 9
3.3. Recycling battery and electric part 10
4. Technical data 11
Page 3
JR RU 30 RTS LI-ION
EN
3Copyright© 2017 SOMFY ACTIVITES SA, Société Anonyme. All rights reserved.
1. PRIOR INFORMATION
1.1. SPHERE OF APPLICATION
JR drive are designed to drive most types of interior roller and roman blinds.
The installer, a home motorisation or home automation professional, must ensure that once the driven prod-
uct is installed, it respects the current standards in the country of installation, notably standard EN 13120
relative to interior blinds.
1.2. LIABILITY
Before installing and using the drive, please read these instructions carefully. In addition to the instructions provided in this guide, please also comply with the instructions set out in the enclosed
Safety instructions document.
The drive must be installed by a home motorisation and automation professional, in accordance with
Somfy’s instructions and the applicable regulations in the country of installation.
Any operation of the drive outside the sphere of application described above is prohibited. Such operation shall exclude Somfy from all liability and invalidate the Somfy warranty, as will any failure to
comply with the instructions given herein and in the enclosed Safety instructions document.
A"er installing the drive, the installer must inform his customers of the operating and maintenance
conditions for the drive and must pass the operating and maintenance instructions on to them, as
well as the enclosed Safety instructions document. Any A"er-Sales Service operation on the drive
requires intervention by a home motorisation and automation professional.
Should any doubt arise during installation of the drive or for additional information, consult a Somfy
contact or visit www.somfy.com.
IMPORTANT SAFETY INSTRUCTIONS REGARDING BATTERY
Warning
• Improper using battery may cause overheat, fire, explosion, resulting in serious injury or
death.
• Do not charge the battery while maintenance work (e.g. window cleaning) is in progress in
the vicinity.
• Be certain to follow instructions when charging the battery. Battery charging is optimal when
exposed to 0 °C to 45 °C.
• Do not disassemble or modify the battery.
• Battery should not be exposed to high temperatures (<60 °C) or fire.
• Battery should not be exposed to any liquids.
Attention
• Keep the battery away from any shock or impact (e.g. falling down from high place)
• Should battery require replacing, always use Somfy qualified replacement components.
Page 4
EN
JR RU 30 RTS LI-ION
4
Copyright© 2017 SOMFY ACTIVITES SA, Société Anonyme. All rights reserved.
2. INSTALLATION
Attention
• These instructions are mandatory for the home motorisation and automation professional
installing the drive.
• Never drop, knock or puncture the drive or immerse it in liquid.
• Install an individual control point for each drive.
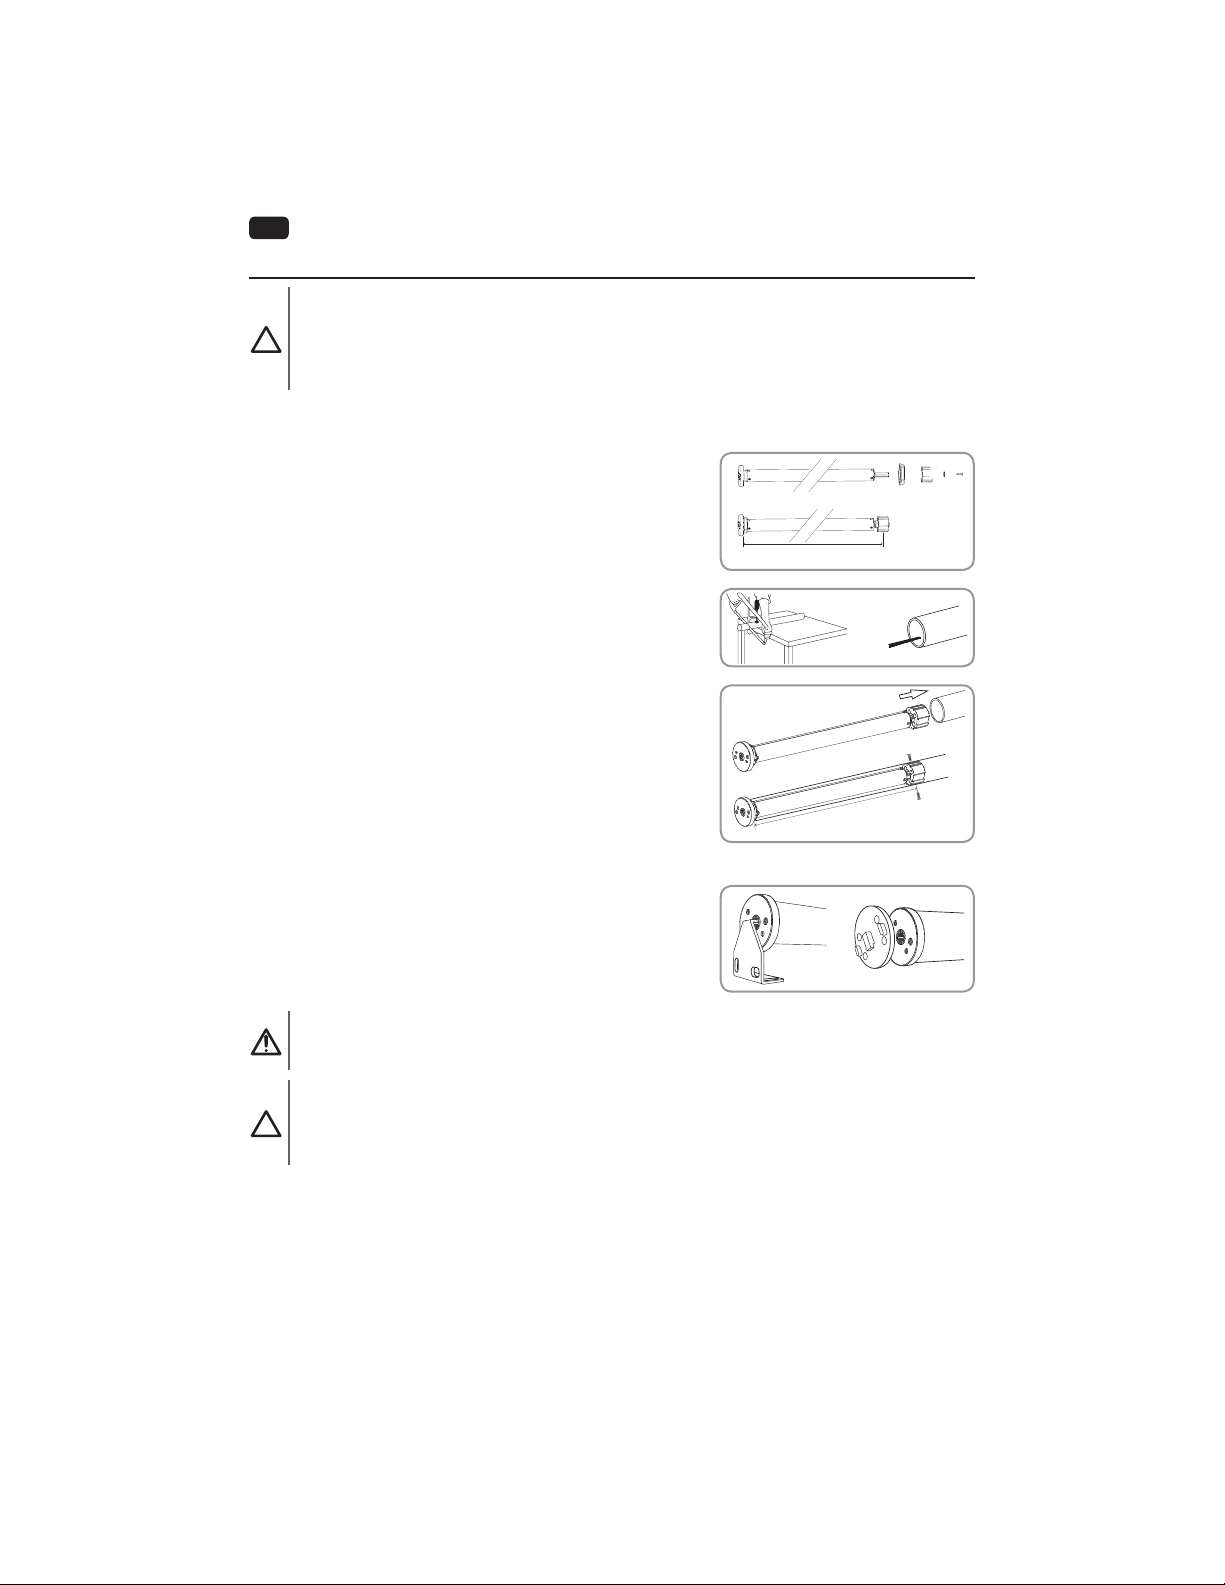
2.1. ASSEMBLY
2.1.1. Drive preparation
1) Fit the crown (a) and drive wheel (b) to the motor.
2) Measure the length (L) between the end of the drive wheel
and the head end.
2.1.2. Tube preparation
Check that the inner diameter of the tube is greater than 30 mm.
Cut the tube to the required length.
Deburr the tube and remove the debris.
2.1.3. Drive/tube assembly
1) Slide the drive into the tube. Insert the wheel by aligning the
wheel to the tube profile. Insert the drive half way and then
slide the crown down the drive and insert it in the tube. Finally, push the motor inside the tube.
2) Not required, but if needed, fix the tube to the drive with
self-tapping screws or steel pop rivets depending on the
dimension (L).
2.1.4. Mounting the tube-drive assembly on the brackets
a) Standard bracket.
b) Drive plate for specific bracket.
! For optimal radio reception, the motor antenna should be kept
straight and should be positioned outside of headrail (if used).
2.2. WIRING
Precaution
To ensure electrical safety, this Class III motor must be powered by a «SELV» voltage source
(Safety Extra Low Voltage).
Attention
• Use power charger (recommended by Somfy) to charge the drive battery.
• To comply with shipping regulation, the battery level must be below 30% before shipping by air.
• Ensure battery is fully charged prior to commissioning.
! While charging the battery, green drive LED blinks twice every 10 seconds
! Drive LED lights Fixed on green when charger is plugged in and battery level is charged above 90%.
!
1
2
a b
Ø > 30 mm
L
1
2
a b
Page 5

JR RU 30 RTS LI-ION
EN
5Copyright© 2017 SOMFY ACTIVITES SA, Société Anonyme. All rights reserved.
2.3. COMMISSIONING
! The manufacturer doesn’t need to charge the battery before setting.
! Orange LED blinks continously in setting mode.
! Green LED blinks once when any order from paired remote is received.
2.3.1. Wake up the drive
For initial unpackaging of drive, wake up the drive by briefly
pressing the motor head programming button or plugging on
the charger.
The driven product briefly moves Up and Down 3 times and LED
lights orange.
2.3.2. Preprogramming the control point
Press the UP and DOWN buttons simultaneously on the control point:
the driven product moves Up and Down and the control point is temporarily programmed to driven
product.
2.3.3. Checking the rotation direction
Press the control point UP button:
a) If the driven product raises (a), the rotation direction is cor-
rect: proceed to section «Setting the end limits».
b) If the driven product is lowers (b), the rotation direction is
incorrect: move to the next step.
• b1) Press the control point MY button until the driven
product moves Up and Down: the rotation direction has
been modified and green LED blinks 5 times.
• b2) Press the control point UP button to confirm the ro-
tation direction.
2.3.4. Setting the end limits
! The end limits can be set in any order.
1) Press and hold the UP button to move the driven product to
the desired Up position. If necessary, adjust the Up position
using the UP or DOWN buttons.
2) To memorize the UP limit: Press the MY and DOWN buttons simultaneously and release once the driven product
begins to move. The Up limit is now memorized and green
LED blinks 5 times.
3) Press the MY button when the driven product reaches the
desired Down position. If necessary, adjust the down position using the UP or DOWN buttons.
4) To memorize the Down limit: Press the MY and UP buttons simultaneously and release when the driven product
begins to move. The Down limit is now memorized. The
driven product moves up and will stop at its upper limit and
green LED blinks 5 times.
5) To confirm and complete limit programming: Press and hold the MY button until the driven
product briefly moves Up and Down. The end limits are now recorded and green LED blinks 5
times.
3x
a
b
=
=
b2b1
1 2
3 4
5
Page 6

EN
JR RU 30 RTS LI-ION
6
Copyright© 2017 SOMFY ACTIVITES SA, Société Anonyme. All rights reserved.
2.3.5. Activate/Deactivate “RTS” radio technology when control point is temporarily preprogrammed
(not paired) to the driven product.
! This function is used to deactivate the radio transmission to save the battery life during shipment, or
when the product will not be used for an extended amount of time (eg: storage).
1) To deactivate the “RTS” Radio Technology Somfy, press the
UP, MY and DOWN buttons simultaneously, until the driven product briefly moves Up and Down once and green LED
blinks 5 times.
2) To activate the “RTS” Radio Technology Somfy, briefly press
the motor head programming button, the driven product
briefly moves Up and Down twice
2.3.6. Recording the RTS control point
A"er recording the end limits:
Briefly press the control point programming button. The driven
product will briefly move Up and Down to confirm pairing.
The control point is recorded “paired” to driven product and
green LED blinks 5 times.
1 2
PROG.
Page 7

JR RU 30 RTS LI-ION
EN
7Copyright© 2017 SOMFY ACTIVITES SA, Société Anonyme. All rights reserved.
2.4. TIPS AND ADVICE ON INSTALLATION
2.4.1. Questions about the drive?
Observations
Possible causes with visual
findings
Solutions
The driven product does
not operate.
Drive battery is low and requires
charge. Red LED blinks 5 times
when any button of a paired control point is pressed.
Charge the battery.
The control point battery is low.
Drive LED doesn't light when any
button of a paired control point is
pressed.
Check the battery and replace it
as required.
The control point is not compatible
or not programmed. Drive LED
doesn't light when any button of a
paired control point is pressed.
Check the compatibility and
replace the control point as
required.
An obstacle hinders the movement
of the driven product. The Red LED
lights fixed on.
Remove the obstacle.
Drive position is out of the end
limits. Red LED blinks 2 times intermittently and continually.
Proceed to section «Setting the
end limits»
Motor is neither set nor paired. Orange LED lights fixed on.
Proceed to section «Commissioning»
The driven product stops
too soon.
The end limits are incorrectly
programmed/
Adjust the end limits.
The driven product has exceeded
recommended weight limit.
Replace driven product.
Battery is low. Red LED blinks 5
times when any button of a paired
control point is pressed.
Charge the battery.
The driven product moves
Up and Down 3 times
Setting is not allowed.
Red LED blinks 3 groups of 3 times.
Maximum or minimum value is
reached for the desired setting.
Or memory is full.
Red LED blinks slowly
for 3 seconds before and
after motor running.
Battery is low. Battery capacity is
less than or equal to 5%.
Charge the battery.
2.4.2. End limit readjustment
Attention
Control point must be paired to the driven product.
! Orange LED blinks slowly until the new end limit is recorded.
2.4.2.1. Readjusting the upper end limit
1) Briefly press the UP button, to move the driven product to
the upper end limit.
2) Press and hold the UP and DOWN buttons simultaneously
until the driven product briefly moves Up and Down.
3) Press and hold the UP or DOWN button to move the driven
product to the new desired position.
4) To confirm the new position press and hold the MY button
until the driven product briefly moves Up and Down and
green LED blinks 5 times.
1 2
3
4
Page 8

EN
JR RU 30 RTS LI-ION
8
Copyright© 2017 SOMFY ACTIVITES SA, Société Anonyme. All rights reserved.
2.4.2.2. Readjusting the lower end limit
1) Briefly press the DOWN button to move the driven product
to the lower end limit.
2) Press and hold the UP and DOWN buttons simultaneously
until the driven product briefly moves Up and Down.
3) Press and hold the UP or DOWN button to move the driven
product to the new desired position.
4) To confirm the new position press and hold the MY button
until the driven product moves Up and Down and green LED blinks 5 times.
2.4.3. Modifying the motor rotation direction
1) Using the UP or DOWN button on the control point, move
the driven product away from the end limits.
2) Press and hold the UP and DOWN buttons simultaneously
until the driven product briefly moves Up and Down and orange LED starts to blink slowly.
3) Press the MY button until the driven product briefly moves
Up and Down to reverse the rotation direction and green
LED blinks 5 times.
4) Press the UP button to check the new rotation direction. The motor rotation direction is reversed.
2.4.4. Erasing control points (transmitters) from memory
To delete all the programmed transmitters, press and hold the
motor head programming button until the driven product briefly moves Up and Down twice. All programmed control points
(transmitters) are deleted and green LED blinks 5 times.
2.4.5. Erasing the memory of the motor (factory default)
To reset the motor, press and hold the motor head programming
button until the driven product briefly moves Up and Down 3
times.
All the settings are erased. Green LED blinks 5 timest then
orange LED is fixed on.
2.4.6. Temporary sleeping mode
Attention
The driven product must be programmed.
! The drive will not respond to any control points commands for
15 minutes.
1) Press and hold the motor head programming button until
the driven product briefly moves Up and Down and green
LED blinks 5 times.
2) Briefly press the motor head programming button, the
driven product briefly moves Up and Down twice. “Sleeping
mode” is activated, green LED blinks 5 times to confirm,
then orange LED blinks slowly as long as the motor is in the
temporary sleeping mode.
3) To deactivate the “Sleeping mode”, briefly press the motor
head programming button. The driven product briefly moves
Up and Down, the control point (transmitter) commands are
enabled. Green LED blinks 5 times.
1 2
3
4
1 2
3
4
2x
3x
2
3
1
2x
Page 9

JR RU 30 RTS LI-ION
EN
9Copyright© 2017 SOMFY ACTIVITES SA, Société Anonyme. All rights reserved.
3. USE AND MAINTENANCE
Attention
• Ensure battery is fully charged prior to use.
3.1. FAVORITE !MY" POSITION
! A intermediate stop or “favorite (my) position,” which is commonly used between the fully Up and
Down positions.
1) To set this function, move the driven product to the desired
position using the UP or DOWN button. Briefly press MY
button to stop the driven product.
2) Press and hold the MY button until the driven product moves
Up and Down. Favorite (my) position is set and green LED blinks 5 times.
3.1.1. To modify the favorite (my) position
1) Use the UP or Down button to move the driven product to
the NEW desired favorite (my) position.
2) Press the My button to stop the driven product.
3) Briefly press and hold the MY button until the driven product briefly moves Up and Down. The new
favorite (my) position is programmed and green LED blinks 5 times.
! Only one favorite (my) position is permitted.
3.1.2. To use the favorite (my) position
Attention
The driven product must be stopped.
Briefly press the MY button: the driven product moves to the favorite (my) position.
3.2. TIPS AND ADVICE ON OPERATION
Observations Possible causes Solutions
The driven product does not
operate.
The control point battery is low. Change battery as required.
Motor battery is too low. Charge using appropriate
charger
RTS is deactivated. Briefly press the drive
programming button, the driven
product moves Up and Down
and radio is now activated
3.2.1. Adding/Deleting Control point
! Orange LED blinks slowly when adding or deleting remote control.
Using a control point (A) that has been previously programmed to the driven product:
1) Press and hold the control point programming button (A) until
driven product briefly moves Up and Down. Green LED blinks
5 times then orange LED blinks slowly.
2) Quickly press the programming button on the back of the new
control point (B) to add or delete control point and green LED blinks 5 times.
Using the Programming button on motor head:
1) Press and hold the motor head programming button until driven product briefly moves Up and Down. Green LED blinks 5
times then orange LED blinks slowly.
2) Quickly press the control point programming button (B) to add or delete control point and green LED
blinks 5 times.
1 2
1 2
A
B
A
A
A
B
B
1 2
PROG.
A
PROG.
B
1 2
PROG.
B
Page 10

EN
JR RU 30 RTS LI-ION
10
Copyright© 2017 SOMFY ACTIVITES SA, Société Anonyme. All rights reserved.
3.2.2. Disabling/Activating “RTS” radio technology when control point is
definitively programmed
! Disabling the radio transmission saves battery life during shipment or for a long period of non-use
(eg storage). The following steps can only be performed in “User” mode or when the products isn't
used for a long time.
When the end limits are set and a control point is paired to the drive, press and hold the programmed
control point programming button or the motor head programming button until the driven product briefly moves Up and Down
once and green LED blinks 5 times. (Motor is in programming
mode)
TO DEACTIVATE RTS RADIO TECHNOLOGY:
a) Press the UP, MY and DOWN simultaneously until the driv-
en product briefly moves UP and Down once and green LED
blinks 5 times.
TO ACTIVATE RTS RADIO TECHNOLOGY:
b) Briefly press the motor head programming button or plug in
the charger, the driven product briefly moves UP and Down
once and green LED blinks 5 times.
3.3. RECYCLING BATTERY AND ELECTRIC PART
1) Unscrew and remove the drive from the tube.
2) Slide the crown to access to 2 torx (T6) screws next to motor head under the drive and unscrew the 4 torx screws of
the bottom cover.
3) Disconnect the battery from the drive.
4) Drop the battery and the electric part in specially provided
containers or at an authorized organization that will ensure
they are recycled.
! Comply with local laws and regulations when discarding used
battery.
ba
PROG.
Torx T6
1
2
3
4
Page 11

JR RU 30 RTS LI-ION
EN
11Copyright© 2017 SOMFY ACTIVITES SA, Société Anonyme. All rights reserved.
4. TECHNICAL DATA
Power supply 12 Vcc TBTS
Frequency bands and maximum power used 433,42MHz
Torque 0.35 Nm
Speed 40 rpm
Safety level III
Operating temperature 0°C - 60°C
Protection rating IP 20 (for indoor use only)
Battery type Li-Ion
Charging temperature 0 / 45°C
! For additional information on the technical data for this drive contact your Somfy representative.
Damaged electric products and batteries should not be disposed of with normal household
waste. Make sure to drop them in specially provided containers or at an authorized organization that will ensure they are recycled.
SOMFY ACTIVITES SA, F-74300 CLUSES as manufacturer hereby declares that the drive
covered by these instructions and used as intended according to these instructions is in
compliance with the essential requirements of the applicable European Directives and in
particular of the Machinery Directive 2006/42/EC, and the Radio Directive 2014/53/EU.
The full text of the EU declaration of conformity is available at www.somfy.com/ce.
Antoine Crézé, Approval manager, acting on behalf of Activity director, Cluses, 07/2017.
 Loading...