


CDR-2100
Side Operated Dough Roller
OPERATIONS MANUAL
WARNING!!! DO NOT CLEAN OR SERVICE THE MACHINE WITHOUT PRESSING THE RED BUTTON AND UNPLUGGING THE ELECTRICAL CORD FROM THE POWER SUPPLY. KEEP YOUR FINGERS AND HANDS FROM THE ROLLER AREA WHEN OPERATING OR SERVICING THE MACHINE. DO NOT OPERATE THE MACHINE WITHOUT THE GUARDS IN PLACE. IF THE MACHINE KEEPS RUNNING WITH SAFETY GUARDS REMOVED, IMMEDIETLY PRESS THE STOP BUTTON AND REMOVE THE PLUG FROM THE POWER SOURCE. CALL THE FACTORY OR A QUALIFIED SERVICE REPRESENTATIVE. DO NOT ATTEMPT TO OPERATE THE MACHINE UNTIL PERMITTED BY THE SERVICE TECHNICIAN.
SOMERSET INDUSTRIES
137 PHOENIX AVE • LOWELL, MA 01852 • USA • +1- 978-667-3355 Email: somerset@smrset.com
Web: www.smrset.com
NOTICE: READ ALL INSTRUCTIONS BEFORE YOU START.!!
UNCRATING AND SETUP
Cut off the fastener wrapped around the machine and the base. Lift the machine straight up out of the wooden base.
Install the machine in its final position or temporarily secure it to a solid surface. Wipe off any dirt that may have accumulated during shipping. Use a soft cloth.
Check the nameplate for correct voltage and frequency.
Plug the machine to the proper power source that matches the nameplate requirements. Turn the power “ON” and check for proper operation of the machine.
!! WARNING !!
NEVER OPERATE THE MACHINE WITHOUT GUARDS IN PLACE!!
KEEP YOUR HANDS AWAY FROM THE CHUTE !!
DO NOT INSERT FOREIGN OBJECTS INTO THE CHUTE !!
DO NOT CLEAN MACHINE WHILE CONNECTED TO ELECTRICAL SUPPLY!!
WATCH YOUR HANDS AND FINGERS !!
MACHINE PREPARATION
The thickness of the final dough is determined by the gap between the rollers. Machines leaving the factory are adjusted as follows: The top dial is aligned with number 4. The bottom dial is aligned with number 2. If these numbers are not correct or your product requires other adjustments please make adjustments as follows:
Loosen the top clamping knob, move the handle such that the dial points to line 4, then tighten the clamping knob.
Loosen the bottom clamping knob, move the handle such that the dial points close to line 2, then tighten the clamping knob.
You may adjust both handles in any direction to produce the final product you require. For round pieces keep the 2:1 (top: bottom) ratio.
Please note that the dial numbers are for reference only.
Make sure the safety cover is on top and secured by four thumb screws.
DOUGH PREPARATION
For best results the dough to be rolled should be at room temperature.
The size and shape of the dough ball affects the size and shape of the finished crust. For round crusts, take a round piece of dough and flatten it slightly.
Dust the dough pieces with flour before putting them in the machine.
NOTE:
MACHINE WILL NOT OPERATE WHEN THE SAFETY COVER IS REMOVED. Dust the chute and rear pan tray with flour before using the machine.
OPERATING PROCEDURE
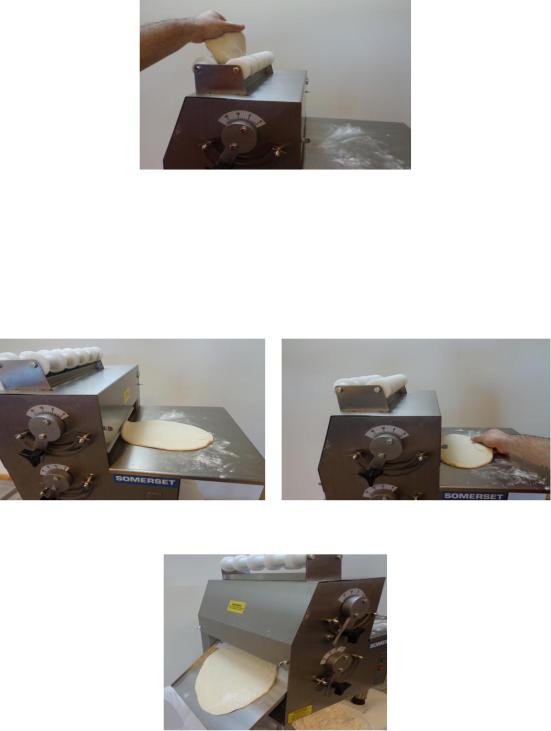
First load the dough in to the top chute, it will come through the first pair of rollers oblong in shape, and from the second set of rollers round in shape.
The rollers are easily adjustable to any thickness of pizza dough or crust you may need.
Load the dough into the chute.
** If dough does not slide easily on the discharge trays, dust the trays with flour. **
If the dough tears or the machine makes a thumping sound, this indicates that the dough is too thick to go through that particular setting of the rollers, which means your roller adjustment has to be opened more, or the dough is too cold and stiff and requires a longer rest period before use.
Turn the elongated piece of dough ¼ of a turn, and at the same time push it back towards the second set of rollers.
The rounded piece of dough comes out on the discharge tray.
!! WARNING !!
IF THE DOUGH GETS STUCK IN THE CHUTE,
NEVER ATTEMPT TO MOVE THE DOUGH BY HAND WHILE THE
MACHINE IS RUNNING.
 Loading...