

Page 1
DESPLEGABLE_BV5712_22_occidentales.fm Page 1 Monday, January 13, 2014 7:25 PM
ESPAÑOL es
INDICACIONES DE SEGURIDAD
• Este aparato está destinado a utilizarse en
aplicaciones domésticas y análogas tales
como cocinas reservadas para empleados en
tiendas, oficinas y otros lugares de trabajo;
agroturismos; por clientes en hoteles, moteles
y otros ambientes de tipo residencial;
residencias de tipo “bed and breakfast”.
Cualquier uso diferente al indicado podría ser
peligroso.
• El aparato no debe ser usado por niños.
Mantener el aparato y su cable fuera del
alcance de los niños. Los niños no deben
jugar con el aparato.
• Este aparato no está destinado para ser
utilizado por personas cuyas capacidades
físicas, sensoriales o mentales estén
reducidas, o carezcan de experiencia o
conocimiento, salvo si son supervisados o han
recibido una instrucción adecuada en lo que
respecta al funcionamiento seguro del
aparato y entiendan los riesgos que entrañan.
• Realice las operaciones de
mantenimiento indicadas en el apartado
LIMPIEZA Y CONSERVACIÓN para una
vida mas prolongada del aparato.
• Desenchufe el aparato siempre después de
su uso y antes de desmontar o montar piezas
y realizar cualquier tarea de mantenimiento o
limpieza. Desenchúfelo también en caso de
apagón. Cuando enchufe o desenchufe el
aparato, debe estar desconectado.
• Si el cable de alimentación está dañado, debe
ser sustituido por el fabricante, por su servicio
post-venta o por personal cualificado similar
con el fin de evitar un peligro.
• Las cuchillas están muy afiladas. Tenga
mucho cuidado al manipularlas. No las
manipule con el aparato enchufado. Durante
el funcionamiento, mantenga las manos, el
pelo, la ropa y cualquier utensilio alejado de
las cuchillas en movimiento.
• Utilice la batidora sólo con la tapa colocada
sobre la jarra. No utilice nunca la batidora en
vacío.
• Asegúrese de que el aparato está
desconectado de la alimentación y las
cuchillas completamente paradas antes de
colocar o retirar el accesorio filtro (8).
• No realice ninguna modificación ni reparación en el aparato. Ante
cualquier anomalía en el aparato, no lo use y acuda a un servicio de
asistencia autorizado.
• No utilice piezas o accesorios no suministrados o recomendados por
SOLAC.
• Antes de enchufar el aparato a la red eléctrica, compruebe que el
voltaje indicado coincide con el de su hogar.
• No tire nunca del cable ni cuelgue el aparato por él. Desenchufe el
aparato tirando siempre de la clavija, nunca del cable.
• Evite que el cable de alimentación entre en contacto con aristas
cortantes o superficies calientes. No deje el cable colgando por el
borde de la mesa o encimera, para evitar que los niños tiren de él y
hagan caer el aparato.
• Retire todas las bolsas de papel o de plástico, láminas plásticas, cartones
y pegatinas eventuales que se encuentran dentro o fuera del aparato que
sirvieron como protección de transporte o promoción de venta.
• No deje la batidora en funcionamiento sin vigilancia.
No introduzca nunca el cuerpo principal del aparato en agua
u otro líquido, ni en el lavavajillas.
A
• No toque el aparato con las manos húmedas cuando esté en
funcionamiento.
• No use el aparato nunca sobre superficies mojadas ni en el exterior.
• La jarra no es apta para microondas.
• Para evitar situaciones de peligro debido al reajuste involuntario del
disyuntor térmico, no conecte nunca el aparato a un interruptor con
temporizador.
¡¡ATENCION!!: Cuando desee desprenderse del aparato,
NUNCA lo deposite en la basura, sino que acuda al PUNTO
q
LIMPIO o de recogida de residuos mas cercano a su
domicilio, para su posterior tratamiento. De esta manera,
está contribuyendo al cuidado del medio ambiente.
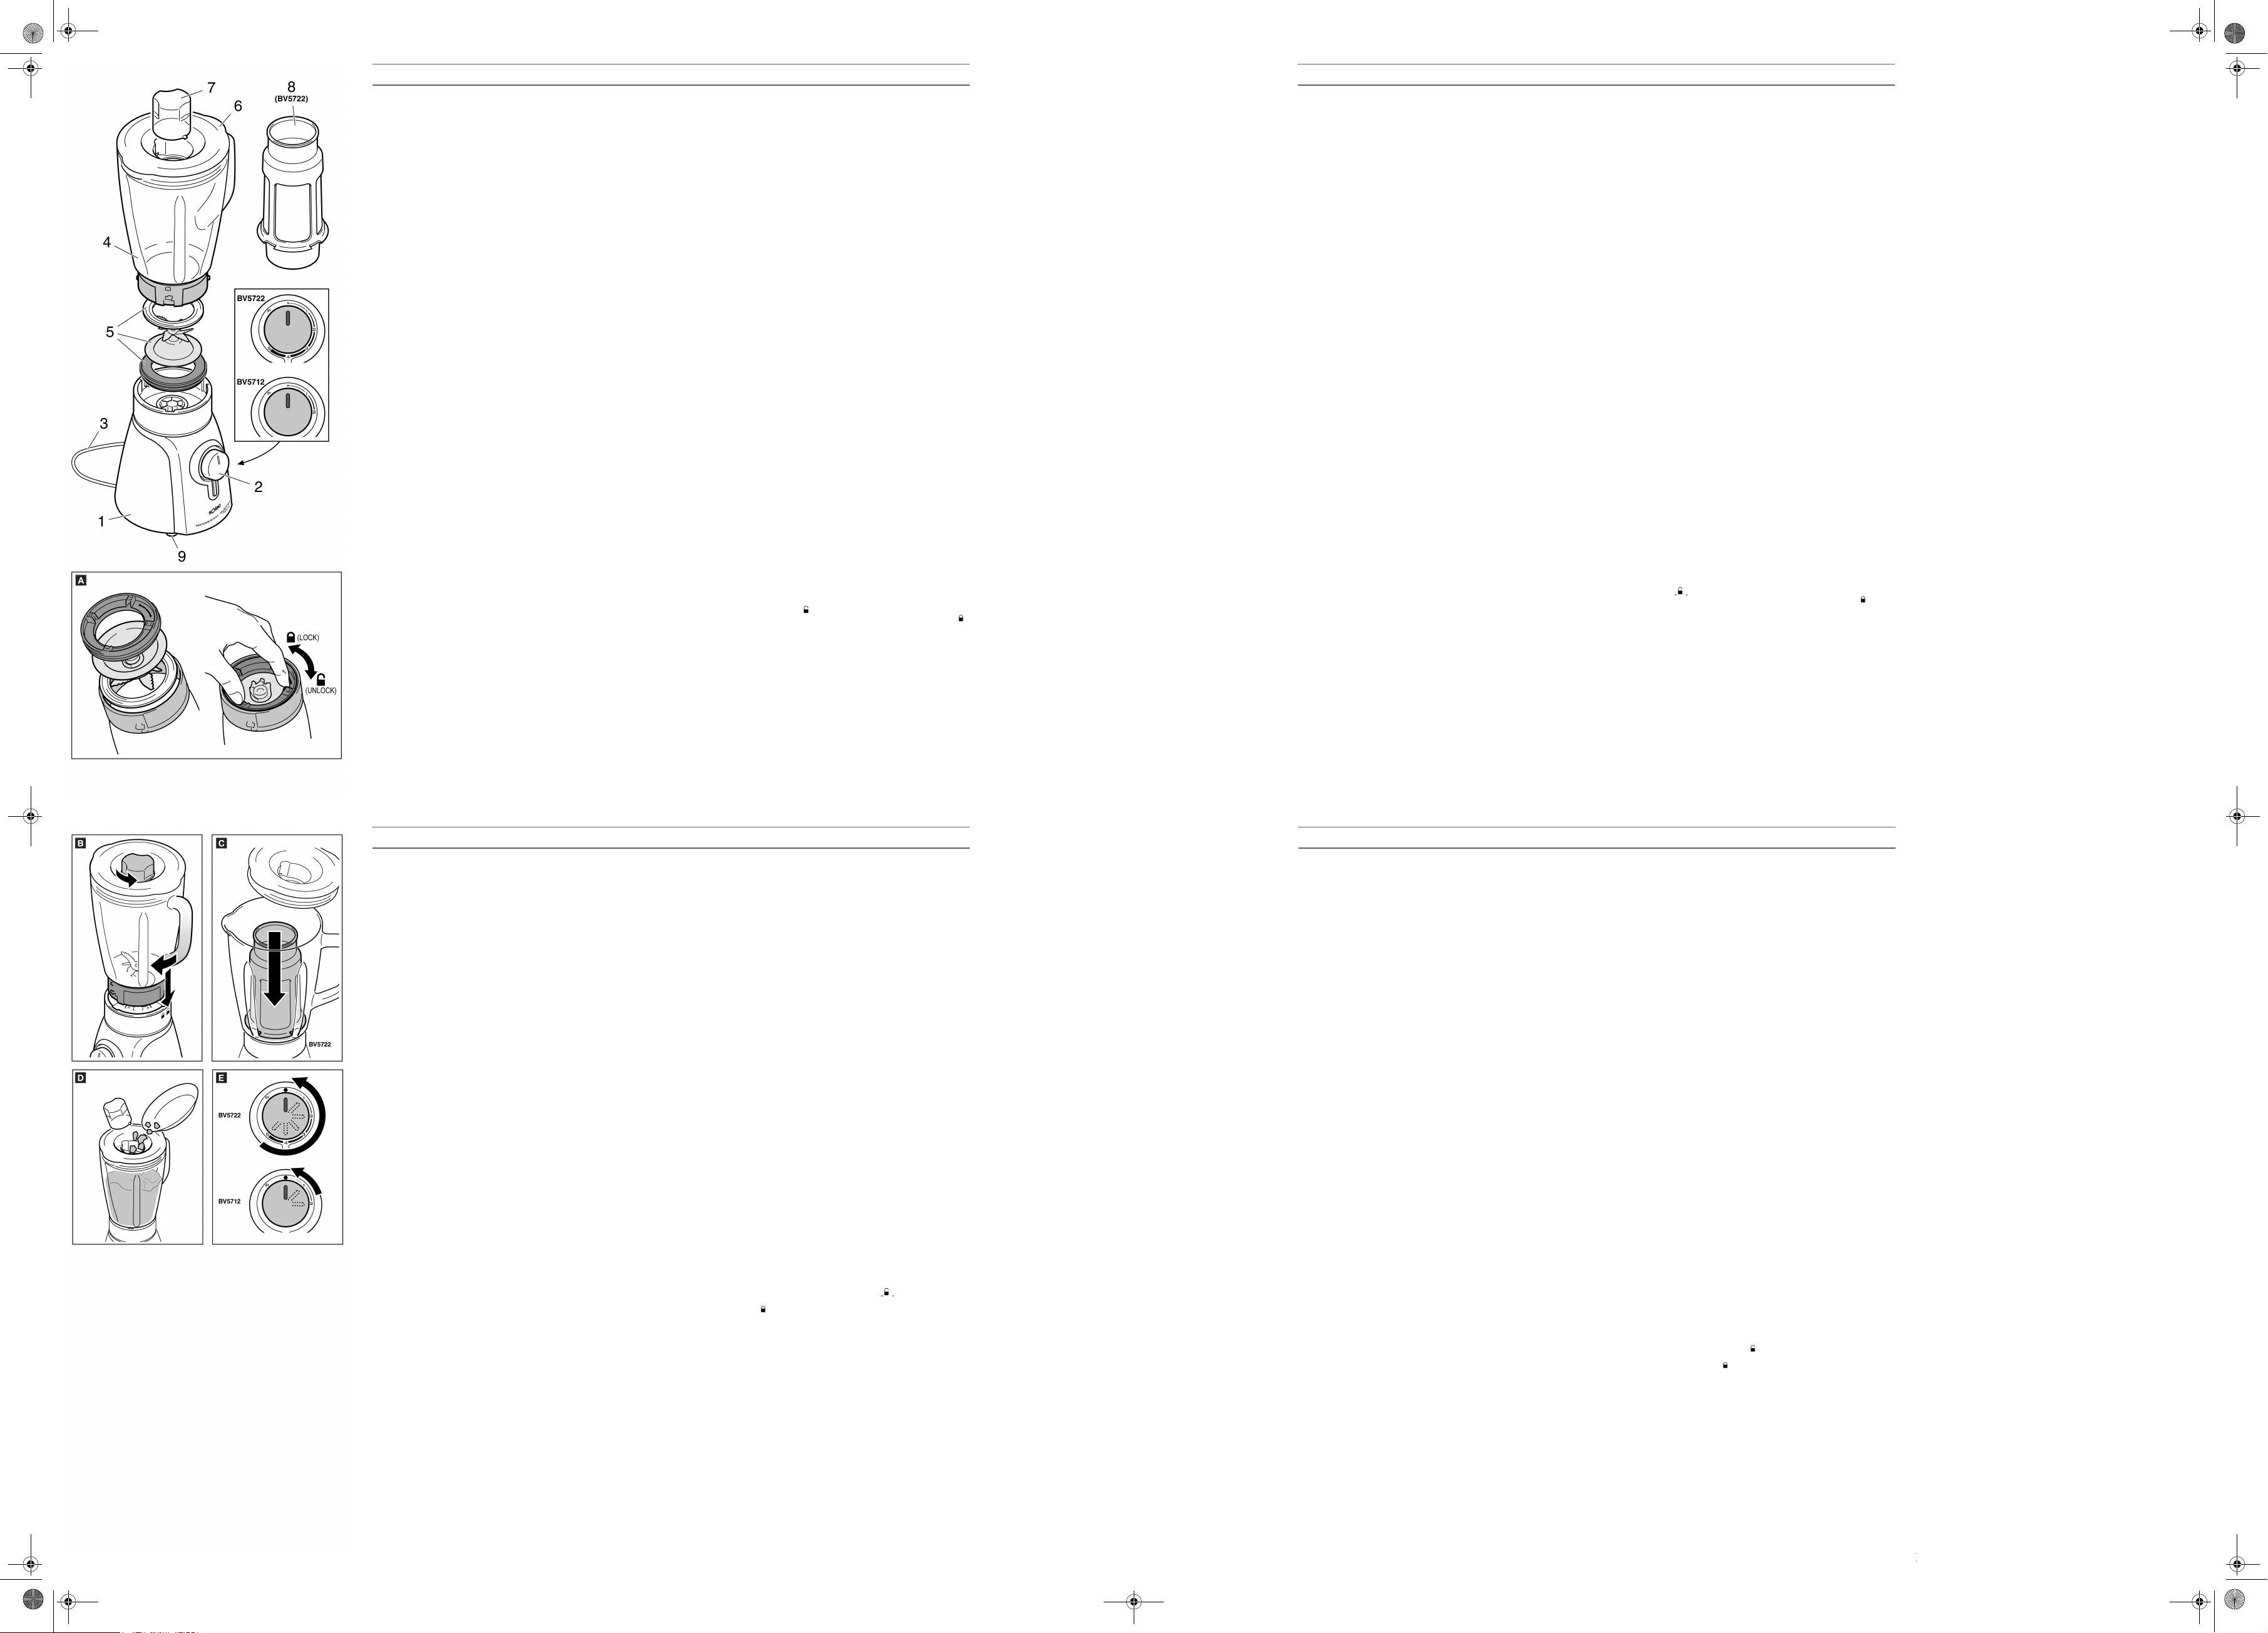
1 Descripción
Partes principales
1 Cuerpo principal (base)
2 Selector de velocidad
BV5712
1
media, 2 máxima, P Posición turbo
BV5722
1 minima, 2, 3 media, 4, 5 máxima,
P Posición turbo
3 Cable de conexión a la red
4 Jarra
5 Conjunto cuchilla
desmontable
6 Tapa
7 Tapón/vaso dosificador
8 Filtro para zumo
9 Recogecables
2 Montaje
ZTrabaje sobre una superficie estable, lisa y limpia, sin posibilidad de que
resbale.
1 Monte el conjunto cuchilla (5) en la base de la jarra A. Para ello:
Coloque la junta de silicona, la cuchilla metálica y por último la pieza de
plástico. Gire la pieza de plástico desde la posición UNLOCK a la
posición LOCK.
2 Encaje la jarra sobre el cuerpo principal. Para ello:
Coloque la jarra (4) sobre el cuerpo (1) de modo que el asa quede en la
vertical del candado abierto .
3 Gire la jarra sin forzarla hasta llegar a la posición del candado cerrado ,
En esa posición hace tope.
i Asegúrese de encajar correctamente la jarra sobre el cuerpo de lo
contrario no se pondrá en funcionamiento.
ZSi desea utilizar la batidora como exprimidor de zumo, coloque el filtro
(8) alrededor de la cuchilla C (modelo BV5722).
B
3Utilización
Z
Este aparato ha sido diseñado para batir líquidos como productos lácteos,
salsas, zumos de fruta, sopas, mezclar bebidas, batidos…. Es posible su
uso para mezclar alimentos blandos o hacer puré con ingredientes cocidos,
por ejemplo, zanahorias o ingredientes de comida para bebé. También es
posible realizar cócteles con hielo picado, aunque no es recomendable
introducir más de 10 hielos a la vez.
ZEn ningún caso es conveniente tener el aparato en funcionamiento
durante más tiempo que el necesario. Después del uso continuo del
aparato durante dos minutos, déjelo enfriar a temperatura ambiente,
para evitar su sobrecalentamiento. Puede volver a utilizarlo
transcurridos 30 segundos.
pNo introduzca nunca objetos de madera, plástico, cristal, metal o
similares dentro de la jarra.
pNUNCA vierta alimentos muy calientes o hirviendo en la jarra, podría
provocarse quemaduras durante el proceso. Los contrastes bruscos de
temperatura podrían además romper la jarra.
1 Monte la batidora como se explica en el apartado “2 Montaje”. Asegúrese
de que está montada correctamente.
2 Introduzca los alimentos en la jarra sin rebasar los 2/3 de la capacidad
máxima (borde superior).
3 Coloque la tapa (6).
4 Coloque el tapón (7) girándolo en el sentido contrario a las agujas del reloj.
B
5 Enchufe el cable a la red.
6 Con el selector de velocidad elija la posición de velocidad deseada (1, 2,
3, 4 o 5, según modelo) o P posición turbo, deberá mantener esta
posición durante el tiempo que desee prolongar el funcionamiento del
aparato (máximo 2 minutos de funcionamiento continuo).
ZDurante el funcionamiento sujete la tapa firmemente con las 2 manos.
7 Si desea añadir algún ingrediente durante el funcionamiento, retire el
tapón dosificador y añada los ingredientes por el orificio de la tapa
pNUNCA retire la tapa durante el funcionamiento.
8 Cuando obtenga el resultado deseado elija la posición de apagado en el
selector de velocidad
9 Desenchufe el cable de la red y espere a que la cuchilla haya dejado de girar.
10 Retire la jarra del cuerpo principal y vacíela.
Funcionamiento como exprimidor (BV5722)
1 Introduzca la fruta pelada en el interior del filtro (8). La pulpa de la fruta
permanecerá en el interior del filtro y el zumo saldrá al exterior
permaneciendo almacenado en el interior de la jarra.
E
.
D
.
iConsejos de Uso
• No utilice la jarra para almacenar alimentos ni objetos.
• Se aconseja no verter en la jarra alimentos muy calientes para evitar
posibles quemaduras.
• Es recomendable añadir los ingredientes poco a poco en lugar de
todo a la vez.
• En primer lugar triture los alimentos más sólidos y a continuación
añada los más blandos. De esta forma es más fácil conseguir una
mezcla homogénea.
• La velocidad más lenta se recomienda para batir o mezclar alimentos
de consistencia líquida. La velocidad más rápida se recomienda para
triturar o mezclar alimentos más sólidos o consistentes.
• Los alimentos gruesos y fibrosos deben ser cortados en cubos de 2 o
3 cm como máximo.
• Para realizar cócteles con hielo picado, introduzca primero los
ingredientes, después el hielo y por último el líquido necesario o un
poco de agua.
• Al picar hielo es recomendable utilizar la velocidad alta o turbo
durante unos instantes, para impulsar los hielos hacia arriba y evitar
que se queden bloqueados abajo.
• Si durante el mezclado los alimentos se pegan a las paredes de la jarra
o quedan fuera del alcance de las cuchillas, apague el aparato y retire la
jarra del cuerpo principal. Retire la tapa y con una espátula desplace los
alimentos cuidadosamente hacia la cuchilla. Tape la jarra, colóquela en
el cuerpo principal y concluya el mezclado de los alimentos.
• No exceda el nivel máximo indicado en la jarra de la batidora.
4 Limpieza y Conservación
pLas cuchillas están muy afiladas. Evite tocar las cuchillas con las manos
al limpiar y secar el interior de la jarra.
ZNo sumerja nunca el cuerpo principal (1) en agua ni lo lave en el
lavavajillas.
1 Limpie el aparato antes del primer uso, inmediatamente después de cada
uso y tras un largo periodo de tiempo sin usar.
2 Limpie la jarra y otros elementos plásticos inmediatamente después de
su uso, ya que algunos alimentos (por ejemplo la zanahoria) son muy
difíciles de limpiar una vez secos.
Limpieza rápida
1 Con la batidora completamente montada, levante la tapa y vierta en la
jarra agua templada con un poco de detergente líquido.
2 Coloque la tapa y el tapón dosificador.
3 Sitúe el selector de velocidad en posición P durante unos segundos.
4 Coloque el selector de velocidad en posición 0 y desenchufe el aparato.
5 Retire la jarra y enjuáguela con agua templada.
Limpieza profunda
1 Vacíe la jarra y desmonte la batidora en sentido inverso al descrito en el
apartado “2 Montaje”.
2 Limpie el cuerpo principal y el cable de conexión con un paño húmedo.
3 Limpie los demás elementos con agua jabonosa y aclárelos con
abundante agua bajo el grifo. No los introduzca en el lavavajillas.
4 Monte la batidora como se explica en el apartado “2 Montaje”.
ENGLISH en
WARNING
• This appliance is intended to be used in
household applications such as: staff kitchen
areas in shops; offices and other working
environments; farm houses; by clients in
hotels, motels and other residential type
environments; bed and breakfast type
environments.
Using it for any purpose other than the one
indicated could be dangerous.
• The appliance must not be used by children.
Keep the appliance and its cable out of
children’s reach. Children must not play with
the appliance.
• This appliance is not intended for use by
persons whose physical, sensory or mental
abilities are impaired, or that lack experience
or knowledge unless they are supervised or
have received adequate instruction regarding
the safe operation of the appliance and
understand the risks posed.
• To prolong the life of the appliance
perform the maintenance operations
described in the CLEANING &
MAINTENANCE section.
• Always unplug the appliance after use and
before assembling or removing parts, and
performing any maintenance or cleaning
operations. Also unplug it in the case of a
power cut. The appliance must be switched off
before plugging or unplugging it into the mains
• If the power cord is damaged, it should be
replaced by the manufacturer or by your aftersales service shop or similar qualified
personnel to prevent possible hazards.
• The blades are very sharp. Be very careful
when handling them. Do not handle them
when the appliance is plugged in. While it is
operating, keep hands, hair, clothes and any
utensil away from the moving blades.
• Only use the blender with the lid fitted on the
jar. Never use the blender when it is empty.
• Be sure that the appliance is disconnected
from the power supply and that the blades
have stopped moving completely before
installing or removing the filter accessory (8).
• Do not modify or repair the appliance. In the event of any
anomaly in the appliance, do not use it and take it to an
authorised assistance service.
• Do not use any parts or accessories not supplied or
recommended by SOLAC.
• Before plugging the appliance into the mains, check that the
indicated voltage is the same as in your home.
• Never pull the cord or use it to hang up the appliance. Always
unplug the appliance by pulling the connection pin, and not the
cord.
• Make sure the cord does not come into contact with sharp
edges or hot surfaces. Do not leave the cord hanging over the
edge of a table or worktop, to prevent children from pulling it
and causing the appliance to fall.
• Remove all elements from the inside or outside of the appliance
used for protection during transport or for sales promotions,
such as paper or plastic bags, plastic sheets, cardboard and
stickers.
• Do not leave the appliance unattended while in operation.
Never immerse the main body of the appliance in
water or any other liquid, or place it in a dishwasher.
A
• Do not touch the appliance with wet hands when in operation.
• Do not use the appliance on wet surfaces or outdoors.
• The jar is not suitable for use in microwave ovens.
• In order to avoid dangerous situations related to the
involuntary resetting of the circuit breaker, never plug the
appliance into a switch with a timer.
WARNING!!: When you want to dispose of the
appliance, NEVER throw it in the rubbish bin. Instead,
q
go to the nearest RECYCLING CENTRE or waste
collection point, where it will receive subsequent
treatment. You will thus be helping to take care of the
environment.
1 Description
Main parts
1 Main body (base)
2 Speed selector
BV5712
medium, 2 maximum, P Turbo setting
1
BV5722
1 minimum, 2, 3
5
maximum, P Turbo setting
medium, 4,
3 Power cord
4Jar
5 Detachable blade
assembly
6Lid
7 Dispenser cup/lid
8 Juice filter
9 Cord winder
2 Assembly
ZWork on a clean flat stable surface with no possibility of it slipping.
1 Fit the blade assembly (5) onto the base of jug A. To do this:
Fit the silicon seal, the metal blade and finally the plastic part. Turn the
plastic part from the UNLOCK position to the LOCK position.
2 Fit the jug onto the main body. To do this:
Place the jug (4) onto the body (1) so that the handle is vertical with the
open padlock
3 Turn the jug without forcing round to the closed padlock position , in this
position it locks home.
i Be sure to fit the jug onto the body correctly otherwise it will not switch
on.
Z If you wish to use the blender as a juicer, fit the filter (8) around the blade
C (model BV5722).
. .
B
.
3 Operation
ZThis appliance has been designed to blend liquids such as dairy
products, sauces, fruit juices, soups; to mix drinks, shakes, etc. It can
be used to mix soft foods or to make purées with cooked ingredients,
such as carrots or baby food ingredients. You can also use it to make
cocktails with crushed ice, although it is not advisable to insert more
than 10 ice cubes at the same time.
ZIn no event is it advisable to leave the appliance operating longer than
necessary. After continuous use of the appliance for two minutes, let it
cool to ambient temperature to prevent overheating. You can use it
again after 30 seconds.
pDo not put any wooden, plastic, glass, metal or similar objects in the jar.
pNEVER pour hot or boiling food into the jug, as this could cause burns
or scalds during use. Sudden sharp changes in temperature may also
shatter the jug.
1 Assemble the blender as explained in section 2 “Assembly”. Be sure that
it is assembled correctly.
2 Put food into the jar without exceeding 2/3 of the maximum capacity
(upper edge).
3 Put on the lid (6).
4 Put on the lid (7), turning it in an anti-clockwise direction.
5 Plug in the power cord.
6 Use the speed selector to choose the desired speed position (1, 2, 3, 4 or
5, depending on the model) or the "P" position for turbo. You must press
and hold this position for the time that you want the appliance to continue
operating (maximum of 2 minutes of continuous operation).
ZDuring operation hold the lid on firmly using both hands.
7 If you want to add any ingredient during the blending process, remove the
dispenser cap and add ingredients through the hole in the lid D.
pNEVER remove the lid while the appliance is operating.
8 When you obtain the desired result, place the speed selector in the off
9 Unplug the cable from the mains and wait until the blade has stopped
10 Remove the jar from the main body and empty it.
Operation as a juicer (BV5722)
1 Place peeled fruit inside the filter (8). The fruit pulp will remain inside the
E
position
turning.
filter, while the juice will flow out and remain stored inside the jug.
.
B
.
i Important Tips
• Do not use this jar to store food or other objects.
• It is not advisable to pour very hot food in the jar to avoid the danger
of burning yourself.
• We recommend adding the ingredients little by little instead of all at
once.
• First blend the harder ingredients and then add the softer ones. This
makes it easier to obtain an even mix.
• The slower speed is more suitable for beating or mixing foods with a
liquid consistency. The faster speed is recommended for mincing or
mixing more solid or thicker foods.
• Coarse and fibrous foods must be cut into 2 or 3 cm cubes at most.
• To make cocktails with crushed ice, first put in the ingredients then the
ice, and lastly the liquid needed or a little water.
When crushing ice, it is recommendable to use high speed or turbo for a
•
few seconds in order to push the ice up and prevent it from becoming
stuck at the bottom.
• If the foods stick to the walls of the jar during blending or remain out
of the range of the blades, switch off the appliance, remove the jar
from the base and take off the lid. Remove the lid and carefully push
the food towards the blades with a spatula. Put the lid on the jar, place
it on the main body and carry on blending the ingredients.
• Do not exceed the maximum level indicated on the blender jar
4 Cleaning and Storage
pThe blades are very sharp. Avoid touching the blades with your hands
while cleaning and drying the inside of the jug.
ZNever submerse the main body (1) in water or wash it in the dishwasher.
1 Clean the appliance before using it for the first time, immediately after use
and after not being used for a long period of time.
2 Clean the jar and other plastic pieces immediately, given that some foods
(such as carrots) are very difficult to clean once they are dry.
Quick cleaning
1 With the blender assembled, open the lid and pour in some warm water
with a drop of liquid detergent.
2 Fit the lid and the dispenser cap.
3 Put the speed selector in the P position for a few seconds.
4 Put the speed selector in position 0 and unplug the appliance.
5 Remove the jar and rinse with warm water.
Thorough cleaning
1 Empty the jug and remove the blender in the reverse order to that
described in section 2 “Assembly”.
2 Clean the main body and the mains cable with a damp cloth.
3 Clean the other parts with soapy water and rinse thoroughly under the
tap. Never wash them in the dishwasher.
4 Assemble the blender as explained in paragraph “2. Assembly”.
FRANÇAIS fr
INSTRUCTIONS DE SÉCURITÉ
• Cet appareil a été conçu pour un usage
domestique tel que: espaces cuisine dans
magasins, bureaux et autres environnements
de travail; agrotourisme; hôtels, motels et
autres types de résidences; bed and
breakfast. Toute utilisation différente de celle
indiquée peut être dangereuse.
• L’appareil ne doit pas être utilisé par des
enfants. Maintenir l'appareil et son câble hors
de portée des enfants. Les enfants ne doivent
pas jouer avec l’appareil.
• Cet appareil n’a pas été conçu pour être utilisé
par des personnes dont les capacités
physiques, sensorielles ou mentales seraient
réduites, ou qui manqueraient d’expérience ou
de connaissances, à moins d'être supervisées
ou d'avoir reçu l'instruction suffisante pour
faire fonctionner l'appareil en toute sécurité et
de comprendre les risques qu’il comporte.
• Réalisez les opérations de maintenance
préconisées à la section NETTOYAGE ET
CONSERVATION pour prolonger la durée de
vie de l’appareil.
• Débranchez toujours l’appareil après usage et
avant de démonter ou de monter des pièces et
d'effectuer toute opération d’entretien ou de
nettoyage. Débranchez-le également en cas de
coupure de courant.
• Si le câble d’alimentation est endommagé, il
doit être remplacé par le fabricant, son service
après vente ou une personne de qualification
similaire afin d’éviter un danger.
• Les lames sont très tranchantes. Faites très
attention en les manipulant. Ne les touchez pas
lorsque l’appareil est branché. Pendant le
fonctionnement, maintenez les mains, les
cheveux, les vêtements et tout ustensile
éloigné des lames en mouvement.
• Utilisez le mixeur uniquement lorsque le
couvercle est placé sur le bol. N’utilisez jamais le
mixeur à vide.
• Vérifiez que l'appareil est débranché et que les
lames sont à l'arrêt avant de placer ou de retirer
le filtre (8).
• Ne modifiez ni ne réparez jamais l’appareil. Si vous constatez une
anomalie sur l’appareil, ne l’utilisez pas et amenez-le à un centre de
service technique agréé.
• N’utilisez pas de pièces ni d'accessoires non fournis ou
recommandés par SOLAC.
• Avant de brancher l’appareil au secteur, vérifiez que la tension
indiquée correspond bien à celle de votre logement.
• Ne tirez jamais sur le câble et ne suspendez pas l’appareil par le
câble. Débranchez l’appareil en tirant toujours sur la prise, jamais sur
le cordon.
• Prenez garde à ce que le cordon d'alimentation n'entre pas en contact
avec des éléments tranchants ou des surfaces chaudes.
• Retirez tous les sachets en papier ou en plastique, les films
plastiques, les cartons et autocollants éventuels apposés sur
l'appareil ou à l'extérieur lui servant de protection pendant le transport
ou pour sa promotion.
• Ne laissez jamais l’appareil branché sans surveillance.
Ne plongez pas l'appareil dans l'eau ou dans un liquide et ne
le mettez pas au lave-vaisselle.
A
• Ne touchez pas l'appareil en marche avec les mains humides.
• Ne l'utilisez jamais sur des surfaces mouillées ni à l'extérieur.
• Le bol ne doit pas être placé au micro-ondes.
• Pour éviter des situations dangereuses dues au réajustement
involontaire du disjoncteur thermique, ne branchez jamais l’appareil à
un interrupteur à temporisateur.
ATTENTION ! : Lorsque vous souhaitez vous débarrasser de
l'appareil, ne le jetez JAMAIS à la poubelle, mais amenez-le
q
au POINT VERT ou de recyclage des déchets le plus proche
de votre domicile pour son traitement ultérieur. Vous
contribuerez ainsi à la préservation de l’environnement.
1 Description
Principaux éléments
1 Bloc principal (base)
2 Speed selector
BV5712
moyenne, 2 maximum,
1
P
Position turbo
BV5722
1 minimale, 2, 3 moyenne, 4,
5
maximum, P Position turbo
3 Cordon d’alimentation
4Bol
5 Ensemble lame
démontable
6Couvercle
7 Bouchon/verre doseur
8 Filtre pour jus
9 Enrouleur de câble
2 Montage
ZTravaillez sur une surface stable, lisse et propre, de façon à ce que
l’appareil ne puisse pas glisser.
1 Montez l’ensemble lame (5) sur la base de la verseuse A.. Pour cela :
Montez d’abord le joint en silicone, puis la lame métallique et pour finir la
pièce en plastique. Tournez la pièce en plastique de la position UNLOCK
à la position LOCK.
2 Emboitez la verseuse sur le bloc principal. Pour cela :
Placez la verseuse (4) sur le bloc principal (1) de manière à ce que l’anse
soit positionnée à la verticale du cadenas ouvert
3 Tournez la verseuse sans la forcer jusqu’à atteindre la position du
cadenas fermé : , Dans cette position, la verseuse est bloquée. B
i Assurez-vous de bien emboîter la verseuse sur le bloc principal sinon
l’appareil ne se mettra pas en marche.
ZSi vous souhaitez utiliser le mixeur comme presse-agrumes, placez le
filtre (8) autour de la lame
C
(modèle BV5722).
. .
3Utilisation
ZCet appareil a été conçu pour battre des liquides tels que produits
laitiers, sauces, jus de fruit, soupes, pour mélanger des boissons, des
milk-shakes… Il peut être utilisé pour mélanger des aliments mous ou
écraser en purée des ingrédients cuits comme des carottes ou des
aliments pour bébé. Il est également possible de préparer des cocktails
avec de la glace pilée, même s’il n’est pas recommandé d’introduire
plus de 10 glaçons à la fois.
ZL'appareil ne doit en aucun cas fonctionner plus longtemps que la durée
maximale indiquée. Après un usage prolongé de l’appareil pendant
deux minutes, laissez-le refroidir à température ambiante pour éviter
une surchauffe. Vous pouvez le réutiliser au bout de 30 secondes.
pN’introduisez jamais d’objets en bois, en plastique, en verre, en métal
ou similaires dans le bol.
pNe versez JAMAIS d’aliments très chauds ou bouillants dans la
verseuse sous peine de provoquer des brûlures. Les changements
brusques de température pourraient par ailleurs casser la verseuse.
1 Montez le mixeur tel qu’il est indiqué dans la section « 2 : montage ».
Assurez-vous qu’il est monté correctement.
2 Introduisez les aliments dans le pichet bol sans dépasser les deux tiers
de sa capacité maximum (bord supérieur).
3 Mettez le couvercle (6).
4 Placez le bouchon (7) en le tournant dans le sens contraire à celui des
aiguilles d’une montre.
5 Branchez le câble.
6 Au moyen du sélecteur de vitesse, choisissez la position souhaitée (1, 2,
3, 4 ou 5, selon le modèle) ou P position turbo; maintenez cette position
pendant la durée que vous estimez nécessaire (au maximum 2 minutes
de fonctionnement continu).
ZPendant le fonctionnement, maintenez fermement le couvercle avec les
deux mains.
7 Si vous souhaitez ajouter un ingrédient en cours le fonctionnement, retirez le
bouchon doseur et incorporez les ingrédients par l'orifice du couvercle D.
pNE JAMAIS retirer le couvercle en cours de fonctionnement.
8 Une fois obtenu le résultat désiré, sélectionnez la position arrêt sur le
sélecteur de vitesse E.
9 Débranchez le cordon d’alimentation et attendez que la lame ait fini de
tourner.
10 Retirez le bol du corps principal et videz-le.
Fonctionnement comme centrifugeuse (BV5722)
1 Introduisez les fruits pelés dans le filtre (8). Seule la pulpe reste à
l'intérieur du filtre tandis que le jus est maintenu à l'intérieur du bol.
B
.
i Conseils d’utilisation
• N’utilisez pas le pichet pour garder des aliments ou des objets.
• Il est recommandé de ne pas verser des aliments très chauds dans le
pichet pour éviter d’éventuelles brûlures.
• Il est recommandé d’ajouter les ingrédients petit à petit au lieu de tout
à la fois.
• Tout d’abord, mixez les aliments les plus solides et ensuite ajoutez les
plus tendres. Vous obtiendrez ainsi un mélange plus homogène.
• La vitesse la plus lente est recommandée pour battre ou mélanger
des aliments à la consistance liquide. La vitesse la plus rapide est
recommandée pour mixer ou mélanger des aliments plus solides ou
consistants.
• Les aliments en gros morceaux ou fibreux doivent être coupés en
cubes de 2 à 3 cm maximum.
• Pour réaliser des cocktails à la glace pilée, introduisez d’abord les
ingrédients, puis la glace et ensuite le liquide nécessaire ou un peu d’eau.
•
Lorsque vous mixez de la glace, il est recommandé d’utiliser la vitesse
élevée ou turbo pendant quelques instants, pour faire monter les glaçons
vers le haut et éviter qu’ils ne restent bloqués au fond du bol.
• Si pendant le mixage, les aliments viennent se coller aux parois du pichet ou
s'écartent de la portée des lames, arrêtez l'appareil et retirez le pichet du
socle. Retirez le couvercle et à l’aide d’une spatule déplacez soigneusement
les aliments vers la lame. Couvrez le pichet, placez-le sur le corps principal et
achevez de réaliser le mélange des aliments.
• Ne dépassez pas le niveau maximum indiqué sur le bol du mixeur.
4 Nettoyage et entretien
pLes lames sont très tranchantes. Évitez de toucher les lames avec les
mains lorsque vous nettoyez et séchez l’intérieur du bol mélangeur.
ZNe plongez jamais le bloc principal (1) dans l’eau et ne le lavez jamais
au lave-vaisselle.
1 Nettoyez l’appareil avant la première utilisation, immédiatement après
chaque utilisation et après une longue période d’inutilisation.
2 Nettoyez le bol et les autres éléments en plastique immédiatement après
les avoir utilisés : certains aliments comme la carotte sont en effet très
difficiles à nettoyer une fois qu'ils sont secs.
Nettoyage rapide
1 Lorsque le mixeur est complètement monté, levez le couvercle et versez
de l’eau tiède avec un peu de liquide vaisselle dans le pichet.
2 Placez le couvercle et le bouchon doseur.
3 Placez le sélecteur de vitesse sur la position P pendant quelques
secondes.
4 Placez le sélecteur de vitesse sur la position 0 et débranchez l’appareil.
5 Retirez le pichet et rincez-le à l’eau tiède.
Nettoyage profond
1 Videz la verseuse et démontez le mixeur en opérant dans le sens inverse
à celui décrit à la section « 2 Montage ».
2 Nettoyez le corps principal et le câble d’alimentation à l’aide d’un chiffon
humide.
3 Nettoyez les autres éléments à l’eau savonneuse et rincez-les
abondamment à l’eau du robinet. Ne les mettez pas au lave-vaisselle.
4 Montez le mixeur tel qu’il est indiqué
PORTUGUÊS pt
INDICAÇÕES DE SEGURANÇA
• Este aparato está destinado a utilizarse en
aplicaciones domésticas y análogas tales
como cocinas reservadas para empleados en
tiendas, oficinas y otros lugares de trabajo;
agroturismos; por clientes en hoteles, moteles
y otros ambientes de tipo residencial;
residencias de tipo “bed and breakfast”.
Cualquier uso diferente al indicado podría ser
peligroso.
• O aparelho não deverá ser utilizado por
crianças. Manter o aparelho e o respectivo
cabo de alimentação fora do alcance das
crianças. As crianças não deverão brincar
com o aparelho.
• Este aparelho não foi concebido para ser
utilizado por pessoas com capacidades
físicas, sensoriais ou mentais reduzidas, sem
experiência ou conhecimentos, excepto se
supervisionadas, ou se adequadamente
instruídas no que toca ao funcionamento
seguro do aparelho e cientes dos riscos
decorrentes da sua utilização.
• Executar as operações de manutenção
descritas na secção LIMPEZA E
CONSERVAÇÃO para uma vida mais
prolongada do aparelho.
• Desligue sempre o aparelho depois da
utilização e antes de desmontar ou montar
peças e realizar qualquer tarefa de
manutenção ou limpeza. Desligue-o também
em caso de corte de energia.
• Se o cabo de alimentação estiver danificado,
deve ser substituído pelo fabricante, pelo seu
serviço de pós-venda ou por pessoal
qualificado semelhante, com o fim de evitar
riscos.
• As lâminas estão muito afiadas. Tenha muito
cuidado ao manuseá-las. Não deverão ser
manuseadas com o aparelho ligado. Durante
o funcionamento, mantenha as mãos, o
cabelo, a roupa e qualquer utensílio afastado
das lâminas em movimento.
• Use o liquidificador apenas com a tampa
colocada no jarro. Não utilize nunca o
liquidificador vazio.
• Assegure-se de que o aparelho está
desligado da alimentação elétrica e de que as
lâminas estão totalmente paradas antes de
colocar ou retirar o acessório filtro (8).
• Não realize qualquer modificação ou reparação ao aparelho.
Perante qualquer anomalia no aparelho, não o utilize e
contacte um serviço de assistência autorizado.
• Não utilize peças ou acessórios que não tenham sido
fornecidos ou recomendados pela SOLAC.
• Antes de ligar o aparelho à rede eléctrica, verifique se a
tensão indicada é igual à da sua residência.
• Nunca puxe nem pendure o aparelho pelo cabo. Desligue o
aparelho da tomada puxando sempre pela ficha, nunca pelo
cabo.
• Evite que o cabo de ligação entre em contacto com arestas
cortantes ou superfícies quentes.
• Retire todas as embalagens de papel ou de plástico, lâminas
plásticas, cartões e eventuais autocolantes que se encontrem
dentro ou fora do aparelho e que serviram como protecção de
transporte ou promoção de venda.
• Não deixe o aparelho em funcionamento sem vigilância.
Não coloque nunca o aparelho na água ou em outro
líquido, nem no lava-loiça
A
• Não toque no aparelho com as mãos húmidas quando este
estiver a funcionar.
• Não utilize o aparelho sobre superfícies molhadas nem no
exterior.
• O jarro não é apto para microondas.
• Para evitar situações de perigo devido ao reacerto
involuntário do disjuntor térmico, não ligue o aparelho a um
interruptor com temporizador.
ATENÇÃO!!: Quando eliminar o aparelho, NUNCA o
deite no caixote do lixo, faça-o no seu ECOPONTO
q
ou no ponto de recolha de resíduos mais perto de sua
casa, para que possa ser tratado posteriormente.
Desta forma, está a contribuir para a protecção do
meio ambiente.
1 Descrição
Partes principais
1 Corpo principal (base)
2 Selector de velocidade
BV5712
média, 2 máxima, P Posição turbo
1
BV5722
1 mínima, 2, 3
P Posição turbo
média, 4, 5 máxima
3 Fio de ligação à rede
4 Jarro
5 Conjunto lâmina
desmontável
6 Tampa
7 Tampa/copo doseador
8 Filtro para sumo
9 Recolhe-fios
2 Montagem
ZTrabalhe sobre uma superfície estável, lisa e limpa, sem possibilidade
de resvalar.
1 Montar o conjunto da lâmina (5) na base do recipiente A. Para esse fim:
Colocar a junta de silicone, a lâmina metálica e, por último, a peça de
plástico. Girar a peça de plástico a partir da posição UNLOCK até à
posição LOCK.
2 Encaixar o recipiente sobre o corpo principal. Para esse fim:
Colocar o recipiente (4) sobre o corpo (1) para que fique na vertical
relativamente ao cadeado aberto.
3 Girar o recipiente sem a forçar até à posição do cadeado fechado: nessa
posição o recipiente trava.
i Garantir que o recipiente foi correctamente encaixado sobre o corpo,
caso contrário não entrará em funcionamento.
4 Caso se pretenda utilizar a batedeira como espremedor de sumo,
colocar o filtro (8) em redor da lâmina C (modelo BV5722).
B
3 Utilização
ZEste aparelho foi concebido para bater líquidos como produtos lácteos,
molhos, sumos de fruta, sopinhas, misturar bebidas, batidos…. Pode
ser utilizada para misturar alimentos suaves ou para fazer puré com
ingredientes cozidos, por exemplo, cenouras ou ingredientes de
comida para bebé. Também pode fazer cocktails com gelo picado,
apesar de não recomendarmos utilizar mais de 10 pedras de gelo de
cada vez.
ZEm nenhum caso é conveniente ter o aparelho em funcionamento
durante mais tempo que o necessário. Depois da utilização contínua do
aparelho durante dois minutos, deixe-o arrefecer à temperatura
ambiente, para evitar o sobreaquecimento. Pode voltar a utilizar após
30 segundos.
pNunca introduza objectos de madeira, plástico, vidro, metal ou
semelhantes dentro do jarro.
pNUNCA verter alimentos muito quentes ou a ferver no recipiente, já que
poderão ocorrer queimaduras durante o seu processamento.
Adicionalmente, mudanças bruscas de temperatura poderão quebrar o
recipiente.
1 Monte o liquidificador como explicado na secção "2 Montagem".
Certifique-se que a montagem está correcta.
2 Introduza os alimentos no jarro sem ultrapassar 2/3 da capacidade
máxima (orla superior) do recipiente.
3 Coloque a tampa (6).
4 Coloque a tampa (7), gire-a no sentido contrário ao dos ponteiros do
relógio.
B
5 Ligue o fio na rede eléctrica.
6 Com o seletor de velocidade escolha a posição de velocidade desejada
(1, 2, 3, 4 ou 5, conforme o modelo) ou P posição turbo; deve manter esta
posição durante o tempo que deseja prolongar o funcionamento do
aparelho (máximo 2 minutos de funcionamento contínuo).
ZDurante o funcionamento, fixe a tampa firmemente com as 2 mãos.
7 Se deseja acrescentar algum ingrediente durante o funcionamento, retire a
tampa doseadora (1) e acrescente os ingredientes pelo orifício da tampa
pNUNCA remova a tampa durante o funcionamento.
8 Quando obtiver o resultado desejado, escolha a posição de desligado no
selector de velocidade
9 Desligue-a da rede e espere a que a lâmina pare de girar.
10 Remova o jarro do corpo principal e esvazie-o.
Funcionamento como espremedor (BV5722)
1 Introduza a fruta descascada no interior do filtro (8). A polpa da fruta
permanecerá no interior do filtro e o sumo sairá para o exterior
permanecendo armazenado no interior do jarro.
.
E
.
i Conselhos de Utilização
• Não utilize o jarro para guardar alimentos ou objectos.
• Recomenda-se não deixar alimentos muito quentes no jarro com o
fim de prevenir queimaduras.
• Recomenda-se acrescentar os ingredientes aos poucos ao invés de
tudo de uma vez.
• Primeiramente, triture os alimentos mais sólidos e seguidamente
adicione os mais moles. Desta forma é mais fácil conseguir uma
mistura homogénea.
• Recomenda-se utilizar a velocidade mais lenta para bater ou misturar
alimentos com consistência líquida. Recomenda-se utilizar a
velocidade mais rápida para triturar ou misturar alimentos com
consistência mais sólida.
• Os alimentos grossos e com fibra têm de ser cortados em quadrados de 2 ou 3
cm como máximo.
• Para os cocktails com gelo triturado introduza primeiro os
ingredientes, depois o gelo e, por último, o líquido necessário ou um
pouco de água.
•
Quando picar gelo recomenda-se utilizar a velocidade alta ou turbo
durante alguns instantes para empurrar os pedaços de gelo para cima
para que não fiquem presos em baixo.
• Se durante o processo de mistura, os alimentos se agarrarem às
paredes da jarra ou ficarem fora do alcance das lâminas, apague o
aparelho e remova o jarro do corpo principal. Remova a tampa e
mova os alimentos cuidadosamente na direcção da lâmina. Tampe o
jarro, coloque-o no corpo principal e termine a mistura dos alimentos.
• Não exceda o nível máximo indicado no jarro do liquidificador.
4 Limpeza e conservação
pAs lâminas estão muito afiadas. Evite tocar nas lâminas com as mãos
ao limpar e enxugar o interior da jarra.
ZNão submergir o corpo principal (1) na água nem o lave na máquina de
lavar loiça.
1 Limpe o aparelho antes da primeira utilização, imediatamente após cada
utilização e após um longo período de tempo sem usar.
2 Limpe o copo e outros elementos plásticos imediatamente à sua
utilização, já que alguns alimentos (por exemplo a cenoura) são muito
difíceis de limpar uma vez secos.
Limpeza rápida
1 Levante a tampa com o liquidificador montado e deite água tépida com
um pouca de detergente líquido.
2 Coloque a tampa e a tampa doseadora.
3 Coloque o selector de velocidade na posição P durante alguns segundos.
4 Coloque o selector de velocidade na posição 0 e desligue o aparelho.
5 Remova o jarro e enxagúe-o com água tépida.
Limpeza profunda
1 Despejar o recipiente e desmontar a batedeira no sentido inverso ao
descrito na secção “2 Montagem”.
2 Limpe o corpo principal e o cabo de ligação com um pano húmido.
3 Limpe os demais elementos com água e sabão e enxagúe com água
abundante sob água corrente. Não os introduza no lava-loiça.
4 Monte o liquidificador como explicado na secção “2 Montagem”.
D
.
Page 2

e
o
s
e
e
h
n
e
o
e
n
.
t
DESPLEGABLE_BV5712_22_occidentales.fm Page 2 Monday, January 13, 2014 7:25 PM
ITALIANO it
INDICAZIONI DI SICUREZZA
• L'apparecchio è destinato all'uso in
applicazioni domestiche quali: zone di
ricreazione di negozi, uffici e altri ambienti di
lavoro; agriturismi; uso da parte di clienti di
hotel, motel e altre strutture alberghiere; bed
and breakfast.
Qualsiasi utilizzo diverso da quello indicato
potrebbe risultare pericoloso.
• L’apparecchio non deve essere utilizzato da
bambini. Tenere l’apparecchio ed il suo cavo
lontano dalla portata dei bambini. Non
permettere ai bambini di giocare con questo
apparecchio.
• Questo apparecchio non deve essere usato
da persone con capacità fisiche sensoriali o
mentali ridotte o con mancanza di esperienza
e conoscenza a meno che non vengano
controllati o hanno ricevuto istruzioni
riguardanti l’uso dell’apparecchio in modo
sicuro e comprendono i rischi che comporta.
• Realizzare le indicazioni della sezione
PULIZIA E CONSERVAZIONE per prolungare
la vita dell'apparecchio.
• Scollegare sempre l’apparecchio dalla rete
elettrica dopo l’uso e prima di smontare o
montare dei pezzi o svolgere qualsiasi attività
di manutenzione o pulitura. Scollegare
l’apparecchio dalla rete elettrica anche in caso
di black-out.
• Se il cavo di alimentazione è danneggiato farlo
sostituire dal produttore, da un servizio di
assistenza post-vendita o da personale
qualificato per evitare pericoli.
• Le lame sono molto affilate. Fare molta
attenzione durante l'uso. Non toccarle se
l'apparecchio è collegato alla rete elettrica.
Durante il funzionamento, tenere mani,
capelli, indumenti e utensili lontani dalle lame
in movimento.
• Utilizzare il frullatore esclusivamente con il
coperchio sul bicchiere. Non utilizzare mai il
frullatore a vuoto.
• Controllare che l'apparecchio sia scollegato
dalla rete elettrica e attendere che le lame
siano completamente ferme prima di togliere o
mettere il filtro (8).
• Non apportare modifiche né riparazioni di sorta all’apparecchio. In
presenza di qualunque anomalia dell’apparecchio, non utilizzarlo e
consultare un servizio di assistenza autorizzato.
• Non usare pezzi o accessori non forniti o non raccomandati da
SOLAC.
• Prima di collegare l’apparecchio alla rete elettrica, verificare che il
voltaggio indicato coincida con quello della sua abitazione.
• Non tirare mai il cavo né appendere l’apparecchio allo stesso.
Scollegare l’apparecchio dalla rete elettrica impugnando sempre la
spina e non il cavo di alimentazione.
• Evitare che il cavo entri in contatto con schegge taglienti o superfici
calde.
• Rimuovere tutti i sacchetti di carta o di plastica, i pezzi di plastica, i
cartoncini ed eventuali adesivi che si trovano dentro o fuori
l'apparecchio e che sono stati utilizzati per proteggerlo durante il
trasporto o per promuoverne la vendita.
• Non lasciare l'apparecchio in funzione senza controllo.
Non immergere mai il corpo principale dell'apparecchio in
acqua o in altro liquido, né lavarlo in lavastoviglie.
A
• Non toccare l'apparecchio con le mani umide quando è in funzione.
• Non utilizzare mai l'apparecchio su superfici umide e all'aperto.
• Il bicchiere non è adatto all'uso nel forno a microonde.
• Al fine di evitare situazioni pericolose derivanti dal ripristino
involontario del disgiuntore termico, non collegare mai l’apparecchio
a un interruttore dotato di timer.
ATTENZIONE!!: non smaltire MAI l'apparecchio insieme ai
rifiuti domestici. Portarlo presso il CENTRO DI
q
SMALTIMENTO o di raccolta più vicino perché possa
essere smaltito adeguatamente. In questo modo si
contribuirà alla tutela dell'ambiente.
1 Descrizione
Componenti principal
1 Corpo principale (base)
2 Selettore della velocità
BV5712
1
media, 2 massima, P Posizione turbo
BV5722
1 minima, 2, 3 media, 4, 5 massima
P Posizione turbo
3 Cavo di collegamento alla
rete
4 Bicchiere
5 Gruppo lama smontabile
6 Coperchio
7 Tappo/Bicchiere dosatore
8 Filtro per centrifuga
9 Avvolgicavo
2 Montaggio
ZLavorare su una superficie stabile, liscia e pulita che non ne consenta la
caduta
1 Montare il gruppo lama (5) sulla base del bicchiere A. Per farlo:
Posizionare la guarnizione in silicone, la lama metallica e infine il
componente in plastica. Portare il componente in plastica dalla posizione
UNLOCK alla posizione LOCK.
2 Innestare il bicchiere sul corpo principale Per farlo:
Appoggiare il bicchiere (4) sul corpo (1) in modo che il manico sia nella
verticale del lucchetto aperto.
3 Girare il bicchiere senza forzarlo fino a raggiungere la posizione del
lucchetto chiuso : in questa posizione raggiunge la battuta.
i Assicurarsi di incastrare correttamente il bicchiere sopra il corpo,
diversamente non si metterà in funzione.
4 Per utilizzare il frullatore come centrifuga per succhi collocare il filtro (8)
intorno alle lame C (modello BV5722).
B
3Uso
ZL’apparecchio è stato progettato per sbattere liquidi come, per esempio,
prodotti a base di latte, salse, succhi di frutta, zuppe, mescolare bibite,
frullati…. Può essere utilizzato per mescolare alimenti morbidi o per fare
purè con ingredienti lessati come le carote, o con ingredienti tipici per
gli alimenti per bambini. È anche possibile fare dei cocktail con ghiaccio
tritato, anche se è consigliabile non introdurre più di 10 cubetti di
ghiaccio alla volta.
ZNon è mai consigliato tenere l'apparecchio in funzione per un periodo
superiore al necessario. Dopo aver utilizzato l'apparecchio per due
minuti, lasciarlo raffreddare a temperatura ambiente per evitarne il
surriscaldamento. È possibile utilizzarlo di nuovo dopo 30 secondi.
pNon introdurre mai nel bicchiere oggetti di legno, plastica, vetro, metallo
o simili.
pNON versare alimenti molto caldi o in ebollizione nel bicchiere, per
evitare possibili scottature. Gli sbalzi improvvisi di temperatura possono
inoltre rompere il bicchiere.
1 Montare il frullatore come spiegato nel paragrafo 2, "Montaggio".
Accertarsi che l'apparecchio sia montato correttamente.
2 Introdurre gli alimenti nel bicchiere senza superare i 2/3 della sua
capacità massima (bordo superiore).
3 Posizionare il coperchio (6).
4 Posizionare il tappo (7) ruotandolo in senso antiorario.
5 Collegare il cavo alla rete.
6 Tramite il selettore della velocità, scegliere la velocità desiderata (1, 2, 3,
4 o 5 a seconda del modello) o P (turbo). Sarà necessario mantenere
questa posizione per tutto il tempo in cui si desidera tenere l'apparecchio
in funzione (al massimo 2 minuti di funzionamento continuo).
ZDurante il funzionamento tenere il coperchio ben saldo con entrambe le
mani.
7 Per aggiungere un ingrediente durante il funzionamento
dell'apparecchio, rimuovere il tappo dosatore e aggiungere gli ingredienti
attraverso il foro del coperchio
pNon togliere MAI il coperchio durante il funzionamento.
8 Una volta ottenuto il risultato desiderato, portare il selettore di velocità
nella posizione di spegnimento
9 Scollegare il cavo dalla rete e aspettare che la lama abbia smesso di
girare.
10 Rimuovere il bicchiere dal corpo principale e svuotarlo.
Funzionamento come centrifuga (BV5722)
1 Introdurre la frutta sbucciata nel filtro (8). La polpa della frutta rimarrà nel
filtro, mentre il succo uscirà all'esterno e verrà raccolto nel bicchiere.
D
.
E
.
B
.
i Consigli per l'uso
• Non utilizzare il bicchiere per riporvi alimenti o cose.
• Si consiglia di non versare alimenti molto caldi nel bicchiere, per
evitare possibili scottature.
• Si consiglia di aggiungere gli ingredienti poco alla volta piuttosto che
tutti insieme.
• Tritare innanzitutto gli alimenti più duri, quindi aggiungere quelli più
morbidi. In questo modo è più facile ottenere un composto omogeneo.
• La velocità più bassa è raccomandata per frullare o mescolare
alimenti di consistenza liquida. La velocità più alta è raccomandata
per tritare o mescolare alimenti più solidi o consistenti.
• Tagliare gli alimenti più grossi e fibrosi in dadi da 2 o 3 cm al massimo.
• Per preparare cocktail con ghiaccio tritato introdurre prima gli
ingredienti, quindi il ghiaccio e infine il liquido necessario o un po'
d'acqua.
•
Per tritare il ghiaccio si consiglia di utilizzare la velocità alta o turbo per
qualche istante. Questo spingerà i cubetti di ghiaccio verso l'alto e
impedirà che rimangano bloccati sul fondo del bicchiere.
• Se, durante la miscelazione, gli alimenti aderiscono alle pareti del
bicchiere o rimangono lontani dalle lame, fermare l'apparecchio ed
estrarre il bicchiere dal corpo principale. Togliere il coperchio e, con
una spatola, spostare delicatamente gli alimenti verso la lama.
Coprire il bicchiere, ricollocarla sul corpo principale e completare la
miscelazione degli alimenti.
• Non superare il livello massimo indicato nel bicchiere del frullatore.
4 Pulizia e conservazione
pLe lame sono molto affilate. Evitare di toccare le lame con le mani
quando si pulisce e si asciuga l’interno della caraffa
ZNon immergere mai il corpo principale (1) in acqua né lavarlo in
lavastoviglie.
1 Pulire l'apparecchio precedentemente al primo utilizzo, immediatamente
dopo ogni utilizzo e dopo lunghi periodi di inattività.
2 Pulire il bicchiere e gli altri elementi di plastica immediatamente dopo
l’uso, in quanto alcuni alimenti, come ad esempio le carote, sono molto
difficili da pulire una volta seccati.
Pulizia rapida
1 A frullatore completamente montato sollevare il coperchio e versare
acqua tiepida e poco detergente liquido nel bicchiere.
2 Collocare il coperchio e il tappo dosatore.
3 Portare il selettore di velocità in posizione P per qualche secondo.
4 Riportare quindi il selettore di velocità in posizione 0 e spegnere
l'apparecchio.
5 Estrarre il bicchiere e sciacquarlo in acqua tiepida.
Pulizia profonda
1 Svuotare il bicchiere e smontare il frullatore nel senso contrario a quello
descritto nel paragrafo “2 Montaggio”.
2 Pulire il corpo principale e il cavo di alimentazione con un panno umido.
3 Pulire gli altri elementi con acqua e sapone e sciacquarli con abbondante
acqua sotto il rubinetto. Non lavare in lavastoviglie.
4 Montare il frullatore come spiegato nel paragrafo 2, "Montaggio".
DEUTSCH de
SICHERHEITSHINWEISE
• Gerät ist zur Verwendung im Haushalt
bestimmt, wie zum Beispiel für:
Mitarbeiterküchen in Geschäften, Büros und
anderen Arbeitsumgebungen; Wohnhäuser;
den Gebrauch durch Hotelgäste oder Gäste in
sonstigen Wohnumgebungen; private
Gästezimmer. Jede andere Verwendung als
vorgesehen könnte gefährlich sein.
• Das Gerät darf nicht von Kindern benutzt
werden. Das Gerät und sein Kabel von
Kindern fernhalten. Das Gerät ist kein
Kinderspielzeug.
• Dieses Gerät ist nicht für den Gebrauch durch
Personen bestimmt, deren physische,
sensorielle oder mentale Fähigkeiten
eingeschränkt sind und die keine Erfahrung im
Umgang mit dem Gerät verfgen, mit
Ausnahme des Falles, dass sie überwacht
werden oder in den sicheren Umgang mit dem
Gerät eingewiesen worden sind und sich der
Risiken bewusst sind, die der Gebrauch
dieses Geräts mit sich zieht.
• Führen Sie die Wartung wie am Gerät
angegeben durch. REINIGUNG UND
ERHALT UNG für eine längere
Lebensdauer des Geräts.
• Trennen Sie das Gerät nach dem Gebrauch,
vor dem Abnehmen bzw. Aufsetzen eines
Teils sowie vor jeder Reinigung oder Wartung
stets vom Netz. Bei Stromausfall ebenfalls
vom Netz trennen.
• Sollte das Netzkabel beschädigt sein, darf es
vorsichtshalber nur vom Hersteller, seinem
autorisierten Kundendienst oder ähnlichem
Fachpersonal ausgetauscht werden.
• Die Messer sind sehr scharf. Vorsicht bei der
Handhabung. Messer nicht bei
angeschlossenem Gerät berühren. Halten Sie
während des Betriebs Hände, Haare,
Kleidung sowie jegliche Gegenstände von den
Messern fern.
• Verwenden Sie den Standmixer nur mit
geschlossenem Becher. Schalten Sie den
Mixer niemals mit leerem Becher ein.
• Stellen Sie sicher, dass das Gerät vom Netz
getrennt ist und die Messer vollständig still
stehen, bevor Sie den Filter (8) einsetzen oder
entfernen.
• Nehmen Sie keine Änderungen oder Reparaturen am Gerät vor.
Benutzen Sie das Gerät im Falle eines Defekts nicht und bringen Sie
es zu einem autorisierten Kundendienst.
• Verwenden Sie ausschließlich von SOLAC gelieferte oder
empfohlene Teile bzw. Zubehör.
• Vergewissern Sie sich vor dem Netzanschluss des Geräts, dass die
angegebene Netzspannung mit derjenigen Ihres Haushalts
übereinstimmt.
• Ziehen Sie nicht am Kabel bzw. hängen Sie das Gerät nicht am Kabel
auf. Ziehen Sie stets am Netzstecker, nicht am Kabel, wenn Sie das
Gerät vom Netz trennen.
• Achten Sie darauf, dass das Netzkabel nicht mit scharfen Kanten
oder heißen Flächen in Berührung kommt.
• Entfernen Sie alle Papier- und Kunststoffbeutel, Kunststofffolien,
Kartons bzw. Aufkleber in oder am Gerät, die als Transportschutz
oder Werbungselemente dienen.
• Das Gerät nicht unbeaufsichtigt eingeschaltet lassen.
Das Gerät nicht in Wasser oder andere Flüssigkeiten
tauchen und nicht in der Spülmaschine reinigen
A
• Das Gerät während des Betriebs nicht mit feuchten Händen berühren.
• Stellen Sie das Gerät niemals auf nassen Oberflächen oder im Freien
auf.
• Der Becher ist nicht mikrowellenfest.
• Zur Vermeidung von Gefahrensituationen durch ein unbeabsichtigtes
Rücksetzen des Thermoschalters das Gerät niemals an einen TimerSchalter anschließen.
ACHTUNG!! Das Gerät KEINESFALLS über den Hausmüll
entsorgen, sondern zum nächstgelegenen
q
WERTSTOFFHOF oder zur Abfallannahmestelle zur
Weiterverwertung bringen. So leisten Sie einen Beitrag zum
Umweltschutz.
1 Beschreibung
Hauptbestandteile
1 Gehäuse (Sockel)
2 Geschwindigkeitswahlschalter
BV5712
1
Mittelstufe, 2 Höchststufe,
P
Turbo-Position
BV5722
1 Niedrigste Stufe, 2, 3
Höchststufe, P Turbo-Position
5 m
2 Montage
ZArbeiten Sie auf einer stabilen, glatten und sauberen Oberfläche, von
der das Gerät keinesfalls abrutschen kann.
1 Montieren Sie den Messersatz (5) an den Kannenboden A Dafür:
Bringen Sie die Silikondichtung, das Metallmesser und zuletzt das
Plastikteil an Drehen Sie das Plastikteil von der Position UNLOCK zur
Position LOCK.
2 Bringen Sie die Kanne auf der Hauptstruktur an. Dafür:
Setzen Sie die Kanne(4) so auf die Hauptstruktur (1), dass sich der Griff
an der Vertikale des offenen Vorhängeschlosses befindet .
3 Drehen Sie die Kanne, bis sie sich in der Position des geschlossenen
Vorhängeschlosses befindet. Nun ist die Kanne eingerastet .
i Stellen Sie sicher, dass die Kanne richtig in der Struktur einrastet.
Ansonsten setzt sich das Gerät nicht in Betrieb.
ZMöchten Sie den Mixer als Saftpresse verwenden, legen Sie den Filter
(8) um das Messer C (Modell BV5722)
3 Verwendung
ZDieses Gerät ist zum Mixen von Flüssigkeiten wie Milchprodukten,
Saucen, Fruchtsäften, Suppen, Mixgetränken usw. vorgesehen. Es
eignet sich zum Zerkleinern weicher Nahrungsmittel oder zur
Herstellung von Püree mit gekochten Zutaten wie Karotten oder auch
Babynahrung. Zudem lassen sich Cocktails mit zerstoßenem Eis
zubereiten (nicht mehr als 10 Eiswürfel auf einmal in den Becher
geben).
ZLassen Sie das Gerät niemals länger als nötig in Betrieb. Lassen Sie
das Gerät nach einem Dauerbetrieb von 2 Minuten auf
Umgebungstemperatur abkühlen, um eine Überhitzung zu vermeiden.
Nach 30 Sekunden kann es wieder verwendet werden.
pGeben Sie keine Holz-, Kunststoff-, Glas-, Metallgegenstände o.ä. in
den Mixbecher.
pGeben Sie NIE sehr heisse oder kochende Speisen in die Kanne, es
könnte während des Vorganges zu Verbrennungen kommen. Die
abrupten Temperaturwechsel könnten ausserdem die Kanne zum
Bersten bringen.
Mittelstufe, 4,
3 Netzkabel
4 Becher
5 Abnehmbarer Messersatz
6 Deckel
7 Stopfen/Messbecher
8 Saftfilter
9 Kabelfach
Mod. BV5712_5722
Batidora de vaso
Jar Blender
Mixeur avec verre
Liquidificador de copo
Frullatore a bicchiere
Blender
Standmixer
B
Solac is a registered Trade Mark 01/14
INSTRUCCIONES DE USO
INSTRUCTIONS FOR USE
MODE D’EMPLOI
INSTRUÇÕES DE USO
ISTRUZIONI PER L’USO
GEBRUIKSAANWIJZING
GEBRAUCHSANLEITUNG
INSTRUCŢIUNI DE UTILIZARE
1 Setzen Sie die Geräteteile nach Anleitung unter Punkt 2 „Montage“
NEDERLANDS nl
VEILIGHEIDSINSTRUCTIES
• Dit apparaat is bedoeld voor huishoudelijke
toepassingen, zoals bijv.: personeelskeukens
in winkels, kantoren en andere
werkomgevingen; boerderijen; door gasten in
hotels, motels en overige woonomgevingen;
bed & breakfast-achtige gelegenheden.
Elk ander gebruik dan hier vermeld kan
gevaarlijk zijn.
• Het apparaat mag niet door kinderen gebruikt
worden. Het apparaat en de kabel buiten het
bereik van kinderen houden. Kinderen mogen
niet spelen met het apparaat.
• Dit apparaat mag niet worden gebruikt door
personen met verminderde lichamelijke,
zintuiglijke of geestelijke vermogens of gebrek
aan ervaring en kennis, tenzij ze onder
toezicht staan ??of voldoende zijn
geïnstrueerd met betrekking tot de veilige
werking en de risico's van het gebruik
begrijpen.
• Voer onderhoudswerkzaamheden aan het
apparaat uit volgens het gedeelte REINIGING
EN OPSLAG voor een langdurige levensduur
van het apparaat.
• Trek altijd na gebruik de stekker uit het
stopcontact en ook vóórdat u onderdelen
verwijdert of aanbrengt of onderhouds- of
reinigingswerkzaamheden aan het apparaat
verricht. Trek de stekker er ook bij
stroomuitval uit.
• Laat als het netsnoer beschadigd is, dit door
de fabrikant, zijn klantenservice of door
vergelijkbaar opgeleid personeel vervangen,
om evt. risico’s te vermijden.
• De messen zijn uiterst scherp. Wees
voorzichtig als u ze aanraakt. Raak ze niet aan
wanneer het apparaat aan staat. Houd tijdens
gebruik de handen, het haar, de kleding en
alle gebruiksvoorwerpen verwijderd van de
bewegende messen.
• Gebruik de blender alleen met het deksel op
de kan. Gebruik de blender nooit als deze leeg
is.
• Controleer of het apparaat uit staat en of de
messen volledig tot stilstand zijn gekomen,
alvorens het filterelement aan te brengen of te
verwijderen (8).
• Voer geen enkele wijziging of reparatie aan het apparaat uit.Bij
defecten aan het apparaat, het apparaat niet gebruiken maar naar
een erkende technische dienst brengen
• Gebruik geen onderdelen of hulpstukken die niet door SOLAC
geleverd of aanbevolen zijn.
• Kijk, alvorens het apparaat op het lichtnet aan te sluiten, of het
aangegeven voltage overeenkomt met de netspanning bij u thuis.
• Trek nooit aan het snoer of laat het apparaat nooit aan het snoer
hangen. Neem de stekker uit het stopcontact door aan de stekker,
nooit aan het snoer, te trekken.
• Zorg ervoor dat het netsnoer niet in contact komt met scherpe kanten
of hete oppervlakken.
• Verwijder alle papieren of plastic zakken, kunststof plaatjes, kaartjes
en stickers die evt. aan de binnen- of buitenkant van het apparaat
aangebracht werden ter bescherming tijdens het transport of voor
reclamedoeleinden.
• Laat het apparaat niet onbeheerd achter wanneer het in werking is.
Dompel dit apparaat niet in water of in andere vloeistoffen
onder en stop het evenmin in de vaatwasser. Laat dit
A
apparaat bij het reinigen niet met water in aanraking komen
• Raak het apparaat niet met natte handen aan als het aan staat.
• Gebruik dit apparaat nooit op een natte ondergrond of buitenshuis.
• De kan is niet geschikt voor in de magnetronoven.
• Om gevaarlijke situaties als gevolg van een onbedoelde reset
(herinstelling) van de thermoschakelaar te vermijden het apparaat
nooit koppelen aan een tijdschakelaar.
LET OP!: Deponeer het apparaat als u het wilt afdanken
NOOIT in de vuilnisbak, maar wend u tot het dichtstbijzijnde
q
INZAMELPUNT of ophaaldienst in uw woonplaats voor
verdere verwerking. Op deze wijze draagt u bij tot het
behoud van het milieu.
1 Beschrijving
Belangrijkste onderdelen
1 Sokkel (voetstuk)
2 Snelheidsregelaar
BV5712
1
Gemiddelde snelheid,
Hoogste snelheid, P Turbostand
2
BV5722
1
minimum, 2, 3 Gemiddelde snelheid, 4,
Hoogste snelheid, P Turbostand
5
3 Netsnoer
4Kan
5 Uitneembaar mes
6 Deksel
7 Deksel/doseerdop
8 Sapfilter
9 Snoeropbergplaats
2 Montage
ZWerk op een stabiel, glad en schoon oppervlak waarop het apparaat niet
kan wegschuiven.
1 Plaats het mes (5) aan de onderzijde van de kan A. Hiervoor gaat u als
volgt te werk:
Plaats de siliconen afdichting, het metalen mes en het kunststof deel.
Draai het kunststof deel vanuit de positie UNLOCK naar de positie LOCK.
2 Zet de kan op het voetstuk van het apparaat. Hiervoor gaat u als volgt te
werk:
Plaats de kan (4) op het voetstuk (1) zodat de verbindingsring van de kan
verticaal samenvalt met de vergrendelingsgleuven.
3 Draai zonder veel druk uit te oefenen de kan in de gesloten
vergrendelingspositie. In deze positie is de kan bevestigd op het
voetstuk.
i Zorg ervoor dat de kan goed in het voetstuk past. Anders zal deze niet
werken.
ZAls u de blender wilt gebruiken als fruitpers, plaatst u het filter (8) rond
het mes C (model BV5722).
B
3Gebruik
Z
Dit apparaat is ontworpen voor het mengen van vloeistoffen, zoals
melkproducten, sauzen, vruchtensappen, soepen, het mixen van dranken,
milkshakes… Het apparaat kan gebruikt worden voor het mixen van zachte
voedingsmiddelen of het pureren van gekookte ingrediënten, bijvoorbeeld
wortels of babyvoeding. Ook kunnen cocktails gemaakt worden met
gemalen ijs, maar het is niet aan te bevelen om meer dan 10 ijsblokjes
tegelijk in de blender te doen.
ZLaat het apparaat niet langer aan dan strikt noodzakelijk. Laat na twee
minuten ononderbroken gebruik het apparaat tot kamertemperatuur
afkoelen om oververhitting te voorkomen. Na 30 seconden kunt u het
weer gebruiken.
p
Plaats nooit houten, kunststof, glazen, metalen of soortgelijke voorwerpen
in de kan.
pGiet NOOIT heet of kokend voedsel in de pot. Dit kan gedurende het
proces tot brandwonden leiden. Plotselinge temperatuurverschillen
kunnen ervoor zorgen dat de kan barst.
1 Monteer de blender zoals in hoofdstuk “2 Montage” beschreven is. Zorg
ervoor de het apparaat correct gemonteerd is.
2 Doe de voedingsmiddelen in de kan zonder 2/3 van de maximale inhoud
(bovenste rand) te overschrijden.
3 Plaats het deksel (6).
4 Draai het deksel (7) naar links vast (tegen de wijzers van de klok in).
5 Sluit het snoer aan op het lichtnet.
6 Zet de snelheidsregelaar op de gewenste stand (1, 2, 3, 4 of 5,
naargelang het model) of de P-turbostand. Houd deze stand aan zolang
als u het apparaat wilt laten werken (maximaal 2 minuten onafgebroken).
ZTijdens de werking van de blender het deksel met 2 handen stevig op de
kan gedrukt houden.
7 Indien u tijdens het mixen nog andere ingrediënten wilt toevoegen, opent
u de bijvuldop en voegt u de ingrediënten toe via de vulopening
pVerwijder NOOIT het deksel wanneer de blender in werking is.
8 Wanneer het gewenste resultaat is verkregen, zet u de snelheidsregelaar
op de uit-stand
9 Neem de stekker uit het stopcontact en wacht tot het mes stilstaat.
10 Haal de kan uit de blender en schenk hem leeg.
Als sapcentrifuge gebruiken (BV5722)
1 Stop geschild fruit in het filter (8). Het vruchtvlees blijft in het filter en het
sap vloeit eruit in de kan.
E
.
B
D
.
i Tips
• Gebruik de kan niet om er levensmiddelen of voorwerpen in te
bewaren.
• Aanbevolen wordt geen hete levensmiddelen in de kan te doen om de
kans op brandwonden te vermijden.
• Aangeraden wordt de ingrediënten beetje bij beetje toe te voegen in
plaats van in één keer.
• Vermaal eerst de hardste voedingsmiddelen en voeg er vervolgens
de zachtere aan toe. Dit is de beste manier om een homogene massa
te krijgen.
• De laagste snelheid is het meest geschikt om te kloppen of vloeibare
levensmiddelen te mengen. De hoogste snelheid dient voor het
vermalen of mengen van vaste levensmiddelen.
• Dikke en vezelachtige levensmiddelen moeten in blokjes van maximaal 2 of 3 cm
worden gesneden.
• Voor het bereiden van cocktails met gehakt ijs dient u eerst de
ingrediënten, vervolgens het ijs en als laatste de benodigde vloeistof of
wat water toe te voegen.
•
Voor het hakken van ijs wordt aanbevolen enkele seconden de hoge
snelheid of de turboknop te gebruiken om het ijs omhoog te stuwen en te
voorkomen dat het onderin vast komt te zitten.
• Blijven de ingrediënten tijdens het mixen tegen de wanden van de kan
plakken of komen ze niet in aanraking met het mes, schakel het
apparaat uit, neem de kan uit het apparaat en verwijder het deksel.
Verwijder het deksel en schuif de levensmiddelen met een spatel
voorzichtig naar het mes. Zet het deksel op de kan, zet de kan in het
apparaat en ga verder met het mixen van de levensmiddelen.
• Overschrijd nooit het maximale vulniveau dat is aangegeven op de kan van
de blender.
4 Reiniging en onderhoud
pDe messen zijn uiterst scherp. Vermijd bij het reinigen en drogen van de
binnenkant van de kan elke aanraking van de messen met de handen.
ZDompel het voetstuk (1) nooit onder in water en was het nooit in de
vaatwasser.
1 Reinig het apparaat voordat u het voor het eerst in gebruik neemt,
onmiddellijk na elk gebruik en na een lange periode ongebruikt te zijn
geweest.
2 Maak de kan en andere plastic elementen onmiddellijk schoon na
gebruik, aangezien sommige voedingsmiddelen (b.v. wortels) in
opgedroogde toestand erg moeilijk schoon te maken zijn.
Snelle reiniging
1 Verwijder het deksel van de volledig gemonteerde blender en giet lauw
water met wat afwasmiddel in de kan.
2 Zet het deksel met de doseerdop erop.
3 Zet de snelheidsregelaar een paar seconden in stand P.
4 Zet de snelheidsregelaar in stand 0 en haal de stekker uit het stopcontact.
5 Verwijder de kan en spoel deze na met lauw water.
Grondige reiniging
1 Maak de kan leeg en demonteer de blender in de omgekeerde volgorde
die beschreven staat in het gedeelte “2 Montage”.
2 Maak de romp en het netsnoer met een vochtige doek schoon.
3 Maak de andere elementen met zeepsop schoon en spoel ze met veel
water onder de kraan af. Niet in de vaatwasmachine reinigen.
4 Monteer de blender zoals in hoofdstuk “2 Montage” beschreven is.
.
zusammen. Stellen Sie sicher, dass alle Teile korrekt montiert wurden.
2 Füllen Sie die Lebensmittel in den Becher bis max. 2/3 des
Fassungsvermögens (oberer Rand) ein.
3 Setzen Sie den Deckel (6) auf.
4 Setzen Sie den Stopfen (7) ein, und drehen Sie ihn gegen den
Uhrzeigersinn.
5 Schließen Sie den Mixer an das Netz an.
6 Stellen Sie den Geschwindigkeitswahlschalter auf die gewünschte Stufe
(1, 2, 3, 4 oder 5 je nach Modell) oder Turbofunktion P. Die gewählte
Stufe darf während des Betriebs des Geräts (max. 2 Minute
Dauerbetrieb) nicht gewechselt werden.
ZHalten Sie den Deckel während des Betriebs mit beiden Händen fest
nieder.
7 Möchten Sie während des Mixvorgangs weitere Zutaten hinzufügen, so
entnehmen Sie den Dosierstopfen und füllen die Zutaten durch die
Deckelöffnung ein
pNehmen Sie NIEMALS den Deckel während des Betriebs ab.
8 Wenn Sie mit dem Mixvorgang fertig sind, stellen Sie den
Geschwindigkeitsschalter auf die AUS-Position
9 Ziehen Sie den Netzstecker und warten Sie, bis das Messer stillsteht.
10 Nehmen Sie den Becher vom Sockel und entleeren Sie den Inhalt.
Option Saftpresse (BV5722)
1 Geben Sie die geschälte Frucht in den Filter (8). Das Fruchtfleisch bleibt
im Filter, während der ausgepresste Saft in den Behälter läuft.
B
.
D
.
E
.
i Tipps zur Verwendung
• Verwenden Sie den Behälter nicht zur Aufbewahrung von
Lebensmitteln oder Gegenständen.
• Füllen Sie keine allzu heißen Lebensmittel in den Behälter, um eine
eventuelle Verbrennungsgefahr zu vermeiden.
• Füllen Sie die Zutaten nach und nach ein, anstatt alle auf einmal.
• Beginnen Sie mit dem Zerkleinern der festeren Zutaten und fügen Sie
danach die weicheren hinzu. Auf diese Weise erzielen Sie ein
gleichmäßiges Mischergebnis.
• Die niedrige Geschwindigkeitsstufe empfiehlt sich zum Mixen bzw.
Verarbeiten flüssiger Lebensmittel. Die hohe Geschwindigkeitsstufe
empfiehlt sich zum Zerkleinern bzw. Verarbeiten von Lebensmitteln
mit festerer Konsistenz.
• Dicke und faserhaltige Lebensmittel in höchstens 2-3 cm. große
Stücke schneiden.
• Zum Mixen von Cocktails mit zerstoßenem Eis füllen Sie zuerst die
Zutaten, dann das Eis und zuletzt die erforderliche Flüssigkeit bzw.
etwas Wasser in den Behälter.
•
Beim Zerkleinern von Eis empfiehlt es sich, kurz die hohe
Geschwindigkeitsstufe bzw. Turbostufe zu verwenden, um die Eiswürfel
nach oben zu stoßen und zu vermeiden, dass sie am Boden bleiben.
• Bleiben die Zutaten während des Mixvorgangs an den Wänden des
Behälters haften oder werden sie nicht vom Messer erfasst, so
schalten Sie das Gerät aus und nehmen den Behälter vom Sockel.
Nehmen Sie den Deckel ab und schieben Sie die Zutaten vorsichtig
mithilfe eines Spatels zum Messer. Verschließen Sie den Behälter
wieder, setzen Sie ihn auf den Sockel und führen Sie den Mixvorgang
zu Ende.
• Achten Sie beim Befüllen darauf, dass die oberste Markierung des
Mixbechers nicht überschritten wird.
4 Reinigung und Aufbewahrung
pDie Messer sind sehr scharf. Achten Sie darauf, die Messer beim
Reinigen und Trocknen des Becherinnenraums nicht zu berühren.
ZTauchen Sie das Gehäuse (1) niemals in Wasser und geben Sie es nicht
in die Spülmaschine.
1 Reinigen Sie das Gerät vor der ersten Verwendung sowie unmittelbar
nach jeder Verwendung, und wenn Sie es längere Zeit nicht benutzt
haben.
2 Reinigen Sie den Becher und die anderen Kunststoffelemente stets
sofort nach der Verwendung, da sich einige Lebensmittel (z.B. Karotten)
nur sehr schwer entfernen lassen, wenn sie eingetrocknet sind.
Schnelle Reinigung
1 Lassen Sie den Behälter (inkl. Messer) auf dem Sockel, nehmen Sie den
Deckel ab und füllen Sie lauwarmes Wasser mit etwas Spülmittel ein.
2 Setzen Sie den Deckel und die Verschlusskappe auf den Behälter.
3 Stellen Sie den Geschwindigkeitsregler einige Sekunden lang auf die
Position „P“.
4 Stellen Sie den Geschwindigkeitsregler auf „0“ und trennen Sie das Gerät
vom Netz.
5 Nehmen Sie den Behälter ab und spülen Sie ihn mit lauwarmem Wasser
aus.
Gründliche Reinigung
1 Leeren Sie die Kanne und und montieren Sie sie in der Gegenrichtung
des im Abschnitt 2 “Montage” Beschriebenen ab.
2 Reinigen Sie das Gehäuse und Netzkabel mit einem feuchten Tuch.
3 Reinigen Sie die restlichen Teile mit Spülmittel und spülen Sie sie
anschließend unter reichlich fließendem Wasser ab. Nicht in der
Spülmaschine reinigen.
4 Setzen Sie die Geräteteile nach Anleitung unter Punkt 2 „Montage“
zusammen.
es • ESPAÑOL
en • ENGLISH
fr • FRANÇAIS
pt • PORTUGUÊS
it • ITALIANO
nl • NEDERLANDS
de • DEUTSCH
Technical data 220-240V,
Protection class BV5712 Class II; BV5722 Class II
BV5712 - 600 W; 77dB(A) /
BV5722 -1000 W; 82,5dB(A)
In conformity with the European directives
L
es
Lea completamente estas instrucciones antes de utilizar su aparato. E
manual es parte integrante del producto. Consérvelo en un lugar segur
para futuras consultas.
en Read these instructions fully before using the appliance.This manual i
an integral part of the product. Keep it in a safe place for future
reference.
fr Lisez attentivement ce mode d'emploi avant d'utiliser l'appareil. C
manuel fait partie du produit. Conservez-le dans un lieu sûr afin d
pouvoir le consulter ultérieurement.
de Lesen Sie diese Anweisungen vor Inbetriebnahme des Geräts gründlic
durch. Diese Bedienungsanleitung ist Bestandteil des Produkts.
Bewahren Sie sie an einem sicheren Ort zum späteren Nachlese
auf.
pt Leia completamente estas instruções antes de utilizar o aparelho. Est
manual é parte integrante do produto. Guarde-o em lugar segur
para eventual consulta posterior.
it Leggere con attenzione le presenti istruzioni prima di utilizzar
l'apparecchio. Il presente manuale è parte integrante del prodotto.
Conservarlo in un luogo sicuro per poterlo consultare in futuro.
nl
Lees deze gebruiksaanwijzingen helemaal door alvorens het apparaat i
gebruik te nemen.
Bewaar de gebruiksaanwijzing op een veilige plek om deze in de toekoms
na te kunnen slaan.
Deze gebruiksaanwijzing is onderdeel van het product
100% Recycled Paper
}
st
Page 3

DESPLEGABLE_BV5712_22_orientales.fm Page 1 Tuesday, January 14, 2014 1:25 AM
ČESKY cs
BEZPEČNOSTNÍ POKYNY
• Tento spotřebič je určen pro použití v
domácím prostředí, například: v
kuchykách zaměstnanců v dílnách,
kancelářích a na jiných pracovištích; v
zemědělských budovách; pro klienty v
hotelích, motelech a jiných ubytovacích
zařízeních; v ubytovnách. Používání
tohoto výrobku pro jiné než zde uvedené
účely může být nebezpečné.
•Spotřebič nesmí používat děti. Udržujte
spotřebič a kabel mimo dosah dětí.
Nedovolte, aby si děti hráli se
spotřebičem.
•Tento spotřebič není určen pro používání
osobami se sníženými fyzickými,
smyslovými nebo duševními
schopnostmi nebo s nedostatkem
zkušeností a znalostí. Tyto osoby jej
smějí používat pouze pod dohledem
nebo pokud jim byly poskytnuty
odpovídající instrukce ohledně
bezpečného provozu spotřebiče a
porozuměli rizikům, které provoz
představuje.
•Za účelem prodloužení životnosti
spotřebiče provádějte údržbu popsanou v
odstavci ČIŠTĚNÍ A ÚDRŽBA.
•Zařízení po použití, před instalací nebo
výměnou částí, před vykonáním jakékoli
údržby a před čištěním odpojte od zdroje
elektrické energie. Zařízení také odpojte
v případě výpadku elektrického proudu.
• Aby nedošlo k eventuálním rizikům,
pokud je poškozena napájecí šňůra, měla
by být vyměněna ve výrobním závodě,
nebo v servisní opravně poskytující náš
poprodejní záruční servis nebo by to měl
provést obdobně kvalifikovaný pracovník.
• Čepele jsou velmi ostré.Zacházejte s nimi
velmi opatrně.Se zařízením
nemanipulujte, je-li připojeno k
síti.Během provozu zařízení udržujte své
ruce, oděv a kuchyňské nářadí mimo jeho
pohyblivé části.
• Mixér používejte pouze v tom případě,
kdy je na pracovní nádobu nasazeno
víko.Je-li nádoba prázdná, mixér nikdy
nepoužívejte.
•Před montáží nebo demontáží filtračního
příslušenství (8) se ujistěte, že je
spotřebič
odpojen od napájecího zdroje a
že se zcela zastavily lopatky.
• Spotřebič neupravujte ani neopravujte. Bij defecten aan het
apparaat, het apparaat niet gebruiken maar naar een erkende
technische dienst brengen
• Nepoužívejte žádné součásti nebo příslušenství, které nebyly
dodány či doporučeny společností SOLAC.
•Před připojením zařízení k elektrické síti zkontrolujte, zda
vyznačené napětí odpovídá napětí sítě ve vaší domácnosti.
• Nikdy netahejte za přívodní šňůru, ani za ni nenechávejte
spotřebič viset. Spotřebič vždy odpojujte z elektrické zásuvky
tahem za zástrčku, nikoliv za šňůru.
• Kabel se nesmí dotýkat ostrých hran ani horkých povrchů.
• Je-li spotřebič zapnutý, neponechávejte jej bez dozoru.
•Z vnitřní nebo vnější strany zařízení odstraňte veškerý
materiál použitý na ochranu během přepravy nebo na podporu
prodeje, jako jsou papírové nebo plastové sáčky, plastové
fólie, kartony a nálepky.
Těleso zařízení nikdy neponořujte do vody ani do jiné
kapaliny. Taky jej nedávejte do myčky na nádobí.
A
• Nemanipulujte se zařízením s mokrýma rukama.
•Přístroj nepoužívejte na mokrých površích nebo ve
venkovních prostorách.
• Pracovní nádoba není vhodná k použití v mikrovlnné troubě.
• Abyste se vyhnuli nebezpečným situacím spojeným s
nechtěným vynulováním tepelného spínače, nikdy zařízení
nezapojujte do vypínače s časovačem.
UPOZORNĚNÍ!!:Budete-li se potřebovat spotřebiče zbavit,
NIKDY jej nevyhazujte do komunálního odpadu.Místo toho jej
b
odneste na nejbližší RECYKLAČNÍ MÍSTO nebo do sběrných
surovin k patřičnému zpracování.Přispějete tak k ochraně
životního prostředí.
1 Popis
Hlavní části
1 Hlavní těleso zařízení (základna)
2Volič rychlostí
BV5712
1 střední, 2 maximální, P Nastavení Turbo
BV5722
1 minimální rychlost, 2, 3
maximální, P Nastavení Turbo
5
2Montáž
Z Pracujte na stabilním, hladkém a čistém povrchu bez možnosti uklouznutí.
1 Namontujte sestavu nože (5) do základny s nádobou A. K tomu:
Nainstalujte silikonové těsnění, kovový nůž a nakonec plastový díl. Otočte
plastovým dílem z polohy UNLOCK (odblokováno) do polohy LOCK
(zablokováno).
2Nasaďte nádobu na hlavní tělo spotřebiče. K tomu:
Umístěte nádobu (4) na tělo (1) tak, aby držadlo zůstalo vertikálně k
otevřenému zámku.
3Otočte nádobou bez použití větší síly do polohy zavřeného zámku: v této
poloze zaklapne. B
i
Ujistěte se, že je nádoba dobře nasazena na tělo spotřebiče, jinak nebude správně
fungovat.
4 Chcete-li použít mixér jako odšťavňovač, umístěte filtr (8) kolem nože C
(model BV5722).
3Provoz
Z Toto zařízení bylo navrženo k míchání tekutin, jako jsou mléčné výrobky,
omáčky, ovocné šťávy, polévky;k mixování nápojů, mléčných koktejlů atd.Je
možné je používat k mixování měkkých potravin nebo k výrobě pyré s
střední, 4,
3 Napájecí kabel
4 Pracovní nádoba
5 Odnímatelná sestava nože
6Víko
7 Dávkovací nádobka/víčko
8 Filtr na odšťavňování
9Navíječ kabelu
vařenými ingrediencemi, jako je mrkev nebo jako jsou ingredience pro dětská
jídla.Také je můžete využít k přípravě koktejlů obsahujících rozdrcený led,
ačkoli se do něj nedoporučuje vkládat více než 10 kostek ledu najednou.
Z V žádném případě nedoporučujeme ponechávat spotřebič v provozu po delší
dobu, než je nezbytně nutné. Po nepřetržitém provozu spotřebiče jej nechte
po dobu dvou minut ochladit na okolní teplotu, abyste zabránili přehřívání.
Spotřebič pak můžete znovu použít po 30 sekundách.
pDo pracovní nádoby nevkládejte žádné dřevěné, plastikové, skleněné, kovové
nebo podobné předměty.
pNIKDY nevkládejte horké nebo vřící potraviny do nádoby, při provozu by mohlo
dojít k popáleninám. Náhlé teplotní kontrasty navíc mohou způsobit prasknutí
nádoby.
1 Mixér smontujte způsobem popsaným v odstavci 2 „Montáž“.Ujistěte se, že je
nasazen správně.
2 Do pracovní nádoby vkládejte pouze tolik potravin, aby nepřesáhly 2/3
maximálního objemu (horní okraj)
3Nasaďte víko (6).
4Nasaďte víko (7) a otočte je proti směru hodinových ručiček.
5 Zapojte napájecí kabel.
6 Použijte volič rychlosti a vyberte požadovanou polohu rychlosti (1, 2, 3, 4 nebo
5, v závislosti na modelu) nebo polohu „P“ pro turbo. Po dobu, kdy chcete, aby
spotřebič pracoval, je nutné stisknout a držet zvolenou polohu (maximálně 2
minuty souvislého provozu).
Z Během provozu pevně oběma rukama přidržujte víko.
7 Chcete-li během procesu míchání přidat jakékoli ingredience, odstraňte
dávkovací uzávěr a přidejte je otvorem ve víku
pBěhem činnosti NIKDY neodstraňujte víko.
8 Jakmile dosáhnete požadovaného výsledku, nastavte volič rychlostí do polohy
vypnuto
9 Vypojte kabel z elektrické sítě a počkejte, až se čepel zastaví.
10 Vyjměte pracovní nádobu z hlavního tělesa a vyprázdněte ji.
Provoz odštavňovače (BV5722)
1Umístěte oloupané ovoce dovnitř filtru (8). Dužina ovoce zůstane uvnitř filtru,
i Doporučení k použití
• Nádobu nepoužívejte na uskladňování jídla ani jiných předmětů.
• Abyste se vyhnuli popálení, nedoporučujeme vám do nádoby přidávat velmi
• Ingredience vám doporučujeme přidávat v malých dávkách, namísto jedné
•Nejdříve mixujte pevné ingredience a poté ty měkčí. Usnadní to dosažení
• Pomalejší rychlost je vhodnější pro míchání a mixovaní jídel s tekutou
• Hrubé a vláknité jídla musíte většinou nakrájet na 2 anebo 3 cm kostky.
• Pro výrobu koktejlů s drceným ledem vložte nejdříve ingredience a poté led.
•Při drcení ledu doporučujeme po několik sekund používat vysoké otáčky nebo
• Když se jídlo přilepí ke stěně nádoby během míchání, nebo zůstane mimo
•Nepřekračujte maximální hladinu vyznačenou na nádobě mixéru.
4 Čištění a uskladnění
pČepele jsou velmi ostré. Při čištění a vysoušení vnitřku nádoby se čepelí
Z Nikdy hlavní těleso (1) zařízení neponořujte do vody, ani jej neumývejte v
1Při prvním použití, okamžitě po každém použití a po delším skladování přístroj
2 Po použití nádobu a jiné plastové části mixéru okamžitě umyjte, protože
Rychlé čištění
1 S namontovanými čepelemi otevřete víko a přidejte trochu teplé vody s malým
2Připevněte víko a dávkovací uzávěr.
3 Na pár vteřin dejte regulátor rychlosti do polohy P.
4 Regulátor rychlosti dejte do polohy 0 a zařízení odpojte od sítě.
5Odstraňte nádobu a opláchněte teplou vodou.
Důkladné čištění
1 Vyprázdněte nádobu a odmontujte nádobu mixéru opačným způsopem, než
2 Hlavní těleso a napět’ový kabel vyčistěte vlhkou látkou.
3 Všechny ostatní části umyjte v mýdlové vodě a opláchněte pod kohoutkem.
4 Čepel namontujte tak, jak je to popsané v odstavci 2 „Montáž“.
E.
zatímco džus vyteče ven a zůstane uložen uvnitř nádoby.
horké jídlo.
velké.
hladší směsi.
konzistencí. Vyšší rychlost vám doporučujeme k mletí a mixování pevnějších
nebo hrubějších jídel.
Nakonec přidejte potřebnou tekutinu a malé množství vody.
turbo, vytlačit tak led směrem nahoru a zabránit mu v zaseknutí v dolní části.
dosah čepelí, vypněte zařízení, nádobu vyjměte ze základny a sundejte víko.
Po odstranění víka opatrně posuňte jídlo pomocí špachtle směrem k č
Na nádobu položte víko, umístěte ji do hlavního tělesa a pokračujte v míchání
ingrediencí.
nedotýkejte rukama.
myčce na nádobí.
umyjte.
některé potraviny (například mrkev) se po usušení myjí velmi obtížně.
množstvím tekutého čistícího prostředku.
jak je popsáno v odstavci 2. Montáž.
Nikdy je neumývejte v myčce na nádobí.
D.
B.
epelím.
POLSKI pl
INSTRUKCJE BEZPIECZEŃSTWA
•Urządzenie przeznaczone jest do użytku: w
kuchenkach dla personelu w sklepach,
biurach i innych zakadach pracy; w
gospodarstwach; przez klientów w hotelach,
motelach i innych tego typu obiektach; w
kwaterach turystycznych. Używanie
urządzenia do innych celów, niż te, do których
zostało ono przeznaczone może być
niebezpieczne.
•Urządzenie nie powinno być stosowane przez
dzieci. Urządzenie wraz z kablem nie powinno
znajdować się w zasięgu dzieci. Dzieci nie
powinny bawić się urządzeniem.
• Niniejsze urządzenie nie jest przeznaczone
dla osób o ograniczonych zdolnościach
psychofizycznych lub osób pozbawionych
wiedzy i doświadczenia w stosowaniu tego
typu urządzeń, chyba, że znajdują się one pod
nadzorem innych, lub przeszły odpowiednie
przeszkolenie w zakresie bezpiecznego
użytkowania urządzenia i zrozumiały
istniejące zagrożenia.
• Czynności konserwacyjne, wskazane w
rozdziale CZYSZCZENIE I KONSERWACJA,
przedłużają okres zdolności użytkowej
urządzenia.
•Po użyciu oraz przed przystąpieniem do
demontaż
u lub montażu jakichkolwiek części
oraz przed wykonaniem prac
konserwacyjnych bądź czyszczeniem należy
wyjąć kabel zasilający z gniazda. W
przypadku przerw w dostawie prądu
urządzenie należy odłączyć od źródła
zasilania.
•Jeśli przewód zasilający jest uszkodzony,
należy go wymienić u producenta, w punkcie
serwisowym lub u wykwalifikowanego
specjalisty w celu uniknięcia ewentualnych
zagrożeń.
• Ostrza są bardzo ostre. Należy zachować
szczególną ostrożność podczas ich używania.
Nie należy dotykać ostrzy, kiedy urządzenie
jest podłączone. Należy upewnić się, że w
czasie pracy urządzenia ręce, włosy, odzież
lub wykorzystywane naczynia kuchenne
znajdują się z dala od poruszających si
części.
•Należy używać blendera wyłącznie, kiedy
pokrywka jest założona na dzbanek. Nie
używać blendera, którego zbiornik jest pusty.
• Przed zamontowaniem lub wymontowaniem
filtra (8) należy upewnić się, że urządzenie jest
odłączone od zasilania, a jego ostrza się nie
poruszają.
• Nie dokonywać żadnych przeróbek ani nie naprawiać urządzenia na
własną rękę. Spotřebič neupravujte ani neopravujte. V případě
jakékoliv anomálie spotřebič nepoužívejte a odneste ho do
autorizovaného servisního střediska.
• Nie stosuj części lub akcesoriów niedostarczonych lub niezalecanych
przez SOLAC.
•Przed podłączeniem urządzenia do źródła zasilania należy upewnić
się, że napięcie znamionowe odpowiada napięciu w domowej
instalacji elektrycznej.
• Nie należy ciągnąć za przewód zasilający lub zawieszać na nim
urządzenia. Odłączać urządzenie od źródła zasilania, ciągnąc za
wtyczkę, a nie za przewód.
•Upewnić się, że przewód zasilający nie dotyka ostrych krawędzi lub
gorących powierzchni. Przewód zasilający nie powinien zwisać ze
stołu lub blatu roboczego.
•Usunąć z wewnętrznej i zewnętrznej części urządzenia wszystkie
materiały reklamowe oraz materiały użyte do ochrony urządzenia na
czas transportu, w tym naklejki, papier, folię oraz karton.
• Nie należy pozostawiać urządzenia bez nadzoru, gdy jest ono
włączone.
Nie zanurzać urządzenia w wodzie ani innych płynach i
nie wkładać do zmywarki.
A
• Nie dotykać włączonego urządzenia mokrymi rękami.
•Nie używać urządzenia na wilgotnych powierzchniach ani na
zewnątrz.
• Dzbanek nie nadaje się do użycia w kuchence mikrofalowej.
• Aby uniknąć niebezpiecznych sytuacji, nie należy podłączać
urządzenia do wszelkiego typu automatycznych wyłączników
czasowych oraz zmierzchowych.
UWAGA!!: Chcąc pozbyć się urządzenia, NIGDY nie należy
wyrzucać go do kosza. Zamiast tego należy oddać je do
b
najbliższego PUNKTU UTYLIZACJI lub składowania odpadów,
gdzie poddane zostanie ono właściwym zabiegom. Takie
działanie pomaga chronić środowisko.
1Opis
Główne części
1 Korpus urządzenia (podstawa)
2 Regulator prędkości
BV5712
1 średnia, 2 maksymalna,
P
Ustawienie turbo
BV5722
1 min., 2, 3
maksymalna, P Ustawienie turbo
5
2Montaż
Z
Urządzenie należy stosować na stabilnej, gładkiej i czystej powierzchni, bez możliwości
ześlizgnięcia.
1Zamontować zestaw ostrza (5) u podstawy naczynia A. W powyższym celu:
Umieścić silikonowe złącze, metalowe ostrze, a w ostatniej kolejności plastikowy element.
Przekręcić plastikowy element z pozycji UNLOCK do pozycji LOCK.
2Umocować naczynie w korpusie głównym. W powyższym celu:
Umieścić naczynie (4) w korpusie (1) w taki sposób, by uchwyt pozostawał w linii prostopadłej
do otwartej kłódki.
3 D elikatnie przekręcić naczynie aż do pozycji zamkniętej kłódki: W tej pozycji nie można już dalej
przekręcić naczynia.
średnia, 4,
B
3 Przewód zasilający
4Dzbanek
5 Zestaw wyjmowanego ostrza
6 Przykrywka
7 Filiżanka dozownika/wieko
8 Filtr do soku
9 Nawijarka kabla
i
Upewnić się, czy naczynie jest poprawnie zamontowane w korpusie głównym, inaczej
urządzenie nie zacznie funkcjonować.
Z
ę
W przypadku stosowania blendera jako wyciskacza do soku należy umieścić filtr (8) wokół
ostrza C (model BV5722).
3Używanie
Z
Urządzenie zostało zaprojektowane do mieszania cieczy, takich jak przetwory mleczne,
sosy, soki owocowe, zupy, do mieszania drinków, koktajli, itd. Można go używać do
mieszania miękkiej żywności lub do robienia purée z ugotowanych składników, takich
jak: marchewka czy żywność dla dzieci. Można również, używać go do robienia koktajli
z kruszonym lodem, choć nie zaleca się wkładania więcej, niż 10 kostek lodu
jednocześnie.
Z
W żadnym wypadku nie zaleca się pozostawiania włączonego bez potrzeby urządzenia. Po
ciągłej pracy urządzenia przez dwie minuty należy je pozostawić do osiągnięcia temperatury
pokojowej, aby zapobiec przegrzaniu. Ponownie można go użyć po 30 sekundach.
p
Nie należy umieszczać w dzbanku żadnych przedmiotów drewnianych, plastykowych,
metalowych itp.
p
POD ŻADNYM POZOREM nie należy wlewać do naczynia wrzących lub gorących produktów,
które mogłyby być przyczyną poparzenia. Ponadto, gwałtowne zmiany temperatury mogłyby
spowodować uszkodzenie naczynia.
1 Zmontować blender w sposób opisany w punkcie 2 „Montaż”. Należy się upewnić, że
urządzenie zostało prawidłowo zmontowane.
2Włożyć składniki do dzbanka, nie przekraczając 2/3 jego maksymalnej pojemności (wysokość
pokrywki górnej).
3Założyć wieko (6).
4Założyć wieko (7), obracając je w lewo. B.
5Podłączyć przewód zasilający.
6 Regulator prędkości pozwala ustawić żądaną prędkość obrotową (1, 2, 3, 4 lub 5 w zależności
od modelu) lub wybrać położenie „P” w celu włączenia trybu turbo. Aby urządzenie pracowało
z prędkością turbo, należy nacisnąć i przytrzymać przycisk. Urządzenie nie może pracować z
tą prędkością dłużej niż 2 minuty.
Z
Podczas pracy należy mocno dociskać przykrywkę obiema rękami.
7Aby dodać składnik podczas miksowania, należy zdjąć dozownik i włożyć składniki przez otwór
w pokrywce D.
p
NIGDY nie należy zdejmować przykrywki, kiedy urządzenie pracuje.
8 Po uzyskaniu pożądanego rezultatu, ustawić regulator prędkości w położeniu wyłączonym E.
9Wyjąć wtyczkę z gniazdka sieciowego i zaczekać, aż ostrza przestaną się obracać.
10 Zdjąć dzbanek z korpusu blendera i opróżnić go.
Użytkowanie jako sokowirówki (BV5722)
1Umieścić obrany owoc w filtrze (8). Miąższ owocu pozostanie w filtrze, a sok wypłynie do
dzbanka.
i Ważne porady
• Nie należy używać dzbanka do przechowywania żywności lub jakichkolwiek przedmiotów.
• Aby uniknąć poparzenia, nie należy umieszczać w dzbanku żywności bardzo gorącej.
• Zalecamy dodawanie poszczególnych składników w małych ilościach, nie wszystkie
jednocześnie.
• Miksowanie należy rozpocząć od składników twardszych, a następnie dodać produkty
miękkie. Umożliwi to uzyskanie jednorodnej mieszanki.
•Składniki o konsystencji ciekłej powinny być ubijane lub miksowane z niską prędkością.
Większa prędkość jest zalecana w przypadku siekania lub miksowania składników
twardszych lub większych.
• Produkty bardzo twarde i włókniste powinny być wcześniej pocięte w kostkę o wymiarach
nieprzekraczających 2 do 3 cm.
• Aby przygotować koktajl z kruszonym lodem, należy najpierw włożyć składniki, następnie lód,
a na koniec dodać odpowiedni napój lub wodę.
• Podczas kruszenia lodu zaleca się na kilka sekund włączyć najwyższą prędkość lub tryb
turbo, aby rozluźnić lód, który mógłby zablokować się na dnie pojemnika.
•Jeżeli podczas miksowania składniki przyklejają się do ścianek dzbanka lub znajdują się
poza zasięgiem ostrzy, należy wyłączyć urządzenie, zdjąć dzbanek z podstawki i podnieść
przykrywkę. Zdjąć pokrywkę i ostrożnie przesunąć składniki w kierunku ostrzy za pomocą
łopatki kuchennej. Założyć przykrywkę na dzbanek, umieścić go na podstawce i
kontynuować miksowanie.
• Nie przekraczać maksymalnego poziomu pokazanego na dzbanku blendera.
4 Czyszczenie i przechowywanie
p
Ostrza są bardzo ostre. Należy unikać dotykania ostrzy rękami podczas czyszczenia i
suszenia wnętrza dzbanka.
Z
Nigdy nie zanurzać korpusu urządzenia (1) w wodzie. Nie wkładać urządzenia do zmywarki.
1Urządzenie powinno zostać wyczyszczone przed pierwszym użyciem, a także bezpośrednio po
każdym użyciu. Ponadto jeśli nie było użytkowane przez dłuższy czas, należy je także umyć
przed użyciem.
2 Dzbanek oraz pozostałe części plastikowe należy czyścić natychmiast po użyciu, ponieważ
niektóre produkty (na przykład marchew) są bardzo trudne do usunięcia po zaschnięciu.
Szybkie czyszczenie
1 Kiedy blender jest złożony, otworzyć przykrywkę i wlać do środka ciepłej wody z kroplą
detergentu.
2Założyć przykrywkę i dozownik.
3Ustawić regulator prędkości w pozycji P na kilka sekund.
4Ustawić regulator prędkości w pozycji 0 i wyłączyć urządzenie.
5Zdjąć dzbanek i przepłukać ciepłą wodą.
Dokładne czyszczenie
1Opróżnić naczynie i rozmontować blender w kierunku odwrotnym do opisanego w rozdziale 2
„Montaż”.
2Za pomocą wilgotnej ściereczki wyczyścić korpus urządzenia oraz przewód zasilający.
3 Wyczyścić pozostałe elementy wodą z mydłem i opłukać je pod strumieniem wody. Nie należy
myć elementów urządzenia w zmywarce.
4 Zmontować blender w sposób opisany w punkcie 2 "Montaż".
SLOVENČINA sk
BEZPEČNOSTNÉ POKYNY
• Zariadenie je určené na domáce použitie, ako
sú: kuchynky pre zamestnancov obchodov,
kancelárií a iných pracovných prostredí;
farmárske domy; klientmi v hoteloch, moteloch
a iných obytných priestoroch; v prostredí
ubytovania typu „bed and breakfast“.
Akékovek iné použitie ako to, ktoré je uvedené
v týchto pokynoch môže byt’ nebezpečné.
• Tento spotrebič nesmú používať deti.
Spotrebič a jeho kábel uchovávajte mimo
dosahu detí. Deti sa nesmú hrať s týmto
spotrebičom.
• Tento spotrebič nie je určený pre používanie
osobami so zníženými fyzickými, zmyslovými
alebo duševnými schopnosťami alebo s
nedostatkom skúseností a znalostí, pokiaľ nie
sú pod dozorom alebo im neboli poskytnuté
príslušné inštrukcie týkajúce sa bezpečnej
obsluhy tohto spotrebiča a pokiaľ
neporozumeli nebezpečenstvám.
•Za účelom predĺženia životnosti spotrebiča
údržbu vykonávajte podľa popisu v časti
ČISTENIE A ÚDRŽBA.
• Zariadenie po použití, pred inštaláciou alebo
výmenou častí, pred vykonaním akejkoľvek
údržby a pred čistením odpojte od zdroja
elektrickej energie. Zariadenie odpojte aj v
prípade výpadku elektrického prúdu.
• Ak je poškodené elektrické vedenie, malo by
byt’ vymenené výrobcom alebo vo vašom
popredajnom servise alebo podobne
kvalifikovanou osobou aby sa predišlo
možným rizikám.
• Čepele sú veľmi ostré. Pri manipulácii s nimi
buďte veľmi opatrný. Nemanipulujte
s čepeľami, keď je napájací kábel zapojený do
elektrickej siete. Počas používania dbajte na
dostatočný odstup vašich rúk, vlasov,
oblečenia a akýchkoľvek kuchynských potrieb
od pohyblivých častí zariadenia.
• Mixér používajte, iba ak je k nádobe
pripevnené veko. Mixér nikdy nepoužívajte, ak
je prázdny.
• Pred inštaláciou alebo vyberaním filtračného
príslušenstva (8) skontrolujte, či je zariadenie
odpojené od napájania a či čepele úplne
zastali.
• Na zariadení nevykonávajte žiadne modifikácie ani opravy. Ak zistíte
akékoľvek poškodenie, zariadenie prestaňte používať a obráťte sa,
prosím, na špecializované servisné stredisko.
• Nepoužívajte časti alebo náhradné príslušenstvo, ktoré nebolo
dodané alebo odporučené výrobcom SOLAC.
• Pred pripojením zariadenia ku zdroju elektrickej energie skontrolujte,
či menovité napätie zodpovedá napätiu u vás doma.
• Nikdy net’ahajte zaň kábel, ani za zariadenie nevešajte. Zariadenie
odpájajte t’ahaním za zástrčku, nie za kábel.
• Uistite sa, že napájací kábel nie je v kontakte s ostrými hranami alebo
s horúcimi povrchmi.
• Z vnútornej alebo vonkajšej strany zariadenia odstráňte všetok
materiál použitý na ochranu počas prepravy alebo na podporu
predaja, ako sú papierové alebo plastové sáčky, plastové fólie,
kartóny a nálepky.
• Zapnuté zariadenie nenechávajte bez dozoru.
Zariadenie nikdy neponárajte do vody alebo inej tekutiny.
Nedávajte ho ani do umývačky na riad.
A
• Nemanipulujte so zariadením s mokrými rukami.
• Zariadenie nepoužívajte na mokrých povrchoch alebo v exteriéroch.
• Nádoba nie je vhodná na použitie v mikrovlnnej rúre.
• Aby nedošlo k nebezpečným situáciám spojeným s nedobrovoľným
vynulovaním ističa, nikdy nezapájajte zariadenie do spínača
s časovačom.
UPOZORNENIE!: Ak chcete prístroj odstrániť, NIKDY ho
nevyhadzujte do odpadu. Namiesto toho choďte do najbližšieho
b
RECYKLAČNÉHO STREDISKA alebo na miesto zberu odpadu
na dodatočné spracovanie. Pomôžete tým životnému
prostrediu.
1Popis
Hlavné čast
1 Hlavná časť zariadenia (základňa)
2 Regulátor rýchlosti
BV5712
1 stredná, 2 maximálna,
Nastavenie Turbo
P
BV5722
1 minimum, 2, 3
5
maximálna, P Nastavenie Turbo
2Montáž
Z
Pracujte na čistom, rovnom a pevnom povrchu bez nebezpečenstva skĺznutia.
1 Zostavu čepelí (5) založte na podstavec nádoby A .Za týmto účelom:
Založte silikónové tesnenie, oceľovú čepeľ a nakoniec plastový diel. Tento plastový
diel otočte z polohy ODOMKNUTÉ do polohy ZAMKNUTÉ.
2 Nádobu založte na hlavné teleso. Za týmto účelom:
Nádobu (4) založte na teleso (1) tak, aby rukoväť bola vo zvislej polohe s otvoreným
vidiacim zámkom .
3 Nádobu voľne otočte do polohy zatvoreného vidiaceho zámku . V tejto polohe sa
zaistí. B.
i
Uistite sa, že nádoba je na teleso správne nasadená, pretože v opačnom prípade sa
nebude môcťzapnúť.
4 Ak mixér chcete použiť ako odšťavovač, na zostavu čepelí založte filter (8) C
(model BV5722).
stredná, 4,
3Sieťový kábel
4 Nádoba
5 Odpojiteľná zostava čepelí
6Veko
7 Šálka/ kryt dávkovača
8 Filter na šťavu
9Navíjač kábla
3 Obsluha
Z
Toto zariadenie je určené na mixovanie tekutín, napríklad mliečnych výrobkov, omáčok,
ovocných štiav, polievok; na mixovanie nápojov, kokteilov atď. Môže sa používať na
mixovanie mäkkých potravín alebo na výrobu pyré z uvarených surovín, napríklad z mrkvy
alebo z potravín pre deti. Môžete ho tiež používať na výrobu kokteilov s drveným ľadom, hoci
sa neodporúča doňho vkladať naraz viac než 10 kociek ľadu.
Z
V žiadnom prípade nenechávajte zariadenie pracovať dlhšiu dobu, ako je skutočne potrebné.
Po nepretržitom používaní zariadenia po dobu dvoch minút ho nechajte vychladnúť na izbovú
teplotu, aby ste predišli jeho prehriatiu. Po 30 sekundách ho môžete znovu použiť.
pDo nádoby nevkladajte žiadne drevené, plastové, sklenené, kovové ani podobné
predmety.
pDo nádoby NIKDY nelejte horúce alebo vriace jedlo, pretože pri používaní by mohlo
spôsobiť popálenie alebo obarenie. Nádobu môžu tiež poškodiť náhle prudké
zmeny teploty.
1 Mixér zostavte tak, ako je to popísané v časti 2 „Montáž“. Uistite sa, že mixér je
zostavený správne.
2 Do nádoby vložte potraviny, pričom nikdy neprekročte 2/3 maximálnej kapacity
(horný okraj) zásobníka.
3Nasaďte kryt (6).
4Nasaďte kryt (7), a otočne ním v protismere hodinových ručičiek. B.
5 Pripojte napájací kábel.
6 Použite regulátor rýchlosti na výber požadovanej polohy rýchlosti (1, 2, 3, 4 alebo
5, v závislosti od modelu) alebo polohu „P“ pre turbo. Musíte stlačiť a podržať túto
polohu počas doby, ktorú má zariadenie pracovať (maximálne po dobu 2 minúty
nepretržitej prevádzky).
Z
Počas prevádzky držte veko pevne oboma rukami.
7 Ak chcete počas procesu miešania pridať ingrediencie, odstráňte dávkovací uzáver
a ingrediencie pridajte cez otvor vo veku D.
pNIKDY neodstraňujte veko, keď je zariadenie v prevádzke.
8Keď dosiahnete požadovaný výsledok, dajte regulátor rýchlosti do vypnutej polohy
E.
9 Kábel odpojte od siete a počkajte, kým sa čepele prestanú otáčať.
10 Nádobu vyberte z hlavného telesa a vyprázdnite ju.
Prevádzka ako odšťavovač (BV5722)
1 Vložte olúpané ovocie do filtra (8). Dužina ovocia zostane vo filtri, zatiaľ čo šťava
vytečie von a zostane v nádobe.
i Odporúčané použitie
• Nádobu nepoužívajte na uskladňovanie jedla ani iných predmetov.
• Aby ste sa vyhli popáleninám, neodporúčame vám do nádoby pridávat’ veľmi
horúce jedlo.
• Ingrediencie vám odporúčame pridávat’ v malých dávkach, namiesto jednej veľkej.
• Najskôr mixujte pevné ingrediencie a potom mäkšie. Uľahčí Vám to dosiahnut’
hladšiu zmes.
• Pomalšia rýchlost’ je vhodnejšia na mixovanie jedál s tekutou konzistenciou. Vyššiu
rýchlost’ vám odporúčame na mletie a mixovanie pevnejších alebo hrubších jedál.
• Hrubé a vláknité jedlá musíte väčšinou nakrájat’ na 2 cm až 3 cm kocky.
• Na výrobu kokteilov s drveným ľadom vložte najskôr ingrediencie a potom ľad.
Nakoniec pridajte potrebnú tekutinu a malé množstvo vody.
• Pri drvení ľadu odporúčame použiť na niekoľko sekúnd vysokú rýchlosť alebo turbo ,
aby sa ľad tlačil smerom hore a nedošlo k jeho zachyteniu v dolnej časti.
•Keď sa jedlo prilepí ku stene nádoby počas miešania, alebo zostane mimo dosahu
čepelí, vypnite zariadenie, nádobu vyberte zo základne a dajte dole veko. Po
odstránení veka opatrne posuňte jedlo pomocou špachtle smerom k čepeliam. Na
nádobu položte veko, umiestnite ju do hlavného telesa a pokračujte v miešaní
ingrediencií.
• Neprekračujte maximálnu úroveň vyznačenú na nádobe mixéra.
4 Čistenie a uskladnenie
pČepele sú veľmi ostré. Pri čistení a sušení vnútornej časti nádoby dávajte pozor
a nedotýkajte sa rukami čepelí.
Z
Nikdy neponárajte hlavnú časť (1) do vody ani ju neumývajte v umývačke riadu.
1 Zariadenie umyte pred prvým použitím, ihneď po použití a keď ho nepoužívate
dlhšiu dobu.
2 Po použití ihneď umyte nádobu a iné plastové časti, pretože niektoré potraviny
(napríklad mrkva) sa po usušení veľmi ťažko umývajú.
Rýchle čistenie
1 S namontovanými čepeľami otvorte veko a pridajte trochu teplej vody s malým
množstvom tekutého čistiaceho prostriedku.
2 Pripevnite veko a dávkovací uzáver.
3 Na pár sekúnd dajte regulátor do polohy P.
4 Regulátor rýchlosti dajte do polohy 0 a zariadenie odpojte od siete.
5Odstráňte nádobu a opláchnite ju teplou vodou.
Dôkladné čistenie
1 Nádobu vyprázdnite a zostavu čepelí odstráňte v opačnom poradí, ako je popísané
v kapitole č. 2 „Zmontovanie“.
2 Hlavné teleso a napät’ový kábel vyčistite vlhkou látkou.
3 Všetky ostatné časti umyte v mydlovej vode a opláchnite pod tečúcou vodou. Nikdy
ich neumývajte v umývačke na riad.
4 Čepeľ namontujte tak, ako je to popísané v časti 2 „Montáž“.
MAGYAR hu
BIZTONSÁGI UTASÍTÁSOK
• A berendezést mint háztartási készüléket a
következő helyeken használhatja: céges
étkezde területén, irodákban, és más
munkakörnyezetben; vidék vendégházakban;
az ügyfelek által hotelekben és más típusú
környezetekben; különböző
magánszállásokon. Az útmutatóban leírtakon
kívüli bármilyen alkalmazás veszélyes lehet.
• A készüléket gyermekek nem használhatják.
A készüléket és tápkábelét olyan helyen
tartsa, ahol gyermekek nem férhetnek hozzá.
Gyermekek nem játszhatnak a készülékkel.
• Ezt a készüléket nem használhatják csökkent
fizikai, érzékelési vagy mentális képességű
személyek, illetve akiknek nincs meg a
szükséges tapasztalatuk és tudásuk, kivéve,
ha szmukra felügyeletet és a készülék
biztonságos használatához megfelelő
kioktatást biztosítanak, hogy a vele járó
veszélyeket megértsék.
• A készülék élettartamának
meghosszabbítása érdekében végezze
el a „TISZTÍTÁS ÉS GONDOZÁS” című
részben ismertetett karbantartási
műveleteket.
• Használat után, alkatrészek felhelyezése vagy
leválasztása, illetve tisztítás és karbantartás
előtt mindig válassza le a készüléket az
elektromos hálózatról. Áramszünet esetén
húzza ki a készülék dugaszát a
csatlakozóaljzatból.
• Ha a hálózati kábel sérült, akkor a lehetséges
veszélyek megelőzése érdekében a
gyártónak vagy a vevőszolgálati
szervizállomásnak vagy hasonló
meghatalmazott személyzetnek ki kell
cserélnie azt a lehetséges kockázatok
elkerülése érdekében.
• A kések nagyon élesek. Legyen óvatos a
kezelésükkor. Ne érjen hozzájuk, miközben a
készülék csatlakoztatva van az elektromos
hálózathoz. Működés közben kezeit, ruháit és
minden eszközt tartson távol a mozgó
késektől.
• A mixert csak az edényre felhelyezett fedéllel
használja. Soha ne használja a mixert üresen.
•Mielőtt beszereli vagy eltávolítja a
szűrőtartozékot (8), győződjön meg arról,
hogy a készüléket lecsatlakoztatta az
áramellátásról, és a pengék mozgása teljesen
leállt.
• Ne módosítsa, és ne javítsa saját kezűleg a készüléket. Ha a
készülék hibás, ne használja, hanem vigye egy hivatalos
márkaszervizbe
• Ne használjon olyan elemeket vagy kiegészítőket, melyeket
nem a SOLAC gyárt, vagy ajánl.
• Az elektromos hálózathoz való csatlakoztatás előtt
ellenőrizze, hogy a hálózati feszültség megfelel a készülék
specifikációjának.
• Ne húzza a tápkábelt, és ne lógassa a készüléket a
tápkábelnél fogva. A dugaszt az aljzatból soha ne a
vezetéknél, hanem a dugasznál fogva húzza ki.
• Vigyázzon, hogy a tápkábel ne érintkezzen éles szélekkel
vagy forró felületekkel.
• Távolítsa el az összes, a szállításkor vagy a
bemutatóteremben használt védőelemet, például a papír vagy
műanyag tasakokat, műanyag lapokat, a készülék külső vagy
belső oldalán lévő kartonpapírt és matricákat.
• A készüléket csatlakoztatott állapotban soha ne hagyja
felügyelet nélkül!.
Soha ne merítse a készüléket vízbe vagy más
folyadékba, illetve ne helyezze mosogatógépbe.
A
• Ne fogja meg nedves kézzel a bekapcsolt készüléket.
• Ne használja a készüléket vizes felületeken vagy kültéren.
• Ne helyezze az edényt mikrohullámú sütőbe.
• A megszakító véletlenszerű átállításából adódó veszélyes
helyeztek elkerülése érdekében soha ne csatlakoztassa a
készüléket időzítő kapcsolóhoz.
FIGYELMEZTETÉS!! Amennyiben már nincs szüksége a
készülékre, SOHA ne dobja azt a háztartási hulladék
b
közé. A készülék szakszerű ártalmatlanítása érdekében
keresse fel a legközelebbi
HULLADÉKHASZNOSÍTÁSSAL FOGLALKOZÓ
SZOLGÁLTATÓT. Ilyen módon is hozzájárulhat
környezete megóvásához.
1Leírás
Fő alkatrészek
1 A készülék háza (alapja)
2
Sebességválasztó
BV5712
1 közepes, 2 maximum, P Turbó beállítás
BV5722
1 minimum, 2, 3
5
maximum, P Turbó beállítás
2 Összeszerelés
Z
Stabil, sík, tiszta és csúszásmentes felületen végezze.
1 Szerelje az aprítókés-szerelvényt (5) az
Helyezze fel a szilikon tömítést, a fém aprítókést és végül a műanyag idomot. Fordítsa a
műanyag idomot „UNLOCK” állásból „LOCK” állásba.
2 Illessze rá a kancsót a készülék törzsére. Ezt a következő módon tegye:
Helyezze a kancsót (4) a készülék törzsére (1) úgy, hogy a füle a nyitott zárszerkezetre
merőleges legyen.
3Erőltetés nélkül forgassa a kancsót addig, amíg a zárszerkezet be nem záródik: Ebben az
állásban rögzítődik.
i
Ügyeljen arra, hogy a kancsó pontosan illeszkedjen a készülék törzsére, mert különben
nem fog működni a készülék.
4 Ha a turmixgéppel gyümölcs levét szeretné kifacsarni, tegye a szűrőt (8) a C penge köré
(BV5722 típusnál).
3Működtetés
Z
Ez a készülék folyadékok (pl. tejtermékek, szószok, gyümölcslevek, levesek, stb.)
mixelésére, és italok, shake-ek készítésére szolgál. Használható puha ételek turmixolására
is, pl. főtt ételek (répa vagy bébiétel) pürésítésére. Ezen kívül használható koktélokhoz tört
jég készítésére is, de nem javasolt egyszerre 10-nél több jégkockát az edénybe tenni.
Z
A szükségesnél hosszabb ideig semmilyen esetben se üzemeltesse a készüléket. A
készülék két perces folyamatos használata után hagyja, hogy szobahőmérsékletűre hűljön -
így elkerülheti a túlmelegedést. 30 másodperc elteltével ismét használhatja.
p
Soha ne helyezzen fa, műanyag, üveg, fém vagy egyéb hasonló tárgyat az edénybe.
közepes, 4,
„A”
B
3 Tápkábel
4Edény
5 Szétszedhető aprítókés-
szerelvény
6 Fedél
7 Adagoló kupak/fedél
8 Gyümölcslé szűrő
9 Kábelfelcsévélő
kancsó talpazatára. Ezt a következő módon tegye:
p
SOHA NE öntsön forró vagy forrásban lévő élelmiszert a kancsóba, mert a turmixolás
folyamán égésnyomok keletkezhetnek. A hőmérséklet hirtelen változásaitól a kancsó el is
törhet.
1 Szerelje össze a mixert a 2. „Összeszerelés” részben leírtak alapján: Győződjön meg róla, hogy
megfelelően van-e összeszerelve.
2 Az ételt helyezze az edénybe úgy, hogy az élelmiszer mennyisége ne haladja meg a maximális
kapacitás (az edény felső pereme) 2/3 részét.
3 Helyezze fel a fedelet (6).
4 Helyezze fel a fedelet (7), és forgassa el óra járásával ellenkező irányba B.
5 Csatlakoztassa a tápkábelt.
6 Használja a sebességválasztó kapcsolót a kívánt sebességfokozat (1, 2, 3, 4 vagy 5, függ az
adott modelltől) vagy a turbó "P" fokozat kiválasztásához. Lenyomva kell tartania ezt a gombot
annyi ideig, míg szeretné, hogy a készülék működjön (maximum két perc folyamatos működés).
Z
Működtetés közben mindkét kezével tartsa erősen a fedelet.
7 Ha a keverési folyamat közben további hozzávalót kíván hozzáadni az ételhez, vegye le az
adagoló kupakot, majd adja hozzá a hozzávalót a nyíláson keresztül D.
p
SOHA ne távolítsa el a fedelet, mialatt a készülék működik.
8 A kívánt eredmény elérésekor állítsa a sebességválasztót „ki” állásba E.
9 Csatlakoztassa le a készüléket az elektromos hálózatról, és várja meg, amíg a kések
megállnak.
10 Vegye le az edényt a talpról és ürítse ki.
Működtetés facsaróként (BV5722)
1 Helyezze a meghámozott gyümölcsöt a szűrő belsejébe (8). A gyümölcspép a szűrő belsejében
marad, míg a gyümölcslé kifolyik, és a kancsóba kerül.
i A készülék használata
• Ne használja az edényt étel és egyéb tárgyak tárolására.
• Az égési sérülések elkerülése érdekében ne tegyen forró élelmiszert az edénybe.
• Javasoljuk, hogy a hozzávalókat fokozatosan adagolja.
•Először a szilárdabb, majd a puhább hozzávalókat tegye az edénybe. Így egyenletesebb
keveréket érhet el.
• Az alacsonyabb sebességfokozat inkább folyékony állapotú ételek felveréséhez és
keveréséhez alkalmas. A gyorsabb sebességfokozat inkább szilárdabb állapotú ételek
darálásához és keveréséhez alkalmas.
• A nyers vagy rostos ételeket legfeljebb 2-3 cm-es kockákra vágja fel.
• Koktélok darált jéggel való készítéséhez először a hozzávalókat, majd a jeget, legvégül pedig
a szükséges folyadékot vagy egy kevés vizet tegyen az edénybe.
•
Jég zúzásakor javasoljuk, hogy magas vagy turbó sebességfokozatot használjon pár
másodpercig, hogy felfelé nyomja a jeget, és az ne rekedjen meg az alsó részen.
• Ha keverés közben az étel az edény falához tapad, vagy a kések nem aprítják fel, kapcsolja
ki a készüléket, vegye le az edényt a talpról, és emelje fel a fedelet. Vegye le a fedelet, és
egy fa spatulával óvatosan irányítsa az ételt a kések irányába. Helyezze vissza a fedelet az
edényre, majd az edényt a talpra, és folytassa a hozzávalók keverését.
• Ne lépje túl az edényen jelzett maximális szintet.
4 Tisztítás és tárolás
p
A kések nagyon élesek. A kancsó belsejének tisztítása és szárítása közben ne érjen a
késekhez.
Z
Soha ne merítse vízbe és ne tegye mosogatógépbe a testet (1).
1 Tisztítsa meg a készüléket az első használat előtt, minden esetben közvetlenül a használat
után, illetve ha hosszabb ideig nem használta azt.
2 Közvetlenül a használat után tisztítsa meg az edényt és a műanyag elemeket, mert néhány
élelmiszer (például a répa) csak nagyon nehezen távolítható el, miután megszáradt.
Gyors tisztítás
1 Nyissa fel az összeszerelt mixer fedelét, majd öntsön az edénybe egy kevés meleg vizet és egy
csepp folyékony mosogatószert.
2 Rögzítse a fedelet és az adagolókupakot.
3 Pár másodpercre állítsa a sebességválasztó kapcsolót P állásba.
4 Állítsa a sebességválasztó kapcsolót 0 állásba, és húzza ki a készülék dugaszát a
csatlakozóaljzatból.
5 Vegye le az edényt, és öblítse el meleg vízzel.
Alapos tisztítás
1 Ürítse ki a kancsót és szedje szét a turmixgépet a „2. Összeszerelés” című részben ismertetett
műveletek fordított sorrendjében.
2 Nedves törlőkendővel tisztítsa meg a készülék házát és a tápkábelt.
3 A többi alkatrészt mosogatószeres vízzel tisztítsa meg, majd bőséges folyó vízzel öblítse le. Az
alkatrészeket soha ne mossa mosogatógépben.
4 Szerelje össze a mixert a 2. „Összeszerelés” részben leírtak alapján.
5Megfelelőségi nyilatkozat
• Névleges feszültség: 220-240 V,
• Névleges teljesítmény:
• Érintésvédelmi osztály: BV5712 Class II; BV5722 Class II
6Forgalmazza
HTM Nemzetközi Kereskedelmi Kft. 1046. Budapest, Kiss Ernő u. 3.
Fax:(1) 369-0403/ Tel.:(1) 370-4074/ (1) 370-1041
7 Garancia feltételek
• A garancia minden gyártási vagy anyaghibából eredő működési rendellenességgel
kapcsolatban egy év.
• A jótállás nem terjed ki a helytelen használatból eredő hibákra.
• A garancia nem érvényes, ha az üzletben nem teljesen vagy helytelenül töltötték ki ill.
pecsételték le a garanciajegyet.
• Nem vonatkozik a garancia az olyan károsodásokra, amelyek a helytelen használatból vagy
szállításból erednek. Ez olyan esetekre is érvényes, amikor a készüléket nem megfelelő
földelésű dugaljhoz csatlakoztatták.
• Ugyancsak érvénytelen a garancia, ha a készüléket illetéktelen (hozzá nem értő személy)
próbálja javítani, aki nem tartozik a vevőszolgálathoz vagy hivatalos szervizhez.
• A meghibásodott készüléket – beleértve a hálózati csatlakozó vezetéket is – csak
szakember, szerviz javíthatja.
BV5712 - 600 W; 77dB(A) /
BV5722 -1000 W; 82.5dB(A)
Page 4

u
a
u
.
A
t
.
е
o
.
ﺗ
DESPLEGABLE_BV5712_22_orientales.fm Page 2 Tuesday, January 14, 2014 1:25 AM
БЪЛГАРСК bg
ИНСТРУКЦИИ ЗА БЕЗОПАСНОСТ
• Този уред е предназначен за домашни
приложения като: малки кухни в магазини,
офиси и други работни среди;
селскостопански дворове; при клиенти в
хотели, мотели и други жизнени
пространства; спални помещения и места
за закуска. Използването на уреда за цели,
различни от посочените, може да бъде
опасно.
• Апаратът в никакъв случай не бива да се
използва от деца . Апаратът и кабелът
трябва да се държат на недостъно за деца
място. Забранено е децата да играят с
апарата.
• Този апарат не е предназначен за
употреба от лица с намалени физически,
сензорни или умствени способности, или
които нямат опит и знания за неговата
употреба, освен ако са получили надлежен
инструктаж за безопасна употреба и
разбират опасностите, свързани с тази
употреба.
• С цел удължаване живота на апарата,
извършвайте действията по поддръжка,
посочени в раздел ПОЧИСТВАНЕ И
ПОДРЪЖКА.
• Винаги изключвайте уреда след употреба
и преди да сглобявате или разглобявате
части или при започване на каквито и да е
дейности по поддръжка и почистване. При
спиране на тока изключете уреда от
мрежата.
• Ако захранващият кабел е повреден, той
трябва да се замени от производителя
или от вашия сервиз за следпродажбено
обслужване, или от подобен квалифициран
персонал, за да се избегнат евентуални
злополуки.
• Режещите ножове са много остри. Бъдете
внимателни, когато боравите с тях. Не ги
докосвайте, когато уредът е включен.
Докато той работи, пазете ръцете,
косата, дрехите си и всякакви
принадлежности далеч от подвижните
режещи ножове.
• Използвайте блендера само когато е
поставен капакът на буркана. Никога не
използвайте блендера, когато е празен.
• Преди да поставяте или да махате
филтъра, уверете се, че уредът е
изключен от захранването и остриетата
са спрели да
• Не правете никакви промени и ремонти на уреда. В случай на
каквато и да е аномалия в уреда, не го използвайте и го
занесете в оторизиран ремонтен сервиз.
• Не използвайте части или принадлежности, които не се
доставят или препоръчват от SOLAC.
• Преди включване на уреда в електрическата инсталация,
проверете дали посоченото напрежение
това в дома ви.
• Никога не дърпайте кабела и не го използвайте за окачване на
уреда. Винаги изключвайте уреда като дърпате щепсела, а не
кабела.
• Уверете се, че захранващият кабел не се допира до остри
ръбове или горещи повърхности.
• Отстранете от външната страна и от вътрешността на
уреда всички елементи, използвани за предпазване по време на
транспортирането или за рекламни промоции, като например,
хартиени или пластмасови торби, пластмасово фол, картон и
стикери.
• Не оставяйте уреда без наблюдение, когато е включен.
Никога не потапяйте основния корпус във вода или
друга течност, както и не го поставяйте в
A
миялната машина.
• Не допирайте работещият уред с мокри ръце.
• Не използвайте уреда върху мокри повърхности или навън.
• Бурканът не е подходящ за употреба в микровълнови фурни.
• За да избегнете опасни ситуации, свързани с неволно
рестартиране на прекъсвача, никога не включвайте уреда в
прекъсвач с таймер.
ВНИМАНИЕ!!!: При бракуване на уреда, НИКОГА не
го изхвърляйте в кофата за боклук. Вместо това,
b
занесете го в най-близкия ЦЕНТЪР ЗА
РЕЦИКЛИРАНЕ или място за приемане на вторични
суровини, където ще бъде обработен по подходящ
начин. Така ще помогнете в грижата за околната
среда.
1 Описание
Основни части
1 Основен корпус на уреда (база)
2 Селектор за скорост
BV5712
1 средна, 2 максимална,
Турбо настройка
P
BV5722
1 Минималнаt, 2, 3
максимална, P Турбо настройка
5
2 Монтаж
Z
Работете върху устойчива, гладка и чиста повърхност, която да не дава
възможност за хлъзване на апарата.
1 Монтирайте набора на ножчето (5) в основата на каната A. За целта:
Поставете силиконовото уплътнение, металното ножче и най-накрая,
пластмасовата част. Завъртете пластмасовата част от положение UNLOCK
към положение LOCK.
2 Закрепете каната върху основния корпус. За целта:
Поставете каната (4) върху корпуса (1) така, че дръжката да бъде по
вертикалата на отворения катинар .
3 Завъртете каната, без да я пресилвате, докато достигне до мястото на
затворения катинар. Това е крайното място на завъртане. B
i Подсигурете се, че каната е закрепена правилно върху корпуса; в
противен случа тя няма да се задейства.
4 Ако желаете да използвате миксера като сокоизстисквачка, поставете
филтъра (8) около ножчето C (отнася се за модел BV5722).
се движат (8).
3 Захранващ кабел
4 Буркан
5 Набор разглобяемо ножче
6 Капак
7 Диспенсър/капак
8 Филтър за сок
средна, 4,
9 Навиване на кабела
на уреда съвпада с
3 Работа
Z
Този уред е изработен, за да смесва течности като млечни продукти, сосове,
плодови сокове, супи; за да смесвате напитки, шейкове и др. Може да се използва за
смесване на меки храни или да приготвяте пюрета със сготвени съставки, като
моркови или продукти за бебешка храна. Можете да го използвате също така, за да
приготвяте коктейли с натрошен лед, въпреки че не е препоръчително да слагате
повече от 10 ледени кубчета.
Z
В никакъв случай не се препоръчва да се остави уредът да работи по-дълго време
от необходимото. След като сте използвали уреда в продължение на 2 минути,
оставете го да изстине до стайна температура, за да се предотврати
прегряването. Можете да го използвате отново след 30 минути.
pНе слагайте дървени, пластмасови, стъклени, метални или други подобни
предмети в буркана.
pВ НИКАКЪВ СЛУЧАЙ не сипвайте в каната много горещи или врящи храни,
тъй като може да получите изгаряния. Осен това, резките температурни
промени могат да доведат до счупване на каната.
1 Сглобете блендера, както е показано в раздел 2 „Монтаж”. Уверете се, че е
монтиран правилно.
2 Поставете храната в буркана без да надвишавате 2/3 от максималния
капацитет (горния ръб).
3 Поставете капака (6).
4 Поставете капака (7), като го завъртите обратно на часовниковата стрелка B.
5 Включете захранващия кабел в мрежата.
6 Използвайте регулатора за скоростта, за да изберете желаното положение на
скоростта (1, 2, 3, 4 или 5 в зависимост от модела) или в позиция "P" за турбо.
Трябва да натиснете и да задържите в това положение за времето, за което
искате уредът да продължи да работи (максимално две минути непрекъсната
работа).
Z
По време на работа с уреда дръжте здраво капака с две ръце.
7 Ако искате да добавите продукти по време на смесването, свалете капачката
на дозатора и добавете съставките през отвора в капака D.
pНИКОГА не махайте капака, докато уредът работи.
8 Когато постигнете желания резултат, поставете селектора за скорост в
позиция изкл. E.
9 Изключете уреда от контакта и изчакайте докато ножовете престанат да се
въртят.
10 Извадете буркана от основата и го изпразнете.
Работа като сокоизстисквачка (BV5722)
1 Поставете обелените плодове във филтъра (8). Плодовата каша ще остане
във вътрешността на филтъра, а сокът ще изтече и ще се запази в каната.
i Важни съвети
• Не използвайте каната за съхранение на храна или други предмети.
• Не се препоръчва да сипвате много гореща храна в каната, за да се избегне
опасността от изгаряне.
• Препоръчваме да добавяте съставките на части, вместо наведнъж.
• Първо смесете по-твърдите съставки, след това добавете по-меките. Така се
смесва по-лесно.
• По-бавната скорост е по-подходяща за разбиване или смесване на храни с течна
консистенция. По-бързата скорост се препоръчва за нарязване или смесване на
по-твърди или по-плътни храни.
• Грубите и богатите на фибри храни трябва да се нарежат на кубчета с размер 2-3
см най-много.
• За да направите коктейли с натрошен лед, първо поставете съставките, след това
леда и накрая течността или малко вода.
• При трошене на лед се препоръчва използването на висока скорост или турбо за
няколко секунди, за да се вдигне ледът нагоре и да се предотврати оставането му
на дъното.
• Ако храната полепне по стените на каната по време на смесването или остане
извън обхвата на ножовете, изключете уреда, свалете каната от основата и
махнете капака. Свалете капака и внимателно избутайте храната към ножовете с
шпатула. Поставете капака върху каната , поставете каната върху основата и
продължете работата.
• Не превишавайте максималното ниво, посочено на буркана.
4 Почистване и съхранение
pРежещите ножове са много остри. Не докосвайте режещите ножове с ръце,
докато ги почиствате и подсушавате вътре в каната.
Z
Никога не потапяйте във вода базата (1) и не я слагайте в съдомиялна машина.
1 Почистете уреда веднага след първата употреба, непосредствено след всяка
употреба и след съхранение за продължителен период от време.
2 Почиствайте буркана и останалите пластмасови части веднага, тъй като някои
храни (например, морковите) се чистят много трудно след засъхване.
Бързо почистване
1 При сглобен блендер, отворете капака и налейте малко топла вода с капка
миещ препарат.
2 Поставете капака и капачката на дозатора.
3 Поставете регулатора за скоростта в положение Р за няколко секунди.
4 Поставете регулатора за скоростта в положение 0 и изключете щепсела на
уреда.
5 Махнете каната и изплакнете с топла вода.
Основно почистване
1 Изпразнете каната и разглобете миксера, завъртайки в посока, обратна на
посочената в раздел 2 - "Монтаж".
2 Почистете основния корпус и захранващия кабел с влажна кърпа.
3 Почистете останалите части със сапунена вода и изплакнете старателно под
струя течаща вода. Никога не ги мийте в миялна машина.
4 Сглобете блендера както е показано в параграф 2 „Монтаж”.
ﺩﺷﻳ ﻥﺃ ﺔﻳﻧﺎﻛﻣﺇ ﺏﻧﺟﺗﻟ ،ﺦﺑﻁﻣﻟﺍ ﻲﻓ ﻡﺎﻌﻁﻟﺍ ﺭﻳﺿﺣﺗ ﺡﻭﻟ ﻭﺃ ﺔﻟﻭﺎﻁﻟﺍ ﻑﺭﻁ
ﻪﺑ ﻝﺎﻔﻁﻷﺍ
،ﺔﻳﻛﻳﺗﺳﻼﺑﻟﺍ ﺢﺋﺎﻔﺻﻟﺍﻭ ،ﺔﻳﻛﻳﺗﺳﻼﺑﻟﺍ ﻭﺃ ﺔﻳﻗﺭﻭﻟﺍ ﺱﺎﻳﻛﻷﺍ ﻝﻛ ﻝﺯﺃ ،ﺓﺍﻭﻛﻣﻟﺍ ﻡﺍﺩﺧﺗﺳﺍ ﻝﺑﻗ •
ﺕﻧﺎﻛ ءﺍﻭﺳ ،ﻪﻠﺧﺍﺩ ﻭﺃ ﺯﺎﻬﺟﻟﺍ ﺝﺭﺎﺧ ﻥﻭﻛﺗ ﺩﻗ ﺔﻠﻣﺗﺣﻣ ﺕﺎﻘﺻﻠﻣ ﻱﺃﻭ ﻥﻭﺗﺭﻛﻟﺍ ﻊﻁﻗﻭ
.ﺔﻳﺟﻳﻭﺭﺗ ﺩﺍﻭﻣﻛ ﻭﺃ ﻡﺍﺩﺧﺗﺳﻻﺍ ﺔﻳﺎﻣﺣﻟ ﺓﺩﻭﺟﻭﻣ
.ﻝﻣﻌﻟﺍ ﺩﻳﻗ ﻥﻭﻛﺗ ﺎﻣﺩﻧﻋ
.ﻕﺎﺑﻁﻷﺍ ﺔﻳﻼﺟ ﻲﻓ ﻻﻭ ،ﺭﺧﺁ ﻝﺋﺎﺳ ﻱﺃ ﻭﺃ ءﺎﻣﻟﺍ ﻲﻓ ﺱﻳﺋﺭﻟﺍ ﺯﺎﻬﺟﻟﺍ ﻝﻛﻳﻫ ﺍًﺩﺑﺃ ﻊﺿﺗ ﻻ
.ﻝﻣﻌﻟﺍ ﺩﻳﻗ ﻥﻭﻛﻳ ﺎﻣﺩﻧﻋ ﻥﺎﺗﺑﻁﺭ ﻙﺍﺩﻳﻭ ﺯﺎﻬﺟﻟﺍ ﺱﻣﻠﺗ ﻻ •
.ﺝﺭﺎﺧﻟﺍ ﻲﻓ ﻻﻭ ﺔﻟﻭﻠﺑﻣ ﺢﻁﺳﺃ ﻰﻠﻋ ﺎًﻗﻼﻁﺇ ﺯﺎﻬﺟﻟﺍ ﻡﺩﺧﺗﺳﺗ ﻻ •
.ﻑﻳﻭﻭﺭﻛﻳﺎﻣﻟﺍ ﻲﻓ ﻝﺎﻣﻌﺗﺳﻼﻟ ﺔﻠﺑﺎﻗ ﺓﺭﻳﻏ ّﺭﺟﻟﺍ •
ﻝﺻﺗ ﻻ ،ﻱﺩﺍﺭﺇﻻ ﻝﻛﺷﺑ ﻱﺭﺍﺭﺣﻟﺍ ﻝﺻﺎﻔﻟﺍ ﻁﺑﺿ ﺓﺩﺎﻋﺇ ﺔﺟﻳﺗﻧ ﺭﻁﺧ ﺕﻻﺎﺣ ﺙﻭﺩﺣ ﺏﻧﺟﺗﻟ •
.ﺕﻳﻗﻭﺗ ﺯﺎﻬﺟﺑ ﺩّﻭﺯﻣ ﻝﺻﺎﻓ ﻱﺄﺑ ﺎًﻗﻼﻁﺇ ﺯﺎﻬﺟﻟﺍ
ﺎًﻗﻼﻁﺇ ﻪِﻣﺭﺗ ﻻ ،ﺯﺎﻬﺟﻟﺍ ﻥﻣ ﺹﻠﺧﺗﻟﺍ ﻲﻓ ﺏﻏﺭﺗ ﺎﻣﺩﻧﻋ !ﻪﺑﺗﻧﺍ
ﻊﻳﻣﺟﺗ ﺯﻛﺭﻣ ﻭﺃ “ﺔﻔﻳﻅﻧ ﺔﻁﻘﻧ” ﻰﻟﺇ ﻪﺟﻭﺗ ﻝﺑ ،ﺕﺎﻳﺎﻔﻧﻟﺍ ﺔﻠﺳ ﻲﻓ
.ﺽﺭﻷﺍ ﻰﻠﻋ ﺯﺎﻬﺟﻟﺍ ﺍﻭﻌﻗﻭﻳﻭ
ﺔﺑﻗﺍﺭﻣ ﻥﻭﺩ ﻥﻣ ﺔﻗﺎﻔﺧﻟﺍ ﻙﺭﺗﺗ ﻻ •
b
ﻩﺫﻬﺑ .ﺏﺟﻳ ﺎﻣﻛ ﻪﺗﺟﻟﺎﻌﻣ ﻡﺗﺗﻟ ﻙﻧﺍﻭﻧﻋ ﻰﻟﺇ ﺏﺭﻗﻷﺍ ﺔﻣﺎﻣﻘﻟﺍ
.ﺔﺋﻳﺑﻟﺎﺑ ﺔﻳﺎﻧﻌﻟﺍ ﻲﻓ ﻡﻫﺎﺳﺗ ﻑﻭﺳ ،ﺔﻘﻳﺭﻁﻟﺍ
ﻑﺻﻭﻟﺍ 1
ﺔﺳﻳﺋﺭﻟﺍ ءﺍﺯﺟﻷﺍ
ﺭﺎﻳﺗﻟﺎﺑ ﻝﻳﺻﻭﺗ ﻙﻠﺳ 3
ﺓّﺭﺟ 4
ﻙﻳﻛﻔﺗﻠﻟ ﺔﻠﺑﺎﻗ ﺕﺍﺭﻔﺷ ﺔﻋﻭﻣﺟﻣ 5
ءﺎﻁﻏ 6
ﻝﻳﻛﻠﻟ ﺏﻭﻛ/ﺓﺩﺍﺩﺳ 7
ﺭﻳﺻﻌﻠﻟ ﺓﺎﻔﺻﻣ 8
ﻡﻟ ﺯﺎﻬﺟ
ﻙﻠﺳﻟﺍ
ّ
9
(ﺓﺩﻋﺎﻘﻟﺍ) ﺱﻳﺋﺭﻟﺍ ﻝﻛﻳﻬﻟﺍ 1
ﺔﻋﺭﺳﻟﺍ ﺭﺎﻳﺗﺧﺍ
ﻯﻭﺻﻘﻟﺍ 2 ،ﺔﻁﺳﻭﺗﻣﻟﺍ 1
،4 ،ﺔﻁﺳﻭﺗﻣﻟﺍ 3 ،2 ،ﺎﻳﻧﺩﻟﺍ 1
“ﻭﺑﺭﻭﺗ” ﺔﻳﻌﺿﻭ P ،ﻯﻭﺻﻘﻟﺍ 5
ﺭﺯ 2
ّ
BV5712
“ﻭﺑﺭﻭﺗ” ﺔﻳﻌﺿﻭ P
BV5722
ﺏﻳﻛﺭﺗﻟﺍ 2
.ﺯﺎﻬﺟﻟﺍ ﻕﻟﺯﻧﻳ ﻥﺃ ﺔﻳﻧﺎﻛﻣﺇ ﺩﻭﺟﻭ ﻡﺩﻋ ﻥﻣ ﺩﻛﺄﺗﻭ ،ﻑﻳﻅﻧﻭ ﺱﻠﻣﺃﻭ ،ﺕﺑﺎﺛ ﺢﻁﺳ ﻰﻠﻋ ﻝﻣﻋﺍ í
ﻥﻣ ﺔﻳﻛﻳﺗﺳﻼﺑﻟﺍ ﺔﻌﻁﻘﻟﺍ ﺭ
ﻝﻔﻘﻟﺍ ﺭﺎﻌﺷ ﻕﻭﻓ ﻱﺩﻭﻣﻋ ﻊﺿﻭ ﻲﻓ ﺎﻬﺗﻛﺳﻣ ﻰﻘﺑﺗ ﺙﻳﺣﺑ (1) ﻝﻛﻳﻬﻟﺍ ﻕﻭﻓ (4) ﺓّﺭﺟﻟﺍ ﻊﺿ
ﻑﻗﻭﺗﺗﺳ ،ﺔﻳﻌﺿﻭﻟﺍ ﻩﺫﻫ ﻲﻓ .3
ﺯﺍﺭﻁﻟﺍ) í C ﺓﺭﻔﺷﻟﺍ ﻝﻭﺣ (8) ﺓﺎﻔﺻﻣﻟﺍ ﻊﺿ ،ﺔﻬﻛﺎﻓ ﺓﺭﺎّﺻﻌﻛ ﺔﻗﺎﻔﺧﻟﺍ ﻡﺍﺩﺧﺗﺳﺍ ﻲﻓ ﺕﺑﻏﺭ ﺍﺫﺇ
ﺩﺃ .ﺔﻳﻛﻳﺗﺳﻼﺑﻟﺍ ﺔﻌﻁﻘﻟﺍ ﺍًﺭﻳﺧﺃﻭ ﺔﻳﻧﺩﻌﻣﻟﺍ ﺓﺭﻔﺷﻟﺍ ﻡﺛ ،ﻥﻭﻛﻳﻠﺳﻟﺍ ﻁﺎﺑﺭ ﺕّﺑﺛ
ِ
.ﻝﻣﻌﺗ ﻥﻟ ﺎﻬﻧﺈﻓ ﻻﺇﻭ ،ﻝﻛﻳﻬﻟﺍ ﻰﻠﻋ ﺢﻳﺣﺻﻟﺍ ﻝﻛﺷﻟﺎﺑ ﺓّﺭﺟﻟﺍ ﺕﻳﺑﺛﺗ ﻥﻣ ﺩﻛﺄﺗ i
:ﻙﻟﺫﻟ .1 A ﺓّﺭﺟﻟﺍ ﺓﺩﻋﺎﻗ ﻲﻓ (5) ﺕﺍﺭﻔﺷﻟﺍ ﺔﻋﻭﻣﺟﻣ ﺏ
.(LOCK) ﻕﻠﻐﻟﺍ ﺔﻳﻌﺿﻭ ﻰﻟﺇ (UNLOCK) ﻕﻠﻐﻟﺍ ﻙﻓ ﺔﻳﻌﺿﻭ
:ﻙﻟﺫﻟ .ﺱﻳﺋﺭﻟﺍ
ﻕﻠﻐﻣﻟﺍ ﻝﻔﻘﻟﺍ ﺔﻳﻌﺿﻭ ﻍﻭﻠﺑ ﻰﺗﺣ ﺎﻬﻳﻠﻋ
ﻝﻛﻳﻬﻟﺍ ﻕﻭﻓ ﺓّﺭﺟﻟﺍ ﺕّﺑﺛ 2
ّ
ﺩﺷﻟﺍ ﻥﻭﺩ ﻥﻣ ﺓّﺭﺟﻟﺍ ﺭِﺩﺃ
.ﺡﻭﺗﻔﻣﻟﺍ
B .ﻙّﺭﺣﺗﻟﺍ ﻥﻋ
.(BV5722
ﻛﺭ
ﻝﺎﻣﻌﺗﺳﻻﺍ 3
،ﺔﻬﻛﺎﻔﻟﺍ ﺭﻳﺻﻋﻭ ،ﺕﺎﺻﻠﺻﻟﺍﻭ ،ﻥﺎﺑﻟﻷﺍ ﺕﺎﺟﺗﻧﻣ ﻝﺛﻣ ﻝﺋﺍﻭﺳﻟﺍ ﻕﻔﺧﻟ ﺯﺎﻬﺟﻟﺍ ﺍﺫﻫ ﻡﻳﻣﺻﺗ ﻡﺗ ﺩﻘﻟ í
ﻭﺃ ﺔﻳﺭﻁﻟﺍ ﺔﻣﻌﻁﻷﺍ ﺝﺯﻣﻟ ﺎﻬﻣﺍﺩﺧﺗﺳﺍ ﻥﻛﻣﻣﻟﺍ ﻥﻣ ...ﺕﺎﻗﻭﻔﺧﻣﻟﺍﻭ ،ﺕﺎﺑﻭﺭﺷﻣﻟﺍ ﺝﺯﻣﻭ ،ءﺎﺳﺣﻟﺍﻭ
ﺩﺍﺩﻋﺇ ﺕﺎﻧﻭﻛﻣ ﻭﺃ ﺭﺯﺟﻟﺍ ،ﻝﺎﺛﻣﻟﺍ ﻝﻳﺑﺳ ﻰﻠﻋ ،ﺔﻗﻭﻠﺳﻣﻟﺍ ﺔﻣﻌﻁﻷﺍ ﻥﻣ “ﻪﻳﺭﻭﺑ” ﻭﺃ ﺔﺳﻳﺭﻫ ﻊﻧﺻ
ﻡﺩﻋ ﻥﺳﺣﺗﺳﻣﻟﺍ ﻥﻣ ﻪﻧﺃ ﻻﺇ ،ﺭﻭﺷﺑﻣﻟﺍ ﺞﻠﺛﻟﺍ ﻊﻣ ﺕﻼﻳﺗﻛﻭﻛ ﺩﺍﺩﻋﺇ ﺎ
ﻡﺍﺩﺧﺗﺳﺍ ﺩﻌﺑ .ﺔﻳﺭﻭﺭﺿﻟﺍ ﺓﺩﻣﻟﺍ ﺯﻭﺎﺟﺗﺗ ﺓﺩﻣﻟ ﺯﺎﻬﺟﻟﺍ ﻝﻳﻐﺷﺗ ،ﻝﺍﻭﺣﻷﺍ ﻕﻠﻁﻣ ﻲﻓ ،ﺯﻭﺟﻳ ﻻ í
.ﺔﻁﺭﻔﻣﻟﺍ ﺔﻧﻭﺧﺳﻠﻟ ﻪﺿّﺭﻌﺗ ﺏّﻧﺟﺗﻟ ﺔﻓﺭﻐﻟﺍ ﺓﺭﺍﺭﺣﺑ ﺩﺭﺑﻳ ﻪﻋﺩ ،ﻥﻳﺗﻘﻳﻗﺩ ﺓﺩﻣﻟ ﺭﻣﺗﺳﻣ ﻝﻛﺷﺑ ﺯﺎﻬﺟﻟﺍ
ً
ﻝﺧﺍﺩ ﻲﻓ ﺎ
ﻗﻼﻁﺇ ﻙﻟﺫ ﻪﺑﺎﺷ ﺎﻣ ﻭﺃ ﺔﻳﻧﺩﻌﻣ ﻭﺃ ﺔﻳﺟﺎﺟﺯ ﻭﺃ ﺔﻳﻛﻳﺗﺳﻼﺑ ﻭﺃ ﺔﻳﺑﺷﺧ ﺽﺍﺭﻏﺃ ﻱﺃ ﻝﺧﺩﺗ ﻻ p
.ﺔﻳﻧﺎﺛ 30 ﺭﻭﺭﻣ ﺩﻌﺑ ﻪﻣﺍﺩﺧﺗﺳﺍ ﺓﺩﺎﻋﺇ ﻥﻛﻣﻣﻟﺍ ﻥﻣ
ً
ﺿﻳﺃ ﻥﻛﻣﻳ ﺎﻣﻛ .ﻝﺎﻔﻁﻷﺍ ﻡﺎﻌﻁ
.ﻥﺁ ﻲﻓ ﺞﻠﺛ ﺕﺎﺑﻌﻛﻣ 10 ﻥﻣ ﺭﺛﻛﺃ ﻊﺿﻭ
.ﺓّﺭﺟﻟﺍ
،ﺔﻳﺩﺎﻳﺗﻋﺍﻭ ﺔﻳﻟﺯﻧﻣ ﺕﺎﻘﻳﺑﻁﺗ ﻲﻓ ﻪﻣﺍﺩﺧﺗﺳﻻ ّﺩﻌُﻣ ﺯﺎﻬﺟﻟﺍ ﺍﺫﻫ •
،ﺔﻳﺭﺎﺟﺗﻟﺍ ﻝﺎﺣﻣﻟﺍ ﻲﻓ ﻥﻳﻔﻅﻭﻣﻠﻟ ﺔﺻﺻﺧﻣﻟﺍ ﺦﺑﺎﻁﻣﻟﺍ ﻝﺛﻣ
ﺔﻳﺣﺎﻳﺳﻟﺍ ﻕﻓﺍﺭﻣﻟﺍﻭ ؛ﻝﻣﻌﻟﺍ ﻥﻛﺎﻣﺃ ﻥﻣ ﺎﻫﺭﻳﻏﻭ ﺏﺗﺎﻛﻣﻟﺍﻭ
ﻕﻓﺍﺭﻣ ﻥﻣ ﺎﻫﺭﻳﻏﻭ ﺕﻼﻳﺗﻭﻣﻟﺍﻭ ،ﻕﺩﺎﻧﻔﻟﺍ ءﻻﺯﻧﻭ ؛ﺔﻳﻔﻳﺭﻟﺍ
ﺔﻓﺭﻐﻟﺍ” ﺕﺎﻣﺩﺧ ﻡﺩﻘﺗ ﻲﺗﻟﺍ ﺔﻳﻗﺩﻧﻔﻟﺍ ﻝﺯﺎﻧﻣﻟﺍﻭ ؛ﺔﻣﺎﻗﻹﺍﻭ ﻥﻛﺳﻟﺍ
ﺭﻁﺧ ﻙﻟﺫﻟ ﺭﻳﺎﻐﻣ ﻝﺎﻣﻌﺗﺳﺍ ﻱﺃ ﻝﻛﺷﻳ ﺩﻗ .“ﺭﺎﻁﻓﻹﺍﻭ
.ﺍ
ً
ﻙﻠﺳﻭ ﺯﺎﻬﺟﻟﺍ
ﻅﻔﺣﺍ .ﺯﺎﻬﺟﻟﺍ ﺍﺫﻫ ﻝﺎﻔﻁﻷﺍ ﻡﺩﺧﺗﺳﻳ ﻥﺃ ﺏﺟﻳ ﻻ •
ﻥﺃ ﺏﺟﻳ ﻻ .ﻝﺎﻔﻁﻷﺍ ﻝﻭﺎﻧﺗﻣ ﻥﻋ ﺍًﺩﻳﻌﺑ ﺎﻬﺑ ﺹﺎﺧﻟﺍ ﺭﺎﻳﺗﻟﺍ
.ﺯﺎﻬﺟﻟﺍ ﺍﺫﻬﺑ ﻝﺎﻔﻁﻷﺍ ﺏﻌﻠﻳ
ﺹﺎﺧﺷﺃ ﻝﺑِﻗ ﻥﻣ ﻪﻣﺍﺩﺧﺗﺳﺍ ﻡﺗﻳﻟ ﺹﺻﺧﻣ ﺭﻳﻏ ﺯﺎﻬﺟﻟﺍ ﺍﺫﻫ •
ﻭﺃ ،ﺓﺩﻭﺩﺣﻣﻟﺍ ﺔﻳﻠﻘﻌﻟﺍ ﻭﺃ ﺔﻳﺳﺣﻟﺍ ﻭﺃ ﺔﻳﺩﺳﺟﻟﺍ ﺕﺍﺭﺩﻘﻟﺍ ﻱﻭﺫ ﻥﻣ
ﻥﻭﻌﺿﺧﻳ ﺍﻭﻧﺎﻛ ﺍﺫﺇ ﻻﺇ ،ﻡﺎﻣﻟﻹﺍ ﻭﺃ ﺔﺑﺭﺟﺗﻟﺍ
ﻰﻟﺇ ﻥﻭﺩﻘﺗﻔﻳ ﻥﻣﻣ
ﻝﻳﻐﺷﺗﺑ ﺹﺗﺧﻳ ﺎﻣ ﻲﻓ ﺎًﺑﺳﺎﻧﻣ ﺎًﺑﻳﺭﺩﺗ ﺍﻭﻘﻠﺗ ﺎﻣ ﺍﺫﺇ ﻭﺃ ﻑﺍﺭﺷﻺﻟ
ﻱﻭﻁﻧﻳ ﻲﺗﻟﺍ ﺭﻁﺎﺧﻣﻟﺍ ﻥﻭﻛﺭﺩﻳ ﺍﻭﻧﺎﻛﻭ ﻥﻣﺁ ﻝﻛﺷﺑ ﺯﺎﻬﺟﻟﺍ
ﻑﻳﻅﻧﺗﻟﺍ” ﺓﺭﻘﻓ ﻲﻓ ﺎﻬﻳﻟﺇ ﺭﺎﺷُﻣﻟﺍ ﺔﻧﺎﻳﺻﻟﺍ ﺕﺎﻳﻠﻣﻋ ﺫﻔﻧ •
.ﺯﺎﻬﺟﻟﺍ ﺓﺎﻳﺣ ﺔﻟﺎﻁﻹ “ﺔﻧﺎﻳﺻﻟﺍﻭ
ﻪﻣﺍﺩﺧﺗﺳﺍ ﻥﻣ ءﺎﻬﺗﻧﻻﺍ ﺩﻌﺑ ﺎًﻣﺋﺍﺩ ﺭﺎﻳﺗﻟﺍ ﻥﻋ ﺯﺎﻬﺟﻟﺍ ﻝﺻﻓﺍ •
ﺔﻧﺎﻳﺻ ﺔﻳﻠﻣﻋ ﻱﺃ ﺫﻳﻔﻧﺗ ﻝﺑﻗﻭ ﺎﻬﺑﻳﻛﺭﺗ ﻭﺃ ﻊﻁﻘﻟﺍ ﻙﻳﻛﻔﺗ ﻝﺑﻗﻭ
ﻭﺃ
ﺩﻧﻋ .ﻲﺋﺎﺑﺭﻬﻛﻟﺍ ﺭﺎﻳﺗﻟﺍ ﻉﺎﻁﻘﻧﺍ ﻝﺎﺣ ﻲﻓ ﺎًﺿﻳﺃ ﻪﻠﺻﻓﺍ .ﻑﻳﻅﻧﺗ
.ﺎًﻔﻗﻭﺗﻣ ﻥﻭﻛﻳ ﻥﺃ ﺏﺟﻳ ،ﻪﻧﻋ ﻪﻠﺻﻓ ﻭﺃ ﺭﺎﻳﺗﻟﺎﺑ ﺯﺎﻬﺟﻟﺍ ﻝﻳﺻﻭﺗ
ﻝﺑِﻗ ﻥﻣ ﺎﻣﺇ ﻪﻟﺍﺩﺑﺗﺳﺍ ﺏﺟﻳ ،ﺭﺭﺿﺑ ﺔﻗﺎﻁﻟﺍ ﻙﻠﺳ ﺏﻳﺻﺃ ﺍﺫﺇ •
ّ
ﻝﺑِﻗ ﻥﻣ ﻭﺃ ﻪﻟ ﻊﺑﺎﺗﻟﺍ ﻊﻳﺑﻟﺍ ﺩﻌﺑ
ﺎﻣ ﺔﻣﺩﺧ ﻡﺳﻗ ﻭﺃ ﻊّﻧﺻُﻣﻟﺍ
.ﺭﻁﺧ ﻱﺃ ﺏﻧﺟﺗ ﻑﺩﻬﺑ ﻥﻳﻠﺛﺎﻣﻣ ﻥﻳﻠﻫﺅﻣ ﻥﻳﻠﻣﺎﻋ
.ﺎﻬﺑ ﻙﺎﺳﻣﻹﺍ ﺩﻧﻋ ﺭﺫﺣﻟﺍ ﻲﺧﻭﺗ ﺏﺟﻳ .ﺔﻳﺎﻐﻠﻟ ﺓﺩﺎﺣ ﺕﺍﺭﻔﺷﻟﺍ •
ﻝﻣﻋ ءﺎﻧﺛﺃ .ﺭﺎﻳﺗﻟﺎﺑ ًﻻﻭﺻﻭﻣ ﺯﺎﻬﺟﻟﺍ ﻥﺎﻛ ﺍﺫﺇ ﺎﻬﺑ ﻙﺳﻣﺗ ﻻ
ﺦﺑﻁﻣ ﺕﺍﻭﺩﺃ ﻱﺃﻭ ﻙﺳﺑﻼﻣﻭ ،ﻙﺭﻌﺷﻭ ،ﻙﻳﺩﻳ ِﻕﺑﺃ ،ﺯﺎﻬﺟﻟﺍ
.ﺔﻛﺭﺣﺗﻣﻟﺍ ﺕﺍﺭﻔﺷﻟﺍ ﻥﻋ ﺓﺩﻳﻌﺑ ﻯﺭﺧﺃ
ﻡﺩﺧﺗﺳﺗ ﻻ .ﺓ
ﺭﺟﻟﺍ ﻰﻠﻋ ءﺎﻁﻐﻟﺍ ﺩﻭﺟﻭﺑ ﻁﻘﻓ ﺔﻗﺎﻔﺧﻟﺍ ﻡﺩﺧﺗﺳﺍ •
ّ
.ﺔﻏﺭﺎﻓ ﻲﻫﻭ ﺎًﻗﻼﻁﺇ ﺔﻗﺎﻔﺧﻟﺍ
ﺔﻔﻗﻭﺗﻣ ﺕﺍﺭﻔﺷﻟﺍ ﻥﺃﻭ ﺭﺎﻳﺗﻟﺍ ﻥﻋ ﻝﻭﺻﻔﻣ ﺯﺎﻬﺟﻟﺍ ﻥﺃ ﻥﻣ ﺩﻛﺄﺗ •
.(8) ﺎﻬﻋﺯﻧ ﻭﺃ ﺓﺎﻔﺻﻣﻟﺍ ﻊﺿﻭ ﻝﺑﻗ ﺎًﻣﺎﻣﺗ
ﻲﻓ ﻲﻌﻳﺑﻁ ﺭﻳﻏ ءﻲﺷ ﻱﺃ ﺕﻅﺣﻻ ﺍﺫﺇ .ﺯﺎﻬﺟﻟﺍ ﻰﻠﻋ ﺕﺎﺣﻳﻠﺻﺗ ﻱﺃ ﻻﻭ ﺕﻼﻳﺩﻌﺗ ﻱﺃ ِﺭﺟﺗ ﻻ •
. •SOLAC ﺎﻬﺑ ﻲﺻﻭﺗ ﻭﺃ ﺎﻫﺭّﻓﻭﺗ ﻲﺗﻟﺍ ﻙﻠﺗ ﺭﻳﻏ ﺕﺍﺭﺍﻭﺳﺳﻛﺇ ﻭﺃ ﺎًﻌﻁﻗ ﻡﺩﺧﺗﺳﺗ ﻻ
.ﻙﻟﺯﻧﻣ ﺔﻳﻁﻠﻓ ﻊﻣ ﻕﻓﺍﻭﺗﺗ ﺓﺩﺩﺣُﻣﻟﺍ ﺔﻳﻁﻠﻔﻟﺍ ﻥﺃ
ﻥﻣ ﺏﺣﺳﻟﺍ ﻝﻼﺧ ﻥﻣ ﺎًﻣﺋﺍﺩ ﺯﺎﻬﺟﻟﺍ ﻝﺻﻓﺍ .ﻪﻛﻠﺳ ﻥﻣ ﺯﺎﻬﺟﻟﺍ ﻕّﻠﻌُﺗ ﻻﻭ ﻙﻠﺳﻟﺍ ﺍًﺩﺑﺃ ﺏﺣﺳﺗ ﻻ •
ﻥﻣ ﺎًﻳﻟﺩﺗﻣ ﻙﻠﺳﻟﺍ ﻙﺭﺗﺗ ﻻ .ﺔﻧﺧﺎﺳ ﺢﻁﺳﺃ ﻭﺃ ﺔﻌﻁﺎﻗ ﺕﺍﻭﺩﺃ ﻱﻷ ﺭﺎﻳﺗﻟﺍ ﻙﻠﺳ ﺔﺳﻣﻼﻣ ﺏﻧﺟﺗ •
.ﻥﻳﺩﻣﺗﻌُﻣﻟﺍ ﺔﻳﻧﻔﻟﺍ ﺔﻣﺩﺧﻟﺍ ﻡﺎﺳﻗﺃ ﺩﺣﺃ ﻰﻟﺇ ﻪﺟﻭﺗﻭ ﻪﻣﺩﺧﺗﺳﺗ ﻻ ،ﺯﺎﻬﺟﻟﺍ
ﻥﻣ ﺩﻛﺄﺗ ،ﻲﺋﺎﺑﺭﻬﻛﻟﺍ ﺭﺎﻳﺗﻟﺎﺑ ﺯﺎﻬﺟﻟﺍ ﻝﺻﻭ ﻝﺑﻗ •
ﺔﻣﻼﺳﻟﺍ ﺕﺍﺩﺎﺷﺭﺇ
.ﺎﻬﻳﻠﻋ
.ﻙﻠﺳﻟﺍ ﻥﻣ ﻻ ،ﺱﺑﺎﻘﻟﺍ
Mod. BV5712_5722
Mixer se skleněnou nádobou
Blender z dzbankiem
Mixér so sklenenou nádobou
Turmixgép
Блендер
Blender cu vas
ИНСТРУКЦИЯ ЗА УПОТРЕБА
INSTRUCŢIUNI DE UTILIZARE
INSTRUCŢIUNI DE UTILIZARE
Solac is a registered Trade Mark 01/14
NÁVOD K POUZITÍ
INSTRUKCJA OBSŁUGI
NÁVOD NA POUŽITIE
HASZNÁLATI UTASÍTÁS
ROMÂNĂ ro
i
INSTRUCŢIUNI PRIVIND SIGURANŢA
• Acest aparat este destinat utilizării în medii
precum: bucătării pentru personalul din
magazine, birouri şi alte medii de lucru; case
de ţară; de către clienţi în hoteluri, moteluri şi
alte tipuri de unităţi de cazare; pensiuni.
Utilizarea aparatului în orice alt scop în afara
celui indicat poate fi pe
• Aparatul nu trebuie să fie utilizat de către copii.
Nu lăsaţi aparatul şi cablul său la îndemâna
copiilor. Copiii nu trebuie să se joace cu
aparatul.
• Aparatul nu este conceput pentru a fi utilizat
de persoane ale căror capacităţi fizice,
senzoriale sau mentale sunt deficitare, sau
care nu dispun de experienţa ori de
cunoştinţele necesare, cu excepţia cazului în
care acestea sunt supravegheate sau au
primit instrucţiuni corespunzătoare cu privire
la utilizarea în siguranţă a aparatului şi înţeleg
riscurile implicate.
• Pentru a prelungi durata de viaţă a
aparatului, efectuaţi operaţiunile de
întreţinere descrise în secţiunea
CURĂŢAREA ŞI ÎNTREŢINEREA.
• Scoateţi întotdeauna aparatul din priză după
utilizare, înainte de a monta sau de a
îndepărta piese componente şi înainte de a
efectua orice operaţiune de întreţinere sau de
curăţare. De asemenea, scoateţi aparatul din
priză în cazul întreruperii alimentării cu curent
electric.
• În cazul deteriorării cablului de alimentare,
acesta trebuie înlocuit de producător sau de
unitatea de service post-vânzare sau de către
personal calificat, pentru a preveni posibilele
accidente.
• Lamele sunt foarte ascuţite. Aveţi grijă atunci
când le manevraţi. Nu manevraţi lamele atunci
când aparatul este în funcţiune. În timpul
funcţionării, asiguraţi-vă că mâinile, părul şi
hainele dumneavoastră, precum şi orice alte
instrumente nu intră în contact cu lamele în
mişcare.
• Folosiţi blenderul numai cu capacul montat pe
vas. Nu folosiţi blenderul atunci când vasul
este gol.
• Asiguraţi-vă că aparatul este deconectat de la
sursa de alimentare şi că lamele s-au oprit
complet din mişcare înainte de instalarea sau
înlăturarea accesoriului pentru filtru (8).
• Nu modificaţi şi nu reparaţi aparatul. Dacă observaţi orice
anomalie la aparat, nu îl mai folosiţi şi duceţi-l la o unitate
service autorizată.
• Nu utiliza părţi sau accesorii care nu sunt furnizate sau
recomandate de către compania SOLAC.
• Înainte de a introduce aparatul în priză, verificaţi dacă
tensiunea indicată pe aparat corespunde cu cea din locuinţa
dumneavoastră.
• Nu trageţi niciodată de cablul de alimentare şi nu agăţaţi
niciodată aparatul de cablul de alimentare. Scoateţi
întotdeauna aparatul din priză trăgând de ştecăr, niciodată de
cablul de alimentare.
•Feriţi cablul de alimentare de contactul cu obiecte ascuţite sau
cu suprafeţe fierbinţi.
• Îndepărtaţi toate elementele care au fost folosite pentru
protejarea aparatului pe durata transportului sau pentru
promoţii de vânzare, cum ar fi pungi de plastic sau de hârtie,
foi de plastic, cartoane şi etichete, care sunt prezente atât în
interiorul aparatului cât şi pe exteriorul acestuia.
•Nu lăsaţi aparatul nesupravegheat atunci când acesta este în
funcţiune.
Nu introduceţi niciodată corpul aparatului în apă şi
în nici un alt lichid şi nu îl introduceţi în maşina de
A
spălat vase.
• Nu atingeţi aparatul cu mâinile ude atunci când acesta este în
funcţiune.
•Nu folosiţi aparatul pe suprafeţe ude sau în exterior.
• Vasul nu este adecvat utilizării în cuptorul cu microunde.
• Pentru a evita situaţiile periculoase legate de resetarea
involuntară a întrerupătorului de circuit, nu conectaţi aparatul
la un întrerupător temporizat.
AVERTISMENT!! Atunci când doriţi să aruncaţi aparatul,
nu îl aruncaţi NICIODATĂ împreună cu gunoiul menajer.
b
Duceţi-l la cel mai apropiat CENTRU DE RECICLARE
sau de colectare a deşeurilor unde va fi procesat
corespunzător. Astfel veţi contribui la ocrotirea mediului
înconjurător.
1 Descriere
Componente principale
1 Corpul principal al aparatului (baza)
2 Selector de viteze
BV5712
1 medie, 2 maximă, P Setare turbo
BV5722
1 minim, 2, 3
maximă, P Setare turbo
5
2 Asamblare
Z Lucraţi pe o suprafaţă stabilă şi netedă, curată, fără posibilitate de alunecare.
1Montaţi ansamblul cu lamă (5) pe baza cănii A .Pentru aceasta:
Montaţi garnitura din silicon, lama metalică şi la final piesa din plastic. Rotiţi piesa
din plastic din poziţia DEBLOCARE în poziţia BLOCARE.
2Montaţi cana pe corpul principal. Pentru aceasta:
Aşezaţi cana (4) pe corp (1) astfel încât mânerul să se afle în poziţie verticală, cu
lacătul deschis .
3Rotiţi cana în poziţia cu lacătul închis, pentru blocare, fără a o forţa. B
medie, 4,
3 Cablu de alimentare
4Vas
5 Asamblarea lamei demontabile
6 Capac
7Cană/capac dozator
8 Filtru pentru suc
9 Dispozitiv pentru înfăşurarea
cablului
Asiguraţi-vă că montaţi corect cana pe corp, fiindcă altfel nu va porni.
4 Dacă doriţi să folosiţi blenderul ca storcător, montaţi filtrul (8) în jurul lamei C
(modelul BV5722).
3Funcţionarea
Z Acest aparat a fost proiectat pentru amestecarea lichidelor, precum produse
lactate, sosuri, sucuri de fructe, supe, pentru amestecarea băuturilor, shake-urilor
etc. Poate fi folosit pentru a amesteca alimente moi sau a face piureuri din alimente
gătite, precum morcovi sau ingrediente pentru copii mici. Puteţi, de asemenea, să
faceţi cocteiluri cu gheaţă zdrobită, deşi nu se recomandă introducerea a mai mult
de 10 cuburi în acelaşi timp.
Z În nici un caz nu lăsaţi aparatul să funcţioneze mai mult decât este necesar. După
utilizarea continuă a aparatului timp de două minute, lăsaţi-l să se răcească la
temperatura ambientală pentru a preveni supraîncălzirea. Puteţi să îl folosiţi din nou
după 30 de secunde.
pNu introduceţi în vas obiecte din lemn, plastic, sticlă, metal sau alte obiecte similare.
pNu turnaţi NICIODATĂ în cană alimente fierbinţi, fiindcă aceasta ar putea provoca
arsuri sau opăriri în timpul utilizării. De asemenea, schimbările bruşte şi puternice
de temperatură pot afecta cana.
1Montaţi blenderul conform indicaţiilor din secţiunea 2 „Asamblarea”. Asiguraţi-vă că
este asamblat corect.
2Introduceţi alimentele în vas, fără a depăşi 2/3 din capacitatea maximă (marginea
de sus).
3Puneţi capac (6).
4Puneţi capacul (7), rotindu-l în sens invers acelor de ceasornic. B.
5Introduceţi ştecărul cablului de alimentare în priză.
6 Utilizaţi selectorul de viteză pentru a alege viteza dorită (1, 2, 3, 4 sau 5, în funcţie
de model) sau poziţia "P" pentru turbo. Trebuie să apăsaţi şi să menţineţi această
poziţie pe durata în care doriţi ca aparatul să continue să funcţioneze (maxim 2
minute de funcţionare continuă).
Z În timpul funcţionării, ţineţi capacul bine apăsat folosind ambele mâini.
7Dacă doriţi să mai adăugaţi un ingredient în timpul procesului de amestecare,
scoateţi capacul distribuitorului şi adăugaţi ingredientele prin orificiul capacului D.
pNU scoateţi capacul atunci când aparatul funcţionează!
8 Atunci când obţineţi rezultatul dorit, treceţi selectorul de viteze în poziţia oprit E.
9 Scoateţi ştecărul din priză şi aşteptaţi oprirea completă a lamei.
10 Scoateţi vasul din corpul principal şi goliţi-l.
Utilizare drept storcător (BV5722)
1Plasaţi fructul decojit în interiorul filtrului (8). Pulpa fructului va rămâne în interiorul
filtrului, în timp ce sucul va trece deasupra şi va rămâne depozitat în interiorul cănii.
i Sfaturi importante
•Nu folosiţi vasul pentru a depozita alimente sau alte obiecte.
• Nu este recomandat să puneţi în vas alimente foarte fierbinţi, pentru a evita astfel
să vă ardeţi.
•Vă recomandăm să adăugaţi ingredientele puţin câte puţin în loc să le puneţi dintr-
o dată.
• La început amestecaţi ingredientele mai tari şi apoi adăugaţi-le pe cele mai moi. În
felul, acesta procesul de amestecare este mai uşor iar amestecul este mai omogen.
•Viteza scăzută este adecvată pentru baterea sau amestecarea alimentelor cu
consistenţă lichidă. Viteza ridicată este recomandată pentru mărunţirea sau
amestecarea alimentelor mai solide sau mai groase.
• Alimentele voluminoase sau fibroase trebuie tăiate în cuburi de 2 sau 3 cm
maximum.
• Pentru a face cocktail-uri cu gheaţă sfărâmată, mai întâi puneţi ingredientele şi apoi
gheaţa, iar la sfârşit lichidul necesar sau puţină apă.
• Atunci când spargeţi gheaţă, se recomandă folosirea unei viteze mari sau turbo
timp de câteva secunde pentru a împinge gheaţa în sus şi pentru a preveni blocarea
acesteia în partea inferioară.
•Dacă în timpul amestecării alimentele se lipesc pe pereţii vasului sau rămân în afara
zonei de acţiune a lamei, opriţi aparatul, luaţi vasul din suport şi scoateţi capacul.
Îndepărtaţi capacul şi împingeţi cu grijă alimentele spre lame cu ajutorul unei
spatule. Puneţi capacul la loc pe vas, puneţi vasul pe corpul aparatului şi continuaţi
amestecarea ingredientelor.
• Nu depăşiţi nivelul maxim indicat pe vasul blenderului.
4Curăţarea şi depozitarea
pLamele sunt foarte ascuţite. A se evita atingerea cu mâna a lamelor în timpul
curăţării şi uscării interiorului recipientului.
Z
Nu scufundaţi corpul principal (1) în apă şi nu îl spălaţi în maşina de spălat vase.
1Curăţaţi aparatul înainte de prima utilizare, imediat după fiecare utilizare şi după ce
nu a fost utilizat o perioadă mai lungă de timp.
2Curăţaţi imediat vasul şi celelalte piese din plastic, deoarece unele alimente (de
exemplu, morcovii) sunt foarte dificil de curăţat după ce s-au uscat.
Curăţare rapidă
1 Având blenderul asamblat, deschideţi capacul şi turnaţi înăuntru puţină apă caldă
cu o picătură de detergent lichid.
2Montaţi capacul vasului şi distribuitorul.
3Puneţi selectorul pentru viteză pe poziţia P timp de câteva secunde.
4Puneţi selectorul pentru viteză pe poziţia 0 şi scoateţi din priză ştecărul aparatului.
5 Scoateţi vasul şi clătiţi-l cu apă caldă.
Curăţare completă
1Goliţi cana şi scoateţi blenderul în ordinea inversă a operaţiilor descrise în
secţiunea 2 „Asamblarea”.
2Curăţaţi corpul aparatului şi cablul de alimentare cu o cârpă umedă.
3Curăţaţi celelalte piese cu apă cu săpun şi clătiţi-le bine cu apă curentă. Nu le
spălaţi niciodată în maşina de spălat vase.
4Montaţi blenderul conform indicaţiilor din secţiunea 2 “Asamblare”.
.ﻰﺻﻗﺃ ﺩﺣﻛ ﻡﺳ •3 ﻭﺃ 2 ﻥﻣ ﺕﺎﺑﻌﻛﻣ ﻝﻛﺷ ﻰﻠﻋ ﻑﺎﻳﻟﻷﺍ ﺓﺭﻳﺛﻛ ﻭﺃ ﺔﻧﻳﺧﺛﻟﺍ
ﺭﻳﺧﺃﻭ ،ﺞﻠﺛﻟﺍ ﻡﺛ ﻥﻣﻭ ،ﺕﺎﻧﻭﻛﻣﻟﺍ ًﻻﻭﺃ ﻝِﺧﺩﺃ ،ﺭﻭﺷﺑﻣﻟﺍ ﺞﻠﺛﻟﺍ ﻡﺍﺩﺧﺗﺳﺎﺑ ﺕﻼﻳﺗﻛﻭﻛ ﻊﻧﺻﻟ •
ﻝﺋﺎﺳﻟﺍ ﺍ
ً
ﻰﻟﺇ ﺞﻠﺛﻟﺍ ﺕﺎﺑﻌﻛﻣ ﻊﻓﺩﻟ ،ﺕﺎﻅﺣﻟ ﻊﺿﺑﻟ “ﻭﺑﺭﻭﺗ” ﻭﺃ ﺎﻳﻠﻌﻟﺍ ﺔﻋﺭﺳﻟﺍ ﻝﺎﻣﻌﺗﺳﺎﺑ ﻲﺻﻭﻧ ،ﺞﻠﺛﻟﺍ ﺭﺷﺑ ﺩﻧﻋ •
ﻝﻳﻐﺷﺗ ﻑﻗﻭﺃ ،ﺕﺍﺭﻔﺷﻟﺍ ﻝﻭﺎﻧﺗﻣ
ﻕَﻭﻠِﻣ ﺔﻁﺳﺍﻭﺑ ﺓﺩﻳﺩﺷ ﺔﻳﺎﻧﻌﺑ ﺔﻣﻌﻁﻷﺍ ﻙّﺭﺣﻭ ءﺎﻁﻐﻟﺍ ﻉﺯﻧﺍ .ﺱﻳﺋﺭﻟﺍ ﻝﻛﻳﻬﻟﺍ ﻥﻋ ﺓّﺭﺟﻟﺍ ﻉﺯﻧﺍﻭ ﺯﺎﻬﺟﻟﺍ
.ﺔﻣﻌﻁﻷﺍ ﺝﺯﻣ ﺔﻳﻠﻣﻋ ءﺎﻬﻧﺄﺑ ﻡﻗ ﻡﺛ ﺱﻳﺋﺭﻟﺍ ﻝﻛﻳﻬﻟﺍ ﻰﻠﻋ ﺎﻬﻌﺿﻭ ﺩﻋﺃﻭ ﺓ
ﻥﻋ ﺓﺩﻳﻌﺑ ﺕﻳﻘﺑ ﻭﺃ ﺓ
.ﻝﻔﺳﻷﺍ ﻲﻓ ﺓﺯﻭﺟﺣﻣ ﺎﻬﺋﺎﻘﺑ ﺏّﻧﺟﺗﻭ ﻰﻠﻋﻷﺍ
ﺭﺟﻟﺍ ﺏﻧﺍﻭﺟ ﻲﻓ ﺝﺯﻣﻟﺍ ءﺎﻧﺛﺃ ﺔﻣﻌﻁﻷﺍ ﺕﻘﺻﺗﻟﺍ ﺍﺫﺇ •
ّ
.ﺔﻗﺎﻔﺧﻟﺍ ﺓ
ﺭﺟ ﻰﻠﻋ ﺩﺩﺣُﻣﻟﺍ ﻰﺻﻗﻷﺍ ﻯﻭﺗﺳﻣﻟﺍ ﺯﻭﺎﺟﺗﺗ ﻻ •
ّ
ﺔﻣﻌﻁﻷﺍ ﻊﻳﻁﻘﺗ ﺏﺟﻳ
.ءﺎﻣﻟﺍ ﻥﻣ ًﻼﻳﻠﻗ ﻭﺃ ﻱﺭﻭﺭﺿﻟﺍ
ﺭﺟﻟﺍ ﱢﻁﻏ .ﺓﺭﻔﺷﻟﺍ ﻩﺎﺟﺗﺎﺑ
ّ
ﻅﻔﺣﻟﺍﻭ ﻑﻳﻅﻧﺗﻟﺍ 4
.ﻪﻔﻳﻔﺟﺗﻭ ﺓّﺭﺟﻟﺍ ﻝﺧﺍﺩ ﻑﻳﻅﻧﺗ ﺩﻧﻋ ﺩﻳﻟﺎﺑ ﺕﺍﺭﻔﺷﻟﺍ ﺔﺳﻣﻼﻣ ﺏّﻧﺟﺗ .ﺔﻳﺎﻐﻠﻟ ﺓﺩﺎﺣ ﺕﺍﺭﻔﺷﻟﺍ p
.ﻕﺎﺑﻁﻷﺍ ﺔﻳﻼﺟ ﻲﻓ ﻪﻠﺳﻐﺗ ﻻﻭ ،ﺭﺧﺁ ﻝﺋﺎﺳ ﻱﺃ ﻭﺃ ءﺎﻣﻟﺍ ﻲﻓ ( í 1) ﺱﻳﺋﺭﻟﺍ ﻝﻛﻳﻬﻟﺍ ﺍ
ﻥﻭﺩ ﻥﻣ ﺔﻠﻳﻭﻁ ﺓﺩﻣ ﺭﻭﺭﻣ ﺩﻌﺑﻭ ﻝﺎﻣﻌﺗﺳﺍ ﻝﻛ ﺩﻌﺑ ﺓﺭﺷﺎﺑﻣﻭ ،ﻝﻭﻷﺍ ﻝﺎﻣﻌﺗﺳﻻﺍ ﻝﺑﻗ ﺯﺎﻬﺟﻟﺍ ﻑﻅﻧ 1
ﻑﻳﻅﻧﺗ ﺏﻌﺻﻳ ﻪﻧﺃ ﺫﺇ ،ﺎﻬﻟﺎﻣﻌﺗﺳﺍ ﺩﻌﺑ ًﺓﺭﺷﺎﺑﻣ ﺔﻳﻛﻳﺗﺳﻼﺑﻟﺍ ﺭﺻﺎﻧﻌﻟﺍ ﻥﻣ ﺎﻫﺭﻳﻏﻭ ﺓّﺭﺟﻟﺍ ﻑﻅﻧ 2
.ﺔﻗﺎﻔﺧﻟﺍ ﻙﻳﻛﻔﺗ ﻝﺑﻗ ،ﺓ
.“ﺏﻳﻛﺭﺗﻟﺍ 1 2” ﺓﺭﻘﻔﻟﺍ ﻲﻓ ﺢﺿﻭُﻣﻟﺍ ﻩﺎﺟﺗﻼﻟ ﺱﻛﺎﻌﻣﻟﺍ ﻩﺎﺟﺗﻟﺍ ﻲﻓ ﺔﻗﺎﻔﺧﻟﺍ ﻙﻛﻓﻭ ﺓّﺭﺟﻟﺍ ﻍﺭﻓﺃ
ﻝﺳﻐﺗ ﻻ .ﺭﻓﺍﻭﻟﺍ ﻱﺭﺎﺟﻟﺍ ﺭﻭﺑﻧﺻﻟﺍ ءﺎﻣﻟﺎﺑ ﺎﻬﻔﻁﺷﺍﻭ ﻥﻭﺑﺎﺻﻟﺍﻭ ءﺎﻣﻟﺎﺑ ﺭﺻﺎﻧﻌﻟﺍ ﻲﻗﺎﺑ ﻑﻅﻧ 3
ﺭﺟﻟﺍ ﻝﺧﺍﺩ ﻲﻓ ﻲﻠﺟﻟﺍ ﻝﺋﺎﺳ ﻥﻣ ﻝﻳﻠﻗ ﻊﻣ ﺍًﺭﺗﺎﻓ ًءﺎﻣ ﺏﻛﺳﺍﻭ ءﺎﻁﻐﻟﺍ ﻊﻓﺭﺍ 1
ّ
.ٍﻥﺍﻭﺛ ﻊﺿﺑ ﺓﺩﻣﻟ 3 P ﺔﻳﻌﺿﻭ ﻰﻠﻋ ﺔﻋﺭﺳﻟﺍ ﺭﺎﻳﺗﺧﺍ
.ﺭﺎﻳﺗﻟﺍ ﻥﻋ ﺯﺎﻬﺟﻟﺍ ﻝﺻﻓﺍﻭ 4 0 ﺔﻳﻌﺿﻭ ﻰﻠﻋ ﺔﻋﺭﺳﻟﺍ ﺭﺎﻳﺗﺧﺍ
.ﺔﺑﻁﺭ ﺵﺎﻣﻗ ﺔﻗﺭﺧ ﺔﻁﺳﺍﻭﺑ ﺭﺎﻳﺗﻟﺍ ﻙﻠﺳﻭ ﺱﻳﺋﺭﻟﺍ ﻝﻛﻳﻬﻟﺍ ﻑﻅﻧ 2
.ﻑﺟﺗ ﻥﺃ ﺩﻌﺑ (ﺭﺯﺟﻟﺍ ﻝﺛﻣ) ﺔﻣﻌﻁﻷﺍ ﺽﻌﺑ
.ﻝﺎﻳﻛﻣﻟﺍ-ﺓﺩﺍﺩﺳﻟﺍﻭ ءﺎﻁﻐﻟﺍ ﻊﺿﻭ ﺩﻋﺃ 2
.ﺭﺗﺎﻔﻟﺍ ءﺎﻣﻟﺎﺑ
.ﻕﺎﺑﻁﻷﺍ ﺔﻳﻼﺟ ﻲﻓ ﺭﺻﺎﻧﻌﻟﺍ
.“ﺏﻳﻛﺭﺗﻟﺍ 4 2” ﺓﺭﻘﻔﻟﺍ ﻲﻓ ﺢ
َ
ﺿﻭُﻣ ﻭﻫ
ً
ﺩﺑﺃ ﻊﺿﺗ ﻻ
.ﻪﻟﺎﻣﻌﺗﺳﺍ
ﻊﻳﺭﺳﻟﺍ ﻑﻳﻅﻧﺗﻟﺍ
ﺭﺯ ﻊﺿ
ّ
ﺭﺯ ﻊﺿ
ّ
ﺭﺟﻟﺍ ﻉﺯﻧﺍ 5
ﺎﻬﻔﻁﺷﺍﻭ ﺓ
ّ
ﻕﻣﻌﺑ ﻑﻳﻅﻧﺗﻟﺍ
ﺎﻣﻛ ﺔﻗﺎﻔﺧﻟﺍ ﺏّﻛﺭ
ﻕﻭﺭﺣ ﻲﻓ ﺏﺑﺳﺗﺗ ﺩﻗ ﺎﻬﻧﺃ ﺫﺇ ،ﺓّﺭﺟﻟﺍ ﻲﻓ ﺎًﻗﻼﻁﺇ ﻥﺎﻳﻠﻐﻟﺍ ﺔﻟﺎﺣ ﻲﻓ ﻭﺃ ﺔﻧﺧﺎﺳ ﺔﻣﻌﻁﺃ ﻱﺃ ﺏﻛﺳﺗ ﻻ p
.ﺓّﺭﺟﻟﺍ ﺭﺳﻛ ﻰﻟﺇ ﺔﺋﺟﺎﻔﻣﻟﺍ ﺔﻳﺭﺍﺭﺣﻟﺍ ﺕﺎﻧﻳﺎﺑﺗﻟﺍ ﻱﺩﺅﺗ ﺩﻗ ،ﻙﻟﺫ
ﻝﻛﺷﻟﺎﺑ ﺎﻬﺑﻳﻛﺭﺗ ﻡﺗ ﺩﻗ ﻪﻧﺃ ﻥﻣ ﺩﻛﺄﺗ .“ﺏﻳﻛﺭﺗﻟﺍ 1 2” ﺓﺭﻘﻔﻟﺍ ﻲﻓ ﺢ
ﺔﻓﺎﺣﻟﺍ) ﻯﻭﺻﻘﻟﺍ ﺏﺎﻌﻳﺗﺳﻻﺍ ﺓﺭﺩﻗ (2 2/3) ﻲﺛﻠﺛ ﺯﻭﺎﺟﺗ ﻥﻭﺩ ﻥﻣ ﺓّﺭﺟﻟﺍ ﻲﻓ ﺔﻣﻌﻁﻷﺍ ﻝِﺧﺩﺃ
“ﻭﺑﺭﻭﺗ” ﺔﻳﻌﺿﻭﻟ 6 P ﻭﺃ (ﺯﺍﺭﻁﻟﺍ ﺏﺳﺣﺑ ،5 ﻭﺃ 4 ،3 ،2 ،1) ﺓّﻭﺟﺭﻣﻟﺍ ﺔﻋﺭﺳﻟﺍ ﺔﻳﻌﺿﻭ ﺭﺗﺧﺍ
ﻲﺗﻟﺍ ﺓﺩﻣﻟﺍ ﻝﺍﻭﻁ ﺔﻳﻌﺿﻭﻟﺍ ﻩﺫﻫ ﻰﻠﻋ ﻅﺎﻔﺣﻟﺍ ﻙﻳﻠﻋ ﺏﺟﻳ ﺎﻣﻛ ،ﺔﻋﺭﺳﻟﺍ ﺭﺎﻳﺗﺧﺍ
.(ﺭﻣﺗﺳﻣﻟﺍ ﻝﻳﻐﺷﺗﻟﺍ ﻥﻣ ﻰﺻﻗﺃ ﺩﺣﻛ ﻥﻳﺗﻘﻳﻗﺩ) ﺯﺎﻬﺟﻟﺍ ﻝﻣﻋ ﺓﺩﻣ ﺔﻟﺎﻁﻹ ﺎﻬﻳﻓ ﺏﻏﺭﺗ
ﻑﺿﺃﻭ ﻝﺎﻳﻛﻣﻟﺍ-ﺓﺩﺍﺩﺳﻟﺍ ﺏﺣﺳﺍ ،ﺯﺎﻬﺟﻟﺍ ﻝﻣﻋ ءﺎﻧﺛﺃ ﻲﻓﺎﺿﺇ ﻥّﻭﻛﻣ ﻱﺃ ﺔﻓﺎﺿﺇ ﻲﻓ ﺕﺑﻏﺭ ﺍﺫﺇ 7
.8 E ﺔﻋﺭﺳﻟﺍ ﺭﺎﻳﺗﺧﺍ ّﺭﺯ ﻲﻓ ﻝﻳﻐﺷﺗﻟﺍ ﻑﺎﻘﻳﺇ ﺔﻳﻌﺿﻭ ﺭﺗﺧﺍ ،ﺓ
.ﻥﺍﺭﻭﺩﻟﺍ ﻥﻋ ﺎًﻣﺎﻣﺗ ﺓﺭﻔﺷﻟﺍ ﻑﻗﻭﺗﺗ ﻰﺗﺣ ﺭﻅﺗﻧﺍﻭ ﺭﺎﻳﺗﻟﺍ ﻥﻋ ﻙﻠﺳﻟﺍ ﻝﺻﻓﺍ 9
ﺯﺎﻬﺟﻟﺍ ﻝﻣﻋ ﺎﻧﺛﺃ ﻙﻳﺩﻳ ﺎﺗﻠﻛﺑ ءﺎﻁﻐﻟﺍ ﻙﺎﺳﻣﺇ ﻡﻛﺣﺃ í
.
.ﺯﺎﻬﺟﻟﺍ ﻝﻣﻋ ءﺎﻧﺛﺃ ﺎ
.ﺎﻬﻏﺭﻓﺃﻭ ﺱﻳﺋﺭﻟﺍ ﻝﻛﻳﻬﻟﺍ ﻥﻋ ﺓّﺭﺟﻟﺍ ﻉﺯﻧﺍ 10
(BV5722) ﺓﺭﺎ
ﺝﺭﺧﻳﻭ ﺓﺎﻔﺻﻣﻟﺍ ﻝﺧﺍﺩ ﻲﻓ ﺔﻬﻛﺎﻔﻟﺍ ﺏﻟ ﻰﻘﺑﻳﺳ .( 1 8) ﺓﺎﻔﺻﻣﻟﺍ ﻝﺧﺍﺩ ﻲﻓ ﺓﺭﺷﻘﻣﻟﺍ ﺔﻬﻛﺎﻔﻟﺍ ﻝ
ﺭﺟﻟﺍ ﻝﺧﺍﺩ ﻲﻓ ﺎًﻧﺯﺧُﻣ ﻰﻘﺑﻳﻟ ﺝﺭﺎﺧﻟﺍ ﻰﻟﺇ ﺭﻳﺻﻌﻟﺍ
.ﺓ
ّ
ﻰﻠﻋ ﺓﻭﻼﻋ .ﺔﻳﻠﻣﻌﻟﺍ ءﺎﻧﺛﺃ
َ
ﺿﻭُﻣ ﻭﻫ ﺎﻣﻛ ﺔﻗﺎﻔﺧﻟﺍ ﺏّﻛﺭ
ﻕﻳﺭﻁ ﻥﻋ (7) ﺓﺩﺍﺩﺳﻟﺍ ﻊﺿ
.D ءﺎﻁﻐﻟﺍ ﺔﻫﻭﻓ ﻝﻼﺧ ﻥﻣ ﺕﺎﻧﻭﻛﻣﻟﺍ
ﻭﺟﺭﻣﻟﺍ ﺔﺟﻳﺗﻧﻟﺍ ﻰﻠﻋ ﻝﺻﺣﺗ ﺎﻣﺩﻧﻋ
ّ
.ﺢﻳﺣﺻﻟﺍ
.(ﺔﻳﻭﻠﻌﻟﺍ
.( 3 6) ءﺎﻁﻐﻟﺍ ﻊﺿ
.ﺭﺎﻳﺗﻟﺎﺑ ﻙﻠﺳﻟﺍ ﻝﺻﻭﺃ 5
ﺭﺯ ﺔﻁﺳﺍﻭﺑ
ّ
ً
ﻗﻼﻁﺇ ءﺎﻁﻐﻟﺍ ﻉﺯﻧﺗ ﻻ p
ﺻﻌﻛ ﺯﺎﻬﺟﻟﺍ ﻝﻳﻐﺷ
ّ
ﺧﺩﺃ
ﻝﺎﻣﻌﺗﺳﻻﺍ ﺢﺋﺎﺻﻧ i
.ﻕﻭﺭﺣ ﻱﺄﺑ ﺔﺑﺎﺻﻹﺍ ﺔﻳﻧﺎﻛﻣﻹ ﺎًﺑّﻧﺟﺗ ﺓّﺭﺟﻟﺍ ﻲﻓ ﺔﻧﻭﺧﺳﻟﺍ ﺓﺩﻳﺩﺷ ﺔﻣﻌﻁﺃ ﻱﺃ ﺏﻛﺳ ﻡﺩﻌﺑ ﺢﺻﻧﻧ •
.ﺓﺩﺣﺍﻭ ﺔﻌﻓﺩ ﺎﻬﻠﻛ ﺎﻬﺗﻓﺎﺿﺇ ﻥﻋ ﺎًﺿﻭﻋ ﺎًﺋﻳﺷﻓ ﺎًﺋﻳﺷ ﺕﺎﻧﻭﻛﻣﻟﺍ ﺔﻓﺎﺿﺈﺑ ﻲﺻﻭﻧ •
ﻝﻭﺻﺣﻟﺍ ﻝﻬﺳﻷﺍ ﻥﻣ ﻥﻭﻛﻳ ﻝﻛﺷﻟﺍ ﺍﺫﻬﺑ .ﺓﻭﺍﺭﻁ ﺭﺛﻛﻷﺍ ﻑﺿﺃ ﻡﺛ
ﺔﻋﺭﺳ ﻉﺭﺳﺃ ﺩﺎﻣﺗﻋﺎﺑ ﻲﺻﻭﻧ .ﻝﺋﺎﺳﻟﺍ ﻡﺍﻭﻘﻟﺍ ﺕﺍﺫ ﺔﻣﻌﻁﻷﺍ ﺝﺯﻣ ﻭﺃ ﻕﻔﺧﻟ ﺔﻋﺭﺳ ﺄﻁﺑﺃ ﺩﺎﻣﺗﻋﺎﺑ ﻲﺻﻭﻧ •
.ﺽﺍﺭﻏﻷﺍ ﻻﻭ ﺔﻣﻌﻁﻷﺍ ﻥﻳﺯﺧﺗﻟ ﺓ
ﺍًﺩﺎﻣﺟ ﺭﺛﻛﻷﺍ ﺔﻣﻌﻁﻷﺍ ﻕﺣﺳﺑ ًﻻﻭﺃ ﻡﻗ •
.ﺩﻳﺩﺷﻟﺍ ﻡﺍﻭﻘﻟﺍ ﺕﺍﺫ ﻭﺃ ﺍًﺩﺎﻣﺟ ﺭﺛﻛﻷﺍ ﺔﻣﻌﻁﻷﺍ ﺝﺯﻣ ﻭﺃ ﻕﻔﺧﻟ
ﺭﺟﻟﺍ ﻝﻣﻌﺗﺳﺗ ﻻ •
ّ
.ﺱﻧﺎﺟﺗﻣ ﺞﻳﺯﻣ ﻰﻠﻋ
4 B .ﺔﻋﺎﺳﻟﺍ ﺏﺭﺎﻘﻋ ﻩﺎﺟﺗﻻ ﺱﻛﺎﻌﻣ ﻩﺎﺟﺗﺎﺑ ﺎﻬﺗﺭﺍﺩﺇ
cs • ČESKY
pl • POLSKI
sk • SLOVENČINA
hu • MAGYAR
bg • българск
ro • ROMÂNĂ
ِ
Technical data 220-240V,
Protection class BV5712 Class II; BV5722 Class II
BV5712 - 600 W; 77dB(A) /
BV5722 -1000 W; 82,5dB(A)
In conformity with the European directives
L
cz
Před použitím zařízení si pozorně přečtěte tento návod.
součástí výrobku. Uschovejte jej pro pozdější potřebu.
pl
Przed uruchomieniem urządzenia zapoznać się z instrukcją obsługi.
stanowi nierozłączną część produktu. Należy ją przechowywać w bezpiecznym
miejscu, w celu ponownego użytku.
sk
Pred použitím zariadenia si pozorne prečítajte tento návod.
súčasťou výrobku. Odložte si ju na bezpečné miesto pre prípad potreby v budúcnosti
hu
A készülék használatba vétele előtt figyelmesen olvassa el az alábbi utasításokat.
kézikönyv elválaszthatatlan részét képezi a terméknek. Őrizze meg biztos helyen, mer
később még szüksége lehet rá.
bg
Прочетете внимателно тези инструкции, преди да започнете да използвате уреда
Тези инструкции за употреба са неразделна част от продукта. Съхранявайт
ги на безопасно място за бъдеща справка.
ro
Citiţi în întregime aceste instrucţiuni înainte de a utiliza aparatul.
parte integrantă a produsului. Păstraţi-l la loc sigur, pentru a putea fi consultat în viitor
Tento návod na použití je nedílno
Niniejsza instrukcj
Táto príručka je neoddeliteľno
Acest manual reprezintă
100% Recycled Paper
}
 Loading...