

Page 1

snom 360
VoIP Business Phone
© 2004 snom technology AG
All rights reserved.
Version 1.0
Quick Installation
Kurzanleitung
Page 2

snom technology AG
Pascalstr. 10B
10587 Berlin, Germany
Note to the reader
This is a quick guide to the installation and operation of the snom360.
The full manual is available on our web page, www.snom.com.
© 2004 snom technology Aktiengesellschaft.
All Rights Reserved. This document is supplied by snom technology AG. No
part of this document may be reproduced, republished or retransmitted
in any form or by any means whatsoever, whether electronically or
mechanically, includ-ing, but not limited to, by way of photocopying,
recording, information recording or through retrieval systems, without
the express written permission of snom technology AG.
snom technology AG reserves the right to revise this document and make
changes at any time and without the obligation to notify any person and/
or entity of such revisions and/or changes.
Product specifi cations contained in this document are subject to change
without notice.
Copyright © 2004 snom technology AG. All rights reserved. snom® is registered trademark
of snom technology AG and affi liates in Germany, U.S.A. and certain other countries. Other
trademarks or registered trademarks mentioned in this document are the property of their
respective manufacturers or owners.
Page 3

Table of Contents
Note to the reader ...................................................................... 2
Installation ................................................................5
Delivery Content ........................................................................ 5
Safety Information ...................................................................... 5
Power supply ............................................................................. 5
Setting up the Phone ................................................................... 6
Wall Mounting ........................................................................... 6
Cleaning .................................................................................. 10
Connecting the phone ..............................................11
Keypad .....................................................................13
Initialization .............................................................17
Booting ................................................................................... 17
Selecting the language ............................................................. 17
DHCP Confi guration ................................................................... 17
Selecting the IP Address ............................................................ 18
Selecting the Netmask ............................................................... 18
Selecting the IP Gateway ........................................................... 19
Selecting the DNS Server ........................................................... 19
Selecting the Tone Scheme ........................................................ 19
Selecting the Timezone ............................................................. 20
Logging on the fi rst account ....................................................... 20
English
Index .......................................................................23
Page 4

English
4 •
Page 5
Installation
Delivery Content
Please check whether the delivery contains the following parts:
• The base unit with display and keypad
• The handset
• The handset cable
• The power supply (optional)
Safety Information
Please read the following safety notices before installing or using
your snom phone. They are crucial for the safe and reliable operation
of the device.
English
1
Power supply
You have two options for providing the snom360 with power:
• An external power supply (5 V)
• Power feeding over the network cable (IEEE 802.3af
compatible)
If you want to use an external power supply, use the one that is
included in the package. Other power supplies may cause damage
to the phone, affect its behavior or induce noise.
snom technology AG • 5
Page 6
[ SNOM 360 QUICK INSTALLATION V1.00 ]
English
Setting up the Phone
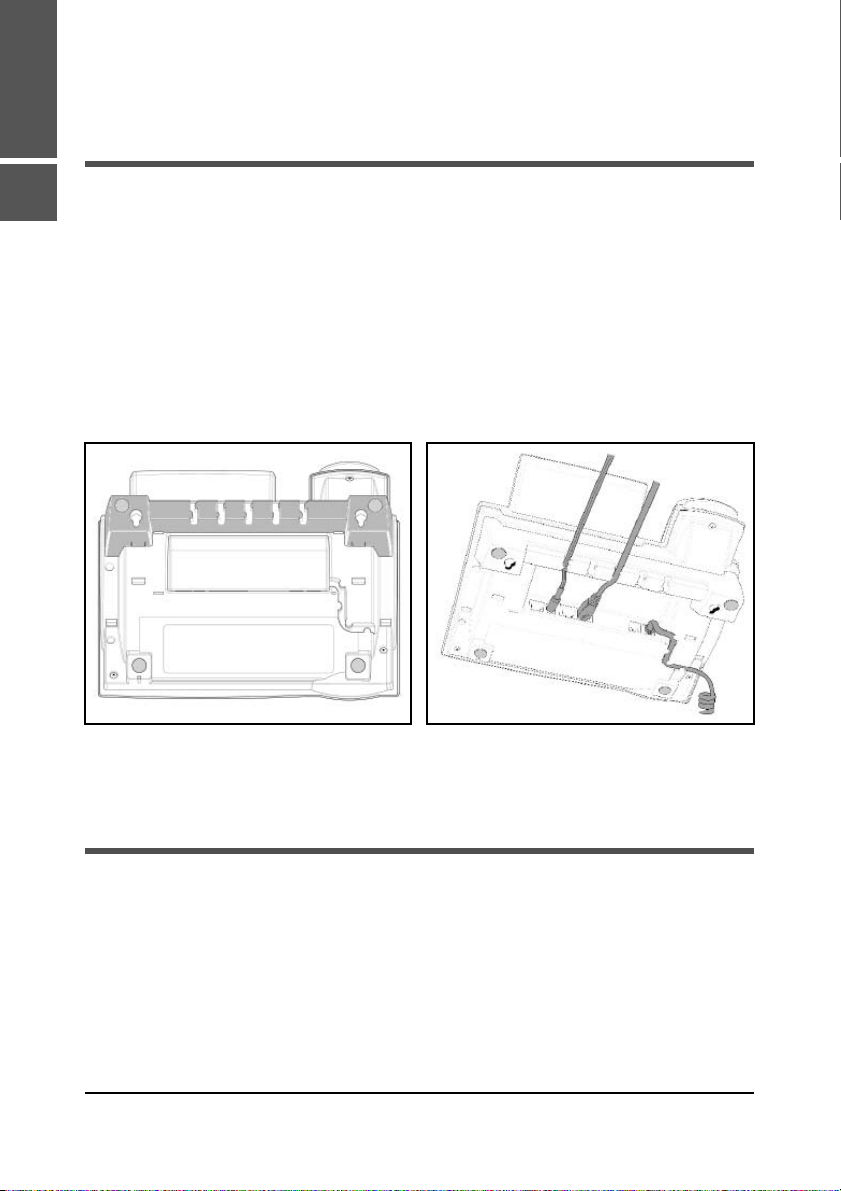
1
Your snom360 is delivered with the footstand attached to the
phone’s bottom shell (shaded gray in Fig. 1). Place the snom360
on an even, horizontal surface that gives the rubber pads a secure
grip. Do not place it on carpets or other materials containing fi bers
that could block the air vents and cause overheating.
After connecting the phone (s. below, chap. Connecting the Phone),
clip the cords into the appropriate slots on the footstand or, in
the case of the handset cord, on the bottom shell of the phone
(Fig. 2).
Fig. 1 Fig. 2
Wall Mounting
It is also possible to mount the snom360 on the wall. In order to
do this, you detach the footstand from the bottom shell and attach
it in the appropriate position for wall mounting, as described in
steps 1 through 6, below.
CAUTION: Do not mount the additional keypad available for
the snom 360 on the wall. If you wish to use the additional
6 • Installation
Page 7
[ SNOM 360 QUICK INSTALLATION V1.00 ]
keypad available for the snom 360, you must place phone and
keypad on an even, horizontal surface, as described above.
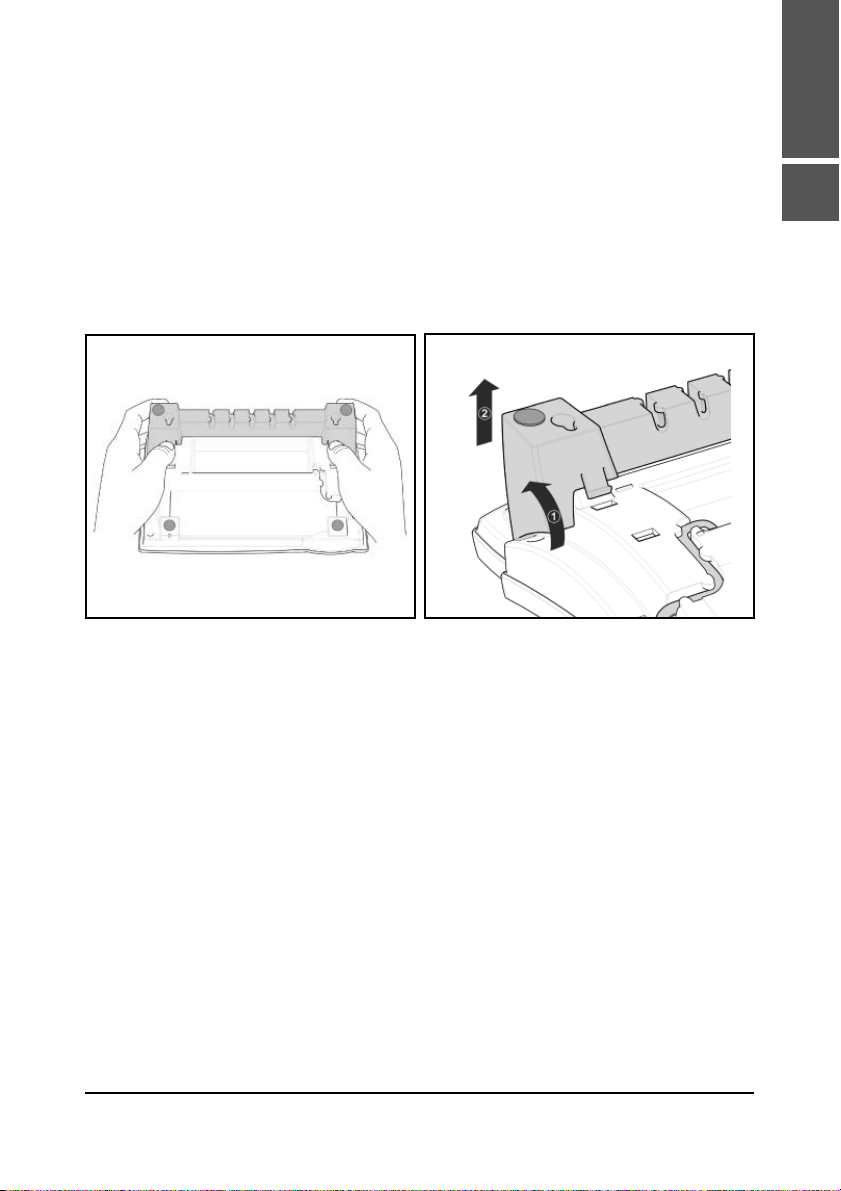
Turn the phone upside down (Fig. 3). Please, ensure that
1
you do not damage the display and/or its hinge and that
you do not drop the receiver. You may want to hold the
phone in your lap or have a second person hold it.
Fig. 3 Fig. 4
English
1
2
Lightly press the snap-fi ts of the footstand inwards
(Fig. 3) and, at the same time, tilt the footstand
backwards and lift it from its anchorage in the mounting
holes (Fig. 4).
Rotate the footstand 180° around its vertical axis
3
Make sure that the handset cord has been clipped
4
correctly into the groove on the bottom shell of the
phone, as shown in Fig. 4 and 6. Failure to clip the
cord into the groove will result in damage to the cord
when the footstand is attached in the position for wall
mounting.
snom technology AG • 7
Page 8
English
1
[ SNOM 360 QUICK INSTALLATION V1.00 ]
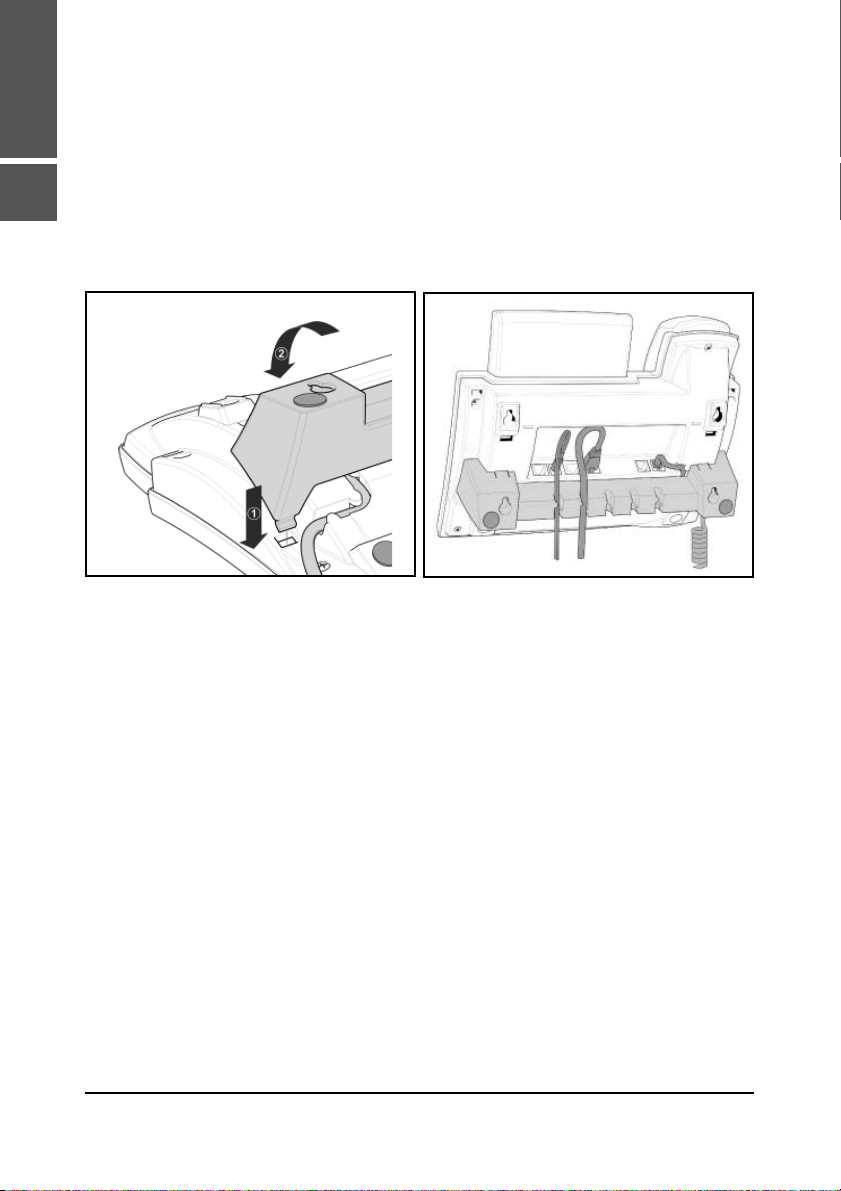
Insert the outside, rear snap-fi ts into the mounting
5
holes on the bottom shell (Fig 5, arrow no. 1). Tilt
the footstand forward and downward until the snap-fi ts
snap into place in the mounting holes. Please, make
sure that the four snap-fi ts have securely snapped
into the holes before mounting the phone on the
wall.
Fig. 5 Fig. 6
The slots on the footstand for the various cords can also
6
be used when the phone is mounted on a wall. After
connecting the phone (see chap. Setting up the Phone,
above), form the cords into loops and gently press the
long ends into the slots on the footstand. The loops
should not be too big, so that they will not hamper the
secure mounting of the phone on the wall, and not too
small, so that the cords will not be bent or broken (Fig.
6).
The delivery includes a template to be used for marking the position
of the holes to be drilled in the wall.
(Use wall plugs, if necessary, and screws with half-round head
profi les (diameters of screws dmax= 4.5 mm (0.1755”), diameters
of heads dmax=8.5 mm (0.3315”).
8 • Installation
Page 9
[ SNOM 360 QUICK INSTALLATION V1.00 ]
The screws must protrude approx. 0.5 cm (0.195”) from the wall
for easy wall mounting of the phone.
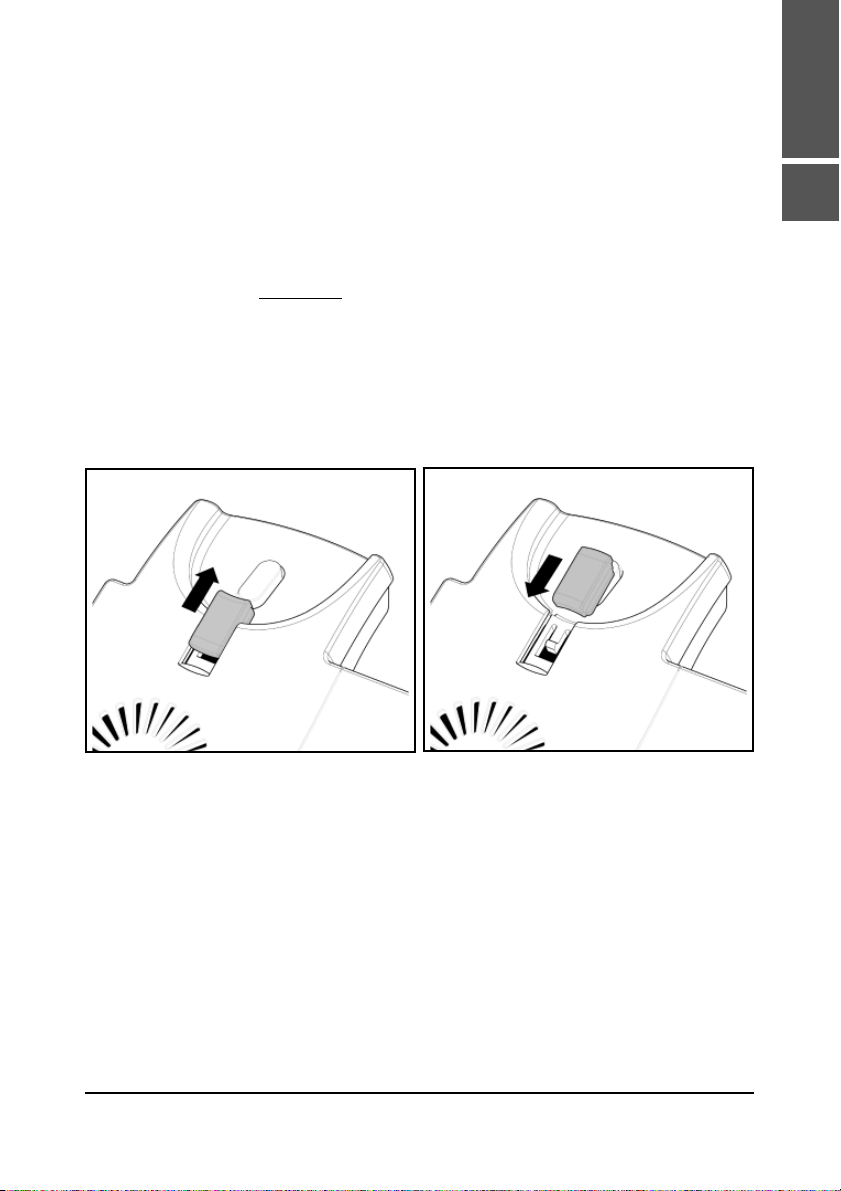
Adjusting the Handset Rest
The speaker of the handset has a small, rectangular indentation
that fi ts over the rounded end of the plastic tab inserted into a slot
on the top shell of the phone. When the phone is mounted on the
wall, the handset must be placed on this rounded end to ensure
that it will not fall off.
Slide the tab out of the slot, as shown in Fig. 7, rotate it 180°, and
slide it back into the slot, as shown in Fig. 8.
English
1
Fig. 7 Fig. 8
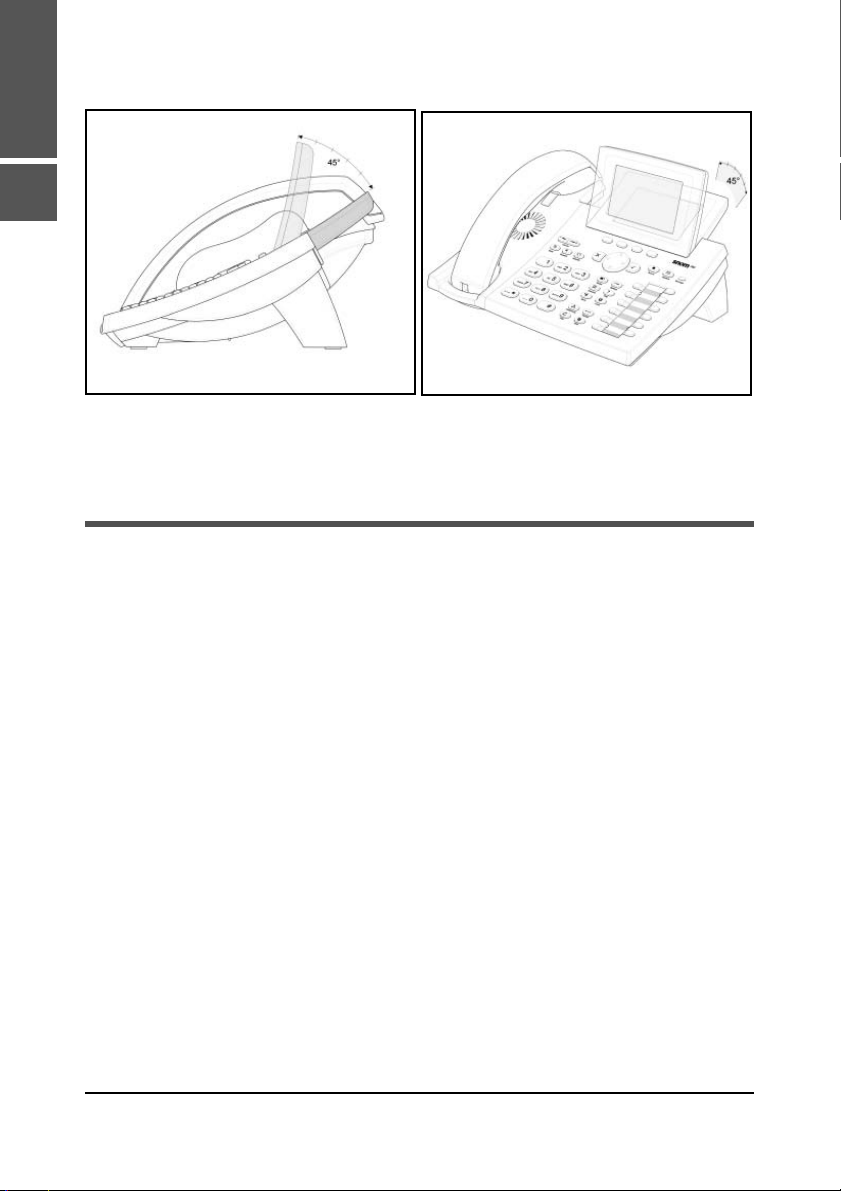
Adjusting the Position of the Display
The position of the snom360’s display is adjustable up to an angle
of 45° (Fig. 9 and 10).
Hold down the phone with one hand and adjust the display with
your other hand. Do not use too much force and do not pull,
wrench, or twist the display as this might damage or break the
hinges.
snom technology AG • 9
Page 10
English
1
[ SNOM 360 QUICK INSTALLATION V1.00 ]
Fig. 9 Fig. 10
Cleaning
To clean the snom360, use an anti-static cloth. Please avoid cleaning
liquids as they might damage the surface or internal electronics of
the phone.
10 • Installation
Page 11

Connecting the
phone
First connect one end of the handset cable to the handset and
then to the jack labeled “ ” on the left-hand side of the phone’s
bottom.
Next plug the Ethernet (network) cable into the RJ45 connector
labeled “ ”, and plug the other end into the network side to
establish a data link. The second RJ45 connector, labeled “ ”, is
for daisy-chaining further Ethernet devices without the need for a
second Ethernet connection line.
If you are using an external power supply, please insert the plug of
the power supply into the connector labeled “ ” next to the data
line and hook up the casing into the mains.
If you want to use a headset, it can be connected to the audio jack
labeled “ ” on the bottom side of the snom 360.
Clip the cords into the appropriate slots on the footstand or, in the
case of the handset cord, on the bottom shell of the phone (see
Fig. 1 in the chap. Setting up the phone).
English
2
snom technology AG • 11
Page 12

English
2
[ SNOM 360 QUICK INSTALLATION V1.00 ]
12 • Connecting the phone
Page 13
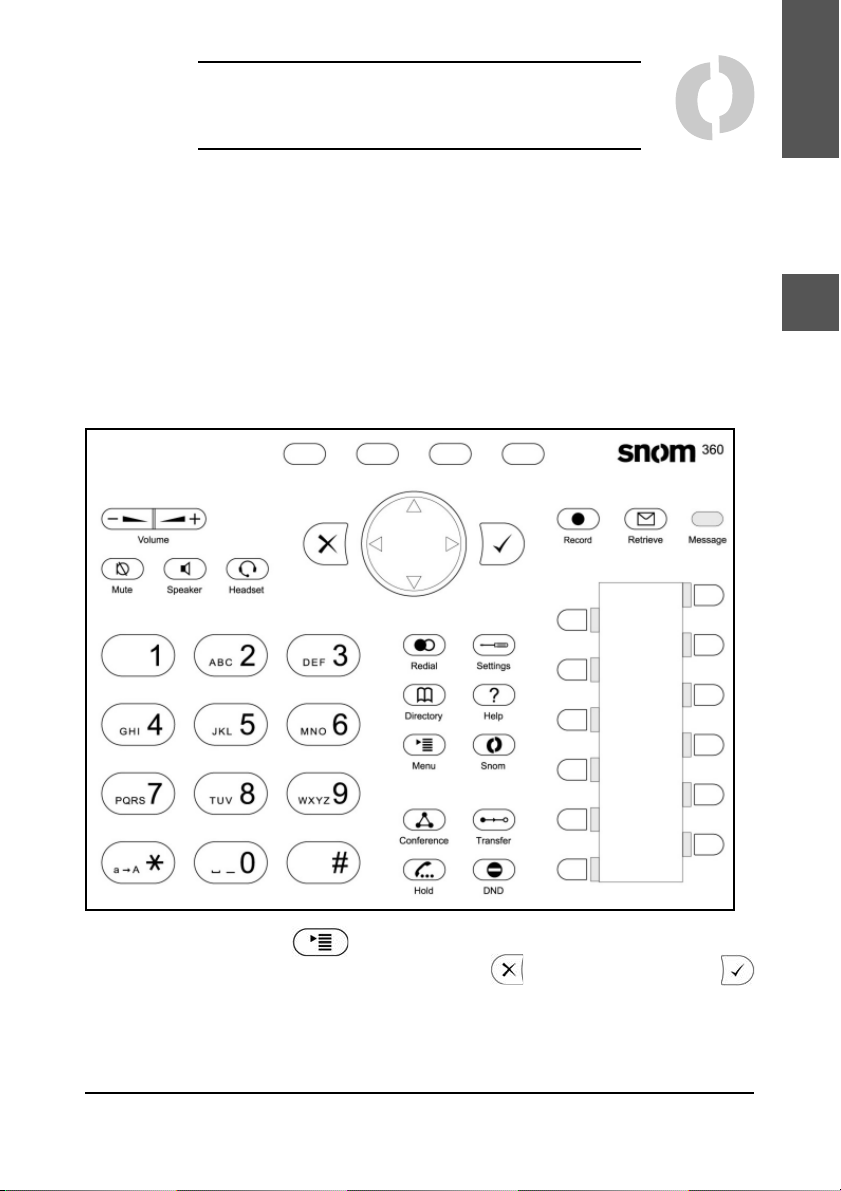
Keypad
The numeric keypad with the keys 0 to 9, *, and # is used to enter
digits and letters. Depending on the operating mode, different
actions can be performed (see the table below):
• Entry of digits only (e.g., when dialing a phone number)
• Typing in letters and digits by pressing the keys repeatedly
(similar to a cellular phone), etc.
English
3
Use the MENU key to call up the main menu. To cancel
actions or input, use the CANCEL key . The ENTER key
confi rms actions, selections and inputs.
Depending on the operating mode, the keys can have contextspecifi c meanings which are described in the manual.
snom technology AG • 13
Page 14

[ SNOM 360 QUICK INSTALLATION V1.00 ]
The four soft keys located below the display are context-sensitive
English
function keys. Their current mapping is depicted with symbols in
the bottom line on the display.
3
The twelve keys on the right with LEDs
/ next to them are
the programmable function keys onto which different functionalities
can be mapped.
The keys of the numeric block in different operating modes:
Key Digits Lower case Upper case
0 (SPC)_0 (SPC)_0
1
2abc2 ABC2
3def3 DEF3
4 ghi4 GHI4
5jkl5 JKL5
6 mno6 MNO6
.@1,?!/():;&%*#+<=>$[]
.@1,?!/():;&%*#+<=>$[]
14 • Keypad
7 pqrs7$ PQRS7$
8 tuv8 TUV8
9 wxyz9 WXYZ9
# or after timeout,
#
* Toggles upper and lower case
number guessing if
not numeric
# or after timeout,
number guessing if
not numeric
Page 15
[ SNOM 360 QUICK INSTALLATION V1.00 ]
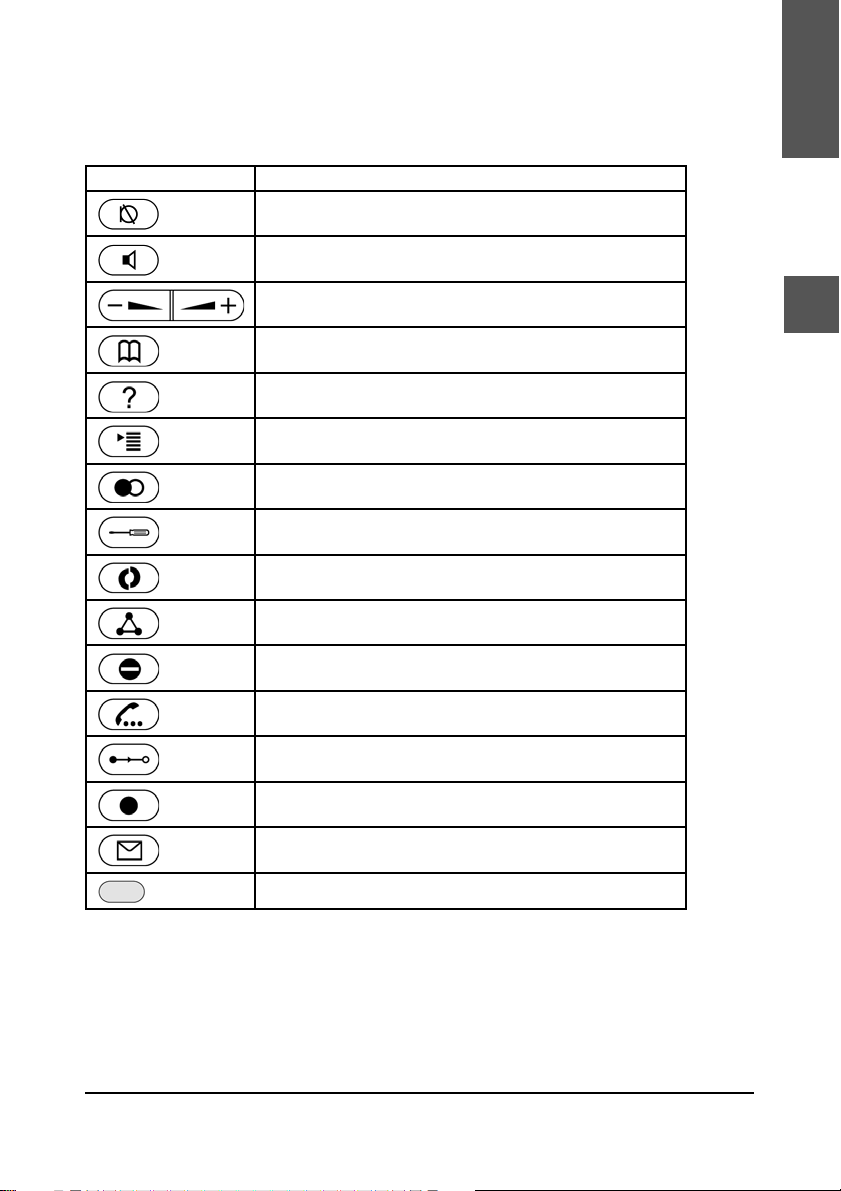
Additionally, the following keys are available:
Key Description
Mute microphone on/off
Casing speaker on/off
Adjust volume (lower/higher)
Open phone book
Help
Main menu
Redial
Settings menu
Snom menu
Establish 3-party conference
Do not disturb mode on/off
English
3
Call hold/unhold
Call transfer
Record a call
Connect to Mailbox
LED for MWI (Message waiting indication)
snom technology AG • 15
Page 16

English
3
[ SNOM 360 QUICK INSTALLATION V1.00 ]
16 • Keypad
Page 17

Initialization
Booting
The booting process comprises a series of different confi guration
steps that set up the phone for future use by any user.
Selecting the language
The default language setting is English. On startup the phone
offers you the option to select the language of your choice. To
change to a different language, use or keys and press
to confi rm.
English
4
DHCP Confi guration
If your network supports DHCP, then on bootup press when
this screen appears:
snom technology AG • 17
Page 18

[ SNOM 360 QUICK INSTALLATION V1.00 ]
The phone has a built-in DHCP client. It will receive an IP address
English
and other network-related settings (Netmask, IP gateway, DNS
server) from the DHCP server.
4
If, on the other hand, DHCP is not used, press
above. The user will subsequently be asked for the following
settings:
in the screen
Selecting the IP Address
The user can provide a static IP address for the phone if DHCP is
not used. A valid IP address appropriate to the network in which
the phone is being used can be provided.
Selecting the Netmask
Similarly, the user will be asked to provide a Netmask. After
entering the information, confi rm with .
18 • Initialization
Page 19

[ SNOM 360 QUICK INSTALLATION V1.00 ]
Selecting the IP Gateway
If a valid Netmask has been provided, the user will be asked for
the IP address of the IP gateway. After entering the information,
confi rm with
.
Selecting the DNS Server
The last item for this series of network-related confi gurations is
the IP address for the DNS server. After entering the information,
confi rm with .
English
4
Selecting the Tone Scheme
The user will then be asked for the tone scheme to be used on the
phone. After entering the information, confi rm with .
snom technology AG • 19
Page 20

English
[ SNOM 360 QUICK INSTALLATION V1.00 ]
4
Selecting the Timezone
The timezone to be used on the phone can also be selected by
moving through the different timezone options available in the
menu and pressing to activate your selection.
If the settings explained above are set up properly, the phone will
ask for the fi rst account registration.
Logging on the fi rst account
If no number is assigned to the phone yet, you will be prompted
to type in your account name. This consists of your phone number
succeeded by @ and the address of your registrar. The phone tries
to guess the correct registrar and address, so the display could
show something like this:
20 • Initialization
Page 21

[ SNOM 360 QUICK INSTALLATION V1.00 ]
After typing in your account name, confi rm your account by pressing
the key.
The phone tries to register your given account name at the given
registrar. The idle screen is shown and if no crossed box but a
phone symbol is displayed in front of your just confi gured identity,
your registration has been successful.
English
4
When this state has been reached, the time and date are also
displayed on the display.
The complete manual is available on our web page,
www.snom.com.
snom technology AG • 21
Page 22

English
4
[ SNOM 360 QUICK INSTALLATION V1.00 ]
22 • Initialization
Page 23

Index
English
A
Account 20
Additional keypad 6
Adjust volume 15
B
Booting 17
C
Call hold/unhold 15
Call transfer 15
CANCEL key 13
Casing speaker 15
Cleaning 10
Conference 15
Connecting the phone 6, 11
Connect to Mailbox 15
E
ENTER key 13
F
Forwarding. see call transfer
H
Handset rest 9
Help 15
I
Installation 5
IP Address 18
IP Gateway 19
K
5
D
DHCP 17
Display 9
DNS Server 19
Do not disturb 15
Keypad 13
L
Language 17
LEDs 14
LED for MWI 15
snom technology AG • 23
Page 24

M
English
Main menu 15
Manual 21
MENU key 13
Mute microphone 15
T
Timezone 20
Tone scheme 19
W
5
N
Netmask 18
Numeric block 14
numeric keypad 13
O
Open phone book 15
P
Power supply 5
External power supply 5
Power feeding 5
R
Record a call 15
Redial 15
Wall mounting 6
S
Safety 5
Safety Information 5
Settings menu 15
Setting up the Phone 6
Soft keys 14
24 • Index
Page 25

snom 360
VoIP Business Phone
© 2004 snom technology AG
Alle Rechte vorbehalten.
Version 1.0
Kurzanleitung
Deutsch
Page 26

snom technology AG
Pascalstr. 10B
10587 Berlin, Germany
Hinweis für den Nutzer
Diese Kurzanleitung hilft Ihnen bei Installation und Bedienung
des snom360. Das Handbuch fi nden Sie auf unserer Webseite,
www.snom.com.
© 2004 snom technology Aktiengesellschaft.
Alle Rechte vorbehalten. Dieses Dokument wird von der snom technology
AG zur Verfügung gestellt. Kein Teil dieses Dokumentes darf in irgendeiner
Form oder zu irgendeinem Zweck nachgebildet, neu veröffentlicht oder
übertragen werden, weder auf elektronischem noch auf mechanischem
Wege. Dies beinhaltet vor allem, aber nicht ausschließlich, die Fotokopie
und die Aufzeichnung ohne die ausdrückliche, schriftliche Genehmigung
der snom technology AG.
Die snom technology AG behält sich jederzeit das Recht auf Überarbeitung
und Änderung dieses Dokumentes vor, ohne dabei verpfl ichtet zu sein,
die vorgenommenen Änderungen anzukündigen oder zu melden.
Copyright © 2004 snom technology AG. Alle Rechte vorbehalten.
Soweit nicht anders angegeben, sind alle gennanten Markenzeichen gesetzlich geschützte
Marken der snom technology AG ®. Dies gilt insbesondere für Produktnamen. Alle anderen
Produkt- und Firmennamen sind Marken der jeweiligen Inhaber.
Page 27

Inhaltsverzeichnis
Hinweis für den Nutzer .............................................................. 26
Installation ..............................................................29
Auslieferungsinhalt ................................................................... 29
Sicherheitshinweise ................................................................... 29
Stromversorgung ...................................................................... 29
Aufstellen des Telefons ............................................................. 30
Wandbefestigung ...................................................................... 30
Höreraufhängung ...................................................................... 33
Stellung des Displays ................................................................ 33
Reinigung ............................................................................... 34
Anschließen des Telefons ........................................35
Die Tastatur .............................................................37
Initialisierung ..........................................................41
Starten/Hochfahren .................................................................. 41
Sprachauswahl ......................................................................... 41
DHCP Konfi guration ................................................................... 41
Die IP-Addresse auswählen ....................................................... 42
Netzmaske auswählen .............................................................. 43
IP-Gateway auswählen .............................................................. 43
DNS Server auswählen .............................................................. 43
Rufton auswählen ..................................................................... 44
Zeitzone auswählen .................................................................. 44
Ersten Account anmelden .......................................................... 45
Index .......................................................................47
Deutsch
Page 28

28 •
Deutsch
Page 29

Installation
Auslieferungsinhalt
Bitte überprüfen Sie, ob Sie folgende Teile erhalten haben:
• Die Basis-Einheit mit Display und Tastatur
• Den Hörer
• Das Anschlusskabel für den Hörer
• Das Netzteil (optional)
Sicherheitshinweise
Bitte befolgen Sie folgende Sicherheitshinweise. Sie sind
entscheidend für den sicheren und zuverlässigen Betrieb des
Gerätes.
1
Stromversorgung
Ihnen stehen zwei Möglichkeiten der Stromversorgung des
snom360 zur Verfügung:
• Ein externes Netzteil (5 V)
• Die Stromversorgung über das Netzwerkkabel
(kompativel mit IEEE 802.3af)
Wenn Sie eine externe Stromversorgung verwenden möchten,
benutzen Sie das im Lieferumfang enthaltene Netzteil. Andere
Netzgeräte können das Telefon beschädigen, sein Verhalten
beeinträchtigen oder Störgeräusche hervorrufen.
snom technology AG • 29
Deutsch
Page 30

[ SNOM 360 KURZANLEITUNG V1.00 ]
Aufstellen des Telefons
1
Ihr snom360 wird mit einer an der Gehäuseunterseite befestigten
Gehäusestütze (in Abb. 1 grau eingefärbt) ausgeliefert. Stellen Sie
es auf eine gerade, horizontale Oberfl äche, die den Gummipads
auf der Unterseite des Gerätes einen sicheren Halt ermöglicht.
Platzieren Sie das snom360 nicht auf Teppichboden oder andere
Materialien, die Fasern enthalten, welche die Luftzufuhr blockieren
und somit Überhitzung verursachen können.
Nach Anschluß des Telefons (s.u., Kap. Anschliessen Ihres Telefons)
befestigen Sie die Kabel in den entsprechenden Schächten an
Fußstütze bzw. im Falle des Hörerkabels an der Unterschale des
Telefons (Abb. 2).
Abb. 1 Abb. 2
Wandbefestigung
Sie haben jedoch auch die Möglichkeit, das snom360 an der
Wand zu befestigen. Dazu lösen Sie die Gehäusestütze vom Gerät
und befestigen Sie es umgekehrt in der für die Wandmontage
vorgesehenen Position.
30 • Installation
Deutsch
Page 31

[ SNOM 360 KURZANLEITUNG V1.00 ]
Hinweis: Die Tastaturerweiterung des snom360 kann
nicht an der Wand befestigt werden. Wenn Sie eine
Tastaturerweiterung anschließen wollen, stellen Sie das
snom360 mit der Erweiterung – wie im Kapitel „Aufstellen
des Telefons“ beschrieben – auf eine gerade, horizontale
Oberfl äche.
Drehen bzw. halten Sie das Telefon mit der
1
Gehäuseunterseite nach oben (Abb. 3). Achten
Sie darauf, dass das klappbare Display dabei nicht
beschädigt wird und der Hörer nicht auf den Boden
fällt. Am besten halten Sie das Telefon hierzu auf dem
Schoß.
1
Abb. 3 Abb. 4
Drücken Sie die Schnapphaken der Gehäusestütze leicht
2
nach innen (Abb. 3) und kippen Sie sie gleichzeitig nach
hinten aus ihrer Verankerung in der Gehäuseunterseite.
(Abb. 4)
Drehen Sie die vom Gerät gelöste Gehäusestütze 180°
3
um die Vertikalachse.
snom technology AG • 31
Deutsch
Page 32

1
[ SNOM 360 KURZANLEITUNG V1.00 ]
Prüfen Sie, ob das Hörerkabel korrekt – wie in Abb. 4 und
4
6 zu sehen - in die Vertiefung auf der Geräteunterseite
eingelegt ist, da sich die Gehäusestütze sonst nicht
befestigen läßt bzw. das Kabel beschädigt werden kann.
Abb. 5 Abb. 6
Führen Sie die beiden links und rechts außen befi ndlichen
5
Schnapphaken der Gehäusestütze in die Öffnungen auf
der Geräteunterseite ein (Abb. 5, Pfeil 1). Kippen Sie
anschließend die Gehäusestütze mit etwas Druck nach
vorn unten. Achten Sie darauf, dass beide Schnapphaken
sicher auf der Geräteunterseite einrasten (Abb. 5).
Die fünf Schächte der Fußstütze zur Kabelhalterung können
6
auch bei Wandmontage genutzt werden. Nach Anschluß
der Kabel (s.u., Kap. Anschliessen Ihres Telefons) legen
Sie diese jeweils in Schlaufen. Drücken Sie anschließend
die nach unten hängenden Enden vorsichtig in die jeweilige
Vertiefung der Gehäusestütze. Achten Sie darauf, dass die
Kabelschlaufen nicht zu weit sind, damit das Gerät sicher
an der Wand befestigt werden kann (Abb. 6).
Im Lieferumfang ist eine Schablone für das Bohren von Löchern zur
Wandbefestigung enthalten. Benutzen Sie diese, um die Position
der späteren Löcher auf der Wand zu markieren.
32 • Installation
Deutsch
Page 33

Verwenden Sie ggf. Dübel und Schrauben mit halbrundem Kopfprofi l
(Schraubendurchmesser dmax= 4.5mm , Kopfdurchmesser
dmax=8.5mm?).
Die Schrauben sollten etwa 0,5 cm aus der Wand herausschauen,
damit sich das Telefon leicht einhängen läßt.
Höreraufhängung
Damit der Hörer bei Wandaufhängung des Telefons sicher in der
Gabel ruht, befi ndet sich in der Unterseite des Hörerlautsprechers
eine rechteckige Vertiefung, die auf dem Hörerdorn eingehängt
wird.
Ziehen Sie dazu – wie in Abb. 5 gezeigt - den Hörerdorn aus der
Oberschale des Telefons heraus (s. Abb. 7), drehen Sie ihn um
180° und schieben Sie ihn in den Schacht zurück (s. Abb. 8).
1
Abb. 7 Abb. 8
Stellung des Displays
Das snom360 hat ein um 45° verstellbares Display (Abb. 9 und 10).
Halten Sie das Telefon mit einer Hand fest und verstellen Sie mit
der anderen Hand durch leichten Druck das Display. Ziehen und
zerren Sie nicht daran, um die Scharniere nicht zu beschädigen.
snom technology AG • 33
Deutsch
Page 34

1
[ SNOM 360 KURZANLEITUNG V1.00 ]
Abb. 9 Abb. 10
Reinigung
Benutzen Sie zum Reinigen des snom360 ein trockenes,
antistatisches Tuch. Vermeiden Sie die Verwendung von fl üssigen
Reinigern, da diese die Oberfl äche und die interne Elektronik des
Telefons zerstören können.
34 • Installation
Deutsch
Page 35

Anschließen des
Telefons
Schliessen Sie zunächst das eine Ende des Hörerkabels am Hörer
und das andere Ende an die mit “ ” beschriftete Buchse (links
an der Unterseite des Telefons) an.
Als nächstes schließen Sie ein Ethernet- (Netzwerk-) Kabel an
die mit “ ” beschriftete RJ45 Anschlussbuchse an. Das andere
Ende des Kabels verbinden Sie mit Ihrem Netzwerk, um den
Datenaustausch zu ermöglichen. Die zweite, mit “ ” beschriftete
RJ45 Anschlussbuchse an der Unterseite des Telefons dient der
Aneinanderkettung weiterer Netzwerkgeräte, ohne dass eine zweite
Netzwerkverbindung erforderlich ist.
Wenn Sie die externe Stromversorgung via Netzteil nutzen
möchten, stecken Sie den Stecker des Netzteils in die mit “ ”
beschriftete Buchse neben dem Netzwerkkabel und schliessen Sie
das Netzteil an die Stromversorgung an.
Wenn Sie Kopfhörer (Sprechgarnitur) benutzen möchten, schließen
Sie diese an die mit “ ” beschriftete Audio-Buchse auf der
Unterseite des snom 360 an.
2
Befestigen Sie die Kabel in den entsprechenden Schächten an
Fußstütze bzw. im Falle des Hörerkabels an der Unterschale des
Telefons (s. Abb. 1 im Kap. Aufstellens des Telefons).
snom technology AG • 35
Deutsch
Page 36

2
[ SNOM 360 KURZANLEITUNG V1.00 ]
36 • Anschließen des Telefons
Deutsch
Page 37

Die Tastatur
Die numerische Tastatur mit den Tasten 0 bis 9, * und # dient der
Eingabe von Ziffern und Buchstaben. Abhängig vom Betriebsmodus
können verschiedene Aktionen durchgeführt werden (siehe auch
Tabelle weiter unten):
• Nur Eingabe von Ziffern (z.B. Wählen einer
Telefonnummer)
• Eingabe von Ziffern und Buchstaben durch wiederholtes
Drücken der Tasten (ähnlich der Eingabe bei
Mobiltelefonen).
3
Die Menü-Taste ruft das Hauptmenü auf. Um Aktionen oder
Eingaben abzubrechen, benutzen Sie bitte die Taste . Die Taste
bestätigt eine Aktion, Auswahl oder Eingabe.
snom technology AG • 37
Deutsch
Page 38

[ SNOM 360 KURZANLEITUNG V1.00 ]
Abhängig vom Betriebsmodus können die Tasten kontextspezifi sche
Bedeutung haben, welche im Handbuch beschrieben werden.
Die vier Tasten unterhalb des Displays sind kontextabhängige
Funktionstasten. Ihre jeweils aktuelle Funktion wird durch Symbole
in der untersten Zeile des Displays dargestellt.
3
Die zwölf Tasten rechts mit den LEDs
/ daneben sind für
verschiedene Funktionalitäten programmierbare Funktionstasten.
Die Tasten des numerischen Blocks in verschiedenen Betriebsmodi:
Taste Ziffer Kleinschreibung Großschreibung
0 (SPC)_0 (SPC)_0
1 .@1,?!-
/():;&%*#+<=>$[]
2abc2 ABC2
3def3 DEF3
4 ghi4 GHI4
5jkl5 JKL5
6 mno6 MNO6
7 pqrs7$ PQRS7$
8 tuv8 TUV8
.@1,?!/():;&%*#+<=>$[]
38 • Die Tastatur
Deutsch
9 wxyz9 WXYZ9
# # oder Auto-
Vervollständigung nach
Zeitüber-schreitung, falls
nicht numerisch
* Umschaltung Groß-/Kleinbuchstaben
# oder AutoVervollständigung
nach Zeitüberschreitung, falls
nicht numerisch
Page 39

Zusätzlich gibt es folgende Tasten:
Taste Bezeichnung
Mikrophon Stummschaltung an/aus
Gehäuselautsprecher an/aus
Lautstärke erhöhen/verringern
Telefonbuch öffnen
Hilfe
Hauptmenü
Erneut wählen
Einstellungsmenü
Snom-Menü (Logon-/Anmeldungsassistent)
Konferenz mit 3 Teilnehmern aufbauen
“Bitte nicht stören”-Modus an/aus
Anruf halten/ makeln
Anruf weiterleiten
Anruf aufzeichnen
Mit der Mailbox verbinden
LED-Anzeige bei auf die Mailbox gesprochenen
Nachrichten
3
snom technology AG • 39
Deutsch
Page 40

3
[ SNOM 360 KURZANLEITUNG V1.00 ]
40 • Die Tastatur
Deutsch
Page 41

Initialisierung
Starten/Hochfahren
Das Hochfahren besteht aus einer Reihe von verschiedenen
Konfi gurationsschritten, die das Telefon für den zukünftigen
Benutzerbetrieb einrichten.
Sprachauswahl
Die Sprache in der Standardeinstellung ist Englisch. Nach dem
Start bietet Ihnen das Telefon die Möglichkeit, die Sprache Ihrer
Wahl auszuwählen.
4
Benutzen Sie die Pfeiltasten oder , um zu einer anderen
Sprache zu wechseln, und bestätigen Sie mit der Taste .
DHCP Konfi guration
Wenn Ihr Netzwerk DHCP unterstützt, drücken Sie , sobald
der folgende Bildschirm erscheint:
snom technology AG • 41
Deutsch
Page 42

[ SNOM 360 KURZANLEITUNG V1.00 ]
4
Das Telefon hat einen eingebauten DHCP-Clienten. Es erhält vom
DHCP-Server eine IP-Adresse und andere Netzwerk-bezogene
Einstellungen (Netzmaske, IP Gateway, DNS-Server).
Falls DHCP nicht angewandt wird, bestätigen Sie auf dem oben
abgebildeten Bildschirm die Funktionstaste . Daraufhin werden
die folgenden Einstellungen abgefragt:
Die IP-Addresse auswählen
Wenn DHCP nicht angewandt wird, kann der Benutzer dem Telefon
eine statische IP-Adresse zuteilen. Eingabe abschließen mit .
Eine gültige IP-Adresse, die dem Netzwerk entspricht, in dem das
Telefon benutzt wird, kann zugeteilt werden.
42 • Initialisierung
Deutsch
Page 43

[ SNOM 360 KURZANLEITUNG V1.00 ]
Netzmaske auswählen
Der Benutzer wird nach IP-Adressen für die Netzmaske gefragt.
Eingabe abschließen mit .
IP-Gateway auswählen
Wenn eine gültige Netzmaske angegeben wurde, wird der Benutzer
nach der IP-Adresse des IP Gateway gefragt. Eingabe abschließen
mit .
4
DNS Server auswählen
Die letzte Position dieser Netzwerk-bezogenen Konfi guration ist die
IP-Adresse für den DNS-Server. Eingabe abschließen mit .
snom technology AG • 43
Deutsch
Page 44

[ SNOM 360 KURZANLEITUNG V1.00 ]
4
Rufton auswählen
Der Benutzer wird dann nach dem Rufton gefragt, der für das
Telefon eingerichtet werden soll. Eingabe abschließen mit .
Zeitzone auswählen
Wandern Sie mit den Pfeiltasten zu der Zeitzone, die auf dem
Telefon eingerichtet werden soll, und bestätigen Sie Ihre Wahl
durch Betätigung der Taste .
44 • Initialisierung
Deutsch
Page 45

[ SNOM 360 KURZANLEITUNG V1.00 ]
Wenn die vorstehend beschriebenen Einstellungen richtig
vorgenommen wurden, wird das Telefon nach der Registrierung
des ersten Accounts fragen.
Ersten Account anmelden
Wenn dem Telefon noch keine Nummer zugeteilt wurde, werden
Sie aufgefordert, Ihr Namenskürzel einzugeben. Er besteht
aus Ihrer Telefonnummer, gefolgt von @ und der Adresse Ihres
Registrars. Das Telefon versucht, Registrar und Adresse richtig zu
vervollständigen; der Bildschirm könnte etwa Folgendes anzeigen:
4
Nachdem Sie Ihr Kürzel eingeben haben, bestätigen Sie es durch
Betätigung der Taste .
Das Telefon versucht nun, Ihr Kürzel beim angegebenen Registrar
anzumelden. Der Ruhebildschirm erscheint. Wenn vor Ihrer soeben
eingegebenen Identität kein durchkreuztes Kästchen, sondern ein
Telefonsymbol angezeigt wird, war Ihre Registrierung erfolgreich.
Jetzt werden auch Zeit und Datum auf dem Display angezeigt
snom technology AG • 45
Deutsch
Page 46

4
[ SNOM 360 KURZANLEITUNG V1.00 ]
Das Handbuch fi nden Sie auf unserer Webseite,
www.snom.com.
46 • Initialisierung
Deutsch
Page 47

Index
A
Account anmelden 45
Account anmelden, Ersten 45
Anruf aufzeichnen 39
Anruf weiterleiten 39
Anschließen des Telefons 35
Auto-Vervollständigung 38
B
Betriebsmodi 38
D
Delivery Content 29
DHCP-Clienten 42
DNS Server auswählen 43
E
G
Gehäuselautsprecher 39
Gehäusestütze 31
H
halten 39
Hauptmenü 37
Hilfe 39
I
Initialisierung 41
IP-Addresse auswählen 42
IP-Gateway auswählen 43
K
Konferenz 39
5
Einstellungsmenü 39
F
Forwarding.siehe auch Anruf
weiterleiten
L
Lautstärke 39
LED-Anzeige 39
M
Mailbox 39
snom technology AG • 47
Deutsch
Page 48

5
makeln 39
Menü-Taste 37
N
Netzmaske auswählen 43
nicht stören 39
P
Pfeiltasten 41
Power supply 29
R
Reinigung 33
Rufton 44
S
W
Wandbefestigung 32
Z
Zeitzone 44
Zeitzone auswählen 44
Safety Notes 29
Setting up the Phone 31
Sprachauswahl 41
Starten/Hochfahren 41
Stromversorgung 29
externe Stromversorgung 29
Stummschaltung 39
T
Tastatur 37
Tasten 38
Umschaltung Groß-/Kleinbuchstaben
38
48 • Index
Deutsch
Page 49

snom technology AG • 49
Page 50

snom VoIP Phone 360
© 2004 snom technology AG
All rights reserved.
Subject to change without notice.
snom technology AG
Pascalstr. 10B
10587 Berlin, Germany
Phone: +49 (30) 39833-0
mailto:info@snom.com
http://www.snom.com
sip:info@snom.com
 Loading...