

Page 1

Quick Start Guide
IP Phone Snom 300
en de fr it es
Page 2
Snom 300 Quick Start Guide
A
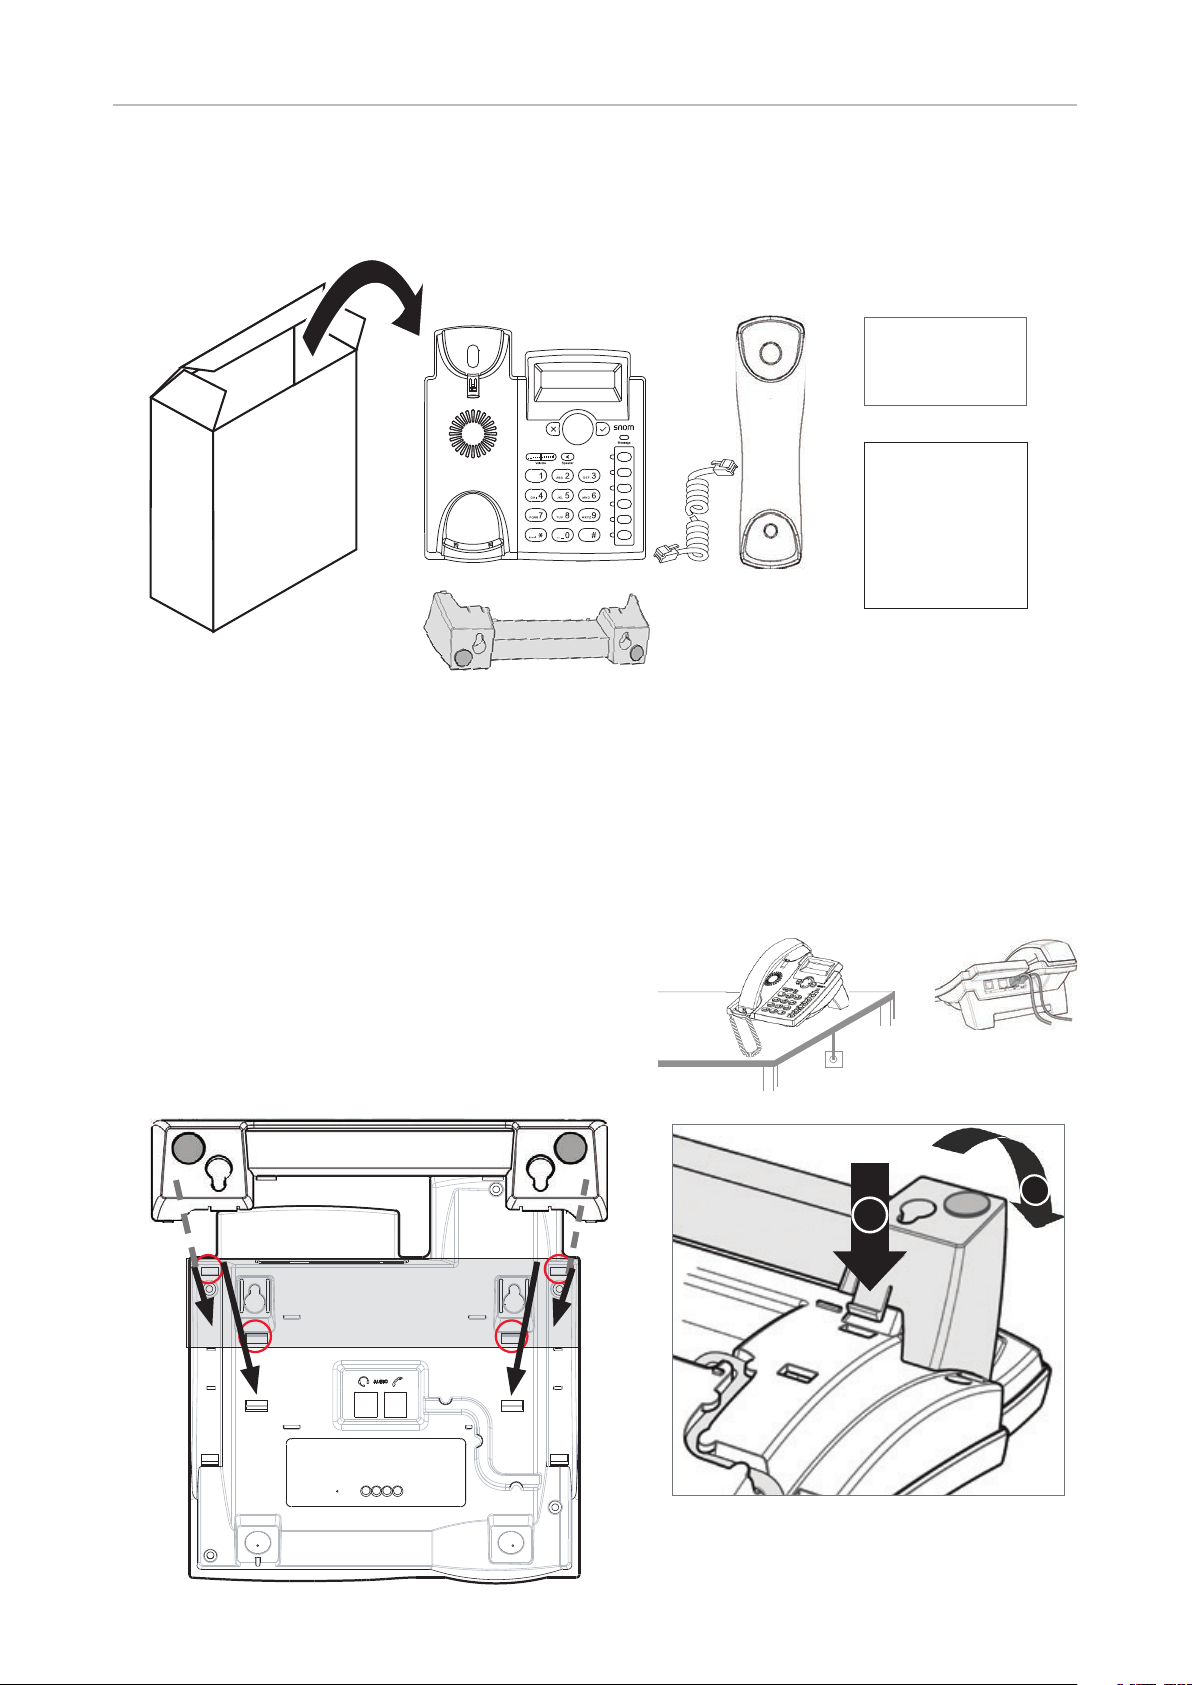
En la caja - Contenuto della confezione
GNU
General Public License
Quick Installation
Guide
Snom 300
Not included - Nicht im Lieferumfang enthalten - Non inclus - No incluido - Non inclusos:
Ethernet cable (IEEE 802.3af) + power adapter
Delivery content - Lieferumfang - Contenu de la boîte -
B
Montaje el soporte - Fissare il supporto
• for desktop placement
• für Schreibtischaufstellung
• pour le placement sur un bureau
• para la colocación en un escritorio
• per il posizionamento su una scrivania
Attaching the Footstand - Fuß montieren - Attacher le pied -
1
2
2
Page 3

Snom 300 Quick Start Guide
C
Attaching the Footstand - Fuß montieren - Attacher le pied -
• for wall mounting
• für die Wandbefestigung
• pour l'installation sur le mur
• para el montaje en pared
• per il montaggio a parete
Montaje el soporte - Fissare il supporto
1.
2.
3.
1
4.
2
3
Page 4

Snom 300 Quick Start Guide
Distancia a la pared
70,00 mm (2.756
D
E
1.
Detaching the Footstand - Fuß abmontieren - Démonter le pied -
Desmontar el soporte - Smantellare il supporto
2.
Wall Mounting - Wandmontage - Fixation murale -
Montaje en pared - Montaggio a parete
Not included in delivery:
Nicht im Lieferumfang enthalten:
Non inclus:
No incluidos:
Non inclusos:
4 x
")
ø max
8 mm
(0.315")
Distance to wall
Abstand zur Wand
Distance au mur
Distanza dalla parete
123,00 mm (4.843")
ø max
4,5 mm
(0.177")
∼ 5 mm (0.197")
125,00 mm (4.921")
4
Page 5

Snom 300 Quick Start Guide
F
Connecting - Anschließen - Connecter -
Conectar - Collegare
1.
Optional
Optionel
Opzionale
Opcional
2.
Optional
Optionel
Opzionale
Opcional
• If PoE not available (not included in delivery)
• Wenn PoE nicht verfügbar (nicht im
xxxxxxxx Lieferumfang enthalten)
• S'il n'y a pas de PoE (non inclus)
• Si no se dispone de PoE (non incluido)
• Se non disponibile PoE (non incluso)
5
Page 6

Snom 300 Quick Start Guide
TABLE OF CONTENTS
Copyright, Trademarks, GPL, Legal Disclaimers ...........................................................8
Important Information ......................................................................................................9
Safety Instructions ................................................................................................................. 9
SELV (Safety Extra Low Voltage) Compliance .............................................................. 9
Standards conformance ......................................................................................................10
Disposal of the device ............................................................................................................10
Cleaning ....................................................................................................................................10
Setting up and connecting the phone ........................................................................... 11
Initializing and registering the phone ............................................................................ 11
Getting to know your phone .......................................................................................... 13
At a glance ...............................................................................................................................13
Settings menu .......................................................................................................................15
The web user interface ........................................................................................................16
Using the phone ............................................................................................................... 17
Input modes and navigation ...............................................................................................17
Entering numerals, letters, special characters, and symbols ..................................17
Making calls ...........................................................................................................................18
Dialing manually ..............................................................................................................18
Redialing ...........................................................................................................................18
Speed dialing ...................................................................................................................18
Calling numbers from directories and call lists ........................................................19
Calling emergency numbers .........................................................................................19
Accepting calls ......................................................................................................................19
Active calls (in call) ...............................................................................................................19
Call waiting .......................................................................................................................19
Holding ..............................................................................................................................20
Conferencing ....................................................................................................................20
Transferring calls ............................................................................................................21
Attended transfer .................................................................................................21
Blind (unattended) transfer ................................................................................21
Call forwarding .....................................................................................................................21
Call forwarding settings .....................................................................................21
Turning call forwarding on .................................................................................22
Turning call forwarding o .................................................................................22
Call lists ..................................................................................................................................23
Directory .................................................................................................................................23
DND (do not disturb) .............................................................................................................24
6
Page 7

Snom 300 Quick Start Guide
Trouble shooting ............................................................................................................ 25
Reboot .....................................................................................................................................25
In user mode ....................................................................................................................25
In admin mode .................................................................................................................25
Hard reboot ............................................................................................................................25
Reset to factory values ........................................................................................................25
7
Page 8

Snom 300 Quick Start Guide
Copyright, Trademarks, GPL, Legal Disclaimers
© 2015 Snom technology Aktiengesellschaft
All Rights Reserved.
Snom, the names of Snom products, and Snom logos are trademarks owned by Snom technology AG.
All other product names and names of enterprises are the property of their respective owners.
Product specifications are subject to change without notice.
Snom technology AG reserves the right to revise and change this document at any time, without being
obliged to announce such revisions or changes beforehand or after the fact.
Texts, images, and illustrations and their arrangement in this document are subject to the protection
of copyrights and other legal rights worldwide. Their use, reproduction, and transmittal to third
parties without express written permission may result in legal proceedings in the criminal courts as
well as civil courts.
When this document is made available on Snom’s web page, Snom technology AG gives its permission
to download and print copies of its content for the intended purpose of using it as a manual. No parts
of this document may be altered, modified or used for commercial purposes without the express
written consent of Snom technology AG.
Although due care has been taken in the compilation and presentation of the information in this
document, the data upon which it is based may have changed in the meantime. Snom therefore
disclaims all warranties and liability for the accurateness, completeness, and currentness of the
information published, except in the case of intention or gross negligence on the part of Snom or
where liability arises due to binding legal provisions.
Our firmware includes some source code that may be used and modified by anyone and everyone
under the GNU Public License (GPL), provided they, in turn, make it available to everyone else with the
same licensing agreement. Please go to https://www.snom.com/en/support/download/gpl-opensource/ for the original GPL license and the source code of components licensed under GPL and used
in Snom products.
8
Page 9

Snom 300 Quick Start Guide
Important Information
Please read the instructions on safety and disposal and on how to set up and use the device before
using it and also give them to other users to read or inform those users of their contents. Save this
document and do not give the device to third parties without it.
Safety Instructions
Follow the instructions in the manual and other applicable documentation of the device.
• If the phone is not supplied with power via an Ethernet cable, use only a power adapter expressly
recommended by Snom technology. Other power supplies may damage or destroy the phone,
aect its behavior, or induce noise.
• Avoid placing the cables where people may trip over them or where they may be exposed to
mechanical pressure as this may damage them.
• This device is for indoor use only! Do not install outdoors - NOT FOR OUTDOOR USE!
• Do not install the device in rooms with high humidity (for example, in bathrooms, laundry rooms,
damp basements). Do not immerse the device in water and do not spill or pour liquids of any kind
onto or into the device.
• Do not install the device in surroundings at risk for explosions (paint shops, for example). Do not
use the device if you smell gas or other potentially explosive fumes.
• Do not use the device during thunderstorms. Lightning striking the power grid may cause electric
shocks.
• Warning: The handset contains a magnet, and its earpiece may attract small dangerous objects
such as needles or pins. Please ensure before each use that no such objects are present.
SELV (Safety Extra Low Voltage) Compliance
Safety status of Input/Output connections comply with SELV requirements.
Warning: To avoid electric shock, do not connect safety extra-low voltage (SELV)
circuits to telephone-network voltage (TNV) circuits. LAN ports contain SELV circuits,
and PSTN ports contain TNV circuits. Some LAN and PSTN ports both use RJ-45 (8P8C)
connectors. Use caution when connecting cables.
9
Page 10

Snom 300 Quick Start Guide
Standards conformance
This device complies with the essential health, safety, and environmental requirements
of all relevant European directives. This phone is FCC Class B certified and meets US
health, safety, and environmental standards.
The declaration of conformity can be requested from
Snom Technology AG
Wittestr. 30 G
13509 Berlin
Germany.
Unauthorized opening, changing, or modifying the device will cause the warranty to
lapse and may also result in the loss of CE conformity and the FCC certification. In
case of malfunction contact authorized service personnel, your seller, or Snom.
• Safety: IEC 60950-1:2001
• Power over Ethernet: IEEE 802.3af, Class 1
• Power: PoE or power adapter PSAC10R-050 (not included - Snom PN 00002730)
• Connectors: 1 x LAN, 1 x PC: RJ45; 2 x 4P4C (handset, optional wired headset)
• Ethernet: 2 x IEEE 802.3 10/100 Mbps switch
Disposal of the device
This device is subject to European Directive 2002/96/EC and may not be disposed of
with general household garbage.
If you do not know where you may dispose of the device at the end of its lifespan,
contact your municipality, your local waste management provider, or your seller.
For countries outside the European Union
Disposal of electrical and electronic products in countries outside the European Union should be done
in line with local regulations. Please contact local authorities for further information.
Cleaning
To clean the device, use an anti-static cloth. Please avoid cleaning liquids as they might damage the
surface or internal electronics of the device.
10
Page 11

Snom 300 Quick Start Guide
Setting up and connecting the phone
See figures B - F on page 2 - 5.
Initializing and registering the phone
Please note: You will need the registration information received from your Internet
service provider or your network administrator - normally the phone or extension
number, the password, and the registrar.
After you have set up the phone and connected it to the network as shown in figure E, the phone
begins to initialize.
Normally the initialization is completely automatic, using DHCP. If your network does
not support DHCP, you must obtain the IP address, netmask, IP gateway, and DNS server
from your Internet service provider or your network administrator and enter them
manually when you are asked to do so on the display.
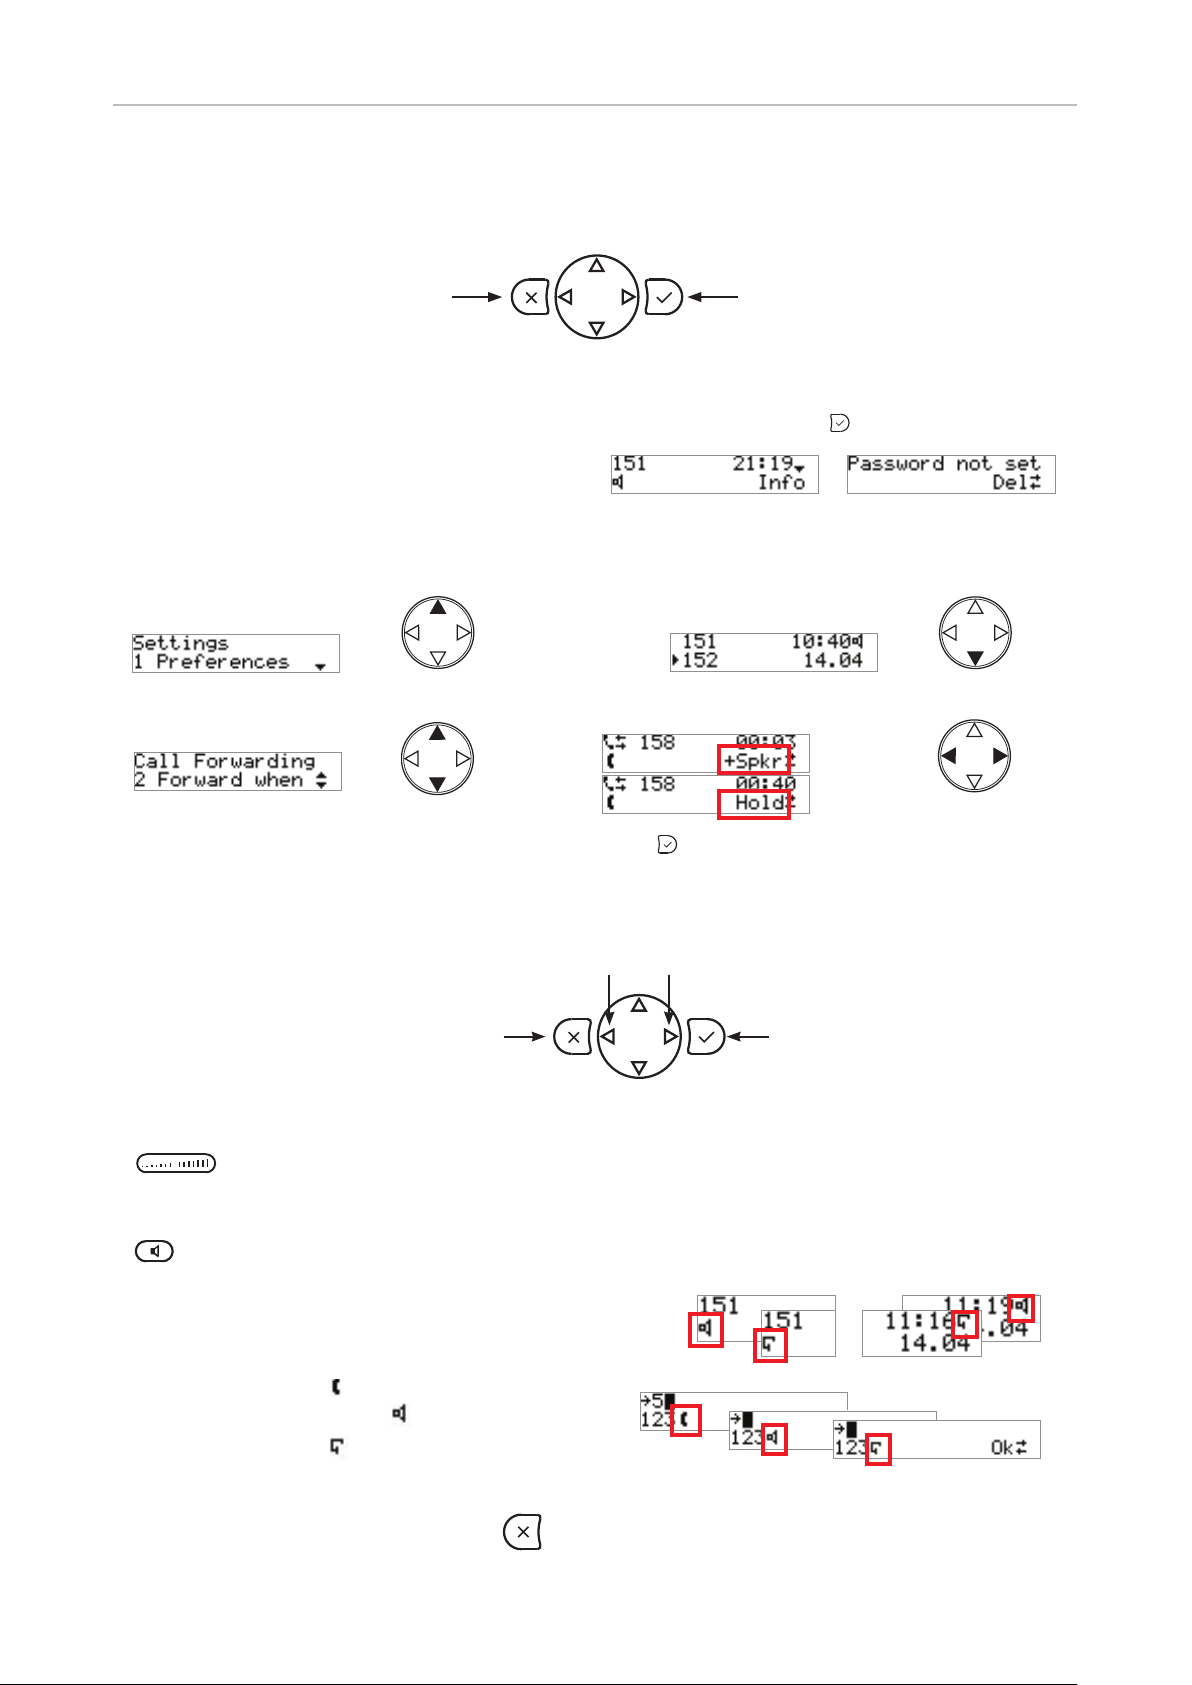
Watch the display and, when prompted, make selections by pressing the arrows on the
navigation key and save your selection by pressing
Note: After registering the account, you can change your language, time zone, and dial
zone settings in the Preferences menu of the phone.
1. Language. The default is English. Other languages are available if the phone/network is
connected to the Internet during initialization, so that they can be provided by the Snom server
automatically (firmware 7 and higher).
◦ Press
◦ Select another language with the up
2. Time zone. Select your time zone with the up
Note: The time zones listed depend on the selected phone language. The list can be
expanded or reduced to show all or only selected time zones.
3. Tone scheme (dial tone). Select your dial tone with the up
to save. The "Welcome" screen appears.
if you want to keep English as the phone language.
and down arrows and press to save.
.
and down arrows and press to save.
and down arrows and press
4. Press any key to log on.
5. Enter the account number and press
a » A
Fig. 1 Fig. 2
to save.
11
Page 12

Snom 300 Quick Start Guide
Note for entering the account number and the registrar (step 6, below):
- Changing the input mode indicated in the right upper corner of the display (Fig. 1 and 2,
above): Press
a » A
for two seconds.
- Press the up
6. Enter the registrar and press
arrow to delete the character to the left of the cursor (Fig. 2).
to save. The display now shows the idle screen (Fig. 3 and 4,
below). Fig. 3 shows the idle screen when the account has been registered and the phone is ready
to be used.
Fig. 3 Fig. 4
Fig. 4 shows the idle screen when the registration was unsuccessful and/or the admin and/or
HTTP passwords are not set.
Fig. 5
◦ Press to view the status messages.
- Press the up
- Press
and down arrows to view the status messages.
to delete the status message on the display (Fig. 5).
- Press
to leave the status messages without deleting them.
◦ Contact your IT admin or your VoIP provider for the correct account and registrar data and/or
the required passwords.
12
Page 13

Snom 300 Quick Start Guide
Message
4
7 8
0
9
#
5 6
GHI JKL MNO
PQRS
a » A
TUV WXYZ
1 2 3
DEF
ABC
SpeakerVolume
#
Getting to know your phone
At a glance
The factory settings at a glance:
Select identity for
outgoing calls:
Display - idle
Handset
speaker
screen
Handset
rest tab
Casing
speaker
Alphanumeric
keypad
Handset
microphone
Star key
a A
• In editing mode:
- Press for one second (long-press) to change input
mode (numerals > lower case > upper case)
- Press briefl y to type *
• On idle screen: Press for 3 seconds to lock/
unlock the keypad
Pound (hash) key
Rescue mode for TFTP update
:
Message LED
• Blinking fast:
Incoming call
• Steady light: Missed
call or waiting message on mailbox.
Press
message;
to retrieve
press to
turn LED o .
Freely programmable
keys with LEDs.
Default mappings:
Casing mi-
crophone
Freely programmable keys with LED
Default mappings:
• L1, L2: Line keys
• Redial: Redialing last number
• Phone directory
• Call transfer
• In call: Mute microphone (on/o ).
When idle: DND on/o (as of FW 8.7.3)
13
Page 14
Snom 300 Quick Start Guide
Cancel and OK keys
• Canceling actions & input, and
returning to previous screen
• Terminating calls on speakerphone
and in headset & handset modes
• Turning o call LED after missed
call
* Note: Redialing/dialed call list is replaced by the "Info" message when status messages are available. To
remove it, either remove the underlying cause (i.e., set password, etc.) or press to view and delete the
messages until the next reboot of the phone.
Navigation keys
Idle screen
Opening the Settings menu Selecting identity
In menus and lists
• Confi rming, saving actions & input,
and returning to previous screen
• Accepting calls on speakerphone
and in headset mode
• From idle screen: Redial (list of
dialed calls)*
In call
Press to select (e.g., add loudspeaker, put
call on hold, etc.)
Call lists (CHist)
From idle screen
Turn o message waiting/missed call LED
Missed calls Received calls
Dialed calls (redial)* (see Note
in Cancel and OK keys section)
Audio control keys
Adjusting the volume
• of the ringer when the phone is idle or ringing
• of the handset/casing loudspeaker when in a call
Toggling between handset, speakerphone, and headset. Location of symbol on display depends on
fi rmware version.
• Press briefly to turn speakerphone on/off
• Press for two seconds to switch to headset mode
Display symbols indicating currently used audio mode:
• Handset:
• Speakersphone:
• Headset:
Looking up phone's IP address
during initial logon:
Press for three seconds.
14
Page 15

Snom 300 Quick Start Guide
1
2
Settings menu
• Press to open the Settings menu.
• Press number key
submenus and settings
• Press
• Press
/ to select setting
to save selected setting
ABC
,
, etc. to open
• Settings with On/O or
change and save
• Press
• Press
briefly to return to previous screen
for 2 seconds to return to the idle
screen
In administrator mode
(+)
(+)
/
: Press to
1
Preferences
1
Time & Date
2
Tone Scheme
3
Ringer
4
Language
5
Display
6
Fkeys
2
Call Features
1
Call Forwarding
1
Forward all
2
When busy
3
On timeout
2
Outgoing Calls
1
Auto Dial
2 Number
Guessing
3
Call Completion
4 Hide own
outgoing ID
3
Incoming Calls
1
Reject anonymous
2
Call Waiting
3 Auto Answer
Indication
4
Auto Answer Type
3
Identity
1 Outgoing
Identity
2
Reregister
3 *
Edit
4 *
Logo
5 *
Logo all
6 (3*)
Call Voicemail
4
Network *
1
IP Setting
2
Webserver
1
Webserver Type
2
HTTP Admin
3
HTTP Password
3
VLAN
1
VLAN ID (0-4095)
2 VLAN Priority
(0-7)
3
Reset VLAN
Network menu
not available in
user mode.
5
Maintenance
1
System Info **
2 *
User Mode
3
Reboot
4
Reset Values
5 (4*)
Change PIN
6 (5*) Check for
SW Update
In user mode
4
Maintenance
1
System Info**
2 Administrator
Mode *
3
Reboot
4
Change PIN
6 Information
1
Status Info
2
System Info **
3
Help
5 Information
1
Status Info
2
System Info **
3
Help
* The submenus and the settings shaded black and gray are not available when the phone is running
in user mode. The factory setting is administrator mode. The default administrator password is
0000 (4 x zero).
** System Info: Firmware version, IP address, MAC address, available + total memory
15
Page 16

Snom 300 Quick Start Guide
The web user interface
1. Look up the phone's IP address: > 6 Information > 2 System Info. Example:
http://192.168.10.115.
2. Open a web browser on your PC. Enter the IP address in the address bar and press ENTER. The
"welcome" screen opens.
3. Click on an item in the menu on the left side of the screen to open that window.
4. If a window contains several pages, click on the tab at the top to open the page. The font weight of
the characters on the tab of the visible page is bold.
5. Any changes you make will not take eect until you click on "Apply". Changes will be lost if you
open another page of the web interface or if you close the web interface without first clicking on
"Apply".
6. Whenever you click on "Apply", the "Save" button will appear at the top of the page. Click on "Save"
to save the changes permanently. Changes that have not been saved will be lost if and when the
phone loses power or is disconnected from its power source.
Admin mode and user mode
Snom phones can be operated in administrator or user mode. In administrator mode, all settings are
accessible and can be modified; in user mode, a number of settings are not accessible. The factory
default is administrator mode; however, if your phone is administered centrally, user mode may be
the rule. Please check with your administrator.
When the phone is running in user mode, the administrator password is required to revert to
administrator mode. The default administrator password is 0000 (4 x zero). We recommend that you
change the password.
Note: Do not forget to write the new password down and store it in a safe place; without it, a TFTP
reset to factory values is necessary to return the phone to administrator mode.
In admin mode In user mode
16
To access pages not available in
user mode, enter the administrator
password to return the phone and
its WUI to administrator mode.
Page 17

Snom 300 Quick Start Guide
Using the phone
Input modes and navigation
The current input mode is indicated in the line underneath the cursor line. Press the down arrow on
the navigation key to change to the next input mode. When entering phone numbers, both to be dialed
and when editing the phone directory, the default is number mode; when editing names in the phone
directory, the default is lower case letters.
Change input mode (123 abc ABC 123).
Delete character to the left of the cursor
Press to change function on OK key
Press to dial Press to delete the
char-acter to the left of
the cursor
Press to access
directories and call lists
Entering numerals, letters, special characters, and symbols
When entering characters in letter mode, pause briefly after each character until the cursor moves
forward. Pausing is not necessary when entering numerals in numeral mode.
Numerals. Numeral mode is the default mode. Press the key to type the large number or symbol
printed on the key. In letter mode, keep pressing the key with the desired numeral quickly until you
see the numeral on the display.
Letters. Switch to the input mode for either lower case or upper case letters. To type one of the
letters printed on a key, press the key one, two, three, or four times quickly to type the first, second,
third, or fourth letter printed on the key. In lower case letter mode, for example, press the "2" key
once to type an "a", twice to type a "b", and three times to type a "c".
Letters with accents and umlauts. Switch to the input mode for either lower case or upper case
letters. Keep pressing the key with the basic form of the letter quickly until you see the letter with
the accent or umlaut on the display. Pause briefly after each letter. Available letters with accents and
umlauts depend on the phone's language setting.
Example - input mode lower case letters: If the phone language is German, press key
"2" four times to type an "ä". If the phone language is French, press key "2" four times
to type an "à".
Special characters and symbols. Switch to one of the letter input modes. Press key "0" or "1" one or
more times quickly, as indicated below. Pause briefly after each character or symbol.
17
Page 18

Snom 300 Quick Start Guide
Message
Press once to enter a space (" "), press twice to enter an underscore ("_").
Press once to enter the period ("."). Press as many times as indicated to enter the special
character listed in the following table:
1x . 2x + 3x @ 4x 1 5x : 6x ,
7x ? 8x ! 9x - 10x _ 11x / 12x \ 13x (
14x ) 15x ; 16x & 17x % 18x * 19x #
20x < 21x = 22x > 23x $ 24x [ 25x ]
Making calls
Dialing manually
• Enter the number on the alphanumeric keypad and pick up the handset or
• pick up the handset, enter the number, press
• press
, enter the number, press or .
, or
Redialing
1. From the idle screen, press the Redial key or, if the redial function is visible on
the display, the OK key
Note: Use the down arrow on the navigation key to view earlier dialed
numbers. You can redial the number shown on the display.
2. Press
to dial the number on the display.
to view the last dialed number.
Speed dialing
Type the speed dial number or character on the alphanumeric keypad and press . The numbers
0 - 30, the pound key # and the asterisk key * can be used for speed dialing.
Speed dial numbers can be set on the Speed Dial page of the phone's web interface. Enter one phone
number per speed dial number or symbol. Type each phone number with any necessary area code
and/or country code etc. without spaces, hyphens, etc. into one of the textboxes of the table. Do not
add any names or other data. Example: To enter (911) 555-0123, type 9115550123.
18
Page 19

Snom 300 Quick Start Guide
Calling numbers from directories and call lists
Fig. 1 Fig. 2 Fig. 3
1. Pick up the receiver or press the speaker key to open the dialing screen (Fig. 1).
2. Press
3. Press
or call history lists.
◦ 1 Directory: The phone's onboard directory. See "Directory" on page 23 on how to find and
◦ 2 LDAP access: This depends on the setup of the external directory. Please, ask your
◦ 3 Missed, 4 Received, 5 Dialed calls: See "Call lists" on page 23 on how to look up and call
to bring Pool on-screen (Fig. 2).
to open the Pool menu. Press the respective number key to open one of the directories
call entries.
administrator.
numbers from one of these lists.
Calling emergency numbers
Type the emergency number and press .
Emergency numbers can be called even when the keyboard is locked. The default settings are the
numbers 911, 112, 110, 999, and 19222. Numbers can be added and removed on the phone's web
interface, Settings menu > Preferences page > Lock Keyboard > Emergency Numbers (space
separated). Type each number without spaces, hyphens, etc. between the digits, separate the
individual numbers with one empty space between them. Example: 911 115 986543.
Accepting calls
• With the handset: Pick up the handset.
• With a headset: Press
• With the speakerphone: Press
or the blinking line key .
.
Active calls (in call)
Call waiting
Four options are available. The default setting is On.
◦ On: Acoustic and visual announcement (for their description, see Visual only and Ringer
settings below).
- Press
- Press
- Press
to view the number of the waiting call (Fig. 2, below) before accepting or rejecting it.
to accept the second call and put your current call on hold.
to reject the second call. The caller will hear the busy signal.
to bring the waiting call symbol on-screen (Fig. 1, below), then press
19
Page 20

Snom 300 Quick Start Guide
Fig. 1 Fig. 2 Fig. 3
◦ Visual only: The Message LED and the line key LED will blink fast to announce the second
call.
◦ Ringer: The second call is announced by a double beep over the audio device you are using
(handset, headset, or the casing loudspeaker if speakerphone is being used).
◦ O: The second call is not announced, and the caller will hear the busy signal.
Setting
On the phone: Settings menu > 2 Call Features > 3 Incoming calls > 3 Call waiting.
On the phone's web interface : Depending on the phone's firmware version, the Call Waiting setting
is found on the Advanced page > Audio tab or on each identity's Configuration page > SIP tab of the
phone's web interface.
Holding
Press the line key of the call. Alternatively, press until you see Hold on the display (Fig. 2), then
press
. The key's LED starts to blink slowly, and the display symbol shows that the call is on
hold (Fig. 3). To resume the call, press the line key again or press .
Fig. 1 Fig. 2 Fig. 3
When you have more than one call on hold, you can resume the call shown in the top line of the
display (Fig. 4).
Resuming a call not currectly shown: Press
until you see the symbol in the lower right
corner of the display (Fig. 5), then press to switch to another held call (Fig. 6).
Fig. 4 Fig. 5 Fig. 6
Conferencing
You do not need a conference server to make a conference call with two other parties. Start a
conference with both parties on hold or one party on hold and the other one on the line.
1. Put the first party on hold.
2. Call the second party.
3. Press
until you see Conf On on the display (Fig. 1), then press to start the conference
(Fig. 2).
Fig. 1 Fig. 2
20
Page 21

Snom 300 Quick Start Guide
Message
Transferring calls
The ability to manually transfer active calls (on the line or on hold) and incoming ringing calls is
available only if the transfer function is mapped onto one of the freely programmable function keys
with LEDs. The factory default setting is the second key from the bottom.
Blind or unattended transfers are possible for active calls and ringing calls, attended transfers only
for active calls.
Attended transfer
1. Put the call on hold.
2. Dial the number of the person to whom you want to transfer the call
3. Press
.
4. Announce the call.
5. If the third party wishes to accept the call, press the Transfer key and
.
Blind (unattended) transfer
1. With the call on the line or an incoming call ringing, press the Transfer key.
2. Dial the phone number of the person to whom you want to transfer the call.
3. Press
.
Call forwarding
The phone can be set to forward incoming calls automatically, either always or under certain
conditions.
Forward All: Forwarding all incoming calls to the number of the phone, extension, or mailbox
specified as this function’s target.
Forward when Busy: Forwarding calls ringing while phone is busy to the number of the phone,
extension, or mailbox specified as this function’s target.
Forward after Timeout: When a call starts ringing, the phone will wait for the number of seconds
specified in the setting "Call forwarding time". If the call is not accepted by the end of this time period,
it is forwarded to the number of the phone, extension, or mailbox specified as this function’s target.
Call forwarding settings
1. Press to open the Settings menu.
2
ABC
2. Press
3. Press
4. Press
Forward after Timeout, respectively.
5. Press
6. Enter the target extension number/phone number.
to open the Call Features menu.
to open the Call Forwarding menu.
2
ABC
,
, or
2
ABC
to open the Target when forwarding window for the selected forwarding event.
3DEF
to open the settings menus of Forward All, Forward when Busy, or
21
Page 22

Snom 300 Quick Start Guide
7. Press . If the forwarding event is Forward after Timeout, continue with step 8, otherwise skip
step 8 and continue with step 9.
3DEF
8. If the selected forwarding event is Forward after Timeout, press
to open the Call forwarding
time window. Enter the time in seconds and press . If an incoming ringing call has not been
picked up after this time period, the call will be automatically forwarded to the number specified
as the Target when forwarding for this forwarding event.
9. Long-press
to return to the idle screen or press to activate the forwarding event and then
long-press to return to the idle screen.
Turning call forwarding on
If the target phone number for the specific call forwarding event has not been set or if you wish to
change it, see "Call forwarding settings" on page 21. If the target numbers and, in case of Forward
after Timeout, the time period have been set, follow the following steps.
1. Press to open the Settings menu.
2
ABC
2. Press
3. Press
4. Press
to open the Call Features menu.
to open the Call Forwarding menu.
2
ABC
,
, or
3DEF
to open the settings menus Forward All, Forward when Busy, or
Forward after Timeout, respectively.
5. Press
to activate the forwarding event. The symbols
(+)/(+)
currently inactive (Fig. 1) or active (Fig. 2).
Fig. 1 Fig. 2
indicate whether the function is
6. Long-press to return to the idle screen. When Forward All is activated, it is shown on the idle
display.
Turning call forwarding o
1. Press to open the Settings menu.
2
ABC
2. Press
3. Press
4. Press
Forward after Timeout, respectively.
5. Press
currently active (Fig. 1) or inactive (Fig. 2).
Fig. 1 Fig. 2
6. Long-press to return to the idle screen.
to open the Call Features menu.
to open the Call Forwarding menu.
2
ABC
,
, or
3DEF
to open the settings menus Forward All, Forward when Busy, or
to deactivate the forwarding event. The symbols
(+)/(+)
indicate whether the function is
22
Page 23

Snom 300 Quick Start Guide
Message
Message
Call lists
The phone's call history is stored in the call lists for missed, received, and dialed calls. They can be
viewed when the phone is idle by pressing the function keys indicated in the diagram:
Missed calls Received calls
Dialed calls (redial)* (see Note in
Cancel and OK keys section) or
Redial key
Handling of all lists
1. Press the respective key to open the list of missed, received, or dialed calls (Fig. 1).
Fig. 1 'Fig. 2 Fig. 3
2. Use the up and down arrows on the navigation key to scroll through the list (Fig. 2).
3. When you have selected a call for viewing or editing, i.e., the call is on the display (Fig. 1),
◦ Press the OK key
◦ Use the left
actions (Fig. 3). Press the OK key
- Del: Press
- Clear: Press
- Details (Fig. 4): Press
the Details screen you can also save the phone number of the call to the phone's directory
(Fig. 5).
Fig. 4 Fig. 5
to call the number.
and right arrows on the navigation key to view the available functions/
to use/activate the function/action visible on the display.
to delete the call.
to delete the entire call list.
to show details of the call (caller/callee, time and date). From
Directory
The built-in directory of the phone can hold 100 entries. Entries can be added and
edited on the phone itself and on the web interface of the phone.
To open the directory, press the directory key. If the key has been mapped with a
dierent function, you can access the directory by lifting the handset, using the
left
and right arrows on the navigation key to select Pool, and then pressing
to open the directory.
23
Page 24

Snom 300 Quick Start Guide
Message
Fig. 1 Fig. 2 Fig. 3
• To make a new entry, open the directory and press the up arrow on the navigation key to go
directly to <New Item>.
• Use the up
are listed by name (nickname) and sorted alphabetically from A-Z.
• With the selected entry on the display (Fig. 1):
and down arrows on the navigation key to scroll through the directory. Entries
◦ Press
◦ Use the left
- Del: Press
- Edit: Press
- Sort. The directory is sorted by name (nickname) from A-Z, but you can choose any of a
to dial the phone number of the entry.
and right arrows on the navigation key to select
to delete the selected directory entry.
to edit the name.
number of categories. You can initiate the sorting process from any entry in the directory.
Press
navigation key to select the sorting criterium, and press to save and return to the
directory.
to open the Sort by screen, then use the left and right arrows on the
DND (do not disturb)
(FW 8.7.3 and higher)
When the phone is idle, pressing the Mute key will turn DND on and o. When
DND is on, calls will not ring on your phone, and callers will hear the busy signal.
24
Page 25

Snom 300 Quick Start Guide
Trouble shooting
Reboot
In user mode
Settings menu > 4 Maintenance > 3 Reboot > "Reboot?" >
In admin mode
Settings menu > 5 Maintenance > 3 Reboot > "Reboot?" >
Hard reboot
Disconnect the power, wait for a few seconds, reconnect to power.
Never disconnect the power during a firmware update!
Reset to factory values
Resetting the phone to factory values is possible only when the phone is running in administrator
mode.
Settings menu > 5 Maintenance > 4 Reset values > enter administrator password >
All customized settings will be lost!
25
 Loading...