

Page 1

snom 100
User Manual v1.9a
Page 2

Page 3

3
Foreword
Congratulations on the purchase of your snom 100
Voice over IP telephone!
Telephony is part of our every day life. Over a period
of more than 100 years a communication form has
evolved which we feel cannot be dismissed. In spite of
the new technology base of the snom 100 most of its
look and feel will be very familiar and intuitive to you.
On the other hand, the world of the Internet opens a
whole range of new possibilities. A lot of users are
using web browsers and own one or more email accounts. They will find it easy to manage the phone via
its web interface or to make a call to
“sip:john@domain.de“ for example.
We are confident that the developments in the computer industry will follow suit in the telecom world.
VoIP is not only about transporting speech over data
networks. It is about interoperability and breaking up
a vertical market as well as streamlining business
processes by seamlessly integrating the telephone into
the computer networks and applications. With its
technical flexibility, our commitment to all open and
relevant standards and our cooperation with other
vendors of the VoIP industry, the snom 100 represents a safe investment in the future.
Now, we wish you a pleasurable experience in the
VoIP world.
snom technology AG
The current version of this user manual can be obtained from:
http://www.snom.de/download/man_snom100e.pdf
Page 4

4
Inhalt
Foreword ...................................................................... 3
Installation.................................................................... 7
Delivery Content ........................................................ 8
Safety Notes.............................................................. 8
Power supply.......................................................... 8
Setting up the Phone............................................... 8
Cleaning ................................................................ 9
Connecting the phone ................................................. 9
Dial Pad ...................................................................10
Initialization..............................................................12
Booting.................................................................12
Selecting the language............................................13
Registration...........................................................14
Basic FunctionsIdle State............................................19
Idle State .................................................................20
Statistics...............................................................20
Registrations .........................................................20
Dialing .....................................................................21
Dialing a phone number (E164) ...............................21
Dialing a H.323/SIP Address....................................23
Dialing an IP Address..............................................23
General Input Mode................................................25
Terminating a call......................................................25
Incoming Call............................................................25
Accepting a Call .....................................................26
Denying/Blocking a Call..............................................26
Adjusting the Volume.................................................26
Main Menu................................................................27
Help Function............................................................28
Advanced Functions.......................................................29
Hold and Resume ......................................................30
Toggling between calls ...............................................30
Transfer ...................................................................31
Direct Transfer.......................................................31
Call Divert ................................................................31
Diverting all calls ...................................................32
Divert when Busy...................................................32
Page 5

5
Divert when not answered ...................................... 32
DTMF Tones..............................................................32
Adjusting the Volume ................................................32
Ring Tones ............................................................... 34
About ...................................................................... 35
Call Register ................................................................36
Phone Book .............................................................. 37
Adding an entry.....................................................37
Editing an entry.....................................................38
Call Lists .................................................................. 40
Speed Dial................................................................40
Dialing.................................................................. 41
Editing speed dial entries........................................42
Deny List.................................................................. 43
Browsing .............................................................. 43
Adding a number...................................................43
Removing a number...............................................44
List Views.................................................................44
Modifying the view.................................................45
Sort Criteria .......................................................... 45
Settings.......................................................................47
Settings via the Phone Gui ......................................... 48
Settings via Browser..................................................49
Options....................................................................51
Call Divert............................................................. 51
Base ....................................................................52
SIP ......................................................................53
H.323...................................................................55
Codecs .................................................................57
Network................................................................ 57
Reset Values ......................................................... 61
Administration..............................................................62
Automatic Installation and Booting..............................63
Overview..................................................................63
Manual update..........................................................65
Phone settings setup .................................................66
Setting files...........................................................66
Downloading procedure ..........................................67
Available Settings......................................................69
Basic....................................................................69
Page 6

6
SIP Settings ..........................................................69
Redirection............................................................71
Codec Settings.......................................................71
Network Settings ...................................................71
H.323 Settings.......................................................73
Updating the software................................................74
Case study: com88....................................................75
Scenario ...............................................................75
Behind the scenes .....................................................77
Setting the Network Identity.......................................80
Installing DHCP......................................................80
Appendix .....................................................................85
Technical Data ..........................................................85
Technical Data ..........................................................86
Standard Conformance...............................................87
Index ..........................................................................88
Page 7

7
Installation
Page 8

8
Delivery Content
Please check whether the delivery contains the following parts:
§ The base unit with display and dial pad
§ The handset
§ The handset cable
§ The power supply (optional)
Safety Notes
Please observe the following safety advice. It is important to observe it in order
to guarantee safe and reliable operation
of the device.
Power supply
You have two possibilities to provide the snom 100
with power:
§ Power feeding over the network cable (Power-
LAN via IEEE 802.3af with 48 V)
§ An external power supply (24 and 48 V)
If you want to use an external power supply then
please stick to the one that’s included in the package.
Other power supplies may cause damage to the
phone, effect the behavior or induce noise.
Setting up the Phone
Please setup the snom 100 only on even and horizontal surfaces, enabling the rubber pads to ensure a
secure grip. Do not place the snom 100 on carpets or
other materials that contain fibers that can block the
air vents and cause overheating.
!
Page 9

9
Cleaning
To clean the snom 100 use a slightly moist and antistatic cloth. Please try to avoid cleaning liquids since
they might damage the surface or internal electronics
of the phone.
Connecting the phone
First connect one end of the handset cable to handset
and then to the jack on the left side of the phone (see
illustration).
Now, plug in the Ethernet (network) cable into the
RJ45 connector on the rear side of the phone as
shown below and the other end into the network side
to establish a data link.
In case you are using an external power supply,
please insert the plug of the power supply into the
connector next to the data line and hook up the casing
into the mains.
Page 10

10
If you want to use a headset, it can be connected to
the audio jacks on the backside of the snom 100. The
outermost connector is for the microphone.
Dial Pad
The numeric key block with the keys 0 to 9, * and #
are used to enter digits and letters. Depending on the
operating mode, different actions can be performed
(see the table below):
§ Entry of digits only (e.g. when dialing a phone
number),
§ Typing in letters and digits by pressing the
keys repeatedly similar to a cellular phone,
§ Or navigate in selection lists. The keys have
arrows printed on them indicating the direction similar to a numeric block on a computer
keyboard.
Page 11

11
The MENU key is used to invoke the main menu.
The HELP key brings up context specific help texts.
To cancel actions or input the CANCEL key can be
used. The Enter/Ok key confirms actions, selections and inputs.
Depending on the operating mode, the keys can have
context specific meanings and are described in this
user manual.
Keys F1 to F4 are context sensitive function keys.
Their current mapping is depicted in the lowest line on
the display through symbols.
The keys of the numeric block in different operating
modes:
Key Digits Lower case Upper case
0 0 (SPC)_0 (SPC)_0
1 1
.,?1!@():;&*#+<=>[]
.,?1!@-
():;&*#+<=>[]
2 2 abc2ä ABC2Ä
3 3 def3 DEF3
4 4 ghi4 GHI4
5 5 jkl5 JKL5
6 6 mno6ö MNO6Ö
7 7 pqrs7ß$ PQRS7$
8 8 tuv8ü TUV8Ü
9 9 wxyz9 WXYZ9
# # # #
* Toggles upper and lower case
Page 12
12
Initialization
Booting
If your network administrator or Internet service provider installed your phone, you will see how the phone
connects to the network and maybe conducts a software update, if one is available. After it has booted, it
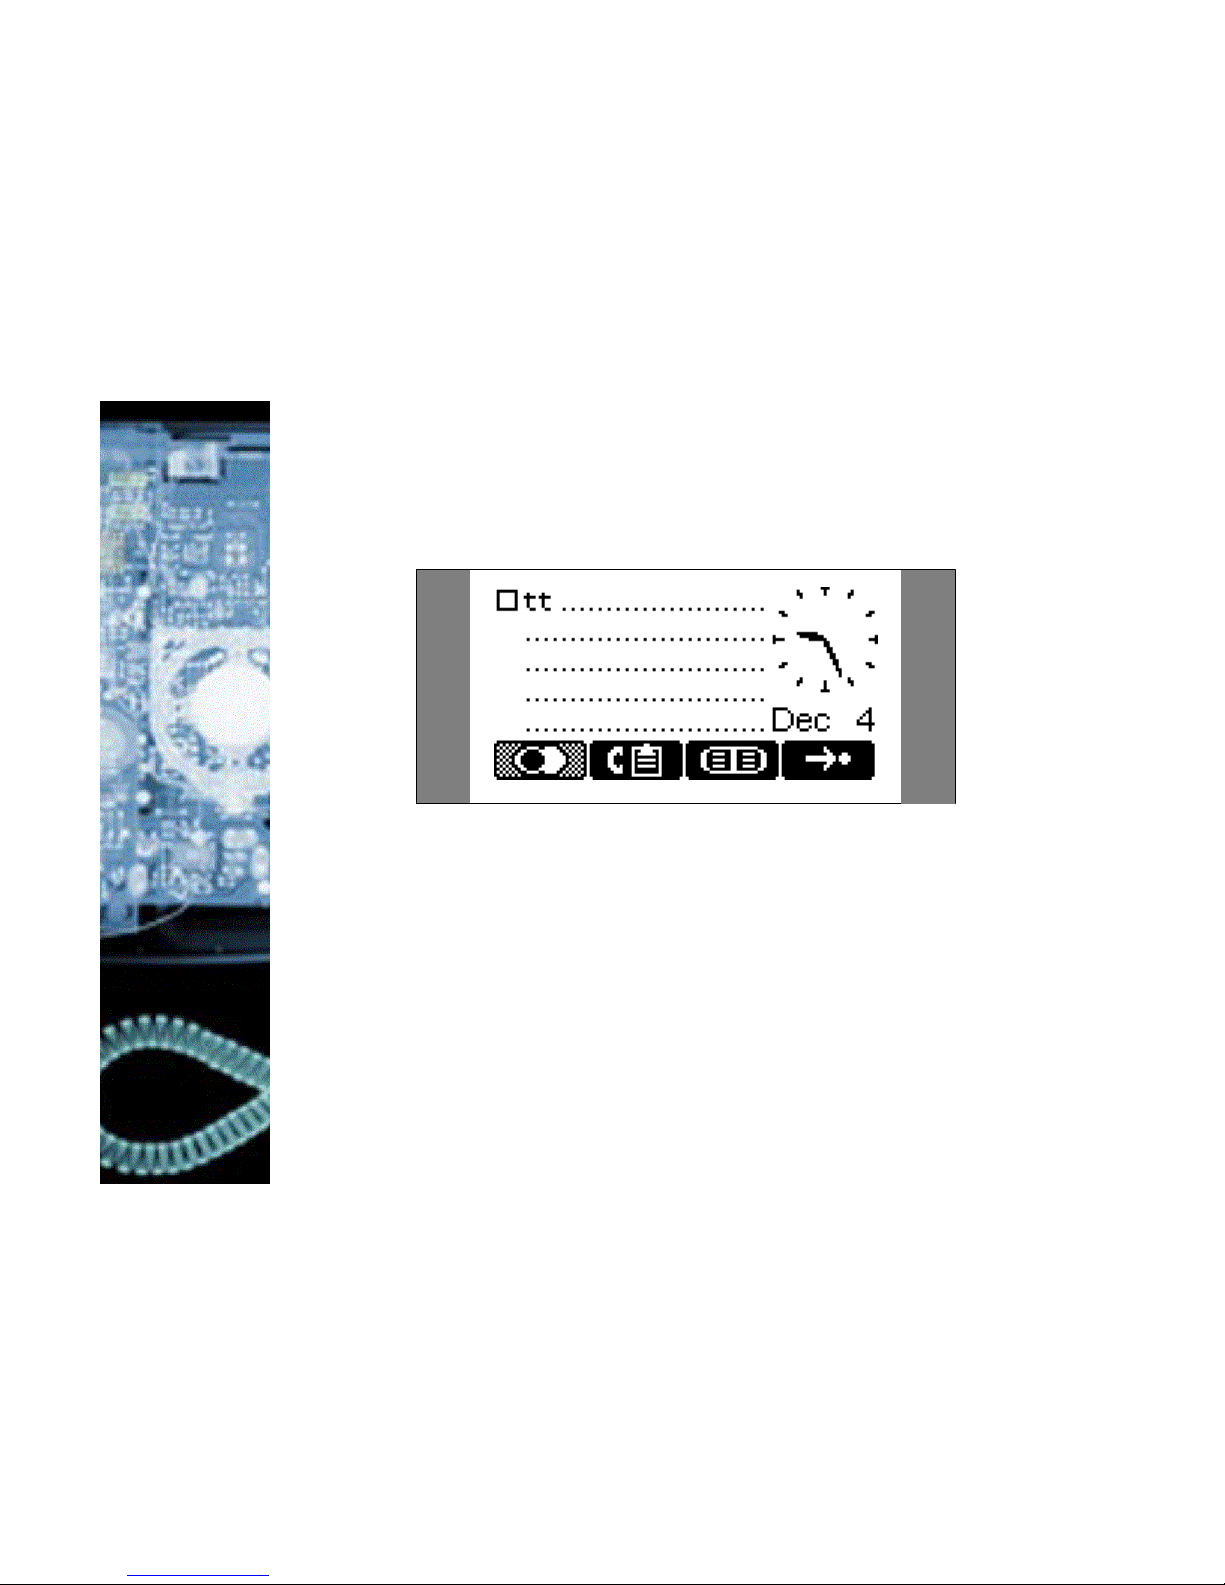
enters the idle state. When this state has been
reached a clock is displayed on the right hand side of
the display.
In case the phone does not reach this operation mode
you should consult your network administrator or
Internet service provider or refer to the chapter “Administration”.
Page 13
13
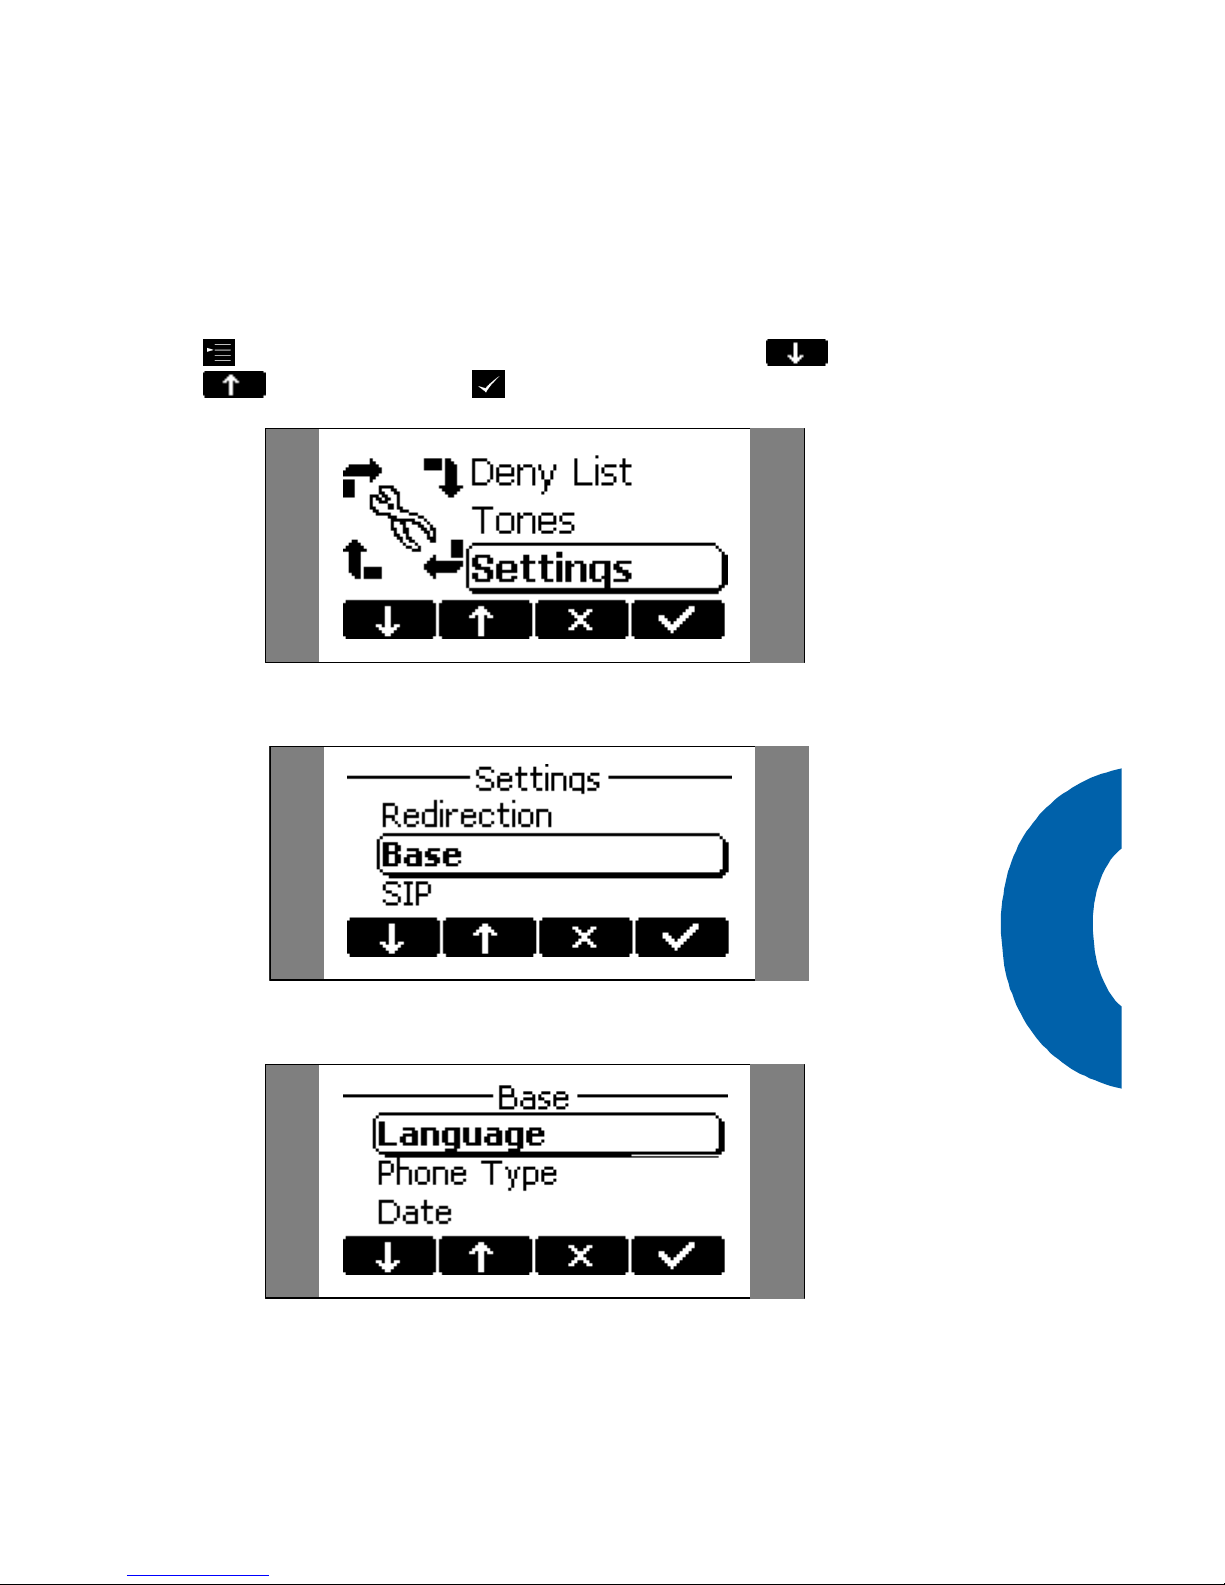
Selecting the language
The language is set to English by default. In, order to
change it for instance to German, press the menu key
and go to the submenu „Settings“ with or
and press Enter to select this menu entry.
Select „Base“ and press Enter.
Then go to „Language“
and set it to „German“.
Page 14

14
Press Enter to activate your selection.
Registration
In order to be able to make calls, the phone normally
has to register with „Gatekeeper“ (H.323) or a „Registrar“ (SIP). You can obtain the Internet address or
name of the server from your network administrator
or Internet service provider. The registration is similar
to the configuration of an email address.
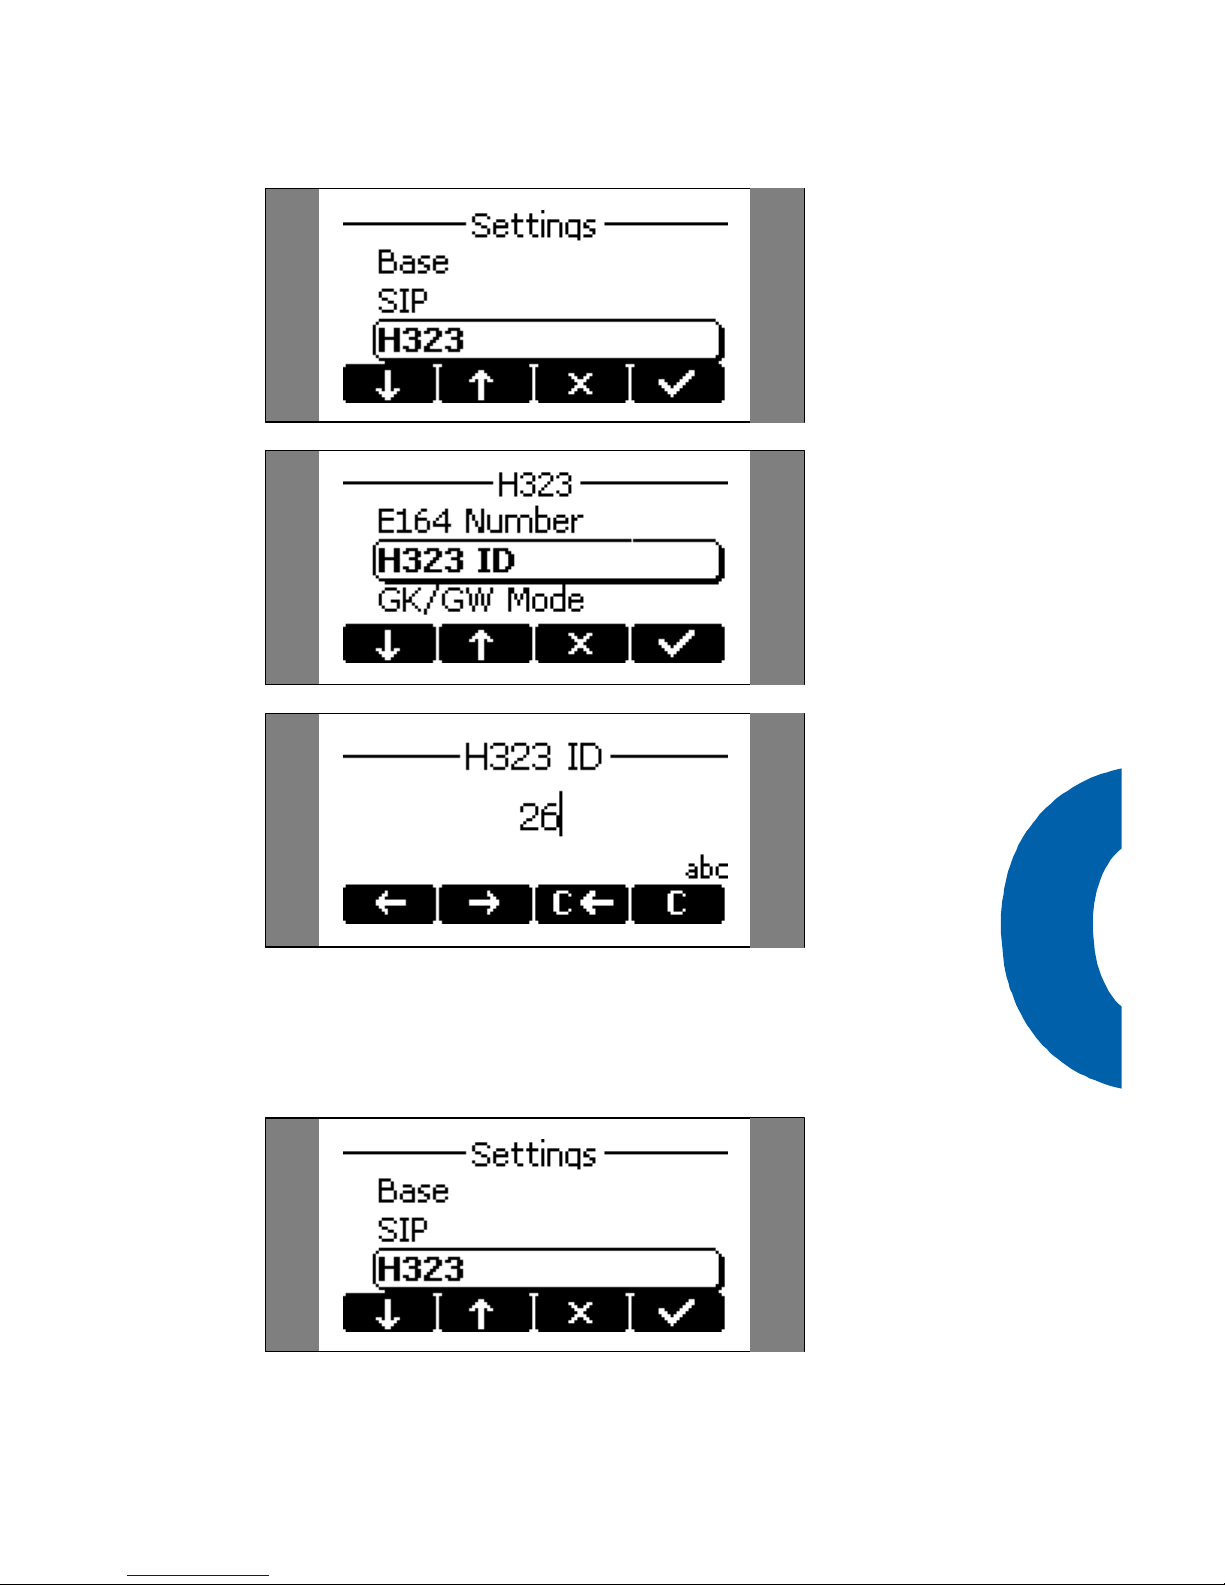
H.323
§ Most Gatekeepers can be discovered auto-
matically by the snom 100. You only need to
set your phone number. Go to the Settings/H323/H323 ID and enter your phone
number.
VoIP has two competing signaling standards
to establish and tear down calls. „H.323“ is
an ITU-T based standard. „SIP“ (Session Initiation Protocol) is based on Internet standards and is similar to Email and WWW. The
snom 100 supports both protocols. Please
ask your company or Internet service provider which protocol you are using.
TIP
Page 15
15
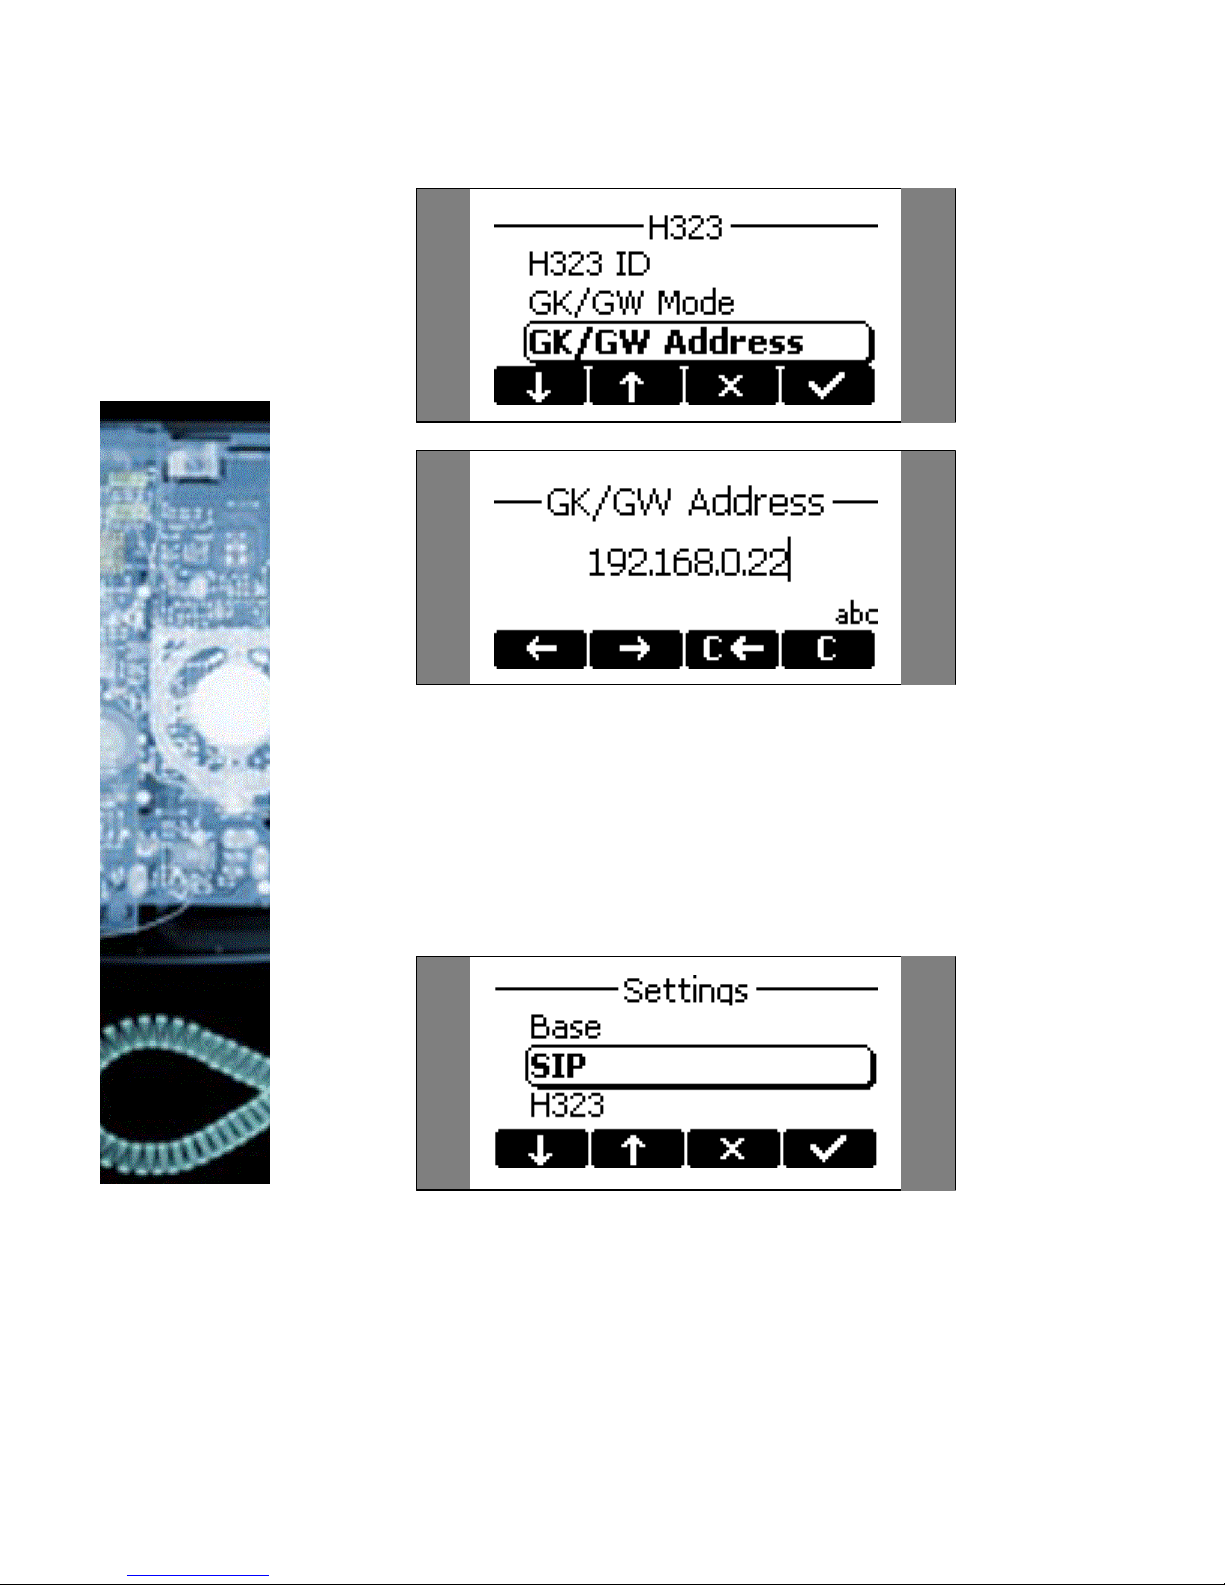
§ If you want to enter the gatekeeper address
manually then go to the “Settings” menu (as
described above) and then to „H.323“. Select
„GK/GW-Address“ and type in the address.
Page 16
16
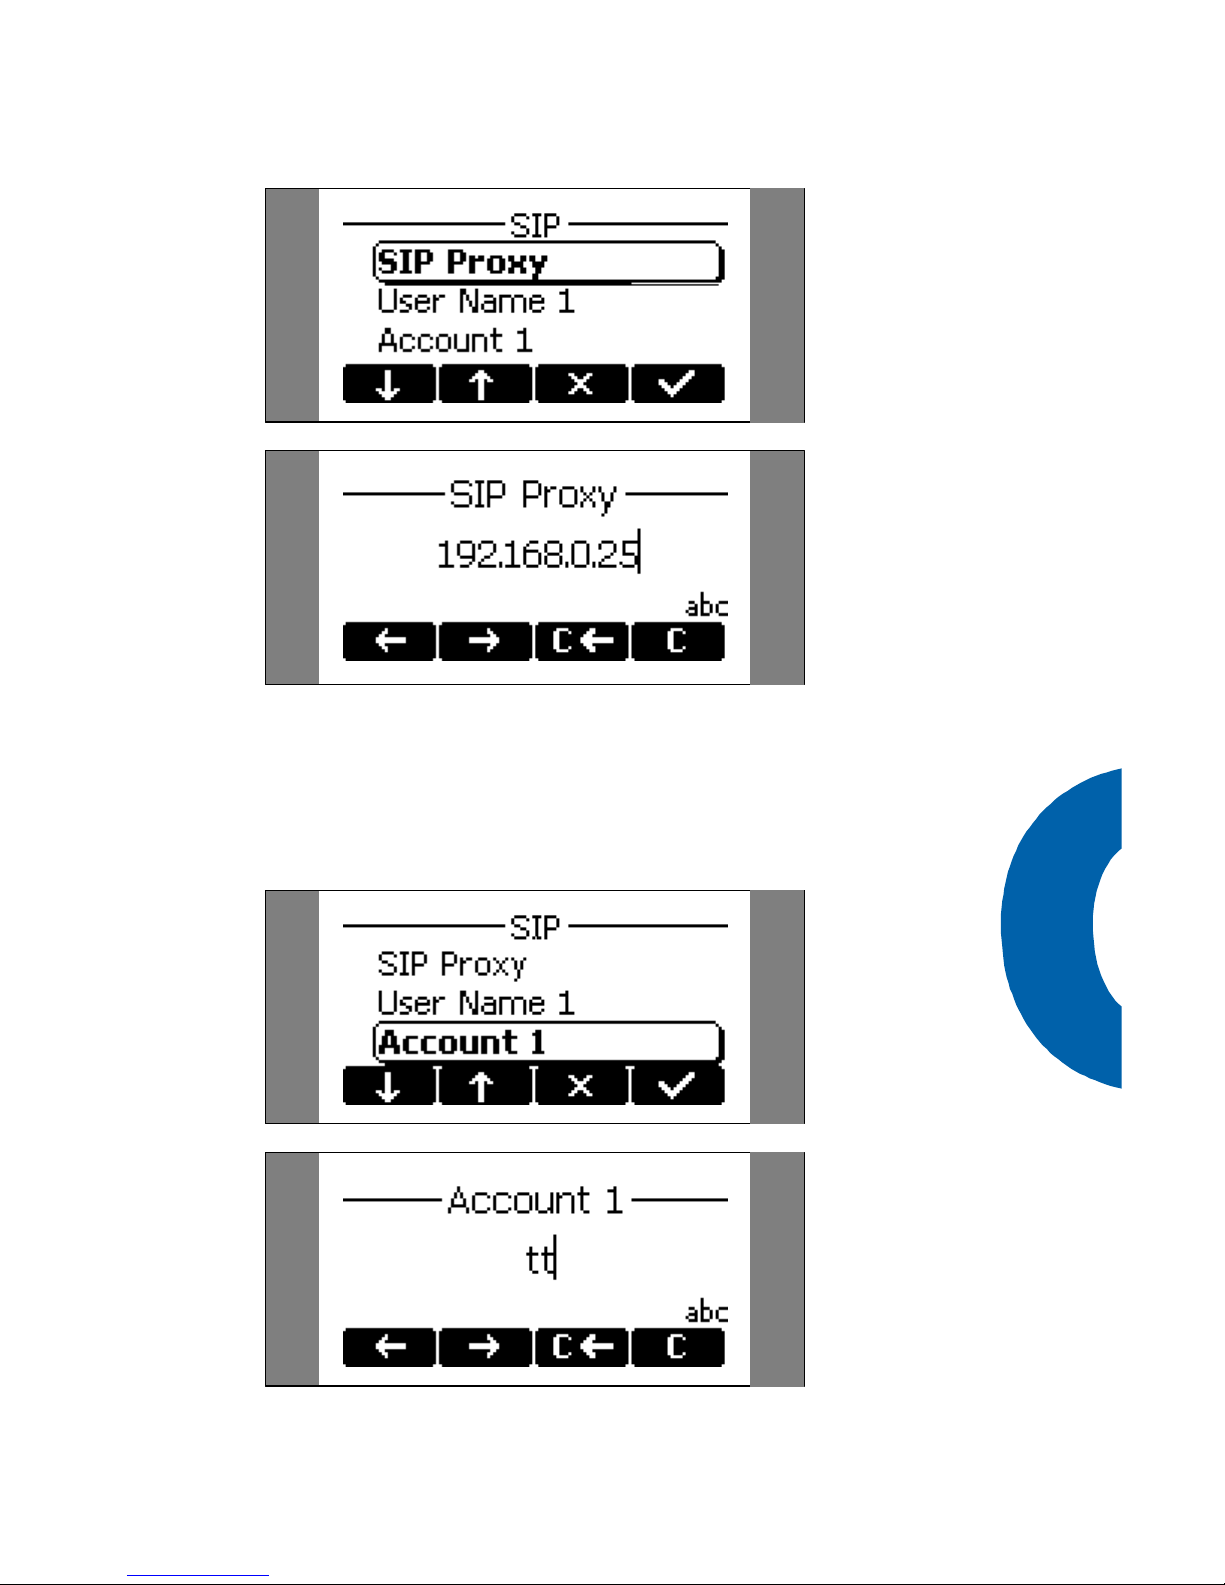
SIP
§ When using the phone in a SIP environment,
go to the sub menu „Settings/SIP/Proxy“ and
set the address of the proxy (e.g.
proxy.sipproxy.com). Also program the address of the SIP registrar. Normally, this will
be identical to the address of the proxy.
Page 17
17
§ Then you have to enter the SIP accounts un-
der which you want to be reachable. For the
first user of the snom 100 this can be entered
in Account1.
Page 18
18
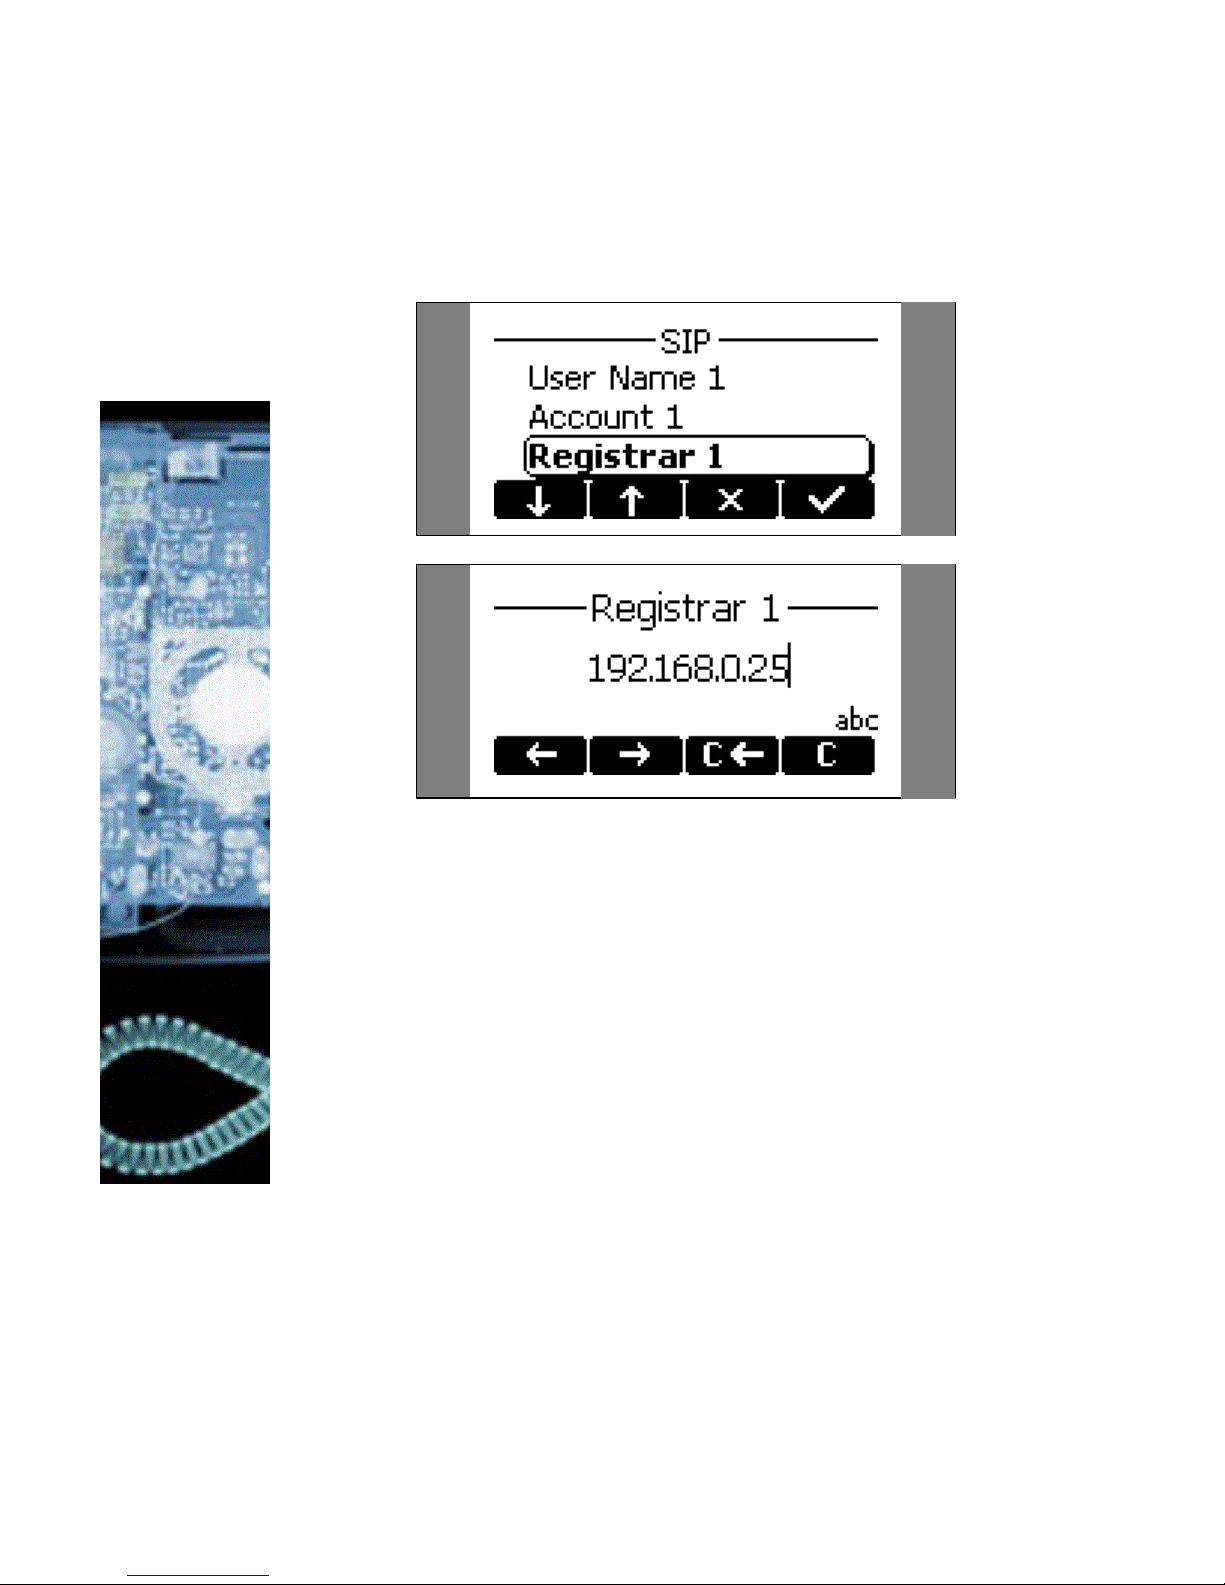
§ Registrar1 is the registrar of the first user.
Please enter the registrar address into this
field. (e.g. proxy.sipproxy.com).
You can also enter other SIP accounts (Account1-7,
Registrar1-7).
Page 19

19
Basic Functions
Page 20
20
Idle State
Depending on which „Desktop Style“ is selected (see
Chapter Settings, Base, Desktop Style) the initial appearence of the phone differs:
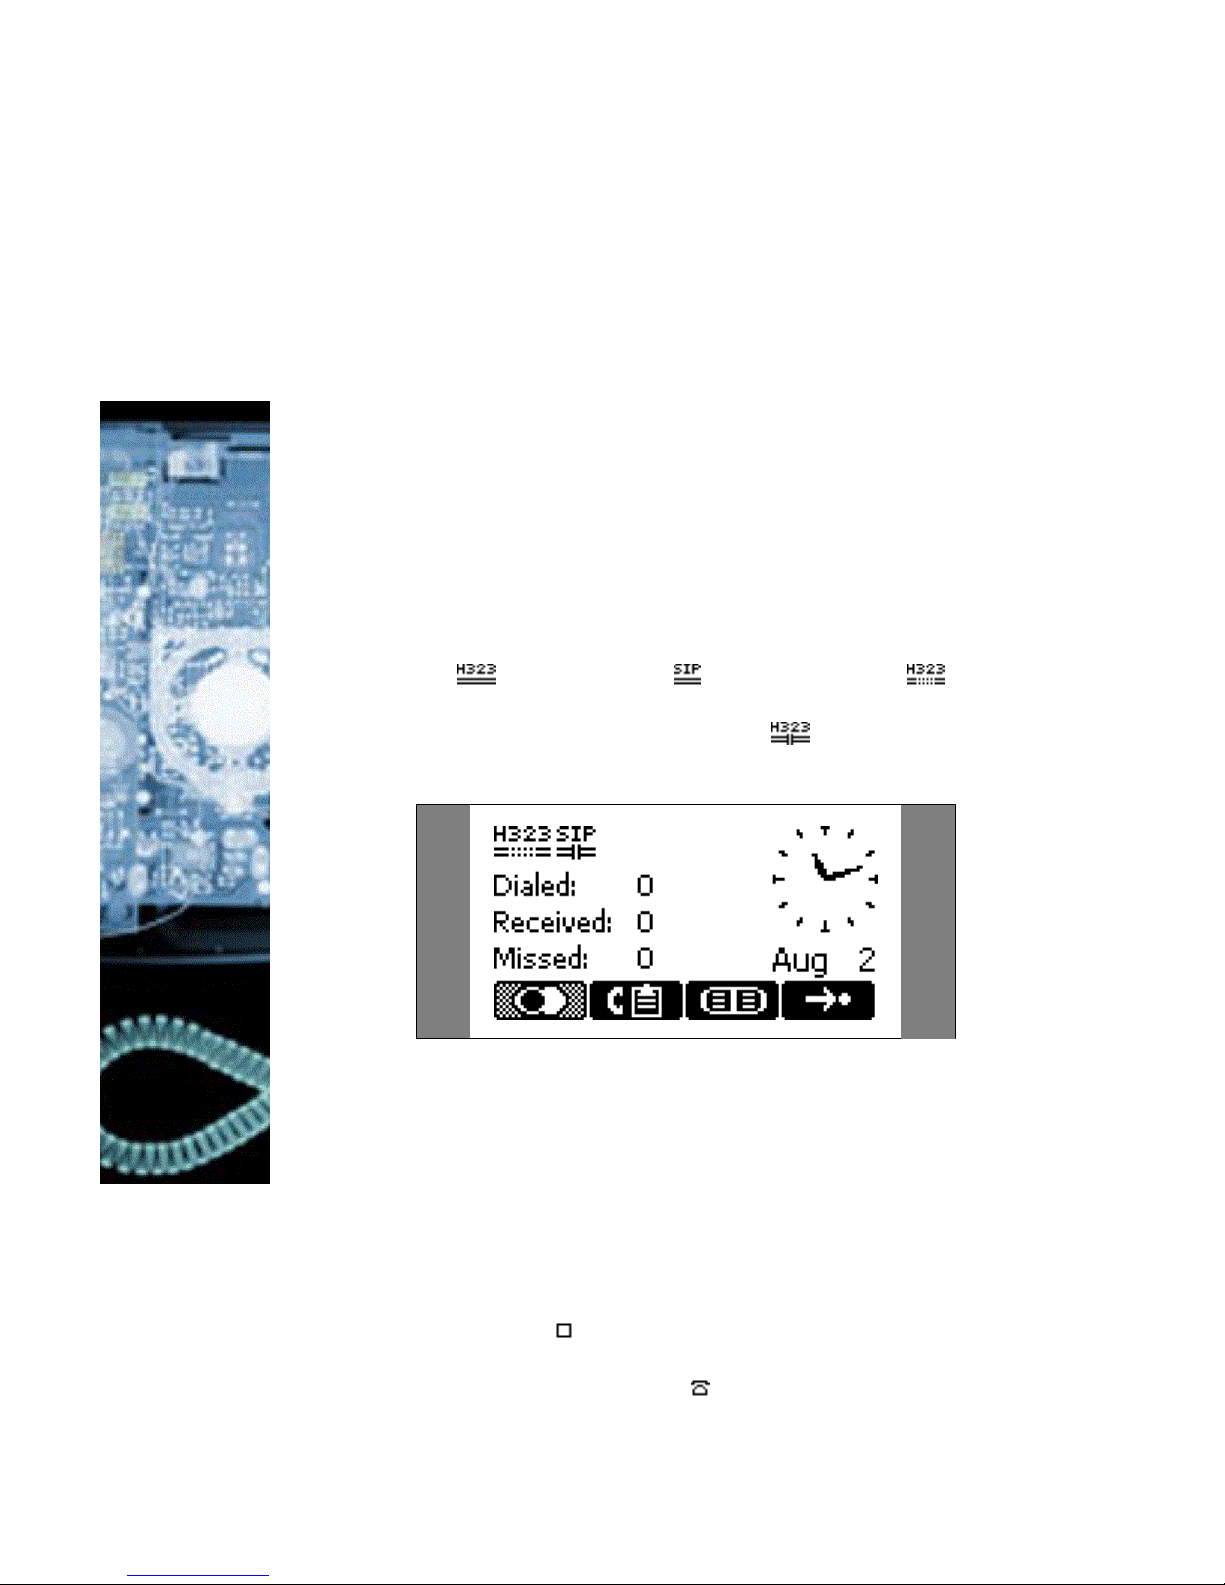
Statistics
In the idle state the selection “Statistics” (especially
suited for H.323) the phone will show:
§ The time and date,
§ The number of dialed, received and missed
calls,
§ The registration state
Continuous lines under the registration symbol indicate a successful registration with the specified gatekeeper ( ) or registrar ( ). Dashed lines ( ) (see
example) signal that the phone is not registered, i.e. it
did not get a reply. Vertical lines ( ) denote that the
registration was denied.
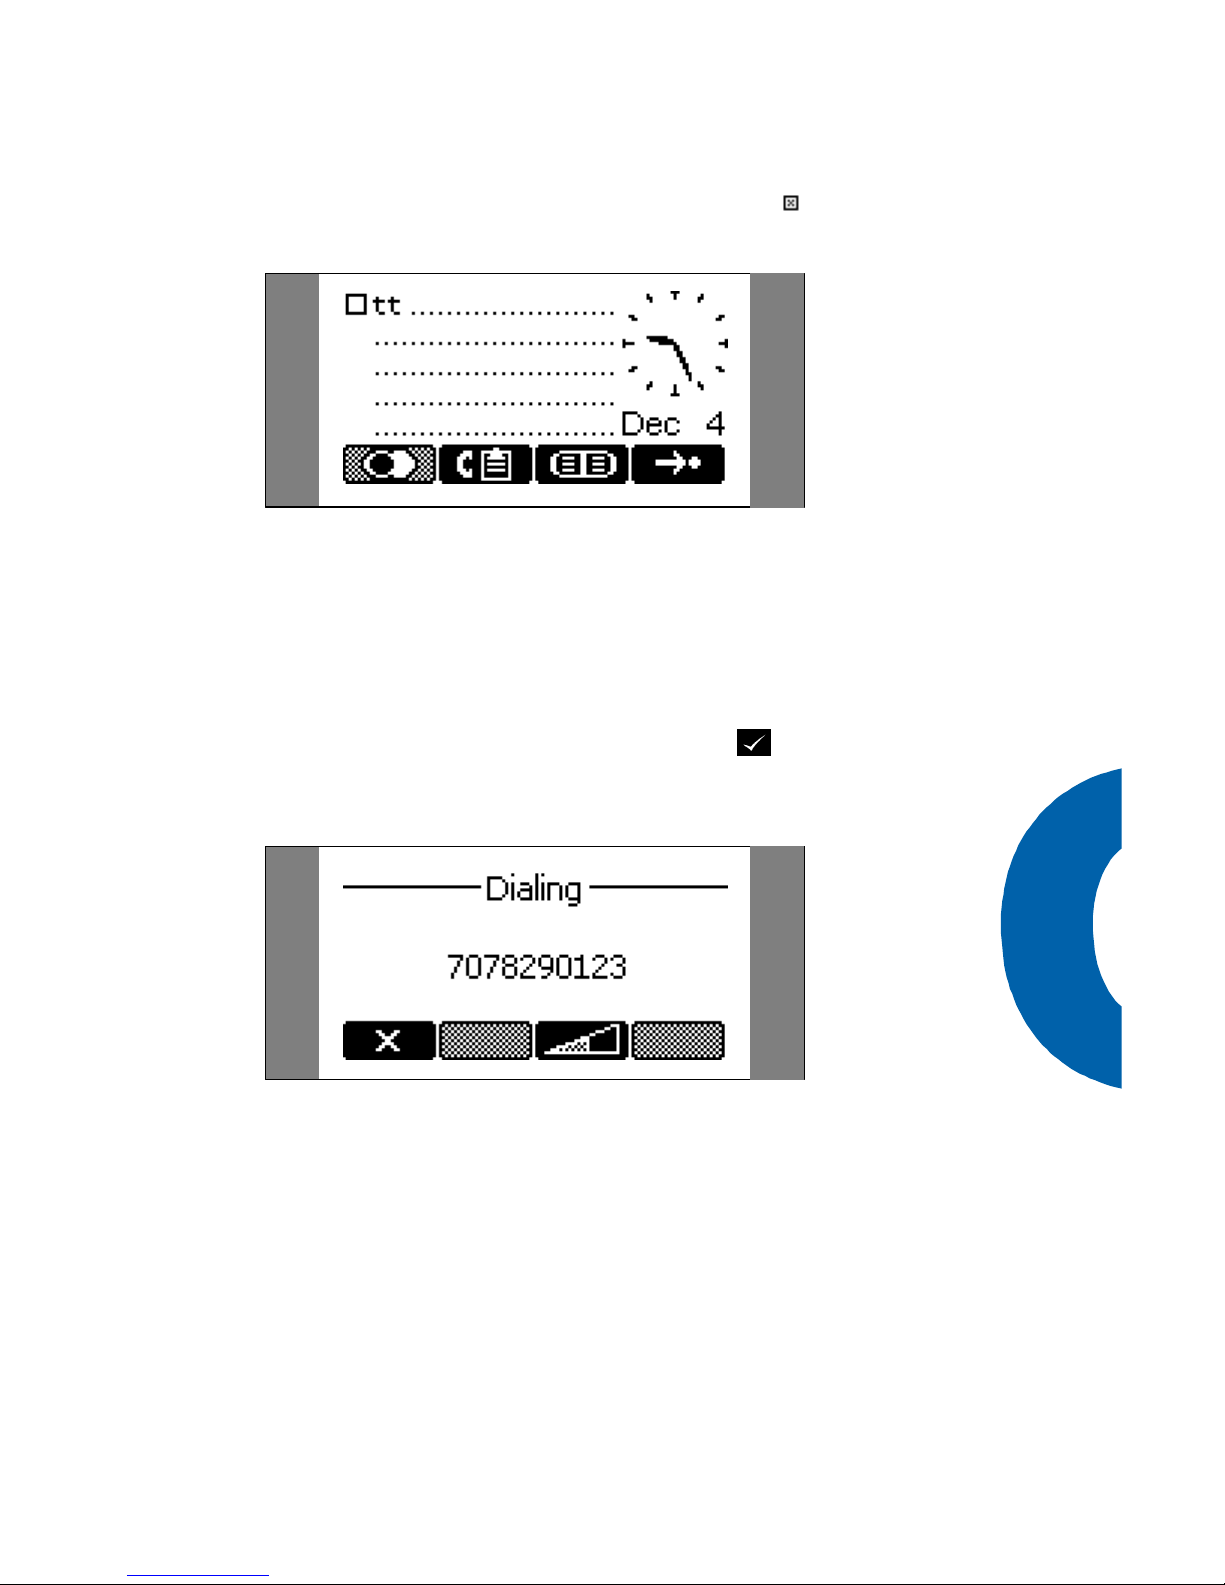
Registrations
In the “Registration” mode (especially suited for SIP)
the phone shows:
§ The date and time,
§ the first five registered users,
§ the connection state of each of the first 5 reg-
istered users
An empty box ( ) before the account (see following
illustration) indicates that the registration process is in
progress. A phone symbol ( ) means that the account
Page 21
21
is successfully registered. A box with a cross ( ) signals an unsuccessful registration attempt.
Dialing
There are two methods to begin a call from the idle
state of snom 100. Either you can start dialing with
the handset resting in the cradle and then pick it up.
Or pick up the handset and then dial the number. In
the latter case you will have to press Enter to ind icate that the number is complete and dialing can
commence.
The snom 100 shows the current communication
status in the display.
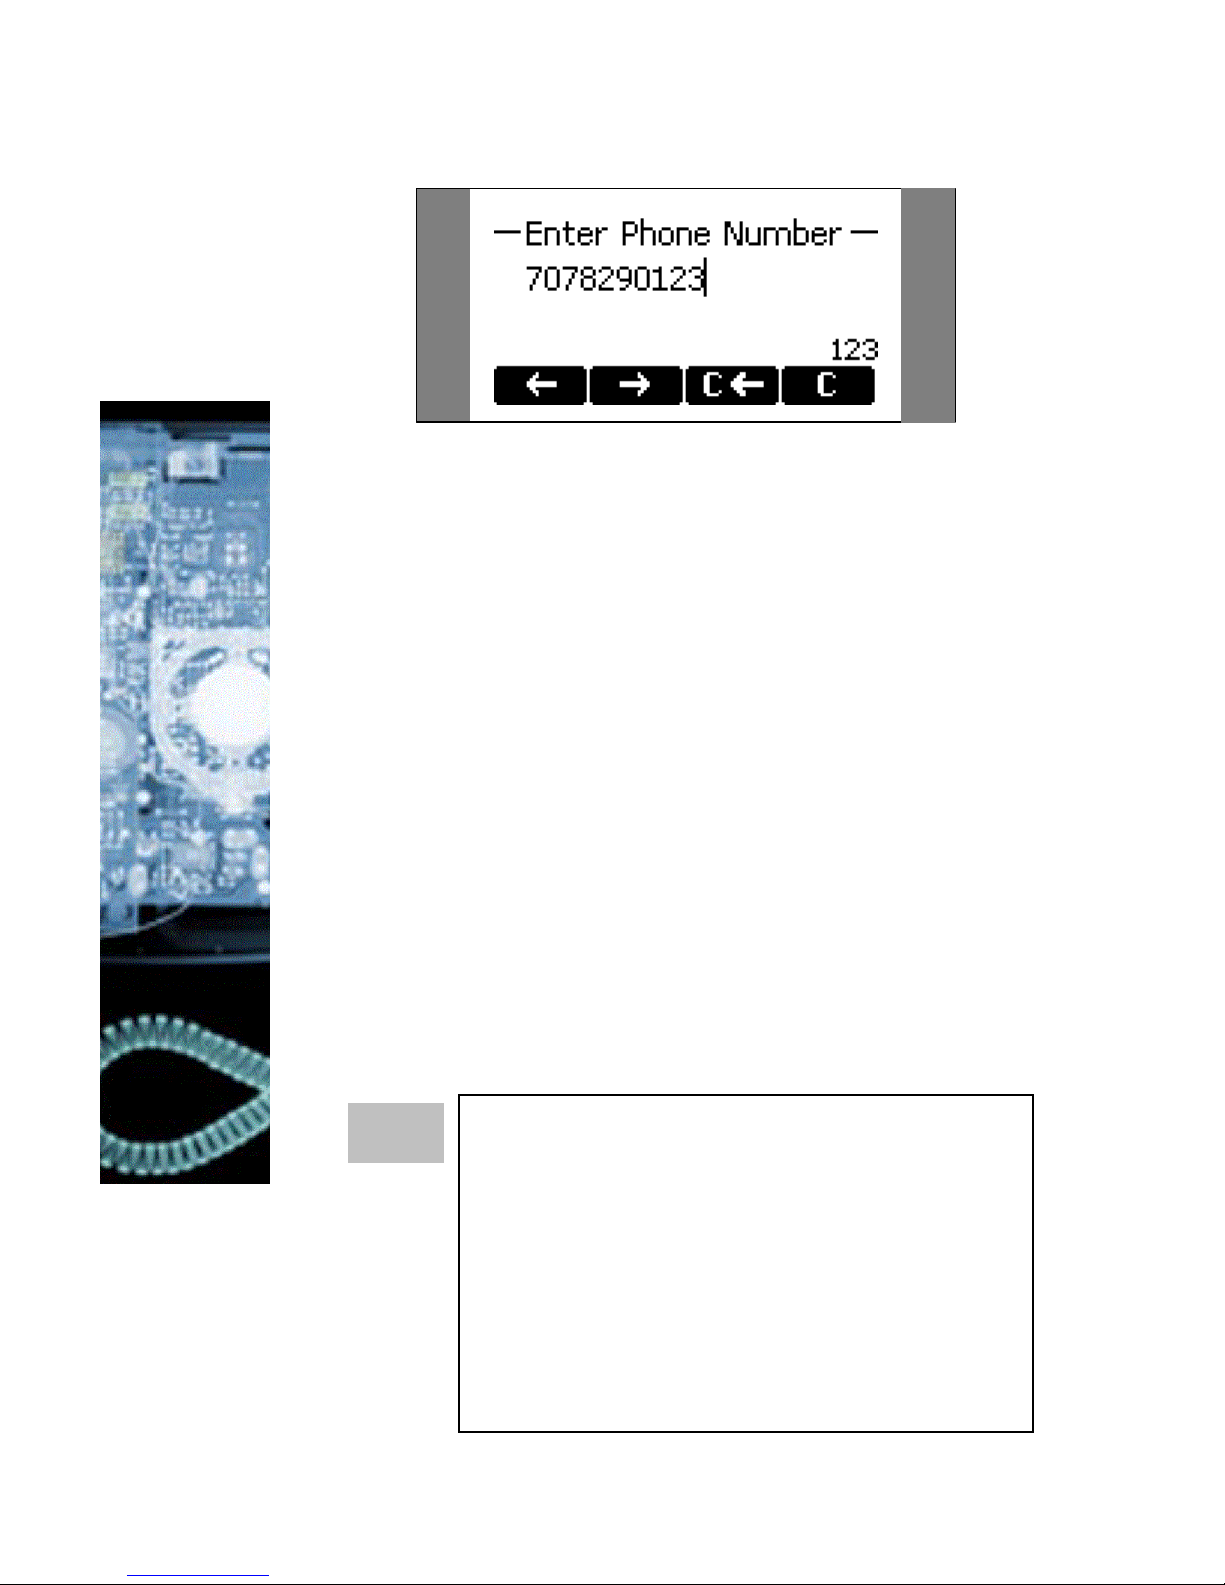
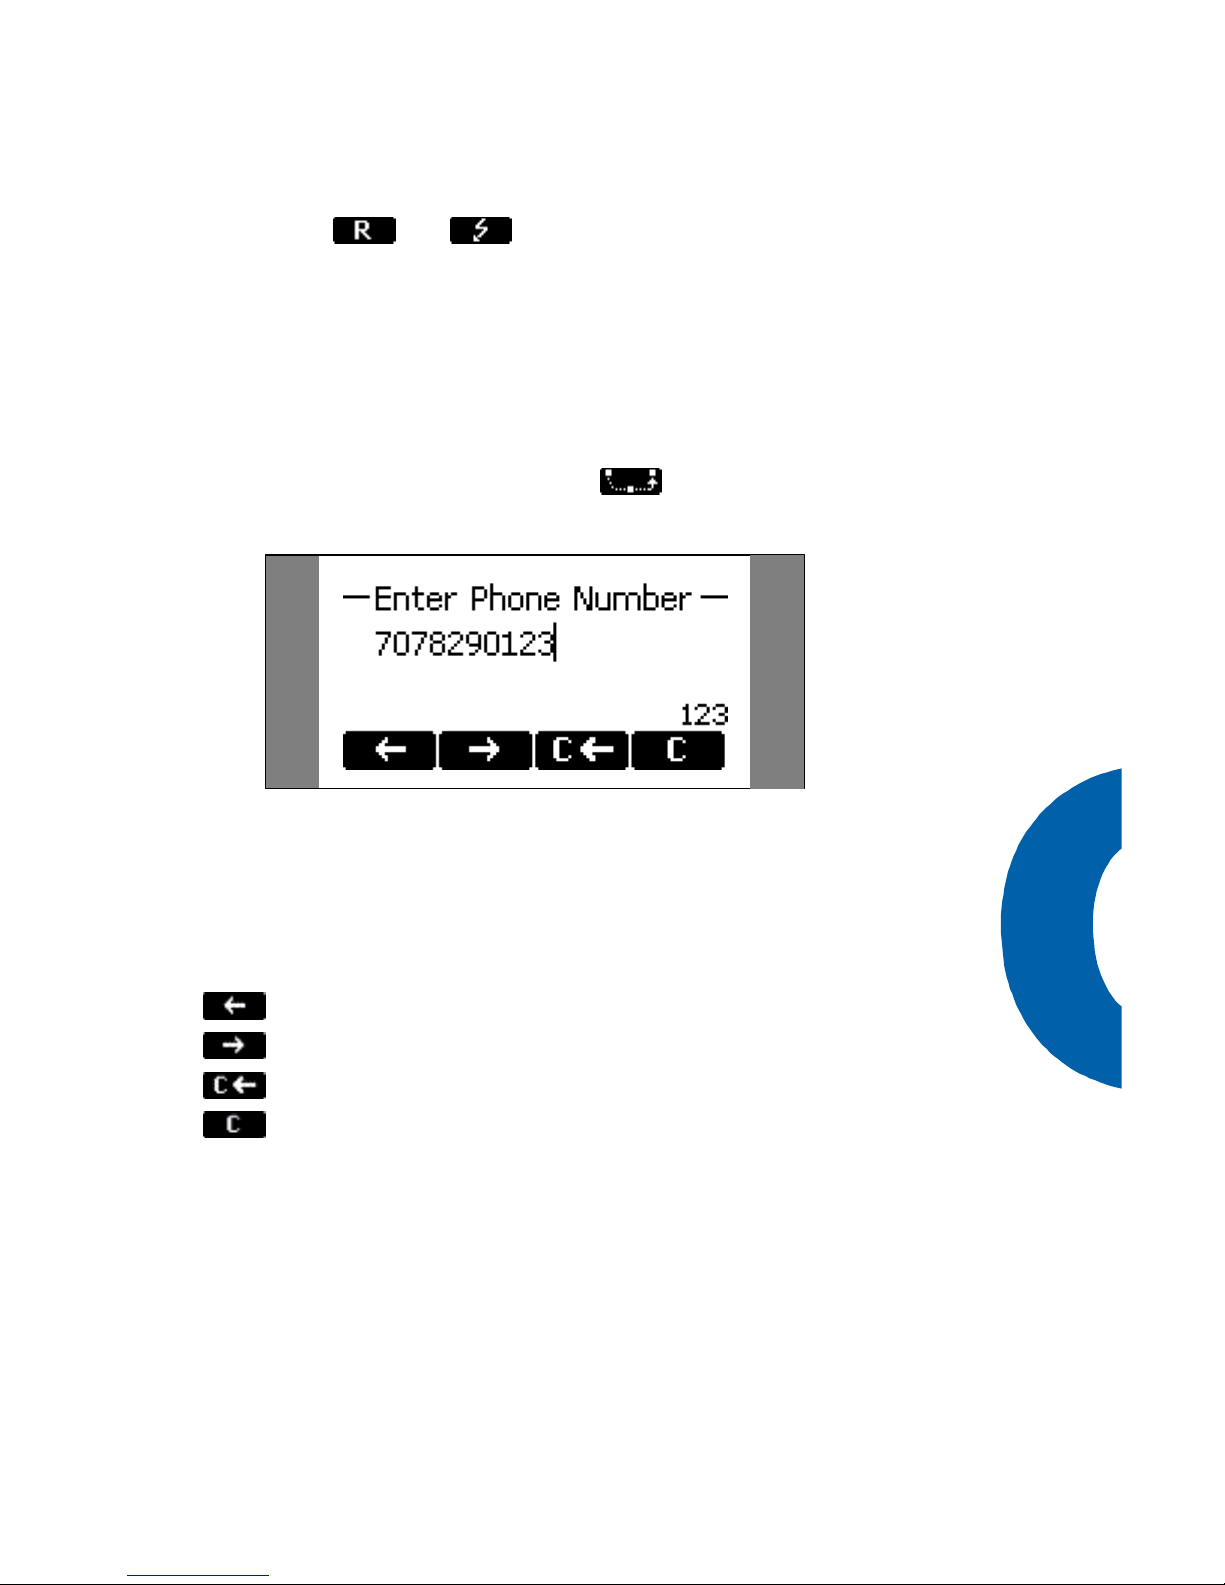
Dialing a phone number (E164)
A telephone number is dialed with the numeric pad,
exactly as one would expect.
Page 22
22
E.164 numbers
E.164 is the standard that defines normal
phone numbers. They may contain digits
from 0-9, * and #. H.323 differentiates between these numbers and “H.323 addresses“ which may contain alphanumeric
characters. Several Gatekeeper implementations do not differentiate E.164 numbers and
H.323 addresses. In case you encounter
problems then try to specify the number as
an H.323 address.
TIP
Page 23
23
Key mapping:
Moves the cursor left.
Moves the cursor right.
Deletes the character left of the cursor.
Clears the buffer.
Enter Dials the number.
Cancel Aborts the dialing.
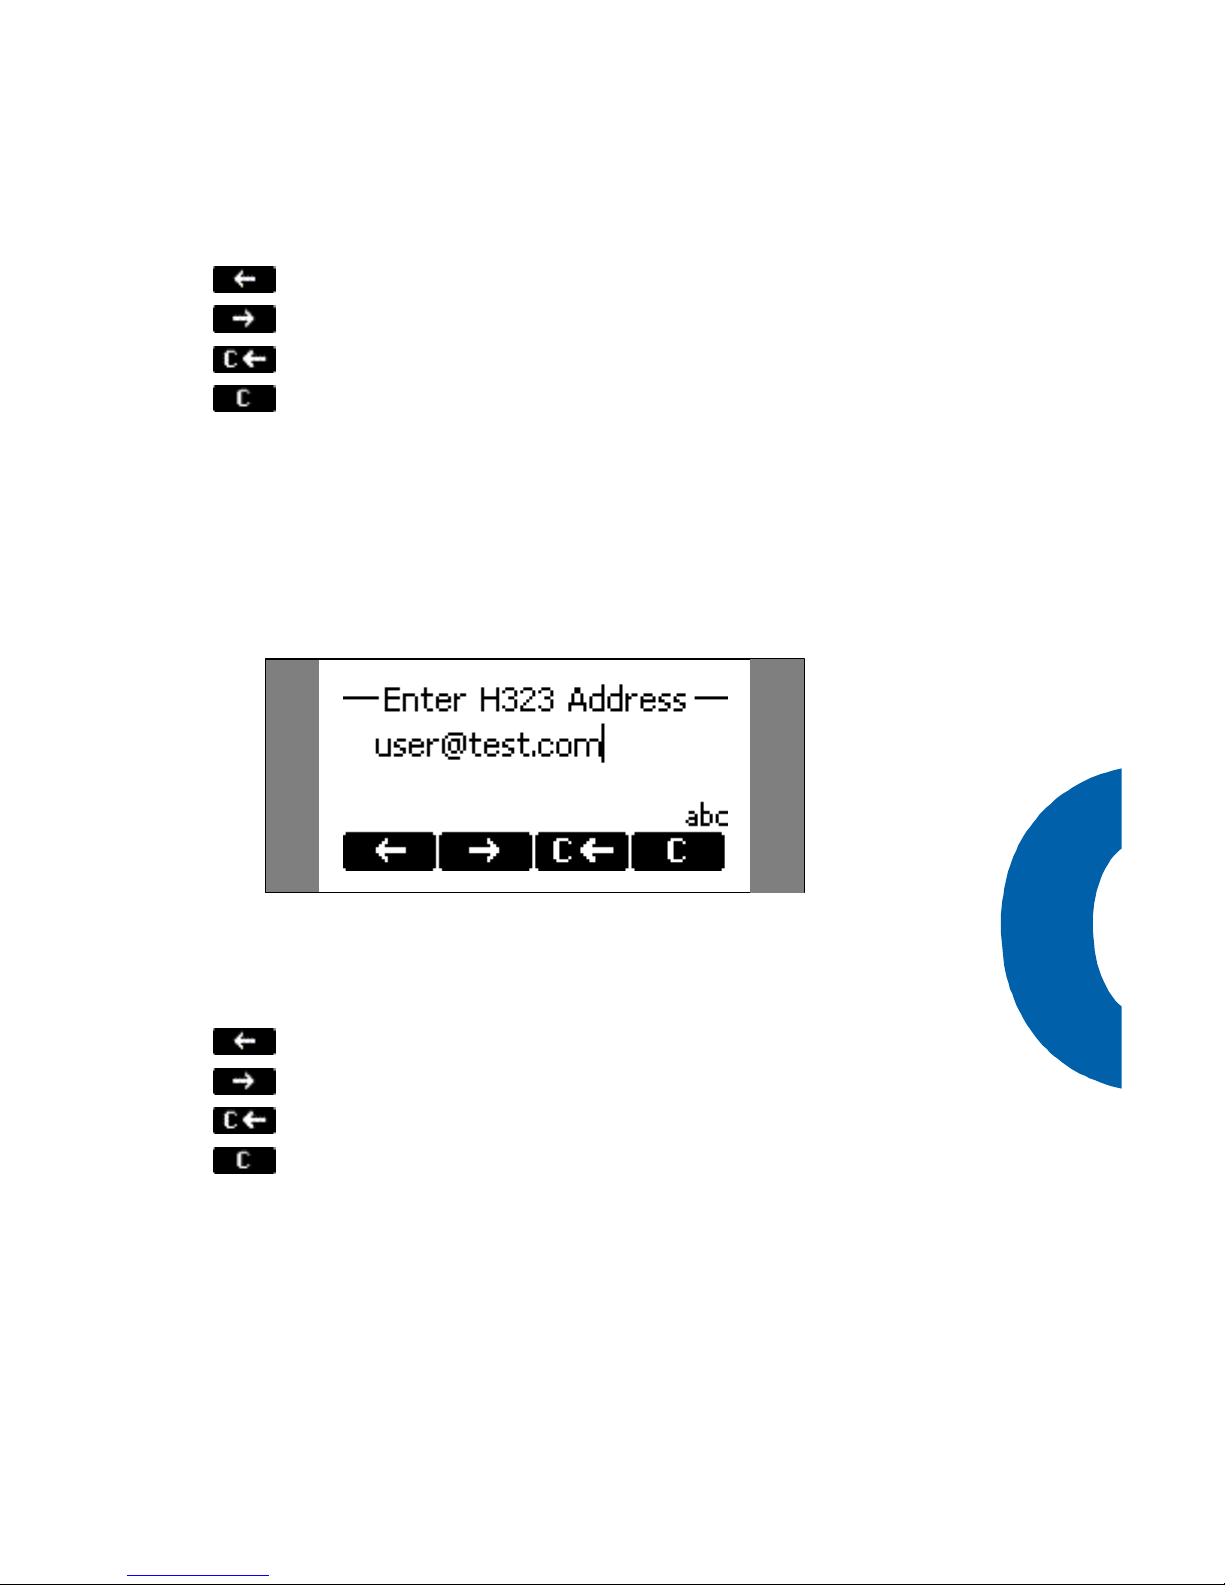
Dialing a H.323/SIP Address
Pressing # will induce the H.323/SIP dial mode and
the respective entry mask will appear.
The H.323 address can then be entered via the numeric block.
Key mapping:
Moves the cursor left.
Moves the cursor right.
Deletes the character left of the cursor.
Clears the buffer.
Enter Dials the H.323 if entered correctly.
Cancel Aborts the dialing of the H.323 address.
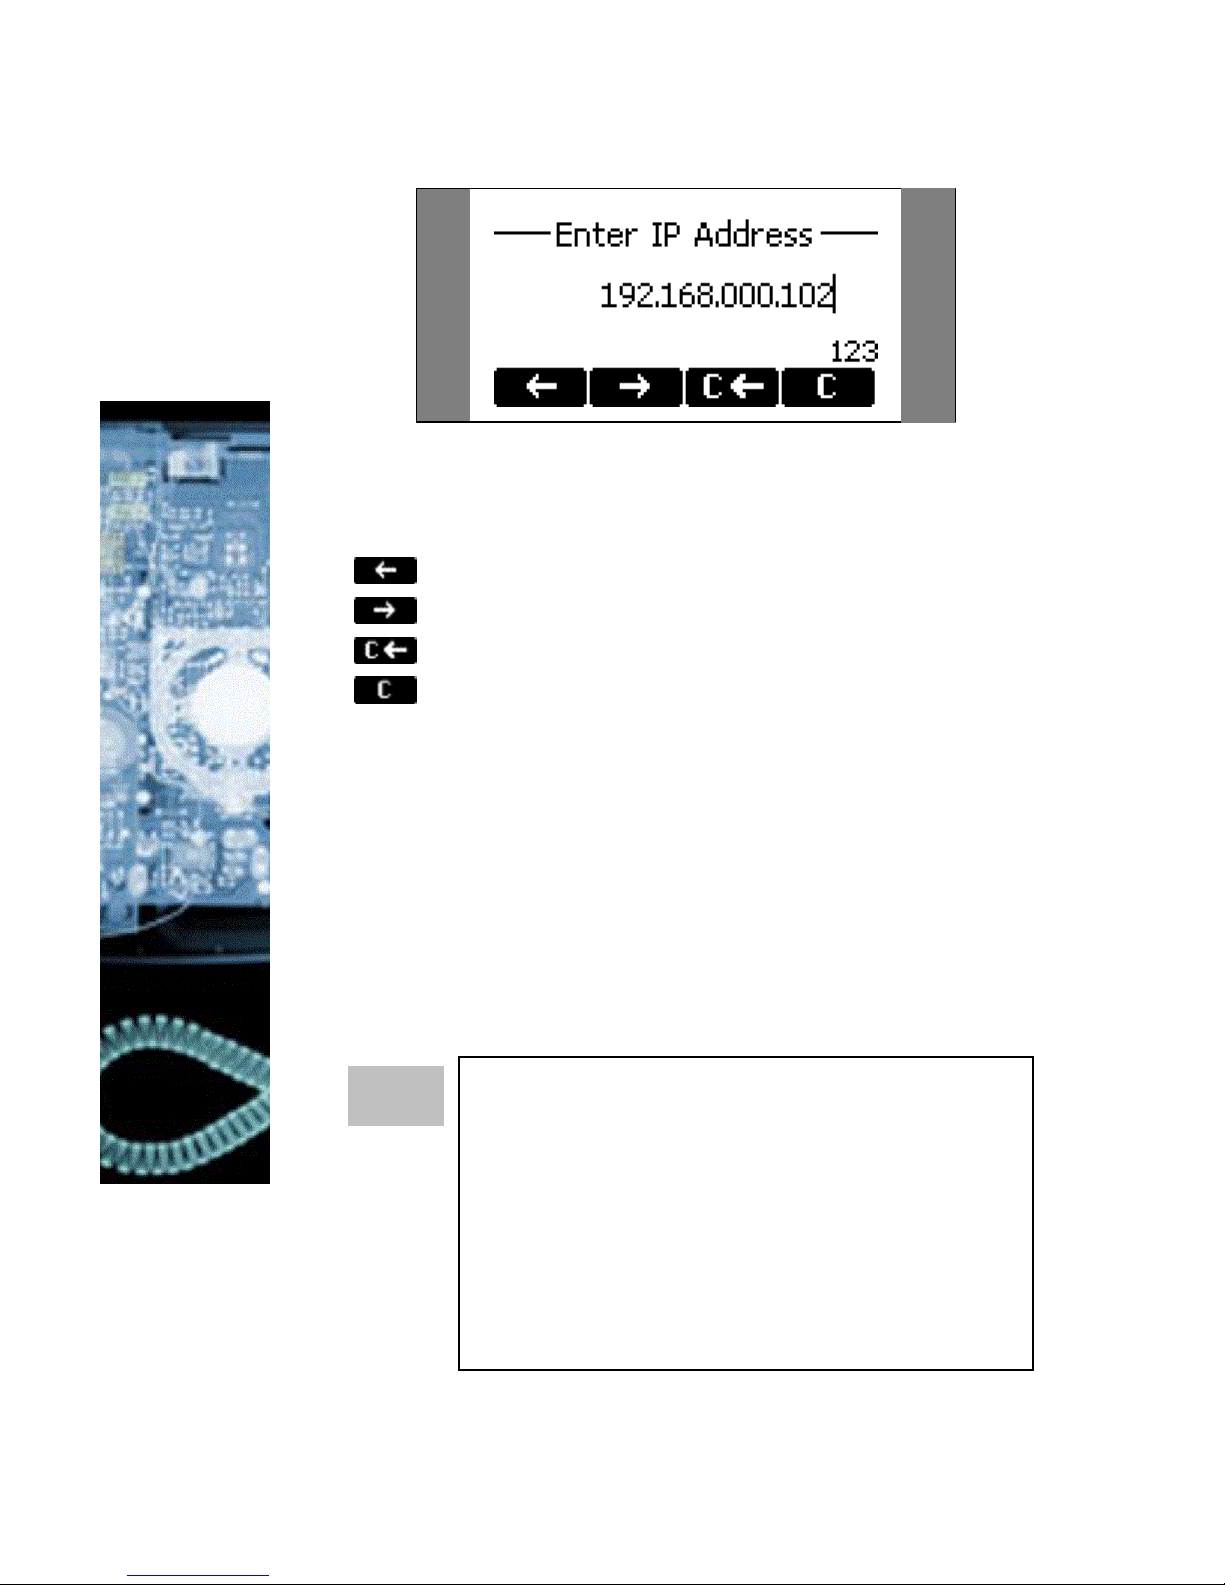
Dialing an IP Address
Pressing * will induce the IP dial mode and the respective entry mask will appear.
Page 24
24
The IP address can then be entered via the numeric
block.
Key mapping:
Moves the cursor left.
Moves the cursor right.
Deletes the character left of the cursor.
Clears the buffer.
# Jumps to the next sub field.
Enter Dials the IP address if entered correctly.
Cancel Aborts the dialing of the IP address.
Dialing an IP Address
When calling an IP address the called phone
or computer cannot determine which user
you want to reach. In SIP mode it is assumed that „anonymous“ is being called and
with H.323 no assumptions are made. This
works with a lot of phones and applications.
Therefore, you should only use this method
in exceptions and in addition the entry of IP
addresses is rather cumbersome.
TIP
Page 25

25
General Input Mode
The active input mode is indicated on the lower right
corner of the display:
123 Only digits can be entered.
+-123
Only digits can be entered. Change the sign
with * or # key.
ABC
Upper Case Mode. By pressing * lower case
mode can be toggled.
abc
Lower Case Mode. Use * to activate upper
case mode.
???
General Input Mode. Please press * for the IP
address mask and # for H.323/SIP addresses
or any digit to enter E.164 numbers.
Pressing CANCEL twice will take you back to the
General Input Mode.
Terminating a call
You can end a call by setting the handset on its cradle,
pressing the hook switch or Cancel. The snom 100 will
terminate the call and return to the idle state.
Incoming Call
When your snom 100 is called it rings and displays the
following screen.
Page 26
26
Accepting a Call
Picking up the handset or pressing Enter will accept
the call. The snom 100 is now in call.
Denying/Blocking a Call
When the snom 100 signals an incoming call, you
have the possibility to deny the call with .
If you decide to press , the caller will be placed
on the deny list and will be always automatically denied.
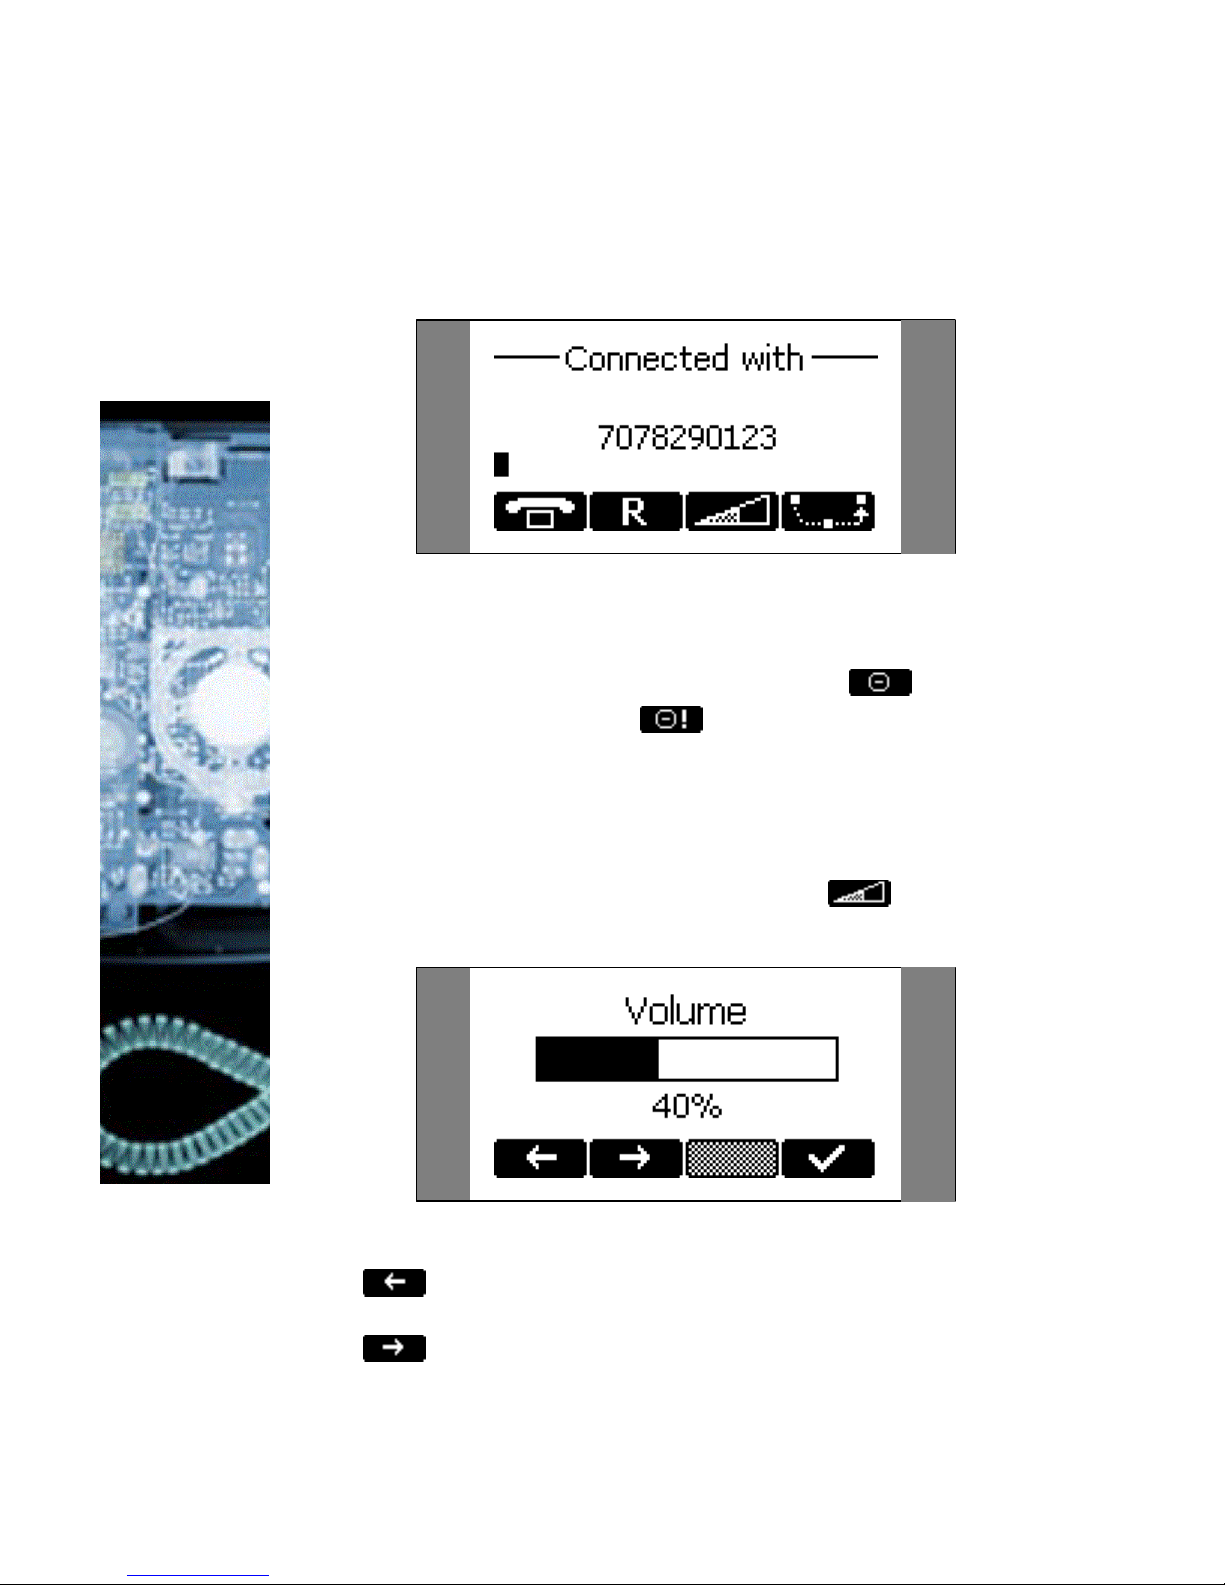
Adjusting the Volume
While conducting a call, you can use to invoke
the volume control.
Key mapping:
,4,8
Reduces the volume in single steps.
,2,6
Increases the volume in single steps.
Page 27

27
9 Reduces the volume in steps of 10.
3 Increases the volume in steps of 10.
#,7 Maximum Volume
*,1 Minimum Volume
F3 Sets the volume to the original value.
Enter Sets the volume and returns.
Cancel Returns without setting the volume.
Main Menu
By pressing the menu key in the idle state the
main menu is invoked. The following submenus are
available: Phonebook, Call List, Deny List, Tones, Settings and About.
Key mapping:
Moves the cursor down.
Moves the cursor up.
Enter Enters the submenu.
Cancel Returns to the idle state.
Page 28

28
Help Function
The snom 100 offers a context specific help.
Press the help key and an appropriate help text
depending on the state of the phone is displayed.
Page 29

29
Advanced Functions
Page 30

30
Hold and Resume
Starting State: A call is in progress.
Pressing the flash key or puts the call on
hold, i.e. the speech is set to mute. (Neither party can
hear each other.)
Another press on the R key resumes the call.
Key mapping:
,
CANCEL
The call being held and indicated on the
display is terminated.
,
Resumes the call being held and indicated
on the display.
Forwards the call that is being held.
Jumps to the next held call and brings it
up on the display.
*,#,digits,
ENTER
Can be used to initiate another call.
Toggling between calls
Starting state: a call is on hold and another is being
conducted.
Now press the flash key or , to place the
current call on hold. Then press the -key until the
Page 31
31
desired call appears on the display. After pressing the
flash key or , the previously held call is
picked up again.
Transfer
Direct Transfer
Starting state: a call is in progress.
After pressing the transfer key you are able to
dial a number.
As soon as you press ENTER the snom 100 will attempt to transfer the other party to that number.
Key mapping:
Moves the cursor left.
Moves the cursor right.
Deletes the character left of the cursor.
Clears the buffer.
Enter The snom 100 tries to transfer the call.
Cancel Aborts the transfer attempt.
Call Divert
All kinds of call diverts can be set, changed and deactivated in the „Settings/Redirection“ menu.
Page 32

32
Diverting all calls
By setting the option „Settings / Redirection / Redirect
Event“ to “always”, every incoming call is diverted
immediately to the number set in „Settings / Redirection / Redirect Number” without the phone ringing.
To disable this feature just set the „Settings / Redirection / Redirect Event“ to “off”.
Divert when Busy
By activating the option „Settings / Redirection / Redirect Event / When Busy“ every incoming call is diverted to the number set in „Settings / Redirection /
Redirect Number” if another call is already in progress.
Divert when not answered
You can set the number of seconds in „Settings / Redirection / Redirect Timeout“ after which every incoming
unanswered call is diverted to the number set in „Settings / Redirection / Redirect Number”.
Setting this value to 0 deactivates this feature.
Note: To activate immediate call divert, see above.
DTMF Tones
During a call, e.g. with a voice mail system, pressing
the digits, * or # will generate and send DTMF tones
to the other party.
Adjusting the Volume
Via the menu „Settings/Tones“ the following window is
activated.
Page 33

33
Here the volume of the load speaker in the casing, in
the handset or both can be adjusted. Select one of the
three choices and you will see a display exactly the
same or similar to the one below.
The current ring tone is played back in the selected
volume and can be used to find the desired setting.
Key mapping:
,4,8
Reduces the volume in single steps.
,2,6
Increases the volume in single steps.
9 Reduces the volume in steps of 10.
3 Increases the volume in steps of 10.
#,7 Maximum Volume
*,1 Minimum Volume
F3 Sets the volume to the original value.
Enter Sets the volume and returns.
Cancel Returns without setting the volume.
Page 34

34
Ring Tones
Via the menu „Settings/Tones“ the following window is
invoked.
Select the submenu „Ring Tones“. Here the ring tones
can be set.
The current ring tone is played back and can be used
to find the desired settings.
Key mapping:
Moves the cursor to next ring tone.
Moves the cursor to the previous ring
tone.
Enter Activates the selection and returns.
Cancel Returns without changing the ring tone.
Page 35

35
About
Via the menu „Settings/About“ the following window is
activated.
It indicates the software version that the snom 100 is
currently using.
Page 36

36
Call Register
Page 37

37
Phone Book
The snom 100 contains an internal phone book which
can be reached from the idle state of the phone by
pressing the phone book key . The entries of the
phone book are displayed in a list whereby three entries are shown simultaneously.
Key mapping:
Moves the cursor down by one.
Moves the cursor up by one.
Enters the edit mode for the selected
entry.
Dials the number corresponding to the
selected entry.
You can also press Enter or pick up the
handset to dial the number.
Enter Dials the number of the selected entry.
Cancel Returns to the idle state.
Adding an entry
In order to add a new entry, go to the end of the list
on to the line <new item>. Then enter the phone
number, last name, first name, abbreviation and
comment and confirm each item by pressing Enter.
Page 38

38
The title of the window indicates which input is expected to be made. Pressing Cancel aborts the new
entry.
Key mapping:
Moves the cursor left.
Moves the cursor right.
Deletes the character left of the cursor.
Clears the buffer.
Enter Accepts the entry.
Cancel Cancels the entry.
Editing an entry
After pressing the edit key on the entry to be
modified, the phone number, last name, first name,
abbreviation and comment will be brought up in sequence. Confirm each item by pressing Enter.
Page 39

39
The title of the window indicates which input is expected to be made. Enter accepts the data and pressing Cancel aborts the entry.
Key mapping:
Moves the cursor left.
Moves the cursor right.
Deletes the character left of the cursor.
Clears the buffer.
Enter Accepts the entry.
Cancel Aborts the entry process.
Page 40

40
Call Lists
The snom 100 maintains lists of received and dialed
calls that can be accessed by pressing the call list key
from the idle state.
Each line represents one call and three calls can be
displayed simultaneously. The first characters indicate
the direction of the call. ('->') represents an incoming
and ('<-') an outgoing call. The time and the called or
calling number follows the direction. In case the phone
book contains the number, the name associated with
it is displayed instead.
Key mapping:
Moves the cursor down by one.
Moves the cursor up by one.
Deletes the selected entry.
Dials the number of the selected entry.
You can also press Enter or pick up the
handset to dial the number.
Enter Dials the number of the selected entry.
Cancel Returns to the idle state.
Speed Dial
The snom 100 supports speed dial of up to 12 numbers. These are mapped onto the digits 0-9, * and #.
Page 41

41
Dialing
Speed dialing is initiated with the speed dial key
in the idle state followed by a digit 0-9, * or #. In this
way, 12 speed dial numbers can be called up without
having to see the display.
The mapping can be checked by pressing the speed
dial key in the idle state.
One entry is displayed at a time. The list view of numbers can be brought up by pressing .
Key mapping:
Moves the cursor down by one.
Moves the cursor up by one.
Displays the speed dial numbers in a list.
Page 42

42
Dials the number of the selected entry.
You can also press Enter or pick up the
handset to dial the number.
Enter Dials the number of the selected entry.
Cancel Returns to the idle state.
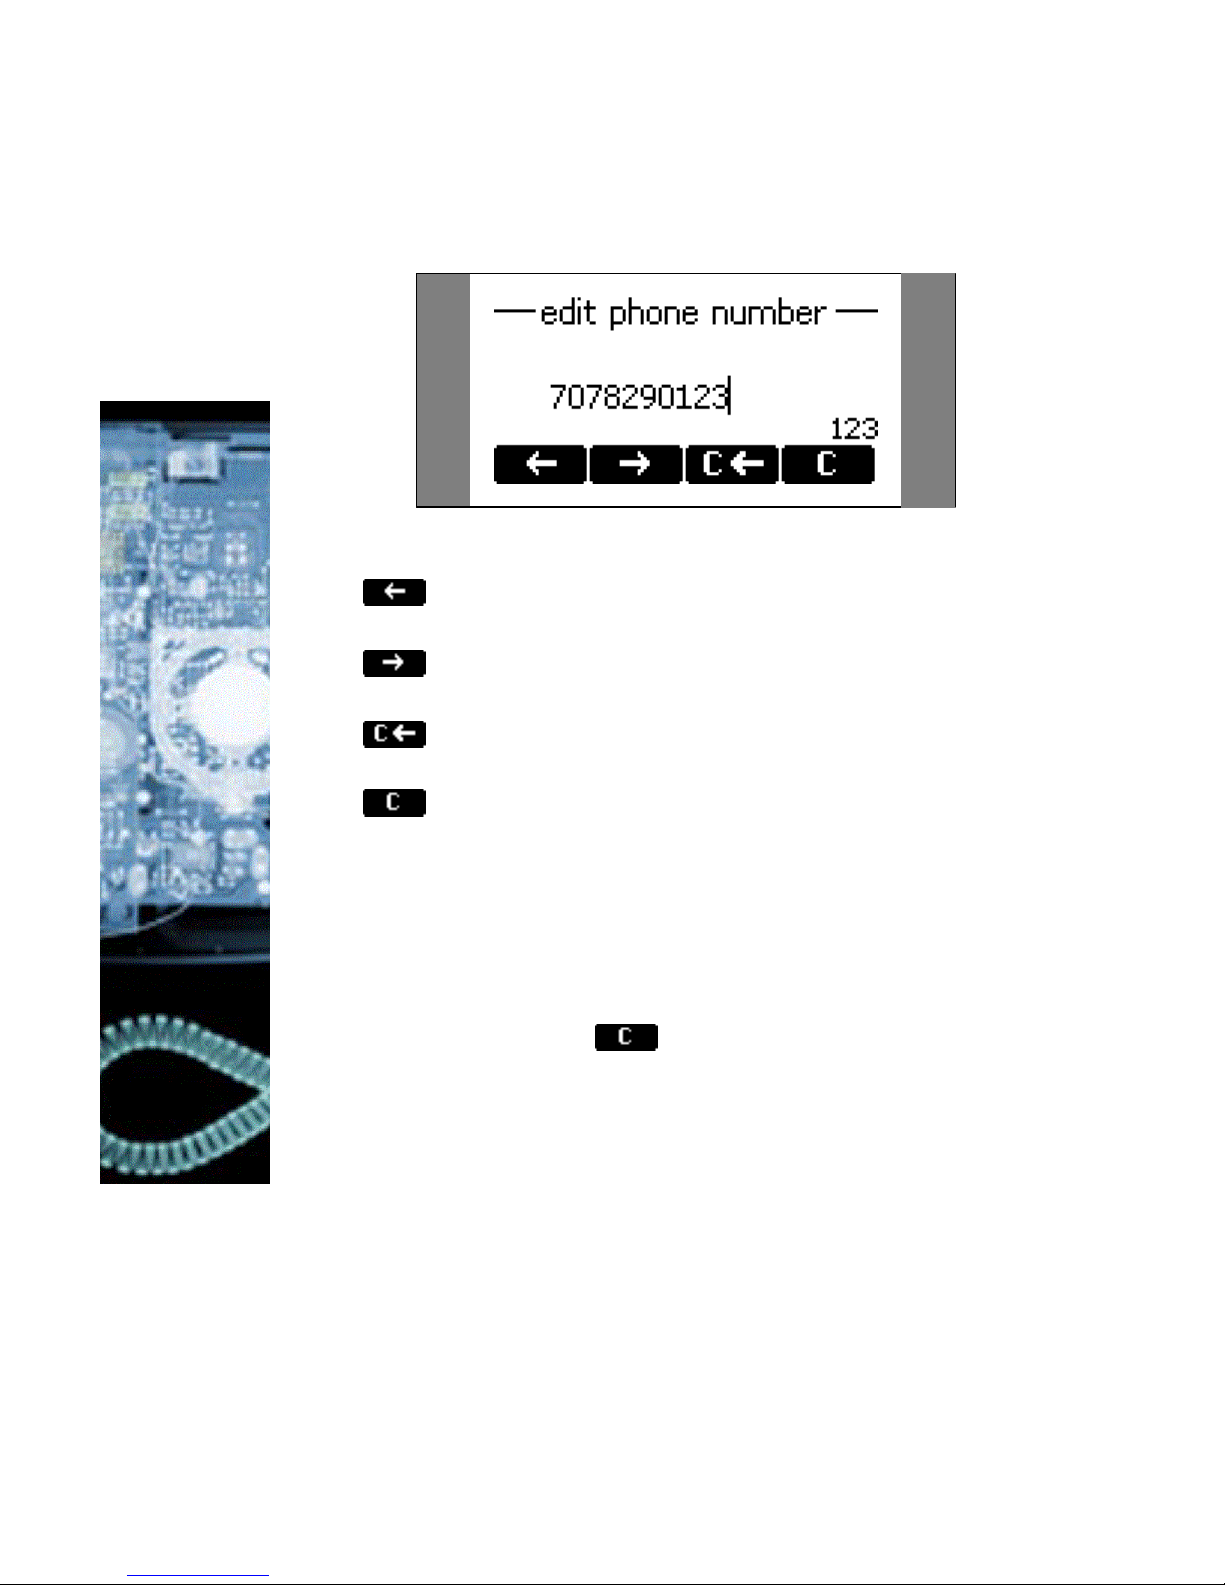
Editing speed dial entries
From the speed dial list mode (see "Dialing" above)
pressing the edit key brings up the phone num-
ber of the selected entry.
It can then be edited and committed with Enter. Cancel aborts the changes on the selected entry.
Key mapping:
Moves the cursor left.
Moves the cursor right.
Deletes the character left of the cursor.
Clears the edit buffer.
Enter Accepts the entry.
Cancel Aborts the changes.
Page 43

43
Deny List
The snom 100 gives you the option to put numbers on
deny list in order to avoid being disturbed.
Browsing
Via the submenu “Deny List” you can reach the deny
list view. Here the deny numbers are displayed in
sequence whereby three numbers are displayed simultaneously.
Moves the cursor down by one.
Moves the cursor up by one.
Deletes the selected entry.
Enters the edit mode of the selected en-
try.
Enter
Enters the edit mode of the selected entry.
Cancel Returns to the idle state.
Adding a number
When you are being called you can press the deny list
key which will not only abort the call but also
add the number to the deny list.
In addition, any number can be added to the deny list
by selecting <new item> in the deny list directly
Page 44
44
After the number has been entered it is added to the
deny list.
Key mapping:
Moves the cursor left.
Moves the cursor right.
Deletes the character left of the cursor.
Clears the edit buffer.
Enter Accepts the entry.
Cancel Aborts the changes.
Removing a number
Removing a number from the deny list is possible by
using the Clear key in the deny list view
List Views
The views of all the lists described in the previous
sections can be adjusted according to your preference.
When you are in a list you can enter the options menu
by pressing the menu button.
Page 45

45
Modifying the view
Select the entry „View Mode“ and go to one of the
submenus.
They describe which view modes are available and can
be set. Select your choice and press Enter and the list
will be displayed accordingly.
Sort Criteria
Select the entry „Sort Criteria“ and go to one of the
submenus.
Page 46

46
They describe which sort criteria are available and can
be set. Select your choice and press Enter and the list
will be sorted accordingly.
Page 47

47
Settings
Page 48

48
The settings can be specified in three different ways:
§ Via the phone
§ With a browser on a PC
§ Automatically via configuration files
Settings via the Phone Gui
Press the menu key in the idle state of the phone.
With the function keys (F1) and (F2) you can navigate
up and down in the menu. Scroll to the submenu “Settings” and press Enter.
You are now in the Settings menu and it has the following submenus:
§ Call Divert
§ Base
§ H.323
§ SIP
§ Codec
§ Network
Please use the keys and to scroll within the
Settings menu. By pressing the Enter key you can
enter the selected submenu.
Now the list of settings of the selected submenu is
displayed. Please use the and to scroll
within the list. By pressing Enter the value of the setting can be viewed or modified.
Some entries cannot be set to any value. Instead they
offer an enumerated list from which a value has to be
selected. Again, please use the and to
scroll within the list to set the desired value. The value
Page 49

49
is committed by pressing Enter. If you decide not to
change the value then press Cancel.
Other settings necessitate the editing of numbers or
strings. This can be done with the dial pad of the
phone. Digits are entered directly via the keys and
letters can be called up by pressing a key repeatedly.
You can toggle between lower case letters ("a") and
upper case letters ("A") with the (*) key.
Key mapping:
Moves the cursor left.
Moves the cursor right.
Deletes the character left of the cursor.
Clears the edit buffer.
Enter Accepts the entry.
Cancel Aborts the changes.
Settings via Browser
You may prefer to use a browser to configure the settings, which normally is easier.
The snom 100 has an integrated web server to configure its settings. If the phone is connected to a network that provides DHCP it can be immediately accessed via the browser. In case you do not want to
use DHCP you must specify the IP address, netmask,
gateway, DNS domain and DNS server statically to
ensure correct operation.
Page 50

50
Illustration 1: Web configuration
§ Start your webbrowser (e.g. Netscape, IE).
§ Enter the IP address of the phone as the URL
(e.g. 192.168.0.100). If you do not know the
IP address please ask your network administrator or have a look at your phone, press
MENU and Settings / Network / IP Addr.
§ You will find a selection menu on the top
(Phone / Settings).
§ Click on the menu item Settings.
§ Now you should see a drop down menu with
submenus appear.
§ Just click on the desired submenu (e.g. Base)
and the current settings of this submenu are
displayed.
You can now modify and store the values by using the
mouse and keyboard. Just click on the SAVE button,
which you will find in the upper/lower section, to store
Page 51

51
the changes made. If you want to discard the changes
then do NOT press SAVE.
Options
Call Divert
You can have all incoming calls diverted to a different
number. From the idle state press the MENU key and
choose ‘Settings’, ‘Redirection’ and ‘Redirect Event’
and you have the following selection:
§ Off: This deactivates all call diverts.
§ Always: All calls are diverted to the number
specified in „Phone Number“.
§ When Busy: When a call is in progress, an-
other call would be rejected and get a busy
indication. The phone can be set in such a way
that the second caller is diverted to another
number or a voice mailbox.
§ Redirect timeout: Calls are diverted after
the timeout specified.
Phone Number
Here the number to which the calls should be diverted
to is specified.
Press the menu key in the idle state and select the
submenu “Settings / Redirection / Redirect Number”.
Divert Timeout
Here the timeout in seconds after which the calls
should be diverted is specified.
Press the menu key in the idle state and select the
submenu “Settings / Redirection / Redirect Time”.
§ 0: calls are not diverted.
§ 1-n: calls are diverted after 1-n seconds.
Page 52

52
Base
Language
Your phone is able to display all texts in different languages. Just press the menu key in the idle state and
select the submenu “Settings/Base/Language” or the
equivalent if you currently have another language set.
Phone Type
Here the VoIP protocol (SIP or H.323) is selected that
the phone should use. Press the menu key in the idle
state and select the submenu “Settings / Base / Phone
Type”.
Date
In case your phone is not able to get the date from
the “Time Server”, you can set the date here. Just
press the menu key in the idle state and select the
submenu “Settings/Base/Date”.
Time
In case your phone is not able to get the time from
the “Time Server”, you can set the time here. Just
press the menu key in the idle state and select the
submenu “Settings/Base/Time”.
Desktop Style
This setting determines the look of the idle state.
“Registrations” is used to show the SIP registrations
and “Statistics” is used for calls statistics. Press the
menu key in the idle state and select the submenu
“Settings / Base / Desktop Style”.
HTTP Admin, HTTP Password
The user name and password to protect the web access to the phone.
Page 53

53
SIP
Outbound Proxy
Here the name or IP address of the outbound proxy
server is set, to which the SIP messages are sent, if
one is present. Please ask your system administrator
which value should be set within your network.
Press the menu key in the idle state and select the
submenu “Settings / SIP / Outbound Proxy”.
User Name<n>
Here the name of the nth user is set, e.g. "Fred Flintstone". Press the menu key in the idle state and select
the submenu “Settings / SIP / User Name<n>”.
Account<n>
The account of the nth user. Example : “fred” is the
account in <sip:fred@rock.com>.
Press the menu key in the idle state and select the
submenu “Settings / SIP / Account<n>”.
Registrar<n>
Here the name or IP address of the registrar server for
the nth user is set. Example : “rock.com” is the registrar in <sip:fred@rock.com>.
Press the menu key in the idle state and select the
submenu “Settings / SIP / Registrar<n>”.
Priority<n>
The likelihood with which the nth user can be found at
this phone. The value has to be between 0.0. and 1.0.
This value is used by proxies to call the phone in the
correct sequence (sequential and parallel forking proxies).
Press the menu key in the idle state and select the
submenu “Settings / SIP / Priority<n>”.
Page 54

54
Action<n>
Specifies the action the registrar should perform for
nth user. It can take on the values ‘none’, ‘redirect’ or
‘proxy’.
Press the menu key in the idle state and select the
submenu “Settings / SIP / Action<n>”.
Timespan<n>
The recommended registration time in seconds for
user<n>.
Press the menu key in the idle state and select the
submenu “Settings / SIP / Timespan<n>”.
Mailbox<n>
The sip URL of the mailbox of user<n>, e.g.
<sip:fred@mailbox.rock.com>.
Press the menu key in the idle state and select the
submenu “Settings / SIP / Mailbox<n>”.
User, Pass, Realm
A tipple needed for authentification by some proxies
and registers. The realm depends on the used product
and user name and password are mostly determined
by the proxy and registrar.
Retry1+2
The time to repeat SIP messages in milliseconds.
These should be set to 500 ms and 4000 ms.
SIP REFER
Setting this value to on will make the phone use REFER instead of BYE/ALSO. Some SIP devices need this
value to be set to ‘on’ and some to ‘off’.
DNS Addresses
Determines whether the FQHN (full qualified hostname) should be used (host.name.com) or the IP
address (192.168.0.133).
Page 55

55
Tracing
Enables and disables the tracing of the SIP signaling.
Session Timer
After the elapse of this standard timeout, there will be
an invitation refresh. Set session timer in seconds. 0
disables this feature.
H.323
H.323 ID (User name)
This can be used to enter the H.323 ID (e.g. Fred
Flintstone). This may have to match a value in the
gatekeeper. Ask your administrator whether and
which value should be used.
Press the menu key in the idle state and select the
submenu “Settings / H.323 / H.323 ID”.
E.164 Number (Phone number)
This can be used to enter the E.164 (e.g. 123). This
may have to match a value in the gatekeeper. Ask
your administrator whether and which value should be
used.
Press the menu key in the idle state and select the
submenu “Settings / H.323 / E.164”.
H.323 URL ID
This can be used to enter the H.323 URL ID (e.g.
Fred@Flintstone.com), which is intended to contain
standard URL schemes that maybe used to register as
a resource. This is helpful for other entities to resolve
the address of this H323 entity. Ask your administrator whether and which value should be used.
Press the menu key in the idle state and select the
submenu “Settings / H.323 / URL ID”.
Page 56

56
GK/GW Mode
The VoIP phone can be used with a gatekeeper, gateway or none. Please ask your system administrator
which value should be set within your network.
Press the menu key in the idle state and select the
submenu “Settings / Network / GK-GW Mode”:
§ Gatekeeper: The phone is in gatekeeper
mode. Set the IP address of the gatekeeper in
“Settings / Network / GK-GW Address”.
§ None: The phone is used without a gate-
keeper and without a gateway.
§ Auto: The phone is in gatekeeper mode but it
uses a multicast to automatically detect it.
§ Gateway: The phone is in gateway mode. Set
the IP address of the gateway in “Settings /
H.323 / GK-GW Address”.
GK/GW Address
Whether the phone is set to gatekeeper or gateway
mode (see "GK-GW Mode") here the IP address is set.
Press the menu key in the idle state and select the
submenu “Settings / H.323 / GK-GW Address”.
Fast Start
FastStart sends encoded OpenLogicalChannel messages in the Setup messages and hence eliminates the
need for an H245 channel i.e. if the other party is also
supporting fastStart. This feature in H323 is optional
so it can be ignored by an endpoint not supporting this
feature. Press the menu key in the idle state and select the submenu “Settings / H.323 / Fast Start”.
§ On: „Fast Start“ is enabled.
§ Off: „Fast Start“ is disabled.
Early Start
The EarlyStart option allows the H245 channel to be
setup earlier, and hence speeds up the call setup.
When EarlyStart is turned on, the H245 channel address is also supplied in the Setup message. This
Page 57

57
speeds up the call setup because the H245 Channel
negotiations can proceed in parallel to H225. Press the
menu key in the idle state and select the submenu
“Settings / H.323 / Early Start”.
§ On: „Early Start“ is enabled.
§ Off: „Early Start“ is disabled.
H.450 Services
The menu item ‘Settings’ / 'H323' / 'H.450 Services'
can be used to toggle between H.450 and facility
based supplementary services (hold, divert, etc).
§ on: H.450 active.
§ off: facility based.
Codecs
Packet Size
The snom 100 converts speech into data packets. With
this setting the payload size of the packets can be set
in terms of milliseconds. Please as your administrator
which value is adequate.
Codec
The preferred codec your phone should use. Currently
‚U-law’, ‚A-law’ and ‚G.729A’ are used.
Only one codec
Only the preferred codec is accepted.
Network
MAC Address
This is the identity of the Ethernet interface and is
unique to each snom 100. This value cannot be
changed.
Page 58

58
IP Address
Here you can setup the IP-Address of the phone directly.
Netmask
Here the IP netmask (e.g. 255.255.255.0) is set.
DNS Domain
This field determines the DNS domain (e.g. company.com).
DNS Server 1, DNS Server 2
Use these fields to specify the DNS server or servers
to be utilized (z.B. 123.45.67.89).
DHCP
Enable this feature if you want a DHCP server to set
other network fields. Depending on how the server is
configured you still might have to specify a few fields.
IP Gateway
This value is needed to send IP packets to destinations
outside the local ip network. This is not the H.323
gateway which is set under ‘H.323’ and ‘Gk/GW Address’!!!
Hostname
Here you can set the hostname (“snom1”) of the
phone. Do not specify one if the name cannot be resolved by your network since your phone may not
work correctly if it is not identified by others.
UTC offset
Enter the number of seconds that your timezone differs from UTC / GMT (e.g. +3600 for CET). Corrections for summer time have to be set elsewhere (see
below).
Page 59

59
Time Server
Here the time server is specified from which your
phone retrieves the UCT / GMT time. Corrections for
the summertime and timezone have to be set in addition.
Daylight Saving Time
This setting is used to specify when summer time is
adjusted each year. It must be set via a browser or in
a configuration file since it can be very elaborate.
Format:
offset mm.ww.tt hh:mm:ss mm.ww.tt hh:mm:ss
The month (mm) is a value between 01-12. The week
(ww) refers to the 01.-05. week, whereby values
greater than 4 are always interpreted as the last week
in the month. The days (tt) represent the weekdays
from Monday to Sunday whereby 01-07 are the values.
Example:
3600 03.05.07 02:00:00 10.05.07 03:00:00
represents Sunday (07) of the last week (05) in
March (03) and the time is adjusted at 2 o’clock
(02:00:00) by one hour (3600 seconds) forward. And
on Sunday (07) in the last week (05) of October (10)
at 3 o’clock (03:00:00) the time is turned back again
by one hour.
NFS Server
This is a special entry for developers that are using a
kernel that mounts NFS.
NFS Root Directory
This is the root directory that the phone should mount
via NFS (developer version only). The default value is
“/tftpboot/disk”
Page 60

60
LCServer 1, LCServer 2
Here alternative application servers can be set. This
might be desirable if functionality is used that does
not fit into the phone such as H.323 tracing. Normally
the phone uses the local server and does not explicitly
have to be set. The second entry is only used as a
backup.
PPPoE User, PPPoE Pass, PPPoE AC Name, PPPoE
Dienst, PPPoE Extra, PPPD Extra
These settings are used to connect the snom 100 to
DSL networks But you need a special version – please
contact us if you are interested.
Page 61

61
Settings Server
If you want to configure the settings via a settings file
over the network then please enter the URL of the
settings file here. The settings server can be an HTTP
or a TFTP server.
Examples:
§ tftp://192.168.0.9/snom100.cnf
§ http://www.company.com/phone_settings/sno
m100.htm
§ 130.149.12.54 (is implicitly converted to
tftp://130.149.12.54/snom100.cnf)
HTTP Proxy
If you do not have direct access to the internet and
need to use an HTTP proxy then specify it here.
Reset Values
When you select this menu point the factory settings
are activated and the other settings removed. Thus,
make sure you only use this if you have to !
TFTP
TFTP is a simple protocol to exchange data
files. It is based on UDP and has a very simple message format. Since it is easy to implement, vendors often use it to transfer
simple configuration.
The snom 100 uses it to upload flash updates and configurations. Ensure that the
phone has access to a TFTP server in order
to utilize its full potential.
TIP
Page 62

62
Administration
Page 63

63
This chapter is meant for people that
want to install the phone in a VoIP network. It has to be ensured that the necessary rights exist to perform this task.
Automatic Installation and
Booting
In order to get the device running, the settings that
have been described in the last chapter have to be set
up. The snom 100 provides a mechanism that allows
complete automatic installation without the need of
user interaction.
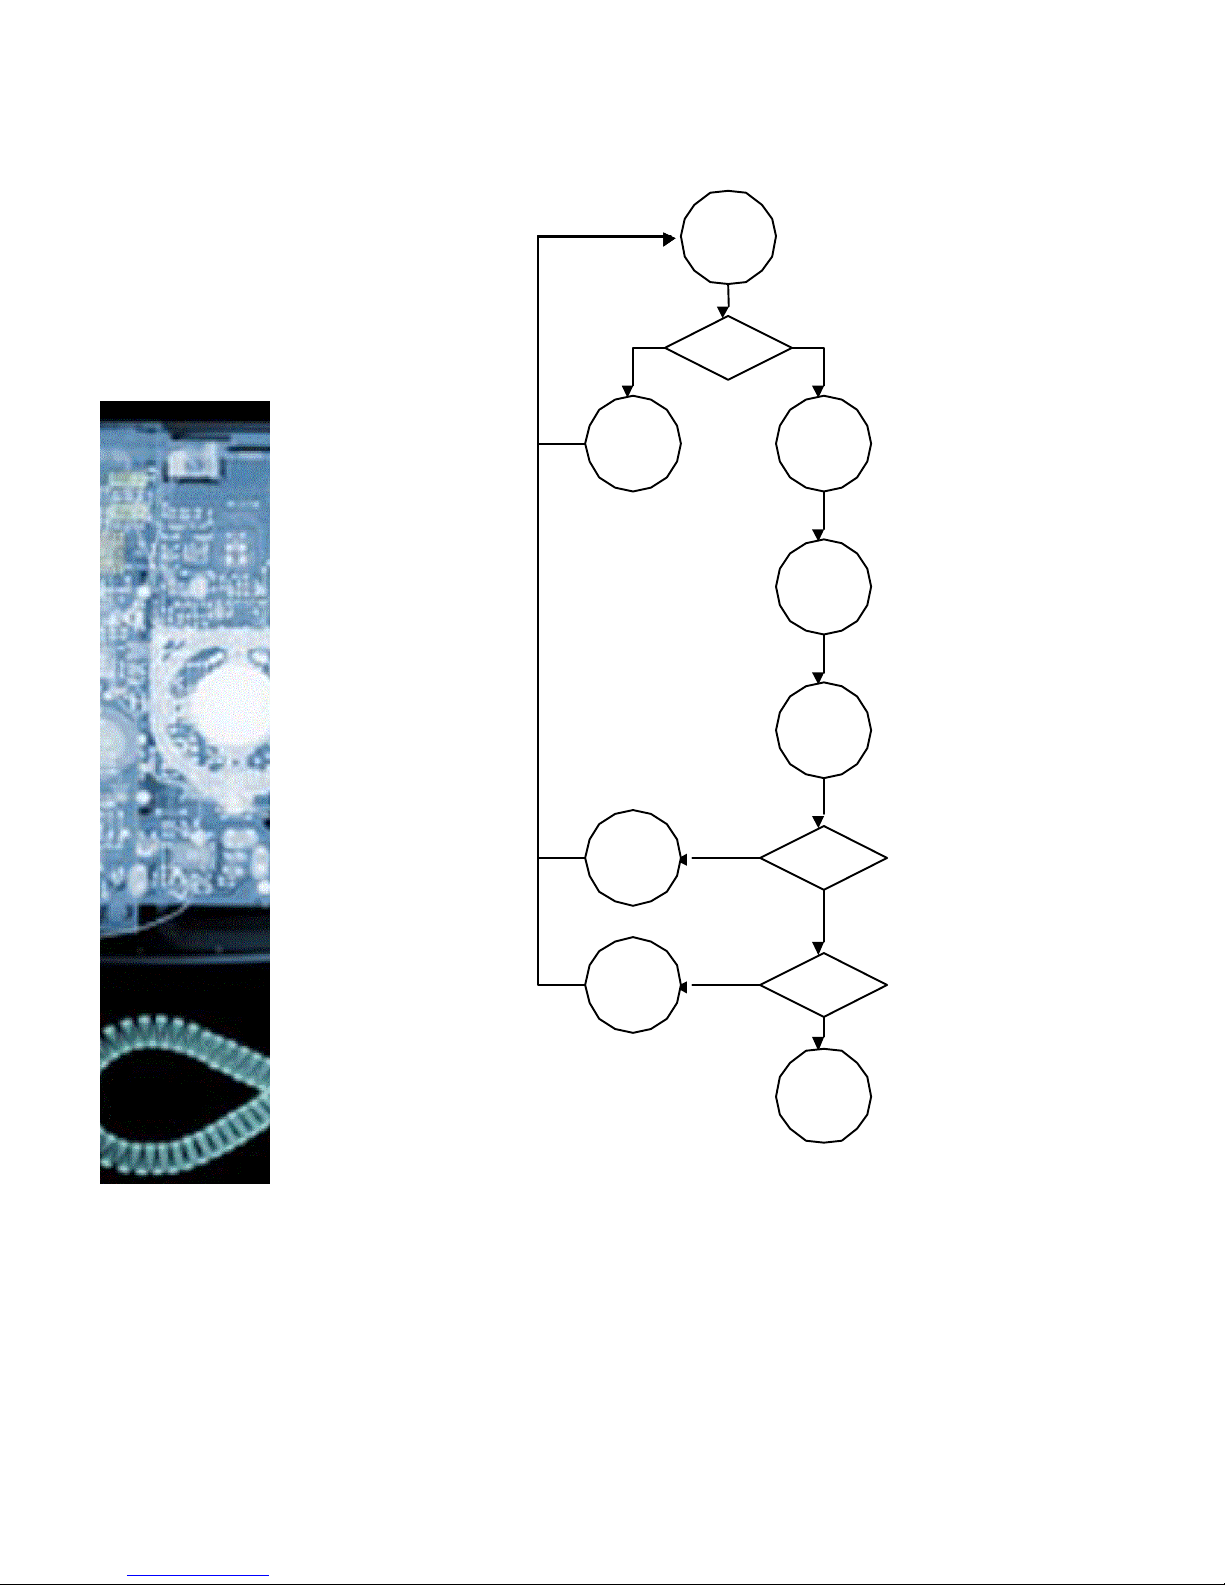
Overview
Fig. 1 illustrates the bootstrapping mechanism. After
powering up, the phone checks if the user presses a
key. If this is the case, the boot loader allows a manual update of the flash content. Otherwise, the phone
reads the generic settings and the specific settings for
that phone. It retrieves the software version number
that is available for updates and compares this to the
stored versions on the phone. If newer versions are
available and the user confirms an update, the latest
boot loader or firmware versions are downloaded into
the flash. If no update is necessary, the phone starts
up.
!
Page 64
64
New?
New?
Start
Manual
Update
Get
Version
Get
Boot-
loader
Run Key?
Get
Firm-
ware
Generic
Setting
Specific
Setting
Fig. 1: Booting of the phone
Page 65

65
Manual update
Manual update is only needed when the usual phone
update mechanism gets stuck. This could happen
when for some reason, important settings on the
phone are read-only and the user cannot set up the
correct IP address, net mask and so on.
The manual mode erases all settings so that the
phone has to be setup again. However, in a proper
setup environment, this is done automatically.
To get into manual update mode, keep the cancel key
pressed during start up. The phone will prompt for
§ an IP address,
§ the net mask,
§ the default gateway,
§ a tftp server.
In this mode, the keyboard is mapped according to
the following description:
Function keys F1 or F2 move to the next (">>") or
previous ("<<") entry. To delete the last Character
enter F3 ("Del") and to delete the whole entry use F4
("Clr"). * and # skip to the next sub section of an IP
address.
After entering the required information and pressing
enter, the phone will try to get the image
“snom100.bin” from the tftp server. Therefore, you
have to set up a tftp server. (See the Linux documentation or for Microsoft Windows operating system ask
our support or FAQ list).
You can get images from www.snom.de/download.
The latest software versions are shown in
www.snom.de/download/snom100-firmware.htm. Do
not use the boot loader, use the firmware link instead.
Remember to rename the downloaded images to
“snom100.bin“.
Page 66

66
Phone settings setup
Settings are non volatile name/value pairs that are
stored in the flash of the phone. They include registration information, dialed numbers, network settings
and other information that should be available after
rebooting.
Settings can be made read only and even made invisible on a per setting basis. This is useful in environments where an operator sets up the phones and
wants to avoid that users change settings that affect
the stability of the phone. This way, expensive trouble
ticket searching can be reduced and the total cost of
ownership of the phone be minimized.
Setting files
Setting files are ASCII based files containing lines
(terminated with newline or carriage return/newline
pairs). Comments start with a # or a < character. The
< characters easily allows integration of html tags.
Names may consist of the characters a-z, A-Z, 0-9
and _. Appending a name with a ! character means
this setting becomes writable by the user, appending a
name with a # means this variable is not even visible
to the user (note: the invisible feature is not implemented in the current version of the web server and
the phone interface). Appending the name with a &
states that the setting is read only, this is the default.
If a setting is marked writable, the value in the setting
file is only written to the phone if that setting has not
been set up so far at the phone.
A sample file looks like this:
<html>
<pre>
#This is a default setting file
#
phone_name: fred
Page 67

67
#user may select H323/SIP on his own,
snom100-SIP is default:
phone_type!: snom100-SIP
</pre>
<html>
Downloading procedure
Settings are downloaded from web servers or from
tftp servers. http is a very powerful way to get configuration information from anywhere in the world, tftp
is available to allow backward compatibility to some
older devices from other vendors. The location of a file
is described in a URL fashion, http files begin with
http://, tftp files with “tftp://”. If no prefix is given, it
is assumed that it is a tftp file (this is to allow backward compatibility).
Settings are set up in the following steps:
1. The settings that were stored in the flash
memory are read.
2. DNS is set up. This allows the phone to get
settings from internet URLs.
3. The phone reads its generic settings. Therefore, it checks the setting “setting_server” and
loads the settings stored in the provided URL.
If this setting has not been set up, the phone
checks
“http://www.snom.de/snom100/snom100.htm
”. For the description of the file format, see
below.
4. The phone repeats step 3 with a different filename that contains its MAC address. The MAC
address is a unique identification ID of
Ethernet devices, snom devices have the form
“000413xxxxxx”, where xxxxxx is a hexadecimal number identifying the snom device.
The MAC address is prepended with a “-“ and
put before the last dot in the URL. An example
would be
Page 68

68
“http://www.snom.de/snom100/snom1000004130214EF.htm”.
5. The “de facto” settings are added. These settings may differ from what has been setup
e.g. because DHCP has changed them. These
settings include:
a. the IP address of the device,
b. the net mask,
c. the IP gateway,
d. the hostname,
e. the DNS domain, first and second DNS
server,
f. the UTC offset in seconds,
g. the time server,
h. DHCP on or off
Page 69

69
Available Settings
Basic
language:
Selects the language. Currently,
English, German, Polish, Croatian
and Serbian are supported.
current_date, current_time:
Current time and date. These
settings can be controlled through
the network setting maintenance
procedures; however using a time
server is encouraged instead.
phone_type:
Identifies the phone as H323 or
SIP device. "snom100-SIP"
makes it a SIP device (default),
"snom100-H323" a H323 device.
desktop:
Desktop style. Currently, "reg" for
showing SIP registrations and
"stat" for showing call statistics
are supported.
http_pass,
http_user:
Username and password for accessing the embedded web server
on the phone.
SIP Settings
user_realname[17]:
This is the name that is displayed
as user name, e.g. "Fred Feuerstein". Don’t add the quotes, this
is done automatically.
user_name[1-7]:
The account names for line x.
Example: For
<sip:abc@bla.com> the
user_name would be abc.
user_host[1-7]:
The registrar for the line x. Example: For <sip:abc@bla.com>
Page 70

70
the user_host would be bla.com.
user_q[1-7]:
The probability of the registration. It can be a value between
0.0 and 1.0. This probability is
used by some proxies to call the
registered phones one by one
(sequential and parallel forking
proxy).
user_action[1-7]:
The action that should be performed by the registrar. It can be
none, proxy and redirect.
user_expiry[1-7]:
The proposed expiry time of the
registration in seconds.
user_mailbox[17]:
The SIP url of the mailbox associated with the line, e.g.
<sip:abc@mailbox.bla.com>.
auth_realm[1-9],
auth_user[1-9],
auth_pass5[1-9]:
A tuple for proxy and registrar
authentication. The realm depends on the used product, the
user name and the password can
usually be set up on the proxy
and registrar.
sip_proxy:
The name of the outboundproxy
that is used for calling.
sip_retry_t1,
sip_retry_t2:
The time for resending SIP messages in ms. Should be set to
500 ms and 4000 ms.
trace:
Enable trace log files. Set to true
or false.
session_timer:
Default time for session timer in
seconds. 0 disables the session
timer, 3600 is a reasonable
value.
sip_refer:
Use REFER instead of BYE/Also.
Some SIP equipment needs this
flag to be set to false.
Page 71

71
Redirection
redirect_event:
Event that causes redirection. "all"
redirects always, "none" never,
"busy" when the phone is in use
and "time" after a timeout.
redirect_number:
The redirect target. If the proxy
executes the redirection, this may
be a comma seperated list of alternate destinations (including probabilities). Examples: tb,sf or
<sip:tb@snom.de;q=0.8,sf@snom.
de;q=0.9>.
redirect_time:
Number of seconds for redirection
timeout.
Codec Settings
codec_name:
Name of the preferred codec.
Currently, "ulaw", "alaw" and
"g729" are supported.
codec_excl:
If set to true, only the preferred
codec is offered.
packet_size:
Packet size in bytes. Affects only
ulaw and alaw codecs (other
codecs have fixed size).
Network Settings
setting_server:
URL of the settings file. Can be
http or tftp (default). Examples:
tftp://192.168.0.9/snom100.cnf,
http://www.mycompany.com/pho
ne_settings/snom100.htm,
130.149.12.54 (defaults to
tftp://130.149.12.54/snom100.cnf
)
Page 72

72
http_proxy:
Set the http proxy for outgoing
http requests.
ip_adr:
The IP address of the device.
Changing this parameter requires
a reboot.
netmask:
The net mask for the device.
Changing this parameter requires
a reboot.
update_server:
IP address of the server that may
serve the flash update file.
dns_domain:
The DNS domain. Changing this
parameter requires a reboot. This
parameter is mandatory in order
to enable DNS searching.
dns_server1,
dns_server2:
Server that may be used for DNS
searches. Changing this parameter
requires a reboot. Setting one of
these parameters is mandatory in
order to enable DNS searching.
dhcp:
Use DHCP ("dhcp") or do not use
DHCP ("off").
gateway:
The IP gateway IP address (not
the VoIP gateway !!!).
phone_name:
Name of the phone. If this parameter is available, it is used for
identifying the device in SIP sig-
naling.
utc_offset: UTC Offset in seconds.
time_server: Address of the time server.
dst:
Daylight saving time that observes
yearly change and leapyears.
Format:
offset mm.ww.tt hh:mm:ss
mm.ww.tt hh:mm:ss
ppp_user,
ppp_pass:
PPPoE user name and password.
You need a special software ver-
sion to make use of these.
Page 73

73
ppp_acname,
ppp_servicename,
ppp_pppoe_extra,
ppp_pppd_extra:
PPPoE settings – you need a special software version to make use
of these.
lcserver1,
lcserver2:
Addresses of alternative LCServer
(leave blank to use local LCServer
on device).
H.323 Settings
gkgw_mode:
Gatekeeper or gateway
mode. Can be “auto” (automatic discovering) or "gatekeeper" for using the gatekeeper mode, "gateway" for
gateway mode and "none"
for autonomous operation.
h323_gateway:
IP address of the gatekeeper
or the gateway, depending
on gkgw_mode (see above).
early_start:
The “early start” option allows the H245 channel to be
setup earlier, and hence
speeds up the call setup.
When “early start” is turned
on, the H245 channel address is also supplied in the
Setup message. This speeds
up the call because the H245
Channel negotiations can
proceed in parallel to H225.
fast_start:
“Fast start” sends encoded
OpenLogicalChannel messages in the Setup messages
and hence eliminates the
need for an H245 channel i.e.
if the other party is also supporting “fast start”. This feature in H323 is optional so it
Page 74

74
can be ignored by an endpoint not supporting this feature.
h323_h450:
Flag if set to “true”, H450
supplementary services are
used, otherwise facility
based.
h323_e164_number:
E164 number assigned to the
phone.
h323_ID:
H323 id assigned to the
phone.
h323_URL_ID:
H323 URL id assigned to the
phone.
Updating the software
VoIP is a technology that is changing rapidly. Shipping
phones with a fixed set of functionality makes them a
bad investment. Customers expect free software upgrades when additional features are available and
known problems are fixed.
For this reason, after initializing the settings, the
snom100 checks for new software releases. This is
done in three steps:
1) First of all, the file located in the setting
“firmware_status” is downloaded on the
phone. The setting may contain an http or a
tftp URL. Loading this small file avoids big
network traffic, usually these files are below
500 bytes. The firmware_status setting is not
available to the user; however it may be controlled through the network setting mechanism. This allows operators to take control of
the update frequency and the software revisions.
2) It compares the given boot loader URL with
the URL that has been stored with the last update (in setting “bootloader”). If it differs, the
user is prompted for acknowledgement and
the new boot loader is loaded from the web
Page 75

75
site. If this succeeds, the boot loader flash
area is erased and the new boot loader is copied into this location.
Updating the boot loader is dangerous. If the
user disconnects the power during erasing and
writing of the boot loader (approx. 15 seconds), the device is permanently broken and
there is no way to recover. If the user pulls
the power plug during the download process,
there is no harm to the device. Therefore, boot
loader image update should only be done if
there is a strong need for this.
3) The same mechanism is applied to the firmware (setting “firmware”). Because the firmware is much bigger, the download and writing
procedure takes significantly longer (approx. 2
minutes on a DSL line). However, if the power
fails during the erase and write procedure, the
device can be recovered. For this purpose, it
needs an update using the boot loader and
tftp.
An example file:
<html>
<pre>
# This is a comment
bootloader:http://www.name.de/conf/boot14.bin
firmware: http://www.name.de/conf/image19b.bin
</pre>
<html>
Case study: com88
Scenario
Let us assume that com88 is a large operator that
offers its clients worldwide flat rate VoIP telephony.
Along with a number of other services like web host-
Page 76

76
ing, free email, and internet appliance management.
com88’s has become big because their customers like
having the SIP accounts that match their email accounts. com88 offers its clients a number of phones,
including the snom 100.
Most of the com88 clients have private IP addresses
and use a SIP enabled firewall that keeps out unwanted access to their network but allows SIP telephony.
After signing up at www.com88.com, snom receives
an order to prepare three devices for com88 and ship
them to the given address. Before shipping, snom
marks the phones as “com88”-phones in their database and ships the devices together with a firewall to
the customer.
The customer installs the firewall into his or her DSL
outlet and connect the phones to the firewall (using a
hub, eventually connecting other devices like PCs as
well). The firewall powers up and receives its IP address via DHCP from com88. The phones start up and
receive their IP addresses and the necessary network
information from the firewall.
The phones now perform the following steps:
1) Because there are no settings stored on the
device, it connects to
http://www.snom.de/snom100/snom100.htm
and reads the settings that have been stored
there. In our case, nothing important is in
there.
2) It then reads the device specific file
http://www.snom.de/snom100/snom1000004130032FE.htm. The snom web server
checks in the database, which operator has
received the phone with the MAC address
0004130032FE and sends the configuration information for com88 to the phone. This information contains the URL for the com88
phones.
3) The phone reboots again and now checks
com88-config.com/snom100.htm. com88 has
Page 77

77
put the snom specific configuration information onto that web page like SIP proxy and the
preferred desktop appearance. It also includes
the URL for flash updates, which com88 wants
to have in their hands.
4) The phone retrieves a new flash image from
com88.
5) The phone reboots with the new image and
again checks the generic com88 settings.
6) The phone then goes to com88config.com/snom100-0004130032FE.htm and
retrieves the phone specific information like its
phone number, the users SIP URL and the
preferred ringing melody.
7) The phone gets the settings and registers with
the com88 proxy.
The user picks up the phone, calls his friend in Australia and happily reports that he has just installed a
VoIP system.
Behind the scenes
To make this happen, com88 has prepared the infrastructure:
1) com88 has set up a DHCP server that grants
clients a public IP address in their network.
2) Because com88 wants to keep traffic off its
main web server, it decided to put configuration serving on a different server, called
com88-config.com. com88 has given this URL
to snom, so that the com88 customers get redirected to that URL.
3) The generic settings are put into a file that
looks like this:
<!DOCTYPE HTML PUBLIC "-//W3C//DTD HTML 4.0
Transitional//EN">
<html>
<pre>
sip_proxy: com88.com
</pre>
</html>
Page 78

78
The <pre> tags indicates that the content in this file is
not really html, so that displaying this file with a web
browser does not cause confusion. Additionally, it allows the file to pass through any firewall.
4) To set up a new customer account, com88 has
written a small html generation program that
looks like this:
#!/bin/bash
# usage: mac name email-name tel-nr
mac=$1
name=$2
email=$3
tel=$4
file=/usr/local/httpd/htdocs/snom100-$mac.htm
echo <!DOCTYPE HTML PUBLIC "-//W3C//DTD HTML
4.0 Transitional//EN"> >$file
echo <html> >>$file
echo <pre> >>$file
echo sip_realname: $name >>$file
echo sip_user1: $email >>$file
echo sip_user2: $tel >>$file
echo sip_host1: com88.com >>$file
echo sip_host2: com88.com >>$file
echo sip_q1!: 1.0 >>$file
echo sip_action1: proxy >>$file
echo sip_q2!: 1.0 >>$file
echo sip_action2: proxy >>$file
echo </pre> >>$file
echo </html> >>$file
Typical output looks like this:
<!DOCTYPE HTML PUBLIC "-//W3C//DTD HTML 4.0
Transitional//EN">
<html>
<pre>
sip_realname1!: Fred Flintstone
sip_user1: fred.flintstone
sip_user2: 9728318632
Page 79

79
sip_host1: com88.com
sip_host2: com88.com
sip_q1!: 1.0
sip_action1: proxy
sip_q2!: 1.0
sip_action2: proxy
</pre>
</html>
To update the settings of a specific phone, the operator has a small program that causes rebooting of a
specific phone. The phone reboots immediately if the
phone is free, or 30 seconds after the user has released the phone.
Page 80

80
Setting the Network Identity
The phone needs to have a network identity to be able
to communicate. These values are the IP address and
the network mask. A few other base settings are
needed aswell to make the configuration of the phone
over the network, easy and comfortable. There are
basically two methods to set up the basic settings:
§ DHCP (Dynamic Host Configuration Protocol).
With this protocol a server provides the settings and local settings of the phone are overridden.
§ Phone Configuration. Here the settings are en-
tered via the dial pad and stored in the flash.
Installing DHCP
DHCP is an option to manage networks centrally. Especially for larger number of phones this represents
an elegant method to administer them. Manual installations should only be used in smaller networks.
Windows 2000
Ensure that you have installed DHCP on the server.
You can verify this by going to Start, Configuration,
System Settings, Administration, Server Configuration, Network, DHCP and follow the instructions of the
wizard. Invoke the DHCP manager.
Page 81

81
The snom 100 behaves like a normal PC running under Linux. Most of the DHCP parameters can thus be
set, as this would be normally done. The vendor specific options in the DHCP option field 43 are set in an
ASCII string that contains the format Option1=Value1:Option2=Value2: etc (This string can be
edited comfortably when clicking on to the ASCII field
on the right side). Please ensure that your input starts
with the first character on the left.
Page 82

82
The following options have an influence on the snom
100:
Option Typical Value
002 Time Offset 7200
003 Router 192.168.0.1
004 Time Server 192.168.0.9
005 Name Server 192.168.0.9
006 DNS Server 192.168.0.9, 174.129.1.129
012 Hostname Phone123
015 DNS Domain
Name
intern.snom.de
Make sure that DHCP is activated in case you want to
utilize it.
Page 83

83
Windows does not offer a TFTP-Server. It has to be
obtained from another provider to make a flash update possible on a Windows system.
Please note that DHCP settings have precedence over
other methods to set values.
Page 84

84
Linux
The DCHP settings are set in the file /etc/dhcpd.conf
when using Linux (see dhcpd(8)). A sample dhcp.conf
file for three phones with the serial numbers 1, 2, 3
could look like the following:
# dhcpd.conf
option domain-name "intern.snom.de";
option domain-name-servers 192.168.0.9;
option time-offset 3600;
option time-servers 192.168.0.9;
option root-path “/tftpboot/disk”;
option ntp-servers 192.168.0.9;
option subnet-mask 255.255.255.0;
default-lease-time 600;
max-lease-time 7200;
subnet 192.168.0.0 netmask 255.255.255.0 {
range 192.168.0.50 192.168.0.99;
option broadcast-address 192.168.0.255;
option routers 192.168.0.1;
}
host snom1 { hardware ethernet 00:04:13:00:00:01;
fixed-address snom1; }
host snom2 { hardware ethernet 00:04:13:00:00:02;
fixed-address snom2; }
host snom3 { hardware ethernet 00:04:13:00:00:03;
fixed-address snom3; }
Please note that DHCP settings have precedence over
other methods to set values.
Page 85

85
Appendix
Page 86

86
Technical Data
Display: 128 x 64 Pixel (SW)
Keyboard: 20 alphanumeric keys
Size: 18,5 x 17 x 7 cm
Weight: 550 g (incl. handset)
Handset: 130 g, headset (optional)
LAN: 10/100 MBit (auto sense, Power
over LAN)
Protocols: SIP (timer, refer), H.323 (H.225,
H.245, H.450) and LPCP
Codecs: G.711 (A-law and U-law), G.729A
QoS: TOS class 5
Administration: http, tftp, dhcp
Remote access: telnet, ftp (optional using NFS)
Miscellaneous: DNS, NFS (for developers) and SNTP
Operating Sys.: Linux (Version 2.4.3)
CPU: MPC855T, 4 MB Flash and 16 MB
RAM
Page 87

87
Standard Conformance
Name and Address of Manufacturer
snom technology AG
Pascalstraße 10
10587 Berlin
The snom technology AG assures that the product
Type: VoIP Phone
Model: snom 100
conforms with the following standards
EMC standard 89/336/EWG incl. all appendices
Low voltage standard 73 / 23 / EWG
Safety Standards
EN 60950 1992 incl. all appendices
Electromagnetic Standards
EN 55022 / 9.98 Class B
EN 55024 / 9.98
EN 61000-3-2/1995+A1/1998+A2/1998+A14 /2000
EN 61000-3-3/1.95
Place, Date Dr. Christian Stredicke
Berlin, 15.05.2001 Vorstand (MD)
Page 88

88
Index
Accepting a Call 25
Advanced functions 29
Available Settings 69
Base 52
Date 52
Language 52
Time 52
Base Unit 8
Basic Functions 19
Behind the scenes 77
Blocking a Call 26
Booting 12
Call
Divert 31
Transfer 31
Call Divert 51
Phone Number 51
Call Lists 40
Call Register 36
Calls
Toggling between 30
Case Study 75
Cleaning 9
Codec
Exclusive 57
Packet Size 57
Preferred Codec 57
Codec Settings 57
Conformance
Standards 87
Connecting the phone 9
Date
Display 20
Date and Time 20
Daylight Saving Time 59
Delivery Content 8
Deny List 43
Adding 43
Browsing 43
Removing 44
Denying a Call 26
Desktop Style 52
DHCP 80
Linux 84
Turn off 58
dhcpd.conf 84
Dial Pad 10
Dialing 21
H.323 Address 23
IP Address 23, 24
Phone number 21
SIP Address 23
Direct Transfer 31
Divert
All Calls 32
When Busy 32
When not Answered 32
Divert Timeout 51
DNS
Domain Name 82
Server 82
DNS Domain 58
DNS Server 58
DTMF Tones 32
E.164 22
Foreword 3
Gatekeeper 14
Gateway
Internet 58
H.323 14
Early Start 56
Fast Start 56
Gatekeeper 56
GK/GW Address 56
Phone Number 55
URL ID 55
Username 55
H.323 Settings 55
H323
H.450 Services 57
Handset 8
Handset cable 8
Page 89

89
Help Function 28
Help key See Keys
Help Key See Keys
Hold and Resume 30
Hostname 58, 82
http Admin 52
http Password 52
HTTP Proxy 61
Idle State 20
Initialization 12
Installation 7
Installation
automatic 63
IP Address 58
Language
Setting 13
LCServer 60
Linux
DHCP 84
List Views 44
Modifying 45
Sort Criteria 45
MAC Address 57
Main Menu 11, 27
Name
Phone 58
Netmask 58
NFS Root Directory 59
NFS Server 59
Phone Book 37
Phone Book
Adding an entry 37
Phone Book
Editing an entry 38
Phone Type 52
Power supply 8
PowerLAN 8
PPPoE 60
Registrar 14
Registration 14
Registrations 20
Reset Values 61
Ring Tones 34
Safety Notes 8
Setting up the Phone 8
Settings 47
Available 69
Codec 57
Fields 51
H.323 55
SIP 53
Via Browser 49
Via Phone 48
Which 51
Settings Server 61
SIP 14
Account 53
Action 54
DNS Addresses 54
Einstellungen 53
Mailbox 54
Pass 54
Priority 53
Proxy 53
Realm 54
REFER 54
Registrar 53
Retry 54
Session Timer 55
Timespan 54
Tracing 55
User 54
Username 53
Speed Dial 40
Speed Dial
Dialing 41
Speed Dial
Editing 42
Standards 87
Statistics 20
Technical Data 86
Terminating
Call 25
Time Offset 82
Time server 59
Time Server 82
UTC offset 58
Verbindungszustand 20
Page 90

90
Version
Software 35
Volume
Adjusting 26, 32
Windows 2000 80
Page 91

Page 92

© 2002 snom technology AG
snom technology Aktiengesellschaft · Pascalstr. 10 · D-10587 Berlin
phone: +49 30 3990783-0 · mailto:info@snom.de · http://www.snom.de
 Loading...