

Page 1

Not for
Reproduction
en
Operator’s Manual
de
it
nl
pl
Gebruiksaanwijzing
da
Brugsanvisningen
Bedienungsanleitung
Manuale dell’operatore
no
Brukerhåndbok
Instrukcja obsługi
Hydro Tractor
Mfg. No. Description
2691046 ELT195460, Lawn Tractor (CE), 19.5 HP
Mower Deck
Mfg. No. Description
1695770 Mower Deck (CE), 117 cm (46”)
Copyright © 2013 Briggs & Stratton Power Products Group, LLC.
Milwaukee, WI, USA. All rights reserved.
SNAPPER is a registered trademark of Briggs & Stratton Corporation.
LT-200 Series (CE/Export)
1753434
Revision B
Page 2

Not for
Reproduction
Page 3

Not for
Reproduction
Table of Contents
Safety Rules & Information
Identification Numbers ...................................... 7
Safety Decals ...................................................... 8
Features & Controls ......................................... 10
Control Functions ..................................................10
Parking Brake Function .........................................12
Cruise Control Operation .......................................12
Hourmeter .............................................................12
Operating the Tractor ...................................... 13
Safety Interlock System Tests ...............................13
General Operating Safety ......................................13
Adding Fuel ...........................................................13
Starting the Engine ................................................13
Stopping the Tractor & Engine ..............................14
Driving the Tractor .................................................14
Mowing ..................................................................14
Mowing in Reverse ................................................14
Attachment Operation in Reverse .........................14
Pushing the Tractor by Hand .................................14
Adjusting Mower Cutting Height ............................15
Attaching a Trailer .................................................15
Storage..................................................................15
............................... 2
Regular Maintenance ....................................... 16
Maintenance Schedule ..........................................16
Check Tire Pressure ..............................................16
Check Mower Blade Stopping Time ......................17
Battery Maintenance .............................................17
Troubleshooting, Adjustment & Service ........ 18
Troubleshooting the Tractor ..................................18
Troubleshooting the Mower ...................................19
Seat Adjustment ....................................................20
Battery Charging ...................................................20
Mower Adjustment ................................................20
Specifications ................................................... 21
Warranty ............................................................ 22
1
Page 4
Not for
Reproduction
Safety Rules & Information
Congratulations on purchasing a superior-quality piece of lawn and
garden equipment. Our products are designed and manufactured to
meet or exceed all industry standards for safety.
Power equipment is only as safe as the operator. If it is misused, or
not properly maintained, it can be dangerous! Remember, you are
responsible for your safety and that of those around you.
Use common sense, and think through what you are doing. If you
are not sure that the task you are about to perform can be safely
done with the equipment you have chosen, ask a
professional: contact your local authorized dealer.
Read the Manual
The operator’s manual contains important safety information you
need to be aware of BEFORE you operate your unit as well as
DURING operation.
Safe operating techniques, an explanation of the product’s features
and controls, and maintenance information is included to help you get
the most out of your equipment investment.
Be sure to completely read the Safety Rules and Information found on
the following pages. Also completely read the Operation section.
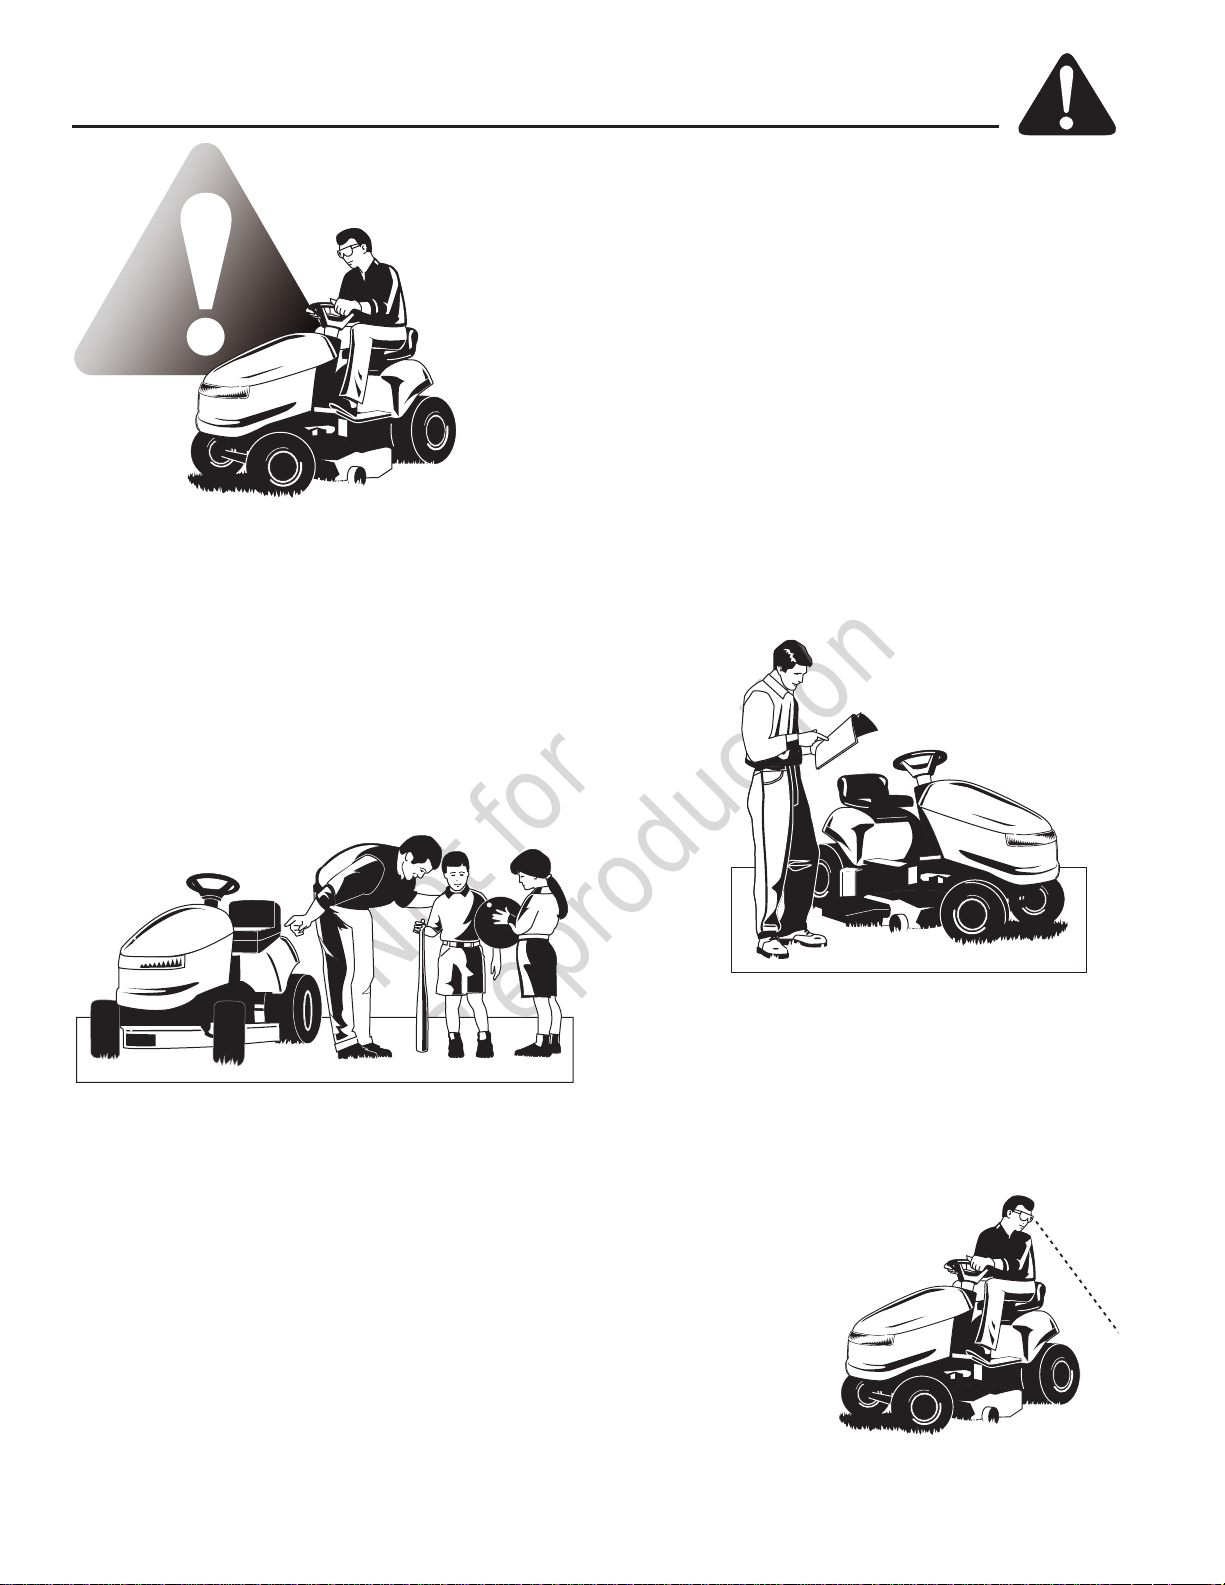
Operating Safety
Children
Tragic accidents can occur with children. Do not allow them
anywhere near the area of operation. Children are often
attracted to the unit and mowing activity. Never assume that
children will remain where you last saw them. If there is a
risk that children may enter the area where you are mowing,
have another responsible adult watch them.
DO NOT GIVE CHILDREN RIDES ON THIS UNIT! This
encourages them to come near the unit in the future while it
is running, and they could be seriously hurt. They may then
approach the unit for a ride when you are not expecting it,
and you may run over them.
Reverse
Do not mow in reverse unless
absolutely necessary. Always look
down and behind
before and while
traveling in reverse
even with the mower
blades disengaged.
2
Page 5
Not for
Reproduction
Safety Rules and Information
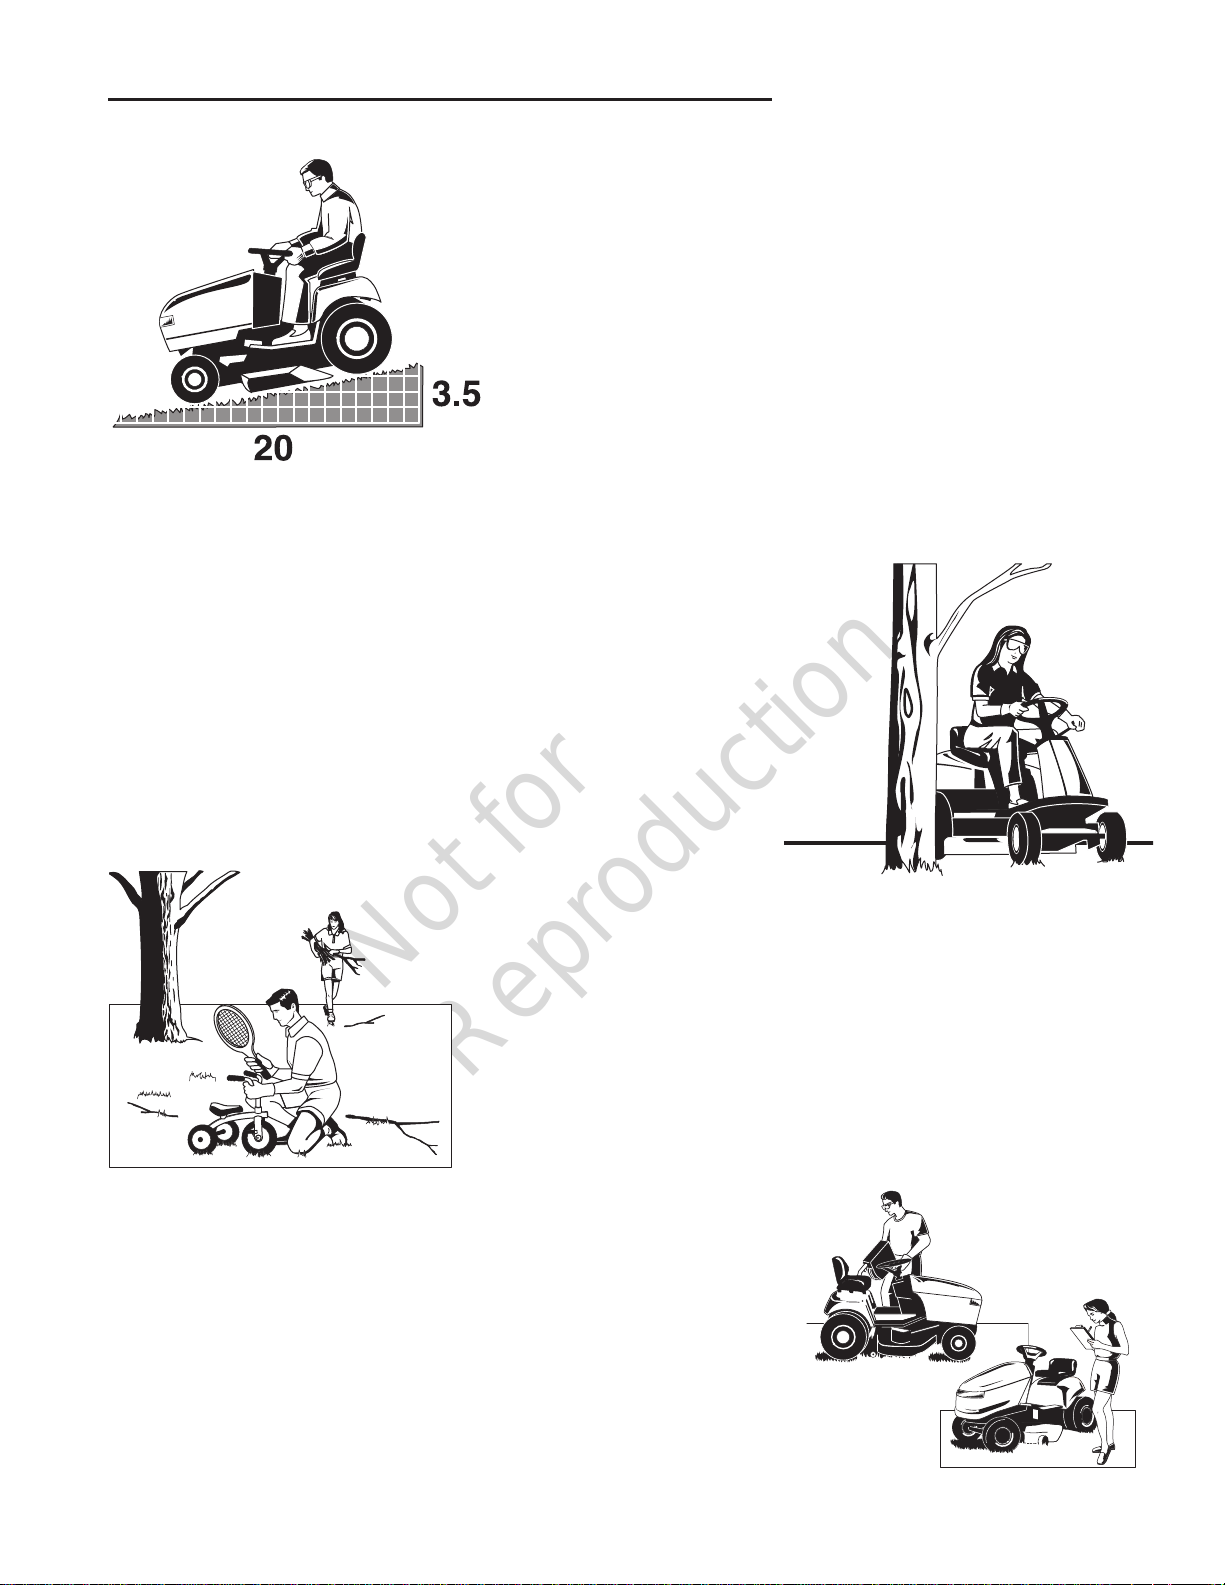
Slope Operation
You could be seriously injured or even killed if you use this unit on too
steep an incline. Using the unit on a slope that is too steep or where you
don’t have adequate traction can cause you to lose control or roll over.
A good rule of thumb is to not operate on any slope you cannot back up
(in 2-wheel drive mode). You should not operate on inclines with a slope
greater than a 3.5 foot rise over a 20 foot length. Always drive up and
down slopes: never cross the face.
Also note that the surface you are driving on can greatly impact stability
and control. Wet grass or icy pavement can seriously affect your ability
to control the unit.
If you feel unsure about operating the unit on an incline, don’t do it. It’s
not worth the risk.
Moving Parts
This equipment has many moving parts that can injure you or someone else.
However, if you are seated in the seat properly, and follow all the rules in this book,
the unit is safe to operate.
The mower deck has spinning mower blades that can amputate hands and feet.
Do not allow anyone near the equipment while it is running!
To help you, the operator, use this equipment safely, it is equipped with an
operator-present safety system. Do NOT attempt to alter or bypass the system.
See your dealer immediately if the system does not pass all the safety interlock
system tests found in this manual.
This unit has spinning mower blades. These blades can pick up and throw
debris that could seriously injure a bystander. Be sure to clean up the area to
be mowed BEFORE you start mowing.
Do not operate this unit without the entire grass catcher or discharge guard
(deflector) in place.
Also, do not allow anyone in the area while the unit is running! If someone
does enter the area, shut the unit off immediately until they leave.
Fuel and Maintenance
Gasoline is extremely flammable. Its vapors are also extremely flammable
and can travel to distant ignition sources. Gasoline must only be used
as a fuel, not as a solvent or cleaner. It should never be stored any place
where its vapors can build up or travel to an ignition source like a pilot light.
Fuel belongs in an approved, plastic, sealed gas can, or in the tractor fuel
tank with the cap securely closed. Spilled fuel needs to be cleaned up
immediately.
Proper maintenance is critical to the safety and performance of your unit. Be
sure to perform the maintenance procedures listed in this manual, especially
periodically testing the safety system.
3
Thrown Objects
Page 6

Not for
Reproduction
Safety Rules & Information
Read these safety rules and follow them closely. Failure to obey these rules could result in loss of control
of unit, severe personal injury or death to you, or bystanders, or damage to property or equipment.
This mowing deck is capable of amputating hands and feet and throwing objects.
The triangle in text signifies important cautions or warnings which must be followed.
GENERAL OPERATION
1. Read, understand, and follow all instructions in the
manual and on the unit before starting.
2. Do not put hands or feet near rotating parts or under
the machine. Keep clear of the discharge opening at
all times.
3. Only allow responsible adults, who are familiar with
the instructions, to operate the unit (local regulations
can restrict operator age).
4. Clear the area of objects such as rocks, toys, wire,
etc., which could be picked up and thrown by the
blade(s).
5. Be sure the area is clear of other people before
mowing. Stop the unit if anyone enters the area.
6. Never carry passengers.
7. Do not mow in reverse unless absolutely necessary.
Always look down and behind before and while
travelling in reverse.
8. Never direct discharge material toward anyone. Avoid
discharging material against a wall or obstruction.
Material may ricochet back toward the operator. Stop
the blade(s) when crossing gravel surfaces.
9. Do not operate the machine without the entire grass
catcher, discharge guard (deflector), or other safety
devices in place.
10. Slow down before turning.
11. Never leave a running unit unattended. Always
disengage the PTO, set parking brake, stop engine,
and remove keys before dismounting.
12. Disengage blades (PTO) when not mowing. Shut off
engine and wait for all parts to come to a complete
stop before cleaning the machine, removing the grass
catcher, or unclogging the discharge guard.
13. Operate the machine only in daylight or good artificial
light.
14. Do not operate the unit while under the influence of
alcohol or drugs.
15 Watch for traffic when operating near or crossing
roadways.
16. Use extra care when loading or unloading the unit into
a trailer or truck.
17. Always wear eye protection when operating this unit.
18. Data indicates that operators, age 60 years and
above, are involved in a large percentage of power
equipment-related injuries. These operators should
evaluate their ability to operate the equipment safely
enough to protect themselves and others from injury.
19. Follow the manufacturer’s recommendations for wheel
weights or counterweights.
20. Keep in mind the operator is responsible for accidents
occurring to other people or property.
21. All drivers should seek and obtain professional and
practical instruction.
22. Always wear substantial footwear and trousers. Never
operate when barefoot or wearing sandals.
23. Before using, always visually check that the blades
and blade hardware are present, intact, and secure.
Replace worn or damaged parts.
24. Disengage attachments before: refueling, removing
an attachment, making adjustments (unless the
adjustment can be made from the operator’s position).
25. When the machine is parked, stored, or left
unattended, lower the cutting means unless a positive
mechanical lock is used.
26. Before leaving the operator’s position for any reason,
engage the parking brake (if equipped), disengage the
PTO, stop the engine, and remove the key.
27. To reduce fire hazard, keep the unit free of grass,
leaves, & excess oil. Do not stop or park over dry
leaves, grass, or combustible materials.
TRANSPORTING AND STORAGE
1. When transporting the unit on an open trailer, make
sure it is facing forward, in the direction of travel. If the
unit is facing backwards, wind lift could damage the
unit.
2. Always observe safe refueling and fuel handling
practices when refueling the unit after transportation
or storage.
3. Never store the unit (with fuel) in an enclosed poorly
ventilated structure. Fuel vapors can travel to an
ignition source (such as a furnace, water heater, etc.)
and cause an explosion. Fuel vapor is also toxic to
humans and animals.
4. Always follow the engine manual instructions for
storage preparations before storing the unit for both
short and long term periods.
5. Always follow the engine manual instructions for
proper start-up procedures when returning the unit to
service.
6. Never store the unit or fuel container inside where
there is an open flame or pilot light, such as in a water
heater. Allow unit to cool before storing.
4
Page 7

Not for
Reproduction
Safety Rules and Information
SLOPE OPERATION
Slopes are a major factor related to loss-of-control and tipover accidents, which can result in severe injury or death.
Operation on all slopes requires extra caution. If you cannot
back up the slope or if you feel uneasy on it, do not operate
on it.
Control of a walk-behind or ride-on machine sliding on a
slope will not be regained by the application of the brake.
The main reasons for loss of control are: insufficient tire
grip on the ground, speed too fast, inadequate braking, the
type of machine is unsuitable for its task, lack of awareness
of the ground conditions, incorrect hitching and load
distribution.
1. Mow up and down slopes, not across.
2. Watch for holes, ruts, or bumps. Uneven terrain could
overturn the unit. Tall grass can hide obstacles.
3. Choose a slow speed so that you will not have to stop
or change speeds while on the slope.
4. Do not mow on wet grass. Tires may loose traction.
5. Always keep unit in gear especially when traveling
down slopes. Do not shift to neutral and coast
downhill.
6. Avoid starting, stopping, or turning on a slope. If tires
lose traction, disengage the blade(s) and proceed
slowly straight down the slope.
7. Keep all movement on slopes slow and gradual. Do
not make sudden changes in speed or direction,
which could cause the machine to rollover.
8. Use extra care while operating machines with grass
catchers or other attachments; they can affect the
stability of the unit. Do not use on steep slopes.
9. Do not try to stabilize the machine by putting your foot
on the ground (ride-on units).
10. Do not mow near drop-offs, ditches, or embankments.
The mower could suddenly turn over if a wheel is over
the edge of a cliff or ditch, or if an edge caves in.
11. Do not use grass catchers on steep slopes.
12. Do not mow slopes you cannot back up them.
13. See your authorized dealer/retailer for
recommendations of wheel weights or counterweights
to improve stability.
14. Remove obstacles such as rocks, tree limbs, etc.
15. Use slow speed. Tires may lose traction on slopes
even through the brakes are functioning properly.
16. Do not turn on slopes unless necessary, and then,
turn slowly and gradually downhill, if possible.
WARNING
Never operate on slopes greater than 17.6 percent
(10°) which is a rise of 3-1/2 feet (106 cm) vertically in
20 feet (607 cm) horizontally.
When operating on slopes use additional wheel
weights or counterweights. See your dealer/retailer
to determine which weights are available and
appropriate for your unit.
Select slow ground speed before driving onto
slope. In addition to front weights, use extra caution
when operating on slopes with rear-mounted grass
catchers.
Mow UP and DOWN the slope, never across the
face, use caution when changing directions and DO
NOT START OR STOP ON SLOPE.
CHILDREN
Tragic accidents can occur if the operator is not alert to the
presence of children. Children are often attracted to the unit
and the mowing activity. Never assume that children will
remain where you last saw them.
1. Keep children out of the mowing area and under the
watchful care of another responsible adult.
2. Be alert and turn unit off if children enter the area.
3. Before and during reverse operation, look behind and
down for small children.
4. Never carry children, even with the blade(s) off. They
may fall off and be seriously injured or interfere with
safe unit operation. Children who have been given
rides in the past may suddenly appear in the mowing
area for another ride and be run over or backed over
by the machine.
5. Never allow children to operate the unit.
6. Use extra care when approaching blind corners,
shrubs, trees, or other objects that may obscure
vision.
EMISSIONS
1. Engine exhaust from this product contains chemicals
known, in certain quantities, to cause cancer, birth
defects, or other reproductive harm.
2. Look for the relevant Emissions Durability Period and
Air Index information on the engine emissions label.
TOWED EQUIPMENT (RIDE-ON UNITS)
1. Tow only with a machine that has a hitch designed for
towing. Do not attach towed equipment except at the
hitch point.
2. Follow the manufacturer’s recommendations for
weight limit for towed equipment and towing on
slopes.
3. Never allow children or others in or on towed
equipment.
4. On slopes, the weight of the towed equipment may
cause loss of traction and loss of control.
5. Travel slowly and allow extra distance to stop.
6. Do not shift to neutral and coast down hill.
IGNITION SYSTEM
1. This spark ignition system complies with Canadian
ICES-002.
5
Page 8

Not for
Reproduction
Safety Rules & Information
SERVICE AND MAINTENANCE
Safe Handling of Gasoline
1. Extinguish all cigarettes, cigars, pipes, and other
sources of ignition.
2. Use only approved gasoline containers.
3. Never remove the gas cap or add fuel with the engine
running. Allow the engine to cool before refueling.
4. Never fuel the machine indoors.
5. Never store the machine or fuel container where there
is an open flame, spark, or pilot light such as near a
water heater or other appliance.
6. Never fill containers inside a vehicle or on a truck bed
with a plastic bed liner. Always place containers on
the ground away from your vehicle before filling.
7. Remove gas-powered equipment from the truck
or trailer and refuel it on the ground. If this is not
possible, then refuel such equipment on a trailer with
a portable container, rather than from a gasoline
dispenser nozzle.
8. Keep nozzle in contact with the rim of the fuel tank or
container opening at all times until fueling is complete.
Do not use a nozzle lock-open device.
9. If fuel is spilled on clothing, change clothing
immediately.
10. Never over-fill the fuel tank. Replace gas cap and
tighten securely.
11. Use extra care in handling gasoline and other fuels.
They are flammable and vapors are explosive.
12. If fuel is spilled, do not attempt to start the engine but
move the machine away from the area of spillage and
avoid creating any source of ignition until fuel vapors
have dissipated.
13. Replace all fuel tank caps and fuel container caps
securely.
Service & Maintenance
1. Never run the unit in an enclosed area where carbon
monoxide fumes may collect.
2. Keep nuts and bolts, especially blade attachment
bolts, tight and keep equipment in good condition.
3. Never tamper with safety devices. Check their proper
operation regularly and make necessary repairs if they
are not functioning properly.
4. Keep unit free of grass, leaves, or other debris buildup. Clean up oil or fuel spillage. and remove any fuelsoaked debris. Allow machine to cool before storage.
5. If you strike an object, stop and inspect the machine.
Repair, if necessary, before restarting.
6. Never make adjustments or repairs with the engine
running.
7. Check grass catcher components and the discharge
guard frequently and replace with manufacturer’s
recommended parts, when necessary.
8. Mower blades are sharp. Wrap the blade or wear
gloves, and use extra caution when servicing them.
9. Check brake operation frequently. Adjust and service
as required.
10. Maintain or replace safety and instructions labels, as
necessary.
11. Do not remove the fuel filter when the engine is hot as
spilled gasoline may ignite. Do not spread fuel line
clamps further than necessary. Ensure clamps grip
hoses firmly over the filter after installation.
12. Do not use gasoline containing METHANOL, gasohol
containing more than 10% ETHANOL, gasoline
additives, or white gas because engine/fuel system
damage could result.
13. If the fuel tank must be drained, it should be drained
outdoors.
14. Replace faulty silencers/mufflers.
15. Use only factory authorized replacement parts when
making repairs.
16. Always comply with factory specifications on all
settings and adjustments.
17. Only authorized service locations should be utilized for
major service and repair requirements.
18. Never attempt to make major repairs on this unit
unless you have been properly trained. Improper
service procedures can result in hazardous operation,
equipment damage and voiding of manufacturer’s
warranty.
19. On multiple blade mowers, take care as rotating one
blade can cause other blades to rotate.
20. Do not change engine governor settings or overspeed the engine. Operating the engine at excessive
speed can increase the hazard of personal injury.
21. Disengage drive attachments, stop the engine,
remove the key, and disconnect the spark plug wire(s)
before: clearing attachment blockages and chutes,
performing service work, striking an object, or if the
unit vibrates abnormally. After striking an object,
inspect the machine for damage and make repairs
before restarting and operating the equipment.
22. Never place hands near the moving parts, such as a
hydro pump cooling fan, when the tractor is running.
(Hydro pump cooling fans are typically located on top
of the transaxle).
23. Units with hydraulic pumps, hoses, or motors:
WARNING: Hydraulic fluid escaping under pressure
may have sufficient force to penetrate skin and cause
serious injury. If foreign fluid is injected into the skin
it must be surgically removed within a few hours by a
doctor familiar with this form of injury or gangrene may
result. Keep body and hands away from pin holes or
nozzles that eject hydraulic fluid under high pressure.
Use paper or cardboard, and not hands, to search
for leaks. Make sure all hydraulic fluid connections
are tight and all hydraulic hoses and lines are in good
condition before applying pressure to the system. If
leaks occur, have the unit serviced immediately by
your authorized dealer.
24. WARNING: Stored energy device. Improper
release of springs can result in serious personal
injury. Springs should be removed by an authorized
technician.
25. Models equipped with an engine radiator: WARNING:
Stored energy device. To prevent serious bodily injury
from hot coolant or steam blow-out, never attempt to
remove the radiator cap while the engine is running.
Stop the engine and wait until it is cool. Even then,
use extreme care when removing the cap.
6
Page 9
Not for
Reproduction
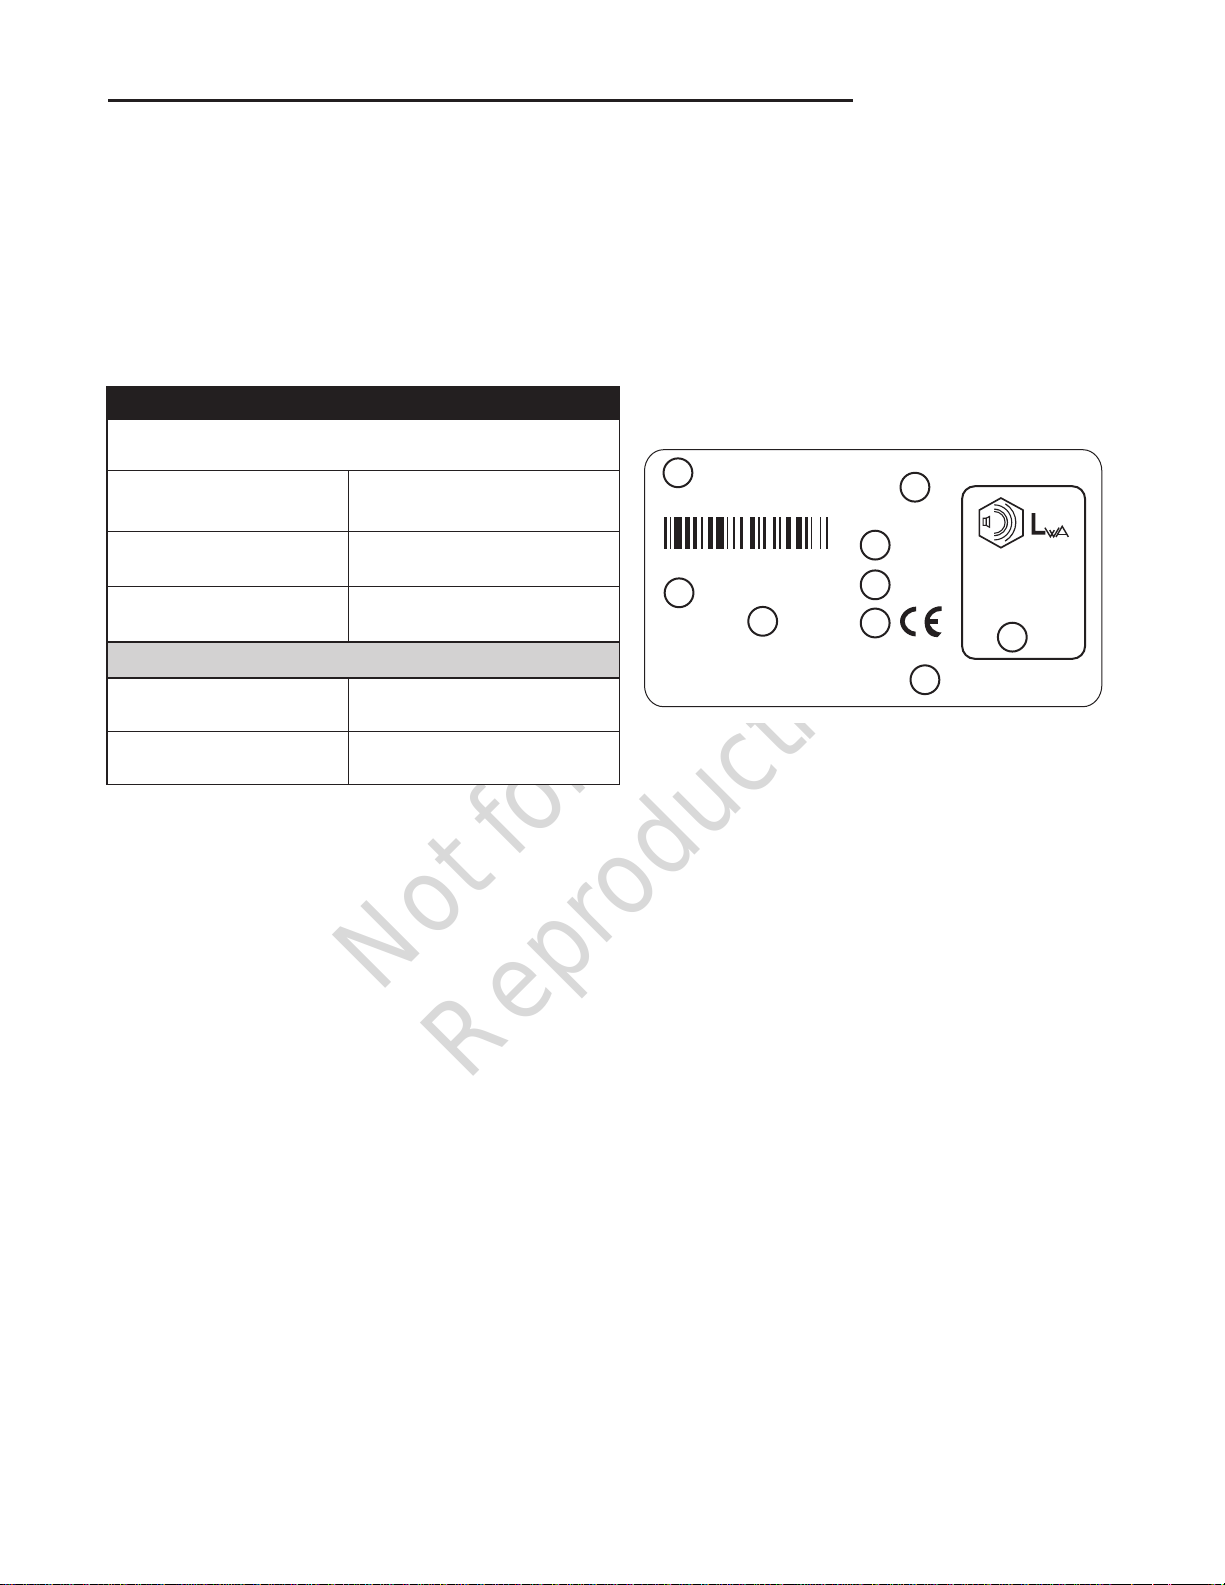
Identification Numbers
CE Identification TagProduct Reference Data
Record your model name/number, manufacturer’s
identification numbers, and engine serial numbers in the
space provided for easy access. These numbers can be
found in the locations shown.
When contacting your authorized dealer for
replacement parts, service, or information you MUST
have these numbers.
PRODUCT REFERENCE DATA
Model Description Name/Number
Unit MFG Number Unit SERIAL Number
Mower Deck MFG Number Mower Deck SERIAL Number
Dealer Name Date Purchased
ENGINE REFERENCE DATA
Engine Make Engine Model
Engine Type/Spec Engine Code/Serial Number
A. Manufacturer’s Identification Number
B. Manufacturer’s Serial Number
C. Manufacturer’s Name and Address
D. Maximum Engine Speed in Rotations per Minute
E. Power Rating in Kilowatts
F. Mass of Unit in Kilograms
G. CE Compliance Logo
H. Year of Manufacture
I. Guaranteed Sound Power in Decibels
A
MODEL NO. xxxxxxx
SERIAL NO. xxxxxxxxxx
B
C
XXXXXXXXXXXXXXXXXXXXXX
XXXXXXXXXXXXXXXXX
“Vibration measurement uncertainty – machine
vibration was recorded using methods and procedures
outlined in the appropriate International Standards in
effect at the time of manufacturer. The uncertainties due
to the measurement may result in a variance of up to
5% from the published value shown in the Declaration of
Conformity.”
D
xxxx min
E
x.x kW
xxx kg
F
G
20xx
-1
H
xxx
I
dB
7
Page 10
Not for
Reproduction
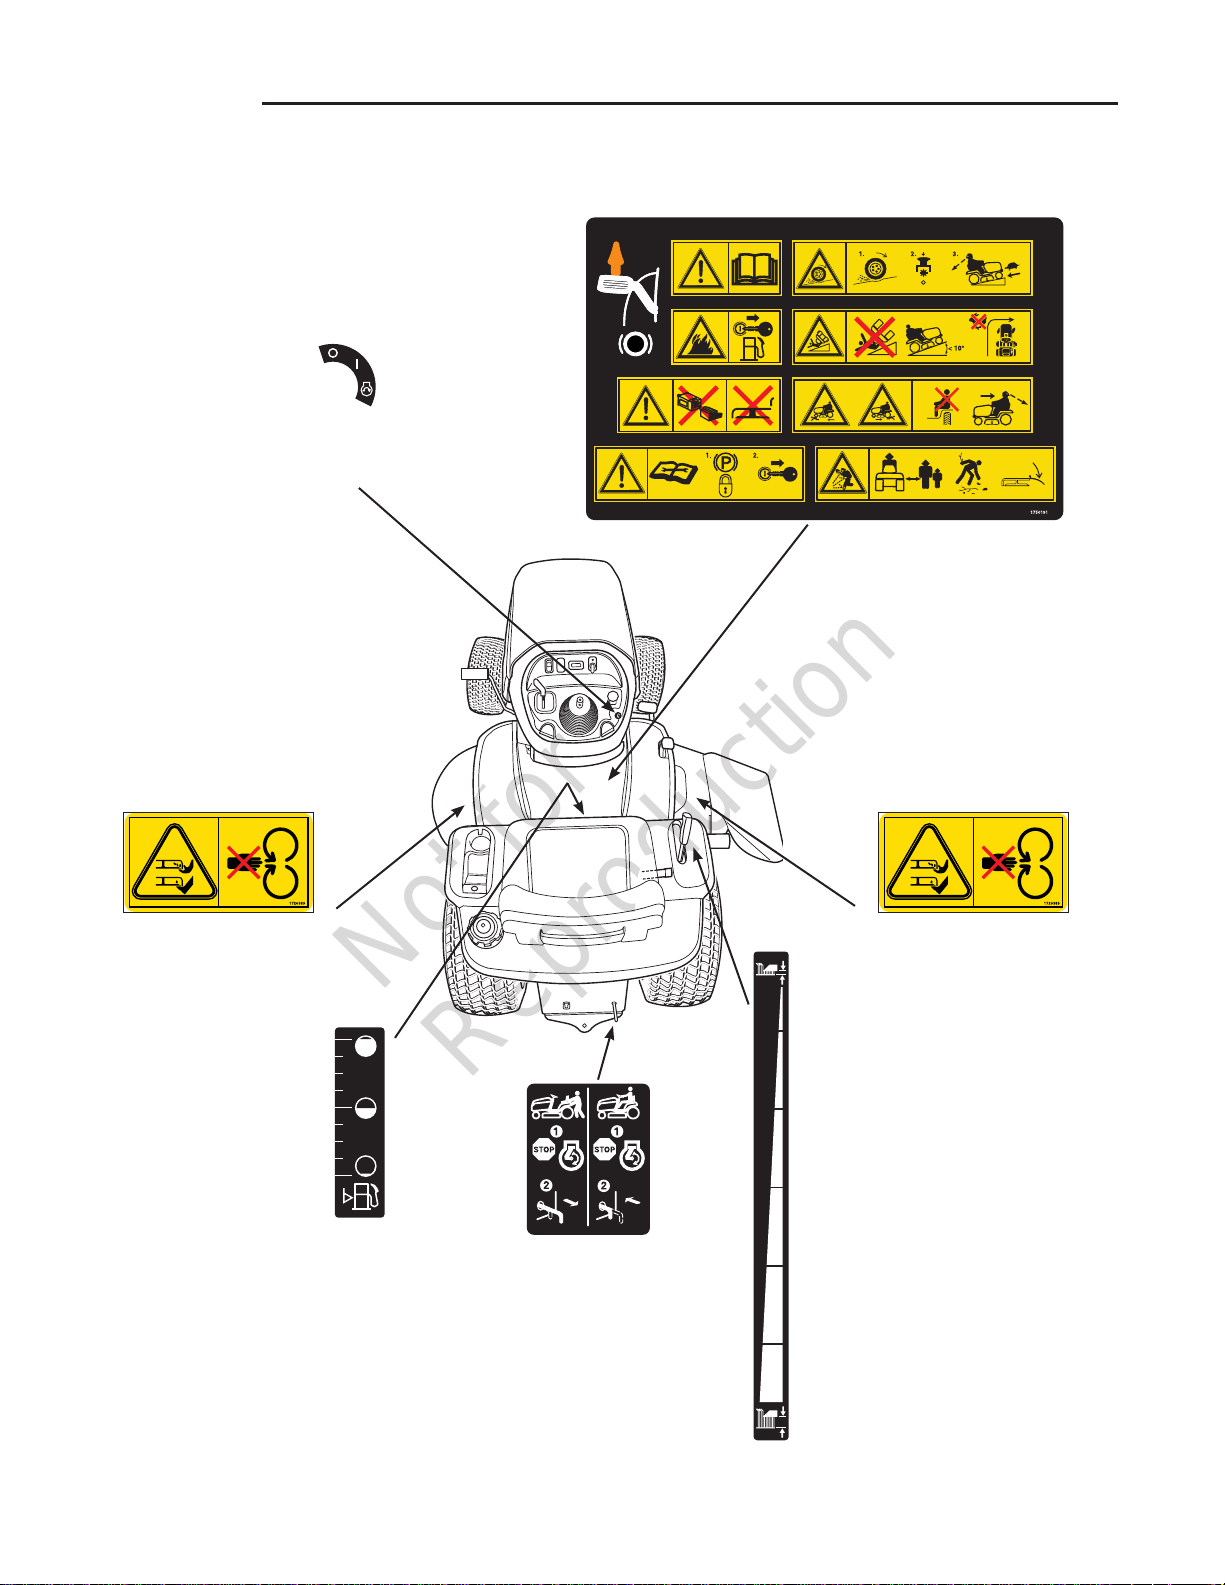
Safety Decals
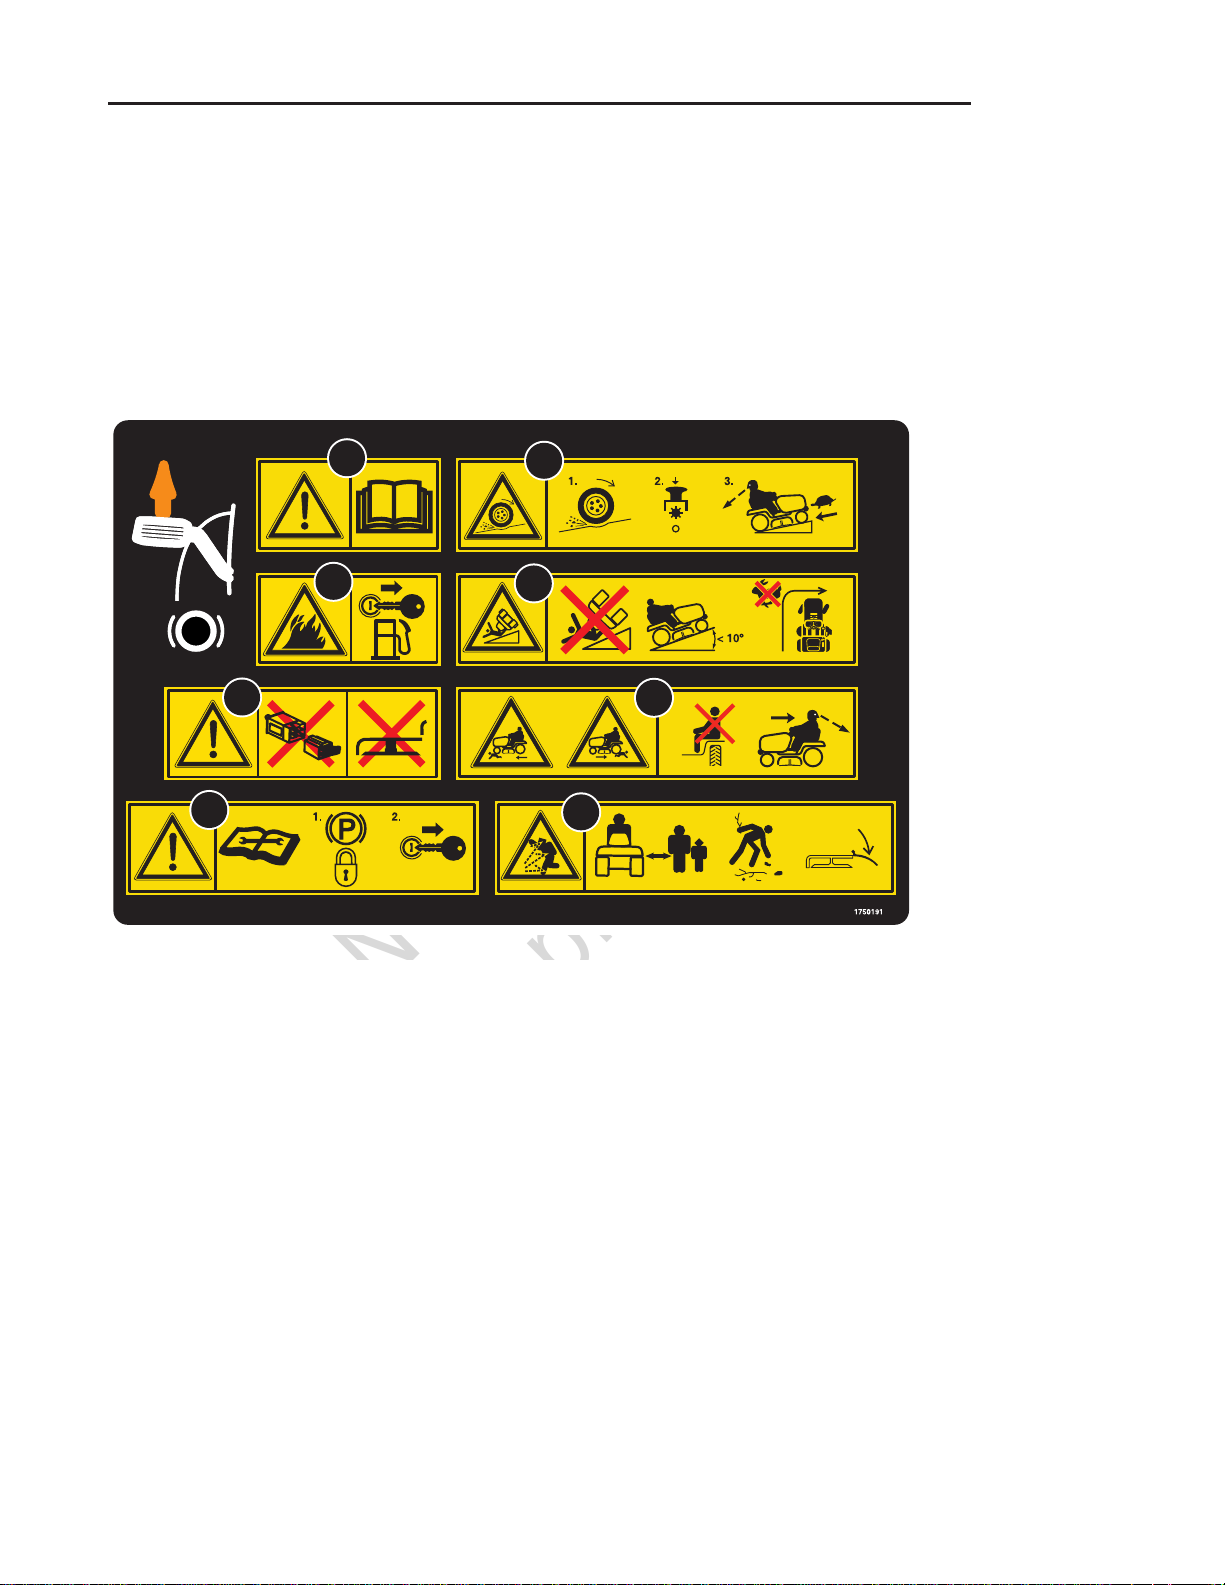
Decal Locations
Operating Instructions,
CE Models, Part No. 1750191
Ignition Switch
Positions
Part No. 1722806
CE-Danger, Rotating Blades,
Part No. 1720389
1730172
Fuel Level
Part No. 1730172
173xxxx
Transmission
Release
Part No. 1730202
CE-Danger, Rotating Blades,
1730264
Part No. 1720389
Attachment Lift
Part No. 1730264
8
Page 11
Not for
Reproduction
Safety Decals
Safety Decals
All DANGER, WARNING, CAUTION and instructional
messages on your rider and mower should be carefully
read and obeyed. Personal bodily injury can result when
these instructions are not followed. The information is for
your safety and it is important! The safety decals below
are on your rider and mower.
Safety Icons
1
3
5
2
4
If any of these decals are lost or damaged, replace
them at once. See an authorized dealer for replacements.
These labels are easily applied and will act as a constant visual reminder to you, and others who may use
the equipment, to follow the safety instructions necessary for safe, effective operation.
6
7
1. WARNING: Read and understand the Operator’s Man-
ual before using this machine. Know the location and
function of all controls. Do not operate this machine
unless you are trained.
2. DANGER - LOSS OF TRACTION, SLIDING, STEER-
ING AND CONTROL ON SLOPES HAZARD: If ma-
chine stops forward motion or starts sliding on a slope,
stop the blades and drive slowly off the slope.
3. DANGER: FIRE HAZARD: Keep unit free of grass,
leaves and excess oil. Do not add fuel while engine
is hot or running. Stop engine, remove key and allow to
cool for at least 3 minutes prior to adding fuel. Do not
add fuel indoors, in an enclosed trailer, garage or other
enclosed areas. Clean up spilled fuel. Do not smoke
while operating this machine.
4. DANGER - TIPPING AND SLIPPING HAZARD: Mow
up and down slopes not across. Do not operate on
slopes over 10 degrees. Avoid sudden and sharp (fast)
turns while on slopes.
8
5. DANGER - AMPUTATION AND DISMEMBER
MENT HAZARD: To avoid injury from rotating
blades and moving parts, keep safety devices
(guards, shields and switches) in place and working.
6. Do not mow when children or others are around.
Never carry riders especially children even with the
blades off. Do not mow in reverse unless absolutely
necessary. Look down and behind – before and
while backing.
7. Consult technical literature before performing
technical repairs or maintenance. When leaving the
machine, shutoff engine, set the parking brake to the
lock position and remove the ignition key.
8. Keep by-standers and children a safe distance
away. Remove objects that can be thrown by the
blade. Do not mow without discharge chute in place.
9
Page 12

Not for
Reproduction
Features & Controls
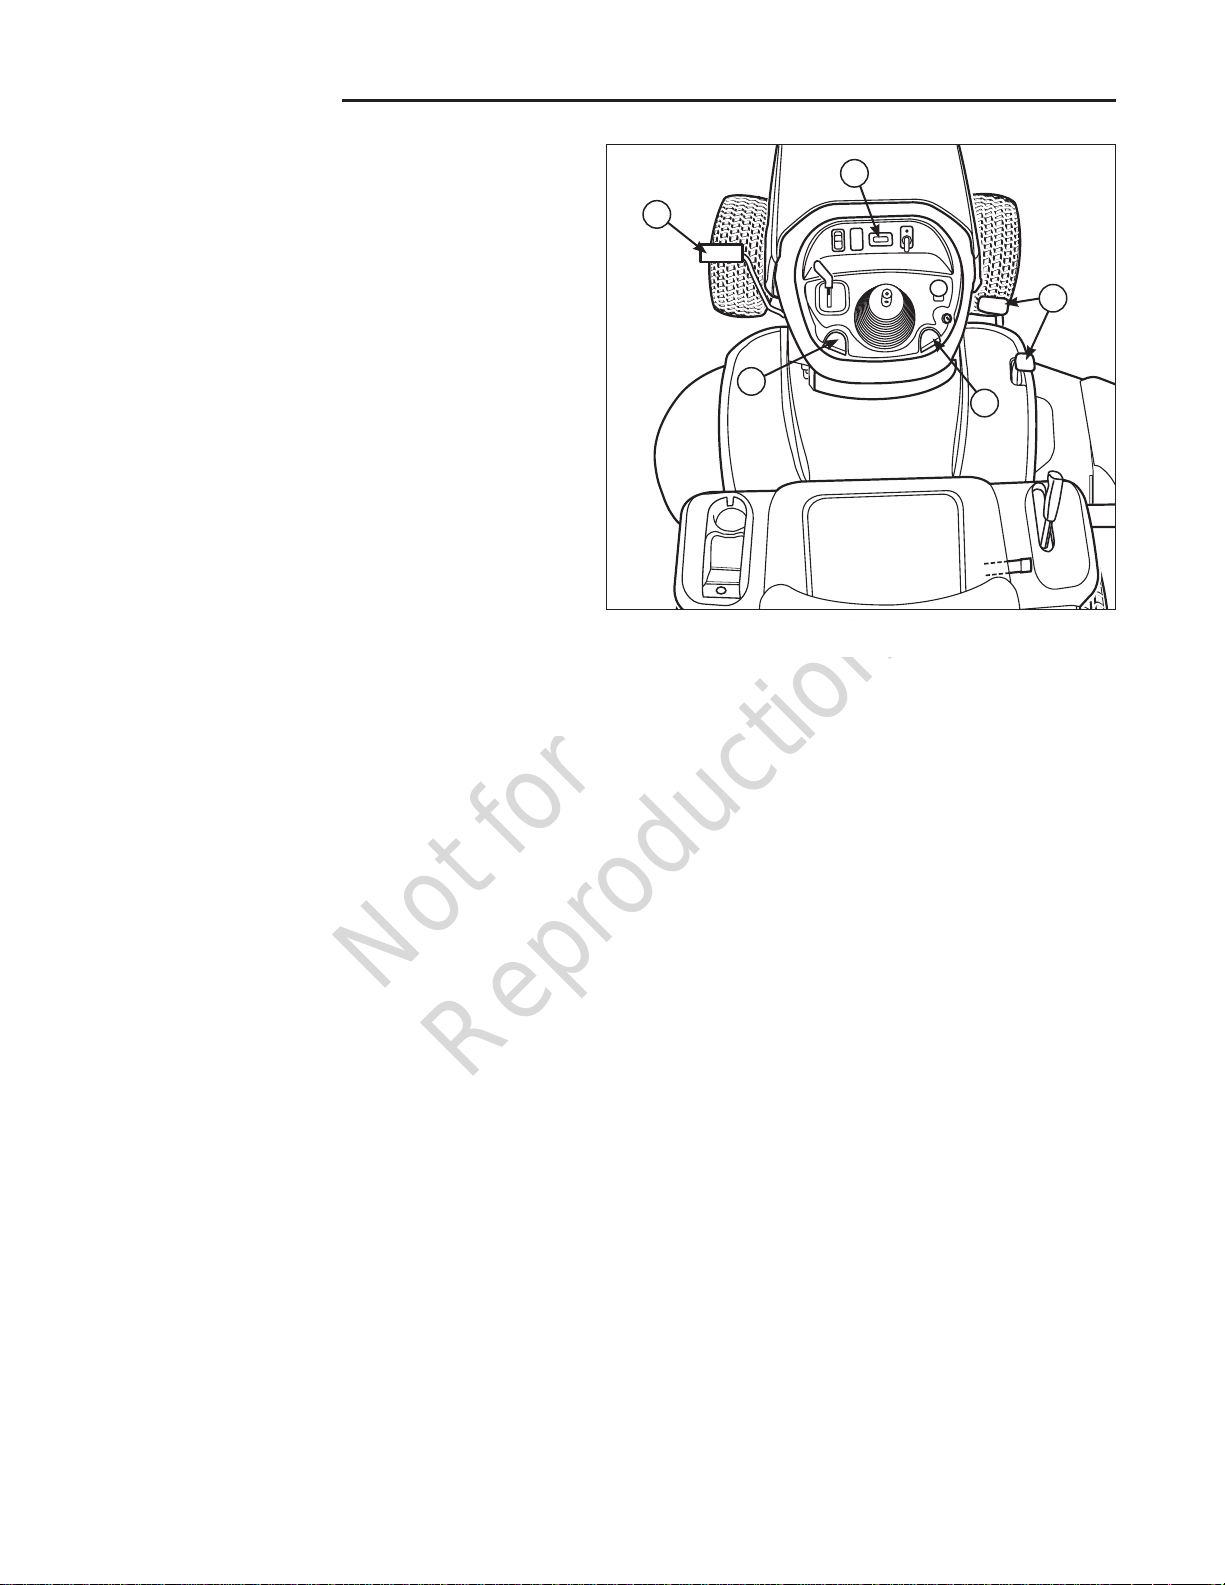
Figure 1. Controls
Control Functions
The information below briefly describes the function of individual controls. Starting, stopping, driving, and mowing
require the combined use of several controls applied in specific sequences. To learn what combination and sequence
of controls to use for various tasks see the OPERATION section.
Throttle/Choke Control
(Choke-A-Matic)
The throttle/choke controls the engine speed and choke
(see Figure 1). Move the throttle/choke control to the
FAST position to increase engine speed and SLOW
position to decrease engine speed. Always operate at full
throttle. Move the throttle/choke control to the CHOKE
position for starting a cold engine. A warm engine may
not require choking.
Headlights
The light switch turns the tractor headlights on and off.
Hour Meter
The hour meter measures the number of hours the key
has been in the RUN position.
10
Page 13

Not for
Reproduction
Features & Controls
Reverse Mowing Option (RMO)
The Reverse Mowing Option allows for mowing (or use of
other PTO driven attachments) while traveling in reverse.
If you choose to mow in reverse, turn the RMO key after
the PTO is engaged. The L.E.D. light will illuminate,
and the operator can then mow in reverse. Each time
the PTO is engaged the RMO needs to be reactivated if
desired.
PTO Switch
The PTO (Power Take-Off) switch engages and
disengages attachments that use the PTO. To engage the
PTO, pull UP on the switch. Push DOWN to disengage.
Note that the operator must be seated firmly in the tractor
seat for the PTO to function.
Ignition Switch
The ignition switch starts and stops the engine, it has
three positions:
OFF Stops the engine and shuts off the
electrical system.
RUN Allows the engine to run and powers the
electrical system.
Mower Height of Cut Adjustment
The mower cutting height adjustment lever controls the
mower cutting height. The mower cutting height can be
set to one of seven positions between 1.0” and 4.0” (2,5
and 10,2 cm).
Seat Adjustment Lever
The seat can be adjusted forward and back. Move the
lever, position the seat as desired, and release the lever
to lock the seat into position.
Transmission Release Valve Lever
The transmission release valve lever deactivates the
transmission so that the tractor can be pushed by hand.
See Pushing the Tractor by Hand for operational
information.
Fuel Tank
To remove the cap, turn counterclockwise.
Fuel Level Gauge
Displays the fuel level in the tank.
START Cranks the engine for starting.
NOTE: Never leave the ignition switch in the RUN
position with the engine stopped–this drains the battery.
Ground Speed Pedals
The tractor’s forward ground speed is controlled by
the forward ground speed control pedal. The tractor’s
reverse ground speed is controlled by the reverse ground
speed control pedal.
Depressing either pedal will increase ground speed.
Note that the further down the pedal is depressed, the
faster the tractor will travel.
Cruise Control
The cruise control is used to lock the ground speed
control in forward. The cruise control has five lock
positions.
Parking Brake
The parking brake knob is used to lock the parking brake
when the tractor is stopped. Fully depressing the brake
pedal and pulling up on the knob engages the parking
brake.
Brake Pedal
Depressing the brake pedal applies the tractor brake.
11
Page 14
Not for
Reproduction
Features & Controls
Parking Brake Function
Applying the Parking Brake - See Figure 2. To lock the
parking brake, release the ground speed pedals (A), fully
depress the brake pedal (B), pull UP on the parking brake
knob (C), and then release brake pedal.
Releasing the Parking Brake -
release the parking brake, depress the brake pedal (B).
See Figure 2. To
Cruise Control Operation
TO ENGAGE:
1. Pull up on the cruise control knob (D, Figure 2).
2. Depress the forward ground speed pedal (A).
3. Lift up the Cruise control knob (D) when desired
speed is reached. The Cruise will lock in one of its
five locking positions.
TO DISENGAGE:
1. Depress the brake pedal (B).
OR
2. Depress the forward ground speed pedal (A).
E
B
A
C
D
Figure 2. Engaging the Parking Brake
Hourmeter
The hour meter (E, Figure 2) measures the number of
hours the key has been in the RUN position.
12
Page 15

Not for
Reproduction
Section Title
Safety Interlock System Tests
This unit is equipped with safety interlock switches and
other safety devices. These safety systems are present for
your safety: do not attempt to bypass safety switches, and
never tamper with safety devices.
WARNING
If the unit does not pass a safety test, do not
operate it. See an authorized dealer.
Test 1 — Engine should NOT crank if:
• PTOswitchisON,OR
• BrakepedalisNOTfullydepressed(parkingbrake
OFF), OR
• ThecruisecontrolleverisNOTinNEUTRAL.
Test 2 — Engine SHOULD crank and start if:
• Operatorissittinginseat,AND
• PTOswitchisOFF,AND
• Brakepedalisfullydepressed(parkingbrakeON),
AND
• ThecruisecontrolleverisinNEUTRAL.
Test 3 — Engine should SHUT OFF if:
• Operatorrisesoffseat.
Test 4 — Check Mower Blade Stopping Time
Mower blades and mower drive belt should come to a
complete stop within five seconds after electric PTO switch
is turned OFF. If mower drive belt does not stop within five
seconds, see an authorized dealer.
Test 5 — Reverse Mow Option (RMO) Check
• Engineshouldshutoffifreversetravelisattemptedif
the PTO has been switched on and RMO has not been
activated.
• RMOlightshouldilluminatewhenRMOhasbeen
activated.
Operating the Tractor
On Two Lines
General Operating Safety
Be sure to read all information in the Safety and
Operation sections before attempting to operate this unit.
Become familiar with all of the controls and how to stop
the unit.
Adding Fuel
WARNING
Gasoline is highly flammable and must be
handled with care. Never fill the tank when the
engine is still hot from recent operation. Do not
allow open flame, smoking or matches in the
area. Avoid over-filling and wipe up any spills.
Do not use gasoline containing
METHANOL, gasohol containing more than
10% ETHANOL, gasoline additives, or white
gas because engine/fuel system damage
could result.
1. Remove the fuel cap (A, Figure 3).
2. Fill the tank. Do not overfill. Leave room in the tank
for fuel expansion. Refer to your engine manual for
specific fuel recommendations.
3. Install and hand tighten the fuel cap.
Starting the Engine
1. Sit in the seat and lift UP the seat adjustment lever,
position the seat as desired, and release the lever to
lock the seat in position.
2. Fully depress the brake pedal or set the parking brake
with pedal fully depressed, pull UP on parking brake
knob, then release pedal.
3. Disengage PTO switch by pushing IN.
4. Move the throttle/choke control to the CHOKE
position.
5. Insert the ignition key and turn clockwise to the
START position and release the key as soon as the
engine starts.
6. After the engine starts, move the throttle/choke control
to half speed. Warm up the engine by running it for at
least 30 seconds.
7. Set throttle/choke control to the FAST position.
NOTE: In the event of an emergency, the engine can
be stopped by turning the ignition switch to STOP.
For normal engine shut down, follow the procedure in
“Stopping the Tractor & Engine.”
13
Page 16
Not for
Reproduction
Operating the Tractor
Stopping the Tractor & Engine
1. Return the ground speed control(s) to NEUTRAL.
2. Disengage the PTO and wait for all moving parts to
stop.
3. Move the throttle/choke control to the SLOW position
and turn the ignition key to OFF. Remove the key.
Driving the Tractor
1. Sit in the seat and adjust the seat so that you can
comfortably reach all the controls and see the dashboard
display.
2. Engage the parking brake.
3. Make sure the PTO switch is disengaged.
4. Start the engine (see Starting the Engine).
5. Disengage the parking brake and release the brake
pedal.
6. Depress the forward ground speed control pedal to travel
forward. Release the pedal to stop. Note that the further
down the pedal is depressed the faster the tractor will
travel.
7. Stop the tractor by releasing the ground speed control
pedals, setting the parking brake, and stopping the
engine (see
Stopping the Tractor and Engine).
Mowing
1. Set the mower cutting height to the desired level and
set the gauge wheels to the appropriate position (if
equipped).
2. Engage the parking brake. Make sure the PTO switch
is disengaged.
3. Start the engine (see Starting the Engine).
4. Set the throttle/choke control to the FAST position.
5. Engage the PTO (Mower Deck).
6. Begin mowing.
7. When finished, shut off the PTO and raise the mower
deck.
8. Stop the engine (see Stopping the Tractor and
Engine).
Mowing in Reverse
If an operator chooses to mow in reverse, the RMO
system can be used. To use the Reverse Mowing Option
(RMO) turn the RMO key after the PTO is engaged. The
L.E.D. light will illuminate, and the operator can then
mow in reverse. Each time the PTO is engaged the RMO
needs to be reactivated if desired. The key should be
removed to restrict access to the RMO feature.
Attachment Operation in Reverse
If an operator chooses to operate a PTO driven
attachment in reverse, the RMO system can be used. To
use the Reverse Mowing Option (RMO) turn the RMO key
after the PTO is engaged. The L.E.D. light will illuminate,
and the operator can then operate the attachment in
reverse. Each time the PTO is disengaged the RMO
needs to be reactivated if desired. The key should be
removed to restrict access to the RMO feature.
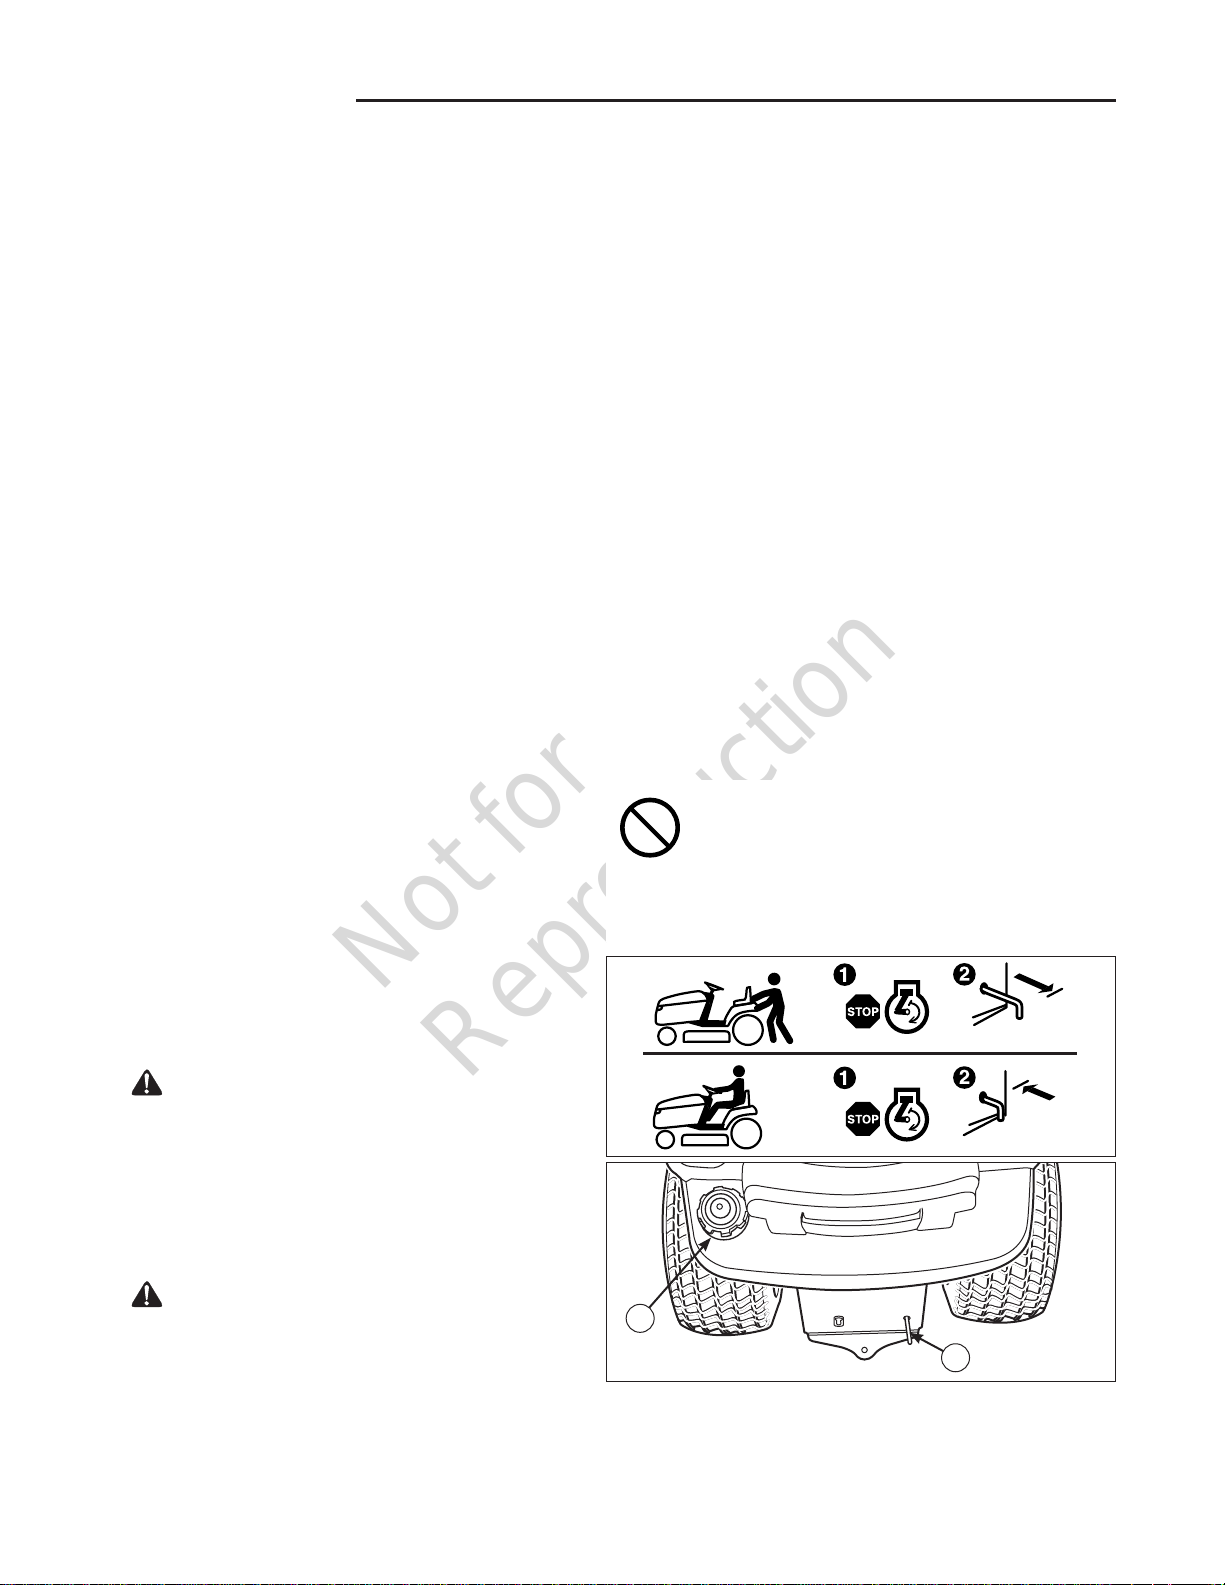
Pushing the Tractor by Hand
1. Disengage the PTO and turn the engine off.
2. Pull the transmission release (B, Figure 3) back
approximately 2-3/8” (6 cm) to lock into released
position.
3. The tractor can now be pushed by hand.
DO NOT TOW TRACTOR
Towing the unit will cause transmission
damage.•Donotuseanothervehicleto
pushorpullthisunit.•Donotactuatethe
transmission release valve lever while the
engine is running.
WARNING
The engine will shut off if the reverse ground
speed pedal is depressed while the PTO is
on and the RMO has not been activated. The
operator should always turn the PTO off prior to
driving across on roads, paths or any area that
maybe used by other vehicles. Sudden loss of
drive could create a hazard.
WARNING
Mowing in reverse can be hazardous to
bystanders. Tragic accidents can occur if the
operator is not alert to the presence of children.
Never activate RMO if children are present.
Children are often attracted to the unit and the
mowing activity.
A
B
Figure 3. Transmission Release Lever & Fuel Tank
14
Page 17
Not for
Reproduction
Operating the Tractor
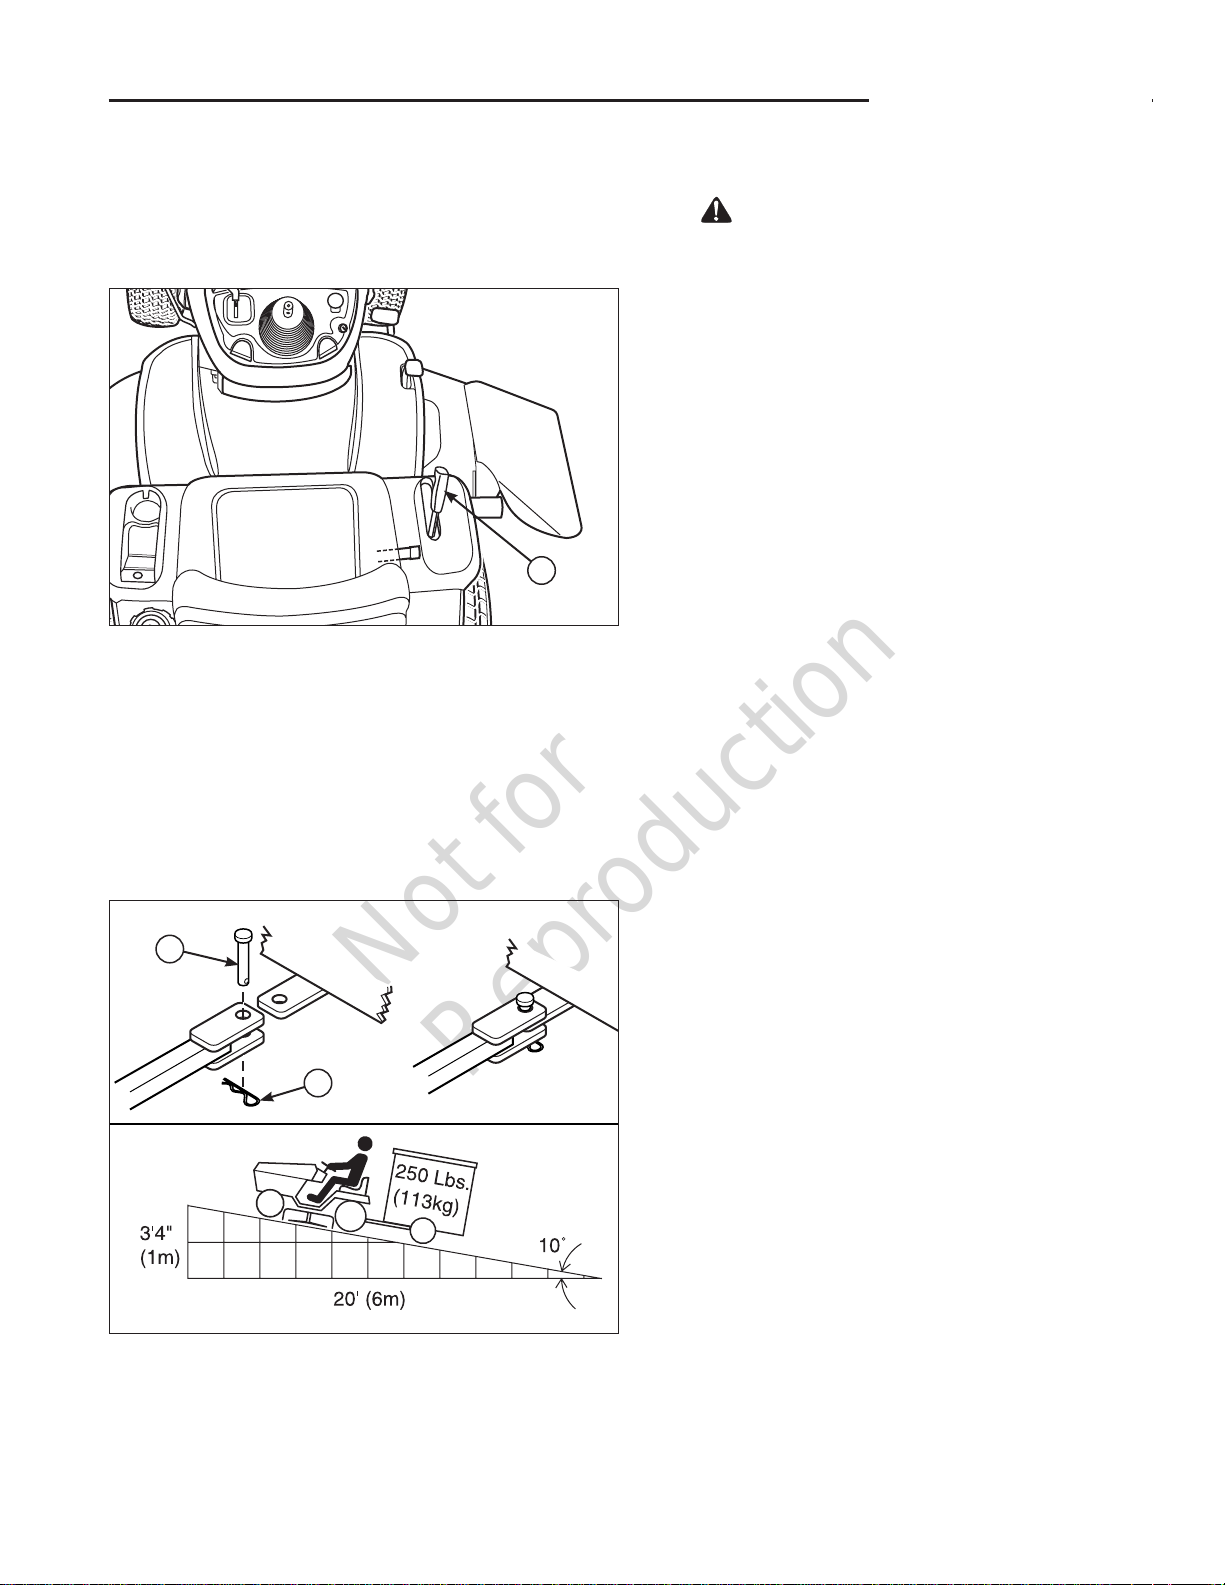
Adjusting Mower Cutting Height
The cutting height lift lever (A, Figure 4) controls the mower
cutting height. The cutting height is has seven positions
between approximately 1.0” and 4.0” (2,5 and 10,2 cm).
A
Figure 4. Raising & Lowering Mower
Attaching a Trailer
The maximum horizontal drawbar force allowed is
280 Newton. The maximum vertical drawbar force is
160 Newton. This equates to a 250 lbs (113 kg) trailer on
a 10 degree hill. Secure the trailer with an appropriately
sized clevis pin (A, Figure 5) and clip (B).
Storage
WARNING
Never store the unit (with fuel) in an enclosed,
poorly ventilated structure. Fuel vapors can
travel to an ignition source (such as a furnace,
water heater, etc.) and cause an explosion.
Fuel vapor is also toxic to humans and animals.
Before you store your unit for the off-season, read the
Maintenance and Storage instructions in the Safety Rules
section, then perform the following steps:
• DisengagethePTO,settheparkingbrake,&remove
the key.
• Performenginemaintenanceandstoragemeasures
listed in the engine owner’s manual. This includes
draining the fuel system, or adding stabilizer to the
fuel (do not store a fueled unit in an enclosed structure
- see warning).
• Batterylifewillbeincreasedifitisremoved,putina
cool, dry place and fully charged about once a month.
If the battery is left in the unit, disconnect the negative
cable.
Before starting the unit after it has been stored:
• Checkallfluidlevels.Checkallmaintenanceitems.
• Performallrecommendedchecksandprocedures
found in the engine owner’s manual.
• Allowtheenginetowarmupforseveralminutes
before use.
A
B
Figure 5. Trailer Weight Recommendations
15
Page 18

Not for
Reproduction
Regular
Maintenance
MAINTENANCE SCHEDULE & PROCEDURES
The following schedule should be followed for normal care of your tractor and mower.
TRACTOR AND MOWER
Every 8 Hours or Daily
Check safety interlock system
Clean debris off tractor and mower deck
Clean debris from engine compartment
Every 25 Hours or Annually *
Check mower blade stopping time
Check tractor and mower for loose hardware
Check tire pressure
Every 50 Hours or Annually *
Check tractor brakes
Clean battery and cables
See Dealer Annually to
Lubricate tractor and mower
Check mower blades **
* Whichever comes first
** Check blades more often in regions with sandy soils or
high dust conditions.
ENGINE
First 5 Hours
Change engine oil
Every 8 Hours or Daily
Check engine oil level
Every 25 Hours or Annually *
Clean engine air filter and pre-cleaner **
Every 50 Hours or Annually *
Change engine oil
Replace oil filter
Annually
Replace air filter
Replace pre-cleaner
See Dealer Annually to
Inspect muffler and spark arrester
Replace spark plug
Replace fuel filter
Clean engine air cooling system
* Whichever comes first
** Clean more often in dusty conditions or when airborne
debris is present.
Check Tire Pressure
Tire Pressure should be checked periodically, and
maintained at the levels shown in the chart (Figure 6).
Note that these pressures may differ slightly from the
“Max Inflation” stamped on the side-wall of the tires. The
pressures shown provide proper traction, improve cut
quality, and extend tire life.
Size PSI bar
22 x 8,0-8 10 0,68
15 x 6,0-6 12-14 0,82-0,96
Figure 6. Tire Pressure
16
Page 19
Not for
Reproduction
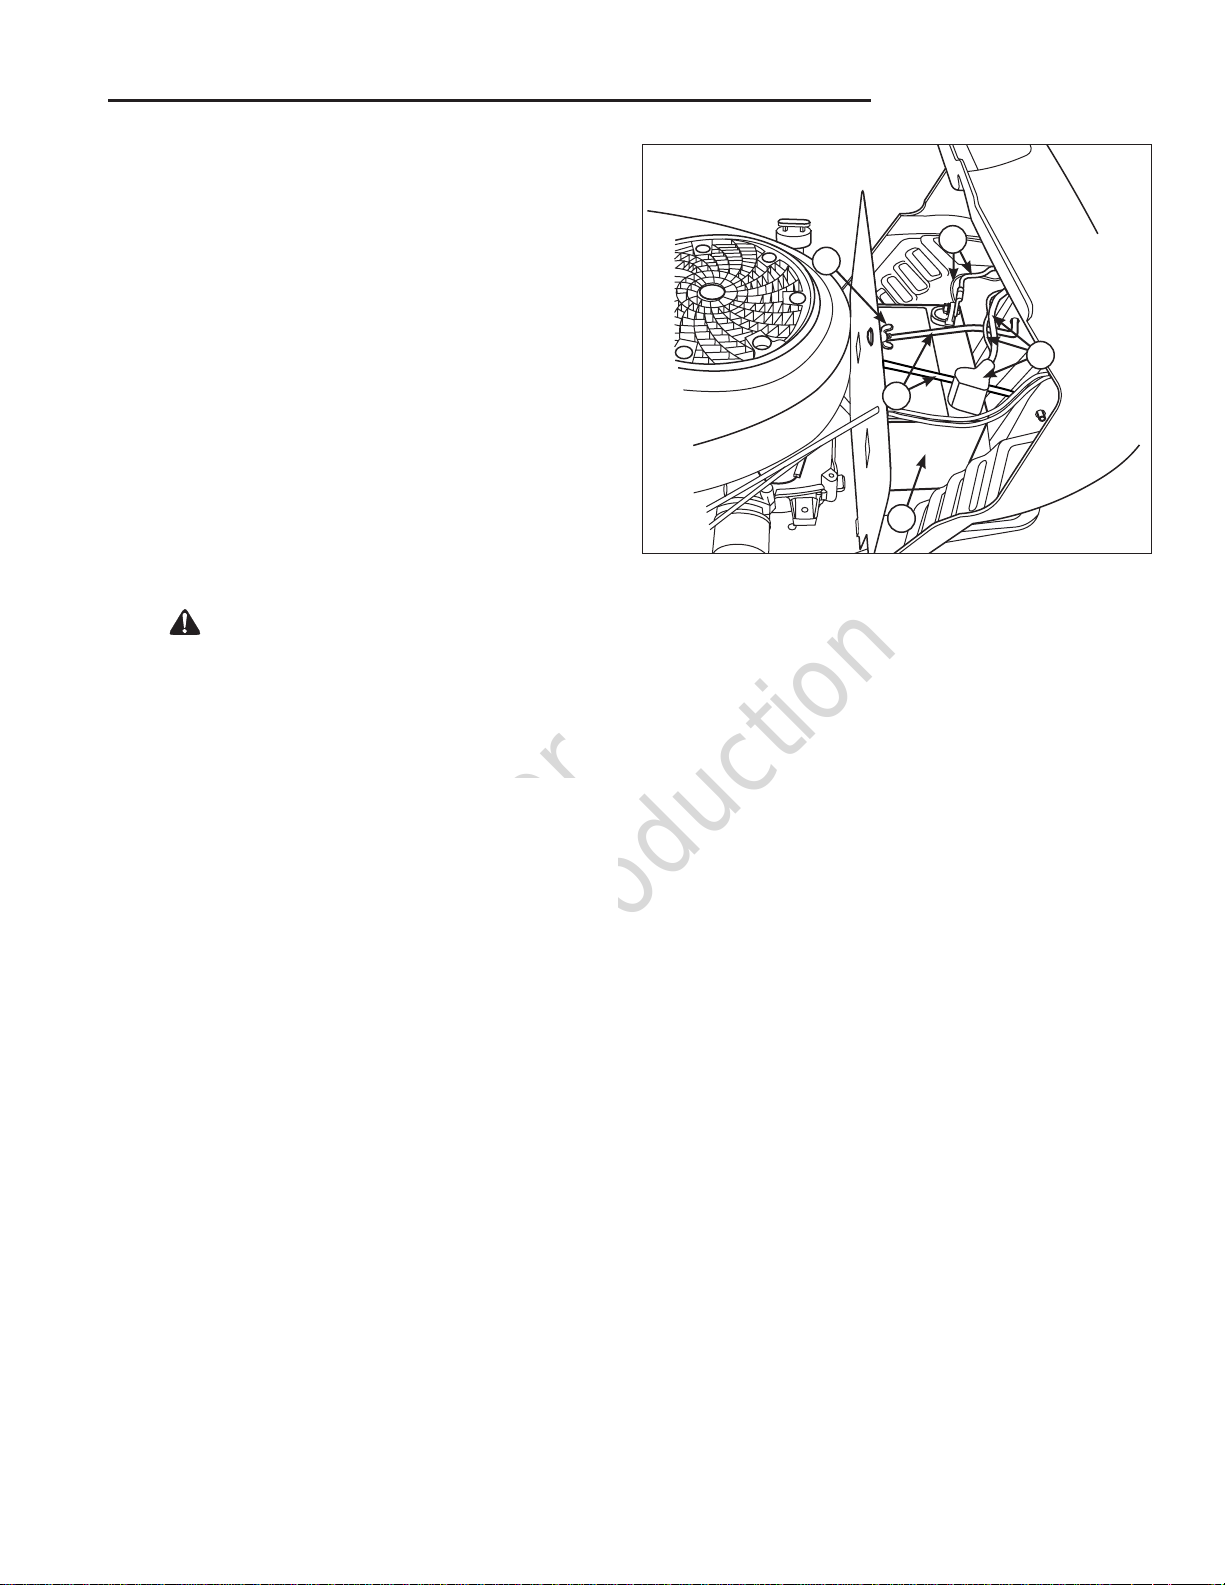
Check Mower Blade Stopping Time
Mower blades and mower drive belt should come to a
complete stop within five seconds after the electric PTO
switch is turned off.
1. With tractor in neutral, PTO disengaged and operator
in seat, start the engine.
2. Look over the left-hand footrest at the mower drive
belt. Engage the PTO and wait several seconds.
Disengage the PTO and check the amount of time it
takes for the mower drive belt to stop.
3. If mower drive belt does not stop within five seconds,
see your dealer.
Regular Maintenance
A
D
B
C
Battery Maintenance
Cleaning the Battery and Cables
WARNING
When removing or installing battery cables,
disconnect the negative cable FIRST and
reconnect it LAST. If not done in this order, the
positive terminal can be shorted to the frame by a
tool.
1. Disconnect the cables from the battery, negative
cables first (A, Figure 7) then the cover & positive
cables (B).
2. Loosen the wingnut & washer (D).
3. Pivot the hold-down rod (C) up and away from battery.
Secure to steering tower.
4. Remove the battery (E).
5. Clean the battery compartment with a solution of
baking soda and water.
6. Clean the battery terminals and cable ends with a wire
brush and battery terminal cleaner until shiny.
7. Reinstall the battery (E) in the battery compartment.
Secure with the battery hold-down rod (C) and
wingnut & washer (D).
8. Re-attach the battery cables, positive cables and
cover first (B) then the negative cables (A).
9. Coat the cable ends and battery terminals with
petroleum jelly or non-conducting grease.
E
Figure 7. Battery Maintenance
17
Page 20

Not for
Reproduction
Troubleshooting,
Adjustment, & Service
Troubleshooting
While normal care and regular maintenance will extend
the life of your equipment, prolonged or constant use may
eventually require that service be performed to allow it to
continue operating properly.
The troubleshooting guide below lists the most common
problems, their causes, and remedies.
Troubleshooting the Tractor
PROBLEM LOOK FOR REMEDY
Brake pedal not depressed. Fully depress brake pedal.
PTO (electric clutch) switch is in ON position. Place in OFF position.
Cruise control engaged. Move knob to NEUTRAL/OFF position.
Out of fuel.
Engine flooded. Disengage the choke.
Engine will not
turnover or start.
Engine starts hard or
runs poorly.
Engine knocks.
Excessive oil
consumption.
Fuse is blown. See authorized dealer.
Battery terminals require cleaning. See Cleaning the Battery and Cables.
Battery discharged or dead. Recharge or replace battery.
Wiring loose or broken.
Solenoid or starter motor faulty. See authorized dealer.
Safety interlock switch faulty. See authorized dealer.
Water in fuel. See authorized dealer.
Gas is old or stale. See authorized dealer.
Fuel mixture too rich. See engine manual.
Engine has other problem. See authorized dealer.
Low oil level. Check/add oil as required.
Using wrong grade oil. See engine manual.
Engine running too hot. See authorized dealer.
Using wrong grade oil. See engine manual.
Too much oil in crankcase. Drain excess oil.
WARNING
To avoid serious injury, perform maintenance
on the tractor or mower only when the engine is
stopped and the parking brake engaged.
Always remove the ignition key, disconnect the
spark plug wire and fasten it away from the plug
before beginning the maintenance, to prevent
accidental starting of the engine.
If engine is hot, allow it to cool, then refill
the fuel tank.
Visually check wiring. If wires are frayed or
broken, see authorized dealer.
18
Page 21

Not for
Reproduction
Troubleshooting, Adjustment, & Service
Troubleshooting the Tractor (Continued)
PROBLEM LOOK FOR REMEDY
Brake will not hold. Internal brake worn. See authorized dealer.
Tractor steers hard or
handles poorly.
Engine exhaust is
black.
Engine runs, but tractor
will not drive.
Troubleshooting the Mower
PROBLEM LOOK FOR REMEDY
Mower will not raise. Lift linkage not properly attached or damaged. See authorized dealer.
Mower cut is uneven.
Mower cut is rough
looking.
Engine stalls easily
with mower engaged.
Excessive mower
vibration.
Engine runs and
tractor drives, but
mower will not drive.
Steering linkage is loose. See authorized dealer.
Improper tire inflation. See Check Tire Pressure section.
Front wheel spindle bearings dry. See authorized dealer.
Dirty air filter. See engine manual.
Choke closed. Open choke.
Ground speed control pedals not depressed. Depress pedals.
Transmission release lever in PUSH position.
Mower drive belt is broken. See authorized dealer.
Parking brake is engaged. Disengage parking brake.
Traction drive belt is broken or slipping. See authorized dealer.
Mower not leveled properly. See authorized dealer.
Tractor tires not properly inflated. See Check Tire Pressure.
Engine speed too slow. Set to full throttle.
Ground speed too fast. Slow down.
Mower has other problem. See authorized dealer.
Engine speed too slow. Set to full throttle.
Ground speed to fast. Slow down.
Dirty or clogged air filter. See engine manual.
Cutting height set too low.
Discharge chute jamming.
Engine not up to operating temperature. Run engine for several minutes to warm-up.
Starting mower in tall grass. Start the mower in a cleared area.
Mower has other problem. See authorized dealer.
PTO not engaged. Engage the PTO.
Mower has other problem. See authorized dealer.
Move into DRIVE position.
Cut tall grass at maximum cutting height
during first pass.
Cut grass with discharge pointing toward
previously cut area.
19
Page 22
Not for
Reproduction
Troubleshooting, Adjustment, & Service
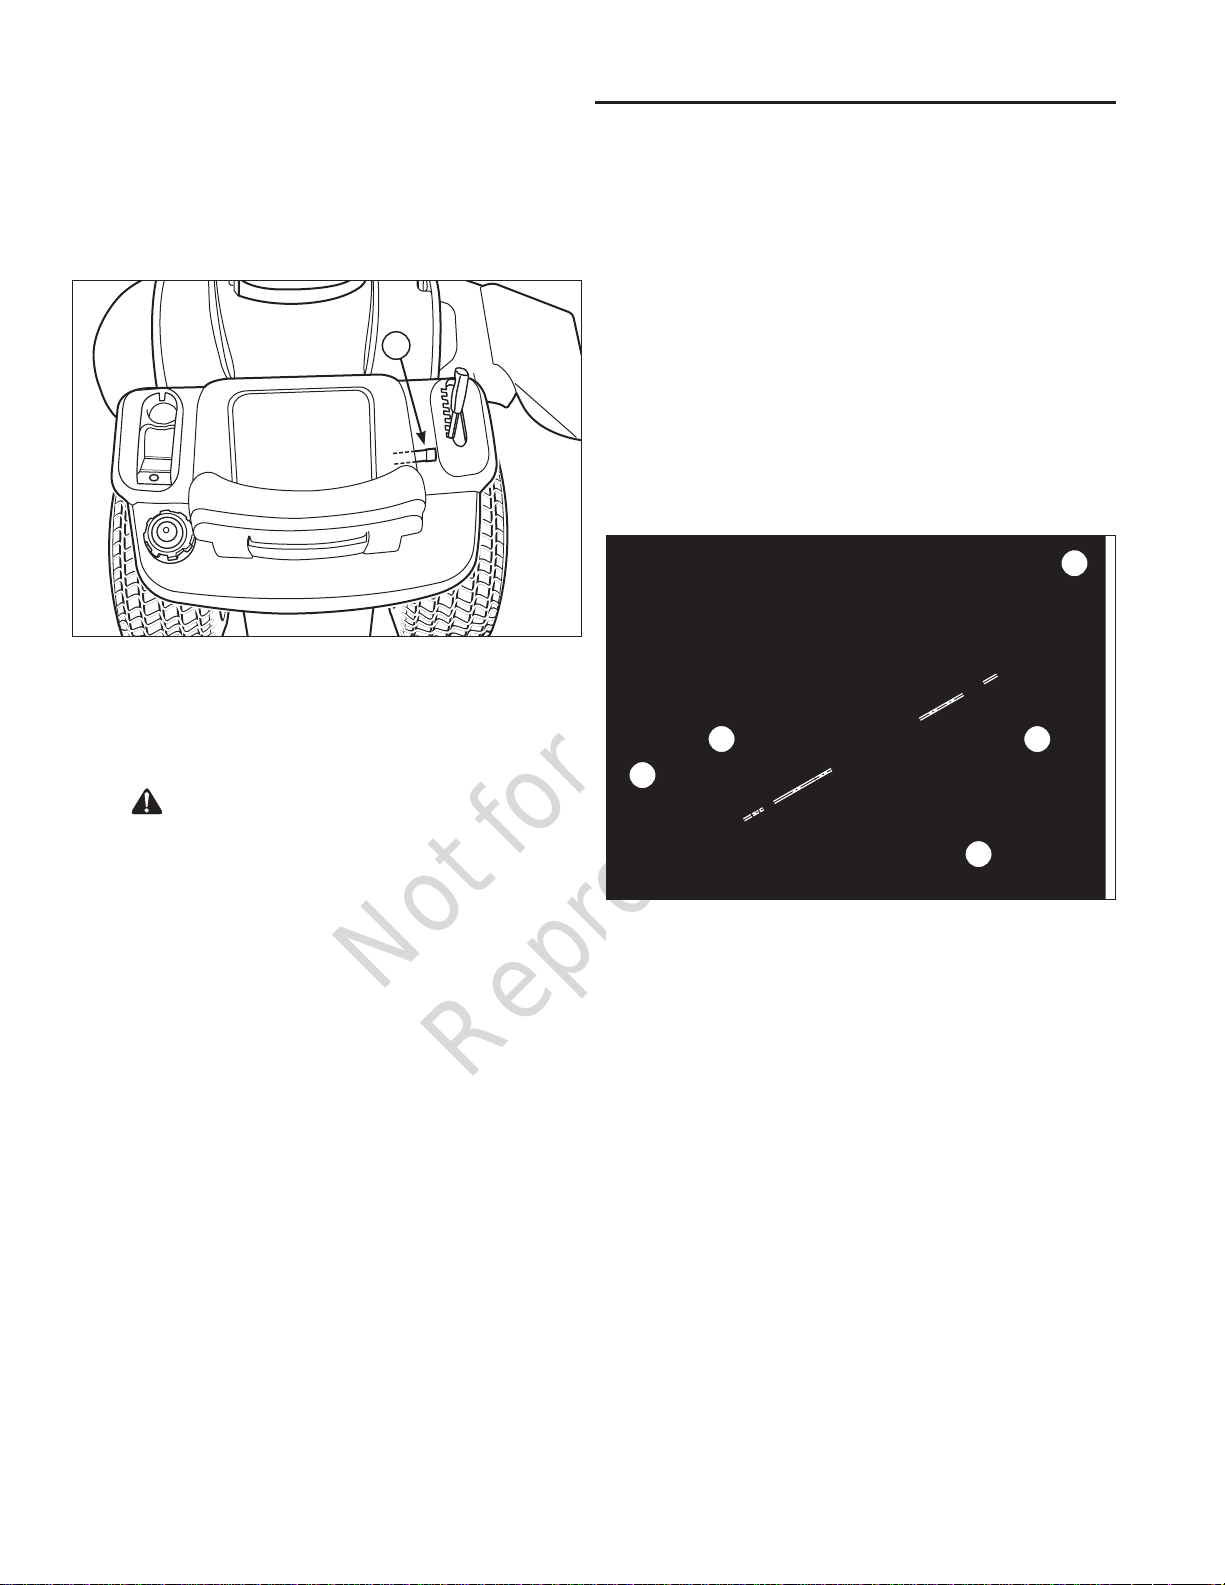
Seat Adjustment
The seat can be adjusted forward and back. Move the
lever (A, Figure 12), position the seat as desired, and
release the lever to lock the seat into position.
A
Figure 12. Seat Adjustment
Mower Adjustment
Gauge Wheels
The mower gauge wheels can be placed in three
positions depending on the height of cut. When using
higher cutting heights, set the wheels in the lower
position. When using lower cutting heights, set the
wheels in the upper position. Do not allow wheels to
remain on the ground constantly while mowing. To adjust:
1. Remove the locknut (B, Figure 17), gauge wheel (C),
washers (D), and shoulder bolt (E). Change position
of gauge wheel to desired height.
2. Insert shoulder bolt (E) through washers (D) gauge
wheel (C), and gauge wheel bracket (A). Secure with
locknut (B). Repeat steps 1 & 2 for all gauge wheels.
A
Battery Charging
WARNING
Keep open flames and sparks away from the
battery; the gasses coming from it are highly
explosive. Ventilate the battery well during
charging.
A dead battery or one too weak to start the engine may
be the result of a defect in the charging system or other
electrical component. If there is any doubt about the
cause of the problem, see your dealer. If you need to
replace the battery, follow the steps under Cleaning the
Battery & Cables.
To charge the battery, follow the instructions provided by
the battery charger manufacturer as well as all warnings
included in the safety rules sections of this book. Charge
the battery until fully charged. Do not charge at a rate
higher than 10 amps.
D
E
Figure 13. Fixed Bracket Gauge Wheel Adjustment
B
C
20
Page 23

Not for
Reproduction
Specifications
ENGINE:
Briggs & Stratton
Make Briggs & Stratton®
Model Intek, 4195 Series
Displacement 30.5 cu in. (500 cc)
Electrical System Alternator : 9 amp
Battery: 12 Volt, 195 CCA
Oil Capacity 48 oz (1,4 L)
TRANSMISSION:
K46
Type Hydrostatic Tuff Torq K46
Hydraulic Fluid 10w 30 Premium Engine Oil
Speeds Forward: 0-5.5 MPH (0-8,9 km/h)
@ 3400 rpm Reverse: 0-3.0 MPH (0-4,8 km/h)
Continuous Torque 170 ft-lbs (230,5 Nm)
Output
CHASSIS:
Fuel Tank Capacity Capacity: 3.5 Gallons (13,2 L)
Rear Wheels Tire Size: 22 x 8.0 -8
Inflation Pressure: 10 psi (0,68 bar)
Front Wheels Tire Size: 15 x 6.0-6
Inflation Pressure: 12-14 psi (0,82-0,96 bar)
Power Rating
The gross power rating for individual gasoline engine models is labeled in accordance with SAE (Society of
Automotive Engineers) code J1940 Small Engine Power & Torque Rating Procedure, and is rated in accordance with
SAE J1995. Torque values are derived at 2600 RPM for those engines with “rpm” called out on the label and 3060
RPM for all others; horsepower values are derived at 3600 RPM. The gross power curves can be viewed at www.
BRIGGSandSTRATTON.COM. Net power values are taken with exhaust and air cleaner installed whereas gross
power values are collected without these attachments. Actual gross engine power will be higher than net engine
power and is affected by, among other things, ambient operating conditions and engine-to-engine variability. Given
the wide array of products on which engines are placed, the gasoline engine may not develop the rated gross power
when used in a given piece of power equipment. This difference is due to a variety of factors including, but not limited
to, the variety of engine components (air cleaner, exhaust, charging, cooling, carburetor, fuel pump, etc.), application
limitations, ambient operating conditions (temperature, humidity, altitude), and engine-to-engine variability. Due
to manufacturing and capacity limitations, Briggs & Stratton may substitute an engine of higher rated power for this
engine.
DIMENSIONS:
Overall Length 70.9” (180 cm)
Overall Width 48” (122 cm)
Height 44.9” (114 cm)
Parts & Accessories
Contact an authorized dealer for details.
21
Page 24

Not for
Reproduction
BRIGGS & STRATTON PRODUCTS WARRANTY POLICY April 2012
LIMITED WARRANTY
Briggs & Stratton warrants that, during the warranty period specified below, it will repair or replace, free of charge, any part that is defective in
material or workmanship or both. Transportation charges on product submitted for repair or replacement under this warranty must be borne by
purchaser. This warranty is effective for and is subject to the time periods and conditions stated below. For warranty service, find the nearest
Authorized Service Dealer in our dealer locator map at snapper-europe.com. The purchaser must contact the Authorized Service Dealer,
and then make the product available to the Authorized Service Dealer for inspection and testing.
There is no other express warranty. Implied warranties, including those of merchantability and fitness for a particular purpose,
are limited to one year from purchase, or to the extent permitted by law. All other implied warranties are excluded. Liability for
incidental or consequential damages are excluded to the extent exclusion is permitted by law. Some states or countries do not
allow limitations on how long an implied warranty lasts, and some states or countries do not allow the exclusion or limitation of incidental or
consequential damages, so the above limitation and exclusion may not apply to you. This warranty gives you specific legal rights and you may
also have other rights which vary from state to state or country to country.**
WARRANTY PERIOD
Item Consumer Use Commercial Use
Equipment 2 years 90 days
Engine* 2 years 90 days
Battery (if equipped) 1 year 1 year
* Applies to Briggs & Stratton engines only. Warranty coverage of non-Briggs & Stratton engines is provided by that engine manufacturer.
Emissions-related components are covered by the Emissions Warranty Statement.
** In Australia - Our goods come with guarantees that cannot be excluded under the Australian Consumer Law. You are entitled to a replacement
or refund for a major failure and for compensation for any other reasonably foreseeable loss or damage. You are also entitled to have the goods
repaired or replaced if the goods fail to be of acceptable quality and the failure does not amount to a major failure. For warranty service, find
the nearest Authorized Service Dealer in our dealer locator map at BRIGGSandSTRATTON.com, or by calling 1300 274 447, or by emailing or
writing to salesenquires@briggsandstratton.com.au, Briggs & Stratton Australia Pty Ltd, 1 Moorebank Avenue, NSW, Australia, 2170.
The warranty period begins on the date of purchase by the first retail consumer or commercial end user, and continues for the period of time
stated in the table above. “Consumer use” means personal residential household use by a retail consumer. “Commercial use” means all other
uses, including use for commercial, income producing or rental purposes. Once a product has experienced commercial use, it shall thereafter be
considered as a commercial use product for purposes of this warranty.
No warranty registration is necessary to obtain warranty on Briggs & Stratton products. Save your proof of purchase receipt. If you
do not provide proof of the initial purchase date at the time warranty service is requested, the manufacturing date of the product will
be used to determine the warranty period.
ABOUT YOUR WARRANTY
We welcome warranty repair and apologize to you for being inconvenienced. Warranty service is available only through Snapper Authorized
Service Dealers. Most warranty repairs are handled routinely, but sometimes requests for warranty service may not be appropriate. This warranty
only covers defects in materials or workmanship. It does not cover damage caused by improper use or abuse, improper maintenance or repair,
normal wear and tear, or stale or unapproved fuel.
Improper Use and Abuse - The proper, intended use of this product is described in the Operator’s Manual. Using the product in a way not
described in the Operator’s Manual or using the product after it has been damaged will void your warranty. Warranty is not allowed if the serial
number on the product has been removed or the product has been altered or modified in any way, or if the product has evidence of abuse such
as impact damage, or water/chemical corrosion damage.
Improper Maintenance or Repair - This product must be maintained according to the procedures and schedules provided in the Operator’s
Manual, and serviced or repaired using genuine Briggs & Stratton parts or equivalent. Damage caused by lack of maintenance or use of nonoriginal parts is not covered by warranty.
Normal Wear - Like all mechanical devices, your unit is subject to wear even when properly maintained. This warranty does not cover repairs
when normal use has exhausted the life of a part or the equipment. Maintenance and wear items such as filters, belts, cutting blades, and brake
pads (except engine brake pads) are not covered by warranty due to wear characteristics alone, unless the cause is due to defects in material or
workmanship.
Stale Fuel - In order to function correctly, this product requires fresh fuel that conforms to the criteria specified in the Operator’s Manual. Damage
caused by stale fuel (carburetor leaks, clogged fuel tubes, sticking valves, etc) is not covered by warranty.
Other Exclusions - This warranty excludes damage due to accident, abuse, modifications, alterations, improper servicing, freezing or chemical
deterioration. Attachments or accessories that were not originally packaged with the product are also excluded. There is no warranty coverage on
equipment used for primary power in place of utility power or on equipment used in life support applications. This warranty also excludes failures
due to acts of God and other force majeure events beyond the manufacturer’s control.
1737660D_EN Rev C
22
Page 25

Not for
Reproduction
Indhold
Sikkerhedsregler og Information
Identifikationsnumre .......................................... 7
Sikkerhedsmærkater.......................................... 8
Egenskaber og styr .......................................... 10
Styrefunktioner ......................................................10
Parkeringsbremsens funktion ................................12
Betjening af cruise-control .....................................12
Timetæller .............................................................12
Betjening af traktoren ...................................... 13
Sikkerhedsblokering ..............................................13
Almindelig driftssikkerhed .....................................13
Påhældning af brændstof ......................................13
Sådan startes motoren ..........................................13
Sådan standses traktor og motor ..........................14
Kørsel af traktoren .................................................14
Sådan slår man græs ............................................14
Græsslåning i bakgear ..........................................14
Drift af tilbehør i bakgear .......................................14
Traktoren skubbes ved håndkraft ..........................14
Justering af slåmaskinens klippehøjde ..................15
Tilkobling af påhængsvogn ...................................15
Opbevaring ...........................................................15
...................... 2
Regelmæssig vedligeholdelse ........................ 16
Vedligeholdelsesplan ............................................16
Kontrol af trykket i dækkene ..................................16
Kontroller stoptiden af plæneklipperens knive .......17
Batterivedligeholdelse ..........................................17
Fejlfinding, justering og service ..................... 18
Fejlfinding ved traktoren ........................................28
Fejlfinding ved slåmaskinen ..................................19
Sædejustering .......................................................20
Batteriopladning ....................................................20
Slåmaskinejusteringer ...........................................20
Specifikationer ................................................. 21
Garanti ............................................................... 22
1
Page 26

Not for
Reproduction
Sikkerhedsregler og information
Betjenings sikkerhed
Tillykke med købet af dette meget høj- kvalitets stykke plæneog haveudstyr! Vore produkter er formgivet og fremstillet til at
imødekomme eller overgå alle industriens sikkerhedsstandarder.
Et elektrisk redskab er kun sikkert, hvis den der betjener det er
sikker. Hvis redskabet misbruges, eller ikke bliver rigtigt vedligeholdt,
kan det være farligt! Husk, at du er ansvarlig for din egen såvel som
for andres sikkerhed.
Brug fornuften og gennemtænk hvad det er, du vil gøre. Hvis du ikke
er sikker på, at den opgave, du planlægger at udføre, kan foretages
sikkert med det valgte udstyr, så spørg en professionel: kontakt den
lokale, autoriserede forhandler.
Læs håndbogen
Betjenings håndbogen indeholder vigtige sikkerhedsoplysninger, som det er nødvendigt at
være opmærksom på både FØR og UNDER betjening af enheden.
Sikre betjenings teknikker, en gennemgang af produktets funktioner
og kontrolinstallationer samt vedligeholdelses information er
inkluderet for at hjælpe dig med at få mest muligt ud af din investering
i udstyret.
Vær sikker på at læse Sikkerhedsreglerne og Oplysningerne på de
følgende sider godt igennem. Læs også afsnittet om Betjening helt
igennem.
Børn
Tragiske ulykker kan forekomme med børn. Lad dem
ikke komme i nærheden af betjeningsområdet. Børn er tit
tiltrukket af enheden og græsslånings aktiviteterne. Du bør
aldrig antage, at børn forbliver på det sted, du sidst så dem.
Hvis der er en risiko for, at børn kommer ind på området,
hvor græsslåning foregår, skal man få en ansvarlig voksen til
at holde øje med dem.
MAN MÅ IKKE LÅDE BØRN KØRE PÅ DENNE ENHED! Det
giver dem lyst til at komme nær enheden i fremtiden, mens
den kører med det resultat, at de kan komme alvorligt til
skade. De løber måske hen til enheden for at få en tur, når du
mindst venter det, og du kan komme til at køre dem over.
2
Baglæns
Slå ikke græs baglæns,
undtagen hvis det er
absolut nødvendigt. Se
altid ned og bagved før,
og mens maskinen kører
baglæns, også selvom
græsslåningsbladene
ikke er engageret.
Page 27

Not for
Reproduction
Sikkerhedsregler og information
Betjening på skråninger
Man kan komme alvorligt, endog dødeligt til skade, hvis denne enhed
anvendes på en for stejl skråning. Ved at bruge enheden på en skråning,
der er for stejl, eller hvor man ikke har tilstrækkelig trækkraft, kan man
miste kontrollen eller rulle over.
En god tommelfingerregel er, at man ikke bør køre på en skråning, som
man ikke kan bakke op ad (i 2-hjuls kørsels måde). Man bør ikke køre på
skråninger, der hæver sig mere end 3.5 meter over en 20 meter længde.
Man skal altid køre lige op og ned af skråninger: aldrig krydse tværs over.
Man skal også være opmærksom på, at overfladen man kører på, kan
have stor indvirkning på stabilitet og kontrol. Vådt græs eller isslag på
fortov/havesti kan have alvorlige konsekvenser for evnen til at kontrollere
enheden.
Hvis man er usikker på, om man kan køre enheden på en skråning, bør
man ikke gøre det. Det er ikke risikoen værd.
Bevægelige dele
Dette redskab har mange bevægelige dele, der kan beskadige dig selv eller en anden.
Hvis man imidlertid sidder korrekt i sædet, og følger alle regler i denne håndbog, er det
sikkert at betjene enheden.
Græsslånings dækket har roterende blade, der kan amputere hænder eller fødder. Lad
ikke nogen komme nær maskinen, mens den kører!
For at hjælpe operatøren med at bruge dette udstyr på en sikker made, er det udstyret
med et operatør-tilstede sikkerhedssystem. Man må IKKE forsøge at ændre eller
forbigå dette system. Kontakt straks forhandleren, hvis systemet ikke passerer alle de
kombinerede sikkerheds systemprøver, der findes i denne håndbog.
Pludseligt kastede objekter
Denne enhed har roterende græsslåningsblade. Disse blade kan opsamle og
kaste genstande gennem luften og således alvorligt skade en omkringstående.
Vær sikker på at rense området, der skal slås, FØR slåningen begynder.
Man må ikke betjene denne enhed, uden at hele græsopfangeren eller
udtømnings skærmen (deflektoren) er på plads.
Lad heller ikke nogen komme ind på området, mens enheden kører! Hvis
nogen kommer ind på området, skal man slukke for enheden, indtil personen
går igen.
Brændstof og vedligehold
Benzin er ekstremt brandbart. Dets dampe er også ekstremt brandbare og
kan bevæge sig hen til fjerntliggende antændelseskilder. Benzin må kun
anvendes som brændstof, ikke som et opløsnings- eller rensemiddel. Det bør
aldrig opbevares på et sted, hvor dets dampe kan fortættes eller bevæge sig
hen til en antændelseskilde, som for eksempel en tændflamme. Brændstof
skal opbevares i en godkendt forseglet plastik benzindunk, eller i traktorens
brændstoftank med låget sikkert lukket. Spildt brændstof skal straks tørres op.
Korrekt vedligehold er kritisk for sikkerheden og præstationen af enheden. Vær sikker på at
udføre vedligeholdelses procedurerne, der er opført i denne håndbog, særligt den periodiske
afprøvning af sikkerhedssystemet.
3
Page 28

Not for
Reproduction
Sikkerhedsregler og information
Læs alle sikkerhedsregler og følg dem nøje. Undlader man at følge disse regler kan det medføre tab af kontrol
over traktoren, alvorlige personskader eller dødsfald for Dem selv eller andre tilstedeværende samt beskadigelse
af ejendom eller udstyr. Klipperen er i stand til at amputere arme og ben samt slynge genstande afsted. Advarsels
trekanten i teksten markerer vigtige forsigtighedsregler eller advarsler, som skal følges.
ALMINDELIG BETJENING
1. Læs, forstå og følg alle anvisninger i manualen og på
traktoren før start.
2. Hold ikke hænder eller fødder nær de roterende dele
eller under maskinen. Hold Dem altid på afstand af
udkaståbningen.
3. Lad kun ansvarsbevidste voksne, der er bekendt med
instruktionerne, betjene traktoren (lokale bestemmelser kan
fastsætte aldersgrænser for føreren).
4. Ryd området for genstande som fx. sten, kviste, hegnstråd
osv., der kan opsamles og udslynges af kniven(e).
5. Sørg for, at området er frit for andre personer, før arbejdet
påbegyndes. Stop arbejdet, hvis andre kommer ind på
området.
6. Medtag aldrig passagerer.
7. Klip aldrig i bakgear, medmindre det er absolut nødvendigt.
Se altid nedad og bagud - både før og imens der køres i
bakgear.
8. Vend aldrig udkastmaterialet efter nogen. Undgå at udkaste
materiale imod en mur eller nogen anden forhindring.
Materialet kan slynges tilbage mod føreren. Stop kniven(e)
mens De kører over grusbelagte overflader.
9. Brug ikke maskinen medmindre hele græsopsamleren,
udkastskærmen (deflektor) eller andet nødvendigt
sikkerhedsudstyr er installeret.
10. Sæt farten ned, før der vendes.
11. Efterlad aldrig en kørende traktor uden opsyn. Slå altid
kraftudtaget (PTO) fra, slå parkeringsbremsen til, stop
motoren og fjern tændingsnøglen før De stiger af traktoren.
12. Kobl knivene (PTO) fra, når De ikke umiddelbart er i færd
med at klippe. Sluk for motoren og vent, indtil alle maskinens
dele er standset helt, før rengøring af maskinen, aftagning af
græsopsamleren eller udrensning af udkastskærmen.
13. Brug kun maskinen i dagslys eller ved godt kunstigt lys.
14. Brug ikke maskinen, mens De er under indflydelse af alkohol,
medicin eller narkotika. Hold øje med trafikken, når De bruger
maskinen nær ved eller kører over veje.
16. Vær særligt forsigtig, når traktoren af- og pålæsses en trailer
eller ladvogn.
17. Brug altid sikkerhedsbriller under kørsel med maskinen.
18. Der findes data, der viser, at førere på 60 år og derover er
indblandet i en høj procentdel af de skader, der skyldes
traktorklippere (riders). Sådanne førere bør vurdere deres
evne til at betjene traktorklipperen tilstrækkeligt betryggende
til at beskytte sig selv og andre mod at blive kvæstede.
19. Følg fabrikantens anbefalinger for brug af hjulvægte eller
kontravægte.
20. Husk at føreren er erstatningsansvarlig for skader, der
påføres andre mennesker eller ejendele.
21. Alle førere bør søge professionel vejledning og erhverve sig
praktisk erfaring.
22. Sørg altid for at være iført kraftigt fodtøj og bukser. Betjen
aldrig traktoren med bare fødder eller iført sandaler.
23. Før brug, skal man altid se efter, at knivene og deres
fastspændingsdele er på plads og uden defekter og gjort fast.
Udskift slidte og beskadigede dele.
24. Sørg for at udkoble tilbehør før brændstofpåfyldning,
afmontering af tilbehøret, eller før der foretages justeringer
(medmindre justering kan foretages fra førersædet).
25. Når maskinen parkeres, stilles til opbevaring eller forlades,
skal klipperen sænkes medmindre en decideret mekanisk
blokering benyttes.
26. Før De forlader førersædet, uanset grunden dertil, skal De
sætte parkeringsbremsen til, slå PTO fra, standse motoren og
fjerne nøglen.
27. For at mindske brandfaren, skal traktoren holdes fri for græs,
blade og overskydende olie. Parkér eller stop ikke oven over
tørre blade, græs eller andet brændbart materiale.
TRANSPORT OG OPBEVARING
1. Når maskinen transporteres på åben ladvogn eller trailer, skal
man sørge for at forenden vender frem mod kørselsretningen.
Ellers vil vindpåvirkningen ved høje hastigheder kunne
forårsage beskadigelse af motorhjelmen.
2. Sørg altid for at anvende sikre metoder ved påfyldning og
håndtering af brændstof efter transport eller opbevaring af
traktoren.
3. Anbring aldrig traktoren (med brændstof) i indelukkede,
dårligt udluftede rum. Brændstofdampe kan finde vej til
en antændelseskilde (såsom fyr, vandvarmere osv.) og
forårsage eksplosion. Brændstofdampe er desuden giftige for
mennesker og dyr.
4. Følg altid instruktionerne i motormanualen om
opbevaringsforberedelser, før henstillen for kortere eller
længere perioder.
5. Følg altid instruktionerne i motormanualen om de korrekte
klargøringsprocedurer, inden traktoren tages i brug igen.
6. Opbevar aldrig maskine og brændstofdunke i rum, hvor der
er åben ild eller vågeblus, som fx i en gasvandvarmer. Lad
motoren køle af, før traktoren stilles til opbevaring.
4
Page 29

Not for
Reproduction
Sikkerhedsregler og information
KØRSEL PÅ SKRÅNINGER
Skråninger er ofte årsag til tab af kontrol med traktoren eller
væltning, hvilket kan medføre alvorlig tilskadekomst eller død.
Kørsel på skråninger kræver ekstra påpasselighed. Hvis De ikke er
i stand til at bakke op ad en skråning eller ikke føler Dem godt tilpas
ved at køre der, bør De ikke gøre det.
Kontrol over en traktor, som glider ned ad en skråning, kan ikke
genvindes ved brug af bremsen. De væsentligste årsager til tab af
kontrol med maskinen er utilstrækkelig kontakt mellem dækkene
og jorden, for høj hastighed, utilstrækkelig bremsning, forkert
anvendelse af maskinen til et givent stykke arbejde, manglende
overblik over jordbundsborholdene, forkert tilkobling af udstyr eller
forkert vægtfordeling.
1. Klip op og ned ad skråninger, ikke på tværs.
2. Hold øjnene åbne for huller, hjulspor og ujævnheder.
Ujævnt terræn kan vælte traktoren. Højt græs kan gemme
forhindringer.
3. Vælg et lavt gear, så det ikke vil være nødvendigt at standse
eller skifte gear under kørsel på skråningen.
4. Klip ikke græs, når det er vådt. Hjulene kan miste deres
traktion.
5. Hold altid traktoren i gear, især ved kørsel ned ad skråninger.
Skift aldrig til frigear og rul ned ad bakken.
6. Undgå at starte, standse eller vende på en skråning. Hvis
hjulene mister traktion, skal man koble knivene fra og
fortsætte langsomt lige ned ad skråningen.
7. Hold al kørsel på skråninger i et langsomt og gradvist tempo.
Foretag ingen pludselige ændringer i fart eller retning, som
kunne få traktoren til at vælte.
8. Vær ekstra forsigtig, mens De bruger maskinen med
græsopsamlere eller andet tilbehør, idet de kan påvirke
maskinens stabilitet.
9. Prøv aldrig at stabilisere masakinen ved at sætte en fod på
jorden.
10. Klip ikke tæt på stejle skrænter, grøfter eller andre stejle
terrænændringer. Traktoren kan pludeselig vælte, hvis et hjul
kommer ud over kanten af en grøft eller skrænt, eller hvis en
kant skrider sammen.
11. Brug ikke græsopsamlere på stejle skråninger.
12. Klip ikke græs på skråninger, der er for stejle til at bakke op
ad.
13. Henvend Dem til den autoriserede forhandler for anbefalinger
vedrørende hjulvægte eller kontravægte, som kan forbedre
maskinens stabilitet.
14. Fjern forhindringer såsom sten, og grene.
15. Kør langsomt. Hjulene kan miste deres traktion på skråninger,
selv om bremserne fungerer, som de skal.
16. Drej ikke på skråninger medmindre det er nødvendigt, og i
så fald drej langsomt og gradvist ned ad bakke, hvis det er
muligt.
BUGSERET UDSTYR
1. Udstyret må kun bugseres med en maskine, der har en
trækkrog, beregnet til bugsering. Bugseret udstyr må kun
fastgøres til trækkrogen.
2. Følg fabrikantens anvisninger vedr. vægtgrænser for
bugseret udstyr og bugsering på skråninger.
3. Lad aldrig børn eller andre sidde i eller på det bugserede
udstyr.
4. På skråninger kan vægten af det bugserede udstyr forårsage
tab af traktion og tab af kontrollen.
5. Kør langsomt, og tillad ekstra plads til at standse på.
6. Skift aldrig til frigear og rul ned ad bakken.
ADVARSEL
Arbejd aldrig på skråninger, der hælder mere end 17,6%
(10 grader), svarende til 1,06 meters stigning for hver
6,07 meter i vandret retning.
Anvend ekstra hjulvægte eller kontravægte, når der køres
på skråninger. Lad forhandleren afgøre, hvilke vægte, der
kan leveres og som passer til enheden.
Sæt farten helt ned, før der køres ud på en skråning.
Foruden at benytte vægte for og bag, skal der anvendes
ekstra forsigtighed på skråninger, når en græsopsamler er
monteret bagpå.
Klip ret OP og NED ad skråninger, aldrig på tværs, vær
forsigtig når kørselsretningen ændres og UNDLAD AT
STARTE OG STOPPE PÅ SKRÅNINGER.
BØRN
Meget alvorlige ulykker kan finde sted, hvis føreren ikke er
opmærksom på tilstedeværelsen af børn. Børn bliver ofte tiltrukket
af traktoren og klippearbejdet. Gå aldrig ud fra, at børn bliver dér,
hvor De så dem sidst.
1. Hold børn borte fra arbejdsområdet, og under vågent opsyn
af en anden ansvarsbevidst voksen.
2. Vær agtpågivende, og sluk traktoren, hvis børn kommer ind
på arbejdsområdet.
3. Før og under bakning skal man se nedad og bagud efter små
børn.
4. Lad aldrig børn køre med på maskinen, selv med kniven(e)
standset. De kan falde af og komme alvorligt til skade, eller
de kan være til hinder for sikker kørsel med maskinen. Børn,
som man har ladt køre med på et tidligere tidspunkt, kan
pludselig dukke op, hvor man klipper, for at køre med igen, og
kan blive påkørt, for-eller baglæns, af maskinen.
5. Tillad aldrig børn at føre traktoren.
6. Vær særligt forsigtig på vej hen mod hushjørner, buskadser,
træer eller andre genstande, som kan spærre for udsynet.
UDLEDNINGER
1. Udstødningen fra denne maskine indeholder kemikalier,
som i visse mængder kan medføre kræft, fødselsskader eller
andre forplantningsmæssige skader.
2. Find oplysninger om den relevante varighed af udledninger
og om luftindeks på mærkaten for motorudledninger.
TÆNDINGSSYSTEM
1. Dette tændingssystem er i overensstemmelse med
Canadiske ICES-002.
5
Page 30

Not for
Reproduction
Sikkerhedsregler og information
SERVICE OG VEDLIGEHOLDELSE
Sikker håndtering af benzin
1. Sluk alle cigaretter, cigarer, piber og alle andre
antændelseskilder.
2. Brug kun godkendte benzindunke.
3. Tag aldrig benzindækslet af eller fyld brændstof på med
motoren gående. Lad motoren køle af før påfyldning af
brændstof.
4. Fyld aldrig brændstof på inden døre.
5. Opbevar aldrig maskinen eller brændstoftanke hvor der
forefindes åben flamme, gnister eller et vågeblus som i f.eks.
en varmtvandsbeholder eller anden husholdningsmaskine.
6. Fyld aldrig beholdere indeni et køretøj eller på ladet af en
lastbil med en plastikindsats. Placer altid beholdere på jorden
i nogen afstand fra køretøjer før påfyldning.
7. Fjern benzindrevet udstyr fra ladet på en lastbil eller
anhænger og påfyld brændstof på jorden. Hvis dette ikke er
muligt, skal sådant udstyr som sidder på en anhænger fyldes
op med en dunk i stedet for med benzinstationens slange.
8. Hold slangens mundstykke i kontakt med kanten af
benzintankens eller dunkens åbning hele tiden, indtil De er
færdig med at fylde brændstof på. Brug ikke anordninger, der
holder mundstykket åbent.
9. Hvis De spilder benzin på tøjet, skal de omgående skifte tøj.
10. Overfyld aldrig benzintanken. Sæt benzindækslet på og stram
det forsvarligt igen.
11. Vær ekstra forsigtig under håndtering af benzin og andet
brændstof. De er brandfarlige, og dampene kan eksplodere.
12. Hvis De spilder brændstof, må De ikke forsøge at starte
motoren, men skal flytte maskinen bort fra det område, hvor
der blev spildt, og undgå at skabe antændelseskilder, indtil
brændstofdampene er afluftet.
13. Sæt dækslerne forsvarligt på benzintanke og -dunke igen.
Service og vedligeholdelse
1. Lad aldrig traktoren køre i et lukket rum, hvor kuliltedampe
kan samles.
2. Se efter, at bolte og møtrikker, især dem, der holder knivene
på plads, sidder godt fast, og hold maskinen i god stand.
3. Sæt aldrig sikkerhedsudstyr ud af kraft. Efterse dets funktion
regelmæssigt og foretag nødvendige reparationer, hvis det
ikke fungerer, som det skal.
4. Hold maskinen ren for græs, blade og andet ophobet
materiale. Visk spildt olie eller brændstof op.
5. Stands og efterse maskinen, hvis De rammer nogen
genstand. Foretag nødvendige reparationer, før De starter
maskinen igen.
6. Foretag aldrig justeringer eller reparationer af maskinen
med motoren gående, med undtagelse af dem, hvor det
udtrykkeligt siges, man skal, i motorfabrikantens manual.
7. Græsopsamlerens enkeltdele er udsat for slitage,
beskadigelse og nedbrydning, hvilket kan blotte arbejdende
maskindele eller føre til at genstande udslynges. Undersøg
alle enkeltdele jævnligt og udskift dem om nødvendigt med
reservedele godkendt af producenten.
8. Klipperknive er skarpe og kan skære. Pak kniven(e) ind eller
brug handsker, og vær ekstra forsigtig når knivene skal slibes.
9. Kontrollér bremsefunktionen regelmæssigt. Udfør justeringer
og service, når det er påkrævet.
10. Vedligehold sikkerheds- og anvisningsmærkater, og udskift
dem, hvis det er nødvendigt.
11. Fjern ikke benzinfilteret, mens motoren er varm, idet spildt
benzin kan antændes. Spred ikke benzinslangeklemmerne
mere end nødvendigt. Vær sikker på, at klemmerne holder
slangerne godt fast på filteret efter installation.
12. Brug ikke benzin, som indeholder METANOL, eller benzin
som indeholder mere end 10 % ETANOL, benzinadditiver
eller hvid benzin, idet det kan resultere i beskadigelse at
motoren/brændstofsystemet.
13. Hvis brændstoftanken skal tømmes, bør det gøres udendørs.
14. Udskift lydpotter, som er i dårlig stand.
15. Brug kun fabriksgodkendte reservedele, når der udføres
reparationer.
16. Følg altid fabrikkens specifikationer om indstillinger og
justeringer.
17. Større service- og reparationsarbejder bør kun udføres af
autoriserede reparationsværksteder.
18. Forsøg aldrig at udføre større reparationer på denne maskine,
medmindre De er uddannet dertil. Ukorrekte servicemetoder
kan medføre, at traktoren bliver farlig at arbejde med, at
udstyret beskadiges, og at fabrikkens garantiforpligtelser
bortfalder.
19. På klippere med flere knive skal man være opmærksom på, at
bevægelse af én kniv kan få de andre knive til at dreje rundt.
20. Undlad at ændre indstillingen af motorregulatoren og undlad
at overgasse motoren. Kørsel med traktoren i for høj fart øger
risikoen for personskade.
21. Kørende udstyr udkobles, motoren stoppes, tændingsnøglen
fjernes og tændkablerne afmonteres før man renser blokering
i udstyr og kanaler, før man udfører servicearbejde, hvis
traktoren vibrerer unormalt, og efter man har ramt en
genstand. Når man har ramt en genstand, skal traktoren
undersøges for beskadigelser og reparationer foretages, før
den startes igen og udstyret anvendes.
22. Anbring aldrig hænderne nær ved køleviften til hydropumpen,
når motoren kører. Køleviften er placeret oven over
transmissionsakslen.
23. Enheder med hydrauliske pumper, slanger eller motorer:
ADVARSEL: Hydraulisk væske, som slippes ud under
tryk kan ramme hårdt nok til at gennemtrænge huden og
forårsage alvorlig skade. Hvis fremmedartet væske skydes
ind i huden, skal den fjernes operativt indenfor nogle få timer
af en doktor, som er bekendt med denne form for skade.
Ellers kan det forårsage gangræn. Hold krop og fingre væk
fra huller og dyser, som udsender hydraulisk væske under
højt tryk. Brug papir eller pap - ikke hænderne for at søge
efter lækager. Vær sikker på, at alle tilslutninger, der fører
hydraulisk væske, sidder stramt, og at alle hydrauliske
slanger og rør er i god stand, før der sættes tryk på systemet.
Hvis der forekommer lækager, skal enheden omgående til
service hos den autoriserede forhandler.
24. ADVARSEL: Dele og væsker kan være under tryk. Forkert
udløsning af fjedre kan forårsage alvorlig personskade.
Fjedre bør kun fjernes af en autoriseret forhandler.
25. Modeller, som er udstyret med en motorkøler: ADVARSEL:
Dele og væsker kan være under tryk. For at undgå alvorlig
legemsbeskadigelse fra varm kølervæske eller udløst damp,
må man aldrig forsøge at fjerne kølerdækslet, mens motoren
går. Stands motoren, og vent indtil den er kølet af. Så skal
man endda stadig udvise forsigtighed.
6
Page 31

Not for
Reproduction
Identifikationsnumre
Produktets referencedata
Notér modellens navn/nummer, fabrikantens ID-numre
og motorens serienumre i det afsatte felt, så de er lette
at finde frem igen. Numrene kan findes på de viste
positioner.
Når De kontakter Deres autoriserede forhandler
angående reservedele, service eller information, SKAL
DE OPLYSE disse numre.
PRODUKTETS REFERENCEDATA
Modellens navn/nummer
Traktorens Fabrikants Nummer
Klipperens Fabrikants Nummer
Forhandlerens navn
MOTORENS REFERENCEDATA
Motorfabrikat
Traktorens Serienummer
Klipperens Serienummer
Købsdato
Motormodel
CE-identifikationsmærkat
A. Producentens Identifikationsnummer
B. Producentens Serienummer
C. Producentens navn og adresse
D. Højeste Motorhastighed i Omdrejninger per Minut
E. Motoreffekt i Kilowatt
F. Maskinens Vægt i Kilogram
G. CE-Mærke
H. Fabrikationsår
I. Garanteret lydstyrke i decibel
A
MODEL NO. xxxxxxx
SERIAL NO. xxxxxxxxxx
B
C
XXXXXXXXXXXXXXXXXXXXXX
XXXXXXXXXXXXXXXXX
D
xxxx min
E
x.x kW
xxx kg
F
G
20xx
-1
H
xxx
I
dB
Motortype/specifikationer
Motorkode/Serienr.
“Usikkerhed ved vibrationsmåling - maskinvibration
blev registreret ved hjælp af metoder og procedurer der
er angivet i de tilhørende internationale standarder der
var gældende på fremstillingstidspunktet. Usikkerhederne
der skyldes målingen kan resultere i afvigelser på op
til 5 % fra de offentliggjorte værdier der fremgår af
overensstemmelseserklæringen.”
7
Page 32

Not for
Reproduction
Sikkerhedsmærkater
Placering af mærkater
Tændingslåsstillinger,
delnr. 1722806
Brugsanvisninger, CE
modeller, delnr. 1750191
Forsigtig, klemmepunkt,
delnr. 1720389
1730172
Brændstofniveau,
delnr. 1730172
173xxxx
Transmissionsudløser,
delnr. 1730202
8
1730264
Forsigtig, klemmepunkt,
delnr. 1720389
Løftestang til tilbehør,
delnr. 1730264
Page 33

Not for
Reproduction
Sikkerhedsmærkater
Sikkerhedsmærkater
Alle FARE, ADVARSEL, BEMÆRK og vejledende
meddelelser på din rider og plæneklipper bør læses
grundigt og fulgt. Det kan medføre personskade hvis disse
vejledninger ikke efterleves. Informationen er med henblik
på din egen sikkerhed og den er vigtig! Sikkerhedsskiltene
nedenfor er på din rider og plæneklipper.
Sikkerhedsikoner
1
3
5
2
4
Hvis nogen af disse skilte forsvinder eller beskadiges skal
de omgående fornys. Kontakt en autoriseret forhandler
med henblik på udskiftning.
Mærkerne er nemme at påsætte og vil være en
vedvarende iøjnefaldende påmindelse til dig,
og andre som måtte bruge udstyret, om at følge
sikkerhedsinstruktionerne der er nødvendige for sikker og
effektiv drift.
6
7
1. ADVARSEL: Læs og gør dig bekendt med
betjeningsvejledningen inden du bruger denne maskine.
Vær bekendt med placeringerne og funktionerne af
alle betjeningshåndtagene. Du må ikke bruge denne
maskine medmindre du har lært at bruge den.
2. FARE FOR TAB AF TRÆKKRAFT, SKRIDNING,
STYRING OG MISTET HERREDØMME PÅ
SKRÅNINGER: Hvis maskinen ikke vil køre ligeud eller
begynder at skride på en skråning, skal du standse
græsslåningen og langsomt bevæge dig væk fra
skråningen.
3. FARE: BRANDFARE: Hold maskinen ren for græs,
blade og overskydende olie. Påfyld ikke brændstof
når motoren er varm eller kører. Stop motoren, udtag
nøglen og lad den køle af i mindst 3 minutter før du
fylder brændstof på. Fyld ikke brændstof på indendørs,
i en lukket anhænger, garage eller andre indelukkede
områder. Tør spildt brændstof op. Ryg ikke under brug af
denne maskine.
4. FARE FOR AT VÆLTE OG SKRIDE: Slå græs op og
ned og ikke på tværs af skråninger. Må ikke betjenes
på skråninger, som er stejlere end 10 grader. Undgå
pludselige og skarpe (hurtige) sving på skråninger.
8
5. FARE FOR AMPUTATION OG ALVORLIG
LEMLÆSTELSE: For at undgå ulykker under
betjening af plæneklipperen skal du sørge for at
sikkerhedsanordningerne (skærme og kontakter) er på
plads og er funktionsdygtige.
6. Undlad at slå græs når der er børn eller andre personer
i nærheden. Tag aldrig en passager med specielt ikke
børn, heller ikke hvis skærene er slået fra. Slå ikke græs i
bakgear medmindre det er ubetinget nødvendigt. Kig dig
tilbage og nedad inden du begynder at køre baglæns.
7. Referer til den tekniske manual inden du udfører
reparationer og vedligeholdelse. Når du forlader
maskinen, så sluk for den, træk parkeringsbremsen og
udtag tændingsnøglen.
8. Hold uvedkommende og børn på behørig afstand. Fjern
genstande der kan risikere at blive slynget afsted af de
roterende skær. Undlad at slå græs hvis affaldsslisken
ikke er på plads.
9
Page 34

Not for
Reproduction
Egenskaber og styr
Figur 1. Styr
Styrefunktioner
Nedenstående oplysninger giver en kort beskrivelse af de enkelte styrs funktioner. At starte, standse, køre og slå græs
kræver, at man kombinerer brugen af flere styr, som anvendes i særlige rækkefølger. Slå op i afsnittet BETJENING for
at lære den kombination og rækkefølge, styrene skal bruges i til de forskellige opgaver.
Gasregulerings/choker
håndtag (Choke-A-Matic)
Gasregulerings/choker håndtaget regulerer motorens
hastighed og chokeren (se figur 1). Flyt gasregulerings/
chokeren hen på HURTIG positionen for at øge motorens
hastighed og hen på LANGSOM positionen for at
sænke motorens hastighed. Brug altid fuld gas. Flyt
gashåndtaget/chokeren hen på CHOKER positionen
når du skal starte en kold motor. En varm motor behøver
måske ikke choker.
Forlygter
Lyskontakten tænder og slukker for traktorens forlygter.
Timetæller
Timetælleren tæller det antal timer, som nøglen har stået
på RUN/KØR.
10
Page 35

Not for
Reproduction
Græsslåning i bakgear (RMO/GVB)
Valgmuligheden for at slå græs i bakgear gør det muligt at
slå græs (eller at bruge andet PTO-drevet tilbehør), mens
man bakker op. Hvis man vælger at slå græs i bakgear,
skal man dreje RMO/GVB-nøglen, efter PTO er tilkoblet.
LED lampen lyser, og så kan føreren slå græs, mens
vedkommende kører baglæns. Hver gang PTO tilkobles,
skal RMO/GVB aktiveres igen efter ønske.
PTO kontakt
PTO (“Power Take-Off”) kontakten tilkobler og afkobler
tilbehør, der benytter PTO. PTO tilkobles ved at skubbe
UP/OP på kontakten. Skub DOWN/NED på kontakten
for at afkoble. Bemærk, at føreren skal sidde godt fast i
traktorsædet, for at PTO kan fungere.
Tænding
Tændingen starter og standser motoren, den har tre
stillinger:
OFF/SLUK standser motoren og slukker for
el-systemet
Egenskaber og styr
Slåmaskinens
græshøjdeklippejustering
Grebet til justering af klippehøjden regulerer
slåmaskinens klippehøjde. Slåmaskinens klippehøjde kan
indstilles på én af syv stillinger mellem 2,5 cm og
10,2 cm.
Greb til justering af sædet
Sædet kan justeres fremad eller tilbage. Flyt grebet,
anbring sædet i den ønskede stilling, og slip grebet for at
låse sædet på plads.
Greb til transmissionens udløserventil
Transmissionens udløserventil sætter transmissionen
ud af funktion, således at traktoren kan skubbes
ved håndkraft. Se TRAKTOREN SKUBBES VED
HÅNDKRAFT for betjeningsoplysninger.
Brændstoftank
Tag dækslet af ved at dreje det mod uret (til venstre).
RUN/KØR lader motoren køre og forsyner
el-systemet med strøm
START forkrøpper motoren, så den starter
BEMÆRK: Man må aldrig lade tændingen blive stående
på RUN/KØR, mens motoren er standset - det dræner
batteriet.
Speederpedaler
Traktorens hastighed i fremadgående retning reguleres
af speederpedalen til fremadgående kørsel. Traktorens
baglæns hastighed reguleres af speederpedalen til
opbakning.
Når man trykker ned på enten den ene eller den anden
pedal øges hastigheden. Bemærk, at jo længere man
trykker pedalen ned, jo hurtigere vil traktoren køre.
Cruise Control
Cruise-control bruges til at fastlåse den fremadgående
hastighed. Cruise-control kan låses i seks forskellige
stillinger.
Brændstofmåler
Viser hvor meget brændstof, der er i tanken.
Parkeringsbremse
Parkeringsbremsegrebet bruges til at fastlåse
parkeringsbremsen, når traktoren er standset. Når man
trykker bremsepedalen helt i bund og samtidig trækker op
i grebet, tilkobles parkeringsbremsen.
Bremsepedal
Når man trykker på bremsepedalen, aktiverer det
traktorbremsen.
11
Page 36

Not for
Reproduction
Egenskaber og styr
Parkeringsbremse funktion
Sådan trykker man på parkeringsbremsen - se
figur 2. Parkeringsbremsen sættes ved at slippe
speederpedalerne (A), trykke bremsepedalen (B) helt i
bund, trække UP/OP i parkeringsbremsegrebet (C) og
derefter slippe bremsepedalen.
Sådan udløses parkeringsbremsen - se figur
2. Parkeringsbremsen udløses ved at trykke på
bremsepedalen (B).
Betjening af cruise-control
TILKOBLING:
1. Træk op i cruise-control-grebet (D, figur 2).
2. Tryk på speederpedalen til kørsel i fremadgående
retning (A).
3. Løft op i cruise-control grebet (D), når man når op på
den ønskede hastighed. Cruise-control fastlåses i en
af de seks mulige stillinger.
FRAKOBLING:
1. Tryk på bremsepedalen (B).
ELLER
2. Tryk på speederpedalen til fremadgående kørsel (A).
E
B
A
C
D
Figur 2. Tilkobling af parkeringsbremsen
Timetæller
Timetælleren (E, figur 2) tæller det antal timer, nøglen har
stået på RUN/KØR.
12
Page 37

Not for
Reproduction
Section Title
Test af sikkerhedsblokeringssystemet
Denne maskine er udstyret med et sikkerhedsblokeringssystem og andet sikkerhedsudstyr. Dette sikkerhedssystem
er installeret af hensyn til din sikkerhed. Forsøg ikke at omgå
sikkerhedsafbryderne, eller på anden måde sætte sikkerhedssystemet ud af kraft.
ADVARSEL
Hvis maskinen ikke består en af disse
sikkerhedsprøver, må den ikke bruges. Henvend dig til
din autoriserede forhandler.
Prøve 1 — Motoren bør IKKE tørne, hvis:
• PTO-koblingenerslåetTIL,ELLER
• BremsepedalenIKKEerhelttrådtibund(med
parkeringsbremsen slået FRA), ELLER
• Cruisecontrol-håndtagetIKKEeriNEUTRAL.
Prøve 2 — Motoren BØR tørne og starte, hvis:
• Førerensidderisædet,OG
• PTOerkobletfra(OFF),OG
• Bremsepedalenerhelttrådtibund(med
parkeringsbremsen slået TIL), OG
• Cruisecontrol-håndtageteriNEUTRAL.
Prøve 3 — Motor skulle STOPPE hvis:
• Førerenhæversigfrasædet.
Prøve 4 — Kontroller stoptiden af plæneklipperens
knive
Knivene og klipperens drivremme skal standse fuldstændigt
inden for 5 sekunder efter, at den elektriske PTO-koblingskontakt er slået fra. Hvis plæneklipperens drivrem ikke standser indenfor fem sekunder, besøg en autoriseret forhandler.
5 — Baglæns klipning (RMO) afprøvning
Prøve
• Motorenskalstandse,hvisdetforsøgesatkøre
baglæns med PTO allerede tilkoblet, men hvor RMO
ikke er blevet aktiveret.
• RMO-lysetskallyseop,nårRMOaktiveres.
Betjening af traktoren
On Two Lines
Almindelig driftssikkerhed
Sørg for at læse alle oplysninger i afsnittene Sikkerhed og
Betjening, inden man prøver på at betjene maskinen. Man skal
gøre sig fortrolig med styrene samt med, hvordan man standser
maskinen.
Påhældning af brændstof
ADVARSEL
Benzin er meget brændbart og skal håndteres
forsigtigt. Man må aldrig fylde tanken, når motoren
stadig er varm efter at være brugt for nyligt. Åben ild,
tobaksrygning eller tændstikker er forbudt i området.
Undgå at fylde for meget på tanken, og tør op efter alle
spild.
Man må ikke bruge benzin, der indeholder
METANOL, “gasohol” med over 10% ETANOL,
benzintilsætningsmidler eller “white” benzin, da det
kan beskadige motoren/brændstofsystemet.
1. Tag kapslen af tanken (A, figur 3).
2. Fyld tanken. Lad være at fylde den for meget. Sørg
for, at der er plads til, at brændstoffet udvider sig. Der
henvises til motorhåndbogen vedrørende særlige
brændstofanbefalinger.
3. Sæt kapslen på tanken igen, og stram den ved håndkraft.
Sådan startes motoren
1. Mens du sidder i førersædet løfter du OP i sædets
justeringshåndtag, placerer sædet i den position du ønsker
og giver slip på håndtaget således at sædets position
fastlåses.
2. Tryk bremsepedalen helt ned eller indstil
parkeringsbremsen med pedalen trykket helt ned, træk OP i
håndtaget på parkeringspedalen og frigør derefter pedalen.
3. Kobl PTO/kraftudtagskontakten fra ved at trykke på IND.
4. Flyt gasregulerings/choker håndtaget hen på CHOKER
positionen.
5. Sæt nøglen i tændingen og drej i urets retning til START
position og frigør nøglen så snart motoren starter.
6. Efter motoren starter, flyt motorens gasregulering til halv
hastighed. Varm motoren op ved at lade den køre i mindst
30 sek.
7. Flyt gasregulerings/choker håndtaget hen på HURTIG
positionen.
BEMÆRK: I tilfælde af en nødsituation kan motoren standses
ved simpelthen at dreje nøglen om til STOP. Denne metode
må kun bruges i en nødsituation. Motoren standses normalt
ved at følge den procedure, der er beskrevet i afsnittet SÅDAN
STANDSES TRAKTOREN.
13
Page 38

Not for
Reproduction
Betjening af traktoren
Sådan standses traktor og motor
1.
Sæt gasreguleringshåndtaget tilbage i NEUTRAL
position.
2.
Kobl PTO/kraftudtaget fra, og vent indtil alle de
bevægelige dele stopper.
3.
Flyt gasreguleringen/choker håndtaget til LANGSOM
position og drej tændingsnøglen til FRA. Tag nøglen ud
af tændingen.
Kørsel af traktoren
1.
Sid i sædet, og juster sædet således, at du mageligt kan
nå alle styr og samtidigt se instrumentbrættet.
2.
Sæt parkeringsbremsen.
3.
Sørg for, at PTO kontakten er frakoblet.
4.
Start motoren (se
5.
Frakobl parkeringsbremsen, og slip bremsepedalen.
6.
Tryk på speederen til fremadgående kørsel for at
køre fremad. Slip pedalen for at standse. Bemærk, at
jo længere ned man trykker pedalen, jo hurtigere vil
traktoren køre.
7.
Stands traktoren ved at slippe speederpedal
parkeringsbremsen og standse motoren (se SÅDAN
STANDSES TRAKTOR OG MOTOR).
SÅDAN STARTES MOTOREN).
erne, sætte
Sådan slår man græs
1.
Indstil slåmaskinens klippehøjde til det ønskede niveau,
og indstil målerhjulene i den hensigtsmæssige stilling
(hvis maskinen er udstyret dermed).
2.
Sæt parkeringsbremsen. Sørg for, at PTO kontakten er
frakoblet.
3.
Start motoren (se
4.
Flyt gasregulerings/choker håndtaget hen på HURTIG
positionen.
5.
Tilkobl PTO (slåmaskinedæksel).
6.
Begynd at slå græs.
7.
Når man er færdig, skal der slukkes for PTO, og
slåmaskinen skal løftes vha. tilbehørsløftestangen.
8.
Stands motoren (se
MOTOR).
SÅDAN STARTES MOTOREN).
SÅDAN STANDSES TRAKTOR OG
Klipning i bakgear
Hvis føreren ønsker at klippe græs i bakgear kan RMOsystemet anvendes. For at anvende RMO-systemet
drejes RMO-nøglen efter PTOen er tilkoblet. LED lampen
lyser og føreren kan derefter klippe i bakgear. Hver gang
PTOen slås fra skal RMO-systemet genaktiveres hvis det
påkræves. Nøglen bør fjernes for at begrænse adgangen
til RMO-systemet.
Anvendelse af reskaber i bakgear
Hvis føreren ønsker at anvende et PTO-drevet redskab i
bakgear kan RMO-systemet anvendes. For at anvende
RMO-systemet drejes RMO-nøglen efter PTOen er
tilkoblet. LED lampen lyser og føreren kan derefter
arbejde i bakgear. Hver gang PTOen slås fra skal RMOsystemet genaktiveres hvis det påkræves. Nøglen bør
fjernes for at begrænse adgangen til RMO-systemet.
Skubning af traktoren ved håndkraft
1.
Slå PTO fra og sluk motoren.
2.
Træk udløserhåndtaget til transmissionen cirka 6,4 cm
bagud for at låse det fast i udløst stilling (figur 3).
3.
Traktoren kan nu skubbes ved håndkraft.
•
UNDLAD AT BUGSERE TRAKTOREN
Bugsering
andet køretøj til at skubbe eller trække traktoren.
Undlad
transmissionen, mens motoren kører.
vil
at
anvende
skade
transmisionen.
udløserhåndtaget
•
Benyt
ikke
til
et
ADVARSEL
Motoren går i stå hvis bakpedalen trædes ned
mens PTOen er tilkoblet og RMO-systemet ikke er
aktiveret. Føreren bør altid slå PTOen fra før der
køres over veje, stier eller andre områder hvor der
befinder isg andre køretøjer. Pludselig mangel på
trækkraft kan udgøre en sikkerhedsrisiko.
ADVARSEL
Klipning i bakgear kan udgøre en sikkerhedsrisiko
for omkringstående personer. Der kan ske
tragiske ulykker hvis føreren ikke er opmærksom
på tilstedeværelsen af børn. Sæt aldrig maskinen
i bakgear, når der er børn i nærheden. Børn
tiltrækkes ofte af maskinen og arbejdet.
A
B
Figur 3. Transmissionsudløsergreb og
brændstoftank
14
Page 39

Not for
Reproduction
Betjening af traktoren
Justering af slåmaskinens klippehøjde
Løftestangen til klippehøjden (A, figur 4) styrer
slåmaskinens klippehøjde. Klippehøjden har syv
forskellige indstillinger mellem ca. 2,5 cm og 10,2 cm
(1.0 tommer og 4 tommer).
A
Figur 4. Slåmaskinen løftes og sænkes
Tilkobling af påhængsvogn
Den maksimalt tilladte vandrette trækbomkraft er
280 Newton. Den maksimale lodrette trækbomkraft
er 160 Newton. Dette svarer til en påhængsvogn
på 113 kg (250 pund) på en 10 graders bakke. Sæt
påhængsvognen fast med en hensigtsmæssig stor
gaffelbolt (A, figur 5) og klip (B).
A
Opbevaring
ADVARSEL
Traktoren må aldrig opbevares (med
brændstof) i et indelukket, dårligt udluftet
rum. Brændstofdampe kan finde vej til en
antændelseskilde (f.eks. et fyr, en vandvarmer
osv.) og afstedkomme en eksplosion.
Dampe fra brændstof er også giftige for
mennesker og dyr.
Inden man opbevarer maskinen for vintersæsonen, skal
man læse instruktionerne vedrørende vedligeholdelse og
opbevaring i afsnittet Sikkerhedsregler, derefter skal man
udføre følgende trin:
• FrakoblPTO,sætparkeringsbremsenogtagnøglen
ud.
• Udførdevedligholdelses-og
opbevaringsforanstaltninger, der står opført
i motorejerhåndbogen. Dette omfatter at
dræne brændstofsystemet eller at tilsætte
stabiliseringsmiddel til brændstoffet (undlad at
opbevare en maskine, der er fyldt med brændstof, i et
indelukket rum - se advarslen).
• Batterietsholdbarhedforbedres,hvisdetafmonteres
og anbringes et køligt, tørt sted, samt når man oplader
det fuldstændigt ca. en gang om måneden. Hvis
batteriet bliver siddende i traktoren, skal det negative
kabel afbrydes.
Inden man starter maskinen, efter den har været
opbevaret:
• Kontrollerallevæskeniveauer.Kontrolleralle
vedligeholdelsesemner.
• Udføralledeanbefaledeeftersynogprocedurer,der
findes i maskinejerens manual.
• Ladmotorenvarmeopiflereminutterindenbrug.
B
Figur 5. Anbefalinger mht. påhængsvognens vægt
15
Page 40

Not for
Reproduction
Regelmæssig
vedligeholdelse
VEDLIGEHOLDELSESPLAN OG PROCEDURER
Man skal følge nedenstående plan til normal vedligeholdelse af traktoren og slåmaskinen.
TRAKTOR OG PLÆNEKLIPPER
Hver 8.time eller dagligt
Kontroller sikkerhedslåsesystemet
Rengør traktor og plæneklipper
Fjern synlige rester fra motorrummet
Hver 25 time eller årligt *
Kontroller stoptiden af plæneklipperens knive
Kontroller om der findes løse dele i traktoren/
plæneklipperen
Kontroller dæktrykket
Hver 50 time eller årligt *
Kontroller traktorens bremser
Rens batteri og kabler
Besøg en forhandler en gang om året for at
Smør traktor og plæneklipper
Kontroller plæneklipper knive **
* Hvad der end kommer først
** Kontroller skærene oftere i tilfælde af meget sandet
jord eller høje forekomster af støv.
MOTOR
Første 5 timer
Skift motorolie
Hver 8.time eller dagligt
Kontroller motorens olieniveau
Hver 25 time eller årligt *
Luftfilter og luft-forfilter **
Hver 50 time eller årligt *
Skift motorolie
Udskift oliefilteret
Årlight
Udskift luftfilter
Udskift forfilter
Besøg en forhandler en gang om året for at
Kontroller lydpotten
Udskift tændrør
Udskift brændstoffilter
Rengør motorens luftkølingssystem
* Hvad der end kommer først
** Hyppigere rengøring er påkrævet i støvede omgivelser
eller hvis der findes urenheder i luften.
Kontroller dæktryk
Dæktrykket skal kontrolleres regelmæssigt og
vedligeholdes på de niveauer, der vises i tabellen
(figur 6). Bemærk, at disse tryk kan variere lidt fra den
“Max Inflation”, der er trykt på dækkenes sidevæg.
De viste tryk giver hensigtsmæssig traktion, forbedrer
klippekvaliteten og forlænger dækholdbarheden.
Størrelse PSI bar
22 x 8,0-8 10 0,68
15 x 6,0-6 12-14 0,82-0,96
Figur 6. Dæktryk
16
Page 41

Not for
Reproduction
Kontroller stoptiden af
plæneklipperens knive
Slåmaskineblade og slåmaskinedrivremme skal være
fuldstændigt standset indenfor fem sekunder af, at der
drejes om for den elektriske PTO kontakt.
1. Start motoren med traktoren i frigear, PTO frakoblet
og føreren i sædet.
2. Se over den venstre fodstøtte på slåmaskinens
drivrem. Tilkobl PTO og vent i flere sekunder.
Frakobl PTO, og kontroller hvor lang tid,
slåmaskinedrivremmen er om at standse.
3. Hvis slåmaskinens drivrem ikke standser indenfor fem
sekunder, besøg forhandleren.
Batterivedligeholdelse
Rengøring af batteri og kabler
ADVARSEL
Når man fjerner eller monterer batterikabler,
skal man afbryde det negative kabel FØRST og
tilslutte det igen SIDST. Hvis det ikke gøres i denne
rækkefølge, risikerer man, at den positive pol
kortsluttes til rammen med et stykke værktøj.
Regelmæssig vedligeholdelse
A
D
B
C
E
Figur 7. Batterivedligeholdelse
1. Afbryd kalberne fra batteriet, de negative kabler først
(A, figur 7), dernæst dækslet og de positive kabler (B).
2. Løsn vingemøtrikken og spændskiven (D).
3. Drej holdestangen (C) op og væk fra batteriet. Sæt
den fast på styrestammen.
4. Tag batteriet ud (E).
5. Rens batterirummet med en opløsning af tvekulsurt
natron og vand.
6. Rens batteriets polklemmer og enderne af kablerne
med en stålbørste og rensevæske til batteripoler, indtil
de skinner.
7. Monter batteriet (E) i batterirummet igen. Sæt batteriet
fast med holdestangen (C) samt vingemøtrikken og
spændskiven (D).
8. Forbind batterikablerne igen, først de positive kabler
og dæksel (B), dernæst de negative kabler (A).
9. Dæk enderne på kablerne og batteriets polklemmer
med vaseline eller ikke-ledende fedt.
17
Page 42

Not for
Reproduction
Fejlfinding, justering
og service
Fejlfinding
Selv om normal pleje og regelmæssig vedligeholdelse
vil forlænge udstyrets holdbarhed, vil langvarig eller
konstant brug eventuelt kræve, at der udføres service, for
at det kan fortsætte med at fungere ordentligt.
Nedenstående fejlfindingsvejledning beskriver de fleste
almindelige problemer, deres årsager og afhjælpning.
Se oplysningerne på de følgende sider, som indeholder
anvisninger mht. hvordan man selv kan udføre de fleste af
disse mindre justeringer og servicereparationer. Hvis man
foretrækker det, kan alle disse procedurer udføres af den
lokale autoriserede forhandler.
For at undgå at komme alvorligt til skade må
man kun udføre vedligeholdelse af traktoren
eller slåmaskinen, når motoren er standset og
parkeringsbremsen tilkoblet.
Sørg altid for at tage nøglen ud af tændingen,
afbryd ledningen til tændrøret og fastgør den på
god afstand af tændrøret, inden vedligeholdelsen
påbegyndes, for at undgå at starte motoren ved
en fejltagelse.
ADVARSEL
Fejlfinding af traktoren
PROBLEM SE EFTER AFHJÆLPNING
Motor vil ikke dreje
eller starte.
Motor svær at starte
eller kører ujævnt.
Motor banker.
For højt olieforbrug.
Sort udstødningsrøg.
Der er ikke trykket på
bremsepedalen.
PTO (elektrisk kobling)
kontakten er i TÆND position.
Cruisekontrol er aktiveret. Skift knappen til NEUTRAL/SLUK position.
Løbet tør for brændstof. Hvis motoren er varm, lad den køle ned, fyld så
Motoren er druknet. Deaktiver chokeren.
Sikringen er sprunget. Henvend dig til din autoriserede forhandler.
Batteriterminaler skal renses. Se Rengøring af batteri og kabler afsnittet.
Batteri er afladt eller fladt. Genoplad eller udskift.
Løse eller afbrudte
forbindelser.
Magnetspole eller selvstarter
defekt.
Sikkerhedsaflåsningskontakt
defekt.
Der er vand i brændstoffet. Henvend dig til din autoriserede forhandler.
Brændstoffet er gammelt eller
forurenet.
Brændstofblandingen er for fed. Rens luftfilteret.
Motoren har et andet problem. Henvend dig til din autoriserede forhandler.
Lavt olieniveau. Kontrollér/påfyld olie efter behov.
Brug af forkert oliekvalitet. Se Olie anbefalinger diagram.
Motoren bliver overophedet. Henvend dig til din autoriserede forhandler.
Brug af forkert oliekvalitet. Se Olie anbefalinger diagram.
For meget olie i krumtaphuset. Aftap overskydende olie.
Snavset luftfilter. Se Servicering af luftfilter afsnittet.
Choker lukket. Åbn chokeren.
Tryk bremsepedalen helt i bund.
Sæt den i SLUK position.
brændstoftanken op.
Undersøg manuelt ledningerne. Hvis ledninger er flosset
eller ødelagte så besøg en autoriseret forhandler.
Henvend dig til din autoriserede forhandler.
Henvend dig til din autoriserede forhandler.
Henvend dig til din autoriserede forhandler.
18
Page 43

Not for
Reproduction
Fejlfinding, justering og service
Fejlfinding af traktoren (fortsat)
PROBLEM SE EFTER AFHJÆLPNING
Motoren kører men
traktoren vil ikke
bevæge sig.
Bremsen kan ikke
holde.
Traktoren styrer
hårdt eller er svær at
håndtere.
Der er ikke trykket på
speederen.
Håndtagene til gearudløsning i
SKUB position.
Plæneklipperens drivrem er
knækket.
Håndbremsen er ikke trukket. Slå håndbremsen fra.
Drivremmen er knækket eller
den glider.
Indvendig bremse er slidt. Henvend dig til din autoriserede forhandler.
Styretilkoblingen er løs. Henvend dig til din autoriserede forhandler.
Forkert dæktryk. Se Kontroller dæktryk afsnittet.
Forhjuls spindellejer er tørre. Henvend dig til din autoriserede forhandler.
Tryk på pedalerne.
Gå til KØR position.
Henvend dig til din autoriserede forhandler.
Henvend dig til din autoriserede forhandler.
Fejlfinding af plæneklipperen
PROBLEM SE EFTER AFHJÆLPNING
Plæneklipperen løfter
sig ikke.
Plæneklipperen klipper
uensartet.
Græsklippet ser
groft ud.
Motoren går nemt i stå
med klipperen tilkoblet.
For kraftig
klippervibration.
Motoren er i gang og
traktoren kører men
plæneklipperen vil
ikke køre.
Løftetilkoblingen er ikke fastgjort
korrekt eller er defekt.
Klippeaggregatet er ikke
parallelt med jordoverfladen.
Dækkene er ikke korrekt
pumpet.
Motorhastighed for lav. Sæt den på fuld gas.
For høj kørselshastighed. Sæt farten ned.
Plæneklipperen har et andet
problem.
Motorhastighed for lav. Sæt den på fuld gas.
For høj kørselshastighed. Sæt farten ned.
Snavset eller tilstoppet luftfilter. Se Servicering af luftfilter afsnittet.
Klippehøjden er indstillet for
lavt.
Affaldsudkastet er blokeret. Klip græs med udkastet vendt mod et område der
Motoren har ikke nået
driftstemperatur.
Start af plæneklipperen i højt
græs.
Plæneklipperen har et andet
problem.
PTO’en er ikke aktiveret. Aktiver PTO’en.
Plæneklipperen har et andet
problem.
Henvend dig til din autoriserede forhandler.
Henvend dig til din autoriserede forhandler.
Se Kontroller dæktryk afsnittet.
Henvend dig til din autoriserede forhandler.
Klip højt græs med maksimal klippehøjde i første
omgang.
allerede er blevet klippet.
Lad motoren køre i adskillige minutter for at varme op.
Start græsslåning i et ryddet område.
Henvend dig til din autoriserede forhandler.
Henvend dig til din autoriserede forhandler.
19
Page 44

Not for
Reproduction
Fejlfinding, justering og service
Sædejustering
Sædet kan justeres frem eller tilbage. Flyt grebet
(A, figur 8), anbring sædet efter ønske, og slip grebet for
at fastlåse sædet i stillingen.
A
Figur 8. Sædejustering
Slåmaskinejusteringer
Målehjul
Slåmaskinens målehjul kan indstilles i to stillinger
afhængigt af klippehøjden. Når man bruger højere
klippehøjder, skal hjulene stilles i laveste stilling. Når man
bruger lavere klippehøjder, skal hjulene stilles i øverste
stilling. Pas på at hjulene ikke bliver på jorden hele tiden,
mens man klipper plæne. Sådan justeres de:
1. Afmonter kontramøtrikken (B, figur 9), målehjul
(C), spændskiver (D) og ansatsbolt (E). Skift
målehjulstillingen til den ønskede højde.
2. Sæt ansatsbolten (E) gennem spændskiverne (D),
målehjulet (C) og målehjulkonsollen (A). Stram
kontramøtrikken (B). Gentag trin 1 og 2 for alle
målehjul.
A
Batteriopladning
ADVARSEL
Hold åben ild og gnister væk fra batteriet, da gas,
som kommer fra batteriet, er meget eksplosiv.
Sørg for udluftning omkring batteriet, mens det
oplades.
Et dødt batteri eller et batteri, der er for svagt til at
starte motoren, kan være forårsaget af en defekt i
opladningssystemet eller i andre elektriske dele. Hvis
der er tvivl om årsagen til problemet, skal man se
forhandleren. Hvis man bliver nødt til at udskifte batteriet,
skal man følge trinnene under Rengøring af batteri og
kabler i afsnittet Almindelig vedligeholdelse.
Når batteriet skal oplades, skal man følge de anvisninger,
der kom fra producenten af batteriopladeren så vel
som alle de advarsler, der er inkluderet i afsnittet om
sikkerhedsregler i denne bog. Oplad batteriet indtil det er
fuldt opladet. Må ikke oplades med højere mærkeeffekt
end 10 A
D
E
C
Figur 9. Justering af målehjul med fast konsol
B
20
Page 45

Not for
Reproduction
Section Title
Specifikationer
On Two Lines
MOTOR:
Briggs & Stratton
Mærke Briggs & Stratton®
Model Intek, 4195 Series
Slagvolumen 500 cc (30,5 kubiktommer)
Elektrisk system Alternator: 9 A
Batteri: 12 Volt, 195 CCA
Oliekapacitet 1,4 L (48 oz)
TRANSMISSIONER:
K46
Type Hydrostatisk Tuff Torq K46
Hydraulikvæske 10w 30 Premium Engine Oil
Hastigheder Fremadgående: 8-9,0 km/t (0-5,5 MPH)
@ 3400 rpm Bagudgående: 0-4,8 km/t (0-3,0 MPH)
Kontinuerligt
drejningsmoment 230,5 Nm (170 fod/pund)
UNDERSTEL:
Brændstoftankens
kapacitet
Baghjul Dækstørrelse: 22 x 8,0-8
Oppumpningstryk: 0,68 bar (10 psi)
Forhjul Dækstørrelse: 15 x 6,0-6
Oppumpningstryk: 0,82-0,96 bar (12-14 psi)
Nominel effekt
Bruttoeffekten for hver enkelt benzinmotormodel er afmærket i henhold til SAE-kode J1940 (Society of Automotive
Engineers) - procedure til angivelse af effekt og moment for små motorer - og angivet i henhold til SAE J1995.
Momentværdier måles ved 2600 o/min. for de motorer, der har omdrejningstallet specificeret på mærkepladen og ved
3060 o/min. for alle andre. Effekten i hestekræfter måles ved 3600 o/min. Bruttoeffektkurverne kan ses på
www.BRIGGSandSTRATTON.com. Nettoeffektværdier bliver målt med udstødnings- og luftfilter monteret, hvorimod
bruttoeffektværdier bliver målt uden disse anordninger. Bruttomotoreffekten vil være højere end den faktiske
nettomotoreffekt, som påvirkes bl.a. af lokale driftsforhold og variationer fra motor til motor. I betragtning af de mange
forskellige produkter, motorerne anvendes i, yder benzinmotoren måske ikke den nominelle bruttoeffekt, når den
anvendes på et givent motorredskab. Denne forskel skyldes en lang række forskellige faktorer, som blandt andet
kan omfatte forskelle i motorkomponenter (luftfilter, udstødning, opladning, køling, karburator, brændstofpumpe osv.),
anvendelsesbegrænsninger, lokale driftsforhold (temperatur, luftfugtighed, højde over havet) og variationer fra motor
til motor. Som følge af produktions- og kapacitetsbegrænsninger forbeholder Briggs & Stratton sig ret til at udskifte
motoren i denne serie med en motor med højere nomineret effekt.
Kapacitet: 13,2 L (3,5 gallons)
DIMENSIONER:
Totallængde 180 cm (70.9”)
Totalbredde 122 cm (48”)
Højde 114 cm (44.9”)
Dele og tilbehør
Kontakt en autoriseret forhandler for yderligere oplysninger.
21
Page 46

Not for
Reproduction
BRIGGS & STRATTON POWER PRODUCTS GROUP, L.L.C. EJER-GARANTIPOLICE April 2012
BEGRÆNSET GARANTI
Briggs & Stratton garanterer at, i løbet af garantiperioden der er angivet nedenfor, vil man reparere eller udskifte enhver del der er defekt i materiale
eller håndværk eller begge dele uden beregning. Transportomkostninger i forbindelse med et produkt, som indleveres til reparation eller udskiftning
under denne garanti, afholdes af køberen. Denne garanti er gyldig inden for tidsperioderne og underlagt nedenstående betingelser. I forbindelse med
garantiservice, finder du den nærmeste autoriserede serviceforhandler på vores forhandlerkort på snapper-europe.com. Køberen skal kontakte den
autoriserede serviceforhandler og derefter stille produktet til rådighed for den autoriserede serviceforhandler med henblik på inspektion og testning.
Der er ikke nogen anden udtrykkelig garanti. Underforståede garantier, inklusive garantier for salgbarhed og egnethed til et bestemt
formål, er begrænset til et år fra købsdato eller i den udstrækning loven tillader. Alle andre underforståede garantier bortfalder. I den
udstrækning gældende lov tillader det, er erstatningsansvar for tilfældig skade eller følgeskade ikke omfattet. Visse stater eller lande tillader
ikke begrænsninger på, hvor lang tid en underforstået garanti varer, og visse stater eller lande tillader ikke udelukkelse eller begrænsning af tilfældig
skade eller følgeskade, så ovenstående begrænsning og udelukkelse er måske ikke gældende for dig. Denne garanti giver dig specifikke lovmæssige
rettigheder, og du har muligvis andre rettigheder, som kan være forskellige fra stat til stat og fra land til land.**
GARANTIPERIODE
Element Privat brug Erhvervsmæssig brug
Udstyr 2 år 90 dage
Motor* 2 år 90 dage
Batteri (hvis dette medfølger) 1 år 1 år
* Gælder kun for Briggs og Stratton-motorer. Garantidækning af ikke-Briggs & Stratton-motorer gives af motorproducenterne. Emmissionsrelaterede
komponenter er omfattet af Emmissions Warranty Statement (Emmissionsgarantierklæringen).
** I Australien - Vores produkter sælges med en garanti, der ikke kan bortfalde i henhold til den australske forbrugerlovgivning. Du er berettiget til en
erstatning eller refundering i tilfælde af en væsentlig defekt eller til kompensation for enhvert forudseeligt tab eller skade. Du er derudover berettiget til at få
dine varer reparerede eller erstattede hvis varerne ikke lever op til kvaliteten og manglen ikke er i forbindelse med en væsentlig defekt. Alle henvendelser
i forbindelse med garantiservice skal foregå til den nærmeste autoriserede serviceforhandler der kan ses på vores kort på BRIGGSandSTRATTON.com
eller ring på 1300 274 447 eller skriv til salesenquires@briggsandstratton.com.au, eller Briggs & Stratton Australia Pty Ltd, 1 Moorebank Avenue, NSW,
Australia, 2170.
Garantiperioden starter på købsdatoen for den første detailkøber eller erhvervsmæssige slutbruger og fortsætter i den tidsperiode, som er angivet i
tabellen ovenfor. "Privat brug" betyder brug i personlig beboelsesmæssig husholdning af en detailkunde. "Erhvervsmæssig brug" betyder al anden form
for brug, inklusiv erhvervsmæssige, indkomstdannende eller lejebaserede formål. Så snart et produkt har været i erhvervsmæssig brug, vil det herefter
blive betragtet som værende i erhvervsmæssig brug hvad angår denne garanti.
Det er ikke nødvendigt at registrere garanti for at opnå garanti på produkter, der bærer Briggs & Stratton-varemærket. Gem dit købsbevis.
Hvis du ikke kan fremvise bevis for den oprindelige købsdato på det tidspunkt hvor der bliver anmodet om garantiservice, vil produktets
produktionsdato blive brugt som grundlag for garantien.
OM DIN GARANTI
Vi udfører gerne garantireparation og beklager for den ulejlighed, du har været udsat for. Garantiservice bliver kun ydet gennem autoriserede Snapper
serviceforhandlere. De fleste garantireparationer håndteres rutinemæssigt, men nogle gange er anmodninger om garantiservice ikke gyldige. Denne
garanti dækker kun materiale- og fabrikationsfejl. Den dækker ikke skader, der er opstået som følge af ukorrekt brug eller mishandling, forkert
vedligeholdelse eller reparation, normalt slid samt gammelt eller ikke godkendt brændstof.
Ukorrekt brug og mishandling - Den korrekte brug, som dette produkt er beregnet til, er beskrevet i betjeningsvejledningen. Ved anvendelse af
produktet på en måde, der ikke er beskrevet i betjeningsvejledningen, eller ved anvendelse af et beskadiget produkt, bortfalder garantien. Garantien
er ugyldig, hvis produktets serienummer er fjernet, hvis produktet på nogen måde er ændret eller modificeret, bærer tegn på mishandling som f.eks.
sammenstød samt korrosionsskader pga. vand eller kemikalier.
Forkert vedligeholdelse eller reparation- Dette produkt skal vedligeholdes i overensstemmelse med procedurerne og skemaerne, som de er angivet
i betjeningsvejledningen. Ved servicering og reparationer skal der bruges originale dele fra Briggs & Stratton. Skader, der er opstået som følge af
manglende vedligeholdelse eller brug af uoriginale reservedele, dækkes ikke af garantien.
Normalt slid - Som med alt mekanisk udstyr bliver din maskine slidt, selv med korrekt vedligeholdelse. Denne garanti dækker ikke reparationer,
hvor normal brug har forårsaget udløb af levetiden for en del af eller hele maskinen. Vedligeholdelses- og sliddele som f.eks. filtre, remme, knive og
bremseklodser (motorens bremseklodser er omfattet) dækkes ikke af garantien ved tegn på slitage alene med mindre årsagen er materiale- eller
fremstillingsfejl.
Gammelt brændstof - For at kunne fungere korrekt kræver dette produkt friskt brændstof, som overholder kriterierne, der er angivet i
betjeningsvejledningen. Skader opstået pga. gammelt brændstof (utæt karburator, tilstoppede brændstofrør, hængende ventiler osv.) dækkes ikke af
garantien.
Andre undtagelser - Denne garanti omfatter ikke skader der skyldes uheld, misbrug, modifikationer, ændringer, uhensigtsmæssig servicering,
frysning eller kemisk nedbrydning. Tilbehør og andre dele der ikke oprindeligt fulgte med produktet er heller ikke omfattet af garantien. Der findes ingen
garantidækning på udstyr der anvendes som primær strømkilde i stedet for kraft eller på udstyr der bruges til livreddende anvendelser. Denne garanti er
undtaget fejl og svigt på grund af naturkatastrofer eller andre force majeure-begivenheder uden for producentens kontrol.
1737660D_DA Rev C
22
Page 47

Not for
Reproduction
Inhaltsverzeichnis
Sicherheitsvorschriften
Identifizierungsnummern .................................. 7
Sicherheitsaufkleber .......................................... 8
Sicherheitssymbole ........................................... 9
Merkmale und Steuerungen ............................ 10
Steuerungsfunktionen ...........................................10
Parkbremsfunktion ................................................12
Automatische Geschwindigkeitsregelung .............12
Betriebsstundenzähler ..........................................12
Betrieb des Traktors ........................................ 13
Sicherheitsverriegelungssystem ...........................13
Allgemeine Betriebssicherheit ...............................13
Kraftstoff einfüllen..................................................13
Motor starten .........................................................13
Traktor und Motor anhalten ...................................14
Traktor fahren ........................................................14
Mähen ...................................................................14
Mähen beim Rückwärtsfahren ...............................14
Anbaugerätbetrieb beim Rückwärtsfahren ............14
Traktor von Hand schieben ...................................14
Mähwerkhöhe einstellen .......................................15
Einen Anhänger anbringen ....................................15
Unterstellen ...........................................................15
..................................... 2
Regelmäßige Wartung ..................................... 16
Wartungsplan ........................................................16
Reifendruck prüfen ................................................16
Stoppzeit der Mäher-Klinge überpüfen ..................17
Batteriewartung .....................................................17
Fehlersuche, Einstellungen und Wartung ..... 18
Fehlersuche beim Traktor .....................................18
Fehlersuche beim Mähwerk ..................................19
Sitzeinstellung .......................................................20
Batterieladung .......................................................20
Mähwerkseinstellungen .........................................20
Technische Daten ............................................ 21
Garantie ............................................................. 22
1
Page 48

Not for
Reproduction
Sicherheitsvorschriften
Herzlichen Glückwunsch zum Kauf eines qualitativ hochwertigen Rasenund Gartengeräts. Unsere Produkte sind so konstruiert und hergestellt,
dass sie alle Sicherheitsstandards der Branche erfüllen oder übertreffen
Der Bediener ist für die Sicherheit von Geräten mit Kraftantrieb
verantwortlich. Falscher Gebrauch und mangelhafte Wartung können
zu Gefahren führen! Denken Sie stets daran, dass Sie nicht nur für Ihre
eigene Sicherheit, sondern auch für die von umstehenden Personen
verantwortlich sind.
Lassen Sie gesunden Menschenverstand walten und durchdenken Sie
Ihre Vorgehensweise. Wenn Sie sich nicht sicher sind, ob eine geplante
Aufgabe mit dem Gerät sicher ausgeführt werden kann, fragen Sie einen
Fachmann: Wenden Sie sich an Ihren Vertragshändler.
Handbuch sorgfältig lesen
Das Bedienungshandbuch enthält wichtige Sicherheitsinformationen,
mit denen Sie sich VOR dem Betrieb des Geräts vertraut machen
sollten und die WÄHREND des Betriebs einzuhalten sind.
Das Handbuch enthält sichere Bedienungsverfahren, eine
Erläuterung der Merkmale und Bedienungselemente sowie
Wartungsinformationen, um Ihnen zu helfen, Ihr Gerät optimal
einzusetzen.
Lesen Sie die Sicherheitsvorschriften und -informationen auf
den folgenden Seiten gründlich durch. Lesen Sie außerdem den
gesamten Abschnitt zum Betrieb.
Sichere Bedienung
Kinder
Vermeiden Sie tragische Unfälle mit Kindern! Halten Sie Kinder
aus dem Mähbereich fern. Kinder interessieren sich für das
Gerät und den Mähvorgang. Gehen Sie niemals davon aus,
dass Kinder dort bleiben, wo sie zuletzt gesehen wurden.
Wenn sich Kinder in der Nähe des Mähbereichs aufhalten,
müssen sie von einem anderen verantwortungsbewussten
Erwachsenen beaufsichtigt werden.
LASSEN SIE KINDER NICHT AUF DEM GERÄT MITFAHREN!
Dies kann Kinder dazu ermutigen, sich auch bei anderen
Gelegenheiten dem laufenden Gerät zu nähern, wodurch sie
schwer verletzt werden können. Wenn ein Kind mitfahren darf,
kann es sich dem Gerät auch einmal nähern, wenn Sie es nicht
erwarten, und dadurch überfahren werden.
2
Rückwärtsfahren
Mähen Sie nur dann beim
Rückwärtsfahren, wenn dies
unbedingt notwendig ist. Schauen Sie
vor und während des
Rückwärtsfahrens
stets nach unten und
hinten, auch wenn
die Mähmesser
ausgekuppelt sind.
Page 49

Not for
Reproduction
Betrieb am Hang
Der Betrieb dieses Geräts an einem Hang mit zu großer Steigung kann zu
schweren oder sogar tödlichen Verletzungen führen. Wenn Sie das Gerät
an einem Hang mit zu großer Steigung oder unzureichender Bodenhaftung
benutzen, können Sie die Kontrolle über das Gerät verlieren und umkippen.
Als Faustregel gilt, dass Sie das Gerät nicht an einem Hang benutzen
sollten, den Sie nicht (im Zweirad-Antriebsmodus) rückwärts hinauffahren
können. Sie sollten das Gerät außerdem nicht an einem Hang benutzen,
dessen Steigung 1 Meter auf einer Länge von 6 Metern überschreitet.
Fahren Sie an Hängen stets auf- und abwärts, niemals schräg.
Beachten Sie außerdem, dass die Bodenoberfläche die Stabilität und
Kontrolle beeinflusst. Nasses Gras oder ein vereister Fahrweg kann Ihre
Fähigkeit zur Kontrolle des Geräts stark beeinträchtigen.
Wenn Sie sich vor oder während der Benutzung des Geräts an einem Hang
nicht sicher fühlen, sollten Sie kein Risiko eingehen und das Gerät nicht am
Hang benutzen.
Bewegliche Teile
Dieses Gerät ist mit zahlreichen beweglichen Teilen ausgestattet, die Sie und
andere Personen verletzen können. Die Sicherheit bei der Bedienung des Geräts ist
jedoch gewährleistet, wenn Sie ordnungsgemäß auf dem Fahrersitz sitzen und alle
Sicherheitsvorschriften in diesem Handbuch beachten.
Das Mähwerk verfügt über rotierende Mähmesser, die Hände und Füße abtrennen
können. Halten Sie sich selbst und andere Personen von diesen Teilen fern, während
das Mähwerk läuft!
Dieses Gerät ist mit einem Fahreranwesenheits-Sicherheitssystem ausgestattet, um
die sichere Bedienung durch den Fahrer zu gewährleisten. Das System darf NICHT
modifiziert oder umgangen werden. Wenn die in diesem Handbuch beschriebenen
Prüfungen des Sicherheits-Verblockungssystems nicht wie angegeben ausgeführt
werden, wenden Sie sich sofort an Ihren Vertragshändler.
Sicherheitsvorschriften
Herausgeschleuderte Objekte
Dieses Gerät verfügt über rotierende Mähmesser. Die Messer können
Gegenstände und Geröll aufnehmen und herausschleudern, was zu schweren
Verletzungen von umstehenden Personen führen kann. Beräumen Sie den
Mähbereich, BEVOR Sie mit den Mäharbeiten beginnen.
Benutzen Sie dieses Gerät nur, wenn der vollständige Grasfangbehälter bzw.
Auswurfschutz (Prallblech) installiert ist.
Halten Sie außerdem andere Personen aus dem Mähbereich fern, wenn das
Mähwerk läuft. Wenn sich jemand dem Mähbereich nähert, stellen Sie das
Mähwerk sofort ab, bis die Personen den Mähbereich wieder verlassen haben.
Kraftstoff und Wartung
Benzin ist äußerst leicht entflammbar. Benzindämpfe sind ebenfalls äußerst
leicht entflammbar und können an eine weit entfernte Zündquelle gelangen.
Benzin darf nur als Kraftstoff und nicht als Lösungs- oder Reinigungsmittel
verwendet werden. Kraftstoff nicht an einem Ort lagern, an dem sich
Dämpfe sammeln oder an eine Zündquelle, wie z. B. eine Zündflamme,
gelangen können. Kraftstoff muss in einem genehmigten, abgedichteten
Kunststoffkanister oder im Kraftstofftank des Traktors mit fest verschlossenem
Deckel gelagert werden. Verschütteten Kraftstoff sofort aufwischen.
Die ordnungsgemäße Wartung ist kritisch für die Sicherheit und
Funktion Ihres Geräts. Stellen Sie sicher, dass die in diesem Handbuch
enthaltenen Wartungsverfahren, besonders die regelmäßige Prüfung des
Sicherheitssystems, ordnungsgemäß durchgeführt werden.
3
Page 50

Not for
Reproduction
Sicherheitsvorschriften
Lesen Sie bitte diese Sicherheitsvorschriften und befolgen Sie sie genau. Die Nichtbeachtung dieser Vorschriften
kann dazu führen, dass Sie die Kontrolle über das Gerät verlieren, sowie zu schweren Personenschäden oder Tod des
Bedieners oder von in der Nähe befindlichen Dritten oder Sachbeschädigung oder Beschädigung des Geräts. Dieses
Mähwerk kann Hände und Füße abtrennen und Gegenstände schleudern. Dreiecke im Text weisen auf wichtige
Vorsichts- oder Achtungshinweise hin, die befolgt werden müssen.
ALLGEMEINER BETRIEB
1. Vor der Inbetriebnahme müssen Sie die in diesem Handbuch
und auf dem Gerät befindlichen Anweisungen lesen,
verstehen und befolgen.
2. Hände und Füße dürfen keinesfalls in die Nähe von
Rotationsteilen oder unterhalb des Gerätebereichs geraten.
Halten Sie sich stets von den Auswurföffnungen fern.
3. Gestatten Sie nur verantwortungsbewussten Erwachsenen,
die die Anweisungen kennen, den Betrieb des Geräts (das
Alter des Bedieners kann auf Grund örtlicher Bestimmungen
Begrenzungen unterliegen).
4. Entfernen Sie Gegenstände, wie Steine, Spielzeug, Draht
usw., die von den Messern bzw. dem Messer aufgenommen
und geschleudert werden können, aus dem Mähbereich.
5. Vergewissern Sie sich vor dem Mähen, dass sich im
Mähbereich keine Personen befinden. Halten Sie das Gerät
an, wenn jemand den Mähbereich betritt.
6. Lassen Sie niemals andere Personen mitfahren.
7. Mähen Sie nicht während des Rückwärtsfahren, außer, es
ist absolut notwendig. Schauen Sie beim Rückwärtsfahren
immer nach unten und nach hinten.
8. Achten Sie darauf, dass der Auswurf des Schnittguts nicht auf
Personen erfolgt. Vermeiden Sie es, das Schnittgut auf eine
Wand oder dergleichen auszuwerfen. Das Schnittgut könnte
auf den Bediener zurückprallen. Halten Sie das/die Messer
an, wenn Sie über Schotterflächen fahren.
9. Benutzen Sie das Gerät nur, wenn das Grasfanggerät,
der Auswurfschutz (Prallblech) und andere
Sicherheitsvorrichtungen angebracht sind.
10. Verlangsamen Sie vor dem Wenden die Geschwindigkeit.
11. Lassen Sie ein laufendes Gerät nie unbeaufsichtigt. Kuppeln
Sie vor dem Absteigen die Zapfwellenkupplung immer aus,
ziehen Sie die Parkbremse an, stellen Sie den Motor ab und
ziehen Sie den Schlüssel ab.
12. Wenn der Mäher nicht eingesetzt wird, müssen die Messer
(Zapfwellenkupplung) ausgekuppelt werden. Schalten Sie
den Motor ab und warten Sie, bis alle Teile zum Stillstand
gekommen sind, bevor Sie das Gerät reinigen, den
Grasfangbehälter entfernen und den Auswurfschutz von
Schnittgut reinigen.
13. Setzen Sie das Gerät nur in Tageslicht oder in gutem
künstlichen Licht ein.
14. Benutzen Sie das Gerät nicht, wenn Sie sich unter dem
Einfluss von Alkohol oder Medikamenten befinden.
15. Achten Sie auf den Verkehr, wenn Sie das Gerät in der Nähe
von Straßen benutzen oder eine Straße überqueren.
16. Seien Sie beim Auf- oder Abladen des Geräts auf einen
Anhänger oder Lastwagen besonders vorsichtig.
17. Tragen Sie stets Augenschutz, wenn Sie dieses Gerät
benutzen.
18. Aus Erfahrungswerten geht hervor, dass Bediener, die
60 Jahre alt oder älter sind, einen hohen Prozentsatz der
mit Aufsitzmähern zusammenhängenden Verletzungen
darstellen. Diese Altersgruppe sollte ihre Fähigkeiten für die
sichere Bedienung eines Aufsitzmähers zum eigenen Schutz
und dem Schutz anderer vor Verletzungen prüfen.
19. Befolgen Sie die Empfehlungen des Herstellers hinsichtlich
Radgewichten und Gegengewichten.
20. Denken Sie daran, dass der Bediener für Unfälle mit anderen
Personen oder Sachschäden verantwortlich ist.
21. Fachliche und praktische Anweisungen sind für alle Fahrer
ratsam.
22. Es müssen immer feste Schuhe und lange Hosen getragen
werden. Das Gerät darf nicht barfuß oder mit Sandalen
bedient werden.
23. Vergewissern Sie sich vor dem Einsatz stets durch
Sichtprüfung, ob die Messer und die Messerbefestigungsteile
vorhanden, intakt und sicher sind. Tauschen Sie abgenutzte
oder beschädigte Teile aus.
24. Kuppeln Sie vor der Durchführung folgender Tätigkeiten
Zubehörteile aus: Auftanken, Demontage eines Zusatzes,
Durchführung von Einstellungen (es sei denn, die Einstellung
kann vom Fahrersitz aus vorgenommen werden).
25. Wenn das Gerät geparkt, untergestellt oder unbeaufsichtigt
ist, muss, wenn keine zwangsläufige mechanische Sperre
benutzt wird, die Mähvorrichtung abgesenkt werden.
26. Wenn Sie den Bedienerplatz aus welchem Grunde auch
immer verlassen, ziehen Sie vor dem Absteigen die
Parkbremse an, kuppeln Sie die Zapfwellenkupplung ein,
stellen Sie den Motor ab und ziehen Sie den Schlüssel ab.
27. Halten Sie das Gerät zur Verminderung der Feuergefahr
immer von Gras, Blättern und überschüssigem Öl frei.
Stoppen oder parken Sie nicht über trockenen Blättern, Gras
oder brennbaren Materialien.
TRANSPORT UND UNTERSTELLEN
1. Wenn dieser Traktor auf einem offenen Anhänger
transportiert wird, muss das Gerät unbedingt nach vorne
in die Fahrtrichtung ausgerichtet sein. Wenn der Traktor
nach hinten ausgerichtet ist, könnte die Haube durch
Windeinwirkung beschädigt werden.
2. Beachten Sie immer die Vorschriften für das sichere
Betanken des Geräts und den sicheren Umgang mit
Kraftstoff, wenn Sie das Gerät nach dem Transport und dem
Unterstellen betanken.
3. Stellen Sie das Gerät (mit Kraftstoff) nie in einem
schlecht belüfteten, geschlossenen Raum unter.
Benzindämpfe könnten zu einer Zündquelle (wie z.B. Ofen,
Warmwasserbereiter, usw.) gelangen und eine Explosion
verursachen. Benzindämpfe sind für Menschen und Tiere
giftig.
4. Befolgen Sie stets die Anweisungen im Motorhandbuch
hinsichtlich der Vorbereitungen für ein Unterstellen des
Geräts, bevor Sie das Gerät für kurze oder lange Zeiträume
unterstellen.
5. Befolgen Sie stets die Anweisungen im Motorhandbuch
hinsichtlich des ordnungsgemäßen Vorgehens bei der
Wiederinbetriebnahme des Geräts.
6. Stellen Sie das Gerät oder den Kraftstoffbehälter nie in
einem Raum ab, in dem sich eine offene Flamme oder eine
Zündflamme, wie z.B. von einem Warmwasserbereiter,
befindet. Lassen Sie das Gerät vor dem Unterstellen
abkühlen.
4
Page 51

Not for
Reproduction
Sicherheitsvorschriften
BETRIEB AM HANG
Abhänge spielen eine Hauptrolle bei Unfällen, die durch einen Verlust
der Kontrolle über das Gerät oder das Umkippen des Geräts verursacht
werden und schwere Verletzungen oder Tod zur Folge haben können. Die
Arbeit an Abhängen bedarf besonderer Vorsicht.
Wenn Sie den Abhang nicht rückwärts hinauffahren können oder Sie sich
unsicher fühlen, sollten Sie den Abhang nicht befahren.
Durch den Einsatz der Bremse können Sie über einen auf einem Abhang
rutschenden Aufsitzmäher nicht die Kontrolle wiedererlangen. Die
Hauptgründe für den Verlust der Kontrolle sind: Unzureichender Griff
der Reifen, zu hohe Geschwindigkeit, ungenügende Bremstätigkeit,
die Geräteart ist für den Einsatz ungeeignet, mangelnde Kenntnis der
Bodenbeschaffenheit, unrichtige Anhänge- und Lastverteilung.
1. Mähen Sie an Hängen vertikal, nicht diagonal.
2. Achten Sie auf Löcher, Furchen oder Erhebungen. Das Gerät
könnte sich auf unebenem Gelände überschlagen. In hohem Gras
könnten Hindernisse verborgen sein.
3. Wählen Sie einen niedrigen Gang, so dass Sie auf dem Hang nicht
stoppen oder schalten müssen.
4. Mähen Sie nicht auf nassem Gras. Die Reifen könnten nicht greifen.
5. Nehmen Sie nie den Gang heraus, insbesondere nicht, wenn Sie
bergab fahren. Legen Sie nicht den Leerlauf ein, da die Bremskraft
des Motors dadurch nicht genutzt werden kann.
6. Vermeiden Sie es, an einem Hang anzufahren, anzuhalten oder zu
wenden. Sollten die Räder nicht mehr greifen, kuppeln Sie das/die
Messer aus und fahren Sie langsam weiter den Hang hinunter.
7. Achten Sie darauf, dass die Bewegungen am Hang langsam und
gleichmäßig ausgeführt werden. Nehmen Sie keine plötzlichen
Geschwindigkeits- oder Richtungsänderungen vor, wodurch sich
das Gerät überschlagen könnte.
8. Seien Sie besonders vorsichtig, wenn Sie das Gerät mit
Grasfanggeräten oder anderem Zubehör verwenden, da die
Stabilität dadurch beeinträchtigt werden könnte.
9. Versuchen Sie nicht, das Gerät zu stabilisieren, indem Sie Ihren
Fuß auf den Boden geben.
10. Mähen Sie nicht in der Nähe von steilen Abhängen, Gräben oder
Aufschüttungen. Der Mäher könnte sich plötzlich überschlagen,
wenn ein Rad über die Kante eines steilen Abhangs oder eines
Grabens gerät oder wenn eine Aufschüttung einbricht.
11. Verwenden Sie auf steilen Abhängen keine Grasfanggeräte.
12. Führen Sie keine Mäharbeiten an einem Hang durch, den Sie nicht
rückwärts hinauffahren können.
13. Lassen Sie sich von Ihrem Vertragshändler wegen Radgewichten
oder Gegengewichten zur Verbesserung der Stabilität beraten.
14. Entfernen Sie Hindernisse, wie Steine, Baumstämme, usw.
15. Fahren Sie langsam. Am Hang kann es vorkommen, dass die
Reifen trotz ordnungsgemäß funktionierender Bremsen nicht
greifen.
16. Wenden Sie nicht an Hängen. Wenn dies unvermeidlich ist,
wenden Sie, wenn möglich, langsam und gleichmäßig bergab.
ANHÄNGER
1. Zusatzgeräte dürfen nur mit einem Fahrzeug mit
Anhängevorrichtung gezogen werden. Zum Ziehen darf nur die
Anhängevorrichtung verwendet werden.
2. Befolgen Sie die Empfehlungen des Herstellers hinsichtlich
Gewichtsbeschränkungen des angehängten Geräts und zum
Ziehen an Hängen.
3. Auf angehängten Zusatzgeräten dürfen keine Personen,
insbesondere keine Kinder, mitgenommen werden.
4. An Hängen kann das Gewicht des angehängten Geräts zu einem
Traktionsverlust führen, oder Sie können die Gewalt über das
Fahrzeug verlieren.
5. Fahren Sie langsam und kalkulieren Sie eine längere Bremsstrecke
ein.
6. Legen Sie nicht den Leerlauf ein, da die Bremskraft des Motors
dadurch nicht genutzt werden kann.
ACHTUNG
Benutzen Sie das Gerät nie an Abhängen, deren horizontales
Gefälle mehr als 17,6% (10 Grad) beträgt, was einem
vertikalen Gefälle von einem 106 cm auf 607 cm horizontal
entspricht.
Benutzen Sie beim Einsatz an Abhängen zusätzliche
Radgewichte oder Gegengewichte. Lassen Sie sich von
Ihrem Vertragshändler beraten, welche Gewichte ggf. für
Ihr Gerät verfügbar und geeignet sind.
Wählen Sie eine niedrige Grundgeschwindigkeit, bevor
Sie auf den Abhang fahren. Lassen Sie bei der Arbeit an
Abhängen mit einem hinten montierten Grasfanggerät
zusätzlich zu den vorderen und hinteren Gewichten
besondere Vorsicht walten.
Mähen Sie am Abhang in VERTIKALER Richtung,
niemals diagonal. Seien Sie bei einem Richtungs wechsel
besonders vorsichtig und STOPPEN ODER STARTEN SIE
NIE AM HANG.
KINDER
Wenn sich der Bediener nicht der Anwesenheit von Kindern bewusst ist,
können tragische Unfälle passieren. Kinder werden vom Gerät und dem
Mähvorgang oft angezogen. Gehen Sie nie davon aus, dass Kinder dort
verweilen, wo Sie sie zum letzten Mal gesehen haben.
1. Halten Sie Kinder vom Mähbereich fern und unter Aufsicht eines
anderen verantwortungsbewussten Erwachsenen.
2. Seien Sie auf der Hut und stellen Sie das Gerät ab, wenn Kinder
den Mähbereich betreten.
3. Schauen Sie vor und während des Rückwärtsfahrens nach hinten
und unten und halten Sie nach kleinen Kindern Ausschau.
4. Nehmen Sie niemals Kinder mit, selbst dann nicht, wenn das/
die Messer nicht in Betrieb sind. Kinder können herunterfallen
und sich schwer verletzen oder den sicheren Betrieb des
Geräts stören. Kinder, die bereits mitfahren durften, können
plötzlich im Mähbereich auftauchen, weil sie wieder mitfahren
möchten und vom Gerät überfahren werden, insbesondere beim
Rückwärtsfahren.
5. Erlauben Sie Kindern niemals, das Gerät zu bedienen.
6. Seien Sie besonders vorsichtig, wenn Sie sich toten Winkeln,
Buschwerk, Bäumen oder anderen Gegenständen nähern, die die
Sicht versperren könnten.
SCHADSTOFFEMISSION
1. In den Motorabgasen dieses Produkts sind Chemikalien enthalten,
die in bestimmten Mengen bekanntermaßen Krebs erregend sind,
zu bei der Geburt vorhandenen Schäden oder anderen negativen
Einflüssen auf die Fortpflanzung führen.
2. Achten Sie auf die entsprechenden Emissionsbeständigkeits- und
Luftindexangaben auf dem Motorabgasschild.
ZÜNDSYSTEM
1. Dieser Ottomotor entspricht Canadian ICES-002 [kanadische
Vorschriften ICES-002].
5
Page 52

Not for
Reproduction
Sicherheitsvorschriften
SERVICE UND WARTUNG
Sicherer Umgang mit Kraftstoff.
1. Brennende Zigaretten, Zigarren, Pfeifen und andere
Brandquellen dürfen sich nicht in der Nähe von Kraftstoff
befinden.
2. Verwenden Sie nur zugelassene Kraftstoffbehälter.
3. Nehmen Sie nie den Deckel des Kraftstoffbehälters ab oder
betanken Sie das Gerät nicht, wenn der Motor läuft. Motor vor
dem Nachtanken abkühlen lassen.
4. Das Gerät darf nie in Innenräumen betankt werden.
5. Stellen Sie das Gerät oder den Kraftstoffbehälter nie in einem
Bereich unter, in dem sich eine offene Flamme, Funken oder
Zündflamme befinden, wie z. B. in der Nähe eines Boilers
oder anderer Geräte.
6. Behälter dürfen niemals im Fahrzeuginnern oder auf einer
Ladefläche mit Kunststoffauskleidung gefüllt werden. Stellen
Sie Behälter vor dem Füllen immer auf den Boden, vom
Fahrzeug entfernt.
7. Entfernen Sie benzinbetriebene Geräte vom Lastwagen oder
Anhänger und nehmen Sie das Auftanken auf dem Boden
vor. Falls dies nicht möglich ist, tanken Sie diese Geräte mit
einem tragbaren Behälter auf einem Anhänger auf; benutzen
Sie keinen Benzineinfüllstutzen einer Tanksäule.
8. Achten Sie darauf, dass die Tülle stets mit dem Rand des
Benzintanks oder der Behälteröffnung in Kontakt ist, bis das
Betanken abgeschlossen ist. Benutzen Sie keine Vorrichtung
zum Offenhalten der Tülle.
9. Falls Benzin auf die Kleidung verschüttet wird, muss die
Kleidung sofort gewechselt werden.
10. Der Tank darf nie überfüllt werden. Bringen Sie den Deckel
des Kraftstoffbehälters wieder sicher an.
11. Seien Sie beim Umfang mit Benzin oder anderen Kraftstoffen
besonders vorsichtig. Sie sind entflammbar und die Dämpfe
sind explosionsgefährdet.
12. Wenn Kraftstoff verschüttet wurde, dürfen Sie nicht den
Versuch unternehmen, den Motor zu starten. Bringen Sie
das Gerät aus dem Bereich, in dem der Kraftstoff verschüttet
wurde und vermeiden Sie es, eine Zündquelle herzustellen,
bis die Kraftstoffdämpfe verflogen sind.
13. Bringen Sie den Tankdeckel und den Deckel des
Kraftstoffbehälters wieder sicher an.
Service und Wartung
1. Lassen Sie das Gerät nie in einem geschlossenen Raum
laufen, in dem sich Kohlenmonoxiddämpfe ansammeln
könnten.
2. Schrauben und Muttern, insbesondere die Schrauben des
Mähwerks, müssen immer fest angezogen und in gutem
Zustand sein.
3. Sicherheitsvorrichtungen dürfen niemals verändert werden.
Überprüfen Sie die Sicherheitsvorrichtungen regelmäßig auf
ordnungsgemäße Funktion und nehmen Sie bei Bedarf die
notwendigen Reparaturen vor.
4. Halten Sie das Gerät frei von Gras, Blättern, usw. Wischen
Sie verschüttetes Öl oder Kraftstoff auf.
5. Halten Sie an und untersuchen Sie das Gerät, wenn Sie einen
Gegenstand berühren. Nehmen Sie eventuell notwendige
Reparaturen vor, bevor Sie das Gerät wieder einsetzen.
6. Nehmen Sie nie Einstellungen oder Reparaturen vor, wenn
das Gerät läuft, es sei denn, dies ist im Handbuch des
Motorherstellers angegeben.
7. Die Bauteile des Grasfangbehälters unterliegen Abnutzung,
Beschädigung und Verschleiß, wodurch die sich bewegenden
Teile freigelegt oder Gegenstände weggeschleudert werden
könnten. Überprüfen Sie die Bauteile häufig und ersetzen Sie
sie, wenn nötig, mit den vom Hersteller empfohlenen Teilen.
8. Mähmesser sind scharf und man kann sich daran
schneiden. Umwickeln Sie die (das) Messer, wenn Sie daran
Servicearbeiten durchführen, oder tragen Sie Handschuhe.
Gehen Sie dabei besonders vorsichtig vor.
9. Überprüfen Sie häufig die Funktion der Bremse. Stellen Sie
die Bremse ein und warten Sie sie nach Vorschrift.
10. Halten Sie Sicherheits- und Anweisungsaufkleber instand
oder ersetzen Sie sie ggf.
11. Ölfilter nicht bei heißem Motor entfernen, da sich das
verschüttete Benzin entzünden könnte. Öffnen Sie die
Schellen der Kraftstoffleitungen nicht mehr als nötig.
Vergewissern Sie sich, dass die Schellen nach dem Einbau
des Filters fest auf dem Schlauch sitzen.
12. Benutzen Sie kein Benzin, das METHANOL, Gasohol
oder mehr als 10 % ETHANOL, Benzinzusätze oder
tetraethylbleifreies Benzin enthält, da dies zu Schäden am
Motor oder am Kraftstoffsystem führen kann.
13. Wenn der Benzintank entleert werden muss, muss dies im
Freien durchgeführt werden.
14. Defekte Auspuffanlagen müssen ausgetauscht werden.
15. Verwenden Sie für Reparaturarbeiten nur werkseitig
genehmigte Ersatzteile.
16. Beachten Sie bei allen Ein- und Nachstellungen immer die
technischen Angaben des Herstellers.
17. Benutzen Sie für umfangreiche Service- und
Reparaturarbeiten nur zugelassene Service-Niederlassungen.
18. Unternehmen Sie nie den Versuch, an diesem Gerät
umfangreiche Reparaturen durchzuführen, wenn Sie dafür
keine ordnungsgemäße Ausbildung haben. Nicht fachgerecht
durchgeführte Servicearbeiten können zu Betriebsgefahren,
Beschädigungen des Geräts und der Nichtigkeit der
Herstellergarantie führen.
19. Seien Sie im Umgang mit Mähern mit mehreren Messern
vorsichtig, da durch die Rotation eines Messers die Rotation
der anderen Messer verursacht werden kann.
20. Ändern Sie nicht die Einstellungen des Drehzahlmessers und
überdrehen Sie den Motor nicht. Durch überhöhte Drehzahlen
erhöht sich die Verletzungsgefahr.
21. Trennen Sie vor der Durchführung folgender Arbeiten die
Antriebszubehörteile, halten Sie den Motor an, ziehen Sie
den Zündschlüssel ab und trennen Sie das/die Zündkabel:
Reinigung verstopfter Zusatzgeräte und Auswurfschächte,
Wartungsarbeiten, wenn der Aufprall mit einem Gegenstand
vorgekommen ist oder wenn das Gerät abnormal vibriert.
Untersuchen Sie nach einem Aufprall das Gerät auf Schäden
und führen Sie vor dem Neustart und dem Einsatz des Geräts
die notwendigen Reparaturen durch.
22. Halten Sie Ihre Hände stets vom hydrostatischen
Pumpenventilator fern, wenn der Traktor läuft. Der Ventilator
befindet sich oberhalb der Transachseleinheit.
23. Geräte mit Hydraulikpumpen, -schläuchen oder -motoren:
ACHTUNG: Unter Druck austretende Hydraulikflüssigkeit
kann u. U. so stark spritzen, dass die Haut durchdrungen
wird und ernsthafte Verletzungen entstehen. Wenn
Fremdflüssigkeit in die Haut eindringt, muss sie innerhalb
einiger weniger Stunden von einem Arzt, der mit dieser Art
von Verletzung vertraut ist, chirurgisch entfernt werden, da
ansonsten eine Gewebsnekrose eintreten kann. Körper und
Hände von Nadellöchern oder Düsen, die Hydraulikflüssigkeit
unter hohem Druck spritzen, fern halten. Bei der Suche nach
Leckagen Papier oder Pappe verwenden, nicht die Hände.
Sicherstellen, dass alle Hydraulikflüssigkeitsanschlüsse fest
sitzen und dass alle Hydraulikschläuche und -leitungen sich
in gutem Zustand befinden, bevor das System unter Druck
gesetzt wird. Wenn Leckagen auftreten, muss das Gerät
sofort von Ihrem Vertragshändler repariert werden.
24. ACHTUNG: Energiespeichervorrichtung. Das unsachgemäße
Lösen von Federn kann zu ernsthaften Verletzungen führen.
Federn sollten nur von einem Vertragshändler ausgebaut
werden.
25. Modelle mit einem Motorkühler: ACHTUNG:
Energiespeichervorrichtung. Um ernsthafte
Körperverletzungen durch heißes Kühlmittel oder
austretenden Dampf zu vermeiden, darf auf keinen Fall
versucht werden, den Kühlerdeckel bei laufendem Motor
abzunehmen. Den Motor stoppen und warten, bis er
abgekühlt ist. Selbst dann muss beim Abnehmen des
Deckels äußerst vorsichtig vorgegangen werden.
6
Page 53

Not for
Reproduction
Identifizierungsnummern
Produktdaten
Geben Sie den Namen und die Nummer des Modells,
die Identifikationsnummern des Herstellers und die
Seriennummern des Motors in den entsprechenden
Feldern an. Diese Nummern stehen auf den jeweiligen
abgebildeten Teilen.
Sie MÜSSEN über diese Angaben verfügen, um
Ersatzteile, Serviceleistungen oder Informationen
vom zugelassenen Fachhändler zu erhalten.
PRODUKTDATEN
Modellbezeichnung, Name/Nummer
Nummer der Baueinheit Seriennummer
Baugruppennummer der
Schneidwerkabdeckung
Händlername Kaufdatum
MOTORANGABEN
Motorbezeichnung Motormodell
Seriennummer der Schneidwerkabdeckung
CE Identifikationsetikett
A. Indentikationsnummer des Herstellers
B. Seriennummer des Herstellers
C. Name und Adresse des Herstellers
D. Maximale Motorendrehzahl in Umdrehung pro Minute
E. Nutzleistung in Kilowatt
F. Masseneinheit in Kilogramm
G. CE-Qualitätslogo
H. Herstellungsjahr
I. Gwährte Schalleistung in Dezibel
A
MODEL NO. xxxxxxx
SERIAL NO. xxxxxxxxxx
B
C
XXXXXXXXXXXXXXXXXXXXXX
XXXXXXXXXXXXXXXXX
xxxx min
E
x.x kW
xxx kg
F
G
D
20xx
H
-1
xxx
I
dB
Motortyp/Spezif. Motorkennzeichen/Seriennummer
“Unsicherheit der Vibrationsmessung – Die
Maschinenvibration wurde mit Verfahren und Methoden
aufgezeichnet, die in den entsprechenden, zum Zeitpunkt
der Fertigung gültigen internationalen Standards
beschrieben waren. Die Messunsicherheiten können zu
einer Abweichung von bis zu 5 % von dem Wert führen,
der in der Konformitätserklärung veröffentlicht wurde.“
7
Page 54

Not for
Reproduction
Sicherheitsaufkleber
Lage der Aufkleber
Betriebsanleitung, CE-Modelle,
Teilenr. 1750191
Zündschalterstellungen,
Teilenr. 1722806
Vorsicht, Klemmstelle,
Teilenr. 1720389
1730172
Kraftstoffniveau
Teilenr. 1730172
173xxxx
Kraftstoffanzeige,
Teilenr. 1730202
1730264
Vorsicht, Klemmstelle,
Teilenr. 1720389
Anbaugeräthub,
Teilenr. 1730264
8
Page 55

Not for
Reproduction
Sicherheitsaufkleber
Sicherheitsaufkleber
Alle mit GEFAHR, WARNUNG, VORSICHT
gekennzeichneten Meldungen und Anleitungen auf Ihrem
Aufsitzmäher und Mäher sollten sorgfältig gelesen und
befolgt werden. Werden diese Anweisungen nicht befolgt,
besteht Verletzungsgefahr. Die Informationen dienen
Ihrer Sicherheit und sind wichtig! Die unten aufgelisteten
Sicherheitsaufkleber befinden Sich an Ihrem Aufsitzmäher
und Mäher.
Sicherheitssymbole
1
3
5
2
4
Falls irgendeiner dieser Aufkleber verloren oder beschädigt
ist, ersetzen Sie ihn sofort. Wenden Sie für den Austausch von
Teilen an einen Vertragshändler.
Diese Aufkleber sind leicht anzubringen und erinnern Sie und
andere Personen, die dieses Gerät bedienen, an die Befolgung
der Sicherheitshinweise, was für einen sicheren und effizienten
Betrieb erforderlich ist.
6
7
1. WARNUNG: Lesen und verstehen Sie die
Bedienungsanleitung, bevor Sie diese Maschine
verwenden. Machen Sie sich mit der Anordnung und
Funktion aller Bedienelemente vertraut. Betreiben Sie
die Maschine nur, wenn Sie entsprechend geschult sind.
2. GEFAHR - GEFAHR DES VERLUSTS DER TRAKTION
UND DER KONTROLLE ÜBER DIE MASCHINE AUF
NEIGUNGEN: Wenn die Maschine an einem Hang die
Vorwärtsbewegung stoppt oder zu rutschen beginnt,
halten Sie die Messer an, und fahren Sie vorsichtig vom
Abhang hinunter.
3. GEFAHR: Brandgefahr: Halten Sie das Gerät frei von
Gras, Laub und ausgelaufenem Öl. Füllen Sie keinen
Kraftstoff nach, solange der Motor läuft oder heiß ist.
Stellen Sie den Motor ab, ziehen Sie den Schlüssel,
und lassen Sie den Motor mindestens 3 Minuten
abkühlen, bevor Sie Kraftstoff auffüllen. Kraftstoff
nicht in geschlossenen Räumen, Anhängern, Garagen
oder anderen geschlossenen Bereichen auffüllen.
Verschütteten Kraftstoff aufwischen. Beim Bedienen
dieser Maschine nicht rauchen.
4. GEFAHR - UMKIPP- UND RUTSCHGEFAHR: Mähen
Sie stets senkrecht nach oben und unten, nicht quer
zum Hang. Arbeiten Sie niemals an Abhängen mit einem
Gefälle von mehr als 10 Grad. Vermeiden Sie plötzliche
und scharfe (schnelle) Kehrtwendungen auf Abhängen.
8
5. GEFAHR - Gefahr der Abtrennung von
KÖRPERTEILEN: Um Verletzungen durch rotierende
Messer und bewegliche Teile zu vermeiden, achten Sie
darauf, dass die Sicherheitsvorrichtungen (Schutze,
Abdeckungen und Schalter) montiert und funktionsfähig
sind.
6. Mähen Sie nicht, wenn Kinder oder andere Personen in
der Nähe sind. Nehmen Sie niemals andere Personen,
insbesondere Kinder, auf Aufsitzmähern mit, auch
nicht, wenn die Messer abgeschaltet sind. Mähen Sie
nie rückwärts, sofern es nicht unbedingt notwendig ist.
Schauen sie nach unten und hinten, bevor und während
Sie rückwärts fahren.
7. Lesen Sie in technischen Anleitungen nach, bevor Sie
Reparaturen oder Wartungsarbeiten durchführen. Wenn
Sie die Maschine verlassen, stellen Sie den Motor ab,
stellen Sie die Parkbremse fest, und ziehen Sie den
Zündschlüssel.
8. Halten Sie Zuschauer und Kinder in einem sicheren
Abstand. Entfernen Sie Objekte, die vom Messer
hochgeschleudert werden könnten. Mähen Sie nicht
ohne montierten Auswurfkanal.
9
Page 56

Not for
Reproduction
Merkmale und Steuerungen
Abbildung 1. Steuerungsfunktionen
Steuerungsfunktionen
Die nachstehenden Informationen beschreiben kurz die Funktion der einzelnen Steuerungen. Starten, Stoppen, Fahren
und Mähen verlangen die Benutzungen mehrerer Steuerungen in einer bestimmten Reihenfolge. Die Kombinationen
und Reihenfolge der Bedienungsaufgaben für verschiedene Arbeiten werden im Abschnitt BETRIEB erläutert.
Gas- und Choke-Hebel
(Choke-A-Matic)
Der Gas- und Choke-Hebel steuert die Motordrehzahl
und den Choke (siehe Abbildung 1). Für die Erhöhung
der Motordrehzahl ist der Gas- und Choke-Hebel in die
Stellung SCHNELL zu stellen. Für eine Verringerung
der Motordrehzahl ist er auf die Stellung LANGSAM zu
stellen. Arbeiten Sie stets mit vollgas. Für das Anlassen
eines kalten Motors ist der Gas- und Choke-Hebel in die
Stellung CHOKE zu bringen. Wenn der Motor warm ist,
braucht der Choke nicht betätigt zu werden.
Scheinwerfer
Mit dem Scheinwerferschalter werden die
Traktorscheinwerfer ein- und ausgeschaltet.
Betriebsstundenzähler
Der Betriebsstundenzähler zählt die Zeit in Stunden, in
denen der Zündschalter in der Stellung LAUF ist.
10
Page 57

Not for
Reproduction
Mähen beim Rückwärtsfahren (RMO)
Die Rückwärtsmähoption (RMO) ermöglicht das Mähen
(oder die Verwendung anderer zapfwellenbetriebener
Zusatzgeräte) beim Rückwärtsfahren. Zum Mähen
beim Rückwärtsfahren den RMO-Schlüssel drehen,
nachdem die Zapfwelle eingekuppelt wurde. Die LEDLeuchte leuchtet auf und der Fahrer kann nun beim
Rückwärtsfahren mähen. Wenn die die Zapfwelle
eingekuppelt wird, muss RMO auf Wunsch erneut
aktiviert werden.
Zapfwellenschalter (PTO)
Der Zapfwellenschalter kuppelt über die Zapfwelle
betriebene Zusatzgeräte ein und aus. Zum Einkuppeln
der Zapfwelle den Schalter nach OBEN ziehen. Um die
Zapfwelle auszukuppeln, den Schalter nach UNTEN
drücken. Es ist zu beachten, dass der Fahrer am
Traktorsitz sitzen muss, damit die Zapfwelle benutzt
werden kann.
Zündschalter
Mit dem Zündschalter wird der Motor angelassen und
abgestellt. Der Schalter hat drei Stellungen:
AUS Stellt den Motor und die Elektrik ab.
Merkmale und Steuerungen
Schnitthöheneinstellung
Mit dem Schnitthöheneinstellhebel wird die Schnitthöhe
des Mähwerks eingestellt. Die Schnitthöhe kann
zwischen 2,5 cm und 10,2 cm (1,0 zoll und 4,0 zoll) in
sieben Stufen verstellt werden.
Sitzeinstellhebel
Der Sitz lässt sich nach vorne und hinten verstellen. Den
Hebel betätigen, den Sitz wunschgemäß einstellen und
den Hebel loslassen, um den Sitz in seiner Stellung zu
arretieren.
Getriebeausrückhebel
Der Getriebeausrückhebel deaktiviert das Getriebe, damit
der Traktor von Hand geschoben werden kann. Unter
TRAKTOR VON HAND SCHIEBEN sind diesbezügliche
Anleitungen zu finden.
Kraftstofftank
Die Kappe nach links drehen, um sie zu entfernen.
Kraftstoffstandanzeige
Zeigt den Kraftstoffstand im Tank an.
LAUF Erlaubt dem Motor zu laufen und macht
die Elektrik stromführend.
START Kurbelt den Motor zum Anlassen an.
HINWEIS: Den Zündschalter bei abgestelltem Motor nicht
in der Stellung LAUF lassen, da dies die Batterie entleert.
Fahrgeschwindigkeitspedale
Die Vorwärts-Fahrgeschwindigkeit des Traktors wird
durch das Vorwärts-Fahrgeschwindigkeitspedal reguliert.
Die Rückwärts-Fahrgeschwindigkeit des Traktors wird
durch das Rückwärts-Fahrgeschwindigkeitspedal
reguliert.
Wenn eines der Pedale betätigt wird, erhöht dies die
Fahrgeschwindigkeit. Je weiter das Pedal nach unten
gedrückt wird, desto schneller fährt der Traktor.
Automatische
Geschwindigkeitsregelung
Die autmatische Geschwindigkeitsregelung wird
zur Einstellung einer gleich bleibenden VorwärtsFahrgeschwindigkeit benutzt. Sie verfügt über fünf
Arretierungspositionen.
Parkbremse
Der Parkbremsenknopf dient zum Anziehen der
Parkbremse, wenn der Traktor angehalten ist. Die
Parkbremse wird gelöst, wenn das Bremspedal
vollständig durchgetreten und am Knopf nach oben
gezogen wird.
Bremspedal
Durch Drücken des Bremspedals wird die Traktorbremse
betätigt.
11
Page 58

Not for
Reproduction
Merkmale und Steuerungen
Parkbremsfunktion
Parkbremse einsetzen - siehe Abbildung 2. Um die
Parkbremse zu arretieren, die Fahrgeschwindigkeitspedale (A) loslassen, das Bremspedal (B) vollständig
durchtreten, am Parkbremsenknopf (C) nach oben ziehen
und anschließend das Bremspedal loslassen.
Lösen der Parkbremse - siehe Abbildung 2. Die
Parkbremse wird gelöst, indem das Bremspedal (B) nach
unten gedrückt wird.
E
B
A
Automatische
Geschwindigkeitsregelung
AKTIVIEREN:
1. Den Geschwindigkeitsregelungsknopf (D, Abbildung
2) nach oben ziehen.
2. Das Vorwärts-Fahrgeschwindigkeitspedal (A) drücken.
3. Den Geschwindigkeitsregelungsknopf (D) hoch
ziehen, wenn die gewünschte Geschwindigkeit
erreicht ist. Die Geschwindigkeitsregelung arretiert
sich in einer von fünf Stellungen.
DEAKTIVIEREN:
1. Das Bremspedal (B) drücken.
ODER
2. Das Vorwärts-Fahrgeschwindigkeitspedal (A) drücken.
Betriebsstundenzähler
Der Betriebsstundenzähler (E, Abbildung 2) zählt die Zeit
in Stunden, in denen der Zündschalter in der Stellung
LAUF ist.
C
D
Abbildung 2. Parkbremse einkuppeln
12
Page 59

Not for
Reproduction
Section Title
Tests des Sicherheitssperrsystems
Dieses Gerät ist mit einem Sicherheitssperrschalter und
anderen Sicherheitsvorrichtungen ausgestattet. Diese Sicherheitssysteme dienen zur Ihrer Sicherheit: Auf keinen Fall
versuchen, Sicherheitsschalter zu umgehen und irgendwelche
Sicherheitsvorrichtungen zu manipulieren.
WARNUNG
Wenn das Gerät eine Sicherheitsprüfung nicht
besteht, darf es nicht in Betrieb genommen werden.
Wenden Sie sich an Ihren Vertragshändler.
Test 1 — Motor sollte NICHT kurbeln, wenn:
• der Zapfwellenantriebsschalter auf EIN steht ODER
• das Bremspedal NICHT ganz gedrückt ist (Parkbremse
auf AUS) ODER
• der Tempomathebel sich NICHT in der Stellung
NEUTRAL befindet.
Test 2 — Motor SOLLTE kurbeln und starten, wenn:
• der Bediener im Sitz sitzt UND
• der Zapfwellenantriebsschalter auf AUS steht UND
• das Bremspedal vollständig gedrückt ist (Parkbremse
auf EIN) UND
• der Tempomathebel sich in der Stellung NEUTRAL
befindet.
Test 3 — Motor SOLLTE kurbeln und starten, wenn:
• der Bediener vom Sitz aufsteht.
Test 4 — Stoppzeit der Mäher-Klinge überpüfen
Die Messer des Mähwerks und der Mähwerkantriebsriemen
sollten nach Ausschalten des elektrischen Zapfwellenantriebsschalters innerhalb von fünf Sekunden zum Stillstand
kommen. Wenn der Mäher-Antriebsriemen nicht innerhalb von
fünf Sekunden stoppt, setzen Sie sich mit Ihrem autorisierten
Händler in Verbindung.
Test 5 — Rückwärtsmähoption (RMO) prüfen
• Der Motor sollte sich ausschalten, wenn versucht
wird, den Rückwärtsgang einzulegen und der
Zapfwellenantrieb eingeschaltet, die RMO aber nicht
aktiviert wurde.
• Die RMO-Lampe sollte leuchten, wenn die aktiviert wurde.
Betrieb des Traktors
On Two Lines
Allgemeine Betriebssicherheit
Vor der ersten Inbetriebnahme des Traktors müssen alle
Abschnitte über Sicherheit und Betrieb durchgelesen
werden. Machen Sie sich mit den Bedienungselementen
vertraut und lernen Sie, wie der Traktor angehalten wird.
Kraftstoff einfüllen
ACHTUNG
Bezin ist leicht entzündlich und muss vorsichtig
gehandhabt werden. Den Tank nicht füllen,
wenn der Motor noch heiß ist. Im Bereich, in
dem aufgetankt wird, keine offenen Flammen,
Streichhölzer verwenden und nicht rauchen. Nicht
zuviel Kraftstoff nachfüllen und Verschüttungen
sofort aufwischen.
Keinen Benzin verwenden, der METHANOL,
Gasohol oder mehr als 10% ETHANOL,
Benzinzusätze oder verbleiten Benzin
enthält, da dies zu Schäden am Motor bzw.
Kraftstoffsystem führen kann.
1. Kraftstofftankdeckel abnehmen (A, Abbildung 3).
2. Tank füllen. Nicht überfüllen. Im Tank Platz für
Ausdehnung des Benzins lassen. BenzinsortenEmpfehlungen sind im Motorhandbuch zu finden.
3. Kraftstofftankdeckel anbringen und mit der Hand
anziehen.
Motor starten
1. Setzen Sie sich auf den Sitz und ziehen Sie den
Sitzeinstellhebel HOCH. Stellen Sie den Sitz nach
Wunsch ein und lassen Sie den Hebel los, damit der Sitz
in dieser Stellung einrastet.
2. Drücken Sie das Bremspedal vollständig durch
oder ziehen Sie die Feststellbremse an. Treten Sie
dazu das Pedal voll durch, ziehen Sie den Knopf der
Feststellbremse HOCH und lassen Sie das Pedal los.
3. Kuppeln Sie die Antriebswelle aus, indem Sie den
Antriebswellenschalter (PTO) hineindrücken.
4. Bringen Sie den Gas- und Choke-Hebel in die Stellung
CHOKE.
5. Stecken Sie den Schlüssel in das Zündschloss und
drehen Sie ihn im Uhrzeigersinn in die Stellung START.
Lassen Sie den Schlüssel los, sobald der Motor startet.
6. Nachdem der Motor angelaufen ist, schieben Sie den
Gas- und Choke-Hebel halb hinein. Lassen Sie den
Motor mindestens 30 Sekunden lang warm laufen.
7. Schieben Sie den Gas-/Choke-Hebel in die Position
SCHNELL (FAST).
HINWEIS: Im Notfall kann der Motor abgestellt werden,
indem der Zündschalter auf STOPP gedreht wird. Für eine
normale Motorabstellung befolgen Sie das Verfahren,
das unter “Anhalten des Rasenmähers und Abstellen des
Motors” beschrieben wird.
13
Page 60

Not for
Reproduction
Betrieb des Traktors
Traktor und Motor anhalten
1. Bringen Sie den Grundgeschwindigkeitshebel wieder in
die Stellung NEUTRAL.
2. Kuppeln Sie die Antriebswelle (PTO) aus und warten Sie,
bis alle bewegten Teile zum Stillstand gekommen sind.
3. Schieben Sie den Gas-Choke-Hebel in die Stellung
LANGSAM (SLOW) und drehen Sie den Zündschlüssel
in die Stellung AUS (OFF). Ziehen Sie den Schlüssel ab.
Traktor fahren
1. Auf dem Sitz Platz nehmen und diesen so einstellen,
dass alle Bedienelemente bequem erreicht werden
können und die Armaturenbrettanzeige gut sichtbar ist.
2. Die Parkbremse anziehen.
3. Sicherstellen, dass die Zapfwelle ausgekuppelt ist.
4. Den Motor anlassen (siehe MOTOR STARTEN).
5. Parkbremse lösen und Bremspedal freigeben.
6. Für Vorwärtsfahrt das VorwärtsFahrgeschwindigkeitspedal drücken. Das Pedal zum
Stoppen freigeben. Je weiter das Pedal nach unten
gedrückt wird, desto schneller fährt der Traktor.
7. Den Traktor durch Loslassen der
Fahrgeschwindigkeitspedale anhalten, die Parkbremse
betätigen und den Motor abstellen (siehe TRAKTOR
UND MOTOR ANHALTEN).
Mähen
1. Das Mähwerk auf die gewünschte Schnitthöhe einstellen
und die Führungsräder (sofern vorhanden) in die
entsprechende Stellung bringen.
2. Die Parkbremse einkuppeln. Sicherstellen, dass die
Zapfwelle ausgekuppelt ist.
3. Den Motor anlassen (siehe MOTOR STARTEN).
4. Schieben Sie den Gas-/Choke-Hebel in die Position
SCHNELL (FAST).
5. Die Zapfwelle einkuppeln (Mähwerk).
6. Mit dem Mähen beginnen. Im Abschnitt LC sind
Hinweise zu Mähmustern, Rasenpflege und
Informationen zur Fehlerbehebung zu finden.
7. Nach Beendigung des Mähvorgangs die
Zapfwelle auskuppeln und das Mähwerk mit dem
Zusatzgeräthubhebel anheben.
8. Den Motor abstellen (siehe TRAKTOR UND MOTOR
ANHALTEN).
Mähen beim Rückwärtsfahren
Zum Mähen beim Rückwärtsfahren kann der Bediener das
RMO-System verwenden. Diese Option wird durch Drehen des
RMO-Schlüssels aktiviert, nachdem die Zapfwelle eingekuppelt
wurde. Die LED-Leuchte leuchtet auf und der Bediener kann
nun beim Rückwärtsfahren mähen. Wenn die Zapfwelle
ausgekuppelt wird, muss die RMO-Funktion erneut aktiviert
werden (falls gewünscht). Der Schlüssel kann abgezogen
werden, um die Aktivierung der RMO-Funktion zu verhindern.
Betrieb von Anbaugeräten beim
Rückwärtsfahren
Zum Betreiben eines zapfwellenbetriebenen Anbaugeräts beim
Rückwärtsfahren kann der Bediener das RMO-System verwenden.
Diese Option wird durch Drehen des RMO-Schlüssels aktiviert,
nachdem die Zapfwelle eingekuppelt wurde. Die LED-Leuchte
leuchtet auf und der Bediener kann nun das Anbaugerät beim
Rückwärtsfahren verwenden. Wenn die Zapfwelle ausgekuppelt
wird, muss die RMO-Funktion erneut aktiviert werden (falls
gewünscht). Der Schlüssel kann abgezogen werden, um die
Aktivierung der RMO-Funktion zu verhindern.
Traktor von Hand Schieben
1. Zapfwellenkupplung auskuppeln und Motor abstellen.
2. Den Getriebeausrückhebel ca. 6,4 cm zurückziehen, um den
Hebel in der freigegebenen Position zu arretieren (Abb. 4).
3. Der Traktor kann nun mit der Hand geschoben werden.
Traktor nicht abschleppen
Abschleppen des Traktors führt zu Getriebeschäden.
• Benutzen Sie zum Schieben oder Abschleppen
des Traktors kein anderes Fahrzeug. • Betätigen Sie den
Getriebeausrückhebel nie bei laufendem Motor.
ACHTUNG
Wenn das Rückwärtsfahrpedal betätigt wird, während
die Zapfwelle eingekuppelt ist, die RMO-Funktion jedoch
nicht aktiviert wurde, wird der Motor abgestellt. Der
Bediener sollte die Zapfwelle stets auskuppeln, bevor
Straßen, Wege oder anderes Gelände, die/das von
anderen Fahrzeugen benutzt werden/wird, überquert
oder befahren werden. Ein plötzlicher Verlust des
Antriebs kann zu einer Gefahrensituation führen.
ACHTUNG
Mähen beim Rückwärtsfahren erhöht die Gefahr für
andere Personen. Unzureichende Aufmerksamkeit des
Bedieners in der Nähe von Kindern kann zu tragischen
Unfällen führen. Die RMO-Funktion nicht aktivieren,
wenn sich Kinder in der Nähe befinden. Kinder
interessieren sich für den Traktor und Mäharbeiten.
A
B
Abbildung 3. Getriebeausrückhebel und
Kraftstofftank
14
Page 61

Not for
Reproduction
Betrieb des Traktors
Mähwerkhöhe einstellen
Mit der Schnitthöheneinstellung (A, Abbildung 4) wird
die Schnitthöhe des Mähwerks eingestellt. Sie kann
zwischen 2,5 cm und 10,2 cm ( 1,0 zoll und 4,0 zoll) in
sieben Stellungen verstellt werden.
A
Abbildung 4. Mähwerk anheben bzw. absenken
Einen Anhänger anbringen
Die maximale horizontale Lastbegrenzung der Zugstange
beträgt 280 N. Die maximale vertikale Lastbegrenzung
der Zugstange beträgt 160 N. Das entspricht einem
Anhänger mit 113 kg Gewicht auf einem Geländeanstieg
von 10 Grad. Den Anhänger mit einem ausreichend
bemessenen Lastbolzen (A, Abbildung 5) und Splint (B)
befestigen.
A
B
Unterstellen
ACHTUNG
Die Maschine (mit Kraftstoff) nie in einem
schlecht belüfteten, geschlossenen Raum
unterstellen. Kraftstoffdämpfe könnten zu einer
Zündquelle (wie z. B. einem Ofen, Warmwasserbereiter usw.) gelangen und eine Explosion
verursachen.
Kraftstoffdämpfe sind für Menschen und Tiere
giftig.
Vor dem Unterstellen des Traktors am Ende der
Arbeitssaison die Wartungs- und Unterstellungsanleitungen im Abschnitt „Sicherheitsvorschriften“
durchlesen und dann folgende Schritte durchführen:
• Zapfwelle auskuppen, Parkbremse einkuppeln und
Zündschlüssel abziehen.
• Die Motorwartungs- und Unterstellungsaufgaben
durchführen, die im Motorenhandbuch angeführt
sind. Dazu gehört das Entleeren der Kraftstoffanlage,
bzw. das Zugeben von Kraftstoffstabilisator (die
aufgetankte Maschine nicht in einem geschlossenen
Raum unterstellen - siehe Achtungshinweis).
• Die Batterienutzungsdauer wird verlängert, wenn die
Batterie ausgebaut, an einem kühlen, trockenen Ort
aufbewahrt und einmal monatlich voll geladen wird.
Wenn die Batterie im Traktor eingebaut bleibt, das
Minuskabel abtrennen.
Bevor die Maschine nach dem Unterstellen in Betrieb
genommen wird:
• Flüssigkeitsstände prüfen. Sämtliche
Wartungsmaßnahmen durchführen.
• Alle Motorwartungs- und Unterstellungsaufgaben
durchführen, die im Motorenhandbuch empfohlen
werden.
• Motor vor dem Einsatz einige Minuten lang warm
laufen lassen.
Abbildung 5. Empfehlungen für das Anhängergewicht
15
Page 62

Not for
Reproduction
Regelmäßige
Wartung
WARTUNGSPLAN UND -VORGEHEN
Der folgende Wartungsplan muss bei der normalen Pflege von Traktor und Mähwerk befolgt werden.
ZUGMASCHINE UND MÄHER
Alle 8 stunden oder täglich
Sicherheitsverriegelungssystem überprüfen
Zugmaschie und Mähergehäuse reinigen
Sichtbare Ablagerungen von der Motorkammer entfernen
Alle 25 stunden oder jährlich *
Stoppzeit der Mäher-Klinge überpüfen
Überprüfung der Zugmaschine/des Mähers auf
lose Gegenstände
Reifendruck prüfen
Alle 50 stunden oder jährlich *
Bremsen der Zugmaschine überprüfen
Batterie und Kabel säubern
Suchen Sie Ihren Händler einmal jährlich auf, um
Zugmaschine und Mäher schmieren
Mäherklingen überprüfen **
* Je nachdem, was zuerst eintritt
** Überprüfen Sie die Klingen in Gegenden mit sandigen
Böden oder starkem Staub öfter
MOTOR
Erste 5 Stunden
Wechseln Sie das Motoröl
Alle 8 Stunden oder täglich
Prüfen Sie den Ölstand des Motors
Alle 25 Stunden oder jährlich *
Reinigen Sie den Motorluftfilter und Vorreiniger **
Alle 50 Stunden oder jährlich *
Wechseln Sie das Motoröl
Wechseln Sie den Ölfilter
Jährlich
Wechseln Sie den Luftfilter aus
Wechseln Sie den Vorreiniger aus
Suchen Sie Ihren Händler einmal jährlich auf, um
Untersuchen Sie Schalldämpfer und Funkenfänger
Wechseln Sie die Zündkerze aus
Wechseln Sie den Kraftstofffilter aus
Reinigen Sie das Luftkühlsystem
Reifendruck prüfen
Der Reifendruck muss regelmäßig geprüft werden. Er
sollte stets den in der Tabelle angegebenen Werten
entsprechen (Abbildung 6). Es ist zu beachten, dass
diese Druckwerte etwas von den auf den Seitenwänden
der Reifen angebrachten Angaben für „Max. Luftdruck“
abweichen können. Die hier angeführten Druckwerte
liefern optimale Bodenhaftung, verbessern die
Schnittqualität und verlängern die Reifenstandzeit.
* Je nachdem, was zuerst eintritt
** Bei staubigen Umwelbedigungen oder wenn in der Luft
schwebende feste Teilchen vorhanden sind, häufiger
reinigen.
Reifengröße PSI bar
22 x 8,0-8 10 0,68
15 x 6,0-6 12-14 0,82-0,96
Abbildung 6. Reifenluftdruck
16
Page 63

Not for
Reproduction
Stoppzeit der Mäher-Klinge
überpüfen
Die Mährwerksmesser und der Antriebsriemen des
Mähwerks müssen innerhalb von fünf Sekunden,
nachdem der elektrische Zapfwellenschalter in die
Stellung AUS geschaltet wurde, vollständig zum Stillstand
kommen.
1. Den Traktor in den Leerlauf schalten, die Zapfwelle
auskuppeln und im Fahrersitz sitzend den Motor
anlassen.
2. Über die linke Fußraste auf den Mähwerksantriebsriemen blicken. Die Zapfwelle einkuppeln und einige
Sekunden lang warten. Die Zapfwelle auskuppeln und
prüfen, wie lange es dauert, bis der Antriebsriemen
zum Stillstand kommt.
3. Wenn der Antriebsriemen nicht innerhalb von fünf
Sekunden zum Stillstand kommt, Vertragshändler
aufgesucht werden.
Batteriewartung
Regelmäßige Wartung
A
D
B
C
E
Abbildung 7. Batteriewartung
Batterie und Kabel reinigen
ACHTUNG
Beim Anbringen bzw. Abtrennen der Batteriekabeln
das Minuskabel immer ZUERST abtrennen bzw.
ZULETZT anschließen. Andernfalls kann der
Pluspol durch ein Werkzeug am Fahrzeugrahmen
kurzgeschlossen werden.
1. Kabel von der Batterie abtrennen, Minuskabel zuerst
(A, Abbildung 7), anschließend Abdeckung und
Pluskabel (B).
2. Flügelmutter und Unterlegscheibe (D) lockern.
3. Niederhalter (C) nach oben und von der Batterie weg
schwenken. Am Lenkturm sichern.
4. Batterie (E) ausbauen.
5. Batteriefach mit einer Lösung aus Natriumbikarbonat
und Wasser reinigen.
6. Batteriepole und Kabelenden mit Drahtbürste und
Polklemmenreiniger reinigen, bis sie glänzen.
7. Batterie (E) wieder im Batteriefach einbauen.
Mit Niederhalter (C) und Flügelmutter und Unterlegscheibe (D) befestigen.
8. Batteriekabel wieder anbringen: erst Pluskabel und
Abdeckung (B), danach Minuskabel (A).
9. Kabelenden und Batteriepole mit Vaseline oder nicht
leitendem Schmiermittel überziehen.
17
Page 64

Not for
Reproduction
Fehlersuche,
Einstellungen und Wartung
Fehlersuche
Während eine normale Pflege und regelmäßige Wartung
die Benutzungsdauer des Traktors verlängern, wird es
durch fortgesetzte oder ständige Benutzung notwendig,
einen Service durchzuführen, auf Grund dessen die
Maschine wieder ordnungsgemäß eingesetzt werden kann.
In den nachstehenden Richtlinien zur Fehlerbehandlung
werden die üblichsten Probleme sowie Ursachen und
Abhilfen angeführt.
Um ernsthafte Verletzungen zu vermeiden, dürfen
Wartungsarbeiten am Traktor oder Mähwerk
nur dann durchgeführt werden, wenn der Motor
abgestellt und die Parkbremse eingekuppelt ist.
Immer den Zündschlüssel abziehen, das
Zündkabel abziehen und von der Zündkerze
entfernt befestigen, bevor mit Wartungsarbeiten
begonnen wird, damit ein versehentliches Starten
des Motors unmöglich ist.
ACHTUNG
Fehlersuche und-behebung bei der Zugmaschine
PROBLEM ÜBERPRÜFEN PROBLEMLÖSUNG
Bremspedal nicht durchgedrückt. Bremspedal vollständig durchdrücken.
Der Motor überträgt
oder startet nicht.
Antriebswellenkupplungsschalter
(elektrische Kupplung) steht in der
Position EIN.
Fahrkontrolle ist eingekuppelt. Bewegen Sie den Knopf in die Stellung NEUTRAL/AUS.
Kraftstoff ist alle. Lassen Sie den Motor abkühlen, wenn er heiß ist, und
Motor abgesoffen. Kuppeln Sie die Klingen aus.
Sicherung durchgebrannt. Suchen Sie einen autorisierten Händler auf.
Batterieanschlüsse müssen
gereinigt werden.
Batterien sind leer oder tot. Laden Sie die Batterie neu auf oder ersetzten Sie sie.
Kabel lose oder gebrochen. Sichtinspektion der Kabel durchführen. Falls die Kabel
Stellen Sie ihn auf die Position AUS.
dann füllen Sie den Kraftstofftank wieder auf.
Sieh hierzu im Abschnitt Reinigen der Batterie und
Kabel.
gebrochen oder ausgefranst sind, wenden Sie sich an
einen autorisierten Händler.
Zylinderspule oder
Startermotorschaden.
Sicherheitsverriegelungsschalter
defekt.
Wasser im Kraftstoff. Suchen Sie einen autorisierten Händler auf.
Kraftstoff ist alt oder abgestanden. Suchen Sie einen autorisierten Händler auf.
Der Motor startet
schwer oder läuft
schlecht.
Motor klopft.
Kraftstoffgemisch zu stark. Den Luftfilter reinigen.
Der Motor hat ein anderes
Problem.
Niedriger Ölstand. Überprüfen Sie das Öl/füllen Sie gegebenenfalls etwas
Es wurde Öl mit dem falschen Grad
verwendet.
Suchen Sie einen autorisierten Händler auf.
Suchen Sie einen autorisierten Händler auf.
Suchen Sie einen autorisierten Händler auf.
nach.
Siehe hierzu die Tabelle Empfehlungen zum Öl.
18
Page 65

Not for
Reproduction
Fehlersuche, Einstellungen und Wartung
Fehlersuche und-behebung bei der Zugmaschine (Fortsetzung)
PROBLEM ÜBERPRÜFEN PROBLEMLÖSUNG
Motor läuft zu heiß. Suchen Sie einen autorisierten Händler auf.
Zu hoher Ölverbrauch.
Motorauspuff ist
schwarz.
Motor läuft aber die
Zugmaschine fährt
nicht.
Parkbremse lässt sich
nicht feststellen.
Zugmaschine lenkt
schlecht oder
lässt sich nicht gut
handhaben.
Es wurde Öl mit dem falschen Grad
verwendet.
Zuviel Öl im Motorgehäuse. Lassen Sie überschüssiges Öl ab.
Den schmutzigen Luftfilter reinigen. Siehe hierzu im Abschnitt Wartung des Luftfilters.
Choke geschlossen. Den Choke öffnen.
Die Grundgeschwindigkeitspedale
sind nicht durchgedrückt.
Die Übertragungs-Lösehebel
stehen in der Position SCHIEBEN.
Mäher-Antriebsriemen ist gerissen. Suchen Sie einen autorisierten Händler auf.
Parkbremse ist eingerastet. Lösen Sie die Parkbremse.
Der Fahrantriebsriemen ist
gerissen oder rutscht.
Bremse abgenutzt. Suchen Sie einen autorisierten Händler auf.
Lenkstange ist locker. Suchen Sie einen autorisierten Händler auf.
Reifendruck stimmt nicht. Siehe hierzu im Abschnitt Überprüfen des
Achslager der Vorderräder sind
trocken.
Fehlersuche beim Mäher
Siehe hierzu die Tabelle Empfehlungen zum Öl.
Pedale durchdrücken.
Hebel in die Position FAHRE bringen.
Suchen Sie einen autorisierten Händler auf.
Reifendrucks.
Suchen Sie einen autorisierten Händler auf.
PROBLEM ÜBERPRÜFEN PROBLEMLÖSUNG
Mäher lässt sich nicht
anheben.
Der Schnitt ist
uneben.
Der Schnitt sieht grob
aus.
Motor stirbt leicht
ab wenn der Mäher
angestellt ist.
Übermäßige Vibration
des Mähers.
Notor läuft und
Zugmaschine fährt,
der Mäher fährt
jedoch nicht.
Hebegestänge ist nicht richtig
befestigt oder beschädigt.
Der Mäher ist nicht richtig nivelliert. Suchen Sie einen autorisierten Händler auf.
Die Reifen der Zugmaschine sind
nicht richtig aufgepumpt.
Motorgeschwindigkeit zu niedrig. Setzen Sie die Geschwindigkeit auf Vollgas.
Grundgeschwindigkeit zu schnell. Verlangsamen.
Der Mäher hat ein anderes Problem. Suchen Sie einen autorisierten Händler auf.
Motorgeschwindigkeit zu niedrig. Setzen Sie die Geschwindigkeit auf Vollgas.
Grundgeschwindigkeit zu schnell. Verlangsamen.
Schmutziger oder verstopfter Luftfilter.
Schnitthöhe ist zu niedrig eingestellt. Schneiden Sie hohes Gras während des ersten
Auswurfkanal verstopft. Geschnittenes Gras mit Ausstoß zeigt in Richtung
Motor hat keine Betriebstemperatur. Lassen Sie den Motor einige Minuten lang warm laufen.
Starten des Mähers in hohem Gras. Starten Sie den Mäher in einem bereinigten Bereich.
Der Mäher hat ein anderes Problem. Suchen Sie einen autorisierten Händler auf.
PTO nicht eingekuppelt. PTO einkuppeln.
Der Mäher hat ein anderes Problem. Suchen Sie einen autorisierten Händler auf.
Suchen Sie einen autorisierten Händler auf.
Siehe hierzu im Abschnitt Überprüfen des
Reifendrucks.
Siehe hierzu im Abschnitt Wartung des Luftfilters.
Schnitts bei maximaler Schnitthöhe.
des vorher geschnittenen Bereiches.
19
Page 66

Not for
Reproduction
Fehlersuche, Einstellungen und Wartung
Sitzeinstellung
Der Sitz lässt sich nach vorne und hinten verstellen. Den
Hebel (A, Abbildung 8) betätigen, den Sitz wunschgemäß
einstellen und den Hebel loslassen, um den Sitz in seiner
Stellung zu arretieren.
A
Abbildung 8. Sitzeinstellung
Mähwerkseinstellungen
Führungsräder
Die Mähwerkführungsräder können je nach Schnitthöhe
in zwei Stellungen gebracht werden. Bei höheren
Schnitteinstellungen die Räder in die untere Stellung
bringen. Bei niedrigeren Schnitteinstellungen die Räder
in die obere Stellung bringen. Die Führungsräder dürfen
beim Mähen nicht konstant auf dem Boden aufliegen.
Einstellen:
1. Sicherungsmutter (B, Abbildung 9), Führungsrad (C),
Unterlegscheiben (D) Ansatzschraube (E) ausbauen.
Das Führungsrad auf die gewünschte Höhe einstellen.
2. Ansatzschraube (E) durch Unterlegscheiben (D),
Führungsrad (C) und Führungsradhalterung (A)
einsetzen. Mit Sicherungsmutter (B) befestigen.
Schritte 1 und 2 für alle Führungsräder wiederholen.
A
Batterieladung
ACHTUNG
Offene Flammen und Funken von der Batterie
fern halten. Die der Batterie entweichenden Gase
sind hoch explosiv. Die Batterie während des
Aufladens gut lüften.
Eine leere Batterie oder eine Batterie, die zu schwach ist
um den Motor zu starten, kann für Fehler im Ladesystem
oder in anderen elektrischen Bauteilen verantwortlich
sein. Sollten Zweifel an der Ursache des Problems
bestehen, den Händler verständigen. Falls die Batterie
ersetzt werden muss, die Schritte unter Batterie und
Kabel reinigen.
Zum Laden der Batterie die Anleitungen befolgen, die
vom Hersteller des Ladegeräts bereit gestellt werden;
außerdem alle Warnhinweise im Abschnitt mit den
Sicherheitsvorschriften dieses Handbuchs beachten. Die
Batterie vollständig aufladen. Keine Ladestromstärke von
mehr als 10 A verwenden.
D
E
Abbildung 9. Führungsradeinstellung bei fest
montierter Halterung
B
C
20
Page 67

Not for
Reproduction
Section Title
Technische Daten
On Two Lines
MOTOR:
Briggs & Stratton
Hersteller Briggs & Stratton®
Modell Intek, 4195 Series
Hubraum 500 cc (40,0 Kubikzoll)
Elektrik Generator: 9 A
Batterie: 12 V, 195 A Kaltstart
Ölfassungsvermögen 1,4 L (48 Unzen)
GETRIEBE:
K46
Typ Tuff Torq K46 (Hydro)
Hydraulikflüssigkeit 10W30-Super-Motoröl
Geschwindigkeiten Vorwärts: 0 - 8,9 km/h (0-5,5 MPH)
bei 3400 U/min Rückwärts: 0 - 4,8 km/h (0-3,0 MPH)
Ständige DrehmomentAusgangsleistung
230,5 Nm (170 Fuß / Pfunde)
ABMESSUNGEN:
FAHRGESTELL:
KraftstofftankFassungsvermögen
Hinterräder Reifengröße: 22 x 8,0-8
Reifendruck: 0,68 bar (10 psi)
Vorderräder Reifengröße: 15 x 6,0 6
Reifendruck: 0,82-,0,96 bar (12-14 psi)
Angegebene Motorleistung
Die Bruttonennleistung für die einzelnen Modelle mit gasbetriebenem Motor wird in Übereinstimmung mit SAE (Society
of Automotive Engineers) -Code J1940 (Small Engine Power & Torque Rating Procedure) angegeben und gemäß
SAE J1995 bewertet. Die Drehmomentwerte wurden für die Motoren, die auf dem Etikett mit „rpm“ versehen sind, bei
2600 U/min und für alle anderen bei 3600 U/min ermittelt, die PS-Werte bei 3600 u/min. Die Leistungskennlinien sind
unter www.BRIGGSandSTRATTON.COM dargestellt. Die Nettoleistungswerte wurden mit montiertem Auspu und
Luftreiniger gemessen, während die Bruttoleistungswerte ohne diese Anbauten ermittelt wurden. Die tatsächliche
Bruttomotorleistung ist höher als die Nutzleistung des Motors und wird u.a. durch die Betriebsbedingungen und
Abweichungen von Motor zu Motor bestimmt. In Anbetracht der breiten Vielfalt an Produkten, in die Motoren eingebaut
werden, kann es sein, dass der Motor nicht die bewertete Bruttoleistung entwickelt, wenn er in einem bestimmten
motorgetriebenen Gerät verwendet wird. Dieser Unterschied lässt sich auf eine Vielfalt von Faktoren zurückführen,
einschließlich u.a. Vielfalt der Motorkomponenten (Luftreiniger, Auspu, Ladung, Kühlung, Vergaser, Kraftstopumpe
etc.), Einschränkungen bezüglich der Anwendung, Betriebsbedingungen (Temperatur, Luftfeuchtigkeit, Einsatzhöhe)
und Abweichungen von Motor zu Motor. Aufgrund von Herstellungs- und Kapazitätsengpässen kann Briggs & Stratton
diesen Motor mit einem Motor höherer Nennleistung ersetzen.
Fassungsvermögen: 13,2 L (3,5 Gallonen)
Gesamtlänge 180 cm (70.9”)
Gesamtbreite 122 cm (48”)
Höhe 114 cm (44.9”)
Ersatzteile und Zubehör
Für nähere Informationen kontaktieren Sie einen autorisierten händler.
21
Page 68

Not for
Reproduction
GARANTIEBESTIMMUNGEN FÜR PRODUKTE VON BRIGGS & STRATTON April 2012
EINGESCHRÄNKTE GARANTIE
Briggs & Stratton garantiert, dass es während des nachstehend angegebenen Garantiezeitraums, sämtliche Teile des Produkts, die Material- oder
Verarbeitungsmängel oder beides aufweisen, kostenlos repariert oder ersetzt. Die Transportkosten für das zur Reparatur oder zum Austausch
eingesandte Produkt unter dieser Garantie müssen vom Käufer getragen werden. Diese Garantie ist für die Zeiträume und unter den unten
genannten Bedingungen wirksam. Für Garantieleistungen finden Sie mit Hilfe unserer Händlerkarte auf snapper-europe.com den nächstgelegenen
Vertragshändler. Der Käufer muss sich mit dem Vertragshändler in Verbindung setzen und anschließend dem Vertragshändler das Produkt zur
Inspektion und Überprüfung zur Verfügung stellen.
Es besteht keine andere ausdrückliche Garantie. Implizite Garantien, einschließlich der der allgemeinen Gebrauchstauglichkeit oder
Eignung für einen bestimmten Zweck, sind auf ein Jahr ab dem Kaufdatum oder auf den gesetzlich zugelassenen Umfang beschränkt.
Sämtliche anderen impliziten Garantien sind ausgeschlossen. Die Haftbarkeit für Folge- oder Begleitschäden ist soweit ausgeschlossen,
wie gesetzlich zulässig. In einigen Staaten ist die Dauer der implizierten Garantie bzw. die Beschränkung von Folge- oder Begleitschäden nicht
zuässig, daher könnte die oben genannte Beschränkung oder Ausnahme eventuell nicht auf Sie zutreffen. Durch diese Garantie erhalten Sie spezielle
Rechte, und von einem Staat zum anderen können Sie außerdem andere, von Land zu Land variierende Rechte haben.**
GARANTIEZEITRAUM
Element Verbraucher-Nutzung Kommerzielle Nutzung
Gerät 2 Jahre 90 Tage
Motor* 2 Jahre 90 Tage
Batterie (falls vorhanden) 1 Jahr 1 Jahr
* Gilt nur für Motoren von Briggs & Stratton. Die Garantieabdeckung für Motoren, die nicht von Briggs & Stratton stammen, wird durch den betreffenden
Motorhersteller festgelegt. Bauteile, die Emissionen ausstoßen, werden durch die Garantieerklärung zu Emissionen abgedeckt.
** In Australien - Unsere Waren werden mit Garantien ausgeliefert, die nicht vom australischen Verbrauchergesetz ausgeschlossen werden können.
Sie haben ein Recht auf einen Ersatz oder eine Erstattung bei einem größeren Defekt und auf eine Entschädigung für jegliche weitere entsprechend
vorhersehbaren Verlust oder Schaden. Sie haben darüber hinaus ein Anrecht auf eine Reparatur oder einen Ersatz der Waren, wenn die Waren keine
akzeptable Qualität aufweisen, und der Defekt nicht zu einem größeren Defekt führt. Für Garantieleistungen finden Sie mit Hilfe unserer Händlersuchkarte
unter www.BRIGGSandSTRATTON.com den nächstgelegenen Vertragshändler. Sie können sich jedoch auch telefonisch unter 1300 274 447, per E-Mail
unter salesenquires@briggsandstratton.com.au oder schriftlich an Briggs & Stratton Australia Pty Ltd, 1 Moorebank Avenue, NSW, Australien, 2170 nach
dem nächstgelegenen Vertragshändler erkundigen.
Der Garantiezeitraum beginnt am Kaufdatum des ersten Einzelhandelskunden oder kommerziellen Endbenutzers und erstreckt sich über den
in der obigen Tabelle genannten Zeitraum. „Endverbraucher-Nutzung“ bedeutet die private Verwendung im eigenen Haushalt durch einen
Einzelhandelskunden. „Kommerzielle Nutzung“ bezieht sich auf alle anderen Verwendungen, einschließlich die Verwendung für kommerzielle,
Einkommen erzeugende oder Vermietungszwecke. Wenn das Produkt einmal kommerziell genutzt wurde, wird es danach für die Zwecke dieser Garantie
als kommerziell genutztes Produkt betrachtet.
Für die Gültigkeit der Garantie für Briggs & Stratton Produkte ist keine Garantieregistrierung erforderlich. Bewahren Sie einfach Ihren
Kaufbeleg auf. Wenn Sie zu dem Zeitpunkt, an dem die Garantieleistung gefordert wird, keinen Beleg für das Datum des Erstkaufs vorlegen
können, wird zur Bestimmung des Garantiezeitraums das Herstellungsdatum des Produkts verwendet.
ÜBER IHRE GARANTIE
Wir führen gern Reparaturen im Rahmen der Garantie aus und entschuldigen uns für die Ihnen entstandenen Unannehmlichkeiten. Garantieleistungen
sind nur durch Snapper-Vertragshändler durchzuführen. Die meisten Garantiereparaturen werden routinemäßig gehandhabt, manchmal sind jedoch
Anträge auf Reparaturen im Rahmen der Garantie unangemessen. Diese Garantie erstreckt sich ausschließlich auf Material- und Verarbeitungsmängel.
Sie deckt keine durch unsachgemäße Verwendung oder Missbrauch des Gerätes, unsachgemäße Wartung oder Reparatur, normale Abnutzung und
Verschleiß oder alten oder nicht zugelassenen Kraftstoff entstandenen Schäden ab.
Unsachgemäße Verwendung und Missbrauch - Der ordnungsgemäße beabsichtigte Verwendungszweck dieses Produkts ist in der
Bedienungsanleitung beschrieben. Die Verwendung des Produkts auf eine Weise, die in der Bedienungsanleitung nicht beschrieben ist, oder die
Verwendung des Produkts nach Beschädigung löscht Ihre Garantie aus. Eine Garantieleistung ist ausgeschlossen, wenn die Seriennummer des Produkts
entfernt oder das Produkt auf irgendeine Weise verändert oder modifiziert wurde oder wenn das Produkt nachweislich unsachgemäß verwendet wurde, z.
B. Schäden durch äußere Einwirkung oder Korrosionsschäden durch Wasser bzw. Chemikalien aufweist.
Unsachgemäße Wartung oder Reparatur - Dieses Produkt muss gemäß den in der Bedienungsanleitung angegebenen Verfahren und Terminen
gewartet und unter Verwendung von Originalersatzteilen von Briggs & Stratton repariert werden. Durch fehlende Wartung oder die Verwendung von
Nicht-Original-Ersatzteilen verursachte Schäden sind durch die Garantie nicht abgedeckt.
Normale Abnutzung - Wie alle mechanischen Geräte unterliegt Ihre Einheit der normalen Abnutzung, selbst wenn sie ordnungsgemäß gewartet wird.
Diese Garantie deckt keine Reparaturen ab, wenn Teile oder das gesamte Gerät durch den normalen Gebrauch verschlissen sind. Wartungs- und
Verschleißteile, wie Filter, Riemen, Messer und Bremsbeläge (außer Motorbremsbelägen), sind allein auf Grund ihrer Verschleißeigenschaften nicht durch
die Garantie abgedeckt, es sei denn die Schadensursache ist auf Material- oder Verarbeitungsmängel zurückzuführen.
Alter Kraftstoff - Für eine ordnungsgemäße Funktion benötigt dieses Produkt frischen Kraftstoff, der den in der Bedienungsanleitung beschriebenen
Kriterien entspricht. Durch abgestandenen Kraftstoff verursachte Schäden (Undichtigkeiten im Vergaser, verstopfte Kraftstoffschläuche, festgefahrene
Ventile etc.) sind nicht durch die Garantie abgedeckt.
Weitere Ausschlüsse - Schäden, die durch Unfälle, Missbrauch, Umbauten, Änderungen, eine unsachgemäße Wartung, durch Einfrieren oder eine
Zustandsverschlechterung durch Chemikalien verursacht wurden, sind nicht abgedeckt. Anbaugeräte oder Zubehörteile, die nicht originalverpackt mit
dem Produkt geliefert wurden, sind ebenfalls von der Garantie ausgeschlossen. Es besteht kein Garantieanspruch bei Geräten, die für Primärstromquellen
anstatt einer Nutzstromquelle genutzt werden, oder bei Geräten, die in lebenserhaltenden Anwendungen eingesetzt werden. Diese Garantie schließt
Schäden aus, die auf höhere Gewalt zurückzuführen sind und sich der Kontrolle durch den Hersteller entziehen.
1737660D_DE Rev C
22
Page 69

Not for
Reproduction
Indice
Regole sulla sicurezza e informazioni ............. 2
Numeri di identificazione ................................... 7
Decalcomanie di sicurezza ............................... 8
Icone di sicurezza .............................................. 9
Funzioni e controlli .......................................... 10
Funzioni di controllo ..............................................10
Freno di stazionamento .........................................12
Controllo crociera ..................................................12
Contaore ...............................................................12
Funzionamento del trattore ............................. 13
Sistema di interbloccaggio di sicurezza .................13
Sicurezza operativa generale ................................13
Aggiunta di carburante ..........................................13
Avvio del motore....................................................13
Arresto del trattore e motore ..................................14
Guida del trattore ...................................................14
Taglio dell’erba ......................................................14
Taglio dell’erba in retromarcia ...............................14
Funzionamento accessori in retromarcia ...............14
Spinta del trattore a mano .....................................14
Regolazione dell’altezza di taglio del tagliaerba ....15
Attacco di un rimorchio ..........................................15
Rimessaggio .........................................................15
Manutenzione regolare .................................... 16
Programma di manutenzione ................................16
Controllo della pressione dei pneumatici ...............16
Controllare le lame fermare il tempo ......................17
Manutenzione della batteria ..................................17
Individuazione dei problemi, regolazione
e manutenzione ................................................ 18
Risoluzione dei problemi del trattore .....................18
Risoluzione dei problemi del tagliaerba .................19
Regolazione del sedile ..........................................20
Carica della batteria ..............................................20
Regolazioni del taglierba .......................................20
Specifiche ......................................................... 21
Garanzia ............................................................ 22
1
Page 70

Not for
Reproduction
Regole sulla sicurezza e informazioni
Funzionamento sicuro
Congratulazioni per l’acquisto di un attrezzo da giardino di qualità
superiore. I nostri prodotti sono concepiti e fabbricati per soddisfare
e superare tutti gli standard di sicurezza del settore.
Gli attrezzi elettrici sono sicuri solo se usati in modo adeguato
dall’operatore. Se utilizzati male o qualora vengano a mancare
gli interventi di manutenzione previsti, possono essere pericolosi!
Ricordare che gli operatori sono sempre responsabili della propria
incolumità e di quella degli astanti.
Adottare buon senso e pensare sempre bene a quello che occorre
fare. Qualora vi siano dubbi su un’operazione da compiere con
l’attrezzo selezionato, rivolgersi ad un professionista del mestiere e
contattare il proprio concessionario autorizzato di zona.
Leggere il manuale
Il manuale dell’operatore contiene importanti informazioni sulla sicurezza di cui occorre
essere a conoscenza PRIMA di azionare l’unità e DURANTE il
funzionamento.
Sono incluse tecniche di funzionamento sicure, una spiegazione
delle funzioni e dei comandi del prodotto ed informazioni sulla
manutenzione per garantire la massima soddisfazione con
l’investimento fatto.
Accertarsi di leggere completamente le regole e le informazioni
sulla sicurezza contenute nelle pagine che seguono. Leggere inoltre
l’intera sezione sul funzionamento.
Bambini
In presenza di bambini possono verificarsi incidenti
tragici. Tenere i bambini a debita distanza dall’area di
funzionamento. I bambini sono spesso attratti verso l’unità e
le attività di giardinaggio. Non presumere mai che i bambini
restino dove gli si chiede di stare. Qualora vi sia il rischio
che bambini si avvicinino all’area in cui si taglia l’erba,
chiedere ad un altro adulto di sorvegliarli.
EVITARE DI FAR SALIRE I BAMBINI SULL’UNITÀ! Questo
li incoraggia ad avvicinarsi in futuro all’unità accesa,
con grave pericolo di ferirsi. Essi potrebbero decidere di
avvicinarsi all’unità improvvisamente, correndo il rischio di
essere schiacciati.
Retromarcia
Non procedere in retromarcia a meno
che non sia assolutamente necessario.
Guardare sempre in
basso ed all’indietro
prima e durante
l’attivazione della
retromarcia, anche con
le lame del tagliaerba
disinserite.
2
Page 71

Not for
Reproduction
Regole sulla sicurezza e informazioni
Funzionamento su pendii
L’utilizzo di questa unità in zone troppo inclinate potrebbe causare gravi
danni o persino morte. L’utilizzo di un’unità su un pendio troppo inclinato,
o in mancanza di trazione adeguata può causare la perdita del controllo
o il ribaltamento dell’unità.
Come regola generale non procedere su un pendio in cui non si possa
tornare indietro (in modalità a 2 ruote matrici). Non azionare l’unità su
pendii con un’inclinazione superiore a 1 metro su una lunghezza di 6
metri. Su un pendio procedere sempre su e giù, mai in trasversale.
Notare inoltre che la superficie percorsa può incidere notevolmente
sulla stabilità e sul controllo dell’unità. Erba bagnata o ghiaccio possono
compromettere gravemente la capacità di controllare l’unità.
In caso di dubbi sul funzionamento dell’unità su un pendio, fermarsi. Non
vale la pena rischiare.
Parti in movimento
Questa unità include parti mobili che possono causare lesioni all’operatore o
agli astanti. Tuttavia, stando seduti in modo corretto ed attenendosi alle regole
contenute in questo manuale, l’unità è sicura.
La base del tagliaerba dispone di lame per tagliaerba girevoli che potrebbero
amputare mani e piedi. Evitare la presenza di astanti in prossimità dell’unità in
funzione!
Questa unità è dotata di un sistema di presenza operatore. NON tentare di alterare
o ignorare questo sistema. Qualora l’unità non superi tutte le prove del sistema
di interbloccaggio di sicurezza contenute in questo manuale, rivolgersi subito al
proprio concessionario.
Questa unità è dotata di lame per tagliaerba girevoli in grado di raccogliere e
lanciare detriti, con gravi lesioni agli astanti. Accertarsi di pulire l’area in cui
tagliare l’erba PRIMA di cominciare.
Non azionare questa unità senza aver dapprima montato il raccoglitore
dell’erba o il deflettore.
Durante l’azionamento dell’unità, tenere tutti a debita distanza! Se qualcuno si
avvicina all’area in questione, spegnere immediatamente l’unità.
Carburante e manutenzione
La benzina è estremamente infiammabile. I suoi vapori sono estremamente
infiammabili e possono raggiungere facilmente fonti di accensione distanti.
Usare la benzina solo come carburante, non come solvente o detergente.
Non conservarla mai in luoghi in cui i suoi vapori potrebbero accumularsi o
raggiungere fonti di accensione quali una luce pilota. Il carburante va tenuto
in un contenitore approvato in plastica con guarnizione, oppure nel serbatoio
del trattore con il tappo ben chiuso. Pulire subito eventuali fuoriuscite di
carburante.
La sicurezza e le prestazioni adeguate dell’unità dipendono da interventi di
manutenzione regolari. Eseguire le procedure di manutenzione elencate in
questo manuale, in particolare le prove periodiche del sistema di sicurezza.
Oggetti lanciati
3
Page 72

Not for
Reproduction
Regole sulla sicurezza e informazioni
Leggere queste norme di sicurezza e seguirle scrupolosamente. Il mancato rispetto di queste indicazioni potrebbe
provocare la perdita di controllo dell’unità con conseguenti ferite o addirittura la morte per l’utilizzatore o eventuali
astanti, o danni ai beni materiali o all’equipaggiamento. Questo piatto di taglio può amputare mani o piedi e
scagliare oggetti. Il triangolo inserito nel testo indica importanti avvertenze o precauzioni di sicurezza a cui ci si
deve attenere.
INFORMAZIONI GENERALI SUL
FUNZIONAMENTO
1. Prima di avviare il trattorino, leggere, comprendere e
osservare tutte le istruzioni contenute in questo manuale.
2. Non tenere le mani o piedi in prossimità degli organi in
rotazione o sotto la macchina. Mantenersi sempre a distanza
dal bocchettone di scarico.
3. L’unità deve essere adoperata solo da persone adulte a
conoscenza delle istruzioni (le leggi locali possono porre un
limite all’età dell’operatore).
4. Eliminare dall’area di lavoro oggetti quali sassi, giocattoli,
fili di ferro, ecc., che potrebbero essere raccolti e scagliati
violentemente dalle lame.
5. Prima di eseguire il taglio, accertarsi che nell’area di lavoro
non si trovino altre persone. Se qualcuno entra nell’area di
lavoro, arrestare immediatamente la macchina.
6. Non trasportare passeggeri.
7. Non procedere a marcia indietro a meno che non sia
assolutamente necessario. Guardare sempre verso il basso e
dietro prima e durante la retromarcia.
8. Non scaricare verso le persone. Evitare di scaricare verso
un muro o una barriera. Il materiale potrebbe rimbalzare e
colpire l’operatore. Durante la marcia sulla ghiaia fermare la/
le fresa/e.
9. Non utilizzare la macchina senza il collettore, la paratia di
scarico (deflettore) o altri dispositivi di sicurezza.
10. Prima di eseguire una curva, rallentare.
11. Non lasciare mai il trattorino incustodito. Prima di lasciare
la macchina, arrestare sempre la presa di forza, innestare
il freno a mano, spegnere il motore e togliere la chiave dal
quadro.
12. Quando non si sta tagliando l’erba, disinnestare le lame
(presa di forza). Prima di pulire la macchina, di rimuovere
il collettore o pulire la paratia di scarico fermare il motore e
attendere che tutti gli organi di movimento si siano fermati
completamente.
13. Utilizzare la macchina solo di giorno o in condizioni di buona
illuminazione.
14. Non usare la macchina se in stato di ebbrezza o sotto l’effetto
di stupefacenti.
15. Durante la marcia in prossimità di strade o in
attraversamento, fare attenzione al traffico.
16. Prestare molta attenzione durante il caricamento o lo
scaricamento dell’unità da un carrello o da un rimorchio.
17. Durante l’uso utilizzare sempre una mascherina di protezione
per gli occhi.
18. Le statistiche indicano che gli operatori sessantenni o di età
superiore vengono coinvolti in una grossa percentuale di
incidenti e riportano ferite dovute alle operazioni di taglio.
Questi operatori dovrebbero valutare attentamente la propria
capacità di condurre il trattorino in modo da proteggere se
stessi e altre persone da eventuali incidenti.
19. Per quanto riguarda i pesi e contrappesi delle ruote si
raccomanda di attenersi alle istruzioni fornite dal produttore.
20. Ricordare che l’operatore è l’unico responsabile per gli
incidenti causati a persone o cose.
21. Tutti gli operatori dovrebbero cercare di ottenere istruzioni di
carattere pratico e professionale.
22. Indossare sempre scarpe e pantaloni resistenti. Non operare
l’unità a piedi scalzi o con i sandali.
23. Prima di utilizzare l’unità, controllare sempre visivamente che
le lame e la minuteria della lama del piatto siano presenti,
intatte e salde. Sostituire i pezzi usurati o danneggiati.
24. Scollegare gli accessori prima di: eseguire il rifornimento di
carburante, rimuovere un accessorio, eseguire le regolazioni
(a meno che la regolazione non possa essere eseguita dalla
posizione dell’operatore).
25. Quando la macchina viene parcheggiata, immagazzinata
oppure lasciata incustodita, abbassare il dispositivo di taglio a
meno che non venga utilizzato un blocco meccanico positivo.
26. Prima di lasciare il posto di guida per qualunque motivo,
disinnestare la presa di forza, innestare il freno a mano,
spegnere il motore e togliere la chiave.
27. Per ridurre il pericolo di incendi, fare in modo che sull’unità
non siano presenti erba, foglie e olio in eccesso. Non
fermarsi o parcheggiare su foglie o erba secca, o su materiali
infiammabili.
TRASPORTO ED IMMAGAZZINAMENTO
1. Quando l’unità viene trasportata su un rimorchio aperto,
accertarsi che la parte anteriore del trattorino sia rivolta nella
direzione di avanzamento. Se la parte anteriore del trattorino
è rivolta nella posizione opposta, eventuali raffiche di vento
potrebbero danneggiare il cofano.
2. Quando viene effettuato il rifornimento di carburante dopo il
trasporto o l’immagazzinamento, rispettare sempre le norme
di sicurezza adeguate.
3. Non immagazzinare mai l’unità (con carburante) in un
ambiente chiuso e scarsamente arieggiato. I vapori
di carburante potrebbero raggiungere una sorgente
infiammabile (quale una caldaia, uno scaldaacqua ecc.) e
causare un’esplosione. Inoltre i vapori di carburante sono
tossici alle persone e agli animali.
4. Prima di immagazzinare l’unità per periodi brevi o lunghi,
attenersi sempre alle istruzioni relative alle procedure di
preparazione e contenute nel manuale del motore.
5. Quando l’unità viene rimessa in esercizio, attenersi sempre
alle istruzioni concernenti le procedure corrette di avviamento
dell’unità contenute nel manuale del motore.
6. Non immagazzinare mai il trattorino o il serbatoio della
benzina in luoghi in cui sono presenti fiamme aperte o una
fiamma pilota quale, ad esempio, uno scaldacqua. Fare
raffreddare l’unità prima di immagazzinarla.
4
Page 73

Not for
Reproduction
Regole sulla sicurezza e informazioni
AZIONAMENTO SU PENDENZE
Le pendenze del terreno sono la causa più frequente di eventuali
ribaltamenti o delle perdite di controllo che possono a loro volta
provocare lesioni gravi o mortali. Su tutte le pendenze, è necessario
procedere con estrema cautela. Se non è possibile retrocedere o se
non ci si sente sicuri su una pendenza, non azionare l’unità.
Il controllo della guida in caso di slittamento dell’unità su pendenze
non verrà ripristinato applicando il freno. Le cause principali
correlate alla perdita di controllo sono: aderenza insufficiente dei
pneumatici al terreno, guida eccessivamente veloce, frenaggio
inadeguato, tipo di macchina inadatto alle operazioni, condizioni del
terreno non idonee alla rasatura, attacchi e distribuzione del carico
incorretti.
1. Non procedere mai in diagonale lungo i tratti in salita/discesa.
2. Fare attenzione a buche, solchi o salti. Marciando su terreni
sconnessi si corre il rischio di rovesciare la macchina. L’erba
alta può nascondere gli ostacoli.
3. Selezionare un rapporto basso in modo da non dover fermare
o cambiare marcia in salita/discesa.
4. Non lavorare sull’erba bagnata. I pneumatici possono
perdere aderenza.
5. Tenere sempre la marcia inserita, specialmente nei tratti in
discesa. Non mettere la marcia in folle nei tratti in discesa.
6. Evitare di partire, fermarsi e svoltare sui tratti in pendenza.
Se i pneumatici perdono aderenza, disinnestare la/le fresa/e
e procedere lentamente in senso rettilineo lungo il tratto in
pendenza.
7. Durante la marcia in salita/discesa tutti i movimenti devono
essere lenti e graduali. Non fare movimenti bruschi,
cambiando direzione o velocità all’improvviso, poiché la
macchina potrebbe rovesciarsi.
8. Usare estrema cautela durante l’uso della macchina con
collettori o altri accessori montati, poiché la macchina può
risultare meno stabile.
9. Non cercare di stabilizzare la macchina mettendo il piede a
terra.
10. Non tagliare l’erba in prossimità di scarpate, fossi o argini. In
caso di cedimento del terreno, o se una delle ruote dovesse
cadere oltre il bordo di una scarpata o fosso, la macchina
potrebbe rovesciarsi.
11. Non utilizzare i collettori su tratti molto ripidi.
12. Non lavorare lungo tratti in discesa che non si è in grado di
ripercorrere in salita.
13. Consultare il rivenditore autorizzato più vicino per chiedere
consigli sui pesi o contrappesi da applicare alle ruote per
migliorare la stabilità del veicolo.
14. Rimuovere gli eventuali ostacoli, come pietre, rami, ecc.
15. Procedere a bassa velocità. In salita e discesa i pneumatici
possono perdere aderenza, anche se i freni funzionano
correttamente.
16. A meno che non sia strettamente necessario, evitare di
svoltare lungo i tratti in pendenza. Per cambiare direzione
girare lentamente e gradualmente, se possibile verso il
basso.
ACCESSORI PER IL TRAINO
1. Per il traino utilizzare esclusivamente una macchina munita
di gancio apposito. Non attaccare l’attrezzatura da trainare in
punti diversi dal gancio di traino.
2. Per quanto riguarda i limiti di peso per l’attrezzatura trainata e
il traino in salita/discesa, seguire le indicazioni del produttore.
3. Non trasportare bambini o altre persone sopra o dentro le
attrezzature trasportate.
4. In salita/discesa, il peso delle attrezzature trasportate può
determinare una perdita di aderenza con conseguente
perdita del controllo.
5. Avanzare lentamente e tenere conto della distanza in più
prima di fermarsi.
6. Non mettere la marcia in folle nei tratti in discesa.
AVVERTENZA
Non lavorare mai su pendenze superiori al 17,6% (10 gradi),
percentuale che corrisponde ad una pendenza pari ad
un’altezza di 106 cm verticalmente e 607 cm orizzontalmente.
Nell’utilizzare la macchina su pendenze, utilizzare pesi
aggiuntivi sulle ruote o contrappesi. Rivolgersi al rivenditore
per determinare quali pesi sono disponibili ed appropriati per
l’unità.
Selezionare una bassa velocità prima di guidare su un pendio.
Oltre ai pesi anteriori e posteriori, esercitare estrema cautela
quando si utilizza la macchina su pendii con il sistema di
raccolta montato posteriormente.
Tagliare l’erba spostandosi verso l’ALTO o verso il BASSO,
mai perpendicolarmente. Esercitare estrema cautela quando si
cambia direzione. NON FERMARSI O RIPARTIRE SU PENDII.
BAMBINI
Se l’operatore non si accorge dell’eventuale presenza di bambini,
potrebbero verificarsi incidenti gravi. I bambini vengono spesso
attratti dall’unità e dalle operazioni di taglio. Non dare mai per
scontato che i bambini restino fermi in un solo posto.
1. Mantenere i bambini lontano dall’area di taglio ed affidarli alle
cure di un adulto.
2. Prestare attenzione a non fare entrare i bambini nell’area di
lavoro e, se ciò si verifica, spegnere il piatto di taglio.
3. Prima e durante la retromarcia, accertarsi dell’eventuale
presenza di bambini. Durante la retromarcia, guardare
sempre in basso e indietro.
4. Non trasportare ma i bambini, anche con la/le fresa/e
disinserita, poiché potrebbero cadere dal trattorino rimanere
feriti gravemente o compromettere la sicurezza operativa
durante l’uso della macchina. I bambini trasportati in
precedenza potrebbero comparire improvvisamente nell’area
di lavoro per chiedere un altro passaggio, rischiando di
essere investiti o sbattuti a terra dalla macchina.
5. Non lasciare mai che i bambini mettano in funzione l’unità.
6. Prestare particolare attenzione quando ci si avvicina ad
angoli stretti, arbusti, alberi o altri oggetti che potrebbero
ostacolare la visuale.
EMISSIONI
1. Gli scarichi emanati dal motore di questo prodotto
contengono prodotti chimici di cui è noto che, in determinate
quantità, possono provocare tumori, difetti congeniti o altri
danni all’apparato riproduttivo.
2. Verificare le informazioni sul periodo di validità delle
emissioni e dell’indice dell’aria sull’etichetta delle emissioni
del motore.
SISTEMA DI ACCENSIONE
1. Questo sistema di accensione a candela è conforme alle
norme canadesi ICES-002.
5
Page 74

Not for
Reproduction
Regole sulla sicurezza e informazioni
MANUTENZIONE E REGOLAZIONI
Uso sicuro del carburante
1. Spegnere tutte le sigarette, sigari, pipe o altre fonti di calore
che potrebbero provocare la combustione.
2. Utilizzare esclusivamente contenitori per carburante
omologati.
3. Non rimuovere il tappo del serbatoio e fare rifornimento con
il motore acceso. Prima di fare il pieno lasciare raffreddare il
motore.
4. Non fare il pieno in ambienti chiusi.
5. Non riporre la macchina o contenitore del carburante in spazi
chiusi in presenza di fiamme libere o fiamme pilota, ad es. in
prossimità di un boiler o altro elettrodomestico.
6. Non riporre i contenitori all’interno di veicoli o sul pianale di
un autocarro con rivestimento in plastica. Per fare il pieno
i contenitori di carburante vanno sempre depositati a terra
lontano dal veicolo.
7. Togliere i macchinari a gas dall’autocarro o rimorchio e fare il
pieno da terra. Qualora ciò non sia possibile, fare il pieno su
un rimorchio servendosi di un contenitore portatile, piuttosto
che usare direttamente la pompa di benzina.
8. Mantenere il bocchettone della pompa di benzina a contatto
con il bordo del serbatoio del carburante o dell’apertura del
contenitore fino a quando l’operazione di riempimento non
sarà ultimata. Non utilizzare un dispositivo di bloccaggio
bocchettone in posizione aperta.
9. Se si dovesse versare del carburante su un indumento,
cambiarsi immediatamente d’abito.
10. Non riempire eccessivamente il serbatoio. Richiudere il
coperchio del serbatoio e stringere bene.
11. Si raccomanda di usare estrema cautela nel maneggiare la
benzina e altri carburanti. Tali sostanze sono infiammabili, e i
vapori esplosivi.
12. Se si verifica una fuoriuscita di carburante, non cercare di
avviare il motore, ma allontanare la macchina dalla zona
interessata ed evitare di provocare combustioni fino a quando
i vapori di carburante non si saranno dispersi.
13. Chiudere con cura tutti i tappi del serbatoio e dei contenitori
del carburante.
Manutenzione ordinaria e straordinaria
1. Non azionare la macchina in ambienti chiusi in cui potrebbero
accumularsi fumi di monossido di carbonio.
2. Conservare dadi e bulloni, specialmente i bulloni di fissaggio
fresa, stringere e mantenere le attrezzature in buone
condizioni.
3. Non manomettere i dispositivi di sicurezza. Controllare
regolarmente che funzionino correttamente. In caso contrario,
eseguire le necessarie riparazioni.
4. Mantenere pulita la macchina, eliminando i residui di erba,
foglie e altri detriti. Pulire le macchie di olio o carburante.
5. n caso di urti contro oggetti, fermarsi ed ispezionare la
macchina. Se necessario, effettuare le riparazioni del caso
prima di ripartire.
6. Non effettuare interventi di registrazione o riparazione con il
motore in moto, salvo diversamente specificato nel manuale
fornito dalla casa costruttrice del motore.
7. I componenti del sistema di raccolta sono soggetti a
consumo, danni e deterioramento che potrebbero esporre
pezzi in movimento o raccogliere e scagliare corpi estranei.
Controllare frequentemente i componenti e, eventualmente,
sostituirli con i pezzi di ricambio consigliati dal produttore.
8. Le lame di taglio sono affilate e taglienti. Ricoprire le lame o
indossare guanti e prestare particolare attenzione durante le
operazioni di manutenzione.
10. Conservare con cura e, se necessario, sostituire le etichette
con le norme di sicurezza e le istruzioni per l’uso.
11. Non rimuovere il filtro del carburante con il motore caldo,
poiché, qualora venga versata, la benzina potrebbe prendere
fuoco. Non allungare i ganci del tubo del carburante più del
necessario. In seguito all’installazione, verificare che i ganci
si aggancino saldamente sui tubi sopra il filtro.
12. Non utilizzare benzina contenente METANOLO, gasolio
contenente più del 10% di ETANOLO, additivi per benzina o
nafta poiché il motore e il sistema di alimentazione possono
venire danneggiati.
13. Se si presenta la necessità di scaricare il serbatoio,
l’operazione dovrà essere effettuata all’aperto.
14. Se la marmitta/silenziatore di scarico non funziona
correttamente occorre sostituire.
15. Quando vengono effettuate delle riparazioni, utilizzare
esclusivamente i pezzi di ricambio autorizzati.
16. Attenersi sempre alle specifiche della fabbrica per tutto ciò
che riguarda le impostazioni e le regolazioni.
17. Per le operazioni di riparazione e manutenzione più
importanti, occorre recarsi solo in officine autorizzate.
18. Non tentare mai di effettuare riparazioni importanti su questa
unità a meno che non si è addestrati adeguatamente.
Procedure di manutenzione non corrette possono causare un
funzionamento pericoloso, danni alle cose e l’annullamento
della garanzia da parte del produttore.
19. Nei piatti di taglio con più lame, prestare attenzione alla
rotazione delle lame che possono fare ruotare le altre lame.
20. Non modificare le impostazioni di regolazione del motore
e non fare girare il motore ad una velocità eccessiva. Se il
motore viene azionato ad una velocità troppo elevata, i rischi
di incidenti e lesioni personali aumentano.
21. Scollegare gli accessori, arrestare il motore, rimuovere la
chiave e scollegare i fili della candela prima di: rimuovere le
ostruzioni dagli accessori e gli scivoli, eseguire operazioni
di manutenzione o se l’unità vibra in modo anomalo o dopo
avere urtato contro un oggetto. Se viene colpito un oggetto,
non avviare e azionare la macchina senza avere controllato
precedentemente la presenza di eventuali danni all’unità ed
eseguito le riparazioni necessarie.
22. Quando l’unità è in funzione, non appoggiare mai le mani
sulla ventola di raffreddamento della pompa idrostatica. La
ventola di raffreddamento è posizionata nella parte superiore
dell’asse di trasmissione.
23. Trattorini con pompe idrauliche, tubi flessibili o motori
idraulici: ATTENZIONE: Il liquido idraulico che fuoriesce
in presenza di pressione può avere una forza sufficiente
per penetrare nella pelle e provocare gravi ferite. Se ciò
si verifica, il liquido deve essere rimosso chirurgicamente
da un medico a conoscenza di questo tipo di infortunio nel
giro di poche ore. In caso contrario si rischia la cancrena.
Tenere le mani e il corpo a distanza dai fori e dagli ugelli da
cui potrebbe fuoriuscire liquido idraulico in pressione. Per
ricercare eventuali perdite servirsi di pezzi di carta o cartone,
non lavorare a mani nude. Controllare che tutti i collegamenti
di erogazione del fluido dell’impianto idraulico siano ben
stretti e che tutte le tubazioni idrauliche siano in buono stato
prima di portare in pressione l’impianto. In caso di perdite,
richiedere immediatamente l’intervento di un rivenditore
autorizzato per le riparazioni.”
24. ATTENZIONE: l’unità contiene energie pericolose. Se
smontate in modo improprio, le molle potrebbero provocare
gravi ferite, pertanto devono essere smontate esclusivamente
da un rivenditore autorizzato.
25. Modelli con radiatore motore: ATTENZIONE: l’unità contiene
energie pericolose. Per evitare gravi incidenti provocati dal
refrigerante caldo o dal vapore, non svitare mai il tappo del
radiatore con il motore in moto. Fermare il motore e attendere
che si raffreddi. Anche in questo caso, fare molta attenzione
mentre si rimuove il tappo.
6
Page 75

Not for
Reproduction
Numeri di identificazione
Dati di riferimento del prodotto
Per averli facilmente a portata di mano, annotare nome/
numero del modello, numeri di riconoscimento del
produttore e numeri di matricola del motore nello spazio
apposito. Detti numeri si trovano nelle posizioni indicate.
Quando ci si mette in contatto con il concessionario
autorizzato locale per ordinare pezzi di ricambio, per
richiedere interventi o per ottenere informazioni si
DEVONO avere a disposizione questi numeri.
DATI DI RIFERIMENTO DEL PRODOTTO
Numero/Nome di descrizione del motore
Codice del PRODUTTORE dell’unità Numero di MATRICOLA dell’unità
Codice del PRODUTTORE
dell’accessorio di falciatura
Nome del concessionario Data di acquisto
DATI DI RIFERIMENTO DEL MOTORE
Marca del motore Modello del motore
Numero di MATRICOLA dell’elemento di
falciatura
Targhetta di riconoscimento CE
A. Codice di riconoscimento del produttore
B. Numero di matricola del produttore
C. Indirizzo e nome del produttore
D. Velocità massima del motore in giri al minuto
E. Potenza nominale in kW
F. Massa dell’unità in kg
G. Simbolo di conformità CE
H. Anno di produzione
I. Potenza acustica in decibel garantita
A
MODEL NO. xxxxxxx
SERIAL NO. xxxxxxxxxx
B
C
XXXXXXXXXXXXXXXXXXXXXX
XXXXXXXXXXXXXXXXX
D
xxxx min
E
x.x kW
xxx kg
F
G
20xx
-1
H
xxx
I
dB
Tipo/Dati del motore Numero di matricola/codice del motore
“Incertezza di misurazione della vibrazione – la
vibrazione della macchina è stata registrata usando
metodi e procedure descritti negli standard internazionali
relativi in vigore al momento della produzione. Le
incertezze di misurazione possono dare come risultato
una varianza fino al 5% dal valore pubblicato presente
nella Dichiarazione di conformità.”
7
Page 76

Not for
Reproduction
Decalcomanie di sicurezza
Posizione delle decalcomanie
Posizioni
dell’interruttore
di accensione
N. di parte
1722806
Istruzioni operative (CE),
N. di parte 1750191
Attenzione, punti
di pizzicatura,
N. di parte 1720389
1730172
Livello carburante
N. di parte 1730172
173xxxx
Rilascio
trasmissione
N. di parte 1730202
1730264
Attenzione, punti
di pizzicatura,
N. di parte 1720389
Rilascio
trasmissione
N. di parte 1730624
8
Page 77

Not for
Reproduction
Decalcomanie di sicurezza
Etichette di sicurezza
Tutti i messaggi di PERICOLO, AVVERTENZA,
ATTENZIONE e le istruzioni sul telaio e sulla falciatrice
vanno letti e rispettati. La mancata osservanza di queste
istruzioni può essere causa di lesioni alla persona. Le
informazioni sono fornite per la sicurezza dell'utente e sono
importanti! Le etichette sottostanti sono apposte sul telaio e
sull'elemento di falciatura.
Icone di sicurezza
1
3
5
2
4
Sostituire immediatamente qualsiasi etichetta mancante
o danneggiata. Rivolgersi al rivenditore autorizzato per le
sostituzioni.
Queste etichette sono facili da rispettare e costituiscono
un costante promemoria, per l'operatore e per altri che
potrebbero utilizzare l'attrezzatura, delle istruzioni sulla
sicurezza indispensabili per un uso sicuro ed efficace.
6
7
1. AVVERTENZA: Prima di usare questa macchina,
leggere e comprendere il manuale per l'operatore.
Conoscere la posizione e la funzione di tutti i comandi.
Non usare questa macchina se non si è addestrati.
2. PERICOLO – RISCHIO DI PERDITA DI TRAZIONE,
SCORRIMENTO, STERZATA E CONTROLLO IN
PENDENZA: Se la macchina non va più avanti o inizia
a slittare sul terreno in pendenza, arrestare le lame e
spostarsi lentamente fuori dal pendio.
3. PERICOLO: PERICOLO D'INCENDIO: Mantenere
l'unità priva di erba, foglie e olio in eccesso. Non fare
rifornimento con il motore caldo o in marcia. Fermare
il motore, togliere la chiave e lasciare che si raffreddi
per almeno 3 minuti prima di fare rifornimento. Non
fare rifornimento al chiuso, su di un rimorchio al chiuso,
in un garage o altre aree racchiuse. Pulire eventuali
versamenti di carburante. Non fumare mentre si usa
questa macchina.
4. PERICOLO – RISCHIO DI CAPOVOLGIMENTO E
SCIVOLAMENTO: Falciare in salita o in discesa e non
trasversalmente sul terreno in pendenza. Non usare
su terreni con pendenza superiore ai 10 gradi. Evitare
svolte improvvise e brusche (rapide) sui pendii.
8
5. PERICOLO – RISCHIO DI AMPUTAZIONE E
SMEMBRAMENTO: Per evitare lesioni causate da
lame rotanti e parti in movimento, tenere a posto e
funzionanti i dispositivi di sicurezza (protezioni, schermi
e interruttori).
6. Non falciare in presenza di bambini o altri. Non
trasportare mai alcuno, specialmente bambini, neppure
con le lame non operative. Non falciare in retromarcia
a meno che la cosa non sia assolutamente necessaria.
Guardare in basso e alle spalle - prima e durante la
retromarcia.
7. Consultare la documentazione tecnica prima di fare
riparazioni o eseguire procedure di manutenzione.
Quando si abbandona la macchina, spegnere il motore,
innestare il freno di stazionamento e togliere la chiave di
accensione.
8. Tenere astanti e bambini a distanza di sicurezza.
Rimuovere gli oggetti che possono essere scagliati
dalla lama. Non falciare senza lo scivolo di scarico in
posizione.
9
Page 78

Not for
Reproduction
Funzioni e controlli
Figura 1. Controlli
Funzioni di controllo
Le informazioni che seguono descrivono brevemente la funzione dei singoli controlli. Le operazioni di avvio, arresto,
guida e taglio dell’erba richiedono l’uso combinato di diversi controlli applicati in sequenze specifiche. Per apprendere
quale combinazione e sequenza di controlli usare per le varie operazioni, consultare la sezione FUNZIONAMENTO.
Comando della valvola
dell’aria/farfalla/(Choke-A-
Matic)
La valvola dell’aria/farfalla controlla velocità del motore
e valvola dell’aria (vedi Figura 1). Portare il comando
della valvola dell’aria/farfalla in posizione VELOCE per
aumentare la velocità del motore e LENTO per diminuirla.
Lavorare sempre con farfalla al massimo. Per avviare il
motore freddo,portare il comando della farfalla/valvola
dell’aria sulla posizione VALVOLA DELL’ARIA. Se il
motore è caldo la valvola dell’aria potrebbe non servire.
Fari
L’interruttore delle luci accende e spegne i fari.
Contaore
Il contaore misura il numero di ore in cui la chiave resta
nella posizione di MARCIA.
10
Page 79

Not for
Reproduction
Funzioni e controlli
Opzione di taglio dell’erba in
retromarcia (RMO)
L’opzione di taglio dell’erba consente di tagliare erba
(oppure usare altri accessori azionati dalla PTO)
viaggiando in retromarcia. Se si decide di tagliare l’erba
in retromarcia, girare la chiave RMO dopo aver azionato
la PTO. La spia L.E.D. si accende e l’operatore può
tagliare l’erba in retromarcia. Ogni volta che la PTO viene
azionata occorre riattivare la RMO, se desiderato.
Interruttore della PTO
L’interruttore della PTO (presa di forza) inserisce e
disinserisce gli accessori che utilizzano la PTO. Per
inserire la PTO, tirare verso l’ALTO l’interruttore. Spingere
in BASSO per disinserire. Notare che la PTO funziona
solo se l’operatore deve restare bene seduto nel trattore.
Interruttore di accensione
L’interruttore di accensione avvia ed arresta il motore; ha
tre posizioni:
OFF Arresta il motore e l’impianto elettrico.
RUN Consente il funzionamento del motore
ed alimenta l’impianto elettrico.
Regolazione dell’altezza di taglio del
tagliaerba
La leva di regolazione controlla l’altezza di taglio del
tagliaerba. L’altezza di taglio del tagliaerba può essere
impostata su una delle sette posizioni da 2,5 cm e
10,2 cm (1,0 e 4,0 pollici).
Leva di regolazione del sedile
Il sedile può essere regolato avanti e indietro. Spostare la
leva, posizione il sedile a piacere e rilasciare la leva per
bloccare il sedile in posizione.
Leva della valvola di rilascio
della trasmissione
La leva della valvola di rilascio della trasmissione disattiva
la trasmissione di modo che il trattore possa essere
spostato a mano. Per informazioni sul funzionamento,
consultare la sezione SPINTA DEL TRATTORE A MANO.
Serbatoio del carburante
Per togliere il tappo, ruotare in senso antiorario.
Manometro del livello di carburante
Visualizza il livello di carburante nel serbatoio.
START Avvia il motore.
NOTA: non lasciare l’interruttore di accensione nella
posizione RUN con il motore arrestato; in questo modo si
scaricare la batteria.
Pedali di velocità di avanzamento
sul terreno
La velocità di avanzamento sul terreno del trattore viene
controllata dal pedale corrispondente. La velocità di
avanzamento sul terreno in retromarcia del trattore viene
controllata dal pedale corrispondente.
Premendo uno dei pedali si aumenta la velocità di
avanzamento sul terreno. Notare che premendo
ulteriormente il pedale, il trattore procede più velocemente.
Controllo crociera
Il controllo crociera viene usato per bloccare in avanti il
controllo velocità di avanzamento sul terreno. Il controllo
crociera ha cinque posizioni di blocco.
Freno di stazionamento
La manopola del freno di stazionamento viene usata per
bloccare il freno di stazionamento quando si arresta il
trattore. Premendo completamente il pedale del freno e
tirando la manopola si aziona il freno di stazionamento.
11
Page 80

Not for
Reproduction
Funzioni e controlli
Freno di stazionamento
Applicazione del freno di stazionamento - Vedere la
Figura 2. Per bloccare il freno di stazionamento, rilasciare
i pedali della velocità di avanzamento sul terreno (A),
premere fino in fondo il pedale del freno (B), tirare vero
l’alto la manopola del freno di stazionamento (C) e
rilasciare quindi il pedale del freno.
Rilascio del freno di stazionamento - Vedere la Figura 2.
Per rilasciare il freno di stazionamento, premere il pedale
del freno (B).
Controllo crociera
PER INSERIRE:
1. Tirare verso l’alto la manopola di controllo crociera (D,
Figura 2).
2. Premere il pedale della velocità di avanzamento sul
terreno (A).
3. Una volta raggiunta la velocità desiderata, sollevare
la manopola di controllo crociera (D). La velocità di
crociera viene bloccata su una delle cinque posizioni.
PER DISINSERIRE:
1. Premere il pedale del freno (B).
OPPURE
2. Premere il pedale della velocità di avanzamento sul
terreno (A).
E
B
A
C
D
Figura 2. Inserimento del freno di stazionamento
Contaore
Il contaore (E, Figura 2) misura il numero di ore in cui la
chiave resta nella posizione di marcia, RUN.
12
Page 81

Not for
Reproduction
Section Title
Funzionamento del trattore
Test del sistema di interblocchi di
sicurezza
L’unità è dotata di interruttori di interblocco di sicurezza e
di altri dispositivi di sicurezza. Questi dispositivi sono stati
installati per ragioni di sicurezza personale: non cercare di
neutralizzare gli interblocchi di sicurezza e non manomettere mai nessuno di questi dispositivi.
AVVERTENZA
Non usare l’unità se non supera tutti i test di
sicurezza. Rivolgersi al rivenditore autorizzato
locale.
Prova 1 — Il motore NON dovrebbe girare se:
• L’interruttorediPTO(presadiforza)èON(impegnato),
OPPURE
• IlpedaledelfrenoNONèpremutosinoinfondo(frenodi
parcheggio DISINSERITO), OPPURE
• LalevadellaregolazionedicrocieraNONèinFOLLE
Prova 2 — Il motore DOVREBBE girare e avviarsi se:
• L’operatoreèsedutosulsedile,E
• L’interruttorediPTO(presadiforza)èOFF
(disimpegnato), E
• Ilpedaledelfrenoèpremutosinoinfondo(frenodi
parcheggio INSERITO), E
• LalevadellaregolazionedicrocieraèinFOLLE.
Prova 3 — il motore dovrebbe SPEGNERSI se:
• L’operatoresialzadalsedile.
Prova 4 — Controllare il tempo di arresto delle lame di
falciatura
Le lame di falciatura e la cinghia di trasmissione
dell’elemento di falciatura dovrebbero fermarsi completamente entro cinque secondi dopo che l’interruttore del PTO
(presa di forza) elettrico è stato messo su OFF (disimpegnato). Se la cinghia dell’elemento di falciatura non si arresta
entro cinque secondi, rivolgersi ad un concessionario autorizzato.
Prova 5 — Controllo dell’opzione di falciatura in retromarcia (RMO)
• Ilmotoresispegneràsesicercadiandareinretromarcia
quando il PTO (presa di forza) è stato attivato e l’opzione
RMO (falciatura in retromarcia) non lo è stata.
• Laspialuminosa(falciaturainretromarcia)siaccenderà
quando l’opzione RMO è stata attivata.
On Two Lines
Sicurezza operativa generale
Prima di tentare di azionare questa unità, accertarsi di
leggere tutte le informazioni contenute nelle sezioni sulla
sicurezza ed il funzionamento. Prendere dimestichezza con
tutti i controlli e sulla procedura di arresto dell’unità.
Aggiunta di carburante
AVVERTENZA
La benzina è altamente infiammabile e va trattata
con cura. Non rabboccare mai il serbatoio con il
motore ancora caldo da un recente funzionamento.
Evitare fiamme aperte, fumo o fiammiferi intorno
all’unità. Evitare di rabboccare in eccedenza e pulire
eventuali fuoriuscite.
Non usare benzina contenente METANOLO,
gasolio contenente più del 10% di ETANOLO,
additivi di benzina e gas bianco, onde evitare
danni all’impianto motore/carburante.
1. Togliere il tappo di rabbocco (A, Figura 3).
2. Rabboccare il serbatoio. Non eccedere. Lasciare spazio
nel serbatoio per consentire l’espansione del carburante.
Consultare il manuale del motore per consigli sul
carburante specifico.
3. Installare e serrare a mano il tappo di rabbocco.
Avvio del motore
1. Sedersi sul sedile e portare SU la leva di regolazione,
posizionare il sedile come desiderato e rilasciare la leva
per bloccare il sedile in posizione.
2. Premere a fondo il pedale del freno o impostare il freno
di stazionamento con il pedale completamente premuto,
tirare SU la manopola del freno, poi rilasciare il pedale.
3. Disinnestare l’interruttore della PTO spingendo IN.
4. Portare il comando di farfalla/valvola dell’aria alla
posizione VALVOLA DELL’ARIA.
5. Inserire la chiave di accensione e ruotare in senso
orario in posizione AVVIO e rilasciare la chiave appena il
motore si avvia.
6. Dopo l’avvio del motore, portare il controllo di valvola
a farfalla/valvola dell’aria a metà velocità. Riscaldare il
motore lasciandolo girare per almeno 30 secondi.
7. Spostare il comando di valvola a farfalla/valvola dell’aria
sulla posizione VELOCE.
NOTA: in casi di emergenza è possibile arrestare il motore
portando l’interruttore di accensione nella posizione di
arresto, STOP. Adottare questo metodo solo in situazioni
di emergenza. Per l’arresto motore regolare attenersi
alla procedura indicata nella sezione ARRESTO DEL
TRATTORE.
13
Page 82

Not for
Reproduction
Funzionamento del trattore
Arresto del trattore e motore
1. Riportare il controllo velocità di avanzamento sul terreno
in FOLLE.
2. Disinnestare la PTO e aspettare che tutte la parti in
movimento si fermino.
3. Spostare il comando della farfalla/valvola su LENTO e
girare la chiave alla posizione OFF. Togliere la chiave.
Guida del trattore
1. Sedersi e regolare il sedile in modo da poter comodamente
raggiungere i controlli e vedere il cruscotto.
2. Inserire il freno di stazionamento.
3. Accertarsi che l’interruttore della PTO sia disinserito.
4. Avviare il motore (consultare la sezione AVVIO DEL
MOTORE).
5. Disinserire il freno di stazionamento e rilasciare il pedale
del freno.
6. Premere il pedale di controllo velocità di avanzamento
sul terreno per procedere in avanti. Rilasciare il pedale
per arrestare. Notare che premendo ulteriormente il
pedale, il trattore procede più velocemente.
7. Arrestare il trattore rilasciando i pedali di controllo
velocità di avanzamento, impostando il freno di
stazionamento ed arrestando il motore (consultare la
sezione ARRESTO DEL TRATTORE E MOTORE).
Taglio dell’erba
1. Impostare l’altezza di taglio del tagliaerba sul livello
desiderato ed impostare le ruote di livello sulla posizione
desiderata (se in dotazione).
2. Inserire il freno di stazionamento. Accertarsi che
l’interruttore della PTO sia disinserito.
3. Avviare il motore (consultare la sezione AVVIO DEL
MOTORE).
4. Spostare il comando di valvola a farfalla/valvola dell’aria
sulla posizione VELOCE.
5. Inserire la PTO (base del tagliaerba).
6. Cominciare a tagliare l’erba.
7. Al termine, disattivare la PTO e sollevare il tagliaerba
usando la leva di controllo di sollevamento degli accessori.
8. Arrestare il motore (consultare la sezione ARRESTO
DEL TRATTORE E MOTORE).
Falciatura in retromarcia
Se l’operatore decide di falciare in retromarcia, si può
usare il sistema RMO. Per usare l’opzione di falciatura in
retromarcia (RMO), girare la chiavetta dell’RMO dopo avere
inserito il PTO. La spia a LED si accenderà e l’operatore può
spostarsi a marcia indietro. L’opzione RMO deve essere
riattivata, se la si desidera riusare, ogni volta che il PTO
viene disinserito. La chiavetta deve essere rimossa per
impedire l’accesso alla funzione RMO.
Opzione funzionamento in
retromarcia
Se l’operatore decide di usare in retromarcia un accessorio
azionato da PTO, si può usare il sistema RMO. Per usare
l’opzione di falciatura in retromarcia (RMO), girare la
chiavetta dell’RMO dopo avere inserito il PTO. La spia a
LED si accenderà e l’operatore potrà usare l’accessorio a
marcia indietro. L’opzione RMO deve essere riattivata, se
la si desidera riusare, ogni volta che il PTO viene disinserito.
La chiavetta deve essere rimossa per impedire l’accesso alla
funzione RMO.
Spinta del trattorino a mano
1. Disinnestare la presa di forza e spegnere il motore.
2. Bloccare la leva di disinnesto della trasmissione nella
posizione di disinnestata tirandola indietro di circa 6,4 cm
(Figura 3).
3. Il trattorino può quindi essere spinto a mano.
NON TRAINARE IL TRATTORINO
Il traino dell’unità danneggerebbe la trasmissione.
•Nonservirsidiunaltroveicoloperspingereo
trainareiltrattorino.•Nonazionarelalevadi
disinnesto della trasmissione quando il motore è
avviato.
AVVERTENZA
Il motore si spegnerà se il pedale di retromarcia a terra
viene premuto con il PTO inserito ma senza l’opzione
RMO attivata. L’operatore deve sempre disinserire
il PTO prima di attraversare strade, sentieri, o altre
aree che possono essere usate da veicoli. La perdita
improvvisa di potenza potrebbe creare una situazione
pericolosa.
AVVERTENZA
La falciatura in retromarcia può essere pericolosa per
gli astanti. Se l’operatore non presta attenzione alla
presenza di bambini si possono verificare incidenti
tragici.Non attivare mai l’opzione RMO (falciatura in
retromarcia) quando ci sono bambini. I bambini sono
attratti dall’unità al lavoro e dall’attività che la circonda.
B
Figura 3. Leva di rilascio della trasmissione e
serbatoio del carburante
14
Page 83

Not for
Reproduction
Funzionamento del trattore
Regolazione dell’altezza di taglio
del tagliaerba
La manopola di regolazione (A, Figura 4) controlla
l’altezza di taglio del tagliaerba. L’altezza di taglio dispone
di sette posizioni tra 2,5 e 10,2 cm (1,1 pollice
e 4,0 pollici).
A
Figura 4. Sollevamento ed abbassamento
del tagliaerba
Attacco di un rimorchio
La forza massima della barra di traino orizzontale
consentita è 280 Newton. Quella verticale è 160 Newton.
Questo equivale ad un rimorchio di 113 kg (250 libbre) su
una collina con dislivello di 10 gradi. Fissare il rimorchio
con un perno con testa di dimensioni giuste
(A, Figura 5) e morsetto (B).
A
Rimessaggio
AVVERTENZA
Non riporre mai l’unità (con carburante) in una
struttura chiusa e scarsamente ventilata. I vapori
del carburante possono raggiungere una fonte
di accensione (caldaia, boiler, ecc) e causare
un’esplosione.
I vapori sono inoltre tossici per esseri umani ed
animali.
Prima di riporre l’unità a fine stagione, leggere le istruzioni
per la manutenzione ed il rimessaggio nella sezione sulle
regole sulla sicurezza, quindi procedere come segue:
• DisattivarelaPTO,inserireilfrenodistazionamentoe
togliere la chiavetta.
• Eseguirelemisuredimanutenzioneerimessaggio
del motore elencate nel manuale del proprietario del
motore. Queste includono lo spurgo dell’impianto del
carburante, o l’aggiunta di stabilizzante al carburante
(non riporre un’unità con carburante in una struttura
chiusa - Leggere il messaggio di avvertenza).
• Perprolungarelaviteutiledellabatteria,rimuoverla,
riporla in un luogo fresco ed asciutto, caricandola
completamente una volta al mese circa. Se la batteria
non viene estratta dall’unità, scollegare il cavo
negativo.
Prima di avviare l’unità dopo un periodo di rimessaggio:
• Controllareillivellodituttiifluidi.Controllaretuttii
componenti.
• Eseguiretuttiicontrollieleprocedureconsigliatie
riportati nel manuale del proprietario del motore.
• Primadell’uso,attenderecheilmotoresiriscaldiper
diversi minuti.
B
Figura 5. Pesi consigliati per il rimorchio
15
Page 84

Not for
Reproduction
Manutenzione
regolare
PROGRAMMA DI MANUTENZIONE E PROCEDURE
Attenersi al seguente programma per la cura regolare del trattore e del tagliaerba.
TRATTORE E ELEMENTO DI FALCIATURA
Ogni 8 ore o una volta al giorno
Controllo del sistema di interbloccaggio di sicurezza
Pulire trattore e piano di falciatura
Pulire il vano motore da eventuali detriti
Ogni 25 ore o una volta l’anno *
Controllare il tempo di arresto delle lame di falciatura
Controllare che non ci siano pezzi allentati sul trattore/
elemento di falciatura
Controllare la pressione delle gomme
Ogni 50 ore o una volta l’anno *
Controllare i freni del trattore
Pulire la batteria e i cavi
Rivolgersi al concessionario per
Lubrificare il trattore e l’elemento di falciatura
Controllodelle lame di falciatura **
* Quello dei due che viene prima
** Nelle regioni con suoli sabbiosi o in condizioni di
polvere abbondante, controllare le lame più spesso.
MOTORE
Prime 5 ore
Cambio d’olio del motore
Ogni 8 ore o una volta al giorno
Controllo di livello dell’olio motore
Ogni 25 ore o una volta l’anno *
Pulire filtro dell’aria e pre-filtro **
Ogni 50 ore o una volta l’anno *
Cambio d’olio del motore
Sostituire il filtro dell’olio
Annualmente
Sostituzione del filtro dell’aria
Sostituire il pre-filtro
Rivolgersi al concessionario per
Ispezionare la marmitta
Sostituire la candela
Sostituire il filtro del carburante
Pulire il sistema di raffreddamento aria del motore
* Quello dei due che viene prima
** In presenza di polvere o di detriti aerotra sportati pulire
più spesso
Controllo della pressione dei
pneumatici
Controllare la pressione dei pneumatici con regolare
frequenza, che va mantenuta ai livelli indicati nella tabella
(Figura 6). Notare che queste pressioni potrebbero
differire leggermente dalla dicitura “Max Inflation”
[Gonfiaggio massimo] stampigliato sulla parete laterale
dei pneumatici. Le pressioni riportate indicano la trazione
corretta, migliorano la qualità di taglio ed estendere la vita
utile dei pneumatici.
Dimensioni PSI bar
22 x 8,0-8 10-12 0,68-0,82
15 x 6,0-6 12-15 0,82-1,0
Figura 6. Pressione dei pneumatici
16
Page 85

Not for
Reproduction
Controllare il tempo di arresto delle
llame di falciatura
Le lame e la cinghia di trazione del tagliaerba devono
arrestarsi completamente entro cinque secondi dopo la
disattivazione dell’interruttore della PTO elettrica.
1. Con il trattore in folle, la PTO disinserita e l’operatore
seduto al suo posto, avviare il motore.
2. Osservare il poggiapiedi sinistro in prossimità della
cinghia di trazione del tagliaerba. Inserire la PTO
ed attendere alcuni secondi. Disinserire la PTO e
controllare quanto tempo occorre per arrestare la
cinghia di trazione del tagliaerba.
3. Se la cinghia non si arresta entro cinque secondi,
consultare il proprio concessionario.
Manutenzione regolare
A
D
B
C
E
Manutenzione della batteria
Pulitura della batteria e dei cavi
AVVERTENZA
Durante la rimozione o l’installazione dei cavi
della batteria, scollegare per PRIMO il cavo
negativo e ricollegarlo per ULTIMO. Se non si
procede in questo ordine, il terminale positivo
può fare cortocircuito con il telaio quando
toccato da un attrezzo.
1. Scollegare i cavi dalla batteria, cominciando dai
cavi negativi (A, Figura 7) e quindi quelli della e
positivi (B).
2. Allentare il dado ad alette e la rondella (D).
3. Ruotare l’asta di tenuta (C) verso l’alto ed allontanarla
dalla batteria. Fissare alla torretta dello sterzo.
4. Rimuovere la batteria (E).
5. Pulire il vano della batteria con una soluzione di
bicarbonato ed acqua.
6. Pulire i terminali della batteria e le estremità dei cavi
con una spazzola metallica e detergente, fino a farli
brillare.
7. Reinstallare la batteria (E) nel vano. Fissare con l’asta
di tenuta (C) ed il dado con alette e rondella (D).
8. Riattaccare i cavi della batteria, cominciando da quelli
positivi e la copertura (B) e quindi quelli negativi (A).
9. Rivestire le estremità dei cavi ed i terminali della
batteria con vaselina o grasso non conduttivo.
Figura 7. Manutenzione della batteria
17
Page 86

Not for
Reproduction
Individuazione dei problemi,
regolazione e manutenzione
Individuazione dei problemi
Sebbene cure e manutenzione regolari prolunghino la vita
utile dell’apparecchiatura, l’utilizzo prolungato o costante
richiede in ultima analisi un intervento di manutenzione per
garantirne il funzionamento continuo e corretto.
La guida all’individuazione dei problemi che segue elenca
i problemi più comuni, la loro causa ed i rimedi consigliati.
AVVERTENZA
Onde evitare lesioni gravi, eseguire la
manutenzione sul trattore o sul tagliaerba solo
quando si è arrestato il motore e si è inserito il
freno di stazionamento.
Rimuovere la chiavetta di accensione, scollegare
il filo della candela ed allontanarlo dalla candela
prima di procedere alla manutenzione, onde
prevenire l’avvio accidentale del motore.
Individuazione e correzione dei problemi del trattore
PROBLEMA ESAMINARE RIMEDIO
Pedale del freno non premuto. Premere fino in fondo il pedale del freno.
Il motore non gira
o non si avvia.
Il motore fa
fatica a partire e
funziona male.
Il motore batte in
testa.
Consumo d’olio
eccessivo.
Lo scarico del
motore è nero.
L’interruttore della PTO (frizione
elettrica) è nella posizione di
acceso, ON.
Controllo crociera attivato. Spostare la manopola sulla posizione di folle/spento,
Carburante esaurito. Se il motore è molto caldo, attendere che si raffreddi e
Motore ingolfato. Chiudere la valvola dell’aria.
Il fusibile è rotto. Rivolgersi al rivenditore autorizzato.
Pulire i terminali della batteria. Vedere la sezione Pulizia della batteria e dei cavi.
Batteria scarica o inutilizzabile. Ricaricare o sostituire la batteria.
Cablaggio allentato o rotto. Controllare visivamente i cavi. Se sono consumati o
Solenoide o motorino dello
starter difettoso.
Interruttore di interblocco di
sicurezza difettoso.
Acqua nel carburante. Rivolgersi al rivenditore autorizzato.
Benzina vecchia o stagnante. Rivolgersi al rivenditore autorizzato.
Miscela di carburante troppo ricca. Pulire il filtro dell’aria.
Il motore ha altri problemi. Rivolgersi al rivenditore autorizzato.
Livello dell’olio basso. Controllare/rabboccare secondo necessità.
Utilizzato il grado di olio sbagliato. Vedere Tabella consigli per l’olio.
Il motore è troppo caldo. Rivolgersi al rivenditore autorizzato.
Utilizzato il grado di olio sbagliato. Vedere Tabella consigli per l’olio.
Troppo olio nel basamento. Spurgare l’olio in eccesso.
Filtro dell’aria sporco. Vedere la sezione Manutenzione del filtro dell’aria.
Bobina d’arresto chiusa. Aprire la bobina d’arresto.
Portarlo in posizione di spento, OFF.
FOLLE/OFF.
rabboccare il serbatoio.
rotti, rivolgersi a un rivenditore autorizzato.
Rivolgersi al rivenditore autorizzato.
Rivolgersi al rivenditore autorizzato.
18
Page 87

Not for
Reproduction
Individuazione dei problemi, regolazione e manutenzione
Individuazione e correzione dei problemi del trattore (segue)
PROBLEMA ESAMINARE RIMEDIO
Il motore è avviato
ma il trattore non si
muove.
Il freno di parcheggio
non tiene.
Il trattore sterza a
fatica o viene guidato
a fatica.
Pedali di controllo della velocità di
avanzamento sul terreno non premuti.
Leva di rilascio della trasmissione in
posizione SPINTA.
La cinghia della falciatrice è rotta. Rivolgersi al rivenditore autorizzato.
Il freno di stazionamento è inserito. Disinserire il freno di stazionamento.
La cinghia di trasmissione della
trazione è rotta o slitta.
Freno interno usurato. Rivolgersi al rivenditore autorizzato.
La tiranteria dello sterzo è allentata. Rivolgersi al rivenditore autorizzato.
Gonfiaggio pneumatici inadeguato. Vedere la sezione Controllo della pressione delle
Cuscinetti del mandrino delle ruote
anteriori asciutti.
Premere i pedali.
Spostare in posizione di GUIDA.
Rivolgersi al rivenditore autorizzato.
gomme.
Rivolgersi al rivenditore autorizzato.
Individuazione e correzione dei problemi dell’elemento di falciatura
PROBLEMA ESAMINARE RIMEDIO
L’elemento di
falciatura non si alza.
La falciatura non è
uniforme.
La falciatura ha un
aspetto grossolano.
Il motore si
arresta facilmente
quando l’elemento
di falciatura è
impegnato.
Eccessive vibrazioni
del tagliaerba.
Il motore gira e il
trattore si sposta, ma
la tagliaerba non si
muove.
La tiranteria di sollevamento non è
attaccata o è danneggiata.
Il tagliaerba non è livellato
correttamente.
Le gomme del trattore non sono
adeguatamente gonfie.
Regime motore troppo lento. Impostare a tutto gas.
Velocità di avanzamento sul terreno
troppo rapida.
Il tagliaerba ha altri problemi. Rivolgersi al rivenditore autorizzato.
Regime motore troppo lento. Impostare a tutto gas.
Velocità di avanzamento sul terreno
troppo rapida.
Filtro dell’aria sporco o ostruito. Vedere la sezione Manutenzione del filtro dell’aria.
L’altezza di taglio è troppo bassa. Durante la prima passata tagliare l’erba all’altezza di
Scivolo di scarico intasato. Tagliare l’erba con lo scarico puntato verso l’area
Il motore non è alla temperatura
d’esercizio.
Il tagliaerba comincia nell’erba alta. Avviare il tagliaerba in una zona pulita.
Il tagliaerba ha altri problemi. Rivolgersi al rivenditore autorizzato.
PTO non innestato. Innestare PTO.
Il tagliaerba ha altri problemi. Rivolgersi al rivenditore autorizzato.
Rivolgersi al rivenditore autorizzato.
Rivolgersi al rivenditore autorizzato.
Vedere la sezione Controllo della pressione delle
gomme.
Ridurre la velocità.
Ridurre la velocità.
taglio massima.
tagliata in precedenza.
Far girare il motore per alcuni minuti per riscaldarlo.
19
Page 88

Not for
Reproduction
Individuazione dei problemi, regolazione e manutenzione
Regolazione del sedile
Il sedile può essere regolato avanti e indietro. Spostare
la leva (A, Figura 8), posizionare il sedile a piacere e
rilasciare la leva per bloccare il sedile in posizione.
A
Figura 8. Regolazione del sedile
Carica della batteria
Regolazioni del taglierba
Ruote di livello
Le ruote di livello del tagliaerba possono essere spostate
in due posizioni, secondo l’altezza di taglio. In caso
di altezze di taglio superiori, impostare le ruote nella
posizione più bassa. In caso di altezze di taglio inferiori,
impostare le ruote nella posizione più alta. Non lasciare le
ruote costantemente sul terreno durante il taglio dell’erba.
Per regolare:
1. Rimuovere il controdado (B, Figura 9), la ruota di
livello (C), le rondelle (D) ed il bullone di spallamento
(E). Portare la ruota di livello sulla posizione
desiderata.
2. Inserire il bullone di spallamento (E) attraverso le
rondelle (D), la ruota di livello (C) e la piastra della
ruota di livello (A). Fissare con il controdado (B).
Ripetere le fasi 1 e 2 per tutte le ruote di livello.
A
AVVERTENZA
Tenere fiamme aperte o scintille lontano dalla
batteria; i gas che ne provengono sono altamente
esplosivi. Ventilare bene la batteria durante la
carica.
Una batteria inutilizzabile o troppo debole per avviare
il motore potrebbe essere il risultato di un difetto
nell’impianto di carica o in un altro componente elettrico.
In caso di dubbi sulla causa del problema, rivolgersi al
proprio concessionario. Se occorre sostituire la batteria,
attenersi alle fasi delineate nella sezione Pulitura della
batteria e dei cavi nella sezione Manutenzione regolare.
Per caricare la batteria, attenersi alle istruzioni del
fabbricante del caricabatteria e rispettare tutti i messaggi
di avvertenza inclusi nelle sezioni sulle regole sulla
sicurezza contenute in questo manuale. Caricare la
batteria completamente. Non caricare ad un livello
superiore a 10 ampere.
D
E
Figura 9. Regolazione della ruota di livello a piastra
fissa
B
C
20
Page 89

Not for
Reproduction
Section Title
On Two Lines
MOTORE:
Briggs & Stratton
Marca Briggs & Stratton®
Modello Intek, 4195 Series
Capsulismo 500 cc (40,0 pollici cubi)
Impianto elettrico Alternatore : 9 ampere
Batteria: 12 Volt, 195 CCA
Capacità olio 1,4 litri (48 once)
TELAIO:
Capacità del serbatoio
del carburante Capacità: 13,2 litri (3,5 galloni)
Ruote posteriori Dimensioni pneumatici: 22 x 8,0-8
Pressione di gonfiaggio: 0,68 bar
(10 psi)
Ruote anteriori Dimensioni pneumatici: 15 x 6,0-6
Pressione di gonfiaggio: 0,82-0,96 bar
(12-14 psi)
Potenza nominale
La potenza nominale lorda per i singoli modelli di motore a benzina è etichettata in conformità con lo standard Small
Engine Power & Torque Rating Procedure codice J1940 di SAE (Society of Automotive Engineers) ed è classificata
conformemente a SAE J1995. I valori della coppia sono calcolati a 2600 RPM per i motori con la dicitura “rpm”
riportata sull’etichetta e a 3060 RPM per tutti gli altri motori; i valori di potenza sono calcolati a 3600 RPM. Le curve di
potenza lorda possono essere visualizzate sul sito www.BRIGGSandSTRATTON.COM. I valori di potenza netti sono
ricavati con il filtro di sfiato e dell’aria installati mentre i valori di potenza lordi sono ricavati senza questi accessori. La
potenza lorda reale del motore sarà superiore a quella netta ed è influenzata, fra altri fattori, da condizioni operative
ambientali e variabilità da motore a motore. Data la vasta gamma di prodotti su cui sono installati i motori, il motore a
gas potrebbe non sviluppare la potenza lorda nominale quando usato su una data apparecchiatura. La differenza è
dovuta a diversi fattori compreso, ma non limitato a, varietà dei componenti del motore (filtro dell’aria, sfiato, carica,
raffreddamento, carburatore, pompa del carburante, ecc.), restrizioni applicative, condizioni operative ambientali
(temperatura, umidità, altitudine) e variabilità da motore a motore. A causa di limitazioni alla produzione e di capacità,
Briggs & Stratton potrà sostituire questo motore di serie con un motore di potenza nominale superiore.
TRASMISSIONI:
K46
Tipo Idrostatico Tuff Torq K46
Fluido idraulico Olio motore 10w 30 Premium
Velocità Marcia avanti: 0-5,5 km/h (0-8,9 MPH)
a 3400 giri/motore Retromarcia: 0-3,0 km/h (0-4,8 MPH)
Coppia continua 230,5 Nm (170 ft-lbs)
DIMENSIONI:
Lunghezza totale 180 cm (70,9”)
Larghezza totale 122 cm (48,0”)
Altezza 114 cm (44,9”)
Specifiche
Parti ed accessori
Per dettagli, rivolgersi a un rivenditore autorizzato.
21
Page 90

Not for
Reproduction
POLITICA DI GARANZIA PRODOTTI BRIGGS & STRATTON Aprile 2012
GARANZIA LIMITATA
Briggs & Stratton Power Products Group, LLC garantisce che, durante il periodo specificato sotto, riparerà o sostituirà, gratuitamente, ogni parte
che si riveli difettosa nel materiale o nella lavorazione o in entrambi I costi per il trasporto del prodotto inviato per la riparazione o la sostituzione ai sensi
di questa garanzia devono essere sostenuti dall'acquirente. Questa garanzia è valida per i periodi di tempo e alle condizioni a cui è soggetta indicati
di seguito. Per l'assistenza in garanzia, trovare il centro di assistenza autorizzato più vicino usando il nostro strumento di ricerca concessionari sul sito
web snapper-europe.com. L'acquirente deve contattare il centro di assistenza autorizzato e poi mettere il prodotto a disposizione di questo il centro di
assistenza autorizzato per ispezione e test.
Non c'è alcuna altra garanzia espressa. Le garanzie implicite, comprese quelle di commerciabilità e adeguatezza ad uno scopo
particolare, si limitano a un anno dalla data di acquisto o nella misura in cui è consentito dalla legge.. Tutte le altre garanzie implicite sono
escluse. Nella misura in cui l'esclusione è consentita dalla legge, sono escluse responsabilità per danni incidentali o consequenziali.
Alcuni stati o Paesi non consentono limiti alla durata della garanzia implicita e alcuni stati o Paesi non ammettono l'esclusione o la limitazione di danni
incidentali o consequenziali, quindi la suddetta limitazione ed esclusione potrebbe non applicarsi al singolo utente. Questa garanzia dà all'utente
specifici diritti legali e lo stesso potrebbe avere altri diritti che variano da stato a stato o da Paese a Paese.**
PERIODO DI GARANZIA
Articolo Uso del consumatore Uso commerciale
Apparecchiatura 2 anni 90 giorni
Motore* 2 anni 90 giorni
Batteria (se in dotazione) 1 anno 1 anno
* Si applica solo a motori Briggs & Stratton. La copertura della garanzia per motori non-Briggs & Stratton viene fornita dal produttore del motore.
Componenti interessati alle emissioni sono coperti dalla Dichiarazione di garanzia sulle emissioni.
** In Australia - I nostri prodotti hanno garanzie che non possono essere escluse ai sensi della Australian Consumer Law. Il cliente ha diritto a una
sostituzione o a un rimborso per guasti gravi e a un compenso per qualunque altra perdita o qualunque altro danno ragionevolmente prevedibile. Il cliente
ha anche diritto ad avere il prodotto riparato o sostituito se lo stesso prodotto non è di qualità accettabile e il guasto non è di tipo grave. Per l'assistenza
in garanzia, trovare il centro di assistenza autorizzato più vicino usando il nostro strumento di ricerca concessionari sul sito web BRIGGSandSTRATTON.
com o chiamando il numero 1300 274 447 o inviando una e-mail a salesenquires@briggsandstratton.com.au, o scrivendo a Briggs & Stratton Australia Pty
Ltd, 1 Moorebank Avenue, NSW, Australia, 2170.
Il periodo di garanzia comincia il giorno dell'acquisto da parte del consumatore al dettaglio o dell'utente finale commerciale e continua per il periodo
di tempo riportato nella tabella sopra. “Uso del consumatore” significa uso domestico residenziale personale da parte di un consumatore al dettaglio.
“Uso commerciale” significa ogni altro uso, compreso l'uso a scopi commerciali, che generano reddito o di noleggio. Se il prodotto viene utilizzato a fini
commerciali sarà pertanto considerato come soggetto ad uso commerciale ai fini di questa garanzia.
Non è necessaria alcuna registrazione di garanzia per ottenere la garanzia sui prodotti Briggs & Stratton. Conservare la ricevuta di acquisto
come prova. Se non viene fornita una prova della data di acquisto iniziale all'atto della richiesta dell'assistenza in garanzia, sarà utilizzata la
data di produzione del prodotto per stabilire l'idoneità della garanzia.
INFORMAZIONI SULLA GARANZIA
Accogliamo le riparazioni in garanzia e ci scusiamo per l'inconveniente. L’assistenza in garanzia è disponibile solo presso i centri di assistenza autorizzati
Snapper. La maggior parte delle riparazioni in garanzia è gestita normalmente, ma qualche volta le richieste di assistenza in garanzia potrebbero non
essere appropriate. Questa garanzia si applica solo in casi di difetti di materiali o lavorazione. Non copre i danni provocati da uso improprio o abuso,
manutenzione o riparazioni non corrette, usura e rotture normali o carburante scaduto o non approvato.
Uso improprio e abuso - L'uso corretto previsto per questo prodotto è descritto nel Manuale per l'operatore. L'uso del prodotto in modi non descritti
nel Manuale per l'operatore o l'uso del prodotto dopo che è stato danneggiato annulla la garanzia. La garanzia non è consentita se il numero di serie del
prodotto è stato rimosso o se il prodotto è stato alterato o modificato in qualche modo o se il prodotto presenta prove di abuso quali danni da impatti o
danni da corrosione per acqua/sostanze chimiche.
Manutenzione o riparazioni non corrette Questo prodotto deve ricevere la manutenzione prevista secondo le procedure e i programmi contenuti nel
Manuale per l'operatore e l'assistenza o le riparazioni devono essere eseguite usando componenti Briggs & Stratton o equivalenti. I danni provocati da
mancanza di manutenzione o da uso di componenti non originali non sono coperti da garanzia.
Usura normale - Come tutti i dispositivi meccanici, questa unità è soggetta ad usura anche se riceve la manutenzione corretta. Questa garanzia non
copre le riparazioni previste quando l'uso normale ha esaurito la vita di una parte o dell'apparecchio. Gli articoli usati per la manutenzione e soggetti ad
usura come filtri, cinghie, lame per il taglio e pastiglie per freni (con l'eccezione delle pastiglie per i freni del motore) non sono coperti da garanzia per le
sole caratteristiche di usura, a meno che la causa sia dovuta a difetti di materiali o lavorazione.
Carburante scaduto - Per un corretto funzionamento, questo prodotto ha bisogno di carburante pulito che sia conforme ai criteri specificati nel Manuale
per l'operatore. I danni provocati da carburante scaduto (perdite al carburatore, tubi per il carburante intasati, valvole bloccate) non sono coperti da
garanzia.
Altre esclusioni - Questa garanzia esclude danni dovuti a incidenti, abuso, modifiche, alterazioni, manutenzione non corretta, congelamento o
deterioramento chimico. Sono anche esclusi componenti o accessori che non facevano parte della confezione originale del prodotto. Non c'è alcuna
copertura di garanzia per apparecchi usati per energia primaria invece che per alimentazione di rete o su apparecchi usati in applicazioni di sostegno
vitale. Questa garanzia esclude guasti dovuti ad atti di Dio e altri eventi di forza maggiore al di là del controllo del produttore.
1737660D_IT Rev C
22
Page 91

Not for
Reproduction
Inhoudsopgave
Veiligheidsvoorschriften en -informatie .......... 2
......................................... 7
Waarschuwingsstickers .................................... 8
Veiligheidspictogrammen ................................. 9
Functies en bedieningsinstrumenten ............ 10
Besturingsfuncties .................................................10
Parkeerremfunctie .................................................12
Werking van snelheidsregelaar .............................12
Uurmeter ...............................................................12
De zitmaaier gebruiken .................................... 13
Veiligheidsvergrendelsysteem ..............................13
Algemene gebruiksveiligheid ................................13
Brandstof bijvullen .................................................13
De motor starten ....................................................13
De zitmaaier en motor stopzetten ..........................14
Met de zitmaaier rijden ..........................................14
Maaien ..................................................................14
Achteruit maaien ...................................................14
Achterwaartse aandrijving van hulpstukken ..........14
De zitmaaier met de hand voortduwen ..................14
De maaihooigte instellen .......................................15
Een aanhanger bevestigen....................................15
Berging ..................................................................15
Periodiek onderhoud ....................................... 16
Onderhoudsschema ..............................................16
De bandenspanning controleren ...........................16
Controleer de remwerking van de maaibladen ......17
Onderhoud van de batterij .....................................17
Problemen oplossen, regelingen
en nazicht .......................................................... 18
Problemen met de zitmaaier oplossen ..................18
Problemen met het maaidek oplossen ..................19
De batterij opladen ................................................20
De positie van de bestuurdersstoel aanpassen .....20
Bijregeling van het maaidek ..................................20
................................. 21
Garantie ............................................................. 22
1
Page 92

Not for
Reproduction
Veiligheidsvoorschriften en -informatie
Veilig gebruik
Gefeliciteerd met de aankoop van een stuk tuingereedschap van superieure
kwaliteit. Onze producten zijn ontworpen en vervaardigd om aan alle
industrienormen te voldoen en deze zelfs te overtreen.
Elektrische apparaten zijn enkel en alleen veilig als ze op veilige wijze worden
gebruikt. Als ze op de verkeerde wijze worden gebruikt of niet behoorlijk
worden onderhouden, kunnen ze gevaarlijk zijn! Vergeet niet, u bent
verantwoordelijk voor uw eigen veiligheid en die van de personen rondom u.
Gebruik uw gezond verstand en denk goed na over waar u mee bezig bent.
Als u er niet zeker van bent dat het karwei dat u gaat opknappen veilig kan
worden uitgevoerd met het gereedschap dat u hebt gekozen, raadpleeg een
vakman: neem contact op met uw plaatselijke erkende verdeler.
Lees de handleiding
De gebruikershandleiding bevat belangrijke veiligheidsinformatie
waar u zowel voor als TIJDENS het gebruik van het gereedschap van
op de hoogte moet zijn.
Hierin vindt u veilige gebruiksaanwijzingen, een beschrijving
van de kenmerken en bedieningsknoppen van het product en
onderhoudsinformatie. Deze informatie zal u helpen het meeste uit
uw apparatuur te halen.
Lees de Veiligheidsvoorschriften en -informatie op de volgende
bladzijden helemaal door. Lees ook het hoofdstuk Bediening volledig.
Kinderen
Kinderen kunnen het slachtoer worden van tragische ongelukken.
Houd ze uit de buurt van de plaats waar u werkt. Kinderen voelen
zich vaak aangetrokken tot het apparaat en het grasmaaien. Ga
er nooit van uit dat kinderen op de plaats zullen blijven waar u ze
het laatst hebt gezien. Als de kans bestaat dat kinderen in de buurt
kunnen komen van de plaats waar u aan het maaien bent, zorg er
dan voor dat een andere verantwoordelijke volwassene toezicht op
hen houdt.
LAAT KINDEREN NOOIT MEERIJDEN OP DE ZITMAAIER! Dit
moedigt hen aan om ook in de buurt van het apparaat te komen
terwijl de motor draait, waardoor ze ernstig gewond kunnen raken. Ze
kunnen dan naar het apparaat toe komen om mee te rijden als u het
niet verwacht, waardoor u hen zou kunnen overrijden.
2
Achteruit
Nooit achteruit maaien, tenzij
dit absoluut nodig is. Kijk voor
en tijdens het achteruitrijden
steeds omlaag
en achterom,
ook wanneer
de maaimessen
uitgeschakeld
zijn.
Page 93

Not for
Reproduction
Veiligheidsvoorschriften en -informatie
Gebruik op een helling
U kunt ernstig gewond raken of zelfs om het leven komen als u dit
apparaat op een te steile helling gebruikt. Het gebruik van de maaier op
een te steile helling of een plaats waar u niet voldoende tractie hebt, kan
ervoor zorgen dat u de controle over de maaier verliest of kantelt.
Een goede vuistregel is de maaier nooit te gebruiken op een helling
waarop u niet achteruit kunt rijden (in de stand 2-wielaandrijving). Gebruik
de maaier nooit op hellingen die meer dan 1 m stijgen over een lengte
van 6 m. Rijd altijd loodrecht op en af hellingen, nooit zijwaarts.
Houd er ook rekening mee dat het oppervlak waarop u rijdt een grote
invloed heeft op de stabiliteit en de controle. Nat gras of een met ijs
bedekt wegdek kunnen ervoor zorgen dat u de maaier niet goed onder
controle hebt.
Als u zich onzeker voelt over het gebruik van de maaier op hellingen, doe
het dan niet. Het is het risico niet waard.
Bewegende delen
Dit apparaat heeft veel bewegende delen die u of iemand anders kunnen verwonden. Als
u echter behoorlijk op de stoel zit en alle voorschriften in deze brochure volgt, kunt u het
apparaat veilig gebruiken.
Het maaidek is uitgerust met draaiende maaimessen die handen en voeten kunnen
amputeren. Laat niemand in de buurt van het apparaat terwijl de motor draait!
Om u, de gebruiker, te helpen dit apparaat veilig te gebruiken, is het uitgerust met een
veiligheidssysteem dat detecteert wanneer de gebruiker aanwezig is. Probeer NIET om het
systeem te wijzigen of te omzeilen. Raadpleeg onmiddellijk uw verdeler als het systeem niet
alle in deze handleiding vermelde veiligheidstests voor vergrendelingssystemen doorstaat.
Weggeslingerde voorwerpen
Dit apparaat heeft draaiende maaimessen. Deze messen kunnen rondslingerende
voorwerpen opnemen en wegslingeren, waardoor omstanders ernstig gewond
kunnen raken. Zorg ervoor dat u het te maaien gebied opruimt VOORDAT u
begint te maaien.
Het apparaat niet gebruiken zonder de opvangbak of afvoerbeschermer
(deector).
Laat ook niemand in de buurt van de maaier komen terwijl de motor draait! Als er
toch iemand in de buurt komt, schakel de maaier dan onmiddellijk uit en wacht tot
hij/zij weer weg is.
Brandstof en onderhoud
Benzine is uiterst ontvlambaar. Benzinedampen zijn ook zeer ontvlambaar en
kunnen verre ontstekingsbronnen bereiken. Benzine mag enkel als brandstof
worden gebruikt, niet als oplos- of reinigingsmiddel. Het mag nooit worden
bewaard op plaatsen waar de dampen kunnen opbouwen of een ontstekingsbron,
zoals een waakvlam, kunnen bereiken. Brandstof moet worden bewaard in een
goedgekeurde afgesloten plastic benzinekan of in de brandstoftank van de tractor
met de dop stevig dichtgedraaid. Gemorste brandstof moet onmiddellijk worden
opgeruimd.
Behoorlijk onderhoud is uitermate belangrijk voor de veiligheid en de prestaties
van uw apparaat. Zorg ervoor dat u de onderhoudsprocedures in deze
handleiding uitvoert, vooral het periodiek testen van het veiligheidssysteem.
3
Page 94

Not for
Reproduction
Veiligheidsvoorschriften en -informatie
Lees deze veiligheidsvoorschriften aandachtig en leef ze strikt na. Als u zich niet aan deze veiligheidsvoorschriften
houdt, kan dat tot gevolg hebben dat u de controle over de machine verliest, dat u schade veroorzaakt aan
eigendommen of gereedschap en dat uzelf en/of omstanders gewond raken met mogelijk de dood tot gevolg. Dit
maaidek kan handen en voeten amputeren en voorwerpen wegslingeren. Het driehoekje in de tekst duidt op
belangrijke waarschuwingen waarmee rekening moet worden gehouden.
1. Vooraleer u met de trekker begint te werken, moet u alle
richtlijnen en uitleg in de handleiding gelezen en op de
machine begrepen hebben en alle voorzorgsmaatregelen
zorgvuldig opgevolgd hebben.
2. Plaats nooit uw handen of voeten in de buurt van draaiende
onderdelen of onder de machine. Blijf altijd uit de buurt van
de afvoeropeningen.
3. Laat enkel volwassenen met een groot
verantwoordelijkheidsgevoel die bovendien ook vertrouwd
zijn met de machine, werken met de trekker. In bepaalde
gebieden kunnen trouwens ook leeftijdsbeperkingen gelden
voor het werken met een dergelijke machine.
4. Zorg ervoor dat er zich in de buurt waar u gaat werken geen
rotsen, speelgoed en/of andere obstakels bevinden die de
goede werking van de machine zouden kunnen hinderen.
Het gevaar bestaat trouwens dat deze voorwerpen door het
maaidek zouden worden rondgeslingerd.
5. Vooraleer u begint te maaien, moet u ervoor zorgen dat er
zich geen andere mensen in de buurt bevinden. Komt er
iemand naar u toe, dan dient u de trekker te stoppen en de
motor stil te leggen.
6. Voer geen passagiers mee op de trekker.
7. Maai niet terwijl u achteruit rijdt, tenzij dit absoluut
noodzakelijk is. Kijk voor en tijdens het achteruitrijden naar
achteren en naar beneden.
8. Richt de materiaalafvoer nooit op iemand. Vermijd het
materiaal af te voeren tegen een muur of een hindernis.
Het materiaal kan terugkaatsen naar de gebruiker. Leg het
maaidek stil wanneer u over een ondergrond met kiezelsteen
moet rijden.
9. Werk nooit met de machine zonder dat het volledige
grasopvangsysteem, de afvoerafscherming (deector) of
andere veiligheidssystemen keurig op hun plaats gemonteerd
zijn.
10. Vertraag vooraleer u een bocht neemt.
11. Laat de trekker nooit achter met draaiende motor. Schakel
altijd eerst de PTO-koppeling uit, activeer de parkeerrem, leg
de motor stil en trek de sleutels uit het contact vooraleer u van
de trekker stapt.
12. Schakel het maaidek (PTO) uit wanneer u niet maait.
Leg de motor stil en wacht tot alle onderdelen volledig tot
stilstand zijn gekomen alvorens de machine te reinigen, het
grasopvangsysteem te verwijderen of de afvoerafscherming
vrij te maken.
13. Werk met deze machine enkel tijdens het daglicht of bij goed
kunstlicht.
14. Werk nooit met de machine terwijl u onder invloed bent van
drugs, geneesmiddelen of alcohol.
15. Let goed op het verkeer wanneer u in de buurt van een
openbare weg werkt of deze moet oversteken.
16. Wees extra voorzichtig als u de machine op een
aanhangwagen of in een vrachtwagen laadt.
17. Draag altijd oogbescherming terwijl u met deze machine
werkt.
18. Uit statistische gegevens blijkt dat vooral 60-plussers
betrokken zijn in een groot aantal ongelukken met trekkers
en maaiers. Het behoort tot de verantwoordelijkheid van alle
bestuurders in kwestie om zo precies mogelijk te bepalen of
ze nog wel of niet meer in staat zijn een dergelijke machine
veilig te besturen en hun omgeving te vrijwaren van mogelijke
ongelukken.
19. Volg de aanbevelingen van de fabrikant in verband met
wielgewichten of tegengewichten.
20. Denk eraan dat het steeds de bestuurder van de trekker is die
verantwoordelijk zal worden gesteld voor ongelukken die hij
veroorzaakt aan derden of goederen van derden.
21. Alle bestuurders moeten ervoor zorgen dat ze een
professionele en praktijkgerichte opleiding krijgen om met
deze machine te werken.
22. Draag bij het werken met de trekker en de maaier steeds
een lange broek en beschermend schoeisel. Werk nooit
blootsvoets of op sandalen.
23. Vooraleer u de maaier gebruikt, moet u nagaan of de
maaibladen nog intact zijn, of ze niet beschadigd of
versleten zijn en of ze nog goed vastzitten. Versleten en/
of beschadigde onderdelen moeten onmiddellijk worden
vervangen.
24. Schakel hulpstukken altijd uit als u een van volgende
handelingen wenst te verrichten: bijtanken, een hulpstuk
regelen of verwijderen (tenzij de regeling kan gebeuren van
op de berijdersstoel).
25. Als u de machine parkeert, opbergt of om een bepaalde
redden onbeheerd achterlaat, moet u het maaidek steeds
volledig laten zakken, tenzij het maaidek mechanisch
vergrendeld wordt.
26. Alvorens de berijdersstoel te verlaten, om eender welke
reden, moet u de parkeerrem activeren, de aftakas
uitschakelen, de motor stilleggen en de sleutel uit het contact
verwijderen.
27. Om brandgevaar te verminderen, moet u ervoor zorgen dat
de machine vrij blijft van gras, bladeren en overtollige olie.
Stop of parkeer de machine niet boven droge bladeren, gras
of brandbaar materiaal.
TRANSPORT EN BERGING
1. Als u deze trekker transporteert op een open aanhangwagen,
moet u ervoor zorgen dat hij met de voorzijde in de rijrichting
staat. Mocht de trekker achterwaarts op de aanhangwagen
staan, dan kan de wind de motorkap optillen en deze ernstig
beschadigen.
2. Neem de nodige veiligheidsvoorschriften in acht als u de
trekker na transport of berging weer vult met brandstof.
3. Stal de machine nooit (met benzine) in een besloten, slecht
geventileerde ruimte. Brandstofdampen kunnen bij een
ontstekingsbron (zoals een verwarmingsketel, boiler enz.)
komen en een ontplong veroorzaken. Brandstofdampen
zijn ook giftig voor mens en huisdier.
4. Neem voor het bergen van de trekker altijd de richtlijnen van
de motorleverancier in acht. U vindt deze richtlijnen in de
handleiding van uw motorleverancier. Volg deze richtlijnen
zowel voor een berging van korte duur als wanneer u de
machine voor langere duur opbergt.
5. Als u de machine weer in dienst stelt na een periode van
inactiviteit moet u ervoor zorgen dat u alle richtlijnen van uw
motorleverancier zo precies mogelijk navolgt.
6. Berg de machine of de brandstofvoorraad nooit op in een
plaats waar ze in contact zouden kunnen komen met vuur,
vonken of een waakvlam, van bv. bij een geiser. Laat de
machine volledig afkoelen vooraleer u ze opbergt.
4
Page 95

Not for
Reproduction
Veiligheidsvoorschriften en -informatie
GEBRUIK OP HELLINGEN
In heel wat gevallen heeft het verlies van controle over de trekker
of ongelukken, zoals het omkantelen van de trekker, precies te
maken met hellingen. Dergelijke ongelukken resulteren meestal in
zware verwondingen met mogelijk de dood tot gevolg. U dient dus
extra voorzichtig te zijn als u werkt op hellingen. Als u de helling
niet achteruit op kunt of als u zich niet veilig voelt, doet u er goed
aan niet op de helling te werken. Als u begint weg te glijden op een
helling kunt u de controle over uw machine niet meer terugkrijgen
door op de rem te gaan staan.
De voornaamste oorzaken die tot het verlies van controle over uw
machine kunnen leiden, zijn de volgende: onvoldoende grip van de
wielen, te hoge rijsnelheid, ongepast remgedrag, verstrooidheid,
een machine gebruiken die niet geschikt is voor de taak die u wenst
uit te voeren, verkeerd aangebrachte hulpstukken en een ongelijke
verdeling van de lading.
1. Maai hellingen door recht naar boven en recht naar beneden
te rijden. Rij nooit zijdelings op de ank van de helling.
2. Kijk uit voor kuilen, groeven of schokken. Op oneen
ondergrond kan de machine omkantelen. In hoog gras
kunnen hindernissen verborgen zijn.
3. Kies een lage versnelling, zodat u niet hoeft te stoppen of
schakelen terwijl u op een helling werkt.
4. Maai niet wanneer het gras nat is. De banden kunnen hun
grip verliezen.
5. Laat de machine altijd in versnelling, in het bijzonder wanneer
u hellingen afrijdt. Schakel niet naar neutraal om de helling af
te rollen.
6. Vermijd starten, stoppen of draaien op een helling. Indien de
banden hun grip verliezen, schakel dan het maaidek uit en
rijd langzaam in een rechte lijn de helling af.
7. Voer alle bewegingen op hellingen langzaam en geleidelijk
uit. Verander niet bruusk van snelheid of richting, want
hierdoor kan de machine kantelen.
8. Wees extra voorzichtig wanneer u werkt met een machine
met een grasopvangsysteem of een ander hulpstuk, want de
stabiliteit van de machine kan hierdoor worden beïnvloed.
9. Probeer nooit de machine te stabiliseren door uw voet op de
grond te plaatsen.
10. Maai niet in de buurt van sterke hellingen, sloten of
ophogingen. De maaier zou plots kunnen kantelen indien een
wiel over de rand van een afgrond of sloot geraakt, of indien
een rand inzakt.
11. Gebruik geen grasopvangsystemen op steile hellingen.
12. Maai geen hellingen waarop u niet kunt achteruit rijden.
13. Neem contact op met uw erkende verdeler voor de
aanbevolen wielgewichten of tegengewichten ter verbetering
van de stabiliteit.
14. Verwijder hindernissen zoals rotsen, grote takken enz.
15. Werk langzaam. De banden kunnen hun grip verliezen op
hellingen, ook wanneer de remmen correct werken.
16. Draai niet op hellingen. Als dit niet kan worden vermeden,
draai dan langzaam en geleidelijk naar beneden toe indien
mogelijk.
VOORTGETROKKEN UITRUSTING
1. Trek uitsluitend met een machine die voorzien is van een
trekhaak. Maak voortgetrokken uitrusting enkel vast aan een
trekhaak en nergens anders aan de machine.
2. Volg de aanbevelingen van de fabrikant in verband met het
maximaal toegelaten gewicht van voortgetrokken uitrusting
en het trekken van voortgetrokken uitrusting op hellingen.
3. Laat kinderen of andere personen nooit in of op de
voortgetrokken uitrusting klimmen.
4. Op hellingen kunnen de banden onder het gewicht van
de voortgetrokken uitrusting hun grip verliezen, zodat de
machine onbestuurbaar wordt.
5. Rij langzaam en houd rekening met een extra lange
remafstand.
6. Schakel niet in neutraal om de helling af te rollen.
WAARSCHUWING
Gebruik de machine nooit op hellingen met meer dan
17,6% stijgingspercentage (10 graden), d.w.z. hellingen
waarbij over een afstand van 607 cm een hoogteverschil
van 106 cm overwonnen wordt.
Als u de machine gebruikt op hellingen moet u extra
wielgewichten of tegengewichten gebruiken. Neem contact
op met uw geautoriseerd verdeler om na te gaan welke
gewichten voor uw machine beschikbaar zijn en welke
geschikt zijn om het werk in kwestie uit te voeren.
Kies de lage versnelling voordat u op de helling begint te
rijden. Zelfs indien u extra wielgewichten of tegengewichten
geplaatst hebt, moet u op hellingen vooral voorzichtig
zijn als u achter op de trekker een grasopvangsysteem
geïnstalleerd hebt.
Maai hellingen door recht naar BOVEN en recht naar
BENEDEN te rijden, NOOIT zijdelings tegen de ank van
de helling. Wees voorzichtig als u van richting verandert en
STOP of VERTREK NIET op een helling.
KINDEREN
Als de bestuurder van de trekker niet aandachtig genoeg is, kunnen
er zich tragische ongelukken voordoen met spelende kinderen.
Kinderen voelen zich nu eenmaal vaak aangetrokken door de
machine en het maaien. Hou kinderen dus steeds in de gaten en
hou er rekening mee dat ze zich niet noodzakelijk meer op dezelfde
plek bevinden als enkele ogenblikken voordien.
1. Hou kinderen weg uit het maaigebied en zorg ervoor dat ze
onder het toezicht staan van een volwassene met een groot
verantwoordelijkheidsgevoel.
2. Wees attent en zet de machine uit als kinderen dichterbij
komen.
3. Kijk voor en tijdens het achteruitrijden naar beneden en naar
achteren.
4. Laat nooit kinderen meerijden, zelfs niet met de maaibladen
gedemonteerd. Ze zouden van de machine kunnen vallen
en ernstig letsel oplopen of door hun handelingen het veilige
gebruik van de machine in het gedrang brengen. Kinderen
die vroeger ooit hebben meegereden, kunnen plotseling in
het maaigebied komen om nogmaals mee te rijden en lopen
zo het gevaar om overreden te worden.
5. Laat de trekker ook nooit door kinderen besturen.
6. Wees extra voorzichtig bij dode hoeken, struiken, bomen
en andere voorwerpen die de zichtbaarheid zouden kunnen
belemmeren.
1. De uitlaatgassen van deze machine bevatten stoen die
schadelijk zijn voor de gezondheid en die bij bepaalde
hoeveelheden kanker kunnen veroorzaken of kunnen leiden
tot misvormingen en/of andere genetische afwijkingen bij de
geboorte.
2. Informatie over de duurzaamheidsperiode van de relevante
emissies en de luchtindex vindt u op het emissiselabel van de
motor.
1. Dit ontstekingssysteem door middel van een elektrische vonk
is conform de Canadese norm ICES-002.
5
Page 96

Not for
Reproduction
Veiligheidsvoorschriften en -informatie
ONDERHOUD EN NAZICHT
Veilig omgaan met benzine
1. Doof alle sigaretten, sigaren, pijpen en andere mogelijke
ontstekingsbronnen.
2. Gebruik enkel goedgekeurde benzinerecipiënten.
3. Verwijder nooit de tankdop of tank nooit terwijl de motor
draait. Laat de motor afkoelen alvorens te tanken.
4. Tank nooit binnen, maar altijd buiten.
5. Plaats de machine of de brandstofrecipiënt nooit in de
buurt van een open vlam, vonken, of een waakvlam, zoals
bijvoorbeeld in de buurt van een geiser of een ander toestel.
6. Vul de recipiënten nooit in een voertuig of op de laadvloer
van een vrachtwagen met een kunststoen bodembekleding.
Plaats recipiënten altijd op de grond, weg van uw voertuig,
alvorens ze te vullen.
7. Verwijder benzineaangedreven machines van de
vrachtwagen of de aanhangwagen en tank ze vol op de
grond. Indien dit niet mogelijk is, vul de machines dan op een
aanhangwagen met een draagbare recipiënt in plaats van met
het tankpistool.
8. Houd het tankpistool de hele tijd in contact met de rand van
de brandstoftank of de opening van de recipiënt totdat deze
gevuld is. Gebruik geen pistoolvergrendel/openingssysteem.
9. Indien u brandstof op uw kleren morst, moet u onmiddellijk
andere kleren aantrekken.
10. Overvul de tank nooit. Plaats de tankdop terug en zet hem
goed vast.
11. Wees extra voorzichtig in de omgang met benzine en andere
brandstoen. Zij zijn ontvlambaar en de dampen die ze
ontwikkelen zijn ontplofbaar.
12. Indien er brandstof wordt gemorst, probeer dan niet de
motor te starten, maar verplaats de machine, weg van
de plaats waar gemorst werd, en zorg er nauwgezet voor
op geen enkele manier vonken te veroorzaken zolang de
brandstofdampen niet volledig zijn verdampt.
13. Plaats alle doppen zorgvuldig terug op de brandstoftank(s) en
de brandstofrecipiënt(en).
Service en onderhoud
1. Laat de machine nooit draaien in een gesloten ruimte waar de
koolstofmonoxidedampen zich kunnen ophopen.
2. Zorg ervoor dat de moeren en bouten, in het bijzonder de
bevestigingsbouten van de maaibladen, altijd goed vast staan
en houd het materieel in goede toestand.
3. Knoei nooit met de veiligheidssystemen. Controleer
regelmatig of ze naar behoren werken en voer de nodige
herstellingen uit indien ze niet goed werken.
4. Houd de machine vrij van gras, bladeren of andere
vuilophoping. Ruim gemorste olie of brandstof op.
5. Stop, leg de motor stil en controleer de machine nadat ze een
voorwerp geraakt heeft. Voer herstellingen uit indien nodig,
alvorens te herstarten.
6. Voer nooit afstellingen of herstellingen uit terwijl de motor
draait, tenzij uitdrukkelijk het tegendeel is vermeld in de
handleiding van de motorfabrikant.
7. De onderdelen van het grasopvangsysteem staan bloot
aan slijtage en allerlei vormen van beschadiging, waardoor
bewegende onderdelen zichtbaar kunnen worden of objecten
unnen worden rondgeslingerd. Controleer deze onderdelen
op regelmatige basis en vervang ze desnoods door de
wisselstukken die de fabrikant daarvoor aanbeveelt.
8. Maaibladen zijn heel scherpe voorwerpen die diepe
snijwonden kunnen veroorzaken. Wikkel de maaibladen in
een omhulsel of draag handschoenen als u ze vastneemt.
Wees ook extra voorzichtig als u onderhoudswerkzaamheden
uitvoert aan de maaibladen.
9. Controleer regelmatig of de rem nog goed werkt. Voer
eventueel de nodige regelingen of herstelwerkzaamheden uit.
10. Onderhoud of vervang de veiligheids- en aanwijzingslabels
indien nodig.
11. Verwijder de brandstolter niet wanneer de motor heet is,
want gemorste benzine kan ontsteken. Plaats de klemmen
voor de brandstoeiding niet verder uit elkaar dan nodig.
Controleer of de klemmen de slang stevig over de lter
vasthouden na de installatie.
12. Gebruik geen benzine met METHANOL of gasohol met meer
dan 10% ETHANOL of benzineadditieven of wasbenzine,
want de motor/het brandstofsysteem kan hierdoor schade
oplopen.
13. Indien de brandstoftank moet worden afgetapt, doe dit dan
buiten.
14. Vervang een defecte knaldemper.
15. Gebruik bij het uitvoeren van herstelwerkzaamheden
uitsluitend door de fabrikant goedgekeurde wisselstukken.
16. Hou bij het uitvoeren van regelingen en
herstelwerkzaamheden altijd rekening met de specicaties en
instellingen opgegeven door de fabrikant.
17. Grote onderhouds- en herstelwerkzaamheden laat u best
gebeuren in erkende en door de fabrikant goedgekeurde
service centers.
18. Voer zelf geen grote herstelwerkzaamheden aan
deze machine uit tenzij u daarvoor de noodzakelijke
technische opleiding gekregen hebt. Verkeerd uitgevoerde
onderhoudswerkzaamheden kunnen tot gevaarlijke situaties,
schade aan de machine en een nietigverklaring van de
garantie leiden.
19. Denk er bij een maaidek met meer dan één blad aan dat het
éne blad het andere in beweging kan zetten.
20. Verander niets aan het motormanagement van de motor en
voer de motor niet op. Hoge motorsnelheden verhogen het
risico op ongelukken.
21. Koppel aangedreven hulpstukken los, leg de motor stil,
haal de sleutel uit het contact en maak de draden van
de ontstekingsbougies los in volgende gevallen: als u
ophopingen van gras en andere materialen in de uitvoer
wenst te verwijderen, als u onderhoudswerkzaamheden
wenst uit te voeren, als u een voorwerp geraakt hebt of
als de machine abnormaal begint te trillen. Hebt u een
voorwerp geraakt, dan moet u nagaan of de machine
schade opgelopen heeft en deze herstellen vooraleer u
de machine opnieuw mag opstarten en doorgaan met de
werkzaamheden.
22. Plaats uw handen nooit in de buurt van de koelventilator
van de hydrostatische pomp terwijl de motor nog loop. Deze
ventilator bevindt zich aan de bovenzijde van de aandrijfas.
23. Machines met hydraulische pompen, slangen of motoren:
WAARSCHUWING: Hydraulische vloeistof die onder
druk ontsnapt, kan voldoende kracht hebben om de huid
te doorboren en ernstig letsel te veroorzaken. Als een
lichaamsvreemde vloeistof in de huid wordt geïnjecteerd,
moet deze binnen enkele uren chirurgisch worden verwijderd
door een arts die vertrouwd is met deze vorm van letsel.
Zoniet kan koudvuur optreden. Houd uw lichaam en handen
weg van pengaten of openingen waaruit hydraulische
vloeistof onder hoge druk wordt verstoven. Gebruik voor het
opsporen van lekken papier of karton en niet uw handen.
Zorg ervoor dat alle hydraulische- vloeistofverbindingen goed
vast staan en dat alle hydraulische slangen en leidingen in
goede staat verkeren alvorens het systeem onder druk te
zetten. In geval van een lek dient u de machine onmiddellijk
te laten nazien door een geautoriseerd verdeler.
24. WAARSCHUWING: Energieaccumulator De veren op
verkeerde wijze losmaken kan ernstig letsel veroorzaken.
Veren mogen enkel door een geautoriseerd verdeler worden
verwijderd.
25. Modellen met een motorradiator: WAARSCHUWING:
Energieaccumulator Ter voorkoming van ernstig lichamelijk
letsel door hete koelvloeistof of een stoomlek mag u nooit de
radiatordop proberen verwijderen terwijl de motor draait. Leg
de motor stil en wacht tot hij afgekoeld is. Zelfs dan moet u
nog uiterst voorzichtig zijn wanneer u de dop verwijdert.”
6
Page 97

Not for
Reproduction
Productreferentiegegevens
Noteer de naam en het nummer van uw model,
de identicatienummers van de fabrikant en de
serienummers van de motor in de daartoe voorziene
ruimte zodat u ze bij de hand hebt. Deze nummers vindt u
op de afgebeelde locaties.
Wanneer u contact opneemt met uw erkend verdeler
voor reserveonderdelen, herstellingen of informatie,
PRODUCTREFERENTIEGEGEVENS
Omschrijvende benaming/nummer van het model
PRODUCTNUMMER van het toestel SERIENUMMER van het toestel
PRODUCTNUMMER van het maaidek SERIENUMMER van het maaidek
Naam van de verdeler Aankoopdatum
Merk van de motor Motormodel
Motortype/-specicatie Code/serienummer van de motor
A. Productidenticatienummer van de fabrikant
B. Serienummer van de fabrikant
C. Naam en adres van de fabrikant
D. Maximale motorsnelheid in toeren per minuut
E. Nominaal vermogen in kilowatt
F. Gewicht van het toestel in kilogram
G. CE-logo (als bevestiging dat aan de CE-vereisten
wordt voldaan)
H. Jaar van fabricage
I. Gegarandeerd geluidsniveau in decibel
A
MODEL NO. xxxxxxx
SERIAL NO. xxxxxxxxxx
B
C
XXXXXXXXXXXXXXXXXXXXXX
XXXXXXXXXXXXXXXXX
“Betrouwbaarheid trillingsmeting – de trilling van de
machine is gemeten met de methodes en procedures die
worden beschreven in de Internationale Standaards die
ten tijde van de fabricage van kracht waren. De betrouwbaarheid van deze meting mag tot 5% afwijken van de
gepubliceerde waarde die wordt genoemd in de Verklaring
van overeenstemming.”
D
xxxx min
E
x.x kW
xxx kg
F
G
20xx
-1
H
xxx
I
dB
7
Page 98

Not for
Reproduction
Waarschuwingsstickers
Locatie van de waarschuwingsstickers
Contactsleutelstanden
stuknr. 1722806
CE-modellen, stuknr. 1750191
Opgepast, knelpunt
stuknr. 1720389
1730172
Brandstofpeil
stuknr. 1730172
173xxxx
voor transmissie
stuknr. 1730202
1730264
Opgepast, knelpunt
stuknr. 1720389
Hefsysteem voor
hulpstukken stuknr.
1730264
8
Page 99

Not for
Reproduction
Waarschuwingsstickers
Veiligheidsstickers
Alle informatie op uw zitmaaier met de melding GEVAAR,
WAARSCHUWING en OPGEPAST en met instructies
moet zorgvuldig worden gelezen en nauwgezet worden
nageleefd. Anders kan lichamelijk letsel ontstaan. Het gaat
om belangrijke informatie die bedoeld is voor uw veiligheid!
De onderstaande veiligheidsstickers bevinden zich op het
tractorgedeelte en het maaidek van uw zitmaaier.
Veiligheidspictogrammen
1
3
5
2
4
Als een van deze stickers weg of beschadigd is, vervangt
u hem meteen. Raadpleeg een erkende dealer voor
reserveonderdelen.
Deze stickers zijn gemakkelijk aan te brengen en zijn een
constante visuele herinnering voor u en andere gebruikers
van het product dat u de veiligheidsvoorschriften die nodig
zijn voor een veilig en eectief gebruik moet naleven.
6
7
1. WAARSCHUWING: Zorg dat u de
gebruikershandleiding hebt gelezen en begrijpt
voor u deze machine gebruikt. Weet waar alle
bedieningselementen zich bevinden en hoe deze
werken. Gebruik deze machine alleen als u voldoende
kennis hebt.
2. GEVAAR - VERLIES VAN TRACTIE, STABILITEIT,
STUREN EN BEDIENEN OP HELLINGEN: als de
machine op een helling niet meer vooruit rijdt en begint
weg te glijden, stop dan de snijmessen en rijd langzaam
de helling af.
3. GEVAAR: BRANDGEVAAR: Zorg dat de machine
vrij is van gras, gebladerte en olieresidu. Voeg geen
brandstof toe terwijl de motor draait of heet is. Stop
de motor en laat hem ten minste 3 minuten afkoelen
alvorens brandstof toe te voegen. Voeg nooit brandstof
toe binnenshuis of in een afgesloten trailer, garage of
andere afgesloten ruimtes. Neem gemorste brandstof
op. Rook niet als deze machine bedient.
4. GEVAAR - KANTELEN EN WEGGLIJDEN: Maai
hellingen in de hellingsrichting, niet overdwars. Maai niet
op hellingen van meer dan 10°. Voorkom plotselinge en
scherpe (snelle) bochten op hellingen.
8
5.
om letsel van ronddraaiende snijmessen
en bewegende delen te voorkomen, moeten de
veiligheidsvoorzieningen (beschermplaten, schermen en
schakelaars) aanwezig zijn en goed werken.
6. Maai niet als kinderen of andere personen in de buurt
zijn. Laat niemand meerijden, zeker geen kinderen,
ook niet als de snijmessen zijn uitgeschakeld. Maai niet
achteruit, tenzij absoluut noodzakelijk. Kijk omlaag en
achter u, voordat en terwijl u achteruitrijdt.
7. Raadpleeg de technische documentatie voordat u
technische reparaties of onderhoud verricht. Als u de
machine verlaat, schakel de motor dan uit, trek de
handrem aan en verwijder de contactsleutel.
8. Houd omstanders en kinderen op een veilige
afstand. Verwijder voorwerpen die door het snijmes
weggeslingerd kunnen worden. Maai alleen met
aangebrachte afvoertrechter.
9
Page 100

Not for
Reproduction
Functies en bedieningsinstrumenten
Figuur 1. Bedieningsinstrumenten
Besturingsfuncties
In wat volgt wordt de functie van elk bedieningsinstrument kort toegelicht. Om te starten, stoppen, rijden en maaien
moet een combinatie van meerdere bedieningsinstrumenten in een specieke volgorde worden gebruikt. Welke
combinatie en volgorde voor de diverse taken vereist zijn, vindt u onder MET DE ZITMAAIER WERKEN.
Gas-/chokehendel (Choke-A-
De gas-/chokehendel regelt het motortoerental en de
choke (zie guur 1). Zet de gas-/chokehendel in de stand
SNEL om het motortoerental te verhogen en in de stand
LANGZAAM om het motortoerental te verlagen. Werk
altijd met volgas. Zet de gas-/chokehendel in de stand
CHOKE om een koude motor te starten. bij een warme
motor hoeft de choke eventueel niet te worden gebruikt.
Koplampen
Met de verlichtingsschakelaar worden de koplampen van
de zitmaaier in- en uitgeschakeld.
Uurmeter
De uurmeter meet het aantal uur dat de sleutel in de
stand AAN heeft gestaan.
10
 Loading...