

Page 1
i
My Wi-Fi Network 1
My Wi-Fi Network 2
Wi-Fi
ON
OFF
ALTUS™ - User’s Guide
Diagnostic Thermal Imager - Elite
221
69
21
69
°F
175
100%
2X
60%
This User’s Guide includes ALTUS registration and operation
instructions.
ALTUS is a mobile-friendly cloud-based application designed
specifically for technicians to store, organize and share
diagnostic information.
The Diagnostic Thermal Imager Elite includes a built-in feature
that automatically transfers captured images to
ALTUSDRIVE.com.
Topic Links
• Thermal Imager Elite Wi-Fi Connection
• ALTUS Registration
– ALTUS - New User Registration
– ALTUS - SureTrack User Setup
• Using ALTUS
– Logging In to ALTUS
– Navigating ALTUS (Toolbars)
– My Files
– Shop Files
– Search
– Favorites
– Profile
– Using Profile Manager
– Printing
– Logging Out of ALTUS
ALTUS Features
• Automatically transfer captured thermal images to your
ALTUS account on ALTUSDRIVE.com.
• Access your online thermal image gallery using your
mobile device or PC.
• Share/send individual images or your entire image gallery
via e-mail, text and social media.
• Download images to your PC (transfer/print/share).
• Tag images (attach descriptive text) to help you search
your gallery.
• Add images to Favorites for easy recall.
• Use the Search function to quickly find images in your
gallery by user defined Tag, Description and Title text.
Important Notes
• To use ALTUS, the to ol must have a Wi-Fi connectio n, and
you will need to register on ALTUSDRIVE.com.
• Wi-Fi connection is required to upload the images to
ALTUSDRIVE.com. If the device is not connected to a
Wi-Fi network when the images are taken, they will not be
sent to your ALTUS account.
• The Diagnostic Thermal Imager Elite only transfers images
to ALTUS, not videos.
• ALTUSDRIVE.com navigation and menu options will vary
by device and/or operating system (PC, mobile, etc).
Some menu selections may be grayed out or not shown,
indicating the option is not supported on your device/
system. Some menu options shown in these instructions
may be not be available on your device.
• ALTUSDRIVE.com is continuously monitored for
inappropriate content. Abuse (as determined by
moderator) will result in account deactivation.
Thermal Imager Elite Wi-Fi
Connection
Connecting the thermal imager to a Wi-Fi network:
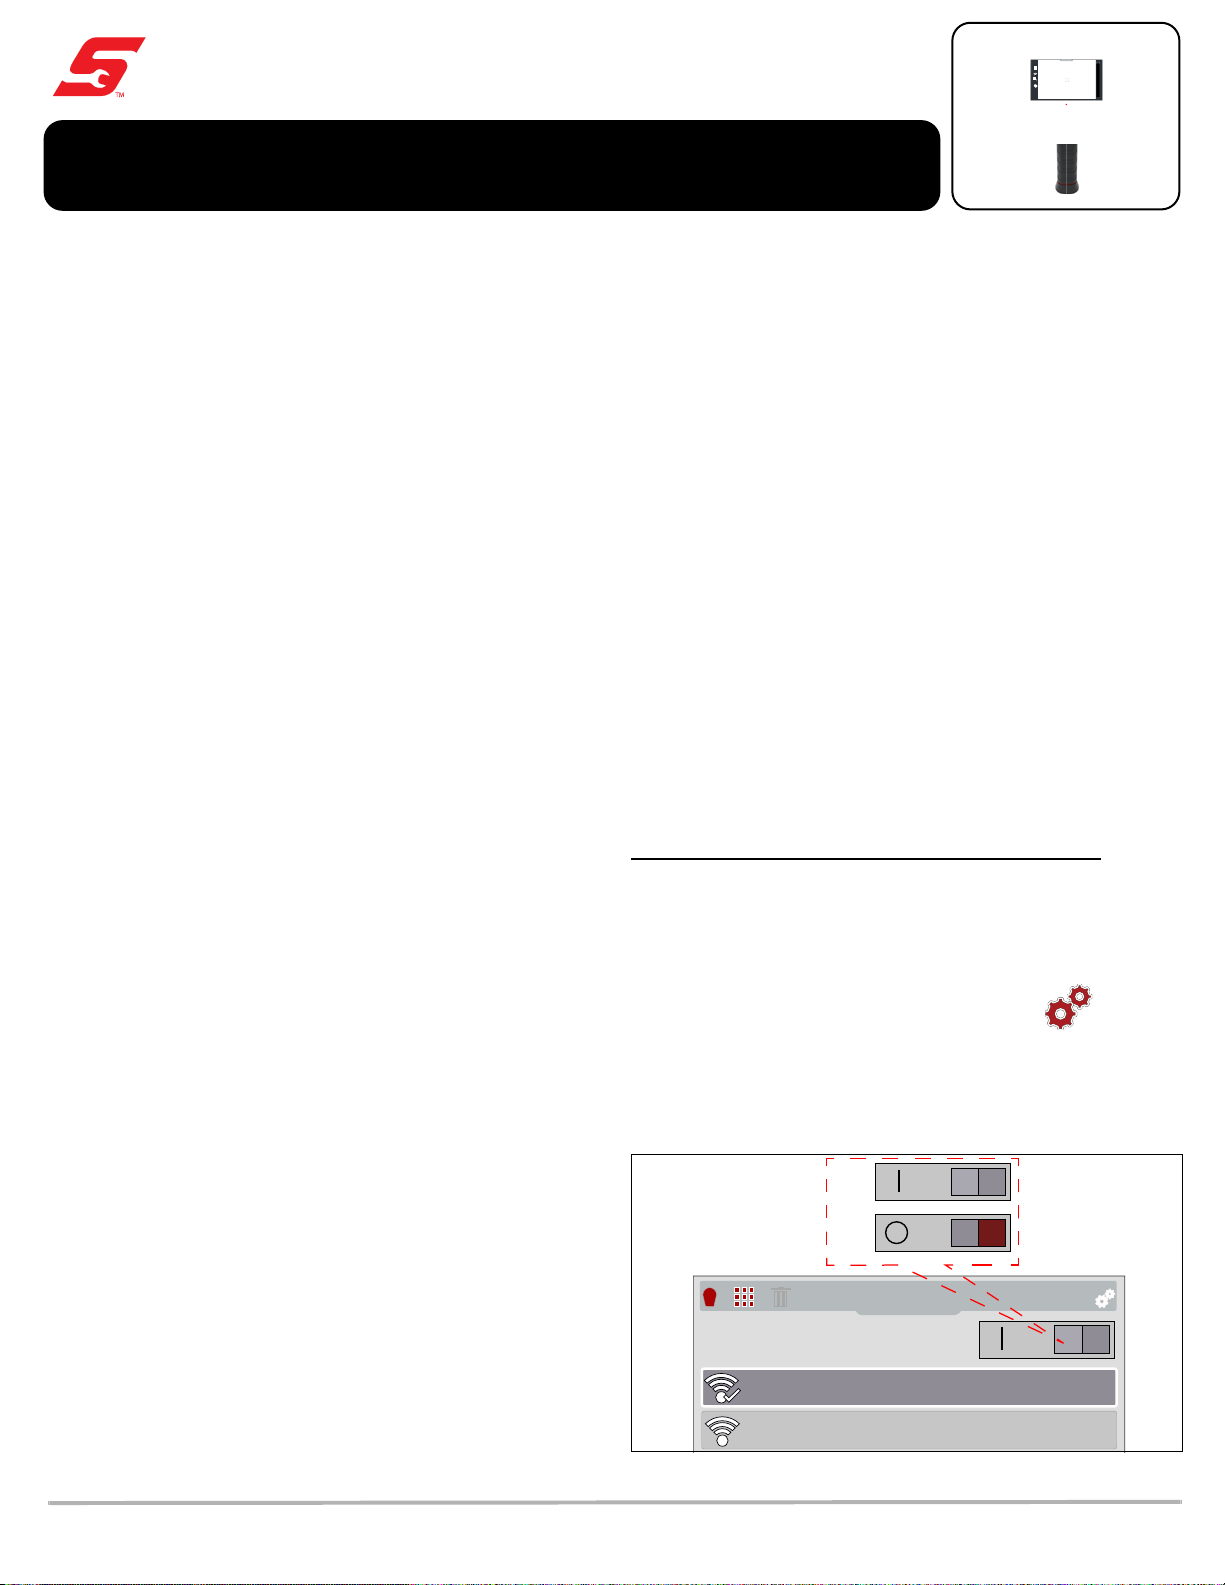
Selecting Wi-Fi Connection from the settings menu allows
you to turn Wi-Fi on/off and select a wireless network
(Figure 1).
1. Turn on the thermal imager and press the Menu button.
2. From the toolbar select the Settings icon .
3. Select Wi-Fi Connection from the menu.
4. To turn Wi-Fi on/off, press the UP control button to select
the Wi-Fi Power icon, then press the Y button to turn
(toggle) Wi-Fi on/off (Figure 1).
Figure 1 Wi-Fi On/Off / Network Selection
1
Page 2
5. Press the Down control button to enter the Wi-Fi network
i
Wi-Fi Password
i
Ok
Serial Number: 123HTM123456
PIN: 123456
Code: 5DED9GJ8
ALTUSDRIVE.com
If you’re a new owner of this tool please register your device at
ALTUSDRIVE.com, doing this will prevent les that you capture from
being uploaded to the previous owners account.
list, then use the Up / Down control buttons to select a
wireless network. Press the Y button to enable the
selection.
For additional information on Wi-Fi, see the Diagnostic Thermal
Imager Elite user manual. User manuals are located at:
www.snapon.com/diagnostics/us/UserManuals
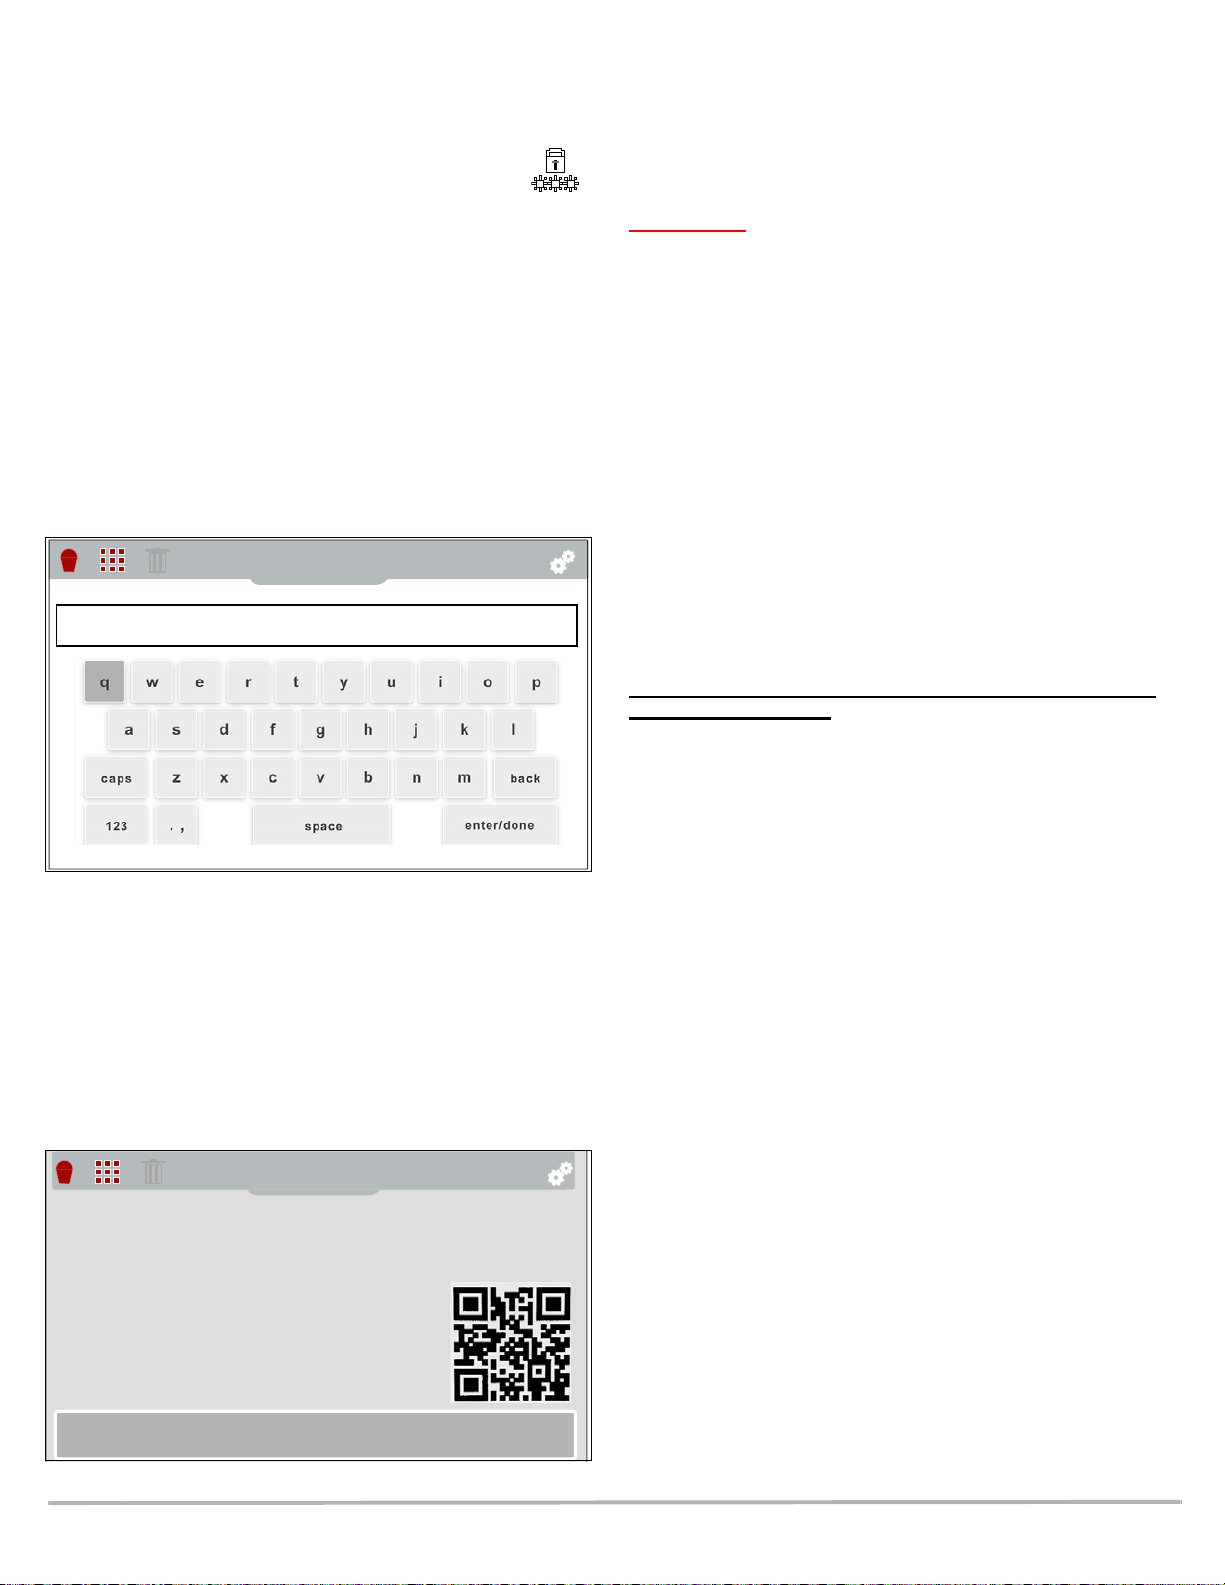
6. If a password is required when choosing a secured
(protected) network, enter the password using the
on-screen keyboard and the directional control buttons.
Select the “enter/done” key when finished (Figure 2).
Notes:
• A password is required when choosing a secu red
(protected) network. Enter the password using the onscreen keyboard and then select the check mark on the
keyboard to continue.
• Networks with a proxy, challenge page, or that require the
user to accept terms of usage are not supported.
• Wi-Fi performance varies depending on your wireless
network equipment and ISP.
Figure 2 Wi-Fi Password Screen
When successfully connected to a Wi-Fi network, a check mark
will display on the Wi-Fi icon.
7. A confirmation screen displays showing the device serial
number, PIN and Code. These numbers are needed for
ALTUS account setup (Figure 3), see ALTUS Registration
on page 2.
Use the QR code to open ALTUSDRIVE.com on your
personal mobile device (Figure 3).
Figure 3 Wi-Fi Password Screen
ALTUS Registration
IMPORTANT - If you are a new owner of this tool (acquired
secondhand), you must register this tool with your ALTUS
account in order to transfer files to your account. If you do not
register the tool with your account, captured files will be sent to
the previous owners ALTUS account.
To use ALTUS:
• The Diagnostic Thermal Imager Elite must be connected to
a Wi-Fi network, see Thermal Imager Elite Wi-Fi
Connection on page 1.
• ALTUS registration is required.
– If you are a new user, you will need to create a new
account, see ALTUS - New User Registration.
– If you already have a SureTrack
- SureTrack User Setup.
ALTUS - New User Registration
If you are a new user, follow these steps to register and
create a new account:
1. Connect the thermal imager to a Wi-Fi network, see
Thermal Imager Elite Wi-Fi Connection on page 1.
2. Write down the Serial Number, PIN and Code that are
displayed when the device connects to the Wi-Fi network,
or leave the screen displayed. These codes can also be
found in the Settings menu, see ALTUS Setup Information
Screen on page 3.
3. Using a mobile device or PC, visit
https://ALTUSDRIVE.com and select Create Individual
Account from the Login screen.
4. Enter the required information and create a Username a nd
Password, then select Create.
5. At the “Success” confirmation screen, select Done.
6. Log in using your Username and Password.
7. Answer the security questions, then select Submit.
8. From “Technician Profile Manager” select the Device
Management tab. See Device Management on page 9 for
a description of this screen.
9. Select Add Device, then enter your Serial Number, PIN,
Code, and Device Name and select Save when done.
10. Log out of “Profile Manager”, then select the ALTUS Home
Page browser tab to get started.
11. Turn the thermal imager off, and then on.
12. See Using ALTUS for operation instructions.
Your thermal imager is now registered to your ALTUS online
account. When connected to Wi-Fi, your images will be
automatically sent to the online account from the device.
®
account, see ALTUS
2
Page 3

ALTUS - SureTrack User Setup
i
Serial Number: 123HTM123456
PIN: 123456
Code: B12A456C
Go to ALTUSDRIVE.com
If you already have a SureTrack account, follow these
steps to setup and register your ALTUS account:
From a PC or mobile device:
1. Connect the thermal imager to a Wi-Fi network, see
Thermal Imager Elite Wi-Fi Connection on p age 1.
2. Write down the Serial Number, PIN and Code that are
displayed when the device connects to the Wi-Fi network,
or leave the screen displayed. These codes can also be
found in the Settings menu, see ALTUS Setup Information
Screen on page 3.
3. Using a mobile device or PC, visit
https://ALTUSDRIVE.com and select Login (upper right
screen).
4. Log in using your SureTrack Username and Password.
5. Open Profile Manager (additional login may be required).
6. From the Device Management tab, select Add Device.
See Device Management on page 9 f or a des cri pti on o f th is
screen.
7. Enter your Serial Number, PIN, Code, and Device Name.
8. Log out of “Profile Manager”, then select the ALT U S H o m e
Page browser tab to get started.
9. Turn the thermal imager off, and then on.
10. See Using ALTUS for operation instructions.
Your thermal imager is now registered to your ALTUS online
account. When connected to Wi-Fi, your images will be
automatically sent to the online account from the device.
Figure 4
Note: The PIN and Code numbers will change each time you
view the ALTUS Setup screens (Figure 4 and Figure 5). This
is normal, any displayed set of PIN and Code numbers may
be used to register on ALTUSDRIVE.com.
Using ALTUS
Note: AL TUSDRIVE.com navigation and menu options will
vary by device and/or operating system (PC, mobile, etc).
Some menu selections may be grayed out or not shown,
indicating the option is not supported on your device/system.
Some menu options shown in these instructions may be not be
available on your device.
To use ALTUS
:
ALTUS Setup Information Screen
From the imager, selecting ALTUS Setup (Figure 4) from the
Settings menu allows you to view the diagnostic tool serial
number, PIN and Code needed to register on
ALTUSDRIVE.com.
1. Press the Menu button.
2. Select the Settings icon from the toolbar, then select
ALTUS Setup from the menu.
ALTUS Setup displays the following:
• Device Serial Number
• PIN
• Code
• ALTUSDRIVE.com QR code
This information is used when registering on
ALTUSDRIVE.com.
• An ALTUS account is required, see ALTUS Registration on
page 2.
• The thermal imager must be connected to a Wi-Fi network,
see Thermal Imager Elite Wi-Fi Connectio n on p age 1.
Logging In to ALTUS
1. Using your mobile device or PC visit ALTUSDRIVE.com.
2. Select the Login icon (Figure 5).
Figure 5
3
Page 4

3. Log in using your Username and Password (Figure 6).
Figure 6
My Files
My Files displays all the images uploaded from the thermal
imager (Figure 9). Each image is displayed in a navigation
card.
Navigating ALTUS (Toolbars)
The upper and lower toolbars are available from all screens.
The upper toolbar includes a menu icon (right side) (Figure 7).
This menu allows you to share all your files, see Sharing all
Images from My Files on page 6.
Figure 7
The lower toolbar (Figure 8) includes the following links:
• My Files, see page 4
• Shop Files, see page 7
• Favorites, see page 7
• Profile, see page 8
Figure 9
1— File Upload Date - Images are displayed with the most recent
uploads at the top. The file Upload Date is displayed at the upper
left of the image(s). The date is shown once at the top of the series
of images, scroll up / down to see all files within a specific date.
2— File Name - See
information.
3— Your Account Username (and timestamp) - See
page 8
date/time the file posted on AL TUSDRIVE.com
4— Menu Icon - options:
5— Favorites Icon - See
information.
6— Copy Icon - See
information.
7— Link Icon - See
on page 6
for additional information. The timestamp indicates the
- Download - Select to download the file to your device.
- Delete - Select to delete the file from ALTUS.
for additional information.
File Detail (Tags) on page 5 for additional
Account on
Favorites on page 7 for additional
Shop Files on page 6 for additional
Sharing an Individual Image from My Files
Selecting an image opens File Details. The File Detail screen
allows you to see alternate views of an image and edit
metadata. See File Detail (Tags) on page 5.
Figure 8
4
Page 5

File Detail (Tags)
As shown in Figure 10 selecting (touching) an image from My
Files opens the File Detail card. Selecting the image again
opens that image in a new browser tab.
5— Description (user entered searchable text) - Enter text
(alphanumeric) in the description field as desired.
6— Known Good / Bad Checkboxes (user defined and
searchable) - Selecting a checkbox automatically creates a tag
(e.g. #good) and is displayed in the Active Tag(s) field.
7— Tag (user entered searchable text) - Enter text (alphanumeric)
in this field as desired. T agging a file allows you to associate (tag)
descriptive text to a file. Tagging can be used to associate multiple
images with a common tag. The tag text then can be used when
performing a search to find all images with the same tag. Each text
entry (word) that is separated by a space (return) is added as a tag,
and is displayed in the Active Tag field.
8— Active Tag(s) - Displays the active tag(s). Tags can include the
“good” or “bad” entry from the Known Good / Bad checkboxes, and
text entered in the file Name, Description and Tag fields. Each entry
is automatically preceded with the “#” symbol.
About Image File Names
When an image is captured, the thermal imager automatically
assigns a system generated ID (name) to each file in the saved
file set. The following describes the ID naming protocol:
Figure 10
The following describes the File Detail card features.
Media
Type
IMG 0153
Unique
Number
ID
Thermal Image View Type
Indicates one of the
following:
Opacity View
X
Split Screen View
Picture-in-Picture
View
V Visual Light View
T Full Thermal View
Image
File
Format
BMP
(Bitmap)
All images are named as shown in the table above, with the four
digit numeral being the unique identifier (e.g. IMG0153V.BMP).
Note: Images are converted from .BMP to .JPG when
uploaded to ALTUS.
Sharing Images from My Files
Sharing images from My Files allows you to share an image(s)
with others via e-mail, text, social media, etc. My File links are
intended as temporary links, and are useful when sharing an
image(s) with another ALTUS user, technician, or shop. If you
delete the image from My Files, the shared link will be broken.
Figure 11
1— Back Icon - Returns to My Files
2— Page Indicators (View Alternate Versions) - Select the page
indicators to see three alternate views of the same image, (1) visual
light, (2) opacity and (3) full thermal.
3—File Name (user entered searchable text) - Select the file name
to open the editor. Enter text (alphanumeric) in the field as desired.
4— Your Account Username (and timestamp) - See
page 8
date/time the file posted on ALTUSDRIVE.com
for additional information. The timestamp indicates the
Account on
Note: The file details displayed in a shared link will be different
depending if the message recipient is logged into ALTUS or
not. If the recipient is not logged in, only limited details are
displayed.
Typical details that are displayed in a link that are displayed by
a recipient that is logged into ALTUS:
• The image
• File name
• Your user name
• Date file was posted
• Description
5
Page 6

Sharing an Individual Image from My Files
MyAcct - 8/18/2018, 4:14:28 PM
Alt1
8/18/2018
MyAcct - 8/16/2018, 1:12:20 PM
Exh-1
8/16/2018
MyAcct - 8/18/2018, 4:14:28 PM
Alt1
8/18/2018
MyAcct - 8/16/2018, 1:12:20 PM
Exh-1
8/16/2018
1. From My Files, select the Link icon (Figure 12) on the
card.
Shop Files
Shop Files allows you to share an image(s) with others via email, text, social media, etc, from a permanent location in the
cloud. Unlike sharing an image(s) from My Files, the link is
permanent and will work, even if the original file is deleted.
Shop Files links are useful when sharing an image with a
customer that is not a registered ALTUS user that just needs to
see the image, and that may need access to the image in the
future.
Note: The file details displayed in a shared link will be different
depending if the message recipient is logged into ALTUS or
not. If the recipient is not logged in, only limited details are
displayed.
Figure 12
2. Select Copy to Clipboard (Figure 13) from the pop-up
window.
Figure 13
3. Open your (e-mail, text, social media, etc.) application and
paste the URL into a message to share with others.
Sharing all Images from My Files
1. From My Files (Figure 12), select the Menu icon
(Figure 14) from the upper toolbar.
To add a image(s) to Shop Files
From My Files
, select the Copy icon (Figure 16) on the image
:
card to copy the image to Shop Files. This copies the image to
a permanent location in the cloud.
Figure 16
To share an individual Shop File image:
Figure 14
2. Select Share My Files.
3. Select Copy to Clipboard (Figure 15) from the pop-up
window.
Figure 15
4. Open your (e-mail, text, social media, etc) application and
paste the URL into a message to share with others.
1. From Shop Files, select the Copy icon (Figure 17) on the
image card.
Figure 17
6
Page 7

2. Select an option (Figure 18) from the pop-up window.
Note: Some selections may be grayed out or not shown,
indicating the option is not supported on your device/system.
Figure 21
Figure 18
• Copy to Clipboard - open your (e-mail, text, social media,
etc.) application and paste the URL into a message to
share with others.
• Send via Email - your system default e-mail application
will open a new message with the link attached, ready to be
sent.
• Send via SMS (Short Message Service) - this option is
used with supporting mobile devices, and will typically
open a new text message with the link attached, ready to
be sent.
To share all files in Shop Files
1. Open Shop Files, see Figure 17.
2. Select the Menu icon (Figure 19) from the upper toolbar.
3. Select Share My Shop Files.
4. Select Copy to Clipboard (Figure 20) from the pop-up
window.
:
Figure 19
Use the following image details to search and find results:
• Image Name
• Known Good / Bad Checkboxes
• Description
• Tag
See File Detail (Tags) on page 5 for additional information on
the above “user entered” text.
Favorites
The Favorites screen displays all the images selected as
favorites (Figure 22).
Figure 20
5. Open your (e-mail, text, social media, etc) application and
paste the URL into a message to share with others.
Search
The Search field is available from My Files, and allows you to
perform text searches on all uploaded files and view the results.
To search for a specific image or set of images, enter a search
term in the search field and select the magnifying glass icon
(Figure 21) (or press Enter).
Figure 22
To set an image as a ”Favorite”, select the Favorite icon (star
symbol) to highlight the icon.
Description Icon
Favorite (on)
Favorite (off)
7
Page 8

The Favorites icon can be selected/deselected at anytime
Your Name
Your Name
when displaying files.
Profile
The Profile screen allows you to:
• Open Profile Manager (Figure 23), see Using Profile
Manager on page 8
• Logout of ALTUS, see Logging Out of ALTUS on page 9
Account
This screen manages the following account information
(Figure 24):
• Authorization Key (not required for ALTUS account
registration)
• Account Expiration Date
• Shop Nickname
• Email
• Username
• Password
Figure 23
Using Profile Manager
To open the Profile Manager screen, select Profile from lower
toolbar, then select Open Profile Manager (Figure 23).
Note: Profile Manager opens a new br owser t ab. To return to
AL TUS after logging out of Profile Manager , you must select the
AL TUS Home Pag e browser t ab.
Enter your Username and Password at the Login screen.
If you are a SureTrack user, please note that Profile Manager is
the same as your SureTrack Profile Manager. Any changes you
make will also be reflected in your SureTrack account.
Profile Manager includes five tabbed categories to help you
manage your account information:
• Account on page 8
• Personal Information on page 8
• Expertise on page 9
• Profile Picture on page 8
• Device Management on page 9
Figure 24
Profile Picture
This screen allows you to personalize your profile picture, by
selecting one of the provided images.
Personal Information
This screen manages the following personal account
information (Figure 25):
• First Name
• Last Name
• City
• State
• Zip Code
Figure 25
8
Page 9

Expertise
Your Name
Your Name
Logging Out of Profile Manager
(SureTrack users only) - Select the vehicles from the list that
you have expertise with. When a question is asked within the
SureTrack community about one of the selected vehicles, you
will receive an email with the details and a link back to the
question.
Figure 26
Device Management
This screen manages devices associated with your account
(Figure 27):
Select the logout icon (upper right screen) to log out of Profile
Manager (Figure 28).
Figure 28
Note: Profile Manager opens a new browser t ab. To return to
AL TUS after logging out of Profile Manager , you must select the
AL TUS Home Page browser t a b.
Logging Out of ALTUS
To log out of ALTUS select Profile from lower toolbar, then
select Logout (Figure 29).
Select Add a Device to setup and add an authorized device
(e.g. Diagnostic Thermal Imager Elite or Diagnostic Tool).
Enter the device:
• Serial Number - serial number of the device
• Code - authorization code specific to the device
• PIN - specific PIN associated to the device
• Device Name - user define name
When finished select Save to save and link the device to your
account.
Figure 29
Figure 27
9
Page 10

Printing
Download
Delete
Notes:
• AL TUSDRIVE.com navigation and menu options will vary
by device and/or operating system (PC, mobile, etc).
• Images are in .JPG format.
Printing on a PC - Typical
1. Find the image to print and select the menu icon on the file
card (upper right).
2. Select Download from the menu options (Figure 30).
3. Once downloaded to your PC, print the image file.
Figure 30
Printing on a Mobile Device - Typical
1. Find the image to print and tap and hold it to display the
options menu.
Typical options will include Download Image or similar.
2. If you have print capabilities on your device, download the
image.
3. Once downloaded to your device, print the image file.
Note: If you do not have print capabilities on your device, you
may be able to download or transfer/share the file to another
device with print capabilities. Refer to the “User Guide” of your
device for printer setup information.
10
 Loading...