

Page 1

1
CW/CWH 511
TABLE OF CONTENTS
1 PRECAUTIONS FOR SAFETY AND USE .......................................................................................................................2
1.1 Trademark ........................................................................................................................................................2
1.2 Name and address of manufacturer or distributor ..........................................................................................2
1.3 Declaration of conformity to product standards ..............................................................................................2
2 TECHNICAL DATA ......................................................................................................................................................3
3 INSTALLATION AND POSITIONING ............................................................................................................................6
4 INSTRUCTIONS FOR TECHNICAL STAFF .....................................................................................................................7
4.1 Plumbing hookup ..............................................................................................................................................7
4.2 Electrical connection ........................................................................................................................................7
5 FIRST START-UP ........................................................................................................................................................8
5.1 Using the water softener (on models with this feature only) ..........................................................................8
6 SET-UP (Authorised technical staff only) ..................................................................................................................9
6.1 Contents of display ........................................................................................................................................ 10
6.2 Note on display of temperatures .................................................................................................................. 10
6.3 Parameter programming procedure ............................................................................................................. 10
6.4 Modifiable parameters .................................................................................................................................. 11
6.5 Adjusting detergent and rinse aid dispensing ............................................................................................... 11
6.6 Starting the peristaltic pumps in manual mode – rapid filling of detergent and rinse aid circuit ................ 12
6.7 Adjusting the regeneration frequency (models with softener only) ............................................................. 12
6.8 Mains water hardness setting table .............................................................................................................. 12
7 MALFUNCTIONS SHOWN ON THE DISPLAY (FOR THE TECHNICIAN) ..................................................................... 13
8 INSTRUCTIONS FOR THE USER ............................................................................................................................... 14
8.1 Control panel ................................................................................................................................................. 14
8.2 Before washing .............................................................................................................................................. 15
8.3 First use each day (tank and boiler empty) ................................................................................................... 16
8.4 Choosing the program ................................................................................................................................... 17
8.5 Changing the program ................................................................................................................................... 17
9 MAINTENANCE AND CLEANING............................................................................................................................. 19
9.1 Daily cleaning of filters .................................................................................................................................. 19
9.2 Routine inspection of the spray arms (once a week) .................................................................................... 19
9.3 Lengthy periods out of use ............................................................................................................................ 20
Page 2
2
CW/CWH 511
These are intended for the qualified staff who are to install, commission and test the appliance and carry out
any servicing and repairs.
These provide recommendations for use, a description of the controls and the correct procedures for cleaning
and maintaining the dishwasher.
19390501500
04/02/2014
Manual Ed.
Date
10 TROUBLESHOOTING .......................................................................................................................................... 20
11 MALFUNCTIONS SHOWN ON THE DISPLAY (FOR THE USER) ............................................................................ 21
SMEG Thanks you for choosing one of its products.
Read all the instructions in this manual carefully to become familiar with the right conditions for the proper use
of your dishwasher.
TECHNICAL INSTRUCTIONS
INSTRUCTIONS FOR THE USER
1 PRECAUTIONS FOR SAFETY AND USE
1.1 Trademark
SMEG
Manual edition
1.2 Name and address of manufacturer or distributor
Smeg S.p.A.
Via Leonardo da Vinci, 4 - 42016 Guastalla (RE) Tel. +39 0522 8211 - Fax + 39 0522 821453
internet: www.smegfoodservice.com, email : fooddservice@smeg.it
Info :
INFORMATION AND SERVICE FOR SMEG PROFESSIONAL DISHWASHERS
Our Sales Department staff will be able to provide you with information about prices and special offers.
Our After-Sales Department will be able to provide you with guidance about keeping your appliance functioning correctly and
put you in touch with your nearest authorised Service Centre. Our entire product offering can be viewed at:
1.3 Declaration of conformity to product standards
THIS APPLIANCE IS TAGGED UNDER EUROPEAN DIRECTIVE 2002/96/EC ON WASTE ELECTRICAL AND ELECTRONIC EQUIPMENT
(WEEE). BY MAKING SURE THAT THIS PRODUCT IS DISPOSED OF CORRECTLY THE USER HELPS TO PREVENT POTENTIAL
DETRIMENTAL EFFECTS ON HEALTH AND THE ENVIRONMENT. WHEN DECOMMISSIONING THE APPLIANCE COMPLY WITH THE
LOCAL WASTE DISPOSAL REGULATIONS. FOR FURTHER INFORMATION ON THE TREATMENT, RECOVERY AND RECYCLING OF THIS
PRODUCT, CONTACT THE COMPETENT LOCAL OFFICE, THE DOMESTIC WASTE COLLECTION SERVICE, OR THE SHOP WHERE THE
PRODUCT WAS PURCHASED. THE APPLIANCE MUST BE GROUNDED AS REQUIRED BY ELECTRICAL EQUIPMENT SAFETY
STANDARDS. THE DISHWASHER IS INTENDED FOR PROFESSIONAL USE ONLY AND MUST ONLY BE USED BY AUTHORISED STAFF.
IT IS DESIGNED TO WASH TABLEWARE (PLATES, CUPS, BOWLS, OVEN DISHES AND CUTLERY) AND SIMILAR ITEMS IN THE
RESTAURANT AND INSTITUTIONAL CATERING SECTOR, AND COMPLIES WITH THE INTERNATIONAL STANDARDS ON ELECTRICAL
AND MECHANICAL SAFETY (CEI-EN-IEC 60335-2-58/61770) AND ELECTROMAGNETIC COMPATIBILITY (CEI-IEC-EN 55014-1/-2,
Page 3
3
CW/CWH 511
THIS MANUAL IS AN INTEGRAL PART OF THE DISHWASHER AND MUST ALWAYS BE KEPT INTACT TOGETHER
WITH THE APPLIANCE.
POSITIONING, HOOKUP, COMMISSIONING, TROUBLESHOOTING AND REPLACING THE POWER CABLE MUST BE
CARRIED OUT BY QUALIFIED STAFF.
THE APPLIANCE MUST BE GROUNDED AS REQUIRED BY ELECTRICAL EQUIPMENT SAFETY STANDARDS.
THE SYMBOL OF THE RUBBISH BIN WITH A BAR ACROSS IT ON THE PRODUCT OR IN THE TECHNICAL
DOCUMENTATION INDICATES THAT THIS PRODUCT MUST NOT BE TREATED AS ORDINARY DOMESTIC WASTE
BUT MUST BE CONSIGNED TO THE SPECIAL COLLECTION POINT FOR THE RECYCLING OF ELECTRICAL AND
ELECTRONIC EQUIPMENT.
NEVER PLACE SOLVENTS SUCH AS ALCOHOL OR TURPENTINE, WHICH MIGHT CAUSE AN EXPLOSION, INSIDE
THE APPLIANCE. NEVER LOAD DISHES DIRTY WITH ASH, WAX OR PAINTS.
NEVER USE THE DISHWASHER OR ANY PART OF IT AS A LADDER, SUPPORT OR STAND FOR PEOPLE,
ANIMALS OR ANY OBJECT. LEANING OR SITTING ON THE OPEN DOOR OF THE DISHWASHER MIGHT
CAUSE IT TO TIP OVER, PUTTING PEOPLE IN DANGER. NEVER LEAVE THE DISHWASHER DOOR OPEN
SINCE PEOPLE MIGHT TRIP OVER IT.
DO NOT DRINK ANY WATER LEFT IN THE DISHES OR DISHWASHER AT THE END OF THE WASHING PROGRAM.
THE APPLIANCE IS NOT SUITABLE FOR USE BY JUVENILES OR PERSONS WITH REDUCED PHYSICAL,
SENSORIAL OR MENTAL CAPACITIES, OR THOSE WITHOUT THE NECESSARY KNOWLEDGE AND EXPERIENCE.
SUCH PERSONS MAY ONLY USE THE APPLIANCE UNDER THE SUPERVISION OF A PERSON RESPONSIBLE FOR
THEIR SAFETY.
kPa (bar)
100-600 (2 ÷ 6)
100-600 (2 ÷ 6)
Water intake temperature
°C
15°C – 60°C
15°C – 60°C
Intake water hardness (models with softener)
°df
15° - 60°
15° - 60°
Intake water hardness (models without softener)
°df
12°
12°
Rinse cycle water consumption
l 3 3
Boiler capacity
l 6 6
Tank capacity
l
11
11
Standard cycle duration with intake water at 50°C
s
120/150/180
90/120/180
Noise level
dB(A)
< 50
< 50
Degree of protection
IPX
CW = 4 - CWH =5
Net weight
Kg
CW = 52/55 - CWH =82/89
Power supply cable type
◄HAR►
H07RN-F
H07RN-F
Fuse A 4
4
61000-3;4, 50366). THE MANUFACTURER DECLINES ALL RESPONSIBILITY FOR INJURY OR DAMAGE CAUSED BY FAILURE TO
COMPLY WITH THE ABOVE REGULATIONS OR DERIVING FROM INCORRECT USE, TAMPERING WITH EVEN JUST ONE PART OF THE
APPLIANCE AND THE USE OF NON-ORIGINAL SPARE PARTS.
2 TECHNICAL DATA
Single-phase Three-phase
Page 4
4
CW/CWH 511
SEE APPLIANCE LABEL
VOLTAGE
FUSE
PROTECTION
TANK
HEATING
MOTOR
BOILER
(1.5X3)
TOTAL
CONNECTION
MAXIMUM
POWER
ABSORPTION
POWER
CABLE
400V-50Hz/3/N/PE
13A
1.1kW
0.7kW
5kW
5.7kW
11A
5X4
230V-50Hz/3/PE
20A
1.1kW
0.7kW
5kW
5.7kW
16A
5X4
230V-50Hz/1/N/PE
25A
1.1kW
0.7kW
3,3kW
4.0KW
18A
3X4
230V-50Hz/1/N/PE
13A
1.1kW
0.7kW
1.7kW
2.4kW
11A
3X2.5
SEE APPLIANCE LABEL
VOLTAGE
FUSE
PROTECTION
TANK
HEATING
MOTOR
BOILER
(1.5X3)
TOTAL
CONNECTION
MAXIMUM
POWER
ABSORPTION
POWER
CABLE
230V-50Hz/1/N/PE
20A
1.1kW
0.7kW
2.8kW
3.4kW
16A
3X2.5
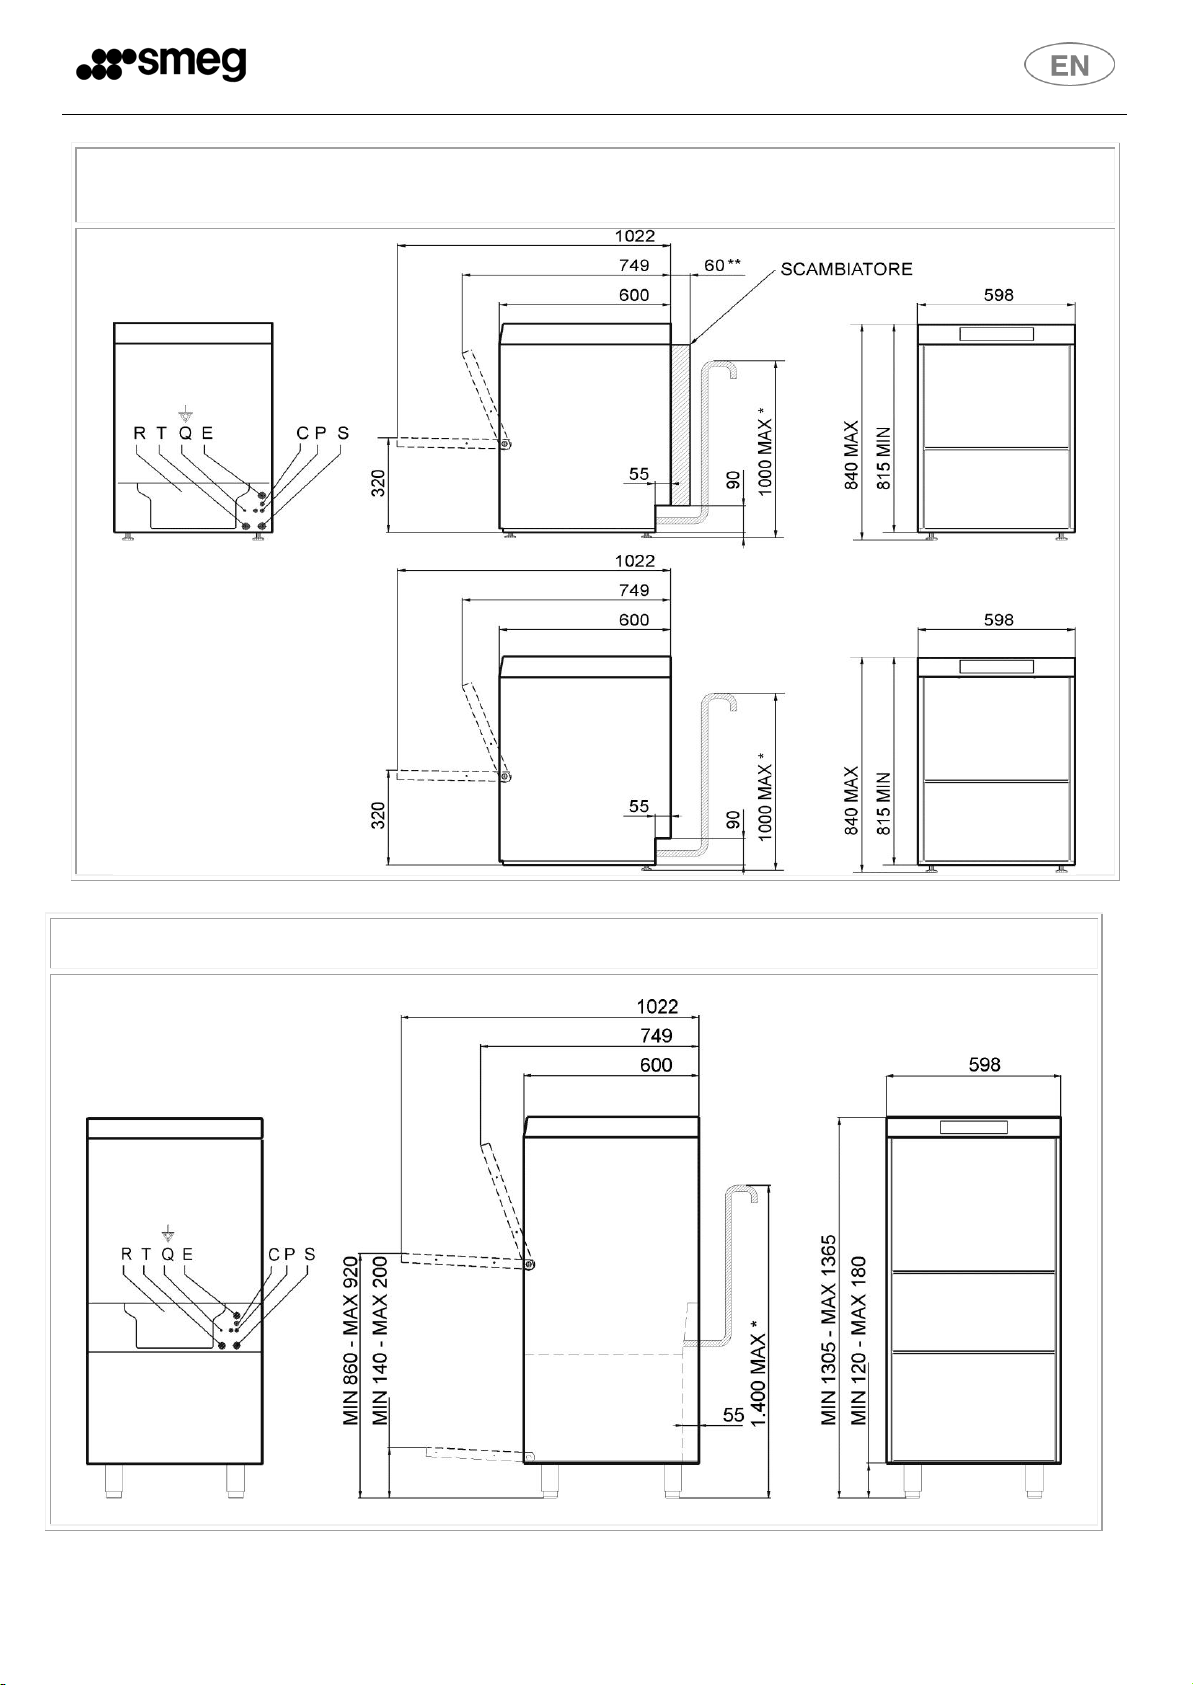
CAVITY DIMENSIONS FOR BUILT-UNDER INSTALLATION
Page 5
5
CW/CWH 511
APPLIANCE DIMENSIONS AND CONNECTION POSITIONS
(* N.B.: distance “1000” - max 600 if siphon with valve is used)
(**N.B.: distance “60” - with heat exchanger)
APPLIANCE DIMENSIONS AND CONNECTION POSITIONS
(*NB – VALUE “1400” WITH ASTERISK: max 1000 if siphon with valve is used)
Page 6
6
CW/CWH 511
KEY TO LETTERS USED IN DIAGRAM
R
LOWER BACK PANEL
Q
EARTH TERMINAL
P
PERISTALTIC PUMP HOSES
E
ELECTRICITY SUPPLY CABLE
S
DRAIN HOSE
T
FILLER HOSE
C
EXTERNAL DISPENSER POWER SUPPLY CABLE ENTRY POINT
Warning: the indoor system and premises in which equipment for institutions is installed must comply with
the relevant regulations.
The manufacturer declines all liability for direct or indirect injury or damage deriving from failure to comply with these
regulations. Before installation, check that there are no objects or materials in the vicinity which may be damaged by steam or
splashes of washing solution, or that any such items are suitably protected. Place the dishwasher in the chosen point and
remove the protective film. Level the dishwasher (with the aid of a spirit level) on its adjustable feet to ensure that it is stable;
all other mounting solutions must be approved by the manufacturer.
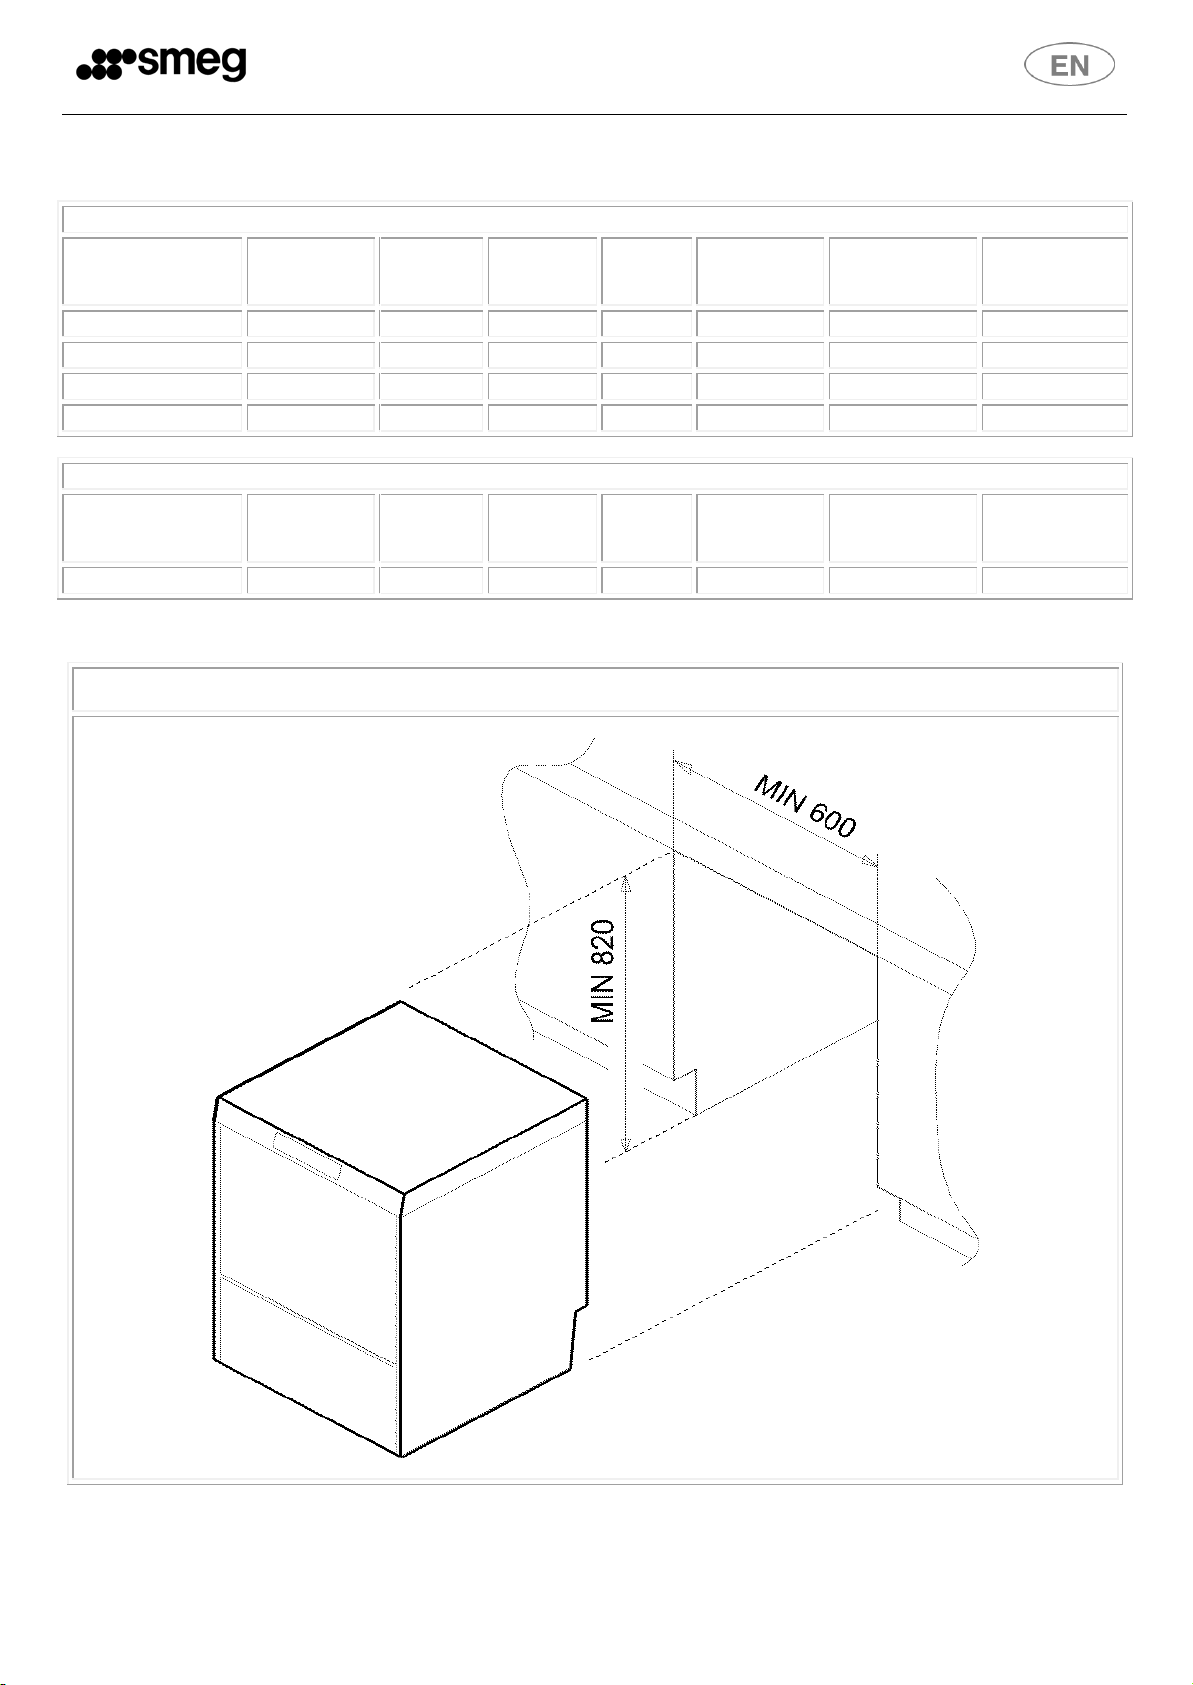
3 INSTALLATION AND POSITIONING
INSTALLATION and POSITIONING
Bring the dishwasher to the installation site, remove the packaging and check the appliance and components for damage; any
damage found must be reported to the transporter in writing. The packaging components (plastic bags, expanded polystyrene,
nails, etc.) must not be left within reach of children and pets since they are potentially dangerous. All packaging materials used
are environment-friendly. They can be kept without constituting any hazard, or may be disposed of at a specialist waste disposal
centre. The plastic components suitable for recycling are marked as follows: PE polyethylene: external packaging film, bag
containing the instructions, protective bags. PP polypropylene: straps. PS expanded polystyrene: corner guards, top of
packaging. Wooden and cardboard components can be disposed of in accordance with the relevant regulati ons.
When the product is decommissioned it must not be dumped in the environment; it must be disposed of in accordance with the
relevant regulations. All metal parts are in stainless steel and can be removed. The plastic parts are marked with the symbol
identifying the material used.
POSITIONING
Page 7
7
CW/CWH 511
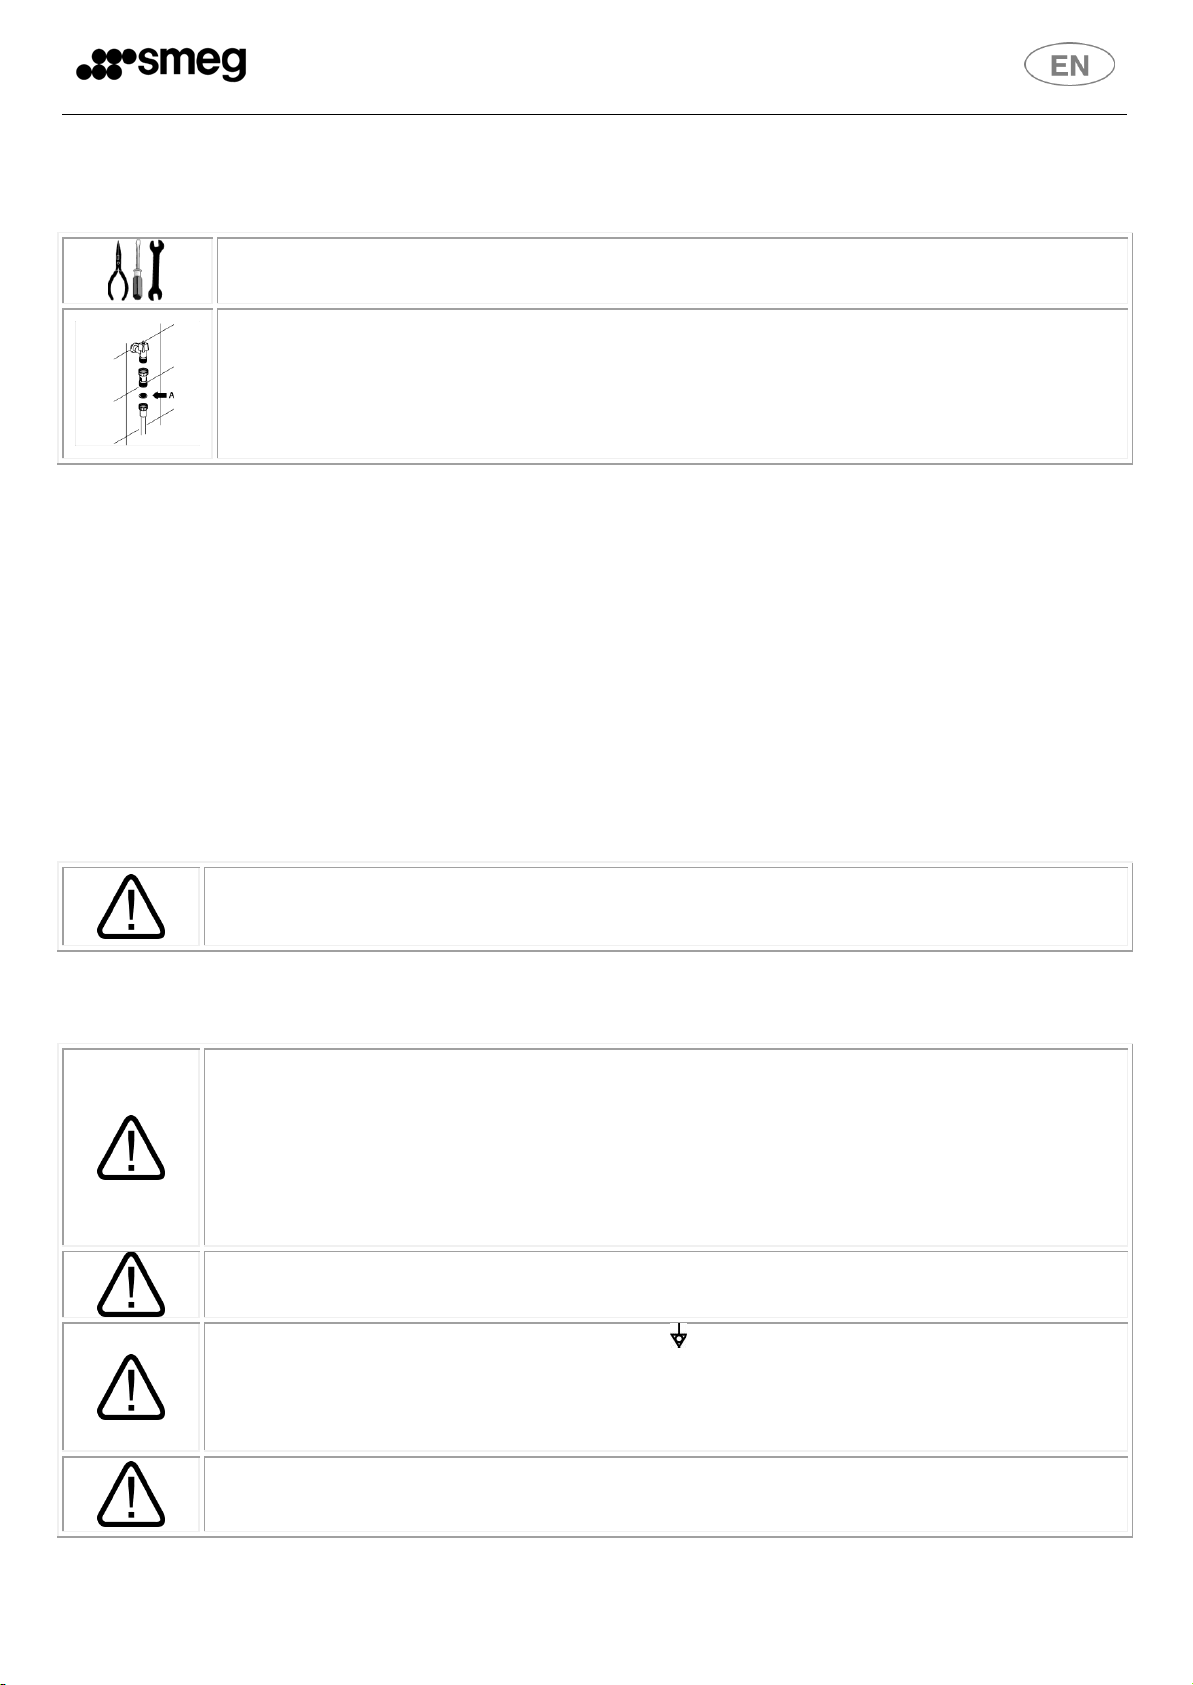
PLUMBING HOOKUP
The water pipelines and electricity supply cable lead out of the bottom right-hand corner of the appliance.
Connect the water intake hose to a connector with ¾” gas threaded fitting, fitting the filter A provided (in
models with Acquastop, the filter and ring-nut form a single unit). The connection to the water mains must
only be made with new hoses; the use of old or worn hoses is not permitted.
Warning: make sure that the intake and drain hoses are not bent, constricted or crushed after installation.
The dishwasher and any additional equipment must be connected to the electrical system by authorised,
skilled staff, in accordance with the relevant regulations; also comply with the technical instructions for the
connection. The total rated power is stated on the appliance’s technical data plate. The electrical protection
devices fitted for the dishwasher must serve this appliance only. The user must have a master switch and a
differential safety breaker, with rating suitable for the appliance’s characteristics, installed on the electricity
supply line in accordance with the relevant regulations. These switches must be installed close to the
dishwasher, be easily accessible after installation, and provide complete disconnection from the electrical
mains in overvoltage class III conditions.
Warning!
The dishwasher is always powered up unless the master switch is turned off.
Connect the appliance to the user’s earth system. The terminal for the connection is in the bottom righthand corner of the appliance. The earth wire (PE) is yellow-green in colour, the neutral wire (N) is blue and the
live wires (L1, L2, L3) are black, grey and brown. In the event of single-phase connection (230V-1N~), the
connection to the electrical mains must be made using a cable with plug compliant with the relevant
regulations.
THE POWER SUPPLY CABLE, IF FITTED, MUST BE REPLACED BY THE MANUFACTURER OR AN AUTHORISED
SERVICE CENTRE IN ACCORDANCE WITH THE TECHNICAL DATA SPECIFIED ON THE WIRING DIAGRAM
SUPPLIED WITH THE APPLIANCE, TO PREVENT ALL RISKS.
4 INSTRUCTIONS FOR TECHNICAL STAFF
4.1 Plumbing hookup
FOR MODELS WITH A WATER SOFTENER
an ‘approved’ double check valve or some other no less effective device providing backflow prevention protection to at least
fluid category two shall be fitted at the point of connection between the water supply and the fitting or appliance.
FOR MODELS WITHOUT A WATER SOFTENER
an ‘approved’ single check valve or some other no less effective device providing backflow prevention protection to at least
fluid category two shall be fitted at the point of connection between the water supply and the fitting or app liance.
The dynamic water supply pressure must be between 1 and 6 bar; if it is higher, installation of a pressure reducer is necessary.
If the pressure is less than 2.5 bar it might be necessary to fit a special pump on the appliance to ensure optimal performance.
Contact the After-Sales Service. It is essential to fit a main stop tap on the water intake deliver pipeline; the tap must be
accessible after installation of the appliance, so do not install it behind the dishwasher. The stated cycle duration applies to
appliances supplied with hot water >50°C<60°C. If the dishwasher is supplied with cold water, the cycle duration might increase
depending on the intake water temperature. Drainage: The dishwasher is fitted with a drain pump and can operate with drain
connections on the floor or wall. Refer to the connection diagram for the maximum permitted height of wall drains – (see
TECHNICAL DATA)
When installing the drain hose to a siphon with valve, the maximum height of the drain outlet is reduced to 600 mm.
4.2 Electrical connection
Page 8

8
CW/CWH 511
Before inserting the hoses into the containers, fit the weights (needed to ensure that they always draw in
liquid from the bottoms of the containers) and the filters onto their ends as shown. If the detergent dispenser
is not factory-fitted, it can be retrofitted after ordering the relative kit.
The quantity of lime in the water (which indicates its hardness) causes whitish marks on dry dishes and dishes
also tend to lose their shine over time. The dishwasher is equipped with an automatic water softener which
removes the substances that cause hardness from the water with the aid of regenerating salt.
The first time the dishwasher is used, a litre of water must be poured into the tank with the salt. Whenever the
tank is filled, always take care to ensure that the cap is firmly closed. The mixture of water and detergent must
not get into the salt tank, as this would impair operation of the regeneration system. In this case warranty
cover will be forfeited.
5 FIRST START-UP
First start-up
The electrical protection system must undergo a functional test before the appliance is put into operation.
The appliance must be installed and/or inspected by qualified staff, who will start it up for the first time and provide the
relevant operating instructions.
Preparing for use (important)
The rinse aid dispenser is fitted on all models, the detergent dispenser only on some.
If both dispensers are present put the external detergent and rinse aid containers in place and insert the respective intake
hoses on the rear of the appliance into them. Red hose: detergent, blue hose: rinse aid
As an alternative an external dispenser can be fitted, making the electrical connection by means of an H05 RN-F 2x0.5 mm
electrical cable, which can be laid along the route shown in the TECHNICAL DATA diagram and connected as shown in the wiring
diagram supplied with the dishwasher. The dispenser must operate on 230V/50 Hz with maximum power absorption of 15 W.
Connect to the detergent dispenser outside the dishwasher using the red hose mentioned above.
IMPORTANT
Whenever the type of detergent or rinse aid is changed, it is ABSOLUTELY ESSENTIAL to flush out the peristaltic pumps by
placing the external intake pipes in water for a few cycles. Always use only products specifically recommended for use in a
professional dishwasher. Failure to comply with this recommendation leads to forfeiture of the warranty entitlement on the
appliance’s water system. The internal pipes of the detergent and rinse aid peristaltic pumps should be replaced by the After-
Sales Service every 12 months or 15,000 wash cycles.
5.1 Using the water softener (on models with this feature only)
Page 9

9
CW/CWH 511
Set-up
During first start-up, the functions/parameters listed below must be set or adjusted.
On/off button
Total pump-out (tank -boiler) button
Regeneration button (only if softener is fitted)
Regenerating salt symbol (only if softener is fitted)
Short programme button
Medium programme button
Long programme button
L1
Short programme Led
L2
Medium programme Led
L3
Long programme Led
L4
Resin regeneration Led (only if softener is fitted)
L5
Drainage Led
L6
Appliance on Led
L7
No salt Led (only if softener is fitted)
CLOSE
Close the door
FILL
Machine preparing for cycle
End
End of operation requested
PrF 500
Appliance model (displayed when the appliance is switched on with the master switch).
UnLoad
Pump-out
6 SET-UP (Authorised technical staff only)
Control Panel
Key to Symbols
Key to messages which scroll across display
Page 10

10
CW/CWH 511
Button
Short press
Pressed for 2”
Pressed for 5”
Long press, release, press again
Display of temperatures in
Boiler (L3) and tank (L1)
On/OF
Setup Menu (1)
Scroll through Setup
options (2)
Set Pump-out
Start Pump-out
Set Regeneration
(mod. with softener only)
Start Regeneration
Set Short Programme
Start Short Programme
Set Medium Programme
Start Medium Programme
Set Long Programme
Start Long Programme
Set P0
Empty tank
Start P0
Start Test (1)
Peristaltic pumps in Manual
mode to prime pipes
Reset to DEFAULT
parameters (3)
Technician user only
Using the buttons
1) Starting from appliance in “OF” status
2) From setup menu only.
3) Restores the default parameters, for new settings see point (6.3)
A series of operations can be carried out when the dishwasher is first installed to customise it to the user's requirements.
6.1 Contents of display
The two digits provide the following information:
• Appliance off but powered up: all decimal points on both digits
• Appliance on and ready for use : Tank temperature
• Washing phase (programme running, washing pump in operation): Tank temperature
• Rinsing phase (programme running, washing pump stopped): Boiler temperature
• Programming phase: See parameter programming section
• Error message: See error messages section
6.2 Note on display of temperatures
Temperatures shown on the display might not indicate the actual temperature in the tank and/or boiler during heating wait about 1’ after the heating elements switch off to see the real temperature.
6.3 Parameter programming procedure
To modify the parameters, proceed as follows starting with the appliance in “OF” status
1) switch the appliance using the On/OF button
2) hold down the button for about 4/5 seconds, until Led L6 goes out and then lights up again, then release the button
and press it again.
3) Press the pump-out button to scroll through the parameters for modification
4) Modify the parameter by pressing button P1
5) During setup operations, Led L1 indicates that the display is showing the description of the parameter, while Led L3
indicates that its value is being displayed (the two alternate)
6) Select the other parameters for modification in the same way and proceed as described above
7) After setting all the appliance parameters, press the button to quit the setup function.
Page 11

11
CW/CWH 511
Display
Settings available
Description
°b
From 85° to 71°
Boiler temperature
°t
From 62° to 52°
Tank temperature
St
On - OF
Auto-start: washing programme starts when door is closed
On enabled OF disabled
HA
H0 – H6
Water hardness setting (see table 6.8)
TS
On - OF
Thermostop
On enabled OF disabled
Sr
-
Access Service menu (for Authorised Engineer only)
WARNING:
Ensure that the appliance is not powered up - ELECTRIC SHOCK HAZARD
6.4 Modifiable parameters
This table lists the model choice or programme and temperature option parameters.
6.5 Adjusting detergent and rinse aid dispensing
RD: Detergent dispensing regulator screw (OPTIONAL)
RB: Rinse aid dispensing regulator screw
Important! If the pump does not deliver rinse aid, check the valve inside “A”: unscrew anti-clockwise.
RD/RB: Adjustments must be made using the adjuster screw as explained. The quantity dispensed is reduced by turning
anticlockwise and increased by turning clockwise.
Page 12

12
CW/CWH 511
With values over 60°dF an external water treatment device must be used and the regeneration frequency must
be set at H0
Hardness
(°dH German degrees)
Hardness
(°dF French degrees)
Setting
level
Resin regeneration interval:
approximate number
of wash cycles
Regeneration off
Regeneration off
H0
8.5
15
H1
81
11
20
H2
69
17
30
H3 default
42
22.5
40
H4
24
28
50
H5
19
33.5
60
H6
11
6.6 Starting the peristaltic pumps in manual mode – rapid filling of detergent and rinse
aid circuit
With the dishwasher powered up and the tank full, press the buttons simultaneously for 5”
The peristaltic pumps continue to operate until one of the 2 buttons is pressed again; the lights remain on as long as the pumps
are running. The display shows “r d” . Bear in mind that the rinse aid peristaltic pump fills the circuit in about 7 minutes, while
for the detergent it only takes 2 minutes. So draw only rinse aid from the jerry cans (1 for the rinse aid and the other for the
detergent) for the first 5 minutes and then also take in detergent for the last 2.
6.7 Adjusting the regeneration frequency (models with softener only)
See appliance setup menu (point 6.4)
6.8 Mains water hardness setting table
This table shows the relationship between the intake water hardness and the quantity the resins are able to treat;
regeneration is required once the appliance has performed the set number of cycles. Regeneration cycle duration: 12
minutes.
Page 13

13
CW/CWH 511
Er 04
Tank temperature probe
malfunction
Tank temperature probe disconnected or not working.
Er 05
Tank water filling malfunction
The tank does not fill within the allowed time: check water intake tap, dynamic
pressure in intake system, cleaning of water intake filter, possible damage to
water intake hose or cleaning of rinsing nozzles.
If the problem persists during “FILL”: - tank level switch failure. (always on
empty: check whether tank safety pressure switch is tripped). - leak from pipe
connected to air trap: if problem persists, check during working programme. drain line vent valve fouled: tank empties completely at end of a wash
programme due to siphon effect.
Er 06
Water pump-out malfunction
Inspect the filters for dirt and check that the drain hose is not blocked, bent or
crushed. Check that the drain pump is not blocked by dirt by removing the
insert on the sump (from inside the tank). If it persists, check in this order: -
with tank empty: constant “tank full” reading: tank pressure switch faulty or
leak from connections of air trap connection pipe (water entering pipe)
- with tank full: drain pump has failed
Er 23
Boiler does not heat up as expected.
The problem might occur because water is continually entering the tank (the
causes are as for “Er 05” – see above) If the boiler heating element is
damaged, this might be due to operation with no water in the boiler - the
pressure switch is indicating full even with the boiler empty: - damaged boiler
heating element - contactor failure - open on boiler safety thermostat side. boiler temperature probe faulty or incorrectly positioned - motherboard relay
failure, Important: If the boiler heating element is damaged, this might be due
to operation with no water in the boiler, pressure switch continues to give full
reading even with boiler empty: check boiler air trap and/or relative pressure
switch and replace if necessary.
Er 24
Boiler temperature probe
malfunction
Boiler temperature probe disconnected or not working
Er 25
Boiler water filling malfunction
The boiler does not fill within the allowed time: check water intake tap,
dynamic pressure in intake system, cleaning of water intake filter, possible
damage to water intake hose or check, in this order:
- boiler pressure switch has failed (continuous empty reading). - pipe
leaking/disconnected (water entering pipe) – item “rp” in service menu not set
correctly
Er 26
Boiler emptying malfunction
- check that rinsing spray arm nozzles are clean
- boiler pressure switch has failed (continuous full reading)
- pipe leaking/disconnected (water entering pipe)
- rinsing pump not working
Er 27
Boiler emptying malfunction – with
tank full
Or boiler full signal on models
without rinsing pump
Boiler pressure switch has failed (continuous full reading) if appears when
rinsing pump is not present; presence of boiler pressure switch: check setting
of item “rp” in service menu
“rp”=on for models with rinsing pump
“rp”=of for models without rinsing pump
7 MALFUNCTIONS SHOWN ON THE DISPLAY (FOR THE TECHNICIAN)
The dishwasher is able to identify a number of malfunctions and show them on the display. If the problem persists after the
dishwasher has been switched off and back on, proceed as described below:
Page 14

14
CW/CWH 511
On/off button
Total pump-out (tank -boiler) button
Regeneration button (only if softener is fitted)
Regenerating salt symbol (only if softener is fitted)
Short programme button
Medium programme button
Long programme button
L1
Short programme Led
L2
Medium programme Led
L3
Long programme Led
L4
Resin regeneration Led (only if softener is fitted)
L5
Drainage Led
L6
Appliance on Led
L7
No salt Led (only if softener is fitted)
CLOSE
Close the door
FILL
Machine preparing for cycle
End
End of operation requested
PrF 500
Appliance model (displayed when the appliance is switched on with the master switch).
UnLoad
Pump-out
8 INSTRUCTIONS FOR THE USER
8.1 Control panel
Key to Symbols
Key to messages which scroll across display
Page 15

15
CW/CWH 511
Button
Short press
Pressed for 2”
Pressed for 5”
Display of temperatures in
Boiler (L3) and tank (L1)
On/OF
Start Pump-out
Start Regeneration
Start Short Programme
Start Medium
Programme
Start Long Programme
Set P0
Start programme P0: emptying of tank to clean filters.
Switch off and back on to allow reuse.
Use only detergents and rinse aids for industrial dishwashers. Do not use detergents intended for hand washing.
We recommend the use of Smeg products, specially developed for this dishwasher.
When topping up the tanks, take care not to swap the products; this might damage the dishwasher and cause
malfunctions.
1. Turn on the mains water tap (user)
2. The level of detergent and rinse aid in the containers.
Using the buttons
8.2 Before washing
Do not mix different detergents; this would damage the dispenser device. Failure to comply with this recommendation
leads to forfeiture of the warranty entitlement on the appliance’s water system.
Industrial dishwasher detergents may cause serious irritation. Comply carefully with the instructions provided by the
detergent producer on the pack.
Check
Page 16

16
CW/CWH 511
3. That there is regenerating salt in the relative container (if fitted).
4. That the filters are in place, the spray arms rotate, and there are no foreign bodies in the dishwasher.
5. Switch on the master switch (user): the decimal points of both digits appear on the display.
Door closed and master switch on ON:
Press and hold it down for 2/3 seconds; the ON/OF Led and the two
digits on the display light up.
With the door closed, filling of the tank begins. The word “FILL” scrolls
across the display and the Led on will be that of the latest program set.
The display shows “End” when the tank is full.
Load the dishes and close the door.
Select the program required by holding down one of the three buttons
required for about 2”; the Led of the program flashes.
While washing is in progress the display shows the water temperature in
the tank. During rinsing, it shows the boiler temperature.
At the end of the program the program Led comes on and “End" scrolls
across the display
8.3 First use each day (tank and boiler empty)
Display shows Actions and what happens
Page 17

17
CW/CWH 511
Unload the dishes
SYMBOL
PROGRAM TYPE OF DIRT
DURATION (*)
DURATION (*)
Short
Glasses and cups
2”
1.5”
Medium
Glasses, cups and plates with light dirt
2.5”
2”
Long Very dirty dishes and cutlery
3”
3”
If the master switch is not turned off, the appliance sets on the last
programme performed. To change it, press the key of the program
required; the Led comes on.
To confirm hold down for about 2”. The Led starts to flash and the
washing programme starts.
Load glasses upside down.
When the door is closed again, the system offers the last program run.
8.4 Choosing the program
Single-phase Three-phase
(*) The cycle duration stated above is guaranteed if the appliance is connected to hot water > 50°C <60°C
If the dishwasher is supplied with cold water, the cycle duration might increase depending on the intake water temperature
and the "Thermostop" setting.
8.5 Changing the program
If a programme is already running, it can be changed by first switching the appliance to pause status (by pressing one of the
buttons for 2”) and then selecting the programme required.
Glasses
Cutlery
Use the basket provided. Load cutlery loose, preferably with the handle at the bottom, taking care not to injure yourself with
fork prongs or knife blades.
Page 18

18
CW/CWH 511
Plates
The basket is able to take 12 soup plates or 18 dinner plates.
Remove solid residues (bones, fruit peel, stones, etc.) and first soak
plates with dried residues of cheese, egg, etc. in water.
Press the pump-out button for about 5”, the Led flashes and the
pump-out and automatic tank cleaning phase starts. The word
“UnLoad” scrolls across the display. If the Led does not flash, the
program has not been started and the boiler heating element is not on.
When pump-out is complete the appliance switches off (only 2 dots lit
on the display)
Never switch the dishwasher off with water in the tank; always pump out first. Models with softener: if the
set number of cycles (see point 6.8 of the “technical manual”) is reached, regeneration is carried out as well
as the pump-out; the entire process lasts about 15’, after which the appliance switches off automatically.
1) ON REQUEST
Press the button for 5” to start regenerating; the Led flashes and the
regeneration phase starts. It lasts about 10 minutes, during which time
the Led keeps flashing. (Regeneration cannot be interrupted).
2) AT THE END OF THE DAY
Start the total pump-out and the appliance will perform regeneration
before emptying.
When pump-out is complete the appliance switches off (only 2 dots lit
on the display)
Plates
TOTAL PUMP-OUT AT THE END OF THE DAY
After a total pump-out the filters should be cleaned as described in the relevant point.
Resin regeneration (for models with water softener)
Once the set number of wash cycles (see point 6.8 of the “technical manual” is reached), the Led above the button flashes.
Therefore, during the working day resin regeneration must be carried out, following the procedure described below. There are
2 regeneration modes.
Page 19

19
CW/CWH 511
Warning: use only salt of the specific type, do not use cooking salt.
Salt must be added when the Led underneath the symbol shown in the box on the left lights up. Top up with salt
when there is no water in the tank to prevent washing water from getting into the water softener device. The
salt tank has a capacity of about 1 kg of coarse-grained salt. The salt tank is in the bottom of the appliance's tank.
After removing the basket, undo the cap and pour the salt in using the funnel supplied. Remove any salt residues
around the opening before screwing the cap back on.
The dishwasher has IPX4/5 protection but pointing water jets straight at it for cleaning is forbidden
Remove the filters (simply lift them out as shown here), taking care that no large residues fall into
the sump underneath. Clean them to remove residues and rinse with plenty of water, then put them
correctly back in place; do not use sharp or pointed tools.
Clean away any limescale deposits to prevent excessive build-ups;
Topping up with regenerating salt (for models with softener)
9 MAINTENANCE AND CLEANING
Although no particular scheduled maintenance is required, users are advised to have the dishwasher checked by a
specialist technician twice a year.
N.B.: the manufacturer accepts no liability for wilful damage or damage deriving from carelessness, neglect, failure to
comply with instructions, regulations and standards or incorrect connections, which lead to forfeiture of warranty cover. If
possible, leave the door ajar when not in use; Clean surfaces thoroughly and often with a damp cloth; use neutral, nonabrasive detergents which do not use chlorine compounds, which corrode and damage stainless steel. Do not use the
products mentioned above even when cleaning the floor underneath or in the vicinity of the dishwasher, as vapours or
drops may damage the steel surfaces.
9.1 Daily cleaning of filters
Cleaning the filter at the end of each working day
9.2 Routine inspection of the spray arms (once a week)
Remove the washing and rinsing (top and bottom) spray arms by unscrewing the central ring-nut 1; remove the parts of the
rinsing spray arms 3 by taking out the screws 2 with a screwdriver as shown below. Do not unscrew the nozzles. Clean the holes
and nozzles under a jet of clean running water; do not use tools which might cause damage. Reassemble the spray arms with
care.
Clean the outside of the appliance with a damp cloth and neutral soap, rinsing and drying thoroughly.
Page 20

20
CW/CWH 511
PROBLEM
POSSIBLE CAUSE
POSSIBLE REMEDY
Led 6 does not light up
Mains power failure
Check electrical mains connection.
Washing program does not
start
The dishwasher has not yet finished
filling.
Wait for the end of the “FILL” phase
Poor washing results
Spray arm washing holes blocked by
dirt or limescale
Remove spray arms and clean them (routine
checks).
Filter fouled
See “Cleaning the filter during the day”
Too little or unsuitable detergent or
rinse aid.
Check type and quantity of detergent.
No or not enough detergent or rinse
aid being supplied: detergent or rinse
aid not being taken from the relative
container.
Check that the intake filter is not fouled. If you are
unable to solve the problem, call the after-sales
service.
Plates/glasses badly arranged
Arrange plates/glasses correctly.
Low washing temperature
Check tank temperature shown on the display, call
the after-sales service if less than 50°C
Inappropriate programme set
Increase wash programme duration, especially if
dirt has dried on.
Inadequate rinsing
Dynamic pressure of mains water
insufficient
Spray arm nozzles fouled
Limescale in boiler
Check mains water pressure. Check that water
intake filter is not fouled. Clean rinsing nozzles.
If you are unable to solve the problem,
call the after-sales service.
Stains on glasses and cutlery
Rinse aid unsuitable or not being
delivered correctly.
Water hardness above 12°f or large
amounts of dissolved salts
Check container of rinse aid and whether it is
suitable for the type of mains water. If the problem
persists, contact the after-sales service.
Water in tank after pump-out
Drain hose incorrectly positioned or
partially obstructed.
Check that the dishwasher hose and drain are
unobstructed and the drain is not too high up; see
connection diagram.
Dishes not properly dried
Low rinsing temperature due to
Thermostop OF and/or water intake
temperature below 50°
Check that the water supplying the
appliance is at least at 50°
Rinse aid being delivered properly
If the problem persists call the after-sales service.
9.3 Lengthy periods out of use
If the dishwasher is to be out of use for a fairly long period of time, the detergent and rinse aid dispenser devices must be
emptied to prevent crystallisation and damage to the pumps: Remove the intake hoses from the detergent and rinse aid
containers and place them in a container of clean water, then perform a few wash cycles followed by a complete pump-out.
Finally, turn off the master switch, close the water intake valve and leave the door ajar until the interior is completely dry.
The detergent and rinse aid intake hoses must be put back into the containers when the dishwasher is returned to service,
taking care not to swap them over (red hose = detergent, blue hose = rinse aid).
10 TROUBLESHOOTING
How to deal with any problems without calling the after-sales service
Page 21

21
CW/CWH 511
ERROR
POSSIBLE CAUSE
POSSIBLE REMEDY
Er 04
Tank temperature probe malfunction
Contact the After-Sales Service
Er 05
Tank water filling malfunction
Check that the water intake tap is on and the dynamic pressure in
intake system, inspect water intake filter and clean if necessary. If
the problem persists, contact the After-Sales Service.
Er 06
Water not pumped out of tank.
Inspect the filters for dirt and check that the drain hose is not
blocked, bent or crushed.
Check that the drain pump is not blocked by dirt by removing the
insert on the sump (from inside the tank)
If the problem persists:
- with the tank empty: tank pressure switch defect (the contact is
locked on full)
- with tank full: drain pump has failed
If the system fails to pump out because the drain pump is fouled
(as a result of incorrect filter positioning), proceed as follows:
Bale out the dishwasher with a basin and disconnect it from the
electrical mains.
Unscrew the screw A, release the tang B and lift it.
Check that the impeller of the drain pump underneath the cover
turns freely, and is free from dirt, limescale residues, or pieces of
glass. Never use tools, screwdrivers, scissors, etc.
If the problem persists, contact the After-Sales Service.
Er 23
Boiler heating malfunction (does not
heat up)
Contact the After-Sales Service.
Er 24
Boiler temperature probe malfunction
Contact the After-Sales Service.
Er 25
Boiler water filling malfunction
Check that the water intake tap is on and the dynamic pressure in
intake system, inspect water intake filter and clean if necessary. If
the problem persists, contact the After-Sales Service.
Er 26
Boiler emptying malfunction
Check that the rinsing spray arm nozzles are not fouled
If the problem persists, contact the After-Sales Service.
Er 27
Boiler emptying malfunction – with tank
full
Contact the After-Sales Service.
11 MALFUNCTIONS SHOWN ON THE DISPLAY (FOR THE USER)
The dishwasher is able to identify a number of malfunctions and show them on the display. If the problem persists after the
dishwasher has been switched off and back on, proceed as described below:
 Loading...