

Page 1
Gebrauchsanweisung
Instructions for use
Mode d’emploi
Gebruiksaanwijzing
Istruzioni per l’uso
Brugsanvisning
Bruksanvisning
Käyttöohje
Manual de utilização
Instrucciones para el uso
Instrukcje użytkowania
Használati utasítás
ИнструкциЯ за употреба
Návod k použití
Návod na použitie
Instrucţiuni de utilizare
Инструкции по эксплуатации
Page 2

REFRIGERATORS AND FREEZERS PRODUCT FICHE
BRAND NAME SMEG
COMMERCIAL CODE CR324PNF1
CATEGORY Fridge/freezer combinaon
ENERGY EFFICIENCY CLASS A+
Energy consumpon 297 kWh per year, based on standard test results for 24 hours. Actual
energy consumpon will depend on how the appliance is used and where it is located.
FREEZER CAPACITY 63 l
STAR RATING 4
REFRIGERATOR CAPACITY 201 l
TEMPERATURE OF SPECIAL COMPARTMENT -°C
FROST FREE SYSTEM Freezer
TEMPERATURE RISE TIME (h) 16
FREEZING CAPACITY (kg/24h) 6
CLIMATE CLASS SN-T
This appliance is intended to be used at an ambient temperature between 10°C and 43°C.
NOISE LEVEL dB(A) re 1 pW 38
TYPE OF INSTALLATION Built-in
Page 3
QUICK GUIDE
B
E
F
A
G
H
I
O
M
D
L
B
E
F
A
G
H
I
O
M
D
L
N
N
C
C
Image 1
Comparto Frigorifero
A. Ventola e ltro antibatterico e antiodore (a seconda del modello)
B. Gruppo termostato con luce
C. Ripiani
D. Piano di copertura cassetto frutta e verdura
E. Cassetto frutta e verdura
F. Targhetta matricola (posta a lato del cassetto frutta e verdura)
M. Balconcini
N. Fermabottiglie (se in dotazione)
O. Balconcino bottiglie
Zona meno fredda
Zona intermedia
Zona più fredda
Zona frutta e verdura
Image 4
Comparto Frigorifero
A. Ventola e ltro antibatterico e antiodore (a seconda del modello)
B. Pannello comandi con luce LED
C. Ripiani
D. Piano di copertura cassetto frutta e verdura
E. Cassetto frutta e verdura
F. Targhetta matricola (posta a lato del cassetto frutta e verdura)
M. Balconcini
N. Fermabottiglie (se in dotazione)
O. Balconcino bottiglie
Zona meno fredda
Zona intermedia
Zona più fredda
Zona frutta e verdura
EN
A
B
M
C
N
D
O
E
F
G
H
I
L
Refrigerator Compartment
A. Fan and antibacterial and anti-odour filter
(depending on the model)
B. Control panel with LED lights
C. Shelves
D. Level covering fruit and vegetable drawer
E. Fruit and vegetable drawer
F. Rating plate (located at side of crisper)
M. Door trays
N. Bottle holder (if provided)
O. Bottle shelf
Freezer Compartment
G. Upper drawer (freezing area)
H. Middle and lower drawers (area for storing frozen
I. Middle and lower drawers (area for storing frozen
Least cold zone
Medium zone
Coldest zone
Fruit & vegetable zone
and deep frozen food)
and deep frozen food)
L. Ice cube trays (if provided)
Note: All of the drawers, door shelves and shelves
can be removed.
The ideal food storage temperatures are already
factory-set.
Read the instructions carefully before using the
appliance.
Features, technical data and images may vary
according to the model.
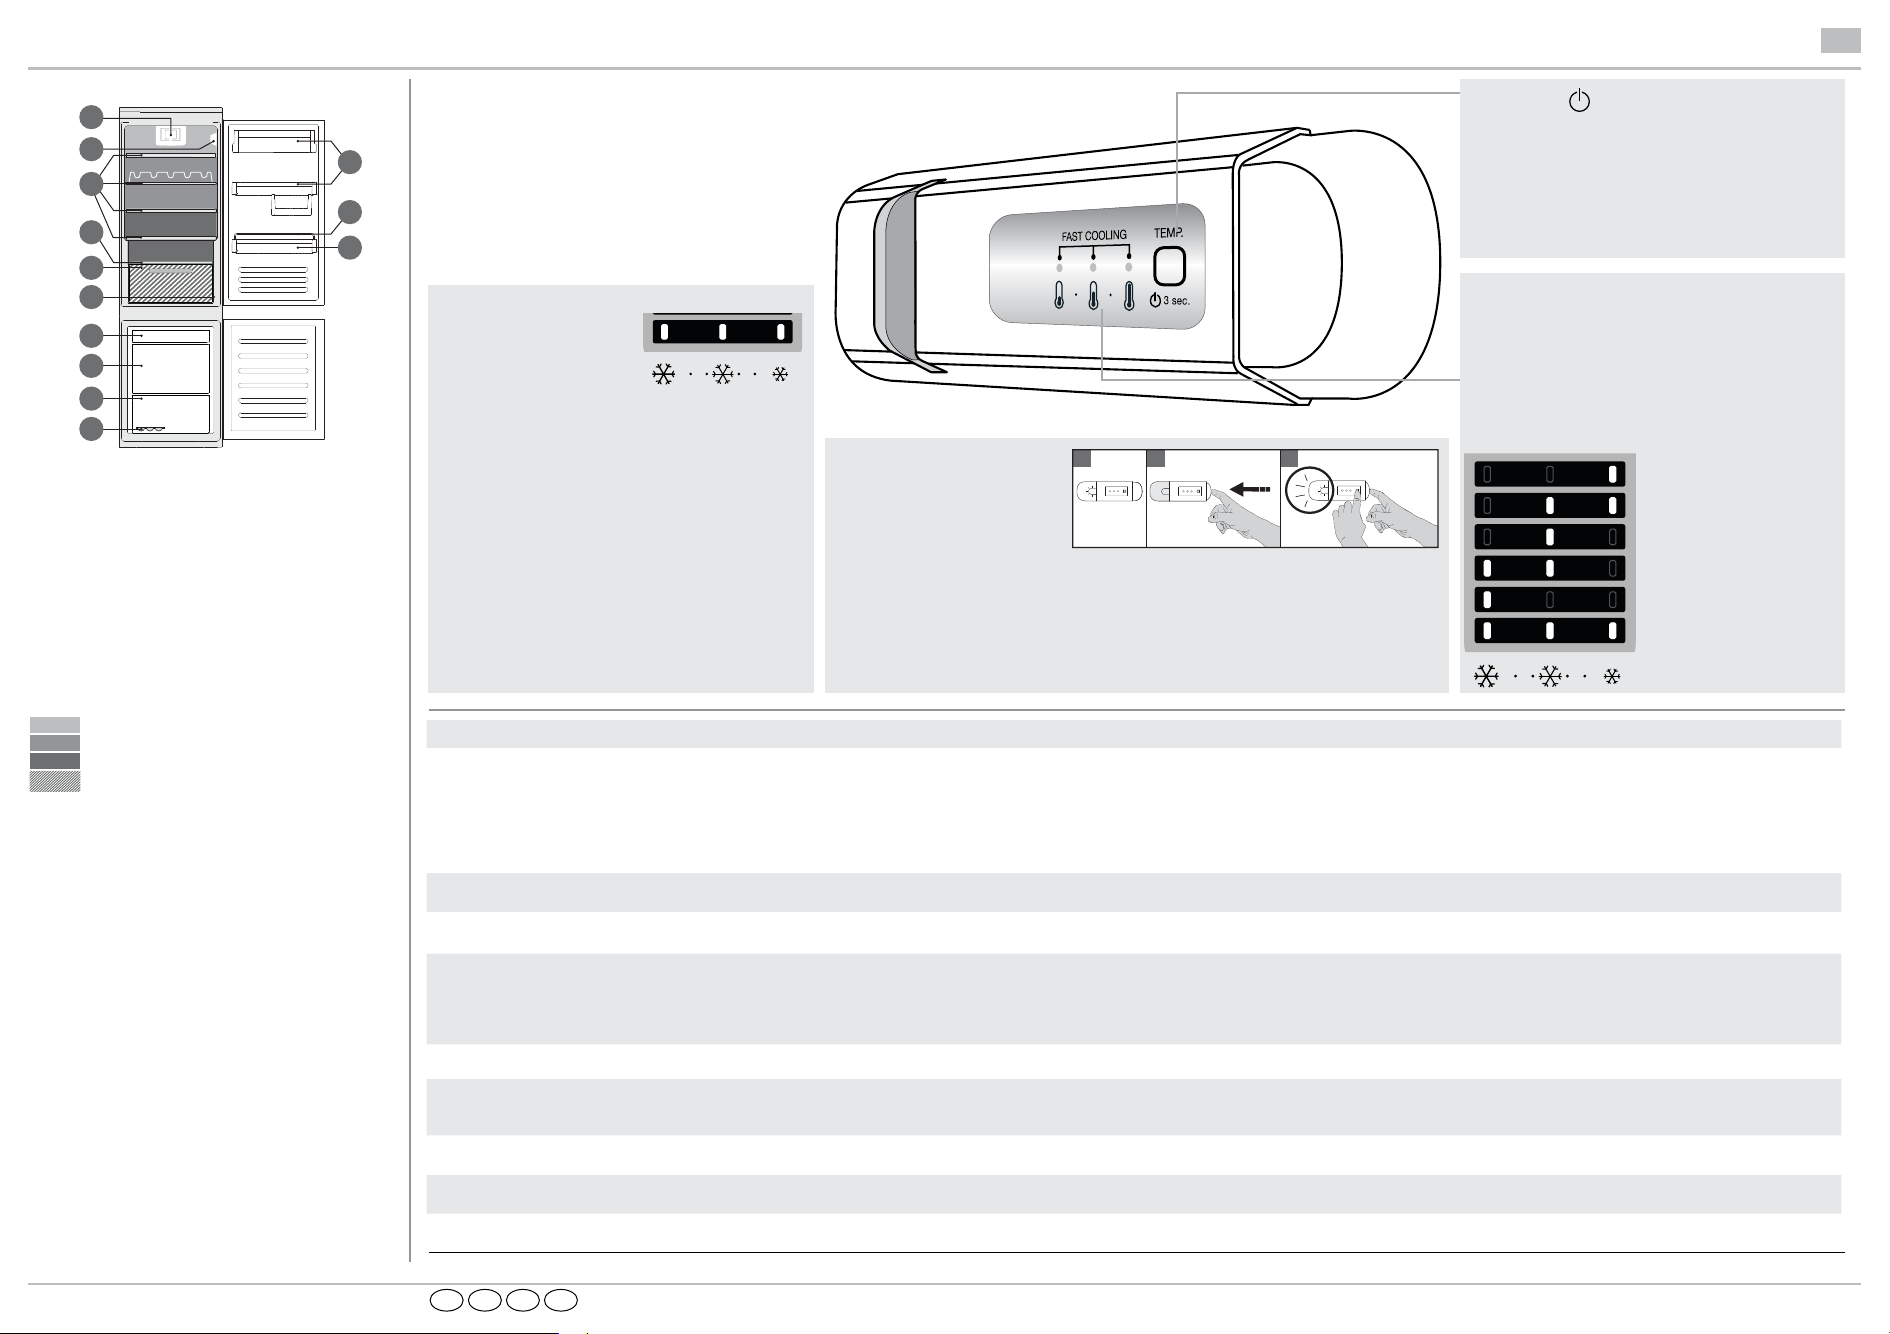
Fast Cool Function (fast cooling)
To cool down the freezer
compartment rapidly or six
hours before inserting big
quantities of food in it, activate
the Fast Cooling function by
pressing the “TEMP” button repeatedly until the 3 green
lights flash and remain on.
The function automatically turns off after 30 hours and
the temperature returns to the previous setting when the
function is turned on.
To turn the function off manually, press the button.
Note: do not put foods that are to be frozen in contact
with others that are already frozen.
To maximise the freezing speed, the lower drawer can
be removed and the food can be placed directly on the
bottom of the compartment.
The control panel is switched off, the appliance
does not work.
The inside light does not work.
The inside light flashes.
The temperature inside the compartments is not
low enough.
There is water on the bottom of the refrigerator
compartment.
Excessive amount of frost in the freezer
compartment.
The front edge of the appliance that the door gaskets
seal against is hot.
One or more green symbols are flashing continuously
and it is not possible to change the temperature set.
The temperature of the refrigerator compartment is
too cold.
Note: some noises, such as gurgles and hissing, caused by the refrigeration system, are normal.
On/Stand-by
Press the button for 3 seconds to turn the appliance
off (the control panel and the light will remain turned
off). Press the button again briefly to reactivate the
appliance.
Note: This does not disconnect the appliance from
the power supply.
Refrigerator compartment temperature
The three LED indicators indicate the refrigerator
compartment set temperature.
It is possible to set a different temperature with the
“TEMP” button.
The following adjustments are possible:
Fan
The fan is pre-set to ON. To
turn the fan on/off carry out the
following steps: Press the light
button as shown in figure 2. The
light will turn off. Without releasing
the Light button, keep pressed the
light will flash just once if the fan is OFF, or it will flash 3 times if the fan in ON. If the
ambient temperature exceeds 27°C, or if drops of water are present on the glass
shelves, it is essential that the fan is on to ensure the proper preservation of the food.
Deactivation of the fan allows energy consumption to be optimised.
1 2 3
“TEMP”
button too, as indicated in picture 3. The
LEDs lit
What to do if... Possible reasons: Solutions:
There may be an appliance power supply problem.
The appliance could be in On/stand by mode.
The light may need replacing.
Malfunction of a technical component.
Door alarm active.
It is activated when the refrigerator compartment door remains open for a prolonged period of time.
There could be various causes (see “Solutions”).
The defrost water drain is blocked. Clean the defrosting water drain (see section “Maintaining and cleaning the appliance” in the instructions for use).
The door to the freezer compartment is not closed properly.
This is not a defect. It prevents condensation from forming. No solution is necessary.
Malfunction alarm
The alarm indicates a fault in a technical component.
- The set temperature is too cold.
- A large amount of fresh food may have been placed in the freezer compartment.
FI SENODK
Check that:
- there is not a power outage
- the plug is properly inserted in the socket and any bipolar power switch is in the correct position
(this enables the power supply to the appliance)
- the household electrical system protection devices are efficient
- the power cable is not broken.
Turn the appliance on by briefly pressing the button (see On/Stand-by function).
Contact an authorized Service Centre.
To stop the alarm, close the refrigerator door.
On reopening the door, check the light works.
Check that:
- the doors close properly
- the appliance is not installed near a heat source
- the set temperature is adequate
- the circulation of air through the vents at the bottom of the appliance is not obstructed (see installation manual).
- Defrost the freezer compartment.
- Make sure the appliance has been correctly installed.
- Check that there is nothing preventing the door from closing properly.
Contact an authorized Service Centre.
- Try to set a less cold temperature.
- If fresh food has been placed in the freezer compartment, wait until it has fully frozen.
Set temperature
High (less cold)
Medium-high
Medium
Medium-low
Low (colder)
Fast cool
5019 550 00353
Page 4
ENGLISH Instructions for use Page 4
DEUTSCH Bedienungsanleitung Seite 8
FRANÇAIS Mode d’emploi Page 12
NEDERLANDS Gebruiksaanwijzing Pagina 16
ESPAÑOL Instrucciones de uso Página 20
PORTUGUÊS Instruções de utilização Página 24
ITALIANO Istruzioni per l’uso Pagina 29
ΕΛΛΗΝΙΚΑ Οδηγίεςχρήσης Σελίδα33
SVENSKA Bruksanvisning Sidan 37
SUOMI Käyttöohje Sivu 41
NORSK Bruksanvisning Side 45
DANSK Brugervejledning Side 49
POLSKI Instrukcjaobsługi Strona53
ČESKY Návodkpoužití Strana57
SLOVENSKY Návodnapoužívanie Strana61
MAGYAR Használati útmutató Oldal 65
LIETUVIŲ Naudojimo instrukcijos Puslapis 69
LATVIEŠU Lietošanasnorādījumi Lappuse73
EESTI Kasutusjuhend Lehekülg 77
ROMÂNĂ Instrucţiunideutilizare Pagina81
SRPSKI Uputstvo za upotrebu Strana 85
HRVAT Uputama za uporabu Stranica 89
БЪЛГАРСКИ Инструкциизаупотреба Страница93
РУССКИЙ Инструкциипопользованиюприбором Страница97
УКРАЇНСЬКА МОВА Інструкціїзвикористання Стор.101
ҚАЗАҚ ТІЛ Нұсқауларигерушілікүшін Бет105
110
3
3
Page 5

USING FOR THE FIRST TIME
Dragon
Connect the appliance to the power supply.
In models with electronics, a sound signal may be emitted, which means that the temperature
alarm has been activated: press the sound alarm off button. Where provided, position the
antibacterial anti-odour filter in the fan as demonstrated in the filter packaging.
Note: After turning the appliance on, you must wait for 4-5 hours for the correct storage
temperature to be reached for a normally filled appliance.
MAINTENANCE AND CLEANING
OF THE APPLICANCE
Clean the appliance occasionally with a cloth and a solution of warm
water and neutral cleaning agents specifically for cleaning the inside
of the refrigerator. Do not use abrasive cleaning agents. To ensure
the constant and correct flow of the defrosting water, regularly clean
the inside of the drain situated in the back wall of the refrigerator
compartment near the fruit and vegetable drawer using the utensil
provided (see figure).
Before carrying out any maintenance or cleaning, take the plug out of the socket or disconnect the
appliance from the power supply.
REPLACING THE LIGHT BULB OR LED
(depending on the model)
Always disconnect the appliance from the power supply before replacing the light bulb. Then
follow the instructions based on the type of light bulb for your product.
Replace the light bulb with one with the same features, available from the Technical Assistance
Service and authorised sellers.
Light type 1)
To remove the light bulb, unscrew it in an anti-clockwise direction, as
shown in the figure. Wait 5 minutes before reconnecting the appliance.
- traditional light bulb (max 25W)
or
- LED light bulb (with the same features)
only available from the Technical Assistance Service
Light type 2)
If the product has LED lights, as demonstrated in the figures below, contact the Technical
Assistance Service if you need a replacement.
LEDs last longer than traditional light bulbs, improve internal visibility and are environmentallyfriendly.
Light bulb
LED light bulb
4
Page 6

IN THE EVENT OF NON-USE
OF THE APPLICANCE
Disconnect the appliance from the power supply, empty it, defrost it (if necessary) and clean it.
Keep the doors slightly ajar to let air circulate inside the compartments. By doing this, you avoid
the development of mould and bad odours.
IN THE EVENT OF AN INTERRUPTION TO
THE POWER SUPPLY
Keep the doors closed so the food stays cold for as long as possible. Do not re-freeze food that
has partially defrosted. If there is a prolonged power cut, the black out alarm may also activate (in
products with electronics).
REFRIGERATOR COMPARTMENT
The refrigerator compartment allows for the storage of fresh food and drink.
The refrigerator compartment defrosts completely automatically.
The occasional presence of drops of water on the internal back wall of the compartment is a
sign of the automatic defrosting phase. The defrosting water is channelled into a drain and then
collected in a container, where it evaporates.
Depending on the model, the product may be equipped with a special “Zero Degrees”
compartment, which is ideal for storing fresh meat and fish.
Warning: do not clean refrigerator accessories in a dishwasher.
Note: the ambient temperature, how often the doors are opened and the position of the appliance
may affect the internal temperatures in the two compartments. Set the temperatures depending on
these factors.
Note: in very humid conditions, condensation may form in the refrigerator compartment, especially
on the glass shelves. In this case, it is recommended that you close containers with liquids in (e.g.
a pot of stock), wrap up food with a high water content (e.g. vegetables) and turn on the fan, if
there is one.
Removing the fruit and vegetable drawer (depending on the model)
Pull the drawer outwards as far as it will go, lift it up and take it out.
To make it easier to remove the fruit and vegetable drawer, it may be necessary to empty (and
possibly remove) the two lower door shelves and then continue to remove the drawer.
Fan and antibacterial anti-odour filter (depending on the model)
The fan allows for the even distribution of the temperatures inside the compartments and,
consequently, better preservation of the food and reduction of excess humidity. Do not obstruct
the ventilation area. The fan can be turned on/off manually (see the Quick Guide); if it is turned on,
it operates automatically when necessary.
5
Page 7

FREEZER COMPARTMENT
Model with separate freezer compartment
The freezer compartment allows for the storage of frozen food (for the period indicated on the
packaging) and the freezing of fresh food. The quantity of fresh food that can be frozen in 24 hours is
written on the rating plate. Arrange the fresh food in the freezing area inside the freezer compartment
(see Quick Guide), leaving enough space around the food packages to allow air to circulate freely. It
is advisable that you do not re-freeze food that has partially defrosted. It is important to wrap the food
in a way that prevents the ingress of water, humidity or condensation.
Making ice cubes
Fill 2/3 of the ice tray (if available) with water and put it back in the freezer compartment. Do not
use sharp or pointed objects to remove the ice under any circumstances.
Removing the drawers (depending on the model)
Pull the drawers outwards as far as they will go, lift them up and remove them. To get more
volume, the freezer compartment can be used without the drawers.
Make sure that the door is closed properly after putting the food back on the grilles/shelves.
Models with an internal product compartment
In the freezer compartment you can also freeze fresh
food. The quantity of fresh food that can be frozen in 24 hours
is written on the rating plate.
How to freeze fresh food:
• arrange the food on the grille, if present (figure 1), or directly on the
bottom of the compartment (figure 2)
• put the food in the middle of the
coming into contact with food that is already frozen, keeping a
distance of about 20 mm (figure 1 and 2).
compartment without it
HOW TO DEFROST
THE FREEZER COMPARTMENT
For frost free models it is not necessary to carry out any defrosting procedures.
For other models, the build up of frost is a normal occurrence.
The quantity and speed of frost accumulation varies depending on the ambient conditions and
how often the door is opened. It is advisable to set the temperature colder or, if available, turn on
the quick freeze function (see Quick Guide) four hours before removing the food from the freezer
compartment, to prolong the preservation of the food during the defrosting phase. To defrost, turn
the appliance off and remove the drawers. Put the frozen food in a cool place. Leave the door
open to allow the frost to melt. To prevent the water from escaping during the defrost, it is advised
that you place an absorbent cloth on the bottom of the freezer compartment and wring it out
regularly.
Clean the inside of the freezer compartment and dry it carefully.
Turn the appliance back on and put the food back inside.
6
(depending on the model)
Figure 1
Figure 2
Page 8

STOP FROST SYSTEM (depending on the model)
The STOP FROST SYSTEM (available depending on the model) facilitates the defrost procedure
for the freezer compartment. The STOP FROST accessory (figure 1) is designed to collect some
of the frost that forms in the freezer compartment and it is easy to remove and clean, therefore
reducing the time needed to defrost the inside of the freezer compartment.
To remove the frost on the STOP FROST accessory follow the cleaning procedure demonstrated
below.
PROCEDURE TO CLEAN THE STOP FROST
ACCESSORY
1
- Open the freezer compartment door and
remove the upper drawer (figure 2).
- Unfasten the STOP FROST accessory
(figure 3) and remove it (figure 4), taking
care not to drop it on the glass shelf below.
Note: if the accessory is jammed or difficult
to remove, do not keep trying to remove it,
but proceed with the complete defrost of the
freezer compartment.
- Close the door to the freezer compartment.
- Remove the frost on the accessory by rinsing
it under running (not hot) water (figure 5).
- Let the accessory drip dry and dry the plastic
parts with a soft cloth.
- Reinsert the accessory by placing the back
part on the projections shown in figure 7-A,
then refasten the handle of the accessory to
the clasps above (figure 7-B).
- Reinsert the upper drawer and close the door
to the freezer compartment.
2
5
7
A
3 4
Click!!
6
It is possible to clean the STOP FROST
accessory on its own without completely
defrosting the freezer compartment. Cleaning
the STOP FROST accessory regularly helps
to reduce the need to completely defrost the
freezer compartment.
Note: the product specifications, including
volume and energy, are calculated without the
STOP FROST accessory.
B
Click!!
7
Page 9

“ZERO DEGREES” COMPARTMENT
(depending on the model)
The “Zero Degrees” compartment is specifically designed
to maintain a low temperature and the correct humidity to
preserve fresh food for longer (for example, meat, fish, fruits
and winter vegetables).
Humidity control technology coupled with Activ0° provides
the best food preservation when the food is not completely
packed.
Turning on and turning off the compartment
The internal temperature of the compartment is approximately 0° when the compartment is turned
on.
To turn on the compartment, press the
button shown in the figure for more than
one second until the symbol lights up.
The lit symbol means that the compartment
is working. Press the button again for more
than one second to turn off the compartment.
To turn off the compartment completely, you
must remove the drawer.
For the correct functioning of the “Zero Degrees” compartment, it is necessary that:
- the refrigerator compartment is turned on
- the temperature is between +2°C and +6°C
- the drawer in the “Zero Degrees" compartment must be inserted for it to be turned on
- one of the following special functions is not selected: Stand-by, Cooling-Off, Vacation (if present),
in this case, remove the food contained in it.
Note:
- if the symbol does not light up when you turn on the compartment, check that the drawer is
properly inserted; if the problem persists contact the authorised Technical Assistance Service.
- if the compartment is turned on and the drawer is open, the symbol in the control panel may
automatically turn off. The symbol will light up again when the drawer is inserted
- regardless of the state of the compartment, you may hear a faint noise, which you should
consider as normal
- when the compartment is not in operation, the temperature inside it depends on the general
temperature of the refrigerator compartment. In this case, it is advised that fruits and vegetables
that are not sensitive to cold (berries, apples, apricots, carrots, spinach, lettuce, etc.) are stored
in it.
Important: if the compartment is turned on and food with a high water content is present,
condensation may form on the shelves. In this case, turn the function off temporarily.
Be careful when positioning food and containers that are small in size on the upper shelf of the
“Zero Degrees” compartment in order to prevent them accidentally falling between the shelf and
the back wall of the refrigerator compartment.
8
Page 10

Removing the “Zero Degrees” compartment:
Carry out the following steps:
- to make it easier to remove the compartment, we recommend that you empty (and possibly
remove) the lower door shelves
- turn off the compartment
- remove the compartment by rotating it upwards
- remove the white plastic shelf under the compartment
Note: it is not possible to remove the upper shelf and side supports.
To use the “Zero Degrees” compartment again, carefully reposition the white plastic shelf under
the compartment before inserting the drawer and turning the function back on.
To have a larger refrigerator volume and to reduce energy consumption, it is recommended that
you turn off the “Zero Degrees” compartment and remove the compartment.
Clean the compartment and its components occasionally using a cloth and a solution of warm
water (taking care not to submerge the white plastic shelf under the drawer) and neutral cleaning
agents specifically for cleaning the inside of the refrigerator. Do not use abrasive cleaning agents.
Before cleaning the compartment (also externally) it is necessary to remove the drawer to
disconnect the electrical supply for the compartment.
TECHNICAL ASSISTANCE SERVICE
Before contacting the Technical
Assistance Service:
Restart the appliance to check if the problem
has been solved. If not, disconnect the
appliance again and repeat the procedure after
one hour.
If, after having completed the checks listed in
the guide for malfunctions and after restarting
the appliance, your appliance continues to
function incorrectly, contact the Technical
Assistance Service, clearly describing the
problem and stating:
• the type of malfunction
• the model
• the type and serial number of the appliance
(written on the rating plate)
• the Service number (if available) (the number
that is after the word SERVICE on the rating
plate placed inside the appliance)
Note:
Reversing the doors of the appliance, if
carried out by the Technical Assistance
Service, is not considered as a warranty
claim.
9
Page 11

5019 600 00814
DE
FR
NL
IT
07/11
 Loading...