


Owner & User Manual
SMT 770 Chameleon Multifunction Thermostat
Ver 1.0
Your new air conditioning system thermostat has been built using the best components and design philosophy currently available. As a result, if properly installed your Smart Temp Chameleon thermostat will provide you with many years of trouble free comfort.
The wall thermostat has been designed by Smart Temp Australia P/L to be an attractive, highly reliable and an easy to use thermostat. By taking the time to read and understand these simple instructions you can take advantage of many of the capabilities that are offered in this premium product.
Great care has been taken in the preparation of this manual. Smart Temp Australia P/L takes no responsibility for errors or omissions contained in this document. It is the responsibility of the user to ensure this thermostat, or equipment connected to it is operating to their respective specifications and in a safe manner.
Due to ongoing product improvement Smart Temp Australia P/L reserves the right to change the specifications of the Chameleon thermostat (or its components) without notice.
All rights reserved. © Smart Temp Australia P/L 2006 Intellectual rights apply.

Table of Contents
Introduction................................................................................................................. |
5 |
Residential Programmable Mode ................................................................................. |
6 |
On / Off and Mode Selection .............................................................................................. |
6 |
Setting the Fan Functions ................................................................................................... |
6 |
Setting the clock ................................................................................................................. |
6 |
Programming your 4 daily events ....................................................................................... |
7 |
Temperature Override...................................................................................................... |
12 |
To Set a Permanent Program Hold. ..................................................................................13 |
|
To Review the set Temperature........................................................................................13 |
|
Commercial Programmable Mode .............................................................................. |
14 |
On /Off and Mode Selection ............................................................................................. |
14 |
Setting the Fan Functions. ................................................................................................14 |
|
Setting the clock ............................................................................................................... |
14 |
Programming your 2 daily events ..................................................................................... |
15 |
After hours Run Timer ...................................................................................................... |
17 |
To Review the set Temperature........................................................................................18 |
|
|
3 | P a g e |

Manual Mode ............................................................................................................ |
18 |
On / Off and Mode Selection ........................................................................................... |
18 |
Setting the Fan Function .................................................................................................. |
18 |
Setting the clock............................................................................................................... |
19 |
Setting your desired temperature.................................................................................... |
19 |
Switching between day and night set points.................................................................... |
20 |
To Review the set Temperature. ...................................................................................... 20 |
|
Common Functions .................................................................................................... |
21 |
The Buttons Explained – ON/Off and Mode selection etc................................................ |
21 |
Control Modes ................................................................................................................. |
23 |
Fan Functions Explained................................................................................................... |
25 |
Auto Fan Mode................................................................................................................ |
25 |
Fan On Mode ................................................................................................................... |
25 |
Fan Speeds ....................................................................................................................... |
26 |
Single Fan Speed.............................................................................................................. |
26 |
Three Fan Speed .............................................................................................................. |
26 |
LCD Explained................................................................................................................... |
27 |
Troubleshooting ........................................................................................................ |
30 |
Specifications............................................................................................................. |
32 |
4 | P a g e |
|
Introduction
The Chameleon thermostat from Smart Temp is able to be used as a residential programmable thermostat, a commercial programmable thermostat or as a simple to use manual thermostat. Your installer will have set these modes to best suit your individual needs.
For clarity, this user manual is broken into the following main sections.
Residential Programmable Mode. (See page 6 of this manual).
Commercial Programmable Mode. (See page 14 of this manual).
Manual Mode. (See page 18 of this manual).
Common Functions to all modes. (See page 21 of this manual for additional functions).
Please Note:
The Chameleon thermostat can be configured by your installer to a large variety of configurations and functions so that your Chameleon thermostat is perfect for you and your individual needs. As such, this manual may describe a function or feature not active on your thermostat.
5 | P a g e
Residential Programmable Mode
On / Off and Mode Selection
Tap the Mode button to cycle the Chameleon thermostat through the available modes, Heat only, Cool only, Auto season change over mode (Shown by Heat & Cool in the LCD), Emergency Heat (if fitted), and OFF. (Note – Not all modes may be active on your Chameleon).
Setting the Fan Functions
Detail on the fan control functions of the Chameleon can be found on page 25 of this manual.
Setting the clock
The Chameleon thermostat is fitted with a real time clock. This clock is used by the Chameleon thermostat for the programming functions as described below.
It is essential that the clock time and day are set accurately if you require your programmed events to start on time.
6 | P a g e

To set the clock, tap the “PROG” button. The LCD will show the Hours Digit flashing. Use the up (S) or down (T) button to adjust the hours to the correct time (note the AM / PM symbol). Tap the “PROG” button again and now the minute’s digits will flash. Adjust this value using the up (S) or down (T) button to show the correct minute. Tap the “PROG” button again and now the weekday flashes, again use the up (S) or down (T) button to set this value to the correct day of the week. Tap the “PROG” button again to exit the clock set function.
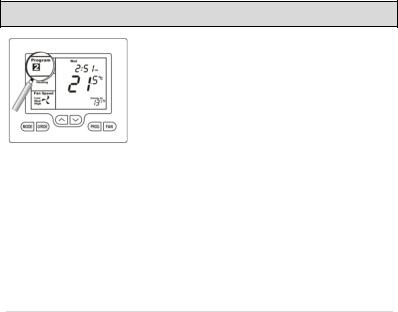
Programming your 4 daily events
The Chameleon is an individual 7 day programmable thermostat. For each day of the week you are able to have 4 timed set temperature changes or programmed events. For clarity these events are conveniently named “1”, “2”, “3” & “4”.
The number “1” event may be used to set the temperature of your home that you would like to wake to.
The number “2” event is typically used to set the temperature you wish your home to maintain whilst you are away at work perhaps.
The number “3” event is often used to set the temperature you wish to be greeted with upon returning home at the end of the day.
The number “4” event can be used to set a comfortable and energy efficient temperature while you sleep.
7 | P a g e

You are permitted to have every event occur at a different time of the day and set a different heating and cooling temperature for each of the 4 daily events. You are also able to set a heating set point temperature between the Heating turned OFF (no heating) and 38 degrees Celsius (100 F). You are able to set a cooling temperature between zero degrees Celsius (32F) and the Cooling OFF (no Cooling), provided your installer has not set control limits that restrict this range of adjustment.
Remember, each of the 4 programmed event desired temperatures will hold the home temperature until the next event time arrives where the new event desired temperature will then be used. So:
The “1” event set temperature will be the temperature of your home until the “2” event time arrives, then The “2” event set temperature will be the temperature of your home until the “3” event time arrives, then The “3” event set temperature will be the temperature of your home until the “4” event time arrives, then
The “4” event set temperature will be the temperature of your home until the next days “1” event time arrives.
Programming your Chameleon thermostat or setting these daily events is no more complicated than setting the clock as described previously. The same buttons are used in the same sequence, using the “PROG” button to advance to the next step, and the up (S) or down (T) buttons to make changes. The LCD shows only relevant information for the event being adjusted thus reducing possible errors that may be caused by having confusing information displayed on the LCD.
8 | P a g e

To enter the program mode.
Press and hold the “PROG” button for 3 seconds. The display will change to show the number “1” and the Day “Monday” flashing. Using the up (S) or down (T) buttons adjust the day to the day you wish to start programming or to the day you wish to edit an existing event or program.
Tap the “PROG” button to advance to the next step, the
LCD will show the digit “1” with the hour’s digit flashing. Using the up (S) or down (T) buttons adjust the hours to the time you wish the number “1” event to commence for the currently selected day.
Tap the “PROG” button again, now the minute’s digits flashes. Using the up (S) or down (T) buttons set
the minute to the time you wish the number “1” event to commence.
Tap the “PROG” button again, now the word “HEAT” (if enabled by the installer) and a temperature value is shown in the LCD, using the up (S) or down (T) buttons set the desired heating temperature to be maintained for the number “1” event.
9 | P a g e

Tap the “PROG” button again, now the word “Cool” (if enabled by the installer) and a temperature value is shown in the LCD, using the up (S) or down (T) buttons set the desired cooling temperature to be maintained for the number “1” event.
 NOTE: The heating set temperature must be at least 1 deg C (2f) lower than the cooling set temperature. If you set the heating or cooling set temperature closer than this minimum value, the Chameleon thermostat will automatically move the other set point away to maintain this minimum value.
Tap the “PROG” button again and the Day previously selected will be shown along with the digit “2”, signifying the 2nd daily event is now being programmed. The Hour digit will flash indicating that this value can now be adjusted with the up (S) or down (T) buttons. Set the hour to the time you wish the number “2” event to commence as described previously.
Continue to tap the “PROG” button to advance you through the number “2” “Minute”, then the set temperature(s) for the number “2” event.
Continuing to tap the “PROG” button you will advance to through the number “3” program and then number “4” programs for the day you have chosen to program. Once you have completed programming the number “4” event, taping the “PROG” button again the LCD will now show the word “COPY”.
10 | P a g e
You now have TWO options
Option 1 – Continue programming as above.
Simply continue to tap the “PROG” Button as you have been previously to advance to the next day, “Tuesday” in this example “1”, “2”, “3”, “4” events then Wednesday, Thursday etc, following the same simple steps previously explained….
OR
Option 2 Copy Program
To copy the values you have just programmed to other days of the week, while the word “COPY” is displayed simply tap the up (S) or down (T) buttons to “TAG” each additional day you wish to copy the currently set days program to. When you have finished “Tagging” the days you desire press the “PROG” button to initiate the
copy process. The word “Copy” will flash briefly to confirm the copy process and your current days values will be copied to the days selected. Normal programming steps will resume at the next day to be programmed.
11 | P a g e
 Loading...