

Page 1

TM
KeypadLinc
Wall-Mounted Controller with Integrated Dimmer
Now Includes
BoosterLinc Signal
Boosting
(6-Button Models only)
For models:
#12073W & #12074W with Amber LEDs
#12073WB & #12074WB with Blue LEDs
#12073WW & #12074WW with White LEDs
Page 2

Congratulations!
Thanks for purchasing the KeypadLincTMWall Mounted Controller, the finest high
quality powerline-controllable keypad available. This amazingly flexible controller is
packed with some of the most advanced features available, allowing you to send
any standard X10/PLC (Powerline Carrier) command, including PRE-SET DIM commands! From controlling a single light to triggering elaborate multi-room scenes, this
KeypadLinc Wall-Mounted keypad can do it all.
Two versions are available:
The 6-Button KeypadLinc Controllers includes Smarthome's BoosterLinc™ technology. When enabled, the BoosterLinc feature acts like a real-time repeater of
X10/PLC signals. It will boost powerline signals to allow an unlimited expansion of
your automation system. Once installed and enabled, PLC signals will be boosted to
improve reliability to other receivers.
The 8-Button KeypadLinc Controllers do not include the BoosterLinc feature.
This manual covers the programming of both types of KeypadLinc Controllers. Only
the steps involving the programming of the dimmer's primar y address will be slightly
different between the two versions.
KeypadLinc Features
• Includes Smarthome’s BoosterLinc technology
(6-Button models only)
• Built-in 450-watt dimmer control circuit
• Wires in just like a standard wall switch*
• Any button can be programmed to control the integrated dimmer
• Responds to 64 scene addresses, each with different fade-on/off rates and dimming levels
• Any button can be programmed to send any address or command
• Status LED/ Set Button shows powerline activity and facilitates programming
• Programmable "toggle" ability, allowing up to 4 different command functions from
one button (ON, OFF, BRIGHT, DIM, etc.)
• User-adjustable dimming Fade-On/Off Rate and On-Level
• Programs and operates like other Smar thome 2-Way products
• All settings are held in non-volatile memory (no code wheels to set)
• Easy, flexible programming
• High-quality construction designed for years of use
* Requires a neutral connection
KeypadLinc Models
Model 12063W - Custom 6-Button KeypadLinc
Model 12064W - Custom 8-Button KeypadLinc
Model 12073W, 12073WB, 12073WW-Custom 6-Button KeypadLinc with Dimmer
Model 12074W, 12074WB, 12074WW - Custom 8-Button KeypadLinc with Dimmer
2
Page 3

CAUTION!!
Read and understand these instructions before installing! This device is intended for
installation in accordance with the National Electric Code and local regulations. For
indoor use only. Connect only copper or copper-clad wire to this device. Before installing
the control, disconnect power at the circuit breaker or remove the fuse to a v oid shock
or damage to the control or to the installer. It is recommended that a qualified electrician perform this installation. Retain these instructions for future reference.
Quick Reference Guide
Use these quick start instructions to make a change to an existing KeypadLinc or
after you have read through the detailed programming instructions beginning on
page 6. These instructions show the basic steps for the most common programming functions without all the explanations and details.
If this is your first time installing or using KeypadLinc, we recommend you skip this
section for now.
DEFAULT
Setting the Dimmer’s 1. Press and hold the set button for 3 seconds A-1
Primary Address 2. Transmit the address within 30 seconds
(6-Button models only)
3. Send an “ON” to enable BoosterLinc Mode
OR
Send an “OFF” to disable BoosterLinc Mode
(see page 6 for more detailed instructions)
Setting the Fade-On/Off 1. Adjust the dim level 2 Seconds
Rate (Brighter = faster dimming)
2. Double tap the Set Button
(press it TWICE quickly)
(see page 7 for more detailed instructions)
Setting the On Dim Level 1. Adjust the dim level to the desired level 100%
2. Tap the Set Button ONCE
(see page 7 for more detailed instructions)
Toggle Mode Address 1. Enter Setup mode (hold any two keys for 5 seconds)
Programming 2. Press the button to be set
3. Confirm button’s light is Blinking
4. Send the address and command (to set the mode)
Bright: Non-dimmable module
ON: Dimmable module
Dim: 2-Way non-dimmable module
OFF: 2-Way dimmable module
8: Controls a Smarthome scene-enabled modules
(see page 12 for more detailed instructions)
Non-Toggled Mode 1. Enter Setup mode (hold any two keys for 5 seconds)
Address Programming 2. Press the button to be set
3. Confirm button’s light is Steady on
4. Send unit code 1 for one command or
send unit code 2 for two commands
5. Send the 1 or 2 addresses or commands
(see page 14 for more detailed instructions)
3
Page 4

Preparation
Before installing KeypadLinc, please familiarize yourself with the following and take
the necessary precautions listed here:
• Be sure that the circuit breaker is turned off to the circuit being controlled.
Installing KeypadLinc with the power on will expose you to dangerous voltages.
• KeypadLinc Wiring Diagram on page 5 will help you to determine the wire colors
of the connections to the KeypadLinc and Multi-Way Companion Switch. Note:
While the neutral connection is optional on the Multi-Way Companion Switch,
the KeypadLinc requires a neutral connection.
• Wiring for 3-way, 4-way, & up switch circuits follow conventional (standard, nonremote) wiring practice (plus the requirement for a neutral). Wiring the
SwitchLinc Multi-way Companion Switch requires the Line (Black) wire be accessible and be the same 110V leg of the house wiring. The White wire on the
"slave" switch is to be connected to NEUTRAL ONLY. If neutral is not available,
cap the white wire, which will simply causes the nightlight LED not to function.
• When using a KeypadLinc with Integrated Dimmer and a Multi-way Companion
Switch, one of the buttons on the KeypadLinc MUST BE assigned to the primar y
address of the Integrated Dimmer in order for the companion switch to operate.
• The KeypadLinc may feel warm during operation. The amount of heat generated
is within approved limits and poses no hazards. To minimize heat build-up,
ensure that the area surrounding the rear of the KeypadLinc has adequate ventilation (i.e., clear away excess insulation).
• Installation should be performed only by a qualified electrician, or by a homeowner who is familiar and comfortable with electrical circuitry. If there are any
questions, consult an electrician or contact Smarthome's Tech Support department for guidance.
Installation Instructions
The KeypadLinc can be easily installed in a new or existing home. The following illustrations do not show the "outgoing" power wires. In a most homes, the wiring circuits
are installed in a "daisy-chain" fashion. Typically the wires run from the circuit breaker box to the first switch, then the next switch box, and so on. Normally, "pig-tail"
connections will split off these cables inside the wall outlet boxes.
Common wiring colors:
o HOT (or LINE) is usually black wire
o LOAD is usually a black wire
o NEUTRAL is usually a white wire.
o Electrical GROUND is a copper or green wire.
o TRAVELERS (in a 3- or 4-way switch) are usually red.
These are the most common colors used over the last few decades. Depending on
the age of the building and local electrical codes, the colors could be different.
Knowing which wire is HOT or LINE is important so having a tester available will be
helpful to the success of the project.
4
Page 5

Step-by-step Instructions
1. Disconnect the power for the existing switches at the circuit breaker or fuse
panel. Verify that the power has been removed by trying to turn on the lights
controlled by the switches.
2. Remove the trim plate from the existing switches.
3. Unscrew and pull the existing switches from the wall box.
4. Disconnect the wires from the existing switches.
5. If the KeypadLinc is being installed into a 3/4/5-way
circuit, the SwitchLinc Multi-way Companion Switch
must be installed in the wall box where power comes
into the circuit. Follow the instructions included with
the Multi-way Companion Switch to identify the "Hot,"
"Neutral," "Ground," and "Traveler" wires.
6. Orient KeypadLinc so the LED is at the top, and make the connections according to the "KeypadLinc Wiring Diagram" below.
7. After all connections have been made, ensure that all wire connectors are firmly attached and that there is no exposed copper except for the Ground wire. If
the Yellow traveler wire isn’t used, place a wire cap on it.
8. Gently place the wires and the KeypadLinc into the wall box (with LED at top of
device) and screw into place.
9. Before installing the faceplates, restore power to the circuit. Once power is applied
to the KeypadLinc, the green Status LED will come on after a few seconds.
10.After testing KeypadLinc, install the faceplate (sold separately).
Tip:
For additional help
installing 3-way circuits,
see page 5 in the Multiway Companion Switch
manual.
XX
5
Page 6

Setting it Up
The KeypadLinc does not use code wheels or dials to set programming addresses.
Instead, it accepts the first address on the powerline once the programming mode is
started. Any PLC/X10 transmitter can be used to set the primary address. The settings are stored in non-volatile memory that will be retained in the event of a power
failure.
You will need a transmitter to set the button's addresses or functions. To get the
maximum number of programming options, we recommend a ControLinc Duo
(Smarthome item #4071) or a Maxi Controller (#4020). These controllers have separate keys for the addresses (1,2,5,etc.) and the commands (ON, OFF, etc.). Many
PLC/X10 transmitters have buttons with combined functions. That is, their buttons
combine the address with a command (1-ON, 1-OFF). When single-button controllers are used, the setup choices will be limited. In some of the programming
steps, it may be necessary to send only the address.
Integrated Dimmer’s Primary Address Programming
The integrated dimmer in KeypadLinc is designed to control incandescent or low-voltage (magnetic transformer) lighting. Connecting the red load wire (explained in the
installation section) and using the integrated dimmer is optional. The KeypadLinc will
function normally without a load connected and the red wire capped off.
Activating the BoosterLinc Mode
The 6-Button
found in Smarthome's plug-in BoosterLinc signal booster. This feature allows it to
boost PLC/X10 signals on the AC line and improve the overall reliability of the automation system in the home. The signal boosting can be disabled if desired or if there are
other Smarthome BoosterLinc-enabled products on the same circuit breaker. Please
see page 16 for impor tant information on this feature.
KeypadLinc Controllers
includes the programming and intelligence
Setting the Primary Address
The dimmer ships from the factory with "A1" and BoosterLinc Mode disabled. The
Dimmer is assigned to button "A" on an 8-button KeypadLinc and the two larger buttons on a 6-button KeypadLinc. (See the diagram on page 16.) If KeypadLinc is
reset, it will revert back to “A1”. Any of the 256 addresses can be programmed.
1. Press and hold the Status LED/ Set Button for approximately 3 seconds until the
load comes on, then release. The green Status LED/ Set Button begin blinking.
2. Within 30 seconds, transmit the desired primar y address (housecode and unit
code) from any transmitter.
3. Set the BoosterLinc Feature
a) Send an “ON” command immediately after
the house and unit code to activate the
BoosterLinc mode.
OR
b) Send an “OFF” command immediately after
the house and unit code to disable the
BoosterLinc mode.
The light(s) controlled by the KeypadLinc will blink
and the Status LED/ Set Button will stop flashing.
6
(For 6-Button mod-
els only)
Important: If you plan on
sending status request signals
to the integrated dimmer of
KeypadLinc Controllers or any
2-way Smarthome product,
make sure that each is programmed with a different primary address. Otherwise, their
simultaneous responses to a
status request may collide
with one another.
Page 7

Assigning a Button to Locally Control the Integrated Dimmer (optional)
Once the integrated dimmer has been assigned a primary address, you may want to
change the button(s) that control it. By default, all 6-Button KeypadLinc Controllers
that began shipping in April 2004 will automatically update the top ON and bottom
OFF control buttons when the dimmer’s address is changed. Follow these steps to
assign a button. This may be overridden by following these steps:
1. Push and hold ANY 2 buttons for at least 5 seconds. When all of the lights
under the buttons begin blinking, release the buttons.
2. Press the button to be assigned to the integrated dimmer.
3. Make sure the button is in the Toggle Mode by observing the button’s light; it
should be blinking. If it is not blinking, press the button a second time.
4. Using a transmitter, send the same unit code address that was sent during the
setting of the integrated dimmer's primary address (previous page).
5. Send an ON command.
For 6-button KeypadLinc users, you may want to use the two large buttons to control
the load. You’ll need to program each button separately where one sends the
address + Off and the other sends the address + On. See Non-Toggle Mode Button
Programming on page 14 for instructions to set up each key.
Setting the Integrated Dimmer's Fade-On/Off Rate (Optional)
The "Fade-On/Off Rate" is the speed that KeypadLinc brings the brightness of the
connected light(s) up or down when activated manually or it receives remote control
command to its primary address. From the KeypadLinc, the rate is adjustable
between .1 and 9 seconds, (the factory default rate is 2 seconds).
1. Press the button assigned to the integrated dimmer to turn on the connected
lights or send a PLC signal to the KeypadLinc to turn on the load.
2. Adjust the brightness of the load (at the KeypadLinc or remotely with dim commands) so that the brighter the load, the faster the fade-on/off rate.
3. Tap the Status LED/Set Button TWICE
The light(s) will blink indicating that it has set the new fade-on rate.
Setting the Integrated Dimmer's ON-Level (Optional)
The ON-Level is the brightness level that the KeypadLinc integrated dimmer will
adjust to when activated manually or it receives remote control ON command to its
primary address. It can be set to resume to the same brightness level each time or
to the previous brightness level it at before being turned off.
Setting a fixed brightness level:
1. Adjust the brightness of the load (at the KeypadLinc or remotely with dim commands) to the desired level.
2. Tap the Status LED/Set Button ONCE.
The light(s) will blink indicating that it has set the new on-level.
Setting the Resume Dim mode:
1. Turn the light off.
2. Tap the Status LED/Set Button ONCE.
7
Page 8
Integrated Dimmer’s Advanced Primary Address Programming
The Integrated Dimmer’s Fade-On/Off-Rate and Default On-Level can be remotely
set using a ControLinc Duo (Smarthome #4071), a Maxi-Controller (#4020) or an
equivalent transmitter capable of sending Housecode and Unit Code without ON or
OFF. These procedures and all the following ones will not work with a transmitter
that sends the address with a command. Transmitters in which one button is
pressed to turn on or off a load will not work.
Remotely Setting the Fade-On/Off Rate (Optional)
1. Transmit the “clear” sequence:
O16 N16 M16 P16 M16
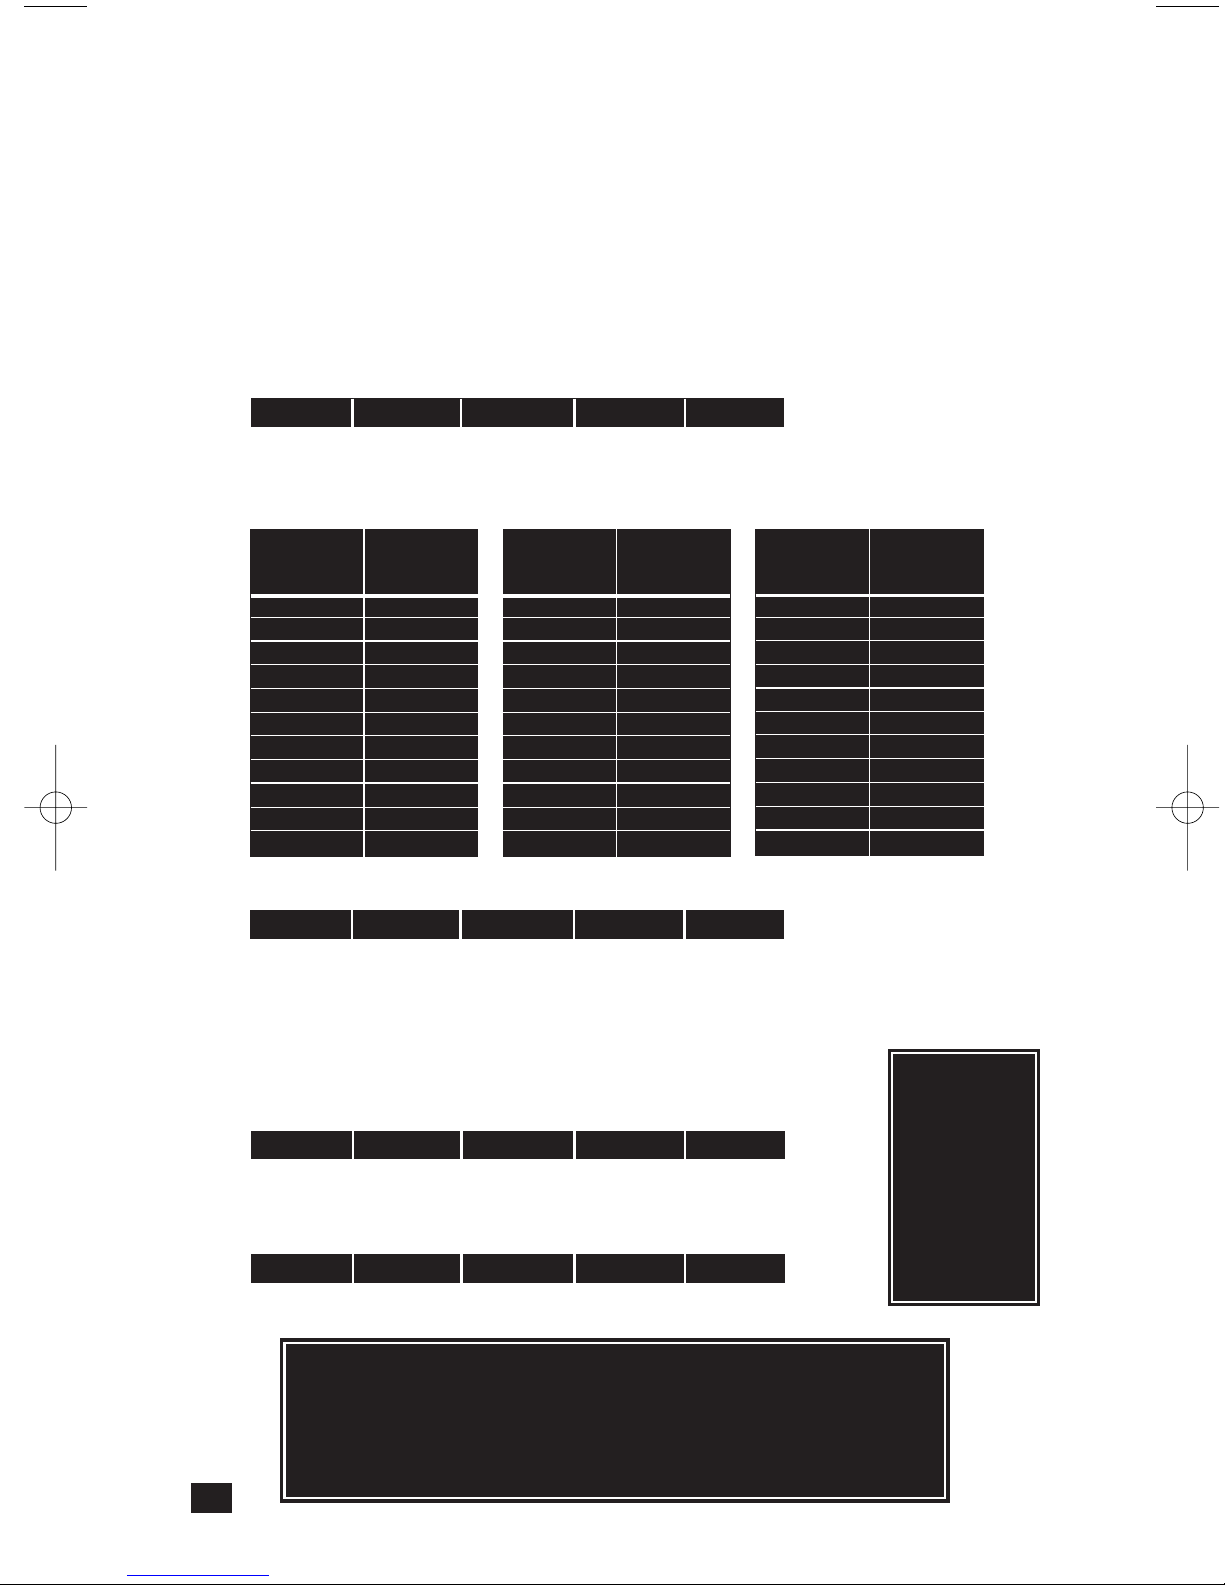
2. Send the house/unit code for the integrated dimmer followed by the PRESET
DIM from the table below. (Alternatively, send BRIGHT or DIM signals to
change the light's brightness to a comparable level.)
Preset
Dim
Level
100%
97%
94%
90%
87%
84%
81%
77%
74%
71%
68%
Fade-On/Off
Rate in
Seconds
0.1
0.2
0.3
0.5
2.0
4.5
6.5
8.5
19.0
21.5
23.5
Preset
Dim
Level
65%
61%
58%
55%
52%
48%
45%
42%
39%
35%
32%
Fade-On/Off
Rate in
Seconds
26.0
28.0
30.0
32.0
34.0
38.5
43.0
47.0
60.0
90.0
120.0
Preset
Dim
Level
29%
26%
23%
19%
16%
13%
10%
6%
3%
0%
Fade-On/Off
Rate in
Seconds
150.0
180.0
210.0
240.0
270.0
300.0
360.0
420.0
480.0
540.0
3. Send the following command sequence to lock-in the new Fade-on/off rate:
O16 P16 N16 M16 O16
The light(s) will blink indicating that it has set the new fade-on/off rate.
Remotely setting the Default On-Level (Optional)
This is the alternative method of adjusting the integrated dimmer’s default onlevel.
1. Transmit the “clear” sequence:
O16 N16 M16 P16 M16
2. Send the house/unit code for the lamp module and adjust the dim
level or send preset dim level.
3. Send the following command sequence to lock-in the new on-level:
P16 N16 M16 O16 M16
The light(s) will blink indicating that it has set the new on-level.
Tip:
Whenever the
CLEAR
sequence is
sent, you will
have 4 minutes to make
your adjustments.
Tip: If you have trouble communicating to the KeypadLinc, there
may be a lot of signal activity on the powerline. Unplug transmitters
whose signals that might be intercepted by KeypadLinc during the
programming sequences. RF transceivers, computer controllers, and
X10 thermostats should be unplugged to avoid interference.
XX
8
Page 9

Scene Address Programming
The KeypadLinc with Integrated Dimmer can be a member of up to 64 scenes. A
scene address is a single address (just like a primary address), and is set at the
time scene membership is programmed. Using a single command to trigger a scene
is much less complicated than using an intelligent computer controller to initiate a
macro that in turn sends dozens of commands over the next few minutes to turn on
multiple receivers and set brightness levels (for dimming-enabled modules).
When an ON signal is transmitted to scene-enabled modules, all members programmed to that address will turn on to their independent ON-levels and at their
independent fade-on rates for that scene. Transmitting an OFF for a scene address
will turn off all modules that are members of that scene. Modules will react to dim
and bright commands after the scene address is sent, however, they will ignore All
Light On and All Units Off commands for the scene address' house code.
KeypadLinc with Integrated Dimmer is compatible with these other scene-enabled
Smarthome products:
• SwitchLinc 2-Way and Plus Dimmers • SwitchLinc RX Plus Dimmers
TM
• LampLinc
• SwitchLinc Relay 2-Way • SwitchLinc Timer
• ApplianceLincTM2-Way & Plus Modules
• ToggleLincTM2-Way and Plus Dimmers and Switch
The scenes for all these modules can be setup simultaneously using the same programming sequence. Signals sent by transmit-enabled Smarthome products, like
those above, will be received and understood by the KeypadLinc!
2-Way & Plus Modules • SwitchLinc 2-Way Switches
Transmitters that can set up scenes
Scenes can be programmed with a ControLinc, a Maxi-Controller
or any transmitter capable of sending Housecode and Unit Code
address without an ON or OFF command. Transmitters in which
one button is pressed to turn a load on or off WILL NOT WORK.
When using one of these equivalent transmitters, be careful when
pressing the buttons. Programming will be ignored if some commands are not sent in the proper sequence. "Fat-Fingering" or
accidentally pressing the same button twice may prevent the programming from being accepted.
TM
Smarthome TouchLinc
help automate the scene setting process.
Touchscreens have a built-in wizard to
Many computer programs like Smarthome
Manager (pictured), Indigo for Macintosh,
HCA, and HomeSeer have tools to aid in setting up scenes and many other features.
Please check with your automation software
supplier for availability.
Tip
: If you forget
to put a module
in a scene or
make a mistake,
you can just reenroll that module in the scene
without having
to re-adjust the
other modules
that are already
in the scene.
SmarthomeTMManager SSoftware
9
Page 10

Scene Address Programming (continued)
Programming Scene Membership and On-Levels:
1. Transmit the “clear” sequence:
O16 N16 M16 P16 M16
2. Activate the integrated dimmer by turning it on and adjusting
the brightness at the KeypadLinc or remotely. (Hint: a scene
can trigger a module to go off by setting the dim level to 0%.)
3. Send the following command sequence:
M16 N16 O16 P16
4. Transmit the desired scene address (house and unit code) to
lock-in new scene.
The light(s) will blink to indicate that it has set the new scene.
Removing the integrated dimmer from a Scene:
1. Transmit the “clear” sequence:
O16 N16 M16 P16 M16
2. Using a controller, send the primary address of the dimmer plus an ON or OFF or
press the button on the KeypadLinc assigned to the integrated dimmer.
3. Send the following command sequence:
O16 P16 M16 N16
Tip:
Be careful not
to “fat-finger”
the buttons as
you send the
lock-in
sequence.
4. Transmit the scene address (house and unit code) that is to be removed.
The light(s) will blink (if they are still on) indicating that the scene has been removed.
Programming Scene Fade-On/Off Rates (optional):
The fade-on/off rate of each in each scene is individually adjustable from .1 to 540
seconds (9 minutes). If this setting is not adjusted, the dimmer will use the fadeon/off rate of the primary address for the scene.
1. Transmit the “clear” sequence:
O16 N16 M16 P16 M16
2. Using a controller, send the primary address of the integrated dimmer and adjust
the dim level corresponding to the fade-on/of f rate time you want using the
table on page 8, (brighter=faster).
3. Send the following command sequence:
N16 O16 P16 M16
4. Transmit the scene address (house and unit code).
The light(s) will blink indicating that the new fade-on/off rate has been set.
10
Page 11

Programming the KeypadLinc Controller’s Buttons
The buttons on the KeypadLinc can be programmed in one of two ways:
Toggle Mode
In this mode, the keypad can send two different commands on alternate presses.
For example, pressing a button when the indicator light is off will cause an ON signal
to be sent. If the indicator light is on, the keypad will send an OFF signal when
pressed. Additionally, the button’s light will reflect the status of that address. If
another transmitter sends a signal corresponding to an address on the keypad, the
light will come on if the signal contains an ON, BRIGHT or ALL LIGHTS ON command.
If the address received contained an OFF or ALL UNITS OFF command, the light will
turn off. If the button was defined as an Appliance, the keypad will ignore the ALL
LIGHTS ON for that address.
Please note that most modules only receive signals and don't transmit anything. If
you have a device that can be activated manually at the module, then that action
would not be sent to the KeypadLinc (because most modules can't transmit). It is
possible for indicators to become out of sync with the true status of your modules.
For example, if you turned on a "receiver-only" wall switch, the indicator light on the
KeypadLinc would not come on because most wall switches can't transmit. If you
need the modules to transmit when manually activated, check out Smarthome's
many 2-way modules like SwitchLinc 2-Way, ToggleLinc 2-Way, and LampLinc 2-Way
plug-in modules.
Non-Toggled Mode
The button will always send the same signal each time it is pressed. The signal
sent can be made up of the following:
Type Examples
One address
Two Addresses
One Command
Two Commands
Address and Command
In the
Non-Toggled Mode, the lights under each button will not light up after the button is
pressed or when a signal that matches a programmed address is received. The light
will only blink momentarily when the keypad is transmitting signals.
F-9
F-9, F-10
F-Dim
F-All Units Off, G- All Units Off
F-9, F-On
Entering Setup Mode
1. To enter Setup Mode, push and hold ANY 2 buttons for at least 5 seconds. When
you see that all of the lights under the buttons are blinking, release the buttons.
2. All of the button lights will blink on and of f every second when in Setup Mode.
3. The KeypadLinc allows approximately 30 seconds for setup. After that time, the
KeypadLinc will turn off the blinking lights and return to its normal state.
Proceed to the button programming instructions on the next page.
XX
11
Page 12

Toggle Mode Button Programming
(Sending different commands on alternate presses)
In this step, it is necessary to send two signals to the keypad from a transmitter.
The first transmission will contain the unit code address; the second will tell the
KeypadLinc how the button is to behave.
1. Enter the Setup Mode (by holding any two buttons for 5 seconds).
2. Press the button to be programmed.
3. Make sure the button is in the Toggled Mode by obser ving the button’s light; it
should be blinking.If it is not blinking, press the button a second time.
4. Send the fir st signal using a controller. The signal must be an address only; unit
codes 1 to 16 without a command.
5. The second signal will set the button’s mode:
Command Mode Explanation
BRIGHT
ON
DIM
OFF
UNIT
CODE
8
Button is for an Appliance Module (Non-Lamp)
Button is for a Lamp or Wall Switch Module.
When the button is pressed and held, KeypadLinc sends BRIGHT
and DIM signals on alternate presses.
Button is for an Appliance Module that can confirm
its ON/OFF status.
KeypadLinc will send the ON or OFF command followed by a status
request signal. The button's light will illuminate depending on the
returned signal. If a device does not respond, the button's light will
not change.
Button is for a Lamp Module than can confirm
its ON/OFF status.
KeypadLinc will send the ON or OFF command followed by a status
request signal. The button's light will illuminate depending on the
returned signal. If a device does not respond, the button's light will
not change. When the button is pressed and held, it sends BRIGHT
and DIM signals on alternate presses.
Button is for triggering scenes in scene-enabled
Smarthome products.
Sends ON/OFF signals on alternate button presses. If the button is
pressed and held, it will aid in setting up scenes in SwitchLinc Wall
Switches. See section: “Setting Scenes for Smarthome SceneEnabled Products” on page 15.
The indicator light will turn off and the button is programmed.
12
Page 13

Most transmitters have only one button to press to send an
address with either an ON or OFF signal. These units will limit the
button mode to regular lamp module or a lamp module with status.
Investing in a Maxi-Controller, (Smarthome #4020), will provide
access to all five button modes.
#4020 Maxi-
Controller
Warning: before using confirmation, make sure the module being controlling is
capable of sending STATUS ON/OFF signals (sometimes called Status Request). If it
cannot, the KeypadLinc light will not correctly indicate the status and the button
cannot toggle since it has no way of knowing the status of the receiver (because the
remote module can’t transmit back).
The following items have two-way abilities and respond to a Status Request signal:
Item Manufacturer’s # Smarthome #.
SwitchLinc 2-Way Wall Switches 2380, 2381, 2383
ToggleLincTM2-Way Wall Switches 23890, 23893
SwitchLinc Relay 2-Way Wall Switch 23883
SwitchLinc Timer Wall Switch 12083
KeypadLinc with Integrated Dimmer 12073W, 12074W
LampLincTM2-Way 2000STW, 2000STW3
ApplianceLincTM2-Way 2002STW, 2001STW
I/O LincTMRelay Controller
1
1624
X10 2-Way Lamp Module LM14A 2000TW
X10 2-Way Appliance Module AM14A 2001TW
ACT 2-Way Switches RS-114/115 2270A, 2271A
Motion Sensing Floodlights PR511 4080XT
RF Transceiver Modules RR-501 4005
1. The I/O Linc automatically echos back commands. Using confirmation settings in KeypadLinc is un-necessary.
Note about signals transmitted by Leviton "Green-Line" products
Some of Leviton's newest X10 transmitters do not communicate properly to some
receivers, including KeypadLinc Controllers. They receive signals normally, but all
receivers may not understand their transmitted signals.
We have tested some of their products for compatibility with KeypadLinc and found
that signals sent from the Leviton transmitters to the KeypadLinc are not recognized as valid X10 signals. We do not recommend using the Status Request feature with Leviton 2-way and transmitting products ending in "-1TW".
Signals from KeypadLinc to all Leviton products are understood.
For those technically inclined, Leviton has updated the way in which these controllers send their X10 signal. They have eliminated the "3-cycle gap" between the
two frames of X10 data.
XX
13
13
Page 14

Non-Toggle Mode Button Programming
(Sending the same commands with each keypress)
In the Non-Toggled mode, the keypad will send the same signals each time the button is pressed. Each button can be programmed to send one or two signals. See
page 11 for more information.
1. Enter the Setup Mode (by holding any two buttons for 5 seconds).
2. Press the button to be programmed.
3. Make sure the button is in the Non-Toggle mode by observing the button’s light;
it should be constantly lit. If it isn’t constantly lit, press the button a second time.
If other button lights come on when a button is pressed, it means that button is part
of a Group. The other buttons indicators will have no effect on the programming of
the selected button. See “Setting Up Groups” on page 15.
4. From a controller you must tell the KeypadLinc how many commands will be put
on the button:
Send Example Function Example
Unit Code
*
1
F-1
One Address F-9
One Command F-All Units Of f
Two Addresses F-9 & F-10
Unit Code
*
2
F-2
Two Commands
F-All Units Off &
G-All Units Off
Address and Command F-9 & F-On
*
Any housecode may be used
• This signal must be a keypress only.
• A transmitter that sends an address and a command (A-1, A-ON) with a single but-
ton press WILL NOT WORK.
•
If this step is skipped, the KeypadLinc will ignore all other signals. At the end of 30
seconds, the keypad will exit the Setup Mode and the button will retain the function
that was previously programmed.
5. Send the one or two addresses or commands to be programmed into the button.
The indicator light will turn off and the button is programmed.
Special Case: BRIGHT/DIM of Last Button Pressed
KeypadLinc can send BRIGHT or DIM signals for the last unit code sent from another button on the KeypadLinc, regardless of the House Code.
1. Enter the Setup Mode (by holding any two buttons for 5 seconds).
2. Press the button to be programmed.
3. Make sure the button is in the Non-Toggle mode by observing the button’s light;
it should be constantly lit. If it isn’t, press the button a second time.
4. Send unit code 1 to indicate One Address/Command.
5. Send BRIGHT or DIM (the controller can be set to any house code).
The indicator light will turn off and the button is programmed.
14
Page 15

Setting Up Groups
Buttons can be programmed in Groups that will allow the indicator lights under the button to stay illuminated af ter the button is pressed. When another button in that Group is
pressed, the KeypadLinc sends the programmed signal, turns off the indicator of the
previous button and turns on the indicator of the recently pressed button.
Groups help identify which mode is in operation at the moment:
• ON/OFF • Dinner Time, Reading, Movie Time, OFF
• Morning or Night scene • Family Home vs. Family Away
• Status of Flags (rain recently vs. dry and run sprinklers)
How to program Groups:
1. Make sure all of the buttons to be Grouped are defined as Non-Toggle
2. Enter the the Setup Mode.
3. Select the buttons for the Group (up to four).
4. If you make a mistake and want to remove a button, just push it. The light will
go off and it is no longer in the Group.
After 30 seconds, all the indicators will flash and the KeypadLinc exits the setup mode.
To remove a button previously programmed into a Group.
1. Enter Setup Mode.
2. Select the button to be removed from the Group by pressing it once. The other
Group buttons are illuminated.
3. Push the button a second time, it will then begin blinking.
After 30 seconds, all the indicators will flash and the KeypadLinc exits the setup mode.
NOTE: If a single button is left in a Group, KeypadLinc will automatically dissolve the
group so that the remaining button does not need to be removed from the group.
(see p.14).
Special Notes About Groups
Only Non-Toggle buttons can join a Group Up to four Groups are permitted on one keypad
Up to four buttons can be in one Group A button can’t be the only member of a Group
A button can only be in one Group at a time
Received PLC signals will no t affect the Group’s indicator lights
Setting Scenes for Smarthome Scene-Enabled Products
In the Toggle Mode Programming section setup, a button could be defined to activate a scene using scene-enabled Smarthome switches and plug-in modules. The
button can also be used to help in setting up the scene's programming.
1. Push and hold the button for setting up the scene for 3 seconds.
2. The button will begin to blink and send the Scene Clear sequence. The button
light will continue to blink and remain in scene setup mode for about 4 minutes.
3. Adjust the lighting level of each scene-enable switch or module to the desired level.
4. Return to the KeypadLinc and push the blinking button.
5. The KeypadLinc will send the command sequence to lock-in the scene. The button will stop blinking and the KeypadLinc will be ready to use.
6. The Smarthome scene-enabled units that were enrolled in that scene will
momentarily blink their lights (if they are still on).
For more information on how scenes work, please refer to the section, "Scene
Address Programming" in the product’s owner's manual.
15
Page 16

Factory Reset
If KeypadLinc begins to operate strangely, the factory reset procedure can be used
to clear the EEPROM’s memory.
1. Gently pull the Set Button out to remove power for five seconds.
2. Push and hold in the Set Button for five seconds, then release.
3. When the Status LED and load comes on, the KeypadLinc is reset.
All of the programming will be defaulted to the assignments below.
Custom 8
Custom 6
Hints for using the BoosterLinc Mode
• Unlike the Plug-in BoosterLinc (#4827), KeypadLinc does not repeat signals
from single-phase onto three-phase electricity.
• KeypadLinc is able to boost signals that are weak, but not totally gone. If the
receiver circuit can't detect the signal, it won't be boosted.
• While the BoosterLinc feature in KeypadLinc works well in homes that don't
have a phase coupler (sometimes called a signal bridge), it works better when a
coupler is installed. We recommend a SignaLinc™ Plug-In Phase Coupler
(#4816A2 or 4816B2) or Hardwired SignaLinc™ Phase Coupler (4816H). The
BoosterLinc feature is compatible with traditional coupler-repeaters.
• Multi-gang wall boxes that contain multiple BoosterLinc-enable products, only
one unit should have the BoosterLinc feature enabled. The other units should
have their BoosterLinc feature disabled.
• It is unlikely that more than one BoosterLinc-equipped product will be required
on a single line serviced by the same circuit breaker.
• Having too many BoosterLinc-enabled products installed (and the BoosterLinc
feature turned on) may cause false-positive signals. If you notice strange happenings or unusual events with your automation system, disable the BoosterLinc
mode.
• The BoosterLinc feature in KeypadLinc has been tested and found to be compatible with all current X10 powerline products. However, it does interfere with
Smarthome’s Insteon
BoosterLinc mode when using Insteon-based products may be necessary.
16
TM
future powerline carrier technologies. Disabling the
Page 17

Troubleshooting & Technical Support
Problem
Keypad does not take
programming signals &
exits the Setup Mode.
KeypadLinc signals are
not triggering all the
modules.
When a button is selected for programming
other buttons light up.
After pressing a button,
the indicator light just
blinks & the load does
not respond.
Buttons don’t light up
when PLC signals are
received by the
KeypadLinc.
The lights on the keypad do not match the
status of the load.
KeypadLinc is locked up
and not responding.
Keypad does not control
the load the original
wall switch controlled.
Possible Cause
Signals being received at the
KeypadLinc are too weak.
Button is defined Non-Toggle
& is waiting for unit codes 1
or 2.
The signal strength at the
receiving modules is too
weak to work reliability.
Keypad is sending ALL
LIGHTS ON to some non-lamp
modules.
The selected button is part of
a “Group.”
The keypad is detecting an
PLC signals on the line.
The keypad is detecting electrical noise.
The button may be defined as
Non-Toggle.
The signal may not have been
strong enough.
The module has been controlled locally or the connected load is malfunctioning.
Button is programmed for
Status and the receiver does
not have Status Request ability.
A glitch or surge in
the power line may have
caused the unit to lock up.
The KeypadLinc 12063 &
12064 are only transmitters.
They do not have any switching or load control circuitry.
Solution
Move the transmitter to a different outlet. Consider
installing a signal bridge or coupler-repeater.
After selecting the button for programming, send
unit code 1 or 2, then send the addresses and/or
commands.
1. Make sure the receiving module is not plugged
into a power strip or noise filter.
2. Other electrical devices near the receiver may be
absorbing the signal. Unplug them and test again.
You may need a filter on some devices to keep them
from absorbing the signals on the AC line.
3. Install a signal bridge or coupler-repeater (amplifier).
Appliance modules and non-lamp modules will
ignore the ALL LIGHTS ON command. To control
these devices in groups, create a macro in your
home automation controller to send individual signals after ALL LIGHTS ON is received.
When this happens, it does not affect the programming of the button, but it can be distracting the first
few times. See page 15 for instructions on how to
remove buttons from a group.
To prevent signal collisions, the KeypadLinc will hold
off sending the signal until the line clears.
Look for sources of electrical noise. Turn off motorized devices, dimmers, & fluorescent lights. When
the noise clears, the KeypadLinc will send the signal.
Only buttons that are defined at “Toggle” will
respond to incoming signals. Group lights will not
respond to signals received.
Consider installing a signal bridge or couplerrepeater to improve signal strength throughout the
house.
When modules are controlled locally, like turning off
a wall switch, it does not transmit out its status. The
KeypadLinc does not know that the module has been
controlled locally (turned on or off).
In the Toggle Mode, make sure after entering the
address you send a single ON or BRIGHT to tell the
KeypadLinc that the receiving module does not have
Status Request abilities.
Turn off the power to the KeypadLinc at the circuit
breaker for five seconds and turn it back on. If it is
still behaving strangely, enter the Setup Mode and
reset the KeypadLinc to the Factory Default settings.
Use a KeypadLinc with an integrated dimmer to
install in place of an existing mechanical switch.
You can also use a transmit-only KeypadLinc, but
you’ll need a Fixture Relay Module (#2250/ 2251) to
control the load.
If these solutions have been tried, the manual has been reviewed and you still cannot resolve an issue you’re having with the KeypadLinc;
• Search our on-line knowledge base at: http://smarthome.custhelp.com
• E-mail tech@smarthome.com
• Call our Technical Support Dept. at 949-221-9200
17
Page 18

Custom Keypad Labels
The KeypadLinc button labels can be changed so you can customize its appearance.
You can use the pre-printed labels that shipped with your KeypadLinc or create your
own using the enclosed blank labels.
Visit the Smarthome Web site to download replacement label files or a templates to
allow label creation in word processors that can read the Microsoft® Word format
and Adobe® Photoshop. All can be found at:
http://www.smarthome.com/12063W.HTML
While we encourage you to customize your KeypadLinc, please be gentle in removing the keys. The buttons on the KeypadLinc 8 require extra special care in removing the keycaps. Using a small, flat edged screwdriver, ONLY pry up on the sides of
the keys from the middle of the keypad (as shown below). Make sure you are centered on the key as there is a small "lip" to pull up on located there. Should any
damage occur to you KeypadLinc during the labeling, please contact Smar thome
Customer Service at 1-800-762-7846 and we will be happy to replace your unit.
To remove keys on the
right side, gently pry
up on the middle of
their left edges.
To remove keys
on the left side,
gently pry up on
the middle of
their right edges.
KeypadLinc 8
18
Page 19

Changing the Front Plastics
The white plastic trim pieces on the front of the KeypadLinc may be changed if
needed. The kit consists of three pieces, however, they come assembled together
for easier installation. If the individual pieces come apart, refer to the image on the
right for the correct assembly order.
1. Removed the keycap covers following the instructions on page 18.
Set them aside as they will be
placed onto the new trim piece.
2. Remove the four Phillips screws on
the front.
3. Gently pull the trim and button
support pieces away from the
KeypadLinc.
4. Place the new trim and button support pieces onto the KeypadLinc.
The assembly has a cut out at the
top for the Status LED/Set Button.
5. Replace the four screws.
6. Replace the keycap covers.
Color Change Kit Assembly Order
How Powerline Signals Travel Around A Home
and How To Improve Reliability
Most homes in North America have two lines of 120 volts coming into the home
from the utility company. This split-single phase electricity is divided out at the
home’s breaker box into the circuits that feed light switches, plug-in outlets, and
appliances. Half of the electricity outlets and wall switches are fed by one of the
120-volt lines and the second 120-volt line feeds the other half. The intermittent
operation of PLC/X10 modules usually happens when the transmitter is sending signals on one line and the receiver module is plugged into an outlet on the other line.
For the signals to get to the receiver, it must leave the home, travel to the utility
company transformer then come back in on the other AC
line. By the time the signal gets back to the home, travels
through the electrical meter and circuit breaker box, there
may not be enough signal left to trigger the module.
#4826B
SignaLincTMRepeater
The first order of business will be to install a couplerrepeater, also known as amplifier. A coupler-repeater will
‘see’ the incoming signal, re-generate it, and blast it out
over both lines of the 120 volts. We recommend that any
home larger than 3000 square feet install a couplerrepeater. In smaller homes, a passive phase coupler also
known as a signal bridge may give satisfactory results.
19
Page 20

How To Improve Reliability (continued)
Once the signal has been amplified, it’s time to preserve it. Since PLC signals go
everywhere in the home, some electrical devices will have more of an ef fect on the
signal strength than other devices. PLC signals are like water pressure in pipes, it
actually goes everywhere it can, not just to the receiving module. In the last 20
years, an explosion of electrical devices has invaded our homes. Computers, video
gear, and fancy high-end electronics are more present than in years past. The more
complicated the electrical power supply is in a device, the more likely it is to absorb
PLC signals. Engineers who design power supplies build in traps to filter out and kill
electrical noise. Unfortunately, the PLC signals looks like electrical noise to these
devices. The result is that a large percent of the transmitted signal is lost to these
devices leaving less for the receivers. The most common sources of signal loss are:
• Televisions • Computer systems
• Audio/Video gear • Computer UPS's and power strips
• Power supplies for laptops and cell phones
Testing for the problem is simple. If a device is suspected of
causing signal absorption, unplug the device and then retransmit the signal. It is very important that the device is
unplugged and not just turned off! If the controlled product
begins working after the appliance is unplugged, then a filter
will be needed on that device to keep PLC signals from being
absorbed and raise the signal strength of the entire home.
Smarthome has many filters that will fix the problem. An average home will need between three and five filters. If you are
in the business of installing automation systems and not in
the ‘call-back’ business, include some of these in your bid as
part of the standard package.
#1626 FilterLinc
Plug-In Filter
TM
Smarthome’s BoosterLinc™can solve localized problems
SignaLinc Repeater is ideal for improving the home
automation signal strength throughout all the outlets in a home. But, as the PLC signals travel down
a circuit and away from the repeater, it will weaken
by the same factors listed above. Additionally, the
signal will get weaker as it passes installed PLC
transmitters. Each PLC transmitter contains a
tuned circuit that when it's not sending signals it's
absorbing them! In addition to plug-in transmitters,
#4827 BoosterLinc
TM
Plug-In Amplifier
abilities will load down the available signal. With so many transmitters installed, the
signal is loaded down to a point where some modules will be unable to receive a
signal. Installing multiple 2-way devices on one branch circuit may necessitate the
use of local amplifier like Smarthome's BoosterLinc.
20
LampLinc™ 2-Way, SwitchLinc™ 2-Ways,
ToggleLinc™ 2-Ways, ApplianceLinc™ 2-Ways,
KeypadLinc™ Controllers, or any module with 2-way
Page 21

Helpful Tools
If you’re investing in home automation, there are a few tools that will make your
projects run smoother:
Maxi-Controller
This plug-in transmitter has the ability to send individual PLC commands. The buttons are separated into Addresses and Command
functions. To use this controller, you have to press the address (for
example, “5”), then the command (ON, OFF, BRIGHT, etc.). Many
of the features found in Smarthome products need to be programmed with individual button presses. Using a controller that
sends the address and command with one button press will not
work. For more info visit: www.smarthome.com/4020.html
Signal Meter
This is an invaluable tool when it comes to installing
and diagnosing problems. By knowing the signal’s
strength at a specific location, you can make sure that
the signal will always trigger that module. Generally, it
is ideal to have at least 100mV at each location.
Conservative installers will want even more; perhaps
250mV just in case the homeowner installs a new bigscreen TV af ter final installation. The extra margin will
still give the receivers enough signal strength to be reliably triggered. These units can also be used to measure the effects of signal
absorption mentioned earlier. Plug in the signal meter and measure the signal’s
strength, then unplug any devices that are plugged into that and nearby outlets. If
10% or greater change is observed, install a filter (like FilterLinc
Signal Analyzer
#4020 Maxi-
Controller
#4814
TM
) on that device.
Voltmeter or Voltage Tester
During the installation of a home automation wall switch or controller, it may be necessary to identify the wires inside the wall box. Knowing for sure which wire is the
HOT or LINE wires can reduce the guesswork when installing a single switch and it is
absolutely necessary when working with 3-way lighting circuits. A voltmeter is ideal
for this application. Many of the digital models can also read current so you'll know
how much power is being drawn by the switch’s load.
A simpler measurement tool, available at most home improvement centers, is a voltage sensor. This device, often costing less than $20, can sense voltage when
placed near a wire. The tip of the voltage sensor can tell if voltage is on the wire
without touching the bare copper conductor or breaking the insulation.
When using these tools, be certain to read and understand the safety
instructions. Often when these tools are used, the power to the circuit will
need to be turned on. When working around live electrical wires, take your
time and concentrate on the task.
21
Page 22

Glossary of Terms
PLC- Power Line Control - A control signal that is embedded onto the electricity
lines. X10 signals are a form of PLC signals.
X10 Address - The Address part of a PLC signal contains the House and Unit code.
An Address can be Unit codes 1 to 16 and House codes A - P. There are 256 total
PLC addresses. Examples of PLC Addresses are A-1, B-5, P-15, O-9.
X10 Command - The Command is action part of a PLC signal. It tells the module
what to do after it sees its address. Examples of a command are ON, OFF, Bright,
DIM, PREdim, All Light ON, and All Units OFF. There are other rarely used commands, but these are the most common ones.
Toggle Mode - Causes KeypadLinc to send two different commands on alternate
presses. If the button's light is off, when pressed, it will send an ON signal. If the
button's light is on, it will send an OFF command when pressed.
Non-Toggle Mode - KeypadLinc will send the same signal each time the button is
pressed regardless of the load's status or the indicator light.
Status & Status Request - Some receivers have the ability to repor t their
on/off/dim status when asked. These modules contain a transmitter that can
send PLC signals. When KeypadLinc sends a Status Request command, the module will reply with its status (On, Off, Predim at some %).
Resume Dim Level - Allows KeypadLinc to come on at its previous dim level.
PreDim Level - One of 32 brightness levels the KeypadLinc can instantly (or slowly)
change the light’s brightness to a predefined brightness level.
Scenes in KeypadLinc - the integrated dimmer can be set up to respond to multiple
PLC signals. When received, the KeypadLinc will turn on its load to a predefined
brightness level. When KeypadLinc transmits a scene signal to other KeypadLinc,
SwitchLinc and LampLinc, the lighting mood instantly changes.
Maxi Controller - A PLC transmitter that has separate buttons for the unit codes
and the commands. In some of the advanced set up functions for the
KeypadLinc, it is necessary for only a unit code to be sent. The Smarthome’s
ControLinc Duo #4071, X10 SC-503, and Leviton 6320 are examples of MaxiControllers. We recommend having a Maxi Controller to set up the KeypadLinc.
X10 Keypress - This is a PLC signal that only contains the house and unit code with-
out a command. The Maxi-Controller, some TouchLinc LCD controllers, and home
automation interfaces can produce a keypress command.
Appliance Module - A receiver device that can be used with any type of load, includ-
ing lighting. It will never contain dimming control as it always has a hard contact
relay. An Appliance Module will ignore the All Lights ON command.
Lamp Module - A receiver that is used to only control lighting devices. It may contain
dimming control or it may have a hard contact relay. A Lamp Module will respond
to the All Lights ON command. KeypadLinc with Dimmer is defined as a lamp module so it will respond to the All Lights On for the primary address housecode.
Hot or Line - The wire in the junction box that contains the incoming electricity from
the electrical panel. It is usually black and may be tied with a wire nut to other
black wires in the rear of the box.
Neutral - While not used on a mechanical switch to control a load, KeypadLinc will
need a neutral wire to operate. Generally, the neutral wires are white and located in the rear of the junction box. There may be two or more wires tied together
by a wire nut.
Load - The wire in the junction box that goes to the light(s). Usually, there is just
one load wire in a junction box and it is commonly black. No voltage is pres-
22
ent on the wire when the switch is off.
Page 23

Specifications
Load types: Permanently installed incandescent & inductive loads
Single pole or multi-location (w/ Multi-Way Com panion Switches)
Operation: Dimming Triac
Maximum load: 450 watts (200 watts if ganged with other dimmers)
On-Level: 1 of 31 possible (3.2%-100%) or resume dim
Fade-on/Off Rate: 0.125 to 9 seconds if pr ogrammed locally
0.125 seconds to 9 minut es if programmed remo tely
Addresses: 1 PL C (X1 0) Base (Primary) Address of 256 possible
Up to 64 PLC (X1 0) Scene Addresses of 255 possible
Minimum PLC transmit lev el: 2V
Minimum PLC receive le vel: 10mV
Maximum PLC signal rejection: 200mV
Status indicator: Green LED
Dimensions - Front Brack et Main Body
(Width) 1.73" 1.73"
(Height) 4.1 4" 2.76"
(Depth) 1.68" 1.40"
Weight 4.3 oz.
Operating temperature range: 32°F to 158°F (0° to 70°C)
Input power: 125 VA C, 60 Hz
Max. # of KeypadLinc Contr ollers
per multiple gang box: 4
Max. # of KeypadLinc
Controllers per circuit: 10 (with more than 6, a coupler-repeater is recommended)
Mounts in single or multiple-ganged J-box
Invest in better Home
Automation Products
Unlike most electric items, many PLCbased products haven't changed much
over the years.
Our Marketing and Customer Service teams surveyed our customers, like you, and our engineers have invented new and better wall switches and plug-in modules. We include more features, higher load handling, and better signal sensitivity for a
superior user experience. While in some cases, they cost more;
we hope you'll agree that not having to replace a dead module
every couple years is worth the added expense and reduced
KeypadLinc 6
with 450W inte-
grated dimmer
aggravation. Please visit a retailer or distributor for the complete line of automation products from Smar thome Design.
Check out our web site at:
http://www.smarthome.com/smarthomedesignstore.html
23
Page 24

About KeypadLinc Controller’s Certification
KeypadLinc has been thoroughly tested by ITS ETL SEMKO, a nationally
recognized independent third-party testing laboratory. Products bearing
North American ETL Listed mark signifies that the product has been
tested to and has met the requirements of a widely recognized consensus of U.S and Canadian product safety standards, that the manufacturing site has been audited, and that the manufacturer has agreed to
a program of quarterly factory follow-up inspections to verify continued
conformance.
Smarthome Limited Warranty
Smarthome warrants to the original consumer purchaser of this product that, for a period of two years
from the date of purchase, this product will be free from defects in material and workmanship and will
perform in substantial conformity to the description of the product in this Owner's Manual. This warranty
shall not apply to defects or errors caused by misuse or neglect.
If the product is found to be defective in material or workmanship or if the product does not perform as
warranted above during the warranty period, Smarthome will either repair it, replace it or refund the purchase price, at its option, upon receipt of the product at the address below, postage prepaid, with proof of
the date of purchase and an explanation of the defect or error. The repair, replacement, or refund that is
provided for above shall be the full extent of Smarthome's liability with respect to this product.
For repair or replacement during the warranty period, call Smarthome customer service to receive an
RA# (return authorization number), properly package the product (with the RA# clearly printed on the
outside of the package) and send the product, along with all other required materials to:
Smarthome
ATTN: Receiving Dept.
16542 Millikan Ave
Irvine, CA 92606-5027
Limitations:
THE ABOVE WARRANTY IS IN LIEU OF AND SMARTHOME DISCLAIMS ALL OTHER WARRANTIES,
WHETHER ORAL OR WRITTEN, EXPRESS OR IMPLIED, INCLUDING ANY WARRANTY OF MERCHANTABILITY OR FITNESS FOR A PARTICULAR PURPOSE. ANY IMPLIED WARRANTY, INCLUDING ANY WARRANTY
OF MERCHANTABILITY OR FITNESS FOR A PARTICULAR PURPOSE, WHICH MAY NOT BE DISCLAIMED OR
SUPPLANTED AS PROVIDED ABOVE SHALL BE LIMITED TO THE ONE YEAR PERIOD OF THE EXPRESS
WARRANTY ABOVE. NO OTHER REPRESENTATION OR CLAIM OF ANY NATURE BY ANY PERSON SHALL
BE BINDING UPON SMARTHOME OR MODIFY THE TERMS OF THE ABOVE WARRANTY AND DISCLAIMER.
IN NO EVENT SHALL SMARTHOME BE LIABLE FOR SPECIAL, INCIDENTAL, CONSEQUENTIAL OR OTHER
DAMAGES RESULTING FROM THE POSSESSION OR USE OF THIS PRODUCT, INCLUDING WITHOUT LIMITATION DAMAGE TO PROPERTY AND, TO THE EXTENT PERMITTED BY LAW, PERSONAL INJURY, EVEN IF
SMARTHOME KNEW OR SHOULD HAVE KNOWN OF THE POSSIBILITY OF SUCH DAMAGES.
Some states do not allow limitations on how long an implied warranty lasts and/or the exclusion or limitation of damages, in which case the above limitations and/or exclusions may not apply to you. You may
also have other legal rights, which may var y from state to state.
SwitchLinc, KeypadLinc, SignaLinc, LampLinc, PowerLinc, ToggleLinc, BoosterLinc, ApplianceLinc,
ControLinc, TesterLinc, FilterLinc, ProbeLinc, TempLinc, TouchLinc, IR Linc, Insteon & Smar thomeLive
are trademarked by Smarthome, Inc.
© Copyright 2004 Smarthome, 16542 Millikan Ave., Irvine, CA 92606-5027
800.SMART.HOME - 949.221.9200- www.smarthome.com
rev 061604
 Loading...