

Page 1

Total Protection Alarm System
SMARTHOME.COM™ 1-800-SMART-HOME 949-221-9200 http://www.smarthome.com Order #7307
SMARTHOME™ #7307
PAT. D410633
Patents Pending
Page 2

Your Guide to the
SMARTHOME.COM™ 1-800-SMART-HOME 949-221-9200 http://www.smarthome.com Order #7307
Total Protection Alarm System
TABLE OF CONTENTS
PACKAGE CONTENTS........................................................................4
OVERVIEW........................................................................................5
SMARTHOME™ #7307
PLANNING YOUR HOME SECURITY NEEDS.......................................6
INSTALLATION
-Control Panel...................................................................................7
-Door/Window Sensor........................................................................8
-Motion Sensor..................................................................................9
TESTING YOUR SYSTEM.................................................................11
LIGHTS AND SOUNDS......................................................................12
STANDARD PROGRAMMING
-Arming and disarming the Security System using the Keypad.............13
-Arming and disarming the Security System using the Keychain
Transmitter.....................................................................................15
-Panic Button on the Keychain Transmitter.........................................16
PASSWORDS
-Master Personal Identification Number (MPIN)...................................17
-Secondary Personal Identification Number (SPIN)..............................18
ADVANCED PROGRAMMING
-Program Sensors to Different Zones.................................................19
-To clear a zone...........................................................................20
-To program a sensor to a zone.....................................................20
-To delete a Keychain Transmitter from zone 5................................21
-To program a Keychain Transmitter or keypad transmitter (option)
to zone 5....................................................................................21
-Standard Arming Sequences...........................................................22
-Additional Arming Sequences..........................................................22
-Customize a Sequence...................................................................24
SUMMARY OF ARMING SEQUENCES..............................................25
BATTERY MAINTENANCE
-Control Panel.................................................................................26
-Motion Sensor................................................................................27
-Door/Window Sensor.......................................................................27
-Keychain Transmitter.....................................................................28
ADDITIONAL ACCESSORIES (OPTION).............................................29
–2–
–3–
Page 3
PACKAGE CONTENTS
SMARTHOME.COM™ 1-800-SMART-HOME 949-221-9200 http://www.smarthome.com Order #7307
OVERVIEW
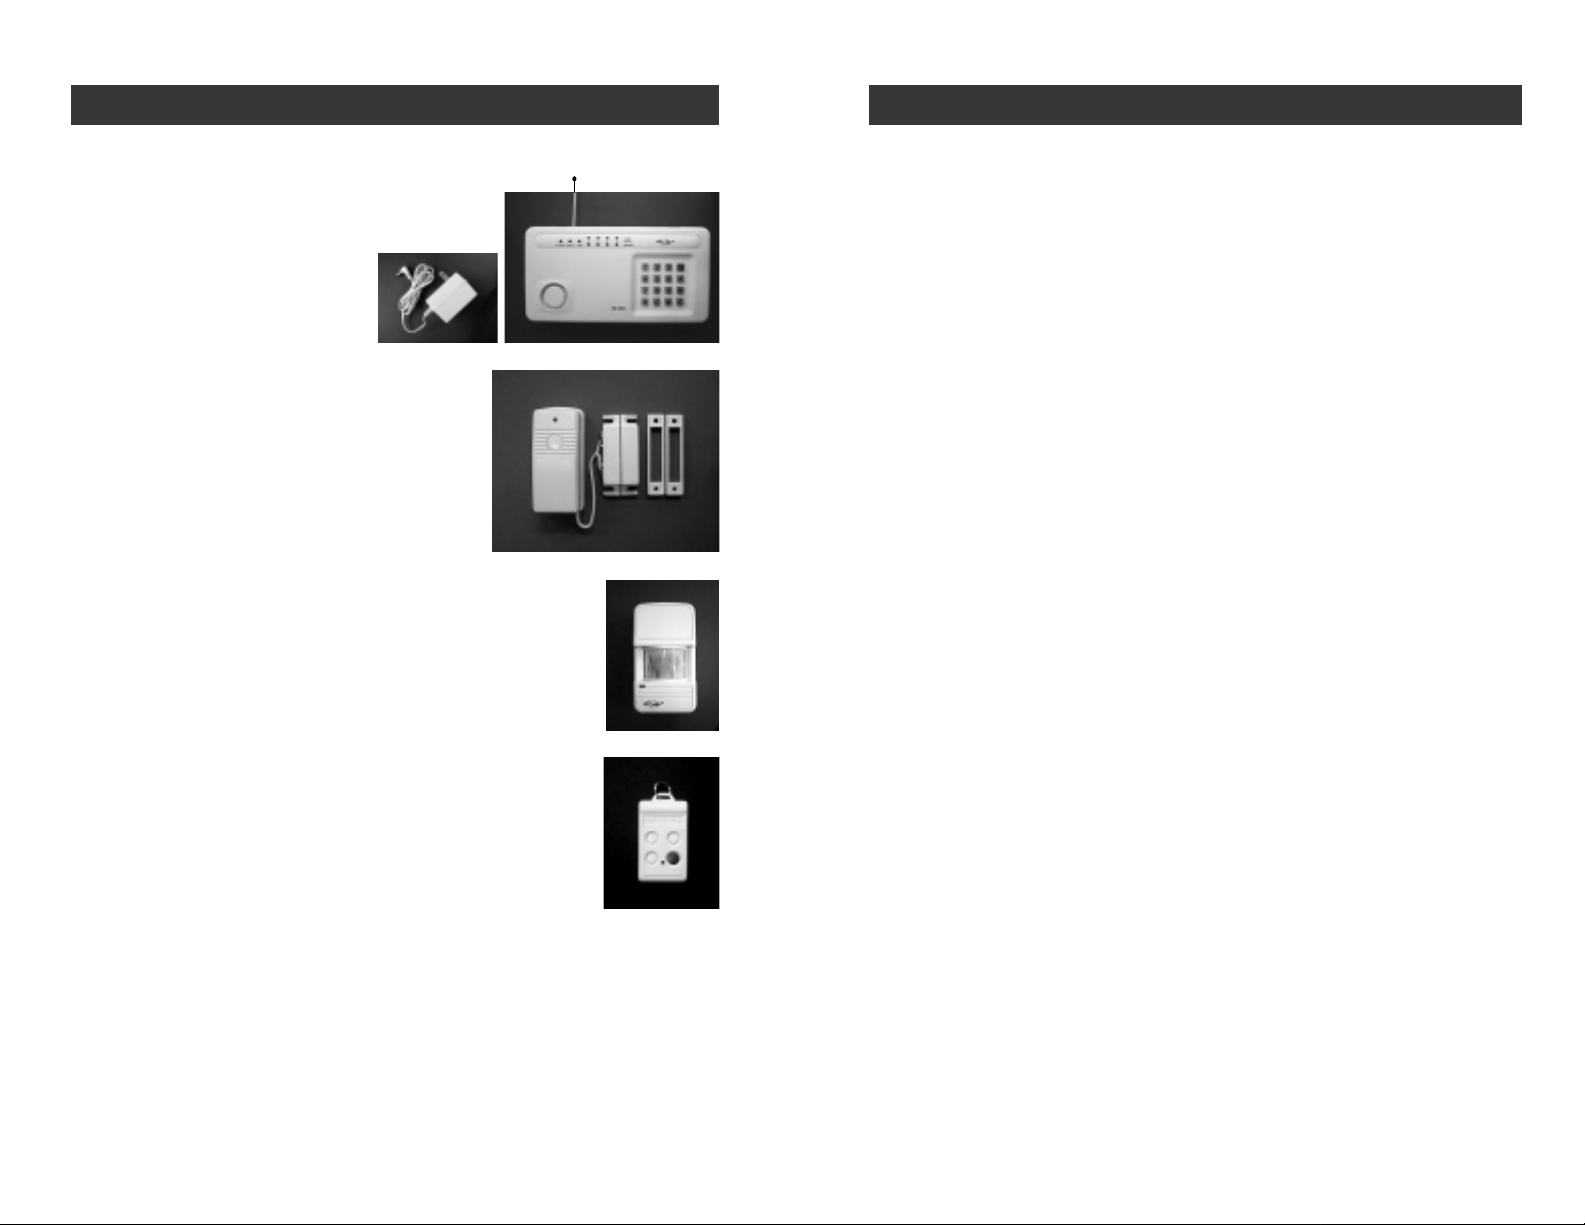
Everything required for installation is included with this package
1 Control Panel (SC-001) includes:
1 antenna (installed)
1 AC adapter
1 9 volt alkaline battery
Two sets of Door/Window Sensors
(WT-433), each set includes:
1 transmitter
1 magnetic switch
1 magnet
2 spacers
1 12 volt alkaline battery (installed)
1 Motion Sensor (PS-433) includes:
1 9 volt alkaline battery (installed)
1 Keychain Transmitter (4B-434) includes:
1 12 volt alkaline battery (installed)
3 Packs of screws and anchors
(for Control Panel, Door/Window Sensors and Motion Sensor)
Sheet of templates
Double Sided T ape (to aid in the installation of the Control Panel, Door/
Window Sensors and Motion Sensor)
Warning Stickers 2 pcs
Manual
Warranty Card
Quick Guide
–4–
Congratulations!
Y ou have just purchased one of the most reliable and up-to-date wireless
security systems on the market today. Skylink is the first company to incorporate the rolling code technology in a home/business security system.
This innovative technology provides increased security and trouble free
wireless connections which greatly reduces false alarms. It guarantees that
the Control Panel will only recognize radio waves from it’s remote sensors,
(door/window sensor, motion sensor and the keychain transmitter), which
prevents high tech thieves from duplicating signals and tampering with your
system.
This manual is divided into 6 categories.
1. Planning, Installation and T esting (pages 6-11)
- explains how to plan a security strategy .
- how to install the Control Panel and the remote devices, (door/window
sensor and the motion sensor).
- once everything is installed, explains how to test each device.
2. Lights and Sounds (page 12)
- explains the function of all the lights on the Control Panel.
- describes all the sounds emitted from the Control Panel.
3. Standard Programming and Passwords (pages 13-18)
- how to arm and disarm the system using the Control Panel.
- how to use the 4 button keychain transmitter to arm and disarm the Control
Panel.
- how to personalize your MPIN (Master Personal Identification Number).
- how to program a SPIN (Secondary Personal Identification Number).
4. Advanced Programming (pages 19-24)
- the Control Panel receives signals from the remote sensors in four different
zones. Explains how to program different remote sensors to different zones.
- the Control Panel is programmed with different alarm modes for different
situations. Explains how to program these alarm modes.
- explains the different alarm sequences preprogrammed at the factory for
your convenience.
5. Summary Table (page 25)
- summarizes all preprogrammed alarm sequences.
6. Maintenance (page 26-28)
- explains how to change batteries in all remote sensors and the Control
Panel.
–5–
Page 4
PLANNING YOUR HOME SECURITY NEEDS
SMARTHOME.COM™ 1-800-SMART-HOME 949-221-9200 http://www.smarthome.com Order #7307
INSTALLATION
Before you begin to install your security system, analyze the premises to
determine your security needs. Consider those doors and windows which
are more likely to be used as points of entry by an intruder, the ones that
are poorly lit or the entrances that can not be seen from the street.
Sketch a map of the premises and determine which doors and/or windows
need contact sensors and which areas of the premises need to be monitored
by a motion sensor. We recommend that you put one door/window sensor
on the door you enter/exit from most often, the other sensor on your secondary
entrance and your motion sensor monitoring the bedrooms, (stairway or
hallway leading to the bedrooms).
If you have determined that you need additional sensors, see Additional
Accessories on page 29.
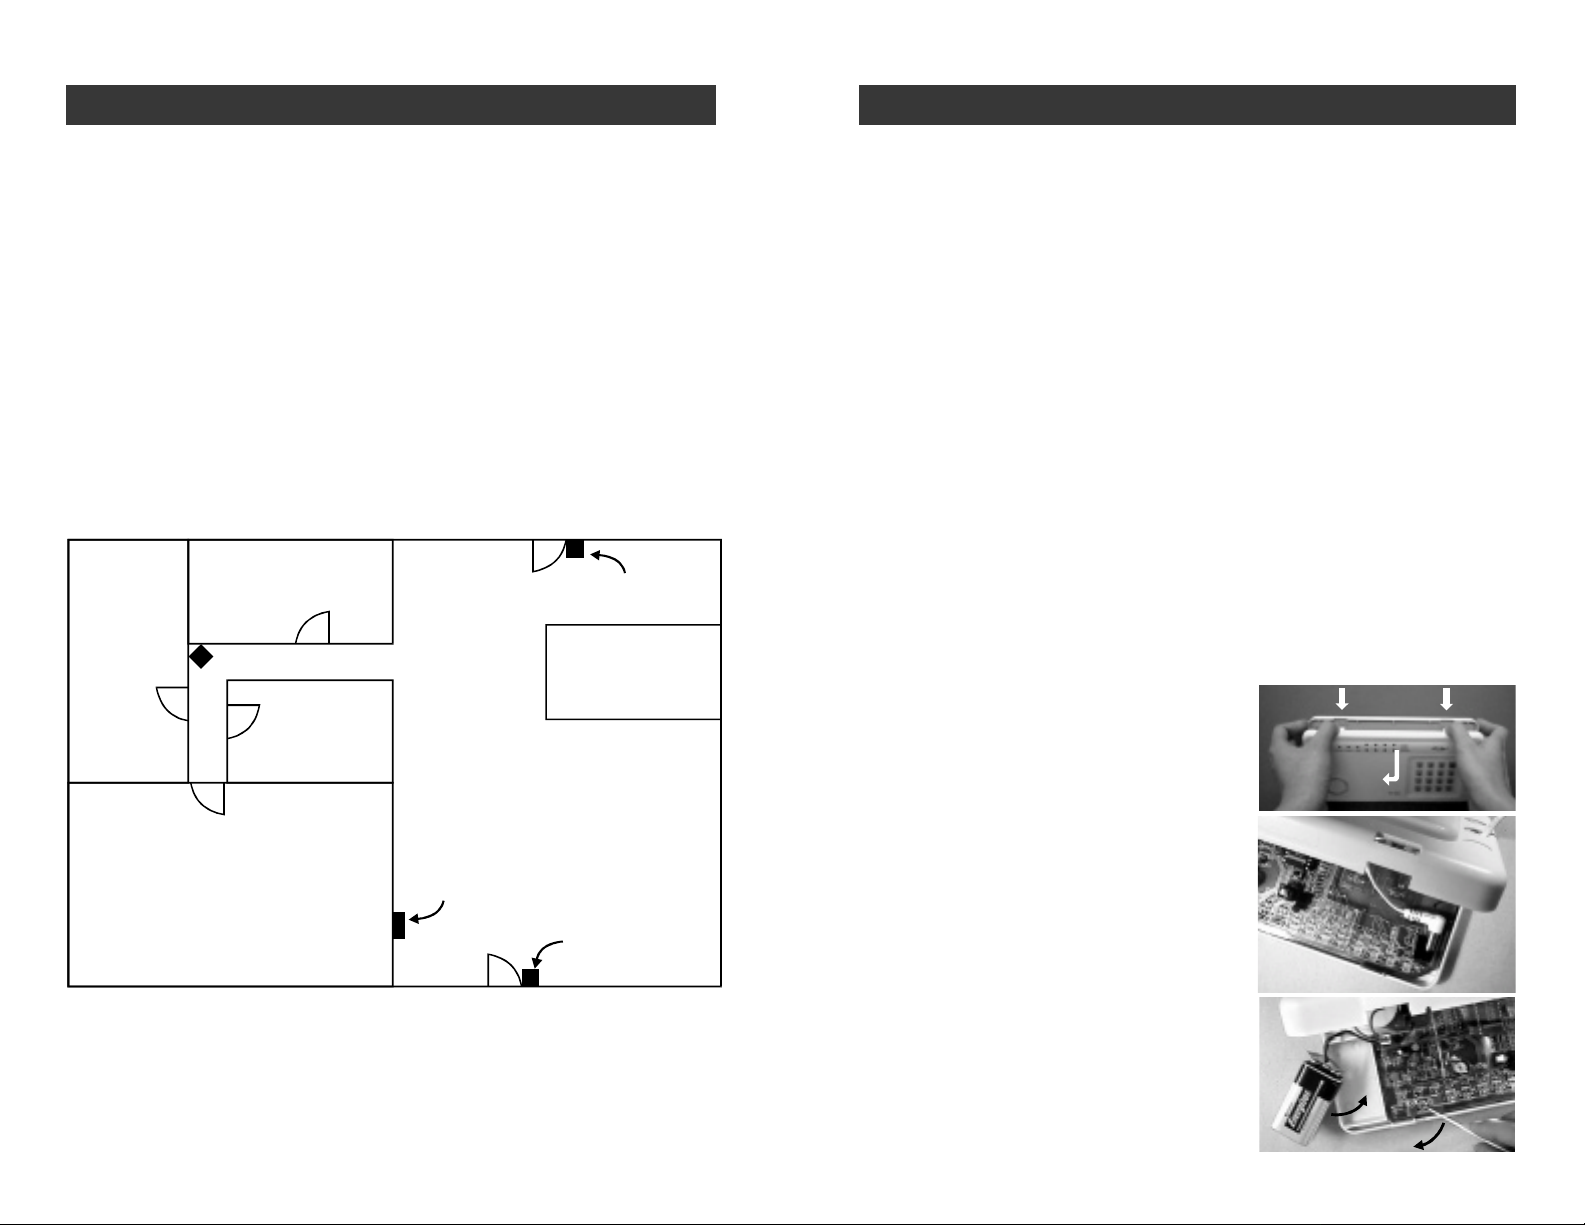
Below is an example of how to position your security system in a house.
BEDROOM
BEDROOM
MOTION SENSOR
BA THROOM
BACK DOOR
DOOR/WINDOW
SENSOR
KITCHEN
LIVING ROOM
DINING ROOM
The Control Panel, door/window sensors and the motion sensor are installed
using the screws included. We have also included double sided tape, (for the
door/window sensor and the motion sensor) to use for temporary installation
while you are positioning the sensors. Once all the sensors are positioned
correctly , install them permanently with the screws. We have also included
wall anchors and templates to help position the screws correctly .
How to use the templates:
1. Cut the template required
2. Tape it in position
3. Screw part way into the surface where the holes are marked
4. Unscrew the screws and remove the template
5. Screw the component in place where you started the screws
INSTALLING THE CONTROL PANEL (SC-001)
Position the Control Panel near the door you use to enter/exit from most
often and within access of an electrical outlet. The Control Panel runs on
regular electrical current. It also contains a 9 volt backup alkaline battery in
case power is interrupted for any reason.
There are 3 ways to attach the Control Panel on the wall:
1. Use double sided tape for temporary use.
2. Hanging it from the two keyholes on the two stationary screws.
3. Screwing the back onto the wall with 4 screws.
To mount the Control Panel:
1. Open the case.
a) Press the two tabs on top of the
Control Panel
b) Pull open the front
MASTER
BEDROOM
CONTROL PANEL
FRONT
DOOR
DOOR/WINDOW
SENSOR
Y ou may choose to install a motion sensor to protect any valuables such as
antiques or paintings. Point the motion sensor directly at the valuables and
if they are disturbed in any way the alarm will be sounded.
–6–
2. Thread the AC adapter cord through
the large hole in the back of the unit
and plug it into the circuit board as
shown. The Adapter cord must be
inserted through the back of the
unit before it is attached to the
wall.
3. Insert the 9 volt alkaline battery and
rotate the antenna from the inside of
the Control Panel to the outside.
–7–
Page 5
INSTALLATION
SMARTHOME.COM™ 1-800-SMART-HOME 949-221-9200 http://www.smarthome.com Order #7307
INSTALLATION
4. Attach the unit to the wall. If hanging the
unit, insert two screws using the template
provided. If screwing the back directly to
the wall, take the back plate right off by
prying apart one hinge. Use as much
force as needed. The plastic hinge will not
break.
5. Using the template, attach the backplate
on to the wall with 4 screws.
6. Mount the Control Panel on the backplate.
Insert one hinge into the hole, then twist
the other hinge into position.
7. Firmly close the case.
8. Plug the AC adapter into a power outlet.
The red AC PWR light and keypad backlight will be on.
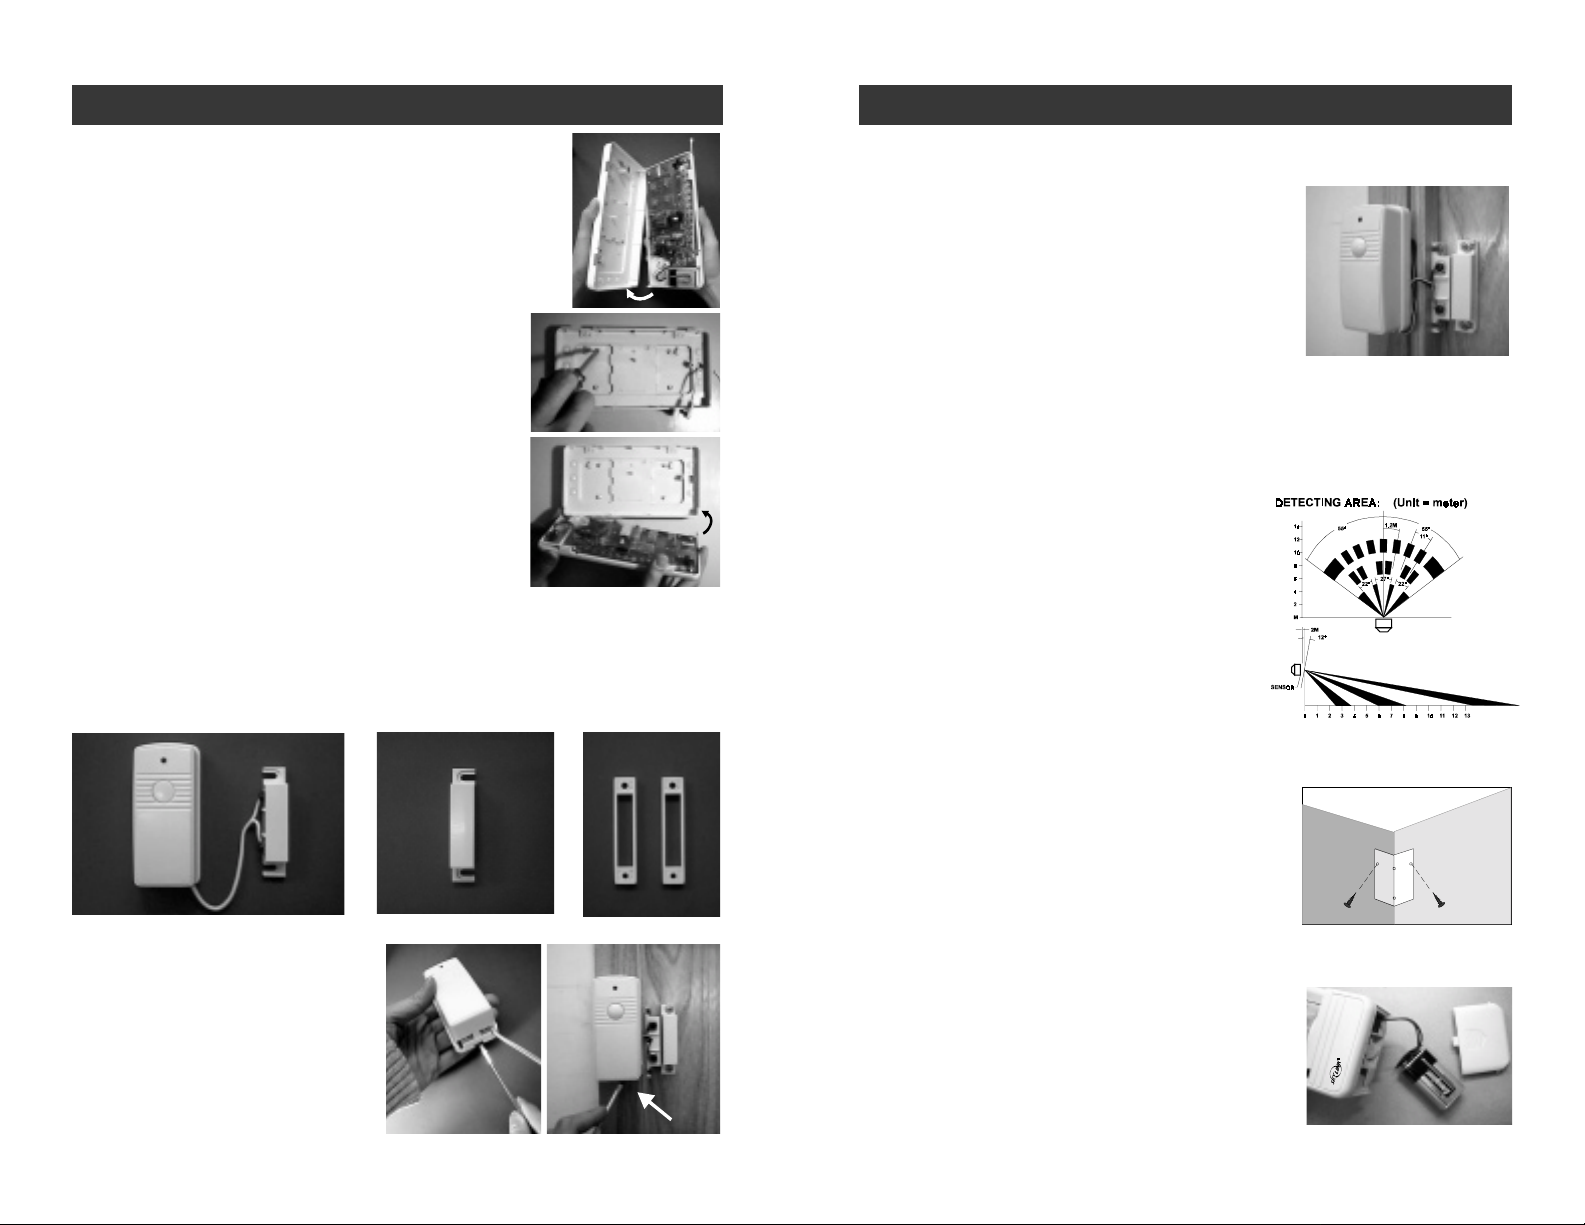
INSTALLING THE DOOR/WINDOW SENSOR (WT-433)
It is recommended to install one sensor on your front door and the other on
your back door.
Each contact sensor has 4 parts:
Transmitter Magnetic Switch Magnet Spacers
2. Position the magnetic switch connected to
the transmitter on the door/window frame.
3. Position the magnet on the door beside the
magnetic switch. They should be no more
than 1 cm (3/8 inch) apart. When the door/
window is closed, the magnets are in contact.
When the door/window is opened, contact is
broken and the transmitter sends a signal to
the Control Panel to activate the chime or
alarm.
INSTALLING THE MOTION SENSOR (PS-433)
The motion sensor senses motion from up to
13 meters, (40 feet) away in a 1 10 degree arc.
It works best when installed from 2 meters,
(approx. 7 feet) off the ground in a corner .
Please position the sensor so that it is looking
down at an angle of about 12 degrees.
We recommend that you position the motion
sensor where it will guard the bedrooms. For
example, have your motion sensor monitoring
the stairway which leads to all the bedrooms
upstairs. A hallway or central area can also be
used.
1. Position the transmitter beside the door/window frame on
the wall using either two sided
tape or screws. If you are using
screws, first pry off the back plate
with a small screwdriver and
screw the back plate into position using the template. Then click
the transmitter on to the back
plate now mounted on the wall.
–8–
1. Once you have decided on a location, tape
the template into position. If you are putting
the motion sensor in a corner, first fold the
template along the center line so it will fit
snugly into the angle. Screw the two mounting screws in position, (if installing on a flat
wall, use the screw holes one above the other,
if installing in a corner, use the screw holes
on sides of the unit).
2. Insert the 9 volt alkaline battery.
(original battery inserted by factory)
3. Match up the two screws with the appropriate
two keyhole s on the back of the Motion Sensor,
then hang the unit in position.
–9–
Page 6

INST ALLA TION
SMARTHOME.COM™ 1-800-SMART-HOME 949-221-9200 http://www.smarthome.com Order #7307
TESTING YOUR SYSTEM
(Cont. : Installing the motion sensor (PS-433)
Set the switch on the side to "TEST" and allow 60 seconds for the unit to warm
up. ( when using test mode, a signal will not be sent to the Control Panel ).
Now walk in the area you want the motion sensor to detect movement in.
If movement is detected, the red light on the front of the unit will appear. If
the red light does not appear, movement has not been detected and you
should reposition your motion sensor.
PULSE COUNT FEATURE
Y our Motion Sensor is equipped with Pulse
Count feature. This new feature significantly
reduces false alarms. Now when Pulse
Count is enabled 2 consecutive movements
are required in order to trigger the motion
sensor. However , the response time of the
motion sensor will become slower. Therefore
you have the option to either enable or disable this feature to suit your specific needs.
The factory default for this feature is set to
“ON”. Y our can disable this feature by relocat-
ENABLE PULSE
COUNT (DEFAUL T)
ing the Pulse Count jumper, which is the red
jumper located inside the battery compartment. When the red jumper is on the left 2
posts (Diagram 1), Pulse Count feature is
enabled. If you would like to disable Pulse
Count, please remove the red jumper and
insert it on the right 2 posts (Diagram 2).
Note: When installing the Motion Sensor,
avoid placing it near heat or cold producing
DIAGRAM 1
DISABLE PULSE
COUNT
devices (i.e. A/C or furnace vents, fans, ovens,
space heaters etc.). Air movement, especially
caused by changes in temperature may
trigger the Motion Sensor and cause false
alarms. Please carefully test your Motion
Sensor to make it will only be triggered by
people.
Insert jumper to
the right 2 posts
DIAGRAM 2
Installation is now completed and now test your system to ensure all the
sensors are communicating with the Control Panel. (See the next section,
TESTING YOUR SYSTEM)
–10–
Before you learn how to use your security system, test to make sure that
the door/window sensors and the motion sensor are communicating with the
Control Panel.
Set the Control Panel to CHIME MODE which will emit a subtly two tone
chime when any of the sensors are activated.
To set control panel to CHIME MODE
1. E nter your MPIN [0, 0, 0] on the Control Panel (MPIN is factory set at [0, 0, 0].
T o change MPIN see MASTER PERSONAL IDENTIFICA TION NUMBER
(MPIN) on page 17.
2. Press [ A ].
3. Press [ # ].
The red arm light and all 4 green lights above the numbers and beside the
word chime will go on. The system will now emit a chime sound when any
sensor is activated. The lights and sounds of the Control Panel are explained
in the next section, (see Lights and Sounds).
The door/window sensors are factory set to communicate with zone 1 and
the motion sensor to communicate with zone 2. If you would like to have the
sensors communicate with a different zone, see PROGRAM SENSORS TO
DIFFERENT ZONES on page 19.
To test the Door/Window Sensor
Open the door/window and break the contact between the magnetic switch
and the magnet. A signal will then be sent to the Control Panel which will
chime telling you that the signal has been received. One of the four green
lights on the Control Panel will flash once as the chime sounds. If you open
the front door, the green light above the #1 (zone 1) will flash.
To test the Motion Sensor
Slide the button on the side of the motion sensor to ON and allow 60 seconds
for the unit to warm up, then walk in the monitored area in front of the motion
sensor. Once movement is detected, a signal will be sent to the Control Panel.
The Control Panel will then emit a two tone chime and the green light above
the #2 (zone 2) will flash once. The motion sensor has been programmed to
send its signal to zone 2 in the Control Panel. It will take about 30 seconds
for the motion sensor to reset itself before it can send another signal.
If you have pets, have them walk in the monitored area to see if they activate
the motion sensor. If so, turn the motion sensor of f if these pets have access
to the monitored area. Smaller pets will not be picked up by the motion
sensor.
–11–
Page 7

LIGHTS AND SOUNDS
SMARTHOME.COM™ 1-800-SMART-HOME 949-221-9200 http://www.smarthome.com Order #7307
STANDARD PROGRAMMING
Below is an explanation of the lights and sounds of the Control Panel.
LIGHTS
ACPWR light on System is being powered by electrical current.
ACPWR light off System is not receiving any electrical power.
LOBA TT. light off Backup battery is connected and working.
LOBA TT. light flashing Backup battery is weak, needs to be replaced.
ARM light off System is disarmed.
ARM light on System is armed.
Key Pad Back Light If powered by AC adapter - back light is always on
If powered by back up battery only - stays on for
eight seconds when any button is pressed.
Green lights above #1-4 System will emit a two tone chime when a sensor
is activated, CHIME MODE.
Red lights below #1-4 System will sound alarm instantly when a sensor
is activated, INST ANT MODE.
Both green and red lights System will beep steadily for 30 seconds when
#1-4 a sensor is activated, after the 30 seconds the
alarm will sound, DELA Y ENTRY MODE.
Both green and red lights Lights will flash for 45 seconds. All remote sensors proflashing grammed to that zone will not communicate with the
Control Panel for those 45 seconds, which gives you
time to exit the premises before the system is armed.
SOUNDS
Three short beeps Y ou have made a mistake, start again.
Long beep Y ou have successfully completed a command.
Short beep Y ou have pressed a key in the right order .
T wo tone chime A device has been activated in CHIME MODE.
Siren (3 minutes) A device has been activated in INST ANT MODE.
Steady repeated beep The alarm has been triggered in DELAY MODE.
Y ou have 30 seconds to disarm the system
before the alarm sounds.
Two tone beep System is set on exit delay , you have 45 seconds
to leave the premises once the system has been
activated. After the 45 seconds, the system emits
a two tone beep and the system is now armed.
If you make a mistake while programming, the Control Panel emits three
short beeps. That means the system has cleared and you must start the programming sequence from the beginning. If you get lost in the programming
sequence or have made a mistake and want to start over again, press the [ * ]
on the key pad of the Control Panel until you hear three short beeps. This will
clear the system, then you can start again from the beginning. If no button is
pressed for eight seconds while in the middle of a programming sequence,
the system will also clear itself.
–12–
Now that the system is installed and the sensors are communicating with the
Control Panel, it is time to learn how to do basic programming of your security
system. More advanced features are explained further in the manual, (see
Advanced Programming).
Y ou can arm and disarm the system by u sing either the keypad on the Control
Panel or the 4 button keychain transmitter or keypad transmitter (option).
TO ARM THE SYSTEM USING THE KEYPAD ON THE CONTROL
PANEL
All programming sequences begin with the Master Personal Identification
Number (MPIN). There is only one MPIN which has been factory set at 0 0 0.
Y ou can also assign up to 3 dif ferent Secondary Personal Identification
Numbers (SPIN). For more information on how to change your MPIN and
how to add an SPIN, (see P ASSWORDS on page 17, 18).
We have preprogrammed 6 different arm sequences to meet different cir-
cumstances. For example, if you would like the system activated while you
are in the premises, the motion sensor will be turned off so you have the
freedom to move about without setting off the alarm. Y ou can personalize
any of these preprogrammed arm sequences, (see Advanced Programming).
Arming sequences
Option 1: Away Sequence - To arm your system when you are the last
person leaving the premises.
1. Press the current MPIN [ 0 0 0 ].
2. Press [ B ].
3. Press [ C ].
Y ou hear a long beep. The arm light and the red lights in zones 3 and 4 go
on. Both the green and red lights flash in zone 1 for 45 seconds which gives
you 45 seconds to leave the premises before the system is activated. After
45 seconds, both the green and red lights in zone 1 and 2 remain on. Upon
re-entering the premises through zone 1, or walking in the monitored area
of the motion sensor, zone 2, you have 30 seconds till the alarm sounds.
The system gives you 30 seconds from the time you enter the premises, for
example opening the front door, to get to the Control Panel to deactivate th e
system. Zones 3 or 4 remain instant. If any sensor in zone 3 and 4 are activated,
the alarm sounds instantly .
–13–
Page 8

STANDARD PROGRAMMING
SMARTHOME.COM™ 1-800-SMART-HOME 949-221-9200 http://www.smarthome.com Order #7307
Option 2: Home Sequence - To arm your system when someone
remains in the premises.
1. Press the current MPIN [ 0 0 0 ].
2. Press [ C ].
Y ou hear a long beep. The arm light and the red lights in zones 3 and 4 go on. Both
the green and red lights flash in zone 1 for 45 seconds which gives you 45 seconds
to leave the premises before the system is activated. After 45 seconds, both the
green and red lights in zone 1 remain on. Upon re-entering the premises through
zone 1, you have 30 seconds till the alarm sounds. The system gives you 30
seconds from the time you activate the door/window sensor , for example opening
the front door, to get to the Control Panel to deactivate the system. Zone 2 remains
off which allows the person in the premises to move around without activating the
motion sensor. Zones 3 and 4 remain instant. If any sensor in zone 3 or 4 are
activated, the alarm sounds instantly .
Option 3: Night Sequence - To arm your system when there are people
in the premises and no one is expected to enter or exit. Example at
night when everyone is sleeping.
1. Press the current MPIN [ 0 0 0 ].
2. Press [ A ].
3. Press [ B ].
Y ou hear a long beep. The arm light, the red light in zones 1, 3 & 4 go on. If any of
the sensors are activated in any of these 3 zones, the alarm is sounded instantly .
Zone 2, the motion sensor, remains of f allowing movement throughout the premises.
KEYCHAIN TRANSMITTER (4B-434)
The Keychain Transmitter conveniently fits on any keychain. It allows you to
arm and disarm the system from a distance of approximately 100 feet from
the Control Panel. The distance will depend on what is between the keychain transmitter and the Control Panel. It also has a panic button that lets
you remotely activate the siren instantly .
Note: Make sure you press down on the transmitter for one full second or
the system may not respond.
3
1
2
PANIC
TO DISARM THE SYSTEM USING THE KEYPAD ON THE CONTROL PANEL
1. Press the current MPIN [ 0 0 0 ].
2. Press [ # ].
All the lights but the AC PWR light go off. The system is now disarmed.
Note: If [MPIN,#] is entered when the system in not activated, the system
will default back to the last sequence before the unit was turned off.
Emergency Silent Alarm works in conjunction with the Emergency Dialer
(option), see Additional Accessories.
If under duress when disarming the system:
1. Enter the current MPIN [ 0 0 0 ].
2. Press [ B ] [ B ].
This will terminate the delay mode (stop the steady repeated beep) and return
to the previous arm mode. It will also send a signal to the Emergency Dialer
silently which will then automatically send a prerecorded message for help.
–14–
TO ARM SYSTEM USING THE KEYCHAIN TRANSMITTER
There are 2 different arm options to choose from:
1. Press button #1, and the Control Panel will beep once.
The system will be armed in the Away Sequence. To be used to arm the
system when you are the last person leaving the premises. (see
page 13 for information on the Away Sequence).
Pressing button #1 will give you the same result as pressing:
MPIN, [ B ] , [ C ] on the keypad.
2. Press button #2, and the Control Panel will beep once.
The system will be armed in Home Sequence. T o be used to arm the
system when someone remains in the premises. (see page 14 for
information on the Home Sequence).
Pressing button #2 will give you the same result as pressing: MPIN, [ C ]
on the keypad.
–15–
Page 9

KEYCHAIN TRANSMITTER (4B-434)
SMARTHOME.COM™ 1-800-SMART-HOME 949-221-9200 http://www.smarthome.com Order #7307
PASSWORDS
TO DISARM THE SYSTEM, OR DEACTIVATE THE SIREN USING
THE KEYCHAIN TRANSMITTER
When the system is armed:
Press button #3.
The red light on the transmitter flashes and the Control Panel beeps twice.
The system is now disarmed.
When the siren is sounding:
Press button #3.
The red light on the transmitter flashes and the siren is deactivated.
THE PANIC BUTTON ON THE KEYCHAIN TRANSMITTER
Both the Control Panel and the keychain tr an s mitter are equipped with panic
buttons. It doesn’t matter what mode you are in or even if the system is off,
once either panic button is pressed, the siren comes on instantly . The alarm
will continue to sound for 180 seconds or until the system is disarmed.
The panic button on the keychain transmitter is the larger red button.
The panic button on the Control Panel is the red button on the keypad.
MASTER PERSONAL IDENTIFICATION NUMBER (MPIN)
Security access to the SC-100 is controlled by a MASTER PERSONAL
IDENTIFICA TION NUMBER (MPIN) or SECONDARY PERSONAL
IDENTIFICA TION NUMBER (SPIN). All programming sequences start with
either the MPIN or SPIN.
To Change your MPIN:
1. Enter the current MPIN, (the MPIN is factory preprogrammed with
0 0 0).
2. Press [ * ].
3. Press [ 0 ].
4. Press [ * ].
5. Enter your new MPIN, (your MPIN must be a minimum of 3 digits).
6. Press [ * ].
If the system accepts the new MPIN, you will hear a long beep.
If you hear three short beeps, the system did not accept the new MPIN.
Start again from the beginning.
Note: If you enter an incorrect MPIN or SPIN, the alarm will sound after the
forth incorrect attempted.
Note: If you forget the current MPIN, unplug the Control Panel and remove
the battery . The MPIN will automatically return to the factory default of 0 0 0.
Make sure the unit is disarmed when you open the Control Panel. The Control Panel has a built in Defence System. When the unit is armed and the
Control Panel is opened or vandalized, the alarm will sound and send a signal
to t he emergency dialer (if applicable). For more information on the Emergency Dialer see Additional Accessories. (page 29)
–16–
–17–
Page 10

P ASSWORDS
SMARTHOME.COM™ 1-800-SMART-HOME 949-221-9200 http://www.smarthome.com Order #7307
ADVANCED PROGRAMMING
SECONDARY PERSONAL IDENTIFICATION NUMBER (SPIN)
You may want to give someone limited access to the system, (baby sitter,
cleaner, repairman etc.). For this purpose the SC-100 provides you with the
option of adding up to 3 separate SPIN.
A SPIN can be any number of 3 digits or more. Y ou can use a SPIN to arm
and disarm the system but not to program it, (programming is explained in
the next section). When someone no longer needs to have access to your
security system, you can simply delete their SPIN.
Adding a SPIN
1. Enter the current MPIN.
2. Press [ * ].
3. Press the number key to identify user, either [ 1 ], [ 2 ] or [ 3 ].
4. Press [ * ].
5. Enter the new SPIN ( your SPIN must be a minimum of 3 digits).
6. Press [ * ].
If the system accepts the new SPIN, you will hear a long beep. If you hear
three short beeps, the system did not accept the new SPIN. Start again.
Deleting a SPIN
1. Enter the current MPIN.
PROGRAM SENSORS TO DIFFERENT ZONES
Y ou now have a basic understanding of how the SC-100 security system
works. In this section, (Advanced Programming), we will explain how to
move sensors to different zones, how to change the alarm modes (for
example from Instant Mode to Delay Mode), and how to customize the preprogrammed arm sequences (for example if you only use one door to enter/
exit from, your secondary door should communicate with a zone that is in
instant mode).
Y our SC-100 Security System is divided into five zones. The 1st four zones
are displayed on the Control Panel as 4 pairs of lights, one green and the
other red. When a remote sensor (door/window sensor or motion sensor) is
activated, it sends a signal to one of the 1st four zones on the Control Panel.
Each zone can communicate with as many as six sensors. The Control
Panel can communicate with a maximum of 24 different sensors.
The fifth zone, (which is not represented by any lights on the Control Panel),
is programmed to communicate with Keychain Transmitters. Zone 5 can
accommodate a maximum of six Keychain Transmitters 4B434 or Keypad
transmitters KP-433 (option).
Y ou can assign your remote sensors to whatever zones you want. For your
convenience, we have preprogrammed the remote sensors for you. Both door/
window sensors are assigned to zone 1 and the motion sensor is assigned
to zone 2.
2. Press [ * ].
3. Press the number to identify the user, either [ 1 ], [ 2 ] or [ 3 ].
4. Press [ * ].
5. Press [ * ] one final time.
If the SPIN was successfully deleted, you will hear a long beep.
–18–
Y ou may wish to program a sensor to communicate to a different zone. For
example: if you do not enter/exit from your back door , you may want to change
the zone so that the door sensor is communicating with a different zone.
Currently , this sensor is communicating with zone 1, but if you change it so it
will be communicating with zone 3, the alarm will now sound instantly . You
may have a premises with three enter/exit doors. Y ou will need additional door/
window sensors, (see Additional Accessories).
–19–
Page 11

ADVANCED PROGRAMMING
SMARTHOME.COM™ 1-800-SMART-HOME 949-221-9200 http://www.smarthome.com Order #7307
ADVANCED PROGRAMMING
T o program sensors to send their signals to a dif ferent zone, you must first
clear them from communicating with their current zone.
TO CLEAR A ZONE
1. Enter the current MPIN.
2. Press [ B ].
3. Press the number key to identify current zone [ 1, 2, 3 or 4 ].
The zone light(s) will flash for eight seconds.
4. While the zone light(s) are flashing, press [ * ].
Now both the green and red lights flash for 30 seconds.
5. Do not activate any sensors while these lights are flashing.
Once the lights stop flashing, the zone is cleared of all devices.
Now that you have cleared the zone from communicating with all sensors, program
the sensors to the zones you would like them to communicate with, (see below).
TO PROGRAM A SENSOR TO A ZONE:
1. Enter the current MPIN.
2. Press [ B ].
3. Press the number key to identify which zone to add the sensor to, zone
[ 1, 2, 3 or 4 ].
The zone light(s) will flash for eight seconds.
4. While the zone light(s) are flashing, press [ * ].
Now both the green and red lights flash for 30 seconds.
5. While the zone lights are flashing, go to the remote sensor you are adding and
activate it. Walk in front of the motion sensor or open the door/window.
Y ou will hear a long beep, the zone light will stop flashing and the remote
sensor will now communicate to that zone.
Note : Y ou can only add remote devices to a zone one by one, but you can
not remove them one by one. Y ou must clear all sensors from the zone and
add back the ones you want.
3. Press [B].
4. Press the number key to identify which zone to add the Motion Sensor to
[1, 2, 3, 4]. We recommend you program the motion sensor to zone 2. Th e
zone light will flash for eight seconds.
5. While the zone light is flashing, press [ * ].
6. While the zone light is flashing, walk in front of the Motion Sensor in order to
activate it. Y ou will hear a long beep if the motion sensor is “learned” to the
con trol panel. The zone light will stop flashing and the remote sensor will now
communicate to that zone.
TO DELETE A KEYCHAIN TRANSMITTER FROM ZONE 5:
1. Enter the current MPIN.
2. Press [ B ].
3. Press [ 5 ].
4. Press [ * ].
5. Do not activate any Keychain Transmitters or sensors for 30 seconds after
the [ * ] was pressed.
Y ou have now cleared zone 5 from communicating with all Keychain Transmitters.
Please re-program the keychain transmitters that you would like to use by
the following instruction.
TO PROGRAM A KEYCHAIN TRANSMITTER OR KEYPAD TRANSMITTER (OPTION) TO ZONE 5:
1. Enter the current MPIN.
2. Press [ B ].
3. Press [ 5 ].
4. Press [ * ].
5. Within 30 seconds of pressing the [ * ], press any of the four buttons on the `
Keychain Transmitter OR press the panic button on the Keypad Transmitter.
TO PROGRAM THE MOTION SENSOR TO THE SECURITY CONTROL
P ANEL (SC-001):
1. Set the switch on the side of the Motion Sensor to “ON”. Wait 60 seconds
to warm up.
2. Enter the current MPIN (Master Personal Identification Number).
–20–
Y ou will hear a long beep and the Keychain Transmitter will now communicate
with zone 5.
NOTE: Zone 5 is designated for keychain and keypad transmitter ONL Y.
Please do not program any sensors other than keychain and keypad transmitters into zone 5, otherwise the system will not work properly .
–21–
Page 12

ADVANCED PROGRAMMING
SMARTHOME.COM™ 1-800-SMART-HOME 949-221-9200 http://www.smarthome.com Order #7307
ADVANCED PROGRAMMING
STANDARD ARMING SEQUENCES
Each zone can be programmed to react 5 different ways when it receives a
signal from a remote sensor.
1. Chime Mode - represented by the green lights
When only the green light is on and the Control Panel receives a
signal from a remote sensor, the Control Panel emits a subtly two
tone chime.
2. Instant Mode - represented by the red lights
When only the red light is on and the Control Panel receives a signal
from the remote sensor, the Control Panel will activate the siren
instantly.
3. Delay Entry Mode - represented by the green and red lights
When both the green and red lights are on and the Control Panel receives a signal from a remote sensor, the lights will flash and the
Control Panel will beep for 30 seconds before the alarm sounds.
These 30 seconds give you time to enter the premises and deactivate
the alarm before the siren sounds.
4. Delay Exit Mode - represented by the flashing of both the green and
red lights for 45 seconds
When both green and red lights are flashing, the control panel will
not recognize any remote sensors communicating to that zone.
These 45 seconds allow you time to exit the premises before that
zone is activated. When the lights stop flashing, both green and
red lights will remain on, which is now in DELA Y ENTRY MODE.
(See above for information on DELA Y ENTRY MODE).
5. Off - neither the green nor the red lights are on.
The Control Panel will not recognize any signals from a remote
sensor.
1. Enter the current MPIN.
2. Press [ A ].
3. Press [ A ].
Y ou will hear a long beep. The arm light, the red and green lights in zones
1 and the red lights in zones 3 and 4 go on. Zone 1 has the entry delay to
allow someone to enter through the front door and deactivate the system
before the siren sounds. This option does not have the exit delay so you
are not able to leave the premises without activating the alarm. Zone 2 (the
motion sensor), is off allowing movement in the premises and zones 3 & 4
are instant.
Option 2: Advanced Home 2 - use to secure the premises while staying in
the building. Delays the alarm to allow someone to enter the building and/or
walk in the monitored area of the motion sensor to deactivate the alarm.
1. Enter the current MPIN.
2. Press [ A ].
3. Press [ C ].
Y ou will hear a long beep. The arm light, the red and green lights in zones
1 and 2 as well as the red lights in zones 3 and 4 go on. Zone 1 & 2 has the
entry delay to allow someone to enter through the front door and walk in the
area monitored by the motion sensor and deactivate the system before the
siren sounds. This option does not have the exit delay so you are not able
to leave the premises without activating the system. Zones 3 & 4 are instant.
Option 3: Chime Sequence - this sequence is used for testing the system
but it can also be used to subtly alert you when a zone has been activated.
Example, if a young child opens the front door, the Control Panel will emit a
two tone chime advising you that the front door has been opened. (See page 1 1
for programming information for the CHIME SEQUENCE.)
We have preprogrammed different combinations of the above modes to meet
different situations, (see ST ANDARD PROGRAMMING).
ADDITIONAL ARMING SEQUENCES
Below are three additional programming options you may want to use.
Option 1: Advanced Home 1 - use to secure the premises while staying
in the building. Delays the alarm to allow someone to enter the building and
deactivate the alarm.
–22–
The three arm sequences above ; Advanced Home 1, Advanced Home 2 and
Chime Sequence along with the three sequences described in the ST ANDARD
PROGRAMMING; Away Sequence, Home Sequence and Night Sequence,
make up the six preprogrammed arm sequences.
However, if any of these six sequences do not satisfy your needs, you may
want to change the modes in certain zones. For example, your zone 2, (motion
sensor) is currently in delay mode. If your motion sensor is located in the basement and you would like to change it to the instant mode, see below.
–23–
Page 13

ADVANCED PROGRAMMING
SMARTHOME.COM™ 1-800-SMART-HOME 949-221-9200 http://www.smarthome.com Order #7307
SUMMARY OF ARMING SEQUENCES
TO CUSTOMIZE A SEQUENCE:
Program the system to the sequence you want to alter.
1. Enter the current MPIN.
2. Press [ B ].
3. Press a number key to select the zone you would like to change,
[ 1 , 2, 3 or 4 ].
The zone lights in the chosen zone will flash for eight seconds.
4. While the lights flash, press [ A ].
5. Select the new mode you want to use:
[ 0 ] = Disarm, [ 1 ] = Chime Mode, [ 2 ] = Delay Entry/Exit Mode,
[ 3 ] = Instant Mode
6. Press [ * ].
A long beep signals a successful change.
Below is a table summarizing all the preprogrammed sequences.
Sequence Zone 1 Zone 2 Zones 3 & 4 When sequence should be used
FOR TESTING
MPIN A # chime chime chime use for testing after installation
and to test batteries, also use as
a subtle chime when a remote
sensor has been activated
BASIC PROGRAMMING
MPIN B C exit delay off instant use when leaving the premises
(after 45 sec.)entry delay entry delay instant and no one is inside
MPIN C exit delay off instant use when leaving the premises
(after 45 sec.) and someone is inside the
premises
MPIN A B instant off instant use when people are in the
premises and no one is expected
to enter/exit
MPIN # off off off turns off the system
note: when MPIN # is enter and the system is already off, the system will default
back to the last sequence before the unit was shut off
ADVANCED PROGRAMMING
MPIN A A entry delay off instant someone is in the building and
someone is expected to enter/
no exit delay
MPIN A C entry delay entry delay instant person staying in the premises
is setting the alarm and will not
walk in the area monitored by the
motion detector
Panic button - The SC-100 has 2 panic buttons, (the red buttons on the
keychain transmitter and on the Control Panel). The alarm will sound instantly
when either of these buttons are pressed what ever mode you are in.
Emergency Silent Alarm (works in conjunction with the Emergency Dialer
option) - When disarming the system under duress, enter your MPIN, then
press [ B ], [ B ]. This will terminate the delay mode and return to the previous
arm mode, as well as send a signal to the Emergency Dialer , which will then
send pre-recorded messages for help.
When both power sources are removed from the Control Panel, (the AC
adapter is unplugged and the battery is removed), all sequences will return
–24–
to the above factory default.
–25–
Page 14

BATTERY MAINTENANCE
SMARTHOME.COM™ 1-800-SMART-HOME 949-221-9200 http://www.smarthome.com Order #7307
BATTERY MAINTENANCE
The SC-100 Security System comes with 5 batteries that at some point you
may have to replace:
1 9 volt alkaline battery for the Control Panel
1 9 volt alkaline battery for the Motion Sensor
2 12 volt alkaline batteries for the 2 Door/Window Sensors
1 12 volt alkaline battery for the Keychain Transmitter
Recommendation: Test you system periodically to ensure that all batteries
are working.
CONTROL PANEL BATTERY
The Control Panel comes equipped with a backup battery in case the
electrical power is interrupted for any reason.
When the Control Panel battery is low, the LOBATT. light goes on. Also,
when the LOBA TT. light is on and if you press any key on the keypad, 10
beeps warn you that the battery needs to be changed.
To replace the Control Panel backup battery:
1. Disarm the unit.
2. Open the Control Panel case by pressing
down on the two tabs on the top edge and
pull the front forward.
3. Disconnect the old battery .
4. Connect the new battery .
5. Close the Control Panel.
Note: T o guard against sabotage, the Control Panel is equipped with an emer-
gency switch that activates the alarm instantly when the case is opened.
Make sure that the unit is disarmed when you open the case or you will
activate the alarm.
The battery life, (9 volt alkaline battery), is approximately two years if used
only for backup.
Note: If the AC adapter is disconnected while the battery is replaced, the
security system will erase all the modifications that have been made and
return to the factory default. Also, your MPIN will return to 000.
–26–
MOTION SENSOR BATTERY
The Motion Sensor operates on a 9 volt alkaline battery accessible beneath a
sliding panel on the botto m of the unit. All remote sensors come with the battery
already installed. Disarm the Control Panel before replacing all batteries.
When the battery level is low, the Motion Sensor will emit a long beep (approx. 3
seconds) when motion is detected. This indicates you should replace the 9V battery .
To replace the Motion Sensor battery:
1. T ake the Motion Sensor down from the wall.
2. Slide off the battery cover .
3. T ake the old battery out of the battery compartment.
4. Disconnect the old battery from the connector wire.
5. Connect the new battery to the connector wire.
6. Put the new battery into the battery compartment.
7. Slide the battery compartment back on.
8. Set the switch on the side of the Motion Sensor to "ON".
9. Put the unit back on the wall.
Switch unit to the “off” position when not in use for long periods of tim e to extend
battery life.
AC Adapter (Optional)
An optional AC adapter can be plugged in to the Motion Sensor as a regular power
source. The output voltage of this optional AC adapter should be at 9V under normal operating condition, the Motion Sensor will not consume the power of the 9V
battery . However, we recommend users should still install the 9V
battery as a back up power supply in case of a power failure.
DOOR/WINDOW SENSOR BATTERY
Each door/window sensor operates on a 12 volt alkaline battery that is inside the transmitter. The sensors come with the
batteries already installed.
To replace the battery:
1. Push on the clip at the bottom of the transmitter case
with a sharp object (such as a paper clip or pen knife)
and pull it away from the backplate.
2. Pry out the old battery from one end.
3. Push the new battery back into place. A diagram beside the battery well indicates which end is positive
an d which is negative.
4. Snap the transmitter back onto the backplate.
-
+
–27–
Page 15

BATTERY MAINTENANCE
SMARTHOME.COM™ 1-800-SMART-HOME 949-221-9200 http://www.smarthome.com Order #7307
KEYCHAIN TRANSMITTER BATTERY
The Keychain Transmitter operates on a 12 volt alkaline battery which is
installed at the factory .
There are two screws on the back of the transmitter that holds the case
together.
To replace the Keychain Transmitter battery:
1. Undo the two screws on the back
of the transmitter.
The back will then come off.
2. Using a small screwdriver or pen
knife, pry out the old battery from
one end.
3. Place the new battery in position.
A diagram beside the battery well
indicates which end is positive
and which is negative.
4. Close the battery cover and re insert the two screws.
+
-
–28–
 Loading...