


 Loading...
Digital
Satellite
Meter
User Manual
Version: 16.07.2012
ENGLISH

User Information
Preface
Dear Customer,
Thank you for purchasing the digital DVB-S meter smartmeter S1. This user manual contains all the information required
•to connect,
•to operate,
•to clean, and
•to dispose of the device.
Please read the user manual carefully before you start using the meter.
smart electronic GmbH Industriestraße 29 78112 St. Georgen Germany
Service Hotline:+49 (0) 7724 9478354
Telefax: +49 (0) 7724 9478333
E-Mail: service@smart-electronic.de
Internet: www.smart-electronic.de
© smart electronic GmbH 2012
All rights, technical changes, errors as well as printing mistakes reserved. Any reproducing or copying of the contents requires prior written permission from smart.
2 |
smartmeter S1 |
|
|
|
User Information |
|
|
|
|
||
|
|
|
||
Contents |
|
|
||
1 |
User Information ................................................................................. |
7 |
|
|
|
1.1 |
Use of this Manual ................................................................... |
7 |
|
|
1.2 |
Signs, Symbols, Layout ........................................................... |
7 |
|
2 |
Product Description ............................................................................ |
8 |
|
|
|
2.1 |
Scope of Delivery ..................................................................... |
8 |
|
|
2.2 |
Meter ........................................................................................ |
9 |
|
|
2.2.1 |
Front View ................................................................................ |
9 |
|
|
2.2.2 |
Top View................................................................................. |
10 |
|
|
2.2.3 |
Bottom View........................................................................... |
11 |
|
|
2.2.4 |
Rear View ............................................................................... |
11 |
|
|
2.3 |
Guarantee............................................................................... |
11 |
|
3 |
Safety Notes ..................................................................................... |
11 |
|
|
|
3.1 |
Safety of persons ................................................................... |
11 |
|
|
3.2 |
Appropriate Usage ................................................................. |
11 |
|
|
3.3 |
Hazards from Improper Use................................................... |
12 |
|
|
3.4 |
Lithium Ion Battery ................................................................. |
13 |
|
4 |
Initial Setup ....................................................................................... |
14 |
|
|
|
4.1 |
Charging the Battery .............................................................. |
14 |
|
|
4.1.1 |
Charge Control....................................................................... |
14 |
|
|
4.1.2 |
State of Charge ...................................................................... |
15 |
|
|
4.2 |
Switching the Meter On and Off ............................................ |
15 |
|
|
4.2.1 |
Switching on........................................................................... |
15 |
|
|
4.2.2 |
Switching off .......................................................................... |
15 |
|
|
4.3 |
Entering and Exiting the Menu............................................... |
16 |
|
|
4.4 |
Navigating through the Menu................................................. |
16 |
|
5 Aligning the Satellite Dish.................................................................. |
17 |
|
||
6 |
Menu TP Search ............................................................................... |
18 |
|
|
|
6.1 |
Renaming a Satellite .............................................................. |
18 |
|
|
6.2 |
Adding a Satellite ................................................................... |
19 |
|
smartmeter S1 |
3 |

User Information
|
6.3 |
Deleting a Satellite................................................................. |
19 |
|
6.4 |
Searching for a Transponder................................................. |
20 |
|
6.5 |
Deleting a Transponder ......................................................... |
20 |
|
6.6 |
Adding a Transponder........................................................... |
21 |
|
6.7 |
Searching Channels............................................................... |
21 |
|
6.8 |
NIT ......................................................................................... |
22 |
7 |
Menu Satellite Identify ...................................................................... |
24 |
|
8 |
Menu Packet Control........................................................................ |
24 |
|
|
8.1 |
Showing Measurement Values of five Transponders........... |
25 |
|
8.2 |
Searching Channels............................................................... |
25 |
9 |
Menu DiSEqC Search....................................................................... |
26 |
|
10 Menu DiSEqC Motor Search ............................................................ |
27 |
||
|
10.1 |
DiSEqC 1.2 ............................................................................ |
28 |
|
10.2 |
USALS ................................................................................... |
28 |
11 |
Menu Spectrum................................................................................ |
29 |
|
12 |
Menu Watch Program....................................................................... |
30 |
|
|
12.1 |
Programmwahl ...................................................................... |
31 |
|
12.1.1 |
Direct Channel Selection ....................................................... |
31 |
|
12.1.2 |
Channel Selection via Selection Window.............................. |
31 |
|
12.1.3 |
Channel Selection via Search Function................................. |
32 |
|
12.2 |
Sorting the Channel List ........................................................ |
32 |
12.3Switching Between TV Channel List and Radio Channel
|
List ......................................................................................... |
33 |
12.4 |
Deleting a Channel from the Channel List............................. |
33 |
13 Menu Settings .................................................................................. |
33 |
|
13.1 |
Hiding the OSD...................................................................... |
34 |
13.2 |
Switching off the Screen ....................................................... |
34 |
13.3 |
Setting Display Brightness .................................................... |
34 |
13.4 |
Selecting Energy Unit ............................................................ |
34 |
13.5 |
Setting Volume Level............................................................. |
34 |
4 |
smartmeter S1 |
|
|
User Information |
|
|
|
|
|
|
13.6 |
Switching On/Off the Beeper ................................................. |
34 |
|
13.7 |
Activating the Automatic Standby Function .......................... |
34 |
|
13.8 |
Selecting the OSD Language................................................. |
35 |
|
13.9 |
Restoring Factory Settings .................................................... |
35 |
14 |
Menu PC Update .............................................................................. |
35 |
|
|
14.1 |
Showing the Software Version............................................... |
35 |
|
14.2 |
Performing a Software Upgrade ............................................ |
36 |
|
14.3 |
Editing the Channel List ......................................................... |
37 |
|
14.3.1 |
Saving the Channel List on a USB disk ................................. |
37 |
|
14.3.2 |
Editing the Channel List with the Editor Program.................. |
38 |
|
14.3.3 |
Loading the Channel List from USB ...................................... |
38 |
|
14.4 |
Media Player .......................................................................... |
39 |
|
14.4.1 |
Playback of a Music File ........................................................ |
40 |
|
14.4.2 |
Playback Mode ...................................................................... |
40 |
|
14.4.3 |
Playback of a Image File ........................................................ |
40 |
|
14.4.4 |
Configure a Slide Show.......................................................... |
41 |
|
14.4.5 |
Sorting Files ........................................................................... |
42 |
|
14.4.6 |
Playlists .................................................................................. |
42 |
15 |
Saving a Screenshot ......................................................................... |
44 |
|
16 |
Operation in a Unicable System........................................................ |
44 |
|
|
16.1 |
About Unicable....................................................................... |
44 |
|
16.2 |
Allocation of IF channels and frequencies............................. |
45 |
|
16.3 |
Installation .............................................................................. |
45 |
17 |
Cleaning the Meter............................................................................ |
46 |
|
18 |
Transporting and Storing the Meter .................................................. |
47 |
|
19 |
Troubleshooting ................................................................................ |
47 |
|
20 |
Disposal ............................................................................................ |
48 |
|
21 |
Specifications.................................................................................... |
49 |
|
|
21.1 |
General................................................................................... |
49 |
|
21.2 |
LNB/Tuner input..................................................................... |
49 |
smartmeter S1 |
5 |

User Information
21.3 |
System Resources................................................................. |
49 |
21.4 |
Video Decoder ....................................................................... |
49 |
21.5 |
Connections........................................................................... |
50 |
21.6 |
Power supply ......................................................................... |
50 |
21.7 |
Dimensions and Weight......................................................... |
50 |
21.8 |
Temperatur ............................................................................ |
50 |
22 Declaration of Conformity................................................................. |
51 |
|
6 |
smartmeter S1 |
User Information
1 User Information
1.1Use of this Manual
•This manual is intended for the DVB-S Meter smartmeter S1.
•Please carefully read this user manual before operating the device for the first time.
•Please note all warnings and notes included in this user manual.
•Consider this user manual to be an integral part of the product, and store it at a well accessible location.
•This user manual should also be enclosed when handing over the device to a third party.
•In case of loss, the current version of the user manual can be downloaded at the support center on our website www.smart-electronic.de.
•The software is still being further developed even after your purchase of the device. Thus, it may be possible that certain operation steps do not fully correspond to the user manual.
1.2Signs, Symbols, Layout
|
Symbol/layout |
|
Meaning |
|
|
|
|
|
|
|
|
|
|
|
|
|
|
WARNING |
|
|
|
|
Danger due to electric shock with possible severe bodi- |
|
|
|
|
ly injury |
|
|
|
|
|
|
|
|
|
|
|
|
|
|
CAUTION |
|
|
|
|
Warning of possible physical damage |
|
|
|
|
|
|
|
|
|
|
|
|
|
|
NOTE |
|
|
|
Useful information and hints |
|
|
|
|
|
|
|
|
|
|
|
|
|
|
|
You are requested to perform an action. |
|
|
|
|
|
|
|
1. |
|
Perform these steps in the stated order. |
|
|
2. |
|
|
|
|
|
|
|
|
|
|
|
|
|
|
|
|
List |
|
|
|
|
|
|
smartmeter S1 |
7 |

Product Description
|
Symbol/layout |
|
Meaning |
|
|
|
|
||
|
|
|
|
|
|
Italics |
|
The various possibilities of settings as well as image |
|
|
|
|
captions are stated in Italics. |
|
|
|
|
|
|
|
|
|
|
|
|
bold |
|
The designations of keys are printed in bold letters. |
|
|
|
|
|
|
|
bold & italics |
|
Menu windows and menu items (that often include fur- |
|
|
|
|
ther hidden menu items or direct settings) are printed in |
|
|
|
|
bold & italic letters. |
|
|
|
|
|
|
2 Product Description
The smartmeter S1 is a handy digital antenna measuring device for a quick and easy alignment of satellite antennas. If a satellite is found, the smartmeter S1 shows it on the display and emits an audible signal. Signal strength and quality are displayed as numerical values and bar graphs.
Another measurement value is the forward error correction (FEC) and the bit error rate after Viterbi (VBER). In addition, the picture quality can be revised on the high-resolution 8.9-inch TFTLCD screen.
Many satellites are pre-programmed in order to an quick antenna adjustment.
There is a protective pouch for transport and as a protection.
2.1Scope of Delivery
Please check if the delivery is complete.
Included in delivery:
•The DVB-S Meter smartmeter S1,
•a 12 V plug-in power supply,
•a 12 V car adapter cable,
•a Quick-F connector,
•a carrying bag,
•a user manual.
If the delivery should be incomplete, contact your specialist dealer the smart electronic GmbH.
8 |
smartmeter S1 |
Product Description
2.2Meter
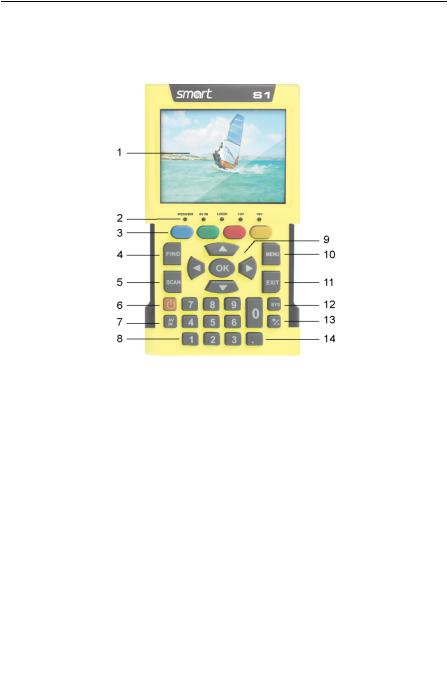
2.2.1Front View
|
No. |
|
|
Description |
|
|
|
|
|
|||
|
|
|
|
|
|
|
|
|||||
|
|
|
|
|
|
|
|
|
|
|
|
|
|
1 |
|
|
LC-Display |
|
|
Display of the TV picture, the menu and the measured |
|
||||
|
|
|
|
|
values. |
|
|
|||||
|
|
|
|
|
|
|
|
|
|
|
|
|
|
|
|
|
|
|
|
|
|
|
|
|
|
|
|
|
|
|
|
|
|
|
|
|
|
|
|
|
|
|
|
|
|
|
|
|
green |
the meter is on |
|
|
|
|
|
|
|
|
|
|
|
off |
the meter is turned off |
|
|
|
|
|
POWER |
|
|
|
|
|
Charging: |
|
|
|
|
|
|
|
|
|
|
|
|
red |
during charging |
|
|
|
|
|
|
|
|
|
|
|
green |
the battery is fully charged |
|
|
|
|
|
|
|
|
|
|
|
|
|
|
|
|
|
|
|
|
|
|
|
|
|
|
|
|
|
|
|
AV IN |
|
|
|
|
|
Lights if the meter is switched to the analog video in- |
|
|
|
2 |
|
|
|
|
LED |
|
|
put. |
|
|
|
|
|
|
|
|
|
|
|
|
|
|||
|
|
|
|
|
|
|
|
|
|
|
|
|
|
|
|
|
LOCK |
|
|
|
|
|
Lights when a signal is received. |
|
|
|
|
|
|
|
|
|
|
|
|
|
|
|
|
|
|
|
|
|
|
|
|
|
|
|
|
|
|
|
|
13V |
|
|
|
|
|
Lights if there is a 13 V signal for the polarization con- |
|
|
|
|
|
|
|
|
|
|
|
trol (vertical) |
|
||
|
|
|
|
|
|
|
|
|
|
|
||
|
|
|
|
|
|
|
|
|
|
|
|
|
|
|
|
|
18V |
|
|
|
|
|
Lights if there is a 18 V signal for the polarization con- |
|
|
|
|
|
|
|
|
|
|
|
trol (horizontal) |
|
||
|
|
|
|
|
|
|
|
|
|
|
||
|
|
|
|
|
|
|
|
|
|
|
|
|
smartmeter S1 |
9 |

Product Description
|
No. |
|
Description |
|
|
|
|
|
|
|
|
|
|
|
|
|
|
|
|
|
|
|
|
|
|
Different functions depending on the menu. |
|
|
3 |
|
FUNCTION keys |
|
The functions are displayed at the bottom of the |
|
|
|
|
|
|
screen. |
|
|
|
|
|
|
|
|
|
|
|
|
|
|
|
|
4 |
|
FIND |
|
Call of the channel search function. |
|
|
|
|
|
|
|
|
|
5 |
|
SCAN |
|
Open the Single Satellite Search menu. |
|
|
|
|
|
|
|
|
|
|
|
|
|
|
|
|
6 |
|
POWER |
|
Switch device on/off. |
|
|
|
|
|
|
|
|
|
7 |
|
AV IN |
|
Switch to the analog video input. |
|
|
|
|
|
|
|
|
|
|
|
|
|
|
|
|
8 |
|
Numeric keys |
|
Direct entry of numbers. |
|
|
|
|
|
|
|
|
|
|
|
Cursor-Kreuz |
|
Press to navigate through menus/submenus: |
|
|
9 |
|
|
|
Press ▲,▼ to switch between stations, |
|
|
|
|
|
Press ◄,► to adjust the volume. |
|
|
|
|
|
|
|
|
|
|
|
|
OK |
|
Press to confirm your selection / display station list. |
|
|
|
|
|
|
|
|
|
10 |
|
MENU |
|
Display the main menu. |
|
|
|
|
|
|
|
|
|
11 |
|
EXIT |
|
Leave the current menu, cancel operation. |
|
|
|
|
|
|
|
|
|
|
|
|
|
|
|
|
12 |
|
SYS |
|
TV mode: call of the menu OSD Setting, |
|
|
|
|
Menu: volume control. |
|
||
|
|
|
|
|
|
|
|
|
|
|
|
|
|
|
|
|
|
|
|
|
|
13 |
|
+/- |
|
Call of the media player. |
|
|
|
|
|
|
|
|
|
|
|
|
|
|
|
|
14 |
|
|
|
Pressing this key copies a screenshot to a connected |
|
|
|
|
USB disk. |
|
||
|
|
|
|
|
||
|
|
|
|
|
|
|
|
|
|
|
|
|
|
2.2.2 |
|
Top View |
|
|
|
|
|
|
No. |
|
Description |
1Digital satellite signal input
2Analog audio input (mono)
3Analog video input (Composite Video)
10 |
smartmeter S1 |
Safety Notes
2.2.3 Bottom View
No. Description
1Low-voltage socket (for power plug) Switch for battery (for separating the
2smartmeter S1 electronics from the rechargeable battery)
3USB port for external data storage devices
The above figures show the smartmeter S1 without the black part covering at the top of the device.
2.2.4Rear View
At the rear is the battery compartment. Normally, you must not open it. If you suspect that the lithium-ion battery must be replaced, contact your dealer.
2.3Guarantee
The digital meter smartmeter S1 of smart electronic GmbH comes with a guarantee in accordance with legal requirements as applicable at the time of the purchase.
3 Safety Notes
3.1Safety of persons
Ensure that nobody can be hurt by falling tools or parts of the satellite antenna during the adjustment and installation of the antenna. For your own security use a rope on sloping roofs.
3.2Appropriate Usage
The measuring device smartmeter S1 was developed to measure signals of digital satellite antennas and satellite systems. It is exclusively for this purpose and should only be used for this purpose. Use the equipment only for the purpose, which is described in this manual.
smartmeter S1 |
11 |
Safety Notes
Any other usage is rated as not properly and can result in damage or even injury. There will be no liability for damages caused by a non-intended use.
3.3Hazards from Improper Use
Make sure the meter and especially the power plug are always kept dry.
Do not expose the meter to temperatures below 0° C.
Connect the power plug only to 100-240 V AC, 50/60 Hz.
Charge the meter only with the supplied power plug.
During electrical storms, disconnect the meter from the aerial and from the power supply.
CAUTION! Do not put heavy objects onto the meter.
Avoid mechanical influences that can damage e.g. the LCD display or the housing of the meter.
Do not bend or crimp the cables.
Do not start to use the meter if you can see signs of damage or if you can hear loose parts inside the device.
Danger of electrical shock from high voltage
Damages on the housing of the power plug or an improperly repaired power plug can expose the user to mains voltage.
Do not open the supplied power plug.
WARNING! Have the power plug repaired by qualified personnel only.
Taking the device from cold into warm temperatures
can lead to condensation forming inside the device.
Do not connect the device instantly. Leave it switched off for a few hours.
12 |
smartmeter S1 |

Safety Notes
3.4Lithium Ion Battery
The smartmeter S1 is provided with a lithium ion battery. Please observe the following safety notes for the battery:
|
|
|
|
Fire and explosion hazard |
|
|
|
|
|
Any kind of heat (from inside or outside) can trigger un- |
|
|
|
|
|
controllable chain reactions inside the battery. |
|
|
WARNING |
|
|
Do not store or use the battery in temperatures above |
|
|
|
|
40 °C. |
|
|
|
|
|
|
|
|
|
|
|
|
Never connect the two poles (+ and -). |
|
|
|
|
|
Never expose the battery to high temperatures, e.g. |
|
|
|
|
|
close to stoves or cookers or other hot objects. |
|
|
WARNING |
|
|
Charge the battery only with the supplied power plug. |
|
|
|
|
|
||
|
|
|
|
|
|
Risk of injury
Damages on and improper use of the battery can lead to fumes leaking from the battery. When inhaled, these fumes can irritate the respiratory tracts.
Avoid any damaging of the battery.
CAUTION If fumes leak from the battery, open the window and seek medical advice if you experience health problems that may result from inhaling battery fumes.
Damages to other objects
Defective batteries can leak and spill battery liquid onto close-by objects.
Check the objects affected.
CAUTION Clean or, if necessary, replace the objects affected.
smartmeter S1 |
13 |

Initial Setup
4 Initial Setup
4.1Charging the Battery
Charge the battery completely before you use the meter for the first time.
The battery can be charged regardless of
•whether the meter is switched on or off or
•whether the battery-switch on the underside of the meter is set to On or Off.
An integrated automatic charging system ensures optimum charging of the battery.
Switch off the meter, if it is not yet switched off, to ensure that the complete power of the power supply can be used to charge the battery.
Basically, the meter is also charged if it is switched on, then the charging period becomes longer.
Plug the power plug into a 230-V socket.
Connect the low-voltage plug of the power plug to the low-voltage socket on the bottom of the meter.
The battery starts charging as soon as you connect the smartmeter S1 to the power plug.
When you charge the battery for the first time, charge
it for at least 5 hours.
The maximum charging time is 12 hours.
4.1.1Charge Control
•Charging is indicated by a continuously moving battery symbol in the display:  .
.
The POWER LED lights red.
14 |
smartmeter S1 |

Initial Setup
•Completed charging is indicated by a steady battery symbol filled with four bars:  .
.
The POWER LED lights green.
4.1.2State of Charge
The current status of the battery is continuously displayed:
•If the battery is not adequately charged, the battery charging icon will be displayed in red with 1 or 2 lines (corresponding to the state of charge). You should charge the battery.
•If the battery is sufficiently charged, the battery charging icon will be displayed in green with 3 or 4 lines.
4.2Switching the Meter On and Off
4.2.1Switching on
1.Ensure that the battery-switch on the underside of the meter is set to an ON position.
2.Press the power key to switch on the meter.
In case of disconnected power supply, the smartmeter
S1 will be turned on, once you put the battery switch
from the OFF to the ON position.
If the power supply is plugged in, the battery switch will be useless, meaning that the smartmeter S1 can be switched on regardless of the switch position.
4.2.2Switching off
Press the power key once again to switch off the meter after use.
For long operational pauses, please also separate the
smartmeter S1 electronics from the battery by setting the battery switch on the underside of the device to the OFF position.
smartmeter S1 |
15 |

Initial Setup
4.3Entering and Exiting the Menu
Press the MENU key to enter the main menu. The display shows the OSD1 main menu.
The display shows the main menu window when you switch the smartmeter S1 on and when you re-enter the menu.
Press the EXIT key to exit the menu or to return to the previous menu level.
Depending on the submenu you are in, you may have to press the EXIT key several times to return to the main
menu.
4.4 Navigating through the Menu
Use the colored function keys and the navigation keys to navigate through the menu:
Press ► / the yellow function key to select the menu item to the right.
Press ▼ / the red function key to select the menu item below.
Press ◄ / the blue function key to select the menu item to the left.
Press ► / the green function key to select the menu item above.
Press OK to enter the selected menu item.
Activated menu items are highlighted by colour.
The function keys may call different functions, dependent on the regarding menu.
Instead of changing a value by using the keys ► und ◄, with many menu items you can also press the OK key, select a new value from the list, and confirm such value by again pressing the OK key.
1 OSD = On Screen Display
16 |
smartmeter S1 |
Loading...