


 Loading...
HDTV Satellite Receiver
MX Flat HD
User Manual
Version: 12.12.2012 - English

Introduction
Introduction
Dear customer,
Thank you for buying a smart HDTV satellite receiver.
This user manual provides information on
•placement
•installation,
•adjustment
•operation,
•cleaning and disposal of the receiver.
Please carefully read the user manual before operating the receiver. We hope you enjoy your smart receiver.
Your
smart electronic GmbH
Industriestraße 29 78112 St. Georgen Germany
Service hotline: |
+49 (0) 7724 947 85 55 |
Fax: |
+49 (0) 7724 947 83 33 |
E-Mail: |
service@smart-electronic.de |
Internet: |
www.smart-electronic.de |
© smart electronic GmbH 2012
All rights, technical changes, errors as well as printing mistakes reserved. Any reproducing or copying of the contents requires prior written permission from smart.
2 |
smart MX Flat HD |
|
|
|
Table of Contents |
|
|
||
Table of Contents |
|
||
1 |
User Information ................................................................................. |
8 |
|
|
1.1 |
Use of this Manual ................................................................... |
8 |
|
1.2 |
Signs, Symbols, Layout ........................................................... |
8 |
2 |
Product Description............................................................................ |
9 |
|
|
2.1 |
Scope of Delivery ..................................................................... |
9 |
|
2.2 |
Receiver ................................................................................. |
10 |
|
2.3 |
Remote Control...................................................................... |
11 |
|
2.4 |
Save Energy ........................................................................... |
13 |
|
2.5 |
Guarantee............................................................................... |
13 |
3 |
General Safety Instructions ............................................................. |
13 |
|
|
3.1 |
Intended Use.......................................................................... |
13 |
|
3.2 |
Risks in Case of Intended Use............................................... |
13 |
|
3.3 |
Location.................................................................................. |
14 |
|
3.4 |
Grounding .............................................................................. |
15 |
|
3.5 |
Handling of Batteries.............................................................. |
15 |
|
3.6 |
Notes on Product Liability...................................................... |
15 |
4 Installation of smart MX Flat HD ..................................................... |
15 |
||
|
4.1 |
Connection Scheme............................................................... |
16 |
|
4.2 |
Connect Satellite Antenna ..................................................... |
16 |
|
4.3 |
Connect TV Set ...................................................................... |
16 |
|
4.4 |
Connect IR Eye ...................................................................... |
16 |
|
4.5 |
Connect Home Cinema System (Optional)............................ |
17 |
|
4.6 |
Connect Data Storage (Optional)........................................... |
17 |
|
4.7 |
Connect External Power Supply ............................................ |
18 |
|
4.8 |
Insert Batteries of Remote Control ........................................ |
18 |
5 |
Basic Operation................................................................................. |
18 |
|
|
5.1 |
Switch on Receiver ................................................................ |
18 |
|
5.2 |
Installation .............................................................................. |
18 |
smart MX Flat HD |
3 |

Table of Contents |
|
|
5.2.1 |
Language ............................................................................... |
19 |
5.2.2 |
RAPS Start............................................................................. |
19 |
5.2.3 |
RAPS Parameters .................................................................. |
21 |
5.2.4 |
Satellite List ........................................................................... |
22 |
5.2.5 |
Country .................................................................................. |
22 |
5.2.6 |
Regional Channel................................................................... |
23 |
5.2.7 |
Channel-Filter ........................................................................ |
23 |
5.3 |
Select Operation Mode.......................................................... |
23 |
5.4 |
Call/Leave Menu.................................................................... |
24 |
5.5 |
Menu Navigation.................................................................... |
24 |
5.6 |
Parental Lock......................................................................... |
25 |
5.7 |
Set Time................................................................................. |
26 |
5.8 |
TV........................................................................................... |
27 |
5.8.1 |
Direct Channel Selection ....................................................... |
27 |
5.8.2 |
Channel Selection via Selection Window.............................. |
28 |
5.8.3 |
Channel Selection via Search Function................................. |
29 |
5.8.3.1 |
HDTV Filter............................................................................. |
29 |
5.8.3.2 |
Genre Filter ............................................................................ |
29 |
5.8.3.3 |
Find Channels (by Alphabet) ................................................. |
30 |
5.8.3.4 |
Sort Channel List (by Alphabet)............................................. |
31 |
5.8.4 |
Channel Information .............................................................. |
32 |
5.8.5 |
EPG........................................................................................ |
32 |
5.8.5.1 |
Single EPG............................................................................. |
33 |
5.8.5.2 |
Multi EPG............................................................................... |
34 |
5.8.6 |
Audio Settings ....................................................................... |
35 |
5.8.7 |
Teletext .................................................................................. |
36 |
5.8.8 |
Subtitles................................................................................. |
36 |
5.8.9 |
Aspect Mode ......................................................................... |
37 |
5.8.9.1 |
Setting the Aspect Mode with the V-MODE key ................... |
37 |
5.8.9.2 |
Setting the Aspect Mode via the Menu ................................. |
37 |
5.8.10 |
Video Resolution.................................................................... |
37 |
5.8.11 |
Recall ..................................................................................... |
38 |
5.8.12 |
Sleep Timer............................................................................ |
38 |
4 |
smart MX Flat HD |

|
|
Table of Contents |
6 Media Player...................................................................................... |
38 |
|
6.1 |
Music...................................................................................... |
39 |
6.1.1 |
Playback................................................................................. |
39 |
6.1.2 |
Playlist .................................................................................... |
40 |
6.1.2.1 |
Creating a Playlist .................................................................. |
40 |
6.1.2.2 |
Moving files within the Playlist ............................................... |
40 |
6.1.2.3 |
Delete files from the Playlist................................................... |
40 |
6.1.2.4 |
Delete all files from the Playlist: ............................................. |
40 |
6.1.3 |
Edit Audio Files ...................................................................... |
41 |
6.1.4 |
Sort Audio Files...................................................................... |
41 |
6.1.5 |
Playback Mode ...................................................................... |
41 |
6.2 |
Images.................................................................................... |
42 |
6.2.1 |
Configure a Slide Show.......................................................... |
42 |
6.2.2 |
Showing all Images in the Current Directory ......................... |
42 |
6.3 |
Video ...................................................................................... |
42 |
6.3.1 |
Playback Video....................................................................... |
42 |
6.3.2 |
Edit Video Files....................................................................... |
43 |
6.3.3 |
Sorting Videos........................................................................ |
43 |
7 Extended Settings and Functions ................................................... |
44 |
|
7.1 |
Installation .............................................................................. |
44 |
7.1.1 |
Antenna Connection .............................................................. |
44 |
7.1.2 |
Satellite List............................................................................ |
44 |
7.1.3 |
Antenna Setup........................................................................ |
46 |
7.1.3.1 |
Fixed Antenna ........................................................................ |
46 |
7.1.3.2 |
Motor Antenna ....................................................................... |
48 |
7.1.4 |
Single Satellite........................................................................ |
50 |
7.1.5 |
Multi Satellite.......................................................................... |
51 |
7.2 |
TV Channel List / Radio Channel List .................................... |
51 |
7.2.1 |
Add Channel to Favorites ...................................................... |
52 |
7.2.2Provide Channels with Password Protection (Lock
Against Unauthorized Access)............................................... |
52 |
7.2.3Skip Channels when Switching from Channel to Channel
(Zapping) ................................................................................ |
52 |
smart MX Flat HD |
5 |

Table of Contents |
|
|
7.2.4 |
Move Channels to Another Channel Position ....................... |
53 |
7.2.5 |
Rename Channels ................................................................. |
53 |
7.2.6 |
Delete Individual Channels from Channel List....................... |
54 |
7.2.7 |
Delete All................................................................................ |
54 |
7.3 |
Rename Favorite Lists ........................................................... |
55 |
7.4 |
Timer...................................................................................... |
55 |
7.5 |
OSD Setting........................................................................... |
57 |
7.5.1 |
Hide OSD............................................................................... |
57 |
7.5.2 |
OSD Transparency ................................................................ |
57 |
7.6 |
LNB Supply Voltage .............................................................. |
57 |
7.7 |
Automatic Standby Function................................................. |
57 |
7.8 |
Display Setting....................................................................... |
57 |
7.9 |
Digital Audio Out.................................................................... |
58 |
7.10 |
Simultaneous Playback of Picture and Sound...................... |
58 |
7.11 |
SmartLink (CEC) .................................................................... |
59 |
7.12 |
RAPS System ........................................................................ |
59 |
7.12.1 |
Show the Date of the RAPS File on the Receiver ................. |
59 |
7.12.2 |
Setting RAPS Mode............................................................... |
59 |
7.12.3 |
Enabling Automatic RAPS Updates ...................................... |
60 |
7.13 |
Software Version.................................................................... |
60 |
7.14 |
Factory Settings..................................................................... |
60 |
7.15 |
Update of the Receiver Software .......................................... |
60 |
7.15.1 |
Software Update via Satellite ................................................ |
60 |
7.15.2 |
Update via USB ..................................................................... |
61 |
8 Operation in a Unicable System...................................................... |
63 |
|
8.1 |
About Unicable ...................................................................... |
63 |
8.2 |
Allocation of IF channels and frequencies ............................ |
63 |
8.3 |
Installation.............................................................................. |
64 |
6 |
smart MX Flat HD |
|
|
|
Table of Contents |
|
|
|
|
9 |
Cleaning ............................................................................................. |
66 |
|
10 |
Transport and Decommissioning.................................................... |
66 |
|
11 |
Troubleshooting ................................................................................ |
67 |
|
12 |
Disposal ............................................................................................. |
69 |
|
13 |
Technical Data................................................................................... |
70 |
|
|
13.1 |
General Information................................................................ |
70 |
|
13.2 |
Remote Control...................................................................... |
70 |
|
13.3 |
Mains Adapter........................................................................ |
70 |
|
13.4 |
Connections ........................................................................... |
70 |
|
13.5 |
Temperature........................................................................... |
70 |
|
13.6 |
Dimensions and Weight ......................................................... |
71 |
14 |
Declaration of Conformity................................................................ |
71 |
|
smart MX Flat HD |
7 |
User Information
1 User Information
1.1Use of this Manual
•This manual is intended for the HDTV cable receiver smart MX Flat HD.
•Please carefully read this user manual before operating the device for the first time.
•Please note all warnings and notes included in this user manual.
•Consider this user manual to be an integral part of the product, and store it at a well accessible location.
•This user manual should also be enclosed when handing over the device to a third party.
•In case of loss, the current version of the user manual can be downloaded at the support center on our website www.smart-electronic.de.
•The software is still being further developed even after your purchase of the device. Thus, it may be possible that certain operation steps do not fully correspond to the user manual.
1.2Signs, Symbols, Layout
|
Symbol/layout |
|
Meaning |
|
|
|
|
|
|
|
|
|
WARNING |
|
|
|
|
Danger due to electric shock with possible severe bodi- |
|
|
|
|
ly injury |
|
|
|
|
|
|
|
|
|
|
|
|
|
|
CAUTION |
|
|
|
|
Warning of possible physical damage |
|
|
|
|
|
|
|
|
|
|
|
|
|
|
UsefulNOTE information and hints |
|
|
|
|
|
|
|
|
|
|
|
|
|
|
You are requested to perform an action. |
|
|
|
|
|
|
|
1. |
|
Perform these steps in the stated order. |
|
|
2. |
|
|
|
|
|
|
|
|
|
|
|
|
|
|
|
|
List |
|
|
|
|
|
|
8 |
smart MX Flat HD |

|
|
|
Product Description |
||
|
|
|
|
|
|
|
|
|
|
|
|
|
Symbol/layout |
|
Meaning |
|
|
|
|
|
|
|
|
|
Italics |
|
The various possibilities of settings as well as image |
|
|
|
|
|
captions are stated in Italics. |
|
|
|
|
|
|
|
|
|
|
|
|
||
|
bold |
|
Menu windows and menu items (that often include further |
|
|
|
|
|
hidden menu items or direct settings) as well as the des- |
|
|
|
|
|
ignations of keys are printed in bold letters. |
|
|
2 Product Description
2.1Scope of Delivery
•HDTV satellite receiver smart MX Flat HD.
•Remote control
•2 batteries (AAA) for remote control
•User manual
•External power supply (12 V)
•External infrared receiver (IR eye) for the remote control
•Fastening material
smart MX Flat HD |
9 |
Product Description
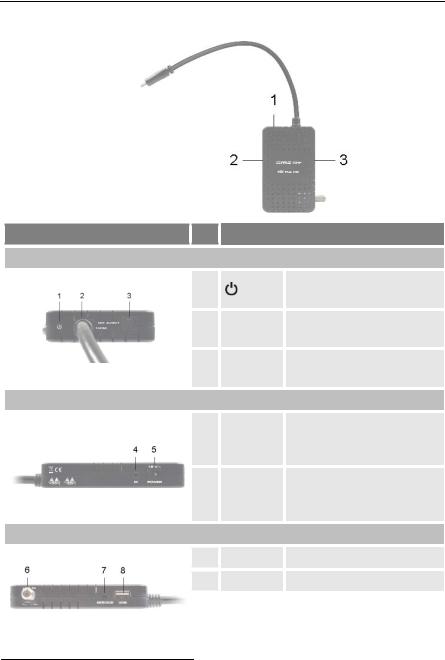
2.2Receiver
Image |
No. Description |
View no. 1
1
2 HDMI0F1
3 OPT.
AUDIO
View no. 2
4 IR
5 POWER
View no. 3
Switch standby / operating mode.
HDMI breakout cable, digital
audio and video output.
Digital optical output (SPDIF).
3.5 mm jack to connect the IR remote eye (see section 4.4, page 16).
Socket for barrel jack to connect the external power supply.
6 |
LNB IN |
F socket to connect the LNB |
7 |
SERVICE |
3.5 mm jack |
8 |
|
USB |
|
Connection for USB storage |
|
|
|||
|
|
device |
||
|
|
|
|
|
|
|
|
|
|
|
|
|
|
|
1 High Definition Multimedia Interface (engl.), Schnittstelle für die volldigitale Übertragung von Audiound Video-Daten.
10 |
smart MX Flat HD |
Product Description
2.3Remote Control
|
No. |
|
|
Key |
|
Description |
|
|
|
|
|
|
|
||||
|
|
|
|
|
|
|
|
|
|
1 |
|
|
|
|
Switch between operational and standby mode |
|
|
|
|
|
|
|
|
|
||
|
2 |
|
|
1 - 9 |
|
Direct channel selection |
|
|
|
|
|
|
|
|
|
|
|
|
3 |
|
|
FIND |
|
Call of channel search function |
|
|
|
|
|
|
|
|
|
|
|
|
4 |
|
|
MENU |
|
Call main menu |
|
|
|
|
|
|
|
|
|
|
|
|
|
|
|
PR+ |
|
Channel + or up-navigation in menu |
|
|
|
|
|
|
|
|
|
|
|
|
|
|
|
PR- |
|
Channel - or down-navigation in menu |
|
|
|
5 |
|
|
|
|
|
|
|
|
|
|
|
|
Volume + |
or menu navigation to the right |
|
|
|
|
|
|
|
|
|
|
|
|
|
|
|
|
|
Volume - |
or menu navigation to the left |
|
|
|
|
|
|
|
|
|
|
|
|
|
|
OK/LIST |
|
Display channel list / confirm menu item |
|
|
smart MX Flat HD |
11 |

Product Description
|
No. |
|
Key |
|
Description |
|
|
|
|
|
|||
|
|
|
|
|
|
|
|
6 |
|
INFO |
|
Display information on current channel |
|
|
|
|
|
|
|
|
|
7 |
|
TXT |
|
Display / hide teletext |
|
|
|
|
|
|
|
|
|
8 |
|
|
|
Red function key |
|
|
|
|
|
|
|
|
|
9 |
|
PR |
|
Switch of previously selected channels |
|
|
|
|
|
|
|
|
|
10 |
|
|
|
Yellow function key |
|
|
|
|
|
|
|
|
|
11 |
|
AUDIO |
|
Selection of audio format |
|
|
|
|
|
|
|
|
|
12 |
|
TV/RADIO |
|
Switch between TV and radio mode |
|
|
|
|
|
|
|
|
|
13 |
|
|
|
Not used |
|
|
|
|
|
|
|
|
|
14 |
|
|
|
Play (media player) |
|
|
|
|
|
|
|
|
|
15 |
|
|
|
Fast rewinding |
|
|
|
|
|
|
|
|
|
16 |
|
|
|
Fast forwarding |
|
|
|
|
|
|
|
|
|
17 |
|
|
|
Mute |
|
|
|
|
|
|
|
|
|
18 |
|
0 |
|
Select playback format of media player |
|
|
|
|
|
|
|
|
|
19 |
|
FAV |
|
Call list of favorites |
|
|
|
|
|
|
|
|
|
20 |
|
EPG |
|
Call of EPG (Electronic Program Guide) |
|
|
|
|
|
|
|
|
|
21 |
|
EXIT |
|
Exit menu or menu item |
|
|
|
|
|
|
|
|
|
22 |
|
|
|
Green function key |
|
|
|
|
|
|
|
|
|
23 |
|
|
|
Blue function key |
|
|
|
|
|
|
|
|
|
24 |
|
V-MODE |
|
Switch aspect mode |
|
|
|
|
|
|
|
|
|
25 |
|
PAGE+ |
|
10 entries up in menu / channel list |
|
|
|
|
|
|
|
|
|
26 |
|
PAGE- |
|
10 entries down in menu / channel list |
|
|
|
|
|
|
|
|
|
27 |
|
|
|
Stop playback |
|
|
|
|
|
|
|
|
|
28 |
|
|
|
Pause playback |
|
|
|
|
|
|
|
|
|
29 |
|
|
|
Slow forwarding – slow motion |
|
|
|
|
|
|
|
|
|
30 |
|
|
|
Slow rewinding |
|
12 |
smart MX Flat HD |

General Safety Instructions
2.4Save Energy
The receiver smart MX Flat HD is equipped with particularly energy-saving electric and electronic components. Furthermore, a sophisticated energy management helps to save energy:
Thus, energy consumption during Save Energy Standby Mode is reduced to less than 0.5 Watt!
2.5Guarantee
The warranty of the HDTV satellite receiver smart MX Flat HD of smart electronic GmbH corresponds to the legal regulations at the time of purchase.
3 General Safety Instructions
3.1Intended Use
The HDTV satellite receiver smart MX Flat HD is intended for private receiving of digital satellite television (DVB-S). It is exclusively intended for such purpose and must be used exclusively for such purpose.
Any other use is deemed to be unintended use.
3.2Risks in Case of Intended Use
Humidity, wrong mains voltage and/or wrong mains frequency, lightning stroke or mechanical overload may cause malfunction of or damage to the device.
Ensure that the receiver (in particular the mains plug) and the remote control are not exposed to any humidity. Example: Do not place filled flower vases or similar onto the receiver.
CAUTION! Only connect the receiver to 175…250 V ~, 50/60 Hz.
Disconnect mains plug in case of thunderstorms or malfunction.
Do not place heavy items onto the receiver.
Do not bend or squeeze the cable.
smart MX Flat HD |
13 |

General Safety Instructions
Risk of electric shock when contacting mains voltage.
Damage to housing, mains cable or improper repair may result in contact to mains voltage.
Do not place heavy items onto the receiver. WARNING! Do not bend or squeeze the cable.
Repairs of plug, cable or receiver should only be performed by qualified specialists.
3.3Location
Place the receiver onto a solid and level surface.
Protect the receiver from humidity, heat, dust and dirt.
Do not place items filled with liquid, e.g. flower vases, onto the receiver.
Protect the receiver from dripping and splash water.
Do not place burning items, e.g. burning candles, onto the receiver.
Ensure sufficient ventilation (ventilation slots must not be blocked): the receiver should have a distance of at least five centimeters to its surrounding elements on all sides.
Ensure that the ventilation openings are not covered by objects such as newspapers, table cloths, curtains etc.
Only operate the receiver in moderate climate (not in tropical climate).
Place the receiver so that the mains plug can be disconnected at any time, correspondingly disconnecting the device from the mains.
If the device is transported from cold to hot environment, then condensing humidity may build up in the de-
vice.
Do not connect the device, but leave it switched-off for some hours.
14 |
smart MX Flat HD |

Installation of smart MX Flat HD
3.4Grounding
The satellite antenna must be grounded properly. Note the relevant VDE1F2 regulations2F3.
smart recommends that the outdoor unit of the satellite system should be installed by a professional!
3.5Handling of Batteries
•Batteries should always be out of children's reach.
•Leaking batteries cause damage to the environment and the remote control.
•Batteries should not be exposed to extreme heat, e.g. sunlight, fire etc.
Dispose of the batteries in accordance with the applicable legal regulations (see chapter Disposal, page 69).
3.6Notes on Product Liability
In the following cases, the intended protection of the device may be limited. Then, liability regarding function of the device correspondingly passes over to the operator:
•The device is not used in accordance with the user manual.
•The device is used out of the field of application as described above.
•The operator performs unauthorized changes of the device.
4 Installation of smart MX Flat HD
First connect the receiver to the satellite antenna and any other devices before connecting the mains plug to the power outlet.
Please also note the user manuals of the other devic-
CAUTION! es.
2VDE = Verband der Elektrotechnik, Elektronik, Informationstechnik (German) = Association for Electrical, Electronic & Information Technologies
3DIN EN 60728-11 VDE 0855-1:2011-06: Cable networks for television signals, sound signals and interactive services, Part 11: Safety
smart MX Flat HD |
15 |
Installation of smart MX Flat HD
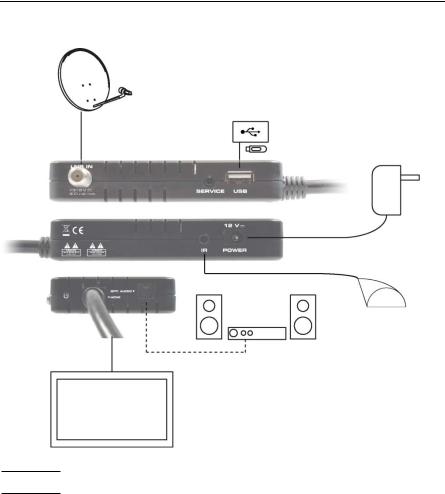
4.1Connection Scheme
default connection optional connection
4.2Connect Satellite Antenna
Connect the antenna cable to the receiver connection LNB IN.
4.3Connect TV Set
As shown in the connection scheme, connect the HDMI breakout cable of the smart MX Flat HD to your TV set.
4.4Connect IR Eye
Um den Receiver mit der Fernbedienung bedienen zu können, müssen Sie an der IR-Buchse das so genannte IR-Auge (im Lieferumfang enthalten)
16 |
smart MX Flat HD |
Installation of smart MX Flat HD
anschließen. Dies muss so positioniert werden, dass es die Signale der Fernbedienung empfangen kann.
Die Benutzung des IR-Auges ist zwingend notwendig.
Ohne korrekt angeschlossenes IR-Auge ist der Betrieb des MX Flat HD nicht möglich.
4.5Connect Home Cinema System (Optional)
To improve audio playback, you can connect to the smart MX Flat HD - additionally to the TV set - also a multichannel home cinema system or a hi-fi system. There are various possibilities for connection. Your type of connection depends on the connection possibilities of your home cinema system.
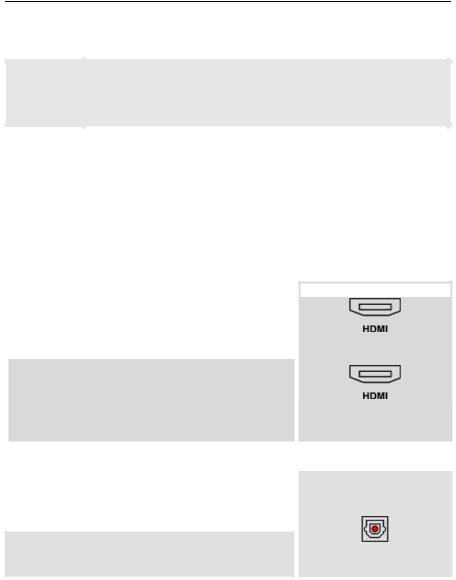
a.
|
Your home cinema system is able to loop |
|
|
Receiver |
|
through an HDMI signal, i.e. HDMI connec- |
|
|
|
|
tion for receiver and HDMI connection for |
|
|
|
|
TV set. |
|
|
TV set |
|
|
|
|
|
|
|
|
Connect the home cinema system and the receiver by using an HDMI cable as well as home cinema system and TV set by using an HDMI cable.
b.
|
Your home cinema system can process |
|
|
|
digital audio data – connection for digital |
|
OPT. AUDIO |
|
data is pre-sent. |
|
|
|
|
|
|
|
|
|
|
Connect your home theater system and your receiver with an optical cable.
4.6Connect Data Storage (Optional)
Connect a data storage (USB stick or hard drive with USB connection) at the USB connector to be able to access MPEG, MP3, JPG or other media data files.
smart MX Flat HD |
17 |

Basic Operation
4.7Connect External Power Supply
Connect the cable of the power plug with the 12 V receiver socket.
4.8Insert Batteries of Remote Control
This describes the steps for inserting new batteries of the remote control or for replacing empty batteries:
1.Open the battery compartment on the bottom side of the remote control. Remove the cover of the battery compartment.
2.Place the two batteries 1.5 V (type: AAA). Ensure correct polarity!
3.Close the battery compartment
Replace the batteries if certain remote control functions are not performed any more or are performed
incorrectly.
When replacing batteries, always ensure that all batteries are replaced.
5 Basic Operation
This chapter describes the required steps to be able to use the offer of radio and TV channels provided via satellite.
5.1 Switch on Receiver
1. Switch on all connected devices.
2. Ensure that the correct AV input is selected at the TV set (i.e. that the signals from the receiver are displayed).
3. Ensure that the correct audio input is selected at the connected home cinema or hi-fi system.
4. Connect the mains plug to the power outlet, to switch on the receiver.
5.2 Installation
After first switching-on or after resetting the receivers, various windows will open:
18 |
smart MX Flat HD |
Basic Operation
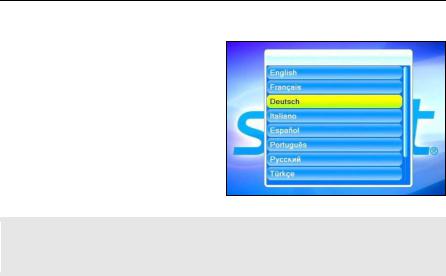
5.2.1Language
By default, the smart MX Flat HD language is preset to Deutsch [German].
Please ensure that the setting is correct; you may change your settings by correspondingly pressing the keys PR+ and PR-.
Confirm by pressing OK to go to the next window.
The submenu Language can be accessed anytime via the menu Language.
5.2.2RAPS Start
Your receiver is equipped with RAPS. RAPS means Receiver Automatic Programming System. RAPS can automatically update the channel lists of your receiver.
What is RAPS?
Currently, the satellites Astra 19.2° and 23.5°, Eutelsat Hot Bird 13° East, Eurobird 9° and Turksat 42° offer a four-digit number of digital TV and radio channels.
At delivery, state-of-the-art satellite receivers have all important channels already stored. But what happens after that? New and interesting channels are added almost weekly, and there are channel changes time and again.
Updating the channel list with a present receiver is not quite easy for most users. When performing a channel search, invalid data are not deleted, and usually the new channels are just added at the end of the list; this requires time-consuming reprogramming of the channel list.
The RAPS system of your MX Flat HD automatically performs such programming work.
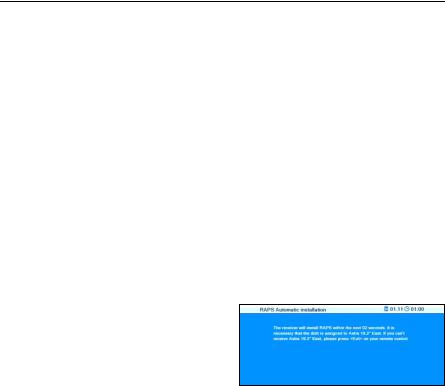
The window RAPS Automatic Installation is the second window of the installation process.
smart MX Flat HD |
19 |
Basic Operation
Every time you switch off your receiver, RAPS checks whether there are any changes with the channel lists (RAPS scan). This only takes a few seconds.
In case of changes, the new data are automatically included into the new channel list (RAPS download) and displayed in a table. If a channel changes the receive parameters, then this is automatically updated by RAPS. In case of new channels, such channels are added. If channels are permanently discontinued, then the corresponding channel number is deleted.
However, new channels are not only added, but allocated to logic blocks, correspondingly enabling easier finding. That is why certain areas may remain free. Example: For Germany, there is the basic list as well as the areas Third Channels, Info+Sports, Special Interest, Local TV, as well as News starting at channel number 100 and many Music Channels starting at channel number 123.
You can cancel RAPS installation by pressing the key EXIT whilst the countdown of RAPS installation is running (and also at a later point in time during installation).
The then displayed channel list is a preprogrammed factory list. However, such list is not updated via satellite due to cancelled RAPS installation!
The respective up-to-date RAPS lists are available via the satellite Astra 19.2°. Correspondingly, RAPS can only be used within the footprint of the satellite Astra 19.2°; furthermore, your system should be suitable for digital Astra receiving.
20 |
smart MX Flat HD |
Basic Operation
5.2.3RAPS Parameters
During installation, the third installation window Automatic Programming displays various parameters:
|
|
|
|
|
|
|
No. |
|
Meaning |
|
|
|
|
|
|
|
|
|
|
|
|
|
|
|
1 |
|
Date of the RAPS file stored in the receiver |
|
|
|
|
|
|
|
|
|
|
|
|
|
|
|
2 |
|
Date of the RAPS file currently available on the satellite |
|
|
|
|
|
|
|
|
|
|
|
|
|
|
|
3 |
|
Number of available RAPS lists |
|
|
|
|
|
|
|
|
|
4 |
|
Number of satellites included in the RAPS file: |
|
|
|
|
|
4 |
|
|
|
|
|
Astra 19.2° East3F |
|
|
|
|
|
Hotbird 13° East |
|
|
|
|
|
Turksat 42° East |
|
|
|
|
|
Astra 23.5° East |
|
|
|
|
|
Eurobird 9A 9° East |
|
|
|
|
|
|
|
|
|
|
|
|
|
|
|
5 |
|
Number of transponders included in the RAPS file |
|
|
|
|
|
|
|
|
|
6 |
|
Number of all channels in the RAPS lists |
|
|
|
|
|
|
|
|
|
7 |
|
Progress bar: informs on progress of download of the RAPS file |
|
|
|
|
|
|
|
|
4 East, often abbreviated "E"
smart MX Flat HD |
21 |
Basic Operation
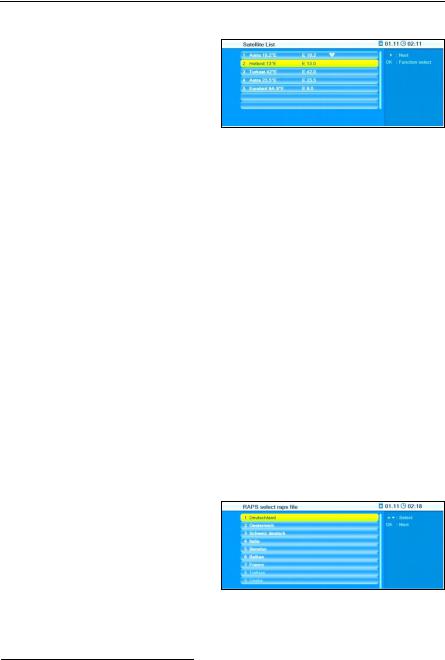
5.2.4Satellite List
After completion of RAPS download and completed satellite scan (RAPS DiSEqC4F5 scan), the window Satellite List will be opened.
The window displays the satellites included in the RAPS file. As the RAPS lists are available via the satellite Astra 19.2°, Astra 19.2° is already
marked  (and cannot be deselected!).
Select a satellite by pressing the keys PR+ and PR-.
Press OK to select a non-marked satellite.
Press OK to deselect a marked satellite.
Press  to go to the next window RAPS select raps file. Examples:
•Your antenna system is designed for receiving Astra 19.2°E and Hotbird 13°E. These satellites are found and marked in the list. You are planning to soon extend your antenna system for receiving of Eurobird 9A 9°E. You can additionally mark Eurobird 9A 9°E already now to avoid repeated installation in the future.
•Your antenna system is designed for receiving Astra 19.2°E and Türksat 42°E. However, the receiver in the children's room should only receive the German channels. For this, manually deselect Türksat 42°E (found by RAPS-DiSEqC scan).
5.2.5Country
Select the country in which you want to use the receiver - and correspondingly also the RAPS list - by pressing the keys PR+ and PR. The selectable countries are based on your satellite selection as per section 5.2.4.
5 DiSEqC = Digital Satellite Equipment Control, a digital control signal technology with satellite receiving systems
22 |
smart MX Flat HD |
Loading...