

Preface
V
Digital Satellite Receiver
MX 92
User Manual
ersion 21.01.2010
Smart MX 92 DE 1

Preface
Preface
Dear Customer,
Thank you for purchasing this digital satellite receiver Smart MX 92.
Before operating this receiver, please read the manual of the Smart MX 92
carefully.
This manual helps you with the
• designated,
• safe and
• advantageous
use of the digital satellite receiver Smart MX 92.
Everyone who
• installs,
• connects,
• operates,
• cleans or
• disposes of this receiver
must have familiarised himself with the complete contents of this manual.
Please keep this manual always at hand near the receiver.
We hope you enjoy using your Smart MX 92.
Your smart electronic GmbH
2 DE Smart MX 92

Preface
Contents
Preface ............................................................................................................. 2
Contents........................................................................................................... 3
Safety Instructions.......................................................................................... 4
Designated Use ............................................................................................... 5
Scope of Delivery ............................................................................................ 5
SAVE ENERGY ................................................................................................ 5
Connection with an unicable system............................................................ 6
Overview of the Units ..................................................................................... 8
Connection..................................................................................................... 12
Start-up of the Receiver................................................................................ 14
Navigieren im Menü ...................................................................................... 17
Manager.......................................................................................................... 19
Guide .............................................................................................................. 20
Timer............................................................................................................... 20
Install .............................................................................................................. 20
USB................................................................................................................. 23
CI..................................................................................................................... 26
Operation ....................................................................................................... 27
Update ............................................................................................................ 30
Cleaning ......................................................................................................... 31
Shutdown and Storage of the Receiver...................................................... 31
Troubleshooting............................................................................................ 32
Disposal ......................................................................................................... 33
Specifications................................................................................................ 34
Warranty......................................................................................................... 35
Manufacturer.................................................................................................. 36
Declaration of Conformity ............................................................................ 36
Smart MX 92 DE 3
Safety Instructions
Safety Instructions
Caution!
Before operating the receiver, please read the safety
instructions carefully.
Please observe all warning and notes on the unit and in this
manual.
Moisture
• Make sure that receiver and mains plug do not come into contact with any
moisture whatsoever.
Electric Hazards
• Connect the receiver to 175 - 250 V ~, 50/60 Hz only.
• During an electric storm or operational faults, pull the plug.
Mechanical Hazards
• Do not bend or squeeze the cable.
• Repairs on plug, cable or receiver may only be performed by qualified
skilled personnel..
• Do not place any heavy objects on the receiver.
Correct installation site
• Place the receiver on a solid flat surface.
• Protect receiver from moisture, heat, dust, dirt, etc.
• Ensure sufficient ventilation (do not cover the ventilation slots)
Proper handling of batteries
• Batteries must be kept away from children.
• Leaking batteries may cause damage to the environment and the remote
control.
Ö Batteries must be disposed of in accordance with current legal regulations
(see chapter Disposal, page°33).
4 DE Smart MX 92
Designated Use
Designated Use
The digital satellite receiver Smart MX 92 is intended for the reception of freeto-air and encrypted digital satellite programs in the private sector. It is
designed exclusively for this purpose and may be used only for such purpose.
Any other purposes are not considered the designated use.
We will not be held liable for damage caused by such use contrary to the
designated use.
Scope of Delivery
• Satellite Receiver Smart MX 92,
• Remote control,
• 2 batteries (AAA) for the remote control,
• one owner's manual.
If you have any questions:
Ö please contact the manufacturer (see chapter Manufacturer, page°36)
SAVE ENERGY
The receiver Smart MX 92 is equipped with special energy-saving electric and
electronic components. Moreover, a well thought-out energy management will
help you save energy.
the SAVE-ENERGY Standby mode will lower the power consumption to
considerably less than 1 Watt!
Smart MX 92 DE 5

Connection with an unicable system
Connection with an unicable system
The unicacable system is only funcionable if the structure of
receiving or according to their components are prepared, i. e.
if an unicable system exists.
The digital satellite receiver MX 92 makes sure, that instead of the different
LNB frequencies the receipt mode can be moved to the unicable standard. It’s
possible to connect up to eight receivers independent of each other.
Each receiver has to be assigned to one specific ZF channel and a matching
frequency in the setting menu. The allocation of canals and frequency is
depending on LNC or multi switch manufacturer.
The data sheet and the technical documentation of your LNC and/or multi
switch contains an allocation table similarly of the following.
Adjusting of the ZF canals and frequency
Receiver ZF-
channel
Receiver 1 1 1284
Receiver 2 2 1400
Receiver 3 3 1516
Receiver 4 4 1632
Receiver 5 5 1748
Receiver 6 6 1864
Receiver 7 7 1980
Receiver 8 8 2096
example-frequency
[MHz]
frequency [MHz]
Write down the frequency of your receiver in the last fissure of
this table, so you have all relevant information in this document
6 DE Smart MX 92
Connection with an unicable system
Adjusting of the ZF canals and frequency
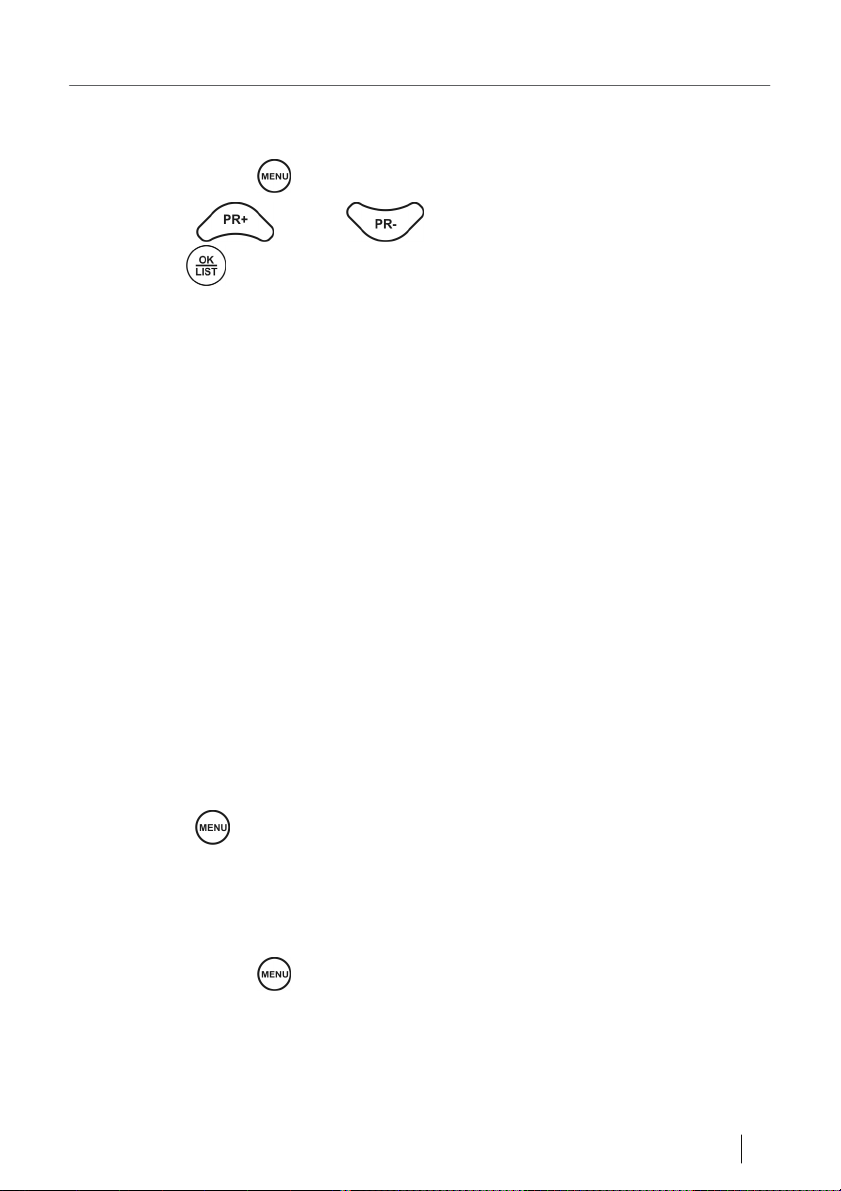
Ö Switch on the receiver.
Ö Press the button
Ö Press the
with the
button.
on the remote control
and the button, select "installation" and confirm
Ö Enter the password (in the state of delivery 0000 is pre-installed).
The installation menu is indicated.
Ö Select the Menu point "antenna setup".
Ö Select the menu point "LNB frequency" after this, select "unicable (9750-
10600)".
Ö Select the menu point "IF Channel" enter a ZF channel.
Ö (Begin with channel "1"; one of the ZF channels in climbing up order
assign to the connected receivers).
Ö Choose "Center Freq" and set up the frequency (see the allocation table)
Ö The bargraph “signal strength” and “signal quality” will display
immediately, when the correct frequency is chosen.
Ö Press the
button
Ö The adjustments are saved.
You are back in the „Installation menu“
Ö Press the button
twice.
The receiver is into the normal mode and ready to receipt.
Smart MX 92 DE 7
Overview of the Units
Overview of the Units
Receiver
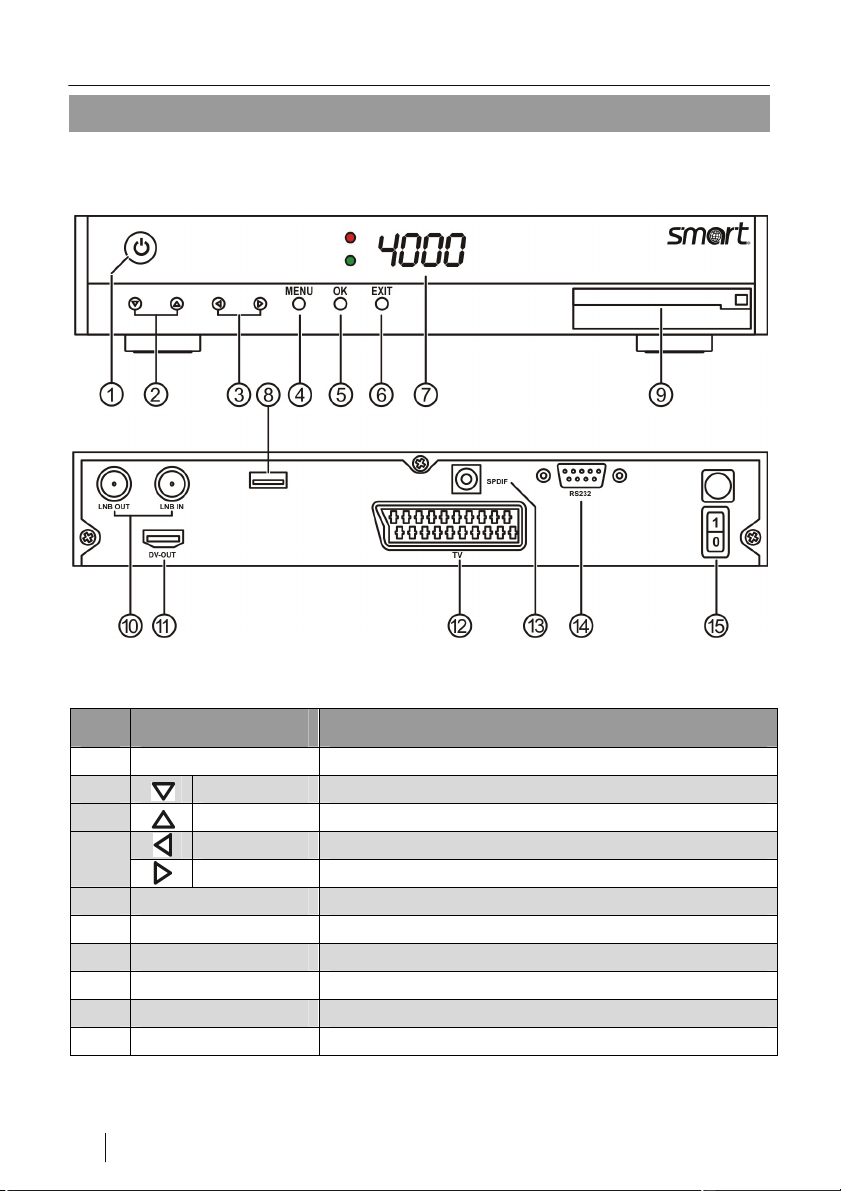
Figure 1: Operating elements and connections (Front: flap open)
No. Designation Function
1 STANDBY Standby/Normal mode selector switch
2
4 MENU To display menu or exit menu
5 OK To show channel list / To confirm menu item
6 EXIT To exit menu or menu item
7 Display and LEDs red = Standby; green = Normal mode
8 USB USB connection
9 CI Common Interface slot
8 DE Smart MX 92
CH- Channel Down / in the menu down
CH+ Channel Up / in the menu up
VOL- To reduce the volume / in the menu to the left 3
VOL+ To increase the volume / in the menu to the right
Overview of the Units
No. Explanation
not used Æ no function 10
LNB IN – Antenna connection
11 DV-OUT HDTV connection
12 Scart connection of TV set
13 Optic Digital Audio Output SPDIF
14 RS-232 connection (for updates)
15 Mains switch
Remote control
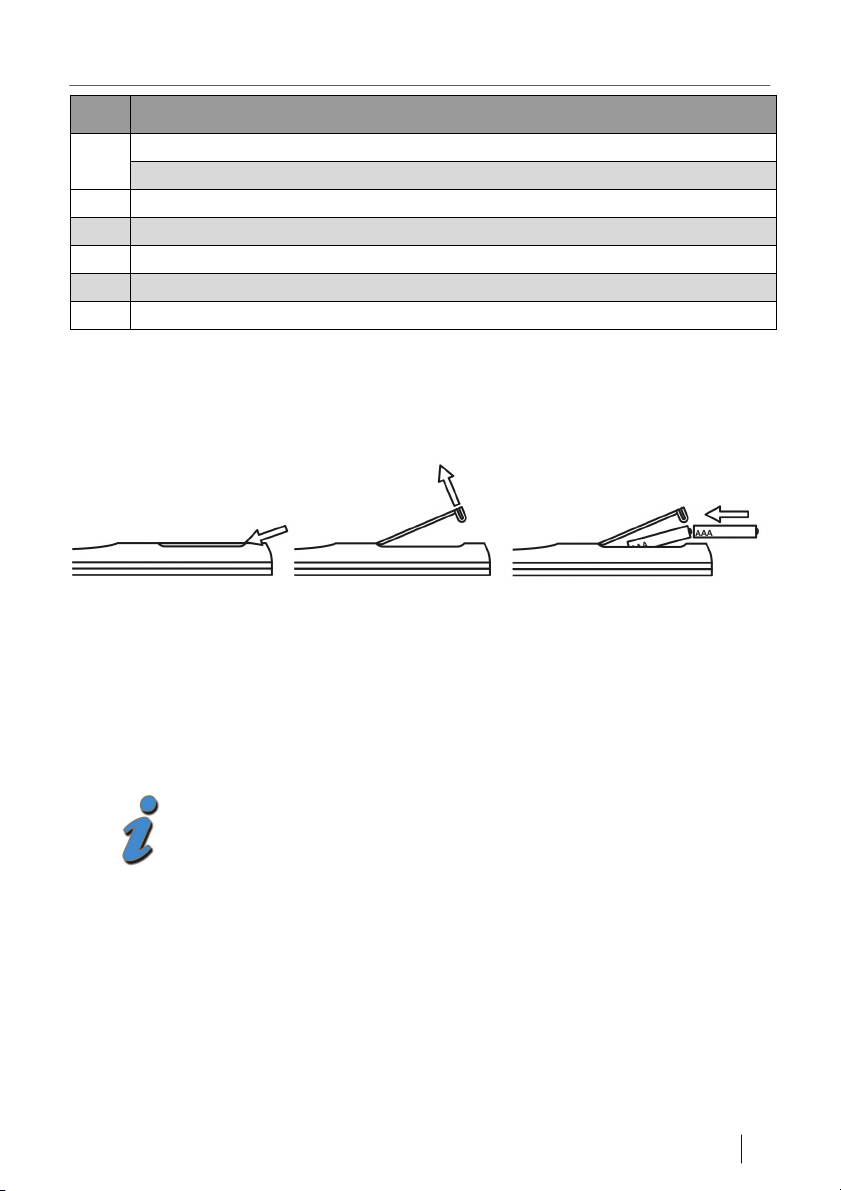
Inserting batteries
Figure 2: Inserting the batteries into the remote control
Replacing the batteries
Ö Replace batteries when the range of the remote control is decreasing or
when the receiver no longer reacts to all commands.
• Required batteries 2 size AAA
• When not used for prolonged periods of time, batteries may
leak. Remove batteries from the remote control if it is not
Smart MX 92 DE 9
used for long periods of time (> 1.5 years).
• When replacing batteries, always replace all batteries.
Overview of the Units
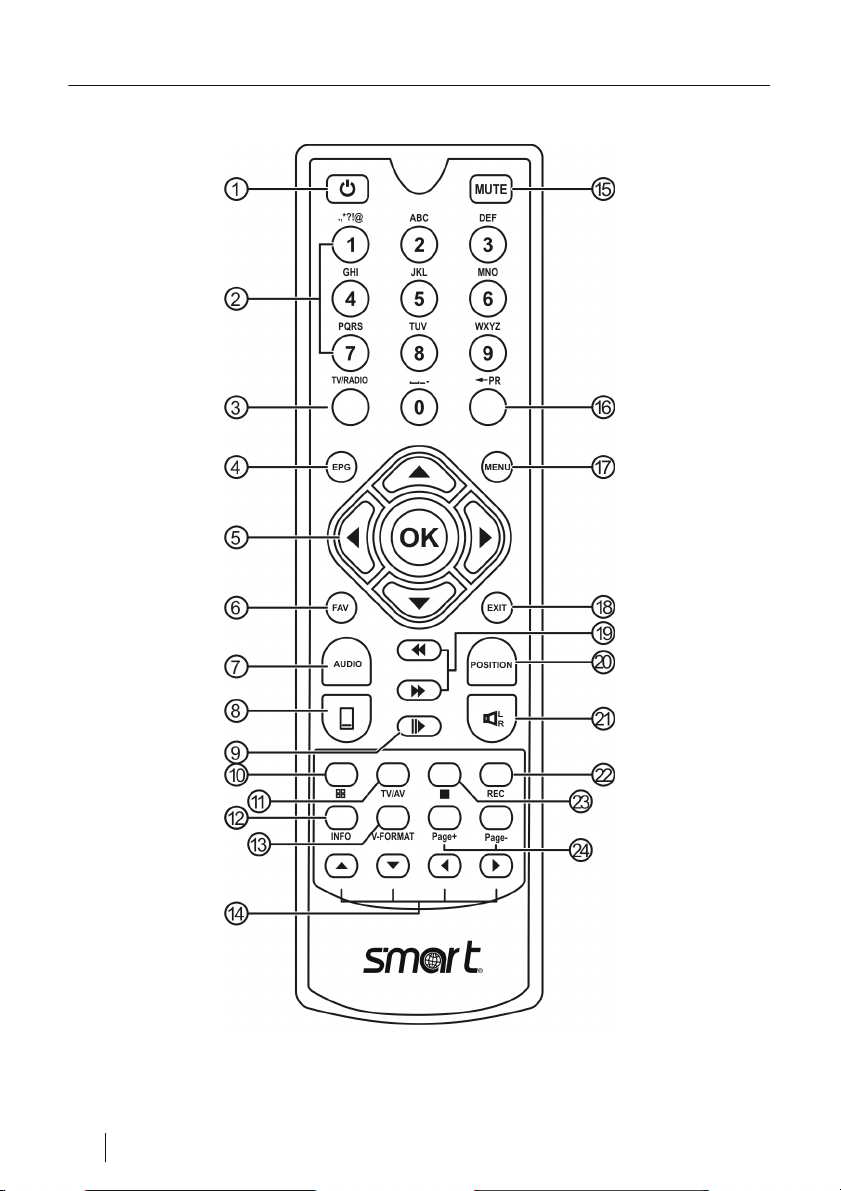
Keys of the remote control handset
Figure 3: Remote control
10 DE Smart MX 92
Overview of the Units
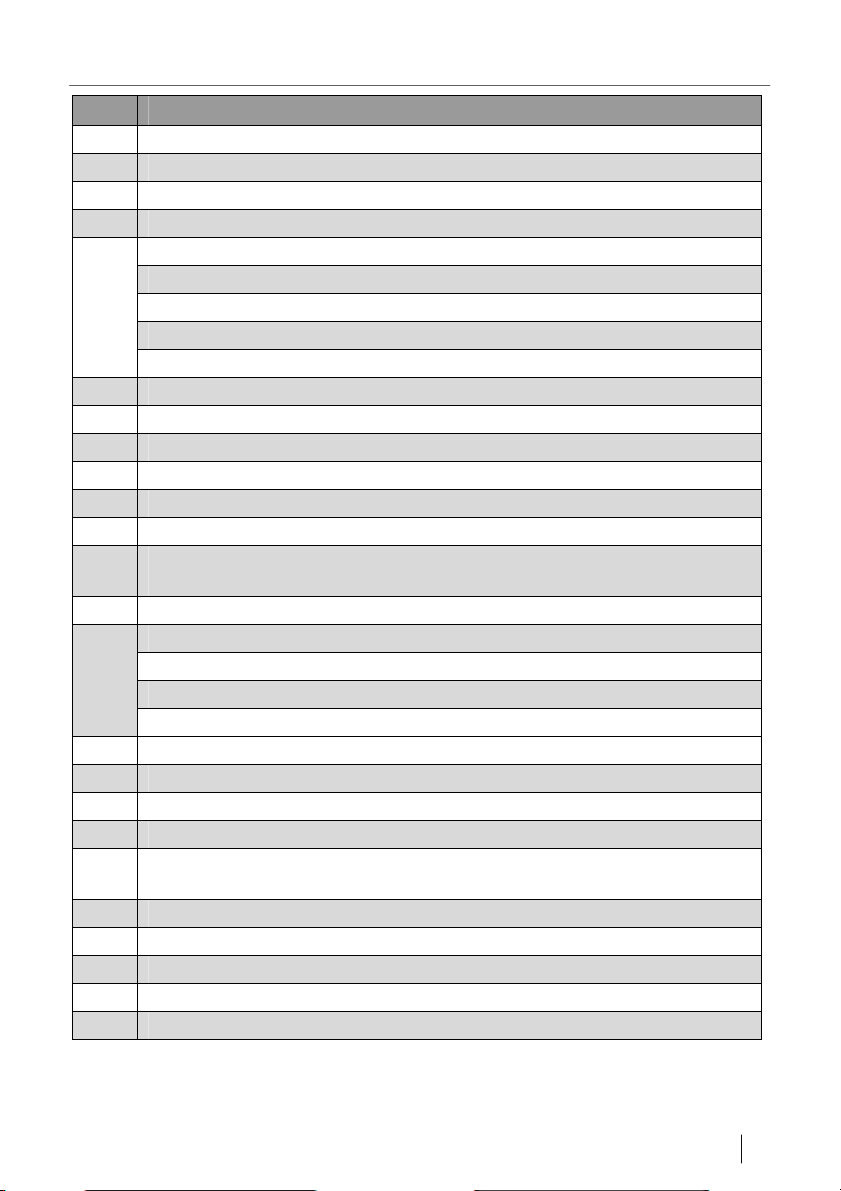
No. Description
1 To switch between operating and standby modes.
2 Direct channel selection or input of alphanumeric characters
3 To switch between TV and radio modes.
4 To start Electronic Programme Guide
Channel + / Navigation in menu
5
Channel - / Navigation in menu
Volume - / Navigation in menu
Volume + / Navigation in menu
OK - To show channel list or confirm menu item
6 To load favourite channel list
7 To switch language / audio channel
8 To start video text / subtitles
9 Timeshift key - To stop or continue TV programme
10 Mosaic function in USB -> Pictures menu
11 To load PVR film archive menu
12
To show information on current programme / Single Channel EPG /
Show scheduled recordings
13 To switch video format
Channel +
14
Channel -
Volume –
Volume +
15 To switch to mute / Load Stream Information (2X)
16 To switch to previously selected channel
17 Main menu
18 To exit menu or menu item
19
To scroll upward/downward through channel list page-by-page /
Fast forward or backward in time shift mode
20 Loading type-based channel list / if available Sky radio button
21 To change Audio mode
22 To start recording
23 To stop recording, time shift or replay
24 To scroll upward/downward through channel list page-by-page
Smart MX 92 DE 11

Connection
Connection
Make sure to connect the receiver first to the antenna and all
other units, before plugging the mains plug into the socket.
Caution!
Figure 4: Connection diagram
12 DE Smart MX 92

Connection
1. Connecting the cable of the satellite installation
Ö Connect cable of the satellite installation to LNB IN.
2. Connecting the TV set
Is there an HDTV socket at the TV
set?
Ö Connect the TV set to the
receiver with an HDTV cable.
If there is no HDTV socket at the
TV set:
Ö Connect the TV set to the
receiver with a Scart cable
(shown in dashed lines on the
connection diagram)..
3 Connecting the home cinema system
If your home cinema system can process digital audio data SPDIF:
Ö Connect the home cinema system to the receiver with a suitable optic
SPDIF cable.
4. Connecting the power supply
Once all units have been properly connected to the receiver:
Ö Plug mains plug into socket.
Smart MX 92 DE 13

Start-up of the Receiver
Start-up of the Receiver
Switching on
Ö Switch on all connected units.
Ö Switch on the receiver on the mains switch at the rear panel.
The receiver starts autotacially.
First start-up
During the first start-up or after a factory reset, the following menus appear
automatically.
1. Language
Here you can select the menu language of the OSD (On Screen Display).
2. Receiver Automatic Programming System (RAPS)
Select here whether you want to use RAPS
If you want to use RAPS (recommended), wait for the 10-second countdown,
after which the RAPS installation will start automatically.
If you do not want to use RAPS (e.g. because you cannot the Astra 19.2° E
satellite), abort the countdown by pressing the EXIT key.
How does RAPS work?
Whenever you switch on your receiver, RAPS will check whether
there are any new channels on the Astra 19.2° E satellite. This will
only take a few seconds. If it finds new channels, they will be added
automatically to the channel list. If channels are switched off permanently,
these channel numbers will be deleted.
However, the new channels are not simply added, but arranged in logical
blocks, to allow them to be found more quickly. Thus, for example, for
Germany the main channel list is followed from channel location 100 by news
channels and from channel location 123 by many music channels.
The different lists can be viewed and also printed out, if desired, by going to
the Internet page www.raps.receiver-settings.de
14 DE Smart MX 92
.

Start-up of the Receiver
2.1. Selecting satellites / Installation aid
Ö Select which satellites you want to receive with your satellite system.
If your antenna has not yet been set or set inaccurately
If the antenna has been set inaccurately or not at all
to Astra 19.2° E, MX92 will automatically start an
installation wizard.
To this end, a bar is shown on your TV screen that indicates the
signal strength.
Adjust your antenna until the signal bar first turns dark green and
then yellow.
As soon as you are receiving Astra 19.2° E, the download of the RAPS
channel tables will start automatically.
(If you have adjusted the antenna with the help of the installation wizard, you
will have to press the OK key once again.)
2.2. RAPS list and regional channels
Depending on the Länder setting, RAPS will save the correct channel list and
your regular regional station on the 3rd channel location.
2.3 Erotic contents/Call TV
Ö Select whether or not you want to receive erotic channels and/or Call TV
programmes.
2.4. Subscription packages
Ö Here you can select which Pay TV offers you have subscribed to and want
to see.
Press the OK key, to confirm all settings and save the configuration.
This completes the configuration of you
receiver.
Smart MX 92 DE 15

Start-up of the Receiver
Channel table updates
You will now receive channel table updates automatically via satellite.
Upon being switched on, the receiver will detect when a new update is
available and immediately start downloading the update.
Once the download is complete, all changes will be shown in a list.
You can navigate in this list pressing the P+ and P- keys. To save the
changes, press the OK key.
16 DE Smart MX 92

Navigieren im Menü
Navigieren im Menü
A menu or OSD is an operator panel displayed on screen
(OnScreenDisplay)
Settings can be made both on the receiver keys (Fig. 5, left)
and on the remote control (Fig. 5, right).
Figure 5: Menu Navigation
Loading/Exiting menu
Ö Press MENU key.
The menu is displayed.
Ö Press EXIT key.
One level back in the menu
To return to Normal mode, you may have to press the key several times.
Navigation in the menu
Ö Press in the menu, to go one menu item up.
Ö Press
Ö Press
Ö Press
Ö Press
Menu items that are active are highlighted in colour.
Smart MX 92 DE 17
in the menu, to go one menu item down.
in the menu, to increase selected value.
in the menu, to decrease selected value.
in the menu, to select a menu item or to confirm a set value.

Navigieren im Menü
Menu Structure
Figure 6: Menu Structure
18 DE Smart MX 92

Manager
Manager
TV Channel / Radio Channel
Here the current channel list can be edited or deleted.
To delete all TV and radio channels, select "Delete all".
Confirm by pressing OK and acknowledge again in the next menu item by
pressing OK.
The following editing options are available:
Delete Delete channel.
Ö Mark channel
Ö Press red key
Ö Confirm Delete by password
Favourites To add a channel to a favourite channel group
Ö Mark channel
Ö Press green key
Ö Assigning a channel to a favourite channel group
Ö Press OK to confirm
Move Moves a channel to a different channel number.
Ö Press yellow key.
Ö Mark channel
Ö Moves channel to the desired channel number.
Ö Press OK to confirm
Lock Protects a channel by a password
Ö Press blue key
Ö Mark channel
Ö Press OK to confirm and enter password
Menu Rename favourites
Rename channels
Sort
Smart MX 92 DE 19

Guide
Guide
Electronic Programme Guide
The Electronic Programme Guide offers you the same information as your
printed TV channel guide (sequence of future programmes, more detailed
infos).
EPG allows you to add programmes directly to the recording
list.
No more complicated programming necessary
Timer
Time Adjust
In this menu, you can set time and date manually.
Time Reservation
Timer events are times programmed by you, at which your TV
set will jump to a preset channel.
Date, time and mode are entered on the
your remote control.
and keys of
Install
Antenna Setup
In the Antenna Setup menu, you can make extensive settings with regard to
the received satellites, transponders, frequencies, motorised control,
polarisation, etc.
Caution!
If you're in doubt, have an expert make the settings in this
menu.
For normal use, it is usually not required to make any settings
here.
20 DE Smart MX 92

Install
Channel Search
Once you have activated RAPS, it is usually not necessary to
make any settings in these menus.
In this menu, you can search individual satellites for receivable channels.
When doing so, you can adjust many settings.
Caution!
If you're in doubt, have an expert make the settings in this
menu.
RAPS
Depending on the Länder setting, RAPS will save the correct
channel list and your regular regional station on the 3rd
channel.
For more information, please go to www.raps.tv
In this menu, you can update your RAPS list and configure your RAPS
settings.
Update by OTA
In this menu, you can update your receiver software via satellite.
System Setting
User language
Here you can select the language of the OSD.
Audio Language
Here you can select the language of the audio channel
Some stations broadcast in different languages. When the
language that you have set is broadcast, your TV set will
broadcast automatically in this language.
Smart MX 92 DE 21

Install
LNC Voltage
Here you can select whether the reception head (LNB) is to be supplied with
power.
Caution!
If you're in doubt, have an expert make the settings in this
menu.
Video Format
Here you can select the video format.
Aspect Ratio
Here you can select in which length-to-width ratio the TV picture is to be
transmitted to the TV set.
Transparency
Here you can select the transparency of the OSD.
Info Box Display
Here you can select for how long the info box (info window when switching
channels) is to be displayed.
HD Format
Here you can select the HD format of your TV set.
Video Output
Here you can select the video output.
HDMI Audio Output
Here you can choose between „PCM“ and Dolby Digital“.
Choose “PCM”, when receiver is connected to the TV via HDMI.
Choose “Dolby Digital”, when the HDMI-Signal loops through a Dolby Digital
amplifier with HDMI in- and outputs.
Start Channel
Here you can select which channel you want the receiver to switch to upon
being switched on.
22 DE Smart MX 92

USB
Parental Lock (Password)
As-delivered the password is set to 0000.
In this menu, you can select whether you want the "Installation" menu to be
protected by a password.
In this menu, you can also activate/deactivate the password protection or
assign a new password.
Factory Default
In this menu, all receiver settings can be reset to the factory default.
Attention: This will delete all changes made by you.
USB
PVR
Film Archive
In this menu, a list containing all films saved to the USB data carrier is
opened.
The Info menu lists all recorded films and the remaining recording time.
Recording List
In this menu, the EPG is opened, in order to programme a previously marked
programme.
Manual Recording
In this menu, you can select a specific channel and then set at what time and
at what date a television programme is to be recorded.
Reservered Recording List
This menu contains a list of the pre-programmed recording events.
Smart MX 92 DE 23

USB
PVR Settings
In this menu, you can enter various settings for time shift television:
Use "Time Shift Duration" to set for how long the TV programme can pause
without missing the continuation of the programme.
Use "Storage Time" to set for how long you want stored recordings to remain
stored on the data carrier.
Use "Clean-Up Mode" to set whether you want stored recordings to be
deleted from the data carrier at automated intervals or by hand.
Use "Clean-Up Range" to set at which point (in percent of its capacity) you
want the clean-up of the hard disk to start.
Use "Clean-Up Type" to set which recordings stored on the data carrier you
want to delete preferentially.
Use "Start Recording Earlier / Finish Recording Later" to set how many
minutes you want programmed recording events to start earlier or finish later.
Use "Duration of PVR Symbol Display" to set for how many seconds you
want the recording symbol to be displayed.
Press the red key (audio) to format your USB storage medium.
Picture Browser
The Pictures browser displays all picture files on the connected data carrier.
The following operating options are available:
key Ö Show previous picture
key Ö Show next picture
P+ key Ö Enlarge picture
P- key Ö Reduce picture
Red key Ö Delete picture
Green key Ö Rotate picture clockwise
Yellow key Ö Rotate picture anticlockwise
Blue key Ö Start slide show
OK key Ö Full-screen mode / return from full-screen mode
Multi-Picture Ö Display several pictures simultaneously
24 DE Smart MX 92

USB
MP3 Player
In this menue you can play/show files from the USB data carrier.
The following operations are available:
Red key Ö Open folder
Green key Ö Play
(one after another or random)
Yellow key Ö Play the selcted files
Blue key Ö Select all MP3-files (left window), or.
Ö Remove from the play-list (right window)
While playing MP3 files the familiar operating symbols are
shown at the bottom (Play, Pause, Stopp, …).
Select the adequate operation symbol with the keys V+ and
V- and and confirme with „OK“.
Software
In this menue, the following options are available:
Software update
The receiver searches automatically for a new software version on the USB
data carrier and installs the software version.
Just follow the commands on the screen.
Write Settings
Read Program table including all settings (language, TV-Format, DiSEq, …)
from the USB data carrier and save the data on the receiver.
Read Settings
Write Program table including all settings (language, TV-Format, DiSEq, …)
onto the USB data carrier.
Smart MX 92 DE 25

CI
USB Browser
The USB-menue can only be opened when an USB data
carrier is connected.
In this menue an overview of the files on the USB data carrier is shown.
USB Browser
You can watch the following information / adjust the following settings:
USB Preview
Shows formatting, whole disc space, free disc space on USB data carrier
USB Remove
The USB data carrier is prepared für removing.
USB Format
The USB data carrier will be formated.
WARNING!
Alle information and files will be lost irrevocable.
Receiver Information
This menu displays the version of your loaded software. No settings are
possible here.
CI
This menu shows the status of your smart card currently inserted in the CI
module.
Operating options (Change Password, Change PG Rating, etc.) depend on
each card and the Pay TV station.
26 DE Smart MX 92

Operation
Operation
Time-shifted TV (Time shift)
If you connected a compatible data carrier to your receiver via USB (hard disk,
USB stick), you will be able to stop the currently broadcast programme and
continue it later on at exactly this position.
To pause the TV signal, simply press the
Press the same
key, to continue the TV signal later on.
The time shift recording will start automatically each time you
switch channels, when Timeshift is activated. There is no need
to enter complicated settings.
key.
You can use the
programme, the way you're used to from your DVD player or video player.
To switch to the current (live) TV picture, press the
and keys to go forward or backward in the TV
key once.
Time shift information field
When you go forward or backward in the TV programme or stop it, the time
shift information field is displayed for a few seconds on screen.
Figure 7: Time shift information field
The blue bar shows for how long the programme has already been recorded.
The yellow dot (on the progress bar) shows which position is being shown on
your TV set.
Deactivating time-shifted TV temporarily
Ö Press the key twice, to deactivate the permanent recording of the TV
signal (e.g. to protect the hard disk).
Ö Press the
key, to reactivate the time shift mode.
Recording a TV programme
Ö Press the "RECORD" key.
Smart MX 92 DE 27

Operation
The "RECORD" information field opens.
Ö Confirm the recording by pressing "OK".
If multiple audiotracks are broadcasted, the receiver record
up to three audiotracks.
While play back you can switch the audiotracks by pressing the
red AUDIO-key.
While recording, the video text will be recorded automatically.
While play back you can open the video text by pressing the
yellow TXT-key.
Ö
Recall
Press the key, to return to the previously selected channel.
Electronic Programme Guide
Ö To open the Electronic Programme Guide, press the EPG key.
The Electronic Programme Guide offers you the same information as your
printed TV channel guide (sequence of future programmes, more detailed
infos).
You can add programmes selected in the EPG directly to your
event timer by pressing the red key.
(Electronic Programme Guide = EPG)
Channel List
Ö Press the OK key, to display the channel list.
You can also display the TV channels arranged by different
types (e.g. news) and then select a channel.
28 DE Smart MX 92

Operation
Favourite Channels List
Ö Press the FAV key, to display a list of your favourite channels.
If you did not enter any favourite channels, this key is unassigned.
You can swap channels by pressing the P+/P- -keys or by
pressing the digit-keys.
Video text
Ö To display/exit the video text, press the yellow TXT key.
Ö If the channel is also offering digital subtitles, they can be activated or
deactivated in the menu that is opening.
Audio function
Ö Press the blue AUDIO key, to go to the Audio menu.
Here you can set the type of transmission of the audio signal.
• Stereo: the stereo signal is transmitted unchanged.
• Left: only the left audio channel is transmitted
• Right: only the right audio channel is transmitted
• Mixed: left and right stereo signals are mixed (Mono)
Programme Information
Ö Press the INFO key, to display additional information on the programme.
Ö Press the INFO key again, to display the single channel EPG. On the right
you’ll find more detailed information on the programme.
If a station does not broadcast additional information on the
programme, the text box remains empty.
Smart MX 92 DE 29

Update
Update
In the menue „Install“ Æ „Update by OTA“ you can easily update the Receiver
software.The Receiver checks automatically if the software on the receiver ist
he newest software available.
If it’s not, the new software will automatically be downloades and installed via
satellite.
You also have the possibility to update your receiver via USB data carrier.
You’ll find the neccesary file in the support area on the website
www.smart-electronic.de
30 DE Smart MX 92

Cleaning
Cleaning
Risk of electric shock!
Liquids must be prevented from entering the unit.
Never clean the receiver with a moist cloth.
Pull the mains plug from the mains socket before cleaning.
Caution!
Do not use any solvent-containing cleaners such as benzin or
thinner.
Ö Clean the housing of the receiver with a dry cloth.
Shutdown and Storage of the Receiver
Ö Disconnect the receiver and the connected units from the power supply.
Ö Pull all connected cables.
Ö Remove the batteries from the remote control.
Ö Place the receiver, cables and remote control in the original packaging.
Ö Store the receiver and all accessories at a dry and dust-free location.
Ö Protect the receiver from frost.
Smart MX 92 DE 31

Troubleshooting
Troubleshooting
Symptom Possible cause Remedy
Display is not
lit.
No sound or
picture, LED at
the receiver is
lit.
No sound or
picture.
The TV set
has no picture.
Picture only
black and
white and/or
not properly
synchronised.
The remote
control is not
working.
Time shift or
recording does
not work
If a malfunction cannot be eliminated by the above measures, please contact
your specialised dealer.
The power cable has not
been connected.
The main switch has not
been switched on.
Receiver is in Standby
mode.
No signal or only a weak
signal.
The system is not
connected properly.
The video format of your
receiver is not set
properly.
The batteries are used
up.
The remote control is
aligned incorrectly.
No USB data carrier
connected
Incompatible USB data
carrier connected
Connect the power cable to the
mains socket.
Switch on the mains switch.
To switch on the receiver, press
the POWER key.
Check the cable connections to
the receiver and from the
receiver to the connected units
and fasten them, if necessary.
Check the connection of the
cable and fasten it, if necessary
Adjust the TV standard of your
receiver to that of the TV set.
Replace the batteries with new
ones.
Direct the remote control at the
front panel of the receiver.
Connecting USB data carrier
www.smart-electronic.de
contains a list of compatible
data carriers.
32 DE Smart MX 92

Disposal
Disposal
Caution!
Never throw receiver and batteries in the normal domestic
waste.
Inquire at your city or local government about proper and
environmentally suitable disposal methods for the unit. Take
used-up batteries to a collection point.
The WEEE symbol on the product or its packaging indicates
that this product is an electric or electronic unit. Do not dispose
of this unit with the domestic waste, but take it your local
communal collection point (recycling centre).
Your contribution to the disposal of this product will help
protect the environment and the health of your fellow citizens.
Recycling of materials helps reduce the consumption of raw
materials.
Help preserve the environment we are living in!
Smart MX 92 DE 33

Specifications
Specifications
LNB and Tuner Input
F socket IEC 169-24
Input frequency range 950 MHz ~ 2150 MHz
Input level range -65 dBm to -25 dBm
LNB power supply 13/18 V, max. 400 mA
LNB control signal 22 kHz, 0/12 V
DiSEqC control Versions 1.0, 1.1, 1.2, 1.3
Demodulator
Front-end module QPSK, 8PSK
Input data rate 2 MS/s to 90 MS/s
SCPC- and MCPC-capble
System resources
Processor 266 MHz
SDRAM 16 x 16 MBits/32 MBytes
FLASH 64 MBits/8 MBytes
Video decoder
Video resolution (video format) 1920 x 1080; 1280 x 720; 720 x 480
Aspect ratio 4:3, 16:9
Remote control
Range up to 7 m
Batteries 2 size AAA
Power supply unit
Power consumption max. 30 W
Power supply 175 - 250 V ~, 50/60 Hz
34 DE Smart MX 92

Warranty
Connectors
Data interface 9-pin, D-Sub
Data carrier interface USB 2.0
Digital Tuner Input (LNB IN) IEC 169-24
TV SCART Scart socket (EURO AV)
Digital audio output (SPDIF) optical
Digital video output 1 DV-OUT
Temperature
Operating temperature 0° C to +40° C
Storage temperature -40° C to +65° C
Dimensions and weight
Width 260 mm
Height 45 mm
Depth 215 mm
Weight approx. 1.5 kg
Warranty
The warranty for the digital satellite receiver Smart MX 92 of the smart
electronic GmbH complies with the legal regulations at the time of purchase.
Smart MX 92 DE 35

Manufacturer
Manufacturer
smart electronic GmbH
Industriestraße 29
78112 St. Georgen
Germany
Service Hotline: 00 49 7724 / 94 78 339
Fax: 00 49 7724 / 94 78 333
E-Mail: info@smart-electronic.de
Internet: www.smart-electronic.de
Declaration of Conformity
The smart electronic GmbH, Industriestraße 29, 78112 St. Georgen, Germany
hereby declares that this product complies with the following directives and
standards:
• Low Voltage Directive 2006/95/EC
• EN 60 335-1
• EN 60 335-2-15
• Electromagnetic Compatibility Directive 2004/108/EC
• EN 55 013:2001
• EN 55 020
• EN 61 000-3-2:2000
• EN 61 000-3-3:1995+A1:2001
• EN 61 938
• Device type/type: Digital Satellite Receiver
smart electronic GmbH
36 DE Smart MX 92
 Loading...