

Page 1

Preface
Preface
Dear Customer,
Thank you for purchasing this digital satellite receiver smart MX 01.
Before operating this receiver, please read the manual of the smart MX 01.
carefully.
This manual helps you with the
• designated,
• safe and
• advantageous
use of the digital satellite receiver smart MX 01.
Everyone who
• installs,
• connects,
• operates,
• cleans or
• disposes of this receiver
must have familiarised himself with the complete contents of this manual.
Please keep this manual always at hand near the receiver.
We hope you enjoy using your smart MX 01.
Your smart electronic GmbH
2 en smart MX 01
Page 2

Contents
Contents
Safety Instructions.......................................................................................... 6
Electric connection ............................................................................................ 6
Correct installation site...................................................................................... 7
Proper handling of batteries .............................................................................. 7
Designated Use ............................................................................................... 8
Scope of Delivery ............................................................................................ 8
Overview of the Units ..................................................................................... 9
Remote Control ............................................................................................. 10
Inserting batteries into the remote control....................................................... 10
Replacing the batteries ................................................................................... 10
Keys of the remote control handset ................................................................ 11
Connecting the Receiver .............................................................................. 13
Connecting the satellite antenna..................................................................... 14
Connecting the TV set..................................................................................... 14
Connecting a Dolby digital unit........................................................................ 14
Start-up of the Receiver................................................................................ 15
Switching on the receiver ................................................................................ 15
RAPS .............................................................................................................. 17
What is RAPS? ............................................................................................... 17
Installing or updating RAPS automatically ...................................................... 18
Setting local TV stations.................................................................................. 21
Allowing erotic channels.................................................................................. 22
Main menu...................................................................................................... 23
PIN .................................................................................................................. 23
Receiver Settings .......................................................................................... 24
Receiver Settings ............................................................................................ 24
TV Format ....................................................................................................... 25
Parental Lock .................................................................................................. 26
STB Information .............................................................................................. 27
smart MX 01 en 3
Page 3

Contents
Time Settings .................................................................................................. 28
Event Timer ..................................................................................................... 29
OTA Update .................................................................................................... 29
Installation ..................................................................................................... 30
Installation ....................................................................................................... 31
Satellite Search ............................................................................................... 32
Manual Search ................................................................................................ 33
Editing the channel list .................................................................................... 34
Factory setting................................................................................................. 35
Save ................................................................................................................ 35
RAPS System.................................................................................................. 36
Utility .............................................................................................................. 37
Operation via the Remote Control............................................................... 38
Switching the receiver on and off .................................................................... 38
Changing the volume ...................................................................................... 38
Switching channels ......................................................................................... 38
Video text ........................................................................................................ 38
Electronic Programme Guide .......................................................................... 39
Favourite Channel List .................................................................................... 39
Finding channels ............................................................................................. 40
Zoom function.................................................................................................. 40
Satellite Overview ........................................................................................... 41
Sleep Timer..................................................................................................... 41
Programme Information .................................................................................. 41
Pause function ................................................................................................ 42
Switching off the sound ................................................................................... 42
4 en smart MX 01
Page 4

Contents
Cleaning ......................................................................................................... 43
Shutdown of the Receiver ............................................................................ 43
Troubleshooting............................................................................................ 44
Disposal ......................................................................................................... 45
Specifications................................................................................................ 46
Manufacturer.................................................................................................. 48
Warranty......................................................................................................... 48
Declaration of Conformity ............................................................................ 48
smart MX 01 en 5
Page 5
Safety Instructions
Safety Instructions
Caution!
Before operating the receiver, please read the safety
instructions carefully.
Please observe all warning and notes on the unit and in this
manual.
Electric connection
• Do not expose the receiver to rain or any other moisture, to avoid risk of
fire and risk of an electric shock.
• Never open the housing. Failure to do so will put you at risk of death due
to electric shock. The manufacturer cannot be held liable for accidents of
the user caused by an open receiver.
• Connect the receiver to a professionally installed mains socket of
90 - 240 V ~, 50/60 Hz only.
• The mains plug must be freely accessible, to allow the receiver in an
emergency to be disconnected quickly and safely from the mains.
• Disconnect the mains plug from the socket during a storm or when you are
not planning to use this unit for longer periods of time. Pull the mains plug
by gripping the plug and not the cable.
• Never expose the receiver to drip or splash water. Do not place any
objects filled with liquids, such as vases, on or over the receiver. Failure to
do so will put you at risk of death due to electric shock.
• If any foreign objects or liquid enter the receiver, immediately pull the
mains plug from the socket. Have the unit check by qualified service
personnel, before operating the unit again. Failure to do so will put you at
risk of death due to electric shock.
• The total current consumption at the antenna connection of the receiver
must not exceed 400 mA.
• Do not bend or squeeze the mains cable.
• Do not touch the mains cable with moist hands. Otherwise, there is a risk
of electric shock.
• When the mains cable is damaged, you must have the receiver repaired
by service personnel, before operating it again. Otherwise, there is a risk
of electric shock.
6 en smart MX 01
Page 6

Safety Instructions
• Never allow children to use the receiver without supervision or play with
the antenna installation. Make sure that children do not slide objects into
the ventilation slots. There is a risk of death due to electric shock.
• Have maintenance work always carried out by qualified service personnel.
Failure to do so will put you and others at risk.
• In case of malfunction, immediately disconnect the receiver from the
power supply.
Correct installation site
• Place the receiver on a solid flat surface.
• Install the receiver away from heat sources, such as radiators or open fire,
and away from devices with strong magnetic fields, such as loudspeakers.
• Do not place objects with open flames, such as candles, on or next to the
receiver.
• Avoid exposure to direct sunlight and locations with extraordinary amounts
of dust or high humidity. Operate the unit only in a moderate climate.
• Never cover the ventilation slots. Do not place any blankets, newspapers
or the like on or under the unit.
• Ensure sufficient ventilation by leaving at least 5°cm of free space all
around the unit.
• Do not place any heavy objects on the receiver.
• When you take the receiver from a cold to a warm environment, moisture
may accumulate inside the unit. In this case, wait for at least three hours
until you operate the receiver.
• Run the mains cable and the antenna cable such that nobody can step on
it or stumble over it.
Proper handling of batteries
• Batteries may contain poisonous materials that damage the environment.
• Batteries must be kept away from children.
• Leaking batteries may cause damage to the remote control.
Ö Batteries must therefore be disposed of in accordance with current legal
regulations. Never throw batteries into the normal domestic waste (see
also chapter Disposal on page°45).
smart MX 01 en 7
Page 7

Designated Use
Designated Use
The digital satellite receiver smart MX 01is intended for the reception of digital
satellite programs in the private sector. It is designed exclusively for this
purpose and may be used only for such purpose. Observe all the information
given in this manual, in particular the Safety Instructions on page°6. Any other
use is considered contrary to its designated use and may result in material
damage or even personal injury.
We will not be held liable for damage caused by such use contrary to the
designated use.
Scope of Delivery
Check whether the delivery contains all parts. The delivery contains
• the digital satellite receiver smart MX 01,
• its remote control,
• 2 batteries (size AAA) for the remote control,
• one owner's manual.
If the delivery is incomplete, please contact your specialist dealer or
smart electronic GmbH
Industriestraße 29
78112 St. Georgen
Germany
Service Hotline: 00 49 7724 / 94 78 328
Fax: 00 49 7724 / 94 78 333
E-Mail: info@smart-electronic.de
8 en smart MX 01
Page 8
Overview of the Units
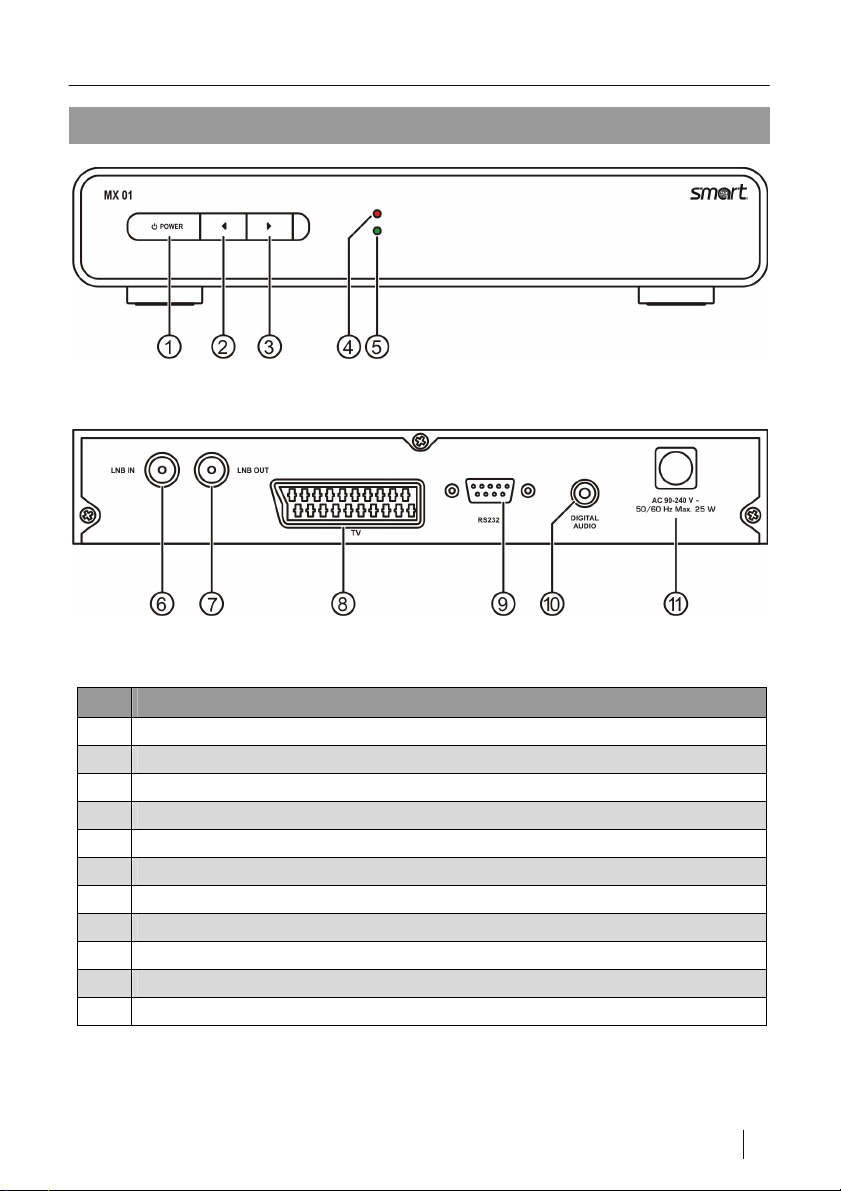
Overview of the Units
Figure 1: Operating elements on the front panel of the receiver
Figure 2: Connections at the rear panel of the receiver
No. Description
1 To switch between the operating and standby modes.
2 Channel -
3 Channel +
4 Power LED, lit green when the receiver is on.
5 Standby LED, lit red when the receiver is in Standby mode.
6 Connection of the satellite antenna cable
7 Receiver loop-through connection
8 SCART connection for TV set
9 Serial interface RS232
10 Digital audio output AC3
11 Mains connection 90 - 240 V ~, 50/60 Hz
smart MX 01 en 9
Page 9
Remote Control
Remote Control
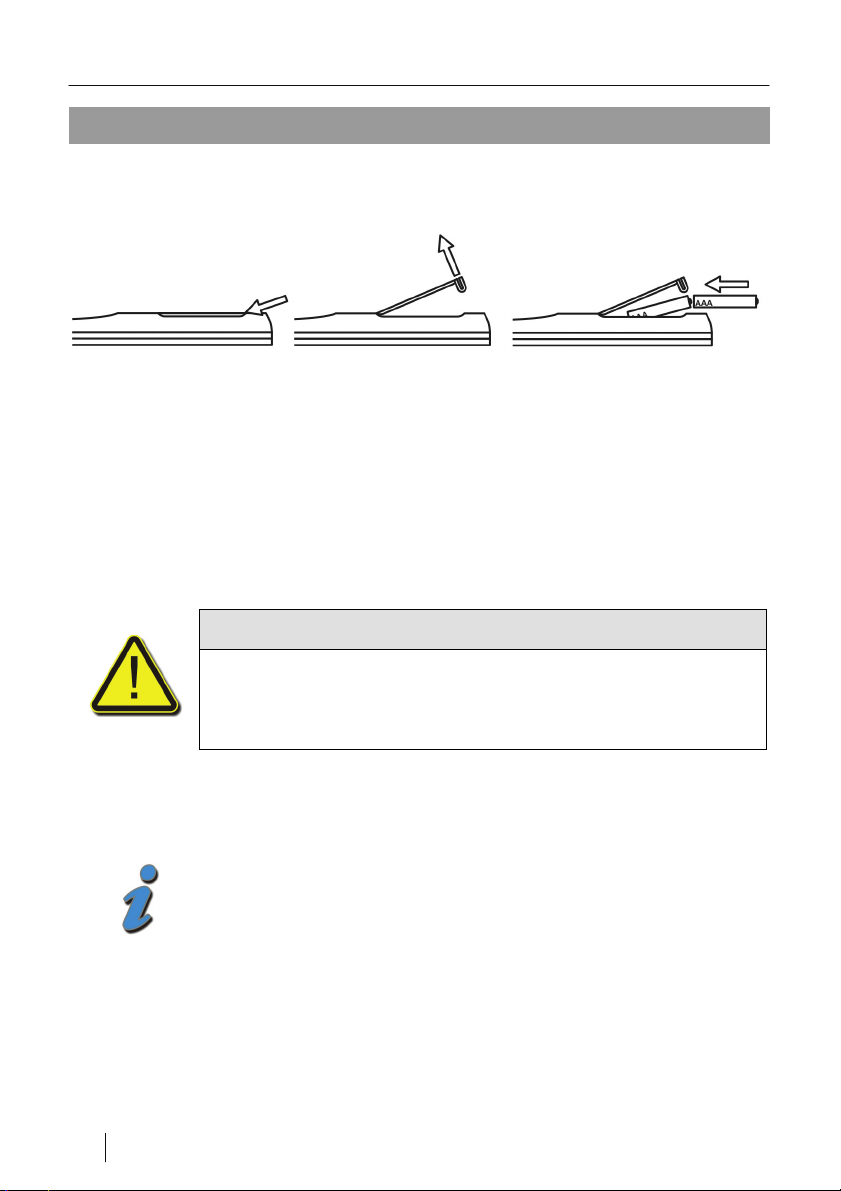
Inserting batteries into the remote control
Figure 3: Inserting the batteries into the remote control
Ö Open lid of the battery compartment at the rear of the remote control.
Ö Insert two "AAA" size batteries (included in the delivery) into the battery
compartment. Align batteries with their correct polarity.
Ö Close the lid of the battery compartment.
Replacing the batteries
Caution!
Never recharge, disassemble or throw conventional batteries
into the fire!
Take used-up batteries to a a collection point.
Ö Replace batteries when the range of the remote control is decreasing or
when the receiver no longer reacts to all commands.
• When not used for prolonged periods of time, batteries may
leak. Remove batteries from the remote control if it is not
10 en smart MX 01
used for long periods of time (> 1.5 years).
• When replacing batteries, always replace all batteries.
Page 10
Remote Control
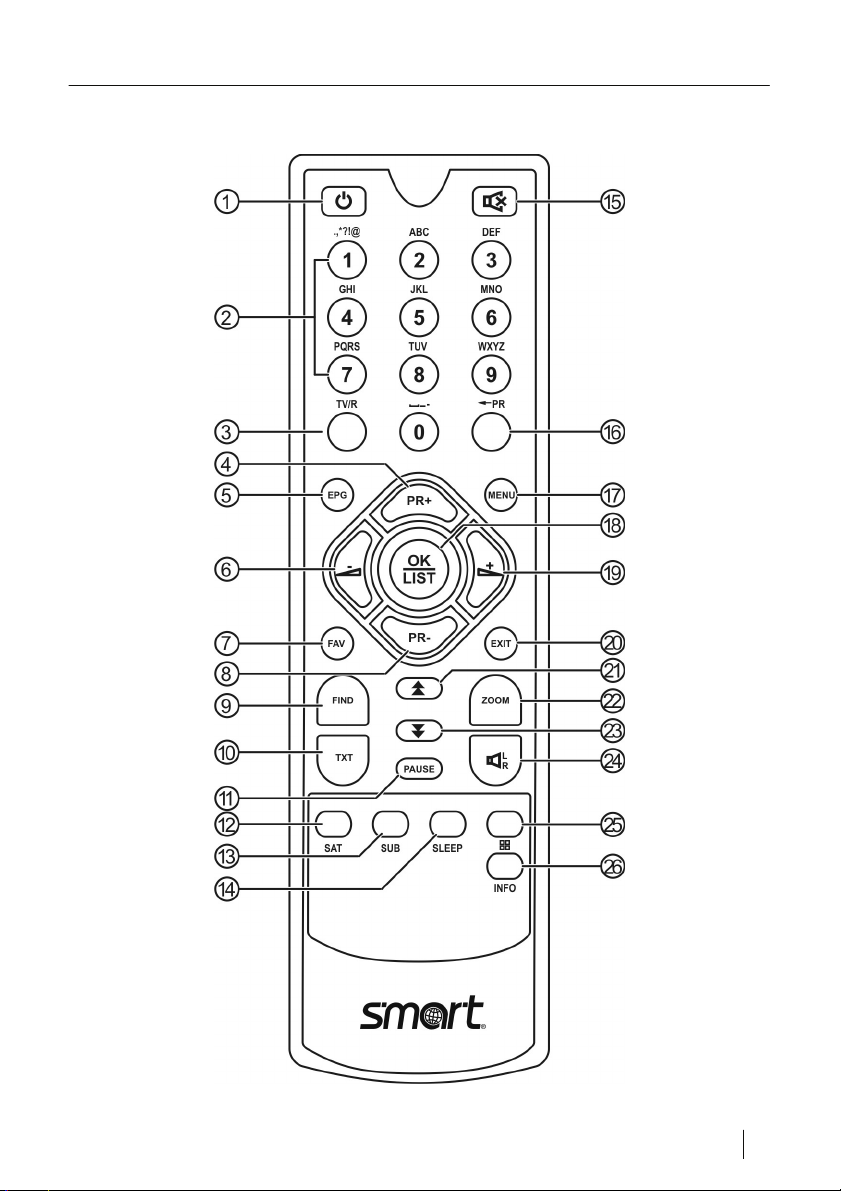
Keys of the remote control handset
smart MX 01 en 11
Page 11
Remote Control
No. Description
1 To switch between the operating and standby modes.
2 Direct channel selection or input of alphanumeric characters
3 To switch between TV and radio modes.
4 Channel + or cursor up
5 To start/finish Electronic Programme Guide
6 Volume - or menu option to the left
7 To load favourite channel list
8 Channel - or cursor down
9 Channel search function
10 Video text
11 Still image
12 To show all programmed satellites
13 Subtitles
14 Sleep Timer
15 Mute switch
16 To switch to the previously selected channel
17 Main menu
18 To show channel list or confirm menu item
19 Volume + or menu option to the right
20 To exit menu or menu item
21 To scroll page up in menu
22 To enlarge image detail
23 To scroll page down in menu
24 To change Audio mode
25 To show several programmes on screen (multi-picture)
26 To show information on the current programme
12 en smart MX 01
Page 12
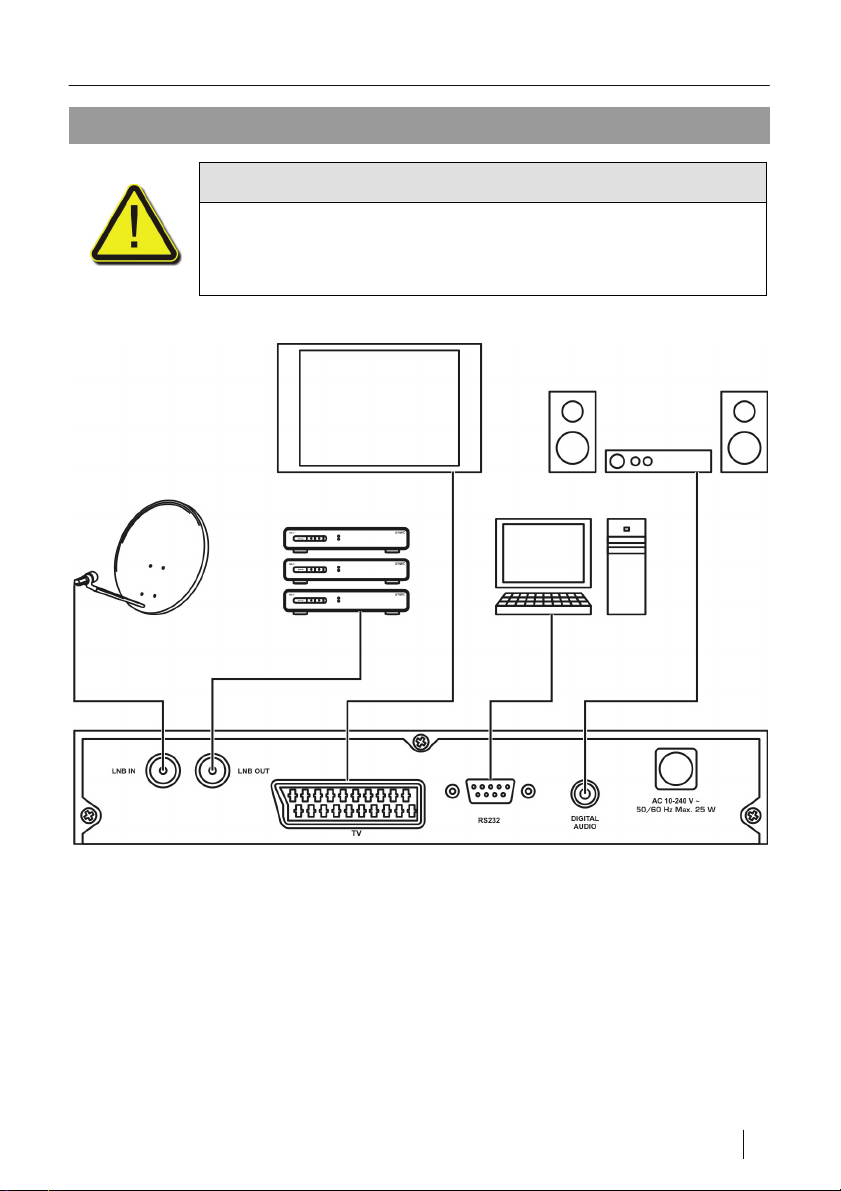
Connecting the Receiver
Connecting the Receiver
Caution!
Make sure to connect the receiver first to the satellite
installation and all other units, before plugging the mains plug
into the socket.
Figure 4: Connection diagram
smart MX 01 en 13
Page 13

Connecting the Receiver
Connecting the satellite antenna
An LNB cable is not included in the delivery. You can obtain a
suitable cable from your specialist dealer.
Ö Connect the satellite antenna and the receiver with an LNB cable.
Ö To do so, screw the F plug of the LNB cable into the LNB IN socket of the
receiver.
Connecting the TV set
A Scart cable is not included in the delivery. You can obtain a
suitable cable from your specialist dealer.
Ö Connect your TV set to the TV Scart socket of the receiver with a Scart
cable.
Connecting a Dolby digital unit
A coaxial digital audio cable is not included in the delivery. You
can obtain a suitable cable from your specialist dealer.
If you have a Dolby digital unit for reproducing Dolby digital sound (AC3
sound), you can connect it to the receiver via a coaxial digital audio cable.
Ö To do so, connect the cable to the digital audio socket of the receiver.
Ö How to connect the cable to the Dolby digital unit is described in the
manual of that unit.
14 en smart MX 01
Page 14
Start-up of the Receiver
Start-up of the Receiver
Switching on the receiver
Caution!
Check that all units and the antenna have been properly
connected, before you connect the receiver to the mains
power.
Ö After all units have been connected to one another, plug the mains plug of
the receiver and the mains plugs of the connected units into the mains
sockets.
Ö The receiver is now in Standby mode.
Ö Switch on the connected units.
Ö Switch on the receiver by pressing the
Ö Switch on the appropriate AV channel on the TV set. For details, please
refer to the manual of the TV set.
The receiver is delivered preset to the TV and radio channels and can be
immediately used. If you want to find out whether there are any new channels,
activate the channel search. Read the information in chapter Installing or
updating RAPS automatically on page°18.
key on the remote control.
smart MX 01 en 15
Page 15
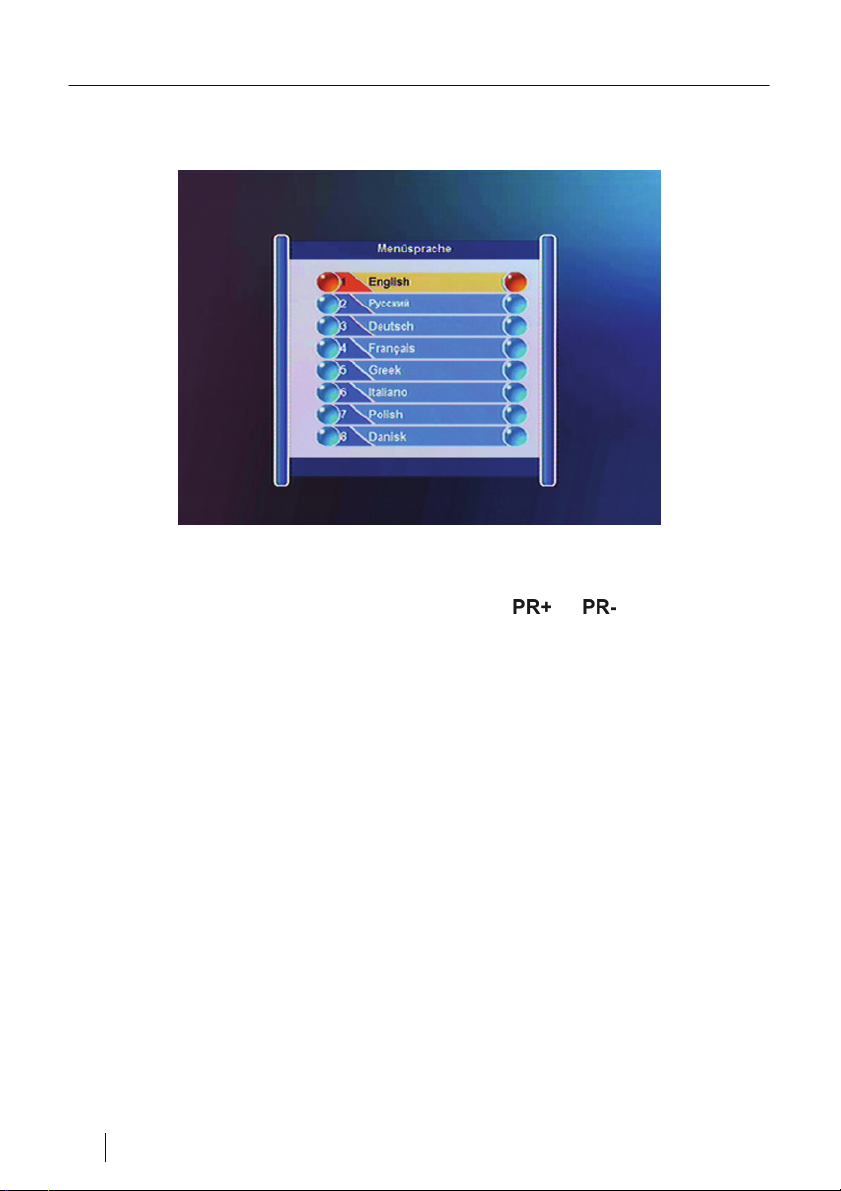
Start-up of the Receiver
After switching on for the first time, a selection of the available menu
languages appears on the screen.
Figure 5: Setting the language during the first start-up
Next, select the menu language by pressing the
or key and confirm
your selection by pressing the OK key.
An on-screen prompt asks you again whether you want to load all settings.
Confirm by pressing the OK key.
16 en smart MX 01
Page 16

RAPS
RAPS
If the receivers asks you, after switching on for the first time or
after a factory reset, whether you want to use RAPS.
Select Yes by pressing the OK key on the remote control!
Figure 6: Selecting RAPS
What is RAPS?
Your receiver is preset for the reception of Astra 19.2°, Eutelsat Hot Bird 13°
East and Türksat 42° with conventional reception systems. In most cases, all
you need to do is connect, switch on and watch. But this receiver can do even
more. It is equipped with the automatic programming system RAPS, which we
recommend you to use to ensure that you always receive the most current
channels.
For the most important satellite systems Astra 19.2° and Eutelsat Hot Bird 13°
East and Türksat 42°, more than 1,200 TV and radio channels can be
received nowadays.
smart MX 01 en 17
Page 17

RAPS
Modern satellite receivers have all important channels already stored when
they are delivered. But what happens afterwards? Every week new interesting
stations are added. To store these stations in an existing Set Top Box is not
that simple for most viewers. In addition, new channels are usually appended
to the end of the list, so that the viewer must re-programme his list in a
complicated manner.
RAPS offers the viewer (and the listener, because we have also thought of the
radio listeners) an easy option of always being up-to-date. RAPS does the
programming work for you. And completely free-of-charge for you. It allows
you to select certain basic settings, such as the country and the preferred
regional channel, and hide erotic channels and foreign languages.
Whenever you switch on your receiver, RAPS will check whether there are
any new channels. This will only take a few seconds. If it finds any, they will be
added automatically to the channel list and shown on screen as new channels.
If channels are switched off permanently, these channel numbers will be
deleted. However, the new channels are not simply added, but arranged in
logical blocks, which is why some areas may also remain unused. However,
this process requires the general channel list to be overwritten each time,
deleting any changes made by you manually in the general channel list!
But it's not a problem if you want to programme stations yourself. You can
create your own channel list in parallel as favourite channel list (favourite
channel lists are not changed by a new RAPS list) or you can switch off RAPS
again at any time via the factory setting. RAPS leaves the decision up to you.
Installing or updating RAPS automatically
To search new RAPS lists is only supported in TV mode.
Switch to TV mode, to search manually for a RAPS list or
make configuration changes to your RAPS system.
The RAPS list will only be transmitted if you receive Astra
19.2°.
If you use RAPS, only your channel list will be updated. Any
favourite channel lists created by you remain intact.
Ö To activate RAPS, reset the receiver to the factory settings or select the
item RAPS under MENU -> SOFTWARE VERSION.
Ö After a factory reset, please enter the menu language.
In the menu that appears, you can select whether you want to use RAPS or
not.
Ö If you want to use RAPS, select the option YES by pressing the
key.
18 en smart MX 01
or
Page 18

RAPS
Ö Press the OK key.
The receiver now searches for a current RAPS list.
Figure 7: Automatic Programming
On the screen, you can see the progress of the update on the progress bar.
This is followed by displaying a pull-down menu showing the satellites that can
be received.
Figure 8: Selection of the satellites that can be received
smart MX 01 en 19
Page 19

RAPS
Ö Use the or key to select the satellite that you want to receive via
the receiver.
Ö Confirm your selection by pressing the OK key.
In the field behind the selected satellite, a check mark is shown.
Ö Repeat the previous steps for all desired satellites.
Ö Finally press the
key, to go to the next step.
The displayed selection now shows you the available RAPS lists.
Figure 9: Selection of the RAPS list
Ö To select the optimal list for you, press the
or key.
Ö Confirm your selection by pressing the OK key.
20 en smart MX 01
Page 20

RAPS
Setting local TV stations
In the following menu item, you are asked to select a regional TV channel.
Figure 10: Selection of the regional channel
In Germany, the regional channels are the third channels. If you have selected
the list for Austrian viewers, you will be asked which ORF2 regional program
(e.g. ORF2-Tirol or ORF2-Kärnten) you want to store on channel number 2.
The available regional TV stations are shown in a list.
Ö Select the desired regional TV station by pressing
Ö Confirm your selection by pressing the OK key.
or key.
Depending on the type of receiver used and the input made on
the following pages, it is possible that some of the menu items
described below will not be shown. In any case, enter all
settings completely. Only this will guarantee complete
configuration of RAPS.
smart MX 01 en 21
Page 21

RAPS
Allowing erotic channels
Ö The next prompt that appears asks you whether you want to see channels
with erotic content.
Ö Select the desired option Yes or No by pressing the
Figure 11: Protection of minors
or key.
Ö Confirm your selection by pressing the OK key.
22 en smart MX 01
Page 22

Main menu
Main menu
PIN
To protect some settings from unauthorised access and changes, they can
only be accessed after entering a PIN. To display the corresponding menu
items, you have to enter a PIN.
As-delivered the PIN is set to 0000.
You can change the PIN at any time (see chapter Parental Lock on page°26).
To go to the main menu, press the MENU key.
Figure 12: Main Menu
smart MX 01 en 23
Page 23

Receiver Settings
Receiver Settings
In this menu, you can enter the following settings:
Figure 13: Receiver Settings
Receiver Settings
Figure 14: Receiver Settings
24 en smart MX 01
Page 24

Receiver Settings
The following settings are possible:
• Menu Language
• Audio Language
• OSD Time
• Transparency
• Auto Power
TV Format
Figure 15: TV Format
The following settings are possible:
• TV Type (PAL is the TV standard in Europe)
• TV Screen Format
• TV Scart
• Modulator Mode
• Modulator Channel
smart MX 01 en 25
Page 25

Receiver Settings
Parental Lock
Figure 16: Parental Lock
The following settings are possible:
• Password lock
• Channel editing lock
• Installation lock
• System lock
• New password
• Confirm password
26 en smart MX 01
Page 26

Receiver Settings
STB Information
This menu shows the following data:
• Receiver Model
• Software Version
• Loader Version
• Channels Used
• Satellites Used
• Transponders Used
Figure 17: STB Information
smart MX 01 en 27
Page 27

Receiver Settings
Time Settings
Figure 18: Time Settings
• GMT On
• GMT Zone
• Summer Time
• Current Time
• Current Date
28 en smart MX 01
Page 28
Receiver Settings
Event Timer
Figure 19: Event Tmer
Here stored events can be displayed and changed
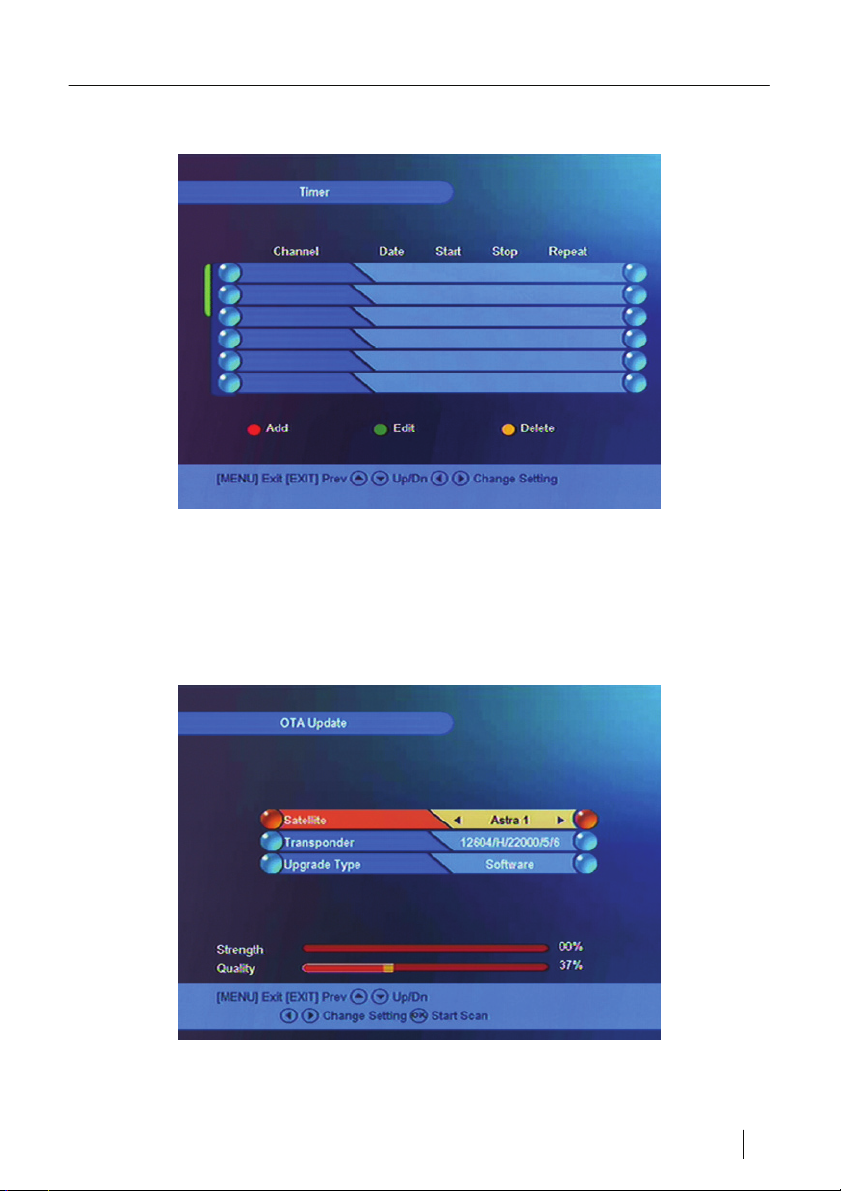
OTA Update
Figure 20: OTA Update
smart MX 01 en 29
Page 29

Installation
Ö Select currently received satellite
Ö Select transponder
Ö Select upgrade type
Ö Confirm by pressing the OK key.
Checks whether a more recent version of the software is available. If so, it will
be received directly by the satellite.
Installation
In this menu, you can enter the following settings:
Figure 21: Antenna Settings
30 en smart MX 01
Page 30

Installation
Installation
In this menu, you can enter the following settings:
Figure 22: Installation
Left column
Satellite Select the satellite you want to receive from
Right column
LNB Frequency Select the LNB frequency
LNB Power Select the LNB power
Transponder Select a transponder
22kHz Leave setting on "Auto"
0/12V Leave setting on "Off"
DiSEq1.0 Activate/Deactivate DiSEq1.0
DiSEq1.1 Activate/Deactivate DiSEq1.1
Motor Select here how you want to drive the motor
smart MX 01 en 31
Page 31

Installation
Satellite Search
Figure 23: Satellite Search
The following search modes are available:
• Search only free-to-air channels or all channels
• Search also radio channels
• Blind Scan
• Selection of the satellite to be searched
32 en smart MX 01
Page 32

Installation
Manual Search
Figure 24: Manual Search
Ö Select the different settings by pressing the
/ keys and the /
keys.
Ö Start search by pressing the OK key.
smart MX 01 en 33
Page 33

Installation
Editing the channel list
Figure 25: Editing channels
The following settings are possible:
• Favourite channel groups
• Changing a channel
• Deleting a channel
34 en smart MX 01
Page 34

Installation
Factory setting
Figure 26: Factory setting
After entering the PIN code and then confirming it, all settings are reset to the
as-delivered settings.
Save
Figure :27: Save
smart MX 01 en 35
Page 35

Installation
After entering the PIN code and then confirming it, all changes to the channel
list are stored as factory setting.
RAPS System
Figure 28: RAPS System
The following settings are possible:
• Activate/Deactivate RAPS Scan
• (Configure/Update) RAPS Mode
• Start (Start RAPS)
• RAPS Update
36 en smart MX 01
Page 36

Utility
Utility
This menu contains a few games:
Figure 29: Utility
To select and use games, press the
OK key.
smart MX 01 en 37
/ keys, the / keys and the
Page 37

Operation via the Remote Control
Operation via the Remote Control
Switching the receiver on and off
Ö To switch the receiver on and off on the remote control, press the key.
Changing the volume
Ö Change the volume at the receiver by pressing the key or key.
Switching channels
Ö To switch to another channel, enter the number of the desired channel on
the numeric keypad.
Ö Press the
order, respectively, from the channel list.
Video text
or key, to load channels in ascending and descending
Figure 30: Video Text (Teletext)
The video text provides news and programme information.
Ö To display/exit the video text, press the TXT key.
38 en smart MX 01
Page 38

Operation via the Remote Control
Electronic Programme Guide
Figure 31: Electronic Programme Guide (EPG)
Ö To display the electronic programme guide, press the EPG key.
The electronic programme guide provides information (if supported by the
channel provider in question) on the currently sent programmes and the
directly following programmes. The Electronic Programme Guide is generally
abbreviated to EPG.
Ö To exit the Electronic Programme Guide, press the EPG key.
Favourite Channel List
Ö Press the FAV key, to display a list containing your favourite channels (TV
or radio).
If you did not enter any favourite channels, no Favourite Channels List will be
shown. Instead the message "No FAV Channels" appears.
smart MX 01 en 39
Page 39

Operation via the Remote Control
Finding channels
To save you the trouble of searching the entire channel list for a particular
channel, smart MX 01 offers you the following option.
Figure 32: Finding channels
Ö Press the red FIND key, to display the menu for channel search.
Ö Select letters by pressing the
selection by pressing the OK key.
Ö Once you have written a few letters, use the
select the OK field and confirm your selection by pressing the OK key.
All channels starting with the sequence of letters entered by you will be
shown.
/ and -/ keys and confirm your
/ and / key to
Zoom function
Ö To display the ZOOM menu, press the green ZOOM key during normal TV
operation.
Ö A magnifying glass appears on screen, which you can position using the
/ and -/ keys.
Ö Press the OK key to zoom into the selected image area.
Ö To leave the ZOOM menu, press "EXIT".
40 en smart MX 01
Page 40

Operation via the Remote Control
Satellite Overview
Figure 33: Overview of the programmed satellites
Ö Press the SAT key, to display an overview of the programmed satellites.
Sleep Timer
Ö To display the SLEEP Timer, press the SLEEP key.
Ö Press the
Ö Confirm by pressing OK.
key repeatedly until the desired length of time appears.
Programme Information
Digital television offers the option of broadcasting additional information on the
programme. But not all stations provide this service. If you select a station that
does not broadcast additional information on the program, the text box
remains empty.
Ö To obtain additional information on the programme in progress, press the
INFO key.
Ö To obtain more detailed information on the programme in progress, press
the INFO key again.
smart MX 01 en 41
Page 41

Operation via the Remote Control
Pause function
Ö To freeze the image of the programme currently in progress, press the
PAUSE key.
Ö To cancel the Pause function, press the PAUSE key again.
Switching off the sound
Ö To switch off the sound, press the key.
Upon switching to MUTE, a symbol showing a crossed speaker appears on
screen.
Ö To switch the sound on again, press the
screen disappears.
Switching the receiver on and off on the the mains switch
Ö To disconnect the receiver completely from the mains power, switch off
the receiver on the mains switch at the rear panel of the unit (position 0).
This is recommended in particular when the unit is not used over a longer
period of time.
key again. The symbol on the
42 en smart MX 01
Page 42

Cleaning
Cleaning
Risk of electric shock!
Liquids must be prevented from entering the unit.
Never clean the receiver with a moist cloth.
Pull the mains plug from the mains socket before cleaning.
Caution!
Do not use any solvent-containing cleaners such as benzin or
thinner.
Ö Clean the housing of the receiver with a dry cloth.
Shutdown of the Receiver
Ö Disconnect the receiver and the connected units from the power supply.
Ö Unscrew the LNB cable from the receiver.
Ö Pull off SCART, cinch and HF cables.
Ö Remove the batteries from the remote control.
Ö Package the receiver, cables and remote control in the original
packaging.
Ö Store the receiver and all accessories at a dry and dust-free location.
Ö Protect the receiver from frost.
smart MX 01 en 43
Page 43

Troubleshooting
Troubleshooting
Symptom Possible cause Remedy
No sound or
picture, LED at
the receiver is
lit.
No sound or
picture.
No signal or
only a weak
signal.
The TV set
has no picture.
Poor picture,
blocking error.
The remote
control is not
working.
If a malfunction cannot be eliminated by the above measures, please contact
your specialised dealer.
Receiver is in Standby
mode.
The antenna is not
aligned to the satellite.
Check all cable connections.
The system is not
connected properly..
The TV set is not in
the AV mode.
The antenna is not
aligned to the satellite.
The LNB is defective.
The batteries are used
up.
The remote control is
aligned incorrectly.
To switch on the receiver, press
key.
the
Align the antenna correctly.
Align the antenna.
Check the connection of the
SCART or HF cable.
Switch the TV set to the
appropriate AV input.
Align the antenna.
Replace the LNB.
Replace the batteries with new
ones.
Direct the remote control at the
front panel of the receiver and
make sure that nothing is inbetween the remote control and
the receiver.
44 en smart MX 01
Page 44

Disposal
Disposal
Caution!
Never throw receiver and batteries in the normal domestic
waste.
Inquire at your city or local government about proper and
environmentally suitable disposal methods for the unit. Take
used-up batteries to a collection point.
The WEEE symbol on the product or its packaging indicates
that this product is an electric or electronic unit. Do not dispose
of this unit with the domestic waste, but take it your local
communal collection point (recycling centre).
Your contribution to the disposal of this product will help
protect the environment and the health of your fellow citizens.
Recycling of materials helps reduce the consumption of raw
materials.
Help preserve the environment we are living in!
smart MX 01 en 45
Page 45

Specifications
Specifications
LNB and Tuner Input
F socket IEC 169-24
Input frequency range 950 MHz ~ 2150 MHz
Input level range -65 dBm to -25 dBm
LNB power supply 13V, max. 400 mA
LNB control signal 22 kHz, 0/12 V
DiSEqC control Versions 1.0 and 1.2
Demodulator
Front-end module QPSK
Input data rate 1 MS/s to 45 MS/s
SCPC- and MCPC-capble
Video decoder
Video resolution (video format) 720 x 576 (PAL), 720 x 480 (NTSC)
TV screen format 4:3, 16:9
Modulator (optional)
RF connections 75Ω IEC 169-2, male / female
RF frequency 470 MHz – 860 MHz
Output channel channels 21 – 69
Pre-programmed output channel channel 38
Remote Control
Range up to 7 m
Batteries 2 size AAA
46 en smart MX 01
Page 46

Specifications
Power supply unit
Power consumption max. 25 W
Power supply 90 - 240 V ~, 50/60 Hz
Connections at the rear panel
Data interface 9-pin, D-Sub
Digital Tuner-Input (LNB IN) IEC 169-24
Loop-Through digit. Tuner (LNB-OUT) IEC 169-24
TV SCART RGB, CVBS, Audio
Digital Audio Output (AC3) 1 RCA cinch coaxial
Temperature
Operating temperature 0° C to +40° C
Storage temperature -40° C to +65° C
Dimensions and weight
Width 280 mm
Height 55 mm
Depth 235 mm
Weight approx. 2 kg
smart MX 01 en 47
Page 47

Manufacturer
Manufacturer
smart electronic GmbH
Industriestraße 29
78112 St. Georgen
Germany
Service Hotline: 00 49 7724 / 94 78 328
Fax: 00 49 7724 / 94 78 333
E-Mail: info@smart-electronic.de
Internet: www.smart-electronic.de
Warranty
The warranty for the digital satellite receiver smart MX 01 of the smart
electronic GmbH complies with the legal regulations at the time of purchase.
Declaration of Conformity
The smart electronic GmbH, Industriestraße 29, 78112 St. Georgen, Germany
hereby declares that this product complies with the following directives and
standards:
• Low Voltage Directive 2006/95/EC
• EN 60 335-1
• EN 60 335-2-15
• Electromagnetic Compatibility Directive 2004/108/EC
• EN 55 013:2001
• EN 55 020
• EN 61 000-3-2:2000
• EN 61 000-3-3:1995+A1:2001
• EN 61 938
• Type: Digital Satellite Receiver
smart electronic GmbH
48 en smart MX 01
Page 48

Page 49

 Loading...