

Page 1

WebconnectDM-IA-IEN122510 | 98-0051210 | Version 1.0
EN
FA: x
xxxx
S
E
R
: x
x
S
PWD
M
-1
0.B
G1
F
A
: xxxxx
SER: xx
SPWDM-10.BG1
B
A
Communication interface for SMA inverters
SMA WEBCONNECT DATA MODULE
Installation Manual
Page 2

Page 3

SMA Solar Technology AG Table of Contents
Installation Manual WebconnectDM-IA-IEN122510 3
Table of Contents
1 Information on this Document. . . . . . . . . . . . . . . . . . . . . . . 5
2 Safety . . . . . . . . . . . . . . . . . . . . . . . . . . . . . . . . . . . . . . . . . . 7
2.1 Intended Use. . . . . . . . . . . . . . . . . . . . . . . . . . . . . . . . . . . . . . . . 7
2.2 Qualification of Skilled Persons . . . . . . . . . . . . . . . . . . . . . . . . . 9
2.3 Safety Precautions. . . . . . . . . . . . . . . . . . . . . . . . . . . . . . . . . . . . 9
3 Scope of Delivery. . . . . . . . . . . . . . . . . . . . . . . . . . . . . . . . 10
3.1 Order Option: Webconnect Data Module Pre-installed in
the Inverter . . . . . . . . . . . . . . . . . . . . . . . . . . . . . . . . . . . . . . . . 10
3.2 Order Option: Webconnect Data Module as Retrofit Kit. . . . . 11
4 Product Description . . . . . . . . . . . . . . . . . . . . . . . . . . . . . . 12
4.1 Webconnect Data Module. . . . . . . . . . . . . . . . . . . . . . . . . . . . 12
4.2 Type Label . . . . . . . . . . . . . . . . . . . . . . . . . . . . . . . . . . . . . . . . 13
4.3 Cable Gland. . . . . . . . . . . . . . . . . . . . . . . . . . . . . . . . . . . . . . . 13
5 Connection . . . . . . . . . . . . . . . . . . . . . . . . . . . . . . . . . . . . . 14
5.1 Device Overview . . . . . . . . . . . . . . . . . . . . . . . . . . . . . . . . . . . 14
5.2 Cabling of the Local Speedwire Network. . . . . . . . . . . . . . . . . 15
5.3 Installing the Webconnect Data Module in the Inverter . . . . . . 15
5.4 Connecting the Webconnect Data Module . . . . . . . . . . . . . . . 17
6 Commissioning . . . . . . . . . . . . . . . . . . . . . . . . . . . . . . . . . . 19
6.1 Commissioning the Plant . . . . . . . . . . . . . . . . . . . . . . . . . . . . . . 19
6.2 Plant Management with Sunny Explorer. . . . . . . . . . . . . . . . . . 19
6.2.1 Functions and Parameter Settings in Sunny Explorer. . . . . . . . . . . . . . . . . . . 19
6.2.2 Connection to Sunny Explorer. . . . . . . . . . . . . . . . . . . . . . . . . . . . . . . . . . . . 20
6.3 Monitoring the Plant in Sunny Portal. . . . . . . . . . . . . . . . . . . . . 20
6.3.1 Registering the Plant in Sunny Portal . . . . . . . . . . . . . . . . . . . . . . . . . . . . . . . 21
Page 4

Table of Contents SMA Solar Technology AG
4 WebconnectDM-IA-IEN122510 Installation Manual
7 Decommissioning . . . . . . . . . . . . . . . . . . . . . . . . . . . . . . . . 22
7.1 Disassembling the Webconnect Data Module . . . . . . . . . . . . . 22
7.2 Packaging the Webconnect Data Module for Shipping. . . . . . 23
7.3 Disposing of the Webconnect Data Module . . . . . . . . . . . . . . 23
8 Troubleshooting . . . . . . . . . . . . . . . . . . . . . . . . . . . . . . . . . 24
9 Technical Data . . . . . . . . . . . . . . . . . . . . . . . . . . . . . . . . . . 25
10 Contact . . . . . . . . . . . . . . . . . . . . . . . . . . . . . . . . . . . . . . . . 26
Page 5

SMA Solar Technology AG 1 Information on this Document
Installation Manual WebconnectDM-IA-IEN122510 5
1 Information on this Document
Validity
This document is valid for device type "SWDM-10" as of firmware version 1.00.00.R.
Target Group
This document is intended for skilled persons. Only skilled workers are allowed to perform the tasks
set forth in this document (see Section 2.2"Qualification of Skilled Persons",page9).
Symbols
Typography
Symbol Explanation
Indicates a hazardous situation which, if not avoided, will result in death
or serious injury.
Indicates a hazardous situation which, if not avoided, could result in death
or serious injury.
Indicates a hazardous situation which, if not avoided, could result in minor
or moderate injury.
Indicates a situation which, if not avoided, could result in property damage
Information that is important for a specific topic or goal, but is not safetyrelevant
Indicates an essential requirement for achieving a specific goal
Desired result
✖ A problem that might occur
Typography Explanation Example
bold •Display messages
• Elements of a user interface
• Connections
• Elements to be selected
• Elements to be entered
• The value can be read from the
Energy field.
•Select Settings.
• Enter the value 10 in the
Minutes field.
> • Connects several elements
that are to be selected
•Select Settings > Date.
[Button/Key] • Button or key to be selected or
pressed
•Select [Next].
Page 6

1 Information on this Document SMA Solar Technology AG
6 WebconnectDM-IA-IEN122510 Installation Manual
Nomenclature
Abbreviations
Complete designation Designation in this document
Electronic Solar Switch ESS
PV plant Plant
SMA Speedwire Speedwire
SMA Webconnect Data Module Webconnect Data Module
SMA Webconnect function Webconnect function
SMA inverter Inverter
Abbreviation Description Explanation
AC Alternating Current
DHCP Dynamic Host Configuration Protocol Protocol for the dynamic assignment of
IP configurations
ESD Electrostatic Discharge
IP Internet Protocol
PIC Product Identification Code Identification key for registration in
Sunny Portal
RID Registration Identifier Registration key for registration in
Sunny Portal
Page 7
SMA Solar Technology AG 2 Safety
Installation Manual WebconnectDM-IA-IEN122510 7
2Safety
2.1 Intended Use
The Webconnect Data Module is a Webconnect communication interface for inverters based on the
SMA Speedwire technology.
Speedwire is a cable-based type of communication based on the Ethernet standard and the
communication protocol SMA Data2+. This enables inverter-optimised 100 Mbit data transmission
between Speedwire devices in PV plants.
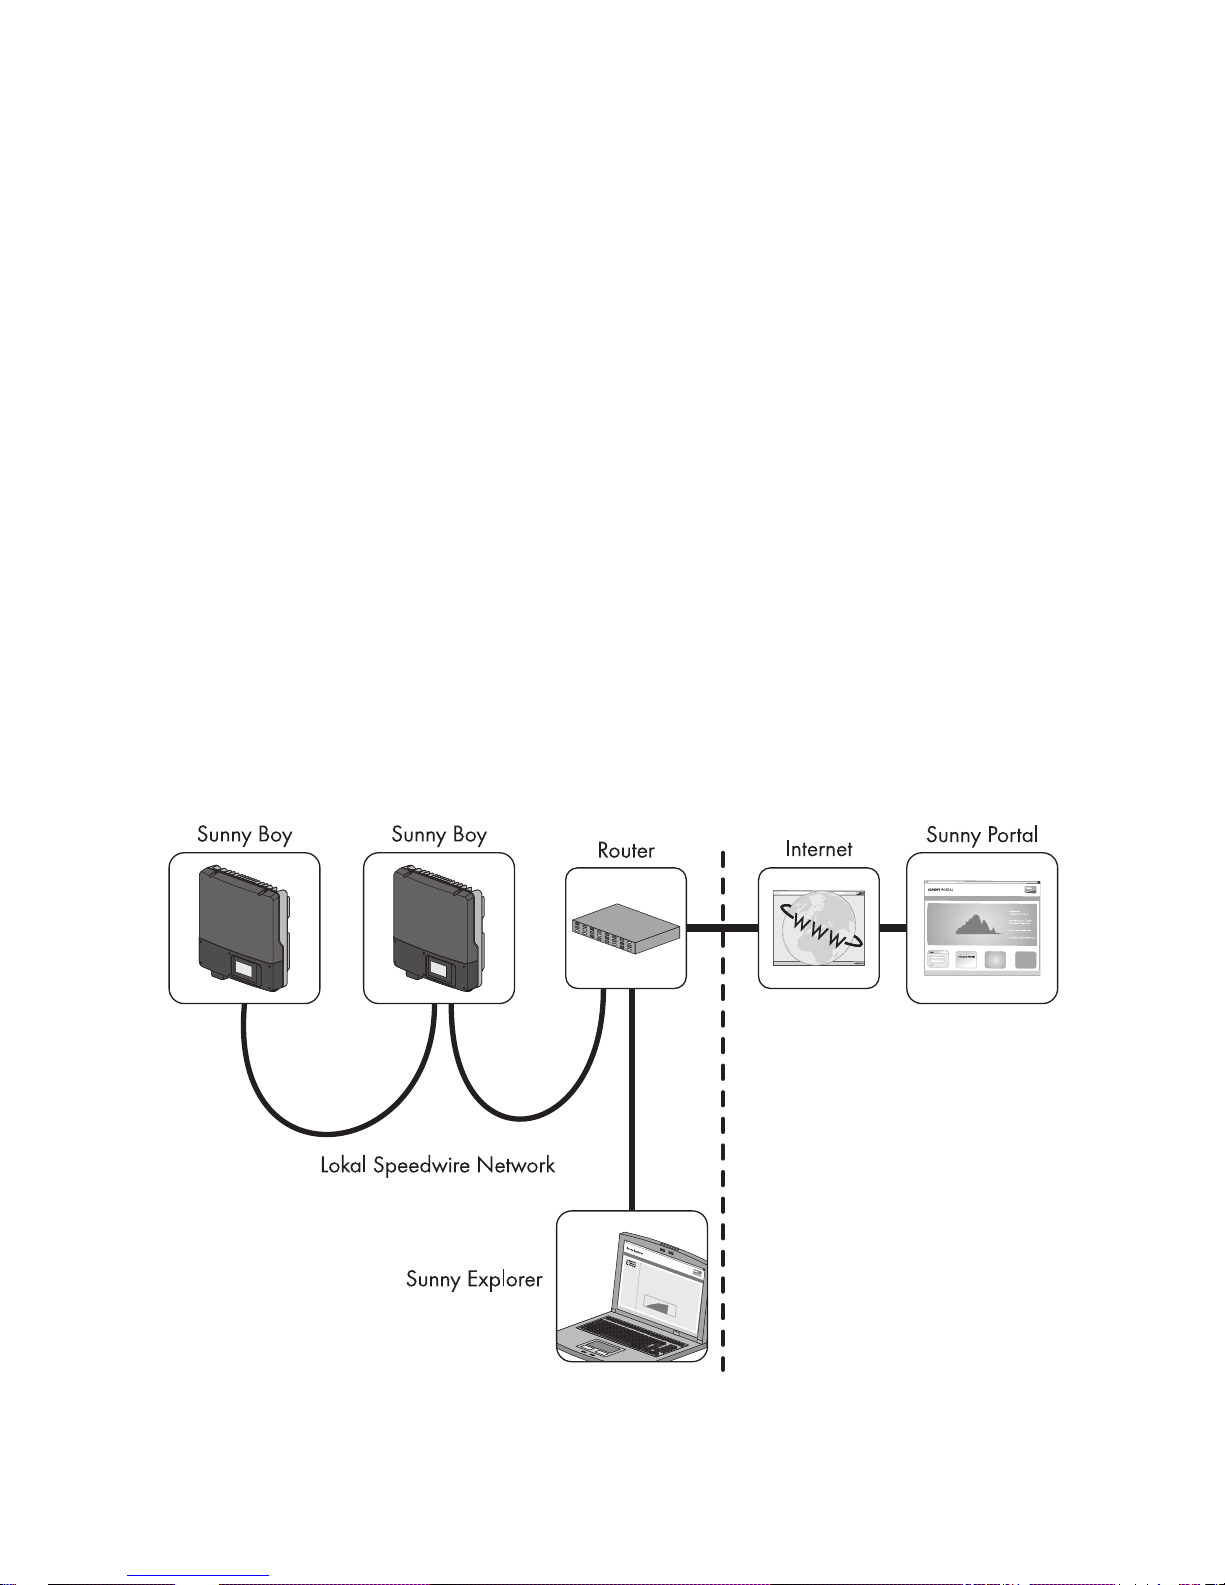
The Webconnect function enables data transmission between the Internet portal Sunny Portal and the
inverters. Data transmission takes place via a router with Internet access. A PC with the software
Sunny Explorer* is also connected to the router.
* as of software version 1.04. Sunny Explorer is available free of charge at www.SMA-Solar.com.
The Webconnect Data Module performs the
following tasks:
• Set-up of a Speedwire network
• Data exchange with the Internet portal Sunny Portal and Sunny Explorer via a router
A plant in Sunny Portal can consist of a maximum of four inverters with installed Webconnect Data
Module. The Speedwire network can be set up optionally with the following topologies:
•Linear topology
• Star topology
Figure1: PV plant with a Speedwire network in linear topology (example)
Page 8

2 Safety SMA Solar Technology AG
8 WebconnectDM-IA-IEN122510 Installation Manual
Figure2: PV plant with a Speedwire network in star topology (example)
The Webconnect Data Module is provided as a retrofit kit or is pre-installed in the inverter.
The Webconnect Data Module must only be installed in the following inverters as of firmware version
2.51:
• Sunny Boy 2500TLST-21 / 3000TLST-21 / 3000TL-21 / 3600TL-21 / 4000TL-21 /
5000TL-21
• Sunny Tripower 8000TL-10 / 10000TL-10 / 12000TL-10 / 15000TL-10 / 17000TL-10 /
15000TLEE-10 / 15000TLHE-10 / 20000TLEE-10 / 20000TLHE-10
For information on the firmware update, refer to the Technical Description "Firmware Update with SD
Card" at www.SMA-Solar.com. For safety reasons, it is not permitted to modify the product or install
components that are not explicitly recommended or distributed by SMA Solar Technology AG for this
product.
The enclosed documentation is an integral part of this product.
• Read and observe the documentation.
• Keep the documentation in a convenient place for future reference.
Only use the additional Webconnect Data Module in accordance with the specifications provided in
the enclosed documentation. Any other use may result in personal injury or property damage.
Page 9

SMA Solar Technology AG 2 Safety
Installation Manual WebconnectDM-IA-IEN122510 9
2.2 Qualification of Skilled Persons
The tasks described in this document are intended for skilled persons only. Skilled persons must have
the following qualifications:
• Training in the installation and commissioning of electrical devices and plants
• Knowledge of how to deal with the dangers and risks associated with installing and using
electrical devices and plants
• Knowledge of all applicable standards and guidelines
• Knowledge of how an inverter works and is operated
• Familiarity with this document and adherence to all safety precautions
2.3 Safety Precautions
Electric Shock
Lethal voltages are present in the conductive parts of the inverter.
• Prior to performing work on the inverter, disconnect the inverter from any voltage sources on the
AC and DC sides (see inverter installation manual).
Burn Hazards
Some parts of the inverter enclosure can get hot during operation.
• During operation, only touch the inverter on the enclosure lid.
Environmental Influences
When closed and with the ESS attached, the inverter has the degree of protection IP65. The inverter
is thus protected against dust intrusion and water penetration. Dust intrusion and water penetration
can damage the inverter.
• If the ESS is not attached, the inverter must be protected against dust and water.
• Firmly attach the ESS again after performing any work on the inverter.
Electrostatic Discharge
By touching electronic components, you can damage or even destroy the inverter through electrostatic
discharge (ESD).
• Earth yourself before touching any inverter components.
Page 10

3 Scope of Delivery SMA Solar Technology AG
10 WebconnectDM-IA-IEN122510 Installation Manual
3Scope of Delivery
3.1 Order Option: Webconnect Data Module Pre-installed in the
Inverter
Check the delivery for completeness and any visible external damage. Contact your specialist dealer
if the delivery is incomplete or you find any damage.
Figure3: Components included in delivery: Webconnect Data Module pre-installed in the inverter
Position Quantity Designation
A 1 Installation manual
B 1 Cable gland
C 1 Sticker with PIC and RID for registration in Sunny Portal
Page 11

SMA Solar Technology AG 3 Scope of Delivery
Installation Manual WebconnectDM-IA-IEN122510 11
3.2 Order Option: Webconnect Data Module as Retrofit Kit
Check the delivery for completeness and any visible external damage. Contact your specialist dealer
if the delivery is incomplete or you find any damage.
Figure4: Components included in delivery: Webconnect Data Module as retrofit kit
Position Quantity Designation
A 1 Webconnect Data Module
B 1 Installation manual
C 1 Cable gland
D 2 Sticker with PIC and RID for registration in Sunny Portal
Sunn
y P
o
r
t
al R
egis
tr
a
tion
PIC
: xxxxxxxxx
xxxxx
x
RID
: XXxX
XX
ABCD
XXXXX
XXX
XXXX
XXXX
XXX
XX
X
XXXX
XXXX
XXX
XXX
X
XXXX
XXX
XXXX
XXXX
XXXX
A
B
Page 12

4 Product Description SMA Solar Technology AG
12 WebconnectDM-IA-IEN122510 Installation Manual
4 Product Description
4.1 Webconnect Data Module
The Webconnect Data Module is a Webconnect communication interface for inverters, which is
based on the SMA Speedwire technology.
Speedwire is a cable-based type of communication based on the Ethernet standard and the
communication protocol SMA Data2+. This enables inverter-optimised 100 Mbit data transmission
between Speedwire devices in PV plants.
The Webconnect function enables data transmission between the Internet portal Sunny Portal and the
inverters. Data transmission takes place via a router with Internet access. A PC with the software
Sunny Explorer* is also connected to the router.
* as of software version 1.04. Sunny Explorer is available free of charge at www.SMA-Solar.com.
The Webconnect Data Module performs the
following tasks:
• Set-up of a Speedwire network
• Data exchange with the Internet portal Sunny Portal and Sunny Explorer via a router
The Webconnect Data Module is provided as a retrofit kit or is pre-installed in the inverter.
Figure5: Product description: Webconnect Data Module
Position Designation
A Hexagon socket screw
B Webconnect Data Module
C Network socket A
D Network socket B
E Ribbon cable plug
F Ribbon cable
G Type label
A
B
A
B
C
E
D
F
G
Page 13

SMA Solar Technology AG 4 Product Description
Installation Manual WebconnectDM-IA-IEN122510 13
Sticker with PIC and RID
To activate the data module in the Sunny Portal, you will need the PIC and RID numbers printed on
the supplied sticker.
4.2 Type Label
You will require the information on the type label to use the inverter safely and when seeking customer
support at the SMA Service Line. The type label must be permanently affixed to the Webconnect Data
Module.
The type label is located in the right-hand top corner on the front of the Webconnect Data Module.
You can identify the module by the type label. You will find the following information on the type label:
•Serial number
• Device type and fabrication version
•CE marking
•MAC address
• PIC and RID
4.3 Cable Gland
The cable gland provides a sturdy, tightly sealed connection of the network cables with the inverter
enclosure. The cable gland also protects the inverter from dust intrusion and moisture penetration.
Figure6: Product description: Cable gland
Position Designation
AFiller-plug
BSeal
CSwivel nut
DCounter nut
Page 14

5 Connection SMA Solar Technology AG
14 WebconnectDM-IA-IEN122510 Installation Manual
5Connection
5.1 Device Overview
Figure7: Overview of the connection area
Position Designation
ADisplay with screw
B Cable route to network sockets
C Opening in the inverter enclosure with filler-plug
D Mounting position of the Webconnect Data Module in the inverter
D
C
B
A
Page 15

SMA Solar Technology AG 5 Connection
Installation Manual WebconnectDM-IA-IEN122510 15
5.2 Cabling of the Local Speedwire Network
The cable length and quality have an effect on the signal quality in the Speedwire network. Note the
following instructions regarding network cabling:
Cable requirements:
Maximum cable length: 100 m
Cross-section: min. 2 x 2 x 0.22 mm2 or min. 2 x 2 x AWG 24
Cable type: 100BaseTx, CAT5 with shielding S-UTP, F-UTP or higher
UV-resistant if used outdoors
Type of plug: RJ45
SMA Solar Technology AG recommends the following cable types:
• For outdoor use: SMA COMCAB-OUTxxx
*
• For indoor use: SMA COMCAB-INxxx
*
*
available in the following lengths: xxx=100 m, 200 m, 500 m and 1,000 m
5.3 Installing the Webconnect Data Module in the Inverter
2. Loosen the screw of the display far enough so that
the display can be flipped up.
3. Flip up the display until it clicks into place.
Interference of network data transmission due to AC cables
When AC cables are in operation, they generate an electromagnetic field which may induce
leading or lagging interference in network cables during data transmission.
• Lay the network cables using suitable fastening material and with a minimum clearance
of 50 mm to the AC cables.
1.
Danger to life due to electric shock when opening the inverter
Death or serious injuries
• Disconnect the inverter from voltage sources on the AC and DC sides and open it
(see the inverter installation manual).
Page 16

5 Connection SMA Solar Technology AG
16 WebconnectDM-IA-IEN122510 Installation Manual
4. Push the pre-mounted filler-plug out of the second
hole from the left in the inverter enclosure.
5. Attach the cable gland to the enclosure opening
with the counter nut.
6. Insert the Webconnect Data Module and slide the
ribbon cable upwards behind the display. The key
on the top edge of the Webconnect Data Module
must fit into the hole in the plastic retainer in the
inverter.
7. Fasten the Webconnect Data Module hand-tight
with the hexagon socket screw.
8. Flip down the display.
1
2
Page 17

SMA Solar Technology AG 5 Connection
Installation Manual WebconnectDM-IA-IEN122510 17
9. Plug the ribbon cable plug onto the centre
connector strip.
5.4 Connecting the Webconnect Data Module
Requirements:
The network cables must be pre-assembled according to the plant topology and the cable
requirements (see 5.2"Cabling of the Local Speedwire Network",page15).
1. Flip up the display until it clicks into place.
2. Unscrew the swivel nut of the cable gland on the
inverter.
3. Press the seal out of the cable gland from the inside.
4. Lead the network cables from the outside into the inverter through the loose swivel nut and the
cable gland.
Page 18

5 Connection SMA Solar Technology AG
18 WebconnectDM-IA-IEN122510 Installation Manual
5. Remove one of the filler-plugs from the seal for each
network cable.
6. Insert the network cables into the seal. Route the
network cable plugs into the inverter to the network
sockets.
7. Push the seal into the cable gland. Make sure that any unused cable openings are sealed with
filler-plugs.
8. Screw the swivel nut of the cable gland on lightly.
9. Insert the network cables into the network sockets. This can be done in any order.
10. Fasten the swivel nut on the cable gland hand-tight. This will fix the network cables in place.
11. Flip the display down and fasten it hand-tight with the display screw.
12. Close the inverter (see inverter installation manual).
13. Depending on the plant topology, connect at least one inverter directly to the router.
Page 19

SMA Solar Technology AG 6 Commissioning
Installation Manual WebconnectDM-IA-IEN122510 19
6Commissioning
6.1 Commissioning the Plant
Requirements:
The Webconnect Data Module must be installed in the inverter (see Section 5.3"Installing the
Webconnect Data Module in the Inverter",page15).
The Webconnect Data Module must be connected (see 5.4"Connecting the Webconnect Data
Module",page17).
Depending on the plant topology, at least one inverter must be connected to the router.
DHCP must be enabled for the router.
• Commission all inverters with installed Webconnect Data Module (see inverter operating
manual).
6.2 Plant Management with Sunny Explorer
6.2.1 Functions and Parameter Settings in Sunny Explorer
The following functions for plant management in Sunny Explorer are available:
• Overview of the plant status
• Graphic display of key plant data, device data and energy values
• Parameterisation of individual devices or an entire device class
• Simple diagnostics thanks to the display of faults and events
• Data export of inverter energy values and events in CSV format
• Device updates
You can change the following parameters in Sunny Explorer:
• Device name of the inverter
• Automatic IP configuration On/Off
• DNS-IP, gateway IP, IP address, subnet mask
• Webconnect function On/Off
Page 20

6 Commissioning SMA Solar Technology AG
20 WebconnectDM-IA-IEN122510 Installation Manual
6.2.2 Connection to Sunny Explorer
Requirements:
The plant must be commissioned (see Section 6.1"Commissioning the Plant",page19).
1. Connect the computer to the plant router with a network cable.
2. Start Sunny Explorer and create plant (see Sunny Explorer user manual).
6.3 Monitoring the Plant in Sunny Portal
Sunny Portal is an Internet portal for plant monitoring and for the visualization and presentation of
plant data.
The following functions for monitoring your plant in Sunny Portal are available:
• Sending of status reports via e-mail to computer or mobile phone
• Summary of key plant data in a plant overview and a plant profile
• Overview of energy and power curves of your plant
• Report of plant yields in form of daily or monthly reports, or as an annual summary
• Communication monitoring between Sunny Portal and a maximum of four inverters with
Webconnect function per plant
• Plant monitoring based on inverter comparison, providing that there are at least two inverters in
the plant
• Overview of device properties, parameters and messages
Page 21

SMA Solar Technology AG 6 Commissioning
Installation Manual WebconnectDM-IA-IEN122510 21
6.3.1 Registering the Plant in Sunny Portal
Requirements:
The plant must be commissioned (see Section 6.1"Commissioning the Plant",page19).
PIC and RID must be available for the Webconnect Data Module.
Your computer must have an Internet connection.
A JavaScript-enabled browser must be installed.
Starting the Plant Setup Assistant in Sunny Portal
The Plant Setup Assistant is a step-by-step guide of the processes required for user registration and the
registration of your plant in Sunny Portal
1. Go to www.SunnyPortal.com/Register (see user manual Webconnect plants in
Sunny Portal).
The Plant Setup Assistant opens.
2. Select [Next].
The User registration page opens.
Maximum permissible number of devices for a plant in Sunny Portal
In Sunny Portal you can manage several plants. A maximum of four interconnected inverters
with installed Webconnect Data Module per plant is permitted.
Plant with Webconnect Data Module can not be combined with other plants
If you already have a plant registered in Sunny Portal with another communication
device, e.g. Sunny WebBox, you will still need to create a separate plant with
Webconnect Data Module. It is not possible to combine the Webconnect Data Module
and other communication devices within one plant in Sunny Portal. Sunny Portal treats the
existing plant and the new plant with Webconnect Data Module as independent plants.
• Create a new plant with Webconnect Data Module.
Page 22

7 Decommissioning SMA Solar Technology AG
22 WebconnectDM-IA-IEN122510 Installation Manual
7 Decommissioning
7.1 Disassembling the Webconnect Data Module
2. Press the left and right lock hooks outwards and
remove the ribbon cable plug from the centre
connector strip of the inverter.
3. Loosen the screw of the display until the display can be flipped up.
4. Flip up the display until it clicks into place.
5. Unscrew the swivel nut of the cable gland.
6. Remove the network cables from the Webconnect Data Module.
7. Unscrew the counter nut of the cable gland.
8. Pull the cable gland and network cables out of the inverter.
9. Release the screw of the Webconnect Data Module and remove it.
10. Flip down the display and fasten the display screw hand-tight.
11. Close the enclosure opening with an appropriate filler-plug.
12. Close the inverter (see inverter installation manual).
The Webconnect Data Module is disassembled.
1.
Danger to life due to electric shock when opening the inverter
Death or serious injuries
• Disconnect the inverter from voltage sources on the AC and DC sides and open it
(see the inverter installation manual).
2
1
1
Page 23

SMA Solar Technology AG 7 Decommissioning
Installation Manual WebconnectDM-IA-IEN122510 23
7.2 Packaging the Webconnect Data Module for Shipping
• Pack the Webconnect Data Module using either the original packaging or other packaging
suitable for the weight and size of the Webconnect Data Module (see Section ) 9"Technical
Data",page25.
7.3 Disposing of the Webconnect Data Module
• Dispose of the Webconnect Data Module in accordance with the regulations for the disposal
of electronic waste applicable at the site of installation.
or
Return the Webconnect Data Module to SMA Solar Technology AG at your own expense
labelled "ZUR ENTSORGUNG" ("FOR DISPOSAL") (see Section 10"Contact",page26).
Page 24

8 Troubleshooting SMA Solar Technology AG
24 WebconnectDM-IA-IEN122510 Installation Manual
8Troubleshooting
Problem Cause and corrective measures
The Webconnect Data Module
cannot be accessed.
There is no Speedwire connection.
Corrective measures:
• Check whether all network cable plugs are inserted and
locked.
• Check whether all inverters in the plant are in operation.
• Check whether the plant router is switched on.
• Check whether the ribbon cable plug of the Webconnect
Data Module is correctly plugged into the centre connector
strip in the inverter.
The inverter does not recognise the Webconnect Data Module.
Corrective measures:
• Update the inverter firmware (download the update file
from www.SMA-Solar.com).
Firewall or IP filter settings are not correct.
Corrective measures:
• Adjust firewall or IP filter settings (see firewall or router
manual).
The Webconnect Data Module does not have a valid IP address.
Corrective measures:
• Check whether DHCP is activated in the router or assign a
manual IP address to the Webconnect Data Module.
Page 25

SMA Solar Technology AG 9 Technical Data
Installation Manual WebconnectDM-IA-IEN122510 25
9 Technical Data
General Data
Mechanical Data
Communication
Connections
Ambient Conditions during Operation
Ambient Conditions for Storage/Transport
Mounting location in the inverter
Voltage supply via inverter
Width x height x depth 73 mm x 88 mm x 34 mm
Communication interface Webconnect/Speedwire
Maximum cable length 100 m
Type of connector RJ45
Number of RJ45 terminals 2
Ambient temperature − 40°C … +85 °C
Relative humidity, non-condensing 5% … 95%
Maximum height above sea level (MSL) 3,000 m
Ambient temperature − 40°C … +85 °C
Relative humidity, non-condensing 10% … 100%
Maximum height above sea level (MSL) 3,000 m
Page 26

10 Contact SMA Solar Technology AG
26 WebconnectDM-IA-IEN122510 Installation Manual
10 Contact
If you have technical problems concerning our products, contact the SMA Service Line. We need the
following data in order to provide you with the necessary assistance:
• Type, serial number and firmware version of the inverter
• Type, serial number and firmware version of the Webconnect Data Module
• PIC and RID numbers of the Webconnect Data Module
• Number of Webconnect Data Modules connected
SMA Solar Technology AG
Sonnenallee 1
34266 Niestetal, Germany
www.SMA.de
SMA Service Line
Inverters +49 561 9522 1499
Communication: +49 561 9522 2499
Fax: +49 561 9522 4699
EMail: ServiceLine@SMA.de
Page 27

SMA Solar Technology AG Legal Restrictions
Installation Manual WebconnectDM-IA-IEN122510 27
The information contained in this document is the property of SMA Solar Technology AG. Publishing its content, either partially or
in full, requires the written permission of SMA Solar Technology AG. Any internal company copying of the document for the
purposes of evaluating the product or its correct implementation is allowed and does not require permission.
SMA Factory Warranty
The current warranty conditions come enclosed with your device. These are also available online at www.SMA.de and can be
downloaded and are available on paper from the usual sales channels if required.
Trademarks
All trademarks are recognized even if these are not marked separately. Missing designations do not mean that a product or brand
is not a registered trademark.
The Bluetooth
®
word mark and logos are registered trademarks owned by Bluetooth SIG, Inc. and any use of such marks by
SMA Solar Technology AG is under licence.
SMA Solar Technology AG
Sonnenallee 1
34266 Niestetal
Germany
Tel. +49 561 9522-0
Fax +49 561 9522-100
www.SMA.de
E-Mail: info@SMA.de
© 2004 to 2012 SMA Solar Technology AG. All rights reserved
Page 28

XXX4."4PMBSDPN
4."4PMBS5FDIOPMPHZ
4."4PMBS5FDIOPMPHZ"(
XXX4."EF
4.""NFSJDB--$
XXX4.""NFSJDBDPN
4."5FDIOPMPHZ"VTUSBMJB1UZ-UE
XXX4.""VTUSBMJBDPNBV
4."#FOFMVY413-
XXX4."#FOFMVYDPN
4."#FJKJOH$PNNFSDJBM$P-UE
XXX4."$IJOBDPN
4."$[FDI3FQVCMJDTSP
XXX4."$[FDIDPN
4."'SBODF4"4
XXX4."'SBODFDPN
4.")FMMBT"&
XXX4.")FMMBTDPN
4."*C©SJDB5FDOPMPHB4PMBS4-
XXX4."*CFSJDBDPN
4."*UBMJB4SM
XXX4."*UBMJBDPN
4."5FDIOPMPHZ,PSFB$P-UE
XXX4.",PSFBDPN
 Loading...