

Page 1
EN
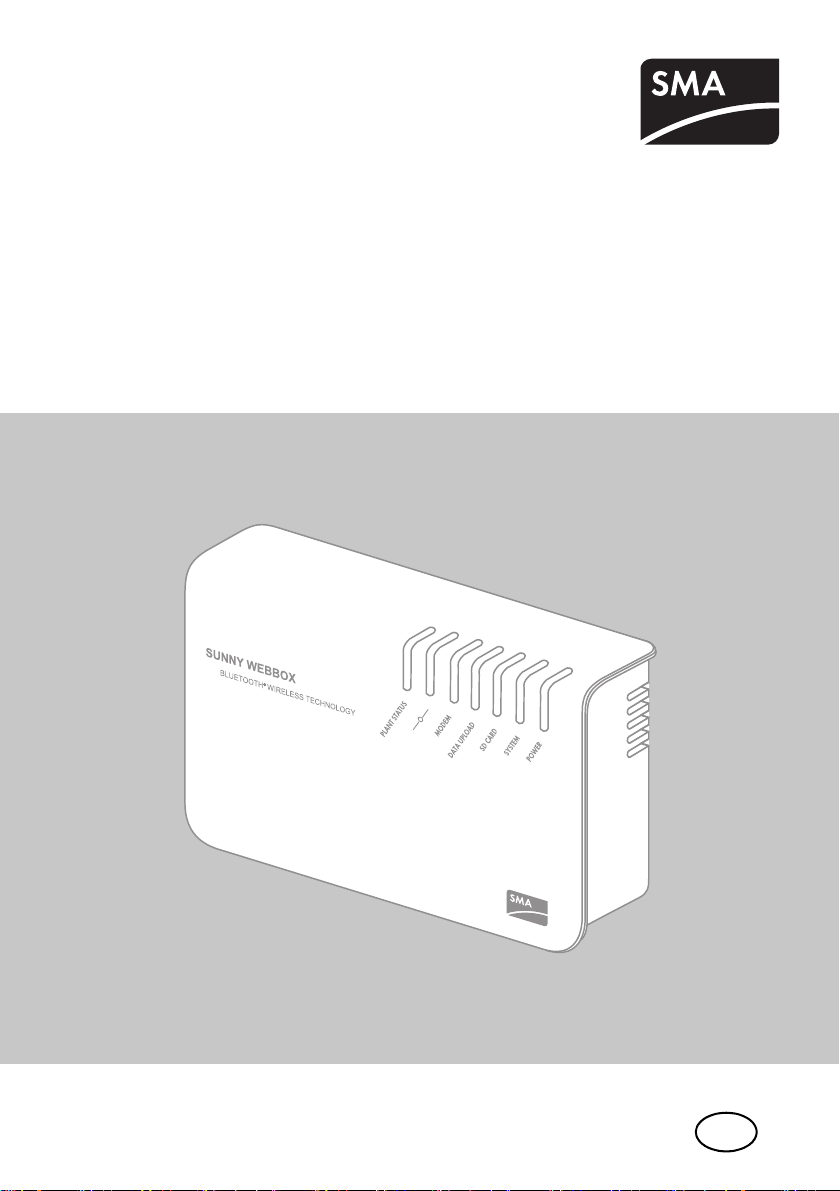
Device for Plant Monitoring
SUNNY WEBBOX with Bluetooth
Installation Manual
®
Wireless Technology
SWebBox20-IA-en-12 | Version 1.2
Page 2

Page 3

SMA Solar Technology AG Table of Contents
Table of Contents
1 Information on this Manual. . . . . . . . . . . . . . . . . . . . . . . . . 7
1.1 Validity . . . . . . . . . . . . . . . . . . . . . . . . . . . . . . . . . . . . . . . . . . . . 7
1.2 Additional Information . . . . . . . . . . . . . . . . . . . . . . . . . . . . . . . . 7
1.3 Symbols Used . . . . . . . . . . . . . . . . . . . . . . . . . . . . . . . . . . . . . . . 8
1.4 Terminology . . . . . . . . . . . . . . . . . . . . . . . . . . . . . . . . . . . . . . . . 8
2 Safety . . . . . . . . . . . . . . . . . . . . . . . . . . . . . . . . . . . . . . . . . . 9
2.1 Intended Use. . . . . . . . . . . . . . . . . . . . . . . . . . . . . . . . . . . . . . . . 9
2.1.1 Supported Products. . . . . . . . . . . . . . . . . . . . . . . . . . . . . . . . . . . . . . . . . . . . 10
2.1.2 Target Group . . . . . . . . . . . . . . . . . . . . . . . . . . . . . . . . . . . . . . . . . . . . . . . . 10
2.1.3 System Requirements. . . . . . . . . . . . . . . . . . . . . . . . . . . . . . . . . . . . . . . . . . . 11
2.2 Safety Precautions. . . . . . . . . . . . . . . . . . . . . . . . . . . . . . . . . . . 11
3 Scope of Delivery. . . . . . . . . . . . . . . . . . . . . . . . . . . . . . . . 12
4 Product Description . . . . . . . . . . . . . . . . . . . . . . . . . . . . . . 13
4.1 Sunny WebBox with Bluetooth . . . . . . . . . . . . . . . . . . . . . . . . 13
4.2 Type Label . . . . . . . . . . . . . . . . . . . . . . . . . . . . . . . . . . . . . . . . 14
4.3 LED Overview . . . . . . . . . . . . . . . . . . . . . . . . . . . . . . . . . . . . . . 15
4.4 Connection Area Overview . . . . . . . . . . . . . . . . . . . . . . . . . . . 17
4.5 Bluetooth Module Overview. . . . . . . . . . . . . . . . . . . . . . . . . . . 17
4.5.1 Bluetooth Module LED Overview . . . . . . . . . . . . . . . . . . . . . . . . . . . . . . . . . 18
4.6 Overview of the LEDs on the Network Connection. . . . . . . . . . 18
5 Assembly. . . . . . . . . . . . . . . . . . . . . . . . . . . . . . . . . . . . . . . 19
5.1 Requirements for the Mounting Location. . . . . . . . . . . . . . . . . . 19
5.2 Determining the Mounting Location for Bluetooth PV Plants . . . 20
5.2.1 Information on SMA Bluetooth . . . . . . . . . . . . . . . . . . . . . . . . . . . . . . . . . . 20
5.2.2 Determining the Mounting Location . . . . . . . . . . . . . . . . . . . . . . . . . . . . . . . 20
5.2.3 Extending the Bluetooth Network with the SMA Bluetooth Repeater . . . . . . 20
Installation Manual SWebBox20-IA-en-12 3
Page 4

Table of Contents SMA Solar Technology AG
5.3 Mounting the Sunny WebBox on the Wall. . . . . . . . . . . . . . . . 21
5.4 Mounting the Sunny WebBox on the Top-Hat Rail. . . . . . . . . . 22
6 Commissioning . . . . . . . . . . . . . . . . . . . . . . . . . . . . . . . . . . 23
6.1 Information on Commissioning . . . . . . . . . . . . . . . . . . . . . . . . . 23
6.2 Configuring Bluetooth Settings for the Sunny WebBox . . . . . . 24
6.3 Connecting the Sunny WebBox Directly to the Computer . . . . 25
6.4 Configuring the Network Settings on the Computer . . . . . . . . . 26
6.4.1 Information on Network Settings on the Computer . . . . . . . . . . . . . . . . . . . . 26
6.4.2 Windows 7, Windows Vista . . . . . . . . . . . . . . . . . . . . . . . . . . . . . . . . . . . . . 26
6.4.3 Windows XP, Windows 2000 . . . . . . . . . . . . . . . . . . . . . . . . . . . . . . . . . . . 28
6.5 Logging into the Sunny WebBox for the First Time . . . . . . . . . . 30
6.6 Configuring Sunny WebBox for the Local Network . . . . . . . . . 31
6.6.1 Using Dynamic Network Settings (DHCP) . . . . . . . . . . . . . . . . . . . . . . . . . . 31
6.6.2 Applying Static Network Settings (Deactivating DHCP) . . . . . . . . . . . . . . . . 32
6.6.3 Connecting the Sunny WebBox to the Local Network . . . . . . . . . . . . . . . . . 33
7 Logging into and out of the Sunny WebBox . . . . . . . . . . 34
7.1 Logging into the Sunny WebBox . . . . . . . . . . . . . . . . . . . . . . . 34
7.2 Logging out of the Sunny WebBox. . . . . . . . . . . . . . . . . . . . . . 35
8 Connecting Sunny WebBox Internet Access . . . . . . . . . . 36
8.1 Information on Sunny WebBox Internet Access . . . . . . . . . . . . 36
8.2 Making Proxy Settings . . . . . . . . . . . . . . . . . . . . . . . . . . . . . . . 36
8.3 Setting the HTTP Port. . . . . . . . . . . . . . . . . . . . . . . . . . . . . . . . . 37
8.4 Setting the NAT Port . . . . . . . . . . . . . . . . . . . . . . . . . . . . . . . . . 37
9 Service Functions . . . . . . . . . . . . . . . . . . . . . . . . . . . . . . . . 38
9.1 Performing Own Update for Sunny WebBox . . . . . . . . . . . . . . 38
9.1.1 Information . . . . . . . . . . . . . . . . . . . . . . . . . . . . . . . . . . . . . . . . . . . . . . . . . . 38
9.1.2 Firmware Update via the Internet (Recommended). . . . . . . . . . . . . . . . . . . . 38
9.1.3 Firmware Update via the SD Card . . . . . . . . . . . . . . . . . . . . . . . . . . . . . . . . 40
4 SWebBox20-IA-en-12 Installation Manual
Page 5

SMA Solar Technology AG Table of Contents
9.2 Restarting the Sunny WebBox via the User Interface . . . . . . . . 41
9.3 Resetting the Sunny WebBox Using the Reset Button . . . . . . . . 42
9.4 Determining the Current Network Settings of the
Sunny WebBox via the SD Card . . . . . . . . . . . . . . . . . . . . . . . 43
10 Maintenance and Care . . . . . . . . . . . . . . . . . . . . . . . . . . . 44
10.1 Maintenance. . . . . . . . . . . . . . . . . . . . . . . . . . . . . . . . . . . . . . . 44
10.2 Care . . . . . . . . . . . . . . . . . . . . . . . . . . . . . . . . . . . . . . . . . . . . . 44
11 Decommissioning . . . . . . . . . . . . . . . . . . . . . . . . . . . . . . . . 45
11.1 Dismounting the Sunny WebBox . . . . . . . . . . . . . . . . . . . . . . . 45
11.2 Packaging the Sunny WebBox . . . . . . . . . . . . . . . . . . . . . . . . . 46
11.3 Disposing of the Sunny WebBox . . . . . . . . . . . . . . . . . . . . . . . 46
12 Troubleshooting . . . . . . . . . . . . . . . . . . . . . . . . . . . . . . . . . 47
12.1 General Troubleshooting for the Sunny WebBox. . . . . . . . . . . 47
12.2 Troubleshooting the Bluetooth Connection . . . . . . . . . . . . . . . . 50
13 Accessories . . . . . . . . . . . . . . . . . . . . . . . . . . . . . . . . . . . . . 52
14 Appendix . . . . . . . . . . . . . . . . . . . . . . . . . . . . . . . . . . . . . . 53
14.1 Information on the SD Card . . . . . . . . . . . . . . . . . . . . . . . . . . . 53
14.2 Structure of the config.xml File . . . . . . . . . . . . . . . . . . . . . . . . . 53
14.3 Structure of an XML Data File . . . . . . . . . . . . . . . . . . . . . . . . . . 55
14.4 Information on Your Internet Browser . . . . . . . . . . . . . . . . . . . . 56
14.5 Setting up a Proxy Exception Rule in Internet Explorer . . . . . . . 56
14.6 Activating IPv6 in Windows XP SP2 . . . . . . . . . . . . . . . . . . . . . 57
14.7 Allocating an IP Address in a Local Network . . . . . . . . . . . . . . 57
Installation Manual SWebBox20-IA-en-12 5
Page 6

Table of Contents SMA Solar Technology AG
15 Technical Data . . . . . . . . . . . . . . . . . . . . . . . . . . . . . . . . . . 58
15.1 Sunny WebBox with Bluetooth . . . . . . . . . . . . . . . . . . . . . . . . 58
15.2 Plug-in Power Supply Units . . . . . . . . . . . . . . . . . . . . . . . . . . . . 59
15.2.1 CINCON, TRG30R 120. . . . . . . . . . . . . . . . . . . . . . . . . . . . . . . . . . . . . . . . 59
15.2.2 TaiyTech, TYT251200200UV/3000 . . . . . . . . . . . . . . . . . . . . . . . . . . . . . . 59
15.2.3 TaiyTech, TYT251200200EU/3000 . . . . . . . . . . . . . . . . . . . . . . . . . . . . . . 59
16 Contact . . . . . . . . . . . . . . . . . . . . . . . . . . . . . . . . . . . . . . . . 60
6 SWebBox20-IA-en-12 Installation Manual
Page 7
SMA Solar Technology AG Information on this Manual
1 Information on this Manual
This manual describes the installation and commissioning of the Sunny WebBox with Bluetooth. Keep
this manual in a convenient place for future reference. This manual does not contain any detailed
information about the connected devices. Detailed information on connected devices is provided in
the device manuals.
1.1 Validity
Th is i nst allatio n ma nua l is va lid for Sunny We bBo x wi th Bluetooth from hardware version A1 and from
firmware version 1.04.
1.2 Additional Information
Links to additional information can be found at www.SMA-Solar.com.
.
Document title Document type
SMA Bluetooth ‒ SMA Bluetooth
Practice
SMA Safety and Password Concept for Password-Protected
PV Plants with Bluetooth
You can call up the Sunny WebBox with Bluetooth user manual on the user interface via the Help
button .
®
®
Wireless Technology in
Wireless Technology
Technical information
Technical description
Installation Manual SWebBox20-IA-en-12 7
Page 8
Information on this Manual SMA Solar Technology AG
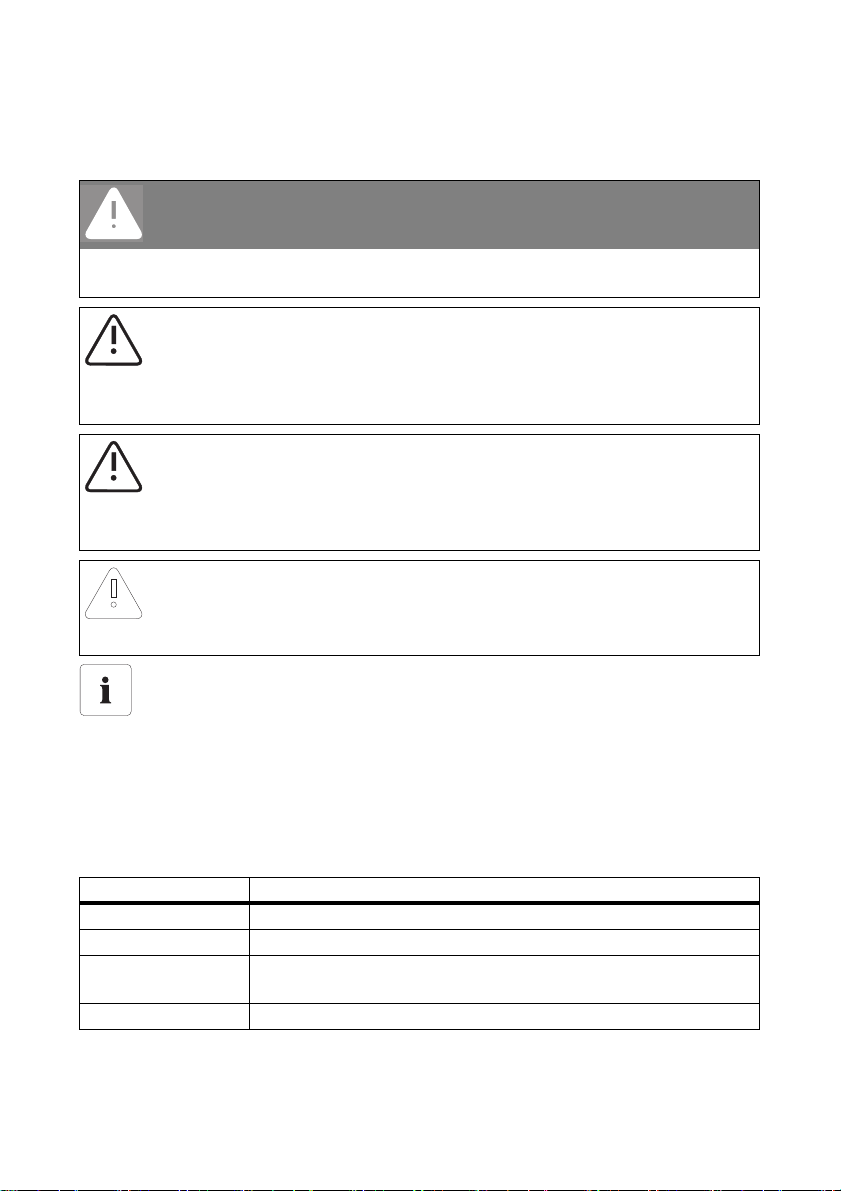
1.3 Symbols Used
The following types of safety precautions and general information appear in this document:
DANGER
DANGER indicates a hazardous situation which, if not avoided, will result in death or
serious injury.
WARNING
WARNING indicates a hazardous situation which, if not avoided, can result in death or
serious injury.
CAUTION
CAUTION indicates a hazardous situation which, if not avoided, could result in minor or
moderate injury.
NOTICE
NOTICE indicates a situation which, if not avoided, could result in property damage.
Information
Information provides tips that are valuable for effective installation and operation of the
product.
1.4 Terminology
The term photovoltaic plant is abbreviated to PV plant in this manual. Additionally, the product name
"Sunny WebBox with Bluetooth
running text.
Formatting Meaning
[Save] Buttons are displayed in square brackets [].
"Menu1" Menu items are displayed in quotation marks.
"Menu1 > Menu2" Menu paths are displayed in quotation marks. The angle bracket >
Example: Examples are represented in italics.
8 SWebBox20-IA-en-12 Installation Manual
®
Wireless Technology" is shortened to "Sunny WebBox" in the
separates individual menus.
Page 9

SMA Solar Technology AG Safety
2 Safety
2.1 Intended Use
The Sunny WebBox with Bluetooth is a communication device that records and logs the data of a
PV plant and makes it available via a user interface using the integrated web server. Additionally, the
Sunny WebBox can be used for remote diagnosis and the configuration of connected devices in a
PV plant via the computer.
The Sunny WebBox is intended for private and industrial use. The Sunny WebBox data is not suitable
for billing purposes. The data collected by the Sunny WebBox on the amount of power generated by
your plant may deviate from the energy meter data. Additional costs can be incurred from the use of
the Internet.
The Sunny WebBox is only suitable for indoor use.
The Sunny WebBox is only to be operated using the supplied plug-in power supply and in the voltage
range intended for this.
The Sunny WebBox must be continuously supplied with current.
• Do not operate the Sunny WebBox using a timer.
The Sunny WebBox is only to be used with original accessories or recommended accessories
approved by SMA Solar Technology AG.
Only use the Sunny WebBox for the purposes described in this manual.
For safety reasons, it is not permitted to modify the product or install components that are not explicitly
recommended or distributed by SMA Solar Technology AG for this product.
The enclosed documentation is part of this product.
• Read and observe the documentation.
• Keep the documentation in a convenient place for future reference.
Installation Manual SWebBox20-IA-en-12 9
Page 10
Safety SMA Solar Technology AG
2.1.1 Supported Products
The Sunny WebBox supports the following SMA products:
• all SMA inverters with integrated Bluetooth
Inverters of type SB x000TL-20 are only supported from firmware version 2.06
• In those inverters with a firmware version below 2.06, update the inverter firmware
via SD card (see technical description "Firmware Update with SD Card" at
www.SMA-Solar.com).
• SMA inverters with retrofitted SMA Bluetooth Piggy-Back/SMA Bluetooth Piggy-Back Plus from
firmware version 02.00.00.R. A list of the supported inverters can be found in the
SMA Bluetooth Piggy-Back/SMA Bluetooth Piggy-Back Plus manual.
• Sunny Backup with retrofitted SMA Bluetooth Piggy-Back Off-Grid from firmware
version 01.00.00.R. A list of the supported Sunny Backups can be found in the
SMA BluetoothPiggy-Back Off-Grid manual.
• Power Reducer Box
• Sunny Matrix from firmware version 2.10.00
•SMA Bluetooth Repeater
•Sunny SensorBox with SMA Power Injector with Bluetooth
• SMA radio-controlled socket
Updating the firmware of SMA products
In order for Bluetooth communication to function correctly in the plant, the firmware of the
SMA products must be completely up to date.
• Before commissioning the Sunny Web Box , up dat e th e fi rmw are of the SMA products
(see the manuals of the SMA products).
2.1.2 Target Group
This document is intended for end users and skilled persons. When you log in to the Sunny WebBox
there are two user groups at your disposal, "Installer" and "User". The "Installer" user group may only
be used by qualified personnel who are authorised to make changes to grid-relevant parameters for
the connected devices.
10 SWebBox20-IA-en-12 Installation Manual
Page 11

SMA Solar Technology AG Safety
2.1.3 System Requirements
Recommended screen resolution:
• 1,024 pixels x 768 pixels
Internet browser:
• Internet Explorer from version 8
• Firefox from version 3.6
2.2 Safety Precautions
General safety precautions in order to avoid physical injury
• Do not open the device or the plug-in power supply.
• Install the cabling in such a way that no one can stand on or trip over it.
General information for preventing property damage
• By touching electronic components, you can cause damage to or destroy the device through
electrostatic discharge (ESD). Avoid touching component connections and plug contacts.
Earth yourself before working on the device.
• With the help of the Sunny WebBox with Bluetooth you can change safety-related parameters
of the SMA inverters (e.g. SMA Grid Guard parameters). Incorrectly configured parameters
can lead to yield losses. Do not alter these safety-relevant parameters without prior consultation
with your power supply company operating the electricity grid into which your plant feeds.
• The saving procedure for parameters can take up to 30 seconds. Do not disconnect the
Sunny WebBox with Bluetooth from the voltage supply during the save procedure. If you
disconnect the Sunny WebBox from the voltage supply during the save procedure, data may
be lost.
Installation Manual SWebBox20-IA-en-12 11
Page 12
Scope of Delivery SMA Solar Technology AG
3 Scope of Delivery
Check the delivery for completeness and for any external damage. Please contact your specialist
dealer if you find any damage or if there are parts missing.
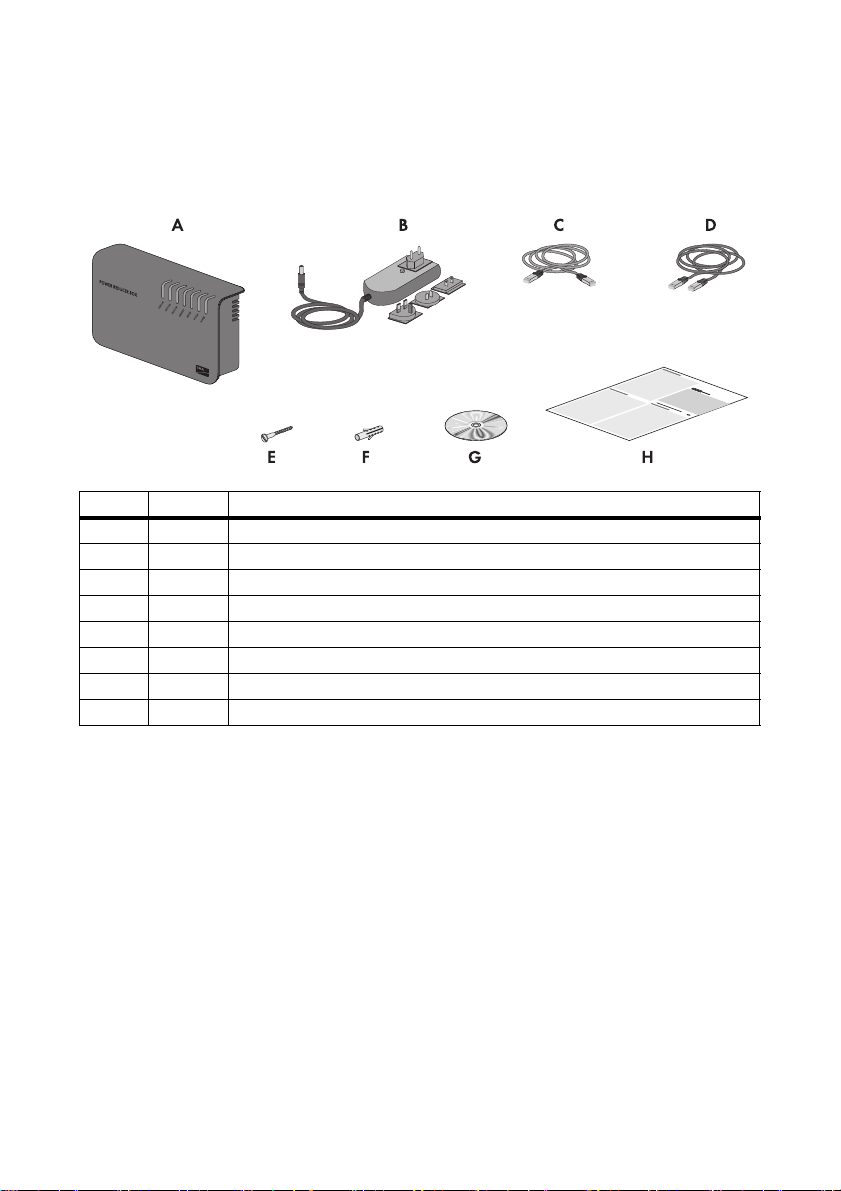
Item Quantity Description
A 1 Sunny WebBox with Bluetooth
B 1 Plug-in power supply with travel adapter
C 1 Patch cable (red)
D 1 Patch cable (blue)
E2 Screws (M6)
F2 Wall plugs (M6)
G 1 CD with installation manual, user manual and Sunny WebBox Assistant
H 1 Quick reference guide for commissioning
12 SWebBox20-IA-en-12 Installation Manual
Page 13
SMA Solar Technology AG Product Description
4 Product Description
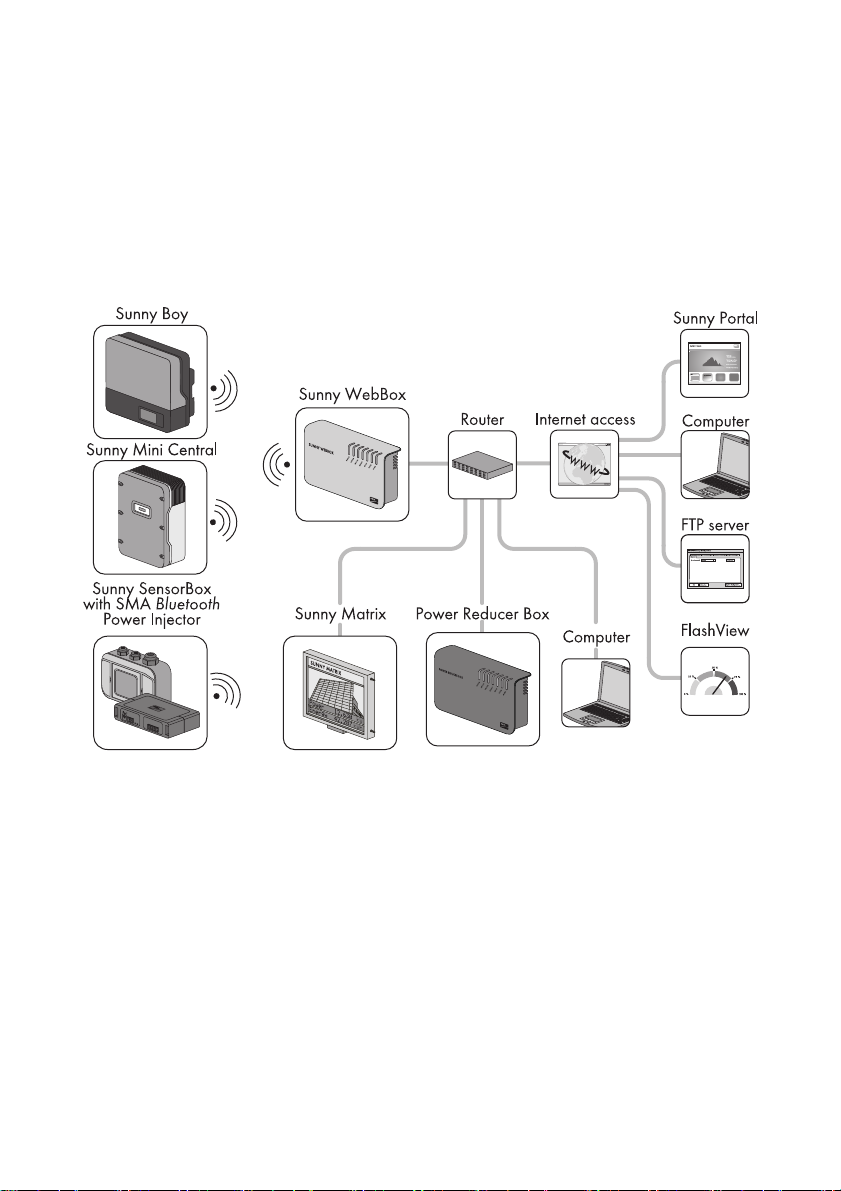
4.1 Sunny WebBox with Bluetooth
The Sunny WebBox with Bluetooth is a communication device that records and logs the data of a
PV plant and makes it available via a user interface using the integrated web server. Additionally, the
Sunny WebBox can be used for remote diagnosis and the configuration of connected devices in a
PV plant via the computer.
The Sunny WebBox can continuously request and evaluate the data of the connected devices.
The query interval for the data of the entire PV plant is five minutes. If you display data via the user
interface of the Sunny WebBox, the currently displayed data will be requested every 20 seconds.
If the connection to the PV plant is broken, the Sunny WebBox re-establishes the connection as soon
as this is possible.
The Sunny WebBox can automatically send the PV plant data to the Sunny Portal Internal portal or a
freely selectable FTP server for further processing. In addition, you can present your plant data via the
Sunny Matrix large view or the FlashView software.
You can use a Power Reducer Box together with the Sunny WebBox in order to involve the plant in
grid management. The Sunny WebBox can receive the requirements of the network operator via the
Power Reducer Box and forward them to the inverters in the PV plant.
Installation Manual SWebBox20-IA-en-12 13
Page 14
Product Description SMA Solar Technology AG
The Sunny WebBox has the function of a grid-forming device (master device) in the Bluetooth plant.
Master devices are communication products which form the structure of the Bluetooth PV plant and
collect, evaluate and process data. Unlike other master devices, the Sunny WebBox can establish up
to five uplinks, meaning that it can directly connect to five devices simultaneously. It can also assume
the function of a slave/root node and be involved in establishing a Bluetooth network. In this way,
the Sunny WebBox can connect multiple groups of inverters to one another that would not otherwise
have had a Bluetooth connection.
The number of devices which the Sunny WebBox can manage depends on the number of master
devices in the Bluetooth network with the same NetID. If the Sunny WebBox is the only Master in the
Bluetooth network, the Sunny WebBox can manage up to 50 devices. If two masters are present in
the Bluetooth netw ork (e. g. S unn y Exp lor er o r Sun ny B eam wit h Bluetooth), a maximum of 25 devices
can be managed by the Sunny WebBox. A maximum of one Sunny WebBox with Bluetooth is
allowed in a Bluetooth network with the same NetID. Additional information about SMA Bluetooth
Wireless Technology can be found in the download area at www.SMA-Solar.com.
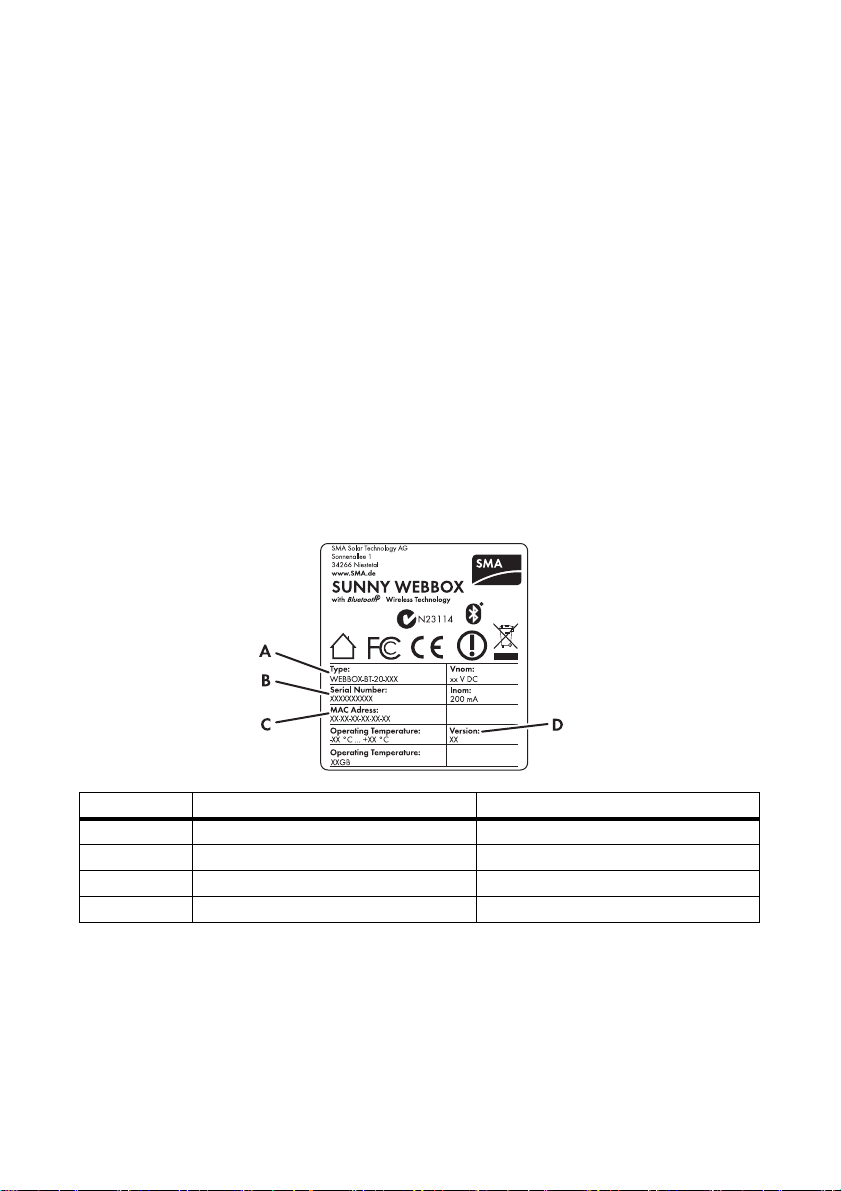
4.2 Type Label
The type label clearly identifies the Sunny WebBox. The type label can be found on the back of the
enclosure.
Item Description Explanation
AType Device type
B Serial number Serial number of the device
C MAC Address MAC address of the device
D Version Hardware version of the device
14 SWebBox20-IA-en-12 Installation Manual
Page 15

SMA Solar Technology AG Product Description
4.3 LED Overview
LED designation Status Meaning
"PLANT STATUS" Glowing green All devices in the PV plant have the status "OK".
Glowing orange At least one device in the PV plant has the "Warning"
status.
Glowi ng red At least one d evice in th e PV plant h as the " Fault" status.
Flashing orange The Sunny WebBox is sending update files to the
devices in the PV plant.*
Off There is no device available in the PV plant.
Glowing green Login for all connected devices is OK.
Glowing orange Login for at least one connected device is not OK.
Glowing red Login for all connected devices is not OK.
"MODEM"Off Not assigned
"DATA UPLOAD" Glowing green The data transmission to the Sunny Portal or an
external FTP server is active. Last upload was
successful.
Flashing green The Sunny WebBox is sending data to Sunny Portal or
an external FTP server.
Glowing red The last data transmission to Sunny Portal or an
external FTP server was not successful.
Off Data transmission is deactivated.
*
Installation Manual SWebBox20-IA-en-12 15
Page 16
Product Description SMA Solar Technology AG
LED designation Status Meaning
"SD CARD" Gl owi ng gre en Th e SD car d is ins ert ed, wri tea ble and the fre e memory
capacity is more than 10% of the overall capacity.
Flashing green The SD card is being written to. The free memory
capacity is more than 10% of the overall capacity.
Gl owi ng ora nge The SD c ard is i nse rte d, w rit eab le a nd t he f ree memory
capacity is less than or equal to 10% of the overall
capacity.
Flashing orange The SD card is being written to. The free memory
capacity is less than or equal to 10% of the overall
capacity.
Glowing red The SD card is full or write-protected or there is an
update file on the SD card.
Off No SD card is inserted.
"SYSTEM" Glowing green The Sunny WebBox is ready for operation.
Flashing green The Sunny WebBox is starting.
Flashing orange The Sunny WebBox is performing a firmware update.
Flashing red A system fault has occurred.
"POWER" Glowing green The Sunny WebBox is supplied with voltage.
Off The Sunny WebBox is not supplied with voltage.
*
The SMA radio-controlled socket, SMA Bluetooth Repeater and SMA Bluetooth
Power Injectors do not have any influence on the "
PLANT STATUS" LED.
16 SWebBox20-IA-en-12 Installation Manual
Page 17
SMA Solar Technology AG Product Description
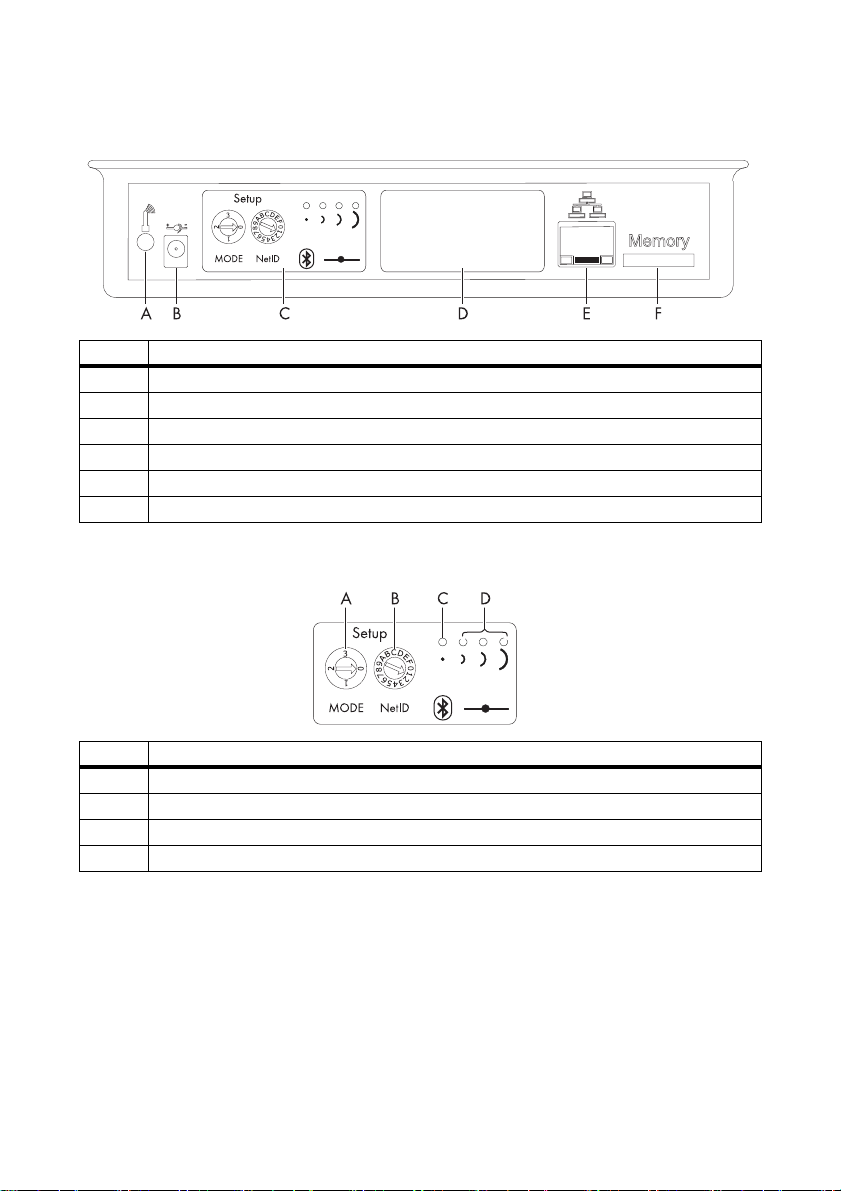
4.4 Connection Area Overview
Item Description
A Connection for GSM antenna cable (not used)
B Connection for the plug-in power supply
C Bluetooth module
D Module slot (not used)
E Network connection for 10/100 MBit Ethernet
FSD card slot
4.5 Bluetooth Module Overview
Item Description
A"MODE" rotary switch
B"NetID" rotary switch
C Bluetooth LED (blue)
D Connection display (not used)
Installation Manual SWebBox20-IA-en-12 17
Page 18
Product Description SMA Solar Technology AG
4.5.1 Bluetooth Module LED Overview
Status Meaning
Bluetooth LED (blue)
Glowing Bluetooth connection established
Off No Bluetooth connection established
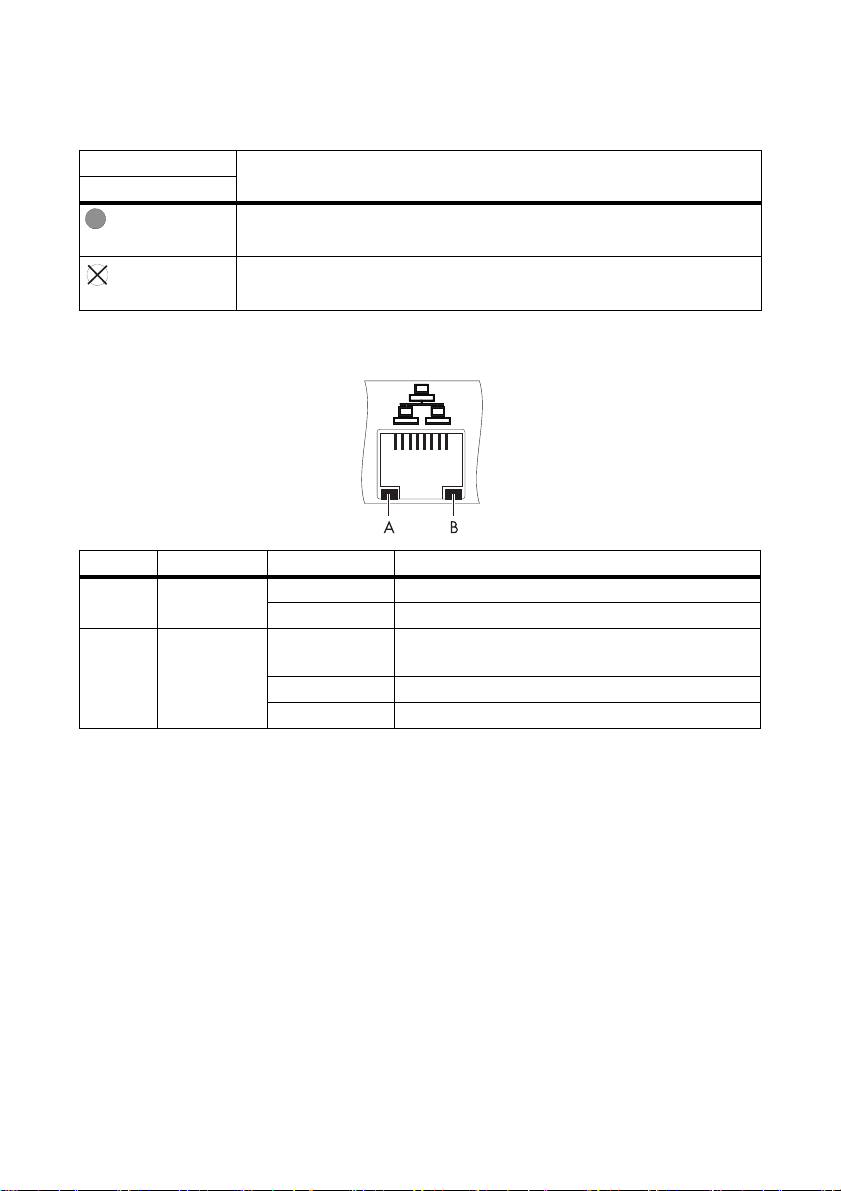
4.6 Overview of the LEDs on the Network Connection
Item LED Status Meaning
A Link On Connection established
Off No connection established
B Activity On Connection established, no data is being sent or
received
Flashing Data is being transmitted or received
Off No connection established
18 SWebBox20-IA-en-12 Installation Manual
Page 19
SMA Solar Technology AG Assembly
5 Assembly
5.1 Requirements for the Mounting Location
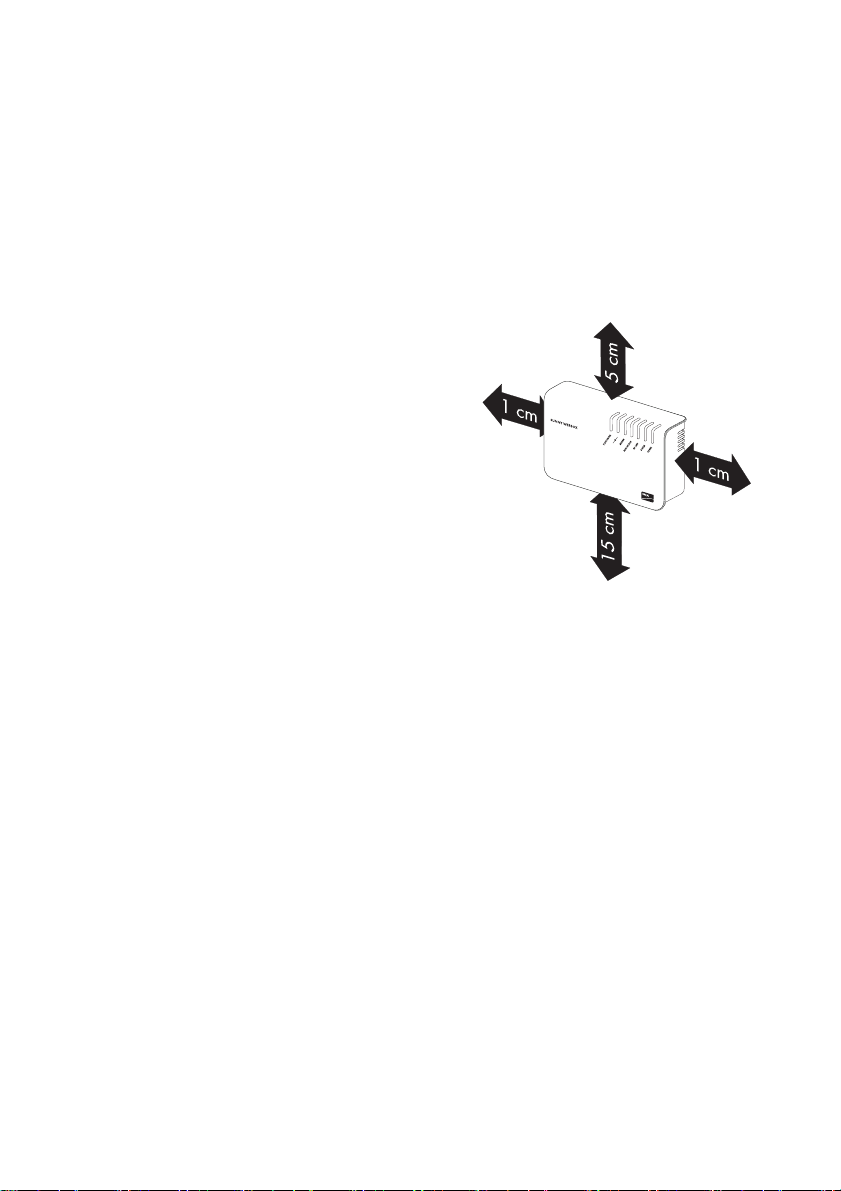
Note the following information on the mounting location of the Sunny WebBox:
• The Sunny WebBox is only suitable for installation in enclosed spaces.
• The ambient temperature must remain between –20°C and +65°C.
• Protect the Sunny WebBox from dust, wet conditions, corrosive substances and vapours.
• Observe the minimum clearances to walls, other
de vic es o r ob jec ts a s sh own in t he d iag ram in o rde r
to guarantee sufficient heat dissipation.
• Do not cover the Sunny WebBox.
• The distance from the Sunny WebBox to the
inverters may not be greater than the maximum
permitted distance of the corresponding plant
communication type. Note the specifications in the
respective sections.
• During installation, make sure there is optimum
reception for the transmission paths.
• Certain ambient conditions can reduce the
connection quality and data transmission speed between Bluetooth devices.
– Mount or install the Bluetooth device at a distance of at least 1 m from the following devices:
–WLAN devices
– Microwave ovens
– Other devices that use the 2.4 GHz radio spectrum
Installation Manual SWebBox20-IA-en-12 19
Page 20

Assembly SMA Solar Technology AG
5.2 Determining the Mounting Location for Bluetooth PV Plants
5.2.1 Information on SMA Bluetooth
The devices in your PV plant can communicate and network with a communication device via
Bluetooth. To ensure that the devices communicate with each other and are interlinked, they have to
be set to the same NetID. The NetI D is a un iqu e identi fic ati on n umber of you r PV pla nt. Thus , th e Ne tID
distinguishes your PV plant from other PV plants.
Determining the NetID for your PV plant
If your PV plant does not yet have a NetID, you must first determine a free NetID using the
Sunny Explorer software and set this for your devices in the PV plant.
NetID 1 is currently not supported by the Sunny WebBox with Bluetooth
It is currently only possible to establish a direct connection to an individual SMA Bluetooth
device via NetID 1 using the Sunny Explorer software or the Sunny Beam with Bluetooth.
Change the NetID of the Sunny WebBox with Bluetooth to the NetID of your PV plant
(NetID 2 to NetID F).
5.2.2 Determining the Mounting Location
Before you mount the Sunny WebBox, check the connec tion quality between the Sunny WebBox and
your PV plant at the intended mounting location of the Sunny WebBox. The connection quality can
be checked using the Sunny Explorer or the Sunny Beam with Bluetooth (see the user manual of the
respective device). You can change the connection quality by reducing and increasing the distance
between the Bluetooth devices.
5.2.3 Extending the Bluetooth Network with the SMA Bluetooth Repeater
The SMA Bluetooth Repeater transmits the data traffic within a Bluetooth network. If you install the
SMA Bluetooth Repeater on the limit of the radio range, the SMA Bluetooth Repeater extends the
range of the Sunny WebBox. Thus you can also connect remote devices via Bluetooth.
20 SWebBox20-IA-en-12 Installation Manual
Page 21

SMA Solar Technology AG Assembly
5.3 Mounting the Sunny WebBox on the Wall
Noting the serial number
Before mounting the Sunny WebBox, make a note of the serial number given on the type
label. You will require the serial number later to call up the Sunny WebBox user interface.
1. Take the relevant requirements into account when defining the mounting location.
2. Use the drilling template to determine the position of the Sunny W ebB ox a nd to mar k th e dr ill ing
holes with a pen.
3. Drill holes with 6 mm diameter at the marked points and insert wall plugs.
4. Screw in the screws and leave approx 6 mm protruding from the wall.
5. Hang the Sunny WebBox from the screws.
Installation Manual SWebBox20-IA-en-12 21
Page 22

Assembly SMA Solar Technology AG
5.4 Mounting the Sunny WebBox on the Top-Hat Rail
Noting the serial number
Before mounting the Sunny WebBox, make a note of the serial number given on the type
label. You will require the serial number later to call up the Sunny WebBox user interface.
1. Take the relevant requirements into account when defining the mounting location.
2. Hook the two lower retainers of the Sunny WebBox onto the lower edge of the top-hat rail.
3. Press the Sunny WebBox upwards and snap it into the upper retainer.
22 SWebBox20-IA-en-12 Installation Manual
Page 23

SMA Solar Technology AG Commissioning
6 Commissioning
6.1 Information on Commissioning
There are two options for commissioning the Sunny WebBox:
• Commissioning the Sunny WebBox using the Sunny WebBox Assistant (recommended)
• Commissioning the Sunny WebBox without the Sunny WebBox Assistant
Commissioning the Sunny WebBox using the Sunny WebBox Assistant
The Sunny WebBox Assistant is a software program which assists you with the commissioning of the
Sunny WebBox. Sunny WebBox Assistant can be found on the supplied CD and in the download
area at www.SMA-Solar.com.
• Use the quick reference guide for Sunny WebBox commissioning.
or
• Proceed as follows:
– Configure the Bluetooth settings of the Sunny WebBox (see page 24).
– Connect the Sunny WebBox directly to the computer (see page 25) or to the local network
(see page 33).
– Start the Sunny WebBox Assistant on your computer.
– Follow the instructions in the Sunny WebBox Assistant.
Commissioning the Sunny WebBox without the Sunny WebBox Assistant
Proceed as follows:
• Configure the Bluetooth settings of the Sunny WebBox (see page 24).
• Connect the Sunny WebBox directly to the computer (see page 25).
• Configure the network settings on the computer (see page 26).
• Configure the Sunny WebBox for the local network (see page 31).
Installation Manual SWebBox20-IA-en-12 23
Page 24

Commissioning SMA Solar Technology AG
6.2 Configuring Bluetooth Settings for the Sunny WebBox
You can configure the Bluetooth settings of the Sunny WebBox via the rotary switch of the Bluetooth
module. For this purpose, use a screwdriver with blade width of 2.5 mm.
Changing the NetID during operation of the Sunny WebBox
If you change the NetID during operation of the Sunny WebBox, the Sunny WebBox will
restart. Afterwards, the Sunny WebBox searches for all devices with the same NetID and
displays them in the plant tree.
NetID 1 is currently not supported by the Sunny WebBox with Bluetooth
It is currently only possible to establish a direct connection to an individual SMA Bluetooth
device via NetID 1 using the Sunny Explorer software or the Sunny Beam with Bluetooth.
Change the NetID of the Sunny WebBox with Bluetooth to the NetID of your PV plant
(NetID 2 to NetID F).
1. Turn the "MODE" rotary switch to position "0". The rotary switch must always be set to position
"0" (default setting). Other positions are not permitted and are intended for SMA Service only.
2. Turn the arrow of the "NetID" rotary switch to the
NetID of the PV plant. For a layout of the switch
positions, see the table.
NetID Function
0 Bluetooth is switched off.
1 (default setting) No function
2 … F Bluetooth is switched on.
The Sunny WebBox can network with all SMA Bluetooth
products with the same NetID. It is not possible to connect to
the Sunny Beam with Bluetooth or Sunny Explorer.
☑ The Sunny WebBox is prepared for Bluetooth communication.
24 SWebBox20-IA-en-12 Installation Manual
Page 25

SMA Solar Technology AG Commissioning
6.3 Connecting the Sunny WebBox Directly to the Computer
1. Use the blue patch cable (Ethernet crossover cable) to connect the Sunny WebBox directly to
the computer (see ➀ ). The terminal on the computer is generally marked with the same symbol
as the network connection of the Sunny WebBox. If necessary, refer to the computer manual.
Recommendation on network cabling
Should the patch cable supplied be too short, observe the following when buying a longer
cable:
• You need an Ethernet crossover cable.
• Unnecessarily long cables have an adverse effect on the signal quality.
The maximum permitted cable length is 100 m per segment.
• Use a high quality shielded twisted pair cable of category 5 (FTP Cat 5) or higher.
2. Connect the plug-in power supply to the Sunny WebBox and plug it into the socket-outlet
(see ➁ ).
☑ The Sunny WebBox starts up and is ready for operation once the "SYSTEM" and "POWER"
LEDs are green. The start-up procedure can take up to 90 seconds.
–If the "SYSTEM" or "POWER" LEDs do not glow green, please refer to Section
12.1"General Troubleshooting for the Sunny WebBox" (page47).
3. Set the computer to the network area of the Sunny WebBox (see Section 6.4"Configuring the
Network Settings on the Computer" (page26)).
Installation Manual SWebBox20-IA-en-12 25
Page 26

Commissioning SMA Solar Technology AG
6.4 Configuring the Network Settings on the Computer
6.4.1 Information on Network Settings on the Computer
If you do not use the Sunny WebBox Assistant for initial start-up of the Sunny WebBox, you need to
make the network settings manually on the computer. To do so, first configure your computer based
on the Sunny WebBox network range on delivery.
Read the respective section for the operating system of your computer. If you use an operating system
that is not described, refer to the manual of your operating system to find out how to set the computer
to IP address 192.168.0.100 and the Subnet mask to 255.255.255.0. You can then configure the
Sunny WebBox for a local network via the user interface (see page 31).
User rights in the operating system
You need the respective user rights on the computer used to commission the
Sunny WebBox in order to be able to make changes to the network settings.
If you have any questions, consult your system administrator.
6.4.2 Windows 7, Windows Vista
1. Start the computer.
2. In Windows, select "Start".
3. Enter "ncpa.cpl" in the search field and press the enter key.
☑The "Network Connections" window opens.
4. Double-click the LAN connection used to connect the Sunny WebBox.
– If Windows displays several LAN connections, there are probably several network
co nne cti ons ins tal led on t he c omp ute r. E nsu re t hat you sel ect the n etw ork con nec tio n th at t he
computer is using to connect to the Sunny WebBox. If necessary, refer to the manual of your
computer.
– If no LAN connection is displayed, please refer to Section 12.1"General Troubleshooting
for the Sunny WebBox" (page47).
☑The "Local Area Connection Status" window opens.
5. In the "General" tab, select [Properties].
26 SWebBox20-IA-en-12 Installation Manual
Page 27

SMA Solar Technology AG Commissioning
☑The "Local Area Connection Properties" window
opens.
6. Mark "Internet Protocol Version 4 (TCP/IPv4)" and
select [Properties].
☑The "Internet Protocol Version 4 (TCP/IPv4)
Properties" window opens.
7. Note the current network settings in the "Internet Protocol Version 4 (TCP/IPv4) Properties"
window. This will enable you to reset the computer network settings after configuration of the
Sunny WebBox.
8. Enter the following static network settings for the
computer in the "Internet Protocol Version 4 (TCP/
IPv4) Properties" window:
– Check the "Use the following IP address" field.
– Enter 192.168.0.100 into the "IP address:" field.
– Enter 255.255.255.0 into the "Subnet mask:"
field.
– Delete any entries in the "Default gateway",
"Preferred DNS server" and "Alternate DNS
server" fields.
9. Select [OK].
10. In the "Local Area Connection Properties" window, select [OK].
☑ The computer is set to the network settings of the Sunny WebBox.
Installation Manual SWebBox20-IA-en-12 27
Page 28

Commissioning SMA Solar Technology AG
6.4.3 Windows XP, Windows 2000
1. Start the computer.
2. In Windows, select "Start > Settings > Network Connections".
3. Double-click the LAN connection used to connect the Sunny WebBox.
– If Windows displays several LAN connections, there are probably several network
co nne cti ons ins tal led on t he c omp ute r. E nsu re t hat you sel ect the n etw ork con nec tio n th at t he
computer is using to connect to the Sunny WebBox. If necessary, refer to the manual of your
computer.
– In the event that no LAN connection is displayed, please refer to Section 12.1"General
Troubleshooting for the Sunny WebBox" (page47).
☑The "Local Area Connection Status" window opens.
4. In the "General" tab, select [Properties].
☑The "Local Area Connection Properties" window
opens.
5. Mark "Internet Protocol (TCP/IP)" and select
[Properties].
☑The "Internet Protocol (TCP/IP) Properties"
window opens.
6. Note the current network settings in the "Internet Protocol (TCP/IP) Properties" window. This will
enable you to reset the computer network settings after configuration of the Sunny WebBox.
28 SWebBox20-IA-en-12 Installation Manual
Page 29

SMA Solar Technology AG Commissioning
7. Enter the following static network settings in the
"Internet Protocol (TCP/IP) Properties" window:
– Check the "Use the following IP address" field.
– Enter 192.168.0.100 into the "IP address:" field.
– Enter 255.255.255.0 into the "Subnet mask:"
field.
– Delete any entries in the "Default gateway",
"Preferred DNS server", and "Alternate DNS
server" fields.
8. Select [OK].
9. In the "Local Area Connection Properties" window, select [OK].
☑ The computer is set to the network settings of the Sunny WebBox.
Installation Manual SWebBox20-IA-en-12 29
Page 30

Commissioning SMA Solar Technology AG
6.5 Logging into the Sunny WebBox for the First Time
1. Start Internet browser (e.g. Internet Explorer).
Enabling JavaScript in the Internet browser
The Sunny WebBox user interface needs JavaScript in order to be able to correctly display
and execute the contents and functions of the Sunny WebBox. Ensure that JavaScript is
activated in your Internet browser. If necessary, refer to the help section of your Internet
browser.
2. Enter http://192.168.0.168 into the address bar and press the enter key.
☑ The Sunny WebBox login page opens.
– If the page does not open, please refer to Section 12.1"General Troubleshooting for the
Sunny WebBox" (page47).
3. Log in to the Sunny WebBox as the user or installer. Upon delivery, the password for the User
is "0000" and the password for the Installer is "1111".
Security in the local network
Change the default password of all user groups promptly in order to avoid unauthorised
access.
30 SWebBox20-IA-en-12 Installation Manual
Page 31

SMA Solar Technology AG Commissioning
6.6 Configuring Sunny WebBox for the Local Network
Information on Integrating the Sunny WebBox into a Local Network
Protecting the Ethernet network from external attacks
Protect your Ethernet network through suitable security measures such as a firewall and
through the allocation of secure passwords (see the Sunny WebBox user manual). After
the first login to the Sunny WebBox, please change the passwords for each user group.
You have the following options for integrating the Sunny WebBox into the local network:
Changing network settings
Do not change any network settings in the network devices if you are not clear about the
effects of the change. Changes to values could lead to the existing network not functioning
or only partially functioning. If you have any questions, contact your network administrator.
• Using dynamic network settings (DHCP)
• Making static network settings
6.6.1 Using Dynamic Network Settings (DHCP)
When using DHCP (Dynamic Host Configuration Protocol), the Sunny WebBox obtains its network
settings (IP address, subnet mask, gateway and DNS server) via a DHCP server.
Default settings
DHCP is activated in the Sunny WebBox by default.
DHCP server requirements
If you want to obtain the network settings for the Sunny WebBox via DHCP, check your
DHCP server in advance. The DHCP server must extend the lease of the assigned IP
address. If the DHCP server assigns a new IP address after the lease has expired, we do
not recommend using DHCP.
You can only call up the user interface via the URL http://WebBox"serial number" if
your DHCP server has a DNS function.
If your DHCP server does not have a DNS function but you want to use DHCP, you can
call up the user interface via the current IP address of the Sunny WebBox. You can
determine the current IP address via the SD card (see page 43). Alternatively, you can find
the Sunny WebBox IP address in the DHCP server. A DHCP server can normally list all
devices to which you have assigned an IP address. You can then identify the
Sunny WebBox based on your MAC address. The MAC address is located on the type
label of the Sunny WebBox.
Installation Manual SWebBox20-IA-en-12 31
Page 32

Commissioning SMA Solar Technology AG
1. Log into the Sunny WebBox.
2. Select the Sunny WebBox in the plant tree and select "Settings" in the device menu.
3. Select the "External Communication > DHCP" parameter group.
4. Select [Edit].
5. Select "Yes" in the "Activated" field.
6. Select [Save].
6.6.2 Applying Static Network Settings (Deactivating DHCP)
1. Log into the Sunny WebBox.
2. Select the Sunny WebBox in the plant tree and select "Settings" in the device menu.
3. Select the "External Communication > Ethernet" parameter group.
4. Select [Edit].
5. In the "DNS server IP" field, enter the IP address of the DNS server (Domain Name System
Server). Usually, the IP address of the router has to be entered here.
6. Enter the gateway IP address of your network into the "Gateway IP" field. Usually, the IP address
of the router has to be entered here.
7. In the "IP Address" field, enter the static IP address under which the Sunny WebBox is to be
accessed in the local network (see Section 14.7"Allocating an IP Address in a Local Network"
(page57)).
8. In the "Subnet mask" field, enter the subnet mask of your network. Normally, you can find this
information in the router manual.
9. In the "DHCP" parameter group, select "No" in the "Activated" field.
10. Select [Save].
☑ The Sunny WebBox saves the network settings. The saving procedure can take up to
30 seconds. Do not disconnect the Sunny WebBox with Bluetooth from the voltage supply
during the save procedure. The saving procedure is complete once you are directed to the
new IP address or the Sunny WebBox is no longer available via the Internet browser.
Resetting the computer to the network settings
Reset your computer to the original network settings in order that you can reach it via the
local network when required (see Section 6.4"Configuring the Network Settings on the
Computer" (page26)).
11. Once the saving procedure is completed, remove the plug-in power supply of the
Sunny WebBox from the socket-outlet.
12. Remove the patch cable (blue).
32 SWebBox20-IA-en-12 Installation Manual
Page 33

SMA Solar Technology AG Commissioning
6.6.3 Connecting the Sunny WebBox to the Local Network
1. Connect the Sunny WebBox directly to the remote terminal (e.g. router, network switch or
Ethernet hub) of the local network using the red patch cable (see ➀ ). The connection of the
remote terminal is normally identified by the same symbol as the Sunny WebBox network
connection. If necessary, please refer to the remote terminal manual.
Recommendation on network cabling
Should the patch cable supplied be too short, observe the following when buying a longer
cable:
• You require a patch cable.
• Unnecessarily long cables have an adverse effect on the signal quality.
The maximum permitted cable length is 100 m per segment.
• Use a high quality shielded twisted pair cable of category 5 (FTP Cat 5) or higher.
2. Connect the plug-in power supply to the Sunny WebBox and plug it into the socket-outlet
(see ➁ ).
☑ The Sunny WebBox starts up and is ready for operation once the "SYSTEM" and "POWER"
LEDs glow green. The start-up procedure can take up to 90 seconds.
–If the "SYSTEM" or "POWER" LEDs do not glow green, please refer to Section
12.1"General Troubleshooting for the Sunny WebBox" (page47).
☑ The user interface of the Sunny WebBox is now available via the new IP address or the URL
http://WebBox"serial number" (s ee S ection 7 "L ogg ing int o and out of t he S unn y We bBo x"
(page34)).
Installation Manual SWebBox20-IA-en-12 33
Page 34

Logging into and out of the Sunny WebBox SMA Solar Technology AG
7 Logging into and out of the Sunny WebBox
7.1 Logging into the Sunny WebBox
Unauthorised access to your PV plant
The plant password protects your plant from unauthorised access.
• After logging in for the first time, change the default password for both user groups.
Plant password at delivery
All devices are delivered with the user password 0000 and the installer password 1111.
1. Start Internet browser (e.g. Internet Explorer).
2. If you use DHCP for the Sunny WebBox (default setting), enter the URL
http://WebBox"serial number", e.g., http://WebBox895903467 in the address bar and
press the enter key. Tip: you can find the serial number on the type label (see Section 4.2"Type
Label" (page14)) or determine it using the SD card (see Section 9.4"Determining the Current
Network Settings of the Sunny WebBox via the SD Card" (page43)).
☑ The Sunny WebBox login page opens.
– If the page does not open, refer to Section 12.1"General Troubleshooting for the Sunny
WebBox" (page47).
3. If you are using static network settings for the Sunny WebBox, enter the static IP address of the
Sunny WebBox in the address bar and press the enter key. If you do not know the IP address
of the Sunny WebBox, see Section 9.4"Determining the Current Network Settings of the Sunny
WebBox via the SD Card" (page43).
☑ The Sunny WebBox login page opens.
– If the page does not open, refer to Section 12.1"General Troubleshooting for the Sunny
WebBox" (page47).
4. Select the desired language.
5. In the "User" field, select the user group you wish to log in to.
6. In the "Password" field, enter the password belonging to the selected user group.
7. Select [Login].
☑ The Sunny WebBox user interface opens
34 SWebBox20-IA-en-12 Installation Manual
Page 35

SMA Solar Technology AG Logging into and out of the Sunny WebBox
7.2 Logging out of the Sunny WebBox
1. Select [Logout] in the icon bar.
☑ The Sunny WebBox login page opens. You have successfully logged out.
Installation Manual SWebBox20-IA-en-12 35
Page 36

Connecting Sunny WebBox Internet Access SMA Solar Technology AG
8 Connecting Sunny WebBox Internet Access
8.1 Information on Sunny WebBox Internet Access
Changing extended network settings
Do not change any network settings in the network devices if you are not clear about the
effects of the change. Changes to values could lead to the existing network not functioning
at all or only working partially. If you have any questions, contact your network
administrator.
If you use a proxy server for the Internet connection, you must make proxy settings in the Sunny WebBox
(see Section 8.2"Making Proxy Settings" (page36)).
If you would like to make the Sunny WebBox available via the Internet to allow, for example, direct
access to the Sunny WebBox via Sunny Portal, you must configure port forwarding in your router.
For this purpose, it is sometimes necessary to adjust the network ports for the Sunny WebBox
(see Section 8.3"Setting the HTTP Port" (page37) and Section 8.4"Setting the NAT Port" (page37)).
8.2 Making Proxy Settings
If there is a proxy server in your network, you must make proxy settings in the Sunny WebBox.
The proxy settings of the Sunny WebBox are required for connection to the Sunny Portal and for
firmware updates to the Sunny WebBox or the devices in your PV plant.
Using the Proxy Server
1. Select the Sunny WebBox in the plant tree and select "Settings" in the device menu.
2. Select the "External Communication" > "Proxy settings" parameter group.
3. In the "Activated" field, select "Yes" to use a proxy server.
4. In the "Login" field, enter the login name for the proxy server.
5. In the "Port" field, enter the network port at which the proxy server is available.
6. In the "Password" field, enter the password for the proxy server.
7. Confirm the password entered in the "Confirm the password" field.
8. In the "Server" field, enter the proxy server IP address.
9. Select [Save].
Not Using the Proxy Server
1. Select the Sunny WebBox in the plant tree and select "Settings" in the device menu.
2. Select the "External Communication" > "Proxy settings" parameter group.
3. In the "Activated" field, select "No" to not use a proxy server.
4. Select [Save].
36 SWebBox20-IA-en-12 Installation Manual
Page 37

SMA Solar Technology AG Connecting Sunny WebBox Internet Access
8.3 Setting the HTTP Port
Adjusting the network ports
Changing the ports is only necessary in rare cases. Before adjusting the ports, contact your
network administrator.
The HTTP port is the network port at which the Sunny WebBox user interface is available in the local
network. The HTTP Port is set to 80 by default.
If you set another HTTP port, you must enter this when opening the user interface behind the IP
address.
Example: the IP address of the Sunny WebBox is 192.168.0.168 and you have changed the
HTTP port to 8080. You must then enter "http://192.168.0.168:8080" in the address bar of the
Internet browser.
1. Log into the Sunny WebBox.
2. Select the Sunny WebBox in the plant tree and select "Settings" in the device menu.
3. Select the "External Communication > HTTP" parameter group.
4. Select [Edit].
5. In the "Port" field, set the desired port (default setting: port 80).
6. Select [Save].
8.4 Setting the NAT Port
Adjusting the network ports
Changing the ports is only necessary in rare cases. Before adjusting the ports, contact your
network administrator.
During data transmission, the Sunny WebBox sends the IP address and port at which the
Sunny WebBox is available on the Internet to the Sunny Portal. You must set up corresponding port
forwarding and release the desired port in the router (see router manual). The NAT port is set to 80
by default. If there are multiple Sunny WebBoxes in your local network, you must select different
NAT ports. If you have selected an NAT port other than 80, you must also set the changed NAT port
in the Sunny WebBox.
1. Log into the Sunny WebBox.
2. Select the Sunny WebBox in the plant tree and select "Settings" in the device menu.
3. Select the "External Communication > Nat" parameter group.
4. Select [Edit].
5. Enter the required port in the "Port" field.
6. Select [Save].
Installation Manual SWebBox20-IA-en-12 37
Page 38

Service Functions SMA Solar Technology AG
9 Service Functions
9.1 Performing Own Update for Sunny WebBox
9.1.1 Information
You have the option of updating the Sunny WebBox firmware. You can perform the firmware update
via the Internet or locally via the SD card. The existing settings of the Sunny WebBox and data from
the PV plant remain available after the update procedure. In order to keep the Sunny WebBox
firmware up to date at all times, automatic firmware updates via the Internet are recommended.
The update procedure is indicated by the flashing orange "SYSTEM" LED and occasionally by a red
light chaser across all LEDs. The firmware update is complete when the "SYSTEM" LED glows green.
An update procedure can take up to a maximum of 20 minutes.
Reading off the current firmware version of the Sunny WebBox
You can find the current firmware version of the Sunny WebBox in the status bar at the
bottom left-hand corner of the user interface.
User interface temporarily unavailable
During the update, the Sunny WebBox restarts and you will not be able to access the
Sunny WebBox user interface for a short period of time.
Do not disconnect the Sunny WebBox from the voltage supply during the update
procedure.
9.1.2 Firmware Update via the Internet (Recommended)
If the Sunny WebBox has Internet access, you can update the Sunny WebBox via the Internet
automatically or manually.
Activating/deactivating automatic firmware update
When the automatic firmware update is activated, the Sunny WebBox checks for new firmware
updates once a day. If a new firmware update is available, the Sunny WebBox downloads the
firmware update from the Internet. The update procedure starts automatically at night between
11:00 p.m. and 11:30 p.m.
Unexpected interruption of an automatically started update procedure
If an automatically started update procedure of the Sunny WebBox is interrupted
(e.g. as a result of a power outage), the Sunny WebBox restarts the update procedure in
the next defined time period.
1. Select the Sunny WebBox in the plant tree and select "Settings" in the device menu.
2. Select the "Device > Update" parameter group.
3. Click on the [Edit] button.
38 SWebBox20-IA-en-12 Installation Manual
Page 39

SMA Solar Technology AG Service Functions
4. In the "Automatic update" field, select "Yes" in order to activate the automatic firmware update
(default setting).
or
In the "Automatic update" field, select "No" to deactivate the automatic firmware update.
5. Select [Save].
Manually Updating the Firmware
NOTICE
Loss of plant data possible!
Only perform a manual firmware update when the PV plant is not in operation
(e.g. during the night). Otherwise, losses may occur during the recording of the plant data.
You can also carry out manual updates when the automatic firmware update is activated.
1. Select the Sunny WebBox in the plant tree and select "Settings" in the device menu.
2. Select the "Device > Update" parameter group.
3. In the "Check for update and install it" field, select [Execute].
☑ The Sunny WebBox checks whether a new firmware update is available. If a new firmware
update is available, the Sunny WebBox downloads the firmware update from the Internet and
starts the update procedure.
Installation Manual SWebBox20-IA-en-12 39
Page 40

Service Functions SMA Solar Technology AG
9.1.3 Firmware Update via the SD Card
NOTICE
Loss of plant data possible!
Only perform a manual firmware update when the PV plant is not in operation
(e.g. during the night). Otherwise, losses may occur during the recording of the plant data.
NOTICE
Loss of data on the SD card possible!
Do not remove the SD card while the "SD CARD" LED is flashing green or orange. This can
damage the file system of the SD card and lead to data loss. Depending on the amount of
data, the writing process can take some time.
Using a separate SD card for firmware updates
Use a separate SD card for firmware updates, which contains only the update files for the
Sunny WebBox. If there are update files on the external SD card, exporting XML and CSV
files is deactivated.
Take note of the information on the SD card (see Section 14.1"Information on the SD Card"
(page53)).
1. Select the required update file in the downloads area at www.SMA-Solar.com and download
it to your computer.
2. Connect the SD card to the computer and create a folder called "UPDATE" on the SD card.
3. Copy the downloaded update file (*.up2) to the "UPDATE" folder created on the SD card, and
then remove the SD card from the computer.
Saving only one update file in the "UPDATE" folder.
The "UPDATE" folder may only ever contain one update file. If there is more than one
update file in the "UPDATE" folder, the firmware will not be updated.
4. Remove the plug-in power supply of the Sunny WebBox from the socket-outlet.
5. Insert the SD card into the Sunny WebBox SD card slot.
6. Insert the plug-in power supply of the Sunny WebBox into the socket-outlet.
☑ After approximately 90 seconds, the Sunny WebBox is ready for operation and the update
process starts.
40 SWebBox20-IA-en-12 Installation Manual
Page 41

SMA Solar Technology AG Service Functions
9.2 Restarting the Sunny WebBox via the User Interface
1. Select the Sunny WebBox in the plant tree and select "Settings" in the device menu.
2. Select the "Device > System" parameter group.
3. In the "Initiate device restart" field, select [Execute].
4. Select [OK].
☑ The Sunny WebBox is restarted. The restart was successful if the "SYSTEM" and "POWER" LEDs
glow green again. The start-up procedure can take up to 90 seconds.
–If the "SYSTEM" or "POWER" LEDs do not glow green, please ref er to Se cti on 1 2.1 "G eneral
Troubleshooting for the Sunny WebBox" (page47).
Installation Manual SWebBox20-IA-en-12 41
Page 42

Service Functions SMA Solar Technology AG
9.3 Resetting the Sunny WebBox Using the Reset Button
You can reset the Sunny WebBox through a small hole in the rear side of the Sunny WebBox, behind
which the Reset button is hidden. For this purpose, the Sunny WebBox must be supplied with current.
Data backup
Before you reset the Sunny WebBox, make a note of all settings such as network or portal
settings if necessary. In addition, save the PV plant data, for example via the SD card or
FTP download, in order to avoid data losses.
Depending on how long you press the Reset button, the Sunny WebBox performs the actions listed in
the following table.
Duration Action
1 … 5 seconds Resets the passwords to the default setting. All other PV plant
settings and data are retained.
5 … 15 seconds Resets the network settings to the default setting. All other PV plant
settings and data are retained.
15 … 60 seconds Resets all settings (event memory, network settings, modem
settings, portal settings and passwords) of the Sunny WebBox
back to the default settings. PV plant data will be fully deleted.
Over 60 seconds The Sunny WebBox is not reset. All settings are retained.
1. Use a sharp object to press the hidden reset button
through the hole.
☑ The Sunny WebBox is reset.
42 SWebBox20-IA-en-12 Installation Manual
Page 43

SMA Solar Technology AG Service Functions
9.4 Determining the Current Network Settings of the Sunny WebBox via the SD Card
The following steps allow you to determine the current settings and the current firmware of the
Sunny WebBox if you do not have access to the user interface.
Take note of the information on the SD card (see Section 14.1"Information on the SD Card"
(page53)).
1. Insert the SD card into the Sunny WebBox SD card slot.
☑ The Sunny WebBox creates a folder with the name "WEBBOX_[serial number]" on the
SD card and saves the "config.xml" file there. The writing process is complete when the
"SD CARD" LED glows continuously. Example: WEBBOX_0155000123\config.xml
2. When the "SD CARD" LED glows continuously, remove the SD card from the Sunny WebBox
SD card slot.
3. Read the SD card using a computer with an SD card reader.
4. Open the "config.xml" fi le in th e WebB ox_[Se rial number] fo lder with a text editor or an Internet
browser.
5. Read the values of the network settings of the Sunny WebBox (see Section 14.2"Structure of
the config.xml File" (page53)).
Installation Manual SWebBox20-IA-en-12 43
Page 44

Maintenance and Care SMA Solar Technology AG
10 Maintenance and Care
10.1 Maintenance
Conduct regular visual inspections of the Sunny WebBox to check for external damage or soiling.
10.2 Care
NOTICE
Damage to the device due to ingress of liquids
• The Sunny WebBox is not waterproof. Protect the Sunny WebBox from wet
conditions.
• When cleaning the device, only use a lightly damp cloth in order to prevent water
from entering the device. If there is a considerable amount of dirt, you can also use
a mild, non-abrasive, non-corrosive cleaning agent.
44 SWebBox20-IA-en-12 Installation Manual
Page 45

SMA Solar Technology AG Decommissioning
11 Decommissioning
11.1 Dismounting the Sunny WebBox
NOTICE
Loss of plant data possible!
Only disconnect the Sunny WebBox from the voltage supply when the PV plant is not in
operation (e.g. at night). Otherwise, losses may occur during the recording of the plant
data.
NOTICE
Loss of data on the SD card possible!
Do not disconnect the Sunny WebBox from the voltage supply while the "SD CARD" LED
is flashing green or orange. This can damage the file system of the SD card and lead to
data loss. Depending on the amount of data, the writing process can take some time.
1. Remove the plug-in power supply of the Sunny WebBox from the socket-outlet.
2. Remove the DC plug of the plug-in power supply from the enclosure.
3. Remove the Sunny WebBox patch cable.
4. Depending on the mounting type, dismount the Sunny WebBox as follows:
Wall mounting
Installation Manual SWebBox20-IA-en-12 45
Page 46

Decommissioning SMA Solar Technology AG
Top-hat rail mounting
11.2 Packaging the Sunny WebBox
For return shipment, use packaging appropriate for transport – if possible the original packaging.
11.3 Disposing of the Sunny WebBox
At the end of its service life, dispose of the Sunny WebBox in accordance with the currently applicable
disposal regulations for electronic waste at the installation site. Alternatively, send it back to
SMA Solar Technology AG at your own expense labelled "ZUR ENTSORGUNG" ("FOR DISPOSAL").
46 SWebBox20-IA-en-12 Installation Manual
Page 47

SMA Solar Technology AG Troubleshooting
12 Troubleshooting
12.1 General Troubleshooting for the Sunny WebBox
No. Problem Cause Remedy
1 The Sunny WebBox
is not available via
the user interface.
or
You cannot find the
Sunny WebBox via
the Sunny WebBox
Assistant.
The Sunny WebBox is not
connected to the network or
to the voltage supply.
Incorrect network settings of
the network components
A firewall is blocking the
connection.
Defective or damaged
network components, patch
cables or plug connections
• C onne ct the S unny W ebBox with t he
patch cable directly to the computer
or the local network and supply the
Sunny WebBox with voltage
(see page 23).
• U se t he S unn y We bBo x As sis tan t fo r
commissioning.
• Check the network settings of the
computer with which you wish to
access the Sunny WebBox. Adjust
the network settings if necessary.
• Reset the Sunny WebBox
(see page 42) and repeat the
commissioning.
• Check the network settings for the
individual network components
(e.g., router, proxy server, etc.).
Adjust the network settings if
necessary.
• Please contact your network
administrator.
• Deactivate the computer firewall or
enable the necessary connection.
• Replace the defective or damaged
parts of the network.
• Please contact your network
administrator.
Installation Manual SWebBox20-IA-en-12 47
Page 48

Troubleshooting SMA Solar Technology AG
No. Problem Cause Remedy
1 The Sunny WebBox
is not available via
the user interface.
or
You cannot find the
Sunny WebBox via
the Sunny WebBox
Assistant.
The Internet browser is
configured incorrectly.
There is no Internet
connection.
The Sunny WebBox has not
been started correctly.
• If there is a proxy server in your
network, you must enter an
exception for the proxy server in
your Internet browser
(see Section 14.4"Information on
Your Internet Browser" (page56)).
• Re-establish Internet access.
If necessary, contact your Internet
service provider.
• Remove the Sunny WebBox plug-in
power supply from the socket-outlet
and plug it back in after a short time
in ord er t o re sta rt t he Sunny Web Box.
Note that this can lead to loss of
collected plant data.
2The "SYSTEM" LED
continuously flashes
red.
The proxy server does not
support IPv6.
A system fault has occurred.
• Use a proxy server that supports
IPv6.
• Remove the Sunny WebBox plug-in
power supply from the socket-outlet
and plug it back in after a short time
in ord er t o re sta rt t he Sunny Web Box.
Note that this can lead to loss of
collected plant data.
• Contact the SMA Service Line.
3The "POWER" LED is
off.
4The "SD CARD" LED
is glowing red.
The Sunny WebBox is not
supplied with voltage.
• Check the voltage supply of the
socket-outlet and rectify any faults.
The SD card is full. • Replace the SD card or format the
SD card in FAT16 format.
The SD card is writeprotected.
There is more than one
update file in the "UPDATE"
• Remove the write protection of the
SD card.
• Delete the update file or perform the
update.
folder on the SD card.
48 SWebBox20-IA-en-12 Installation Manual
Page 49

SMA Solar Technology AG Troubleshooting
No. Problem Cause Remedy
5 Parameters cannot
be edited.
You do not possess the
necessary rights for the
• Change the user group.
parameter.
You have an inverter with
upgraded SMA Bluetooth
Piggy-Back with a firmware
version lower than
02.00.00.R.
The configuration of parameters and the
graphical presentation of monthly and
annual energy values are not supported.
• Update the firmware of the
Bluetooth Piggy-Back using
Sunny Explorer.
6Windows does not
display the LAN
connection.
The network card device
driver (Ethernet card) is not
installed.
• Check the installation of the network
adaptor in the Windows device
manager and re-install the device
driver.
7 Fault in the user
interface display.
The computer network card
is faulty.
JavaScript is not enabled. • Enable JavaScript in your Internet
• Replace the faulty network card with
a new network card.
browser.
Installation Manual SWebBox20-IA-en-12 49
Page 50

Troubleshooting SMA Solar Technology AG
12.2 Troubleshooting the Bluetooth Connection
No. Problem Cause Remedy
1The Sunny
WebBox does not
display any
Bluetooth devices.
An incorrect NetID is set. • Set the NetID of the PV plant
(see Section 6.2"Configuring
Bluetooth Settings for the Sunny
WebBox" (page24)) and repeat
the commissioning).
The connection to the
Bluetooth plant is too weak.
• Shorten the distance to the devices
or use an SMA Bluetooth Repeater
in order to extend the radio range.
Repeat the commissioning
(see page 23).
There are already four
masters connected to the
• Remove a master and repeat the
commissioning (see page 23).
Bluetooth plant.
There are already two
participants connected to the
device through which you
want to set up a connection
to the Bluetooth plant.
• Change the position of the
Sunny WebBox in order to set up a
connection via another device in the
plant or remove one master from the
plant. Further information on
SMA Bluetooth can be found in the
download area at
www.SMA-Solar.com
50 SWebBox20-IA-en-12 Installation Manual
Page 51

SMA Solar Technology AG Troubleshooting
No. Problem Cause Remedy
2Inverter is not
accessible.
The Bluetooth connection
was interrupted.
• Wait until the Sunny WebBox has
automatically re-established the
connection.
Parameters for the Bluetooth
communication were
changed.
When setting parameters that regulate the
Bluetooth connection (e.g. parameters for
the radio range and country parameters),
the communication via Bluetooth is
interrupted for some time because the
inverters are carrying out a restart of the
communication interface. This does not
relate to inverters with upgraded
SMA Bluetooth Piggy-Backs.
• Wait until the inverter has completed
a restart. The inverter is then
accessible again.
3 Th e Sunn y Web Box
displays unknown
inverters.
4An inverter is
displayed as an
unknown device in
the plant tree.
Inverter with upgraded
SMA Bluetooth Piggy-Back is
in night mode.
The inverter has not been set
to the NetID of your PV plant
and commissioned.
The set NetID is already
assigned by an external
Bluetooth PV plant.
The inverter with integrated
Bluetooth has an old
firmware version
(only for inverters
SB 3000TL-20,
• Wait until the inverter is again
working in normal operation. The
inverter is then accessible again.
• The inverter must be set to the NetID
of your PV plant and commissioned.
Contact your installer.
• You must assign the PV plant a free
NetID. Contact your installer.
• Ensure that the inverter with
integrated Bluetooth has the latest
firmware version (see technical
description "Firmware Update with
SD Card" at www.SMA-Solar.com).
SB 4000TL-20,
SB 5000TL-20).
The new inverter type is not
detected by the
• Perform own update for the
Sunny WebBox (see page 38).
Sunny WebBox.
Installation Manual SWebBox20-IA-en-12 51
Page 52

Accessories SMA Solar Technology AG
13 Accessories
You will find the corresponding accessories and spare parts for your product in the following
overview. If required, you can order them from SMA Solar Technology AG or from your specialist
dealer.
Description Brief description SMA order number
SMA Bluetooth Repeater SMA Bluetooth repeater for increasing
the range of SMA Bluetooth produc ts f or
use indoors
SD card 1 GB 1 GB Secure Digital Memory Card for
Sunny WebBox, I-Grade
SD card 2 GB 2 GB Secure Digital Memory Card for
Sunny WebBox, I-Grade
BTREP
SD-Card 1 GB
SD-Card 2 GB
52 SWebBox20-IA-en-12 Installation Manual
Page 53

SMA Solar Technology AG Appendix
14 Appendix
14.1 Information on the SD Card
In order to ensure the proper functioning of the SD card, use the SD cards available from
SMA Solar Technology AG. Compatibility with all SD cards available on the market cannot be
guaranteed. The Sunny WebBox does not support SD cards with storage capacities of more than
2GB or SDHC cards.
Only use SD cards which have been formatted with the FAT16 file system. If necessary, use the
computer to reformat the SD card.
The Sunny WebBox converts the SD card's file system to TFAT in order to increase data security.
If you wish to clear the SD card, you must format the SD card on the computer with the FAT16 file
system.
14.2 Structure of the config.xml File
The "config.xml" configuration file contains information on the Sunny WebBox network settings,
firmware version and further settings.
Example:
<?xml version='1.0' encoding='utf-8'?>
<WebBox>
<Settings>
<add key='Version' value='1.0.40.B' />
<add key='Plant-ID' value='' />
<add key='User-ID' value='Max.Mustermann@SMA.de' />
<add key='DHCP' value='False' />
<add key='IP-Address' value='192.168.0.168' />
<add key='SubNetMask' value='255.255.255.0' />
<add key='Gateway' value='192.168.0.1' />
<add key='DNS-Server' value='192.168.0.1' />
<add key='NAT-Port' value='80' />
<add key='Webserver-Port' value='80' />
<add key='Webservice-Port' value='80' />
</Settings>
</WebBox>
Installation Manual SWebBox20-IA-en-12 53
Page 54

Appendix SMA Solar Technology AG
Setting Meaning
Version The current firmware version of the Sunny WebBox
Plant-ID Plant ID for Sunny Portal
User-ID User ID for Sunny Portal
DHCP Displays whether the network settings are acquired via DHCP
IP-Adresse The current IP address of the Sunny WebBox
SubNetMask The current subnet mask of the Sunny WebBox
Gateway The set gateway IP address
DNS-Server The set DNS server IP address
NAT-Port The currently set NAT port
Webserver-Port The currently set port of the web server
Webservice-Port The set port of the web service
54 SWebBox20-IA-en-12 Installation Manual
Page 55

SMA Solar Technology AG Appendix
14.3 Structure of an XML Data File
Example:
<?xml version="1.0" encoding="utf-8"?>
<WebBox>
<Info>
<Created>2012-11-22T11:10:00</Created>
<Culture>de</Culture>
<UtcOffset>60</UtcOffset>
</Info>
<CurrentPublic>
<Key>Meine Sunny WebBox:155001390:Metering.TotWhOut</Key>
<Mean>34698.724</Mean>
<Unit>kWh</Unit>
<Base>1</Base>
<Period>300</Period>
<Timestamp>2012-11-22T11:10:00</Timestamp>
</CurrentPublic>
<MeanPublic>
<Key>Meine Sunny WebBox:155001390:GridMs.TotW</Key>
<Min>405</Min>
<Max>3719</Max>
<Mean>9019</Mean>
<Unit>W</Unit>
<Base>1</Base>
<Period>300</Period>
<Timestamp>2012-11-22T11:10:00</Timestamp>
</MeanPublic>
<MeanPublic>
(...)
</MeanPublic>
</WebBox>
Installation Manual SWebBox20-IA-en-12 55
Page 56

Appendix SMA Solar Technology AG
Setting Meaning
Info Information
Create Date of generation
Culture Language
UtcOffset Offset in minutes to UTC (Universal Time Coordinated)
MeanPublic Data of the mean values
CurrentPublic Data of the instantaneous values
Key Name of the element made up of device name, device serial number and the
parameter name. Individual values are separated by a colon.
Example: <Key>Sunny WebBox:155000234:Metering.TotWhOut</Key>
Min Smallest value in measurement interval/merging
Max Largest value in measurement interval/merging
Mean Average value in measurement interval/merging
Base Number of measured values in the interval/number of merged values
Period Length of the measurement interval in seconds
TimeStamp Time stamp at which the average was calculated
14.4 Information on Your Internet Browser
In order to be able to call up the Sunny WebBox user interface, you need a current Internet browser.
You can use the default settings of your Internet browser.
• Ensure that JavaScript is activated.
• If a proxy server is active in your network, you must set up a proxy exception rule in your
browser (see page 56).
14.5 Setting up a Proxy Exception Rule in Internet Explorer
1. Start Internet Explorer.
2. In Internet Explorer, select "Tools > Internet Options".
3. The "Internet Options" window opens.
4. Select the "Connections" tab, then click [Settings].
5. Select [Advanced].
6. In the "Do not use proxy server for addresses beginning with:" field, enter the address
192.168.*.
7. Confirm the entries with [OK] and close each further window with [OK].
56 SWebBox20-IA-en-12 Installation Manual
Page 57

SMA Solar Technology AG Appendix
14.6 Activating IPv6 in Windows XP SP2
In order to be able to locate the Sunny WebBox with the Sunny WebBox Assistant, IPv6 is required.
IPv6 stands for Internet Protocol Version 6 and specifies the procedures that are necessary for data
transmission via a packet-switching data network.
IP v6 i s th e su cce ssor to I Pv4 , wh ich is s til l pr edo mina ntl y us ed o n th e In ter net . IP v6 is alr ead y ac tiv ate d
in Windows Vista, Windows 7, MacOS and Linux. In Windows XP SP2, you must activate IPv6.
In order to activate IPv6, proceed as follows:
1. In Windows, select "Start > Settings > Network Connections".
2. Double click on the LAN connection via which the Sunny WebBox is connected.
– If Windows displays several LAN connections, there are probably several network
co nne cti ons ins tal led on t he c omp ute r. E nsu re t hat you sel ect the n etw ork con nec tio n th at t he
computer is using to connect to the Sunny WebBox. If necessary, refer to the manual of your
computer.
– In the event that no LAN connection is displayed, please refer to Section 12.1"General
Troubleshooting for the Sunny WebBox" (page47).
☑The "Local Area Connection Status" window opens.
3. Select [Properties] in the "General" tab.
☑The "Local Area Connection Properties" window opens.
4. Activate "Microsoft TCP/IP Version 6"
5. Select [OK].
14.7 Allocating an IP Address in a Local Network
You select a static IP address (Internet Protocol) yourself. Use the address range which is available to
your router. In most cases the address range of the router lies between 192.168.0.1 and
192.168.255.254. If necessary refer to the manual of your router.
Please note during the allocation of the IP address that the first three address parts of the IP address
must be identical for all participants of the same network. You may not allocate the same IP address
twice.
Example.
Router: 192.168.0.1
Computer 1 192.168.0.2
Computer 2 192.168.0.3
Sunny WebBox 192.168.0.168
Installation Manual SWebBox20-IA-en-12 57
Page 58

Technical Data SMA Solar Technology AG
15 Technical Data
15.1 Sunny WebBox with Bluetooth
Mechanical Data
Width x height x depth 226 mm x 130 mm x 57 mm
Weight 750 g
Voltage Supply
Typical power consumption 4 W
Maximum power consumption 12 W
Ambient Conditions
Ambient temperature ‒20°C ... +65°C
Relative humidity 5% … 95%, non-condensing
Degree of protection* IP20
*Degree of protection according to DIN 60529
Communication
Sunny Boy, Sunny Mini Central*, Windy Boy
with SMA Bluetooth interface
Computer 10/100 Mbit Ethernet
Maximum number of SMA Bluetooth devices
with 1 master
Maximum number of SMA Bluetooth devices
with 2 masters
Maximum Bluetooth radio range in free-field
conditions
Max. Ethernet radio range per segment 100 m
*Apart from the USA
Bluetooth
50
25
100 m
Other
User interface languages German, English, French, Italian, Spanish, Greek,
Korean, Portuguese, Czech, Dutch
Internal ring buffer 12.5 MB
Memory expansion via SD memory cards* 1 GB/2 GB
*Optional
58 SWebBox20-IA-en-12 Installation Manual
Page 59

SMA Solar Technology AG Technical Data
15.2 Plug-in Power Supply Units
15.2.1 CINCON, TRG30R 120
Mechanical Data
Width x height x depth 107.8 mm x 57.5 mm x 33.5 mm
Weight 300 g
Voltage Supply
Voltage 100 V … 240 V AC, 50/60 Hz
Nominal current 0.8 A
15.2.2 TaiyTech, TYT251200200UV/3000
Mechanical Data
Width x height x depth 92.0 mm x 58.0 mm x 41.4 mm
Weight 244 g
Voltage Supply
Voltage 100 V … 240 V AC, 50/60 Hz
Nominal current 0.75 A
15.2.3 TaiyTech, TYT251200200EU/3000
Mechanical Data
Width x height x depth 92.0 mm x 90.6 mm x 36.0 mm
Weight 128 g
Voltage Supply
Voltage 100 V … 240 V AC, 50/60 Hz
Nominal current 0.75 A
Installation Manual SWebBox20-IA-en-12 59
Page 60

Contact SMA Solar Technology AG
16 Contact
If you have technical problems concerning our products, contact the SMA Service Line.
We require the following information in order to provide you with the necessary assistance:
• Sunny WebBox firmware version
• Sunny WebBox serial number and hardware version
• Type of communication interface between Sunny WebBox and the inverters
• Type and serial numbers of the inverters connected to the plant
SMA Solar Technology AG
Sonnenallee 1
34266 Niestetal, Germany
www.SMA.de/en
SMA Serviceline
Inverters: +49 561 9522 1499
Communication: +49 561 9522 2499
Fax: +49 561 9522 4699
E-Mail: Serviceline@SMA.de
60 SWebBox20-IA-en-12 Installation Manual
Page 61

SMA Solar Technology AG Legal Provisions
Legal Provisions
The information contained in this document is the property of SMA Solar Technology AG. Publishing its content, either partially or
in full, requires the written permission of SMA Solar Technology AG. Any internal company copying of the document for the
purposes of evaluating the product or its correct implementation is allowed and does not require permission.
Declaration of Conformity
SM A So lar Te chn olog y AG her eby decla res t hat t his e quip men t is i n com plia nce with the e sse ntia l req uire ment s an d oth er re leva nt
provisions of Directive 1999/5/EC. The entire EC Declaration of Conformity can be found at www.SMA-Solar.com.
SMA Factory Warranty
The current warranty conditions come enclosed with your device. These are also available online at www.SMA-Solar.com and can
be downloaded and are available on paper from the usual sales channels if required.
Trademarks
All trademarks are recognized even if these are not marked separately. Missing designations do not mean that a product or brand
is not a registered trademark.
The Bluetooth
SMA Solar Technology AG is under licence.
QR Code
SMA Solar Technology AG
Sonnenallee 1
34266 Niestetal
Germany
Tel. +49 561 9522-0
Fax +49 561 9522-100
www.SMA.de
E-Mail: info@SMA.de
© 2004 to 2012 SMA Solar Technology AG. All rights reserved
®
word mark and logos are registered trademarks owned by Bluetooth SIG, Inc. and any use of such marks by
®
is a registered trademark of DENSO WAVE INCORPORATED.
Installation Manual SWebBox20-IA-en-12 61
Page 62

SMA Solar Technology
www.SMA-Solar.com
SMA Solar Technology AG
www.SMA.de
SMA Australia Pty. Ltd.
www.SMA-Australia.com.au
SMA Benelux bvba/sprl
www.SMA-Benelux.com
SMA Beijing Commercial Company Ltd.
www.SMA-China.com.cn
SMA Central & Eastern Europe s.r.o.
www.SMA-Czech.com
SMA France S.A.S.
www.SMA-France.com
SMA Hellas AE
www.SMA-Hellas.com
SMA Ibérica Tecnología Solar, S.L.U.
www.SMA-Iberica.com
SMA Solar India Pvt. Ltd.
www.SMA-India.com
SMA Italia S.r.l.
www.SMA-Italia.com
SMA Japan K.K.
www.SMA-Japan.com
SMA Technology Korea Co., Ltd.
www.SMA-Korea.com
SMA Middle East LLC
www.SMA-Me.com
SMA Portugal - Niestetal Services Unipessoal Lda
www.SMA-Portugal.com
SMA Solar (Thailand) Co., Ltd.
www.SMA-Thailand.com
SMA Solar UK Ltd.
www.SMA-UK.com
 Loading...