

Page 1
EN
Device for Plant Monitoring
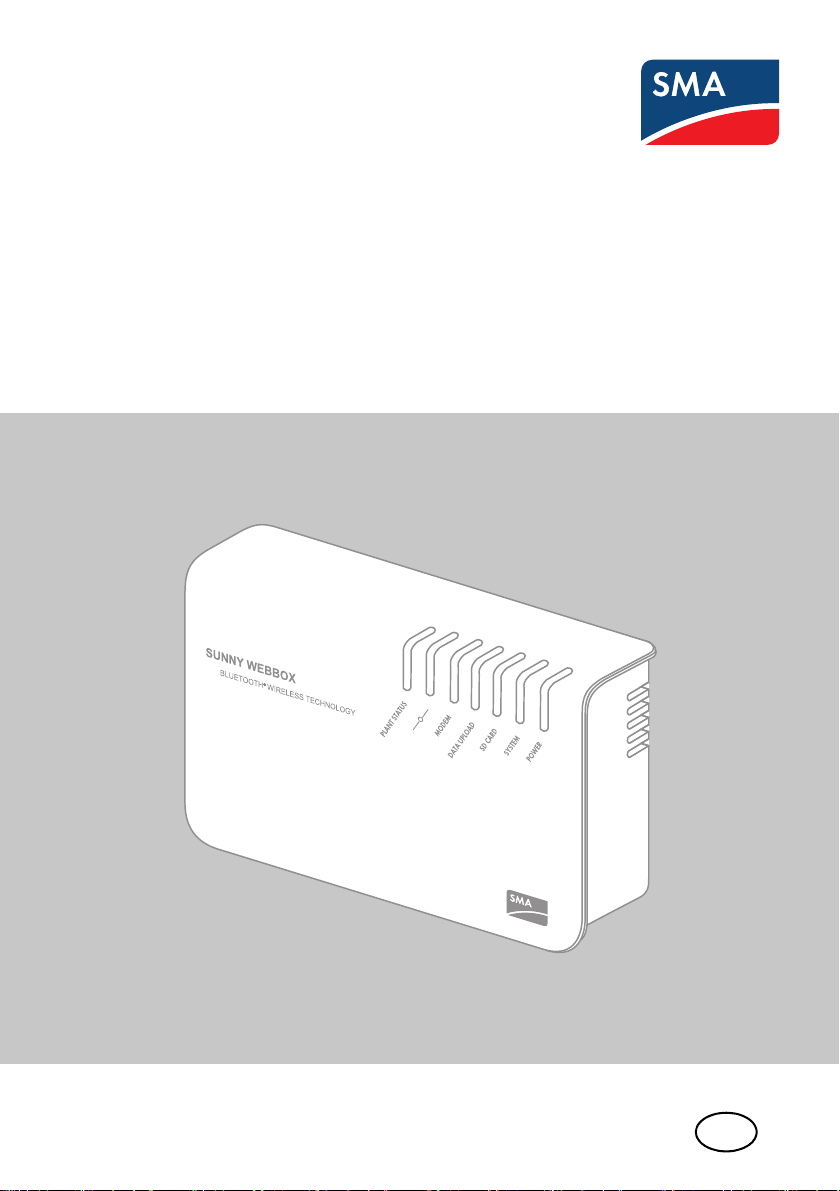
SUNNY WEBBOX with Bluetooth
User Manual
®
Wireless Technology
SWebBox20-BA-en-13 | Version 1.3
Page 2

Page 3

SMA Solar Technology AG Table of Contents
Table of Contents
1 Information on this Manual. . . . . . . . . . . . . . . . . . . . . . . . . 8
1.1 Validity . . . . . . . . . . . . . . . . . . . . . . . . . . . . . . . . . . . . . . . . . . . . 8
1.2 Additional Information . . . . . . . . . . . . . . . . . . . . . . . . . . . . . . . . 8
1.3 Symbols Used . . . . . . . . . . . . . . . . . . . . . . . . . . . . . . . . . . . . . . . 9
1.4 Terminology . . . . . . . . . . . . . . . . . . . . . . . . . . . . . . . . . . . . . . . . 9
2 Safety . . . . . . . . . . . . . . . . . . . . . . . . . . . . . . . . . . . . . . . . . 10
2.1 Intended Use. . . . . . . . . . . . . . . . . . . . . . . . . . . . . . . . . . . . . . . 10
2.1.1 Supported Products. . . . . . . . . . . . . . . . . . . . . . . . . . . . . . . . . . . . . . . . . . . . 11
2.1.2 Target Group . . . . . . . . . . . . . . . . . . . . . . . . . . . . . . . . . . . . . . . . . . . . . . . . 11
2.1.3 System Requirements. . . . . . . . . . . . . . . . . . . . . . . . . . . . . . . . . . . . . . . . . . . 11
2.2 Safety Precautions. . . . . . . . . . . . . . . . . . . . . . . . . . . . . . . . . . . 12
3 Product Description . . . . . . . . . . . . . . . . . . . . . . . . . . . . . . 13
3.1 The Sunny WebBox with Bluetooth. . . . . . . . . . . . . . . . . . . . . 13
3.2 Summary of Functions. . . . . . . . . . . . . . . . . . . . . . . . . . . . . . . . 14
3.3 Type Label . . . . . . . . . . . . . . . . . . . . . . . . . . . . . . . . . . . . . . . . 15
3.4 LED Overview . . . . . . . . . . . . . . . . . . . . . . . . . . . . . . . . . . . . . . 16
3.5 Information on the Operation of the Sunny WebBox . . . . . . . . 17
4 Sunny WebBox with Bluetooth: Basics . . . . . . . . . . . . . . . 18
4.1 User Interface . . . . . . . . . . . . . . . . . . . . . . . . . . . . . . . . . . . . . . 18
4.1.1 Icon Bar. . . . . . . . . . . . . . . . . . . . . . . . . . . . . . . . . . . . . . . . . . . . . . . . . . . . . 19
4.1.2 Plant Tree . . . . . . . . . . . . . . . . . . . . . . . . . . . . . . . . . . . . . . . . . . . . . . . . . . . 20
4.1.3 Device Menu. . . . . . . . . . . . . . . . . . . . . . . . . . . . . . . . . . . . . . . . . . . . . . . . . 21
4.1.4 Overview. . . . . . . . . . . . . . . . . . . . . . . . . . . . . . . . . . . . . . . . . . . . . . . . . . . . 21
4.1.5 Instantaneous Values. . . . . . . . . . . . . . . . . . . . . . . . . . . . . . . . . . . . . . . . . . . 23
4.1.6 Settings . . . . . . . . . . . . . . . . . . . . . . . . . . . . . . . . . . . . . . . . . . . . . . . . . . . . . 25
4.1.7 Events . . . . . . . . . . . . . . . . . . . . . . . . . . . . . . . . . . . . . . . . . . . . . . . . . . . . . . 26
4.1.8 Updates. . . . . . . . . . . . . . . . . . . . . . . . . . . . . . . . . . . . . . . . . . . . . . . . . . . . . 28
User Manual SWebBox20-BA-en-13 3
Page 4

Table of Contents SMA Solar Technology AG
4.2 Security and Password Concept . . . . . . . . . . . . . . . . . . . . . . . . 29
4.2.1 User Groups . . . . . . . . . . . . . . . . . . . . . . . . . . . . . . . . . . . . . . . . . . . . . . . . . 29
4.2.2 Plant Password . . . . . . . . . . . . . . . . . . . . . . . . . . . . . . . . . . . . . . . . . . . . . . . 29
4.2.3 Access Security for the Sunny WebBox with Bluetooth . . . . . . . . . . . . . . . . 30
4.2.4 Strength of Passwords. . . . . . . . . . . . . . . . . . . . . . . . . . . . . . . . . . . . . . . . . . 30
4.2.5 SMA Grid Guard . . . . . . . . . . . . . . . . . . . . . . . . . . . . . . . . . . . . . . . . . . . . . 30
4.2.6 Forgotten the Password. . . . . . . . . . . . . . . . . . . . . . . . . . . . . . . . . . . . . . . . . 31
4.3 Symbols . . . . . . . . . . . . . . . . . . . . . . . . . . . . . . . . . . . . . . . . . . 32
5 Logging into and out of the Sunny WebBox . . . . . . . . . . 35
5.1 Logging into the Sunny WebBox . . . . . . . . . . . . . . . . . . . . . . . 35
5.2 Logging out of the Sunny WebBox. . . . . . . . . . . . . . . . . . . . . . 36
6 Operation . . . . . . . . . . . . . . . . . . . . . . . . . . . . . . . . . . . . . . 37
6.1 Plant View . . . . . . . . . . . . . . . . . . . . . . . . . . . . . . . . . . . . . . . . . 37
6.1.1 Plant Status . . . . . . . . . . . . . . . . . . . . . . . . . . . . . . . . . . . . . . . . . . . . . . . . . . 37
6.1.2 Setting Parameters for a Device Class . . . . . . . . . . . . . . . . . . . . . . . . . . . . . 37
6.1.3 Changing the Plant Name. . . . . . . . . . . . . . . . . . . . . . . . . . . . . . . . . . . . . . . 38
6.2 Device View . . . . . . . . . . . . . . . . . . . . . . . . . . . . . . . . . . . . . . . 38
6.2.1 Device Status. . . . . . . . . . . . . . . . . . . . . . . . . . . . . . . . . . . . . . . . . . . . . . . . . 38
6.2.2 Setting the Device Parameters. . . . . . . . . . . . . . . . . . . . . . . . . . . . . . . . . . . . 38
6.3 Adjusting the Password of a Device to the Plant Password. . . . 39
6.4 Determining the Serial Number of the Sunny WebBox . . . . . . 40
6.5 Determining the IP Address of the WAN . . . . . . . . . . . . . . . . . 40
6.6 Activating/Deactivating SMA Grid Guard Mode . . . . . . . . . . 41
7 Configuring the Sunny WebBox . . . . . . . . . . . . . . . . . . . . 42
7.1 Changing the Password of the Sunny WebBox . . . . . . . . . . . . 42
7.2 Plant Time . . . . . . . . . . . . . . . . . . . . . . . . . . . . . . . . . . . . . . . . . 43
7.2.1 Information on Plant Time . . . . . . . . . . . . . . . . . . . . . . . . . . . . . . . . . . . . . . . 43
7.2.2 Setting the Date and Time. . . . . . . . . . . . . . . . . . . . . . . . . . . . . . . . . . . . . . . 43
7.2.3 Synchronising the Time with Sunny Portal Manually. . . . . . . . . . . . . . . . . . . 44
4 SWebBox20-BA-en-13 User Manual
Page 5

SMA Solar Technology AG Table of Contents
7.2.4 Activating/Deactivating Automatic Time Synchronisation. . . . . . . . . . . . . . . 44
7.3 Country Settings . . . . . . . . . . . . . . . . . . . . . . . . . . . . . . . . . . . . 45
7.3.1 Setting the Date Format. . . . . . . . . . . . . . . . . . . . . . . . . . . . . . . . . . . . . . . . . 45
7.3.2 Setting the Language . . . . . . . . . . . . . . . . . . . . . . . . . . . . . . . . . . . . . . . . . . 45
7.3.3 Setting the Number Format . . . . . . . . . . . . . . . . . . . . . . . . . . . . . . . . . . . . . . 45
7.3.4 Setting the Time Format. . . . . . . . . . . . . . . . . . . . . . . . . . . . . . . . . . . . . . . . . 46
7.3.5 Setting the Unit of Temperature. . . . . . . . . . . . . . . . . . . . . . . . . . . . . . . . . . . 46
7.4 Changing the Device Name of the Sunny WebBox. . . . . . . . . 46
7.5 Network Settings. . . . . . . . . . . . . . . . . . . . . . . . . . . . . . . . . . . . 47
7.5.1 Information on Network Settings. . . . . . . . . . . . . . . . . . . . . . . . . . . . . . . . . . 47
7.5.2 Using Dynamic Network Settings (DHCP) . . . . . . . . . . . . . . . . . . . . . . . . . . 47
7.5.3 Configuring Static Network Settings (Deactivating DHCP) . . . . . . . . . . . . . . 48
7.5.4 Configuring Proxy Settings . . . . . . . . . . . . . . . . . . . . . . . . . . . . . . . . . . . . . . 49
7.5.5 Setting the HTTP Port . . . . . . . . . . . . . . . . . . . . . . . . . . . . . . . . . . . . . . . . . . . 49
7.5.6 Setting the NAT Port . . . . . . . . . . . . . . . . . . . . . . . . . . . . . . . . . . . . . . . . . . . 50
7.6 Data Recording. . . . . . . . . . . . . . . . . . . . . . . . . . . . . . . . . . . . . 50
7.6.1 Information on Data Recording. . . . . . . . . . . . . . . . . . . . . . . . . . . . . . . . . . . 50
7.6.2 CSV Files . . . . . . . . . . . . . . . . . . . . . . . . . . . . . . . . . . . . . . . . . . . . . . . . . . . . 51
7.6.3 XML Files. . . . . . . . . . . . . . . . . . . . . . . . . . . . . . . . . . . . . . . . . . . . . . . . . . . . 52
7.6.4 Setting the Measurement Name to the Local Language . . . . . . . . . . . . . . . . 53
7.7 E-mail Alert in the Event of a Fault. . . . . . . . . . . . . . . . . . . . . . . 53
7.7.1 Information on E-mail Alert in the Event of a Fault. . . . . . . . . . . . . . . . . . . . . 53
7.7.2 Activating E-mail Alert in the Event of a Fault . . . . . . . . . . . . . . . . . . . . . . . . 54
7.7.3 Deactivating E-mail Alert in the Event of a Fault . . . . . . . . . . . . . . . . . . . . . . 54
7.8 Activating/Deactivating Grid Management . . . . . . . . . . . . . . . 55
8 Managing Plant Data . . . . . . . . . . . . . . . . . . . . . . . . . . . . 56
8.1 Information on the Plant Data . . . . . . . . . . . . . . . . . . . . . . . . . . 56
8.2 Sunny Portal . . . . . . . . . . . . . . . . . . . . . . . . . . . . . . . . . . . . . . . 56
8.2.1 Information on Sunny Portal . . . . . . . . . . . . . . . . . . . . . . . . . . . . . . . . . . . . . 56
8.2.2 Registering Sunny WebBox in Sunny Portal . . . . . . . . . . . . . . . . . . . . . . . . . 57
8.2.3 Activating/Deactivating Sunny Portal . . . . . . . . . . . . . . . . . . . . . . . . . . . . . . 58
User Manual SWebBox20-BA-en-13 5
Page 6

Table of Contents SMA Solar Technology AG
8.2.4 Testing the Connection to Sunny Portal. . . . . . . . . . . . . . . . . . . . . . . . . . . . . 58
8.2.5 Setting the Upload Frequency. . . . . . . . . . . . . . . . . . . . . . . . . . . . . . . . . . . . 59
8.2.6 Accessing the Sunny WebBox via Sunny Portal . . . . . . . . . . . . . . . . . . . . . . 59
8.2.7 Adjusting the Plant Identifier for Sunny Portal . . . . . . . . . . . . . . . . . . . . . . . . 60
8.3 SD Card . . . . . . . . . . . . . . . . . . . . . . . . . . . . . . . . . . . . . . . . . . 60
8.3.1 Information on Saving Plant Data on an SD Card . . . . . . . . . . . . . . . . . . . . 60
8.3.2 Saving Plant Data on an SD Card . . . . . . . . . . . . . . . . . . . . . . . . . . . . . . . . 61
8.4 Integrated FTP Server . . . . . . . . . . . . . . . . . . . . . . . . . . . . . . . . 61
8.4.1 Information on the Integrated FTP Server . . . . . . . . . . . . . . . . . . . . . . . . . . . 61
8.4.2 Activating/Deactivating the Integrated FTP Server . . . . . . . . . . . . . . . . . . . . 61
8.4.3 Calling up the FTP Server via Internet Explorer . . . . . . . . . . . . . . . . . . . . . . . 62
8.5 FTP Push . . . . . . . . . . . . . . . . . . . . . . . . . . . . . . . . . . . . . . . . . . 62
8.5.1 Information on FTP Push . . . . . . . . . . . . . . . . . . . . . . . . . . . . . . . . . . . . . . . . 62
8.5.2 Activating/Deactivating FTP Push . . . . . . . . . . . . . . . . . . . . . . . . . . . . . . . . . 63
8.5.3 Testing FTP Push . . . . . . . . . . . . . . . . . . . . . . . . . . . . . . . . . . . . . . . . . . . . . . 63
9 Service Functions . . . . . . . . . . . . . . . . . . . . . . . . . . . . . . . . 64
9.1 Performing Own Update of the Sunny WebBox . . . . . . . . . . . 64
9.1.1 Information . . . . . . . . . . . . . . . . . . . . . . . . . . . . . . . . . . . . . . . . . . . . . . . . . . 64
9.1.2 Firmware Update via the Internet (Recommended). . . . . . . . . . . . . . . . . . . . 65
9.1.3 Firmware Update via SD Card . . . . . . . . . . . . . . . . . . . . . . . . . . . . . . . . . . . 66
9.2 Performing a Subdevice Update. . . . . . . . . . . . . . . . . . . . . . . . 67
9.2.1 Information . . . . . . . . . . . . . . . . . . . . . . . . . . . . . . . . . . . . . . . . . . . . . . . . . . 67
9.2.2 Device Update via the Internet (Recommended) . . . . . . . . . . . . . . . . . . . . . 69
9.2.3 Device Update via SD Card . . . . . . . . . . . . . . . . . . . . . . . . . . . . . . . . . . . . . 70
9.3 Restarting the Sunny WebBox via the User Interface . . . . . . . . 72
9.4 Resetting the Sunny WebBox with the Reset Button . . . . . . . . . 72
9.5 Determining Current Network Settings of the
Sunny WebBox Using the SD Card . . . . . . . . . . . . . . . . . . . . . 73
6 SWebBox20-BA-en-13 User Manual
Page 7

SMA Solar Technology AG Table of Contents
10 Troubleshooting . . . . . . . . . . . . . . . . . . . . . . . . . . . . . . . . . 74
10.1 General Troubleshooting for the Sunny WebBox. . . . . . . . . . . 74
10.2 Troubleshooting for the Bluetooth Connection . . . . . . . . . . . . . 79
11 Appendix . . . . . . . . . . . . . . . . . . . . . . . . . . . . . . . . . . . . . . 81
11.1 Information on the SD Card . . . . . . . . . . . . . . . . . . . . . . . . . . . 81
11.2 Structure of the Config.xml File . . . . . . . . . . . . . . . . . . . . . . . . . 81
11.3 Structure of an XML Data File . . . . . . . . . . . . . . . . . . . . . . . . . . 83
11.4 Information on Your Internet Browser . . . . . . . . . . . . . . . . . . . . 84
11.5 Setting up a Proxy Exception Rule in Internet Explorer . . . . . . . 84
11.6 Activating IPv6 in Windows XP SP2 . . . . . . . . . . . . . . . . . . . . . 85
11.7 Assigning IP Addresses in a Local Network . . . . . . . . . . . . . . . 85
12 Contact . . . . . . . . . . . . . . . . . . . . . . . . . . . . . . . . . . . . . . . . 86
User Manual SWebBox20-BA-en-13 7
Page 8
Information on this Manual SMA Solar Technology AG
1 Information on this Manual
This manual contains instructions for operating the Sunny WebBox with Bluetooth. Keep this manual
in a convenient place for future reference. This manual does not contain any detailed information
about the connected devices. Detailed information on connected devices is provided in the device
manuals.
1.1 Validity
This user manual is valid for the Sunny WebBox with Bluetooth for hardware version A1 and higher
and for firmware version 1.04 and higher.
1.2 Additional Information
Links to additional information can be found at www.SMA-Solar.com.
.
Document title Document type
SMA Bluetooth - SMA Bluetooth
Practice
SMA Safety and Password Concept for Password-protected
PV Plants with Bluetooth
You can also call up the user manual of the Sunny WebBox with Bluetooth via the Help button
in the user interface.
®
Wireless Technology in
®
Wireless Technology
Technical information
Technical description
8 SWebBox20-BA-en-13 User Manual
Page 9
SMA Solar Technology AG Information on this Manual
1.3 Symbols Used
The following types of safety precautions and general information appear in this document:
DANGER
DANGER indicates a hazardous situation which, if not avoided, will result in death or
serious injury.
WARNING
WARNING indicates a hazardous situation which, if not avoided, can result in death or
serious injury.
CAUTION
CAUTION indicates a hazardous situation which, if not avoided, could result in minor or
moderate injury.
NOTICE
NOTICE indicates a situation which, if not avoided, could result in property damage.
Information
Information provides tips that are valuable for effective installation and operation of the
product.
1.4 Terminology
The term photovoltaic plant is abbreviated to PV plant in this guide. Additionally, the product name
"Sunny WebBox with Bluetooth
running text.
Formatting Meaning
[Save] Buttons are displayed in square brackets [ ].
"Menu1" Menu items are displayed in quotation marks.
"Menu1 > Menu2" Menu paths are displayed in quotation marks. The angle bracket >
Example: Examples are shown in italics.
User Manual SWebBox20-BA-en-13 9
®
Wireless Technology" is shortened to "Sunny WebBox" in the
separates individual menus.
Page 10

Safety SMA Solar Technology AG
2 Safety
2.1 Intended Use
The Sunny WebBox with Bluetooth is a data logger that records, logs and makes available the data
of a PV plant via a user interface via the integrated web server. The Sunny WebBox also enables
remote diagnostics and the configuration of connected devices in a PV plant via the computer.
The Sunny WebBox is intended for private and industrial use.
Th e Su nny WebBox d ata is n ot suita ble for bil ling pur pos es. The data collected by the Sunny WebBox
on the amount of power genera ted by y our pl ant may deviate fr om the energy meter data. Additional
costs can be incurred from the use of the Internet.
The Sunny WebBox is designed for indoor use only.
Only operate the Sunny WebBox using the supplied plug-in power supply and in the voltage range
intended for this.
The Sunny WebBox must be continuously supplied with current.
• Do not use the Sunny WebBox with a timer switch.
The Sunny WebBox is only to be used with original accessories or recommended accessories
approved by SMA Solar Technology AG.
Only use the Sunny WebBox for the purposes described in this manual.
For safety reasons, it is not permitted to modify the product or install components that are not explicitly
recommended or distributed by SMA Solar Technology AG for this product.
The enclosed documentation is an integral part of this product.
• Read and observe the documentation.
• Keep the documentation in a convenient place for future reference.
10 SWebBox20-BA-en-13 User Manual
Page 11

SMA Solar Technology AG Safety
2.1.1 Supported Products
The Sunny WebBox supports the following SMA products:
• all SMA inverters with integrated Bluetooth
Inverters of the type SB x000TL-20 are only supported from firmware
version 2.06 onwards
• For those inverters with a firmware version lower than 2.06, perform a firmware
update using an SD card (see technical description "Firmware Update with SD Card"
at www.SMA-Solar.com).
• SMA inverters with upgraded SMA Bluetooth Piggy-Back/SMA Bluetooth Piggy-Back Plus
from firmware version 02.00.00.R. A list of the supported inverters can be found in the
SMA Bluetooth Piggy-Back/SMA Bluetooth Piggy-Back Plus manual.
• Sunny Backup with upgraded SMA Bluetooth Piggy-Back Off-Grid from firmware
version 01.00.00.R. A list of the supported Sunny Backups can be found in the
SMA Bluetooth Piggy-Back Off-Grid manual.
• Power Reducer Box
• Sunny Matrix from firmware version 2.10.00
•SMA Bluetooth Repeater
•Sunny SensorBox with SMA Power Injector with Bluetooth
• SMA radio-controlled socket
Updating the firmware of SMA products
To ensure that Bluetooth communication functions correctly in the plant, the firmware of the
SMA products must be up to date.
• Before commissioning the Sunny Web Box , up dat e th e fi rmw are of the SMA products
(see manual of the SMA products).
2.1.2 Target Group
This document is intended for end users and skilled persons. When you log into the Sunny WebBox
there are two user groups at your disposal: "Installer" and "User". The "Installer" user group may only
be used by qualified personnel who are authorised to make changes to network parameters for the
connected devices.
2.1.3 System Requirements
Recommended screen resolution:
• 1,024 x 768 pixels
Internet browser:
• Internet Explorer from version 8
• Firefox from version 3.6
User Manual SWebBox20-BA-en-13 11
Page 12

Safety SMA Solar Technology AG
2.2 Safety Precautions
General safety precautions in order to avoid physical injury
• Do not open the device or the plug-in power supply.
• Install the cabling in such a way that no one can stand on or trip over it.
General information in order to avoid damage to the device
• By touching electronic components you can damage or destroy the device through electrostatic
discharge (ESD). Avoid touching component connections and plug contacts. Earth yourself
before working on the device.
• With the help of the Sunny WebBox with Bluetooth you can change safety-relevant parameters
of the SMA inverters (e.g. SMA Grid Guard parameters). Incorrectly configured parameters
can lead to yield losses. Do not alter these safety-relevant parameters without prior consultation
with the electric utility company operating the electricity grid into which your plant feeds.
• The saving procedure for parameters can take up to 30 seconds. Do not disconnect the
Sunny WebBox with Bluetooth from the voltage supply during the saving procedure. If you
disconnect the Sunny WebBox from the voltage supply during the saving procedure, data can
be lost.
12 SWebBox20-BA-en-13 User Manual
Page 13
SMA Solar Technology AG Product Description
3 Product Description
3.1 The Sunny WebBox with Bluetooth
The Sunny WebBox with Bluetooth is a communication device that records, logs and makes available
the data of a PV plant via a user interface using the integrated web server. The Sunny WebBox also
enables remote diagnostics and the configuration of connected devices in a PV plant via the
computer.
The Sunny WebBox can continuously interrogate and evaluate the data it receives from connected
devices. The interrogation interval for the data of the whole PV plant is five minutes. If you display data
via the user interface of the Sunny WebBox, the currently displayed data is interrogated every
20 seconds. If the connection with the PV plant is interrupted, the Sunny WebBox restores the
connection as soon as possible.
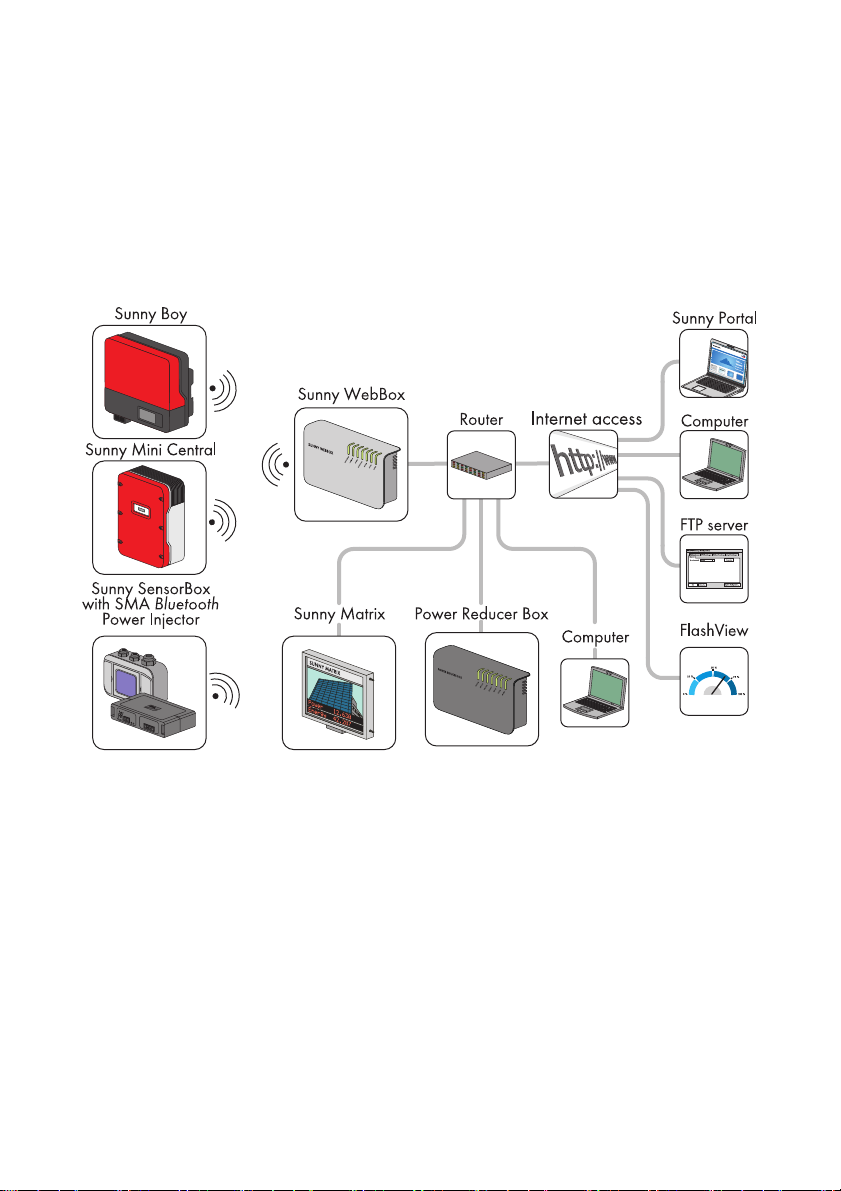
The Sunny WebBox can automatically send the collected data of the PV plant to the Sunny Portal
Internet portal or to a freely selectable FTP server for subsequent processing. You can also present
your plant data via the Sunny Matrix large-format display or the Flashview software.
You can use a Power Reducer Box in combination with the Sunny WebBox to incorporate the plant
into the grid management. The Sunny WebBox can receive the requirements of the network operator
via the Power Reducer Box and forward them to the inverters in the PV plant.
User Manual SWebBox20-BA-en-13 13
Page 14

Product Description SMA Solar Technology AG
The Sunny WebBox has the function of a network-forming device (master device) in the Bluetooth
plant. Master devices are communication products that form the structure of the Bluetooth PV plant
and collect, evaluate and process data. Unlike other master devices, the Sunny WebBox can establish
up to five uplinks, i.e. it can directly connect with five devices at the same time. It can also assume the
function of a slave/root node and participate in establishing the Bluetooth network. In this way, the
Sunny WebBox can link together several groups of inverters that would otherwise have no Bluetooth
connection.
The number of devices which the Sunny WebBox can manage depends on the number of master
devices in the Bluetooth network with the same NetID. If the Sunny WebBox is the only master in the
Bluetooth network, the Sunny WebBox can manage up to 50 devices. If two masters are present in
the Bluetooth netw ork (e. g. S unn y Exp lor er o r Sun ny B eam wit h Bluetooth), a maximum of 25 devices
can be managed by the Sunny WebBox. A maximum of one Sunny WebBox with Bluetooth is
allowed in a Bluetooth network with the same NetID. Additional information about SMA Bluetooth
Wireless Technology can be found in the download area of www.SMA-Solar.com.
3.2 Summary of Functions
The most important functions of the Sunny WebBox with Bluetooth Wireless Technology at a glance:
Plant communication
•Wireless control of the PV plant with Bluetooth Wireless Technology
External plant communication
• Ethernet network 10/100 Mbit
Integrated web server
• Quick overview of the current status of the PV plant
• Graphic display of the most important plant data
• Parameterisation of individual devices or an entire device class
• Setting of SMA Grid Guard parameters
• Simple diagnostics thanks to the display of device events
• Secure data transmission thanks to a new password concept
PV plant data management
• Displaying of plant data from the PV plant via the user interface
• Saving of plant data from the PV plant on an internal drive
• Saving of plant data from the PV plant to an optional SD card
• Automatic transmission of plant data from the PV plant to Sunny Portal
• Call up plant data via the internal FTP server
• Load plant data from the PV plant to an external FTP server via the FTP Push function
• Plant data in CSV or XML format
14 SWebBox20-BA-en-13 User Manual
Page 15
SMA Solar Technology AG Product Description
Service functions
• Firmware update for the Sunny WebBox via Internet or SD card
• Firmware update for devices of the PV plant via Internet or SD card (device update)
• Time synchronisation via Internet
• Restoration of default settings
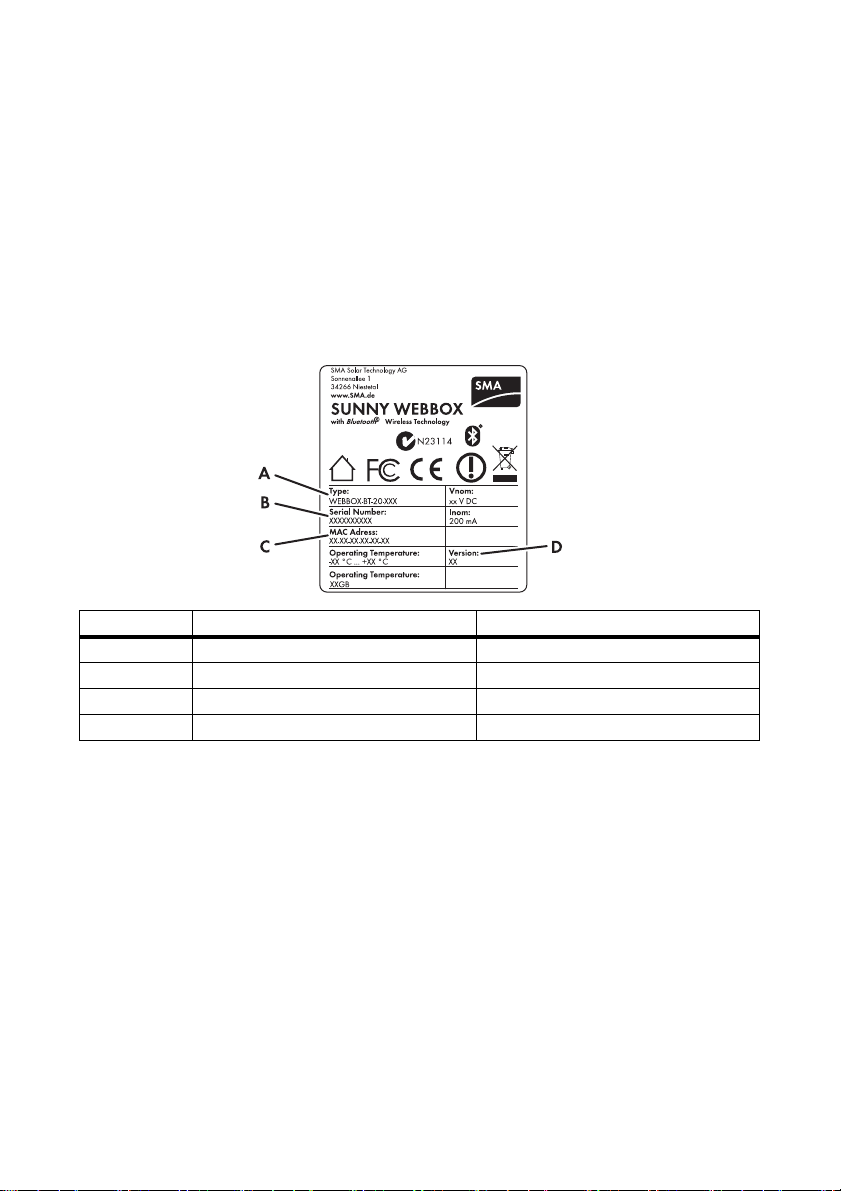
3.3 Type Label
The type label clearly identifies the Sunny WebBox. The type label can be found on the back of the
enclosure.
Item Description Explanation
AType Device type
B Serial number Serial number of the device
C MAC address MAC address of the device
D Version Hardware version of the device
User Manual SWebBox20-BA-en-13 15
Page 16
Product Description SMA Solar Technology AG
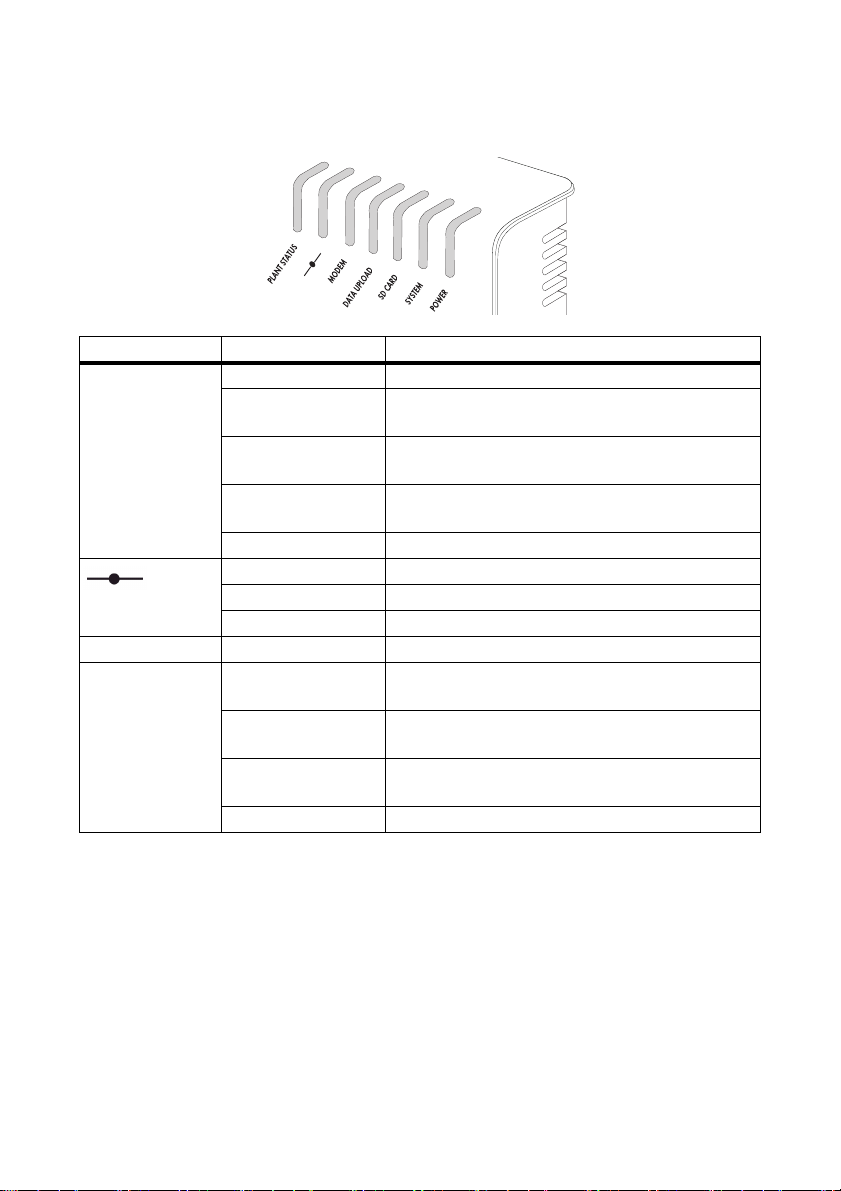
3.4 LED Overview
LED designation Status Meaning
"PLANT STATUS" Glowing green All devices in the PV plant have the status "OK".*
Glowing orange At least one device in the PV plant has the status
"Warning".*
Glowing red At least one device in the PV plant has the status
"Fault".*
Flashing orange The Sunny WebBox is sending update files to the
devices in the PV plant.*
Off There is no device available in the PV plant.
Glowing green Login for all connected devices is OK.
Glowing orange Login for at least one connected device is not OK.
Glowing red Login for all connected devices is not OK.
"MODEM"Off Not assigned
"DATA UPLOAD" Glowing green The data transmission to Sunny Portal or an external
FTP server is activated. Last upload was successful.
Flashing green The Sunny WebBox is sending data to Sunny Portal or
an external FTP server.
Glowing red The last data transmission to Sunny Portal or an
external FTP server was unsuccessful.
Off Data transmission is deactivated.
*
16 SWebBox20-BA-en-13 User Manual
Page 17
SMA Solar Technology AG Product Description
LED designation Status Meaning
"SD CARD" Gl owi ng gre en Th e SD car d is ins ert ed, wri tea ble and the fre e memory
capacity is more than 10% of the overall capacity.
Flashing green The SD card is being written to. The free memory
capacity is more than 10% of the overall capacity.
Gl owi ng ora nge The SD c ard is i nse rte d, w rit eab le a nd t he f ree memory
capacity is less than or equal to 10% of the overall
capacity.
Flashing orange The SD card is being written to. The free memory
capacity is less than or equal to 10% of the overall
capacity.
Glowing red The SD card is full or write-protected, or there is an
update file on the SD card.
Off No SD card is inserted.
"SYSTEM" Glowing green The Sunny WebBox is ready for operation.
Flashing green The Sunny WebBox is starting.
Flashing orange The Sunny WebBox is performing a firmware update.
Flashing red A system fault has occurred.
"POWER" Glowing green The Sunny WebBox is supplied with voltage.
Off The Sunny WebBox is not supplied with voltage.
*
The devices SMA radio-controlled socket, SMA Bluetooth Repeater and SMA Bluetooth Power Injector have no
influence on the status of the "PLANT STATUS" LED.
3.5 Information on the Operation of the Sunny WebBox
• The Sunny WebBox user interface needs JavaScript in order to be able to correctly display and
execute the contents and functions of the Sunny WebBox. Ensure that JavaScript is enabled in
your Internet browser. If necessary, refer to the help of your Internet browser.
• The saving procedure for parameters can take up to 30 seconds. Do not disconnect the
Sunny WebBox with Bluetooth from the voltage supply during the saving procedure.
Otherwise, data can be lost.
User Manual SWebBox20-BA-en-13 17
Page 18
Sunny WebBox with Bluetooth: Basics SMA Solar Technology AG
4 Sunny WebBox with Bluetooth: Basics
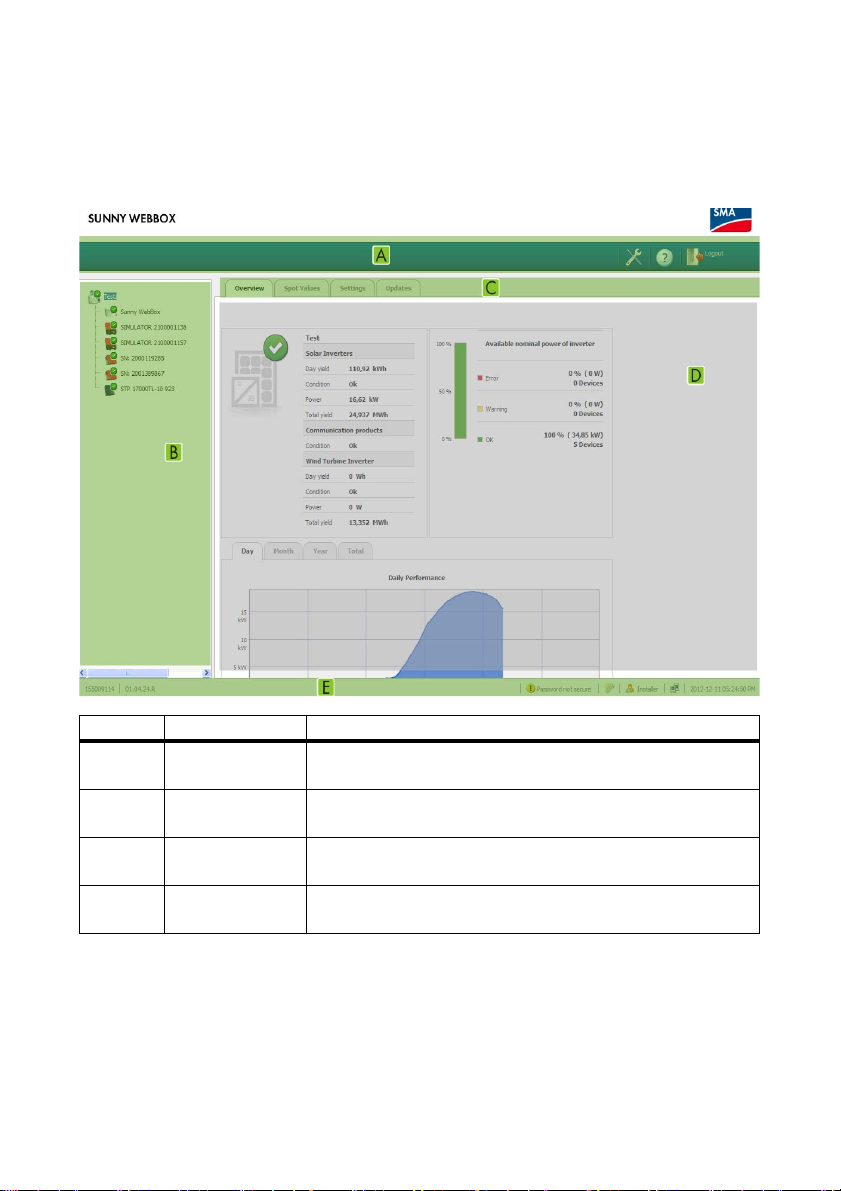
4.1 User Interface
Item Description Meaning
A Icon bar The icon bar gives you quick access to the main functions of the
Sunny WebBox.
B Plant tree In the plant tree, all devices of a PV plant are displayed in a tree
structure.
C Device menu The device menu is used to call up information and configurations
relating to the devices selected in the plant tree.
D Content area In the content area, the actual content is displayed. The content is
determined by the device menu.
18 SWebBox20-BA-en-13 User Manual
Page 19
SMA Solar Technology AG Sunny WebBox with Bluetooth: Basics
Item Description Meaning
E Status bar The status bar reflects the current status of the Sunny WebBox and
contains the following content:
• Serial number
•Software version
After logging into the Sunny WebBox, the status bar also contains:
• Information on the password status
• Information on the device update
• SMA Grid Guard (only for installers)
• Current user group
• Connection status to the PV plant
• Current date and time
4.1.1 Icon Bar
The icon bar gives you quick access to the main functions of the Sunny WebBox.
Symbol Meaning
The Settings button opens the Sunny WebBox settings. You can also configure
th e se tti ngs of t he S unn y We bBo x vi a th e pl ant tree "Sunny WebBox" > "Settings".
The Help button opens the Sunny WebBox help.
The user can log out of the Sunny WebBox user interface via the "Logout" button.
User Manual SWebBox20-BA-en-13 19
Page 20
Sunny WebBox with Bluetooth: Basics SMA Solar Technology AG
4.1.2 Plant Tree
From the point of view of plant communication, a PV plant consists of several devices that are linked
with one another via the same type of communication (e.g. SMA Bluetooth).
View of a Bluetooth plant
The physical plant structure (A) is mapped using the plant tree in the Sunny WebBox. For this, all
devices of a plant (including the Sunny WebBox) are shown underneath the plant (B). From the point
of view of plant communication, the plant is created by the Sunny WebBox.
Plant tree in the Sunny WebBox
In general, a distinction is made between the plant view
(B) and the device view (C).
• See Section 6.1 ”Plant View” (page37)
• See Section 6.2 ”Device View” (page38)
20 SWebBox20-BA-en-13 User Manual
Page 21
SMA Solar Technology AG Sunny WebBox with Bluetooth: Basics
4.1.3 Device Menu
The device menu shows the setting options and instantaneous values of a device. The device must first
be selected in the plant tree. The menu items adapt to the device accordingly.
Tabs Meaning
Overview The overview page provides you with information on the devices or plants
selected in the plant tree. In addition to the actual status display, this page
also contains a brief overview of the most important data relating to the
device.
Spot values The spot values provide you with current data on the selected device,
regardless of the user group.
Settings Via the settings, you can view and configure various parameters
depending on the user group.
Events The events page shows you the events of a device. The events displayed
depend on the user group.
4.1.4 Overview
The "Overview" page shows the most important information for the whole PV plant or a single device.
Device view
When a device is selected in the plant tree, the yield and power values of that device are displayed
in dia gra ms o n th e ov erview p age . Th ere are fou r di agr ams , which y ou c an c all up u sin g th e fo llo win g
tabs:
Tabs Meaning
Day Shows the yield of the device over the course of one day.
Month Shows the daily yield of the device over the course of one month.
Year Shows the monthly yield of the device over the course of one year.
Total Shows the annual yield of the device over the course of the last 10 years.
If you point or click with the mouse on a point on the curve, a display opens. The display contains the
exact value of this point, the corresponding time and the date.
Using the arrows below the diagram, you can scroll to the next period. You can select a period
directly using the calendar symbol.
User Manual SWebBox20-BA-en-13 21
Page 22
Sunny WebBox with Bluetooth: Basics SMA Solar Technology AG
Plant view
If the plant is selected in the plant tree, the overview page shows the following information for the
whole PV plant:
• Data of all inverters in the PV plant:
– Daily yield: yield produced so far on this day
– Condition: current operating status of the plant (OK, fault, warning)
–Power: power produced so far on this day
– Total yield: total yield produced so far
• Data of the communication products of the PV plant:
– Condition: current operating status of the communication products (OK, fault, warning)
• Available nominal power of the inverters
• If there are no more than 15 devices in the plant: yield and power values of all the inverters of
the PV plant in diagrams:
Tabs Meaning
Day Shows the yield of all inverters over the course of one day.
Month Shows the daily yield of all inverters over the course of one month.
Year Shows the monthly yield of all inverters over the course of one year.
Total Shows the annual yield of all inverters over the course of the last 10 years.
If you point or click with the mouse on a point on the curve, a display opens. The display
contains the exact value of this point, the corresponding time and the date.
Using the arrows below the diagram, you can scroll to the next period. You can select a period
directly using the calendar symbol.
22 SWebBox20-BA-en-13 User Manual
Page 23
SMA Solar Technology AG Sunny WebBox with Bluetooth: Basics
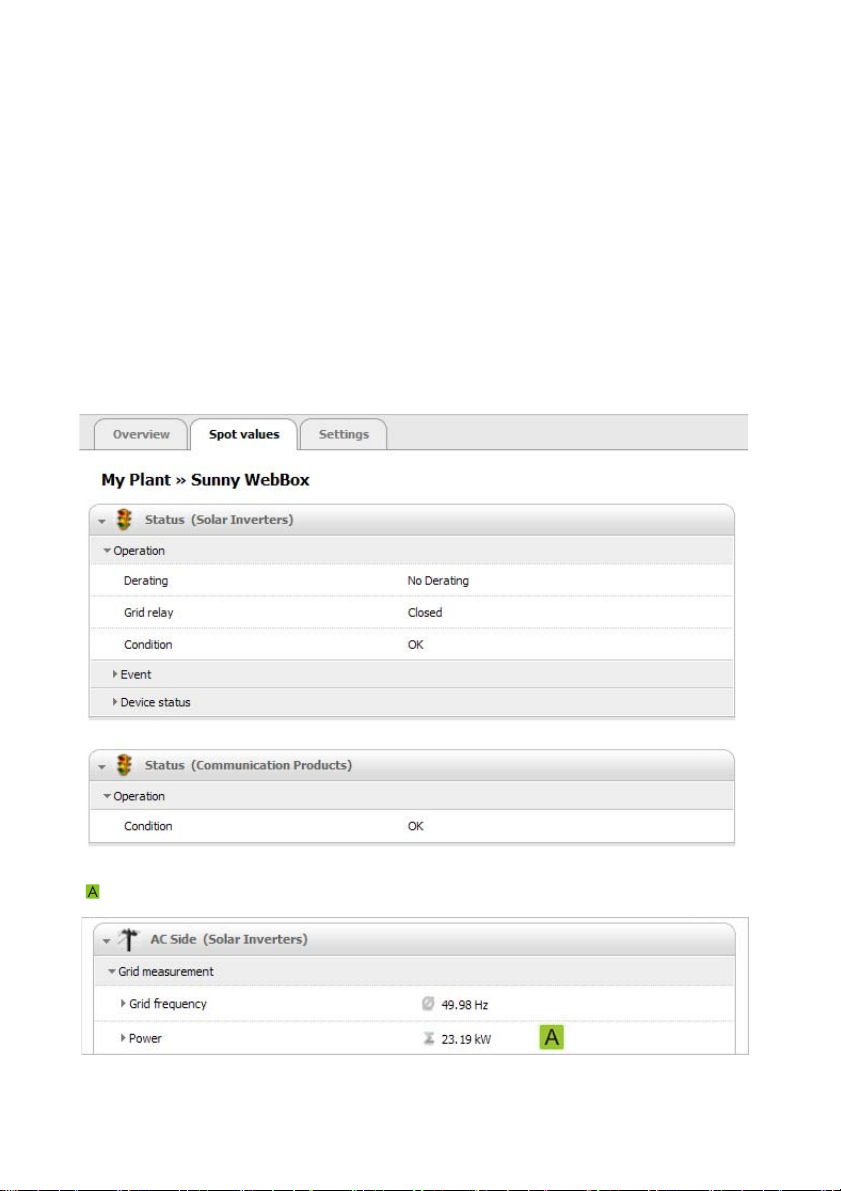
4.1.5 Instantaneous Values
The "Spot Values" page shows all values of the device selected in the plant tree or of the selected
plant. The values displayed depend on the relevant user group. All values are summarised in groups
(parameter groups) and subgroups.
Device view
If a device is selected in the plant tree, the "Spot Values" page shows the values for the individual
device.
Plant view
If a plant is selected in the plant tree, the "Spot Values" page shows the values for the complete device
class. When you click on a parameter group, the device classes are displayed separately
(e.g. solar inverters and communication products).
Some values are summarised from the individual devices of a device class (e.g. sum of the power
( )).
User Manual SWebBox20-BA-en-13 23
Page 24
Sunny WebBox with Bluetooth: Basics SMA Solar Technology AG
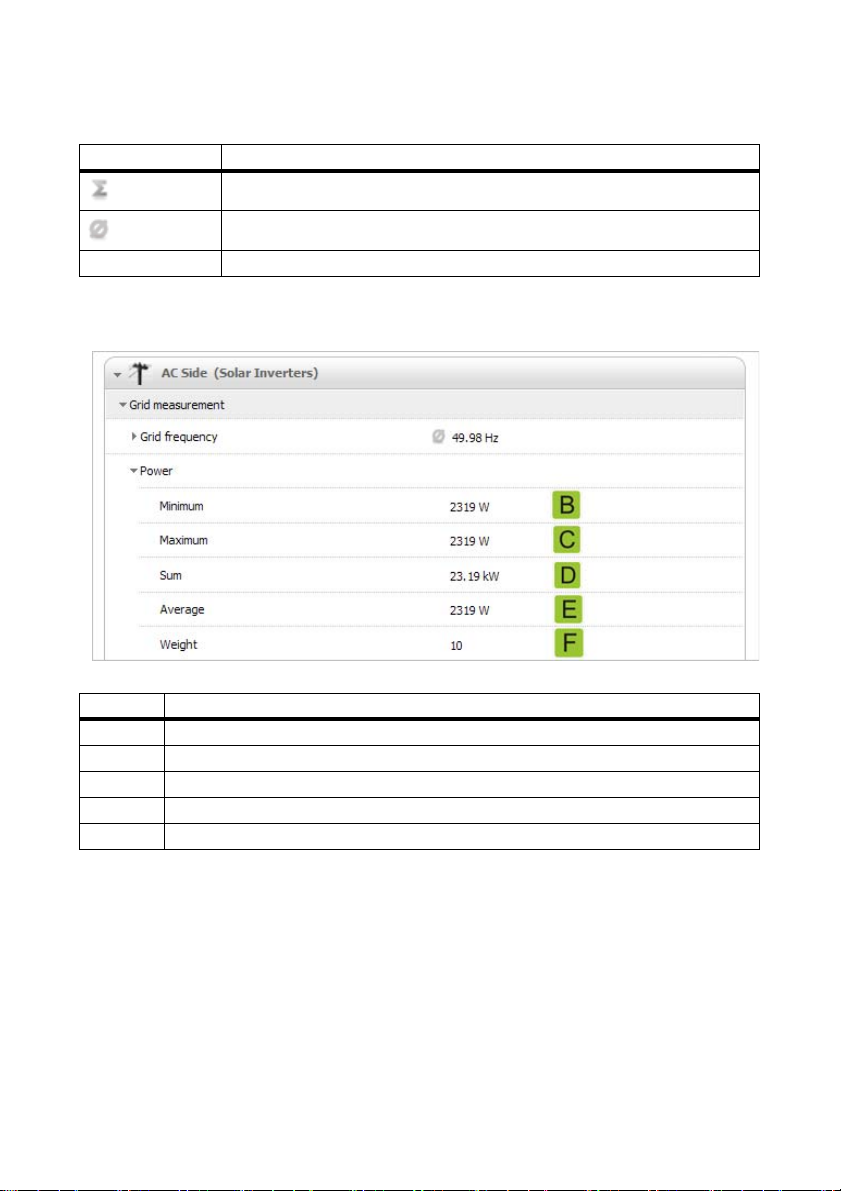
Depending on the type of value, a useful summary is displayed for the device class:
Symbol Meaning
Sum
Average value
e.g. 20°C ... 50°C Smallest and largest value
To read further information on the summarised value, click on the value.
In the following figure, the values are summarised for 10 devices as an example.
Item Meaning
B The smallest power value of the ten devices
C The largest power value of the ten devices
D Sum of the power values of the ten devices
E Average power value based on the ten devices
F Number of devices in the device class
24 SWebBox20-BA-en-13 User Manual
Page 25
SMA Solar Technology AG Sunny WebBox with Bluetooth: Basics
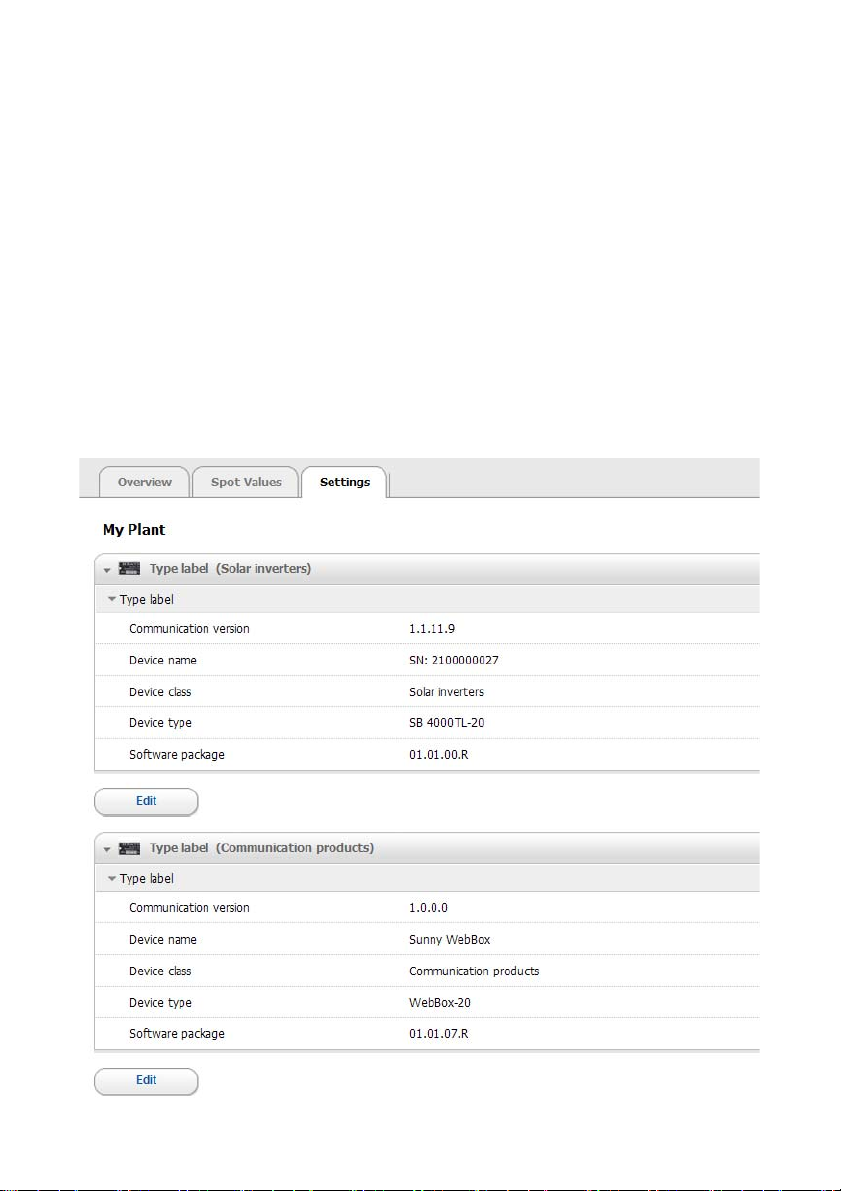
4.1.6 Settings
The "Settings" device menu shows all parameters of the device selected in the plant tree or of the
selected plant. For numerical values, the permissible parameter limits are displayed in brackets after
the value. Display of the parameters depends on the relevant user group. All parameters are
summarised in groups (parameter groups) and subgroups.
Device view
If a device is selected in the plant tree, you can edit the parameters for the selected device on the
"Settings" page.
Plant view
If a plant is selected in the plant tree, you can edit the parameters for a complete device class on the
"Settings" page. All devices of the device class are set to the new parameter value. When you click
on a parameter group, the device classes are displayed separately (e.g. solar inverters and
communication products).
User Manual SWebBox20-BA-en-13 25
Page 26
Sunny WebBox with Bluetooth: Basics SMA Solar Technology AG
If different values are set for devices of a device class, these are displayed in an empty field (A) in the
editing mode.
With selection menus, the different options are listed. The figure in brackets is the number of devices
that are set to this option. See (B) and (C). By selecting an option and saving, all devices of this device
class are set to this value. A "*" symbol means that this parameter is not available for all devices.
In text fields the common leading characters are displayed. Different characters are supplemented
with "...".
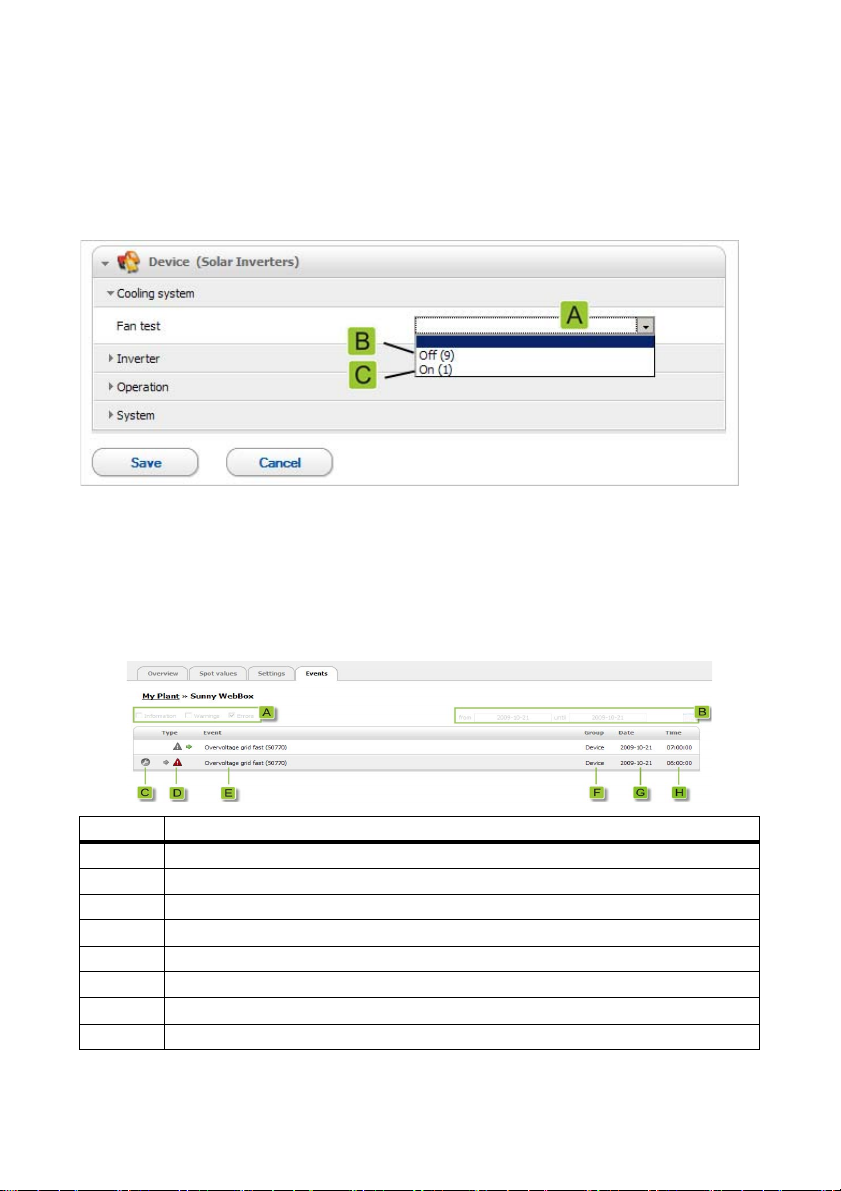
4.1.7 Events
The Sunny WebBox can display its own events and the events of the individual devices.
The Sunny WebBox requests the list of events directly from the devices.
Item Meaning
A Filter for the event categories
B Filter for the period of the displayed events
C Priority of the event
DType of event
E Event in plain text and the event number in brackets
F Group of affected parameters (parameter group)
G Date on which the event occurred
H Time at which the event occurred
26 SWebBox20-BA-en-13 User Manual
Page 27
SMA Solar Technology AG Sunny WebBox with Bluetooth: Basics
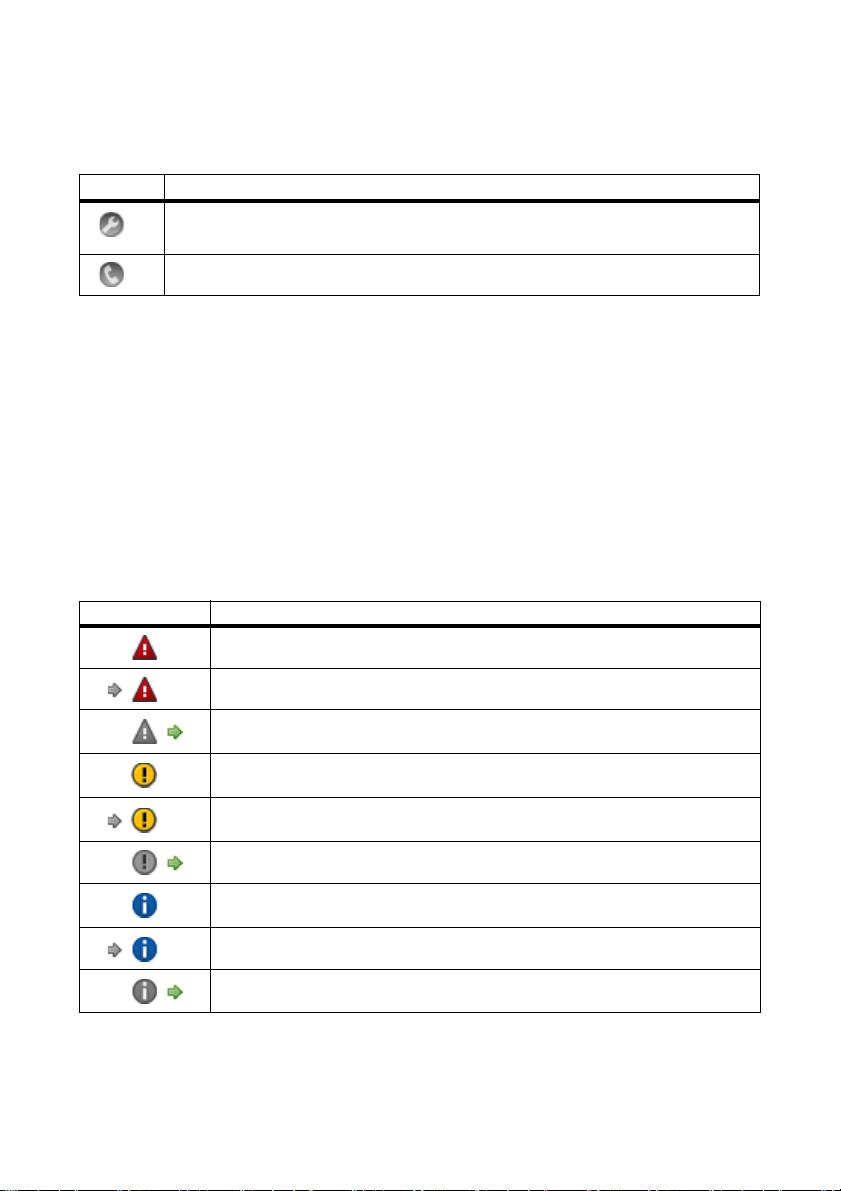
Priorities of the events
The twopriority levels for the events are as follows:
Symbol Meaning
This event can only be remedied by means of intervention on the device by the installer.
Contact your installer quoting the serial number of the device and the event number.
Contact your installer quoting the serial number of the device and the event number.
Types of event
There are three event types which the Sunny WebBox displays using symbols:
• Information
•Warning
• Error
Symbols and meaning of event types
Events can have three possible statuses:
• Incoming: the event is occurring.
• In progress: the event has existed for some time and could not yet be automatically remedied.
• Outgoing: the event does not exist any longer.
Symbol Meaning
Error
Incoming error
Outgoing error
Warning
Incoming warning
Outgoing warning
Information
Incoming information
Outgoing information
User Manual SWebBox20-BA-en-13 27
Page 28

Sunny WebBox with Bluetooth: Basics SMA Solar Technology AG
4.1.8 Updates
The "Updates" page is displayed if the PV plant is selected in the plant tree. On the "Updates" page,
you can configure the settings for the device updates. It also lists all available devices of the PV plant,
with the devices grouped according to device type. Via the "Updates" page, you can view the current
firmware status of the devices in your PV plant. You can also view available device updates,
download them and transmit them to the devices.
Item Meaning
A Settings for the device update
B Shows available device updates for this device group.
C Shows all devices of this device group, each with display name, serial number, current
firmware version and update status.
If new device updates are available, the new update files and the number of update
attempts per device are also shown.
D Delete update files having the status "Ready".
E Look for new update files and update the list of available update files.
28 SWebBox20-BA-en-13 User Manual
Page 29

SMA Solar Technology AG Sunny WebBox with Bluetooth: Basics
4.2 Security and Password Concept
4.2.1 User Groups
SMA Solar Technology AG generally distinguishes between the two user groups: "User" and
"Installer". After entering the SMA Grid Guard code, installers can also configure advanced settings
on devices. The user groups have the following rights:
User group Right
User This user group enables the user to view all information relating to
the display, such as instantaneous values and parameter settings.
Settings that affect functionality cannot be modified.
The user can choose any plant password for the user group "User".
In sta lle r In add ition t o us er r ights, t his user gro up can c onf igure and change
plant parameters that affect functionality.
This user group also has the option of resetting the plant password
of the user and – after entering the SMA Grid Guard code –
configuring advanced settings on devices.
Installer with SMA Grid Guard
rights
The installer can modify the SMA Grid Guard parameters of
devices.
4.2.2 Plant Password
The plant password of the relevant user group is the same for all devices of a plant. After logging in
with the plant password ("User"/"Installer"), you can configure several devices of your plant at the
same time. If the password for the device does not match the plant password, for instance when
adding a new device to an existing plant, the device is shown in the plant tree with a padlock symbol
().
Unauthorised access to your PV plant
The plant password protects your plant against unauthorised access.
• After initial login, you should change the default password for both user groups.
Plant password on delivery
All devices are delivered with the user password 0000 and the installer password 1111.
Plant password for an existing plant featuring Sunny Beam with Bluetooth
If the Sunny WebBox is retrofitted in an existing plant that has a Sunny Beam, the
Sunny WebBox must have the same plant password set as the Sunny Beam.
User Manual SWebBox20-BA-en-13 29
Page 30

Sunny WebBox with Bluetooth: Basics SMA Solar Technology AG
4.2.3 Access Security for the Sunny WebBox with Bluetooth
Each user group is protected with a freely selectable password. Passwords are transmitted in
encrypted form. If the password is entered incorrectly four times, access to the Sunny WebBox is
blocked for 15 minutes. You can then log in again.
Protect your PV plant against unauthorised access by taking suitable precautionary measures, such as:
• Setting up secure passwords (see Section 4.2.4 ”Strength of Passwords” (page30)).
• Changing passwords at regular intervals.
• Using different passwords for different user groups.
• Never leaving slips of paper with passwords written on around.
• Setting up a firewall in Ethernet networks.
• Closing unnecessary network ports in Ethernet networks.
4.2.4 Strength of Passwords
To increase the security of your password, bear in mind the following advice when selecting the
password:
• Select a password with at least 8 characters. The longer the password, the more secure it is.
• Do not use names or terms from dictionaries (e.g. "Dog", "Cat", "Mouse" etc.).
• Do not use data related to your person as passwords (e.g. names of persons or pets, personal
numbers or identification numbers, car registration plates etc.).
• Do not repeat names or words (e.g. "househouse", "carcar" etc.).
• Use a combination of upper and lower case letters, special characters and numbers.
• Do not use combinations of numbers or letters in the same order as they appear on your
keyboard (e.g. "12345", "qwerty" etc.).
4.2.5 SMA Grid Guard
SMA Grid Guard is a security concept for country-specific settings in the inverter which define the
network behaviour in an electricity grid. These settings (Grid Guard parameters) are preset in the
devices and can only be changed via the SMA Grid Guard password. In order to change
SMA Grid Guard parameters, you will need to be logged in as an installer and you will need your
personal SMA Grid Guard password, which you can obtain from SMA Solar Technology AG.
You can find the application form for the personal access code in the download area of
www.SMA-Solar.com, in the "Data sheet" section of the respective inverter.
30 SWebBox20-BA-en-13 User Manual
Page 31

SMA Solar Technology AG Sunny WebBox with Bluetooth: Basics
4.2.6 Forgotten the Password
If you have forgotten the plant password, you can unlock the devices of your PV plant with a
Personal Unlocking Key (PUK). There is one PUK per user group ("User" and "Installer") for each
inverter and each Sunny WebBox.
Procedure:
1. Request PUKs for inverters and Sunny WebBox.
2. Unlock inverters via Sunny Explorer using the PUKs.
3. Unlock Sunny WebBox using the PUK.
Requesting PUKs for inverters and Sunny WebBox
1. Download the application form for PUKs in the "Service" area of www.SMA-Solar.com.
2. Complete the application form and sign it.
3. Send the application form to the SMA Service Line:
– Send the application form by e-mail (see Section 12 ”Contact” (page86)).
or
– Send the application form by fax (see Section 12 ”Contact” (page86)).
or
– Send the application form by post (see Section 12 ”Contact” (page86)).
☑ The SMA Service Line will check the application and send you the requested PUKs.
Unlocking inverters using the PUK
Unlocking several inverters using the PUK
Each PUK can only be used for oneinverter and oneuser group.
• If you requested PUKs for several inverters, you must unlock each inverter individually
using the corresponding PUK.
1. Log into the inverter via Sunny Explorer using the PUK (see Sunny Explorer user manual).
2. Set a new password (see Sunny Explorer user manual).
Unlocking Sunny WebBox using the PUK
1. Start the Internet browser (e.g. Internet Explorer).
2. Enter the IP address of the Sunny WebBox in the address line and press the enter key.
3. In the "User" field, select the user group for which the SMA Service Line has generated the PUK.
4. Enter the PUK in the "Password" field.
5. Change the password of the Sunny WebBox (see Section 7.1 ”Changing the Password of the
Sunny WebBox” (page42)). To do this, use the plant password that you previously set via
Sunny Explorer.
☑ The Sunny WebBox shows the inverters in the plant tree without the padlock symbol. You have
access rights to all inverters in the relevant user group.
User Manual SWebBox20-BA-en-13 31
Page 32

Sunny WebBox with Bluetooth: Basics SMA Solar Technology AG
4.3 Symbols
Symbols for access rights
The individual devices are shown in the plant tree with a symbol relating to the access rights. If no
symbol is displayed after a device, you have access rights to the device according to the user group
logged into.
Updating time in the plant tree
In the plant tree, updating the symbols for access rights (SMA Grid Guard symbol and
padlock symbol) can take up to two minutes.
Symbol Meaning
You have no access to the device. The password for the device differs from the current
plant password.
You ha ve access to par amete rs that are pr otected wi th the SMA G rid Guard password.
Parameters that are protected with SMA Grid Guard are additionally marked with this
symbol.
Device symbols
Device symbols are displayed in the plant tree and on the overview page of a device. Devices have
a particular status, which is shown by means of a symbol.
Symbol Meaning
Plant
Sunny WebBox
Inverter
Unknown device
Sunny SensorBox with SMA Power Injector with Bluetooth
SMA Bluetooth
32 SWebBox20-BA-en-13 User Manual
Repeater
Page 33

SMA Solar Technology AG Sunny WebBox with Bluetooth: Basics
Group symbols for instantaneous values and settings
Group symbols are used for the individual parameter groups.
Symbol Meaning
Status
General values that describe the status of the device. Statuses of other components in
the device (e.g. modem) are not listed here.
Type label
All values that describe the device/plant.
Device
Values that directly affect the device and cannot be classified into one of the special
categories (e.g. DC side, AC side, plant communication etc.).
User rights
All values that influence access protection to the device.
DC side
Values that affect the direct current side of the device (e.g. PV modules).
AC side
Values that affect the grid side of the device.
Grid monitoring
Includes parameters that affect the electricity grid and are partially protected by the
personal SMA Grid Guard password.
Plant and device control
Includes parameters for devices that must fulfill special requirements for feeding into the
medium voltage level. The parameters are protected by the personal SMA Grid Guard
password.
Plant communication
All va lues that d efine the communic ation betw een commun icatio n devices and the plant.
Data recording
All values that affect data recording for the device (storage location, storage intervals,
storage format).
Device components
Includes parameters and measured values that affect the components of a device. This
group is a kind of "extended type label". Here, version numbers of the system
components are classified for example.
Meteorology
Includes all measured values for the connected sensors, e.g. temperature, irradiation
and wind speed.
User Manual SWebBox20-BA-en-13 33
Page 34

Sunny WebBox with Bluetooth: Basics SMA Solar Technology AG
Other symbols
Symbol Meaning
Hourglass
The hourglass shows the saving of values in a device.
Average value
The average symbol indicates an average value.
Sum
The sum symbol indicates totalled values.
Maximum
Indicates the maximum of a value.
Minimum
Indicates the minimum of a value.
Update
This symbol indicates that values are being read from the device.
Alarm clock
The alarm clock symbol indicates that values are more than ten minutes old.
Calendar function
Opens a calendar for selecting a date, a start date or an end date.
34 SWebBox20-BA-en-13 User Manual
Page 35

SMA Solar Technology AG Logging into and out of the Sunny WebBox
5 Logging into and out of the Sunny WebBox
5.1 Logging into the Sunny WebBox
Unauthorised access to your PV plant
The plant password protects your plant against unauthorised access.
• After initial login, you should change the default password for both user groups.
Plant password on delivery
All devices are delivered with the user password 0000 and the installer password 1111.
1. Start Internet browser (e.g. Internet Explorer).
2. If you use DHCP for the Sunny WebBox (default setting), enter the URL
http://WebBox"serial number", e.g. http://WebBox895903467, in the
address line and press the enter key.
Tip: You can read off the serial number from the type label (see Section 3.3 ”Type Label”
(page15)) or determine it using an SD card (see Section 9.5 ”Determining Current Network
Settings of the Sunny WebBox Using the SD Card” (page73).
☑ The Sunny WebBox login page opens.
– If the page does not open, refer to Section 10.1 ”General Troubleshooting for the Sunny
WebBox” (page74).
3. If you use the static network settings for the Sunny WebBox, enter the static IP address of the
Sunny WebBox in the address line and press the enter key. If you do not know the IP address
of the Sunny WebBox, see Section 9.5 ”Determining Current Network Settings of the Sunny
WebBox Using the SD Card” (page73).
☑ The Sunny WebBox login page opens.
– If the page does not open, refer to Section 10.1 ”General Troubleshooting for the Sunny
WebBox” (page74).
4. Select the desired language.
5. In the "User" field, select the user group under which you would like to log in.
6. In the "Password" field, enter the password of the selected user group.
User Manual SWebBox20-BA-en-13 35
Page 36

Logging into and out of the Sunny WebBox SMA Solar Technology AG
7. Select [Login].
☑ The Sunny WebBox user interface opens.
5.2 Logging out of the Sunny WebBox
1. Select [Logout] in the icon bar.
☑ The Sunny WebBox login page opens. You have successfully logged out.
36 SWebBox20-BA-en-13 User Manual
Page 37

SMA Solar Technology AG Operation
6 Operation
6.1 Plant View
6.1.1 Plant Status
Symbol Status Meaning
Neutral The plant status is unknown and is currently being updated.
OK All devices of the plant are working correctly.
Warning At least one device in the plant is displaying the status "Warning".
No device is displaying the status "Fault".
Fault At least one device in the plant is displaying the status "Fault".
6.1.2 Setting Parameters for a Device Class
A device class refers to devices of the same type. You can configure all the devices in a device class
simultaneously. It is not possible to configure different device classes at the same time. Save the
changes made to one device class before processing another device class.
To configure all the devices in a device class, proceed as follows:
1. Select the plant in the plant tree.
2. Select "Settings" in the device menu.
☑ The parameter groups of the whole plant are displayed.
3. Select the parameter group that contains the parameter to be configured.
☑ The individual device classes are listed. It may take a moment for all data to be read from
the devices.
4. Select [Edit] below the appropriate device class.
5. Change desired parameters for the whole device class.
6. Select [Save].
☑ The settings are transferred to all devices of the same device class.
Saving after parameter changes
An hourglass displays the saving process. After saving the changes in the Sunny WebBox,
the data is transferred to the device. The saving procedure may take several hours if the
device (e.g. an inverter) is in night mode. When the device is started, the data is transferred
to the main memory and the hourglass is no longer shown.
User Manual SWebBox20-BA-en-13 37
Page 38

Operation SMA Solar Technology AG
6.1.3 Changing the Plant Name
1. Select the Sunny WebBox in the plant tree and select "Settings" in the device menu
or
Select the "Settings" button in the icon bar.
2. Select the "Type Label > Type Label" parameter group.
3. Select [Edit].
4. Select the desired plant name in the "Plant name" field.
5. Select [Save].
6.2 Device View
6.2.1 Device Status
Devices have a particular status, which is shown by the symbols in the plant tree and on the overview
page of the device.
Symbol Status Meaning
Neutral The status of the device is currently being updated.
OK The device is ready for operation and working correctly.
Warning The device is currently not operating correctly. It may be
possible to automatically remedy the fault.
Fault The device is in a fault state. There is a problem with the
device. Please check the device.
Communication fault The device cannot communicate at present. This may happen
at night, for example, when the inverter is not operating. This
symbol is also displayed if you have taken the device out of
operation. To remove the device from the plant tree, select the
[Remove] button.
6.2.2 Setting the Device Parameters
You can configure a device via its parameters. The setting of device parameters is dependent on the
user group.
To change device parameters, proceed as follows:
1. Select the appropriate device in the plant tree.
2. Select "Settings" in the device menu.
☑ The parameter groups of the device are displayed.
38 SWebBox20-BA-en-13 User Manual
Page 39

SMA Solar Technology AG Operation
3. Select the parameter group that contains the desired parameter.
☑ Reading the values may take a moment because the values are requested directly from the
device.
4. Select [Edit].
5. Change the desired parameter.
6. Select [Save].
Saving after parameter changes
Saving is indicated by an hourglass. After saving the changes in the Sunny WebBox, the
data is transferred to the device. The saving procedure may take several hours if the device,
e.g. an inverter, is in night mode. When the device is started, the data is transferred to the
main memory and the hourglass disappears.
6.3 Adjusting the Password of a Device to the Plant Password
If the password of a device differs from that of your plant, the device is shown in the plant tree with a
padlock symbol. This can occur when new devices are added to an existing plant for example. To
apply your plant password to the new device, proceed as follows:
1. Log into the Sunny WebBox as an "Installer".
☑ The new device is shown in the plant tree with a padlock symbol.
2. Select the Sunny WebBox in the plant tree and select "Settings" in the device menu
or
Select the "Settings" button in the icon bar.
3. Select the "User Rights > Access Control" parameter group.
4. Select [Edit].
5. Enter the password of the new device in the "Set installer password" field.
6. Enter the password again in the "Confirm the password" field.
7. Enter the password of the new device in the field of the relevant user group.
8. Enter the password again in the "Confirm the password" field.
9. Select [Save].
☑ The Sunny WebBox saves the password of the new device in all enabled devices. All
devices have the same plant password.
10. Restart the Sunny WebBox via the user interface (see page 72).
11. Repeat the process for setting the password in order to transfer your old plant password to all
devices.
12. Select [Save].
13. Restart the Sunny WebBox via the user interface (see page 72).
☑ The device is shown in the plant tree without a padlock symbol. The password of the new device
is adjusted to the password the plant.
User Manual SWebBox20-BA-en-13 39
Page 40

Operation SMA Solar Technology AG
6.4 Determining the Serial Number of the Sunny WebBox
You have the following options for determining the serial number of the Sunny WebBox:
• Read off the serial number from the status line of the user interface
• Determine the serial number using the SD card (see Section 9.5 ”Determining Current Network
Settings of the Sunny WebBox Using the SD Card” (page73)).
• Read off the serial number from the type label (see Section 3.3 ”Type Label” (page15))
• Determine the serial number using the parameter groups
Determining the serial number using the parameter group
1. Select the Sunny WebBox in the plant tree and select "Settings" in the device menu
or
Select the "Settings" button in the icon bar.
2. Select the "Type Label > Type Label" parameter group.
3. Read off the serial number of the Sunny WebBox from the "Serial number" field.
6.5 Determining the IP Address of the WAN
You can determine the IP address of the WAN (wide area network) of your Sunny WebBox using the
parameter group or the SD card (see Section 9.5 ”Determining Current Network Settings of the Sunny
WebBox Using the SD Card” (page73)). The IP address of the WAN is the IP address at which the
Sunny WebBox is to be accessed on the Internet.
1. Select the Sunny WebBox in the plant tree and select "Settings" in the device menu
or
Select the "Settings" button in the icon bar.
2. Select the "External Communication > Nat" parameter group.
3. The WAN IP address is shown in the "WAN IP" field.
40 SWebBox20-BA-en-13 User Manual
Page 41

SMA Solar Technology AG Operation
6.6 Activating/Deactivating SMA Grid Guard Mode
Country-specific settings on the inverter
SMA Grid Guard parameters may only be changed with the express authorisation of the
network operator. Any unauthorised changes made to the SMA Grid Guard parameters
shall void the operation permission for the respective device.
Updating time in the plant tree
In the plant tree, updating the symbols for access rights (SMA Grid Guard symbol and
padlock symbol) can take up to two minutes.
Activating the SMA Grid Guard mode
You can configure SMA Grid Guard parameters of devices by first entering your SMA Grid Guard
password.
1. Log in as an "Installer".
2. Select the SMA Grid Guard symbol in the status bar of the Sunny WebBox user interface.
☑ The SMA Grid Guard dialogue opens.
3. Enter your password in the "Individual access code" field. You receive the password from
SMA Solar Technology AG (see page 30).
4. Select [OK].
☑ The SMA Grid Guard code is now set. You can now edit all devices that are marked with the
SMA Grid Guard symbol.
Deactivating the SMA Grid Guard mode
To end the SMA Grid Guard mode, proceed as follows:
1. Select the SMA Grid Guard symbol in the status bar of the Sunny WebBox user interface.
☑ The SMA Grid Guard dialogue opens.
2. Enter the blocking code "54321" in the "Individual access code" field.
3. Select [OK].
☑ SMA Grid Guard mode is deactivated. Check if the SMA Grid Guard mode has been
deactivated for all inverters. The blocking code is not supported by inverters with
SMA Bluetooth Piggy-Back.
– If the SMA Grid Guard mode is still active, log out of the Sunny WebBox user interface and
log back in after two minutes (see Section 5 ”Logging into and out of the Sunny WebBox”
(page35)). The SMA Grid Guard mode is then deactivated.
User Manual SWebBox20-BA-en-13 41
Page 42

Configuring the Sunny WebBox SMA Solar Technology AG
7 Configuring the Sunny WebBox
7.1 Changing the Password of the Sunny WebBox
Additional rights for the installer
If you are logged in as an installer, you can configure and change plant parameters that
affect functionality in addition to user rights. The "Installer" user group also has the option
of resetting the plant password of the user and changing SMA Grid Guard parameters.
Password for the internal FTP server
The password set here is also valid for access to the internal FTP server.
When the password of the Sunny WebBox is set, this password is also set for all devices that are
shown in the plant tree without a padlock symbol. To successfully adopt the password, the
Sunny WebBox must be restarted (see page 72).
1. Select the Sunny WebBox in the plant tree and select "Settings" in the device menu
or
Select the "Settings" button in the icon bar.
2. Select the "User Rights > Access Control" parameter group.
3. Select [Edit].
4. Enter a secure password in the field of the relevant user group. The password can be no more
than twelve characters long. The following special characters are permitted: ?_!-.
Bear in mind the strength of your password (see Section 4.2.4 ”Strength of Passwords”
(page30)).
5. Enter each password again in the "Confirm the password" field.
6. Select [Save].
☑ All devices are now set to the Sunny WebBox password.
42 SWebBox20-BA-en-13 User Manual
Page 43

SMA Solar Technology AG Configuring the Sunny WebBox
7.2 Plant Time
7.2.1 Information on Plant Time
The date and time of a PV plant is referred to as plant time.
When operating your Bluetooth PV plant with the Sunny WebBox, all connected Bluetooth devices
adopt the plant time of the Sunny WebBox.
If additional communication products (e.g. Sunny Beam with Bluetooth or Sunny Explorer) are added
to the PV plant, the new communication products automatically adopt the existing PV plant time.
If you change the plant time, all the inverters will adapt immediately to the new plant time. Additional
communication products in the plant only adopt the plant time after some time (max. 7 hours later).
The plant time can be manually adjusted in the Sunny WebBox or synchronised via the Internet.
With "Automatic time synchronization", the Sunny WebBox synchronises the date and time with
Sunny Portal once a day. You do not need to register in Sunny Portal to do this.
NOTICE
Possibility of data loss when changing the plant time
Please note that changing the time can have an effect on the data already recorded.
If for example the time or date were put back, the recorded data could be overwritten.
Only change the plant time when it is necessary.
7.2.2 Setting the Date and Time
Automatic time synchronisation
You can also synchronise the plant time automatically via the Internet (see Section 7.2.4
”Activating/Deactivating Automatic Time Synchronisation” (page44)).
1. Select the Sunny WebBox in the plant tree and select "Settings" in the device menu
or
Select the "Settings" button in the icon bar.
2. Select the "Device > Time settings" parameter group.
3. Select [Edit].
4. In the "Standard/Daylight Saving Time conversion on" field, select "Yes" in order to activate
automatic adjustment between Summer and Winter Time (default setting).
or
In the "Standard/Daylight Saving Time conversion on" field, select "No" in order to deactivate
automatic adjustment between Summer and Winter Time. When the clocks change, the date
and time must be manually adjusted.
5. In the "Set plant time" field, set the current date and time of the PV plant.
6. In the "Time zone" field, select the time zone in which the PV plant is located:
"((UTC+01:00) Amsterdam, Berlin, Bern, Rome, Stockholm, Vienna").
7. Select [Save].
User Manual SWebBox20-BA-en-13 43
Page 44

Configuring the Sunny WebBox SMA Solar Technology AG
7.2.3 Synchronising the Time with Sunny Portal Manually
1. Select the Sunny WebBox in the plant tree and select "Settings" in the device menu.
2. Select the "Device > Time settings" parameter group.
3. In the "Synchronize time with portal" field, select [Execute] to synchronise the date and time with
Sunny Portal.
☑ The date and time are synchronised with Sunny Portal. The synchronisation was successful if the
time is displayed in the "Set plant time" field.
7.2.4 Activating/Deactivating Automatic Time Synchronisation
Activating automatic time synchronisation
1. Select the Sunny WebBox in the plant tree and select "Settings" in the device menu
or
Select the "Settings" button in the icon bar.
2. Select the "Device > Time settings" parameter group.
3. Select [Edit].
4. In the "Automatic time synchronization" field, select "Yes" to synchronise the date and time with
Sunny Portal.
Deactivating automatic time synchronisation
1. Select the Sunny WebBox in the plant tree and select "Settings" in the device menu
or
Select the "Settings" button in the icon bar.
2. Select the "Device > Time settings" parameter group.
3. Select [Edit].
4. In the "Time synchronisation switched on" field, select "No" to set the date and time manually
(see Section 7.2.2 ”Setting the Date and Time” (page43))(default setting).
44 SWebBox20-BA-en-13 User Manual
Page 45

SMA Solar Technology AG Configuring the Sunny WebBox
7.3 Country Settings
7.3.1 Setting the Date Format
Effect on existing PV plant data
Changes to the format apply to all future data exports, e.g. data on the SD card and data
on the internal FTP server.
1. Select the Sunny WebBox in the plant tree and select "Settings" in the device menu
or
Select the "Settings" button in the icon bar.
2. Select the "Device > Country settings" parameter group.
3. Select [Edit].
4. In the "Date format" field, select the desired date format ("DD"=day, "MM"=month,
"YYYY"=year) (default setting: "DD.MM.YYYY").
5. Select [Save].
7.3.2 Setting the Language
• I f yo u ar e no t yet log ged int o th e Su nny Web Box , se t th e language using the language selection
at the top left of the Sunny WebBox login page.
or
Proceed as follows:
1. Select the Sunny WebBox in the plant tree and select "Settings" in the device menu
or
Select the "Settings" button in the icon bar.
2. Select the "Device > Country settings" parameter group.
3. Select [Edit].
4. Select the desired language in the "Language" field.
5. Select [Save].
7.3.3 Setting the Number Format
1. Select the Sunny WebBox in the plant tree and select "Settings" in the device menu
or
Select the "Settings" button in the icon bar.
2. Select the "Device > Country settings" parameter group.
3. Select [Edit].
4. In the "Number format" field, select the desired number format (default setting: "123.456,0").
5. Select [Save].
User Manual SWebBox20-BA-en-13 45
Page 46

Configuring the Sunny WebBox SMA Solar Technology AG
7.3.4 Setting the Time Format
Effect on existing PV plant data
Changes to the format apply to all future data exports, e.g. data on the SD card and data
on the internal FTP server.
1. Select the Sunny WebBox in the plant tree and select "Settings" in the device menu
or
Select the "Settings" button in the icon bar.
2. Select the "Device > Country settings" parameter group.
3. Select [Edit].
4. In the "Time format" field, select the desired time format ("hh"=12-hour format,
"HH"=24-hour format, "mm"=minutes, "ss"=seconds)(default setting: "HH:mm").
5. Select [Save].
7.3.5 Setting the Unit of Temperature
1. Select the Sunny WebBox in the plant tree and select "Settings" in the device menu
or
Select the "Settings" button in the icon bar.
2. Select the "Device > Country settings" parameter group.
3. Select [Edit].
4. In the " Unit of temperature" field, select the desired unit of temperature (default setting: "Celsius").
5. Select [Save].
7.4 Changing the Device Name of the Sunny WebBox
1. Select the Sunny WebBox in the plant tree and select "Settings" in the device menu
or
Select the "Settings" button in the icon bar.
2. Select the "Type Label > Type Label" parameter group.
3. Select [Edit].
4. Enter the desired device name in the "Device name" field.
5. Select [Save].
☑ The device name of the Sunny WebBox is set.
46 SWebBox20-BA-en-13 User Manual
Page 47

SMA Solar Technology AG Configuring the Sunny WebBox
7.5 Network Settings
7.5.1 Information on Network Settings
Changing advanced network settings
Do not change any network settings of devices if you are unsure of the consequences of
the change. Changing values can result in the existing network not functioning or only
partially functioning. If you have any questions, contact your network administrator.
Sunny WebBox Assistant
It is recommended to use the Sunny WebBox Assistant for commissioning the
Sunny WebBox and integration into a network. You can obtain Sunny WebBox Assistant
on the Internet at www.SMA-Solar.com.
You can assign the Sunny WebBox static network settings or have these obtained dynamically via a
DHCP server. It is also possible to use a proxy server for the Internet connection.
If you would like to make the Sunny WebBox available on the Internet so that you can directly access
the Sunny WebBox via Sunny Portal for example, you must set up port forwarding on your router.
For this, you may need to adjust the HTTP port and the NAT port (see Section 7.5.5 ”Setting the HTTP
Port” (page49) and Section 7.5.3 ”Configuring Static Network Settings (Deactivating DHCP)”
(page48)).
7.5.2 Using Dynamic Network Settings (DHCP)
When using the DHCP (Dynamic Host Configuration Protocol), the Sunny WebBox obtains your
network settings (IP address, subnet mask, gateway and DNS server) via a DHCP server.
Default settings
DHCP is activated in the Sunny WebBox by default.
DHCP server requirements
If you want to obtain the network settings for the Sunny WebBox via DHCP, check your
DHCP server in advance. The DHCP server must extend the lease of the assigned IP
address. If the DHCP server assigns a new IP address after the lease has expired, we do
not recommend using DHCP.
Calling up the user interface via the URL http://WebBox"serial number" only works if
your DHCP server has a DNS function.
If your DHCP server does not have a DNS function but you want to use DHCP, you can
call up the user interface via the current IP address of the Sunny WebBox. You can
determine the current IP address via the SD card (see page 73). Alternatively, you can find
the Sunny WebBox IP address in the DHCP server. A DHCP server can normally list all
devices that have obtained an IP address from it. You can then identify the Sunny WebBox
using its MAC address. You can find the MAC address of your Sunny We bBox on the type
label.
User Manual SWebBox20-BA-en-13 47
Page 48

Configuring the Sunny WebBox SMA Solar Technology AG
1. Log into the Sunny WebBox.
2. Select the Sunny WebBox in the plant tree and select "Settings" in the device menu.
3. Select the "External Communication > DHCP" parameter group.
4. Select [Edit].
5. Select "Yes" in the "Activated" field.
6. Select [Save].
☑ DHCP is activated in the Sunny WebBox. You can access the user interface via the URL
http://WebBox"serial number" (see Section 5.1 ”Logging into the Sunny WebBox”
(page35)).
7.5.3 Configuring Static Network Settings (Deactivating DHCP)
1. Log into the Sunny WebBox.
2. Select the Sunny WebBox in the plant tree and select "Settings" in the device menu.
3. Select the "External Communication > Ethernet" parameter group.
4. Select [Edit].
5. In the "DNS server IP" field, enter the IP address of the DNS server (Domain Name System
server). Usually, the IP address of the router has to be entered here.
6. In the "Gateway IP" field, enter the IP address of your network's gateway. Usually, the IP
address of the router has to be entered here.
7. In the "IP Address" fi eld , en ter the stat ic I P ad dre ss at whi ch t he S unny Web Box is t o be acc essed
in the local n etwor k (see Section 11.7 ”Assi gning IP Addres ses in a Local Network” (page 85)).
8. Enter the subnet mask of your network in the "Subnet mask" field. Normally, you can find this
information in the router manual.
9. In the "DHCP" parameter group, select "No" in the "Activated" field.
10. Select [Save].
☑ The network settings are assigned manually. You can access the user interface via the static
IP address (see Section 5.1 ”Logging into the Sunny WebBox” (page35)).
48 SWebBox20-BA-en-13 User Manual
Page 49

SMA Solar Technology AG Configuring the Sunny WebBox
7.5.4 Configuring Proxy Settings
If there is a proxy server in your network, you must make proxy settings in the Sunny WebBox.
The proxy settings of the Sunny WebBox are required for connection to the Sunny Portal and for
firmware updates to the Sunny WebBox or the devices in your PV plant.
Using a proxy server
1. Select the Sunny WebBox in the plant tree and select "Settings" in the device menu.
2. Select the "External Communication" > "Proxy settings" parameter group.
3. Select "Yes" in the "Activated" field in order to use a proxy server.
4. In the "Login" field, enter the login name for the proxy server.
5. In the "Port" field, enter the network port via which the proxy server can be accessed.
6. In the "Password" field, enter the password for the proxy server.
7. In the "Confirm the password" field, enter the password again.
8. In the "Server" field, enter the proxy server IP address.
9. Select [Save].
Not using a proxy server
1. Select the Sunny WebBox in the plant tree and select "Settings" in the device menu.
2. Select the "External Communication" > "Proxy settings" parameter group.
3. Select "No" in the "Activated" field in order not to use the proxy server.
4. Select [Save].
7.5.5 Setting the HTTP Port
Adjusting the network ports
Changing ports is only required in rare cases. Before adjusting the ports, contact your
network administrator.
The HTTP port is the network port via which the Sunny WebBox user interface can be accessed in the
local network. The default setting is port 80. If you set another HTTP port, you must enter this after the
IP address when calling up the user interface.
Example: The IP address of the Sunny WebBox is 192.168.0.168 and the HTTP port has been
changed to: 8080. You must then enter "http://192.168.0.168:8080" in the address line of the
Internet browser.
1. Select the Sunny WebBox in the plant tree and select "Settings" in the device menu.
2. Select the "External Communication > HTTP" parameter group.
3. Select [Edit].
4. Set the desired port in the "Port" field (default setting: port 80).
5. Select [Save].
User Manual SWebBox20-BA-en-13 49
Page 50

Configuring the Sunny WebBox SMA Solar Technology AG
7.5.6 Setting the NAT Port
Adjusting the network ports
Changing ports is only required in rare cases. Before adjusting the ports, contact your
network administrator.
During data transmission to Sunny Portal, the Sunny WebBox communicates which IP address and
which port can be used to access the Sunny WebBox on the Intern et. You must set up port forwarding
on the router and enable the desired port (see router manual). The default setting for the NAT port is
80. If there are several Sunny WebBoxes in your local network, you must select different NAT ports.
If you have selected an NAT port other than 80, you must also set the new NAT port in the
Sunny WebBox.
1. Select the Sunny WebBox in the plant tree and select "Settings" in the device menu.
2. Select the "External Communication > Ethernet > Nat" parameter group.
3. Select [Edit].
4. Set the desired port in the "Port" field.
5. Select [Save].
7.6 Data Recording
7.6.1 Information on Data Recording
The Sunny WebBox can output the collected data of the PV plant in various data formats and make
these available via the integrated FTP server or the SD card.
The following data formats are possible:
• Comma Separated Value (CSV) (see Section 7.6.2 ”CSV Files” (page51))
• Extensible Markup Language (XML) (see Section 7.6.3 ”XML Files” (page52))
All data is stored at the selected recording interval in the relevant directory for the data format.
You can also set the name of the measured values (see Section 7.6.4 ”Setting the Measurement
Name to the Local Language” (page53)).
Effect on existing PV plant data
Changes to the format apply to all future data exports, e.g. data on the SD card and data
on the internal FTP server.
50 SWebBox20-BA-en-13 User Manual
Page 51

SMA Solar Technology AG Configuring the Sunny WebBox
7.6.2 CSV Files
Information on CSV files
The Sunny WebBox saves the collected data of the PV plant in the appropriate daily CSV file every
five minutes. The content of the existing data is added to this. Individual data is always separated by
a semicolon in the file. The decimal separator and the time format within the files are dependent on
the country-specific settings of the Sunny WebBox (see Section 7.3 ”Country Settings” (page45)).
Directory path and structure of the file name
Directory path
.../CSV/[YYYY]/[MM]/
Filename structure
[YYYY]-[MM]-[DD].csv CSV file
Example: Daily report file from 2010-03-01: .../CSV/2010/03/2010-03-01.csv
Activating data export in CSV format
1. Select the Sunny WebBox in the plant tree and select "Settings" in the device menu.
2. Select the "Data Recording > Export" parameter group.
3. Select [Edit].
4. In the "Data export in CSV format" field, select "Yes".
5. Select [Save].
Deactivating data export in CSV format
1. Select the Sunny WebBox in the plant tree and select "Settings" in the device menu.
2. Select the "Data Recording > Export" parameter group.
3. Select [Edit].
4. In the "Data export in CSV format" field, select "No".
5. Select [Save].
User Manual SWebBox20-BA-en-13 51
Page 52

Configuring the Sunny WebBox SMA Solar Technology AG
7.6.3 XML Files
Information on XML files
The Sunny WebBox saves the collected data of the PV plant in an XML file every five minutes.
To reduce the number of data items and the data volume, the new XML files are automatically
compressed into a zip file and saved on the integrated FTP server or the SD card every 15 minutes.
In general, each compressed file contains 3 XML files. The decimal separator and the time format
within the files are dependent on the country-specific settings of the Sunny WebBox (see Section 7.3
”C oun try Set tin gs” (pa ge 45) ). F or t he struc tur e of the XML fil e, see Section 11.3 ”Structure of an XML
Data File” (page83).
Directory path and structure of the file name
Directory path
.../XML/[YYYY]/[MM]/[YYYY]-[MM]-[DD]/
Filename structure
[YYYY]-[MM]-[DD]_[HHMMSS].zip Compressed file in zip format
[YYYY]-[MM]-[DD]_[HHMMSS].xml XML file
Example: Daily report file from 2010-03-01, 12:42:08 hrs.: .../XML/2010/03/2010-03-01/
2010-03-01_124503.zip
The zip file contains the following three XML files: 2010-03-01_123159.xml,
2010-03-01_123703.xml, 2010-03-01_124208.xml.
Activating data export in XML format
1. Select the Sunny WebBox in the plant tree and select "Settings" in the device menu.
2. Select the "Data Recording > Export" parameter group.
3. Select [Edit].
4. In the "Data export in XML format" field, select "Yes".
5. Select [Save].
☑ Data is output in XML format.
Deactivating data export in XML format
1. Select the Sunny WebBox in the plant tree and select "Settings" in the device menu.
2. Select the "Data Recording > Export" parameter group.
3. Select [Edit].
4. In the "Data export in XML format" field, select "No".
5. Select [Save].
☑ Data is not output in XML format.
52 SWebBox20-BA-en-13 User Manual
Page 53

SMA Solar Technology AG Configuring the Sunny WebBox
7.6.4 Setting the Measurement Name to the Local Language
You can also set the name of the measured values as follows:
• Technical name of the measured value. Example: Metering.TotWhOut
• Name of the measured value as a term. Example: Total yield
1. Select the Sunny WebBox in the plant tree and select "Settings" in the device menu.
2. Select the "Data Recording > Export" parameter group.
3. Select [Edit].
4. In the "Measurement name in local language" field, select "Yes" in order to the display the name
as a term.
or
In the "Measurement name in local language" field, select "No" in order to the display the
technical name.
5. Select [Save].
7.7 E-mail Alert in the Event of a Fault
7.7.1 Information on E-mail Alert in the Event of a Fault
E-mail alert in the event of a fault allow you to respond quickly to faults in your PV plant and minimise
downtimes. The Sunny WebBox informs you by e-mail of the occurrence of any events of the type
"Fault" and "Communication fault", and optionally also events of the type "Warning".
The Sunny WebBox must be connected to the Internet.
Delayed notification of communication faults
For plants that include inverters with upgraded SMA Bluetooth Piggy-Back/
Piggy-Back Plus, it is possible that notifications concerning communication faults are not
sent until the following day. The reason for this is that these inverters switch off at night,
during thunderstorms and when the modules are covered with snow.
.
User Manual SWebBox20-BA-en-13 53
Multiple alerts possible via Sunny Portal report dispatch
You can also have events of the type "Warning" and "Communication fault" e-mailed to
you by means of report dispatch from Sunny Portal. The Sunny WebBox settings for alerts
in the event of a fault have no effect on the event reports that can be configured in
Sunny Portal.
If you activate the e-mail dispatch in Sunny Portal and in the Sunny WebBox, you may
receive several e-mails about the same event.
Displaying events of the type Fault, Warning and Communication fault via the
user interface
The Sunny WebBox records events of the type Fault, Warning and Communication fault in
the event report and displays them via the user interface (see Section 4.1.7 ”Events”
(page26)).
Page 54

Configuring the Sunny WebBox SMA Solar Technology AG
7.7.2 Activating E-mail Alert in the Event of a Fault
1. Log into the Sunny WebBox as an installer.
2. Select the Sunny WebBox in the plant tree and select "Settings" in the device menu.
3. Select the "External Communication > SMTP" parameter group.
4. Select [Edit].
5. Enter data of the e-mail server (SMTP):
– Enter the user name in the "Login" field.
– If the SMTP server requests specification of an e-mail sender address, enter the desired
e-mail sender address in the "Alternative e-mail sender address (optional)" field.
–In the "Port" field, enter the port of the SMTP server.
–In the "Password" field and the "Confirm the password" field, enter the password of the user
account.
–In the "Server" field, enter the name of the SMTP server (e.g. mail.gmx.net).
6. Select [Save].
☑ The e-mail server (SMTP) is set up.
7. Select the "Further Applications > Alarm" parameter group.
8. Select [Edit].
9. In the "Email" area, select "Yes" in the "Activated" field.
10. In the "Email address(es)" field, enter recipient's e-mail address. Multiple e-mail addresses should
be separated by a comma or a semicolon.
11. Make a selection in the "Alarm upon warnings" field in the "Filter settings" area:
– If you would exclusively like to be informed of events of the type "Fault", select "No".
– If you would like to be informed of events of the type "Fault" and events of the type
"Warning", select "Yes".
12. Select [Save].
☑ E-mail alert in the event of a fault is activated.
13. To test the dispatch, send a test e-mail. To do so, select [Execute] in the "Send test e-mail" field.
☑ The Sunny WebBox sends a test e-mail to the specified e-mail address(es).
7.7.3 Deactivating E-mail Alert in the Event of a Fault
1. Log into the Sunny WebBox as an installer.
2. Select the Sunny WebBox in the plant tree and select "Settings" in the device menu.
3. Select the "Further Applications > Alarm" parameter group.
4. Select [Edit].
5. Select "No" in the "Activated" field.
54 SWebBox20-BA-en-13 User Manual
Page 55

SMA Solar Technology AG Configuring the Sunny WebBox
7.8 Activating/Deactivating Grid Management
1. Log into the Sunny WebBox as an installer.
2. Select the Sunny WebBox in the plant tree and select "Settings" in the device menu.
3. Select the "Equipment & device control system > Plant control" parameter group.
4. To activate grid management, select "Yes" in the "Activated" field.
or
To deactivate grid management, select "No" in the "Activated" field.
User Manual SWebBox20-BA-en-13 55
Page 56

Managing Plant Data SMA Solar Technology AG
8 Managing Plant Data
8.1 Information on the Plant Data
The Sunny WebBox can display instantaneous values and parameters of the registered devices and
pass them on for subsequent processing (e.g. via Sunny Portal, FTP Push, internal FTP server, SD card).
Depending on the device type, SMA devices provide different instantaneous values and parameters
that can be displayed and edited via the Sunny WebBox according to user group. Instantaneous
values are measured or calculated values for the device, such as temperature and power.
Parameters are used to configure the device and can be edited depending on the user's rights.
To find out which instantaneous values and parameters are provided by a device, refer to the manual
of the relevant device.
The Sunny WebBox saves all continuously recorded values from the connected devices on the 1 GB
internal drive. If the memory capacity of the internal drive is reached, all values that are older than
twelve months are overwritten. Save the plant data on an external drive at regular intervals using the
Sunny WebBox functions provided.
8.2 Sunny Portal
8.2.1 Information on Sunny Portal
The Sunny WebBox gives you the option of automatically sending all relevant plant data of your
PV plant to the Sunny Portal Internet portal. Sunny Portal is suitable for the individual presentation of
plant data of any power class and offers extensive evaluation and notification functions. Further
information on Sunny Portal is available at www.SunnyPortal.com.
Before you can use Sunny Portal, you must register via the Sunny WebBox (see page 57).
If you are already registered with the PV plant in Sunny Portal, you must adjust the plant identifier
(see page 60). This can be the case, for example, if the Sunny WebBox is replaced.
Possible delays in visualisation and notifications
Please note that there can be delays in Sunny Portal displaying the transmitted data of the
your PV plant and it may send you notifications if necessary.
Text message notification on your mobile phone
You can use Sunny Portal to generate report e-mails, which you can have automatically
sent to your mobile phone via a third party supplier.
56 SWebBox20-BA-en-13 User Manual
Page 57

SMA Solar Technology AG Managing Plant Data
8.2.2 Registering Sunny WebBox in Sunny Portal
1. Select the Sunny WebBox in the plant tree and select "Settings" in the device menu.
2. Select the "Sunny Portal > User settings" parameter group.
3. Select [Edit].
4. In the "Email" field, enter the e-mail address to which Sunny Portal should transmit the access
data.
5. The plant identifier is automatically entered in the "Plant ID" field. Together with the e-mail
address and the plant name, the number is a clear identifier of the PV plant.
6. Enter the name of your PV plant in the "Plant name" field. The plant will be displayed under this
name in Sunny Portal.
7. Select [Save].
8. Under the subgroup "Status and Actions", select [Execute] in the "Register" field.
☑ The Sunny WebBox registers on Sunny Portal. The registration was successful if "OK" is
displayed in the "Result of the last registration" field. Sunny Portal then sends your access data
to the specified e-mail address.
– If registration was unsuccessful, refer to Section 10.1 ”General Troubleshooting for the
Sunny WebBox” (page74).
User Manual SWebBox20-BA-en-13 57
Page 58

Managing Plant Data SMA Solar Technology AG
8.2.3 Activating/Deactivating Sunny Portal
Activating data transmission to Sunny Portal
Requirement:
You must be registered in Sunny Portal (see Section 8.2.2 ”Registering Sunny WebBox in Sunny
Portal” (page57)).
1. Select the Sunny WebBox in the plant tree and select "Settings" in the device menu.
2. Select the "Sunny Portal > Basic settings" parameter group.
3. Select [Edit].
4. In the "Use Sunny Portal" field, select "Yes" in order to use Sunny Portal. Depending on the
configured upload frequency, the Sunny WebBox automatically transmits the PV plant data to
Sunny Portal.
5. Select [Save].
Deactivating data transmission to Sunny Portal
1. Select the Sunny WebBox in the plant tree and select "Settings" in the device menu.
2. Select the "Sunny Portal > Basic settings" parameter group.
3. Select [Edit].
4. In the "Use Sunny Portal" field, select "No" in order not to use Sunny Portal (default setting).
5. Select [Save].
8.2.4 Testing the Connection to Sunny Portal
You can test the connection to Sunny Portal. You do not need to register in Sunny Portal to do this.
1. Select the Sunny WebBox in the plant tree and select "Settings" in the device menu.
2. Select the "Sunny Portal > Status and Actions" parameter group.
3. In the "Portal connection test" field, select "Execute".
☑ The Sunny WebBox performs the connection test. The connection test was successful if "OK" is
displayed in the "Result of the last portal connection test" field.
– If the connection test was unsuccessful, refer to Section .10.1 ”General Troubleshooting for
the Sunny WebBox” (page74).
58 SWebBox20-BA-en-13 User Manual
Page 59

SMA Solar Technology AG Managing Plant Data
8.2.5 Setting the Upload Frequency
1. Select the Sunny WebBox in the plant tree and select "Settings" in the device menu.
2. Select the "Sunny Portal > Basic settings" parameter group.
3. Select [Edit].
4. In the "Upload frequency" field, select the desired value. See table:
Selection Meaning
"every 15 minutes" Data transmission within the next full 15 minutes.
"daily" Data transmission within the next full 24 hours.
"hourly" Data transmission within the next full hour.
Possible delays in data uploads
The upload of the data can be started with a delay of up to 2.5 minutes in order to reduce
high data volumes at certain times for Sunny Portal.
If an upload is still running and another upload is due to start (possibly for 15-minute
intervals), the new upload is not performed. The data is then transmitted during the next
upload.
5. Select [Save].
☑ The Sunny WebBox transmits data to Sunny Portal at the specified intervals.
8.2.6 Accessing the Sunny WebBox via Sunny Portal
For each data transmission from the Sunny WebBox to Sunny Portal, Sunny Portal saves the current
IP address of the Sunny WebBox or the current IP address of the router with which you establish the
Internet connection.
You can directly access your Sunny WebBox from Sunny Portal via the Internet. Please note that you
must set up port forwarding on your router. For this, you may need to adjust the HTTP port and the
NAT port of the Sunny WebBox (see Section 7.5 ”Network Settings” (page47)).
User Manual SWebBox20-BA-en-13 59
Page 60

Managing Plant Data SMA Solar Technology AG
8.2.7 Adjusting the Plant Identifier for Sunny Portal
In the following cases, you must adjust the plant identifier of the Sunny WebBox:
• The plant data of the PV plant in question has already been sent to Sunny Portal via another
communication device.
• The plant identifier set for the Sunny WebBox was reset using the Reset button.
• The Sunny WebBox has been replaced with another Sunny WebBox.
• The WebBox is to be added to a plant that is already registered in Sunny Portal.
Perform the following steps to adjust the plant identifier of the Sunny WebBox for Sunny Portal:
1. Log into Sunny Portal with the available access data (www.SunnyPortal.com).
2. On the Sunny Portal page, select "Configuration > Plant Properties".
3. Copy the plant identifier to the clipboard.
4. Log into the Sunny WebBox as a user or installer.
5. On the Sunny WebBox user interface, select the Sunny WebBox in the plant tree.
6. Select "Settings" in the device menu.
7. Select the "Sunny Portal > User settings" parameter group.
8. Select [Edit].
9. In the "Plant ID" field, delete the current content and paste in the content of the clipboard.
10. Select [Save].
8.3 SD Card
8.3.1 Information on Saving Plant Data on an SD Card
You can save your plant data onto an SD card. Once you have inserted the SD card into the
SD card slot, the Sunny WebBox copies all the plant data that is stored on the internal drive of the
Su nny Web Box ont o th e SD car d. Th e Su nny Web Box sav es n ew p lan t da ta on to t he S D ca rd a s lo ng
as the SD card is inserted in the SD card slot and there is enough memory space available. To select
a data format in which the data is to be provided, refer to Section 7.6 ”Data Recording” (page50).
60 SWebBox20-BA-en-13 User Manual
Page 61

SMA Solar Technology AG Managing Plant Data
8.3.2 Saving Plant Data on an SD Card
NOTICE
Data loss on the SD card possible
Do not remove the SD card while the "SD CARD" LED is flashing green or orange. This can
damage the file system of the SD card and lead to data loss. Depending on the amount of
data, the writing process can take some time.
Please observe the information on the SD card (see Section 11.1 ”Information on the SD Card”
(page81)).
• Insert the SD card into the SD card slot of the Sunny WebBox.
8.4 Integrated FTP Server
8.4.1 Information on the Integrated FTP Server
The Sunny WebBox is equipped with an integrated FTP server. Via the FTP server, you can access the
saved plant data. The FTP server is deactivated by default. You can call up the data with any FTP
program or Internet Explorer. The FTP server is protected by the passwords of the relevant user group.
Please note that for logging into the integrated FTP server, the English name (user identifier) for the
corresponding user group and the associated password must be entered:
User identifier User group
"Installer"For the "Installer" user group
"User" For the "User" user group
To select a data format in which the data is to be provided, refer to Section 7.6 ”Data Recording”
(page50).
8.4.2 Activating/Deactivating the Integrated FTP Server
Activating the integrated FTP server
1. Select the Sunny WebBox in the plant tree and select "Settings" in the device menu.
2. Select the "Device > FTP server" parameter group.
3. Select [Edit].
4. In the "Activated" field, select "Yes" in order to activate the integrated FTP server.
5. Select [Save].
Deactivating the integrated FTP server
1. Select the Sunny WebBox in the plant tree and select "Settings" in the device menu.
2. Select the "Device > FTP server" parameter group.
3. Select [Edit].
4. In the "Activated" field, select "No" in order to deactivate the integrated FTP server.
5. Select [Save].
User Manual SWebBox20-BA-en-13 61
Page 62

Managing Plant Data SMA Solar Technology AG
8.4.3 Calling up the FTP Server via Internet Explorer
1. Start Internet Explorer.
2. Ente r the IP address of the S unny WebBox, includ ing the user identifier and the password, in the
address line of the Internet browser as shown in the following example:
ftp://[User identifier]:[Password]@[IP address]
Use the following user identifier:
User identifier User group
"Installer"For the "Installer" user group
"User" For the "User" user group
Example: If you wish to use the password "1111" to log into the Sunny WebBox as an installer
with the IP address 192.168.0.168, enter the following: ftp://
Installer:1111@192.168.0.168
3. Press the enter key on the keyboard.
☑ The browser displays the directory structure of the integrated FTP server. You can now
download and display the data.
The user name and password remain stored in the cache of the Internet browser
Once you have accessed the integrated FTP server using an Internet browser, the user
name and password remain stored in the cache of the Internet browser. To prevent
unauthorised access to the integrated FTP server, clear the cache of the Internet browser.
8.5 FTP Push
8.5.1 Information on FTP Push
The Sunny WebBox has an FTP Push function. With this function, the Sunny WebBox can upload the
co lle cte d da ta o f yo ur P V pl ant to a fre ely sel ect abl e FT P se rver. FTP Push always transmits via network
port 21. The FTP Push function is deactivated by default. The collected data is uploaded to the
specified directory and in the desired data format every 15 minutes.
62 SWebBox20-BA-en-13 User Manual
Page 63

SMA Solar Technology AG Managing Plant Data
8.5.2 Activating/Deactivating FTP Push
Activating FTP Push
1. Select the Sunny WebBox in the plant tree and select "Settings" in the device menu.
2. Select the "Further Applications > FTP Push" parameter group.
3. Select [Edit].
4. In the "Login" field, enter the login name of the external FTP server.
5. In the "Port" field, enter the network port via which the FTP server can be accessed.
6. In the "Password" field, enter the password of the FTP server.
7. In the "Server path" field, enter the subdirectory where the data is to be saved on the FTP server.
8. In the "Server" field, enter the address of the server.
9. In the "Data export in CSV format" field, select "Yes" in order to receive the data in CSV format.
or
In the "Data export in CSV format" field, select "No" in order not to receive the data in CSV
format.
10. In the "Data export in XML format" field, select "Yes" in order to receive the data in XML format.
or
In the "Data export in XML format" field, select "No" in order not to receive the data in XML
format.
11. Select [Save].
Deactivating FTP Push
1. Select the Sunny WebBox in the plant tree and select "Settings" in the device menu.
2. Select the "Further Applications > FTP Push" parameter group.
3. Select [Edit].
4. In the "Data export in CSV format" field, select "No".
5. In the "Data export in XML format" field, select "No".
6. Select [Save].
8.5.3 Testing FTP Push
1. Select the Sunny WebBox in the plant tree and select "Settings" in the device menu.
2. Select the "Further Applications > FTP Push" parameter group.
3. In the "Connection test" field, select [Execute].
☑ The Sunny WebBox performs the connection test. The connection test was successful if "OK" is
displayed in the "Result of the last connection test" field.
– If the connection test was unsuccessful, refer to Section .10.1 ”General Troubleshooting for
the Sunny WebBox” (page74).
User Manual SWebBox20-BA-en-13 63
Page 64

Service Functions SMA Solar Technology AG
9 Service Functions
9.1 Performing Own Update of the Sunny WebBox
9.1.1 Information
You have the option of updating the Sunny WebBox firmware. You can perform the firmware update
via the Internet or locally via the SD card. The existing settings of the Sunny WebBox and data from
the PV plant remain available after the update procedure. In order to keep the Sunny WebBox
firmware up to date at all times, automatic firmware updates via the Internet are recommended.
Th e up dat e pr oce ss i s in dic ate d by the ora nge fla shi ng " SYSTEM" LED and occasionally by a red light
chaser across all the LEDs. The firmware update is complete when the "SYSTEM" glows green.
An update process can take up to 20 minutes.
Reading off the current Sunny WebBox firmware version
You can read off the current Sunny WebBox firmware version from the bottom left of the
status line on the user interface.
Temporarily no access to user interface
During the update process, the Sunny WebBox restarts and you will not be able to access
the Sunny WebBox user interface for a short period of time.
Do not disconnect the Sunny WebBox from the electricity grid during the update
process.
64 SWebBox20-BA-en-13 User Manual
Page 65

SMA Solar Technology AG Service Functions
9.1.2 Firmware Update via the Internet (Recommended)
If the Sunny WebBox has Internet access, you can update the Sunny WebBox automatically or
manually via the Internet.
Activating/deactivating automatic firmware update
If the automatic firmware update is activated, the Sunny WebBox checks once a day whether a new
firmware update is available. If a new firmware update is available, the Sunny WebBox downloads
the firmware update from the Internet and starts the update process. The update process starts
automatically at night between 11 p.m. and 11:30 p.m.
Unexpected termination of an automatically performed update process
If an automatically performed Sunny WebBox update process is interrupted, e.g. by a
power outage, the Sunny WebBox restarts the update process at the next specified time
interval.
1. Select the Sunny WebBox in the plant tree and select "Settings" in the device menu.
2. Select the "Device > Update" parameter group.
3. Click on [Edit].
4. In the "Automatic update" field, select "Yes" in order to activate the automatic firmware update
(default setting).
or
In the "Automatic update" field, select "No" in order to deactivate the automatic firmware
update.
5. Select [Save].
Performing a manual firmware update
NOTICE
Loss of plant data possible!
Only perform a manual firmware update when the PV plant is not in operation (e.g. at
night). Otherwise, this can lead to gaps in the recording of plant data.
You can also perform the manual firmware update if the automatic firmware update is
activated.
1. Select the Sunny WebBox in the plant tree and select "Settings" in the device menu.
2. Select the "Device > Update" parameter group.
3. In the "Check for update and install it" field, select [Execute].
☑ The Sunny WebBox checks whether a new firmware update is available. If a new firmware
update is available, the Sunny WebBox downloads the firmware update from the Internet and
starts the update process.
User Manual SWebBox20-BA-en-13 65
Page 66

Service Functions SMA Solar Technology AG
9.1.3 Firmware Update via SD Card
NOTICE
Loss of plant data possible!
Only perform a manual firmware update when the PV plant is not in operation (e.g. at
night). Otherwise, this can lead to gaps in the recording of plant data.
NOTICE
Data loss on the SD card possible!
Do not remove the SD card while the "SD CARD" LED is flashing green or orange. This can
damage the file system of the SD card and lead to data loss. Depending on the amount of
data, the writing process can take some time.
Use a separate SD card for firmware updates
For firmware updates, use a separate SD card that contains only the update files for the
Sunny WebBox. If there are update files on the external SD card, the export of XML and
CSV files is deactivated.
Please observe the information on the SD card (see Section 11.1 ”Information on the SD Card”
(page81)).
1. Select the desired update file in the download area of www.SMA-Solar.com and download it
to your computer.
2. Connect the SD card to the computer and create a file directory with the name "UPDATE" on
the SD card.
3. Copy the downlo aded updat e file ( *.up2 ) to the direc tory you cre ated o n the SD card and then
remove the SD card from the computer.
Only save one update file in the "UPDATE" directory.
There should only ever be one update file in the "UPDATE" directory. If there is more than
one update file in the "UPDATE" directory, the firmware update will not take place.
4. Remove the plug-in power supply of the Sunny WebBox from the socket-outlet.
5. Insert the SD card into the SD card slot of the Sunny WebBox.
6. Insert the plug-in power supply of the Sunny WebBox into the socket-outlet.
☑ After approx. 90 seconds, the Sunny WebBox is ready for operation and the update process
starts.
66 SWebBox20-BA-en-13 User Manual
Page 67

SMA Solar Technology AG Service Functions
9.2 Performing a Subdevice Update
9.2.1 Information
Yo u ca n up dat e th e fi rmware o n th e de vic es o f yo ur PV pla nt v ia t he S unn y We bBo x. F or t he follo win g
devices, updating the firmware via the Sunny WebBox is possible:
• all SMA inverters with integrated Bluetooth
Firmware updates for inverters of the type SB x000TL-20 with a firmware version
older than 2.06 are only possible using an SD card
• Perform firmware updates of these inverters using an SD card (see technical
description "Firmware Update with SD Card" at www.SMA-Solar.com).
•SMA Bluetooth Piggy-Back/SMA Bluetooth Piggy-Back Plus from firmware version 02.00.00.R.
•SMA Bluetooth Piggy-Back Off-Grid from firmware version 01.00.00.R
•SMA Bluetooth Repeater
• SMA Power Injector with Bluetooth
The device update can be performed online via the Internet or locally via the SD card. Settings already present
for the Sunny WebBox and data for the PV plant are retained following the update process. To ensure that the
devices of your PV plant always have the latest firmware installed, the automatic device update via the Internet is
recommended.
NOTICE
Yield losses possible!
For some inverters, device updates are only possible from a specific DC input voltage.
The inverters in question do not feed energy during a device update. This can result in
temporary yield losses.
Do not change the update source during the update process
If you change between the update sources "Storage card" and "Update portal" during the
update, the firmware update will not take place.
No update is performed for devices with a padlock symbol ( )!
Devices that have no connection to the Sunny WebBox due to a lack of access rights
(marked with a padlock symbol ( ) in the plant tree) receive no update.
If you do not have the necessary access rights, change the password of the device
concerned to the password of the plant (see Sunny WebBox user manual).
Sufficient DC input voltage is required to update the devices!
In som e inver ters, a dev ice upd ate is only po ssibl e from a certai n DC in put voltage. The DC
input voltage can be too low for a device update, depending on the time of the day,
weather or the condition of the PV modules (e.g. covered with snow or leaves).
Do not disconnect the Sunny WebBox from the electricity grid during the update
process.
User Manual SWebBox20-BA-en-13 67
Page 68

Service Functions SMA Solar Technology AG
Update status
The relevant update statuses for the whole PV plant, the individual devices and the update files are
shown on the Sunny WebBox user interface.
Reading off the update status of the PV plant
1. Log into the Sunny WebBox.
2. Select the Sunny WebBox in the plant tree.
3. Select "Overview" in the device menu.
or
Select the "Plant Communication" > "Device update" parameter group in the "Spot Values"
device menu.
If the update status "Information" or "Warning" appears, this is also displayed in the status bar.
Symbol Update status Meaning
OK No update files are available, or the update function is not
Information "There is information on the device update"
Warning "There are warnings regarding the device update"
Update status of the device
• To read off the update status of the individual devices, select "Name of your plant" in the plant
tree and select the "Updates" tab (see Section 4.1.8 ”Updates” (page28)).
Update status Meaning
"OK" No update files are available for this device, or the update
"Update available" The update file is ready for sending to the devices in the PV plant.
"Update in process" The update process is underway.
"Update failed" The update process was unsuccessful. The update file was not sent
activated.
function is not activated.
to all devices in the PV plant.
Status of the update file
• To read off the status of the update file, select "Name of your plant" in the plant tree and select
the "Updates" tab (see Section 4.1.8 ”Updates” (page28)).
Status Meaning
"Download available" The update file is available for downloading.
"Ready" The update file was downloaded and can be sent to the devices
in the PV plant.
"Sending" The update file is being sent to the devices in the PV plant. This can
take approx. 20 minutes.
"Waiting" The update file is in the queue and will be sent to the devices in the
PV plant as soon as possible.
68 SWebBox20-BA-en-13 User Manual
Page 69

SMA Solar Technology AG Service Functions
9.2.2 Device Update via the Internet (Recommended)
If the Sunny WebBox has Internet access, you can update the firmware of your PV plant devices
automatically or manually via the Internet.
Activating automatic device update
If the automatic device update is activated, the Sunny WebBox checks once a day between 10 p.m.
and 3 a.m. whether a new device update is available. If a new device update is available, the
Sunny WebBox downloads the device update from the Internet. For SMA inverters with upgraded
SMA Bluetooth Piggy-Back, the update process is started on the following day (11 a.m.) due to the
overnight shutdown. For all other supported SMA devices, the update process starts the following
night (4 a.m.).
Unexpected termination of an automatically performed update process
If an automatically performed Sunny WebBox update process is interrupted (e.g. by a
power outage or a change of update source), the Sunny WebBox restarts the update
process the next day.
1. Select "Name of your PV plant" in the plant tree and select "Updates" in the device menu.
2. Select the "Settings" parameter group.
3. Click on [Edit].
4. Select "Yes" in the "Activated" field.
5. Select "Operating mode" in the "Automatic update" field.
6. Select "Update portal" in the "Update source" field.
7. Select [Save].
Performing a manual device update
1. Select "Name of your plant" in the plant tree and select "Updates" in the device menu.
2. Select the device type (e.g. SB 5000TL-20, SB 4000TL-20) for which you would like to perform
a manual update.
3. Select the required update file in the "Available updates" area and click [Download].
☑ The Sunny WebBox downloads the update file from the Internet and indicates when the
process is complete by marking the update file as "Ready" in the "Available updates" area.
– If the update file cannot be downloaded, the Internet connectio n of you r co mpu ter may hav e
been interrupted. Restore Internet access. If necessary, contact your Internet service
provider.
4. If the Sunny WebBox has loaded the selected update file, click on [Send].
☑ The Sunny WebBox checks the stored files and sends the update file to the devices in the
PV plant once a day on up to 5 consecutive days.
☑ During the sending process, the "PLANT STATUS" LED flashes orange.
☑ The update process was successful if all devices of the PV plant report back the version number
of the sent update file.
– If you receive an error message, refer to Section 10.1 ”General Troubleshooting for the
Sunny WebBox” (page74).
User Manual SWebBox20-BA-en-13 69
Page 70

Service Functions SMA Solar Technology AG
9.2.3 Device Update via SD Card
Please observe the information on the SD card (see Section 11.1 ”Information on the SD Card”
(page81)).
NOTICE
Data loss on the SD card possible!
Do not remove the SD card while the "SD CARD" LED is flashing green or orange. This can
damage the file system of the SD card and lead to data loss. Depending on the amount of
data, the writing process can take some time.
Use a separate SD card for device updates.
Use a separate SD card for device updates. If there are update files on the external
SD card, the export of XML and CSV files is deactivated.
Activating automatic device update via SD card
1. Select "Name of your PV plant" in the plant tree and select "Updates" in the device menu.
2. Select the "Settings" parameter group.
3. Click on [Edit].
4. Select "Yes" in the "Activated" field.
5. In the "Operating mode" field, select "Automatic update" in order to activate the automatic
device update.
6. In the "Update source" field, select "Storage card".
7. Select [Save].
Performing automatic device update via SD card
No update is performed for devices with a padlock symbol ( )!
Devices that have no connection to the Sunny WebBox due to a lack of access rights
(marked with a padlock symbol ( ) in the plant tree) receive no update.
If you do not have the necessary access rights, change the password of the device
concerned to the password of the plant (see Sunny WebBox user manual).
1. Select the desired update file in the download area of www.SMA-Solar.com and download it
to your computer.
2. Connect the SD card to the computer and create a file directory with the name "UPDATE" on
the SD card.
3. Copy the downloaded update file (*.up2) to the "UPDATE" directory you created on the
SD card and then remove the SD card from the computer.
4. Insert the SD card into the SD card slot of the Sunny WebBox.
☑The "SD CARD" LED flashes green.
☑ The Sunny WebBox copies the selected update file to the internal SD card.
70 SWebBox20-BA-en-13 User Manual
Page 71

SMA Solar Technology AG Service Functions
5. When the "SD CARD" LED stops flashing, remove the SD card.
☑ The Sunny WebBox checks the stored files and sends the update file to the devices in the PV
plant once a day on up to 5 consecutive days.
☑ During the sending process, the "PLANT STATUS" LED flashes orange.
☑ The update process was successful if all devices of the PV plant report back the version number
of the sent update file.
– If you receive an error message, refer to Section 10.1 ”General Troubleshooting for the
Sunny WebBox” (page74).
Performing a manual device update via SD card
1. Select the desired update file in the download area of www.SMA-Solar.com and download it
to your computer.
2. Connect the SD card to the computer and create a file directory with the name "UPDATE" on
the SD card.
3. Copy the downloaded update file (*.up2) to the "UPDATE" directory you created on the
SD card and then remove the SD card from the computer.
4. Insert the SD card into the SD card slot of the Sunny WebBox.
☑The "SD CARD" LED flashes green.
5. Start the update process:
– Select "Name of your plant" in the plant tree and select "Updates" in the device menu.
– Select the device type (e.g. SB 5000TL-20, SB 4000TL-20) for which you would like to
perform a manual update.
– Select the required update file in the "Available updates" area and click [Download].
☑ The Sunny WebBox copies the selected update file to the internal SD card.
6. When the "SD CARD" LED stops flashing, remove the SD card.
7. If the Sunny WebBox has loaded the selected update file, click on [Send].
☑ The Sunny WebBox checks the stored files and sends the update file to the devices in the PV
plant once a day on up to 5 consecutive days.
☑ During the sending process, the "PLANT STATUS" LED flashes orange.
☑ The update process was successful if all devices of the PV plant report back the version number
of the sent update file.
– If you receive an error message, refer to Section 10.1 ”General Troubleshooting for the
Sunny WebBox” (page74).
User Manual SWebBox20-BA-en-13 71
Page 72

Service Functions SMA Solar Technology AG
9.3 Restarting the Sunny WebBox via the User Interface
1. Select the Sunny WebBox in the plant tree and select "Settings" in the device menu.
2. Select the "Device > System" parameter group.
3. In the "Initiate device restart" field, select "Execute".
4. Select [OK].
☑ The Sunny WebBox is restarted. The restart was successful if the "SYSTEM" LED and the
"POWER" LED are glowing green again. The start-up process can take up to 90 seconds.
–If the "SYSTEM" LED or the "POWER" LED does not glow green, refer to Section 10.1
”General Troubleshooting for the Sunny WebBox” (page74).
9.4 Resetting the Sunny WebBox with the Reset Button
You can reset the Sunny WebBox using the Reset button, which is concealed inside a small hole in
the back of the Sunny WebBox. For this to be done, the Sunny WebBox must be supplied with current.
Data backup
Before you reset the Sunny WebBox, make a note of all settings, such as network and
portal settings if necessary. Also back up the data of your PV plant to prevent data loss.
Depending on how long you hold down the Reset button, the Sunny WebBox performs the actions
listed in the following table.
Duration Action
1 ... 5 seconds Sets passwords to the default setting. All other settings and PV
plant data are retained.
5 ... 15 seconds Sets network settings to the default. All other settings and PV plant
data are retained.
15 ... 60 seconds Sets all Sunny WebBox settings (event memory, network settings,
portal settings and passwords) back to the default. PV plant data
is fully deleted.
Over 60 seconds The Sunny WebBox is not reset. All settings are retained.
72 SWebBox20-BA-en-13 User Manual
Page 73

SMA Solar Technology AG Service Functions
• Press the concealed Reset butt on i nsi de the h ole using
a pointed object.
☑ The Sunny WebBox is reset.
9.5 Determining Current Network Settings of the Sunny WebBox Using the SD Card
The following steps can be used to determine the current settings and the current firmware of the
Sunny WebBox if you cannot access the user interface.
Please observe the information on the SD card (see Section 11.1 ”Information on the SD Card”
(page81)).
1. Insert the SD card into the SD card slot of the Sunny WebBox.
☑ The Sunny WebBox creates a directory with the name "WEBBOX_[Serial number]" on the
SD card and uses it to store the XML file "config.xml". The writing process is complete when
the "SD CARD" LED glows continuously.
Example: \WEBBOX_0155000123\config.xml
2. If the "SD CARD" LED glows continuously, remove the SD card from the SD card slot of the
Sunny WebBox.
3. Read out the SD card using a computer with an SD card reader.
4. In the WebBox_[Serial number] directory, open the "config.xml" file with a text editor or an
Internet browser.
☑ Read off the network settings of the Sunny WebBox (see Section 11.2 ”Structure of the
Config.xml File” (page81)).
User Manual SWebBox20-BA-en-13 73
Page 74

Troubleshooting SMA Solar Technology AG
10 Troubleshooting
10.1 General Troubleshooting for the Sunny WebBox
No.
Problem Cause Remedy
1 The Sunny WebBox
cannot be accessed
via the user
interface.
or
You cannot find the
Sunny WebBox via
the Sunny WebBox
Assistant.
The Sunny WebBox is not
connected to the network or
to the voltage supply.
Incorrect network settings of
the network components.
A firewall is blocking the
connection.
Defective or damaged
network components, patch
cables or plug connections.
• Connect the Sunny WebBox
directly to the computer or the local
network using the patch cable and
provide the Sunny WebBox with
voltage (see installation manual of
the Sunny WebBox with Bluetooth).
• Use the Sunny WebBox Assistant
for commissioning.
• Check the network settings of the
computer with which you wish to
access the Sunny WebBox. Adjust
the network settings if necessary.
• Reset the Sunny WebBox (see page
72) and repeat the commissioning.
• Check the network settings for the
individual network components
(e.g. router, proxy server etc.).
Adjust the network settings if
necessary.
• Contact your network administrator.
• Deactivate the computer firewall or
enable the necessary connection.
• Replace the defective or damaged
parts of the network.
• Contact your network administrator.
74 SWebBox20-BA-en-13 User Manual
Page 75

SMA Solar Technology AG Troubleshooting
No.
Problem Cause Remedy
1 The Sunny WebBox
cannot be accessed
via the user
interface.
or
You cannot find the
Sunny WebBox via
the Sunny WebBox
Assistant.
The Internet browser is
configured incorrectly.
There is no Internet
connection.
The Sunny WebBox has not
been started correctly.
• If there is a proxy server in your
network, you must enter an
exception rule for the proxy server
in your Internet browser
(see Section 11.4 ”Information on
Your Internet Browser” (page84)).
• Restore Internet access. If
necessary, contact your Internet
service provider.
• Remove the Sunny WebBox plug-in
power supply from the socket-outlet
and plug it back in after a short
time in order to restart the
Sunny WebBox. Note that this can
lead to loss of collected plant data.
2The "SYSTEM" LED
is continuously
flashing red.
IPv6 is not supported by the
proxy server.
A system fault has occurred.
• Use a proxy server that supports
IPv6.
• Remove the Sunny WebBox plug-in
power supply from the socket-outlet
and plug it back in after a short time
in order t o re start th e Sunny Web Box.
Note that this can lead to loss of
collected plant data.
• Contact the SMA Service Line.
3The "POWER" LED is
off.
The Sunny WebBox is not
supplied with voltage.
• Check the voltage supply of the
socket-outlet and remedy any
possible faults.
User Manual SWebBox20-BA-en-13 75
Page 76

Troubleshooting SMA Solar Technology AG
No.
Problem Cause Remedy
4 Sunny WebBox
does not send any
da ta t o Su nny Por tal
or the external FTP
server (the
"DATA UPLOAD"
LED is glowing red)
or
The connection test
to Sunny Portal or to
the external FTP
server was
unsuccessful.
The data transmission is
incorrectly configured.
• Check the settings of Sunny Portal or
FTP Push (see page 56).
•Perform a connection test.
• In order to transmit data to
Sunny Portal, you must be
registered. Register your
Sunny WebBox in Sunny Portal
(see page 57).
There is a fault in the network. • Check the network settings for the
individual network components
(e.g. router, Sunny WebBox,
computer) and adjust these if
necessary.
• Check the network components for
defects or damage. Replace any
defective or damaged parts of the
network.
•Perform a connection test.
5 The Sunny Portal
registration was
Invalid data • Perform a connection test
(see page 58).
unsuccessful.
6After an FTP
download, the
Internet Explorer
The cache behaviour of the
Internet Explorer shows old
data.
• Use an FTP client to load the plant
data from the internal FTP server of
the Sunny WebBox.
shows old Sunny
WebBox data.
76 SWebBox20-BA-en-13 User Manual
Page 77

SMA Solar Technology AG Troubleshooting
No.
Problem Cause Remedy
7The firmware
update for
connected devices
was unsuccessful.
You are not connected to the
Internet.
• Restore Internet access. If
necessary, contact your Internet
service provider.
☑ If you have activated the automatic
device update, the automatic device
update restarts on the next day.
• If you would like to start the device
update immediately, perform a
manual device update
(see ”Performing a manual device
update” (page69)).
The SD card has been
removed during the update
process.
• Reinsert the SD card into the SD
card slot of the Sunny WebBox and
perform a manual device update
(see ”Performing a manual device
update via SD card” (page71)).
After five attempts, the sys tem
was unable to transmit the
update file to the PV plant
devices.
• Check the status of the Bluetooth
connection for the devices of your
PV plant. Please note that the
Bluetooth connection can also be
interrupted by a lack of DC input
voltage at the inverters. The DC
input voltage can vary depending
on the time of day, weather or the
condition of the PV modules
(e.g. covered with snow or leaves).
–If necessary, improve the
connection quality.
– If you would then like to start the
device update immediately,
perform a manual device update
(see ”Performing a manual
device update” (page69) or
”Performing a manual device
update via SD card”
(page71)).
User Manual SWebBox20-BA-en-13 77
Page 78

Troubleshooting SMA Solar Technology AG
No.
Problem Cause Remedy
8The "SD CARD" LED
glows red.
The SD card is full. • Replace the SD card or format the
SD card in the FAT16 format.
The SD card is writeprotected.
There is an update file in the
"UPDATE" directory on the SD
• Remove the write-protection from
the SD card.
• Delete the update file or perform the
update.
card.
9 After replacing a
Sunny WebBox,
two plants with the
same name appear
in Sunny Portal.
Double registration in Sunny
Portal.
The Sunny WebBox that was supplied as
the replacement device is logging into
Sunny Portal with a new plant identifier.
Sunny Portal creates a new plant for this
plant identifier, even if you gave the plant
the same name.
• Assign the plant identifier of the old
plant to the replacement device
(see page 60).
• In the replacement device, enter the
e-mail address of a user who has
administrator rights for the plant in
Sunny Portal.
• In Sunny Portal, delete the new plant
that the replacement device
created.
10 Parameters cannot
be edited.
You do not have the
necessary rights for the
• Change the user group.
parameters.
You have an inverter with
upgraded SMA Bluetooth
Piggy-Back and a firmware
version lower than
02.00.00.R.
Configuration of parameters and
graphical display of the monthly and
annual energy values are not supported.
• Perform a firmware update for the
Bluetooth Piggy-Back using
Sunny Explorer.
11 The Sunny WebBox
does not implement
any requirements
relating to grid
management of the
Power Reducer Box.
Grid management is
deactivated in the
Sunny WebBox and/or in the
inverter.
• Activate grid management in the
Sunny WebBox (see Section 7.8
”Activating/Deactivating Grid
Management” (page55)).
• Depending on the inverter type,
activate grid management in the
inverter (see inverter manual)
78 SWebBox20-BA-en-13 User Manual
Page 79

SMA Solar Technology AG Troubleshooting
No.
Problem Cause Remedy
12 Windows does not
display the LAN
connection.
The driver of the network card
(Ethernet card) is not
installed.
• Check the installation of the network
adapter in the device manager and
reinstall the driver.
The network card is faulty. • Replace the faulty network card with
a new one.
13 Fault in the display
of the user interface.
JavaScript is not enabled. • Enable JavaScript in your Internet
browser.
10.2 Troubleshooting for the Bluetooth Connection
No.
Problem Cause Remedy
1The Sunny WebBox
displays no
Bluetooth devices.
2 Inverter cannot be
accessed.
An incorrect NetID has been
set.
The connection quality to the
Bluetooth plant is too poor.
Four masters are already
connected to the Bluetooth
plant.
Two participants are already
connected to the device via
which you wish to establish
connection to the Bluetooth
plant.
The Bluetooth connection has
been interrupted.
• Set the NetID of the PV plant
(see installation manual of the
Sunny WebBox with Bluetooth) and
repeat the commissioning.
•Contact your installer.
• Reduce the distance to the devices
or use an SMA Bluetooth repeater
to extend the radio coverage.
Repeat the commissioning
(see installation manual of the
Sunny WebBox with Bluetooth).
• Remove a master and repeat the
commissioning (see installation
manual of the Sunny WebBox with
Bluetooth).
• Change the position of the
Sunny WebBox to establish a
connection to the plant via another
device, or remove a master from the
plant. Further information on
SMA Bluetooth can be found in the
download area of
www.SMA-Solar.com
• Wait until the Sunny WebBox
automatically restores the
connection.
User Manual SWebBox20-BA-en-13 79
Page 80

Troubleshooting SMA Solar Technology AG
No.
Problem Cause Remedy
2 Inverter cannot be
accessed.
Parameters for the Bluetooth
communication have been
changed.
When setting the parameters that regulate
the Bluetooth connection (e.g. parameters
for transmission power and country
parameters), communication via Bluetooth
is interrupted for a time, as the inverters
perform a restart of the communication
interface. This does not affect inverters
with upgraded SMA Bluetooth
Piggy-Back.
• Wait until the inverter has performed
a restart. The inverter can then be
accessed again.
Inverter with upgraded SMA
Bluetooth Piggy-Back is in
night mode.
Inverter is not set to the NetID
of the PV plant and
commissioned.
3The Sunny WebBox
shows other
inverters.
4 An inverter is shown
in the plant tree as
an unknown device.
The NetID that is set has
already been assigned by
another Bluetooth PV plant.
The inverter with integrated
Bluetooth has an old firmware
version (only for inverters
SB 3000TL-20,
SB 4000TL-20,
SB 5000TL-20).
The new inverter type is not
recognised by the
• Wait until the inverter has returned
to normal operation. It can then be
accessed again.
• The inverter must be set to the NetID
of your PV plant and commissioned.
Contact your installer.
• You must assign the PV plant a
NetID that is not already in use.
Contact your installer.
• Ensure that the inverter with
integrated Bluetooth has the latest
firmware version (see technical
description "Firmware Update with
SD Card" at www.SMA-Solar.com).
•Contact your installer.
• Perform a self-update of the
Sunny WebBox (see page 64).
Sunny WebBox.
80 SWebBox20-BA-en-13 User Manual
Page 81

SMA Solar Technology AG Appendix
11 Appendix
11.1 Information on the SD Card
To ensure that the SD card works correctly, use SD cards available from SMA. Compatibility with all
SD cards available on the market cannot be guaranteed. The Sunny WebBox does not support
SD cards with storage capacities of more than 2 GB or SDHC cards.
Only use SD cards which have been formatted with the FAT16 file system. If necessary, reformat the
SD card using the computer.
The Sunny WebBox converts the SD card to the TFAT file system to increase data security. If you wish
to delete the SD card, you must format the SD card with the FAT16 file system on the computer.
11.2 Structure of the Config.xml File
The configuration file "config.xml" contains information concerning network settings, the firmware
version and other Sunny WebBox settings.
Example:
<?xml version="1.0" encoding="utf-8"?>
<WebBox>
<Settings>
<add key="Version" value="1.5" />
<add key="Plant-ID" value=" " />
<add key="User-ID" value="Max.Mustermann@sma.de" />
<add key="DHCP" value="false" />
<add key="IP-Address" value="192.168.0.168" />
<add key="SubNetMask" value="255.255.255.0" />
<add key="Gateway" value="192.168.0.100" />
<add key="DNS-Server" value="192.168.0.100" />
<add key="NAT-Port" value="80" />
<add key="Webserver-Port" value="80" />
<add key="Webservice-Port" value="80" />
</Settings>
</WebBox>
Setting Meaning
Version The current firmware version of the Sunny WebBox
Plant-ID The plant ID for Sunny Portal
User-ID The user identifier for Sunny Portal
DHCP Indicates whether the network settings are obtained via DHCP.
User Manual SWebBox20-BA-en-13 81
Page 82

Appendix SMA Solar Technology AG
Setting Meaning
IP-Adress The current IP address of the Sunny WebBox
SubNetMask The current subnet mask of the Sunny WebBox
Gateway The currently set gateway IP address
DNS-Server The currently set DNS server IP address
NAT-Port The currently set NAT port
Webserver-Port The currently set port of the web server
Webservice-Port The currently set port of the web service
82 SWebBox20-BA-en-13 User Manual
Page 83

SMA Solar Technology AG Appendix
11.3 Structure of an XML Data File
Example:
<?xml version="1.0" encoding="utf-8"?>
<WebBox>
<Info>
<Created>2012-11-22T11:10:00</Created>
<Culture>de</Culture>
<UtcOffset>60</UtcOffset>
</Info>
<CurrentPublic>
<Key>My Sunny WebBox:155001390:Metering.TotWhOut</Key>
<Mean>34698.724</Mean>
<Unit>kWh</Unit>
<Base>1</Base>
<Period>300</Period>
<Timestamp>2012-11-22T11:10:00</Timestamp>
</CurrentPublic>
<MeanPublic>
<Key>My Sunny WebBox:155001390:GridMs.TotW</Key>
<Min>405</Min>
<Max>3719</Max>
<Mean>9019</Mean>
<Unit>W</Unit>
<Base>1</Base>
<Period>300</Period>
<Timestamp>2012-11-22T11:10:00</Timestamp>
</MeanPublic>
<MeanPublic>
(...)
</MeanPublic>
</WebBox>
Setting Meaning
Info Information
Create Date of generation
User Manual SWebBox20-BA-en-13 83
Page 84

Appendix SMA Solar Technology AG
Setting Meaning
Culture Language
UtcOffset Offset in minutes to UTC (Universal Time Coordinated)
MeanPublic Data of the mean values
CurrentPublic Data of the instantaneous values
Key Name of the element made up of device name, serial number of the device and
the parameter name. Individual values are separated by a colon.
Example: D <Key>SENS0700:5141:TmpMdul C</Key>
Min Smallest value in measurement interval/merging
Max Largest value in measurement interval/merging
Mean Average value in measurement interval/merging
Base Number of measured values in the interval/number of merged values
Period Length of the measurement interval in seconds
TimeStamp Time stamp, at which the average was calculated
11.4 Information on Your Internet Browser
To be able to call up the Sunny WebBox user interface, you need a current Internet browser. You can
use the default settings of your Internet browser.
Ensure that
• JavaScript is enabled.
• If a proxy server is active in your network, you must set up a proxy exception rule in your
browser (see page 11.5 ”Setting up a Proxy Exception Rule in Internet Explorer” (page84)).
11.5 Setting up a Proxy Exception Rule in Internet Explorer
1. Start Internet Explorer.
2. In Internet Explorer, select "Tools > Internet Options".
3. The "Internet Options" window opens.
4. Select the "Connections" tab, then click [Settings].
5. Select [Advanced].
6. In the "Do not use proxy server for addresses beginning with:" field, enter the address
192.168.*.
7. Confirm entries by clicking [OK] and close all other windows by clicking [OK].
84 SWebBox20-BA-en-13 User Manual
Page 85

SMA Solar Technology AG Appendix
11.6 Activating IPv6 in Windows XP SP2
To be able to locate the Sunny WebBox with the Sunny WebBox Assistant, IPv6 is required.
IPv6 stands for Internet Protocol Version 6 and specifies the procedures that are necessary for data
transmission via a packet-switching data network.
IPv6 is the successor to IPv4, which is still predominantly found in use on the Internet. IPv6 is already
activated in Windows Vista, Windows 7, MacOS and Linux. In Windows XP SP2 you must activate
IPv6.
In order to activate IPv6, proceed as follows:
1. In Windows select "Start > Settings > Network Connections".
2. Double-click the LAN connection used to connect the Sunny WebBox.
– If Windows displays several LAN connections, there are probably several network
co nne cti ons ins tal led on t he c omp ute r. E nsu re t hat you sel ect the n etw ork con nec tio n th at t he
computer is using to connect to the Sunny WebBox. If necessary, refer to the manual of your
computer.
– If no LAN connection is displayed, refer to Section 10.1 ”General Troubleshooting for the
Sunny WebBox” (page74).
☑The "Local Area Connection Status" window opens.
3. Select [Properties] in the "General" tab.
☑The "Local Area Connection Properties" window opens.
4. Activate "Microsoft TCP/IP Version 6"
5. Select [OK].
11.7 Assigning IP Addresses in a Local Network
You select a static IP address (Internet Protocol) yourself. Use the address range that is available to
your router. In most cases the address range of the router lies between 192.168.0.1. and
192.168.255.254. If necessary refer to the manual of your router.
Please note that when assigning the IP address, the first three parts of the IP address must be identical
for all participants of the same network. You may not allocate the same IP address twice.
Example:
Router: 192.168.0.1
Computer 1 192.168.0.2
Computer 2 192.168.0.3
Sunny WebBox 192.168.0.168
User Manual SWebBox20-BA-en-13 85
Page 86

Contact SMA Solar Technology AG
12 Contact
If you have technical problems concerning our products, contact the SMA Service Line. We require
the following information in order to provide you with the necessary assistance:
• Sunny WebBox firmware version
• Serial number and hardware version of the Sunny WebBox
• Type of communication interface between the Sunny WebBox and the inverters
• Type and serial number of inverters connected to the PV plant
SMA Solar Technology AG
Sonnenallee 1
34266 Niestetal, Germany
www.SMA.de
SMA Service Line
Inverters: +49 561 9522 1499
Communication: +49 561 9522 2499
Fax: +49 561 9522 4699
E‑Mail: ServiceLine@SMA.de
86 SWebBox20-BA-en-13 User Manual
Page 87

SMA Solar Technology AG Legal Provisions
Legal Provisions
The information contained in this document is the property of SMA Solar Technology AG. Publishing its content, either partially or
in full, requires the written permission of SMA Solar Technology AG. Any internal company copying of the document for the
purposes of evaluating the product or its correct implementation is allowed and does not require permission.
Declaration of Conformity
SMA Solar Technology AG hereby declares that this equipment is in comp lian ce wit h the ess ential r equirem ents and ot her rele vant
provisions of Directive 1999/5/EC. You can find the entire CE declaration of conformity at www.SMA-Solar.com.
SMA Factory Warranty
The current warranty conditions come enclosed with your device. These are also available online at www.SMA-Solar.com and can
be downloaded and are available on paper from the usual sales channels if required.
Trademarks
All trademarks are recognised even if these are not marked separately . Missin g des ignat ions do n ot me an tha t a produ ct or brand
is not a registered trademark.
The Bluetooth
SMA Solar Technology AG is under licence.
QR Code
SMA Solar Technology AG
Sonnenallee 1
34266 Niestetal
Germany
Tel. +49 561 9522-0
Fax +49 561 9522-100
www.SMA.de
E-Mail: info@SMA.de
© 2004 to 2013 SMA Solar Technology AG. All rights reserved
®
word mark and logos are registered trademarks owned by Bluetooth SIG, Inc. and any use of such marks by
®
is a registered trademark of DENSO WAVE INCORPORATED.
User Manual SWebBox20-BA-en-13 87
Page 88

SMA Solar Technology
www.SMA-Solar.com
SMA Solar Technology AG
www.SMA.de
SMA Australia Pty. Ltd.
www.SMA-Australia.com.au
SMA Benelux bvba/sprl
www.SMA-Benelux.com
SMA Beijing Commercial Company Ltd.
www.SMA-China.com.cn
SMA Central & Eastern Europe s.r.o.
www.SMA-Czech.com
SMA France S.A.S.
www.SMA-France.com
SMA Hellas AE
www.SMA-Hellas.com
SMA Ibérica Tecnología Solar, S.L.U.
www.SMA-Iberica.com
SMA Solar India Pvt. Ltd.
www.SMA-India.com
SMA Italia S.r.l.
www.SMA-Italia.com
SMA Japan K.K.
www.SMA-Japan.com
SMA Technology Korea Co., Ltd.
www.SMA-Korea.com
SMA Middle East LLC
www.SMA-Me.com
SMA Portugal - Niestetal Services Unipessoal Lda
www.SMA-Portugal.com
SMA Solar (Thailand) Co., Ltd.
www.SMA-Thailand.com
SMA Solar UK Ltd.
www.SMA-UK.com
 Loading...