

Page 1
Accessories for Wind Power Inverter
WINDY BOY PROTECTION BOX 400 / 500 / 600
Installation Guide
WBP-Box-IEN103320 | IMEN-WBP-BOX | Version 2.0
EN
Page 2

Page 3

SMA Solar Technology AG Table of Contents
Table of Contents
1 Notes on this Guide . . . . . . . . . . . . . . . . . . . . . . . . . . . . . . . 5
1.1 Validity . . . . . . . . . . . . . . . . . . . . . . . . . . . . . . . . . . . . . . . . . . . . 5
1.2 Target Group . . . . . . . . . . . . . . . . . . . . . . . . . . . . . . . . . . . . . . . 5
1.3 Additional Information . . . . . . . . . . . . . . . . . . . . . . . . . . . . . . . . 5
1.4 Symbols Used . . . . . . . . . . . . . . . . . . . . . . . . . . . . . . . . . . . . . . . 6
2 Safety . . . . . . . . . . . . . . . . . . . . . . . . . . . . . . . . . . . . . . . . . . 7
2.1 Appropriate Usage. . . . . . . . . . . . . . . . . . . . . . . . . . . . . . . . . . . 7
2.2 Safety Precautions. . . . . . . . . . . . . . . . . . . . . . . . . . . . . . . . . . . . 8
2.3 Symbols on the Type Label . . . . . . . . . . . . . . . . . . . . . . . . . . . . . 8
3 Scope of Delivery. . . . . . . . . . . . . . . . . . . . . . . . . . . . . . . . . 9
4 Mounting the Windy Boy Protection Box . . . . . . . . . . . . 10
5 Electrical Connection . . . . . . . . . . . . . . . . . . . . . . . . . . . . . 13
5.1 Overview of the Connection Area . . . . . . . . . . . . . . . . . . . . . . 13
5.1.1 Interior View . . . . . . . . . . . . . . . . . . . . . . . . . . . . . . . . . . . . . . . . . . . . . . . . . 13
5.1.2 View from Below. . . . . . . . . . . . . . . . . . . . . . . . . . . . . . . . . . . . . . . . . . . . . . 14
5.2 Grounding the Windy Boy Protection Box . . . . . . . . . . . . . . . . 14
5.3 Connecting the Small Wind Turbine System . . . . . . . . . . . . . . . 15
5.4 Connecting the Wind Power Inverter . . . . . . . . . . . . . . . . . . . . 16
5.5 Connecting the Load Resistor . . . . . . . . . . . . . . . . . . . . . . . . . . 17
6 Commissioning the Windy Boy Protection Box . . . . . . . . 18
7 Cleaning the Cooling Fins of the
WindyBoyProtectionBox . . . . . . . . . . . . . . . . . . . . . . . . 19
8 Troubleshooting . . . . . . . . . . . . . . . . . . . . . . . . . . . . . . . . . 20
Installation Guide WBP-Box-IEN103320 3
Page 4

Table of Contents SMA Solar Technology AG
9 Decommissioning . . . . . . . . . . . . . . . . . . . . . . . . . . . . . . . . 21
9.1 Removing the Windy Boy Protection Box . . . . . . . . . . . . . . . . . 21
9.2 Packaging the Windy Boy Protection Box . . . . . . . . . . . . . . . . 21
9.3 Storing the Windy Boy Protection Box . . . . . . . . . . . . . . . . . . . 21
9.4 Disposing of the Windy Boy Protection Box . . . . . . . . . . . . . . . 21
10 Technical Data . . . . . . . . . . . . . . . . . . . . . . . . . . . . . . . . . . 22
10.1 Windy Boy Protection Box 400 . . . . . . . . . . . . . . . . . . . . . . . . 22
10.2 Windy Boy Protection Box 500 . . . . . . . . . . . . . . . . . . . . . . . . 23
10.3 Windy Boy Protection Box 600 . . . . . . . . . . . . . . . . . . . . . . . . 24
11 Contact . . . . . . . . . . . . . . . . . . . . . . . . . . . . . . . . . . . . . . . . 25
4 WBP-Box-IEN103320 Installation Guide
Page 5

SMA Solar Technology AG 1Notes on this Guide
1 Notes on this Guide
1.1 Validity
This guide applies to the following device types:
• WBP-Box 400-11
• WBP-Box 500-11
• WBP-Box 600-11
1.2 Target Group
This guide is for qualified personnel. The tasks described in this guide may only be performed by
qualified personnel.
1.3 Additional Information
You will find further information on the Windy Boy Protection Box in the download area of
www.SMA.de/en.
Installation Guide WBP-Box-IEN103320 5
Page 6
1Notes on this Guide SMA Solar Technology AG
1.4 Symbols Used
The following types of safety warnings and general information are used in this guide:
"DANGER" indicates a hazardous situation which, if not avoided, will result in death or
serious injury.
"WARNING" indicates a hazardous situation which, if not avoided, could result in death
or serious injury.
"CAUTION" indicates a hazardous situation which, if not avoided, could result in minor
or moderate injury.
"NOTICE" indicates a situation that can result in property damage if not avoided.
Important
"Important" indicates important information.
6 WBP-Box-IEN103320 Installation Guide
Page 7
SMA Solar Technology AG 2Safety
2Safety
2.1 Appropriate Usage
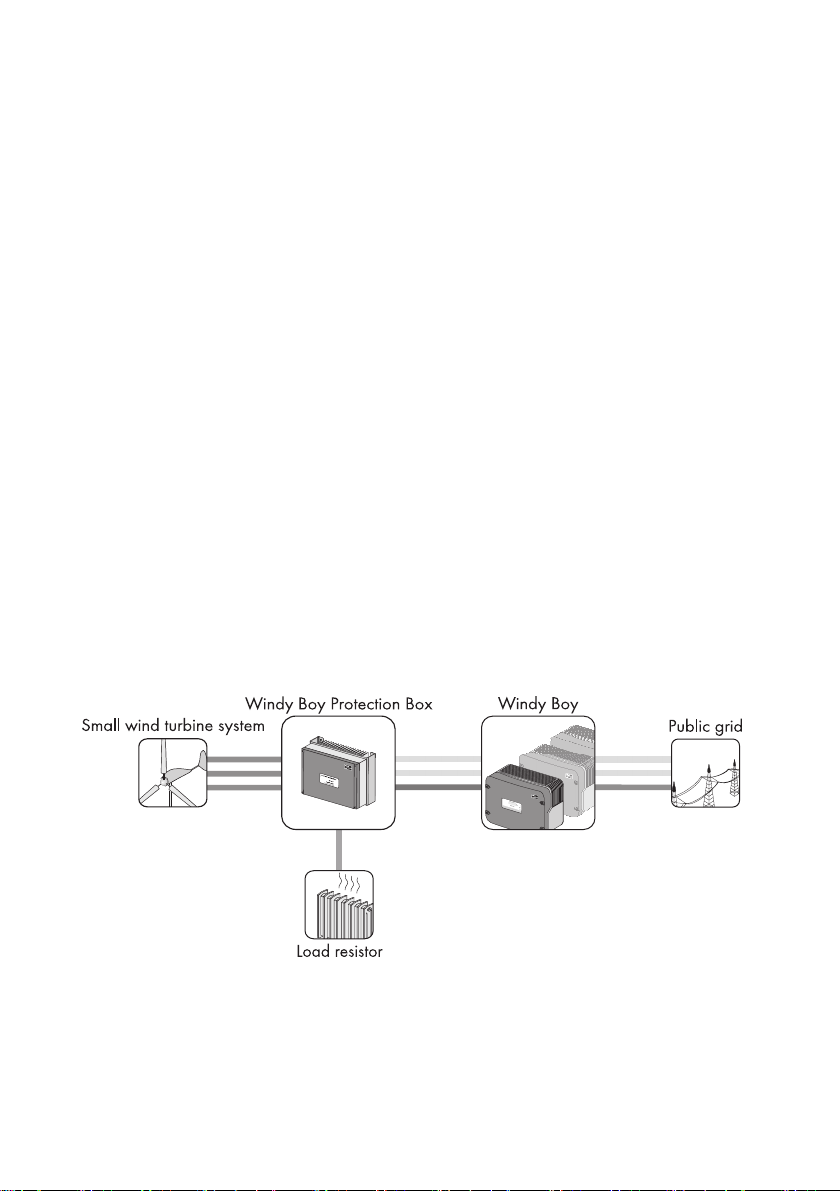
The Windy Boy Protection Box converts the variable AC voltage of a small wind turbine system into
DC voltage. The Windy Boy Protection Box sends the DC voltage to the wind power inverter. At the
same time, the Windy Boy Protection Box protects the wind power inverter against overvoltage.
Depending on the device type, the Windy Boy Protection Box restricts the DC voltage to 400 V,
500V or 600 V (see section10”Technical Data”,page22).
The Windy Boy Protection Box has been designed to allow up to 3 wind power inverters to be
connected. Various combinations with SMA wind power inverters are possible (see the
TechnicalInformation "Windy Boy Protection Box" at www.SMA.de/en).
The output voltage and output current of the small wind turbine system, among other factors,
determine the systems for which the Windy Boy Protection Box is suitable. Observe all restrictions
imposed by the manufacturer. Ensure that the permitted operating range of all components is
maintained at all times.
The Windy Boy Protection Box is only suitable for use with original SMA accessories or with
accessories recommended by SMA Solar Technology AG.
Do not use the Win dy B oy P rot ect ion Box for p urp ose s ot her tha n those described here. Modifications
and the installation of components void the warranty claims and operation permit.
This guide forms part of the Windy Boy Protection Box. Follow all tasks in this guide. Keep this guide
in a convenient place for future reference.
Principle of a small wind turbine system with Windy Boy Protection Box
Installation Guide WBP-Box-IEN103320 7
Page 8
2Safety SMA Solar Technology AG
2.2 Safety Precautions
Danger to life due to high voltages.
• All work on the Windy Boy Protection Box must be carried out exclusively by qualified
personnel.
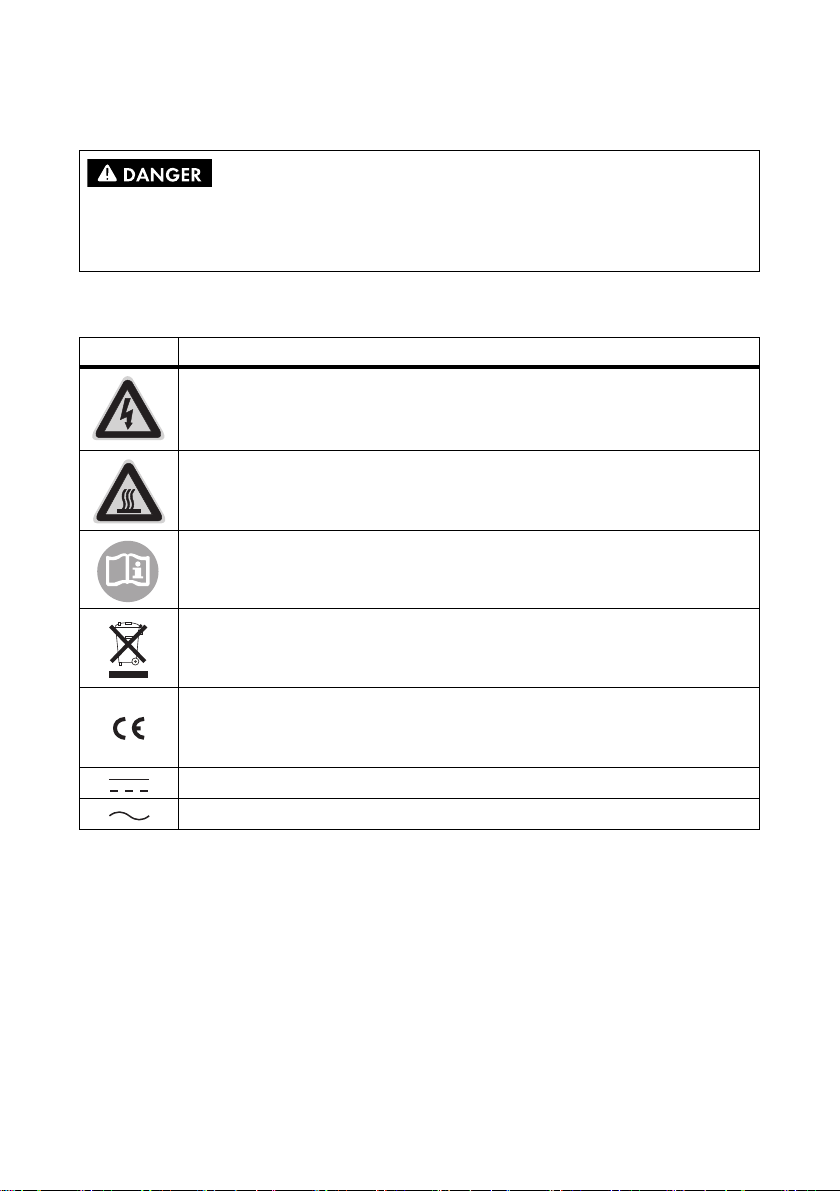
2.3 Symbols on the Type Label
Symbol Designation
Beware of dangerous electrical voltage.
The Windy Boy Protection Box operates at high voltages. All work on the
WindyBoyProtection Box must be carried out exclusively by qualified personnel.
Beware of hot surface.
The Windy Boy Protection Box can become hot during operation. Avoid contact
during operation.
Observe all documentation included with the WindyBoyProtectionBox.
The Windy Boy Protection Box must not be disposed of together with the household
waste. For more information on disposal, see section 9.4”Disposing of the Windy
Boy Protection Box”,page21.
CE mark.
The Windy Boy Protection Box complies with the requirements of the applicable EC
guidelines.
Direct Current (DC).
Alternating Current (AC).
8 WBP-Box-IEN103320 Installation Guide
Page 9
SMA Solar Technology AG 3Scope of Delivery
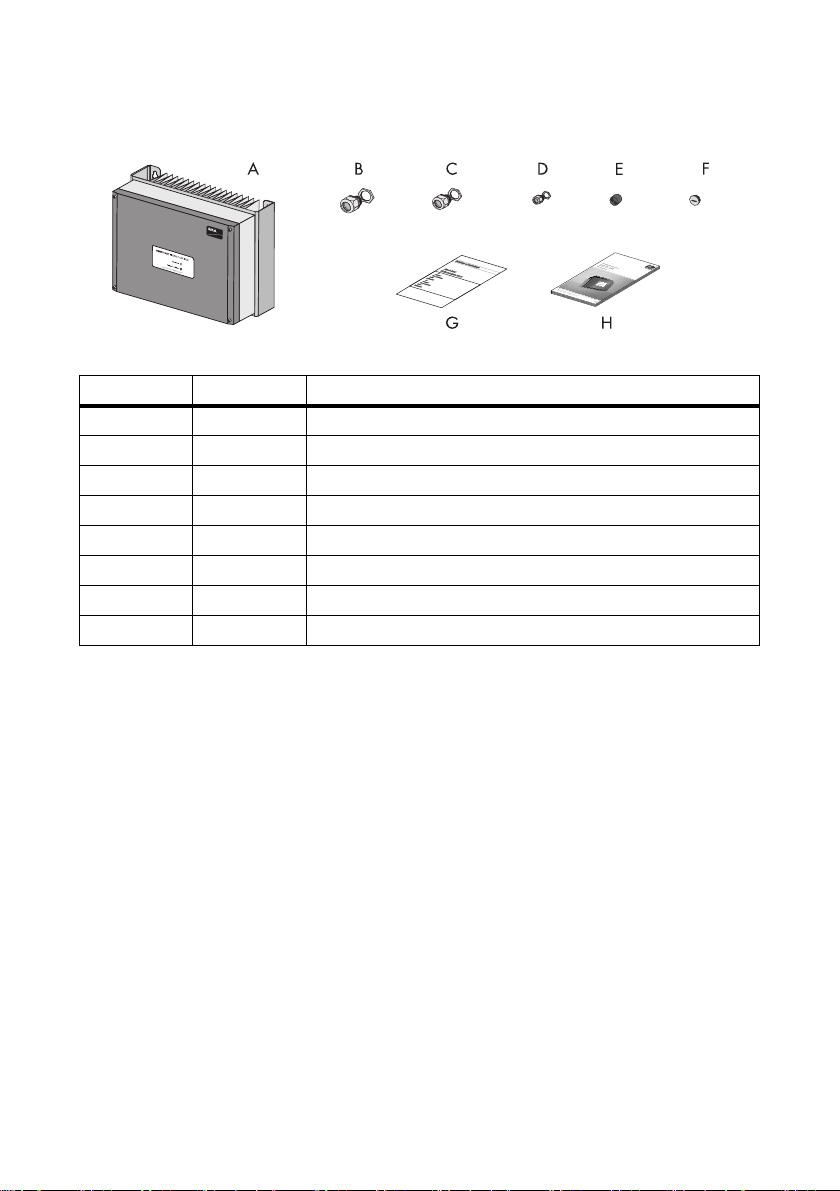
3Scope of Delivery
Figure1:Components included in delivery
Position Quantity Designation
A 1 Windy Boy Protection Box
B 1 M25 cable gland
C 4 M20 cable gland
D 1 M12 cable gland
E 3 Multiple seal inserts for M20 cable gland
F2Sealing plugs for enclosure opening
G 1 EC Declaration of Conformity
H 1 Installation Guide
Installation Guide WBP-Box-IEN103320 9
Page 10

4Mounting the Windy Boy Protection Box SMA Solar Technology AG
4 Mounting the Windy Boy Protection Box
Requirements for the mounting location:
☐ Mount on a solid surface.
☐ The mounting surface and surrounding area are non-flammable.
☐ The mounting surface is suitable for the weight and dimensions of the Windy Boy Protection Box.
☐ The mounting location is accessible at all times.
☐ The ambient temperature is between − 25 °C and 65 °C.
☐ The mounting location is not at risk of explosion.
Mounting position:
Figure2:Permitted and prohibited mounting positions
Minimum clearances:
Figure3:Obligatory clearances
10 WBP-Box-IEN103320 Installation Guide
Page 11

SMA Solar Technology AG 4Mounting the Windy Boy Protection Box
Fixing points:
Figure4:Fixing point distances
Destruction of the Windy Boy Protection Box due to overheating.
If you mount the load resistor directly in line with the Windy Boy Protection Box on the rear of the
wall, this will adversely affect the functionality of the Windy Boy Protection Box.
• Mount the load resistor in an offset position to the
Windy Boy Protection Box on the rear of the wall.
Installation Guide WBP-Box-IEN103320 11
Page 12

4Mounting the Windy Boy Protection Box SMA Solar Technology AG
1. Mark the position of the drill holes. Observe the fixing point distances when doing so.
2. Drill the holes according to the markings and insert
wall anchors.
3. Insert 2screws into the 2 upper holes. Leave the
screws protruding out by 3mm.
4. Ha ng t he W indy Bo y Pr ote cti on B ox onto the upp er
screws using the mounting links.
5. Secure the Windy Boy Protection Box using the
lower fixing points.
6. Tighten both upper screws.
12 WBP-Box-IEN103320 Installation Guide
Page 13

SMA Solar Technology AG 5Electrical Connection
5 Electrical Connection
5.1 Overview of the Connection Area
5.1.1 Interior View
Figure5:Connection terminals
Position Designation
A Alternator connection terminal for small wind turbine system
B DC+ connection terminal for wind power inverter
C DC − connection terminal for wind power inverter
D LR+ and LR − connection terminals for load resistor
E PE connection terminal for grounding the Windy Boy Protection Box, the load
resistor and its cable shield
Installation Guide WBP-Box-IEN103320 13
Page 14

5Electrical Connection SMA Solar Technology AG
5.1.2 View from Below
Figure6:Enclosure openings for connections
Position Designation
A Enclosure opening for small wind turbine system
B Enclosure openings for wind power inverter
C Enclosure opening for load resistor
D Enclosure opening for grounding the Windy Boy Protection Box, the load resistor
and its cable shield
5.2 Grounding the Windy Boy Protection Box
1. Stop the small wind turbine system and secure against restart.
2. Disconnect the wind power inverter from voltage sources (see the manual for the
windpowerinverter).
3. Ensure that no voltage is present in the system.
4. Loosen the screws of the enclosure lid and carefully remove the lid. Disconnect the enclosure lid
PE from the Windy Boy Protection Box when doing so.
5. Attach the M12 cable gland to the enclosure opening for grounding.
6. Unscrew the cable gland's lock nut and pass it over the PE of the Windy Boy Protection Box.
7. Pass the PE through the cable gland and connect to the PE connection terminal.
8. Tighten the lock nut firmly to the cable gland.
14 WBP-Box-IEN103320 Installation Guide
Page 15

SMA Solar Technology AG 5Electrical Connection
5.3 Connecting the Small Wind Turbine System
Grounding the small wind turbine system:
The small wind turbine system is not grounded through the Windy Boy Protection Box. You must
ground the small wind turbine system by other means than the Windy Boy Protection Box. Observe
all manufacturer instructions when doing so.
De str uct ion of the W ind y Bo y Pr ote cti on B ox d ue t o ex cessiv e po wer from the small wind
turbine system.
• Observe the maximum power that can be connected (see section10”Technical
Data”,page22).
• If the power of the small wind turbine system exceeds the maximum power that can be
connected to the Windy Boy Protection Box, use several Windy Boy Protection Boxes in the
system.
1. If there are rectifiers and overvoltage protection between the small wind turbine system and the
wind power inverter, remove the rectifiers and overvoltage protection.
2. Attach the M25 cable gland to the enclosure opening for the small wind turbine system.
3. Unscrew the cable gland's lock nut and pass it over the cable.
4. Pass L1, L2, and L3 of the small wind turbine system through the cable gland and connect to the
Alternator connection terminal.
5. Tighten the lock nut firmly to the cable gland.
Installation Guide WBP-Box-IEN103320 15
Page 16

5Electrical Connection SMA Solar Technology AG
5.4 Connecting the Wind Power Inverter
Cable sizing:
☐ The cable has been sized for the maximum power of the wind power inverter.
☐ A stranded lead of type Silivolt-E 4 mm² or a comparable lead is used.
☐ Maximum length is 2 m.
☐ Maximum cross section is 6 mm².
Connect each wind power inverter as per the following procedure.
1. Attach the M20 cable gland to the enclosure opening for the wind power inverter.
2. Unscrew the cable gland's lock nut and pass it over the cable.
3. Remove the seal from the cable gland.
4. Pass the multiple seal insert over DC+ and DC − and press into the cable gland.
5. Connect DC+ to the DC+ connection terminal.
6. Connect DC − to the DC − connection terminal.
7. Tighten the lock nut firmly to the cable gland.
8. Close all enclosure openings that are not required with sealing plugs.
16 WBP-Box-IEN103320 Installation Guide
Page 17

SMA Solar Technology AG 5Electrical Connection
5.5 Connecting the Load Resistor
Requirements:
☐ Load resistor never exceeds 54 Ω at the operating temperature.
☐ Load resistor never drops below 30 Ω when switched off.
☐ Load resistor has been designed for the maximum voltage of the Windy Boy Protection Box.
☐ The heat from the load resistor is permanently conducted away.
Cable sizing:
☐ Cable of type "RADOX GKW - LW/S 3x2.5 mm²" or a comparable cable used.
☐ Maximum length is 3 m.
☐ Maximum cross section is 6 mm².
1. Measure the resistance of the load resistor.
☑ The resistance is above 30 Ω .
✖ The resistance is below 30 Ω ?
The load resistor is not suitable for connection to the Windy Boy Protection Box.
• Select another load resistor. Observe the requirements when doing so.
2. Attach the M20 cable gland to the enclosure opening for the load resistor.
3. Unscrew the cable gland's lock nut and pass it over the cable.
4. Connect PE to the PE connection terminal.
5. Connect the cable shield to the PE connection terminal.
6. Connect LR+ to the LR+ connection terminal.
7. Connect LR − to the LR − connection terminal.
8. Tighten the lock nut firmly to the cable gland.
Installation Guide WBP-Box-IEN103320 17
Page 18

6Commissioning the Windy Boy Protection Box SMA Solar Technology AG
6 Commissioning the Windy Boy Protection Box
Requirements:
☐ The small wind turbine system is correctly connected.
☐ The wind power inverter and load resistor are correctly connected.
☐ The Windy Boy Protection Box, load resistor and load resistor cable shield are grounded.
☐ The small wind turbine system is grounded according to the manufacturer specifications.
☐ All unused enclosure openings are closed with sealing plugs.
1. Mount the enclosure lid onto the enclosure. Connect the PE of the enclosure lid to the
WindyBoy Protection Box when doing so.
2. Secure the enclosure lid with screws.
3. Commission the small wind turbine system. Observe all manufacturer specifications when
doingso.
4. Commission the wind power inverter (see the manual for the wind power inverter).
☑ Green LED is glowing.
✖ Green LED and red LED are glowing?
The Windy Boy Protection Box restricts overvoltage. As soon as the wind power inverter feeds
into the public distribution grid, the red LED will go out.
✖ All LEDs are off?
There is probably a fault.
• Eliminate the fault (see section8”Troubleshooting”,page20).
18 WBP-Box-IEN103320 Installation Guide
Page 19

SMA Solar Technology AG 7Cleaning the Cooling Fins of the WindyBoyProtectionBox
7 Cleaning the Cooling Fins of the
WindyBoyProtectionBox
• If the cooling fins of the Windy Boy Protection Box
are very dirty, clean them with a soft brush.
Installation Guide WBP-Box-IEN103320 19
Page 20

8Troubleshooting SMA Solar Technology AG
8Troubleshooting
Symptom Cause Corrective measures
All LEDs are off. The small wind turbine system
is stopped; there is no
voltage.
All LEDs are off. There is no voltage. • Check the connection of the small
• Commission the small wind turbine
system. Observe all manufacturer
specifications when doing so.
wind turbine system. See
section5.3”Connecting the Small
Wind Turbine System”,page15
for this.
• If the Windy Boy Protection Box is
permanently in this state, contact
the SMA Serviceline.
20 WBP-Box-IEN103320 Installation Guide
Page 21

SMA Solar Technology AG 9Decommissioning
9 Decommissioning
9.1 Removing the Windy Boy Protection Box
1. Stop the small wind turbine system (see the manufacturer manual).
2. Decommission the wind power inverter (see the manual for the wind power inverter).
3. Loosen the screws of the enclosure lid and carefully remove the lid. Disconnect the enclosure lid
PE from the Windy Boy Protection Box when doing so.
4. Disconnect the small wind turbine system from the Windy Boy Protection Box.
5. Disconnect the wind power inverter from the small wind turbine system (see the manual for the
wind power inverter).
6. Disconnect the load resistor and the load resistor cable shield from the
WindyBoyProtectionBox.
7. Disconnect PE from the Windy Boy Protection Box.
8. Place the enclosure lid onto the enclosure and secure with screws.
9. Loosen all fixing screws.
10. Lift the Windy Boy Protection Box from the upper fixing screws.
9.2 Packaging the Windy Boy Protection Box
• Package the Windy Boy Protection Box in the original packaging if available.
• If the original packaging is not available, use a box that is suited to the weight and dimensions
of the Windy Boy Protection Box.
9.3 Storing the Windy Boy Protection Box
Requirements for the storage location:
☐ The storage location is dry.
☐ The ambient temperature is between − 25 °C and 65 °C.
9.4 Disposing of the Windy Boy Protection Box
• Dispose of the Windy Boy Protection Box in accordance with the applicable disposal
regulations for electronic waste.
or
• Return the Windy Boy Protection Box to SMA Solar Technology AG with shipping paid by the
sender. When doing so, label the packaging "ZUR ENTSORGUNG" ("FOR DISPOSAL").
Installation Guide WBP-Box-IEN103320 21
Page 22

10Technical Data SMA Solar Technology AG
10 Technical Data
10.1 Windy Boy Protection Box 400
Small wind turbine system connection
Quantity 1 x 3-phase
Voltage 3 x 0 V … 500 V
Current 3 x 0 A … 11.5 A
Frequency 0 Hz … 400 Hz
Nominal power 1 kW … 3 kW
Wind power inverter connection
Maximum number 3
Voltage limitation 400 V
Total power 3 kW
Load resistor connection
Quantity 1
Nominal voltage 400 V
Continuous power 3 kW
General data
Width x height x depth 280 mm x 220 mm x 130 mm
Weight 5 kg
Rectifier Integrated
Peak efficiency 99.95 %
Operating temperature range − 25 °C … 65 °C
Protection rating * IP54
Load loss at continuous power 15 W
* According to IEC 60529
22 WBP-Box-IEN103320 Installation Guide
Page 23

SMA Solar Technology AG 10Technical Data
10.2 Windy Boy Protection Box 500
Small wind turbine system connection
Quantity 1 x 3-phase
Voltage 3 x 0 V … 500 V
Current 3 x 0 A … 11.5 A
Frequency 0 Hz … 400 Hz
Nominal power 3 kW … 5 kW
Wind power inverter connection
Maximum number 1
Voltage limitation 500 V
Voltage limitation with connection to a
Windy Boy 5000TL
Total power 5 kW
Load resistor connection
Quantity 1
Nominal voltage 500 V
Continuous power 5 kW
550 V
General data
Width x height x depth 280 mm x 220 mm x 130 mm
Weight 5 kg
Rectifier Integrated
Peak efficiency 99.95 %
Operating temperature range − 25 °C … 65 °C
Protection rating * IP54
Load loss at continuous power 20 W
* According to IEC 60529
Installation Guide WBP-Box-IEN103320 23
Page 24

10Technical Data SMA Solar Technology AG
10.3 Windy Boy Protection Box 600
Small wind turbine system connection
Quantity 1 x 3-phase
Voltage 3 x 0 V … 500 V
Current 3 x 0 A … 11.5 A
Frequency 0 Hz … 400 Hz
Nominal power 2 kW … 7 kW
Wind power inverter connection
Maximum number 2
Voltage limitation 600 V
Total power 7 kW
Load resistor connection
Quantity 1
Nominal voltage 600 V
Continuous power 7 kW
General data
Width x height x depth 280 mm x 220 mm x 130 mm
Weight 5 kg
Rectifier Integrated
Peak efficiency 99.95 %
Operating temperature range − 25 °C … 65 °C
Protection rating * IP54
Load loss at continuous power 30 W
* According to IEC 60529
24 WBP-Box-IEN103320 Installation Guide
Page 25

SMA Solar Technology AG 11Contact
11 Contact
If you have technical problems concerning our products, contact the S MA Servicelin e. We r equire the
following information in order to provide you with the necessary assistance:
• Device type (see "Type/Model" on the type label)
• Serial number (see "SerialNo." on the type label)
• Type of connected small wind turbine system
• Type and number of connected wind power inverters
• Technical data of the connected load resistor
SMA Solar Technology AG
Sonnenallee 1
34266 Niestetal, Germany
www.SMA.de
SMA Serviceline
Inverters: +49 561 9522 1499
Communication: +49 561 9522 2499
Fax: +49 561 9522 4699
E-Mail: Serviceline@SMA.de
Installation Guide WBP-Box-IEN103320 25
Page 26

Notes SMA Solar Technology AG
26 WBP-Box-IEN103320 Installation Guide
Page 27

SMA Solar Technology AG Legal Restrictions
The information contained in this document is the property of SMA Solar Technology AG. Publishing its content, either partially or
in full, requires the written permission of SMA Solar Technology AG. Any internal company copying of the document for the
purposes of evaluating the product or its correct implementation is allowed and does not require permission.
Exclusion of liability
The general terms and conditions of delivery of SMA Solar Technology AG shall apply.
The content of these documents is continually checked and amended, where necessary. However, discrepancies cannot be
excluded. No guarantee is made for the completeness of these documents. The latest version is available online at www.SMA.de
or from the usual sales channels.
Guarantee or liability claims for damages of any kind are excluded if they are caused by one or more of the following:
• Damages during transportation
• Improper or inappropriate use of the product
• Operating the product in an unintended environment
• Operating the product whilst ignoring relevant, statutory safety regulations in the deployment location
• Ignoring safety warnings and instructions contained in all documents relevant to the product
• Operating the product under incorrect safety or protection conditions
• Altering the product or supplied software without authority
• The product malfunctions due to operating attached or neighboring devices beyond statutory limit values
• In case of unforeseen calamity or force majeure
The use of supplied software produced by SMA Solar Technology AG is subject to the following conditions:
• SMA Solar Technology AG rejects any liability for direct or indirect damages arising from the use of software developed by
SMA Solar Technology AG. This also applies to the provision or non-provision of support activities.
• Supplied software not developed by SMA Solar Technology AG is subject to the respective licensing and liability agreements
of the manufacturer.
SMA Factory Warranty
The current guarantee conditions come enclosed with your device. These are also available online at www.SMA.de and can be
downloaded or are available on paper from the usual sales channels if required.
Trademarks
All trademarks are recognized even if these are not marked separately. Missing designations do not mean that a product or brand
is not a registered trademark.
The Bluetooth
Solar Technology AG is under license.
SMA Solar Technology AG
Sonnenallee 1
34266 Niestetal
Germany
Tel. +49 561 9522-0
Fax +49 561 9522-100
www.SMA.de
E-Mail: info@SMA.de
© 2004 to 2010 SMA Solar Technology AG. All rights reserved
®
wor d mark an d logos a re regis tered tr ademark s owned b y Blueto oth S IG, In c. and an y use of s uch mark s by SM A
Installation Guide WBP-Box-IEN103320 27
Page 28

4."4PMBS5FDIOPMPHZ"(
XXX4."EF
 Loading...