

Page 1
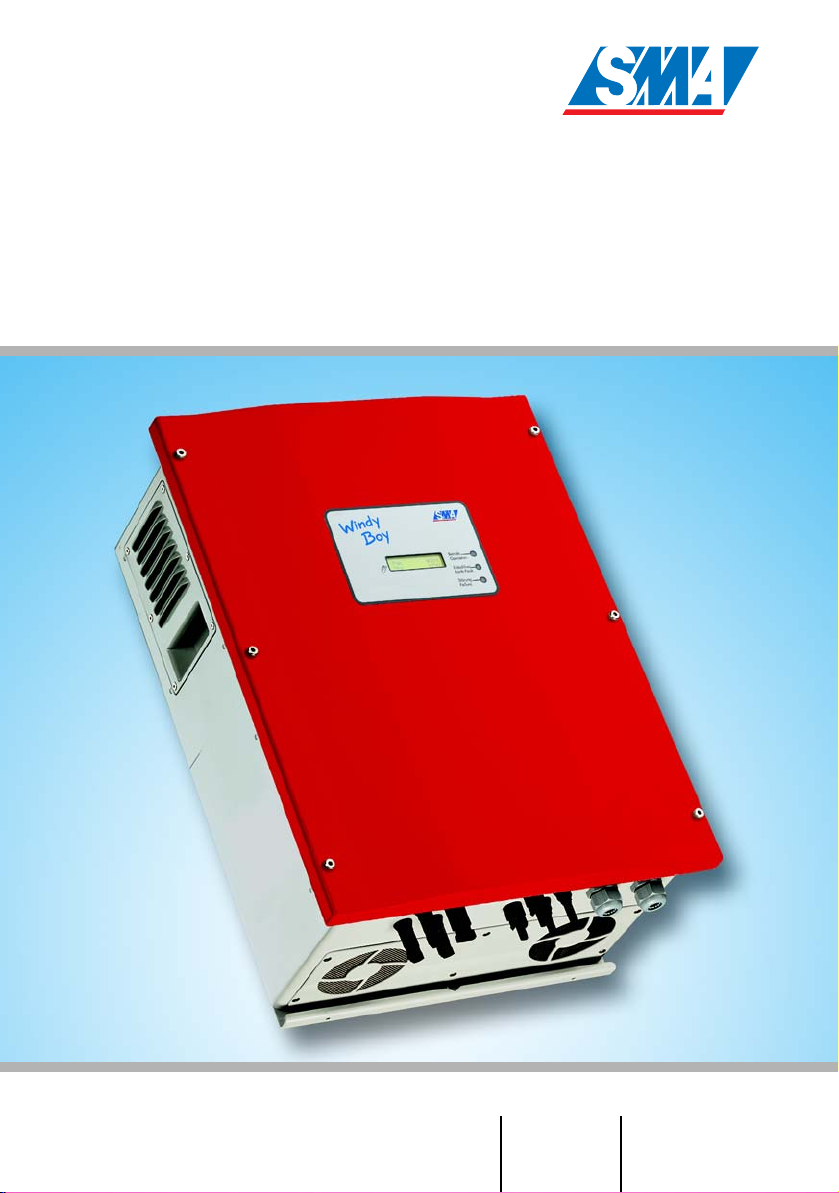
Windy Boy 5000
Windy Boy 6000
Inverter for Wind Energy Power Plants
Installation Guide Version 1.0 WB50_60-11:SE4005
IME-WB50-60
Page 2

Page 3

SMA Technologie AG Revision Histroy
Revision History
Document number Changes Author
WB50_60-11:SE4005 First issue Welzel
Installation Guide WB50_60-11:SE4005 Page 3
Page 4

SMA Technologie AG
Page 4 WB50_60-11:SE4005 Installation Guide
Page 5
SMA Technologie AG Explanation of Symbols used in this Document
Explanation of Symbols used in this Document
This symbol indicates information that is essential for a trouble-free
and safe operation of the product. Please read these sections carefully in order to avoid any damages of the equipment and for optimal personal protection.
This symbol indicates information that is required for the optimal operation of
the product. Read these sections carefully in order to ensure an optimal operation of the product and all its features.
This symbol indicates an example.
Installation Guide WB50_60-11:SE4005 Page 5
Page 6

Legal Restrictions SMA Technologie AG
Liability exclusion
The information contained in this documentation are the property of SMA Technologie AG. No part of this
documentation may be published without written permission from SMA Technologie AG. A reproduction for
internal purposes for the evaluation of the product or an appropriate application is permitted and does not
require authorization.
All information are based on our "General Terms and Conditions of Delivery of SMA Technologie AG”.
The content of this documentation is reviewed continuously and adjusted, if necessary. SMA Technologie
AG provides this documentation without exclusion of deviations and without warranty of completeness. You
will find the current version on the Internet at www.SMA.de or can obtain it via the usual sales c hannels.
Warranty or liability claims for all kinds are excluded in case of damages due to:
• Inappropriate use of the product
• Operation of the product in an improper environment
• Operation of the product without considering the relevant safety regulations
• Non-fulfillment of the warnings or safety instructions described in the documentation for the product
• Operation of the product under faulty conditions concerning security and protection
• Arbitrary changing of the product or the provided software
• Failure of the product due to interference of connected or contiguous devices out of legal limit values
• Disasters and force majeure
Software Licensing
The use of the provided software by SMA Technologie AG is subject to the following conditions:
The software may be reproduced for internal purposes and installed on any number of computers. Provided
source codes can be changed and adjusted on the company’s own authority according to the internal
purpose. Driver may be ported to other operating systems as well. No part of the source codes may be
published without written permission of SMA Technologie AG. Sublicensing of the software is not
acceptable.
Liability limitation: SMA Technologie AG disclaims liability for any direct or indirect consequential damages
arising from the use of the software produced by SMA Technologie AG. The same applies for the provision
and/or non-provision of support.
Provided software not produced by SMA Technologie AG is subject to the respective licensing and liability
agreements of the manufacturer.
Trademarks
All brand and product names used herein are trademarks or registered trademarks of their respective
holders, although they may not be specifically designated as such.
SMA Technologie AG
Hannoversche Strasse 1-5
34266 Niestetal
Germany
Tel. (+49) 5 61 95 22 – 0
Fax (+49) 5 61 95 22 – 100
www.SMA.de
E-Mail: info@SMA.de
© 2005 SMA Technologie AG. All rights reserved.
Page 6 WB50_60-11:SE4005 Installation Guide
Page 7

SMA Technologie AG Table of Contents
Table of Contents
1 Foreword . . . . . . . . . . . . . . . . . . . . . . . . . . . . . . . . . 9
2 Safety information . . . . . . . . . . . . . . . . . . . . . . . . . . 11
3 Overview . . . . . . . . . . . . . . . . . . . . . . . . . . . . . . . . 13
3.1 Unit description . . . . . . . . . . . . . . . . . . . . . . . . . . . . . . . . . . .13
3.2 External dimensions. . . . . . . . . . . . . . . . . . . . . . . . . . . . . . . .14
3.3 OptiCool ventilation system . . . . . . . . . . . . . . . . . . . . . . . . . .15
4 Installation requirements . . . . . . . . . . . . . . . . . . . . . 17
4.1 Installation site requirements . . . . . . . . . . . . . . . . . . . . . . . . .17
4.2 DC input prerequisites . . . . . . . . . . . . . . . . . . . . . . . . . . . . . .19
4.3 Low voltage grid 230 V (AC). . . . . . . . . . . . . . . . . . . . . . . . .19
4.4 Stand-alone mains grid . . . . . . . . . . . . . . . . . . . . . . . . . . . . .25
5 Installation . . . . . . . . . . . . . . . . . . . . . . . . . . . . . . . 27
5.1 Mounting the unit . . . . . . . . . . . . . . . . . . . . . . . . . . . . . . . . .27
5.2 Electrical installation . . . . . . . . . . . . . . . . . . . . . . . . . . . . . . .28
5.3 Startup . . . . . . . . . . . . . . . . . . . . . . . . . . . . . . . . . . . . . . . . .32
6 Opening and closing the Sunny Boy 3800 . . . . . . . . 35
6.1 Opening the Windy Boy . . . . . . . . . . . . . . . . . . . . . . . . . . . .35
6.2 Closing the Windy Boy . . . . . . . . . . . . . . . . . . . . . . . . . . . . .35
7 Communication . . . . . . . . . . . . . . . . . . . . . . . . . . . . 37
7.1 Mains grid communication . . . . . . . . . . . . . . . . . . . . . . . . . . .37
7.2 RS232 communication . . . . . . . . . . . . . . . . . . . . . . . . . . . . . .38
7.3 RS485 communication . . . . . . . . . . . . . . . . . . . . . . . . . . . . . .40
8 Checking heat dissipation. . . . . . . . . . . . . . . . . . . . . 43
8.1 Cleaning the fans . . . . . . . . . . . . . . . . . . . . . . . . . . . . . . . . .43
8.2 Checking the fans . . . . . . . . . . . . . . . . . . . . . . . . . . . . . . . . .45
8.3 Cleaning the fan gills. . . . . . . . . . . . . . . . . . . . . . . . . . . . . . .46
9 Replacing the varistors. . . . . . . . . . . . . . . . . . . . . . . 47
10 Contact. . . . . . . . . . . . . . . . . . . . . . . . . . . . . . . . . . 51
Installation Guide WB50_60-11:SE4005 Page 7
Page 8

SMA Technologie AG
Page 8 WB50_60-11:SE4005 Installation Guide
Page 9

SMA Technology AG Foreword
1 Foreword
The installation of the Windy Boy 5000 / 6000 may only be done
by qualified technicians. The installer must be approved by the
utility company. Please read the installation guide carefully before
you begin with the installation. The installation of utility interactive
power sources must be compliant with all applicable regulations of
the utility company and with all applicable regulations and
standards.
This installation guide is intended solely for qualified electricians. Its aim is to help
install and set up SMA Sunny Boy 3800 inverters quickly and correctly.
For detailed technical information and instructions on how to use the device, please
refer to the operating instructions.
The Windy Boy 5000 / 6000 is externally identical to the Sunny Mini Central inverter
for photovoltaic systems. For this reason, it can also be used as a PV inverter. Please
download the Sunny Mini Central instruction manuals from www.SMA.de and
contact the SMA hotline if you intend to use the inverter in this manner.
If you require further information, please call the SMA hotline on the following
number:
+49 (0)561 95 22 - 499
Installation Guide WB50_60-11:SE4005 Page 9
Page 10

Foreword SMA Technology AG
Page 10 WB50_60-11:SE4005 Installation Guide
Page 11
SMA Technology AG Safety information
2 Safety information
Work on the Sunny Boy 3800 with the
cover removed must be carried out by a
qualified electrician! Before working on
the Sunny Boy 3800 with the cover
Windy
Boy
Pac 903W
Upv 330V
N
e
t
z
B
w
e
t
r
e
i
e
c
b
G
h
O
s
r
id
e
p
l
e
r
r
ic
a
ti
t
e
i
h
o
d
n
te
i
r
n
fü
v
e
r
r
W
te
r
E
i
r
n
d
fo
s
d
c
r
h
e
w
l
u
n
E
s
s
e
a
i
n
r
r
t
h
g
d
F
i
e
a
tu
u
a
l
r
t
n
b
l
in
a
g
e
e
s
n
S
t
ö
r
u
n
g
F
a
i
l
u
r
e
must wait approx. 30 minutes for the capacitors in the Sunny Boy
3800 to discharge. Only then is it safe to open the unit by removing
the cover. You must also make sure that no voltage is present in
the device.
The Sunny Boy 3800 is equipped with an independent mains disconnection
device, the "SMA grid guard". It ensures that the Sunny Boy 3800 complies
with the VDEW (Verband der Elektrizitätswirtschaft – German Electricity
Industry Association) regulations for the connection and parallel operation of
electrical power units to the low-voltage grid of the electricity supply company
and with DIN VDE 0126 (4.99), which forms a part of these regulations.
removed, the AC and DC voltage MUST
be disconnected from the Sunny Boy
3800.
The Sunny Boy 3800 must be
disconnected from the mains grid and
precautions must be taken to prevent the
grid being reconnected. The connection to
the DC voltage must also be removed.
After isolating the AC and DC voltage you
Installation Guide WB50_60-11:SE4005 Page 11
Page 12

Safety information SMA Technology AG
Page 12 WB50_60-11:SE4005 Installation Guide
Page 13
SMA Technology AG Overview
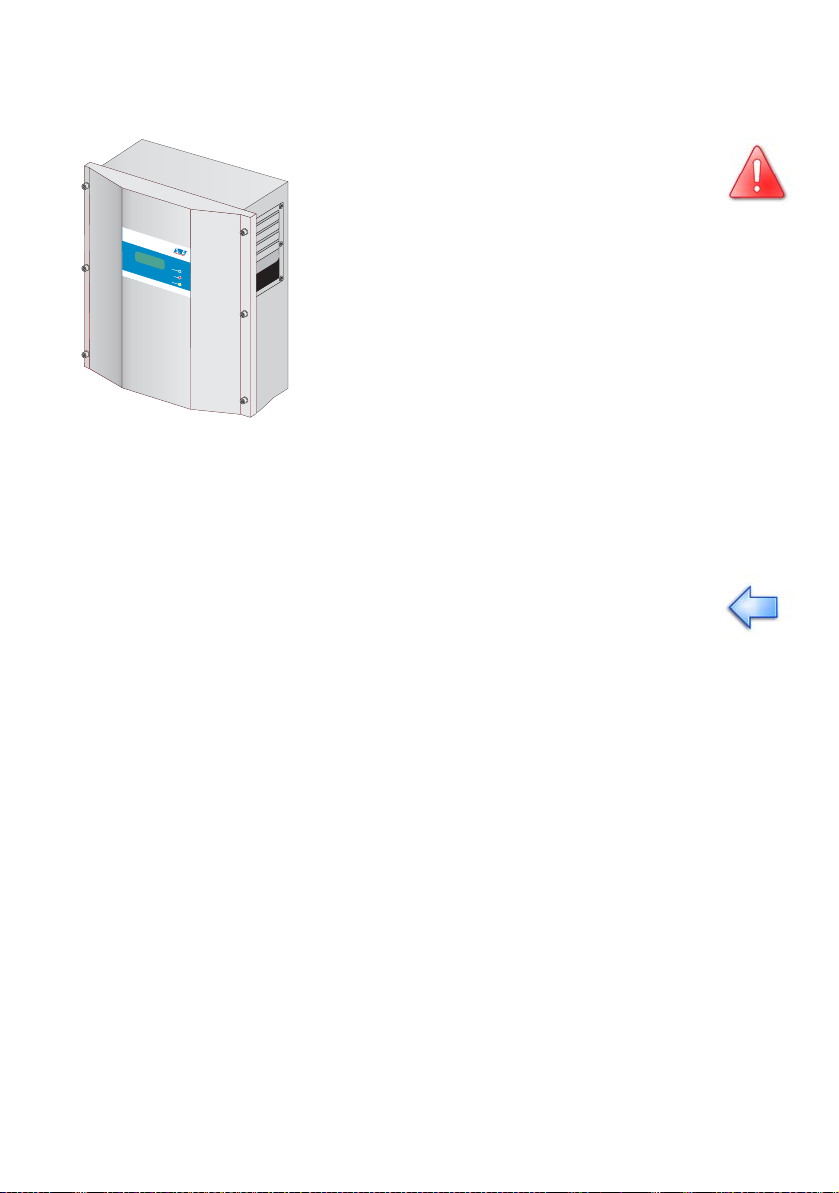
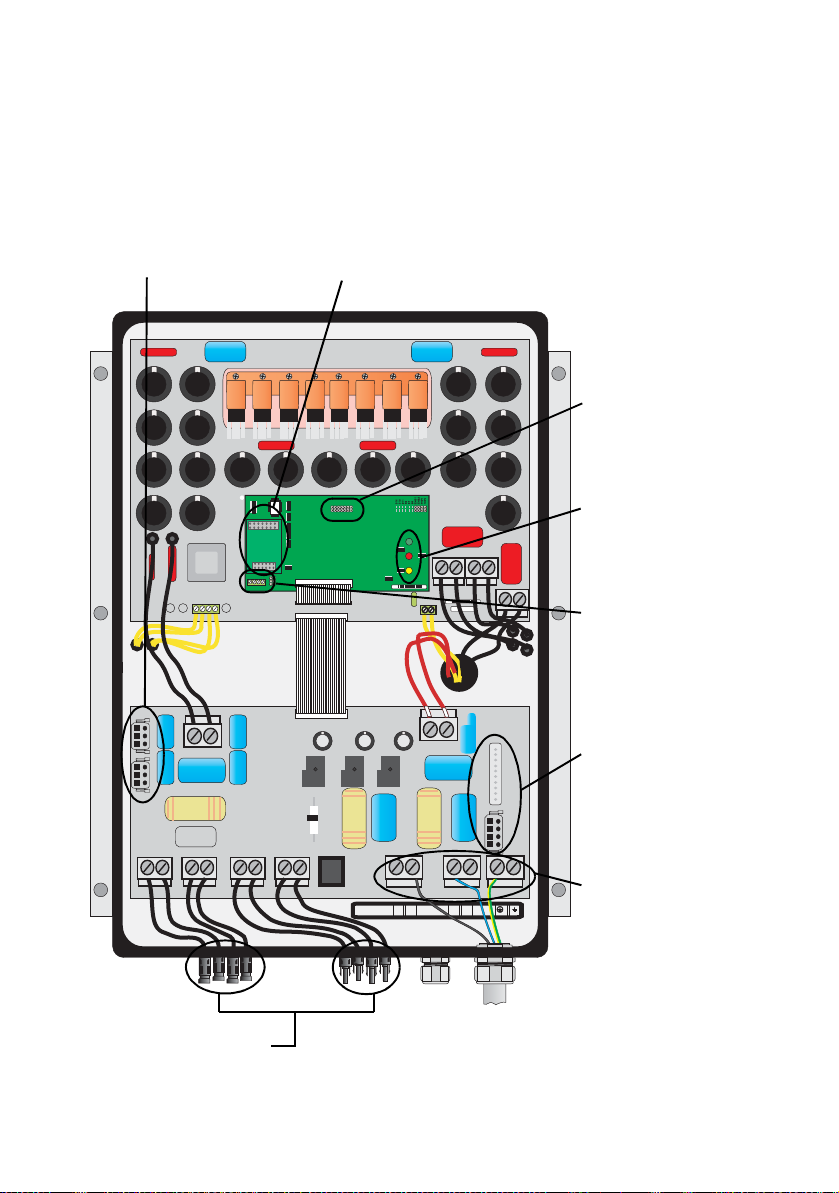
3 Overview
3.1 Unit description
The following diagram gives a schematic overview of the various components and
connection points inside the Sunny Boy 3800 with the cover removed:
Varistors
(page 47)
Socket for communication (RS232,
RS485, NLM, wireless) (page 37)
C
B
A
2357
SMC60-AST
V
40
0 V
2
Potter& Brumfield Potter& Brumfield Potter& Brumfield
Display socket
(Sunny Display)
Operating status
LEDs
Communications
connector
Socket for PLC
power module
(required for mains
grid communications)
Connection
+ +
+ +
- - - -
MCMC
MC MC MC MC
VN30.15/00858
230 Vac:
MC
N
NL1
MC
L
PE
terminals (AC)
(page 19)
DC input plug
(page 19)
Installation Guide WB50_60-11:SE4005 Page 13
Page 14
Overview SMA Technology AG
Netzwechselrichter für Windenergieanlagen
Grid tied inverter for wind turbines
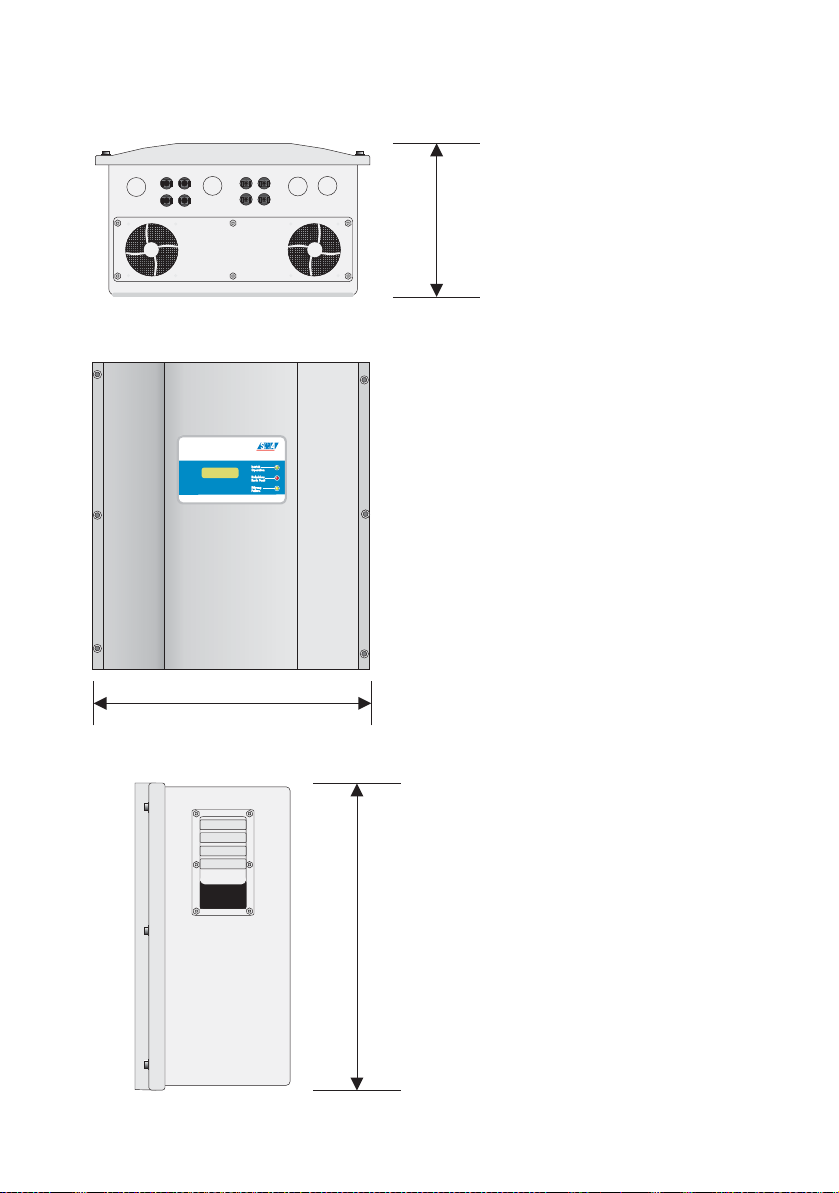
3.2 External dimensions
250 mm
Windy
Boy
Pac 903W
Upv 330V
Netzwechselrichter für Windenergieanlagen
Grid tied inverter for wind turbines
430 mm
600 mm
Page 14 WB50_60-11:SE4005 Installation Guide
Page 15
SMA Technology AG Overview
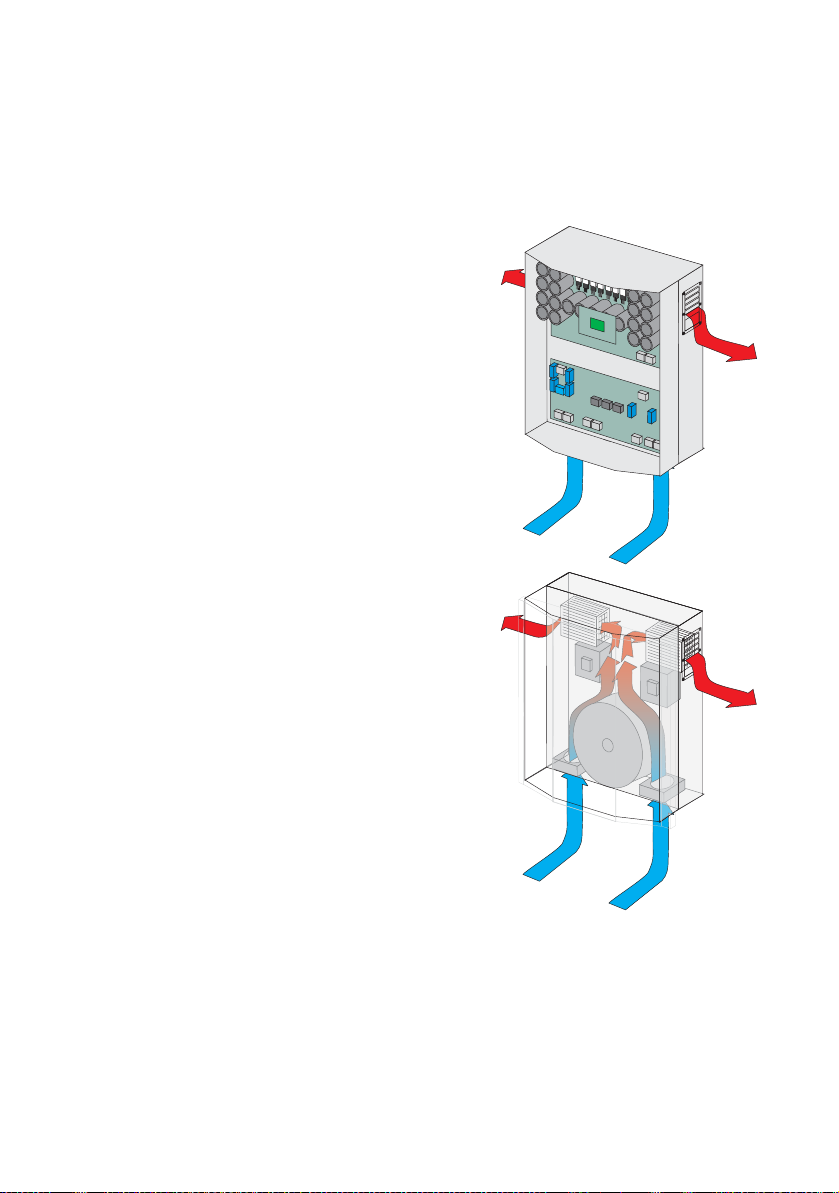
3.3 OptiCool ventilation system
The Windy Boy 5000 / 6000 is equipped with the patented OptiCool two-chamber
cooling system. At the same time, the Windy Boy's enclosure is integrated into the
temperature management and now serves not only to incorporate and protect the
internal components but also as a cool air and heat distributor.
As the central component of passive heat
abstraction, the heat sink is placed in the
enclosure, thus dividing it into two chambers.
The front chamber containing the electronic
components is especially sealed and thus
protected against infiltration by water, dust or dirt.
In addition, the heat sink, functioning as a partition
wall, provides enough space for the installation of
the heat-producing components.
The rear enclosure chamber contains the
components which develop high amounts of heat,
depending on their function, such as chokes and
transformers, which are either especially enclosed
or unsusceptible to external influences.
An active cooling unit is affixed to the underside of
the second chamber which has been specially
designed for this purpose. According to the
temperature, the power conductor and the
inductive components switch themselves on
automatically and vary the number of revolutions
as necessary for an even heat balance within the
device.
The air current provided by the fan is particularly
well channeled via a current tunnel and expels the
waste heat both from the heat sink and the other components in this area.
OptiCool makes for low component temperatures throughout the Windy Boy. This
leads to high levels of reliability and excellent overload behavior which both impact
considerably on the economic viability of the Windy Boy and, therefore, the PV
system as a whole.
Installation Guide WB50_60-11:SE4005 Page 15
Page 16

Overview SMA Technology AG
Page 16 WB50_60-11:SE4005 Installation Guide
Page 17
SMA Technology AG Installation requirements
4 Installation requirements
Please check that all of the conditions listed below are met before installing and
commissioning the Windy Boy 5000 / 6000.
4.1 Installation site requirements
The Windy Boy 5000 / 6000 weighs 63 kg. Please take this weight
into account when choosing the installation site and method of
installation.
The ambient temperature must not be outside the -25°C to
+60°C range.
The Windy Boy 5000 / 6000 should be installed in a place where it
is not exposed to direct sunlight. An increased ambient temperature
63 kg
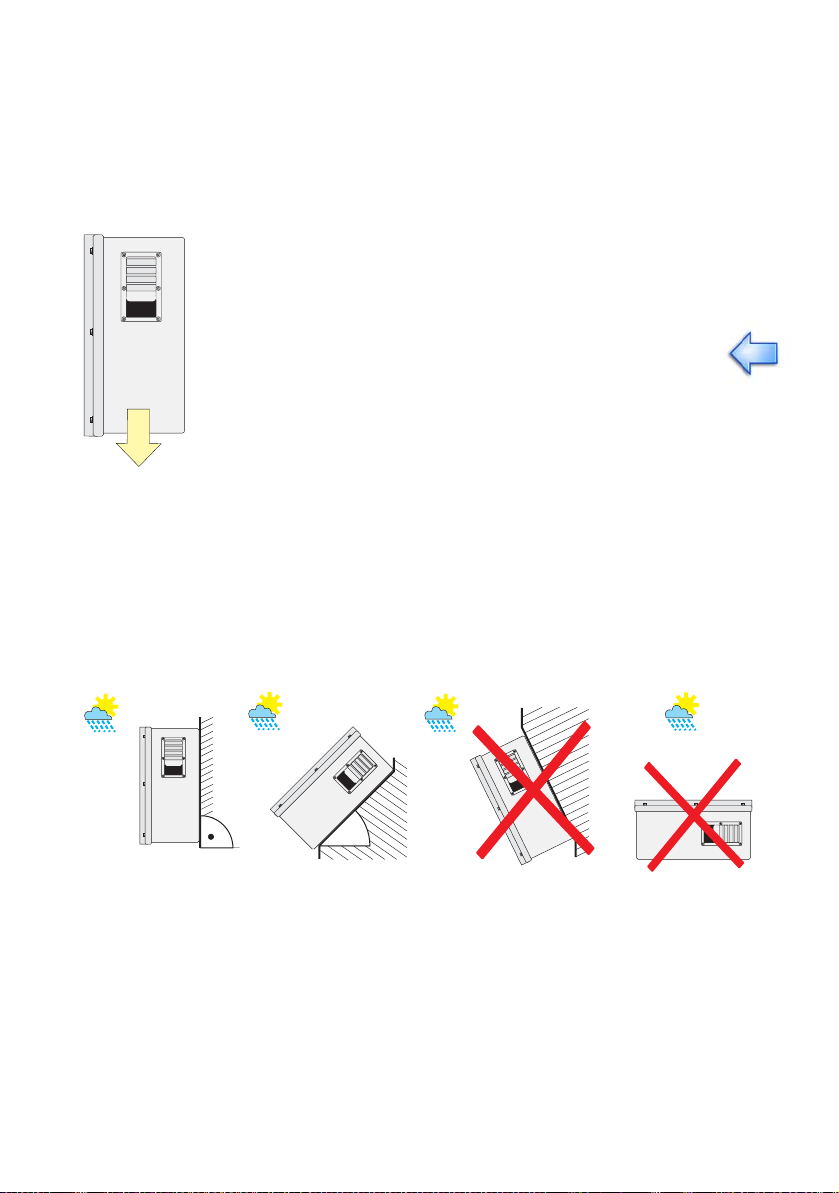
The Windy Boy 5000 / 6000 is designed to be mounted on a vertical wall. If
absolutely necessary, however, the Sunny Boy 3800 can be installed tilted back at
a maximum angle of 45°. For an optimum energy yield and the most convenient
operation, vertical installation at eye-level is preferable. If installing the unit outdoors,
make sure that it is not slanting forward.
can reduce the yield of the system.
We advise against installing the unit in a horizontal position outdoors.
min. 45°
Install the Windy Boy vertically or
tilting backward.
Installation Guide WB50_60-11:SE4005 Page 17
Never install the inverter
horizontally or so that it tilts
forward.
Page 18

Installation requirements SMA Technology AG
Netzwechselrichter für Windenergieanlagen
Grid tied inverter for wind turbines
When choosing the installation site, be sure to note the
following:
Unintentionally pulling out the DC plug connector under load can
damage the plug and result in bodily injury or death! Install the
Windy Boy 5000 / 6000 in such a way that it is not possible (e.g.
for children) to unintentionally unplug the DC plug connector.
Individual components in the Windy Boy 5000 / 6000 can reach a
temperature of more than 60 °C. Ensure the unit is sufficiently far
away from combustible materials.
Do not install the Windy Boy 5000 / 6000 in potentially explosive
areas!
When choosing the installation site, ensure there is enough space for heat to
dissipate. Under normal conditions, the following guidelines should be applied for
the space to be kept clear around the Windy Boy 5000 / 6000:
Minimum clearance
Sides 30 cm
Top 30 cm
Underneath 30 cm
In front 5 cm
30 cm
30
cm
Windy
Boy
Pac 903W
Upv 330V
Netzwechselrichter für Windenergieanlagen
Grid tied inverter for wind turbines
30 cm
5
cm
30
cm
If you install the Windy Boy 5000 / 6000 in areas where high ambient temperatures
are to be expected, increase the distance between the devices. This will prevent the
individual Windy Boy 5000 / 6000 from drawing in the cooling air of the adjacent
device. Ensure that the inverter is sufficiently ventilated.
In domestic installations, the unit should not be mounted
on plasterboard walls, wooden boarding or similar as
otherwise audible vibrations are likely to result. The
Windy Boy 5000 / 6000 can make noises when in use
that may be irritating in a domestic setting.
Page 18 WB50_60-11:SE4005 Installation Guide
Page 19

SMA Technology AG Installation requirements
4.2 DC input prerequisites
Your Sunny Boy 3800 is equipped with Multi-Contact (4 mm) DC plug connectors as
standard. Depending on your order preferences, the Sunny Boy 3800 can be
equipped with other connector systems instead, such as Multi-Contact (3 mm) or Tyco
connectors.
The device has eight DC plug connectors for connecting an upstream rectifier /
overvoltage protection unit for the wind turbine. The connecting cables must also be
fitted with the same type of plug connector. A pre-plugged set for connecting loose
cables to the appropriate DC connector system of the Sunny Boy 3800 is available
as an optional accessory. The SMA order codes for the various connectors are as
follows:
• Multi-Contact 3 mm: "SWR-MC"
• Multi-Contact 4mm: "MC-SET"
• Tyco: "TYCO-SET"
Limit values for DC input
Max. voltage 600 V (DC)
Max. input current 30 A (DC)
Please make sure that the input voltage never exceeds 600 V.
Higher input voltages will damage the Sunny Boy 3800 and lead
to loss of any and all warranty rights!
4.3 Low voltage grid 230 V (AC)
The relevant technical regulations and the special instructions of the local grid
operator must be followed.
The connection terminals of the Windy Boy 5000 /
6000 are suitable for wire cross-sections of up to
16 mm². The external diameter of the cable must be
between 11 mm and 25 mm. If you use a cable with
a cross-section smaller than 14 mm (11 mm minimum),
the rubber bushing in the screw fitting must be
replaced by the one included with the inverter
The connection is made with three wires (L, N, PE).
Each connection to a Windy Boy 5000 /
6000 must be equipped with a separate
circuit breaker 40 A. No other consumers
may be connected to the cable.
32A
Installation Guide WB50_60-11:SE4005 Page 19
Cable diameter
o
11 ... 25 mm
Wire cross-
section
max. 16 mm²
Page 20

Installation requirements SMA Technology AG
Rating for a line circuit breaker
When installing the fuses, please take the information in the manufacturer's
data sheets into account, e.g. in terms of installation distance and heat impact.
Various factors should be taken into account when selecting line circuit breakers.
These include, for example:
• The type of cable used (conductor material and insulation)
• Ambient temperatures affect the cables (higher temperatures result in a reduced
maximum current load)
• Method of routing the cable (reduces the maximum current load)
• bundling cables together (reduces the maximum current load)
• Loop impedance [Z] (in the event of a body contact this limits the current that can
flow and therefore determines the response behavior of the circuit breaker)
• Adequate separation between the circuit breakers to avoid excessive heating
• Selectivity
• Protection class of the connected load (VDE 0100, part 410), „Protection against
electric shock“
The following standards should be followed in all cases:
1
and / or the international standard IEC 60364-4-41:1992
• DIN VDE 0298-4
• DIN VDE 0100; part 430
1
(„Cable routing and current-carrying capacity)“
1
(„Protection measures for protection of cables
and conductors in terms of overcurrent“) and / or the international
standard IEC 364-4-43:1977 and IEC 364-4-473:1977
1
• DIN VDE 0100; part 410
(„Protection against electric shock“) and / or
the international standard IEC 60364-4-41:1992
1. The standards mentioned above are to be only used as a guideline for your
installation. They apply for installations in Germany. Please note that other
standards will apply for different countries throughout the world.
Page 20 WB50_60-11:SE4005 Installation Guide
Page 21

SMA Technology AG Installation requirements
The mains grid impedance at the AC input of the Sunny Boy 3800 must be less than
1 Ohm or the protective equipment may not work properly. In addition, we
recommend dimensioning the conductor cross-section so that line losses do not
exceed 1% at the nominal power. Line losses depending on the cable length and
cross-section are shown in the graph below. Multi-wire cables with copper forward
and return conductors are used.
Cable losses of the Windy Boy 5000
1,4%
Do not use cable losses that exceed 1.0 %
6,0 mm²
10,0 mm²
Windy Boy 5000
16,0 mm²
Loss
1,2%
1,0%
0,8%
0,6%
0,4%
0,2%
0,0%
0 m
4,0 mm²
5 m
10 m 15 m 20 m 25 m 30 m 35 m 40 m 45 m 50 m
Cable length
The maximum cable lengths for the different cable cross-sections are as follows:
Conductor cross-section 4.0 mm² 6.0 mm² 10.0 m² 16 mm²
Max. length 12 m 18 m 31 m 49 m
Installation Guide WB50_60-11:SE4005 Page 21
Page 22

Installation requirements SMA Technology AG
Cable losses of the Windy Boy 6000
1,4%
Do not use cable losses that exceed 1.0 %
6,0 mm²
10,0 mm²
16,0 mm²
Windy Boy 6000
Loss
1,2%
1,0%
0,8%
0,6%
0,4%
0,2%
0,0%
0 m
4,0 mm²
5 m
10 m 15 m 20 m 25 m 30 m 35 m 40 m 45 m 50 m
Cable length
The maximum cable lengths for the different cable cross-sections are as follows:
Conductor cross-section 4.0 mm² 6.0 mm² 10.0 m² 16 mm²
Max. length 10 m15 m25 m41 m
Page 22 WB50_60-11:SE4005 Installation Guide
Page 23

SMA Technology AG Installation requirements
The Windy Boy 5000 / 6000 is designed for operation on 230 V grids and works at
grid voltages from 198 V to 260 V and frequencies from 49.8 Hz to 50.2 Hz, or from
59.8 to 60.2 Hz.
AC output limit values, at 50 Hz
AC output limit values, at 50 Hz
Voltage range 198 V ... 260 V
Frequency range 49.8 Hz ... 50.2 Hz
Voltage range programmable
between
Frequency range programmable
between
180 V ... 265 V
45.5 Hz ... 54.5 Hz
AC output limit values, at 60 Hz
AC output limit values, at 60 Hz
Voltage range 198 V ... 260 V
Frequency range 59.8 Hz ... 60.2 Hz
Voltage range programmable
between
Frequency range programmable
between
180 V ... 265 V
55.5 Hz ... 64.5 Hz
The Windy Boy 5000 / 6000 is fitted with an automatic grid frequency identifier.
Therefore, it can be connected to a 50 or 60 Hz system without further
parameterization. Always follow the grid operator's instructions.
Installation Guide WB50_60-11:SE4005 Page 23
Page 24

Installation requirements SMA Technology AG
Mains supply impedance
A high mains supply impedance can lead to a high AC voltage at the terminal of the
Windy Boy 5000 / 6000. The output voltage (Uac) of the Windy Boy 5000 / 6000
ist limited to 260 V according to E DIN VDE 0126 4/99. If the Windy Boy 5000 /
6000 records that this voltage limit has been reached, it switches off immediately and
displays a grid error message.
The following diagram shows the power output the inverter can feed into the grid per
phase without leading to a switch-off because of a too high AC voltage.
1,5
1,4
1,3
1,2
1,1
1,0
0,9
0,8
0,7
Mains supply impedance [Ohm]
0,6
0,5
250 V 240 V 230 V 220 V 210 V 200 V
0 5 10 15 20 25 30
Output [kW] per phase
The following variables are needed to get an estimate of it.
• Grid voltage without mains supply
• Mains supply impedance at the terminal of the Windy Boy 5000 / 6000
The diagram shows the respective curves for an AC voltage without mains supply. A
maximum possible feed-in power per phase (X axis) is obtained for the respective
curves depending on the mains supply impedance (Y axis).
• The grid voltage without mains supply is 230 V.
• The mains supply impedance at the terminal is 1.2 Ohms.
Page 24 WB50_60-11:SE4005 Installation Guide
Page 25

SMA Technology AG Installation requirements
1,5
1,4
1,3
1,2
1,1
1,0
0,9
0,8
0,7
Mains supply impedance [Ohm]
0,6
0,5
0 5 10 15 20 25 30
230 V
Output [kW] per phase
The power read on the X axis is approx. 6.2 kW per phase.
Consequently, there should be installed only one Windy Boy 5000 / 6000 per phase
in this example. A higher output per phase, without causing a switch-off because of
AC overvoltage, requires better connection conditions for the Windy Boy 5000 /
6000 (e.g. a cable with a larger diameter).
4.4 Stand-alone mains grid
When providing electricity using Sunny Island systems:
configure the Sunny Boy 3800 according to the Sunny Island instruction
manual.
Installation Guide WB50_60-11:SE4005 Page 25
Page 26

Installation requirements SMA Technology AG
Page 26 WB50_60-11:SE4005 Installation Guide
Page 27

SMA Technology AG Installation
5 Installation
5.1 Mounting the unit
To make the job easier, we recommend you use the
supplied wall bracket to mount the Sunny Boy 3800.
For vertical installation on solid concrete or block walls,
for example, you can fit the bracket using 8 mm x 50
Windy
Boy
P
a
c
U
p
v
9
0
3
W
3
3
0
V
Net
z
w
e
c
h
s
e
l
r
i
c
G
h
r
t
i
e
d
r
t
f
i
ü
e
r
d
W
i
n
in
v
e
d
r
e
te
n
r
e
f
r
o
g
r
i
e
w
a
i
n
n
l
d
a
g
t
u
e
r
n
b
i
n
e
s
Windy
Boy
P
a
c
U
p
v
9
0
3
W
3
3
0
V
N
et
z
w
e
c
h
s
e
l
r
i
c
G
h
r
t
i
e
d
r
t
f
i
ü
e
r
d
W
i
n
i
v
n
e
d
r
e
te
n
r
e
f
r
o
g
r
i
e
w
a
i
n
n
l
d
a
g
t
u
e
r
n
b
i
n
e
s
mm hexagon bolts to DIN 571 standard, stainless steel
type, and with wall plugs type SX8.
You can also mount the Windy Boy 5000 / 6000, e.g.,
on a wooden wall using the vertically arranged holes
in the middle of the fastening bar. Make sure that you
only choose stable laths as mounting material which
can bear the weight of the Windy Boy 5000 / 6000
(63 kg).
1. Fit the wall bracket (1). To mark the positions to
drill the holes, you can use the wall bracket as a
drilling template.
2
1
2. Now hook the Windy Boy 5000 / 6000 onto the
wall bracket (2) at its upper mounting plate so that
it cannot be moved sideways.
3. Fix the Windy Boy 5000 / 6000 onto its bracket
by screwing the supplied M6x10 bolt into the
central threaded hole at the bottom of the bracket
(3).
1
4. Make sure the Windy Boy 5000 / 6000 is
positioned securely on the bracket.
Installation Guide WB50_60-11:SE4005 Page 27
3
Page 28

Installation SMA Technology AG
5.2 Electrical installation
The complete wiring for a Windy Boy 5000 / 6000 is shown schematically in the
following diagram:
NL1
230 Vac:
-
-
+++
-
+
-
32A
B
max. 16 mm²
Communication
Overvoltage protection
Max. 600 V!
Control unit
Control unit
Rectifier
Make sure that the input voltage never exceeds 600 V. Higher
input voltages will damage the Windy Boy 5000 / 6000 and will
lead to the loss of any and all warranty rights.
Page 28 WB50_60-11:SE4005 Installation Guide
Page 29

SMA Technology AG Installation
Connecting the AC output
To connect the AC output, proceed as follows:
1. Check the grid voltage. If this is higher than 260
V, the Windy Boy 5000 / 6000 will not be fully
operational. In this case, contact the local grid
operator for assistance.
The maximum grid voltage for feeding
Max. 260V!
electricity into the grid is 260 V!
2. Isolate the grid connection (switch the line circuit
breaker to its "off" position), make sure it cannot
be switched back on, and test to make sure no
voltage is present.
Off!
1. 2. 3.
You must make sure that no voltage is
present at the AC output before opening
3. Remove the screws that secure the case of the
Windy Boy 5000 / 6000 and remove the cover.
the Windy Boy!
Windy
Boy
Pa
c
Upv
903W
330V
Ne
t
z
w
e
c
h
s
e
l
r
i
c
G
h
r
t
i
e
d
r
t
f
i
ü
e
r
d
W
i
n
i
v
n
e
d
r
e
t
e
n
r
e
f
r
o
g
r
i
e
w
a
i
n
n
l
d
a
g
t
u
e
r
n
b
i
n
e
s
4. Connect the earth wire (PE) of the mains cable
to the left terminal of the right terminal block
(see the figure on the right).
NL1
230 Vac:
PE
PE conductor connection
Installation Guide WB50_60-11:SE4005 Page 29
Page 30

Installation SMA Technology AG
5. Connect the mains cable as shown in the figure.
Use the supplied cable feed-through. "L" and
N
L
"N" must not be swapped.
NL1
230 Vac:
"L" and "N" connection
6. Fix the enclosure cover of the Windy Boy 5000 / 6000 and tighten the six
screws evenly. Do not forget the washers. The indentations of the washers must
face toward the enclosure cover.
Do not switch the line circuit breaker on yet! The Sunny Boy 3800
may only be connected to the AC grid once the DC cables are
connected and the device is securely closed.
Page 30 WB50_60-11:SE4005 Installation Guide
Page 31

SMA Technology AG Installation
DC connection
To connect up the input, follow these steps:
1. Check that the DC connectors have the right
polarity and do not exceed the maximum input
voltage of 600 V (DC), see also chapter 4.2
"DC input prerequisites” (page 19).
Caution! Life-threatening high voltages may be present.
2. Connect the DC connector of the generator to
the Sunny Boy 3800. Make sure that the
polarity is correct!
3. Close the unnecessary DC input sockets with the
caps included in the delivery.
-
++
-
Installation Guide WB50_60-11:SE4005 Page 31
Page 32

Installation SMA Technology AG
Netzwechselrichter für Windenergieanlagen
Grid tied inverter for wind turbines
5.3 Startup
You can start up the Sunny Boy 3800 when
• The AC (mains) cable is connected correctly
• The DC cables are fully connected and the unused DC plug connectors on the
bottom of the enclosure are closed using the protective caps
• The enclosure's cover is securely screwed on
• You are sure that the input voltage cannot exceed 600 V, and
• The DC input voltage is sufficient for supplying the onboard electronics.
How to start up the inverter
1. First of all, switch the line circuit breaker to the
"on" position.
2. Now look at the LED display and consult the
table below to check whether the Sunny Boy
3800 is in a fault-free operating status and that
you understand what this status means. Once
the inverter is in a fault-free operating status,
startup has successfully completed.
Windy
Boy
Netzwechselrichter für Windenergieanlagen
Grid tied inverter for wind turbines
Pac 903W
Upv 330V
On!
Off
Page 32 WB50_60-11:SE4005 Installation Guide
Page 33

SMA Technology AG Installation
Green Red Yellow Status
Is not illuminated Is not illuminated OK (working mode)
Illuminates
continuously
Flashes quickly
(3x per second)
Flashes slowly
(1x per second)
Briefly goes out
(approx. 1x per
second)
Illuminates
continuously
Is not illuminated Is not illuminated OK (stop)
Illuminates
continuously
Is not illuminated Is not illuminated
Illuminates
continuously
Is not illuminated Is not illuminated OK (derating)
Illuminates
continuously
Is not illuminated Fault
Illuminates
continuously
OK (initialization)
Is not illuminated Fault
OK (waiting, grid
monitoring)
Is not illuminated Fault
Is not illuminated Fault
Is not illuminated OK (Standby)
Is not illuminated
Is not illuminated
Illuminates
continuously
Illuminating/
flashing
Fault
Is not illuminated Fault
Illuminating/
flashing
Fault
For a detailed description of the fault messages and their causes, refer to the Windy
Boy 5000 / 6000 operating instructions.
Installation Guide WB50_60-11:SE4005 Page 33
Page 34

Installation SMA Technology AG
Page 34 WB50_60-11:SE4005 Installation Guide
Page 35

SMA Technology AG Opening and closing the Sunny Boy 3800
6 Opening and closing the Sunny Boy 3800
If you need to open the device for whatever reason, please pay
attention to chapter 2 "Safety information” (page 11).
6.1 Opening the Windy Boy
Caution:
Follow the sequence below under all circumstances.
1. Disconnect the AC connection.
2. Disconnect the DC connection.
3. Wait 30 minutes! (This is necessary for the discharge of internal
voltages.)
4. Remove the six screws from the enclosure cover and pull the cover forward
smoothly.
6.2 Closing the Windy Boy
Caution:
Follow the sequence below under all circumstances.
1. Now secure the enclosure cover to the Sunny Boy 3800 by tightening the six
screws evenly. Do not forget the washers. The indentations of the washers must
face toward the enclosure cover.
2. Connect the DC plug connectors. Make sure that the polarity of the DC input
plugs is correct. Close the unnecessary DC input sockets with the caps included
in the delivery.
3. Reconnect the Sunny Boy 3800 to the mains grid. This activates the Sunny Boy
3800.
4. Now check whether the LED display on the Sunny Boy 3800 indicates that the
device is functioning correctly.
Installation Guide WB50_60-11:SE4005 Page 35
Page 36

Opening and closing the Sunny Boy 3800 SMA Technology AG
Page 36 WB50_60-11:SE4005 Installation Guide
Page 37

SMA Technology AG Communication
7 Communication
Please obtain the necessary information for retrofitting with communication modules
from the instructions delivered together with each module.
The connection of the RS232 and RS485 data communication cables proceeds as
follows:
Based on the order code on the delivery note, you can check if the Sunny Boy 3800
has already been equipped with a communication interface at the factory:
"-0xx“ without interface
"-1xx“ or "-6xx“ NLM modem (mains grid communication)
"-2xx“ or "-7xx“ RS232 interface
"-4xx“ or "-8xx“ RS485 interface
For packaging reasons, the Sunny Boy 3800 cannot be factory fitted with a wireless
piggy-back.
7.1 Mains grid communication
To allow communication over the mains grid cables, the following conditions must be
satisfied:
• The Sunny Boy 3800 must be equipped with the "NLM Piggy-Back“ (see chapter
3.1 "Unit description” (page 13)).
The Sunny Boy 3800 can be retrofitted for powerline communication. The SMA order
code is "NLMPB--SMC-NR“.
Installation Guide WB50_60-11:SE4005 Page 37
Page 38

Communication SMA Technology AG
7.2 RS232 communication
RS232 is a communication standard for communicating with a single Windy Boy over
a maximum distance of 15 m. For RS232 communication, the following conditions
must be satisfied:
• The Sunny Boy 3800 must be equipped with a cable feed-through on the lower
side of the enclosure, between the DC inputs and the opening for the AC cables.
• The Sunny Boy 3800 must be equipped with an RS232 Piggy-Back.
• A completely shielded cable with a minimum of three conductors, e.g. LiYCY,
0.25 mm², and a maximum length of 15 m must be used.
The Sunny Boy 3800 can be retrofitted for RS232 communication. The SMA order
code for RS232 is "232PB-NR“. When upgrading with an RS232 interface, the feedthrough provided must be installed in the Sunny Boy 3800, next to the mains cable
feed-through. The cable to be fed into the Sunny Boy 3800 is clamped using the
screw terminals on the communications connector of the Sunny Boy 3800 (see
chapter 3.1 "Unit description” (page 13)) and the other end is connected to a serial
interface on a PC in the usual manner. The pin connections for a normal PC
connections are shown in the following table:
Terminal Signal D-SUB 9 plug D-SUB 25 plug
Case Shielding Case Case
2
3 TxD (Windy Boy input) 3 2
5GND 5 7
RxD (Windy Boy
output)
23
Page 38 WB50_60-11:SE4005 Installation Guide
Page 39

SMA Technology AG Communication
SMC60-AST
VN30.15/00858
Potter & Brumfield
Potter & Brumfield
PC with
Sunny Data
Windy
Boy
P
a
c
Up
v
9
03
W
3
3
0V
N
e
t
z
B
w
e
tr
e
i
e
c
b
G
h
O
s
r
i
e
p
d
l
e
r
r
i
t
a
c
i
t
e
io
h
d
n
t
e
i
r
n
f
v
ü
e
r
r
t
W
e
r
E
i
r
n
f
d
o
s
d
c
r
h
e
l
w
u
n
E
s
e
s
a
i
n
r
r
t
g
h
d
i
F
e
t
a
u
a
u
l
r
t
n
b
l
i
a
n
g
e
e
s
n
S
t
ö
r
u
n
g
F
a
il
u
r
e
5
3
2
5
3
2
Jumper Configuration for RS232 Communication:
RS232
Piggy-Back
Jumpers must not be
mounted for RS232
communications
C
B
A
Terminal for
connecting the
RS232 cable
+ +
+ +
2357
- - - -
MCMC
MC MC MC MC
SMC60-AST
0 V
240 V
Potter & Brumfield
Potter & Brumfield Potter & Brumfield
8
85
00
5/
0.1
3
N
V
N
L
N L2 L1
230Vac:
MC
MC
PE
Installation Guide WB50_60-11:SE4005 Page 39
Page 40

Communication SMA Technology AG
7.3 RS485 communication
RS485 is a standard for communicating with up to 50 Windy Boys over a total
distance of up to 1200 m. For RS485 communication, the following conditions must
be satisfied:
• All Windy Boys must be equipped on the lower side of the case with the cable
feed-through provided.
• All the Windy Boys must be equipped with an RS485 Piggy-Back. You require a
RS485 / RS232 converter in order to connect a PC. SMA recommends the i-7520
converter, which can be purchased from SMA. The SMA order code is
"RSU485“.
• The completely shielded cable (e.g. LiYCY), having a minimum of one set of
twisted-pair conductors, each with an impedance of 100 Ohms, must be used.
• The first and last Sunny Boy 3800 in the RS485 chain must be equipped with a
termination resistor.
The SMA order code for RS485 is "485PB-NR“.
At present, the Sunny Boy Control and the Sunny Boy Control Plus can
communicate with up to 10 different models and a total of up to 50 SMA
inverters.
Begin with the last Windy Boy in the communications chain (e.g. the Windy Boy at
the end of the RS485 cable).
1. On the Windy Boy 5000 / 6000, remove the screw fitting (PG dummy plug)
from the second feed-through hole in the case, next to the AC connection plug.
2. Mount the PG screw fitting, with two perforated cable feed-throughs, provided
in the RS485 kit in the now open hole in the case.
3. On the last Windy Boy, please only open one of the two perforated cable feed-
throughs, since the RS485 communication bus ends at this device and only one
cable will be fed into the device.
4. Feed the cables through the feed-throughs in the Windy Boy and strip the cables
about 1 cm from the feed-through. Tighten the screw fitting firmly.
5. Please insulate the individual conductors using the silicon tubes provided in the
accessories kit. Please insulate the shield conductor separately. Please clamp the
shield conductor onto the PE (protective earth) screw terminal of the inverter's
case.
6. Connect each conductor of one of the twisted pair cables to terminals 2 and 7.
Take note of which conductor is connected to which terminal.
7. Connect one (or both) of the conductors of the second twisted pair cable to
terminal 5. Take note of which conductor you have used.
8. If no further Windy Boys must be connected, proceed to step 12.
Page 40 WB50_60-11:SE4005 Installation Guide
Page 41

SMA Technology AG Communication
9. Now connect the next Windy Boy.
10. Connect the conductors of the cable to the next inverter, using the same
terminals as you noted when connecting the first Windy Boy. This applies to the
cable conductors coming from the final Windy Boy and also to those leading to
the next Windy Boy. Be especially careful here. Finding cabling mistakes can be
very time consuming.
11. Repeat steps 9 and 10 for every Windy Boy that is to be connected to the
system.
12. For subsequent connection of a PC, or a Sunny Boy Control with an interface
converter, the cable ends should be labelled as follows:
Terminal D-SUB 9 plug Conductor
labelling
Your conductor
label
Case Case Shield
23Data +
78Data 55GND
The connection of one or more Windy Boys to a Sunny Boy Control using RS485 is
described in detail in the Sunny Boy Control user manual.
Installation Guide WB50_60-11:SE4005 Page 41
Page 42

Communication SMA Technology AG
SMC60-AST
VN30.15
/
0
0
8
58
Potter & Brumfield
Potter & Brumfield
+ +
0 V
24
0
V
230Vac:
Interface converter
RS485 / RS232
i-7520
1
DATA +
DATA -
2
5
5
3
External
power supply
9
10
+10V ... 30V DC
GND
3
2
2
10 pin terminal
on the interface converter
i-7520
D SUB 9 socket
on the interface converter
i-7520
PC with
Sunny Data
Jumper Configuration for RS485 Communication:
RS485
Piggy-Back
Jumpers for balancing
and termination resistors
C
B
A
2357
SMC60-AST
V
V
0
4
0
2
Potter & Brumfield Potter & Brumfield
Potter & Brumfield
8
5
8
0
/0
5
.1
0
3
N
V
+ +
+ +
- - - N
L
PE
N L2 L1
230Vac:
MC
MCMC
MC
MC MC MC MC
120 Ohm termination resistor between
terminal 2 (Data+) and terminal 7 (Data-)
680 Ohm resistors between
terminal 2 (Data+) to +5V and
terminal 7 (Data-) to GND
for balancing the signal
LiYCY twisted pair cable
5
7
2
5
7
2
Connect
shield to case
Connect
shield to case
last Windy Boy
on the RS485 bus
Windy
Boy
P
a
c
U
p
v
9
0
3
W
3
3
0
V
N
e
t
z
B
w
e
t
r
e
i
e
c
b
G
h
O
r
s
i
e
p
d
e
l
r
r
a
t
i
i
c
t
i
e
o
h
d
n
t
e
i
r
n
f
v
ü
e
r
r
t
W
e
r
E
r
i
d
f
n
o
s
d
c
r
h
e
l
u
w
n
E
s
s
a
e
i
n
r
r
t
h
d
g
F
i
a
t
e
u
u
a
l
r
t
n
b
l
i
a
n
g
e
e
s
n
S
t
ö
r
u
n
g
F
a
i
l
u
r
e
Windy
Boy
P
a
c
U
p
v
9
0
3
W
3
3
0
V
N
e
t
z
B
w
e
t
r
e
i
e
c
b
G
h
O
s
r
e
i
p
d
l
e
r
r
i
a
t
c
i
t
e
i
h
o
d
n
t
e
i
r
n
f
v
ü
e
r
r
t
W
e
r
E
i
r
n
d
f
o
s
d
c
r
h
e
l
u
w
n
E
s
e
s
a
i
n
r
r
t
g
h
d
i
F
e
a
t
u
u
a
l
r
t
n
b
l
i
a
n
g
e
e
s
n
S
t
ö
r
u
n
g
F
a
i
l
u
r
e
(max. 50)
Klemmleiste zum
Anschluss des
RS485 Kabels
Jumper A mounted:
Jumper B and C mounted:
Caution: Onlyinstall jumper A when the Windy Boy is locatedat one or
the otherend of the RS485bus. Only install jumpers Band C on
ONE device inthe middle of the RS485bus, and only when the
bus cannot be otherwise balanced. Balancing is not necessary
when using the i-7520 interface converter because this unit
performs busbalancing internally.
SMA recommends the i-7520 interface converter for the connection between an
RS485 bus and a PC. An alternative possibility is to use an i-7561 (RS485/USB).
The cabling is identical to that used in the i-7520, apart from the fact that the
connection to the PC occurs via USB.
Page 42 WB50_60-11:SE4005 Installation Guide
Page 43

SMA Technology AG Checking heat dissipation
Netzwechselrichter für Windenergieanlagen
Grid tied inverter for wind turbines
8 Checking heat dissipation
You need only check the heat dissipation of the Sunny Boy 3800 if, during a visual
inspection, you notice a marked build-up in the filter or the Windy Boy is increasingly
observed to be in derating mode. A Sunny Boy 3800 switching to derating mode
depends on the ambient temperature and cooling efficiency. This means a device
with dirty filters (low air-flow) and low ambient temperature can rarely or never
switch to derating mode, whereas this can happen relatively often with a Sunny Boy
3800 that has a good air-flow and high ambient temperature.
8.1 Cleaning the fans
If the fan guards are only covered in loose dust, they can be cleaned with a vacuumcleaner. If you do not achieve satisfactory results with a vacuum-cleaner, you can
dismantle the fans for the sake of cleaning.
The fans are mounted on a sheet metal plate on the underside of the Sunny Boy
3800. In order to clean the fans, observe the following procedure:
1. Disconnect the Sunny Boy 3800 from both the DC
and AC connections.
2. Wait for the fans to stop rotating.
3. Remove the six screws which secure the fan
element on the underside of the case.
Windy
Boy
Pac 903W
Upv 330V
Netzwechselrichter für Windenergieanlagen
Grid tied inverter for wind turbines
4. Carefully remove the metal plate with the fans
attached.
5. Unlock the plugs of the connecting cables of the
fans and remove them carefully.
6. Each of the fans are fastened to the plate with four
nuts. Remove the four nuts to remove the fans and
the filters below them.
7. Clean the filters and fans using a soft brush, a
paint brush or a cloth. Do not use compressed air as this can damage the fan.
Installation Guide WB50_60-11:SE4005 Page 43
Page 44

Checking heat dissipation SMA Technology AG
8. After cleaning, replace everything in reverse order. Do not forget to reconnect
the fan plugs. After installation, ensure that the fans are functioning (see chapter
8.2 "Checking the fans” (page 45)).
Page 44 WB50_60-11:SE4005 Installation Guide
Page 45

SMA Technology AG Checking heat dissipation
8.2 Checking the fans
If necessary, there are three different ways to check the fans are functional:
• Set the "Fan Test“ parameter to "1“ (using Sunny Data, Sunny Data Control or
the Sunny Boy Control data logger).
• Set the jumper on the controller board.
Proceed as follows to set the jumper to check the fan.
1. Open the Windy Boy 5000 / 6000 as described in section 6.1 "Opening the
Windy Boy” (page 35).
2. Connect the enclosed jumper to the slot shown below on the controller board.
Jumper position for checking
the fan
3. Close the Sunny Boy 3800 again and restart it. Follow the instructions in chapter
6.2 "Closing the Windy Boy” (page 35).
The Sunny Boy 3800 recognizes the jumper only once the system has been
restarted.
4. Once you have put the jumper in position, you must restart the Sunny Boy 3800.
Check the fan's air-flow; the Sunny Boy 3800 sucks air in from underneath and
then blows it back out on the upper sides. Look out for any unusual noise which
could indicate incorrect installation or that the fans are faulty.
5. Once you have checked the fans, you must set the "Fan Test" parameter back to
0 and remove the jumper.
Installation Guide WB50_60-11:SE4005 Page 45
Page 46

Checking heat dissipation SMA Technology AG
8.3 Cleaning the fan gills
There are fan gills on the sides of the Sunny Boy 3800. If the filters of the fan gills are
so dirty that they block the air outflow, you can clean them as follows.
1. Remove the six screws which secure each fan gill
to the enclosure.
2. Remove the fan gills from the enclosure. Filters are
attached inside the fan gills. Clean them with a soft
brush, a paint-brush or compressed air.
3. Insert the fan gills back into the Sunny Boy 3800.
Page 46 WB50_60-11:SE4005 Installation Guide
Page 47

SMA Technology AG Replacing the varistors
9 Replacing the varistors
The Windy Boy 5000 / 6000 is a complex high-technology device. As a result, the
possibilities for fixing faults on site are limited to just a few items. Please do not
attempt any other repairs than those described here, but instead use the 24-hour
replacement service (the Windy Boy 5000 / 6000 is made ready for shipping within
24 hours and then given to a shipping company) and the repair service of SMA
Technologie AG
If the red LED on the status display illuminates continuously during operation, you
should first of all make sure that there is no earth leakage in the wind generator.
1. Disconnect the Sunny Boy 3800 from the low
voltage grid (switch the line circuit breaker to its
"off" position or pull out the AC plug). Make
sure the grid cannot be inadvertently
reconnected.
2. Loosen the DC plug connectors on the DC
inputs!
.
Off!
1. 2. 3.
You must make sure that no voltage is
present at the AC output before opening
the Windy Boy!
-
++
-
Remove the DC inputs from the
Windy Boy
3. Remove the screws that secure the cover and remove the cover from the Sunny
Boy 3800. Disconnect the PE connection from the cover. Make sure that no
voltage is present.
Installation Guide WB50_60-11:SE4005 Page 47
Page 48

Replacing the varistors SMA Technology AG
4. Using a continuity tester, check all the varistors to see if there is a conducting
connection between connectors 2 and 3. If not, then that varistor is not working.
5. Replace the varistor concerned with a new one
as shown in the drawing to the right. Ensure the
varistor is installed the right way round! If you
do not receive a special tool for operating the
Insert the special tool to
open the terminal.
terminal clamps with your replacement
varistors, please contact SMA. As an
alternative, the terminal contacts can be
operated using a suitable screwdriver. Since the
Remove the varistor.
failure of one varistor is generally due to factors
that affect all varistors in a similar way
(temperature, age, inductive overvoltages), it is
highly recommended that you replace both
varistors, not just the one that is obviously
123
The pole with the small loop
(crimp) must be fitted to
terminal 1 when replacing
the varistor.
defective. The varistors are specially
manufactured for use in the Windy Boy 5000 /
6000 and are not commercially available. They
must be ordered directly from SMA
Technologie AG (SMA order code: "SB-TV4“).
In case there are no spare varistors available the Windy Boy 5000
/ 6000 still can feed electricity into the grid. The input is not protected against overvoltages in this case. Replacement varistors should
be obtained as soon as possible. In systems with a high risk of overvoltages, the Windy Boy 5000 / 6000 should not be operated
with defective varistors.
6. Attach the cover to the enclosure of the Windy Boy 5000 / 6000 by tightening
the six screws. Don’t forget the lock washers. The notches of the lock washers
should face to the lid.
7. Connect the DC plug connector.
8. Close the unnecessary DC input sockets with the
caps included in the delivery.
Page 48 WB50_60-11:SE4005 Installation Guide
++
-
-
Page 49

SMA Technology AG Replacing the varistors
9. Switch the line circuit breaker to the "on"
position.
On!
10. Now check whether the LED display on the
Windy Boy 5000 / 6000 indicates that the
device is functioning correctly.
Off
If no earth leakage and no defective varistor were found, there is probably a fault in
the Sunny Boy 3800. In this case, contact the SMA hotline to discuss further steps.
Installation Guide WB50_60-11:SE4005 Page 49
Page 50

Replacing the varistors SMA Technology AG
Page 50 WB50_60-11:SE4005 Installation Guide
Page 51

SMA Technology AG Contact
10 Contact
If you have any questions or technical problems concerning the Sunny Boy 3800,
please contact our hotline. Please have the following information available when you
contact SMA:
• Inverter type
• Type of wind turbine and AC/DC converter
• Type of overvoltage protection
• Communication
• Serial number of the Sunny Boy 3800
Address:
SMA Technologie AG
Hannoversche Strasse 1 - 5
34266 Niestetal
Germany
Tel.:+49 561 95 22 - 499
Fax:+49 561 95 22 - 4699
hotline@SMA.de
www.SMA.de
Installation Guide WB50_60-11:SE4005 Page 51
Page 52

Contact SMA Technology AG
Page 52 WB50_60-11:SE4005 Installation Guide
Page 53

Page 54

Sales
SMA Solar Technology
www.SMA.de
Rosendahl Industrievertretungen
Adolf-Dembach-Strasse 1
47829 Krefeld
Germany
Tel. +49 2151 45678 90
Fax +49 2151 45678 99
SMA Technologie AG
SMA Solar Technology China
International Metro Center,
Building A, City Square No. Jia 3,
Shilipu Road, Changyang District
100025 Beijing, P.R. China
Tel. +86 10 65 58 78 15
www.SMA-CHINA.com
SMA America, Inc.
12438 Loma Rica Drive, Unit C
Grass Valley, CA 95945, USA
Tel. +1 530 273 4895
www.SMA-AMERICA.com
SMA Spain
Rosendahl Técnica Energética, S.L.
Decages S.A.
Balmes, 297, 1er, 2a
08006 Barcelona, Spain
Freecall +800 SUNNYBOY
Freecall +800 78669269
SMA Italy
Rosendahl Tecnologie Energetiche S.r.I.
Via Lorenzo Valla, 16
20141 Milano, Italy
Freecall +800 SUNNYBOY
Freecall +800 78669269
Innovation in Systems Technology
Seite 54 WB50_60-11:SE4005 Installation Guide
for the Success of Photovoltaics
 Loading...