

Page 1
EN
Device for Closing Dead Zones with SMA Bluetooth
Wireless Technology
SMA BLUETOOTH REPEATER OUTDOOR
Installation Manual
®
BTREPOUT-IA-en-11 | 98-0054411 | Version 1.1
Page 2

Page 3

SMA Solar Technology AG Table of Contents
Table of Contents
1 Information on this Document. . . . . . . . . . . . . . . . . . . . . . . . . . . 5
2 Safety . . . . . . . . . . . . . . . . . . . . . . . . . . . . . . . . . . . . . . . . . . . . . . 7
2.1 Intended Use . . . . . . . . . . . . . . . . . . . . . . . . . . . . . . . . . . . . . . . . . . . . 7
2.2 Qualification of Skilled Persons . . . . . . . . . . . . . . . . . . . . . . . . . . . . . . 8
2.3 Safety Precautions . . . . . . . . . . . . . . . . . . . . . . . . . . . . . . . . . . . . . . . . 8
3 Scope of Delivery . . . . . . . . . . . . . . . . . . . . . . . . . . . . . . . . . . . . . 9
3.1 Order Option Top-Hat Rail Power Supply Unit . . . . . . . . . . . . . . . . . . 9
3.2 Order Option Power Module . . . . . . . . . . . . . . . . . . . . . . . . . . . . . . 10
3.3 Identifying the SMA Bluetooth Repeater Outdoor. . . . . . . . . . . . . . . 10
4 Product Description . . . . . . . . . . . . . . . . . . . . . . . . . . . . . . . . . . 11
4.1 Range of Usage. . . . . . . . . . . . . . . . . . . . . . . . . . . . . . . . . . . . . . . . . 11
4.2 Functions . . . . . . . . . . . . . . . . . . . . . . . . . . . . . . . . . . . . . . . . . . . . . . 11
4.3 Device Overview . . . . . . . . . . . . . . . . . . . . . . . . . . . . . . . . . . . . . . . . 12
5 Assembly. . . . . . . . . . . . . . . . . . . . . . . . . . . . . . . . . . . . . . . . . . . 15
5.1 Selecting the Mounting Location . . . . . . . . . . . . . . . . . . . . . . . . . . . . 15
5.2 Mounting the Bluetooth Repeater Outdoor on the Wall . . . . . . . . . . 18
6 Electrical Connection . . . . . . . . . . . . . . . . . . . . . . . . . . . . . . . . . 19
6.1 Connecting the Bluetooth Repeater Outdoor with Top-Hat Rail
Power Supply Unit to the Voltage Supply . . . . . . . . . . . . . . . . . . . . . 19
6.2 Connecting the Bluetooth Repeater Outdoor to the Voltage Supply. 21
7 Settings . . . . . . . . . . . . . . . . . . . . . . . . . . . . . . . . . . . . . . . . . . . . 23
7.1 Setting the MODE . . . . . . . . . . . . . . . . . . . . . . . . . . . . . . . . . . . . . . . 23
7.2 Setting the NetID. . . . . . . . . . . . . . . . . . . . . . . . . . . . . . . . . . . . . . . . 23
8 Maintenance and Care . . . . . . . . . . . . . . . . . . . . . . . . . . . . . . . 25
9 Decommissioning . . . . . . . . . . . . . . . . . . . . . . . . . . . . . . . . . . . . 26
9.1 Detaching the Bluetooth Repeater From The Wall. . . . . . . . . . . . . . . 26
9.2 Packing the Bluetooth Repeater Outdoor . . . . . . . . . . . . . . . . . . . . . 26
9.3 Disposing of the SMA Bluetooth Repeater . . . . . . . . . . . . . . . . . . . . 26
Installation Manual BTREPOUT-IA-en-11 3
Page 4

Table of Contents SMA Solar Technology AG
10 Troubleshooting . . . . . . . . . . . . . . . . . . . . . . . . . . . . . . . . . . . . . 27
10.1 Voltage Supply . . . . . . . . . . . . . . . . . . . . . . . . . . . . . . . . . . . . . . . . . 27
10.1.1 LED RDY . . . . . . . . . . . . . . . . . . . . . . . . . . . . . . . . . . . . . . . . . . . . . . 27
10.1.2 LEDs of the Top-Hat Rail Power Supply Unit . . . . . . . . . . . . . . . . . . 29
10.2 Connection Quality . . . . . . . . . . . . . . . . . . . . . . . . . . . . . . . . . . . . . . 30
11 Technical Data . . . . . . . . . . . . . . . . . . . . . . . . . . . . . . . . . . . . . . 32
12 Contact . . . . . . . . . . . . . . . . . . . . . . . . . . . . . . . . . . . . . . . . . . . . 34
4 BTREPOUT-IA-en-11 Installation Manual
Page 5

SMA Solar Technology AG 1 Information on this Document
1 Information on this Document
Validity
This document is valid for the following device types as of hardware version A1 and firmware version
V 1.07.R:
• BTREP-OUT.GR1
• BTREP-OUT.GR2
Target Group
This document is for skilled persons. Only qualified personnel with the appropriate skills are allowed
to perform the tasks described in this manual (see Section2.2 "Qualification of Skilled Persons",
page8).
Additional Information
Links to additional information can be found at www.SMA-Solar.com:
Document title Document type
®
SMA Bluetooth
SMA Bluetooth
Wireless Technology Technical description
®
Wireless Technology in Practice Technical information
Symbols
Symbol Explanation
Indicates a hazardous situation which, if not avoided, will result in death
or serious injury
Indicates a hazardous situation which, if not avoided, could result in death
or serious injury
Indicates a hazardous situation which, if not avoided, could result in minor
or moderate injury
Indicates a situation which, if not avoided, could result in property damage
Information that is important for a specific topic or goal, but is not
safety-relevant
☐ Indicates an essential requirement for achieving a specific goal
☑ Desired result
✖ A problem that might occur
Installation Manual BTREPOUT-IA-en-11 5
Page 6
1 Information on this Document SMA Solar Technology AG
Typographies
Typography Usage Example
bold • Display messages
• Elements of a user interface
•Connections
• Elements to be selected
• Elements to be entered
> • Connects several elements that
• The value can be read
from the Energy field.
• Select Settings.
•Enter the value 10 in the
Minutes field.
• Select Settings > Date.
are to be selected
[Button/Key] • Button or key to be selected or
• Select [Next].
pressed
Nomenclature
Complete designation Designation in this document
PV plant Plant
Small wind turbine system Plant
SMA Bluetooth Piggy-Back Bluetooth Piggy-Back
SMA Bluetooth Piggy-Back Plus Bluetooth Piggy-Back Plus
SMA Bluetooth Repeater Outdoor Bluetooth Repeater Outdoor
®
Sunny Beam with Bluetooth
Wireless Technology Sunny Beam with Bluetooth
Abbreviations
Abbreviation Designation Explanation
AC Alternating Current ‒
DC Direct Current ‒
LED Light-Emitting Diode ‒
WLAN Wireless Local Area Network ‒
6 BTREPOUT-IA-en-11 Installation Manual
Page 7

SMA Solar Technology AG 2 Safety
2 Safety
2.1 Intended Use
The Bluetooth Repeater Outdoor is used in outdoor installations to close dead zones under
unfavourable installation conditions between SMA Solar Technology AG devices by means of
Bluetooth or to improve poor wireless connections.
The Bluetooth Repeater Outdoor is intended for private and industrial use. Use the
Bluetooth Repeater Outdoor in outdoor installations.
The SMA Bluetooth Repeater Outdoor may only be used with supported products:
For safety reasons, it is not permitted to modify the product or install components that are not explicitly
recommended or distributed by SMA Solar Technology AG for this product.
The enclosed documentation is an integral part of this product.
• Read and observe the documentation.
• Keep the documentation in a convenient place for future reference.
Only use the SMA Bluetooth Repeater Outdoor in accordance with the information provided in the
enclosed documentation. Any other use may result in personal injury or property damage.
Supported Products
The SMA
products:
Bluetooth
• All SMA communication products with Bluetooth
• All in verters wi th SMA Bluetooth Piggy-Ba ck upgrade . A list of s upported i nverters c an be found
in the SMA Bluetooth Piggy-Back installation manual.
• All inverters with SMA Bluetooth Piggy-Back Plus upgrade. A list of supported inverters can be
found in the SMA Bluetooth Piggy-Back installation manual.
• SMA PV inverters with integrated Bluetooth:
– SB (Sunny Boy) 3000TL-20/SB 4000TL-20/SB 5000TL-20: from software package 2.06
– SB 3000TL-21/SB 4000TL-21/SB 5000TL-21
– SB 2000HF-30/SB 2500HF-30/SB 3000HF-30
– STP (Sunny Tripower) 10000TL-10/STP 12000TL-10/STP 15000TL-10/STP 17000TL-10
• SMA wind power inverters with integrated Bluetooth:
– WB (Windy Boy) 3600TL-20/WB5000TL-20
– WB 2000HF/WB 2500HF/WB 3000HF
Repeater Outdoor may only be used with the following SMA Solar Technology AG
Installation Manual BTREPOUT-IA-en-11 7
Page 8

2 Safety SMA Solar Technology AG
2.2 Qualification of Skilled Persons
The work described in this document must be performed by skilled persons only. Skilled persons must
have the following qualifications:
• Training in the installation and commissioning of electrical devices and plants
• Knowledge of how to deal with the dangers and risks associated with the installation and
operation of electrical devices and plants
• Knowledge of all applicable standards and directives
• Knowledge of how an inverter works and is operated
• Knowledge of and adherence to this document and all safety precautions
2.3 Safety Precautions
Electric Shock
Lethal voltages are present in the conductive parts of the inverter.
• Prior to performing any work on the inverter, disconnect the inverter from any voltage sources
on the AC and DC sides (see inverter installation manual). Observe the waiting time to allow
the capacitors to discharge.
Burn Hazards
Some parts of the inverter enclosure can get hot during operation.
• During operation, touch the inverter on the enclosure lid only.
Environmental Influences
When closed, the Bluetooth Repeater Outdoor has the degree of protection IP54.
The Bluetooth Repeater Outdoor is thus protected against dust intrusion and water penetration. Dust
intrusion and water penetration can damage the Bluetooth Repeater Outdoor.
• When the enclosure of the Bluetooth Repeater Outdoor is not closed, protect the
Bluetooth Repeater Outdoor against dust intrusion and water penetration.
• Close the enclosure of the Bluetooth Repeater Outdoor again after performing any work on the
Bluetooth Repeater Outdoor.
Electrostatic Discharge
By touching electronic components, you can damage or even destroy the inverter or the
Bluetooth Repeater Outdoor through electrostatic discharge (ESD).
• Earth yourself before touching any components of the inverter or the Bluetooth Repeater
Outdoor.
8 BTREPOUT-IA-en-11 Installation Manual
Page 9
SMA Solar Technology AG 3 Scope of Delivery
3 Scope of Delivery
3.1 Order Option Top-Hat Rail Power Supply Unit
Check the scope of delivery for completeness and any externally visible damage. Contact your
specialist dealer if the scope of delivery is incomplete or damaged.
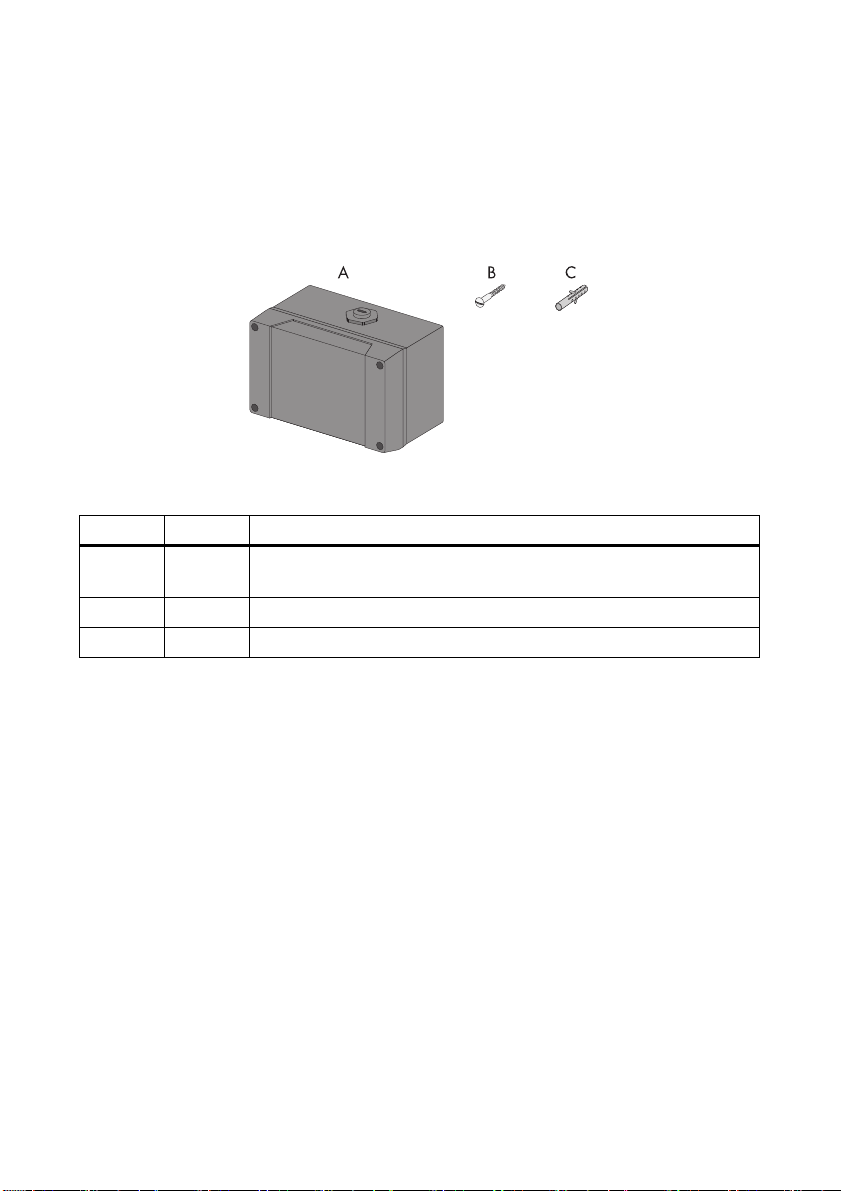
Figure1: Components included in the scope of delivery with order option top-hat rail power supply unit
Item Quantity Description
A1Bluetooth Repeater Outdoor (device type „BTREP-OUT.GR1“),
pre-assembled
B4Screw
C 4 Wall plug
Installation Manual BTREPOUT-IA-en-11 9
Page 10

3 Scope of Delivery SMA Solar Technology AG
3.2 Order Option Power Module
Check the scope of delivery for completeness and any externally visible damage. Contact your
specialist dealer if the scope of delivery is incomplete or damaged.
Figure2: Components included in the scope of delivery with order option Power Module
Item Quantity Description
A1Bluetooth Repeater Outdoor (device type „BTREP-OUT.GR2“),
pre-assembled
B 1 Power Module for the voltage supply (for scope of delivery see the
installation manual of the Power Module)
C4Screw
D 4 Wall plug
3.3 Identifying the SMA Bluetooth Repeater Outdoor
You can identify the SMA Bluetooth Repeater Outdoor by means of the type label. The type label is
on the right-hand side of the SMA Bluetooth Repeater Outdoor.
10 BTREPOUT-IA-en-11 Installation Manual
Page 11

SMA Solar Technology AG 4 Product Description
4 Product Description
4.1 Range of Usage
Figure3: Use of the Bluetooth Repeater Outdoor (example)
The Bluetooth Repeater is used in outdoor installations to close dead zones under unfavourable
installation conditions between SMA Solar Technology AG devices wi th Bluetooth o r to imp rov e po or
wireless connections.
Item Description
A Inverter with Bluetooth
B Bluetooth Repeater Outdoor
C Communication device with Bluetooth
4.2 Functions
• Connection to SMA devices with Bluetooth via Bluetooth Class 1
• Maximum range of up to 100 m in free-field conditions with direct visual contact
• Can be used outdoors, thanks to weatherproof enclosure
Installation Manual BTREPOUT-IA-en-11 11
Page 12

4 Product Description SMA Solar Technology AG
4.3 Device Overview
Figure4: Overview of the enclosure elements (with enclosure lid (left-hand) and enclosure bottom (right-hand))
Item Description
ASeal
B Enclosure lid screw
C Top-hat rail power supply unit*
D Feed-through terminal for the connection to the voltage supply
E Enclosure opening for voltage supply
F Opening with self-adhesive membrane for pressure equalisation
G Screw seal with screwable seal insert, by means of which there is access to the
rotary switches MODE and NetID
H Bluetooth Repeater
* only included in order option top-hat rail power supply unit
Do not damage or remove the self-adhesive membrane
The self-adhesive membrane is a pressure membrane balance element, e. g. for heat
generation in the inside of the enclosure, and ensures the tightness of the enclosure in
accordance with the degree of protection IP54* .
* according to IEC 60529
12 BTREPOUT-IA-en-11 Installation Manual
Page 13

SMA Solar Technology AG 4 Product Description
Figure5: Overview of the device elements on the Bluetooth Repeater Outdoor
Item Description Colour Explanation
A − − Terminal DC source (top-hat rail power supply
unit or Power Modul)
B RDY Green LED for voltage supply
C MODE − Rotary switch for configuring the MODE
D NetID − Rotary switch for configuring the NetID
E− Blue Bluetooth LED
F − Yellow Bluetooth LEDs
Figure6: Overview of the LEDs of the top-hat rail power supply unit
Item Description Colour Explanation
A DC LO Yellow LED for voltage supply
B DC OK Green LED for voltage supply
Installation Manual BTREPOUT-IA-en-11 13
Page 14

4 Product Description SMA Solar Technology AG
Figure7: Overview of the terminals on the feed-through terminal
Item Description
A Terminal 1 for the connection of the voltage supply cable
B Terminal 2 for the connection of the voltage supply cable
14 BTREPOUT-IA-en-11 Installation Manual
Page 15

SMA Solar Technology AG 5 Assembly
5 Assembly
5.1 Selecting the Mounting Location
Requirements for the mounting location:
☐ If the top-hat rail power supply is used, the mounting location must be in the vicinity of a
socket-outlet in the interior area.
☐ The mounting location must be protected against dust, moisture and corrosive substances.
Observe the maximum cable length:
☐ If a Power Module is used, observe the maximum cable length of 10 m for the voltage supply
cable.
Observe minimum clearances:
Figure8: Minimum clearances to be observed
• Observe the minimum clearance to walls and other devices or objects.
• Observe the minimum clearance of 1 m to devices using the 2.4 GHz frequency band, e. g.
WLAN devices or microwave ovens. This is to prevent any reduction in connection quality or
data transmission speed.
Installation Manual BTREPOUT-IA-en-11 15
Page 16

5 Assembly SMA Solar Technology AG
Determining the Mounting Location
Determine the mounting location by varying the distance between the Bluetooth Repeater Outdoor
and devices with a critical connection signal until all devices display at least a "good" signal.
Requirements:
☐The rotary switch MODE is at position 0 (see Section7.1 "Setting the MODE", page23).
☐The rotary switch NetID is set to the NetID of the plant (see Section7.2 "Setting the NetID",
page23).
Danger to life due to electric shock when opening the inverter
Lethal voltages are present in the conductive parts of the inverter.
• Prior to performing any work on the inverter, disconnect the inverter from any voltage sources
on the AC and DC sides (see inverter installation manual). Observe the waiting time to allow
the capacitors to discharge.
1. Decommission the plant (see the manual of the inverter and of the communication product).
Thus, you ensure that the Bluetooth Repeater Outdoor is integrated into the SMA Bluetooth
network at the point where the dead zone is, thus improving the Bluetooth connection at that
point.
2. Position the Bluetooth Repeater Outdoor half way between the devices with critical connection
quality.
3. Connect the voltage supply (see Section6 "Electrical Connection", page19).
4. Recommission the plant (see the installation manual of the inverter and of the communication
product).
5. Repeat the plant search with the communication device (see the communication product
manual, e.g. Sunny Beam with Bluetooth, Sunny Explorer).
16 BTREPOUT-IA-en-11 Installation Manual
Page 17

SMA Solar Technology AG 5 Assembly
6. Check that the connection quality for all devices is at least "good". During this procedure, all
devices must be in their usual positions (e.g., the Sunny Beam with Bluetooth must not be held
directly in front of the Bluetooth Repeater Outdoor):
Product Good connection quality
Bluetooth Repeater Outdoor One blue and two yellow LEDs are lit
Sunny Boy of the type SB x000TL-2x and
SB xx00HF-30, Sunny Tripower of the type
At least two rings are shown in the
inverter display
STP xx000TL-10
Other types of SMA inverters with
Bluetooth Piggy-Back or
Bluetooth Piggy-Back Plus
Use the communication product to check
whether the connection signal is improved by
using the Bluetooth Repeater Outdoor
(see manual of the communication product)
Communication product See manual of the communication product
☑ The connection quality displayed is at least "good" for all devices. Mount the Bluetooth
Repeater Outdoor there at this location.
✖ The connection quality displayed is not at least "good" for all devices?
•Move the Bluetooth Repeater Outdoor to another position and check the connection
signals again.
• If necessary, install additional SMA Bluetooth Repeater Outdoor devices.
Installation Manual BTREPOUT-IA-en-11 17
Page 18

5 Assembly SMA Solar Technology AG
5.2 Mounting the Bluetooth Repeater Outdoor on the Wall
Requirement:
☐ Bluetooth Repeater Outdoor must be disconnected.
1. Loosen the screws of the enclosure lid and remove the lid.
2. Drill holes through the indentation in the enclosure
edges. Use a drill bit (4 mm) for this purpose.
3. Mark the holes with the help of the pre-drilled holes
in the enclosure on the wall.
4. Drill the holes at the marked positions.
5. Attach the Bluetooth Repeater Outdoor to the wall using wall plugs and screws
6. Remove the seals from the inside of the enclosure lid
and press them onto screws.
7. Reattach the enclosure lid using the enclosure lid screws.
18 BTREPOUT-IA-en-11 Installation Manual
Page 19

SMA Solar Technology AG 6 Electrical Connection
6 Electrical Connection
6.1 Connecting the Bluetooth Repeater Outdoor with Top-Hat Rail Power Supply Unit to the Voltage Supply
Danger to life due to electric shock in the event of missing separators and missing fuses
on the AC cable
• The AC cable used for the connection must have a separator.
– In the case of an alternating current supply by means of an IT system the separator must
have two poles in accordance with IEC 60364-1.
• The separator must be easily accessible.
• If the separator is a plug-connection, the socket-outlet must be situate d in close p roximity to t he
Bluetooth Repeater Outdoor.
• The AC cable used for the connection must be equipped with a fuse (16 A for Europe and
20 A for the US and Canada).
Danger to life due to electric shock in the event of mixing up the Bluetooth Repeater
Outdoor
Only the Bluetooth Repeater Outdoor of the device type „BTREP-OUT.GR1“ is allowed to be
connected via the top-hat rail power supply unit to the alternating current grid.
•Ensure that the Bluetooth Repeater Outdoor is of device type „BTREP-OUT.GR1“ before
connecting it to the alternating current grid. To do so, check the type label on the
Bluetooth Repeater Outdoor (see Section3.3 "Identifying the SMA Bluetooth Repeater
Outdoor", page10).
Requirements for the connection cable:
☐ Number of insulated wires: 2
☐ Cable cross-section: 1 mm
☐ External diameter: 5 mm … 10 mm
☐ Cable must be suitable for outdoor installations.
☐ Cable must be UV resistant.
☐ If a grid connection plug is used in outdoor installations: Grid connection plug must be suitable
for outdoor installations.
Installation Manual BTREPOUT-IA-en-11 19
2
… 2.5 mm2
Page 20

6 Electrical Connection SMA Solar Technology AG
1. Loosen the screws of the enclosure lid and remove the lid.
2. Unscrew the nut from the lower left corner of the cable gland and push out the filler-plug.
3. Preparing the cable:
– Remove 40 mm of the cable sheath from the
side of the Bluetooth Repeater Outdoor.
– Shorten unused insulated wires flush with the
cable sheath.
– Strip approx. 10 mm off the wires.
4. Insert the cable into the enclosure through the nut
and the cable gland.
5. Connecting the cable to the feed-through terminal
in the enclosure:
– Push the terminal 1 and terminal 2 of the
feed-through terminal open using a screwdriver
(2.5 mm).
– Connect the conductor to terminal 1 and the
insulator to terminal 2.
6. Separate the AC grid connection point from the alternating current grid using the separator.
Thus you ensure that there is no voltage present at the AC grid connection point.
7. Connect the Bluetooth Repeater Outdoor to the voltage supply.
• Plug the grid connection plug into the socket-outlet, if a grid connection plug is used.
• If no grid connection plug is used, connect the other end of the cable to the voltage supply
as desired, e.g. via a cable junction box.
8. Connect the AC grid connection point to the AC grid using the separator.
☑LED DC OK of the top-hat rail power supply unit and LED RDY of the Bluetooth Repeater
Outdoor are glowing green
✖LED DC LO of the top-hat rail power supply unit or LED RDY are not in operation or are
glowing yellow?
• Rectify the fault (see Section10.1 "Voltage Supply", page27).
20 BTREPOUT-IA-en-11 Installation Manual
Page 21

SMA Solar Technology AG 6 Electrical Connection
9. Check whether the cable gland seal is correctly in
place. The seal must not protrude over the cable
gland.
10. Hand-tighten the nut to the cable gland. Tighten the nut with a torque of 0.8 Nm thus securing
the cable.
11. Reattach the enclosure lid using the enclosure lid screws.
6.2 Connecting the Bluetooth Repeater Outdoor to the Voltage
Supply
Danger to life due to electric shock when opening the inverter
Lethal voltages are present in the conductive parts of the inverter.
• Prior to performing any work on the inverter, disconnect the inverter from any voltage sources
on the AC and DC sides (see inverter installation manual). Observe the waiting time to allow
the capacitors to discharge.
Requirement:
☐ The Power Module is installed in the inverter (see Power Module installation manual).
1. Loosen the enclosure lid screws and remove the enclosure lid from the
Bluetooth Repeater Outdoor.
2. Unscrew the nut from the lower left corner of the cable gland of the enclosure and push the
filler-plug out of the nut.
3. Preparing the cable:
– Remove 40 mm of the cable sheath from the
side of the Bluetooth Repeater Outdoor.
– Shorten unused insulated wires flush with the
cable sheath.
– Strip approx. 10 mm off the wires.
Installation Manual BTREPOUT-IA-en-11 21
Page 22

6 Electrical Connection SMA Solar Technology AG
4. Insert the cable into the enclosure through the nut
and the cable gland.
5. Connecting the cable to the feed-through terminal
in the inside of the enclosure:
– Push the terminal 1 and terminal 2 of the
feed-through terminal open using a screwdriver
(2.5 mm).
– Conne ct t he w ire s of the cab le t o te rmi nal 1 and
terminal 2. The polarity is arbitrary.
6. Recommission the inverter with installed Power
Module (see inverter manual).
☑LED RDY is glowing green.
✖The LED RDY is off or flashing?
• Rectify the fault (see Section10.1 "Voltage Supply", page27).
7. Check that the cable gland seal is correctly in
place. The seal must not protrude over the cable
gland.
8. Hand-tighten the nut to the cable gland. Tighten the nut with a torque of 0.8 Nm thus securing
the cable.
9. Reattach the enclosure lid using the enclosure lid screws.
22 BTREPOUT-IA-en-11 Installation Manual
Page 23

SMA Solar Technology AG 7 Settings
7 Settings
7.1 Setting the MODE
The MODE rotary switch is set to the position 0 for delivery. Other positions are not permitted and
are intended for SMA Service only.
•If the MODE rotary switch is not positioned
correctly, set the correct position:
– Remove the seal insert of the screw seal from the
top of the Bluetooth Repeater Outdoor using a
screwdriver (2.5 mm). Thus you can see the
MODE rotary switch in the inside of the
enclosure and reach it using the screwdriver
(2.5 mm).
– Turn the arrow of the MODE rotary switch to the correct position using a screwdriver
(2.5 mm).
– Insert the seal insert of the screw seal and tighten it using a screwdriver (2.5 mm). This
ensures the degree of protection IP54.
7.2 Setting the NetID
The NetID serves to distinguish PV plants with SMA Bluetooth operating in close proximity to one
an oth er. All dev ice s in a PV pla nt m ust hav e th e sa me N etI D. Y ou can set the SMA Bluetooth Repeat er
Outdoor to the NetID of your plant using the "NetID" rotary switch.
Assignment of the rotary switch positions*
NetID Function
0 Bluetooth is switched off.
1
(Default setting)
2 ... 9 and A ... F Bluetooth is switched on.
* See Section 10.2 for information on the status of the Bluetooth LEDs.
Installation Manual BTREPOUT-IA-en-11 23
Bluetooth is switched on.
The device can connect to a maximum of two communication products. The
device cannot connect to other inverters or SMA Bluetooth Repeaters.
The device can interlink with all SMA Bluetooth products with the same
NetID.
Page 24

7 Settings SMA Solar Technology AG
NetID 1 is possible for plants with 1 inverter
You may leave the default NetID set to 1 in your inverter if your Bluetooth plant consists of the
following products:
• A maximum of one inverter
• A maximum of one computer with Bluetooth and the Sunny Explorer software
•A maximum of one Sunny Beam of type BEAM-BT-11.GR1
or
• A maximum of one inverter
• A maximum of 2 Sunny Beams of type BEAM-BT-11.GR1
In all other cases you must determine a free NetID (see Sunny Explorer Help).
1. If you do not know the plant NetID, read off the NetID from one of the devices in the plant
(see the manual of the device).
2. Remove the seal insert of the screw seal from the top
of the enclosure of the Bluetooth Repeater Outdoor
with a screwdriver (2.5 mm). Thus you can see the
NetID rotary switch and the Bluetooth LEDs in the
inside of the enclosure.
3. Use a screwdriver (2.5 mm) to turn the arrow of the NetID rotary switch to the plant NetID.
4. Insert the seal insert of the screw seal and tighten it using a screwdriver (2.5 mm). This ensures
the degree of protection IP54.
24 BTREPOUT-IA-en-11 Installation Manual
Page 25

SMA Solar Technology AG 8 Maintenance and Care
8 Maintenance and Care
• Check the Bluetooth Repeater Outdoor regularly for external damage or soiling.
• If external damage to the Bluetooth Repeater Outdoor is severe enough to impair correct
function, replace the Bluetooth Repeater Outdoor.
•If the Bluetooth Repeater Outdoor is soiled, clean the Bluetooth Repeater Outdoor using only
a slightly damp cloth. Any cleaning agents used must be non-abrasive and non-corrosive.
Installation Manual BTREPOUT-IA-en-11 25
Page 26

9 Decommissioning SMA Solar Technology AG
9 Decommissioning
9.1 Detaching the Bluetooth Repeater From The Wall.
1. When connecting to the AC grid separate the Bluetooth Repeater Outdoor from the voltage
supply using the separator and check that there is no voltage present in the cable. When a grid
connection plug is used remove it from the socket-outlet.
2. Remove the cable gland of the Power Module for the connection to the Power Module
(see installation manual of the Power Module).
3. Loosen the screws of the enclosure lid and remove the lid.
4. Remove the screws of the enclosure from the wall and take down the Bluetooth Repeater
Outdoor.
5. Remove the cable from the feed-through terminal in the inside of the enclosure.
– Push open terminal 1 and terminal 2 of the feed-through terminal using a screwdriver
(2.5 mm)
– Pull out the wires of the cable.
– Remove the cable from the enclosure. To do this, unscrew the nut from the lower left corner
of the cable gland of the enclosure and pull out the cable gland from the enclosure.
6. Reattach the enclosure lid using the enclosure lid screws.
9.2 Packing the Bluetooth Repeater Outdoor
•Pack the Bluetooth Re pea ter Out doo r us ing the ori gin al p ack agi ng o r pa cka gin g th at is suitable
for the weight and size of the Bluetooth Repeater Outdoor (see Section11 "Technical Data",
page32).
9.3 Disposing of the SMA Bluetooth Repeater
•Dispose of the Bluetooth Repeater Outdoor in accordance with the locally applicable disposal
regulations for electronic waste.
or
Send the Bluetooth Repeater Outdoor back to SMA Solar Technology AG with shipping paid
by sender. When doing so, label the packaging "ZUR ENTSORGUNG" ("FOR DISPOSAL").
26 BTREPOUT-IA-en-11 Installation Manual
Page 27

SMA Solar Technology AG 10 Troubleshooting
10 Troubleshooting
10.1 Voltage Supply
10.1.1 LED RDY
The LED RDY is only visible when the enclosure lid is open.
• In order to open the enclosure lid loosen the four enclosure lid screws.
Status Meaning Measure
permanently
glowing green
flashes green
and all other
LEDs are
switched off.
flashes green
and all other
LEDs are
flashing
The supply voltage is good.
Bluetooth Repeater Outdoor is
in operation.
Power supply is marginal.
Bluetooth Repeater Outdoor is
in operation.
The Bluetooth Repeater
Outdoor firmware is defective.
None
If you are using the top-hat rail power
supply unit:
• Contact the SMA Service Line.
If you are using the Power Module:
•If you are using the cable included in the
delivery:
– Contact the SMA Service Line.
• If you are using a different cable:
– Improve the power supply via one of
the following measures:
– Shorten the cable.
– Choose a larger cable cross-section.
• Contact the SMA Service Line.
Installation Manual BTREPOUT-IA-en-11 27
Page 28

10 Troubleshooting SMA Solar Technology AG
Status Meaning Measure
off No power supply or the power
supply is too low.
The Bluetooth Repeater
Outdoor is not in operation.
If you are using the top-hat rail power
supply unit:
Check whether the socket-outlet is supplying
voltage.
•Do this, for example, by connecting a
different device to the socket-outlet.
If the socket-outlet is providing voltage,
then either the top-hat rail power supply
unit or the Bluetooth Repeater Outdoor is
defective.
– Contact the SMA Service Line.
If you are using the Power Module:
•If you are using the cable included in the
delivery:
– Contact the SMA Service Line.
• If you are using a different cable:
– Check the wiring.
If the wiring is correct, either the
Power Module or the Bluetooth Repeater
Outdoor is defective.
– Contact the SMA Service Line.
28 BTREPOUT-IA-en-11 Installation Manual
Page 29

SMA Solar Technology AG 10 Troubleshooting
10.1.2 LEDs of the Top-Hat Rail Power Supply Unit
The LEDs of the top-hat rail power supply unit are only visible when the enclosure lid is opened.
• In order to open the enclosure lid loosen loosen the four enclosure lid screws.
Status Meaning Measure
The LED
DC OK is
glowing green
and the LED
DC LO is
switched off.
The LED DC
OK is
switched off
and the LED
DC LO is
glowing
yellow
Both LEDs are
switched off.
The supply voltage is good.
Bluetooth Repeater Outdoor is
in operation.
The supply voltage is too low.
The Bluetooth Repeater
Outdoor is not in operation.
No supply voltage
The Bluetooth Repeater
Outdoor is not in operation.
None
Check whether the socket-outlet is supplying
voltage.
•Do this, for example, by connecting a
different device to the socket-outlet.
If the socket-outlet is providing voltage,
then either the top-hat rail power supply
unit or the Bluetooth Repeater Outdoor is
defective.
– Contact the SMA Service Line.
Installation Manual BTREPOUT-IA-en-11 29
Page 30

10 Troubleshooting SMA Solar Technology AG
10.2 Connection Quality
The Bluetooth Repeater Outdoor can only display the connection quality if it is integrated into an
existing SMA Bluetooth network. The SMA Bluetooth network can only be established by a master*.
Devices will always display the connection signal to the device from which the connection has been
established.
Bluetooth LEDs
Status Meaning Measure
blue LED yellow LEDs
permanently
lit
3 LEDs are
permanently lit
Two LEDs are
permanently lit
One LED is
permanently lit
Three LEDs off
Connection quality very
good
Connection quality good None
Connection quality is
unreliable
Connection quality critical
None
• Change the position of the
Bluetooth Repeater
Outdoor.
or
• Install additional Bluetooth
Repeater Outdoor devices.
* "Maste r" is a network e nginee ring term. In a network, a maste r is a device that for example requests other devices (slaves)
to receive or send data. All communication products (e.g. Sunny Explorer, Sunny Beam with Bluetooth) are masters in an
SMA Bluetooth network.
30 BTREPOUT-IA-en-11 Installation Manual
Page 31

SMA Solar Technology AG 10 Troubleshooting
Bluetooth LEDs
Status Meaning Measure
blue LED yellow LEDs
off Three LEDs off
The Bluetooth Repeater
Outdoor is not connected to
the Bluetooth network:
There is no device with the
same NetID within the radio
range.
The SMA Bluetooth network
has not been established.
• Check the NetID.
• Change the position of the
Bluetooth Repeater Outdoor
or install additional
Bluetooth Repeater Outdoor
devices.
• Commission a master in the
SMA Bluetooth network.
Only masters, e.g.
communication products,
initiate network
establishment.
is flashing
and RDY
Three LEDs are
flashing
Three LEDs are
flashing
The NetID rotary switch is
set to position 1 or 0.
The Bluetooth Repeater
Outdoor firmware is
defective.
•Set the NetID rotary switch
to the NetID of your plant
(see Section 7.2).
• Contact the SMA Service
Line.
LED is
flashing
green
Installation Manual BTREPOUT-IA-en-11 31
Page 32

11 Technical Data SMA Solar Technology AG
11 Technical Data
General Data
Width x height x depth 200 mm x 160 mm x 93 mm
Weight with top-hat rail power supply unit 800 g
Weight with Power Modul 740 g
Mounting location outdoors
Type of mounting Wall mounting
Status display LEDs
Degree of protection*
Certified countries All EU Member States
* according to IEC 60529
Voltage Supply via Top-Hat Rail Power Supply Unit
Input voltage 100 V … 240 V AC
Tolerance value for input voltage ± 10%
Frequency of input voltage 47 Hz … 63 Hz
Typical power consumption 1.8 W
Maximum power consumption 2.5 W
Overvoltage category II
IP54
Voltage Supply via the Power Module
Input voltage 12 V … 24 V AC/DC
Tolerance value for input voltage ± 20%
Typical power consumption 0.6 W
Maximum power consumption 1.5 W
Environmental Conditions in Operation
Ambient temperature − 25°C ... +60°C
Relative humidity, non-condensing 4% … 100%
Altitude above mean sea level (MSL) 0 m … 2,000 m
32 BTREPOUT-IA-en-11 Installation Manual
Page 33

SMA Solar Technology AG 11 Technical Data
Ambient Conditions for Storage/Transport
Ambient temperature − 40°C ... +70°C
Relative humidity, non-condensing 10% … 95%
Altitude above mean sea level (MSL) 0 m … 2,000 m
Communication
Inverter Bluetooth
Data logger Bluetooth
Range in open air ≤ 100 m
Installation Manual BTREPOUT-IA-en-11 33
Page 34

12 Contact SMA Solar Technology AG
12 Contact
If you have technical problems concerning our products, please contact the SMA Service Line. We
require the following information in order to provide you with the necessary assistance:
• Type, serial number and firmware version of the inverter
• Serial number of the communication product
• Firmware version or software version of the communication product
• Serial number and firmware version of the Bluetooth Repeater Outdoor
SMA Solar Technology AG
Sonnenallee 1
34266 Niestetal, Germany
www.SMA.de
SMA Service Line
Inverters: +49 561 9522 1499
Communication: +49 561 9522 2499
Fax: +49 561 9522 4699
E‑Mail: ServiceLine@SMA.de
34 BTREPOUT-IA-en-11 Installation Manual
Page 35

SMA Solar Technology AG Legal Provisions
Legal Provisions
The information contained in this document is the property of SMA Solar Technology AG. Publishing its content, either partially or
in full, requires the written permission of SMA Solar Technology AG. Any internal company copying of the document for the
purposes of evaluating the product or its correct implementation is allowed and does not require permission.
Declaration of Conformity
SM A So lar Tec hno log y AG her eby dec lar es th at t he d esc rib ed d evi ce / devices fulfill the essential requirements and other relevant
rules of Directive 1999/5/EC. The entire Declaration of Conformity can be found at www.SMA.de.
SMA Factory Warranty
The current warranty conditions come enclosed with your device. These are also available online at www.SMA-Solar.com and can
be downloaded and are available on paper from the usual sales channels if required.
Trademarks
All trademarks are recognized even if these are not marked separately. Missing designations do not mean that a product or brand
is not a registered trademark.
The Bluetooth
SMA Solar Technology AG is under licence.
QR Code
SMA Solar Technology AG
Sonnenallee 1
34266 Niestetal
Germany
Tel. +49 561 9522-0
Fax +49 561 9522-100
www.SMA.de
E-Mail: info@SMA.de
© 2004 to 2012 SMA Solar Technology AG. All rights reserved
®
word mark and logos are registered trademarks owned by Bluetooth SIG, Inc. and any use of such marks by
®
is a registered trademark of DENSO WAVE INCORPORATED.
Installation Manual BTREPOUT-IA-en-11 35
Page 36

SMA Solar Technology
www.SMA-Solar.com
SMA Solar Technology AG
www.SMA.de
SMA Australia Pty. Ltd.
www.SMA-Australia.com.au
SMA Benelux bvba/sprl
www.SMA-Benelux.com
SMA Beijing Commercial Company Ltd.
www.SMA-China.com.cn
SMA Central & Eastern Europe s.r.o.
www.SMA-Czech.com
SMA France S.A.S.
www.SMA-France.com
SMA Hellas AE
www.SMA-Hellas.com
SMA Ibérica Tecnología Solar, S.L.U.
www.SMA-Iberica.com
SMA Solar India Pvt. Ltd.
www.SMA-India.com
SMA Italia S.r.l.
www.SMA-Italia.com
SMA Japan K.K
www.SMA-Japan.com
SMA Technology Korea Co., Ltd.
www.SMA-Korea.com
SMA Middle East LLC
www.SMA-Me.com
SMA Portugal - Niestetal Services Unipessoal Lda
www.SMA-Portugal.com
SMA Solar (Thailand) Co., Ltd.
www.SMA-Thailand.com
SMA Solar UK Ltd.
www.SMA-UK.com
 Loading...