

Slendertone Bottom S7 Instruction Manual
www.slendertone.com
Instruction Manual
Mode D’emploi
Bedienungsanleitung
Instrucciones de Uso
Gebruiksaanwijzingen
Istruzioni per l'Uso
Instruções Para a Utilização

2
WELCOME
HOW DOES MUSCLE STIMULATION TECHNOLOGY WORK?
Congratulations on purchasing your SLENDERTONE BOTTOM S7. Please read your user manual
fully before using this product.
SLENDERTONE BOTTOM S7 is the latest innovation in SLENDERTONE’s premium range of
products. Designed for ease of use, bottom lifts, firms and tones your bottom comfortably
and effectively, with results you should be able to see in just a few short weeks. This newly
designed lycra shorts garment, makes it easy and comfortable to tone your
bottom while about your home.
SLENDERTONE BOTTOM S7 uses clinically proven EMS technology to exercise the muscles of
your bottom. A signal is sent to the muscles and as the signal strength increases, the
muscles contract.
Use your
BOTTOM S7 4 times a week and in just 4 weeks, you can expect to see these
results:
• Tones and firms your bottom
• An improvement in your shape in 4 weeks
• Look better in your jeans
For the best results we recommend that you use your slendertone bottom in conjunction
with a normal, healthy diet and exercise.
SLENDERTONE BOTTOM S7 is an electronic muscle stimulator intended for the enhancement of
the performance of the gluteal muscles of the body. It may also be used, with medical
supervision, for the rehabilitation of muscle which has become deficient due to disuse or
injury.
If you have any difficulty setting up your unit or have any other questions or concerns about
your
BOTTOM S7 call the SLENDERTONE Careline on :
UK: 0330 221 1278 Email: info@slendertone.com
Rep. of Ireland: 1890 92 33 88 www.slendertone.com
International: +353 94 902 9936
SLENDERTONE BOTTOM S7 uses electrical muscle stimulation (EMS) technology. This
technology has been used in hospitals and by physiotherapists for over 50 years. Here is
a summary of how it works.
Step 1
A gentle signal is
transmitted through the
pads to the sciatic nerve
and its branches.
Step 2
The signals switch
on the nerves which
control the muscles.
Step 3
The nerves, in turn,
cause your muscles
to contract
and relax rhythmically.
3
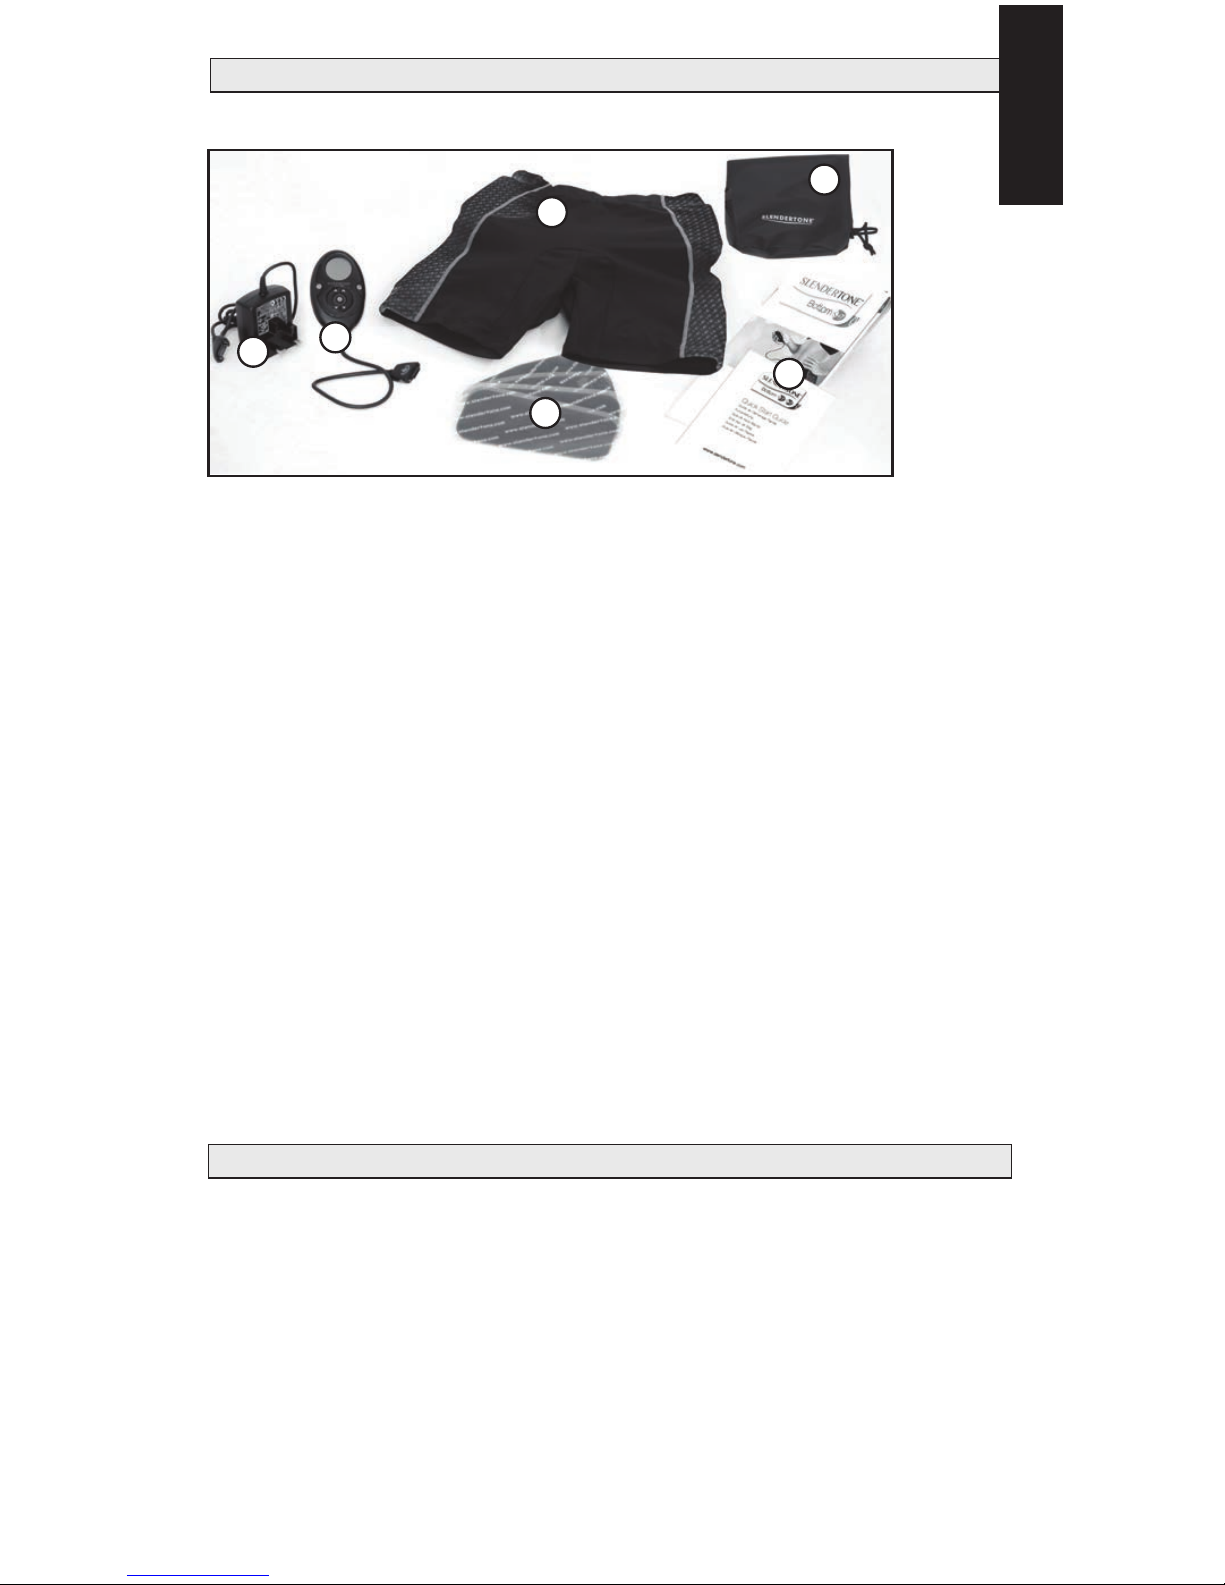
INTRODUCING YOUR SLENDERTONE BOTTOM S7
PRODUCT WARRANTY
1. SLENDERTONE BOTTOM S7 Garment:
Your
SLENDERTONE BOTTOM S7 garment has been ergonomically designed and incorporates
the stimulation area into a comfortable shorts garment. The garment fits sizes 6-12 (Waist:
24-32"/61-81cm; Hips: 32-38"/81-97cm). There is also a pocket to hold your unit during use.
2. Controller:
The controller generates signals which are sent, via the gel pads, to your muscles to make
them contract. The controller is rechargeable and takes approximately 3 hours to charge
fully.
3. Pack of Four Adhesive gel pads.
These adhesive gel pads are placed onto your garment before use. These gel pads must be
in contact with your skin so that signals can be sent to your muscles.
4. SLENDERTONE Battery Charger:
Plug the charger into a socket and then into your controller to charge your controller’s
battery.
Please ensure you only use the charger supplied by
SLENDERTONE.
5. Instruction Literature:
This contains a detailed guide to using your
SLENDERTONE BOTTOM S7 and an additional
quick start guide to help get you started.
6. Travel Pouch:
You also get a handy travel pouch for storing everything while not in use.
Should your product develop a fault within two years of purchase, SLENDERTONE will
undertake to replace or repair the product or any parts found to be defective with no charge
for labour or materials *, provided the product:
• Has been used for its intended purpose and in the manner described in this user manual.
• Has not been connected to an unsuitable power source.
• Has not been subjected to misuse or neglect.
• Has not been modified or repaired by anyone other than an approved
SLENDERTONE agent.
This guarantee complements existing national guarantee obligations and does not affect your
statutory rights as a consumer.
* This excludes consumables (e.g. gel pads, belt, etc.) which are subject to normal wear and tear.
English
6
5
1
3
2
4
THESE ARE THE CONTENTS FOR THE FULL SLENDERTONE BOTTOM S7 PACK.
THE BOTTOM S+7 PACK DOES NOT CONTAIN A CONTROLLER OR CHARGER.
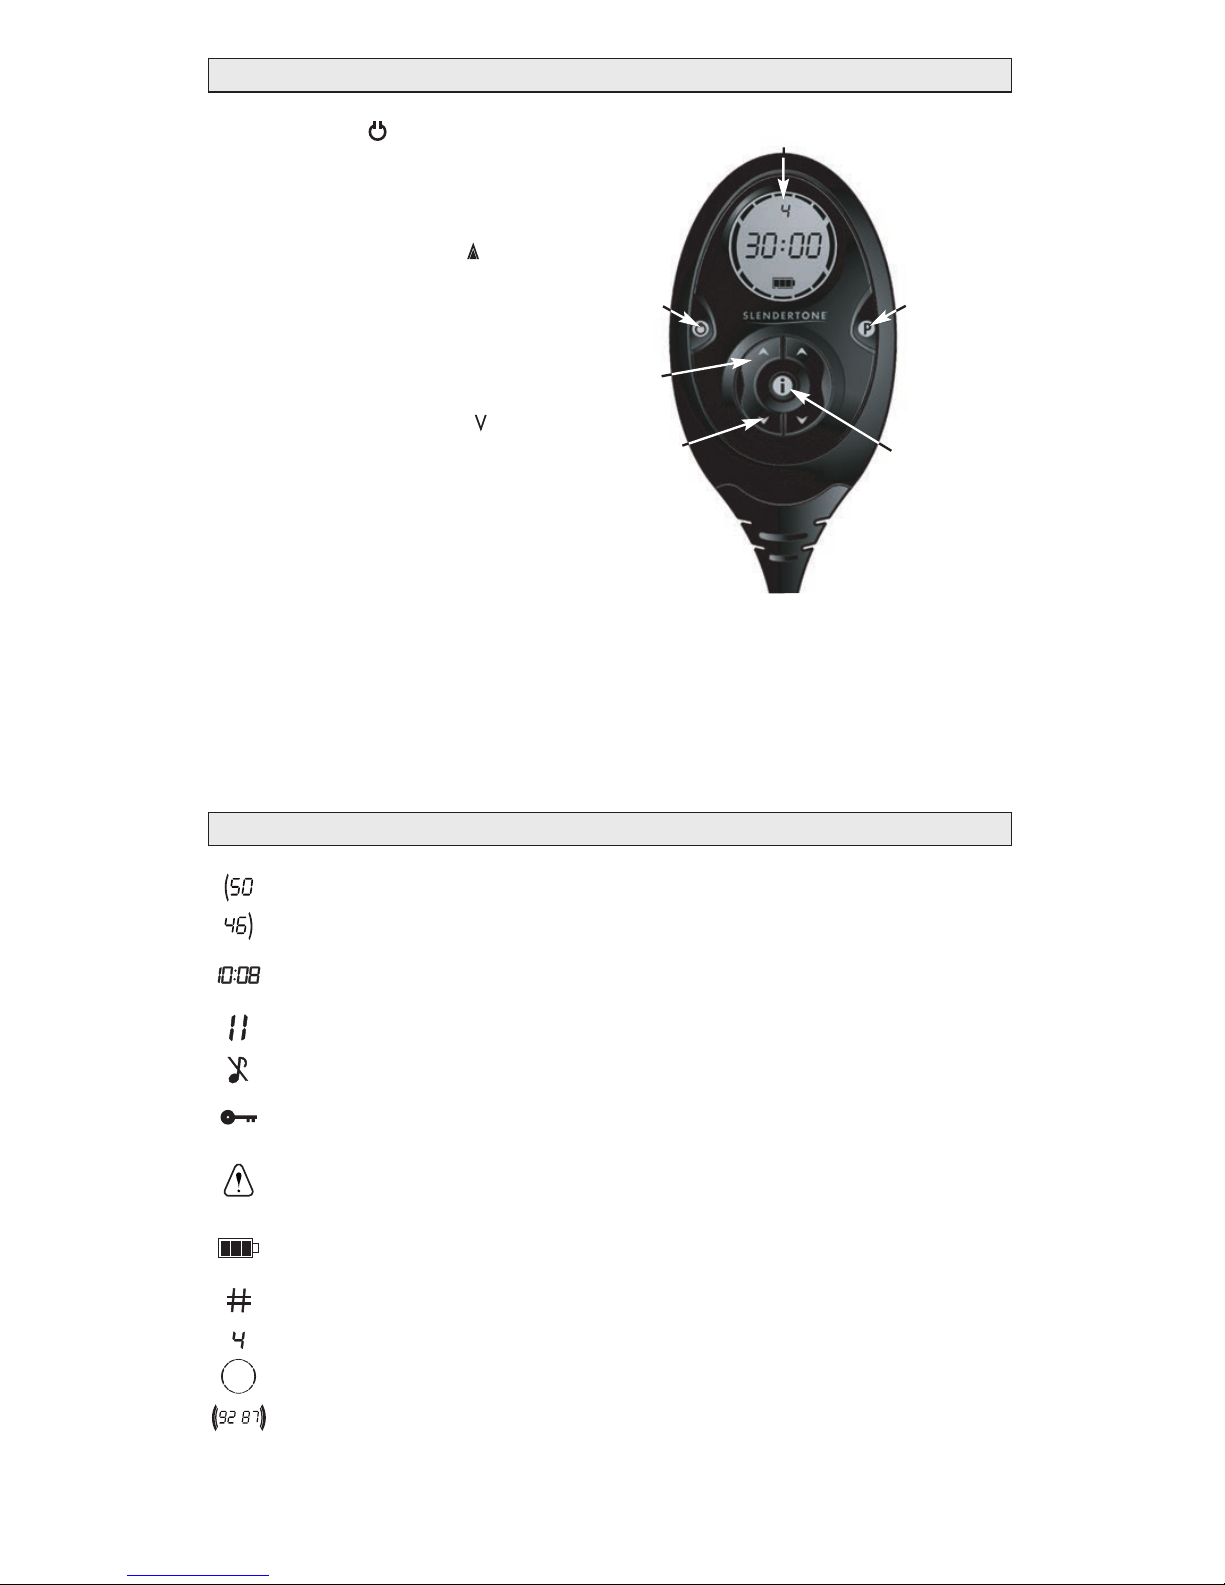
1. On/Off Button ( )
Press and hold this button for 2 seconds to turn
your controller on or off. You may also pause the
exercise by briefly pressing this button.
2. Increase Toning Intensity ( )
Press and hold these buttons to increase
the intensity of the exercise. The right-hand
button controls the right-hand side
of your garment. The left-hand button
controls the left-hand side.
3. Decrease Toning Intensity ( )
Press and hold these buttons to decrease the
intensity of the exercise on either side of the
garment.
4. Programme Button ( P )
Press this button to select the toning programme
you wish to use. There are 4 programmes in total, which are
explained later in this manual (page 7).
5. Information Button ( i )
Press this button to see your training information, such as the maximum intensity for your
current or last session and the number of sessions you have completed.
4
HOW DOES THE CONTROLLER WORK?
CONTROLLER DISPLAY
DISPLAY
4.
5.
3.
2.
1.
Toning intensity from the left-hand side of the garment.
Toning intensity from the right-hand side of the garment.
Counts down the time left in the current session. Also displays error
messages (see page 8).
Appears when the exercise has been paused.
Indicates that the sound is off.
Keylock is active - you cannot change the intensity levels or the
programme accidentally.
This symbol indicates a poor contact between the controller and the garment
or between the gel pads and the skin (see page 9 for more details).
Shows the battery power remaining. The battery icon will flash when
the battery is low and needs to be recharged.
Number of sessions completed.
Shows the programme currently running (1 - 4).
This symbol appears during each contraction phase.
Maximum intensity for the current/ last session.
5
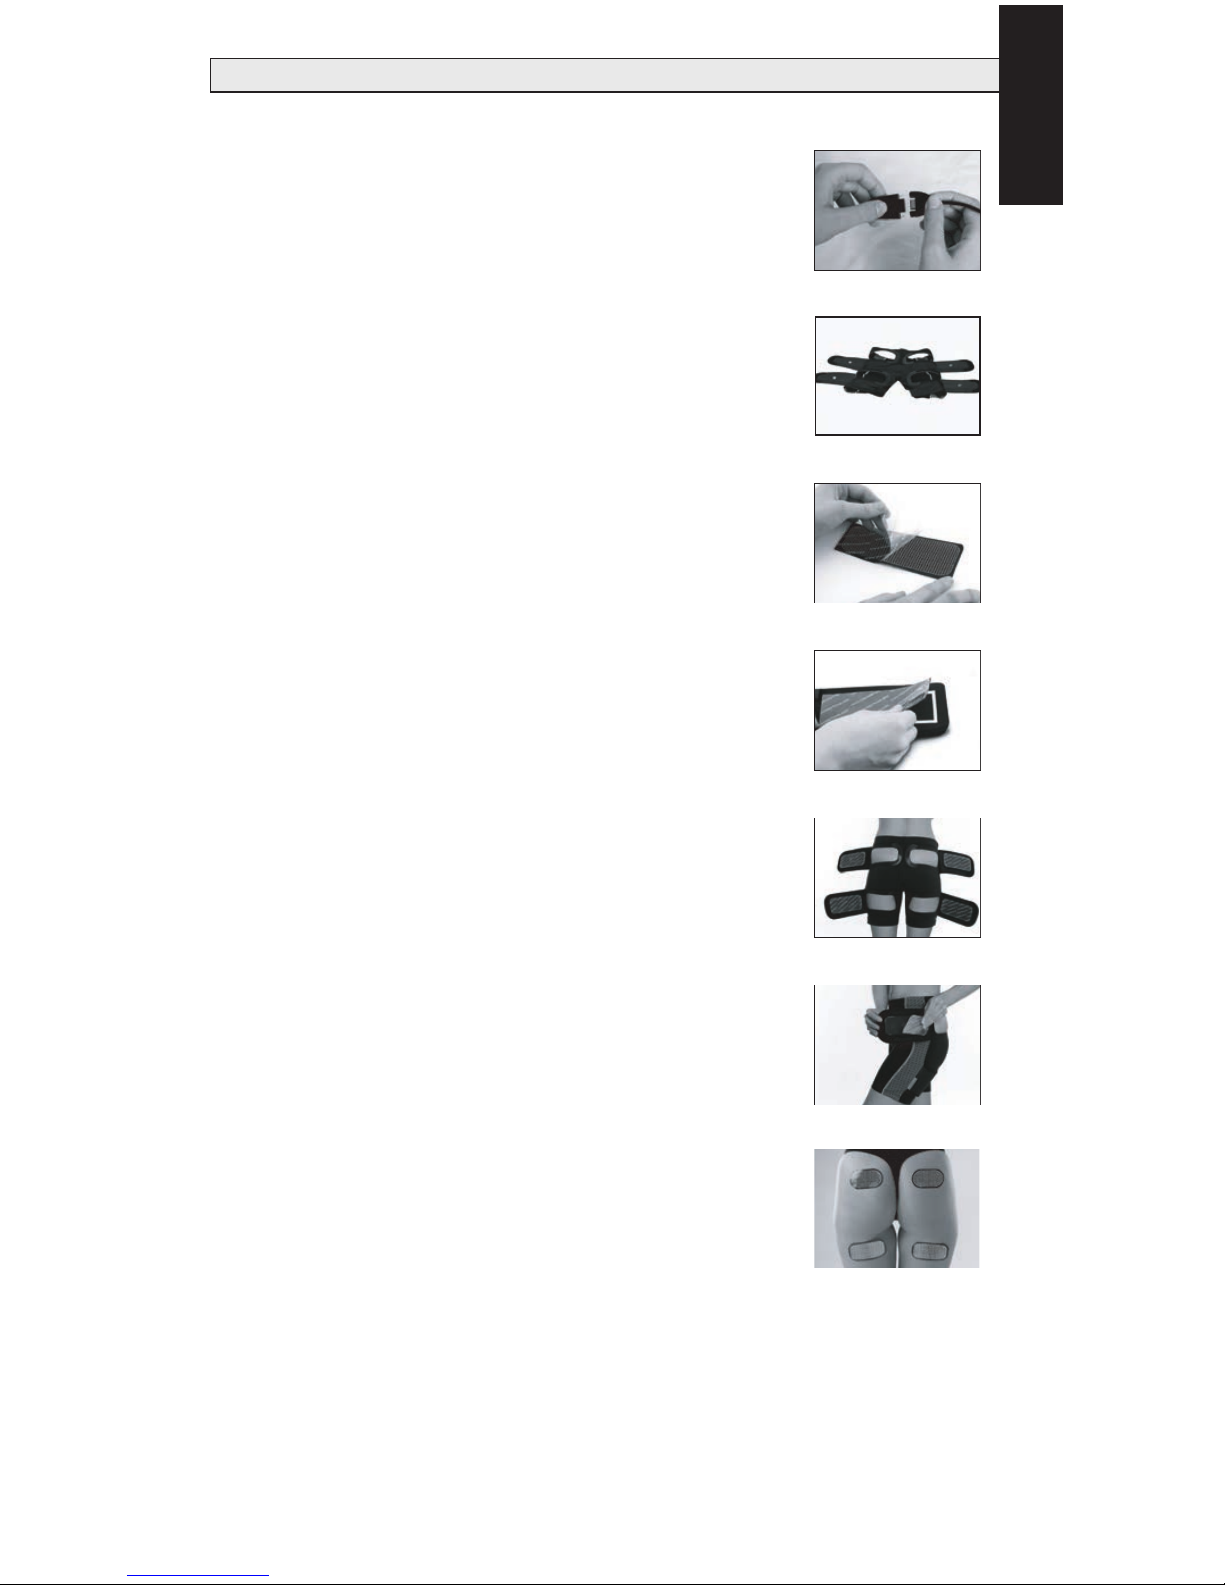
SETTING UP YOUR SLENDERTONE BOTTOM S7
1. Insert your charger into a socket and then connect it to your
controller (Fig. a). It’ll take approximately 3 hours to fully charge
the battery. Your controller is fully charged when all three
sections of the battery icon are full.
NOTE: Only use the charger supplied by SLENDERTONE. Do not
leave your controller connected to the charger when the battery
is fully charged.
2. Lay the garment on a flat surface with the 4 flaps on the back
open (Fig. b). Remove the adhesive gel pads from their pack.
One side of each gel pad has a grid pattern on it while the other
side is plain black.
3. Remove the covers from the patterned side of the gel pads
(Fig. c). Do not remove the covers from the black side of the gel
pads yet.
4. Place the patterned side of each gel pad directly over a metal
stud on each of the flaps (Fig. d), on the raised section.
NOTE: Press the gel pad, especially around the edges, firmly
onto the material before use.
Before you progress, make sure that all of the metal studs are
completely covered by the gel pads.
5. The gel pads need to be in contact with the skin directly, so it is
advisable to wear a thong or an undergarment that allows for
this. Leaving the 4 flaps open put on the garment. When the
garment is correctly positioned, the windows should be located
as shown in Fig. e.
6. Remove the covers from the black side of the upper gel pads,
but do not throw them away, as you may need them later, and
close the flaps. Ensure gel pads are in full contact with your
skin, nothing should be on the fabric/garment.
7. Remove the covers from the black side of the lower gel pads
and close the flaps. Ensure each gel pad is positioned just
below the crease of your bottom.
NOTES:
• You may need to adjust the position of the garments slightly
until you find the most comfortable position. However, the
positioning will become much easier after a few sessions.
• Use your
SLENDERTONE BOTTOM S7 whenever it suits you. You can
use it almost any time and any place. We recommend you use
your product while relaxing at home. Your
SLENDERTONE BOTTOM
S7
really is a convenient way of firming and toning your bottom.
• For the best results, we recommend that you do five training
sessions per week. You should, however, only do one session
per day, as this allows your muscles to recuperate.
• Standing or lying down is more comfortable at high intensities.
Fig. a
Fig. b
Fig. d
Fig. f
Fig. g
Fig. c
Fig. e
English

6
YOUR FIRST TONING SESSION
Muscle toning can be an unusual sensation, but a pleasant one. It may tickle to
begin with. We recommend that you use the product while seated until you become
accustomed to the sensation. This progresses to a smooth muscle contraction as
the toning intensity increases. To get started, follow these simple steps:
1. ‘Click’ the controller connector and garment connector
together (Fig. a).
2. Press and hold the on/off button ( - Fig. b) for two seconds
to switch your controller on.
3. Select the program you wish to use by pressing the program
button ( P - Fig. c). Then, to start that program, press and
hold the increase intensity buttons ( - Fig. d) until you feel
your muscles contracting. Always choose an intensity level at
which you feel a strong but comfortable contraction. This will
vary from person to person. You should try to reach an
intensity level of 25 or higher in your first session. The
increasing intensity level is displayed on the screen.
4. Continue increasing the intensity throughout the session if
possible. You will feel the muscle contractions getting
stronger as the intensity increases. Remember the harder you
work your muscles the better the results you will see, but
always reduce the intensity if you feel any discomfort. Your
controller’s intensity range is 0-99.
PAUSING A SESSION
If you wish to pause a session before it is finished, simply press
the on/off button briefly. The display will show that the controller
is paused ( ). To resume the session, briefly press the on/off
button again. The display will return to its normal mode.
5. At the end of the training session your
SLENDERTONE BOTTOM
S7
will stop automatically. However, to switch off your
controller at any time during a session, press and hold the
on/off button for two seconds. You should see the display
turn off.
6. To remove the garment, first open the flaps and replace the
gel pads covers. The gel pads should remain on the flaps.
Store your BOTTOM S7 TONER, ensuring that the pads are
kept flat, until your next session.
NOTE: Do not disconnect the controller from the garment
without first switching the controller off, as this may result in
an error on your display.
Well done on completing your first training session!
Fig. a
Fig. b
Fig. c
Fig. d
 Loading...