

Page 1

Page 2

TABLE OF CONTENT
I GENERAL DESCRIPTIONS-----------------------------------
Basic Functions---------------------------------------------------Accessories--------------------------------------------------------II OPERATION----------------------------------------------------Button function overview----------------------------------------Function light overview------------------------------------------Power on/off-------------------------------------------------------Mode switch-------------------------------------------------------Playing MP3 music-----------------------------------------------Equalizer modes-------------------------------------------------Playing voice recording-----------------------------------------Voice recording---------------------------------------------------Shortcut keys to recording funtion----------------------------
Volume & music/recording control-----------------------------Deleting music/voice recording--------------------------------PC connection-----------------------------------------------------Battery power indicator------------------------------------------Time setting--------------------------------------------------------Battery recharging-------------------------------------------------
1
1
4
5
5
6
7
7
8
9
10
10
10
10
11
11
12
12
12
Page 3

III INSTALLATION OF MP3 PLAYER-----------------------------
System requirements-------------------------------------------------
USB connection-------------------------------------------------------
Installation guide------------------------------------------------------
Firmware download---------------------------------------------------
CAUTIONS----------------------------------------------------------
Ⅳ
Ⅴ CHANGING THE USB
CABLE-----------------------------------
Ⅵ HELPFUL TIPS-----------------------------------------------------
Ⅶ PRODUCT SPECIFICATIONS----------------------------------
NOTE--------------------------------------------------------------------
14
14
14
15
21
23
24
28
29
30
Page 4

Ⅰ GENERAL DESCRIPTIONS
Basic Functions
1. Playable music format:MP3 / WMA / ADPCM
2. USB1.1 interface
3. Portable storage disk(USB1.1)
4.Playing order: Sequence, Random, Pause, Resuming
5. different equalizer modesChoose between
6. Delete (current track / voice recording)
7. Built in Microphone: ADPCM voice recording
8. Stereo earphone jack:standard φ2.5mm
9.Automatic detecting of battery voltage and power indicator
10. Power saving:
※ Automatic power off if no button pushed in 2 minutes under
pause status
※ Automatic power off in 2 minutes when all tracks played
11. Battery:Rechargeable Li-ion battery (3.7V)
12. Standard USB port for recharging, download and upload
1
Page 5

13. 11 LED lights:
MP3 (MP3): lights up/MP3 mode; flashing per second
/playing MP3
PLAY REC (voice recording / playing): lights up/playing
mode of voice recording;flashing per second/playing
voice recording
RECORDING (voice recording): lights up/voice record ing mode;flashing per second/recording
POWER (power supply indicator): lights up/ power on;
off/ power off or no power
(also as battery power indicator): lights up/full power;
flashing per second/1/5 power remained; flashing per 0.5
sec/ out of power soon;off/out of power and automatic
power off
CHARGE (recharging): lights up/recharging;off/rech-
arging over
USB : lights up / in proper connection with PC
POP: lights up / equalizer set as POP mode
ROCK : lights up / equalizer set as ROCK mode
2
Page 6

JAZZ : lights up / equalizer set as JAZZ mode
CLASSIC: lights up / equalizer set as CLASSIC mode
RANDOM: lights up / random playing
14.5 buttons:
----working mode (MODE) / power on (ON) / pow-
er off (OFF)
----forward (FORWARD) / increase volume
(VOLUME+)
----reverse (REVERSE) / decrease volume
(VOLUME-)
----delete (DELETE)
----play (PLAY)/pause (PAUSE)
3
Page 7

Accessories
MP3 Watch
Installation CD
USB extension cable
Instruction Manual
Earphone Plug Converter
(2.5mm to 3.5mm) (optional)
Charging adapter(optional)
Earphone
4
Page 8

working mode /power on /
power off
play / pause
Delete
earphone jack
Button function overview
function light
Voice recording
microphone
5
Forward /
increase volume
Crown
Reverse /
decrease volume
Page 9

POP
Power indicator
/ POWER
MP3
ROCK
JAZZ
CLASSIC
USB
Function light overview
6
Recharging
/ CHARGE
Random
playing
/ RANDOM
Play voice
recording
/ PLAY REC
Voice recording
/ RECORDING
Page 10

Power on/off
Press button momentarily
---- POWER light lights up, power on
Press and hold button for
3 seconds
----POWER light off, power off
※ Note: default mode when power on : 1) MP3 playing mode, MP3
light lights up. 2) equalizer mode, same as when power off last time
3) play the last track of voice recording once motivated. 4)playing
starts from the track stopped at last time.
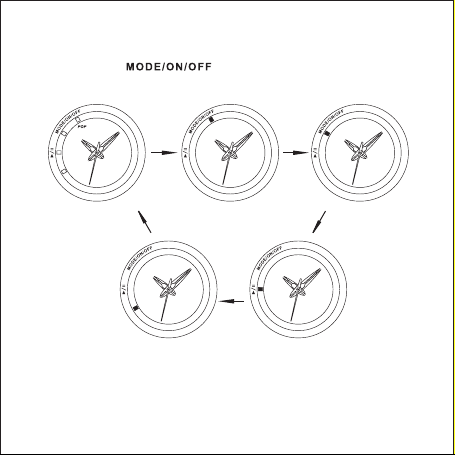
Mode switch
Under pause status of MP3 playing / voice recording playing
or when voice recording is stopped, press button
momentarily to switch between the following modes:
7
Page 11

MP3
MP3 mode
(MP3 light
lights up)
MP3 mode
(MP3 light lights up)
MP3
random playing
RANDOM
(RANDOM light
lights up)
RECORDING
recording
mode
(RECORDING
light lights up)
playing recording mode
(PLAY REC light
lights up)
Playing MP3 music (under MP3 mode)
Press momentarily ----play, MP3
light flashing
Press again momentarily---- pause, MP3
light lights up
(Random playing starts when RANDOM light
lights up.)
8
PLAY REC
Page 12
Equalizer modes (under music playing mode)
Press button momentarily --- switch among the
following equalizer modes:
ROCK
JAZZ
CLASSIC
NORMAL POP
(CLASSIC light lights up)
(POP light lights up)
CLASSIC
CLASSIC
POP
JAZZ
(JAZZ light lights up)
JAZZ
ROCK
ROCK
(ROCK light
lights up)
※ Note: under NORMAL mode POP/ROCK/CLASSIC/JAZZ lights
are off.
9
Page 13
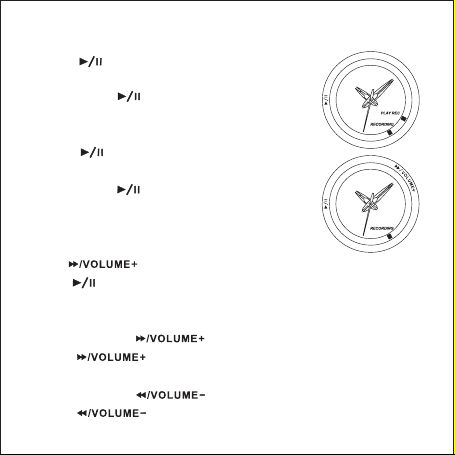
Playing voice recording (under recording playing mode)
Press momentarily ----play, PLAY REC light
flashing
Press again momentarily---- pause, PLAY
REC light lights up
Voice recording (under recording mode)
Press momentarily----start voice recording
(RECORDING light flashing per second)
Press again momentarily----stop voice
recording (RECORDING light lights up)
Shortcut keys to recording funtion(under
playing pause mode or recording pause mode)
Press and hold for a while ----recording starts
press ----recording stops.
Volume & music/voice recording control
(Under music playing or voice recording mode)
Press and hold ---- increase volume
Press momentarily----play next track (music/recording)
Press and hold ----decrease volume
Press momentarily (1)play previous track (music/
10
Page 14
recording) if pressing within 5 seconds after
playing( 2)replay the current track (music/
recording) if pressing after playing for 5
seconds
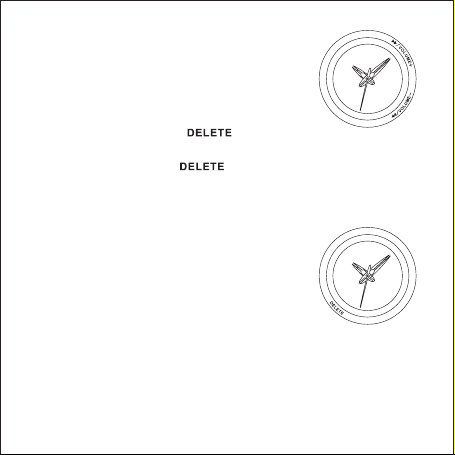
Deleting music/voice recording
Press and hold button for 2 seconds----delete the
current track( music/voice recording)
Press and hold button for 10 seconds :
1.delete all music tracks under the pause status of MP3 playing
and random playing (MP3 light flashing per 0.5 second within
10 seconds and keeps lighted up after 10 seconds when all
tracks deleted.)
2.delete all recording tracks under the pause
status of playing recording (PLAY REC light
flashing per 0.5 second within 10
seconds and keeps lighted up after 10
seconds when all tracks deleted.)
3.delete all recording tracks under the pause status of record ing (RECORDING light flashing per 0.5 second within 10 seconds
and keeps lighted up after 10 seconds when all tracks deleted.)
PC connection
1.Connect the watch to PC through USB cable.
2.Recharging light(CHARGE)lights up, which means the pro-
11
Page 15
duct is already connected to PC and being recharged.
3.Flashing USB light(USB)means data in transmission(Busy);
lighted USB light(USB)means ready for work(Idle);dead
USB light(USB) means disconnected with PC( Suspend)
4.Remove the product as per PC's requirement when upload
and download completed.
Battery power indicator
Power indicator (POWER light): lights up --- full power
Flashing per second --- 1/5 power remained
Flashing per 0.5 second --- out of power soon
Off --- out of power and automatic power off
Time setting
1.Pull out the crown to stop the second
hand when it sweeps to 12 o'clock.
Crown
2.Turn the crown to set hour and minute
hands.
3.Push back the crown and the second
hand starts sweeping.
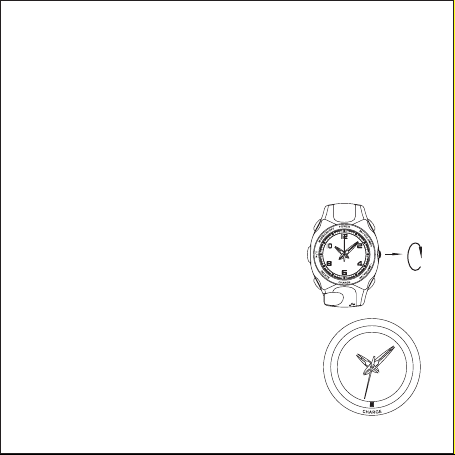
Battery recharging
Recharging is needed when power indicator
(POWER light) is flashing per 0.5 second or off.
1) Connect the watch to PC through USB
cable or through optional adaptor to AC power
for recharging (ref. to Figure Battery recharging')
12
Page 16
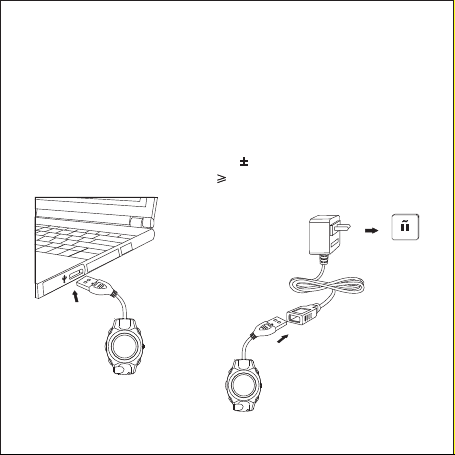
2)Recharging light(CHARGE)lights up ----under recharge
3) Recharging light(CHARGE)lights weakly----slow recharge
4) Recharging light(CHARGE)off----recharge over
※ Note: a)The battery will be recharged slowly when close to
full power and the product can work by then.
b) No slow recharge is indicated by CHARGE light when re charged through PC.
c) Output voltage should be 5V 0.25V,when recharging the
MP3 output electric current 500mA.
Plug into 100v-240v AC power
Plug into the
USB port
Battery recharging
13
Page 17

III INSTALLATION OF MP3 PLAYER
System requirements
IBM compatible personal computer
Pentium 166 MHz MMX or faster
Windows98SE/ME/2000/XP
USB port (Universal Serial Bus)
Mac Os X/Mac Os 9.0
64MB RAM or more
20MB free hard-disk space or more
4 x CD-ROM drive or more
Accessible to Internet (Recommended)
※ Note: User name has to be set as administrator under Win dows2000
USB connection
1.USB port on your PC is used for sending files and battery re-
charging.
2.Check the USB port on your PC referring to its hardware instru-
ction manual.
3.USB light and CHARGE light are lighted when the product co-
nnected to PC through USB port.
4.Under Win98 SE make sure the driver MP3 Player utilities enclos-
ed in the packing is successfully installed before connecting the
product to PC.
14
Page 18
Installation guide
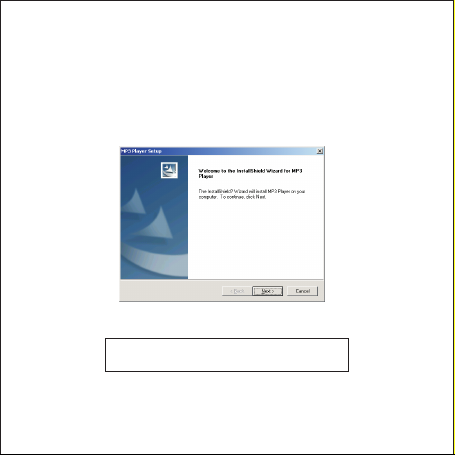
Install the driver MP3 Player:
Put the installation CD into CD-ROM Drive and then it will be installed automatically.
The following window will pop up:
Click Next button and the window
below will pop up
15
Page 19
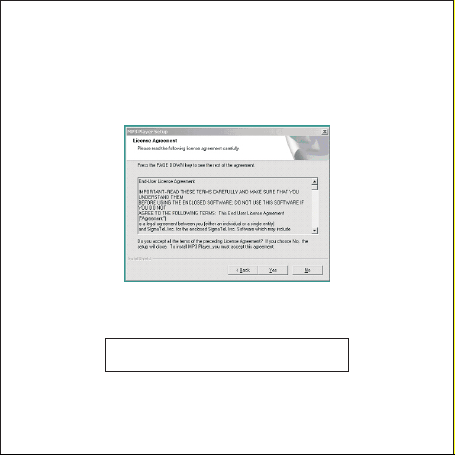
Click Yes button to continue
16
Page 20
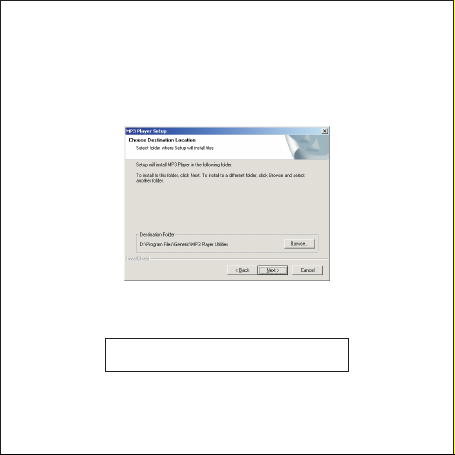
Select the installation folder and
then click Next
17
Page 21
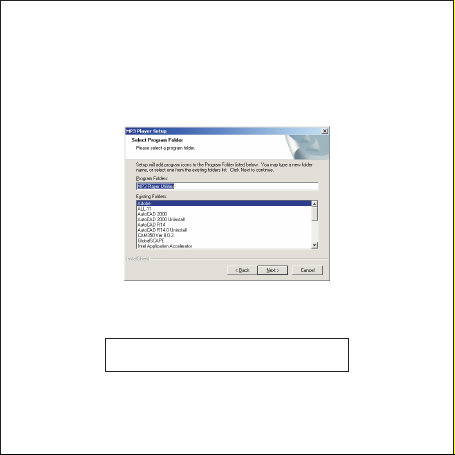
Click Next to start installation
18
Page 22
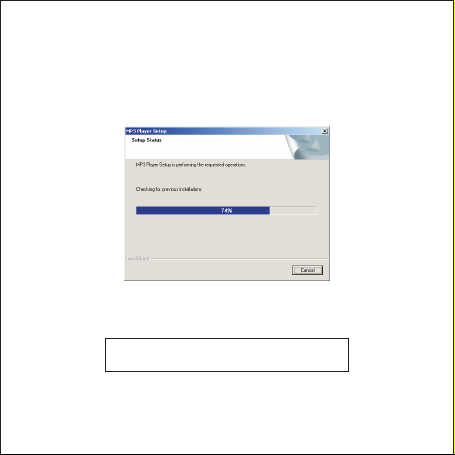
Installation completed
19
Page 23
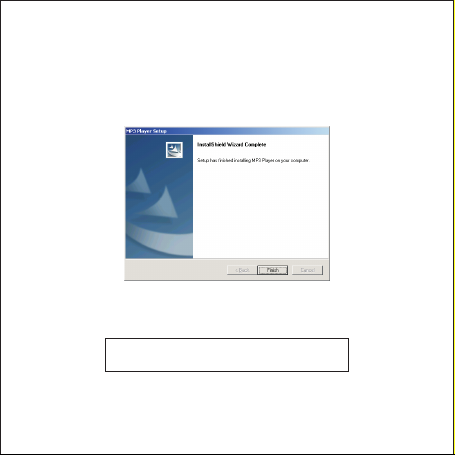
Click Finish and restart your
PC according to the PC requirement
20
Page 24
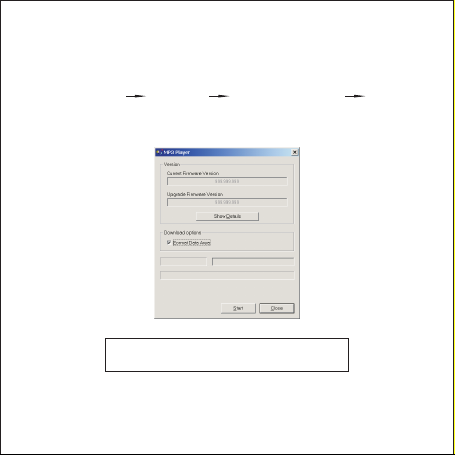
Firmware download:
1.Make sure the MP3 player utilities is successfully installed
2.Connect the product to PC
3.Click (start) (program) (MP3 Player Utilities) (Firmware
Download)
the following window will pop up
Click Start and the window
below will pop up
21
Page 25
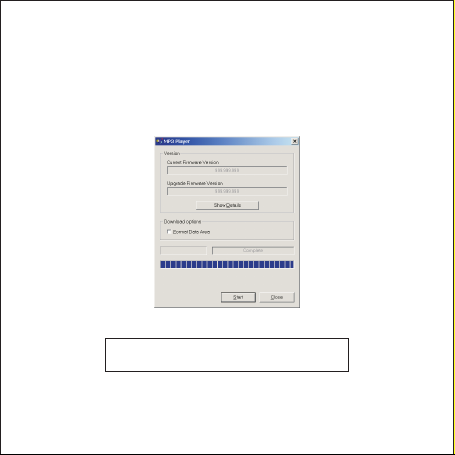
Click Close to complete the download
22
Page 26
Ⅳ CAUTIONS
1.Do not disassemble or change any part of the product that is
not mentioned in this manual.
2.Do not pull or plug the product with wet hands, which may cause short circuit of the product.
3.Do not expose the product to fire or excessive heat.
4.Do not expose the product to electromagnetic wave circumstances, which may cause malfunction or data transmitting error
of the product.
5.Keep the USB plug and cable away from corrosive liquid such
as salt water and acid as the corrosion may destroy the circuitry
reliability.
6. Ensure the USB plug is dry before connecting to computer to
avoid damage by moisture.
7
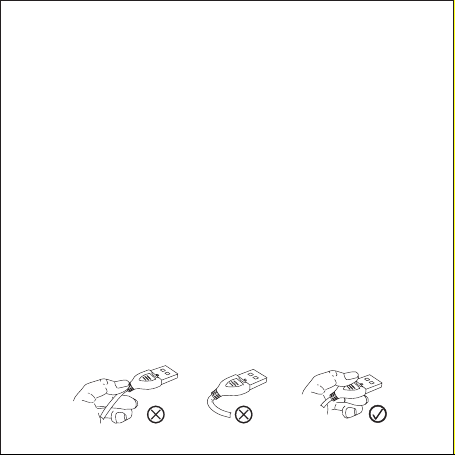
.Remove the product from any device holding the USB plug
itself but not the cable or watch body.Do not overbend the cable
'.
in case its broken (ref.to the Figure below)
8.When recharging through the accessorial adapter,make sure
to pull out the MP3 watch before pulling out the adapter.
9
.Regular cleaning of the USB plug is recommended.
10
.Recharge the battery after power drained to prolong the batt-
ery life.
23
.
Page 27
Ⅴ
Changing the USB Cable:
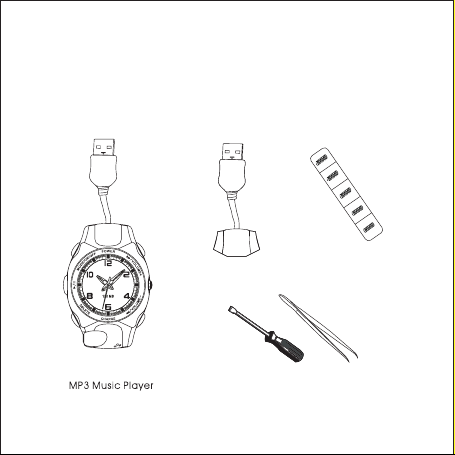
1. Preparation:
Prepare the new USB plug assembly and spare springs for
replacement:
USB Plug
Screwdriver and tweezers(optional)
Spare Springs
24
Page 28
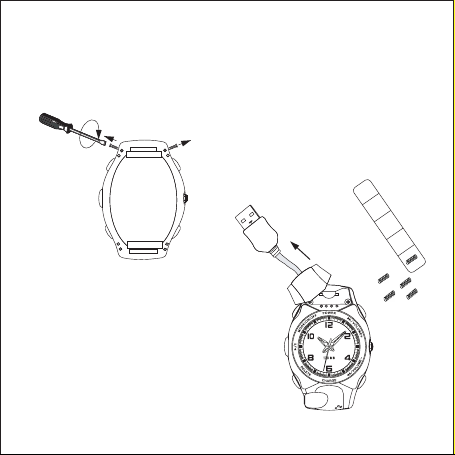
2. Unscrew the case:
1) Unscrew the two screws that fix the USB plug assembly.
2) No need to unscrew the case back as picture shows.
3. Lift of the defect USB plug:
!) Lift of the defect USB plug
in vertical direction as arrow
shows.
2) Take out spare springs from
the case with your tweezers.
25
Page 29
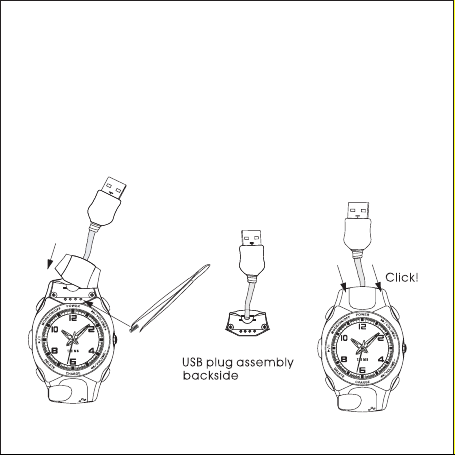
4.Place the new USB plug:
1) Place the springs from the plastic package into the four spr-
ing holes.
2) Make sure there are springs in all four spring holes. Press the
new USB plug onto the case in vertical direction as arrow shows.
Make sure it fits well on the case.
26
Page 30
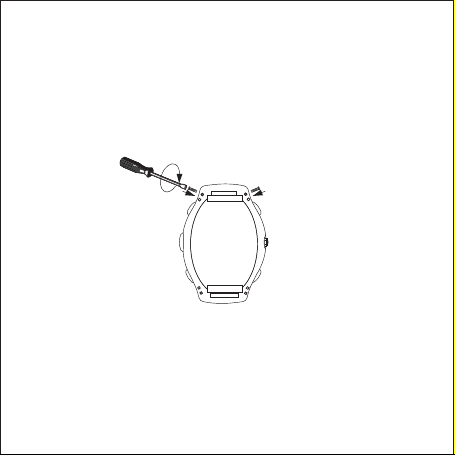
5. Fixing the case:
Put back the two screws up on the case to fix new USB plug.
The replacement is now finished.
27
Page 31

Ⅵ HELPFUL TIPS
Problem Analysis
Unable to
play MP3
Unable to
download
music
Unable to
do voice
recording
No Drive
Letter
Sound
skips
MP3 shut off
suddenly
Battery low
Not standard MP3/WMA files
Battery low Recharge the battery
USB cable broken or not
connected properly.
No space for more recording
files
The USB plug not connected
or loose.
The Manager Software not
installed successfully.
The PC motherboard does not
support USB port.
MP3 file made at compression
level exceeding 320kbps.
Electrical interferences from other
appliances like mobile phone,
fluorescent lamp, bulb and high
voltage wiring etc.
Maybe caused by strong external
staric interference
28
Solution
Recharge the battery
Download standard
MP3/WMA files
Check the USB
connection and reinsert
Delete some old recording files
Check USB connection
Reinstall the Manager
Software
Upgrade the motherboard driver
Using lower compressing
level to record the file into
MP3 format.
Move away from source of
electrical interference
Restart the MP3 player
by pressing the
"
MODE/ON/OFF"
button
Page 32

Ⅶ PRODUCT SPECIFICATIONS
Built in memory: 32MB/64MB/128MB/256MB/512MB flash
Port: standard USB port
Battery: 170mAh/3.7V macromolecule polymer Li-ion rechargeable battery
Recharging time: 2 hours for fully charged
Battery playtime: 7 continuous hours with fully charged battery
Voice recording time: 2hours/32MB, 4.5hours/64MB, 9hours/128MB,
18hours/256MB,36hours/512MB
Music playtime: WMA format (64Kbps): 60minutes/32MB, 120minutes/64MB, 240minutes/128MB,480minutes/256MB,960minutes
/512MB
MP3 format (128Kbps): 30minutes/32MB, 60minutes/64MB, 120
minutes/128MB,240minutes/256MB,480minutes/512MB
S/N Ratio: 90dB
Working temperature: -5℃ ~ +50℃
Earphone Output: 5mW+5mW
Frequency response: 20Hz~20KHz
Sampling frequency of voice recording: 8KHz
Compression level: 32Kbps~ 320Kbps
29
Page 33
NOTE:
1.
The manufacturer is not responsible for any radio or TV inter-
ference caused by unauthorized modifications to this equip-
ment. Such modifications could void the Users authority to
operate the equipment.
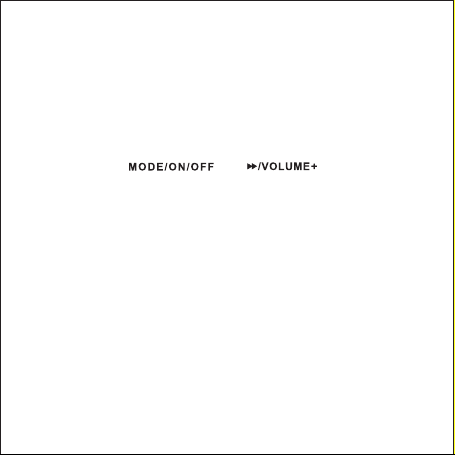
2.If the MP3 watch shuts down and the buttons are not workable,
please press and at the same time
to reset.
'
30
Page 34

 Loading...