

Page 1
SM 2610948764 04-07 4/25/07 9:02 AM Page 1
IMPORTANT: IMPORTANT : IMPORTANTE:
Read Before Using Lire avant usage Leer antes de usar
Operating/Safety Instructions
Consignes de fonctionnement/sécurité
Instrucciones de funcionamiento y seguridad
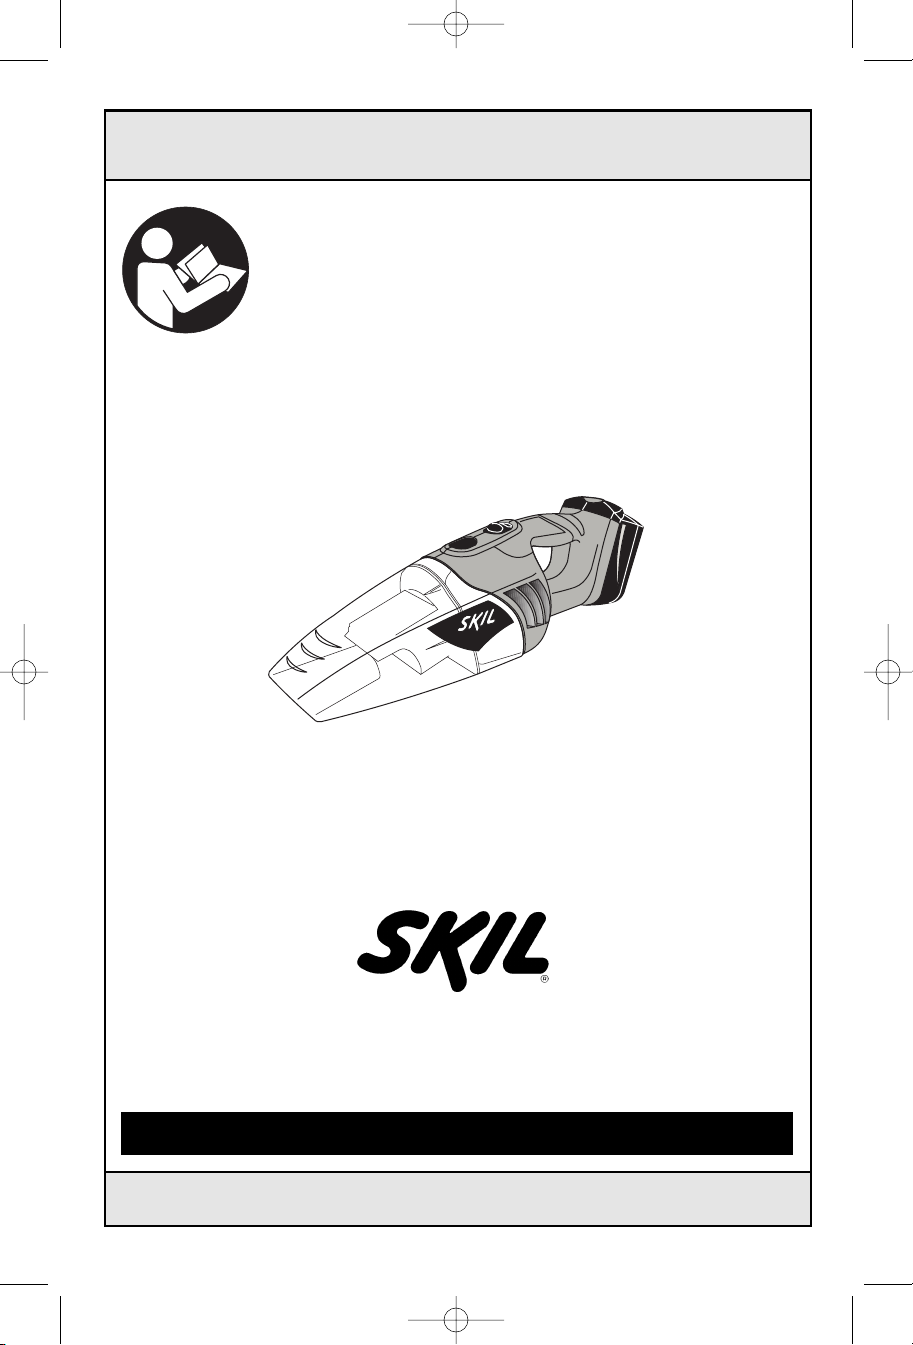
2810
Call Toll Free for
Consumer Information
& Service Locations
1-877-SKIL999 (1-877-754-5999) www.skil.com
For English Version
See page 2 Voir page 12 Ver la página 22
Pour obtenir des informations
et les adresses de nos centres
de service après-vente,
appelez ce numéro gratuit
Version française
Llame gratis para
obtener información
para el consumidor y
ubicaciones de servicio
Versión en español
Page 2
SM 2610948764 04-07 4/25/07 9:02 AM Page 2
T
his vacuum is intended for Household use only.
IMPORTANT SAFETY INSTRUCTIONS
SAVE THESE INSTRUCTIONS
When using an electrical appliance, basic precautions should always be followed:
WARNING
!
TO REDUCE THE RISK OF FIRE, ELECTRICAL
SHOCK OR INJURY:
WARNING
!
cancer and birth defects or other reproductive harm. Wash hands after using.
WARNING
!
involving fire, electric shock or serious personal injury.
The cords wires and/or cables supplied with this product contains chemicals
including lead or lead compounds known to the state of California to cause
Please read these instructions before using this vacuum due to the safety
rules contained in this manual. Failure to comply can result in accidents
IMPORTANT SAFETY INSTRUCTIONS
SAVE THESE INSTRUCTIONS
This vacuum is intended for Household
use only.
• Do Not allow children to operate hand
vacuum as a toy.
necessary when used near children.
•
Do Not charge or use the unit outdoors.
This unit can be used for wet pick up i.e.
water, juice and other household spills.
Do Not use charger with damaged cord
•
or plug.
properly, has been dropped, damaged, left
outdoors or dropped in water, return to your
nearest Authorized Skil Service Center.
•
Do Not abuse cord. Never carry charger
or base by the cord or yank to
disconnect from electrical outlet.
allow cord to hang over edge of table or
counter or to lay on hot surfaces.
•
Do Not use or handle charger or vacuum
with wet hands.
• Do Not use hand vacuum or charger
outdoors.
• Do Not put any objects in ventilation
openings.
blocked. Keep openings free of dust, lint,
hair and anything that my reduce air flow.
•
Keep loose hair, loose clothing, fingers
and all parts of the body away from
openings and moving parts.
If hand vacuum is not working
Do not use with any opening
Close attention is
Do not
• Keep exhaust away from face, eyes and
hair during use.
• NEVER vacuum materials such as hot
coals, cigarette butts, matches, etc.
could result.
•
Do Not use without dust canister, filter
and filter seal in place.
• Do Not turn unit upward when cover has
any fluids in it.
and motor.
•
Do Not use to pick up flammable or
combustible liquids such as gasoline or
use in areas where such liquids may be
present.
Do Not use to pick up hand objects such
•
as nails, screws, coins, etc.
injury could result.
• This hand vacuum does not have to be
plugged into an electrical outlet therefore, it
is always in operating condition. Be aware
of possible hazards when using your hand
vacuum or when charging accessories.
Use Only the Skil chargers, models SC118
•
and SC118B to charge the Skil SB18A &
SB18B battery packs provided with your
unit. Do not substitute any other charger.
Use of another charger could cause
batteries to explode causing possible injury.
-
2-
Fire could result.
You could short batteries
Damage or
Fire
Page 3
SM 2610948764 04-07 4/25/07 9:02 AM Page 3
• Do Not place hand vacuum near fire or
heat. The batteries inside the pack may
explode.
• Do Not charge batteries in a damp or wet
location.
• Your hand vacuum battery pack should be
charged in a location where the
temperature is more than 50 degrees F but
less than 100 degrees Farenheit.
• Leaks from battery cells can occur under
extreme conditions. If the liquid comes in
contact with skin, wash immediately with
soap and water, then neutralize with lemon
juice or vinegar. If liquid gets into your
eyes, flush with clean water for at least 10
minutes, then seek immediate medical
attention. Following this rule will reduce the
risk of serious personal injury.
• Your tool is equipped with a dust
canister, empty it frequently, after
Battery/Charger
Before using battery charger, read all
instructions and cautionary markings on
(1) battery charger, (2) battery pack, and
(3) product using battery.
Use only the charger which accompanied
your product or direct replacement as
listed in the catalog or this manual.
substitute any other charger. Use only Skil
approved chargers with your product. See
Functional Description and Specifications.
Do not disassemble charger or operate
the charger if it has received a sharp blow,
been dropped or otherwise damaged in
any way. Replace damaged cord or plugs
immediately.
damage may result in electric shock or fire.
Do not recharge battery in damp or wet
environment. Do not expose charger to
rain or snow. If battery case is cracked or
otherwise damaged, do not insert into
charger.
Charge only Skil approved rechargeable
batteries. See Functional Description and
Specifications.
burst causing personal injury and damage.
Charge battery pack in temperatures
above +50 degrees F (10 degrees C) and
below +100 degrees F (38 degrees C).
Incorrect reassembly or
Battery short or fire may result.
Other types of batteries may
Do not
completion of vacuuming and before
storing.
disposal, materials in fine particle form may
be explosive. Do not throw dust on an
open fire. Combustion from mixture of
varnishes, lacquers, polyurethane, oil or
water with dust particles can occur if there
is a static discharge, spark introduced in
the box, or excessive heat.
!
known to the State of California to cause
cancer, and birth defects or other
reproductive harm.
handling.
Not suitable to vacuum hazardous or
toxic substances or dusts e.g. asbestos.
The filters will not be able to capture all
particles and may exhaust them back into
the environment.
Store tool and battery pack in locations
where temperatures will not exceed 120
degrees F (49 degrees C).
to prevent serious damage to the battery
cells.
Battery leakage may occur under extreme
usage or temperature conditions. Avoid
contact with skin and eyes.
liquid is caustic and could cause chemical
burns to tissues. If liquid comes in contact
with skin, wash quickly with soap and water,
then with lemon juice or vinegar. If the liquid
contacts your eyes, flush them with water for
a minimum of 10 minutes and seek medical
attention.
Place charger on flat non-flammable
surfaces and away from flammable
materials when re-charging battery pack.
The charger and battery pack heat during
charging. Carpeting and other heat insulating
surfaces block proper air circulation which
may cause overheating of the charger and
battery pack. If smoke or melting of the case
are observed unplug the charger
immediately and do not use the battery pack
or charger.
Use of an attachment not recommended or sold by Skil may result in a risk
of fire, electric shock or injury to persons.
Be extremely careful of dust
WARNING
This product contains
chemicals, including lead,
Wash hands after
This is important
The battery
-3-
Page 4
SM 2610948764 04-07 4/25/07 9:02 AM Page 4
Battery Care
WARNING
!
away from metal objects.
protect terminals from shorting
place batteries in a tool box or pocket with
When batteries are not in
tool or charger, keep them
For example, to
DO NOT
nails, screws, keys, etc. Fire or injury may
result.
D
O NOT PUT BATTERIES INTO FIRE OR
EXPOSE TO HIGH HEAT.
explode.
Battery Disposal
WARNING
!
remove any component projecting from
the battery terminals.
result. Prior to disposal, protect exposed
terminals with heavy insulating tape to
prevent shorting.
NICKEL-CADMIUM BATTERIES
If equipped with a nickel-cadmium battery,
the battery must be collected, recycled or
disposed of in an environmentally sound
manner.
Do not attempt to disassemble the battery or
Fire or injury may
“The EPA certified RBRC
Battery Recycling Seal on the
nickel-cadmium (Ni-Cd)
battery indicates Robert
Bosch Tool Corporation is
voluntarily participating in an
industry program to collect and recycle these
batteries at the end of their useful life, when
taken out of service in the United States or
Canada. The RBRC program provides a
convenient alterative to placing used Ni-Cd
batteries into the trash or the municipal
waste stream, which may be illegal in your
area.
Please call 1-800-8-BATTERY for information
on Ni-Cd battery recycling and disposal
bans/restrictions in your area, or return your
batteries to a Skil/Bosch/Dremel Service
Center for recycling. Robert Bosch Tool
Corporation’s involvement in this program is
part of our commitment to preserving our
environment and conserving our natural
resources.”
They may
-4-
Page 5
0
SM 2610948764 04-07 4/25/07 9:02 AM Page 5
Symbols
IMPORTANT: Some of the following symbols may be used on your tool. Please study them
and learn their meaning. Proper interpretation of these symbols will allow you to operate the
tool better and safer.
Symbol Name Designation/Explanation
V Volts Voltage (potential)
A Amperes Current
Hz Hertz Frequency (cycles per second)
W Watt Power
kg Kilograms Weight
min
s Seconds Time
n
.../min Revolutions or reciprocation per minute Revolutions, strokes, surface speed,
0 Off position Zero speed, zero torque...
1, 2, 3, ... Selector settings Speed, torque or position settings.
I, II, III, Higher number means greater speed
Minutes Time
Diameter Size of drill bits, grinding wheels, etc.
No load speed Rotational speed, at no load
0
orbits etc. per minute
Infinitely variable selector with off Speed is increasing from 0 setting
Arrow Action in the direction of arrow
Alternating current Type or a characteristic of current
Direct current Type or a characteristic of current
Alternating or direct current Type or a characteristic of current
Class II construction Designates Double Insulated
Construction tools.
Earthing terminal Grounding terminal
Warning symbol Alerts user to warning messages
Ni-Cad RBRC seal Designates Ni-Cad battery recycling
program
This symbol designates
that this tool is listed by
Underwriters Laboratories.
This symbol designates
that this tool is listed to
Canadian Standards by
Underwriters Laboratories.
This symbol
designates
that
this tool
complies
to NOM
Mexican
Standards.
This symbol designates
that this tool is listed by
the Canadian Standards
Association.
This symbol designates that
this tool is listed by
Underwriters Laboratories,
and listed to Canadian
Standards by Underwriters
Laboratories.
-5-
Page 6
SM 2610948764 04-07 4/25/07 9:02 AM Page 6
Functional Description and Specifications
WARNING
!
accessories.
accidentally.
Disconnect battery pack from tool or place the switch in the locked or
o
ff position before making any assembly, adjustments or changing
Such preventive safety measures reduce the risk of starting the tool
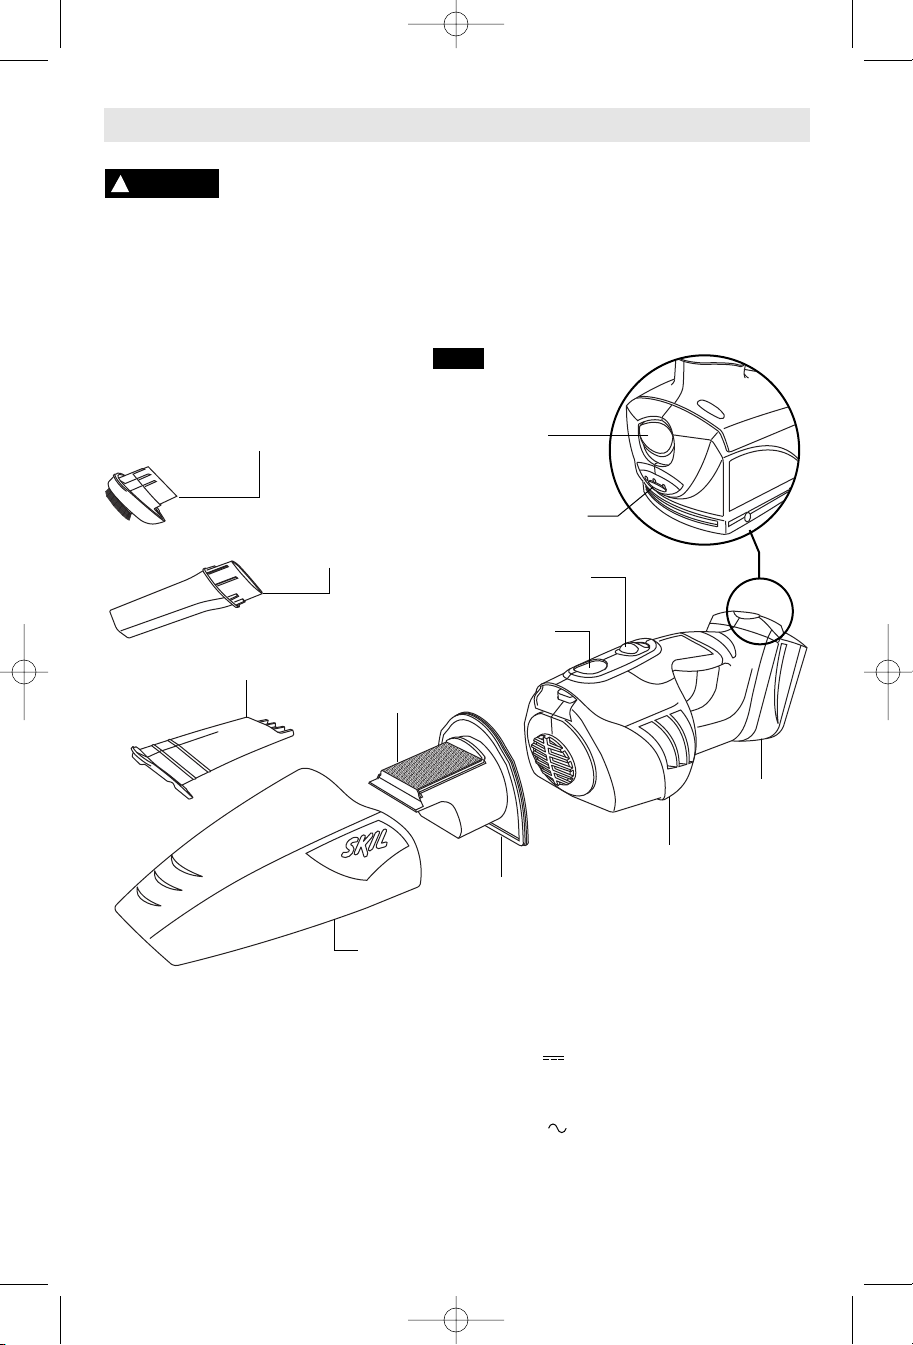
Cordless Vacuum
FIG. 1
BRUSH
CREVICE
TOOL
ACCESSORY
FILTER
BATTERY
RELEASE BUTTON
BATTERY FUEL
INDICATOR BUTTON
SLIDE ON/OFF
SWITCH
DUST CANISTER
RELEASE BUTTON
FILTER
SEAL
DUST
CANISTER
Tool
Model number
2810
Voltage rating 18 V
Battery pack SB18A & SB18B
Charger SC118 or SC118B
Voltage rating 120 V 60 Hz
-6-
MOTOR
HOUSING
BATTERY
PACK
Page 7
SM 2610948764 04-07 4/25/07 9:02 AM Page 7
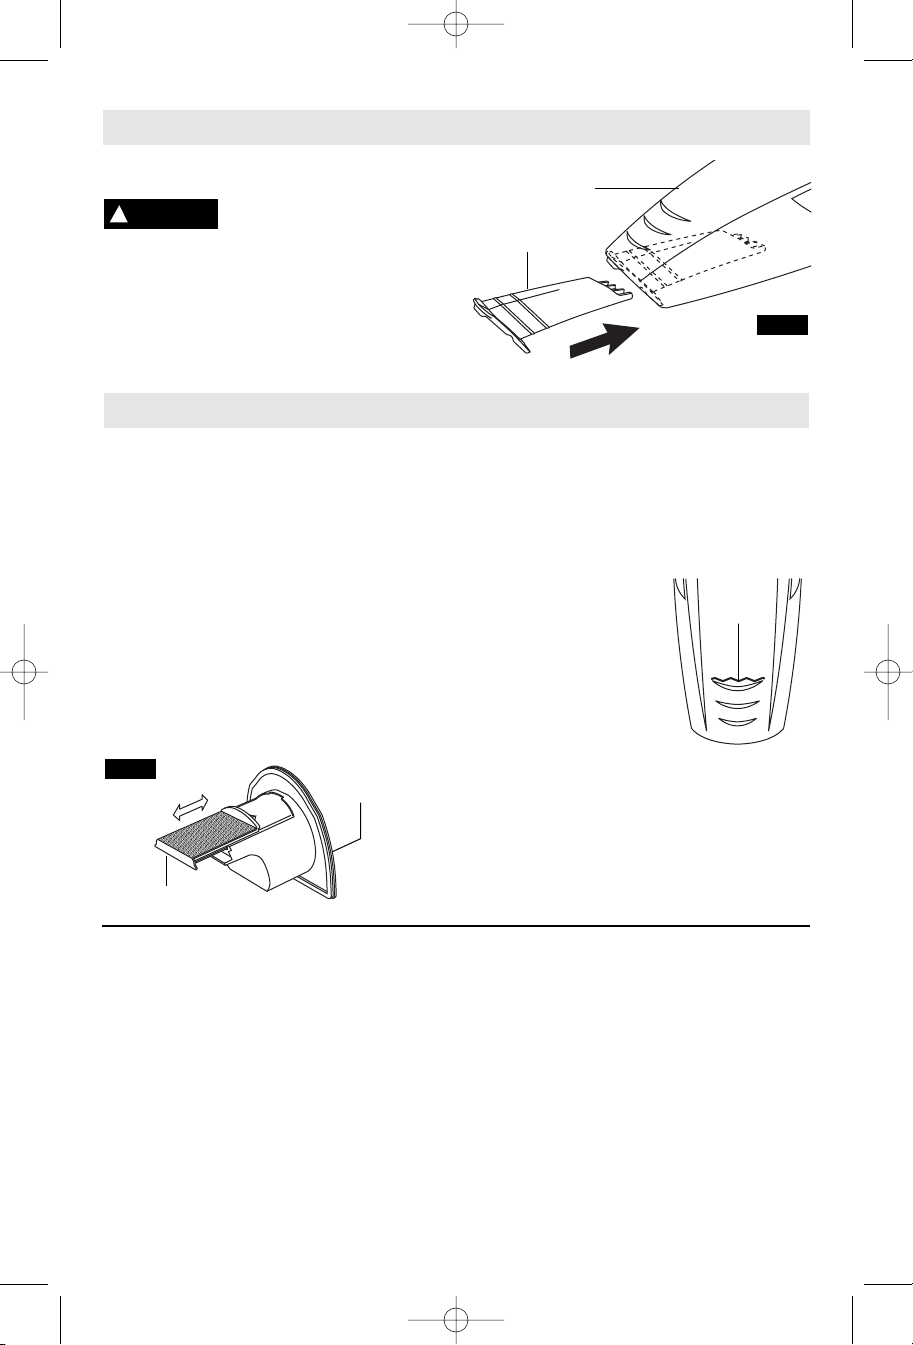
Assembly
INSTALLING AND REMOVING
ACCESSORIES
WARNING
!
Disconnect battery pack
from tool or place the
switch in the locked or off position before
making any assembly, adjustments or
changing accessories.
1. To install, push desired accessory
completely into dust canister (Fig. 2).
To remove, simply pull out of dust canister.
Operating Instructions
Your tool can be switched "ON" by the slide
switch located on top of the motor housing.
TO TURN TOOL "ON" slide the switch
forward.
TO TURN TOOL "OFF" slide the switch
backward.
1. Depress dust canister release button, and
remove the dust canister (Fig. 1).
2. Pull filter seal completely out of dust
canister and empty dust canister (Fig. 1).
3. Slide filter out of filter seal and tap dust out
of filter (Fig. 3).
SLIDE "ON/OFF" SWITCH
EMPTYING THE DUST CANISTER
FIG. 3
FILTER
FILTER
SEAL
DUST
C
ANISTER
A
CCESSORY
FIG. 2
4. Slide filter back into filter seal and push
filter seal completely into dust canister
(Fig. 3).
5. Push dust canister onto housing until it
locks into place (Fig. 1).
FULL LINE INDICATOR
The full line shown on the
dust canister should be
used as an indicator
FULL
LINE
INDICATOR
when vacuuming liquids.
This full line indicated the
maximum level for liquids
within the dust canister.
Your vacuum should
never be filled past the
full line; empty the dust
canister to avoid this situation. Maximum
water capacity is approximately 3 fluid ounces.
Do not tilt your vacuum with liquids in dust
canister.
Never use your vacuum to pick up flammable
or combustible liquids such as gasoline; motor
could ignite.
BATTERY CHARGED CONDITION
INDICATOR
The battery is equipped with a charged
condition indicator (Fig.1). The indicator
lights shows the charged condition of the
battery during the working process.
By pressing the battery fuel indicator button,
the charged condition can also be checked
when the battery is removed or when the
machine is not in use.
• • • When all three lights are illuminated,
this indicates the battery pack is fully
charged.
• • When only two lights illuminate, this
indicates the battery pack is partially charged.
When only one light illuminates, this
•
indicates the battery pack is slightly charged.
When no lights illuminate, this indicates the
battery pack is completely discharged.
RELEASING AND INSERTING
BATTERY PACK
Release battery pack from tool by pressing
the battery release button and sliding pack
out of handle base (Fig. 1). To insert battery,
align battery and slide battery pack into tool
until it locks into position. Do not force.
-7-
Page 8
SM 2610948764 04-07 4/25/07 9:02 AM Page 8
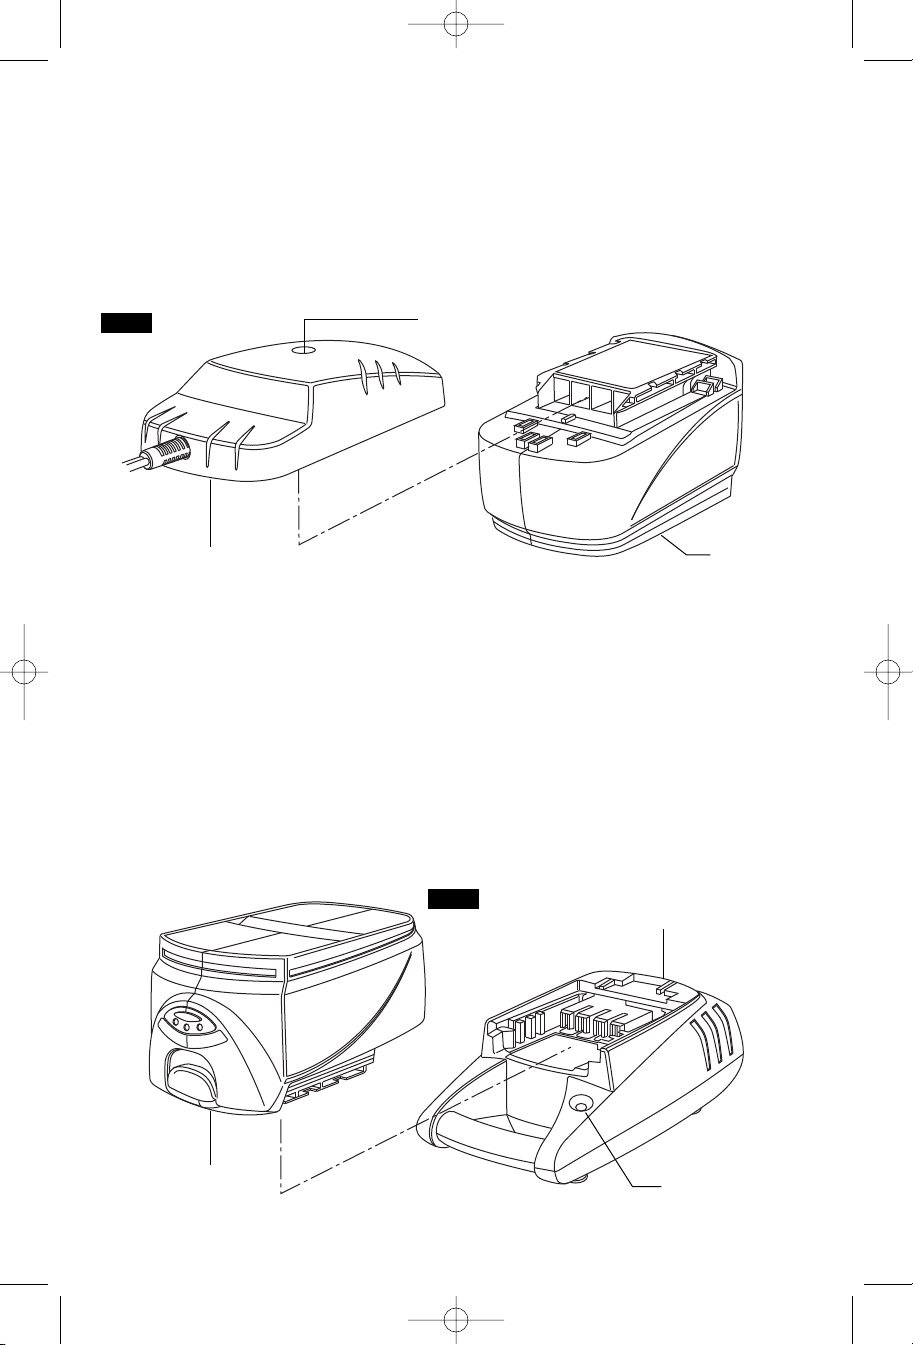
CHARGING BATTERY PACK (STANDARD CHARGER)
Plug charger cord into your standard power
outlet, then slide battery pack into charger
(Fig. 4). The charger’s green light will turn
“ON”. The green light remains ‘‘ON’’ as long as
charger is plugged in, and does not shut off.
After normal usage, the battery pack requires
approximately 3 hours or less charging time
is run-down completely, it may require up to
5 hours charging time to become fully
charged.
W
u
nplug the charger (unless you're charging
another battery pack) and slide the battery
pack back into the tool handle.
to become fully charged. If the battery pack
hen the battery pack is fully charged,
FIG. 4
CHARGER
INDICATOR LIGHT
CHARGING BATTERY PACK (FAST CHARGER)
Plug charger cord into your standard power
outlet, then slide the battery pack into charger
(Fig. 5).
The charger’s green indicator will begin to
“BLINK”. This indicates that the battery is
receiving a fast charge. Fast-charging will
automatically stop when the battery pack is
fully charged.
When the indicator light stops “BLINKING”
(and becomes a steady green light) fast
charging is complete.
BATTERY
PACK
When you begin the charging process of the
battery pack, a steady green light could also
mean the battery pack is too hot or too cold.
The purpose of the light is to indicate that the
battery pack is fast-charging. It does not
indicate the exact point of full charge. The
light will stop blinking in less time if the
battery pack was not completely discharged.
When the battery pack is fully charged,
unplug the charger (unless you're charging
another battery pack) and slip the battery
pack back into the tool handle.
FIG. 5
CHARGER
BATTERY
PACK
-8-
INDICATOR
LIGHT
Page 9

SM 2610948764 04-07 4/25/07 9:02 AM Page 9
IMPORTANT CHARGING NOTES
1. The battery pack accepts only about 80%
of its maximum capacity with its first few
c
harge cycles. However, after the first few
c
harge cycles, the battery will charge to full
capacity.
2. The charger was designed to fast charge
the battery only when the battery
temperature is between 50˚F (10˚C) and
100˚F (38˚C).
3. A substantial drop in operating time per
charge may mean that the battery pack is
nearing the end of its life and should be
replaced.
If you anticipate long periods (i.e. a month
4.
or more) of non-use of your tool, it is best to
run your tool down until it is fully discharged
before storing your battery pack. After a long
period of storage, the capacity at first recharge
will be lower. Normal capacity will be restored
in two or three charge/discharge cycles.
R
emember to unplug charger during storage
p
eriod.
5. If battery does not charge properly:
in some other electrical device.
light switch which turns power “off” when
lights are turned off.
Clean with cotton swab if necessary.
take or send tool, battery pack and charger
to your local Skil Service Center.
Note: Use of charger’s or battery packs not
sold by Skil will void the warranty.
a. Check for voltage at outlet by plugging
b. Check to see if outlet is connected to a
c. Check battery pack terminals for dirt.
d. If you still do not get proper charging,
-9-
Page 10
SM 2610948764 04-07 4/25/07 9:02 AM Page 10
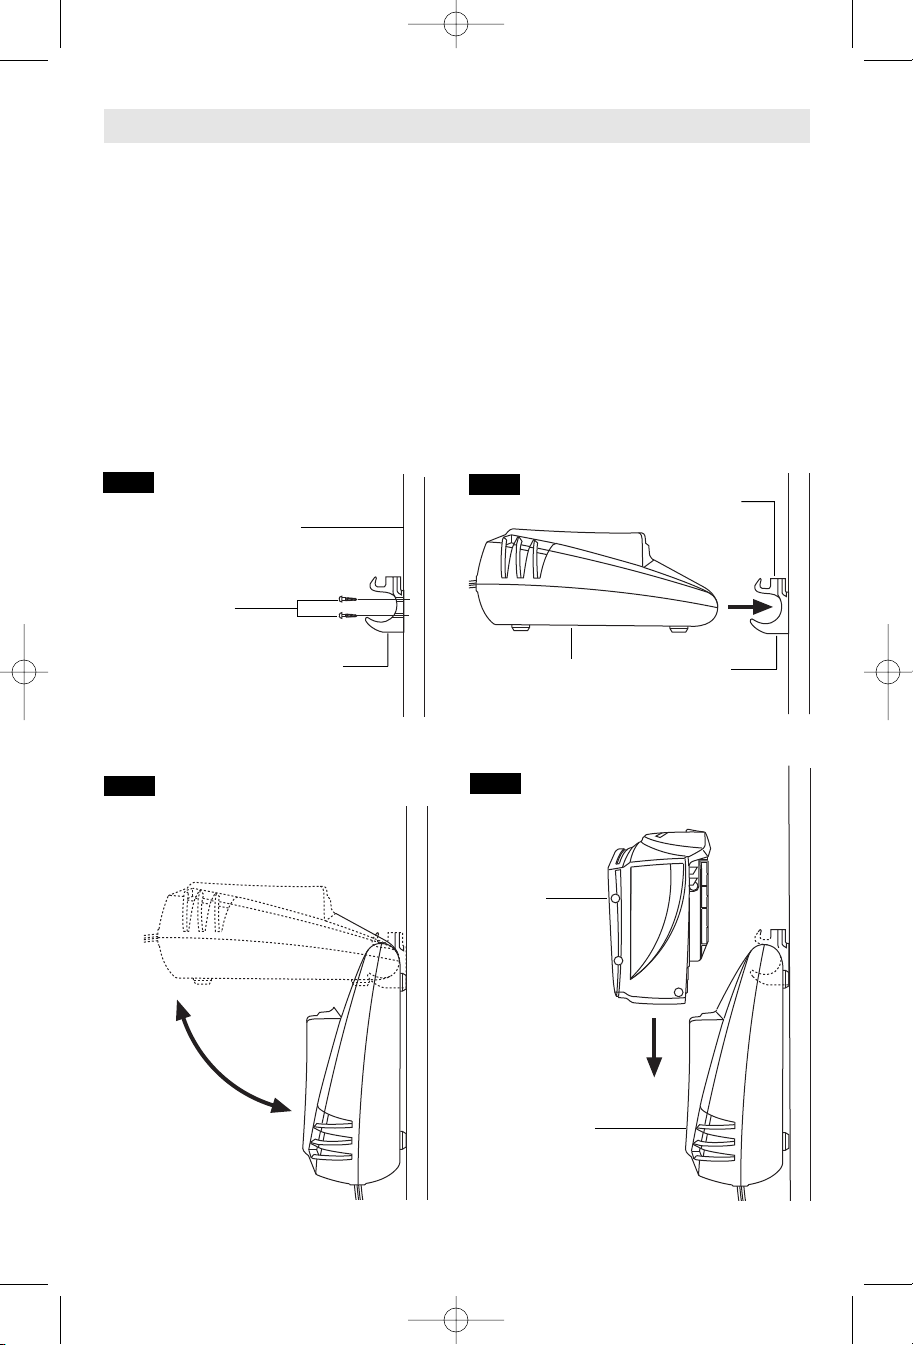
Mounting Charger
MOUNTING CHARGER TO
A VERTICAL SURFACE
For convenience, your charger was designed
so it may be used on a flat horizontal surface,
or it may be mounted onto a vertical surface.
The mounting clip also features a bit storage on
top of the clip.
1. Select mounting location near a electrical
outlet so that the plug will reach the outlet.
Check for studs or other support.
2. Using a pencil, mark two places on the
surface in a vertical line about 3/4" apart.
3. Secure mounting clip to the vertical surface
using two #8 round head screws (Fig. 6).
FIG. 6
VERTICAL
SURFACE
#8 ROUND
HEAD WOOD
SCREWS
MOUNTING
CLIP
4. Remove battery pack from charger before
mounting.
5. Insert handle of charger into the mounting
clip in the horizontal position (Fig 7).
6. Gently lower the charger into the vertical
position until it lays flat against the vertical
surface and locks the charger into the mounting
the clip (Fig. 8).
7. To remove charger when desired, raise the
charger back into the horizontal position to
unlock the charger, then remove charger from
the mounting clip (Fig. 8).
8. To charge the battery pack, simply slide
battery pack into charger (Fig. 9).
FIG. 7
CHARGER
BIT STORAGE
COMPARTMENT
MOUNTING
CLIP
FIG. 8
TO
UNLOCK
TO LOCK
-10-
FIG. 9
BATTERY
PACK
CHARGER
Page 11

SM 2610948764 04-07 4/25/07 9:02 AM Page 11
Maintenance
Service
WARNING
!
maintenance performed by unauthorized
personnel may result in misplacing of
internal wires and components which
could cause serious hazard.
Be alert for battery packs that are nearing
their end of life.
tool performance or significantly shorter
running time between charges then it is time
to replace the battery pack. Failure to do so
can cause the tool to operate improperly or
damage the charger.
Long term battery storage should be in
the discharged state.
longer and re-charge better when they are
stored discharged. Remember to fully recharge battery packs before using after
prolonged storage.
Your Skil tool has been properly lubricated
and is ready for use.
NO USER SERVICEABLE
PARTS INSIDE. Preventive
BATTERIES
If you notice decreased
Battery packs last
TOOL LUBRICATION
The motor in your tool has been engineered
for many hours of dependable service. To
maintain peak efficiency of the motor, we
recommend it be examined every six months.
Only a genuine Skil replacement motor
specially designed for your tool should be
used.
!
charger from the power supply before
cleaning.
effectively with compressed dry air.
wear safety goggles when cleaning tools
with compressed air.
Ventilation openings and switch levers must
be kept clean and free of foreign matter. Do
not attempt to clean by inserting pointed
objects through opening.
!
plastic parts.
carbon tetrachloride, chlorinated cleaning
solvents, ammonia and household detergents
that contain ammonia.
.C. MOTORS
D
Cleaning
WARNING
CAUTION
To avoid accidents, always
disconnect the tool and/or
The tool may be cleaned most
Certain cleaning agents
and solvents damage
Some of these are: gasoline,
Always
Accessories
WARNING
!
adequate size conductors that is capable
of carrying the current necessary for your
tool must be used.
excessive voltage drop, loss of power or
overheating. Grounded tools must use 3-wire
extension cords that have 3-prong plugs and
receptacles.
NOTE: The smaller the gauge number, the
heavier the cord.
If an extension cord is
necessary, a cord with
This will prevent
RECOMMENDED SIZES OF EXTENSION CORDS
120 VOLT ALTERNATING CURRENT TOOLS
Tool’s
Ampere
Rating
3-6
6-8
8-10
10-12
12-16
Cord Size in A.W.G.
Cord Length in Feet Cord Length in Meters
50 100 150 15 30 60 120
25
16
16
18
18
18
16
14
14
16
14
16
14
16
—
12
Wire Sizes in mm
0.75
14
0.75
12
0.75
12
1.0
12
——— —
—
-11-
2
0.75 1.5 2.5
1.0 2.5 4.0
1.0 2.5 4.0
2.5 4.0 —
Page 12

SM 2610948764 04-07 4/25/07 9:02 AM Page 12
Cet aspirateur est conçu exclusivement pour un usage ménager.
CONSIGNES DE SÉCURITÉ IMPORTANTES
CONSERVEZ CES INSTRUCTIONS
Il faut toujours prendre les précautions élémentaires suivantes pendant l’utilisation d’un appareil électrique.
!
AVERTISSEMENT
POUR RÉDUIRE LE RISQUE D’INCENDIES, DE CHOCS
ÉLECTRIQUES OU DE BLESSURES :
!
AVERTISSEMENT
détermination de l’État de Californie, causent le cancer ainsi que des anomalies congénitales et d’autres troubles de
la reproduction. Lavez-vous les mains après avoir utilisé ces cordons, fils et/ou câbles électriques.
!
AVERTISSEMENT
risque de causer des accidents pouvant consister en des incendies, des chocs électriques ou des blessures graves.
Les cordons, fils et/ou câbles électriques qui accompagnent ce produit contiennent des
produits chimiques tels que du plomb et des composés du plomb qui, selon la
Veuillez lire les présentes consignes avant d’utiliser l’aspirateur et respecter les règles de
sécurité contenues dans ce mode d’emploi. Le non-respect de ces règles et consignes
CONSIGNES DE SÉCURITÉ IMPORTANTES
CONSERVEZ CES INSTRUCTIONS
Cet aspirateur est conçu exclusivement pour un usage
ménager.
• Ne permettez pas à des enfants de se servir de
l’aspirateur portatif comme d’un jouet. Vous devez
faire très attention quand vous utilisez cet appareil à
proximité d’enfants.
• Ne chargez pas cet appareil en plein air et ne
l’utilisez pas en plein air. Cet outil peut être utilisé
pour aspirer des boissons telles que de l’eau, du jus
de fruit ou d’autres liquides susceptibles d’être
renversés dans un environnement ménager.
• N’utilisez pas de chargeur dont le cordon ou la fiche
serait endommagé. Si l’aspirateur portatif ne
fonctionne pas correctement, si vous l’avez laissé
tomber, s’il a été endommagé, laissé en plein air ou
trempé dans de l’eau, veuillez le retourner au centre de
service après-vente agréé Skil le plus proche.
• Ne maltraitez pas le cordon. Ne portez jamais le
chargeur ou le socle par le cordon, et ne tirez
jamais brusquement sur le cordon pour débrancher
l’appareil de la prise de courant. Ne laissez jamais le
cordon pendre au-dessus du bord d’une table ou d’un
comptoir et ne le posez jamais sur une surface
chaude.
N’utilisez et ne manipulez pas le chargeur ou
•
l’aspirateur avec des mains mouillées.
• N’utilisez pas l’aspirateur portatif ou le chargeur en
plein air.
• Ne placez aucun objet dans les ouvertures de
ventilation. N’utilisez jamais cet appareil si ses
ouvertures d’aération sont bouchées. Veillez à ce que
ces ouvertures ne contiennent pas de poussière, de
peluches, de cheveux ou toutes autres particules qui
risqueraient de réduire la circulation de l’air.
• Gardez les cheveux, les vêtements lâches, les
doigts et toutes les autres parties du corps à
distance des ouvertures et de pièces mobiles.
• Gardez l’échappement à distance de votre visage,
de vos yeux et de vos cheveux pendant que vous
utilisez l’aspirateur.
• N’aspirez JAMAIS de matériaux tels que des
charbons ardents, des mégots de cigarettes, des
allumettes, etc.
• N’utilisez pas l’appareil sans que le récipient à
poussière, le filtre et le joint de filtre ne soient en
place.
• N’inclinez pas l’appareil vers le haut quand des
liquides sont présents dans la plaque de couverture.
Cela risquerait de court-circuiter les piles et le moteur.
• N’utilisez pas cet appareil pour aspirer des liquides
inflammables ou combustibles, comme de
l’essence, ou pour aspirer dans des environnements
où de tels liquides pourraient être présents. Cela
risquerait de causer un incendie.
• N’utilisez pas cet appareil pour aspirer de petits
objets tels que des clous, des vis, des pièces, etc.
Cela risquerait de causer des dommages ou des
blessures.
• Il n’est pas nécessaire de brancher cet aspirateur dans
une prise de courant ; il est par conséquent toujours
en condition de fonctionnement. Soyez conscient de
dangers potentiels quand vous vous servez de votre
aspirateur portatif ou quand vous chargez des
accessoires.
Cela risquerait de causer un incendie.
-12-
Page 13

SM 2610948764 04-07 4/25/07 9:02 AM Page 13
• Utilisez uniquement les chargeurs Skil modèles SC118
et SC118B pour charger le bloc-piles Skil SB18A et
SB18B qui a été livré avec votre appareil. N’utilisez
aucun autre chargeur. L’utilisation d’un autre chargeur
pourrait entraîner l’explosion des piles, ce qui
risquerait de causer des blessures.
• Ne placez pas l’aspirateur portatif à proximité d’un feu
ou d’une source de chaleur. Les piles à l’intérieur du
bloc risqueraient d’exploser.
• Ne chargez pas les piles à un endroit mouillé ou
humide.
• Le bloc-piles de votre aspirateur portatif doit être
chargé dans un emplacement dont la température est
supérieure à 10 °C (50 °F) mais inférieure à 37,8 °C
(100 °F).
• Des fuites provenant des cellules des piles risqueraient
de se produire à des températures extrêmes. Au cas
où le liquide entrerait en contact avec votre peau, vous
devez laver la peau immédiatement à l’eau et au savon,
puis neutraliser avec du jus de citron ou du vinaigre.
Si du liquide entre en contact avec vos yeux, rincez à
l’eau propre pendant au moins 10 minutes, puis allez
voir un médecin sur le champ. Si vous suivez cette
consigne, cela réduira le risque de blessure grave.
Chargeur de pile
Avant d'utiliser le chargeur de pile, lisez toutes les
consignes et tous les marquages d'avertissement
sur (1) le chargeur de pile, (2) le bloc-pile et (3) le
produit utilisant la pile.
N'utilisez que le chargeur qui accompagnait votre
produit ou remplacement direct, comme indiqué
dans le catalogue ou ce manuel.
autre chargeur. N’utiliser que les chargeurs approuvés
par Skil avec votre produit. Voir Description
fonctionnelle et Spécifications.
Ne désassemblez pas le chargeur et ne l'utilisez pas
s'il a reçu un choc violent, s'il est tombé ou s'il a
été endommagé par ailleurs. Remplacez
immédiatement les cordons ou les fiches abîmés.
Un remontage incorrect ou des dommages peuvent
provoquer un incendie ou des secousses électriques.
Ne rechargez pas la pile dans un environnement
mouillé ou humide. N'exposez pas le chargeur à la
pluie ou la neige. Si le boîtier de la pile est fissuré
ou endommagé par ailleurs, ne l'insérez pas dans le
chargeur. Il pourrait y avoir un incendie ou un court-
circuit de pile.
Ne charger que des piles rechargeables approuvées
par Skil.
Spécifications. Les autres types de piles peuvent
éclater causant ainsi des blessures et des dommages.
Chargez le bloc-pile à des températures de plus de
10 degrés C (+50°F) et de moins de 38 degrés C
Voir Description fonctionnelle et
Ne substituez aucun
• Si votre outil est équipé d'un récipient à poussière,
videz-le à intervalles réguliers, mais aussi après
avoir aspiré et avant de le ranger. ∑Procédez
extrêmement soigneusement pendant l'évacuation de
la poussière car les matières à particules fines peuvent
être explosives. Ne jetez pas de sciure directement sur
le feu. Une combustion spontanée peut parfois
résulter d'un mélange de vernis, de laque, de
polyuréthane, d’huile ou d'eau avec des particules de
poussière en cas de décharge d’électricité statique ou
d’étincelle introduite dans la boîte, ou en cas de
chaleur excessive.
!
AVERTISSEMENT
plomb. L’état de Californie a déterminé que ces
substances sont cancérigènes ou peuvent causer des
anomalies congénitales ou d’autres troubles
reproductifs. Lavez-vous les mains après utilisation.
Ne convient pas à l’aspiration de substances ou
poussières toxiques ou dangereuses comme
l’amiante par exemple. Les filtres ne sont pas conçus
pour bloquer toutes les particules et risquent de les
rejeter dans l’atmosphère.
(+100°F). Rangez l'outil et le bloc-pile à des
endroits dont la température ne dépasse pas 49
degrés C (+120°F).
des dommages considérables aux éléments des piles.
Il peut y avoir une fuite de pile dans des conditions
extrêmes d'utilisation ou de température. Évitez tout
contact avec la peau et les yeux. Le liquide de pile
est caustique et pourrait causer des brûlures
chimiques aux tissus. Si le liquide vient en contact
avec la peau, lavez rapidement à l'eau savonneuse,
puis au jus de citron ou au vinaigre. Si le liquide vient
en contact avec les yeux, rincez-les à l'eau pendant au
moins 10 minutes et sollicitez des soins médicaux.
Posez le chargeur sur une surface plate
ininflammable et à distance de matériaux
inflammables lorsqu’on recharge un bloc-piles. Le
chargeur et le bloc-piles s’échauffent pendant la
charge. Le coussinet de mousse souple et autres
surfaces isolantes empêchent la circulation normale
de l’air, ce qui peut provoquer une surchauffe du
chargeur et du bloc-piles. S’il y a dégagement de
fumée ou si le boîtier fond, débranchez le chargeur
immédiatement et n’utilisez ni le chargeur, ni le blocpiles.
L'utilisation d'un accessoire non recommandé ni
vendu par Skil peut causer des risques d'incendie,
de chocs électriques ou de lésions corporelles.
Ce produit contient des
produits chimiques dont du
Ceci est important pour prévenir
-13-
Page 14

SM 2610948764 04-07 4/25/07 9:02 AM Page 14
Entretien des piles
!
AVERTISSEMENT
chargeur, gardez-les à l’écart d’objets métalliques.
Ainsi, pour éviter un court-circuitage des bornes, NE
PLACEZ PAS les piles dans la boîte à outils ou dans la
Lorsque les piles ne sont
pas dans l’outil ou le
poche avec des clous, des vis, des clés, etc. Ceci peut
provoquer un incendie ou des blessures.
NE METTEZ PAS LES PILES AU FEU ET NE LES
EXPOSEZ PAS À UNE CHALEUR ÉLEVÉE. Elles peuvent
exploser.
Mise au rebut des piles
!
AVERTISSEMENT
ou d’enlever tout composant faisant saillie des bornes
de piles, ce qui peut provoquer un incendie ou des
blessures. Avant la mise au rebut, protégez les bornes
exposées à l’aide d’un ruban isolant épais pour prévenir
le court-circuitage.
Si le produit est équipé d'une pile nickel-cadmium, la
pile doit être ramassée, recyclée ou mise au rebut
d'une manière qui ne soit pas nocive pour
l'environnement.
PILES NICKEL-CADMIUM
Ne tentez pas de
désassembler le bloc-piles
“Le sceau RBRC de recyclage des
piles, homologué par l’EPA
(Agence pour la protection de
l’environnement des États-Unis), qui
se trouve sur les piles au nickelcadmium (Ni-Cd) indique que
Robert Bosch Tool Corporation participe
volontairement à un programme industriel de
ramassage et de recyclage de ces piles au terme de
leur vie utile, pourvu qu’elles soient mises hors service
aux États-Unis ou au Canada. Le programme du RBRC
offre une alternative pratique à la mise des piles au NiCd usées au rebut ou au ramassage d’ordures
municipal, ce qui pourrait être interdit dans votre
région.
Veuillez appeler le 1-800-8-BATTERY pour obtenir de
plus amples renseignements sur le recyclage des piles
au Ni-Cd et sur les restrictions ou interdictions de
mise au rebut qui s’appliquent à votre région ou
renvoyez vos piles à un Centre de Service
Skil/Bosch/Dremel pour recyclage. La participation de
Robert Bosch Tool Corporation à ce programme
s'insère dans le contexte de notre engagement à
préserver notre environnement et à conserver nos
ressources naturelles.”
-14-
Page 15

0
SM 2610948764 04-07 4/25/07 9:02 AM Page 15
Symboles
IMPORTANT : Certains des symboles suivants peuvent être utilisés sur votre outil. Veuillez les étudier et
apprendre leur signification. Une interprétation appropriée de ces symboles vous permettra d'utiliser l'outil de
façon plus efficace et plus sûre.
Symbole Nom Désignation/Explication
V Volts Tension (potentielle)
A Ampères Courant
Hz Hertz Fréquence (cycles par seconde)
W Watt Puissance
kg Kilogrammes Poids
min Minutes Temps
s Secondes Temps
Diamètre Taille des mèches de perceuse, meules,
etc.
n
0
.../min Tours ou mouvement alternatif par Tours, coups, vitesse en surface, orbites,
0 Position d'arrêt Vitesse zéro, couple zéro ...
1, 2, 3, ... Réglages du sélecteur Réglages de vitesse, de couple ou de
l, ll, lll, ... position. Un nombre plus élevé signifie
Vitesse à vide Vitesse de rotation, à vide
minute etc., par minute
une vitesse plus grande.
Sélecteur variable à l'infini avec arrêt La vitesse augmente depuis le réglage 0
Flèche Action dans la direction de la flèche
Courant alternatif Type ou caractéristique du courant
Courant continu Type ou caractéristique du courant
Courant alternatif Type ou caractéristique du courant
ou continu
Construction classe II Désigne des outils construits avec double
isolation
Borne de terre Borne de mise à la terre
Symbole d'avertissement Alerte l'utilisateur aux messages
d'avertissement.
Sceau Ni-Cad RBRC Désigne le programme de recyclage des piles
Ni-Cad.
Ce symbole signifie que cet
outil est approuvé par
Underwriters Laboratories.
Ce symbole signifie que cet
outil est approuvé par
l'Association canadienne de
normalisation.
Ce symbole signifie que
cet outil est approuvé
conformément aux normes
canadiennes par Underwriters
Laboratories.
Ce symbole signifie que cet outil
est approuvé par Underwriters
Laboratories et qu’il a été
homologué selon les normes
canadiennes par Underwriters
Laboratories.
Ce symbole
signifie que
cet outil se
conforme aux
normes
mexicaines
NOM.
-15-
Page 16

SM 2610948764 04-07 4/25/07 9:02 AM Page 16
Description fonctionnelle et spécifications
!
AVERTISSEMENT
accessoires. Ces mesures de sécurité préventives réduisent le risque d'une mise en marche accidentelle de
l'outil.
Débranchez le bloc-pile de l'outil ou placez l'interrupteur à la position de blocage
ou d'arrêt avant d'effectuer tout assemblage ou réglage ou de changer les
Aspirateur sans fil
FIG. 1
BOUTON DE DÉ
BLOCAGE DE LA PILE
BROSSE
BOUTON INDICATEUR DU NIVEAU
DE CARBURANT DE PILE
SUCEUR PLAT
ACCESSOIRE
INTERRUPTEUR À GLISSIÈRE
MARCHE/ARRÊT
BOUTON D’OUVERTURE
DU RÉCIPIENT À
POUSSIÈRE
FILTRE
JOINT À
FILTRE
RÉCIPIENT À
POUSSIÈRE
Outil
Numéro de modèle 2810
Tension nominale
Bloc piles SB18A et SB18B
Chargeur SC118 ou SC118B
Tension nominale 120 V 60 Hz
18 V
-16-
BLOC-PILES
BOÎTIER
DU MOTEUR
Page 17

SM 2610948764 04-07 4/25/07 9:02 AM Page 17
Assemblage
INSTALLATION ET RETRAIT DES ACCESSOIRES
!
AVERTISSEMENT
l’interrupteur dans la position de blocage ou d’arrêt
avant de réaliser la moindre opération d’assemblage,
de réglage ou de remplacement.
1. Installez l’accessoire que vous souhaitez en le
poussant complètement dans le récipient à poussière
(Fig. 2).
Pour le retrait, il suffit de tirer sur l’accessoire pour le
faire sortir du récipient à poussière.
Séparez le bloc-piles et
l’outil ou placez
Consignes de fonctionnement
INTERRUPTEUR À GLISSIÈRE MARCHE/ARRÊT
Vous pouvez mettre votre outil en marche à l'aide de
l'interrupteur à glissière situé sur le dessus du carter du
moteur.
POUR METTRE L'OUTIL EN MARCHE, faites glisser
l'interrupteur vers l'avant.
POUR METTRE L'OUTIL À L'ARRÊT, faites glisser
l'interrupteur vers l'arrière.
VIDAGE DU RÉCIPIENT À POUSSIÈRE
1. Appuyez sur le bouton d’ouverture du récipient à
poussière et retirez le récipient (Fig. 1).
2. Retirez complètement le joint à filtre du filtre et sortez
la poussière du récipient à poussière (Fig. 1).
3. Faites glisser le filtre hors du joint à filtre et tapotez
sur le filtre pour en faire sortir la poussière (Fig. 3).
FIG. 3
FILTRE
JOINT À
FILTRE
RÉCIPIENT À
P
OUSSIÈRE
ACCESSOIRE
FIG. 2
4. Remettez le filtre dans le joint à filtre en le faisant
glisser et poussez le joint à filtre complètement à
l’intérieur du récipient à poussière (Fig. 3).
5. Poussez le récipient à poussière sur le boîtier jusqu’à
ce qu’il se verrouille en place (Fig. 1).
La ligne de repère de
remplissage figurant sur le
récipient à poussière est utile
pendant l’aspiration des
liquides. Cette ligne de repère
indique le niveau maximum de
liquides pouvant être contenu
dans le récipient à poussière.
Vous ne devez jamais remplir
votre aspirateur au-delà de cette
ligne de repère. Videz le récipient à poussière pour
éviter cette situation. La capacité en eau maximale de
l’appareil est d’environ 3 onces liquides (8,9 cl).
N’inclinez pas votre aspirateur lorsque des liquides sont
présents dans le récipient à poussière.
N’utilisez jamais votre aspirateur pour ramasser des
liquides inflammables ou combustibles tels que de
l’essence car le moteur risquerait de prendre feu.
REPÈRE DE REMPLISSAGE
REPÈRE DE
REMPLISSAGE
TÉMOIN D’ÉTAT DE CHARGE DE LA PILE
La pile est munie d’un témoin d’état de charge qui
indique son état de charge pendant l’utilisation(Fig. 1).
En appuyant sur le bouton indicateur du niveau de
carburant de pile, on peut également contrôler l’état de
charge de la pile quand celle-ci se trouve hors de l’outil
ou quand l’outil est à l’arrêt.
• • • Quand les trois témoins sont allumés, ceci indique
que le bloc-piles est à pleine charge.
• • Quand deux témoins seulement sont allumés, ceci
indique que le bloc-piles est partiellement chargé.
• Quand un seul témoin est allumé, ceci indique que
la charge du bloc-piles est faible.
Si aucun des témoins n’est allumé, ceci indique que le
bloc-piles est complètement déchargé.
DÉPOSE ET REPOSE DU BLOC-PILES
Enlevez le bloc-piles de l’outil en appuyant sur le bouton
de déblocage de la pile puis en laissant cette dernière
glisser hors de l’embase de la poignée (Fig. 1). Pour
remettre le bloc dans l’outil, glissez-le dans l’ouverture
jusqu’à ce qu’il se verrouille en place.
-17-
Page 18

SM 2610948764 04-07 4/25/07 9:02 AM Page 18
CHARGEMENT DU BLOC-PILES (CHARGEUR STANDARD)
Branchez le chargeur sur une prise murale ordinaire
puis glissez le bloc-piles sur le chargeur (Fig. 4).
Le témoin lumineux vert du chargeur s’allumera. Le
témoin lumineux vert demeurera allumé tant que le
chargeur sera branché, et ne s’éteindra pas.
Après utilisation normale, il faut environ 3 heures ou
est complètement déchargé, il se peut qu’il faille
jusqu’à 5 heures pour le recharger complètement.
Lorsque le bloc-pile est entièrement chargé,
débranchez le chargeur (à moins que vous ne
chargiez un autre bloc-pile) et réinsérez le bloc-pile
dans la poignée de l'outil.
moins pour recharger complètement le bloc-pile. S’il
FIG. 4
TÉMON LUMINEUX
CHARGEUR
CHARGEMENT DU BLOC-PILES (CHARGEUR RAPIDE)
Branchez le chargeur sur une prise murale ordinaire
puis glissez le bloc-piles sur le chargeur (Fig. 5).
Le témoin vert du chargeur commencera à CLIGNOTER,
ce qui indique que la pile reçoit une charge rapide. La
charge rapide s'arrêtera automatiquement lorsque le
bloc-pile est à pleine charge.
Le témoin CESSE DE CLIGNOTER (et s'allume en vert
continu) au terme de la charge rapide.
Lorsque vous commencez le processus de charge du
bloc-pile, un témoin vert continu pourrait également
BLOC-PILES
signifier que le bloc-pile est trop chaud ou trop froid.
Le témoin a pour but d'indiquer que le bloc-pile est en
charge rapide. Il n'indique pas le point exact de pleine
charge. Le témoin cessera de clignoter en moins de
temp si le bloc-pile n'était pas entièrement déchargé.
Lorsque le bloc-pile est entièrement chargé,
débranchez le chargeur (à moins que vous ne chargiez
un autre bloc-pile) et réinsérez le bloc-pile dans la
poignée de l'outil.
FIG. 5
CHARGEUR
BLOC-PILES
-18-
TÉMON
LUMINEUX
Page 19

SM 2610948764 04-07 4/25/07 9:02 AM Page 19
REMARQUES IMPORTANTES CONCERNANT LA CHARGE
1. Lors des premiers cycles de charge, le bloc-piles
neuf n’absorbe que 80 % de sa capacité maximale.
Par la suite, cependant, les piles se chargeront à
pleine capacité.
2. De même, le chargeur n’est destiné qu’à la charge
rapide des bloc-piles dont la température se situe
entre 4°C (40°F) et 41°C (105°F).
3. Une diminution marquée de la réserve énergétique
entre les charges peut signaler l’épuisement du blocpiles et le besoin d’un remplacement.
4. Si vous prévoyez de longues périodes (à savoir, un
mois ou plus) de non-utilisation de votre outil, il est
préférable d'utiliser votre outil jusqu'à ce que sa pile
soit entièrement déchargée avant de remiser votre
bloc-pile. Après une longue période de remisage, la
capacité sera réduite à la première recharge. La
capacité normale sera rétablie en deux ou trois cycles
de charge/décharge. N'oubliez pas de débrancher le
chargeur durant la période de remisage.
5. Si le bloc-piles ne se charge pas normale-ment :
a. Vérifiez la présence de courant à la prise en y
branchant un autre appareil électrique.
b. Vérifiez si la prise n’est pas raccordée con-
jointement à un interrupteur qui servirait à éteindre les
lumières.
c. Vérifiez la propreté des bornes du bloc-piles. Au
besoin, nettoyez avec un tampon en coton.
d. Si vous n’arrivez toujours pas à obtenir la charge
satisfaisante, confiez l’outil, le bloc-piles et le
chargeur à votre centre d’entretien Skil habituel.
Remarque : L’utilisation de chargeurs ou de blocpiles non vendus par Skil annule la garantie.
-19-
Page 20

SM 2610948764 04-07 4/25/07 9:02 AM Page 20
Montage du chargeur
MONTAGE DU CHARGEUR À UNE
SURFACE VERTICALE
Pour être encore plus pratique, votre chargeur a été
conçu pour être utilisé sur une surface horizontale
plate ou monté sur une surface verticale. La partie
supérieure de la pince de montage sert également au
rangement des embouts.
1. Choisissez un endroit suffisamment près d’une prise
électrique pour que le cordon puisse l’atteindre. Essayez
de trouver un poteau ou autre support.
2. À l’aide d’un crayon de bois, faites deux marques sur
la surface, à la verticale l’une de l’autre et distantes
d’environ 3/4 po.
3. Fixez la pince de montage à la surface verticale à
l’aide de deux vis à tête ronde No 8 (Fig. 6).
FIG. 6
SURFACE
VERTICALE
VIS À BOIS À TÊTE
RONDE No 8
PINCE DE
MONTAGE
4. Enlevez le bloc-piles du chargeur avant de fixer ce
dernier.
5. Enfoncez la poignée du chargeur dans la pince de
montage en position horizontale (Fig. 7).
6. Abaissez doucement le chargeur pour l’amener à la
verticale bien à plat contre la surface de montage, ce qui
lui permettra de se bloquer dans la pince de montage
(Fig. 8).
7. Pour enlever le chargeur quand on le souhaite,
relevez-le, amenez-le à la position horizontale pour le
débloquer puis enlevez-le de la pince de montage
(Fig. 8).
8. Pour charger le bloc-piles, il suffit de le glisser sur le
chargeur (Fig. 9).
FIG. 7
CHARGEUR
COMPARTIMENT DE
RANGEMENT DES EMBOUTS
PINCE DE
MONTAGE
FIG. 8
POUR
DÉBLOQUER
POUR
BLOQUER
FIG. 9
BLOC-PILES
CHARGEUR
-20-
Page 21

SM 2610948764 04-07 4/25/07 9:02 AM Page 21
Entretien
Service
!
AVERTISSEMENT
PIÈCE SUSCEPTIBLE D’ÊTRE ENTRETENUE PAR
L’UTILISATEUR. L’entretien préventif exécuté par
des personnes non autorisés peut entraîner un
positionnement erroné des composants et des fils
internes, ce qui peut présenter de graves dangers.
Nous recommandons de confier toute intervention
d’entretien sur l’outil à un centre de service-usine Skil
ou à un centre de service après-vente Skil agréé.
TECHNICIENS : Débranchez l’outil et/ou le chargeur de
la source de courant avant d’entretenir.
Faire attention aux blocs-piles qui approchent la fin
de leur vie. Si vous remarquez une diminution dans
les performances de votre outil ou une durée de
fonctionnement réduite de manière significative entre
charges, il est temps de remplacer le bloc-piles. S’il
n’est pas remplacé, il se peut qu’il endommage le
chargeur ou que l’outil fonctionne incorrectement.
Les piles doivent être déchargées avant de les
entreposer pour une longue durée. Les blocs-piles
durent plus longtemps et se rechargent mieux quand ils
sont rangés déchargés. Rappelez-vous qu’il faut
complètement recharger les blocs-piles avant toute
utilisation survenant après un stockage prolongé.
IL N’EXISTE À
L’INTÉRIEUR AUCUNE
PILES
Votre outil Skil a été graissé de manière appropriée et il
GRAISSAGE DE L’OUTIL
est prêt à l’usage.
MOTEURS C.C.
Le moteur de votre outil a été conçu pour de
nombreuses heures d’utilisation fiable. Pour maintenir
l’efficacité maximale du moteur, nous recommandons
de l’examiner tous les six mois. Seul un moteur de
remplacement Skil authentique, conçu spécialement
pour votre outil, doit être utilisé.
Nettoyage
!
AVERTISSEMENT
et/ou le chargeur de la source de courant avant de
nettoyer.
La façon la plus efficace de nettoyer l’outil est
à l’aide d’air sec comprimé. Portez toujours des
lunettes de sécurité en nettoyant les outils à l’air
comprimé.
Les prises d’air et les leviers de commutation doivent
être gardés propres et exempts de corps étrangers. Ne
tentez pas de nettoyer en insérant des objets pointus à
travers l’ouverture.
!
MISE EN GARDE
dissolvants abîment les pièces en plastique. Parmi
ceux-ci se trouvent: l’essence, le tétrachlorure de
carbone, les dissolvants de nettoyage chlorés,
l’ammoniaque ainsi que les détergents domestiques
qui en contiennent.
Pour éviter les accidents,
débranchez toujours l’outil
Certains agents de
nettoyages et certains
Accessoires
!
AVERTISSEMENT
devez utiliser un cordon avec conducteurs de
dimension adéquate pouvant porter le courant
nécessaire à votre outil. Ceci préviendra une chute
excessive de tension, une perte de courant ou une
surchauffe. Les outils mis à la terre doivent utiliser des
cordons de rallonge trifilaires pourvus de fiches à trois
broches ainsi que des prises à trois broches.
REMARQUE : Plus le calibre est petit, plus le fil est gros.
Si un cordon de rallonge
s'avère nécessaire, vous
DIMENSIONS DE RALLONGES RECOMMANDÉES
OUTILS 120 VOLTS COURANT ALTERNATIF
Intensité
nominale
de l’outil
3-6
6-8
8-10
10-12
12-16
Calibre A.W.G.
Longueur en pieds
25
18
18
18
16
14
150
100
50
16 16 14 0,75 0,75 1,5 2,5
16 14 12 0,75 1,0 2,5 4,0
16 14 12 0,75 1,0 2,5 4,0
16 14 12 1,0 2,5 4,0 —
12 — — — — — —
-21-
Calibre en mm
Longueur en mètres
30
15
2
120
60
Page 22

SM 2610948764 04-07 4/25/07 9:02 AM Page 22
Esta aspiradora está diseñada para uso doméstico solamente.
INSTRUCCIONES DE SEGURIDAD IMPORTANTES
GUARDE ESTAS INSTRUCCIONES
Cuando se utilice un electrodoméstico, se deben seguir siempre las precauciones básicas:
!
ADVERTENCIA
PARA REDUCIR EL RIESGO DE INCENDIO, DESCARGAS
ELÉCTRICAS O LESIONES:
!
ADVERTENCIA
causan cáncer y defectos de nacimiento u otros daños sobre la reproducción. Lávese las manos después de
usar este producto.
!
ADVERTENCIA
el resultado puede ser accidentes que involucren incendio, descargas eléctricas o lesiones corporales graves.
Los cordones, alambres y/o cables suministrados con este producto contienen sustancias
químicas, incluyendo plomo o compuestos de plomo, que el estado de California sabe que
Sírvase leer estas instrucciones antes de utilizar esta aspiradora, para familiarizarse con
las normas de seguridad contenidas en este manual. Si no se cumple con dichas normas,
INSTRUCCIONES DE SEGURIDAD IMPORTANTES
GUARDE ESTAS INSTRUCCIONES
Esta aspiradora está diseñada para uso doméstico
solamente.
• No deje que los niños utilicen la aspiradora de
mano como un juguete. Es necesario prestar la
máxima atención cuando la aspiradora se use cerca de
niños.
• No cargue ni use la unidad al aire libre. Esta unidad
se puede usar para recoger material mojado, por ej.,
agua, jugo y otros derrames domésticos.
No use el cargador si tiene el cordón o el enchufe
•
dañado. Si la aspiradora de mano no está
funcionando correctamente, se ha caído, se ha
dañado, se ha dejado a la intemperie o se ha caído al
agua, devuélvela al Centro de Servicio Skil Autorizado
más próximo.
No someta el cordón a abuso. No transporte nunca
•
el cargador ni la base por el cordón ni tire del
cordón para desconectarlo de un tomacorriente. No
deje que el cordón cuelgue del borde de una mesa o
de un mostrador ni lo apoye en superficies calientes.
No use ni maneje el cargador ni la aspiradora con
•
las manos mojadas.
• No use la aspiradora de mano ni el cargador al aire
libre.
• No ponga ningún objeto en las aberturas de
ventilación. No use la aspiradora si tiene bloqueada
alguna abertura. Mantenga las aberturas libres de
polvo, pelusa, pelo o cualquier cosa que pueda reducir
el flujo de aire.
Mantenga el pelo suelto, la ropa holgada, los dedos
•
y todas las partes del cuerpo alejados de las
aberturas y las piezas móviles.
• Mantenga el escape de aire alejado de la cara, los
ojos y el pelo durante el uso.
• No recoja NUNCA con la aspiradora materiales tales
como carbón caliente, colillas de cigarrillo,
fósforos, etc.
• No use la aspiradora si no tiene colocados en su
sitio el recipiente para polvo, el filtro y el sello del
filtro.
• No voltee la unidad de modo que quede en posición
invertida cuando la cubierta tenga algún fluido en
ella. Se podrían poner en cortocircuito las baterías y
el motor.
No use la aspiradora para recoger líquidos
•
inflamables o combustibles, tales como gasolina, ni
la use en áreas en las que dichos líquidos puedan
estar presentes. El resultado podría ser un incendio.
• No use la aspiradora para recoger objetos de mano,
tales como clavos, tornillos, monedas, etc.
resultado podría ser daños o lesiones.
• Esta aspiradora de mano no tiene que enchufarse en
un tomacorriente. Por lo tanto, siempre está lista para
utilizarse. Tenga presentes los peligros posibles
cuando utilice la aspiradora de mano o cuando cargue
los accesorios.
Utilice únicamente los cargadores Skil modelos SC118
•
y SC118B para cargar el paquete de baterías Skil
El resultado podría ser un incendio.
El
-22-
Page 23

SM 2610948764 04-07 4/25/07 9:02 AM Page 23
SB18A y SB18B proporcionado con su unidad. No
sustituya dichos cargadores con ningún otro cargador.
l uso de otro cargador podría hacer que las baterías
E
exploten, causando posibles lesiones.
• No ponga la aspiradora de mano cerca del fuego o del
calor. Las baterías que están dentro del paquete
podrían explotar.
• No cargue las baterías en un lugar húmedo o mojado.
• El paquete de baterías de la aspiradora de mano debe
cargarse en un lugar donde la temperatura sea de más
de 50 grados F pero menos de 100 grados Fahrenheit.
• Se pueden producir fugas de los elementos de batería
en condiciones extremas. Si el líquido entra en
contacto con la piel, lávesela inmediatamente con agua
y jabón, y luego neutralice el líquido con jugo de limón
y vinagre. Si le cae líquido en los ojos, enjuáguelos con
agua limpia durante al menos 10 minutos y luego
obtenga atención médica inmediata. Si se sigue esta
norma, se reducirá el riesgo de lesiones corporales
graves.
La herramienta está equipada con un recipiente
•
para polvo; vacíelo frecuentemente, después de
Batería/cargador
Antes de utilizar el cargador de baterías, lea todas
las instrucciones e indicaciones de precaución que
se encuentran en (1) el cargador de baterías, (2) el
paquete de baterías y (3) el producto que utiliza
baterías.
Utilice solamente el cargador que acompañaba al el
producto o un reemplazo directo según se indica en
el catálogo o en este manual. No sustituirlo por
ningún otro cargador. Utilice únicamente cargadores
aprobados Skil con su producto. Consulte Descripción
funcional y especificaciones.
No desarme el cargador ni lo haga funcionar si ha
recibido un golpe brusco, se ha caído o se ha
dañado de cualquier modo. Cambie el cordón o los
enchufes dañados inmediatamente. El reensamblaje
incorrecto o los daños pueden ocasionar sacudidas
eléctricas o incendio.
No recargue la batería en un entorno húmedo o
mojado. No exponga el cargador a lluvia ni nieve.
Si la caja de baterías está agrietada o dañada de
algún otro modo, no la introduzca en el cargador.
Se puede producir un cortocircuito de las baterías o un
incendio.
Cargue solamente baterías recargables aprobadas
Skil. Consulte Descripción funcional y
especificaciones. Otros tipos de baterías pueden
reventar causando lesiones personales y daños.
Cargue el paquete de baterías a temperaturas
superiores a +50 grados F (10 grados C) e inferiores
terminar de recoger material con la aspiradora y
antes de almacenarla.
uidadoso al eliminar el polvo, ya que los materiales
c
en forma de partículas finas pueden ser explosivos. No
tire el polvo a un fuego al descubierto. Se puede
producir una combustión de la mezcla de barnices,
lacas, poliuretano, aceite o agua con partículas de
polvo si se produce una descarga de electricidad
estática, se introduce una chispa en la caja o hay calor
excesivo.
!
ADVERTENCIA
plomo, que el estado de California sabe que causan
cáncer y defectos de nacimiento u otros daños sobre la
reproducción.
manejarlo.
Esta aspiradora no es adecuada para recoger
sustancias o polvos peligrosos o tóxicos, como por
ejemplo asbesto. Los filtros no podrán atrapar todas
las partículas y es posible que las expulsen de vuelta al
medio ambiente.
a +100 grados F (38 grados C). Guarde la
herramienta y el paquete de baterías en lugares
donde las temperaturas no superen 120 grados F (49
grados C).
graves a los elementos de la batería.
Se puede producir un escape del líquido de las
baterías bajo condiciones extremas de uso o de
temperatura. Evite el contacto con la piel y los ojos.
El líquido de la batería es cáustico y podría causar
quemaduras químicas en los tejidos. Si el líquido
entra en contacto con la piel, lávela rápidamente con
agua y jabón y luego con jugo de limón o vinagre. Si
el líquido entra en contacto con los ojos, enjuáguelos
con agua durante un mínimo de 10 minutos y obtenga
atención médica.
Ponga el cargador sobre superficies planas
ininflamables y alejado de materiales inflamables
cuando recargue el paquete de baterías. El
cargador y el paquete de baterías se calientan durante
el proceso de carga. Las alfombras y otras
superficies termoaislantes bloquean la circulación
adecuada de aire, lo cual puede causar
sobrecalentamiento del cargador y del paquete de
baterías. Si observa humo o que la carcasa se está
derritiendo, desenchufe inmediatamente el cargador y
no utilice el paquete de baterías ni el cargador.
El uso de un accesorio no recomendado ni vendido
por Skil puede constituir un peligro de incendio,
sacudidas eléctricas o lesiones a las personas.
Lávese las manos después de
Esto es importante para evitar daños
Sea extremadamente
Este producto contiene
sustancias químicas, incluyendo
-23-
Page 24

SM 2610948764 04-07 4/25/07 9:02 AM Page 24
Cuidado de las baterías
!
DVERTENCIA
A
cargador, manténgalas alejadas de objetos
metálicos. Por ejemplo, para evitar que las terminales
hagan cortocircuito, NO ponga las baterías en una caja
Cuando las baterías no están en
la herramienta o en el
de herramientas o en un bolsillo con clavos, tornillos,
llaves, etc. Se pueden producir un incendio o lesiones.
NO ARROJE LAS BATERIAS AL FUEGO NI LAS
EXPONGA AL CALOR INTENSO. Pueden explotar.
Eliminación de las baterías
!
ADVERTENCIA
ponentes que sobresalen de las terminales de la
batería. Se pueden producir lesiones o un incendio.
Antes de tirarla, proteja las terminales que están al
descubierto con cinta adhesiva aislante gruesa para
prevenir cortocircuitos.
Si este producto está equipado con una batería de
níquel-cadmio, dicha batería debe recogerse,
reciclarse o eliminarse de manera segura para el
medio ambiente.
BATERÍAS DE NIQUEL-CADMIO
No intente desarmar la batería
ni quitar ninguno de los com-
“El sello de reciclaje de baterías
RBRC certificado por la EPA que se
encuentra en la batería de níquelcadmio (Ni-Cd) indica que Robert
Bosch Tool Corporation está
participando voluntariamente en un
programa de la industria para recoger y reciclar estas
baterías al final de su vida útil, cuando se retiran de
servicio en los Estados Unidos y Canadá. El programa
RBRC proporciona una alternativa conveniente a tirar
las baterías de Ni-Cd usadas a la basura o a la
corriente municipal de aguas residuales, lo cual quizás
sea ilegal en su área.
Tenga la amabilidad de llamar al 1-800-8-BATTERY
para obtener información acerca de las
prohibiciones/restricciones sobre el reciclaje y la
eliminación de baterías de Ni-Cd en su lugar o
devuelva las baterías a un Centro de servicio
Skil/Bosch/Dremel para reciclarlas. La participación de
Robert Bosch Tool Corporation en este programa es
parte de nuestro compromiso hacia preservar nuestro
medio ambiente y conservar nuestros recursos
naturales.”
-24-
Page 25

0
SM 2610948764 04-07 4/25/07 9:02 AM Page 25
Símbolos
IMPORTANTE: Es posible que algunos de los símbolos siguientes se usen en su herramienta. Por favor,
estúdielos y aprenda su significado. La interpretación adecuada de estos símbolos le permitirá utilizar la
herramienta mejor y con más seguridad.
Símbolo Nombre Designación/explicación
V Volt Tensión (potencial)
A Ampere Corriente
Hz Hertz Frecuencia (ciclos por segundo)
W Watt Potencia
kg Kilogramo Peso
min Minuto Tiempo
s Segundo Tiempo
Diámetro Tamaño de las brocas taladradoras,
muelas, etc
n
0
.../min Revoluciones o alternación por minuto Revoluciones, golpes, velocidad de
0 Posición "off" (apagado) Velocidad cero, par motor cero...
1, 2, 3, ... Graduaciones del selector Graduaciones de velocidad, par motor o
I, II, III, posición. Un número más alto significa
Velocidad sin carga Velocidad rotacional sin carga
superficie, órbitas, etc., por minuto
mayor velocidad
Selector infinitamente variable con La velocidad aumenta desde la
apagado graduación de 0
Flecha Acción en la dirección de la flecha
Corriente alterna Tipo o una característica de corriente
Corriente continua Tipo o una característica de corriente
Corriente alterna o continua Tipo o una característica de corriente
Construcción de clase II Designa las herramientas de construcción
con aislamiento doble.
Terminal de toma de tierra Terminal de conexión a tierra
Símbolo de advertencia Alerta al usuario sobre mensajes de
advertencia
Sello RBRC de Ni-Cd Designa el programa de reciclaje de baterías
de Ni-Cd
que
Este símbolo indica que esta
herramienta está catalogada
por Underwriters
Laboratories.
Este símbolo indica que esta
herramienta está catalogada
por la Canadian Standards
Association.
Este símbolo
Underwriters Laboratories ha
catalogado esta herramienta
indicando que cumple las
normas canadienses.
Este símbolo indica que esta
herramienta está catalogada por
Underwriters Laboratories y que
Underwriters Laboratories la ha
catalogado según las normas
canadienses.
indica
Este símbolo
indica que esta
herramienta
cumple con la
norma mexicana
oficial (NOM).
-25-
Page 26

SM 2610948764 04-07 4/25/07 9:02 AM Page 26
Descripción funcional y especificaciones
!
ADVERTENCIA
Desconecte el paquete de baterías de la herramienta o ponga el interruptor en la
posición fijada o de apagado antes de hacer cualquier ensamblaje, ajustes o cambiar
accesorios. Dichas medidas preventivas de seguridad reducen el riesgo de arrancar la herramienta
accidentalmente.
Aspiradora inalámbrica
FIG. 1
BOTÓN DE
LIBERACIÓN DE
CEPILLO
ACCESORIO
BOQUILLA
RINCONERA
BOTÓN DE LIBERACIÓN DEL
RECIPIENTE PARA POLVO
FILTRO
LA BATERÍA
BOTÓN DEL INDICADOR DE
COMBUSTIBLE DE LA BATERÍA
INTERRUPTOR CORREDIZO
"ON/OFF"
(DE ENCENDIDO Y APAGADO)
SELLO DEL
FILTRO
RECIPIENTE
PARA POLVO
Herramienta
Número de modelo
Tensión nominal
2810
18 V
Paquete de baterías SB18A y SB18B
Cargador SC118 o SC118B
Tensión nominal 120 V 60 Hz
-26-
CAJA DEL
MOTOR
PAQUETE DE
BATERÍAS
Page 27

SM 2610948764 04-07 4/25/07 9:02 AM Page 27
Ensamblaje
INSTALACIÓN Y REMOCIÓN DE ACCESORIOS
!
ADVERTENCIA
ponga el interruptor en la posición fijada o de
apagado antes de hacer cualquier ensamblaje,
ajustes o cambiar accesorios.
1. Para realizar la instalación, empuje el accesorio
deseado completamente al interior del recipiente para
polvo (Fig. 2).
Para quitar el accesorio, simplemente tire de él hasta
sacarlo del recipiente para polvo.
Desconecte el paquete de
baterías de la herramienta o
Instrucciones de funcionamiento
INTERRUPTOR CORREDIZO "ON/OFF"
La herramienta puede encenderse con el interruptor
corredizo ubicado en la parte superior de la caja del motor.
PARA ENCENDER LA HERRAMIENTA, deslice el
interruptor hacia adelante.
PARA APAGAR LA HERRAMIENTA, deslice el
interruptor hacia atrás.
1. Oprima el botón de liberación del recipiente para
polvo y quite el recipiente para polvo (Fig. 1).
2. Tire del sello del filtro hacia fuera, hasta sacarlo
completamente del recipiente para polvo, y saque el
polvo del recipiente para polvo hasta que éste quede
vacío (Fig. 1).
3. Deslice el filtro hacia fuera, hasta sacarlo del sello del
filtro, y golpee suavemente el polvo para sacarlo del
filtro (Fig. 3).
FIG. 3
(DE ENCENDIDO Y APAGADO)
VACIADO DEL RECIPIENTE PARA POLVO
SELLO DEL
FILTRO
FILTRO
RECIPIENTE
P
ARA POLVO
ACCESORIO
FIG. 2
4. Deslice el filtro de vuelta al interior del sello del filtro
y empuje el sello del filtro completamente al interior del
recipiente para polvo (Fig. 3).
5. Empuje el recipiente para polvo sobre la carcasa
hasta que quede fijo en su sitio (Fig. 1).
La línea de lleno mostrada en
el recipiente para polvo se
debería usar como un
indicador cuando se recojan
líquidos con la aspiradora.
Esta línea de lleno índica el
nivel máximo que los líquidos
pueden alcanzar dentro del
recipiente para polvo. La
aspiradora no se debe llenar
nunca por encima de la línea
de lleno; vacíe el recipiente para polvo con el fin de evitar
esta situación. La máxima capacidad de agua es de
aproximadamente tres onzas líquidas.
No incline la aspiradora cuando haya líquidos en el
recipiente para polvo.
No utilice nunca la aspiradora para recoger líquidos
inflamables o combustibles, tales como gasolina; el
motor se podría incendiar.
INDICADOR DE LÍNEA DE LLENO
INDICADOR
DE LÍNEA
DE LLENO
INDICADOR DE ESTADO CARGADO DE LA BATERÍA
La batería está equipada con un indicador de estado
cargado (Fig. 1). Las luces indicadoras muestran el
estado cargado de la batería durante el proceso de
trabajo.
Al oprimir el botón del indicador de combustible de la
batería, el estado cargado también se puede comprobar
cuando se quita la batería o cuando la máquina no se
está utilizando.
• • • Cuando las tres luces están encendidas, esto indica
que el paquete de batería está completamente cargado.
• • Cuando solamente dos luces están encendidas,
esto indica que el paquete de batería está parcialmente
cargado.
• Cuando solamente se enciende una luz, esto indica
que el paquete de batería está ligeramente cargado.
Cuando no se enciende ninguna luz, esto indica que el
paquete de batería está completamente descargado.
LIBERACION E INSERCION DEL
Suelte el paquete de batería de la herramienta
oprimiendo el botón de liberación de la batería y
deslizando el paquete hasta sacarlo de la base del
mango (Fig. 1). Para introducir la batería, alinee la
batería e introduzca el paquete de baterías en la
herramienta hasta que quede fijo en su posición. No lo
fuerce.
-
27
-
PAQUETE DE BATERÍAS
Page 28

SM 2610948764 04-07 4/25/07 9:02 AM Page 28
CARGA DEL PAQUETE DE BATERÍAS (CARGADOR ESTÁNDAR)
Enchufe el cordón del cargador en un tomacorriente
estándar y luego deslice el paquete de batería al interior
del cargador (Fig. 4). La luz verde del cargador se
encenderá. La luz verde permanecerá encendida
mientras el cargador esté enchufado, y no se apaga.
Después del uso normal, el paquete de batería requiere
un tiempo de carga de aproximadamente 3 horas o
menos para cargarse completamente. Si el paquete de
batería se descarga completamente, es posible que
requiera un tiempo de carga de hasta 5 horas para
cargarse completamente.
Cuando el paquete de baterías esté completamente
cargado, desenchufe el cargador (a menos que vaya a
cargar otro paquete de baterías) y deslice el paquete de
baterías de vuelta en el interior del mango de la
herramienta.
FIG. 4
CARGADOR
LUZ INDICADORA
CARGA DEL PAQUETE DE BATERÍAS (CARGADOR RÁPIDO)
Enchufe el cordón en un tomacorriente estándar y luego
deslice el paquete de batería al interior del cargador
(Fig. 5).
El indicador verde del cargador comenzará a
"PARPADEAR". Esto indica que la batería está recibiendo
una carga rápida. La carga rápida se detendrá
automáticamente cuando el paquete de baterías esté
completamente cargado.
Cuando la luz indicadora deje de "PARPADEAR" (y pase
a ser una luz verde constante), la carga rápida se habrá
completado.
Cuando comience el proceso de carga del paquete de
baterías, una luz verde constante también podría
PAQUETE DE
BATERÍAS
significar que el paquete de baterías está demasiado
caliente o demasiado frío.
El propósito de la luz es indicar que el paquete de
baterías se está cargando rápidamente. No indica el
punto exacto de carga completa. La luz dejará de
parpadear en menos mas tiempo hora si el paquete de
baterías no estaba completamente descargado.
Cuando el paquete de baterías esté completamente
cargado, desenchufe el cargador (a menos que vaya a
cargar otro paquete de baterías) y deslice el paquete de
baterías de vuelta en el interior del mango de la
herramienta.
PAQUETE DE
BATERÍAS
FIG. 5
CARGADOR
LUZ INDICADORA
-28-
Page 29

SM 2610948764 04-07 4/25/07 9:02 AM Page 29
NOTAS IMPORTANTES PARA CARGAR
1. El paquete de baterías acepta únicamente alrededor
del 80 por ciento de su capacidad máxima en los
primeros ciclos de carga. Sin embargo, después de los
primeros ciclos de carga, la batería se cargará hasta su
capacidad máxima.
2. El cargador fue diseñado para cargar la batería
rápidamente sólo cuando la temperatura de la batería
está entre 4°C (40°F) y 41°C (105°F).
3. Un descenso considerable en el tiempo de
funcionamiento por carga puede significar que el
paquete de baterías se está acercando al final de su vida
y que debe ser sustituido.
4. Si espera que haya largos períodos (es decir, un mes
o más) en los que no se use la herramienta, lo mejor es
hacerla funcionar hasta que esté completamente
descargada antes de guardar el paquete de baterías.
Después de un largo período de almacenamiento, la
capacidad después de la primera recarga será más baja.
La capacidad normal se restaurará en dos o tres ciclos
de carga/descarga. Recuerde desenchufar el cargador
durante el período de almacenamiento.
5. Si la batería no carga adecuadamente:
a. Compruebe que hay tensión en el tomacorriente
enchufando algún otro dispositivo eléctrico.
b. Compruebe si el tomacorriente está conectado a
un interruptor de luz que corta el suministro de energía
cuando se apagan las luces.
c. Compruebe si hay suciedad en las terminales del
paquete de baterías. Si es necesario, límpielas con un
pedazo de algodón.
d. Si usted sigue sin obtener una carga adecuada,
lleve o envíe la herramienta, el paquete de baterías y el
cargador al Centro de servicio Skil local.
Nota: La utilización de cargadores o paquetes de batería
no vendidos por Skil anulará la garantía.
-29-
Page 30

SM 2610948764 04-07 4/25/07 9:02 AM Page 30
Montaje del cargador
MONTAJE DEL CARGADOR EN UNA
SUPERFICIE VERTICAL
Para brindar conveniencia, el cargador fue diseñado
para que se pueda utilizar en una superficie horizontal
plana o se pueda montar en una superficie vertical. El
clip de montaje también tiene un área de
almacenamiento de brocas en su parte superior.
1. Seleccione la ubicación de montaje cerca de un
tomacorriente eléctrico para que el enchufe llegue al
tomacorriente. Compruebe si hay postes de pared u otro
soporte.
2. Utilizando un lápiz, marque dos lugares en la superficie
en una línea vertical, separados aproximadamente 3/4".
3. Sujete firmemente el clip de montaje a la superficie
vertical utilizando dos tornillos de cabeza redonda No. 8
(Fig. 6).
FIG. 6
SUPERFICIE
VERTICAL
TORNILLOS DE
CABEZA REDONDA
NO. 8 PARA MADERA
CLIP DE
MONTAJE
4. Saque el paquete de batería del cargador antes de
realizar el montaje.
5. Introduzca el mango del cargador en el clip de
montaje en posición horizontal (Fig. 7).
6. Baje suavemente el cargador hasta la posición
vertical, hasta que esté plano contra la superficie vertical
y se bloquee en el clip de montaje (Fig. 8).
7. Para quitar el cargador cuando se desee, súbalo de
vuelta a la posición horizontal para desbloquearlo y
luego saque el cargador del clip de montaje (Fig. 8).
8. Para cargar el paquete de batería, simplemente
deslice dicho paquete al interior del cargador (Fig. 9).
FIG. 7
CARGADOR
COMPARTIMIENTO DE
ALMACENAMIENTO DE BROCAS
CLIP DE
MONTAJE
FIG. 8
PARA
DESBLOQUEAR
PARA
BLOQUEAR
FIG. 9
PAQUETE DE
BATERÍA
CARGADOR
-30-
Page 31

SM 2610948764 04-07 4/25/07 9:02 AM Page 31
Mantenimiento
Servicio
!
ADVERTENCIA
AJUSTADAS O REPARADAS POR EL USUARIO. El
mantenimiento preventivo realizado por personal no
autorizado pude dar lugar a la colocación incorrecta
de cables y componentes internos que podría
constituir un peligro serio. Recomendamos que todo
el servicio de las herramientas sea realizado en un
Centro de servicio de fábrica Skil o en una Estación de
servicio Skil autorizada. TECNICOS DE REPARACIONES:
Desconecten la herramienta y/o el cargador de la fuente
de energía antes de realizar servicio de ajustes y
reparaciones.
Esté alerta a los paquetes de baterías que estén
aproximándose al final de su vida útil. Si observa una
disminución del rendimiento de la herramienta o un
tiempo de funcionamiento significativamente más corto
entre cargas, entonces ha llegado el momento de
cambiar el paquete de baterías. Si no se hace esto, el
resultado puede ser que la herramienta funcione
incorrectamente o que el cargador se dañe.
Cuando la batería se almacene a largo plazo, debe
estar en estado de descarga. Los paquetes de baterías
duran más y se recargan mejor cuando se almacenan
descargados. Recuerde recargar completamente los
paquetes de baterías antes de utilizarlos después de un
almacenamiento prolongado.
NO HAY PIEZAS EN EL
INTERIOR QUE PUEDAN SER
BATERÍAS
LUBRICACION DE LAS HERRAMIENTAS
Su herramienta Skil ha sido lubricada adecuadamente y
está lista para la utilización.
MOTORES “CORRIENTE DIRECTA”
El motor de la herramienta ha sido diseñado para
muchas horas de servicio fiable. Para mantener un
rendimiento óptimo del motor, recomendamos que éste
sea examinado cada seis meses. Sólo se debe usar un
motor de repuesto Skil genuino diseñado especialmente
para la herramienta.
Limpieza
!
ADVERTENCIA
herramienta y/o el cargador de la fuente de energía
antes de la limpieza. La herramienta se puede limpiar
más eficazmente con aire comprimido seco. Use gafas
de seguridad siempre que limpie herramientas con
aire comprimido.
Las aberturas de ventilación y las palancas de
interruptor deben mantenerse limpias y libres de
materias extrañas. No intente limpiar introduciendo
objetos puntiagudos a través de las aberturas.
!
PRECAUCION
plástico. Algunos de estos son: gasolina, tetracloruro
de carbono, disolventes de limpieza clorados, amoníaco
y detergentes domésticos que contienen amoníaco.
Para evitar accidentes,
desconecte siempre la
Ciertos agentes de limpieza y
disolventes dañan las piezas de
Accesorios
!
ADVERTENCIA
cordón con conductores de tamaño adecuado que sea
capaz de transportar la corriente necesaria para la
herramienta.
pérdida de potencia o recalentamiento. Las herramientas
conectadas a tierra deben usar cordones de extensión de
3 hilos que tengan enchufes de 3 terminales y
receptáculos para 3 terminales.
NOTA: Cuanto más pequeño es el número de calibre,
más grueso es el cordón.
Si es necesario un cordón de
extensión, se debe usar un
Esto evitará caídas de tensión excesivas,
TAMAÑOS RECOMENDADOS DE CORDONES DE EXTENSION
HERRAMIENTAS DE 120 V CORRIENTE ALTERNA
Capacidad
nominal en
amperes de la
herramienta
3-6
6-8
8-10
10-12
12-16
Tamaño del cordón en A.W.G.
Longitud del cordón en pies
25 50 100 150 15 30 60 120
18 16 16 14 0,75 0,75 1,5 2,5
18 16 14 12 0,75 1,0 2,5 4,0
18 16 14 12 0,75 1,0 2,5 4,0
16 16 14 12 1,0 2,5 4,0 —
14 12 — — — — — —
Tamaños del cable en mm
Longitud del cordón en metros
-31-
2
Page 32

SM 2610948764 04-07 4/25/07 9:02 AM Page 32
IMITED WARRANTY OF SKIL CONSUMER PORTABLE, BENCHTOP AND HD AND SHD HEAVY DUTY POWER TOOLS
L
Robert Bosch Tool Corporation ("Seller") warrants to the original purchaser only, that all SKIL consumer portable, benchtop and HD and SHD Heavy Duty power tools
will be free from defects in material or workmanship for a period of one year from date of purchase. SKIL Benchtop and consumer portable power tool models will be
free from defects in material or workmanship for a period of ninety days if the tool is used for professional use.
SELLER’S SOLE OBLIGATION AND YOUR EXCLUSIVE REMEDY under this Limited Warranty and, to the extent permitted by law, any warranty or condition implied
by law, shall be the repair or replacement of parts, without charge, which are defective in material or workmanship and which have not been misused, carelessly
handled, or misrepaired by persons other than Seller or Authorized Service Station. To make a claim under this Limited Warranty, you must return the complete
product, transportation prepaid, to any SKIL Factory Service Center or Authorized Service Station. For Authorized SKIL Power Tool Service Stations, please visit
www.skil.com or call 1-877-SKIL-999 (1-877-754-5999).
THIS LIMITED WARRANTY DOES NOT APPLY TO ACCESSORY ITEMS SUCH AS CIRCULAR SAW BLADES, DRILL BITS, ROUTER BITS, JIGSAW BLADES,
SANDING BELTS, GRINDING WHEELS AND OTHER RELATED ITEMS.
ANY IMPLIED WARRANTIES SHALL BE LIMITED IN DURATION TO ONE YEAR FROM DATE OF PURCHASE. SOME STATES IN THE U.S., SOME CANADIAN
PROVINCES DO NOT ALLOW LIMITATIONS ON HOW LONG AN IMPLIED WARRANTY LASTS, SO THE ABOVE LIMITATION MAY NOT APPLY TO YOU.
IN NO EVENT SHALL SELLER BE LIABLE FOR ANY INCIDENTAL OR CONSEQUENTIAL DAMAGES (INCLUDING BUT NOT LIMITED TO LIABILITY FOR LOSS OF
PROFITS) ARISING FROM THE SALE OR USE OF THIS PRODUCT. SOME STATES IN THE U.S. AND SOME CANADIAN PROVINCES DO NOT ALLOW THE
EXCLUSION OR LIMITATION OF INCIDENTAL OR CONSEQUENTIAL DAMAGES, SO THE ABOVE L IMITA TION OR EXCLUSION MAY NOT APPLY TO YOU.
THIS LIMITED WARRANTY GIVES YOU SPECIFIC LEGAL RIGHTS, AND YOU MAY ALSO HAVE OTHER RIGHTS WHICH VARY FROM STATE TO STATE IN THE
U.S., PROVINCE TO PROVINCE IN CANADA AND FROM COUNTRY TO COUNTRY.
T
HIS LIMITED WARRANTY APPLIES ONLY TO PRODUCTS SOLD WITHIN THE UNITED STATES OF AMERICA, CANADA AND THE COMMONWEALTH OF PUERTO
RICO. FOR WARRANTY COVERAGE WITHIN OTHER COUNTRIES, CONTACT YOUR LOCAL SKIL DEALER OR IMPORTER.
GARANTIE LIMITÉE DES OUTILS ÉLECTRIQUES GRAND PUBLIC SKIL PORTATIFS, DE TABLE ET POUR USAGE INDUSTRIEL HD ET SHD
Robert Bosch Tool Corporation (le « Vendeur ») garantit à l'acheteur initial seulement que tous les outils électriques grand public SKIL portatifs, de table et pour
usage industriel HD et SHD seront exempts de vices de matériau ou de façon pendant une période d'un an depuis la date d'achat. Les modèles d'outils électriques
grand public SKIL portatifs et de table seront exempts de vices de matériau ou de façon pendant une période de quatre-vingt-dix jours si l'outil est utilisé
professionnellement.
L
A SEULE OBLIGATION DU VENDEUR ET LE SEUL RECOURS DE L’ACHETEUR sous la présente garantie limitée, et dans la mesure où la loi le permet sous toute
garantie ou condition implicite qui en découlerait, sera l’obligation de remplacer ou réparer gratuitement les pièces défectueuses en termes de matériau ou de façon,
pourvu que lesdites défectuosités ne soient pas attribuables à un usage abusif ou à quelque réparation ou altération bricolée par quelqu’un d’autre que le Vendeur ou
le personnel d’une station-service agréée. En cas de réclamation sous la présente garantie limitée, l’acheteur est tenu de renvoyer l’outil complet en port payé à un
centre de service-usine SKIL ou une station-service agréée. Pour trouver les coordonnées de la station-service agréée SKIL la plus proche, veuillez visiter
www.skil.com ou téléphoner au 1-877-SKIL-999 (1-877-754-5999).
LA PRÉSENTE GARANTIE NE S’APPLIQUE PAS AUX ACCESSOIRES TELS QUE LAMES DE SCIE CIRCULAIRE, MÈCHES DE PERCEUSES, FERS DE TOUPIES, LAMES
DE SCIES SAUTEUSES, COURROIES DE PONÇAGE, MEULES ET AUTRES ARTICLES DU GENRE.
TOUTE GARANTIE IMPLICITE SERA LIMITÉE À UNE DURÉE À UN AN À COMPTER DE LA DATE D’ACHAT. COMME CERTAINS ÉTATS AMÉRICAINS ET CERTAINES
PROVINCES CANADIENNES N’ADMETTENT PAS LE PRINCIPE DE LA LIMITATION DE LA DURÉE DES GARANTIES IMPLICITES, IL EST POSSIBLE QUE LES
LIMITATIONS CI-DESSUS NE S’APPLIQUENT PAS À VOTRE CAS.
EN AUCUN CAS LE VENDEUR NE SAURAIT ÊTRE TENU POUR RESPONSABLE DES INCIDENTS OU DOMMAGES INDIRECTS (INCLUANT, MAIS NE SE LIMITANT
PAS AUX PERTES DE PROFITS) CONSÉCUTIFS À LA VENTE OU À L’USAGE DE CE PRODUIT. COMME CERTAINS ÉTATS AMÉRICAINS ET CERTAINES PROVINCES
CANADIENNES N’ADMETTENT PAS LE PRINCIPE DE LA LIMITATION OU DE L’EXCLUSION DES DOMMAGES INDIRECTS ET SECONDAIRES, IL EST POSSIBLE QUE
LES LIMITATIONS OU EXCLUSIONS CI-DESSUS NE S’APPLIQUENT PAS À VOTRE CAS.
CETTE GARANTIE LIMITÉE VOUS DONNE DES DROITS PRÉCIS, ET VOUS POUVEZ ÉGALEMENT AVOIR D'AUTRES DROITS QUI VARIENT D'UN ÉTAT À L'AUTRE
AUX ÉTATS-UNIS, D'UNE PROVINCE À L'AUTRE AU CANADA, ET D'UN PAYS À L'AUTRE.
CETTE GARANTIE LIMITÉE S'APPLIQUE UNIQUEMENT AUX OUTILS VENDUS AUX ÉTATS-UNIS D'AMÉRIQUE, AU CANADA ET DANS LE COMMONWEALTH DE
PORTO RICO. POUR CONNAÎTRE LA COUVERTURE DE GARANTIE DANS LES AUTRES PAYS, CONTACTEZ VOTRE IMPORTATEUR OU REVENDEUR SKIL LOCAL.
GARANTÍA LIMITADA PARA HERRAMIENTAS MECÁNICAS PORTÁTILES DE CONSUMO, DE BANCO Y DE SERVICIO PESADO HD y SHD DE SKIL
Robert Bosch Tool Corporation ("el Vendedor") garantiza, únicamente al comprador original, que todas las herramientas mecánicas portátiles de consumo, de
banco y de servicio pesado HD y SHD de SKIL estarán libres de defectos de material o de fabricación durante un período de un año a partir de la fecha de compra.
Los modelos de herramientas mecánicas de banco y portátiles de consumo de SKIL estarán libres de defectos de material o de fabricación durante un período de
noventa días si la herramienta se emplea para uso profesional.
LA ÚNICA OBLIGACIÓN DEL VENDEDOR Y EL RECURSO EXCLUSIVO QUE USTED TIENE bajo esta Garantía Limitada y, hasta donde la ley lo permita, bajo
cualquier garantía o condición implícita por ley, consistirá en la reparación o sustitución sin costo de las piezas que presenten defectos de material o de fabricación
y que no hayan sido utilizadas incorrectamente, manejadas descuidadamente o reparadas incorrectamente por personas que no sean el Vendedor o una Estación
de servicio autorizada. Para efectuar una reclamación bajo esta Garantía Limitada, usted debe devolver el producto completo, con el transporte prepagado, a
cualquier Centro de servicio de fábrica SKIL o Estación de servicio SKIL autorizada. Para localizar Estaciones de servicio autorizadas de herramientas mecánicas
SKIL, sírvase visitar www.skil.com o llame al 1-877-SKIL-999 (1-877-754-5999).
ESTA GARANTÍA LIMITADA NO SE APLICA A ARTÍCULOS ACCESORIOS TALES COMO HOJAS PARA SIERRAS CIRCULARES, BROCAS PARA TALADROS,
BROCAS PARA FRESADORAS, HOJAS PARA SIERRAS DE VAIVÉN, CORREAS PARA LIJAR, RUEDAS DE AMOLAR Y OTROS ARTÍCULOS RELACIONADOS.
TODAS LAS GARANTÍAS IMPLÍCITAS TENDRÁN UNA DURACIÓN LIMITADA A UN AÑO A PARTIR DE LA FECHA DE COMPRA. ALGUNOS ESTADOS DE LOS
EE.UU. Y ALGUNAS PROVINCIAS CANADIENSES NO PERMITEN LIMITACIONES EN CUANTO A LA DURACIÓN DE UNA GARANTÍA IMPLÍCITA, POR LO QUE ES
POSIBLE QUE LA LIMITACIÓN ANTERIOR NO SEA APLICABLE EN EL CASO DE USTED.
EL VENDEDOR NO SERÁ RESPONSABLE EN NINGÚN CASO DE NINGÚN DAÑO INCIDENTAL O EMERGENTE (INCLUYENDO PERO NO LIMITADO A
RESPONSABILIDAD POR PÉRDIDA DE BENEFICIOS) QUE SE PRODUZCA COMO CONSECUENCIA DE LA VENTA O UTILIZACIÓN DE ESTE PRODUCTO. ALGUNOS
ESTADOS DE LOS EE.UU. Y ALGUNAS PROVINCIAS CANADIENSES NO PERMITEN LA EXCLUSIÓN O LIMITACIÓN DE LOS DAÑOS INCIDENTALES O
EMERGENTES, POR LO QUE ES POSIBLE QUE LA LIMITACIÓN O EXCLUSIÓN ANTERIOR NO SEA APLICABLE EN EL CASO DE USTED.
ESTA GARANTÍA LIMITADA LE CONFIERE A USTED DERECHOS LEGALES ESPECÍFICOS Y ES POSIBLE QUE USTED TAMBIÉN TENGA OTROS DERECHOS QUE
VARÍAN DE ESTADO A ESTADO EN LOS EE.UU., DE PROVINCIA A PROVINCIA EN CANADÁ Y DE PAÍS EN PAÍS.
ESTA GARANTÍA LIMITADA SE APLICA SÓLO A LOS PRODUCTOS VENDIDOS EN LOS ESTADOS UNIDOS DE AMÉRICA, CANADÁ Y EL ESTADO LIBRE ASOCIADO
DE PUERTO RICO. PARA COBERTURA DE GARANTÍA EN OTROS PAÍSES, PÓNGASE EN CONTACTO CON SU DISTRIBUIDOR O IMPORTADOR LOCAL DE SKIL.
© Robert Bosch Tool Corporation 1800 W. Central Road Mt. Prospect, IL 60056-2230
Exportado por: Robert Bosch Tool Corporation Mt. Prospect, IL 60056-2230, E.U.A.
Importado a México por: Robert Bosch, S.A. de C.V., Calle Robert Bosch No. 405, Zona Industrial,
Toluca, Edo. de México, C.P. 50070, Tel. (722) 2792300
2610948764 04/07
Printed in China
 Loading...