

Page 1
·
.:.;
., .!
.'.
. •. ·;.·:r.:--
'.'
....
,t·. ~'...•.
..•.'.j
.J • .--
.
..:.
...•..
-.-
,'.,
-,
-,
:~
..
.
,:
instruction
->§-:.
SKIL
CORPORA TlON,
...
5033
N.
60630
-s .
_<f
i-'
<;
-:-;
.--
'.
-.-:- ...•
~.
::--:
.
Page 2
2
CHAI-NSAW SAFETY
Wear safety gl~sses,. a:~af~~ .~:~~I~t;-.~af~tY:to~t~ea~ :',gloves and .sniJ~~ritti1'l9
clothing.' . ..... '0,. ,.
i:"
>:'-."7:' .(· ••
"\~"Jt,s
.:Jl.:..~~,~
Never start cutting until you nave a clear place to work, a secure place to
stand and a safe exit from ,lil11~~5~~i,:~~~s._
• Keep all .bvstanders at <;I'.sa:fe,;:(ESta.f!~e~~{rQ.m0Jor.~a~~~,.
• Cut' awav fro~ your bo'd~"~~t~~f'i"ti~~~," ~h~ngi~g your position
if
necessary
to work safely,
a
Stand behind and In line with engine end of saw, never beside it when engine
is running. .: .
• ' AI~a¥s:;~;ld;':~~~~w firmly with both hands. Use grip (shown on page
6)
with the thumb on the underside of the hand lebar, qpposing the fingers,
• When cutting limbs of a fallen tree, .do not stand on the tree. Use caution
;,', . wh&n~cut~i';,g'~lim-b-s supporting the fallen tree.
"" ,~.: « : .~~ ::;;
:::.=. ~, ".
;j;"",<:."
whli:ii' 6ud~lriil,'i, (Cutting) always stand
on
high side of log, place pivot point
-.. agaInst log: and use both hands on .saw. (See Stress Analys~~, page 7J
• Do not .carrv the saw in runninq condition. Always shut '~ngine off before
filling oil or gas tank.
-, .;,.:,~,. When carrying saw, grasp top handle with bar and chain pointing to rear .
.L'~;t:~t:~
,',<;:AUTION: Exhaust deflector is normally hot after saw is used and could
;"~~,Js:~t{-~..
~;C1:~~"
a serious burn.
"i¥_
':C--hifC'k~hain tension frequently.
?t;~',~r
7~..•
~.~:.~*;"i:.~~;:~~~_" . ..
• -:>~~,;e·i{,~tffiJn,~~~ution when cutting-small size brush and saplings because slender
mi'H~h,;it:;ma:y';-
';ap the chain -and .whip toward you or pull you off balance .
.:.t.\i~:'~~}~~"~':,,.'.~~.
'1':'i. ,~~;.
• Extra:¥.~b~j", .J~;}.le on h~nd. When
chain
is damaged it
~(;),JM~,
be taken ,_
off saw rmrn: .t~;I,y-);t9'T;servicsnq or replacement.
..,;:[--'c",."";''-'':'5,
"~'~:":~'~':;:~~~:);;;.:.~::';:i;~+-":.
-V"". ~ '_""
.~~>~..~ ~:.~'
':"7'';~~1
• During operatiR,?X:fcub?~fj~P~ at a,:.tirn~~i1ever let the. fi~~ ..qf_:$e,:;li,ar touch
the ground, ano~her~~Q.!L#h15i:~nch ,or:;,-any obstruction: ~"'-,' ·t:~:'1./
• Do not smoke whilt:·t~~j~~~~fin~~J~.i,ngthe:?~: ..~
;<i:-'
-,3,:f~/;':lf
• Operate the chain sawcii!~Y"
~p.ga
w_el~~~l)tiljiWL~r~c .
• . ." ,,\~/":?";'. -
:.~:·:~-~;Si:~:.... - ~
-,,£!~~.
• If fuelISspilled on saw, wipe 'Clean'NY~t'!,:<l.f'ag. If fu'e
bury heavily with dirt. ..
,,!:::~;;.,
c..'·i~::,:; .
1"'~"" : " •• "
• Alway-s handle fuel in safety type
,fuet~l1s
;iba):
use' ·glass or plastic bottles. }' ~"
~~'~::f~';'~"/
i., • .: _ •.,,_ ••.••
., .' .-~~..«s: ,- -.;.'.(.~,..:;:.~":~'
;:.!. .'~' ,
• BE SURE YOU HAVE READ ALL SA'fETY~RtfI~E$ AND UNDE-RSTAND:
.ALL THE INSTRUCTIONS IN TH.lS MANUAi..:::'iF-;-€i;R';SAFE OPER"A"fiOI'ii
OF THE TOOL. .'
!1..
···i~}~\.:",,~:~:~::,_
SAFETY
THEN
FIRST
SAW
~.;.. ".r·~,
S~£Cco'f~~~'tION
\
.
.
-.
..
-',
.'
.
•...
~'¥, }-
..•...
~
./
/
.
.;
,
l
'"
_- • .,J
yt~~
- 1
..~....!
Page 3

2
CHAI-NSAW SAFETY
Wear safety gl~sses,. a:~af~~ .~:~~I~t;-.~af~tY:to~t~ea~ :',gloves and .sniJ~~ritti1'l9
clothing.' . ..... '0,. ,.
i:"
>:'-."7:' .(· ••
"\~"Jt,s
.:Jl.:..~~,~
Never start cutting until you nave a clear place to work, a secure place to
stand and a safe exit from ,lil11~~5~~i,:~~~s._
• Keep all .bvstanders at <;I'.sa:fe,;:(ESta.f!~e~~{rQ.m0Jor.~a~~~,.
• Cut' awav fro~ your bo'd~"~~t~~f'i"ti~~~," ~h~ngi~g your position
if
necessary
to work safely,
a
Stand behind and In line with engine end of saw, never beside it when engine
is running. .: .
• ' AI~a¥s:;~;ld;':~~~~w firmly with both hands. Use grip (shown on page
6)
with the thumb on the underside of the hand lebar, qpposing the fingers,
• When cutting limbs of a fallen tree, .do not stand on the tree. Use caution
;,', . wh&n~cut~i';,g'~lim-b-s supporting the fallen tree.
"" ,~.: « : .~~ ::;;
:::.=. ~, ".
;j;"",<:."
whli:ii' 6ud~lriil,'i, (Cutting) always stand
on
high side of log, place pivot point
-.. agaInst log: and use both hands on .saw. (See Stress Analys~~, page 7J
• Do not .carrv the saw in runninq condition. Always shut '~ngine off before
filling oil or gas tank.
-, .;,.:,~,. When carrying saw, grasp top handle with bar and chain pointing to rear .
.L'~;t:~t:~
,',<;:AUTION: Exhaust deflector is normally hot after saw is used and could
;"~~,Js:~t{-~..
~;C1:~~"
a serious burn.
"i¥_
':C--hifC'k~hain tension frequently.
?t;~',~r
7~..•
~.~:.~*;"i:.~~;:~~~_" . ..
• -:>~~,;e·i{,~tffiJn,~~~ution when cutting-small size brush and saplings because slender
mi'H~h,;it:;ma:y';-
';ap the chain -and .whip toward you or pull you off balance .
.:.t.\i~:'~~}~~"~':,,.'.~~.
'1':'i. ,~~;.
• Extra:¥.~b~j", .J~;}.le on h~nd. When
chain
is damaged it
~(;),JM~,
be taken ,_
off saw rmrn: .t~;I,y-);t9'T;servicsnq or replacement.
..,;:[--'c",."";''-'':'5,
"~'~:":~'~':;:~~~:);;;.:.~::';:i;~+-":.
-V"". ~ '_""
.~~>~..~ ~:.~'
':"7'';~~1
• During operatiR,?X:fcub?~fj~P~ at a,:.tirn~~i1ever let the. fi~~ ..qf_:$e,:;li,ar touch
the ground, ano~her~~Q.!L#h15i:~nch ,or:;,-any obstruction: ~"'-,' ·t:~:'1./
• Do not smoke whilt:·t~~j~~~~fin~~J~.i,ngthe:?~: ..~
;<i:-'
-,3,:f~/;':lf
• Operate the chain sawcii!~Y"
~p.ga
w_el~~~l)tiljiWL~r~c .
• . ." ,,\~/":?";'. -
:.~:·:~-~;Si:~:.... - ~
-,,£!~~.
• If fuelISspilled on saw, wipe 'Clean'NY~t'!,:<l.f'ag. If fu'e
bury heavily with dirt. ..
,,!:::~;;.,
c..'·i~::,:; .
1"'~"" : " •• "
• Alway-s handle fuel in safety type
,fuet~l1s
;iba):
use' ·glass or plastic bottles. }' ~"
~~'~::f~';'~"/
i., • .: _ •.,,_ ••.••
., .' .-~~..«s: ,- -.;.'.(.~,..:;:.~":~'
;:.!. .'~' ,
• BE SURE YOU HAVE READ ALL SA'fETY~RtfI~E$ AND UNDE-RSTAND:
.ALL THE INSTRUCTIONS IN TH.lS MANUAi..:::'iF-;-€i;R';SAFE OPER"A"fiOI'ii
OF THE TOOL. .'
!1..
···i~}~\.:",,~:~:~::,_
SAFETY
THEN
FIRST
SAW
~.;.. ".r·~,
S~£Cco'f~~~'tION
\
.
.
-.
..
-',
.'
.
•...
~'¥, }-
..•...
~
./
/
.
.;
,
l
'"
_- • .,J
yt~~
- 1
..~....!
Page 4
,.
.
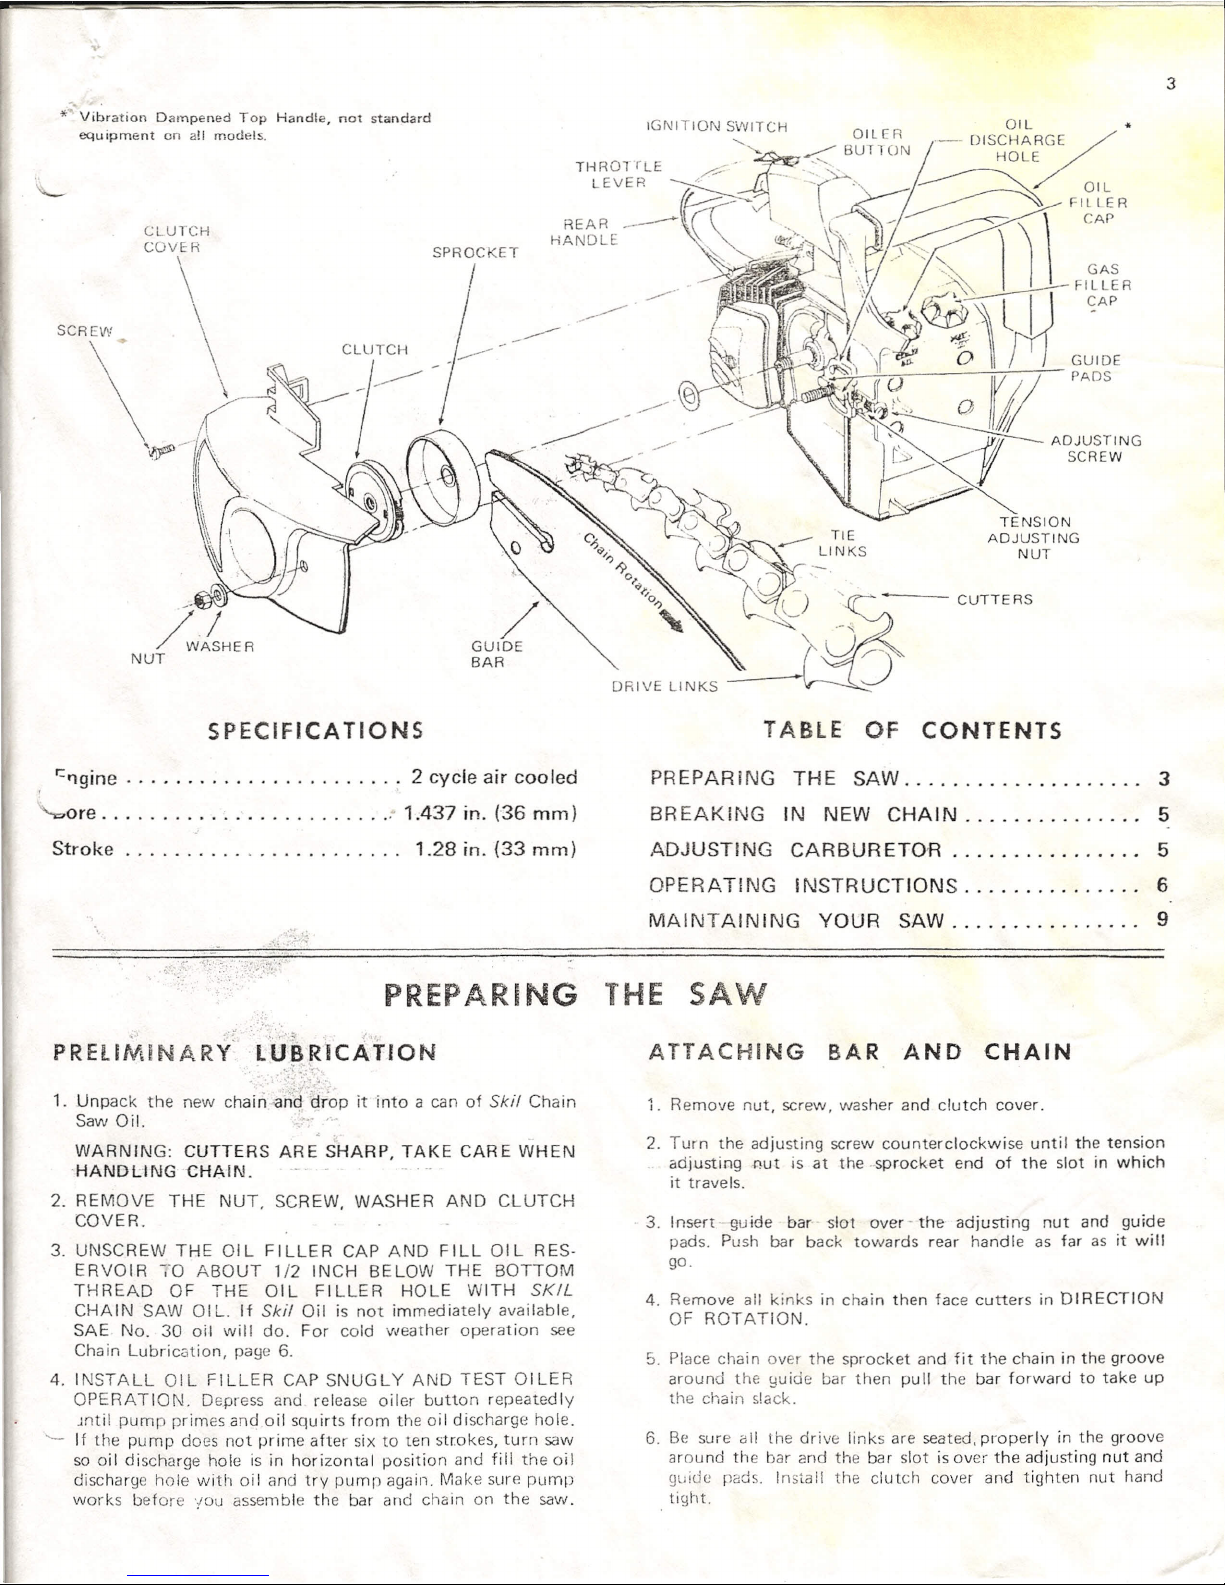
"", Vibration Dampened Top
Handle,
not standard
equ
iprne ntona!1
models.
SPROCKET
I
SCREVI/
/
GUIDE
BAR
SPECIFICATIONS
'=I')gine ,
2
cycle air cooled
are ' 1.437
in.
(36 mm)
Stroke. , 1.28 in. (33 mm)
3
TENSION
ADJUSTING
NUT
CUTTERS
DRIVE LINKS
TABLE OF CONTENTS
PREPARING THE SAW 3
BREAKING IN NEW CHAIN 5
ADJUSTING CARBURETOR................ 5
OPERATING INSTRUCTIONS 6
MAINTAINING YOUR SAW 9
PREPARING THE SAW
PRELIMiNARY'
t'tJ~R;ICAtION
•...
-,
~
-:
1. Unpack the new chain .an~/~;op it into a can of
Ski!
Chain
Saw Oil.
WARNING: CUTTERS ARE SHARP, TAKE CARE WHEN
·HANDUNGCHAIN.
2.
REMOVE THE NUT, SCREW, WASHER AND CLUTCH
COVER.
3.
UNSCREW THE OIL FILLER CAP AND FILL OIL RES·
ERVOIR
-;-0
ABOUT
1i2
INCH BELOW THE BOTTOM
THREAD OF THE OIL FILLER HOLE WITH
SKIL
CHAIN SAW01L. If
Ski!
Oil is not immediately available,
SAE No. 30 oil will do. For cold weather operation see
Chain Lubrication, page
6.
4.
INSTALL OIL FILLER CAP SNUGLY AND TEST OILER
OPERATION. Depress and release oiler button repeatedly
.mtil
pump primes and oil squirts from the oil discharge hole.
'- If the pump does not prime after six to ten
strokes,
turn saw
so oil discharge hole is in horizontal position and fill the oil
discharge hole with oil and try pump again. Make sure pump
works before
'IOU
assemble the bar and chain on the saw.
ATTACHING BAR
AND CHAIN
1.
Remove nut, screw, washer and clutch cover.
2.
Turn the adjusting screw counterclockwise until the tension
adjusting Rut is at the .sprocket end of the slot in which
it travels.
3. Insert guide bar slot over- the adjusting nut and guide
pads. Push bar back towards rear handIe as far as it wi II
go.
4.
Remove all kinks in chain then face cutters in DIRECTION
OF ROTATION.
5.
Place chain over the sprocket and fit the chain in the groove
around the guide bar then puII the bar forward to take up
the chain slack.
6.
Be sure all the drive links are seated,properly in the groove
around the bar and the bar slot is
over
the adjusting nut and
guide pads. Install the clutch cover
and
tighten nut hand
tight.
Page 5

,.
.
"", Vibration Dampened Top
Handle,
not standard
equ
iprne ntona!1
models.
SPROCKET
I
SCREVI/
/
GUIDE
BAR
SPECIFICATIONS
'=I')gine ,
2
cycle air cooled
are ' 1.437
in.
(36 mm)
Stroke. , 1.28 in. (33 mm)
3
TENSION
ADJUSTING
NUT
CUTTERS
DRIVE LINKS
TABLE OF CONTENTS
PREPARING THE SAW 3
BREAKING IN NEW CHAIN 5
ADJUSTING CARBURETOR................ 5
OPERATING INSTRUCTIONS 6
MAINTAINING YOUR SAW 9
PREPARING THE SAW
PRELIMiNARY'
t'tJ~R;ICAtION
•...
-,
~
-:
1. Unpack the new chain .an~/~;op it into a can of
Ski!
Chain
Saw Oil.
WARNING: CUTTERS ARE SHARP, TAKE CARE WHEN
·HANDUNGCHAIN.
2.
REMOVE THE NUT, SCREW, WASHER AND CLUTCH
COVER.
3.
UNSCREW THE OIL FILLER CAP AND FILL OIL RES·
ERVOIR
-;-0
ABOUT
1i2
INCH BELOW THE BOTTOM
THREAD OF THE OIL FILLER HOLE WITH
SKIL
CHAIN SAW01L. If
Ski!
Oil is not immediately available,
SAE No. 30 oil will do. For cold weather operation see
Chain Lubrication, page
6.
4.
INSTALL OIL FILLER CAP SNUGLY AND TEST OILER
OPERATION. Depress and release oiler button repeatedly
.mtil
pump primes and oil squirts from the oil discharge hole.
'- If the pump does not prime after six to ten
strokes,
turn saw
so oil discharge hole is in horizontal position and fill the oil
discharge hole with oil and try pump again. Make sure pump
works before
'IOU
assemble the bar and chain on the saw.
ATTACHING BAR
AND CHAIN
1.
Remove nut, screw, washer and clutch cover.
2.
Turn the adjusting screw counterclockwise until the tension
adjusting Rut is at the .sprocket end of the slot in which
it travels.
3. Insert guide bar slot over- the adjusting nut and guide
pads. Push bar back towards rear handIe as far as it wi II
go.
4.
Remove all kinks in chain then face cutters in DIRECTION
OF ROTATION.
5.
Place chain over the sprocket and fit the chain in the groove
around the guide bar then puII the bar forward to take up
the chain slack.
6.
Be sure all the drive links are seated,properly in the groove
around the bar and the bar slot is
over
the adjusting nut and
guide pads. Install the clutch cover
and
tighten nut hand
tight.
Page 6
4
ADJUSTING CHAIN TENSION
I. USING GLOVES OR A RAe TO PROTECT YOURSELF
r-ROM THE SHARP CUTTERS, PULL THE CHAIN
AROUND THE BAR BY HAND AND MAKE THE TEN-
S!ON AS TIGHT AS POSSIBLE WITHOUT CAUSING ANY
BIND BETWEEN THE CHAIN AND THE BAR. TURN
hiE ADJUSTING SCREW "CLOCKWISE" TO INCREASE
-,t.;NSION
,OR
"COUNTERCLOCKWISE" TO DECRE.ASE
'1
EN",ION.
~!
r.rr
r
UP GUIDE BAR NOSE. HOLD IT UP AND TIGHTEN
CLUi CH COVER NUT SECURELY USING A 6-INCH OR
SIViALLER OPEN END OR CRESCENT WRENCH.
FUELING THE SAW
The engine is lubricated
by
oil mixed with gasoline. The right
amount
of oil in the mixture is very important.
CAUTION: ALWAYS SHUT ENGINE OFF BEFORE FILL·
ING TANK.
1.
GASOLINE:
Use "regular", clean, fresh gasoline. (Premium grade
gasoline is not necessary).
Use properly identified container marked - "GASO·
LINE".
Do not use winter blend gasoline in summertime or
vice versa.
Do not use fuel which was stored longer than 2 months,
because starting the saw may be difficult. (Remove
old fuel mixture and dispose of it safelv l.
Do not use lead-free gasoline.
2.
OIL:
For best performance and longest service life, use
SKIL
Chair. Saw Oil.
If
SKIL
Chain Saw Oil is not available, use other good
blend 2-CYCLE01L - SAE-30-MS.
Do not use multi-grade oil (10W-30), or any oilsformu-
lated for 4-cycle engines.
3.
FUEL MIX
(16:
1!
Fuel mix
proportions
are: 16 parts of gasoline to 1 part
of oil. Use fOlio-wing chart:
FUEL MIX CHART
16:1
r--
GASO LINE
OIL
GASOLINE OIL
(u.s.
Gallons)
(Ounces) (Imperial Gallons)
(Ounces)
1/4 GAL.
2 OZ.
1/4 GAL.
2-1/2 OZ.
1/2 GAL.
4 OZ.
1/2 GAL.
5
OZ.
1
GAL.
8
OZ.
1 GAL.
10 OZ.
2 GAL. 16 OZ.
2 GAL. 20 OZ.
Select container 'with a flexible spout tor easy pouring.
Mark the container - "CHAIN SAW FUEL MIX".
ALWAYS MIX IN 16: 1 proportions, regardless of what
is indicated on the oil container.
<:
ALWAYS prepare the mixture in a separate conta iner
and mix THOROUGHLY (shake well) before pouring
Into fuel tank. (Never mix in fuel tank}.
Do not let dirt get into the gas tank while pouring.
Wipe the saw with a rag to remove spilled fuel.
STARTING
THE SAW
1. READ THE SAFETY RULES BEFORE ANY ATIEf
TO. START THE SAW.
2.
CHECI( CHAIN TEI\!SION.
3.
HOLD THE SAW BY THE REAR HANDLE FIRMLY IN
YOUR RIGHT HAND.
4.
SLIDE IGI\!ITION SWITCH TO THE "ON" P9SITI01\J.
5.
PULL CHOKE ALL THE WAY OUT. (It is not necessary
to choke a warm engine.!
6. POINT BAR AND CHAIN. AWAY FROIVI YOURSELF
AND ALL OTHER OBJECTS.
7.
SQUEEZE THROTTLE.
8.
GRASP STARTER HANDLE FIRMLY IN LEFT HAND,
AND SLOWLY PULL OUT UNTIL RESISTANCE IS FELT.
9.
PULL THE STARTER HANDLE FIRM AND FAST, AND
AT THE SAME TIME PUSH THE SAW AWAY FROM YOU
WITH YOUR RIGHT HAND. REPE~T UNTIL THE EN-
GIN E FIR ES. Do not pull ropeto it's end,to dosomaybreakrope.
10. WHEN THE ENGINE FIRES,PUSH THE CHOKE IN AND
RELEASE THE THROTTLE HALF WAY. (Cold engine
may require several pulls to
start.)
11. TO STOP ENGINE, PUSH IGNITION SWITCH TO "OFF".
Follow the aboveprocedureonly. If your sawdoesnot start10to
15
pulls on the rope,your sawis in needof maintenance. ---.;
Is the air filter clean?
Is the spark plug clean and properly gapped?
Is the carburetor adjusted?If not. perform steps1and2of
ADJUSTING CARBURETOR.
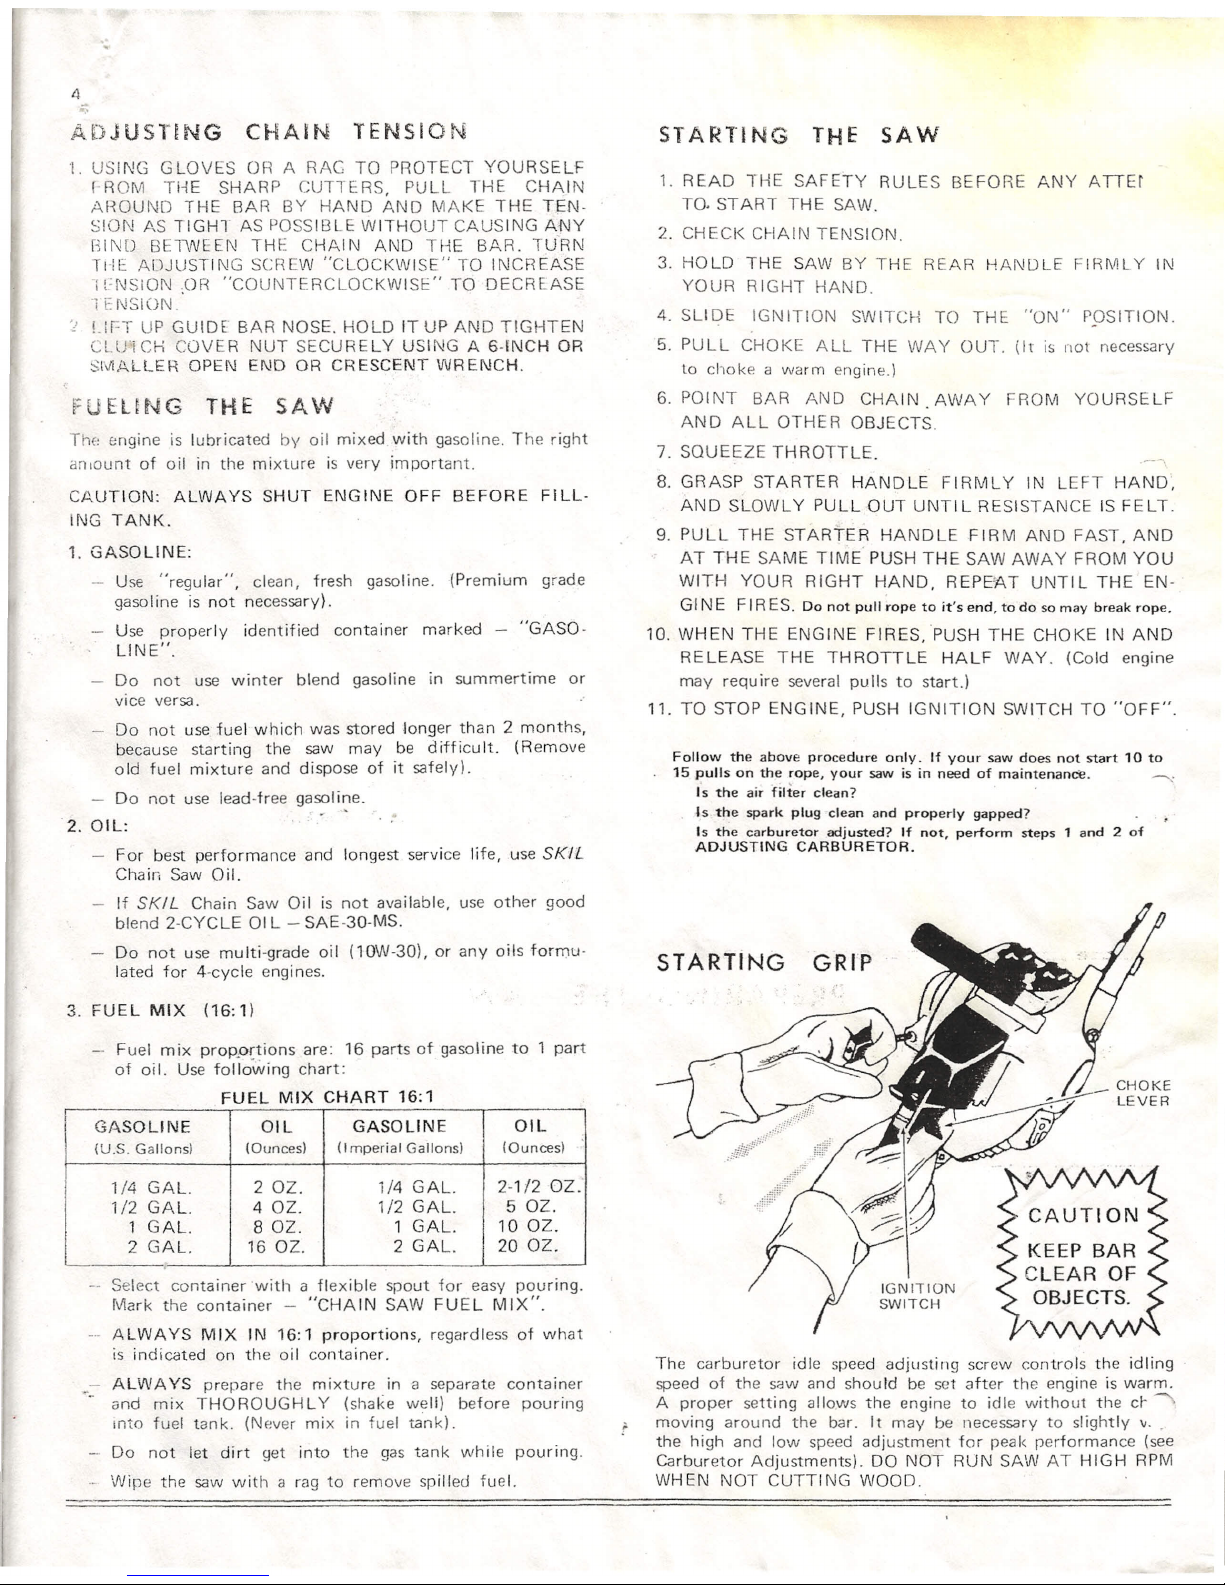
STARTING GRIP
IGNITION
SWITCH
The carburetor idle speed adjusting screw controls the idling
speed of the saw and should be set after the engine is warm.
A proper setting allows the engine to idle without the c+
moving around the bar. It may be necessary to slightly v..
the high and low speed adjustment for peak performance (see
Carburetor
Adjustments)
DO NOT RUN SAW AT HIGH RPM
WHEN NOT CUTTING WOOD.
Page 7

4
ADJUSTING CHAIN TENSION
t.
USING GLOVES OR A RAG TO PROTECT YOURSELf
F-ROM THE SHARP CUTTERS, PULL THE CHAJN
AROUND THE BAR BY HAND AND MAKE THE T!=N-
SION AS TIGHT AS POSSIBLE WITHOUT CAUSING ANY
BIND BETWEEN THE CHAIN AND THE BAR. TU-RN
TI-IE ADJUSTING SCREW "CLOCKWISE" TO INCREASE
H,NSION
,OR
"COUNTERCLOCKWISE" TO 'DECREASE
TENSION.
'.!
LIFT UP GUIDE BAR NOSE. HOLD IT UP AND TIGHTEN
CLU~ CH COVER NUT SECURELY USING A 6-INCH OR
SMALLER
OPEN END OR CRESCENT WRENCH.
fUELING THE SAW
The engine is lubricated by oil mixedwith gasoline. The right
amount
of oil in the mixture is very
important.
CAUTION: ALWAYS SHUT ENGINE OFF BEFORE FILL-
ING TANK_
1.
GASOLINE:
Use "regular", clean, fresh gasoline.
{Premium
grade
gasoline is not necessary).
Use properly identified container marked - "GASO-
LINE".
Do not use winter blend gasoline in summertime or
vice versa.
Do not use'fuel
which
was stored longer than 2 months,
because starting the saw may beaifficu It. (Remove
old fuel mixture and dispose of it safely).
Do not use lead-tree gasoline.
::....
-~
...
.'
2.
OIL:
For best performance and longest service I·ife, .use
SK1L
Chain Saw Oil.
If
SKIL
Chain Saw Oil is not available, use other good
blend 2-CYCLE 01 L - SAE-30-MS.
Do not use multi-grade oil (lOW-30), or any oils formu-
lated for 4-cycle engines.
3.
FUEL MIX (16: 1)
Fuel mix
proportions
are:16parts of gasoline to1part
of oil. Use following chart:
FUEL
MIX CHART 16:1
GASOLINE OIL
GASOLINE OIL
(Ounces)
:
(u.s.
Gallons)
(Ounces)
(I
mperialGallons)
--
1/4
GAL.
2
OZ.
1/4
GAL.
2-1f20Z:
1/2
GAL.
4 OZ_
1/2
GAL.
5
OZ.
1
GAL.
S
OZ.
1
GAL.
10
OZ.
2
GAL.
16 OZ.
2
GAL.
20 OZ.
-
Select container 'with a flexible spout for easy pouring.
Mark the container - "CHAIN SAW FUEL MIX".
ALWAYS MIX IN 16:1 proportions, regardless of what
is indicated on the oil container.
~_ ALWAYS prepare the mixture in a separate conta iner
and mix THOROUGHLY (shake well) before pouring
Into fuel tank. (Never mix in fuel tank).
Do not let dirt get into the gas tank while pouring.
Wipe the saw with a rag to remove spilled fuel.
STARTING THE SAW
1.
READ THE SAFETY RULES BEFORE ANY ATIEt
TO. START THE SAW.
2. CHECK CHAIN TENSION.
3.
HOLD THE SAW BY THE REAR HANDLE FIRMLY IN
YOUR RIGHT HAND.
4.
SLIDE IGNITION SWITCH TO THE "ON" PPSITION.
5.
PULL CHOKE ALL THE WAY OUT. (It is not necessary
to choke a warm engine.)
6.
POINT BAR AND CHAIN. AWAY FROM YOURSELF
AND ALL OTHER OBJECTS.
7.
SQUEEZE THROTTLE_
.-,
8.
GRASP STARTER HANDLE FIRMLY IN LEFT HAND',
AND SLOWLY PULLOUT UNTIL RESISTANCE IS FELT.
9.
PULL THE STARTE~ HANDLE FIRM AND FAST, AND
AT THE SAME TIME PUSH THE SAW AWAY FROM YOU
WITH YOUR RIGHT HAND, REPE~T UNTIL THE EN-
GIN E FIR ES. Do not pull.~opeto it's end,
todo
somay breakrope.
10.
WHEN THE ENGINE FIRES,PUSH THE CHOKE IN AND
RELEASE THE THROTTLE HALF WAY. (Cold engine
may require several pulls to
start.)
11.
TO STOP ENGINE, PUSH IGNITION SWITCH TO "OFF".
Follow the aboveprocedure only.Ifyour sawdoesnot start10to
15
pulls on the rope, your sawis in needof maintenance.
is the air filter clean?
A.stbe spark plug-ctear.and properly gapped?
Is the carburetor.adjusted?If not. perform steps1and2of
ADJUSTING CARBURETOR.
. 10'
.;,
"1"
r ;
s.
CAUTION
KEEP BAR
CLEAR OF
OBJECTS.
IGNITION
SWITCH
The carburetor idle speed adjusting screw controls the idling
speed of the saw and should be set after the engine is warm.
A proper setting allows the engine to idle without the cf ...•.•.••
moving around the bar. It may be necessary to slightly
II.• '
the high and low speed adjustment for peak performance (see
Carburetor Adjustments). DO NOT RUN SAW AT HIGH RPM
WHEN NOT CUTTING WOOD.
Page 8

5
BR'EAKIN~i IN: NEW
CHAIN
,.
IfARNING: DO NOT ATTEMPT TO ADJUST CHAIN WITH SAW
FUJNNING.
1. A. SQUEEZE THE TRIGGER JUST ENOUGH TO LET
U-lAIN ROTATE FOR ABOUT2MINUTES ..
B.
PUMP OIL TO THE BAR AND CHAIN, use oil pro-
fusely during this break-in stage.
3. TURN THE SAW OFF AND CHECK TO SEE IF THE
TIE LINKS ARE SNUG AGAINST THE BAR. IF NOT,
LOOSEN. THE COVER NUT-
ANO
RESET THE CHAIN
. TENSION. ',.. . -
WARNING: MAKE SURE
THE'
'CLUTCH COVER 'NUTS
ARE TIGHTENED SECURE.LY
BEFORE
CUTTING~J~D
AFTER EACH ADJLJ~TMENT_' " ' • _..•.
:~t.'
'f
.J'. "~ -. ,_,
During the first half to one hour of operation while the chain,
bar and sprocket are wearing in together, chain slack will
develope. Stop cutting every five to ten minutes and check
the chain tension. BE SURE TO SHUT OFF SAW. Always
reset tension when it is incorrect. TOO MUCH TENSION
creates excessive heat and wear, robs power and overloads
the engine. TOO LITTLE TENSION allows the chain to ham-
mer and chatter during operation, damaging the chain, bar
groove and sprocket ..
ADDITIONAL TENSJON CHECK: The chain should coast
slightly after throttling' down 'the
enqine ,Ifthe chain stops
instantly, it is an indication that the chain is too tight.
NOtE': A loose 'chain is "normally caused by Stretch and
not a' loosecover nut.
'.
t~ -; ; - ):
'.. ADJU.S.TJNG
:1:~~ARff.~~LY
'i~,f{~
THE'
;'AJ.:.:,_.~NR·~~A-.Q~i,.$fl:rn~9('.~f~~~
.. DLES ALL THE WAY IN (CLOCKWISE) ANTI
.GJ:NJ..LY
,~ ,-,,~~ •. s- ;.;.
r , '
SEAT BOTH NEEDLES. Forcing the needles into seat can
cause damage and make the carburetor unadjostable and
require replacing it.
2.
TURN THE "HI" NEEDLE OUT (COUNTERCLOCKWISE)
APPROXIMATELY
1
FULL TURN AND THE "LO" NEE-
DLE APPROX
i'Ty1&T.Jf4Y'J·.]/~
""VflNS.
,
...
/
3. START THE E:~G(Nf::
ANT)
LET"'IT IDLE. If the engine
will not idle, and keeps stoppinq, turn the idle speed screw
in Ir:lockwisel until it co.ntinues to idle.
'"
~:.
NOTE: THE CHAIN MAY ROTATE WHEN THE ENGiNE'
IS COLD. ALlOW THE 'E'NGINE TO WARM .kl_~-'-FOR
SEVERAL MINUTES, DO, NOTo. RACE THE.E-NGINE·_
':
.
'.
,.\:'
....
..,;;
.•.
;
4.
ADJUST THE
'10
LE SPEED SCREW UNTI L THE CHA'(N
STOPS ROTATING. ','
/i~~"-{'
<3, '')
s-
5. TURN THE IDLE SPEED SCREW UNTIL THE CH~IN'
BEGINS TO ROTATE.
J'~' .
¥:~:!
OPEN
1-1.1/2TURNS
OPEN
3/4-1·1/4 TURNS-
CARBURETOR
K'
SEjo'JH,E,-"
!P.-!J:,:~p:~E6.
'$qn=.w
.J'0IDWAY· 'BdwEE~
'''THE SETTINGS IN STEPS'4AN.D5AB·OVE.'
e ;
<:
J . :" '" .', "-.' • • • '. ~
\~r::
NOTE: ANY TIME THE IDLE SPEED SCREW IS ADJUST-
ED YOU MUST READJUST THE "LO" SPEED NEEDLE.'
7.
ADJUST THE "LO" NEEDLE SLOWLY (IN ONE DIREC-
TION THEN THE OTHER) TO WHERE THE ENGINE
IDLES THE FASTEST WITHOUT THE CHAIN ROTATING:' .•
8.
TO ADJUST THE "HI" SPEED NEEDLE, FIRST MAKE
A
TEST CUT, TURN
fH~
NEEDLE SLlGHTL Y COUNTER:: .
CL6cKWISE. Too lean a mixture may damage the engine'
'dlJe to lack of 'lubr ication. A white deposit in the muffler
is an indication of a lean rnixturer Tf THERE IS AN
EX-
CESSIVE AMOUNT OF SMOKE COMING FROM THE
EXHAUST, THE MIXTURE IS TOO RICH. TURN THE
NEEDLE SL1GHTLY CLOCKWISE·.··.After each adjustment -
make a~teSt
cut, unti
lthe best performance is attained. Do
. ". ~~~~l~~g~-'by sound; but the way the saw cuts.
.::/.,{:'N.().tE~··d-iECK THE IDLE SPEED. It may be necessary to
':-':. ;::·jeatljuSt the. "LO" needle "after the "HI" needle has been
:~;:':'~ adju~ed. . "
r" .,
.
.~-
(OLE
SCREW
Page 9

6
OPERATING
CHAIN AND BAR LUBRICAT·ION
For chain lubrication use the same
SKIL
Chain Saw Oil as
indicated in "Preliminary Lubrication" (page 3).
In very cold weather, dilute the oil with kerosene to make
the oil flow ;freely along the bar.
NEVER LET THE OIL RESERVOIR RUN DRY-CHECK
FREOUENTLY. CORRECT CHAIN LUBRICATION IS EVI·
DENT WHEN SOME OIL SPLASHES FROM THE CHAIN
WHILE THE SAW IS FREE RUNNING. UNDER NORMAL
CONDiTIONS THE AUTOMATIC 01LER WILl SUPPLY A
SUFFICIENT AMOUNT OF OIL BUT FOR LARGE DIA-
METER CUTS AND CUTTING IN COLD WEATH'ER, USE
THE MANUAL PUMPTO SUPPLY i\119RE
ou,
If your ch.ainsawbar hasasprocket nosejoccasionallvadd a.i,ew
drops of chain saw oil in small hole at the tip
of
the bar.
GENERAL CUTTING
With saw idl ing, POSition pivot point, close to the wood., Open
throttle fully and pivot the saw into the work, allowing chain
to feed itself into the wood.
t ~:
',.:.
:~. J _ .~. ~ •..•.••
.~
'-'
INSTRUCTIONS
When you cut further out along the bar, the chain will have a
tendency to pull you and the saw towards the work. so you
must take care to brace vourselt against this suqnt pull. (The
reversewiII be true if you are using the top ot the bar to snip
small limbs or "under" buck). Exert light feed pressure to cut
straight through the wood, but be ready to ease-off on the
throttle the moment the cut is completed.
IMP.ORTANT: Know where the chain is at all times with refer-
enceto obstructions-stop cutting before the chain touches the
ground or any obstruction. Keep using the oiler button to keep
the chain well supplied with oil. Watch out for grit or sand in
the bark. Dirty bark will dull the chain immediately. Use an.
axe to chip away dirty bark before cutting.
. ' .. ', ,:1 ', ..
Keep quide bar straight in
'cut
toprevent chain in upper groove
from cutting as it passesthrough the work. Binding or pinch-
=:
ing in 'the cut can.be.avoided by undercutting.
1f
the' wo~k i~··o~;1:heground and undercutting is impractical,
m~~e su~~ the work lies J=LAT ,qn the ground to minimize
I?in?!r~.. R~IV!EMB.E~,~~ressthe oil button frequently during
operation. ,~~
'
..
-:
-.
',;:
, - _r:' '
"'j"
,
.~"
,
·\.I(
PIVOT
POINT
WARNING: Never start the engine while
chain is in contact with the wood.
.,C~MTI9N,
'ALWAYS :
':'WEAR '.-
z: . ,\
:J~i.OVES·"-.',
. '.1:
t..~'r~
;::.t-o
f
if- ""; •
-.'
Page 10

SITUATIONS
K NOW N
NOTE: While ~ou can't alwavs p~elie~~ 'kick-back from occur-
ing, you can guard against being injured by maintaining
prop~r grip and balance at all times.
S T ·R E S S' 'A:N A l
Y S,I S
: t't' ," •
MUST
,..;!..t~:; .
UPHILL
Log lying flat on t~"
ground: 'buck" from
the 'top, 'cutting .as
much wood 'as you
can; but not letting
chain hit the ground. .....;,
Roll log, if possible, to put uncut side on top.
-'
Log having one.end hangi~g'1-;;~ir-: cut 1)3 frorn underside. to
avoid splitting -wood,,~str';ipp'ir1g-1Jark
"or
pin..thing'saw-'bar.
~
..
:
.',
..
·W 0 R K·
Prepare imrned iate cutting
area by cleaning out under-
wth likely to interfere
.h operator and saw. Pre-
pare a path of safe retreat
to the rear and diagonal to
the line of fall. Keep all by-
standers from work area.
\
7
T 0
CAUSE
KICK-BACK
.KICK-BACK can occur when removing
saw from cut, if moving chain catches
side of the cut along
top edge of the bar.
KICK-BACK can occur if the chain
at top or nose section of the bar
strikes another log
or other object.
. r
B E
CONSIDERED
FIR S T
'.
.s;
"
When log is gen'~~ally
lying flat, but cut-off
section may sag into
a depression, prevent
binding
err'Saw'
be·
tween cut ends of
logs by making cut
a few .degrees off
squkr~:io that log dropping off is longer at 'bottom than at top.
,~
,"
,
"
i,i
"l
~, ":,.' I
Log supported on 'oath
ends with room' under-
neath for cutti ng: .
if
necessary to avoid
spf
it-
ting large, heavy log,
buck 1/3 from top first.
Otherwise do allcuttinq
from underside causing
cut to widen instead of closing.
P ·R
EeA U T
~ON S
WATCH OUT FOR "SPRING POLES" OR OTHER
HIGH STRESS CONDITIONS
where a log or tree could
spring up or shift when stress is relieved by cutting.
Page 11

8
BRANCH REMOVAL
WARNING: When it is necessary to work in the tree: climb
tree first, then haul up the saw with a rope. Alwavs have a
firm footho
ld.
Undercut notch as shown to
pr-event
the falling branch from
stripping bark from the stub of the limb down the trunk of the
tree.
Make the main cut
(backcut)
from the top of the limb and
i1
f
ew inches further from the trunk
as
shown. Cut flush and
cover the scar with a prepared paint to prevent rot.
FELLING TREES,'
-
.
Before felling a tree survev-It.parefutlv: consider size, shape,
direction of lean and danger from other trees or snags in area
where you want the tree to fall. A Iso consider factors such as
wind direction and velocity. Do not fell trees when it is very
wi ndY.:. , : ':
'!~t
~~'f
>:~ ":. .:
! ..
r/j
-2} ,.;. .',~:
Clear work area around tree, limb branches only high enough'so
that notch can be ma.d~.,~f:9round space is limited, remove all
branches. Be on the lookout for anything that can touch the
front or top of the bar;~nd cause kickback. Do not overreach.
. '~~:~<r~·~' :~,;.'.
.
'
CONTROLLING DIRECTIGN
OF FALL .
Helper must not be
closer than
1,1/2
times tree heiqhr.
Securely tie three ropes as high up in the tree as practical. Take
aile of the tope's 2 .fe.E!tout ·on the Iine of fall, then as fa r to
the left of the tree as possible and anchor it to the ground. Take
the second rope anddo th~ .sarne except go to the right of the
tree. Take the third rope (tether line) around a tree trunk or
other stationary object that is-located in -the direction in which
the tree is to fall and a distance of at least twice the tree height.
The pulling force can be increased by usinq a pulley and attach-
ing a rope to the tether line and pulling at 900to it.
CAUTION: Always select and properly prepare a .path of safe
retreat from the tree before. you fell
it,
This path shou Id be to
the rear and, a bit off to one side of the line of fa II.
MAKE.BACK CUT 2"
OR MORE ABOVE
HORI.ZONT-AL CUT:.
O·F·NOT-CH. '
3rd
CUT
'l/
z
"
;~'--
~1I:1
1&1
..
~
~J'
\
III
LINE OF FALL
~~II
_wnn*··
IiI
I
)'
') 1/3 OF TREE
( -DIAM.f-TER
i
f
'>
.II
II (
.1 I \
.
,~
~
"
,:¥==="':i"
)'
<,
,1\\
~.~II
~
~
..•
--
..
<;
~
..
-».
<I"
\1
1\
t
\
I"
'., r..
__ "":1
<,
113
" .pIA.
Make
·~~:t;~"~..
cutS'·i/3.:.o.t;:;~~ tree's diameter and perpendicular
to the directienof fall. Hemove the notch. Havea helper exert
a steady
pull:
df-f:.:the tether Wne'as you make the back ..cut to the
hinge: Back cut about 2 inches higher andparalle! to' the notch.
DO NOT CUT THE "HiJ~GE. ' .' ..
2nd BACK CUT
FINAL FELLING CUT
1st BACK CUT
~~~v
TREES HAVING DIAMETERS UP TO
TWIC~TI;IE BAR LENGTH CAN .BE
CUrUOWN USING THIS TECYNIQUE.
~
-.".
,
Soft plasfic Dr wooden wedqes can be driven into the incorn
pleted back cut to force it open. This is a preferred technique
with large trees. Do not use hard rnetalsplittinq wedges which
would ruin the chain and cause severe kickback of saw.' ""'\
It is possible to cut trees up to near lvtwice the usable length-of
the saw blade, by notching and back-cuttinq .in a series of cuts.
However, always remember that the series' shou Id be completed
leaving hinge wood of equal thickness from end to end.
Page 12

MAINTAINING YOUR SAW
_ARE OF
GUIDE BAR
EXamine the bar carefully. Check the illustrations of wear
patterns of guide bar rails. Also check that the groove is deep
enough all the way around the bar that the chain drive tangs do
not "bottom out". Rotating the bar helps to equalize wear. A
blue discoloration along the bar indicates that the bar and chain
need more oil, a dull chain, or that the rails have been pinched
together at this point. If the bar is not in good condition, reo
place it before any more cutting is done.
WEj\..R PATTERN IN GUIDE BAR GROOVE
I
"~·,.'
--:
-:
.-:
.:
U
1. GOOD
2. UNEVEN
HEIGHT
3. BURRED
4. WORN FROM
TOO LOOSE
CHAIN
6. SHALLOW
GROOVE;
GRIND
DEEPER
5. SP·READ
RAILS
SH ARPENING CHAIN ~
(SKIL Service Cen-
ters are equipped to sharpen your chain)
For
fastest cutting and maximum life of chain and all saw parts,
always keep the chain in good sharp condition. When the saw-
dust turns from chips into fine powder and you find yourself
pressing hard to feed the chain STOP IMMEDIATELY and
sharpen the chain.
1. Place the chain in a chain filing vise, if a vise is not available
leave the chain on the sawand tighten up the tension enough
to keep the chain from wobbling on the bar. Do all the filing
at the mid point of bar.
2. Use a file holder having 5/32 round file (not tapered). A file
holder has the required 300top filing angle marked. If a file
holder is not available, just the file will do.
3. Hold file against
cutter.face.at
·309.'angle.andappro,l<iO'lately
50 from the horizontal with the
+iand
ie low. Keep' 20%·(1'/5)
the file diameter. above top edge of cutter. . ..
4. File in one direction onlv=towards., fron.t .corner ot.. tbe
cutter. Move file away from the cutter face on return stroke.
5. Use light but firm pressure, mostly towards back of tooth.
Avoid heavy downward filing pressure.
1/5
0
9
30°
GUIDE https://manualmachine.com/~'~~;"~-
MARK ON - -
=r: --:
HOLDER ,/ -
---/
.
..:'
/ -==?
30°
TAP PLATE ANGLE
BEVELED
UNDER EDGE
~~
SIDE PLATE
90°toline
of chain travel.
6. Refile any teeth having one or more of these faults:
FORWARD HOOK
Chain will grab and jerk, producing rough
cutting.
...
Causedbyexcessivedownward filing pressure;
or tip of file held too Iowan tooth.
BACK SLOPE
Chain resistsentering wood (scrapes instead of
cutting wood). Causesexcessiveheat and wear
to bar and chain.
Causedbylowering handle end of file or hold-
ing file too high on the tooth.
IMPROPER TOP PLATE AN9LES
Blunt. chain requires too much feed pressure.
.This top plate angle causeschain to bind, pro-
duces..a..r-9ugh cut,
·f-OGS
power-from saw, and
increasesbar groove wear.
Caused by holding file at wrong angle or let-
ting it drift or rock during the stroke.
~-
~-
>'" •
A SHARP EDGE WILL
NOT REFLECT LIGHT
Page 13

10
CUTTERS FILED AT
NON·MATCHING ANGLES
/ ' f
" I
/
'
/' I
/
,
,
'/ I "I
:_(:.:?"~~.);\;~~l-'__
r~
--r=
, I'
, I'
, I I
\ I
Caused by letting pressure and filing angle vary from tooth to
tooth or one side filed with different angle and lengths than
the other .
Chain will not cut at
its best. !Vial' cut off
line or "run" to one
side, dray may slow
down engine.
THIN FEATHERED EDGES
When they aImost immediately break off,
you have a dull chain. Usually found on
chain filed with a hook (see "forward
hook").
Causedby holdinq file with handle too low,
or pressing back down too hard on file.
BLUNT CUTTING EDGES
JOINTING
(DEPTH
Although edge is durable, it won't cut
properly; scrapes wood, robs power and
produces sawdust instead of chips.
Causedby holding file too high on face of
tooth, or keeping file handle too high.
.-
CHAIN
CLEARANCE)
Every second or third time the cuttersare sharpened the depth
gagesshould' be jointed to the correct depth. Depth.gageclear-
ance is as important as sharp 'cutters. 'Clearancedetermines the
bite the cutter takes. If the gagesare too high, the cutters will
not get a good bite; if too low, the' cutters 'wit'I'taketoo largea
bite, causing the chain to grab and jerk;' If 'sorneqaqesare'higher
than others, the chain will cut off line, favoring the side having
the lowest gages,
/
1/4"
ROUND FILE
POINT OF DRIVE
LINKS WORN DOwN
DEPTH CLEARANCE
FOR YOUR CHAIN
The depth clearance of your chain should be .020·inch.
1.
Check clearancewith a depth gagejointer. If a jointer is not
available, lay a straight edge on top of three cutters and check
clearance of the center depth gage with a feeler gage.
2. Lightly file the desired clearance with a safe edge tlat file.
3. Round off the leading edge so the depth gagewill not dig
into the wood.
4. Check clearanceof the next cutter and repeat steps 2 and 3
for the entire length of chain.
REPAIRING CHAIN
Any part of a chain can be replaced. However, do not attempt
to replace a part if the whole chain is in poor condition.
CHAIN DISASSEMBLY -Remove rivet heads of parts needing
replacement on a bench grinder or with a hand file. Pry parts
loose with a cold chisel or drive out rivet with punch.
INSTA!.L1NG CUTTERS-When replacing acutter, also replace
its tie link. A worn tie link will not properly support cutter.
When a new cutter is installed in a chain it should befiled back
to correspond with the top plates of the other cutters. Be sure
that the depth gageheight isfiled to match the other cutters. It
is also important to file off the bottom of cutter to match the
wear on the other worn cutters and tie links.
INSTALLING TIE LINKS-Tie link is countersunk anr' ~
slightly rounded edges on .one side. This side must alway
c
installed toward the outside of chain. It is important' to file the
bottoms of new tie links installed in a used chain to match the
wear on the bottoms of worn tie links in the chain, thus pre-
venting the chain from tilting to one side. (Use
1/4"
round file).
INSTALLING DRIVE LINKS-Chain drive tangs must have
sharp points to clean sawdust from the bar groove and bar
groove must be deep enough for the tangs to clear the bottom
all the way around bar. (Every fourth or fifth tang resharpened
will do the job 'as the chain wears). If drive links are badly
worn, install a few new ones throughout chain.
INSTALLING RIVETS-Set rivets ~ith a ball peen hammer. Do
not use heavy blows-rivet may split.
RIVETS
TIE LINKS
GOOD
00
POOR
./
G
Page 14

CARE OF
rlUTCH AND SPROCKET ASSEMBLY
Examine the sprocket periodically. Worn sprockets damage
chain and greatly reduce cutting efficiency. Always install a
new sprocket and bearing with a new chain. Clean bearing and
shaft thoroughly with a clean oil soaked cloth and repack the
bearing with Skil No. 252 lubricant or a good grade of water-
proof grease. Replace the bearing if any damage is apparent.
REMOVING THE SPROCKET: Remove the nut, screw, washer
and clutch cover. Loosen adjusting screw and remove bar and
chain. Insert a screwdriver in one of the slots in the clutch and
gently tap the screwdriver in a clockwise rotation to loosen the
clutch. Remove the clutch, sprocket and bearing.
CAUTION: DO NOT OPERATE THE CHAIN SAW WITHOUT
THE CLUTCH AND DRUM ASSEMBLY IN PLACE. CENTRI-
FUGAL FORCE WILL CAUSE THE CLUTCH SHOES TO FLY
OUT UNLESS RETAINED BY THE CLUTCH DRUM.
:
.
"
When the saw is not going to be. used for a week or more:
1. Drai~"the
0{1
a~d' ;~'el· t~~f ~hen ;~a~ ~he saw and run the
engine until the fuel in the carburetor is burned up. If you do
not .follow this procedure when storing saw, you will have
trouble starting your chain saw or it may not start at all.
2. Remove the chain and bar. Put the chain in oil and wrap the
guide bar in an oil soaked rag:
3. Clean and wax the painted surfaces of the saw and store
in a cool dry place. :, '..
.EVENTIVE MAINTENANCE
PROGRAM
.
'
Preventive Maintenance of your
Ski!
Chain Saw is easy. There
are just6steps below to. follow:
•. r"i •
1. Durlnq Use:..Always keep engine free of sawdust and debris;
for your safety
a·0d
16nger enqine life.
2. After Each Use or Every Tankful: Pull choke out and remove
air filter (see Parts Diagram). Blowout with compressed air
or wash filter in clean gasoline or solvent. Dry the filter be-
fore refitting. NEVER RUN THE SAW WITHOUT AIR
FILTER IN POSITION.
SLOTS FOR
REMOVALOF
CLUTCH WITH
SCRE\lYD.llIVER.
CLUTCH
(Turn clockwise
.to remove)
SPROCKET WASHER
BEARING' .- __
j
--
.
•• --6;v ~~-
.~ »>:
\SJ)
e
~, . »>
r---.:.II"-"'-
CLUTCH
COVER
SCR~ \
~
*
Vibration Dampened Top Handle, not standard
equipment on all models.
11
3. After Each Use or Every 5th Tankful Use a Wire to:
A. Clean out the groove, holes of the bar, and the discharge
hole. (If cutting wet wood, this may have to be done
more often.)
4. After Every
10th
Tankful: Squirt a few drops of
Skit
Chain
Saw
Lubricantontcrankshaft
behind clutch drum.
5. After Every 25th Tankful:
A. Remove the exhaustrnuff'ler and the spark plug, rotate
the crankshaft by means-of the starter until the piston is
at top dead center in the cylinder. Turn the saw on end
(exhaust ports facing down) this will prevent carbon par-
ticles from entering the cvlinder.Bernove carbon build-up
around the exhaust port area
wltp
a blunt edged wooden
tool. Inspect muffler baffle and replace if necessary,
NEVER RUN THE SAW WITHOUT THE MUFFLER
IN PLACE .
B. Clean and gap the spark plug (.025 inch) .
6,
After Every 100th Tankful: We recommend you return your
chain saw to the nearest
Ski!
Service Center or Authorized
Service Station for the following service.
• Parts cleaned and inspected.
• Points, condenser, spark plug and fuetFilter
replaced if necessary.
.- Electrical System Tested.
SHAFT
OIL DISCHARGE HOLE
~GUIDE
BAR
CAUTION: Damaged flvwheel
may burst. Flywheel removal
must be performed by. a com-
petent chain saw service man.
Page 15

so
REF.
NO.
178083·
180073
180095
180096
312802
00
180·131
180135
180136
312806
180174
312821
180190
312807
312825
312823
312824
312808
312822' .
180303
180359 _
n2809
180451
180523
180663
312820
180792
720610
726208
727210
728610
730810
312848
180088
736210
736410
806010
790660
854208
'850365
23622
312803
I
2
3
4
5
6
7
8
I'
10
rr
12
13
14
15
16
17
18
19
20
21
22
23
24
25
26@
27
28
29
30
31
32
33
34
35
36
37
38
39
40
41
F-314650 2 76
Sj(jt,SAW
'MODELS
1614&1616 GASOLINE CHAJNSAWS TYPE 1
ENGI"'E .....•.• 2 CYCLE AIR COOLED
BORE ..............•.
I
.437
[n,
l36
mmJ .
SIROKE .•.•..•......
1.18
;n.133mml
DISPtAC~'""'ENT. .... 2.2tu.
in.
(J6c:c:)
PLUG GAP ...••.•.•.... 02S ;•.
(.o;mm)
PCINT GAP ...••....... 015
in.
(,4
mm)
Q:).16
37
•. 'J
I/~~~
~--/~5
../ 14
I
141, .. ...--'
~10~ JO
JI
17
»>: ~
~~ 18/''-'
.-1-~
34 • ,.:.-. ~~ '.
46,
V·----,
$.~;
-~\~l"·
"'ql -
>,c~
;cA
L:~~';.
'. .:.i
®
8~~·.:'::::< ~I 12-
5
'059
--~2i' ". - -" -- - .•.. -
---U
r ~
26
;·H:····· -
-0
J
.i->
:& ~ ..
j
N •
;-Ol~ ~
< ..~.
~* 52
l
t
" *98·~
~54 •..•.•. ~*95
--..., * 97:
_-r.4ZD'
I
0
53 -
0
*
85
<:5 •
~ART Of
'-.. *
93 I.
'55'"
*..
* ~ . .•
90.71
.' - .r· " .
*n ~ "",
. '>t
J.-}.-~. "~. ~ * 73 ~~
.-&;_
*. *'
C,,* '
./"\_33
91 ._.~'.~
<,
<c-> ~\)~
""87 82'-
84 '.
l..-/
I
• .' : "'Portof '-~_ 24
*89 ·-19
73* '. .. .~.
. -~". 1,*'71.90 ~
~*
74
n(_
75*
2S-\~1;> •• _
1 28
I
So
So·,
1- 6:.,'
G.. "(;;
_n*
< ~
. . .•. ' ~ 38Y/
rQ'.·
40 ,'t'Q-76* 28 •.••
"1>
~-tt
* 91 •. ~ 32 22 ~r. /~_39
• \ 45 • ~
"">
11-64
.• ~ -; 79 <.~
J!-
61 . (
(~~{ .•.. -: ~/62'.
!
J!-
6~ / _,
i
J!-
6S '--::'""
.,!-
PART
NO.
~
.'
REF.
PART
NO.
NO.
PART NAME
42
312826
TANK COVER & HANDLE
43.
180282
BAR ADJUSTING NUT
44
732060 SCREW
4S
180658
FLYWHEEL
ASSEMBLY
46
31~801
SCREW
REF.
PART
NO.
. NC1.
PART
NAME
ASSEMBLIES
80
*
312855
CONNECTING ROD, PISTON AND
CRANKSHAFT ASS'Y
(5
ee Note]
81
312836 PISTON
82
180017 WRIST PIN
83
312897 ROLLER SET (13
to theset)
84
180047 CLIP-WRIST PIN (2)
85
180050 RING-PISTON
86
3128J7RETAINER RING (2)
87
312834 ROLL PIN
88
312832 CONNECTING ROD
89
312830 CRANKSHAfT (Same
as it•••• 74)
90
* 313.457
CRANKCASE & CYLINDER BLOCK ASS'Y
91
tsoo
13 BAR BOLT
92
18001'5 VENT WIRE
93
~3262 DUe K 81LL
94
*
180710
ENGIN'E GASKET SET
95
180097 GASKET
96
180098 GASKET
97
180246 GASKET
98
180252 GASKET
PART NAME
WASHER (3)
NtJT·. -
CARBURETOR
INSal:ATOR BLOCK
REAR HANDLE
MUFF ~ER BAFFLE
MUFFLER BODY
MUFFLER COVER
HANDLE FILLER
AIR CLEANER
INTAKE COVER
OILER 8UTTON
THROTTLE TRIGGER
LEAD Wl.R.E
SWITCH'
TOGGLE CAP
CROSS SHAFT
PUSH ROD.
KEY
WASHER
CHAIN COVER
8REAKER PLATE COVER
SPARK PWG (CHAMPION OJ 8)
8REAK'ER PLATE
COIL &.CORE ASS'Y
OIL PUMP'
SCREW
SCREW (2)
SCREW
SCREW (2)
SCREW
SCREW (2)
8REAKER PLATE LEAD
SCREW (2)
SCREW (2)
SCREW (4)
SCREW
LOCKWASHER (2)
NUT
WASHER
INSERT
ASSEMBLIES
s
.,(1
50·.
180638
51
52
o
180647
53
54
...
71904
55
560300388
57
58
59
60
-tt 30,7899
61
62
63
M
65
66
67
68
69@180676
70
71*312654
72
73
74
75
76
77
78
79
~:'
.
o
It FILLER CAP ASS
'Y
180258 GASKET
CLUTCH ASSEM8LY
180373 SPRING (2)
SPROCKET & DRUM ASS'Y
180349 THRUST WASHER
CHOKE ASS'Y
312804 CHOKE HOLDER
312805 CHOKE SLIDE
312800 BUSHING (2)
FAN HOUSING & STARTER ASS'Y
180298 PULLEY
180311 REWIND SPRING
180323iHRUST WASHER
180324 RETAINER
1803.15 STARTER ROPE
180337 STARTER HANDLE
312812 ~AN HOUSING
8502;10 NUT
FlJtL FILLER CAP ASS'Y
180la6 GASKET
SHORT BLOCK ASS'Y
177227
c
~O"M.'E I
180024 IHRUST WASHER (2)
312830 CRANKSHAFT
190030 MAIN BEARING (2)
180033 8EARING SEAL (2)
180166 FLAT WASHER (2)
180206 FUEL HOSE
180635 FUEL fiLTER ASS'Y
GUIDE BAR AND CHAIN REPlJI.CEMENT
1614
1616
14"
16"
GUIDE BAR
71912
71913
CHAIN
71902
71903
312809
CHAIN REPAIR KIT
313899 S?ROCKET NOSE REPLACEMENT KIT
NOTE,
CONNECTING ROD, PISTON AND BEARING KIT
PART NO. 312856 CONTAINS iTEMS 81 THRU 88.
f!l PIN 71898 SPARK ARRESTER (optional)
® P. N 180790 OIL PUMP REPAIR KIT
SKIL CORpORATION
5033 ELSTON AVENUE
PRINTED IN U.S.A.
CHICAGO, ILLINOIS 60630
Page 16

:)0
S~OL MODELS 1614 8: 1616 CARBURETOR
11l
(T)
r...--
~_.---32
WAlBRO
W8A
23
26
REF.
NO.
NAME
1
Carburetor Assembly
2
Diaphragm Gasket
3
Diaphragm
4
Diaphragm Cover
5 DI;;ph"~9m Ret. Screw
&
Lockwasher
6
Fupl Pump Gasket
7
Fupl Pump Diaphragm
8
FuelPurnp Body ....
9 Fue
l Pump Body Ret. Screw&Lockwasher
i
0 Idie MixlUre Screw .
11 l
dlo Mixture Screw Sprinq
12
Idl~ Speed Screw
13
IlIlp. Speed Screw Spri
119
14'
Inlet Control Lever ..
15
Inll!, Fulcrum Pin "
16
InlPi Fulcrum Pin Ret. Screw
17Inlet
Needle
18
Inlet Screen ..
19 l
nlet Tension S['1"II1g.
20
High Speed Mixturp Screw.
21
High Speed MixlUIP. Screw Spring.
22 NoZ/!e
Check
Valve .
23
1ruottte Shaft and Level
24
Throttle Sh?ft Ctin
r.
7~, Thr(,11 Ie Return Spring.
26
TllCottle Shutter.
27
Throttle Shutter Screw ~I\d Lo ckvvasher
28 8r.'dy Channe] Welch Plug
29
Repair Par rs Kit
30
Gasket Set
PART
NO.
180095
.*
IE.
180144
A
••••
A
£.
A
••
178151
£
A-
180122
Ia
180123
A
'"
180777 .•
180778
*
REF.
NO.
PART NAME
s
f\!
UMBER
~I
:i
3t
~
~)
fj
8
9
10
11
12
13
14
15
16
17
18
19
20
21
22
23
24
25
26
27
28
29
30
31
32
(',-1
t""
I!t(), A:,se",bly
(1800951
Cove:
f\'\'!t~llflg
UldIJhrc;~Jnl
l::,.'(~1
/J,,",f!!!lhIV
Punlll
'::;/I •.•t\;:":-.';oPIIIUIV
1
hr o
t
t
h:
Vnrve-1hr
onl«
Ctip- r:"otife Shah
Valvp
!
111(;1
Nt:erJle
Gast,
(;1
Pu
rnp
Gasket Cir cui
t
Ptai
e
Guskel-
Metcllng
Dlaphrdgn,
Dlu(Jl1(d~in
1':'1I111P
idle
Ad,
:;"r"oJV
(3i:l452 1
Diaphragm Assembly- Mcteflng
Screw- Shutter
Screw-s
Merer mq Lever Pin
Screw - Circuit Plate
Screw=-Assernbtv
Screw-Pu~p Caver
Spring-·Main Adj.
SPring-Idle Adj.
Spri ng- Metering Lever
Spring-Throttle Return
Needle-High Speed (
313454 )
Needle--Idle
(313455)
Pin-Metering Lever
Plate-Circuit
Lever- Metering
Screen-e l nle
t
Spring (
313453'
Repair Parts Kit
(313450)
Gasket Set
(313451
Washer- Lock
•••
*
Parts contained in Repair Parts Kit
*
Parts contained in
Gasket
Set
TILLOTSON
HU-4A
Page 17

SKH. MODELS
1614 8: 1616 CARBURETOR
_ 18
30
WALBRO
W8A
26
REF.
NO.
NAIYlE
PART
NO.
TILLOTSON
HU-4A
1
Carburetor Assembly
2
Diaphragm Gasket
3
Diaphragm
4
Diaphragm Cover
5
Diaphragm ReI. Screw&Lockwasher
6
Fupl Pump Gasket
7
Fw,1 Pump Diaphragm .
8
Fuel Pump Body .
9
Fuel Pump Body Ret. Screw&Lockwasher
10
Idie Mixture Screw .
11 Idle Mixture Screw Spring
12
Idie Speed Screw
13
Idip. Speed Screw Spring
14' Inlet Control Lever ..
i5
Inll!, Fulcrum Pin
16
Inlrt Fulcrum Pin Ret. Screw
17
Inlet Needle ..
18
Inlet Screen ...
19
I
nler
Tension Spr inq .
20
High Speed Mixture Screw.
21 High Speed Mi x
iure
Screw Spring.
7.2
Novia Check Volvo.
23
1
hrottie Shaft and Level
24 Thronle
Shaft
Clip .
r.
25 Tbr ot t le Return Spring.
26
Throttle Shutter. .
27
Throttle Shutter Screw and
l.ockvvasher
28 Body Channel Welrh Plug
29 Repair Pans Kit
30
Gasket Set
180095
.*
...
180144
••
••
••
JA.
A
••
178151
1&
A-
180122
A
180123
.A.
..•.
180777 .•
180778
*
REF.
NO.
PART NAME&NUMBER
1
'}
('",htllc:tor Assembly
(180095)
C{!Vt'1
(··.'\-tt::1IliQ
Dldphrcynl
l::,,'(-I
./l.(\ernbly
Pu n
ip
Srl....tl ;:..~::.•
PIIILJly
T hr ot
t
h:
Varve-Ihr
011
If--
CI,p- r:llotlle Shah
Valve!III~t Needle
Gaskel- Pump
Gasket
Cir
cuitPlate
Gaskei
Meter Ing Diaphragm
DluiJlu
dgrn·-
Fump
:die Ad) ~crt:w(3i
:l452 I
Draptu
aqrn Assembly-· Metering
Screw- Shutter
Screw-s Merer mq Lever Pin
Screw·- Circuit Plate
.Screvv- ..Assernblv
'Screw=Pump
Caver
Spring--,Main Adj.
Sprtng-I.dl~ Adj.
Spring-Metering Lever
Spring- Throttle
He
tu rn
Needle-High Speed (
313454 )
Needle--Idle
(313455)
Pin-Metering Lever
Plate-Circuit
Lever- Metering
Screen-I nlet
Spring (
313453
I
Repair Parts Kit
(313450 I
Gasket Set
(313451 )
Washer- Loc k
._ 3t
5
fj
7
s
9
io
11
12
13
14
15
16
17
18
19
20
21
22
23
24
25
26
27
28
29
30
31
32
••
*
Parts contained in Repair Parts Kit
*
Parts contained in
Gasket
Set
, <
Page 18

CHAIN SAW ACCESSORIES
CHAIN SAW SHARPENING
part/ item
code no.
5/32" dia, Chain
Sharpening File
with Guide
pitch
description
71095
FILE
CHAIN SAW
Combination screwdriver and
wrench service tool for all
models.
71093-
For
1/4"&3/8"
Low Profile
Pitch Chain
ALABAMA
ARIZONA
ARKAH$A$
CALIfORNIA
COLORADO
CONNECTICUT
FtURIDA
IOWA
KEJltTUCIH
LOUISIANA
MA~YLAHO
""'ASSACHUS(TTS
MICHl"""
r
OIL FOR
ENGINE
&
CHAIN
Specially Compounded Chain Saw Oil
part/item
'code
no.
description
72782
7.3374
72781
Jr~/~
FACTORY SERVICE CENTERS
'(ORCIA
HA:WAII
ILLINOIS
Birmingham, 806 'N. Fiflh Ave. 35203 (205) 322·247-;4
Phoenix. 1710 E.
McDowell
Rd. 85006 ":. . .(602)
254.116'5
Utile Rock. 1303 W. I.arkham 72201 (501) 374·1911
Brisbane, 3868 8ay~ho(e Blvd. 94005
.(tltS)
467·5250
Los Angeles, 5455 E. wasttlng ton Blvd. 90022 .(2l3) 685·6760
Oakland. 425 Jackson SI. 94607 . .(415}444·1559
Sacramento. 2100 19th St. 95818 . ,(916) 446·4019
San
Diego. ]231 Morena ·Blvd. 92}.10 .. (M4l'276·3550
Santa Ana. 165 W. Pomona 92707 . , .. , .(714) 542·5679
Santa
Clara.
2130 DelaCruz
Blvd.
95050 t.406l243·9444
Van Nuys ,
l620} Victory
Blvd.
9}406 (213)994·8896
Denver. 678 Bryant S1. 80204 .. .(303) 893·.5123
Rocky Hill, 2122 Silas Deane Hwy, 06067 (203) 527-4153
Jacksonville, 1628
Hendricks
Ave. 32207 ." .(9u4) 398·0728
North Miami. l2041
N.W.
7th
Ave.
33161 (305)685·620]
~~~~~o'5m
"Ji
~~~;~a~s
Bir
d
·3m?5 :
:\mlm~m
Atlanta. 170 . 14th Street N.W. 30318 .(404) 873·2908
Honolulu. 3e69 Uatena St. 96819 ... (808) 847-4407
Chicago (lincolnwood), 6434 N. Ridgeway
Ave.
60645 (312) 583·5533
Chicago (Central). 552 W. Washington Blvd. 60606. (3I2) 726·6198
Chicago (south). 3259
VI.
Columbus Ave. 60652 , ... (312) 436·1555
Northlake. 332E.North Ave. 60164 •.... • .. (312) 562·1022
Springfield. 300 S. 31st S1. 62703 . .. (217) 528·6415
Hammond. 6339 S.
Indianapolis
Blvd. 46320 .(219) 845·9400
Indianapolis. 3304 Madison Ave. 46227 .(317) 787·8297
Des Moines. 2430 Hubbell Ave. 50317 .•.. " . ,(515) 265·3275
Louisville, 2501 Crit1enden Dr. 402J 7 .. .(502) 636·2835
Ne\">Orleans. 350} rcnocpltcctas S1. 70115 . (S04) 899·6309
Baltimore. 290S Greenmount Ave. 21218 (301) 243·1146
College Park, 9925 RhfdC Island Ave. 20740 (301)474·5510
Boston (Brighton). 1)9 N.
neacco
St.
02135 .. (617) 254·4560
Oetroit 26J11 W. Eight Mile Rd. 1182110.. .(313) 535·1919
Cund
Rapids. 154 441h 51.. S.W. 49508 .(616) 538·5060
IHDIAN"
MINNESOTA Minneapolis, 2539 Nicollet Ave. 55404 ...•... ' .. (6l2) 827·4013
Sf. Paul. 1950 University Ave. 55104 .. . .. (612) 646·6104
MISSOURI Kansas City. 1710 Wyandotte 51. 64J08 (816) 221-J766
St. louis. 1238 S. Vandeventer Ave. 63110 •....... (3l4) 535·7424
NEBRASKA Omaha. 2110 S. 371h SI. 68105 ..
.(402):>41P33
NEW JERSEY Edison, 6
Kilmer
Court 08817 , (201) 572-0875
Newark (Hiltslde). 6ll U.S. Hlghway No. 22 07205 .. (201) 686,,6350
NEW YORK Buffalo, 88 Benbro Dr. 14225 , (7·16) 681'2500
Huntington Sta .•
t.t.,
673 E. Jericho Turnpike 11:746.(516) 423·~1OD
Jamaica, 153·25 Hillside Ave. 11432 .•......... '.' .(212) 297~1919
New York (Manhattan). 75 VaHck'St. 10013 (2121226·7630
East Syracuse. 601 Manlius St. 13057 •••••...•.. (315) 437·3435
NORTH CAROLINA Charlotte, 4800 N. Tryon 28203 .••...•.......•. ('704) 597·1957
Raleigh. 5306 Hillsborough 27606 .. .(919) 851·1418
OHIO Akron. 2169 E. Market SI. 44312 .(216) 794·9440
Cincinnati, 1245 Tennessee Ave. 45229 .{513l242·0244
ctevetenc. 3038 Payne Ave. 441]4 :. . .(216) 621·8136
Columbus. 5562 N. High St. 43214 .•... . (614l885·8670
Dayton,
5671 Webster SI. 45415 .(513) 890·0760
OKLAHOMA Oklahoma City. 606 N. Pennsylvania Ave. 73107 (405) 236·0170
OREGaN Eugene. 1457 W. 6th Ave. 97402 (503) 484-13lJ
Portland. 2933E.Burnside 97214 (503) 234·7418
PENHSYlVA'~lA "Phitadetphia. 4210 Macalester Ave. 19124 .. (215)455·2506
. . 'Pittsbutgb, 3221 Liberty Ave. ]5201 .. . (4121 261-6457
SOUTH CAR{iLrNA Greenville. Wade Hampton Mall 29606 (803) 271·8161
TENNES~EE Knoxville. 2002 E. Magnolia 37914 .. .(6151546·7744
Memphis. 895·6 Brooks Road 38U6 .(901) 332-9293
TEXAS ~t.JJ~orfi~6~11{6ir~ ~~V~t~i~~~a;:ilir. 76iis::
·~mlm:~m
Houston. 324 N. Hutcheson St. 77003 ,(7J3) 221j·9178
lubbock. 2112 50th 79412 ., (806) 747-9177
San A~tonio. 612 McCullough Ave. 78215 .(512) 22tl·6311
UTAH Salt Lake City. 280 VI. 2855 South 51. 84115 (8011 ~86·0368
VIRGINIA Norfolk. 2438 Ingleside
Rd.
23513 (804) 855·2035
Richmond, 2026·8 Chambertayne Ave. 23222 ••.... (804) 359·6007
WASHINGTON Seat II•. 2424· 4th Ave. 98121 (206) 622·4404
Spokane, 1902 E. Mission Ave. 99202 ..•.. '" .(509) 535·1754
Tacoma, 2513 Tacoma Ave. South 98Jl02 .. . .(206) 272·3455
WrSCONSIN West
Allis,
10.906 W. Natlonal-nve. 53227 .(414) 327·0050
MODEL and TYPE NUMBERS can be found on the nameplate of your tool.
SKIL Corporation 5033 Elston Avenue, Chicago, III. ·60630
CENTRAL blSTRIBUTION CENTER:
3500
Oakton Street. Skokie. Illinois
60076
WEST COAST DISTRtBUTtON CENTER:
1941
West Avenue
140th,
San Leandro. Calif.
94577
F-315649. 5/76
1/2
Gallon
~uart
Pint
S"~/~
AUTHORIZED
SERVICE STATIONS
are ·Iocated in the following
cities. -For addresse's bnd·:'·
~phone rrumbers.: see you r
.. 'phone book Yellow Paqes
u~d;r "To"als-Electric;'.
ALABAMA: Montgomery; Sheffield;
Huntsville
ALASKA: Anchorage:
Fairbanks
ARIZONA: Tucson
CALIFORNIA: Bakersfield; Fresno;
Ventura'; Santa Barbara
DELAWARE: Wilmingtor,
FLORIDA: Pensacola
IDAHO: Boise
ILLINOIS: Peoria
J.OWA:..:oavenport
KANSAS: Wichita
LOUISIANA:
Shreveport;
W. Monroe
MAtNE:
Westbrook
MARYLAND:
Hagerstown
MtSSISSIPPI: Jackson
MONTANA: Great Falls;
Missoula.
Billings
NEVADA: Reno; Las Vegas
NEW MEXICO: Albuquerque
NEW YORK:
Schenectady
Oj+f Or-Young stown
OREGON: Medford
PENNSYLVANIA:
Erie:
Bethlehem;
Allentown: Easton
SO.UTH CAROLINA:
Columbia
TENNESSEE:
Nashville
T6ilCAs: EI
Paso; Odessa; Amarillo;
Harlingen; .corous Christi
VIRGINIA: Roanoke
WASHINGTON: Yakima
WEST VIRGINIA: Huntington
PRINTED IN U.S.A.
Page 19

CHAIN SAW ACCESSORIES
CHAIN SAW SHARPENING
part/ item
code no.
5/32" dia, Chain
Sharpening File
with Guide
pitch
description
71095
FILE
CHAIN SAW
Combination screwdriver and
wrench service tool for all
models.
71093 -
For
1/4"&3/8"
Low Profile
Pitch Chain
AlABAMA
ARllONA
ARKANSAS
CALIFORNIA
COLORADO
CONNECTICUT
Fll)RIDA.
'[ORCIA.
HAWAII
ILLINOIS
IOWA
KEHTUCI{Y
LOUISIANA
MA~YLANO
MASSACHUS[TTS
MICHl","
Specially Compounded Chain Saw Oil
part/item
'code no.
OIL FOR
ENGINE
&
CHAIN
description
72782
73374
72781
Jr~/l
FACTORY SERVICE CENTERS
'HDIANA
Birmingham, 806 N.
Firth
Ave. 35203 ..••.....•.. (205) 322·247-;4
Phoenix, 1710 E.
McDowell
Rd. 85006 ":. . .(602)
254-116'5
lillie Rock, 1303 W. Markham 72201 ...•.....•... (5Dl) 374·1911
Brisbane, 3868 Bay!>hofe Blvd. 94005 •......... ,(415) ~67·5250
Los Angeles, 5455 E. washington Blvd. 90022 .•.•.. (213) 685·6760
Oakland. 425 Jackson S1. 94607 .... . .... (415) 444·1559
Sacramento, 2100 19th St. 95818 •... . ,(916) 446-4019
San Diego,
]231
Morena ·Blvd.
92}.10 ..
(M4l'276·355D
Santa Ana, 165 W. Pomona 92707 ....•.. . , .. , .(714) 542·5679
Santa Clara.
2)30
DelaCruz Blvd.
95050 \(08)243.9444
Van
Nuys.
16201 Victory Blvd. 91406 .. . (213) 994·8896
Denver. 678 Bryant SI. 80204 .(303) 893·~123
Rocky HIli. 2122 Silas Deane Hwy, 06067 (203) 527-4153
Jacksonville, 1628 -Hendricks Ave. 32207
,(9u4)
398·0728
North
Miami.
1204)
N,W.
7th Ave. 33161 .......•.
C305}
685·6201
~~~~~o,
5m
"Ji
~~~~~a~s Bird·3~~g~5 .:":.:': , :: :\~~~l
~~~~m
Atlanta, 170· 14th Street N.W. 30318 .••... . .. (404) 873·2908
Honolulu. 3C69
uetena
SI. 96819 ..... (808) 847~07
Chicago
(lincolnwood), 6434
N. Ridgeway
Ave.
60645 (312) 583·5533
Chicago (Central).
552 W.
Washington Blvd. 60606 .. (312) 726·6198
Chicago (south). 3259
VI.
Columbus
Ave.
60652 , ...
(312) £:36·1555
Northlake. 332 L North
Ave.
60)64 • . .(31'2)
562·1022
Springfield. 300 S. 31s1 SI. 62703 ....•... . .(217) 528·6415
Hammond. 6339 S.
Indianapolis
Blvd. 46320 .(219) 845·9400
Indianapolis,
3304
Madison Ave. 46227 .{3l7) 787·8297
Des Moines. 2430 Hubbell Ave. 50317 .... . ,(515) 265·3275
louisville, 2501
Cri"endcn
Dr. 40217 . (502) 636·2835
Nev. Orleans. 3501 rchccpuceras S1. 70115 . (504) 899·6309
Baltimore.
2905 Greenmounl Ave. 21218 (30l) 243·1146
College Park, 9925 Rh~dC Island Ave. 20740.. . .(301}474·5510
Boston (Brillhton). lI9 N. Beacon Sf. 02J35 .. (617) 254·4560
Detroit 26J11 W. Eight Mile Rd. 48240.. . (313)535·1919
Grand Rapids, IS. 441h 51.. S.W, 49508 (616) 538·5060
MINNESOTA
Minneapolis,
2539
Nicollet
Ave. 55404 ...•...... (612) 827·4013
St. Paul. 1950 University Ave. 55104 .. . .. (612) 646·610.
MISSOURI Kansas City, 1710 Wyandotte 51. 64108 ... . .. (816) 221-1766
St. louis. 1238 S. Vandeventer Ave. 63110 • . .. (314) 535·742.q
NEBRASKA Omaha. 2110 S. 37th SI. 68105 .
.(402)~IP33
NEW JERSEY Edison, 6 Kilmer Court 08817 (201) 572·0875
Newark (Hillside), 611 U.S. /iighway No. 22 07205 .. (201) 686 •.6350
NEW YORK Buffalo, 88 Benbro Or. 14225 ...•......•....•...
(iI6)
68r~25'ilO'
Huntington Sta .. l.1., 673 E. Jericno Turnpike 11:746. (516) 423.~)OD
Jamaica, 153·25 Hillside Ave. 11~32
j ••••••••• '.'
.(212) 297~1919
New York (Manhattan). 75 VaHck St. 10013 .....• (2121226·7630
East Syracuse. 601 Manlius St. 13057 ••.....•.•. (315) 437-3435
NORTH CAROLINA Charlotte, 4800 N. Tryon 2B203 ..•...•.......•. (i04) 597·1957
Raleigh, 5306 Hillsborough 27606 .. .(919) 851·1418
OHIO Akron, 2169 E. Market St. 44312 . .(216) 794·9440
Cincinnati, 1245 Tennessee Ave. 45229 .(513) 242·0244
ctevetend. 3038 Payne Ave. 44114 ..... (216) 621·8136
Columbus. 5562 N. High St. 43214 .•.... " ..... , .(6141885·8670
Dayton, 5671 Webster St. 45415 "., .(513) 890·0760
OKLAHOMA Oklahoma City. 606 N. Pennsylvanta Ave. 73107 ... (1l05) 236·0170
OREGON Eugene, 1457 W. 6th Av~. 97402 ............•... (503) 484-1311
Portland, 2933 E. Burnside 97214 .. , .•...•••.•.. (503) 234·7418
PENNSY~VAllIA "Philadelphia. 4210 Macalester Ave. 19124 1215)455·2506
.. " ; :PiUsbureh.
3221 Uberty Ave. ]5201 (412\261-6457
SOUTH CARIJLfNA Greenville, Wade Hampton Mall 29606 (803) 271·8161
TENNESHE Knoxville. 2002 E. Magnolia 37914 .. .(615) 546·7744
• Memphis, 895·6 Brooks Road 38116 .. .(901) 332·9293
TEXAS Dallas. 2366
lrvlng
Blvd. 75207 ..... " .. (214) 637·2630
Ft. Worth, 1116·18 East Seminary Dr.
76iis· .....
(817) 926·7787
Houston. 3211 N.
Hutcheson
st.
77003 '" ,(713) 2211·9178
Lubbock, 2112 50th 79412 (80G) 747-9177
San Antonio, 612 McCullough Ave. 78215 (512) 2211·6311
UTAH Salt L~ke City, 280w.2855 South SI. 84115 (801) ~86·0368
VIRGINIA
Nortotk.
2.38 Ingleside Rd. 23513 (804) 855·2035
Richmond, 2026·8 Chamber layne Ave. 23222 ••.... (804) 359·6007
WASHINGTON seatue. 242.· 4th Ave. 9812\ ..............•... (206) 622·4404
Spokane, 1902E.Mission Ave. 99202 ..••.•...... (509) 535·1754
Tacoma, 2513 Tacoma Ave. South 981102 .. . .(206) 272·3455
WrSCONSIN West Allis, 10906 W. National.Ave. 53227 ,(414) 327·0050
MODEL and TYPE NUMBERS can be found on
the
nameplate of your tool.
SKIL Corporation 5033 Elston
Avenue, Chicago,
111.60630
CENTRAL OlSTRIBUTION CENTER:
3500
Oakton Street, Skok te, Illinois
60076
WEST COAST DISTRIBUTION CENTER:
1941
West Avenue
140th,
San Leandro, Calif.
94577
F-315649- 5/76
1/2
Gallon
~uart
Piht
Jr~/l
AUTHORIZED
SERVICE STATIONS
are ')ocated in the following
cities. -For addresse's '~nd':"
~phone
numbers,
'see
your
. 'phone book Yellow
'Pages
u~d;r
"To'als-Electric".
ALABAMA: Montgomery; Sheffield;
Huntsville
ALASKA: Anchorage: fairbanks
ARIZONA: Tucson
CALIFORNIA:
Bakersfield;
Fresno;
Ventura';
Santa
Barbara
DELAWARE: Wilmington
FLORIDA: Pensacola
IDAHO:
Boise
ILUNOIS:
Peoria
JOW .••.:.:.Davenport
KANSAS:
Wichita
LOUISIANA;
Shreveport;
W. Monroe
MAINE; Westbrook
MARYLAND;
Hagerstown
MISSISSIPPI: Jackson
MONTANA:
Great
Falls; Mis-soula, Billings
NEVADA:
Reno; Las
Vegas
NEW
MEXICO;
Albuquerque
NEW YORK:
Schenectady
OHIO:· Youngstown
OREGON: Medford
PENNSYLVANIA:
Erie:
Bethlehem;
Allentown:
Easton
SO.UTHCAROLINA: Columbia
TE~ESSEE:
Nashville
T6KAs:EIPaso:
Odessa: Amarillo;
Harlingen; .corous
Christl
VIRGINIA: Roanoke
WASHINGTON: Yakima
WEST
VIRGINIA:
Huntington
PRINTED IN U.S.A.
 Loading...