


Sirius Emtc 580 WH, Emtc 880, Emtc 1180, Emtc 1180 WH, Emtc 580 User Manual
...
Congratulations on your purchase! Thank you for choosing a Sirius product.
S-DD2-L FLUSH TOP
DOWNDRAFT INSTALLATION INSTRUCTIONS FOR SEM 1, SEM 2, SEM 7, & SEM 8 motors
SDD2 L EMTC 580 |
EAN #9351116001063 |
SDD2 L EMTC 880 |
EAN #9351116001094 |
SDD2 L EMTC 1180 |
EAN #9351116001193 |
SDD2 L EMTC 580 WH |
EAN #9351116001070 |
SDD2 L EMTC 880 WH |
EAN #9351116001278 |
SDD2 L EMTC 1180 WH |
EAN #9351116001285 |

S-DD2-L FLUSH TOP
INSTALLATION GUIDE
TO THE ATTENTION OF THE USER |
3 |
INSTALLATION GUIDELINES |
3 |
APPLIANCE DIAGRAMS |
4 |
PRE-INSTALLATION CHECKS |
5 |
INSTALLING THE RANGEHOOD |
6 |
INSTALLATION INSTRUCTIONS |
|
FOR SEM 1 AND SEM 2 |
|
150MM SIDE OR BOTTOM VENTING |
8 |
FOR SEM 7 AND SEM 8 |
|
200MM SIDE OR BOTTOM VENTING |
9 |
FOR SEM 1, SEM 2, SEM 7, AND SEM 8 |
|
150MM / 200MM FRONT OR REAR VENTING |
10 |
DUCTING FROM MOTOR TO VENT (SEM 1 & 8 ONLY) |
12 |
ELECTRICAL CONNECTION |
12 |
HOW THE RANGEHOOD WORKS |
14 |
CLEANING THE RANGEHOOD |
15 |
TROUBLESHOOTING |
15 |
REPLACING THE LIGHT |
16 |
PARTS LIST |
17 |
WIRING DIAGRAM |
20 |
The symbol on the product or on its packaging indicates that this product may not be treated as house-hold waste. Instead it shall be handed
over to the applicable collection point for the recycling of electrical and electronic equipment. By ensuring this product is disposed of correctly, you will help prevent potential negative consequences for the environment and human health, which could otherwise be caused by inappropriate waste handling of this product. For more detailed information about recycling of this product, please contact your local city office, your household waste disposal service or the shop where you purchased the product. This appliance is marked according to the European directive 2002/96/EC on waste electrical and electronic equipment (WEEE).
2

TO THE ATTENTION OF THE USER
This rangehood is designed to work with ducted outside evacuation.
 WARNING
Keep these instructions for use with the appliance. If the appliance should be sold or passed on to others, make sure that the instructions are passed on with it. We thank you for taking note of these suggestions before installing and using the appliance. They have been written for your personal safety and the safety of others.
S-DD2-L FLUSH TOP
INSTALLATION GUIDE
INSTALLATION GUIDELINES FOR GAS COOKTOP APPLICATIONS
•A minimum 60mm gap must be left between the stainless steel frame and the nearest edge of the cooktop.
•The minimum distance between the border of the gas cooktop and the nearest burner must not be less than 95mm
•For the downdraft to operate at a premium, the distance between the downdraft opening and the furthest burner shall not exceed 650mm.
•Distance between the burners on the side closest to the downdraft shall not be closer than 165mm.
SAFETY INSTRUCTIONS
These hoods have been designed for personal use in the home. The appliance must be used by adults. Make sure that the appliance is out of reach of children and that they do not use it to play with.
Make sure that children do not operate the controls.
•When the appliance is delivered, check the overall appearance of the packaging. Check PARTS
LIST on page 17 for all included parts prior to discarding packaging.
Any remarks should be written on the delivery coupon, of which you keep a copy.
Your appliance is designed for normal domestic use. It is not designed for commercial or industrial use, or for purposes other than those for which it was designed.
•Any consequences of or damage from incorrect installation or incorrect use of the appliance will not be covered by the manufacturer’s guarantee.
•Do not ever change or try to change the characteristics of this appliance. This would be a danger. Repairs must be performed only by an authorised technician.
•Always disconnect the hood before carrying out cleaning or maintenance operations.
•Adequately ventilate the room when a rangehood and other appliances, powered by energy other than electricity, are used simultaneously, so that the hood does not suck any combustion fumes.
•It is not allowed to cook food over open flames (flambé) or operate gas hobs without pots
or pans on them under the hood itself (the flames sucked into the hood might damage the appliance).
•Frying under the appliance must be done under constant supervision as hot oils and fats may ignite.
•Respect the guidelines for cleaning and replacement of grease filters. Accumulated deposits of grease are a fire hazard.
•This appliance must not be used over cook tops powered by wood or coal or in any case, over cook tops with power levels that could damage the appliance.
•Never use steam or high-pressure devices for cleaning your hood (regulations regarding electrical safety).
•Never use the rangehood without the grease filters.
•The minimum distance between the Downdraft (closed) and the surface above it must be at least 800 mm.
•When handling the downdraft, never put your hands in the field of action of the extractable unit.
At Sirius, we are constantly seeking to improve our products. We reserve the right to modify their technical, functional, or aesthetic characteristics deriving from their upgrading.
Motors manufactured and approved by Sirius only are to be used at all times. Failure to comply with this will result in the forfeit of the manufacturer warranty.
The air collected must not be conveyed into a flue used for smoke or fumes from appliances powered by anything other than electricity (central heating systems, bathroom and toilet exhausts, etc.). As far as discharging exhaust air is concerned, please
follow the guidelines given by competent authorities.
3
S-DD2-L FLUSH TOP
INSTALLATION GUIDE
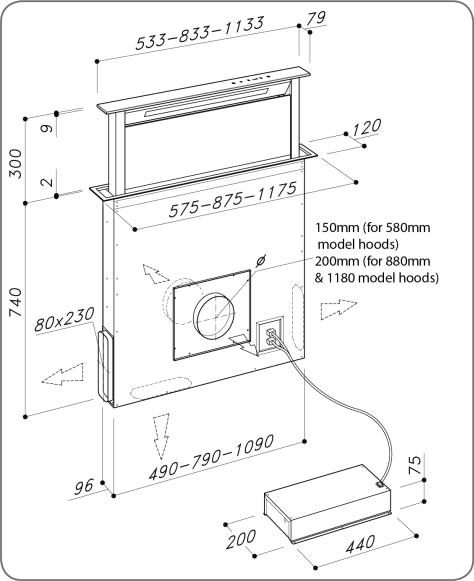
APPLIANCE DIAGRAMS
DUCTING TYPES
• Side / bottom venting - SEM 1, SEM 2 motor |
pg.7 |
• Side / bottom venting - SEM 7, SEM 8 motor |
pg.8 |
• Front / rear venting - SEM 1, SEM 2, SEM 7, SEM 8 motor |
pg.10 |
• Side / bottom venting - SEM 10 motor |
see separate |
|
installation |
|
guide |
4

S-DD2-L FLUSH TOP
INSTALLATION GUIDE
 NOTE
NOTE
Check PARTS LIST on page 17 for all included parts prior to discarding packaging.
PRE-INSTALLATION CHECKS
Connect all of the electrical components to the unit and motor to make sure both the unit and the motor are functioning properly.
(NOTE: The motor plug is fitted with a dummy plug - with the exception of SEM1 motor - to protect the connection from dust. Ensure the red dummy plug is removed and replaced with the two
pin motor plug from the power transformer box. Failure to do so will result in only two speeds operating).
Red dummy plug |
Two pin motor plug |
Remove all plugs and proceed with installation if both unit and motor are fully operational.
 CAUTION
Installation must comply with the regulations in force regarding the ventilation of enclosed environments. In particular, discharged air must not be conveyed into a duct used for fumes discharge or discharge from appliances using gas or other combustible materials. Air cannot be ducted into roof space.
The use of discontinued ducts is not allowed without the approval of a qualified technician.
BEFORE YOU INSTALL
Sirius warranty covers only Sirius product. If you choose to install a non-Sirius branded accessory such as flexible ducting, Sirius will only warrant the hood and motor. If installation is found to be the cause of failure or issue then charges will apply for service and parts.
Flexible ducting is not permitted under any circumstances. Flexible ducting has been found to increase noise levels, increase vibration and reduce airflow. Sirius Semi-rigid or solid ducting can be used in lieu. There is a range available to suit any application.
Available at www.siriusbrand.com
A reduction in the duct diameter from stated ducting size will void warranty.
If you are in doubt about the ducting, please contact Sirius on 1300 762 219 prior to installation.
5

S-DD2-L FLUSH TOP
INSTALLATION GUIDE
INSTALLING THE RANGEHOOD
•Before carrying out the appliance installation, please check that all components are not damaged, in such a case contact your retailer and do not carry out any installation operation. Before the installation of the downdraft, please remove the safety piece you can see in the picture (Fig. 1). Leave all other protective tape in place at this point. Furthermore, please read carefully all of the following installation instructions.
•Use Sirius ducting with a maximum length of 7 metres to the motor.
•Limit the number of elbows in the ducting, since each elbow reduces the air capacity of 1 linear meter. (Ex: if you use no. 2 x 90° elbows, the length of piping should not exceed 5 meters).
•Avoid abrupt direction changes. (Optimum angle 45° when required)
•Use a 150 mm for 580mm models, - 200mm ducting for larger models - constant diameter pipe for the whole length.
Use ducting approved by standards enforced - see www.siriusbrand.com.au for approved ducting The manufacturer shall not be deemed responsible for air capacity or noise problems caused by failure to comply with the above instructions and no warranty on the product shall be provided.
STEP 1:
Refer to cutout dimensions required per unit as they vary for each unit.
1.Before making the cutout, check that there are no structural or other parts inside the cabinet where the appliance is to be placed which could hinder a proper installation. Check that the dimensions of the downdraft and the cooktop are compatible with the cabinet so that the installation can be carried out properly.
2.Make a rectangular cutout in the back of the
cooktop:
•542mm x 100mm for the 580mm model
•842mm x 100mm for the 880mm model
•1142mm x 100mm for the 1180mm model.
3.Put the downdraft in the opening, inserting it from above as shown in (Fig. 2)
 WARNING
Technical specifications and product sizes can be varied by the manufacturer without notice. Cut out dimensions are indicitive only and physical measurement should be taken as a precautionary measure to ensure no issues arise with fitment.
(Fig. 1) |
(Fig. 2) |
NB: Remove only red parts
6
 Loading...