

Page 1
Quantum XL-100
INSTRUCTION MANUAL
SINGER
Page 2

CONGRATULATIONS
...on the purchase of this new Singer* computer sewing machine. To
achieve the most enjoyment and satisfaction from this product, it
is recommended that the instruction manual be read through step by step
while seated in front of the machine. This will help
get to know all of its parts and capabilities.
INSTRUCTION BOOK SINGER* QUANTUM XL-ioo
The manufacturer reserves the right to change the appearance, design, or
accessories of this sewing machine as considered
necessary without any notification or obligation.
*A trademark of The Singer Company
Copyright 1994 Singer Sewing Company.
All rights reserved throughout the world.
“IMPORTANT SAFETY INSTRUCTIONS”
“When using an electrical appliance, basic safety precautions should always be followed, including the following:’
“Read all instructions before using this sewing machine.”
DANGER.
1. “An appliance should never be left unattended when plugged in. Always unplug this appliance from the electric outlet
immediately after using and before cleaning.”
2. “Always unplug before relamping. Replace bulb with same type rated 5 Watts.”
it
WARNING
“Do not allow to be used as a toy. Close attention is necessary when this appliance is used by or near children.”
1.
2.
“Use this appliance only for its intended use as described in this manual. Use only attachments recommended by the
manufacturer as contained in this manual.”
“Never operate this appliance if it has a damaged cord or plug, if it is not working properly, if it has been dropped or damaged
3.
or dropped into water. Return the appliance to the nearest authorized dealer or service center for examination, repair,
electrical or mechanical adjustment.”
“Never operate the appliance with any air openings blocked. Keep ventilation openings of the sewing machine and foot
4.
controller free from the accumulation of lint, dust, and loose cloth.”
“Keep fingers away from all moving parts. Special care is required around the sewing machine needle.”
5.
“Always use the proper needle plate. The wrong plate can cause the needle to break.”
6.
7.
“Do not use bent needles.”
“Do not pull or push fabric while stitching. It may deflect the needle causing it to break.”
8.
“Switch the sewing machine off (“0") when making any adjustments in the needle area, such as threading needle, changing
9.
needle, threading bobbin, or changing presser foot, and the like.” >
“Always unplug sewing machine from the electrical outlet when removing covers,lubricating, or when making any other user
10.
servicing adjustments mentioned in the instruction manual.”
11.
“Never drop or insert any object into any opening.”
12.
“Do not use outdoors.”
“Do not operate where aerosol (spray) products are being used or where oxygen is being administered.”
13.
14.
“To disconnect, turn all controls to the off (“0") position, then remove plug from outlet.
“Do not unplug by pulling on cord. To unplug, grasp the plug, not the cord.”
15.
cc
SAVE THESE INSTRUCTIONS
This sewing machine is intended for household use only.”
_To reduce the risk of electric shock:”
_To reduce the risk of burns, fire, electric shock, or injury to persons:”
55
Page 3

CONTENTS
Important Safeguards...........................................................2
Various Types of Stitches
Principal Parts....................................................................4,5
Accessories...........................................................................5
Major Functions....................................................................6
Memory Buttons and Pattern Category Buttons
Changing Presser Feet.........................................................8
Types of feet and their application
Connecting Machine.............................................................9
Winding Bobbin.............................................................10,11
Threading Machine........................................................12,13
Trial Sewing!..................................................................14,15
How to operate automatic thread cutter
How to select needle position
How to use the thread cutting groove
How to Select Utility Patterns
How to Adjust Stitch Length of Utility Patterns
Stitch length of each stitch pattern
How to Adjust Stitch Width of Utility Patterns
Automatic Computer Controlled Thread Metering
(tension)..............................................................................19
How to modify top thread supply.
How to shirr and gather.
Problem Indicators..............................................................20
Fabric, Thread and Needle Table
How to Remove and Insert Needle
Straight Stitch......................................................................22
Back Tack..........................................................................23
Changing sewing direction/ pivoting.
Seam guides/ How to select needle positions.
Zigzag Stitch
How to adjust stitch width.
Manually adjusted stitch width vs. stitch length.
Overcasting (Overedging)...................................................25
Automatic Buttonholes...................................................26,27
Purl stitch buttonholes
Sewing Corded Buttonholes
Basting Stitch......................................................................28
Blindstitch
Attaching Buttons................................................................30
Four Direction Sewing........................................................31
Balancing Shape of Pattern
Pattern Sewing
How to select patterns. Pattern modifier keys.
Large Size Pattern Sewing
1 .Single pattern
2. Enlarge pattern
3. Reduce pattern
4. Mirror pattern
5.2-color pattern
6. Position pattern
7. Repeat pattern
.......................................................................
......................................................................
.............................................................
..........
............................................3
...................
.............................................
...................
.....................
......................................
....................................
...............................................
...............................................
............................................
16
17
18
21
21
28,29
31
32,33
34,35
24
28
Fun-face Pattern Sewing....................................................36
Regular Pattern Sewing......................................................37
How to use pattern modifier keys of regular patterns.
Alphabet Stitch Sewing.......................................................38
How to select letter of alphabet.
7
How to Combine Patterns...................................................39
Combine upper case and lower case.
Combination fun-face and alphabet.
How to Correct Patterns in Memory
How to Cut Cross-over Stitch
Free Arm Sewing
Circular Pattern Stitch.........................................................42
Heirloom Sewing (Using wing needle)................................43
Quilting (Using quilting guide).............................................43
Patch Work
Twin Needle Sewing
Pin Tucks............................................................................45
Darning/ Free-motion Embroidery
Rolled Hemming.................................................................47
Even Feeding......................................................................47
Inserting Zippers.................................................................48
Inserting Invisible Zippers
Manual Buttonholes............................................................50
Attaching Cords..................................................................51
Optional Accessories.....................................................52,53
Ruffler presser foot
PIntuck foot/ Open toe embroidery foot
Darning/Embroidery foot/ Quilter’s foot
Side cutter
Embroidery
Preparation for Embroidery
Attaching/removing embroidery bed.
Inserting/removing embroidery card.
Securing material in embroidery frame.
Attaching/removing embroidery frame.
Determining location of embroidery.
Letter embroidery guide
Initial letter embroidery frame
Sampler Card Patterns of Embroidery...........................58,59
Outline embroidery
Multi-color embroidery
Letters Card of Embroidery
Example (combination of sampler and
upper/lower case script)
Troubles in Embroidering....................................................63
If thread breaks during embroidering:
To re-embrolder troubled pattern from start:
Helpful messages given on LCD window during
embroidering:
Optional Embroidery Cards
How to Replace Light Bulb
Cleaning..............................................................................65
How to Replace Needle Threader Hook Holder
Performance Checklist
Part Number of Accessories...............................................68
.................................................................
.......................................................................
...........................................................
.......
....................................................................
.....................................................
..................................................
...................................
............................................
......................................
...........................................
54,64
...........................................
...........................................
................................................
.................................................
56,57
60,61
.................
66,67
40
40
44
45
46
49
41
62
64
65
65
Page 4
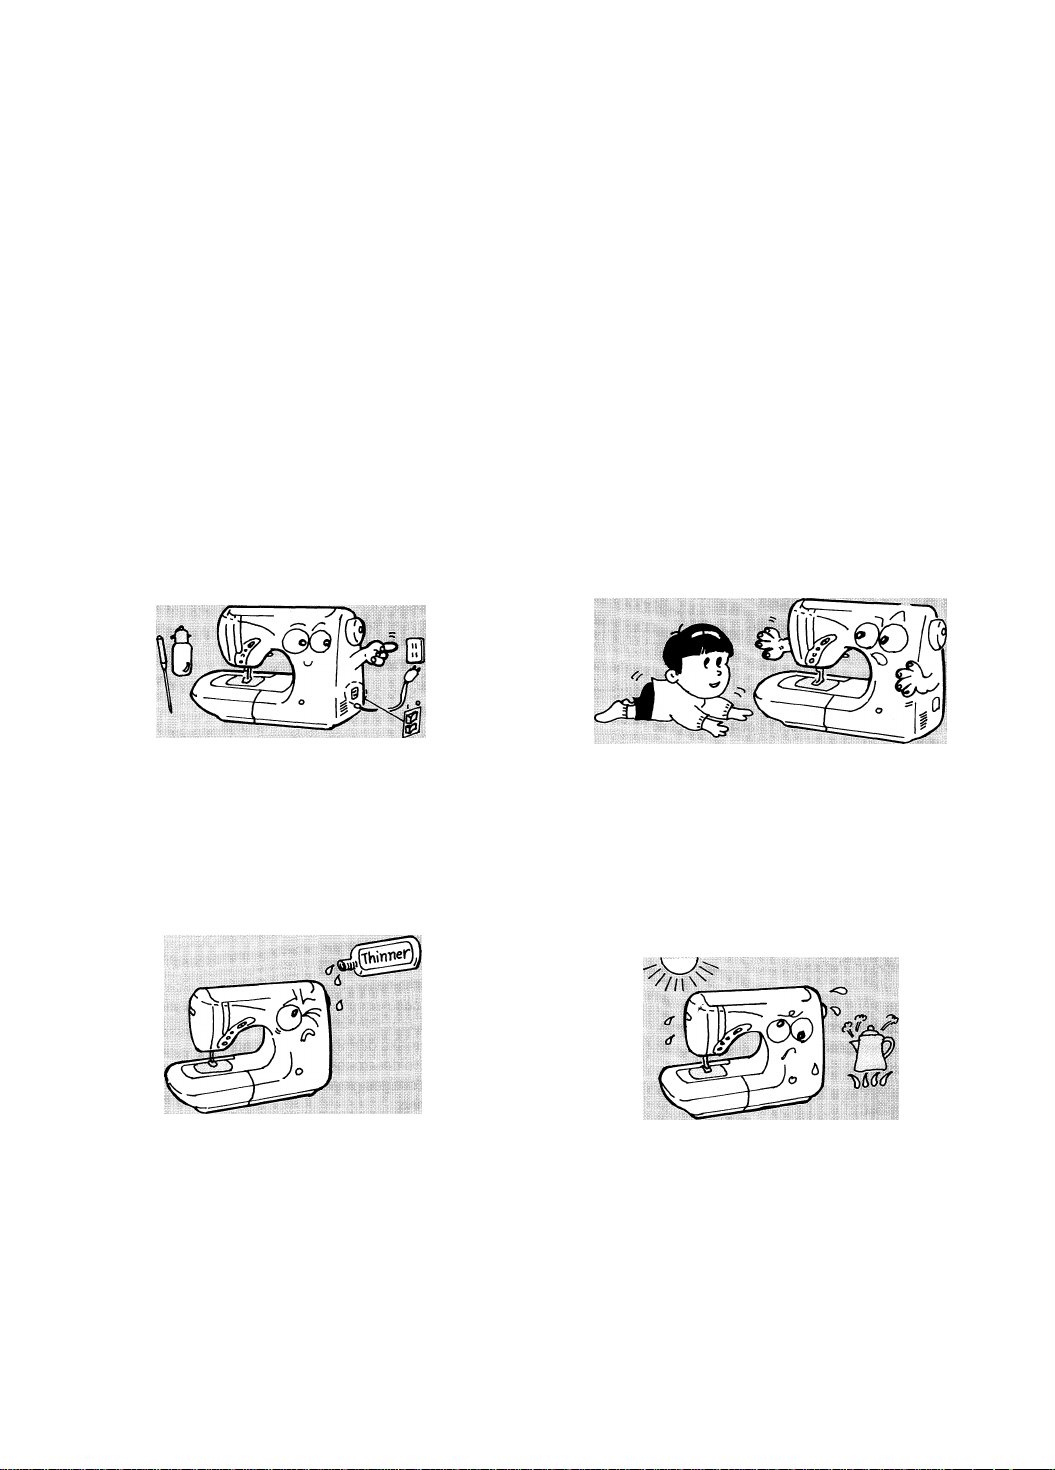
Be sure to turn power switch OFF before replacing sewing machine needle, or lubricating machine.
When not in use, be sure to turn power switch OFF and unplug machine.
Do not use thinner or other similar solvents to clean machine.
Do not expose machine to direct sunlight or humid atmos
phere.
This sewing machine uses a micro computer and precision electronic circuits consisting of semiconductor components, so
please observe the following precautions:
• Keep room temperature at 40°F to 100°F. If temperature of room where machine is used is too low, machine may present
problems such as failure to reach its normal sewing speed.
• Motor used in this sewing machine is electronically controlled. When the machine is operated for an extended period of
time at low speed, safety device will automatically turn machine OFF preventing motor from overheating. If motor should
stop while sewing, turn power switch OFF, and wait about 20 minutes. This will reset safety device.
Page 5
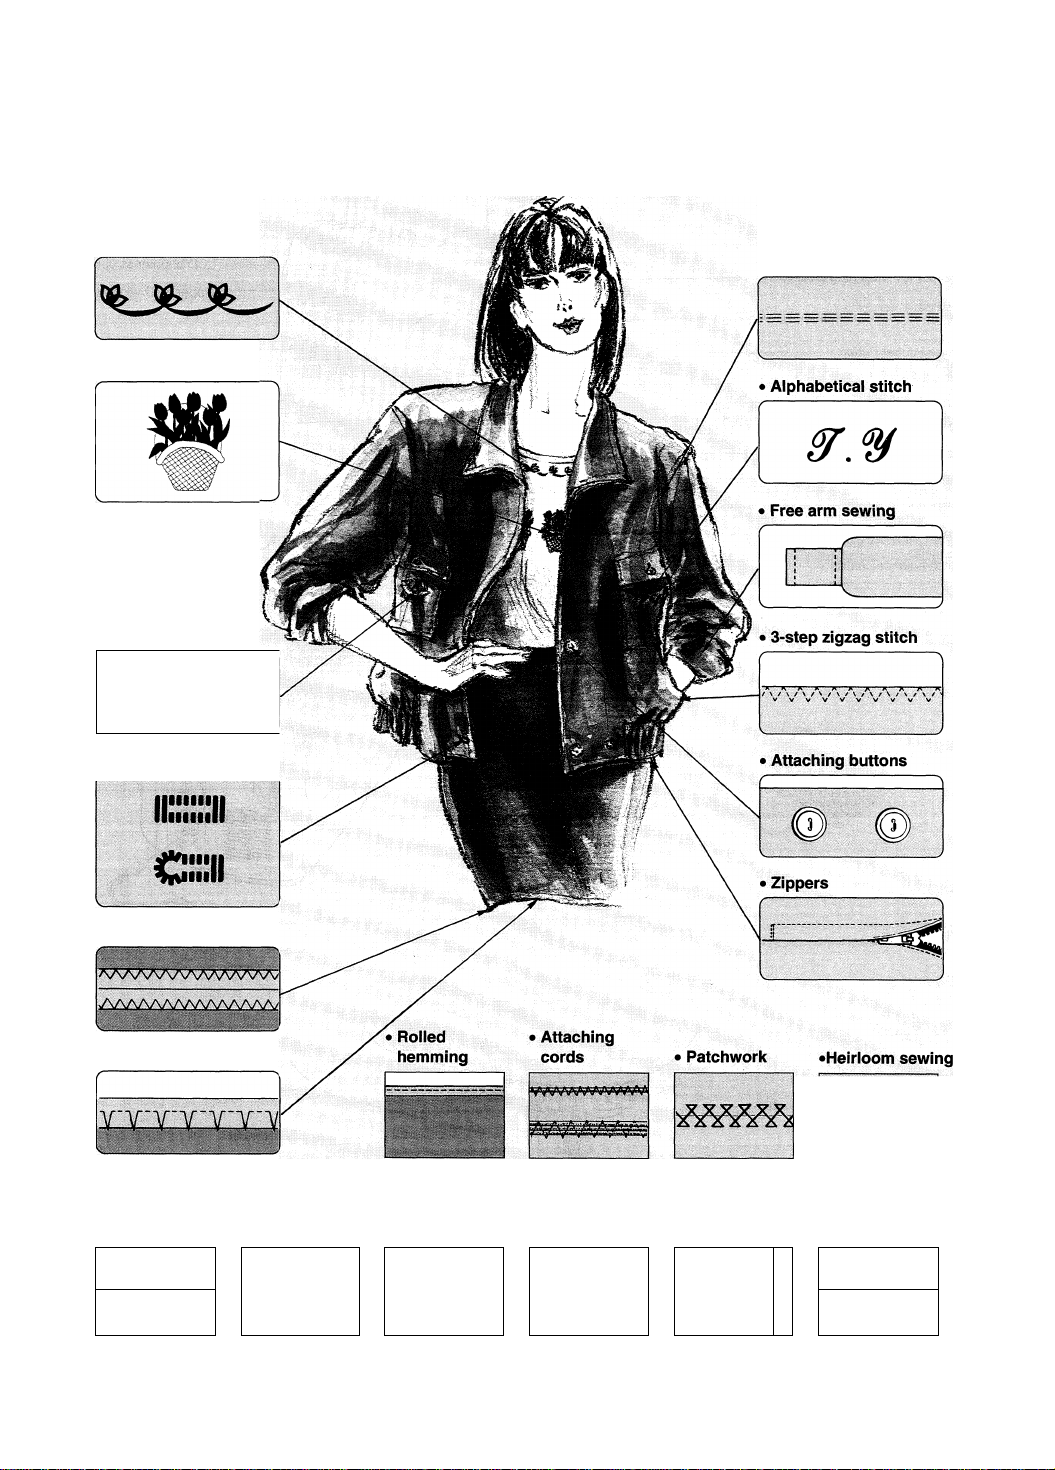
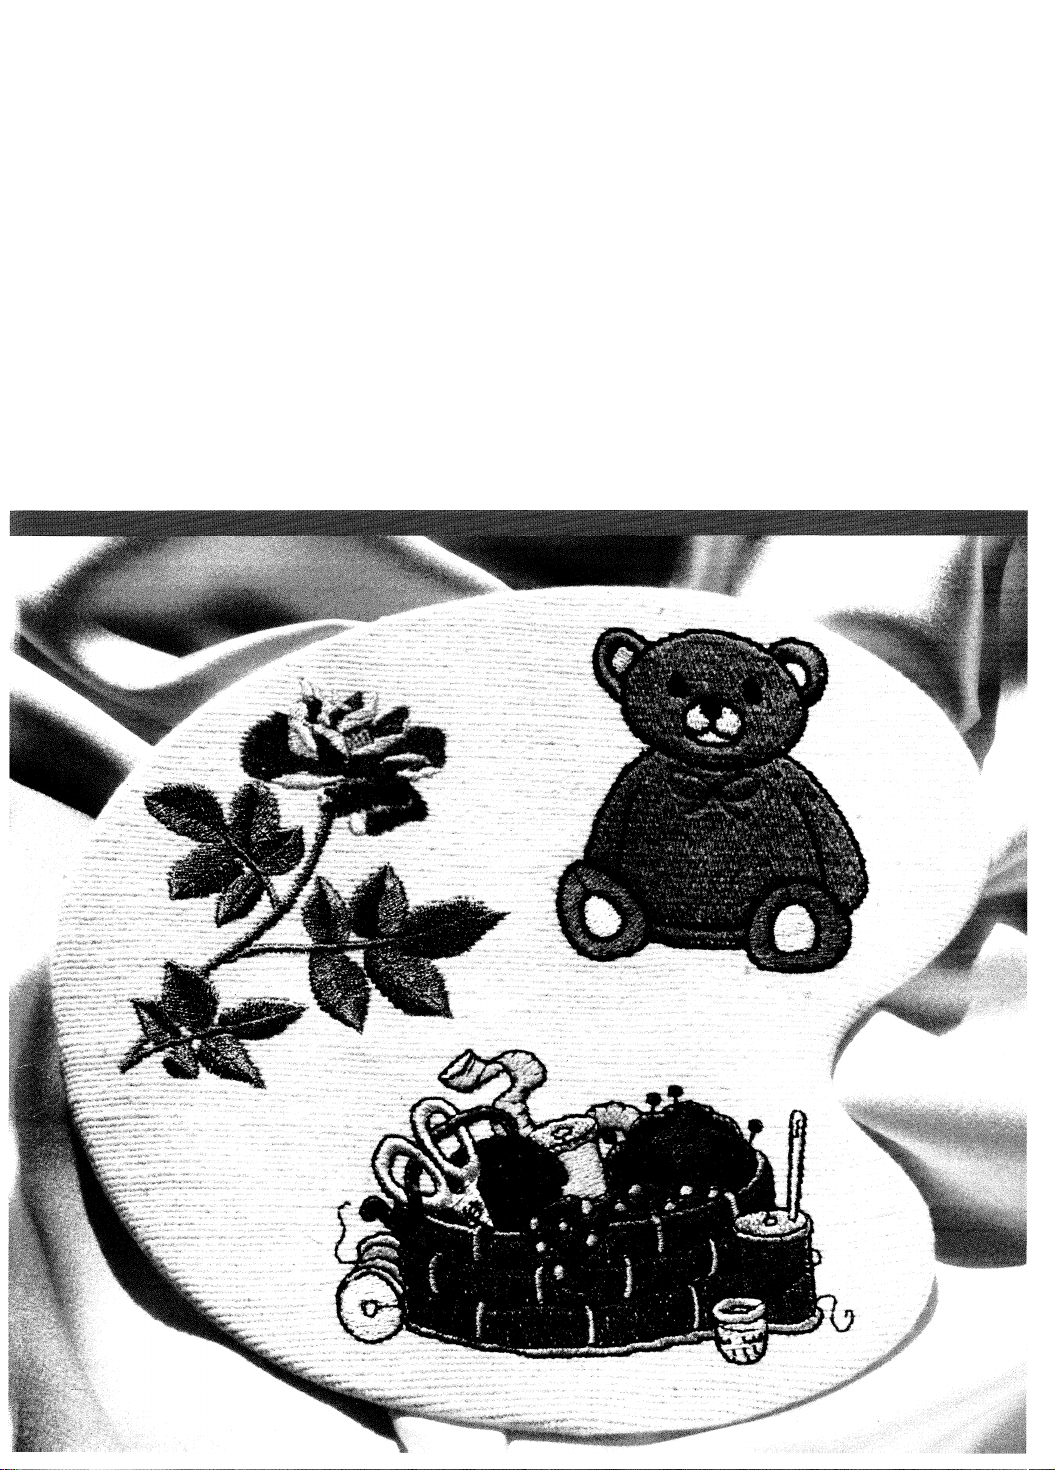
Various Types Of Stitches
• Pattern stitch
• Embroidery stitch
» Applique
• Buttonholes
r
• Reinforcing stretch
stitch
»Overcasting
» Blindstitch
• Circular
• Straight stitch • Zigzag stitch • Basting stitch pattern stitch • Quilting
aaaaa
rrrm“rrrrn
CCCCCCCOICO
Wing needle
► Pintuck
j s
AA/|\AA/^sAA^ A/
Twin needle
Page 6
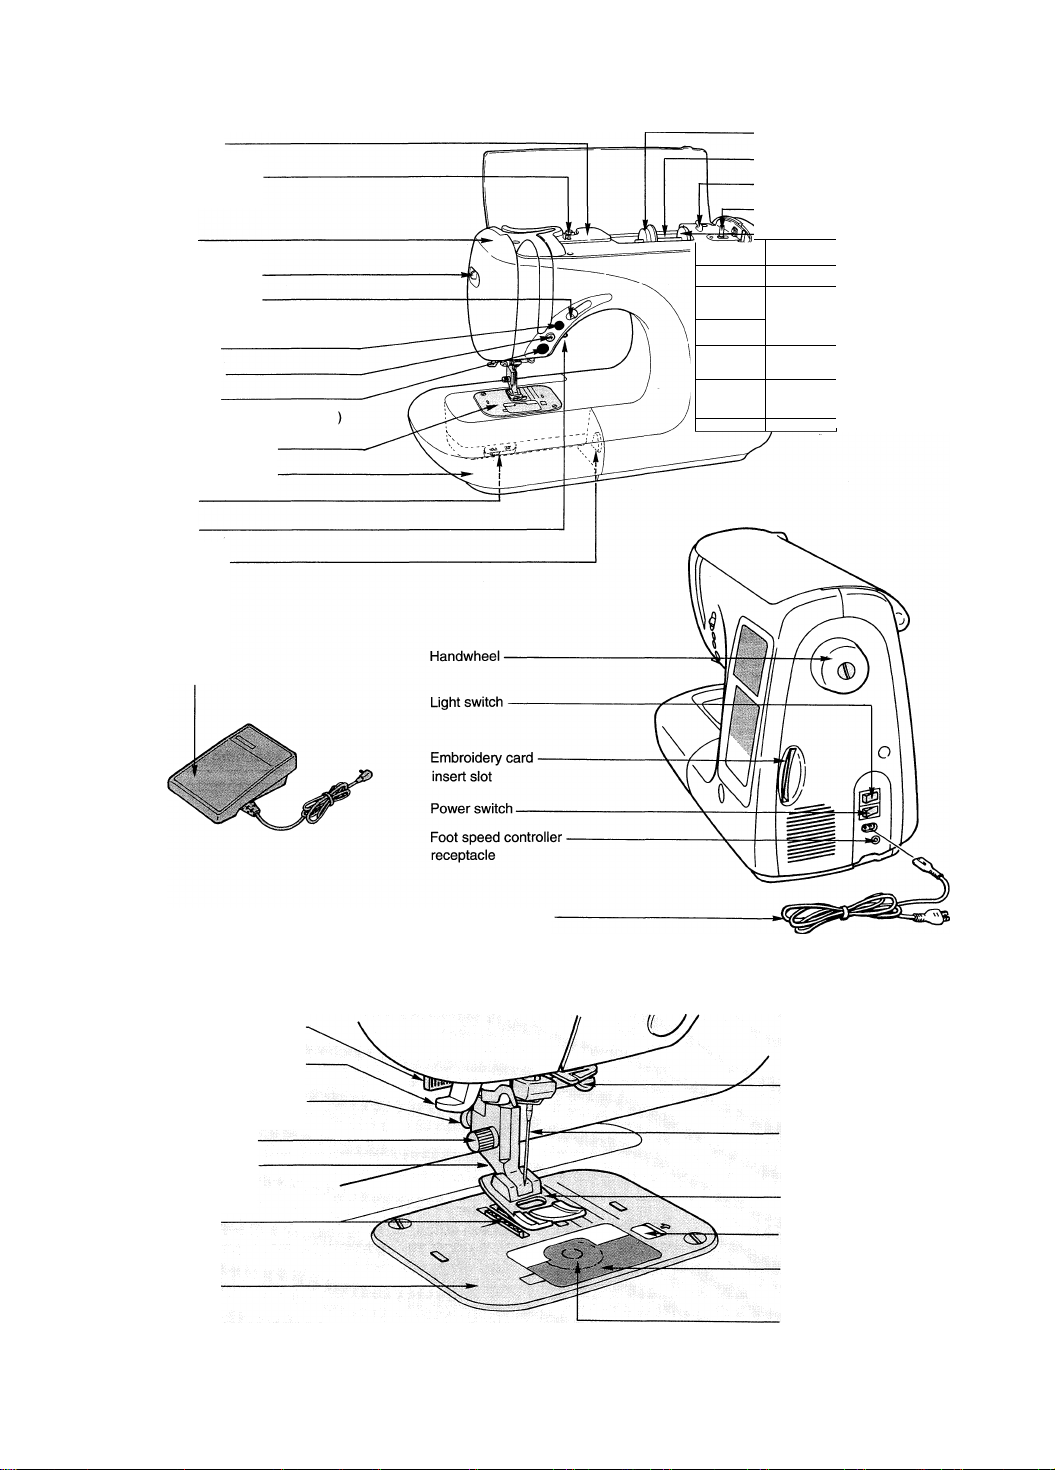
Principal Parts
Thread sensor guide
Bobbin winder thread guide
Face plate cover
Presser foot adjusting lever
Sewing speed lever
(When foot speed controller is not used.)
Thread cutter button
Back tack button
Start/stop button
(When foot speed controller is not used.
Needle plate
Auxiliary bed (Accessory box)
Drop feed lever
Presser foot lifter
Stitch balance control
Foot speed controller
\
--------
Thread spool cap
Spool pin
Bobbin thread cutter
Bobbin winder
Spool pin felt
LCD brightness control
Upper LCD window:
Lower LCD touch-screen
Function buttons
Utility pattern button
Buttonhole lever
Needle threader
Presser foot release button
Presser foot screw
Presser foot holder
Feed dog
Needle plate
Electric power cord
Needle clamp
Needle
Presser foot
Bobbin case cover button
Bobbin case
Bobbin
Page 7
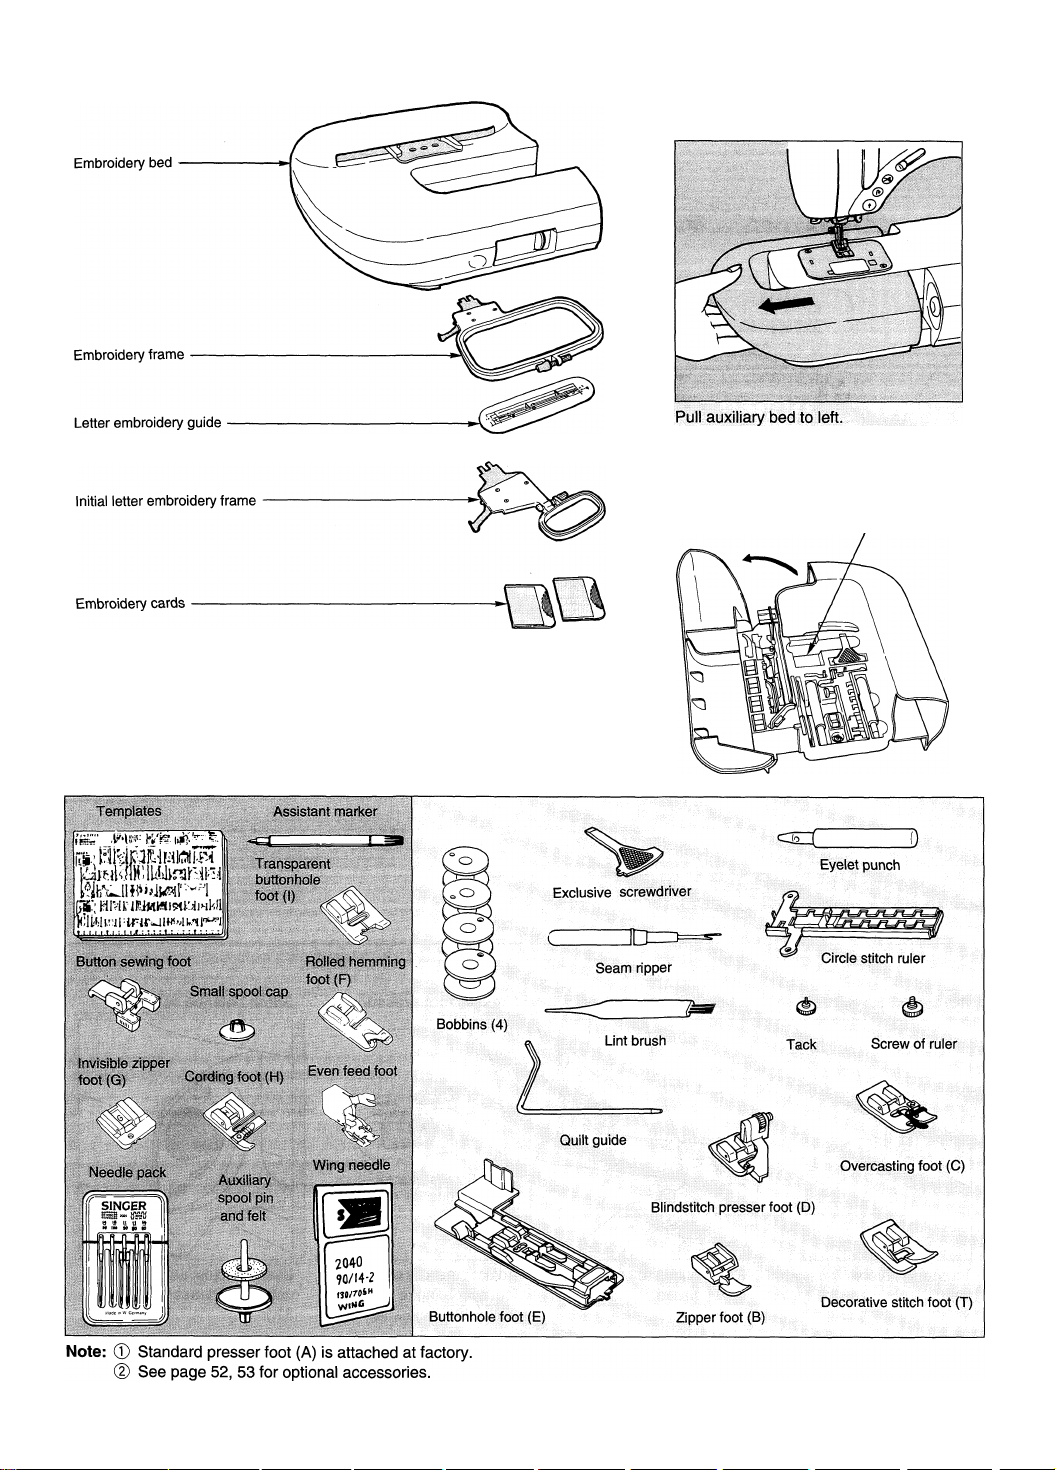
Embroidery foot -
Converting machine to free-arm
Available spot for extra feet.
Accessories
d) See page 68 for part numbers of accessories.
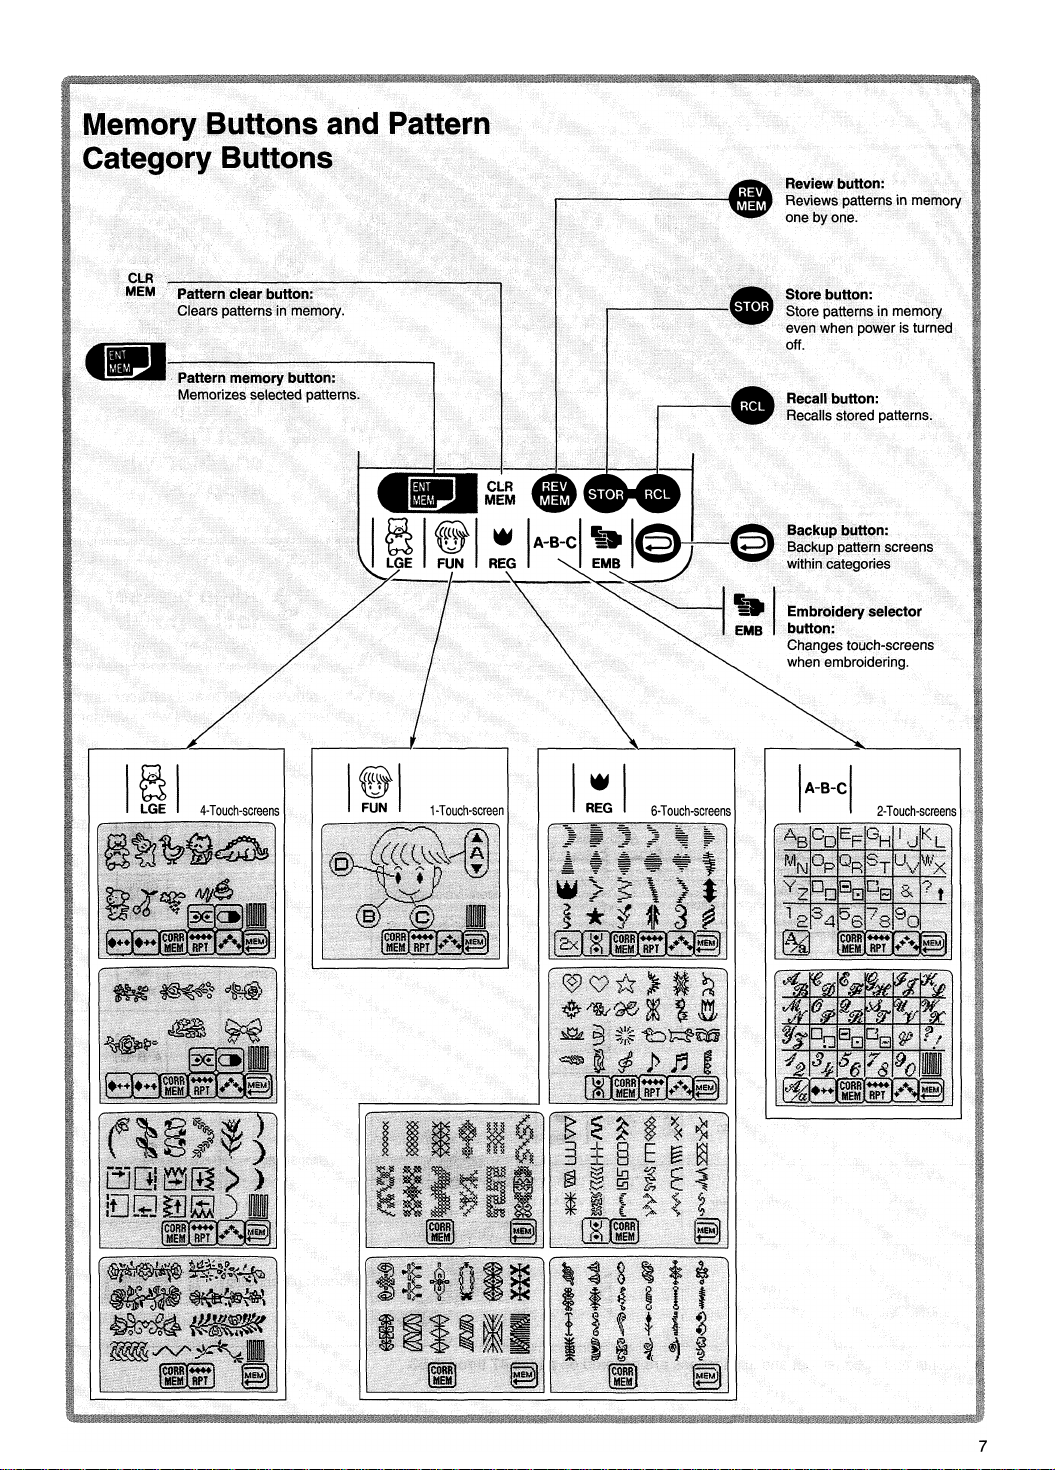
Page 8

Major Functions
' LCD Brightness control:
Controls brightness and contrast of upper LCD window and
lower LCD touch-screen.
• Upper LCD window:
View stitch pattern graphics and problem indicators.
• Thread meter override buttons:
Increases and decreases top thread supply (tension).
• Liquid crystal display:
Indicates presser foot, stitch length, stitch width, tension, mirror
image, turn over, pattern repeat, small abc, two color patterns
and memory.
» Stitch length override buttons:
Increases and decreases stitch length.
► Needle position/stitch width buttons:
Changes straight stitch needle position and stitch width.
► Lower LCD touch-screen:
Indicates patterns which may be selected.
Memory buttons:
Memorize, clear, review, store and recall patterns.
' Pattern category buttons:
Used to select large motifs, fun faces, regular, alphabet or
embroidery category touch-screens.
Back tack button
Used to back tack beginning
and end of seam.
Utility pattern button:
Instant access to utility pattern screen
Thread cutting button Presser foot pressure
lower thread.
foot according to type and
thickness of material.
Stitch balance control
patterns. (Please see page
31.)
Page 9
Page 10
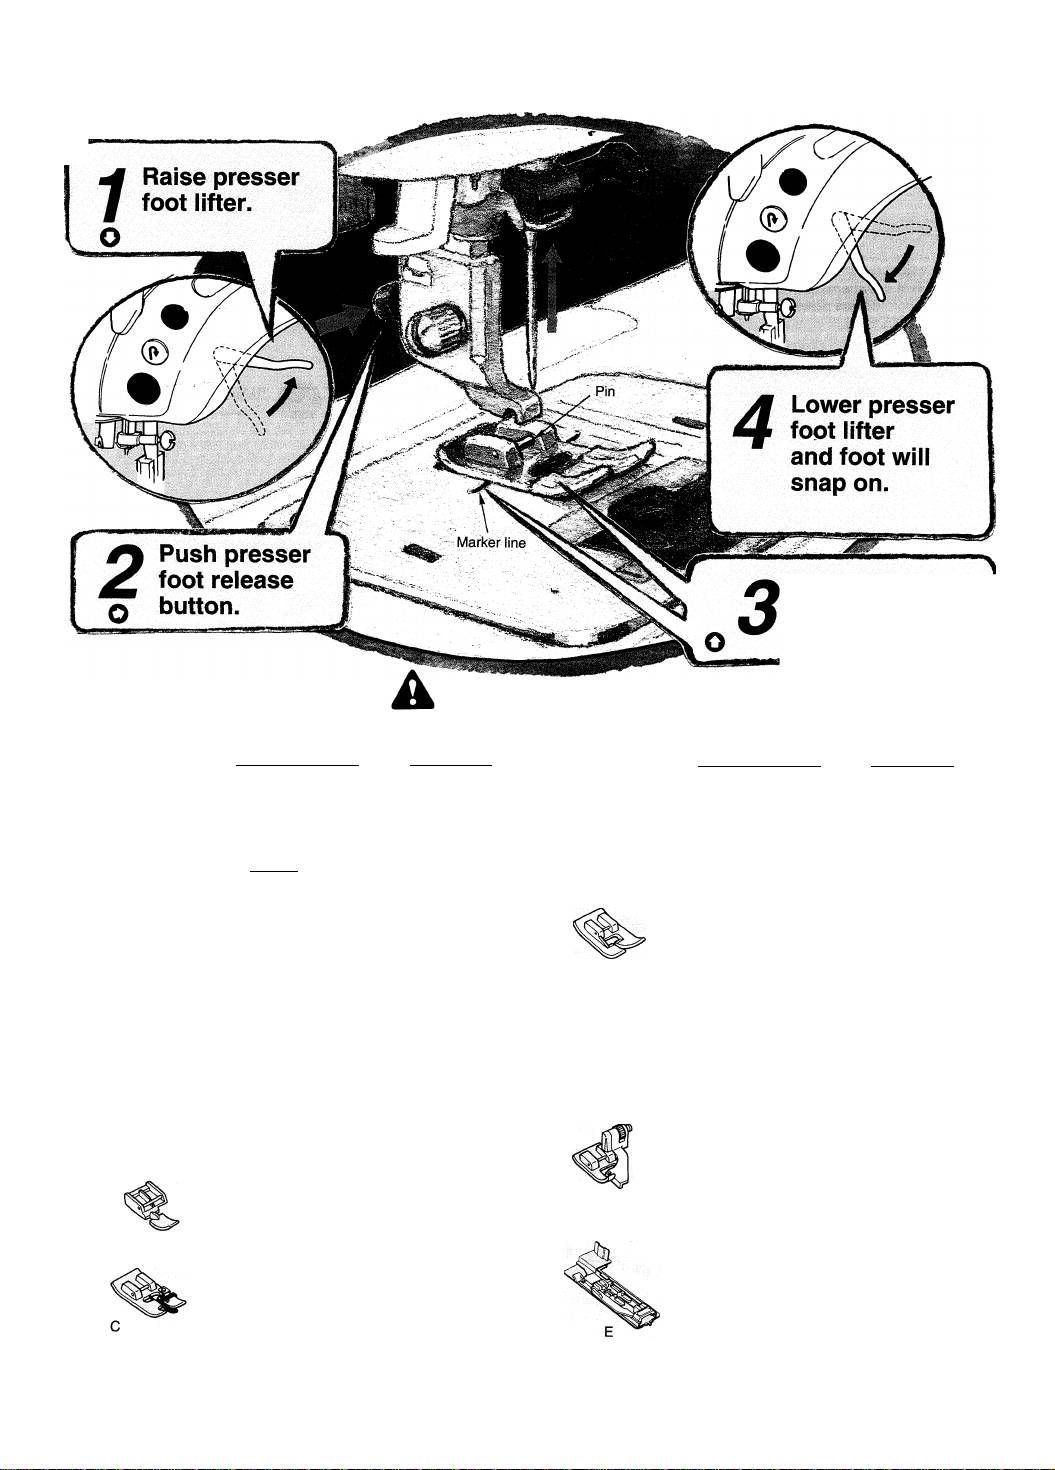
Changing Presser Feet
Place needle in highest position.
Align presser
foot pin with
marker line.
Types of Feet and Their Application
Typical applications
Standard presser foot
Zipper foot
B
Overcasting
Straight stitch
Quilting
Pintuck
Zigzag stitch
Applique
Quilting
Overcasting
3-step zigzag stitch
(elastic stitch)
Stretch
reinforcing stitch
Overcasting, etc.
Pattern stitch,
patchwork, etc.
Inserting zipper
Overcasting
(Overlocking)
CAUTION: When changing to feet which require removal and replacement of
presser foot screw it is mandatory screw is tighted with exclusive
screwdriver (see page 47).
Stitch pattern
Auto-matic
Decorative stitch foot
Blindstitch presser foot
w
REG
Buttonhole foot
Typical applications Stitch pattern
Large motif patterns
LGE
Fun Face
Patterns
Regular Patterns
Alphabet
Blindstitch
Automatic buttonholing
FUN
w
REG
A-B-C
<
<
O D D
ti
y
Additional and optional feet and applications are covered on pages 47 through 53.
Page 11
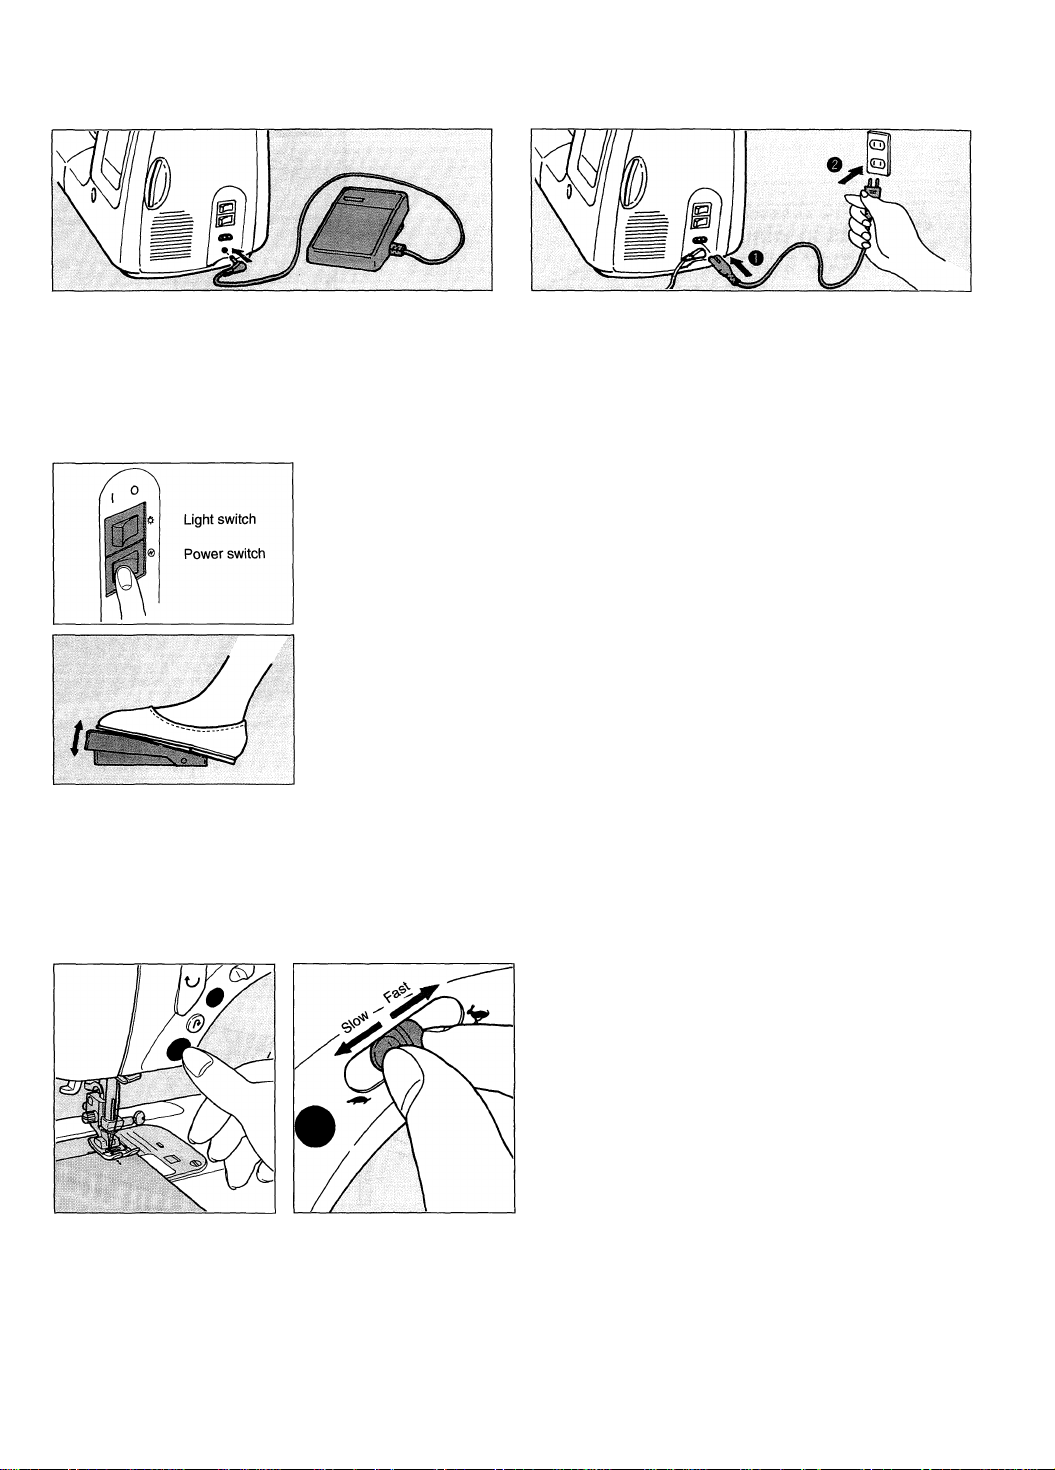
Connecting Machine
Push foot speed controller plug into lower receptacle at right
end of machine.
NOTE: If upper LCD window or lower LCD touch-screen is too bright or dark to see the stitch patterns, adjust LCD brightness
control (see page 15).
Push power cord plug O into upper receptacle at right end of
machine. Plug 0 into electric outlet.
Running Machine
Power/light switch.
- When ‘T’ side of power switch is pressed machine will be turned on.
- When “O” side of power switch is pressed machine will be turned off.
Note: Power switch must be on before light switch will operate.
To run machine press foot speed controller. The harder you press, the faster machine will
sew.
To stop machine, remove foot from controller.
Running machine without foot speed controiier
Foot control must be unplugged for start/stop button and sewing speed lever to operate.
Start/stop button
One press on button starts
machine, and another press
stops machine.
Note: #1.When foot speed controller is plugged In, start/stop button can only be used to stop machine.
#2. When foot speed controller Is plugged in, sewing speed lever will not operate.
Sewing speed lever
Sliding lever sets desired
sewing speed.
Page 12
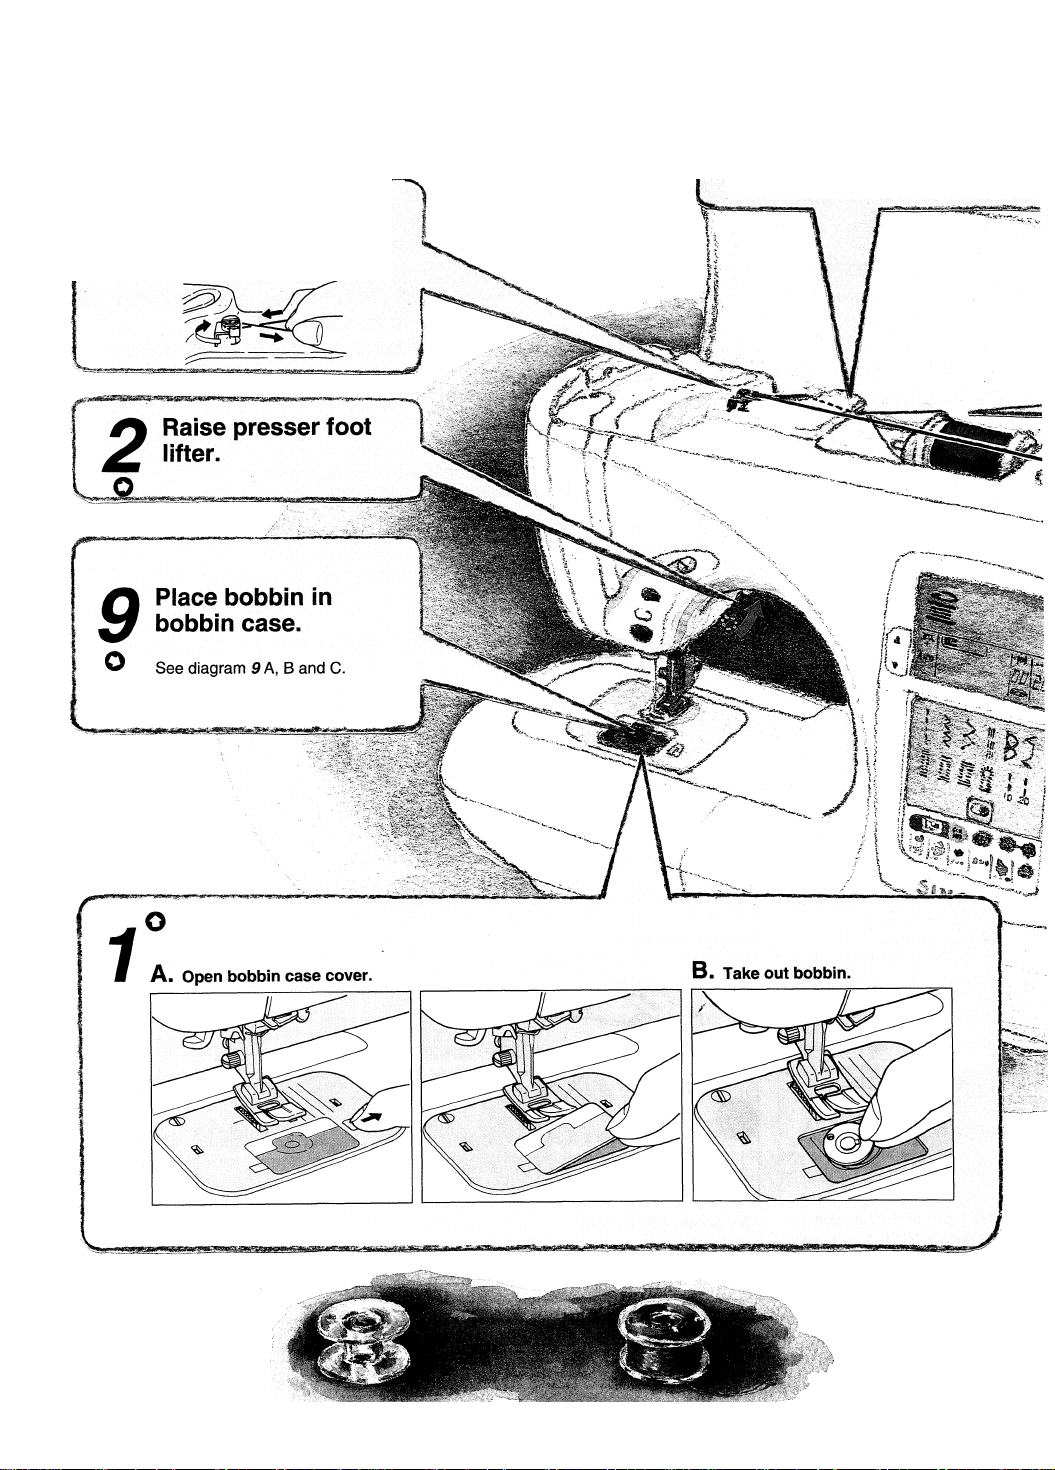
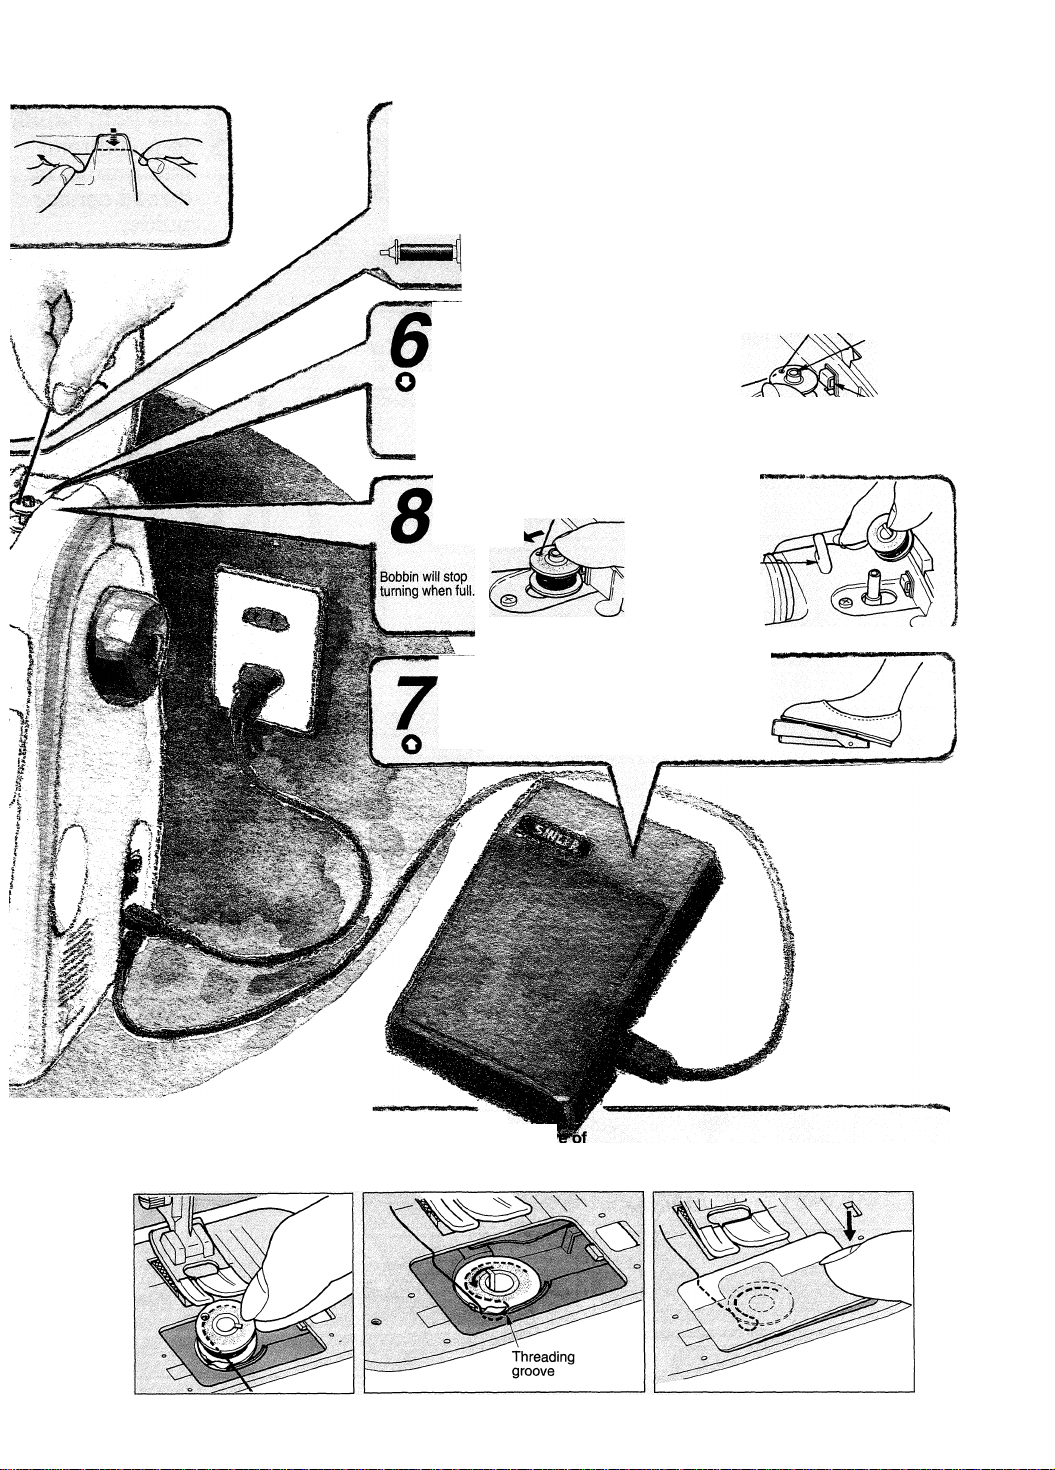
Winding Bobbin
To wind a bobbin follow steps 1 through 9.
Wind thread around
5
bobbin winder
Q thread guide.
Use both hands to
pull thread into
4
Q groove of thread
sensor guide.
10
Page 13
£% Place thread spool
and spool cap onto
- , . (2) Use cap to hold spool in
(1) Be sure notch on spool is i
on right side.
O spool pm. place
oUhread® large spool NOTE: Some size and style spools of
V—,i" " 11 '• I . TKiiiiiiiiiiiiiiiiJiiiiiiJiiiiiiiri
thread do not deliver thread smoothly with
horizontal spool and spool cap. In this
case use vertical auxiliary spool pin.
Place bobbin on bobbin
Bobbin
winding shaft
winding shaft.
Lead thread through one
of the holes in bobbin
from inside out.
• Press bobbin against winding regulator. \ regulator
• Hold thread while winding and trim flush with top of bobbin. J
Push bobbin back to left.
O t
Bobbin thread
cutter
Take bobbin off shaft
and cut thread.
Hold thread end, depress
speed controller to wind
bobbin. *
r
9
Place bobbin in case Pull thread Into grodS
with thread pulling off bobbin case and draw thread to
A. as illustrated. B. rear of machine C. Close bobbin case cover.
NOTE: Always use Singer 15 class bobbins!
Page 14

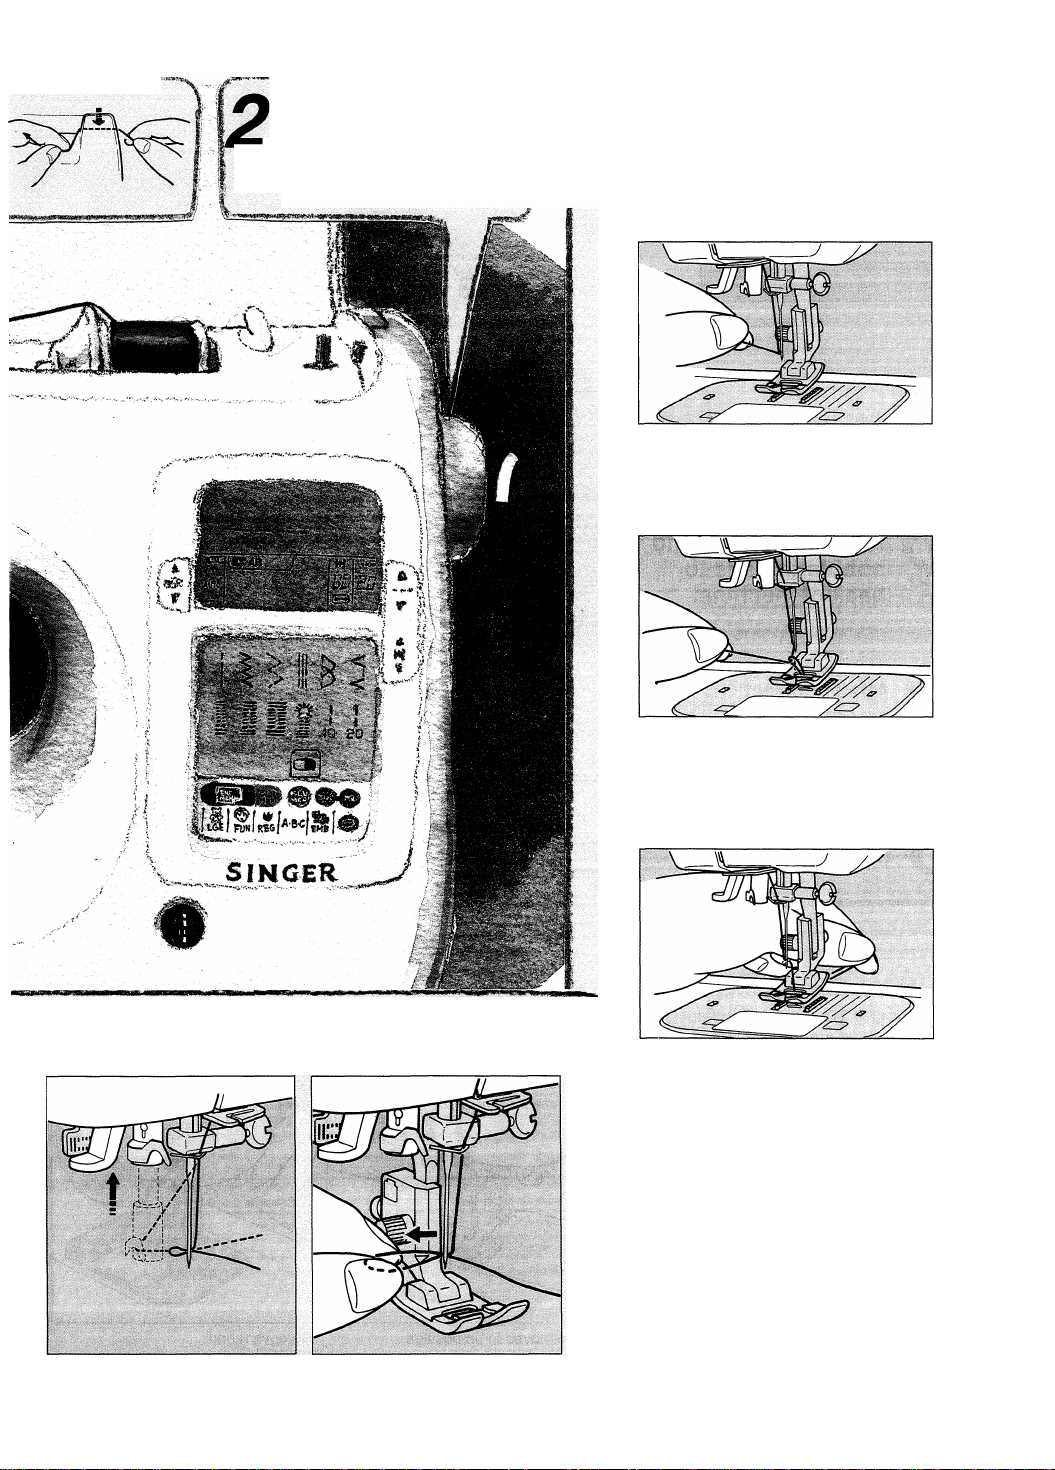
Threading Machine
To thread machine follow steps 1 through
Follow threading
path arrows on
4
Q machine. (4,5,6,7)
O Use both hands
^ to pull thread
Q into groove of
i I
thread sensor
guide.
12
Automatic Needle Threading
A. Lower presser foot lifter.
Raise needle to highest position.
B. Push threading lever down. C. through eye of needle.
Place thread onto ®
' Push threading lever all the
way down and a hook will go
Pass thread in front of needle and
below hook.
Page 15
►• c»» 1^. *V>- *-vi s,..*jfj*, .
Turn handwheel,
__
counterclockwise to
Q raise needle to high
est position.
Pulling up Bobbin
10
Thread
Hold needle thread lightly with left
hand and turn handwheel
counterclockwise until needle
A. enters needle plate.
Continue turning handwheel while holding
needle thread until needle rises.
Tighten hoid on needle thread
B. until bobbin thread is pulied up.
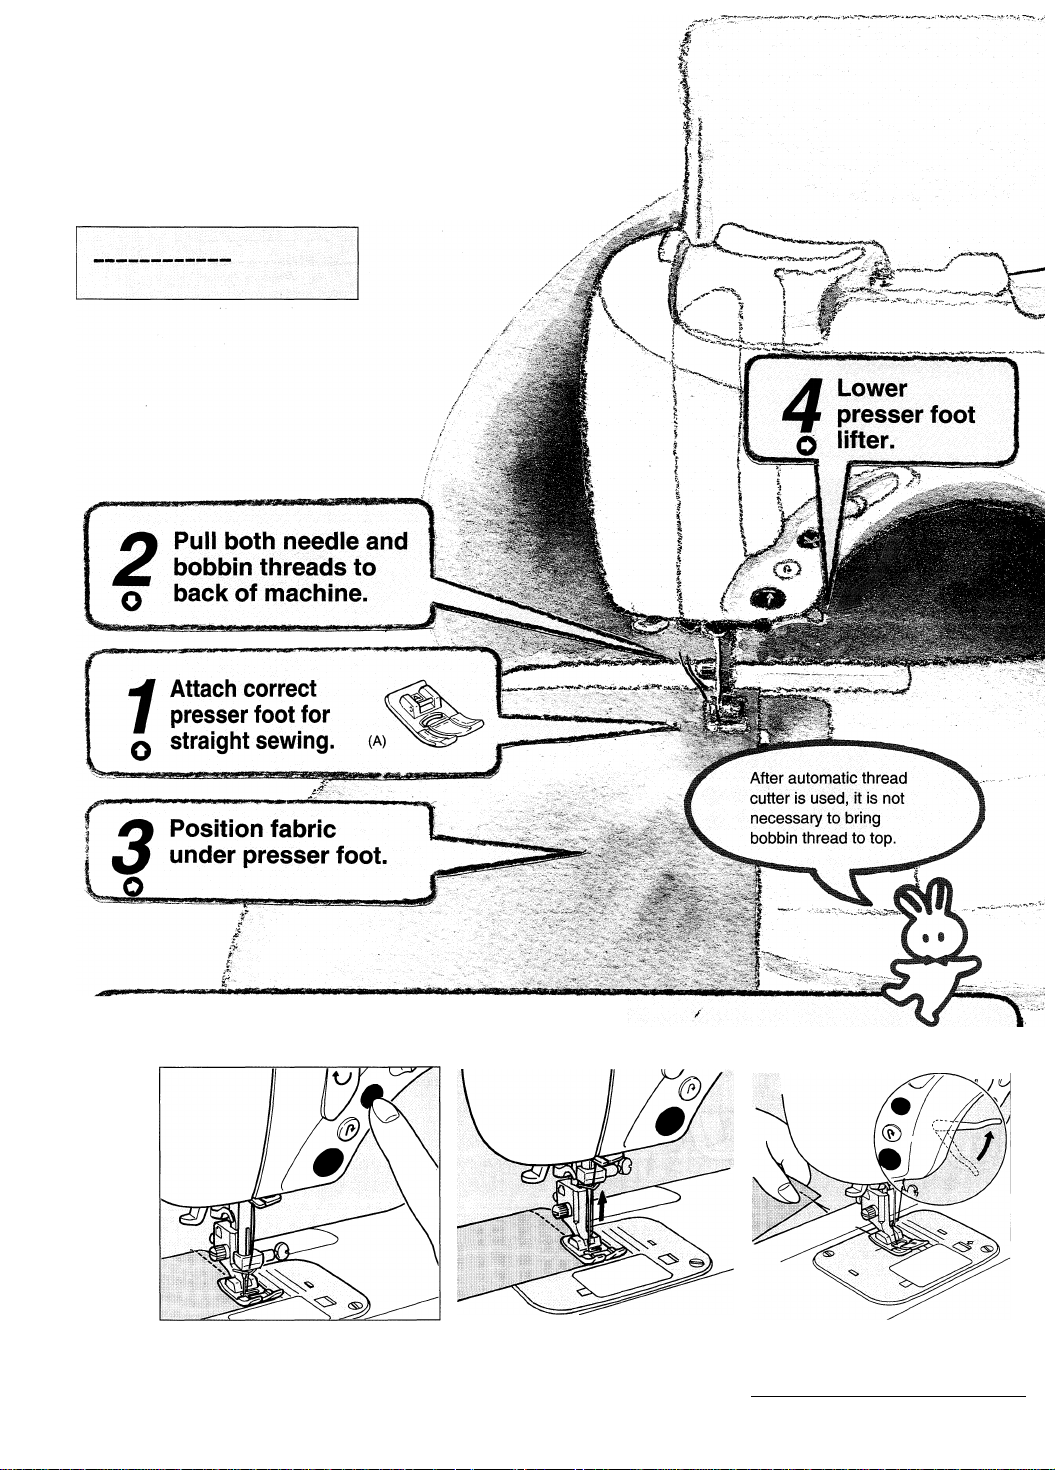
D. Release needle threader.
Undo loop with fingers.
Pull both needle and bobbin
threads out about 4" and pass
them under presser foot to back of
C. machine.
Pull loop of thread that is at
back of the needle out about
E. 4".
-J
Caution:
1. Do not lower threading lever while sewing
machine is in operation.
2. Automatic needle threader will not work on
twin needles or wing needles.
13
Page 16
Trial Sewing!
When power switch is turned on utility touch-screen
illuminates and left position straight stitch is
automatically selected.
Upper LCD window
14
How to Operate Automatic Thread Cutter
Wait until needle stops _
A- completely in down position. B- Release button.
Press thread cutting button.
Needle moves to up position. Remove fabric.
C. Raise presser foot lifter.
NOTE: Use thread cutting groove
located at back of presser foot for
cutting thick or special types of thread^
Page 17
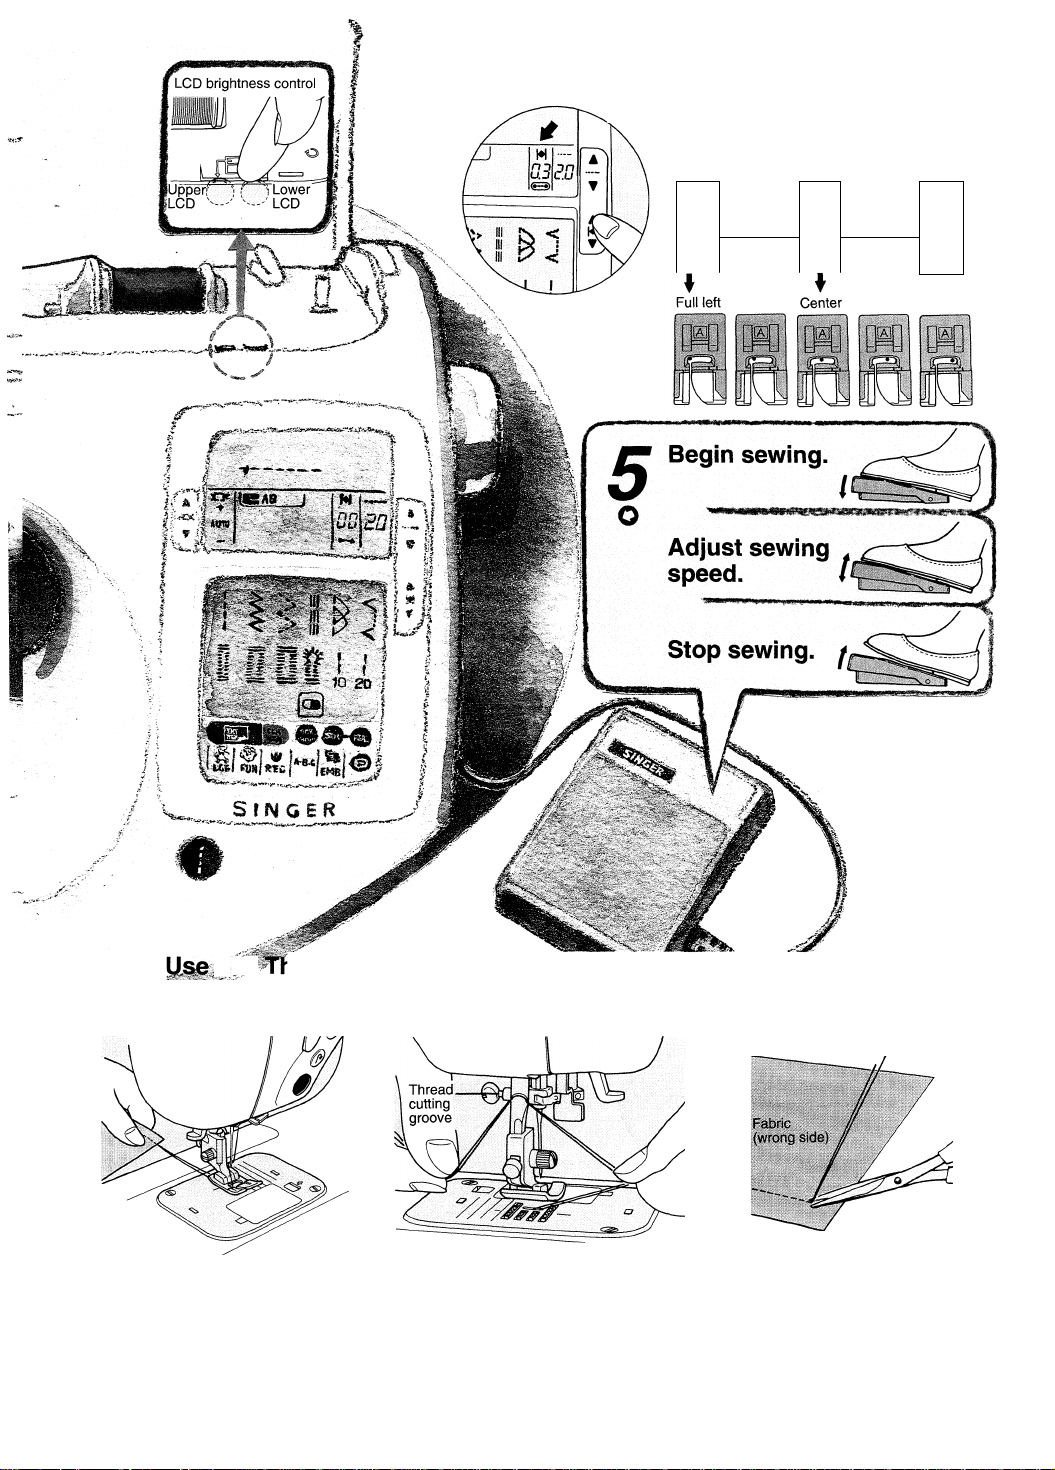
How to select needle position
(Only works with straight stitch)
Press needle position buttons to select from
among 22 possible needle positions.
M
nn
uu
M M
3.E
in
I.Lf
Full right
How to JH^^read Cutting Groove (How to Knot the Threads)
Remove material from machine.
After finishing a seam, raise needle and
presser foot, and slowly pull material from
under presser foot.
Note: It is advisable to use automatic thread cutter at end of a seam.
Use thread cutting groove located at back of presser foot for cutting thick threads or special types of thread.
^ Cut threads, using thread cutting
I groove.
Hold upper and bobbin threads together,
pull them out about 4" and cut them with
thread cutting groove located at rear of
presser foot.
^ Knot two threads on wrong side of O fabric.
Pull upper thread to wrong side of fabric,
and knot upper and bobbin threads. Cut
threads as close to knot as possible.
This technique is useful for securing
pattern stitches.
15
Page 18
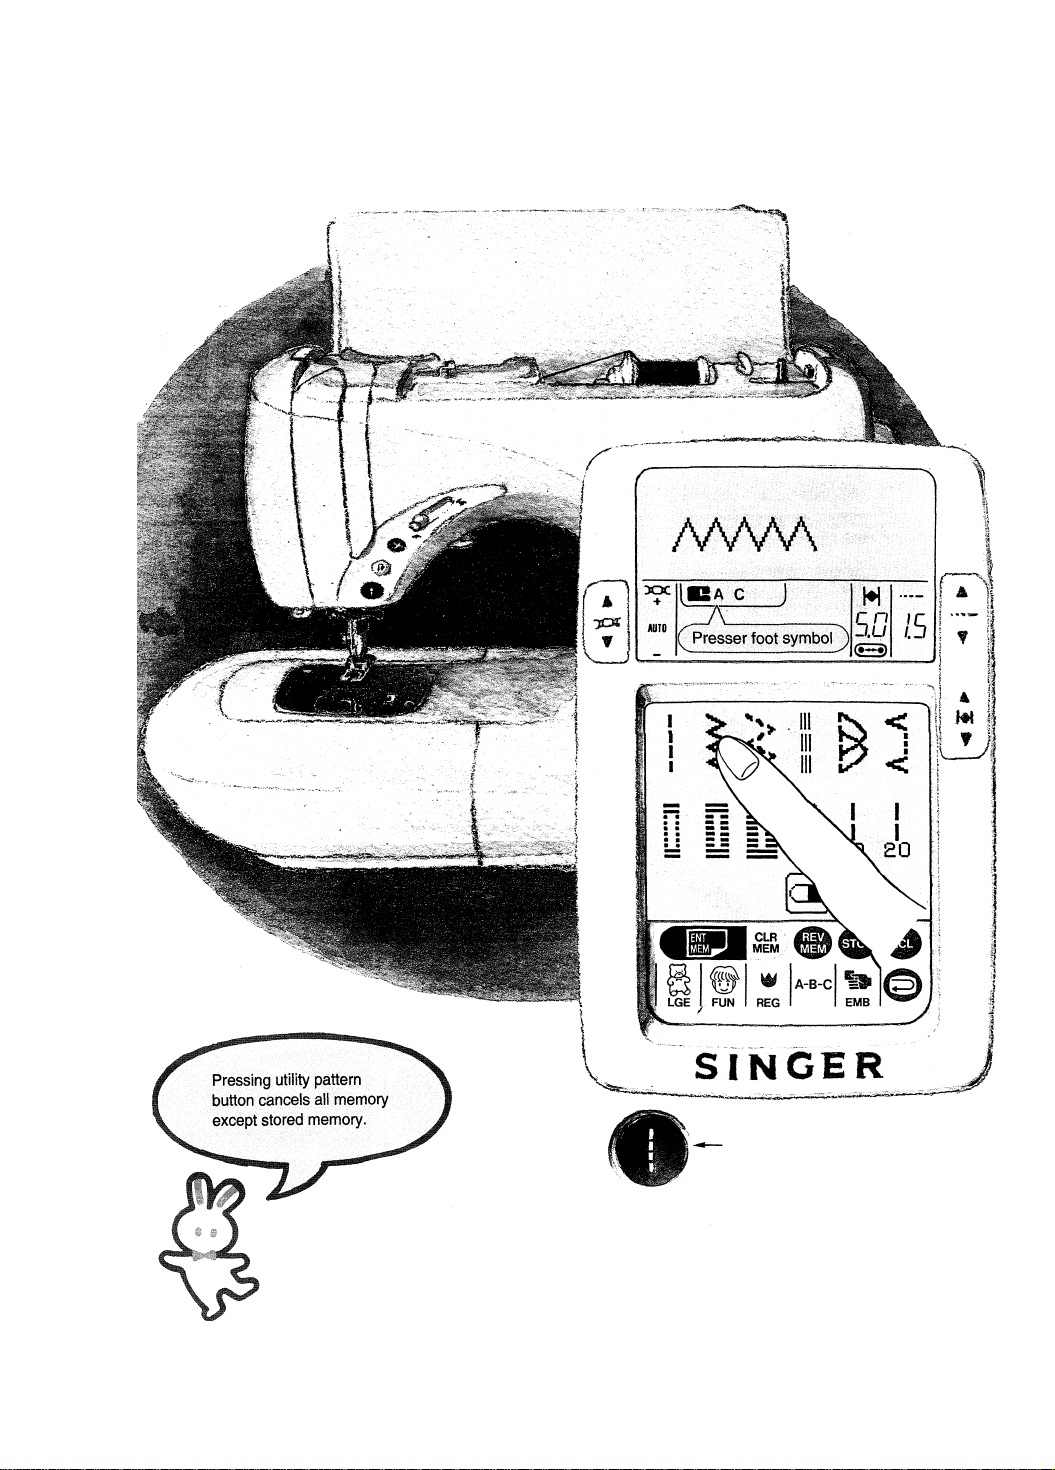
How To Select Utility Patterns
Touch utility pattern button , then touch desired utility
pattern. Upper LCD window will indicate selection.
№
*
16
Utility Pattern Button
Instant access to utility patterns
Page 19
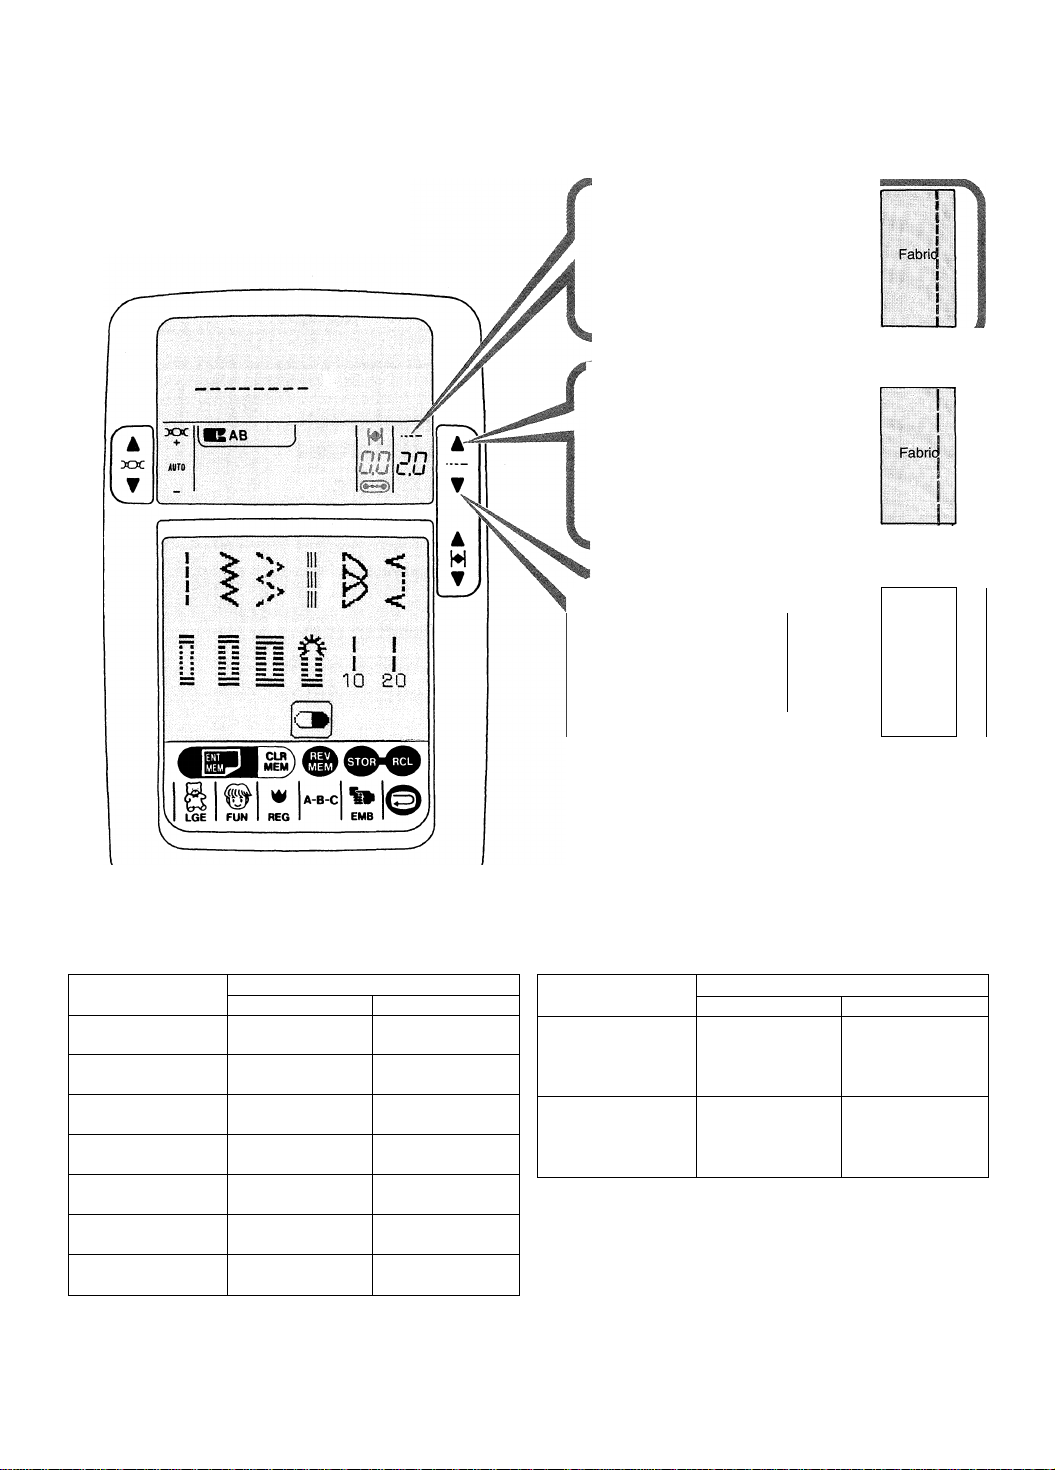
How to Adjust Stitch Length of Utility Patterns
Machine’s stitch patterns are automatically set to an optimum length.
By using override buttons pattern length can be adjusted as desired.
How to use stitch length manual
override buttons.
Example (Straight stitch)
¿0
(Automatic)
Example (Straight stitch)
Press this but
ton to increase
stitch length.
. Example (Straight stitch)
Press this but
ton to decrease
the stitch length.
40^
(Adjusted)
nc
(Adjusted)
Fabric!
inr
Stitch Length of Each Stitch Pattern
E'.O
1.5
1 n
i,U
J n
LJJ
Stitch length
Adjusted
LUJ UJ
LUJ UJ
LUJ UJ
LUJ UJ
LUJ I, LI
Stitch pattern
1
1
1
1
1
i ^
<
<
Q ODy
1 1
1 1
10 20
Automatic
Bartacked Keyhole
n C n c
U,J UJJ
n n
n n
n u n
n u n
! n
n u
LI, 1
n LI
IJ, 1
Stitch length
Adjusted
l~l u n
IJ,LI l,U
n u n
IJ,IJ l,U
Stitch pattern
))>
on W
1 LGE 1
1® % iP
1 ^ 1
on
1 REG I
NOTE: (—) indicates that pattern cannot be adjusted
using stitch length button.
When stitch length displays (- -) the pattern may be
adjusted with stitch balance control (see page 31).
Automatic
17
Page 20
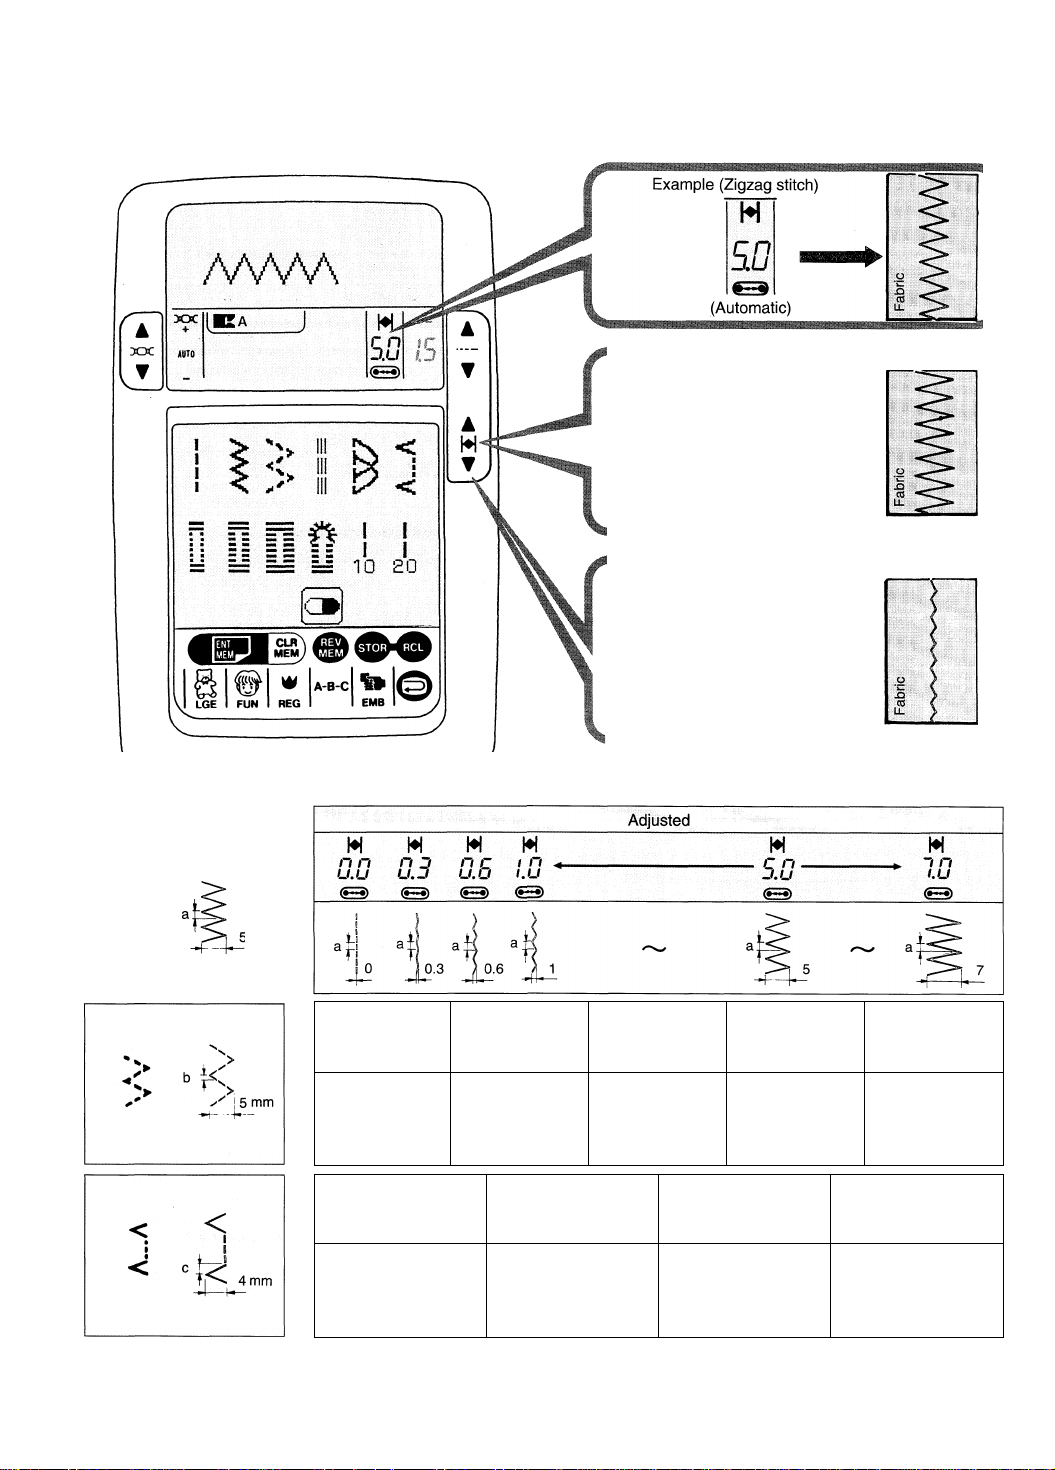
How to Adjust Stitch Width of Utiiity Patterns
After specifying pattern from among % : > 4 , if desired, the stitch width may
be adjusted by pressing stitch width buttons.
^ <
Example (Zigzag stitch)
Press this but-
ton to increase
stitch width.
Example (Zigzag stitch)
Press this but
ton to decrease
the stitch width.
M
Ì0
(Adjusted)
M
(Adjusted)
Automatic stitch width
5 mm
M
0 n
J.U
4Ì5
M
J n J
J.U ^
<
Stitch length a = 1.5 mm, b = 1 mm, c = 2 mm
w
1,U
j ^ 4
un ^
- 5.G -
M
u n J
IJJ
^3)
<
1
M ' w
. c n
5
.► C n
^ J.U
"lib
M
&>
<
O.U
^3)
W
c n
u.u
&>
M
nn
t.u
<^3>
18
Page 21
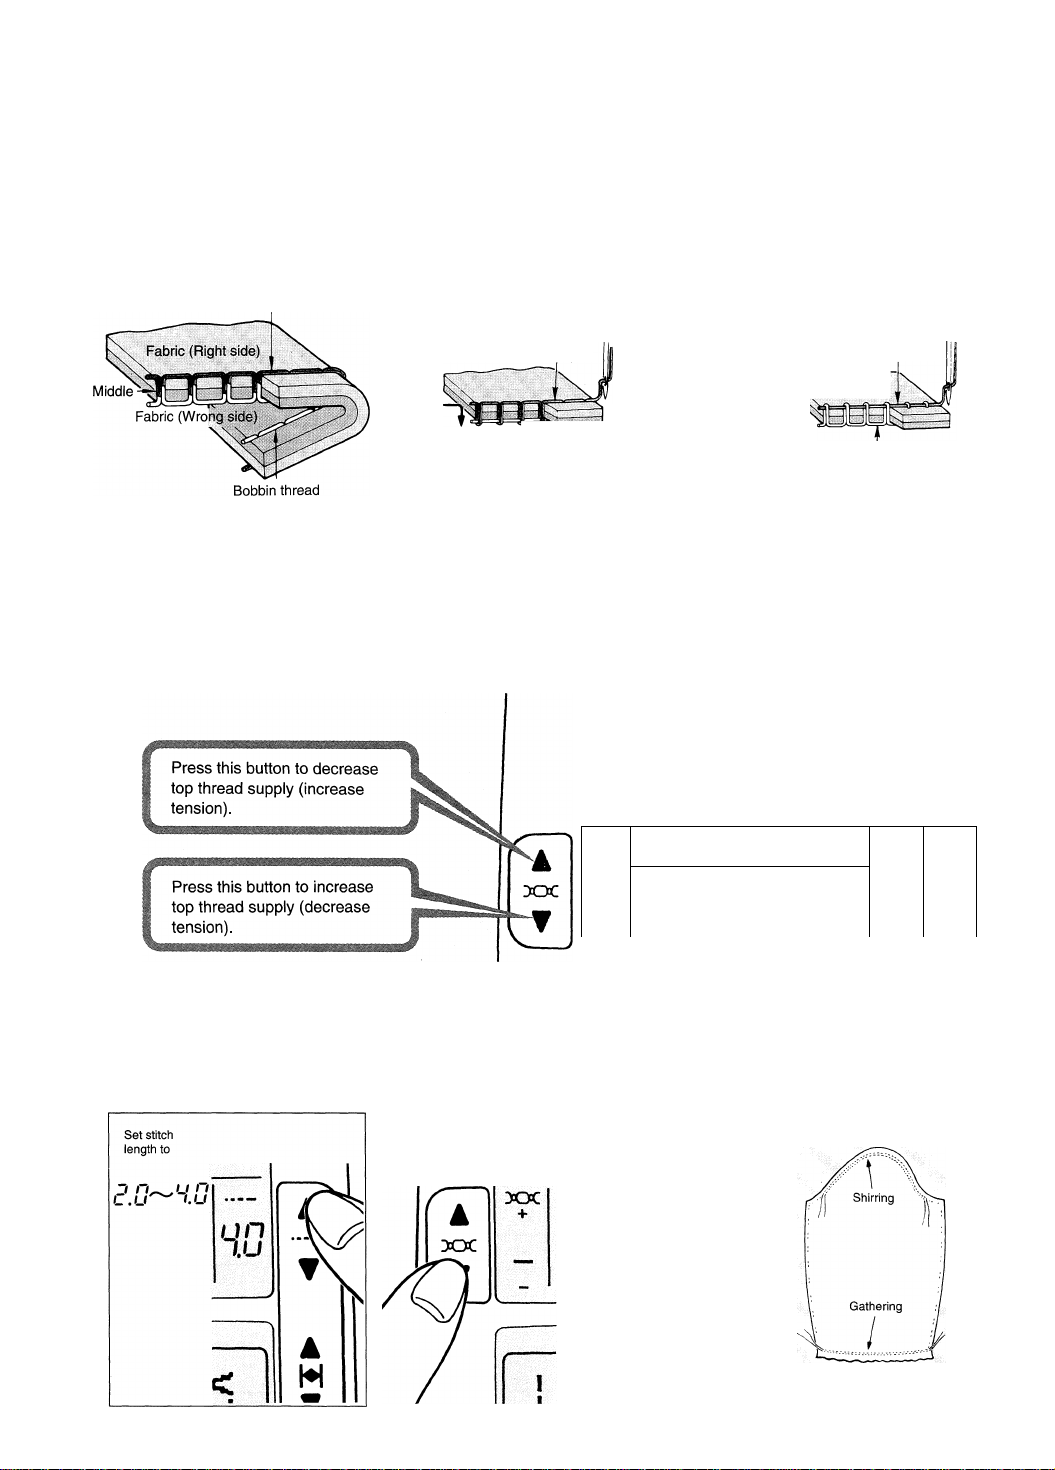
Automatic Computer Controlled Thread Metering (tension) System
Insteadof a mechanical tension system, which controls thread by squeezing it between 2 discs, the XL-100 controls thread by
computer. An automatic computer controlled thread metering system delivers the precise amount of thread for each needle
penetration to create the optimal appearance of each stitch. This makes possible, perfectly balanced straight stitch, plus no
pucker blind hemming, two color patterns without changing thread, multicolored embroidery without changing bobbin thread, and
decorative top-stitching and cross stitching that simulate hand sewn. An override control allows individual modification for
specialized effects.
Examples of Automatic Thread Metering:
Upper thread
Upper thread
Bobbin thread Fabric
Straight stitch: Upper and
bobbin thread join in middle.
Embroidery and decorative topstitch
patterns: Upper and bobbin thread
join on wrong side of fabric to
optimize top side appearance.
How to modify top thread supply.
Use thread meter override buttons to modify top thread supply (tension).
(Wrong side)
XX
+
AUTO-
[BAB J
----------------
Indicates that thread
metering (tension) is
automatic.
Upper thread
Fabric (Right side)
J
Bobbin thread
Two-color patterns: Upper and
bobbin thread join on right side
of fabric.
—
W
rin
u.u
C—
jn
L.U
♦)
How to shirr and gather.
When shirring an armhole or skirt waist, or gathering cuffs or yokes, sew with a long thread length, then pull bobbin
thread by hand to gather material.
Increase top
thread supply. "I
XX
XX
XX
+
19
Page 22
Problem Indicators
If machine has not been properly set to sew, a problem indicator will appear in LCD window advising where problem is located.
Problem indicators, cause & solution
• Bobbin winding shaft was left in right position
after winding.
• Move bobbin winding shaft back to left position.
Lower buttonhole lever.
Buttonhole lever has
not been pulled down.
(See page 26, 27.)
Check needle thread.
1) Upper thread has run out or broken or
2) Thread is not in thread sensor guide.
Select a pattern.
Select one of patterns shown on lower screen.
Problem indicators, cause & solution
Raise needle.
5t
Place embroidery frame on machine.
Place embroidery frame in position on machine.
Change to full size embroidery frame.
Embroidery card is not installed. Turn off power
and install card properly.
IÜ1
A
IMEWfl
Machine does not accept this operation.
Memory error
Memory is full.
Indicates pattern is being stored in memory
after key is pressed.
Indicates pattern is being recalled from memory
after mUk key is pressed.
This card cannot be used.
Change it with another one.
X
Deletg. pattern with clear key.
Lower presser foot lifter.
Change needle thread to a different color.
Qltilll
20
Page 23

Fabric, Thread And Needle Table
Your fabric will determine choice of needle and thread,
Always refer to it before a new sewing project. And be
Fabric
Fabrics below can be of any fiber, cotton, linen,
silk, wool, synthetic, rayon, blends. They are listed
as examples of weight.
Very Lightweight*Batiste, Chiffon, Organza, Voile.
Also all microfiber or microdenier fabrics.
Lightweight*Challis, Chambray, Charmeuse,
Crepe de Chine, Gauze, Handkerchief Linen, Silk,
Taffeta, Tissue faille.
Medium-weight*Broadcloth, Brocade, Chino,
Chintz, Corduroy, Flannel, Linen, Poplin, Satin,
Synthetic, Suedes, Taffeta, Terry, Velvet.
Medium to Heavy-weight*Coating, Damask,
Denim, Drapery Fabric, Fake Fur, Gabardine,
Ticking, Woolens. Long fiber polyester (two spun)
Heavy-weight»Canvas, Duck, Sailcloth, Upholstery
Fabric.
Leather
Knits*Jersey, Tricot, Single Knit
Sweatshirt-Double Knit, Swimwear, Sweater Knit
^ Use with standard sewing thread in bobbin.
The following table is a practical guide to needle and thread selection,
sure to use same size and type of thread in bobbin as in top thread supply.
Thread
Cotton-Wrapped polyester core
(extra fine)
Long fiber polyester (extra fine)
Cotton-wrapped polyester core
(all purpose)
Long fiber polyester (two spun)
Cotton-wrapped polyester core
(all purpose)
Long fiber polyester (two spun)
Cotton-wrapped polyester core
(all purpose)
Cotton-wrapped polyester core
(all purpose)
Long fiber polyester (two spun)
Cotton-wrapped polyester core
(all purpose)
Long fiber polyester (two spun)
Cotton-wrapped polyester core
(all purpose)
Long fiber polyester (two spun)
A
How to Remove and Insert Needle.
1 Removing needle
Attaching needle
2 (Needle cannot be inserted unless it is correctly positioned.)
Needles
Failure to use a Singer brand needle
may result in skipped stitches or
poor sewing performance.
TYPE
2020
red
shank
2020
red orange
shank
2020
red blue
shank
2020 16/100
red
shank
2020
red
shank
2032
leather
2045
yellow
shank
2045
yellow
shank
CAUTION: Make sure power/light switch is off
before inserting needle.
SIZE
9/70 or 11/80
orange
band
11/80
band
14/90
band
purple
band
18/110
11/80
orange
band
14/90
blue
band
position.
(2) Loosen needle clamp screw with
exclusive screwdriver.
it fully until it touches stopper pin.
21
Page 24

straight stitch
When power is turned on, full left position straight stitch is automatically selected. To move needle position see page 15 or 23.
a
-Automatic needle position
(Left needle position)
4 Begin sewing.
Seiect straight
1 stitch pattern.
2 Use correct presser foot.
Use presser foot bearing symbol
indicated on LCD.
* See page 8 for how to attach presser
foot.
5 Lightly hold material.
Position material, and lower presser
3 foot.
Place edge of material under presser
foot.
Pull upper and bobbin threads to rear of
machine and lower presser foot.
6 Adjust sewing speed.
22
force to material while sewing.
Cut thread.
(For automatic thread cutter see
8 page 14.)
Lift presser foot and remove
9 material.
Page 25

Back tack
Back tack is used at the
beginning and end of seam
to secure it.
O Press back tack button
for 3 needle penetrations
to lock off seam.
• The back tack button is only designed to be used for 3 needle penetrations at the ends of a seam.
• If you want to sew continuous reverse stitching, consult page 31 (Four Direction Sewing)
and use the continuous reverse stitch there.
• The sewing machine will back tack only while the button Is being pushed and stops when
the button Is released.
• The sewing machine runs at a slow speed when back tacking.
& Begin sewing.
© Press back tack button
again for 3 needle
penetrations to lock off
other end of seam.
Changing sewing direction/pivoting
Stop machine in desired position.
Lower needle into fabric. Lift presser foot,
and turn material in desired sewing
direction.
Lower presser foot and start sewing.
How to seiect needle positions
When power is turned on, full left straight
stitch is automatically selected.
Press needle position buttons to select
from among 22 possible needle positions.
Seam guides
Page 26

Zigzag Stitch ^ Select zigzag stitch
pattern. 2 Use correct presser foot. 3
How to adjust stitch width.
The sewing
method is the
same as for
straight stitch steps
3 through 9. (see
page 22)
symbol indicated on LCD.
After selecting zigzag stitch pattern, if desired, adjust stitch width by pressing
stitch width buttons.
Select from among 22 different stitch width possibilities.
NOTE: Stitch width can only be adjusted when sewing machine is stopped.
NOTE:
Automatic
stitch width
and stitch
length
5
Manually Adjusted Stitch Width vs. Stitch Length
^ See page 17 for how to adjust stitch length.
24
Page 27

Overcast! nqm(OveredgIng)
1 Select desired stitch pattern.
Used to prevent fabric from fraying.
There are three stitch types that can be
used for overcasting.
Select the one that is best suited for
material.
2 Use correct presser foot.
• Be sure to use the
standard presser foot for
zigzag and multi-stitch
zigzag sewing.
M
Standard presser foot A
• Overlock/overcasting
Overcasting foot C
Use presser foot which is indicated on
LCD.
edges.
Used for overcasting edge of fabric to prevent fraying.
This stitch may also be used to sew a seam that will not
be pressed open.
25
Page 28

Automatic Buttonholes
When sewing knit or other
stretchy materials, apply
interfacing to the material, and
set presser foot pressure
adjustment lever to “LOW”.
Be sure to sew a test
buttonhole first.
Automatic stitch length
(density) is 0.5 for bartack
buttonholes and 0.6 for
keyhole buttonhole. Adjust
buttonhole density by
adjusting stitch length (see
page 17).
Automatic buttonhole foot has an underplate for sewing
perfect buttonholes along edge of garments where fabric
layers are not equal. Underplate may be removed for
special applications such as a double-breasted coat.
For sewing small buttonholes on light
weight fabric
For sewing small buttonholes on light
to medium weight fabric
For sewing large buttonholes on
medium to heavy weight fabric
For sewing large buttonholes in thick
or heavy weight fabrics
Select desired style and
1 size buttonhole.
2 Change foot.
3 Position Needle and Bobbin threads.
bobbin thread between buttonhole foot and
underplate.
4 Place button in buttonhole foot. 5 Remove button.
Mark Buttonhole
6 Positions.
Button slide
After placing button in presser foot,
push slide to set buttonhole length.
Note: When sewing buttonholes be sure to support the weight of the garment
26
Page 29

Automatic buttonhole steps
12 3 4
► 1 J
^ ^
> 1
: ' ^ :
! I
I I
0
i ^ \
1 ^
i. 1 <
*• 1 *
r V 1
Tacking stitch automatically.
Purl stitch Buttonholes
Tacking stitch
:
At end of buttonhole
machine will sew a
tacking stitch, then stop
The bartack buttonholes and the keyhole
buttonhole can be used for purl stitch effect.
Select desired buttonhole and press 2-color
key CM .
• Finished appearance resembles a hand
sewn buttonhole.
7 Position material. 8 Lower buttonhole foot.
and underplate.
Attempting to sew without lowering the buttonhole lever, will cause problem indicator to flash on and off, and machine will not
start.
If buttonhole length is set wrong, or needle or bobbin thread runs out, restart buttonhole from beginning by pressing buttonhole
stitch pattern selection button once.
10 Begin sewing.
of needle hole in foot.
11 Press thread cutter button.
9 Lower buttonhole lever.
If problem indicator
comes on, buttonhole
lever has not been
lowered correctly.
When buttonhole
lever is fully lowered
problem indicator will
go off.
Open completed buttonhole, using seam
12 ripper.
ii Bartacked
Ü buttonholes
Straight pin
threads.
Ì
Seam ripper
ft Keyhole i l Eyelet
y buttonhole S—^ punch
Cut middle of buttonhole open using seam ripper,
being careful not to cut threads.
It is advisable to place a straight pin at end of
buttonhole to help prevent overcutting.
Use eyelet punch to cut out round portion of
keyhole buttonhole. It is advisable to place fabric
on old piece of wood.
27
Page 30

Sewing Corded Buttonholes
Sewing a cord into buttonholes will prevent them from becoming loose and they will last longer. Buttonhole twist thread may be
used tor cording.
How to set the cord
n n n
To sew buttonholes with cording, pass cord around end of buttonhole foot and
knot ends of threads at front. Then, attach buttonhole foot to presser bar and sew
buttonhole. Pull cording tight into sewn buttonhole and cut off excess cord.
Basting Stitch
Basting stitch seam
can be easily removed.
Blindstitch
Blind stitching provides
a durable way to finish
a hem. It takes
practice, however, so a
test sample is sug
gested.
1 Select desired length basting stitch.
Stitch
length
Select blindhem stitch
I
i
10
1
I
10mm
Use correct presser
2 foot.
Presser foot
symbol
I
I
20
20 mm
Standard presser
foot (A)
2 Use correct presser foot.
Use presser foot which has symbol
indicated on LCD.
28
Page 31

For blindstitching general fabrics or heavy-weight materials
Position folded edge against
1 Overcast material, and fold edge.
Refer to page 25 for overcasting.
Refer to page 28 for basting stitch.
2 guide and sew. 3 Turn fabric over.
For blindstitching light-weight fabrics
1 Fold the fabrics.
Position folded edge against
2 guide and sew.
How to adjust guide of blindstitching presser foot
• If stitches fail to reach folded edge:
• If stitches cover folded edge too much:
3 Turn fabric i
Fabric Fabric
(wrong side)
j
s
r
_ ,
(right side)
-
Turn screw counter clockwise.
This will move guide to right.
Place folded edge snugly
against repositioned guide.
You also may adjust stitch width to achieve a perfect blindstitch.
This will move guide to left.
Place folded edge snugly
against repositioned guide.
29
Page 32

Attaching Buttons
1 Use correct presser foot. 2 Lower feed dogs. 3 Select zigzag stitch pattern.
Í ©/
U® X
4 у
XX
XX
Авто
ЛЛЛАЛ
[■SA
штА
....
шш
D.UIS
The Zigzag stitch is
used to attach both 2
and 4-hole buttons.
The button-sewing foot
must be attached when
sewing a button.
supplied in accessory bag.
Press stitch width buttons to match holes in
button to be sewn.
NOTE: 3.0 mm width will generally sew all size
buttons.
I ''
Ж i=5
-----
,
^ у 7SS \ J
Place fabric on machine, and
Up Down Cl
Turn handwheel by hand to confirm
that needle exactly enters holes in
button.
6 Tack thread in place.
Press back tack button to
tacking stitches to secure,
sew 5
30
Slowly press on speed
controller allowing needle to
7 sew 8 to 10 stitches.
Caution: Due to irregular shape of some buttons button foot may not clamp securely.
Press reverse stitch button to sew 5
8
or 6 tacking stitches.
Do not attempt to sew these or buttons with a shank using sewing machine.
Press thread cutting
3 button, trim thread.
Page 33

Four Direction Sewing
1 Press LGE motif button
cs*
I r )
Select desired
2 pattern.
3 Use correct presser foot.
These four stitches
allow sewing sideways
(Zigzag/Straight stitch)
and forward or
backward, without
pivoting the fabric.
Follow steps O through O
o
O o
iDCaS!^)
|VW|
ŒI II
Balancing Shape Of Pattern
It is recommended that a test sample of pattern be sewn using same fabric and interfacing or backing before sewing on garment.
Depending on type of material, its finish, thickness and interfacing used, shape of pattern may be altered. If pattern is out of
shape sew trial sewing pattern to balance machine.
Press pattern category
> )
1 button. 2 Press trial sewing pattern . 3 Begin sewing.
4 Completion
g
LGE
FUN
When stitch length displays (— ), pattern
may be adjusted with stitch balance control.
(Except basting stitches)
NOTE: Trial sewing pattern may
also be used for darning.
A-B-C
REG
Machine may be balanced with trial sewing
pattern from any touch-screen.
How to adjust right side up
4-1 stitching
Incorrect balance
I. -K-
side
P
Turn stitch balance control up.
Correct balance
Horizontal
This will balance
all applicable
patterns in
machine.
How to adjust right side down
4-2 stitching
Turn stitch balance control down.
31
Page 34

Pattern Sewing
How to select patterns
1.
FUN
w
REG
A-B-C
Press desired pattern category button. Lower LCD
Touch-screen will illuminate to indicate selection.
Pattern Modifier Keys
sz
CO
CD
CO
CD
o
O
E
ra S'
_i«£
Enli
-
--------
arge siz<
s
3 key
2.
Touch desired pattern on lower LCD Touch-screen.
Selected pattern will appear on upper LCD window.
Presser foot
symbol
Decorative
stitch foot (T)
XX
fk'
30C
AUTO
1—^40353025201510• . . . 5 • • • • 0
....
III
JC
to CL
c £
1 ®
^ sy.
CL
CO
Ü
Ic
CL
2
O)
Q
O
-j
32
----------------------------------^ -------------------
4 Touch-screens
□Di©EI> )
m:
№11
00@h3@
IBI^l 1^1
I ^ 1 Touch-
I
FUN I screen
^ 6 Touch-screens
I REG 1
1 \ > 1
1 * ÿ f 3 ^
f Ov 1 TcORRT*^]’ 1
1 f*i ImemIrpt !♦
•=® 1 ^ > jg 1
1 fii lïÉSI^kNI^I
[ g g § II ^ ì
i È i E 1 0
S ,i § 1 b i
v^CQR^
Ilf ?; b 1
^ 1
1 B
--------------------------
^ 1 S 1 # # 1
1 1 1 i Î t
Î1 f M ê
1111 f
[CÓRRI fn^il
[wemI
îffoil
IBI 1^
-
2 Touch
ffis
:^/ii
Op
Si
«N
iS
YZ
°D
®4
^•2
®e
CORR
MEM
â:
%
fr %■
%Pb
%
?
^6-Fô^
a
CORRÎ^^'
IS!^/
ImemIrpt
1 "25f-
screens
is ii
mm
»
•'s
So
'****
RPT
1
*<0:1
?E:
M£m)
№
1:
i
g
Page 35

Reduce size key
Mirror (reversed image) key
Turn over key
W
Category button
I
REG I
'i:'
. M J
Pattern elongate key
Category button
I
REG
I
RPT
Repeat pattern key
Continuous pattern sewing
^ ♦
Pattern position key
Each press of
/v\ position key will
indicate a different
pattern layout.
Applicable 3 Touch-screens
memJ
Return key
(^3^ HAP
Needle will return to sewing
start point of memory
patterns.
Applicable 1 Touch-screen
or
/a.
Small alphabet key
Frames upper or lower case.
CORR
MEM,
Correction key
Corrects undesired pattern in
middle of memory sequence.
Pattern memory button
(to memorize pattern
selected)
40353025201510 • . • • 5 • • • ♦ 0
Indicates memory
capacity remaining.
NOTE: Indicator counts
down by 5 until 10
patterns remain at which
point it counts down one
by one.
CLR
MEM
Pattern clear button
(clears pattern that has
been memorized.)
Store button
Stores patterns in memory
even when power is OFF.
Review button
Reviews patterns in
memory one by one.
Recall button
Recalls stored memory.
33
Page 36

Large Size Pattern Sewing
It is recommended to make a sample using same fabric and interfacing or backing material before sewing on garment.
Note; Virtually all fabrics require interfacing to sew large size patterns properly.
When sewing pattern stitches or
alphabet stitches, be sure to use
decorative stitch foot (T).
Presser foot symbol
To determine pattern placement use It is vital fabric is kept square to
assistant marker and templates provided machine to assure proper pattern
with machine. formation.
Position fabric under decorative
stitch foot (T) where needle will
begin sewing pattern.
Patterns are stitched sideways, this
allows for easier sewing with freearm.
Decorative stitch foot (T)
How to select patterns of lower LCD touch-screens.
Press large motif category button...
1 - First press... 2- Second press...
How to select a pattern.
Touch desired pattern on lower LCD
Touch-screen. Pattern will appear on
upper LCD window.
1. Single pattern
Note: See template for additional
3- Third press...
(
i3Q'SEi> )
iDEï3S')
5. Fifth press... returns to first screen
instructions.
4. Fourth press...
[cörrT
[memI
34
XX
lE : tJ-
(k
XX
a¥o
1-V4035302520BIO« • • • 5 • • • « 0
M 1 -
asas
When one pattern is
complete machine will stop
automatically.
Page 37

2. Enlarge pattern.
1. Select pattern.
2. Press enlarge size key
3. Begin sewing.
3. Reduce pattern.
1. Select pattern.
2. Press reduce size key
3. Begin sewing.
4» Mirror pattern
y
1. Select pattern.
2. Press mirror key iXi .
3. Begin sewing.
* Pattern can also be enlarged or reduced.
5« 2-color pattern
These illustrated patterns can be sewn in two colors. This
unique technique is achieved by placing a different color
thread in bobbin than needle thread. Bobbin thread color is
sewn on right side of fabric, thereby sewing pattern in two
different colors.
On machine as shown on inside of top cover grey area of
pattern will be sewn with bobbin thread.
* Press 2-color pattern key IcTiJ.
6. Position pattern
In position pattern mode, machine is capable of changing
position of each pattern.
1. Select pattern.
2. Press position key
Continue to press position key to select from among 6
different positions as shown on upper LCD window.
3. Begin sewing.
4. Machine will continue to sew pattern until machine is
stopped.
NOTE: This is a repeat function and cannot be entered
into memory.
____
7. Repeat pattern.
1. Select pattern.
2. Press repeat key
3. Begin sewing.
stopped.
NOTE: To finish sewing to the end of patter
repeat key again.
Machine will stop sewing at end of pattern.
RPT
35
Page 38

Furi’face Pattern Sewing
Presser foot to be used
fl
Decorative stitch
foot (T)________j
1. Press the FUN button I .
2. Press |a| , (B) , © and @ key.
To change features from among 1920 possible
faces. Face changes appear on upper LCD
window.
Names of each key
Hair key
Advance
^/r •
f'^
(gv
, \ /r _ ^
df"©
[meîïiIrpt h
Kinds
(aKM frSl (n^
Chin key
Mouth key
Eye key
36
T
Back
(B)
(C
/ \ ¡¡J
J / 4
% ff
Q 0
if%
0 fl
/ Vi VJ
0 0 D r
/ 0
Page 39

Regular Pattern Sewing
1 - Press regular pattern button \ ^ \ .
2. Each time [^ \ button is pressed, lower LCD touch-screen will change.
I REG I
Presser foot to be used
Decorative stitch
ft
foot (T)
Single patterns
1
>1 5 > % ►
w >
Ì*
f 3 ^
> i ^
'I
^ g c?
S ^ I
NOTE: All regular patterns except top 3 rows of screen 1 must be balanced for perfect appearance, (see page 31). Use the trial
pattern from any of the 4 large touch-screens or from the fun-face touch-screen to balance pattern to fabric being used. Backing
fabric will enhance appearance of stitch patterns.
Continuous patterns
-
&
«L
n
-.L
o
J
u
1 n
1—1
fa
g
fa
i=0
c
corr'
Ì
MEM
J
.xO-
TO.
Û7
«6
SUS
li
>• ■•' 0
m
M
mem)
><
§ >-<
>k
mem]
§ i6.
C
mem)
»« ffS-..
ÎOÎ
CORR
MEM
n V^Vw
■jiSii ¥ -, .. ..
^ 111
a 4? 'Ÿ' y ^
ei
é
CORR
MEM
How to use pattern modifier keys of reguiar patterns.
1. Press regular pattern button *** .
2. Press desired pattern.
For example: Touch-screen 1
> 1
â S
w >
i *
J
W W %
y
^i‘
> ^ ►
\ ^ i
f 3 ^
IMS'
ifiS
___________
LGE I FUN I REG I I EMB l^y
3. Begin sewing.
Automatic Pattern
I REG I
|a-b-c| IÆ)
Name and function of modifier key
!dx
'i:'
i*i
♦♦♦♦
Pattern elongater key
Turn over key
Repeat pattern key
RPT
.A.
Pattern position key
Result
How to adjust width and length of regular patterns.
• The width on patterns of first 3 touch-screens may be adjusted from automatic width of 7mm to widths of 4 and 5mm (see page
18 for How to adjust stitch width).
• The length of the first 3 rows of patterns on touch-screen 1 may be adjusted for desired density (see page 17 for How to adjust
stitch length).
37
Page 40

Alphabet Stitch Sewing
1. Press alphabet button |a-b-c| .
First press
Ag
“n Op
Y-p
1
N
LGE I FUN I REG I
How to select letter of alphabet.
c>4
Ep
Qp.
®E]
^8
CORR
,MEM
CLn
I MEM
Oh
O'T
,RPT ,
^ |A-
'j a'
IJ,
• t
CrUR I
Second press
•M
%
% %
A
corr'
[mem,
№Ü
g)
^0
,RPT
A-B-C
D
^1©
Presser foot to be used
ft
V
em)
Decorative stitch
foot (T)
Space key
Period key [ |
Hyphen key | —[
Center point key [ ■ |
Apostrophe key □
• Pressing
Pressing key again will select
First time key is pressed: ^ ^
Second time key is pressed; ^ ^/^1/ / -► /
First time Y'ct
Second time ■:
key once will select ^
or key is pressed: ^ /^8
or key is pressed:
How to place letters or patterns into memory
• Press BBIl button and last selected letter or pattern
shown on upper LCD window will be placed in memory.
Press
placed in memory.
• Press button to delete a wrong letter or pattern in
memory.
• Press button to review patterns in memory one by
one.
• Use memory capacity indicator ( |mem) 40 35 30 25 20 15
10) to determine how much space is still available in memory.
button for every letter and pattern to be
► Press button to store letters or patterns in memory
even when power to machine is turned off.
» To recall stored letters and patterns from memory press LGE,
FUN, REG or A-B-C category button and then button.
After selecting (Q) , wait for beep and for sequence stored
to again show on LCD screen. This will assure storage.
' If new patterns are stored in memory, patterns which were
stored in memory before will be erased.
' To store in memory additional patterns with patterns already in
stored memory, first recall existing pattern to upper LCD
window, add additional patterns to memory sequence, then
store new pattern sequence in memory.
38
Page 41

How to Combine Patterns.
Combine upper case and lower case.
Up to 40 patterns may be entered into memory.
1 - Press alphabet button a-b-c twice.
2. Press . (Indicates ^ on upper LCD window.)
3. Press 4^81
4- Press M^i . (Indicates )
(Example)
11 . Press . (Indicates )
5. Press key. (Indicates
6- Press
button.
7- Press twice. (Indicates )
Combination Fun-Face and Alphabet
1 ■ Press Fun-Face button
2. Press desired |a| , (§)’■©
key to make face.
3. Press
button.
4. Press Alphabet button |a-b-c
5- Press j'-^|-|| twice. (H)
12. Press button.
13- Press twice. (Indicates )
14. Press SBQ button.
15 - Begin sewing.
D
11 . Press Op twice. (P)
12. Press ^iSil button.
13- Press V' 2;[ •
14- Press tfyn button.
15- Press pQ . (space key)
16. Press Iliiil button.
^ A
23. Press A-p twice. (T)
24. Press IjBIWl button.
25. Press |0}-^| twice. (H)
26- Press
I button.
27- Press jOpj twice. (D)
28- Press
I button.
6- Press button.
7. Press ^b| • (A)
Or
button.
twice. (P)
button.
8- Press
9. Press
10- Press
17. Press Aq| twice. (B)
18. Press HlBll button.
19- Press I i ,j| . (I)
20- Press ^^3 button.
21 - Press Op twice. (R)
29. Press ^ . (A)
30. Press button.
31 - Press "i"'' 2I • (Y)
32- Press lilBiJ button.
33. Begin sewing.
22- Press fl|Hl button.
Data which has been placed in memory can be cancelled with any of following three methods.
1. Press clear button to remove one pattern at a time or hold it down to cancel all memory.
Press Utility Pattern Button || . W,, ^^,3,
2. Press Utility Pattern Button || . | once.
Turn off power to machine then turn it back on. J Does not apply to stored data.
39
Page 42

How to Correct Patterns in Memory
When an undesired pattern has been
placed in memory.
• button will operate only when
button has been pressed.
• Pressing button will clear
patterns which have been selected.
• Memory of undesired patterns will be
cleared in order from pattern which was
selected last.
• Continue to press button and
all patterns which have been selected
will be cleared one at a time.
• Turning power switch off, or selecting
utility pattern button will clear all
data In memory.
• To clear reduced size or mirror pattern
press modifier key again.
When last selected pattern that
A has been placed in memory is not
IP a desired one.
Liquid crystal display window
ABC
XX
lE
AUTO
1^403530252015»
''’Vj
^7
1 .p.
When an undesired pattern is
selected in middle.
Up
o
'-^’4
Tj(3>a W
....5....0 <S)
Ep
Qr
Bq
cor r'
,RP T ,
MEM,
^ lA-B-Cl
REG I I EMB
Li,,
8p
'j
Tlx
to©
EMB
u'
\A.'x
MEMjj
► When memory is not full, it will be
indicated on LCD and patterns may
continue to be added.
• Before selecting a new set of patterns,
•—
be sure to clear all memorized patterns.
Memory Capacity Indicator (^) will not
show on LCD.
» 40 patterns can be stored in memory.
Memory Capacity Indicator Pointer ^
indicates how much space is available
in memory.
last pattern will be deleted.
2. Select correct letter (C.)
3. Press Pml button.
I
L
______
-__J
are the desired patterns.
I
------------
are selected by mistake.
1
1. Press button twice.
2. Press key and button.
Press iSfi? key and select
3.
WcM
correct letter (B.)
4. Press ^IBU button.
Press button twice.
5.
Indicated on
upper LCD window
EC
f
■=>
G
|"bc
/
■=>
ABC_
Page 43

Free Arm Sewing
Application examples
Sewing hard-to-reach garment areas is
made easier by using free-arm sewing
capability of sewing machine.
Note: See page 5 for converting machine
to free-arm.
/
Hemming
41
Page 44

Circular Pattern Stitch
sewing outside
periphery of coasters
and emblems.
Circular ruler allows
machine to sew circular
patterns of 3 to 10 cm
radius.
Attach circular pattern
3
stitching ruler.
Left-hand side:
Suited to sewing of large circular
patterns
4
Move sizing lever by
firmly pushing from
slot.
Select pattern as
1 desired.
Select patterns from
IRK I category.
If single pattern is selected
press I Rpj key.
Move sizing plate to
5
desired position.
Attach decorative stitch
2
foot (T).
Push sizing lever into
6 slot.
Right-hand side;
■ Suited to sewing of small
circular patterns
Attach circular pattern stitching
ruler to left- or right-hand side of
Needle plate using screw supplied
with machine.
Place material on machine and
hold in position using tack sup-
7
plied with machine.
42
Page 45

Heirloom Sewing (Using wing needie)
☆ When using wing needle, do not use thread cutter (needle may bend).
Quilting (Using Quilt guide)
1
Select pattern as desired. 2 may use stitch width.
CAUTION:
Use correct presser
2 foot
When using zigzag stitch
Make sure power/light switch is off before changing needle.
Automatic needie threader
3 cannot be used. 4 patterns from category.
Select one of five
REG
ZJ -L i"~i r~
••1*.
_J _L U ^
^ Pattern
pattern so press
3
Use correct presser foot.
is single
RPT
are joined together with
parallel rows of
stitching. Batting is
usually placed between
layers of material,
which is used for
protection against cold
or for decoration.
4
Attaching quilt guide.
Insert quilt guide into hole in presser foot holder.
desired.
Sew quilting on material using quilt guide to
5
trace pattern previously sewn.
Spacing between lines of stitching may be adjusted
by moving quilt guide.
43
Page 46

Patch Work
With pattern stitches,
fabrics can be joined
together to form a
strong seam.
Overlapping Patch
1
1
Select pattern.
Press ^ button, and select
I REG I
desired pattern.
Choose one of above three
patterns.
2
Use correct presser foot.
Basting stitch
5/8"
\ ,^iii
N
Fabric (wrong side)
I
I
Place two pieces of fabric right sides together and sew a
basting stitch. Press seam to one side.
Open Patch
1
Fabric (wrong side)
^ Seam
Place two pieces of fabric right sides together and sew a
basting stitch. Press seam open.
44
Sew a pattern stitch on top of seam. Remove basting stitch for
open fagotted appearance.
Page 47

Twin Needle Sewing
- With machine turned off, insert twin needle into needle clamp, and thread machine as for single
needle sewing through left needle eye.
- Attach auxiliary spool pin into hole by bobbin thread cutter. Place second spool of thread on it; and,
again, thread machine as usual except as noted in point 4 below. The second thread will thread
through right needle.
Attaching
1 twin needle.
Twin needle sewing
produces two parallel
lines of closely-spaced
stitching.
Attach
Use correct presser foot.
auxiliary
3 spool pin.
4
Thread machine.
NOTE:
needle threader and
automatic thread cutter
cannot be used.
IMPORTANT: Use only
Singer branded twin
needle style # 2025.
5
Patterns for twin needle sewing.
Select straight or zigzag patterns. Patterns
illustrated on right are designed for twin
needle sewing.
Automatic
Straight stitch
Adjusted needle
position (center)
M
3.E
foot (A) or decorative
stitch foot (T).
Zigzag stitch
AW
Adjusted stitch width
M
S!/7
Caution:
Pin Tucks
1
Select straight stitch. 2 Use correct presser foot.
Put right needle thread into outer slit,
by-pass final thread guide and then
through right needle.
Press the ^ button.
CAUTION: Do not select any
pattern which cannot be
adjusted to 4 mm stitch width.
I REG I
* If sewing with twin needle, never press the elongate or
position key (since the needle will hit the presser foot).
* Sew at low or medium sewing speed.
* Do not use reverse stitch.
Make folds on material for
pin tuck using an iron so
that they are neatly
finished.
A type of fabric decoration.
Commonly used in French
sewing.
Traditionally, pin tucks are
formed by stitching very
near a folded edge, as
shown in steps 1 through 5.
You can also sew pin tucks
with a twin needle.
Twin needle tucks are
always even as they are
formed by two parallel needles.
Decreasing top thread supply
(increasing tension) will result
in a more pronounced pin tuck.
After finishing sewing, tilt pin tuck to
one side and press.
Sew folds taking care not
to stretch them.
A blindstitch presser foot
guide will help finish the
folds more beautifully.
Application examples
• Blouse
* Apron
Page 48

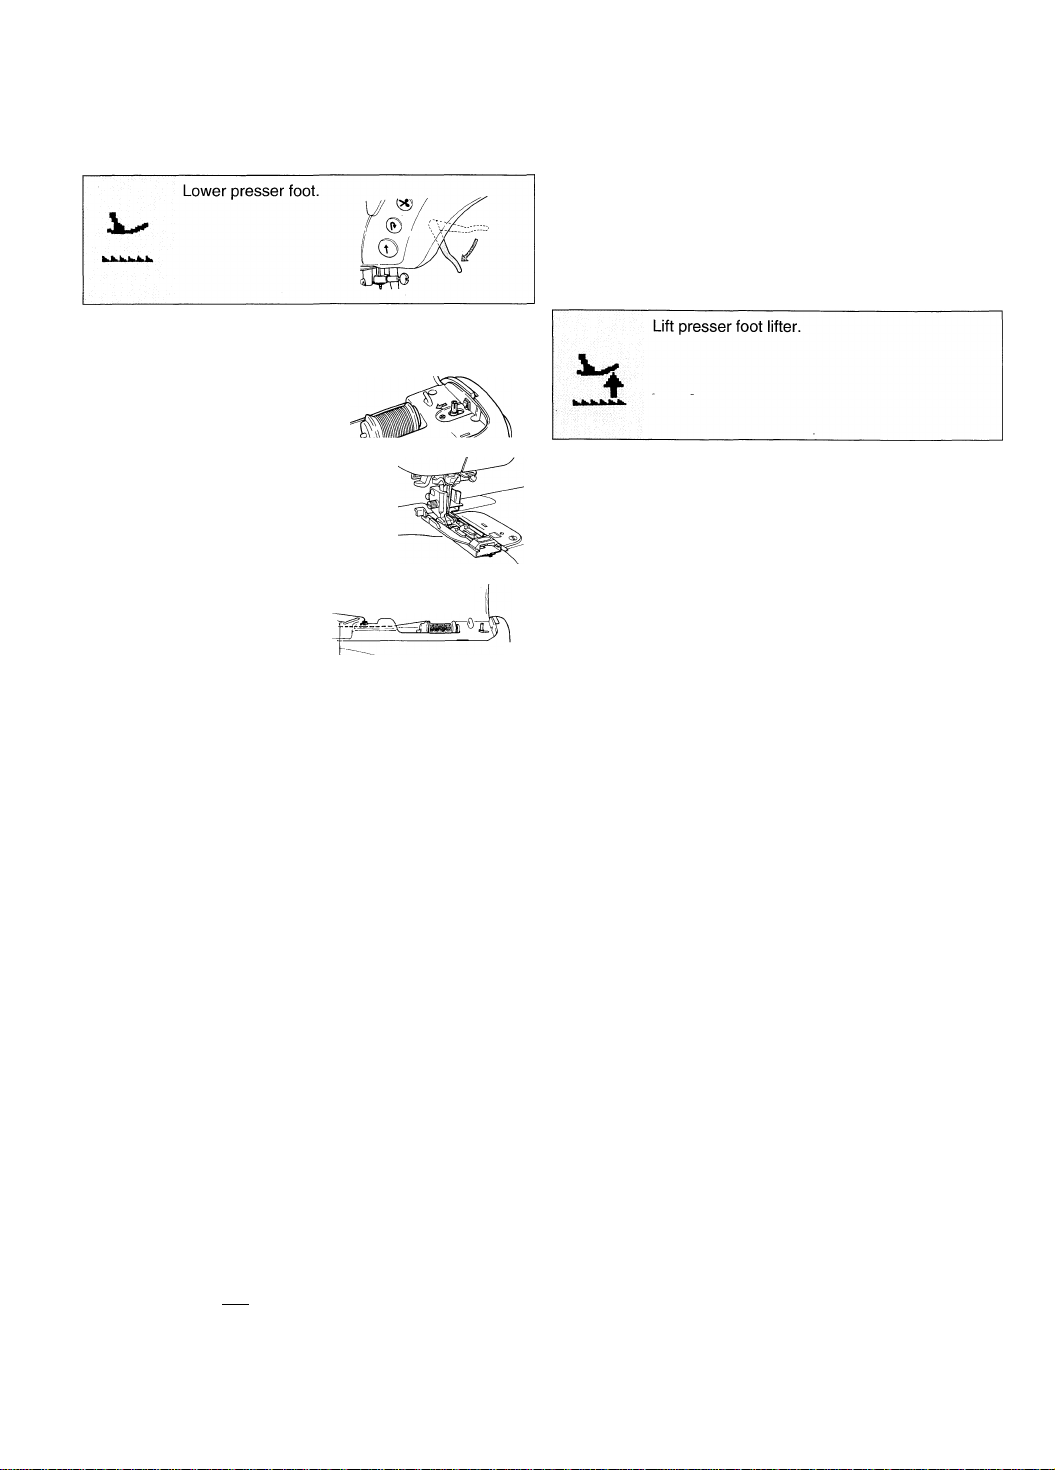
Darning/ Free-motion Embroidery
Remove presser foot
1 holder.
' Before removing presser
foot holder, be sure to turn
off power to sewing
machine.
2 up to down.
Move drop feed lever from
3 Select zigzag stitch pattern.
AWV\
-------
XX
'
A
yoc
UTO
-
cn
D.U
M
4 Select stitch width.
Set stitch length to 4.0 to
5 increase thread suppiy.
Set embroidery hoop in
6 place.
Lower presser foot lifter and start
sewing.
NOTE: It is possible to sew without embroidery hoop if optional Darning/Embroidery foot is used.
See page 53 for further information.
46
Page 49

Rolled Hemming
Material edge is hemmed while rolling it
under.
Used for finishing bottom of shirts and
blouses and edges of frills and handker
chiefs.
Select desired stitch
1 pattern.
2 Change foot.
in accessory bag.
NOTE:
needle position may
be adjusted for perfect
sewing position, (see
page 15 or 23)
Straight stitch
work easier.
Insert material into spiral groove in hemmer foot
until needle position is reached.
Even Feeding
To prevent slippage of material, use even
feed foot.
* For matching plaids and designs,
* To prevent slipping, stretching or
sticking when sewing fabrics such as
synthetic suede, sheers, heavy knit and
quilted.
Select straight
1
stitch.
2
Remove presser foot holder.
Drawing ends of needle and bobbin threads, turn
handwheel 3 or 4 turns by hand to guide material
to hemmer foot.
Use even feed foot only for forward stitching.
* Do not use it for any patterns which feed sideways or feed
both forward and reverse.
3
Attach even feed foot to machine.
When power switch is
turned on, straight stitch
is automatically selected.
Lift presser bar, remove presser foot clamp screw
and remove presser foot holder.
' Sew at low or medium sewing speed.
' To sew elastic materials such as knits and jersey, set presser foot adjusting lever to "LOW.”
Put forked section of actuating lever around
needle clamp, attach to presser bar and securely
tighten presser foot clamp screw.
47
Page 50

Inserting Zippers
1
Select straight stitch.
Zippers may be inserted in
several ways. Type and
location of zipper will help
select right method.
Lapped
inserted in side seam of the
garment.
Centered
centered in opening, and
are suitable for almost all
fabrics.
zippers usually are
zippers are
Lapped Insertion
o
XX
IBAB J
+
XX
AUTO
•vT
When power switch is
turned on, straight stitch is
selected automatically.
Use correct presser
2 foot.
machine. Zipper foot can be
put on to left or right of
needle, depending on where
bulk of garment is placed.
side of zipper foot goes on shank.
If zipper is to right of needle, right
side of foot goes on shank.
A zipper is lapped when one edge of
fabric opening overlaps and conceals it,
allowing only one stitching line to show.
* Machine-baste zipper opening together
on seamline, and press open seam
allowance.
* Attach left side of zipper foot to shank.
O
* Pin or machine-baste zipper to garment
from wrong side, through zipper tape,
seam allowance, and front of garment.
* Turn garment right side out.
* Attach left side of zipper foot to shank.
* Stitch across lower end of zipper and up
to waistline. Use basting stitches as a
guide.
* Remove basting and press.
48
* Open zipper and flatten back seam
allowance, as shown, with zipper face
down and edge of teeth following seam
line. Zipper’s top should fall between
1/8" and 3/8" below garment top seam.
* Stitch zipper to seam allowance from
bottom to top.
Centered Insertion
m
seamline, and press open seam
allowance.
' Place open zipper face down on seam
allowance with teeth against seamline.
^ Stitch zipper to seam allowance from
bottom to top.
^ Close zipper and turn it face up.
^ Smooth back seam allowance at edge
of zipper.
^ Stitch zipper from bottom to top, as
shown, near seam allowance folded
edge.
allowance and garment exterior.
' Turn garment right side up and topstitch
it to zipper, sewing through all layers.
' Remove basting and press.
Page 51

Inserting Invisible Zippers
Since a seam does not
appear on right side of
material, opening can be
finished with material edges
neatly butted.
4
1 Select straight stitch. 2 Change foot.
When power switch is
turned ON, straight stitch is
automatically selected.
Attach invisible zipper foot
supplied in accessory bag.
Set center of Invisible zipper on seam.
on seamline, and press open seam
allowance.
After fitting teeth of zipper to groove on invisible
zipper foot and raising teeth with fingers, sew
zipper tape on seam allowance from opening
end by forming seam along edge of teeth.
Baste zipper to seam allowances.
Undo basted seam up to opening end
shown and open zipper.
Sew other side of zipper tape on seam allow
ance using same procedure.
49
Page 52

Manual Buttonholes
Automatic foot can make buttonholes up to 1 1/2:
use transparent foot to create larger buttonholes.
^ To make ribbon casings
Other uses for Transparent foot I.
' For french machlne-sewing:mock whip and roll,
pin-tucking and entredeux, are better controlled
because there is a groove In bottom of foot.
' For satin stitching
Select desired stitch
1 pattern.
2 Change foot.
Mark rnaterial to indicate buttonhole
placement.
Lower buttonhole foot so that mark is at
center of needle hole in foot.
Lower buttonhole lever.
When needle reaches end of marker line,
slightly press buttonhole lever towards
rear of machine.
Start sewing while slightly pulling
buttonhole lever towards front of
7
machine.
slightly pull lever towards front of
machine.
* Machine starts straight stitching on
right-hand parallel section of button
hole.
If sewing machine does not operate as described above, stop machine and press buttonhole pattern key again. It will start
buttonholing from beginning.
slightly press buttonhole lever towards
rear of machine.
* Machine starts zigzag stitching on right-
hand parallel section of buttonhole.
8
When needle reaches beginning of mark,
slightly pull lever towards front of
machine and sewing machine will start
bartacking, perform fastening stitching
and stop.
50
Page 53

Attaching Cords
Gathering and shirring
Place pearl cotton into center of foot and zig-zag
over it.
Secure one end of pearl cotton and pull other
end to gather.
Use same method with elastic threads to create
shirring.
' Decorative shirring
Experiment with decorative threads, like ribbon
thread or metallics.
Place cording into slots and stitch using multi
stitch zigzag.
^ Applying trims
1
Select desired stitch pattern. 2 Change foot.
i=> For one cord
(Manual zigzag stitch
width 1.0-2.0)
Multi-stitch
zigzag stitch
O For three cords
Sewing one cord
For sewing one cord, pass cord through center
spring of cording foot, fit top end of cord in groove
on sole of cording foot, then lower cording foot.
Sew cord on material using zigzag stitching
function with zigzag width reduced (stitch width
1.0-2.0).
Make fastening stitches at beginning and end of
seam by pressing reverse button.
Sewing three cords
For sewing three cords, pass cords through all
springs of cording foot and fit cord ends in groove
on sole of cording foot as in case of sewing one
cord. Then, lower cording foot.
stitch pattern.
As in case of sewing one cord, make fastening
stitches, draw cords out on wrong side of material
and make a knot. Then trim cords.
* To sew two cords, pass cords through rightmost
and leftmost springs.
51
Page 54

* Always use Singer genuine accessory feet.
^ . I - > Off brand or generic accessories may cause poor performance, damage to sewing
Optional ACCGSSOriGS machine or injury.
Ruffler presser foot (Pan No.saeoas)
Ruffler quickly & easily produces
professional looking ruffles on
garments and home decorating.
' Be sure to turn power off before Select straight stitch pattern and
Attaching ruffler.
® Remove presser foot.
@ Raise needle bar to highest position.
(D Fit ruffler fork onto needle clamp screw and attach to presser bar.
® Tighten presser foot screw with exclusive screwdriver.
removing/attaching ruffler adjust needle position to 1.0 (This is
presserfoot. very important).
Ruffling.
(1) Determine number of ruffles.
• Ruffles
every
stitch.
(3) Place fabric under ruffler foot.
*Note: Sew test swatch before sewing on project.
• Ruffles
every six
stitches.
®
O
• Ruffles
every 12
stitches.
........
-
Fabric
(2) Adjust overlapping width of ruffles.
Straight
stitch
(4) Lower ruffler presser (5) Lightly push cloth feed plate towards
foot.
'< edge
badk of machine.
(6) Turn handwheel counter clockwise to
lower needle into fabric until fabric begins
to fold.
Ruffle overlap
width increases.
Ruffle overlap
width decreases.
52
(7) Start Sewing.
Through 25mm
Page 55

Optional Accessories
PintUCk foot (Part No.386022)
Uses:
- Sews evenly spaced plain twin needle pintucks.
- Sews evenly spaced corded twin needle pintucks.
Procedures:
Plain pintucks
1) Insert twin needle and thread machine with two
spools of thread, using auxiliary spool pin. (See page
45)
2) Select straight stitch pattern and adjust needle to
center position (3.6).
3) Mark straight line for first pintuck.
4) Stich along marked line. Increase tension as desired,
to make pintucks stand up.
5) Place first tuck into desired groove on bottom of
pintuck foot. Stitch, allowing groove to guide fabric for
evenly spaced tucks.
Corded pintucks:
Follow procedure above, but place cording under fabric.
Lower twin needle by hand to ensure cording is centered
inbetween stitch, being sure to catch cording between
needles.
Darning/embroidery foot (PartNo.3860i7)
Uses:
- For free-motion embroidery, darning & monogramming.
Procedures:
1) Drop feed dog.
2) Place fabric into embroidery hoop (optional).
3) Attach foot and tighten presser foot screw with
exclusive screwdriver. Begin stitching, moving hoop
as you stitch. If not using hoop, grasp fabric firmly
with two hands and hold taut.
Sew at slow to medium even sewing speed.
Quilter’s foot (Part No.386005)
Open toe embroidery foot (Part N0.386023).
Uses:
- For satin stitching.
- For applique.
- For machine embroidery, cutwork and fagoting.
Procedures:
- This foot allows a clear view for sewing above tech
niques.
- Follow instructions found in Singer Sewing Reference
Library Series.
Uses:
- To sew perfect 1/4" seams for piecing quilt blocks.
- To sew narrow seams, such as those In doll clothes.
Procedures:
- Use in place of A foot.
- Select straight stitch pattern full left (automatic)
position.
Side cutter (PaHNo.386001)
Uses:
- To cut and overedge fabric in one step.
Procedures:
- Remove presser foot holder and attach
side cutter. Follow Instructions which
come with side cutter.
- Tighten presser foot screw with
exclusive screwdriver.
53
Page 56

Embroidery
Setting up machine to embroider
Precautions to be taken when embroidering.
1. Be sure to turn OFF power to machine before attaching/
removing embroidery bed and embroidery card to/from
machine.
2. Be sure to keep embroidery cards in original case for
storage.
3. Do not carry main unit of sewing machine with embroidery
bed attached.
* When embroidery bed is used with sewing machine, foot
speed controller cannot be used.
Attach embroidery
presser foot (J).
A CAUTION:
Tighten presser foot screw securely with exclusive
\
screwdriver!
Lift presser foot and attach
embroidery frame.
7
^ (see below for details)
Attach embroidery
3
bed.
C
Set lever of embroidery
4
I To obtain neatly-finished embroidery
Type of needle
' To embroider difficult-to-feed materials such as light-weight
materials and elastic materials, adhere a piece of temporarysticking type of fusible interfacing (non-woven fabric), using an
iron (temperatureilow to medium) on wrong side of material.
bed to the rightmost posi-
O tion. (see below)
Needle thread ^
Use good quality thread designed for
sewing machine embroidery.
M
Bobbin thread
White 100% Polyester lightweight 80
to 100 weight
©
Singer red band woven size 11/80 or
size 14/90
■ Placing embroidery bed in position.
1 Remove auxiliary bed. 2 right.
Slide embroidery bed O
to right. Push lever 9 to
54
Page 57

^ If upper LCD window gives
indication.
Raise presser
foot.
if upper LCD window gives
^
O
Ш
_ ing range.
V embroidery card
O into slot until it
indication.
Raise needle.
Press arrows on
f, ^ key to det erm ine
loca tion o n fa bri c whe re
Press ® key to check sew-
Securely insert
will go no further, i
1
See
next page for how to
attach material to frame.
Be sure to raise presser foot to Lightly hold thread end.
allow clearance to attach
Turn off power to
machine.
r
Turn on power to
0
machine.
Now, start sewing machine
again.
55
Page 58

Preparation for Embroidery
Precautions to be taken when embroidering
■ Attaching/removing embroidery bed
Turn off power Slide embroidery bed to right on
1 switch. 2 to machine.
Attach/remove embroidery bed to/from
machine while on level table.
■ Inserting/removing embroidery card
Turn off power Hold embroidery card with arrow shown on it faced forward,
1 switch. 2 insert card straight into slot until it will go no further.
Push connector lever to
3
rightmost position.
To remove embroidery card from
machine
1. Turn off power switch.
2. Pull card straight out from slot.
To remove embroidery bed
from machine
1. Turn off power switch.
2. Return connector lever to
leftmost position.
3. Slide embroidery bed to left
from machine.
■ Securing materiai in embroidery frame
All fabrics will sew better If permanent or temporary - sticking
non-woven fusible interfacing is adhered to the back of material.
Loosen frame adjusting
Draw marker lines on screw and place material
material with assistant between inner and outer
1 marker. 2 frames.
lines align with raised marks on inner frame is completely
frame. inserted into outer frame to
56
Slightly tighten frame
adjusting screw, pull
material edges to remove
3
slack.
A CAUTION:
avoid frame dislodging during
sewing.
Make sure
Once material is properly
positioned with no slack,
securely tighten frame
4
adjusting screw.
Tighten screw.
Page 59

■ Attaching/removing embroidety frame
Fully raise embroidery presser
foot and put embroidery frame
1 under it.
Slide frame into slot located on
2 embroidery bed until it clicks.
k I
To remove embroidery frame from sewing
machine
Pull embroidery frame towards front of
machine while pressing frame lever.
D
y
i—■ w\
Fully raise embroidery presser foot and pull
out frame from under presser foot.
Determining iocation of embroidery, inside embroidery frame
Lower LCD panel
NOTE:
warning sound indicates frame will
move no further in that direction.
When pressing key,
1. ) Select pattern
2. ) Press one of the four-direction
arrows
Letter embroidery guide
This guide plate indicates standard, reduced and
enlarged sizes of letters to be embroidered. “
Use guide to confirm possible embroidery area extending from top end to bottom end
of embroidery frame, needle position and reference line of letter pattern to be sewn.
How to use letter embroidery guide.
1) Draw needle entry line on fabric with assistant marker using needle hole slot
^ I in letter embroidery guide.
Use letter embroidery guide for checking upper and lower sewing range.
2) Secure material in embroidery frame (see page 56).
Attach embroidery frame (see page 57).
3) Enter desired letters into memory.
(right / left / up / down) on key, and
frame will move in direction of arrow
pressed.
Adjust so embroidery presser foot is
at center of marker lines.
3.) Press key, and frame will
move to show embroidery area.
Initial letter embroidery frame
Material can be secured in frame
following same procedure as large frame.
This frame is suited to embroidery of a
small number of letters. Initial frame can
only be used with 1.0 and 0.7 cm letters.
4) Use the four direction arrows ^^ J ^—J up or down to position the needle over the marker line on the fabric. Use the left
or right arrows to locate the center of the letters to be sewn.
5) Press sewing range key to check left most and right most range.
57
Page 60

Sampler Card Patterns of Embroidery
Each time ^ button is pressed, lower LCD touch-screen
will change to show 6 different screens (total 23 patterns).
1. Outline embroidery
* Entire pattern is embroidered using a single cojor needle
(1) Press pattern appearing on the lower LCD touch-screen.
(2) Pattern will appear on upper LCD window.
(3) Determine area of pattern to be embroidered inside frame
I EMB I
thread.
by pressing arrows on key.
2. Multi-color embroidery
(1) Press key, and color steps will be shown on upper
LCD window.
(2) Follow steps 3 and 4 in outline embroidery.
(3) Change needle thread to yellow and start sewing
machine. When pattern is finished, machine will automati
cally stop and cut thread.
(4) Follow step 3 to sew other colors of pattern.
si
(4) Confirm sew area with key.
XX
l«s J1
■¥
AUIO
L-^40353025201510* . • . 5 • • • • 0
FUN REG
A-B-C 1»
EMB
•*—
w
A
—
m
f
, ^ Si/
' If embroidery pattern area exceeds
embroidery frame, machine warns
operator with an electronic sound.
©
SINGER
Page 61

-¿A.
B -*-B
B B -»-B
M
B -^B
M
Ww
D -► B
B
0-^B-
This page indicates steps and
colors suggested for sampler
card.
0
^ H
J
hHi h
.........
□ B
♦
B
I
□ -►
B ^B
B-»-B -B
m
*
D -r B
n ^ B ->-B
MMH
□ 4- B
M
Ml
B H
-B
B -►B
a
a
D
•- B -•
M
m
B
59
^B
o
► a H
m
Ml
v,^
B
n
□ -►
H
IM
B
H
o
Page 62

Letters Card of Embroidery
(1) Attach embroidery bed, letters card and frame. When the
key is pressed:
standard size
15 mm
(2) Pressing
Pressing key again will select
ft
J ' ...............
key once will select
%
..........................................
03®
J CLR
FUN
SINGER
%
á
MEM
^ |a-b-c ^
REG I I EMB
%
y....................—‘'Y
When the
When the
For each of aforementioned keys, two presses will return screen to
standard.
When sewing small size letters It is recommended to use #11/80 needle
and fine thread to improve stitching quality.
NOTE:
NOTE:
key is pressed:
.4-
key is pressed:
/a.
Function buttons
Press button and selected letter will be stored in memory.
Press button for every letter to be placed in memory.
*The number of letters that can be stored in memory
depends on size of letters.
If you have placed a wrong letter in memory, press button to
delete from memory.
Press button to check letters In memory.
Letters are of 3 types, each in upper and lower case and 3
sizes.
The optional large letters card (see page 64) comes with
additional instructions and letter embroidery guide. It is
necessary to follow those instructions which are specific for
large letters. Instruction manual Instructions will not work with
large letter card P/N 386048.
jf Lower case
letters are
shown.
Each time
button is t
.the
Script type
is %
%
ft %
HI
SI®
1 LGE 1 FUN
1 CLR
1 MEM
REG
á
|a-b-c| ^
I 1 EMB
ñf.
V %
'd
% Cd
%
Yz
Jilslh
II8
.fti 1^
Roman type
Ep
%
®'o
1 CLR ■
1 MEM .
w
S rp
&
A-B-C
Op
n
FUN REG
Ij
Uv
?t
PMR I
Kl
%
Page 63

Script type
€i4ciie^^nii££*n
ne^qi,ita»ufxy^
£234567890
&.?!-U
ABCDEFGHIJKLM
NOPQRSTUVWXYZ
i
Eurostile type
®a
®ca“a
%
'^a
E@@ UJ@
g
LGE FUN
a
: CLR
MEM
^ A-B-C
REG I I EMB
EMR
abcdefghijklm
nopqrstuvwxyz
1234567890
&.?!-□
Eurostile type |
%
'^n
Space key: □
61
Page 64

Example (combination of sampler and upper/lower case script).
Follow steps of procedure in numerical order.
1. Turn off power to machine. Put
embroidery bed on machine. (See
page 54.)
2. Determine location of pattern to be
sewn and draw a reference marker
line on material with assistant marker.
3. Secure material In embroidery frame. (See page 56.)
4. Insert sampler embroidery card ^.T/'1 Into slot on
machine. i
5. Install embroidery frame on embroidery bed.
6. Turn on power to machine.
7. Raise needle and embroidery presser foot.
8. Select pattern
9. Press multi
Multi-color No.1 Blue/green
10. Determine center of pattern using key.
11. Check sewing area using key.
12. Place blue/green needle thread In position, and lower
presser foot.
13. Start sewing machine. After completion of part of pattern
which is embroidered with blue/green needle thread,
machine will stop and cut thread.
14. Follow steps 12 and 13 to finish other colors In grape
pattern.
15. After completion of sewing grape pattern, turn OFF power
to machine.
16. Remove sampler embroidery card.
key.
2 Gold
3 Light green
4 Purple
17. Insert slot letter embroidery card
machine.
18. Turn on power to machine.
19. Press key. ( ^ )
20. Press
21. Press
22. Press
letter. ( ^ )
23. Press
24. Press
25. Press
26. Press
27. Press
28. Press
29. Press
30. Determine center of letters using key.
31. Check sewing area using |w^m| key.
button.
8-^
key twice. ( 0t)
key to change upper case to lower case
u
button,
key. ( €1^ )
button,
key twice. (
button.
■apl key. ( « )
button.
into slot on
62
32. Thread needle with desired color.
33. Start sewing machine.
Page 65

Troubles in Embroidering
If thread breaks during embroidering:
«
%
I (5 J± .t?]
&
&
V
■ /
w
_
jZL
1. Stop sewing machine.
2. Raise needle.
3. • In case of needle thread breakage:
Properly thread machine head again.
• In case of bobbin thread breakage:
Trim needle thread and remove embroidery frame from machine.
Properly install bobbin thread in bobbin case and attach embroidery
frame.
4. Press key to feed material backward until troubled part is
Ji
* Use key if material is fed beyond
desired position with jj key.
reached. Then, further feed it backward a little.
5. Lower presser foot and start sewing machine.
* After sewing, draw thread remaining at beginning of sewing to
backside of material and tie. Then, trim thread.
To re-embroider troubled pattern from start:
1. Stop sewing machine.
2. Raise needle.
3. Press key, and needle will return to sewing start point.
4. Lower presser foot and start sewing machine.
Helpful messages given on LCD window during embroidering:
X
Memory is full.
Embroidery card is not installed. Turn off power
and install properly.
Çf
Raise needle.
Lift presser foot lifter.
Place embroidery frame on machine.
n
^ Place embroidery frame in position on machine.
Change to full size embroidery frame.
X
This card cannot be used.
Change it with another one.
Delete pattern with clear key.
Lower presser foot lifter.
Change needle thread to a different color.
4
Qllllll
63
Page 66

Optional Embroidery Cards
k>l I I»|#I Wl VIWI y ^«.«l VflW
Animais
Part No 38
'a.o«¥
I Large i letters
ABCDEFGHIJK
LMNOPQRSTU a.™©[p(iia^[S]
VWXYZ WSQmi^
Part No
1234567890
&.?!-□
Flowers
?■' ■ ■ ^
''ÎÎ^^''ÎÎ t /%.-«
j-r-
^''•k
***
/
Part No
Part No
liS
V«,
^0
386o|
yu(jres*Q3t^M<iu
yWBCf^
'/23^567890
&.?!-U
64
NOTE: Large letters are
25 and 40 mm.
Vegetables & Fruits partNosssol
\
Christmas motilH
.SIR, #£.
* ^ Ç) _
.to^
^ \ ^
1‘* i
ni ^.
^ vWnTK
Part No 38601
I
Page 67

i CAUTION: Be sure to disconnect plug from wall outlet before opening cover.
How To Replace Light Bulb
Using exclusive screwdriver, loosen setscrews at rear and top
side of face plate cover about two turns, and pull cover straight
off.
Remove lamp cover.
Remove bulb by pushing bulb
upward and turn to left.
Replace by pushing upward
and turn to right.
Cleaning
Removing lint and dust
Accumulation of lint or dust may cause
problems. Always keep sewing machine
clean.
CAUTION:
Be sure to disconnect plug from wall outlet
before cleaning machine.
Remove needle and presser foot, and clean
area between feed dog teeth and slots in
needle plate, using brush furnished with
machine.
Always keep area around hook and bobbin
case clean.
CAUTION:
Contact dealer for correct light
bulb replacement.
Power consumption of bulb is
5 watts.
How to Replace Needle Threader Hook Holder (Optional Part) pan N0.233075
CAUTION: Be sure to disconnect plug from wall outlet before removing needle.
Align slit in new hook
holder with needle
3 threader shaft pin.
Push new hook holder up
from bottom with finger
4 until it snaps in place.
Remove needle and
1 presser foot.
Place exclusive screw
driver on top of hook
2 holder and push down.
Push threading lever halfway
down.
65
Page 68

Performance Checklist
If sewing difficulties occur, make sure instructions are correctly followed. If a problem still exists, reminders below may help solve
it.
Problem Cause (Reason)
Sewing machine
suddenly stops during
sewing.
Light is on, and
handwheel can be
turned by hand
smoothly.
Sewing machine has been
run at Tow sewing speed for
an extended period of time.
Machine is designed to
automatically turn motor
power off to prevent
overheating.
Action to be taken
Turn power switch off, and
wait for about 20 minutes.
Safety device will reset, and
machine will be ready to
operate.
Page
â
PlglrHSi®.
Needle
will not
move. 1^ presser FOOT
Sewing machine will not
run.
LCD window and/or
LCD touch-screen blank
or totally blue.
Thread breaks.
Skipped stitches
I CHECK THREAD
» THREAD CUTTER
I BOBBIN WINDER
BUTTONHOLE LEVER
Upper thread has run out.
Presser foot is up.
Bobbin winder shaft was left
in winding position.
Buttonhole lever was not
lowered when machine was
placed in buttonhole mode.
Presser foot is not correct
one, and needle hits
presser foot.
Needle has come out and is
in hook of machine.
LCD brightress control
knobs have accidently been
rotated to wrong position.
Threading is not correct.
Thread has a knot In it.
Thread tension is not
correct.
Needle is bent or blunt.
Needle has been inserted
wrong.
Bobbin has not been fully
inserted in bobbin case.
Bobbin case has been
Incorrectly threaded.
Bobbin does not turn
smoothly in bobbin case.
Needle and threads do not
match.
Thread take-up lever has
not been threaded.
Replace empty spool, and
thread machine.
Lower presser foot.
Move bobbin winder shaft
back fully to left.
Lower buttonhole lever.
Replace presser foot with
correct one.
Remove needle and insert
new one.
Readjust knobs to desired
brightness and contrast.
Correctly thread machine.
Remove knot.
Correct thread tension.
Replace needle.
Properly insert needle.
Securely install bobbin into
bobbin case.
Correctly thread bobbin
case.
Check to see that bobbin
has been wound evenly.
Use proper thread or
needle.
Check threading order.
20
20
20
20
8
21
15
12,13
21
21
11
11
11
21
12
66
Stitches are not formed
properly.
Thread has not been pulled
into thread sensor guide.
Threading is not correct.
Bobbin case has been
threaded wrong.
Spool cap is wrong size for
thread spool.
____________
Fully pull thread Into thread
sensor guide.
Correct threading.
Correctly thread bobbin
case.
Replace the cap with
correct size.
12.13
12.13
11
11
Page 69

\ W W \/M I///
Problem
Fabric puckers
Cause (Reason) Action to be taken
Stitch length is too long for
Decrease stitch length.
material.
Needle point is blunt.
Replace needle.
Page
17
21
Needle breaks. A thin needle was used for
sewing heavy-weight
material.
Needle has not been fully
inserted into needle bar.
Needle clamp screw is
loose.
Presser foot is not correct
one.
Loud noise is heard.
Dust has accumulated in
feed dogs.
Lint is in hook.
Embroidery bed is
installed, embroidery
card is inserted,
Connector lever on
embroidery bed not in
proper position.
machine is turned on
but screen shows utility
patterns.
The machine does not
feed material.
• The stitch length has been
set to zero.
• The presser foot pressure is
too low.
•
• Feed dogs are lowered.
Threading cannot be
done.
The needle threader will
not turn.
The needle is not in highest
position.
The needle threader is
designed not to turn to
protect itself if the needle is
not up.
The threading hook will
not enter needle eye.
The needle has not been
fully inserted into needle
bar.
Use correct size needle.
Properly insert needle.
Securely tighten needle
clamp screw.
Use correct presser foot.
Clean machine.
Clean machine.
Turn off power to machine.
Slide connector lever to full
right position.
Turn on power to machine.
Reselect the desired stitch
pattern, and proper stitch
length will be set.
Set presser foot pressure
adjustment lever to
“Normal”.
Raise feed dogs.
Turn handwheel until needle
reaches its highest position.
Properly insert needle.
21
21
21
8
65
65
65
56
17
21
Needle threader cannot
be returned, and the
sewing machine stops.
The threading hook is
left in the needle eye.
Sewing machine will not
sew when start button is
Sewing machine was
accidentally started while
threading hook was still in
needle eye (during
threading).
Speed controller has been
plugged in.
Slightly turn handwheel
clockwise and remove
threader.
Unplug speed controller.
pressed.
Sewing speed remains
unchanged even when
the sewing speed
adjusting lever is moved
while sewing.
If any of the above problems should still remain after you have tried above suggestions, please contact a service center or the
store where you purchased sewing machine.
67
Page 70

Listing of Part Number of All Accessories Included with Machine, Optional Accessories and Most Common Replacement Parts.
Parts Parts No.
Templates
Assistant marker 283425
Needle pack
Wing needle
Auxiliary spool pin & felt
Exclusive screwdriver
Seam ripper 385098
Lint brush
Quilt guide 283401
Eyelet punch
Circle stitch ruler
Tack
Screw of ruler
Standard presser foot (A)
Zipper foot (B)
Overcasting foot (C)
Blindstitch presser foot (D)
Buttonhole foot (E)
Decorative stitch foot (T) 386029
Rolled hemming foot (F)
Invisible zipper foot (G)
Cording foot (H)
Transparent buttonhole foot (1)
Button sewing foot
Even feet foot
386024
®
386025
@
386026
@
386033
283680
386019
283394
283403
283392
386030
386031
386032
386004
386014
386018
386016
386012
386011
386015
386013
386027
283677
386020
Note: List all accessories, optional
accessories and following most
common replacement parts.
Bulb
Thread spool cap
Small spool cap
Bobbin case cover
Power cord
Instruction manual'
Needle threader hook
Bobbin case
Parts No.
283318
385376
386003
386002
283647
386034
283075
386006
Embroidery:
Embroidery frame
Letter embroidery guide
Initial letter embroidery frame 386009
Embroidery foot
Embroidery card
Optional feet:
Puffier presser foot 386028
Pintuck foot
Open toe embroidery foot 386023
Darning/embroidery foot
Quilter’s foot
Side cutter
386008
386007
386010
See page 64.
386022
386017
386005
386001
68
Page 71

Page 72

Part No. 386034 Eng.
Printed in Japan
 Loading...