

Page 1
:Íliá:'?>
:^т,>уЩ^\.
С ■ ''Х'й-.'Ч’/
• • «Ш&г ■
Mf I
-:Л' H í *
nvnNVIAl NOUOntaSNI
I.-JX lunfuen^
/(
ì
О
Page 2

CONGRATULATIONS
..on the purchase of this now Singer* electronic sewing machine. To achieve
the most enjoyment and satisfaction from this product, it is recommended
that the instruction manual be read through step by step while seated in
front of the machine. This will help the operator get to know all of its parts
and capabilities.
INSTRUCTION BOOK SINGER* quantum XL 1
The manufacturer reserves the right to change the appearance, design, or
accessories of this sewing machine as considered necessary without any
notification or obligation.
*A trademark of The Singer Company
Copyright 1989 Singer Sewing Machine Company.
All rights reserved throughout the world.
Page 3
CONTENTS
Accessories.............................................................................. 1
Principal Parts
Major Functions.........................................................................3
Important Safeguards................................................................4
Connecting The Machine
Winding The Bobbin
Threading The Machine.........................................................8, 9
Automatic Needle-Threader
Changing The Sewing Feet.....................................................10
Type Of Feet And Their Applications
Stitch Length Of Each Stitch Pattern
Automatic Thread Tension Control..........................................12
Indicator Lights........................................................................13
Fabric, Thread And Needle Table
How To Remove And Insert The Needle
Various Types Of Stitches.......................................................15
Straight Stitch..........................................................................16
Reverse Stitch....................................................................... 17
Shirring And Gathering............................................................18
How To Operate The Automatic Thread Cutter
How To Use The Thread Cutting Groove................................18
ZigZag Stitch
Automatic Buttonholes.......................................................20, 21
Free-Arm Sewing
Overcasting (Overedging)
..........................................................................
..........................................................
..............................................................
......................................................
...
..................................
.................
...........................................
...........................................................................
....................................................................
.......................................................
.....................
...............................
.....................
6, 7
10
11
14
14
18
19
22
23
Pattern Sewing.................................................................. 24-33
2
5
9
Information Indicated On The Liquid Crystal
Display Window...................................................................24
Relationship Between Patterns And Buttons ......................25
Large Size Pattern Sewing (1 )
Single Pattern Stitch
Reverse Pattern Stitch
Reduced Pattern Stitch
Repeat Pattern Stitch
Large Size Pattern Sewing (2)
Alphabet Stitch
Continuous Pattern Stitch
How To Combine Patterns
Balancing The Shape Of A Pattern
How To Cut The Cross-Over Stitch........................................31
How To Correct Patterns In Memory
Four Direction Sewing ............................................................34
Attaching Feed Cover
Darning Stitch..........................................................................36
Twin Needle Sewing
Pin Tucks
Blindstitch
Patchwork
Inserting A Zipper
Optional Accessories
How To Adjust The Bobbin Case............................................42
How To Remove The Face Cover ..........................................43
Lubricating The Machine
Performance.......................................................................44, 45
................................................................................
...........................................................................
...............................................................................
.............................................................
..............................................................
...................................................................
..............................................................
.........................................
..........................................
................................................
....................................
.................................
........................................................
26, 27
28, 29
30, 31
30, 31
32, 33
38, 39
35
37
37
40
41
42
43
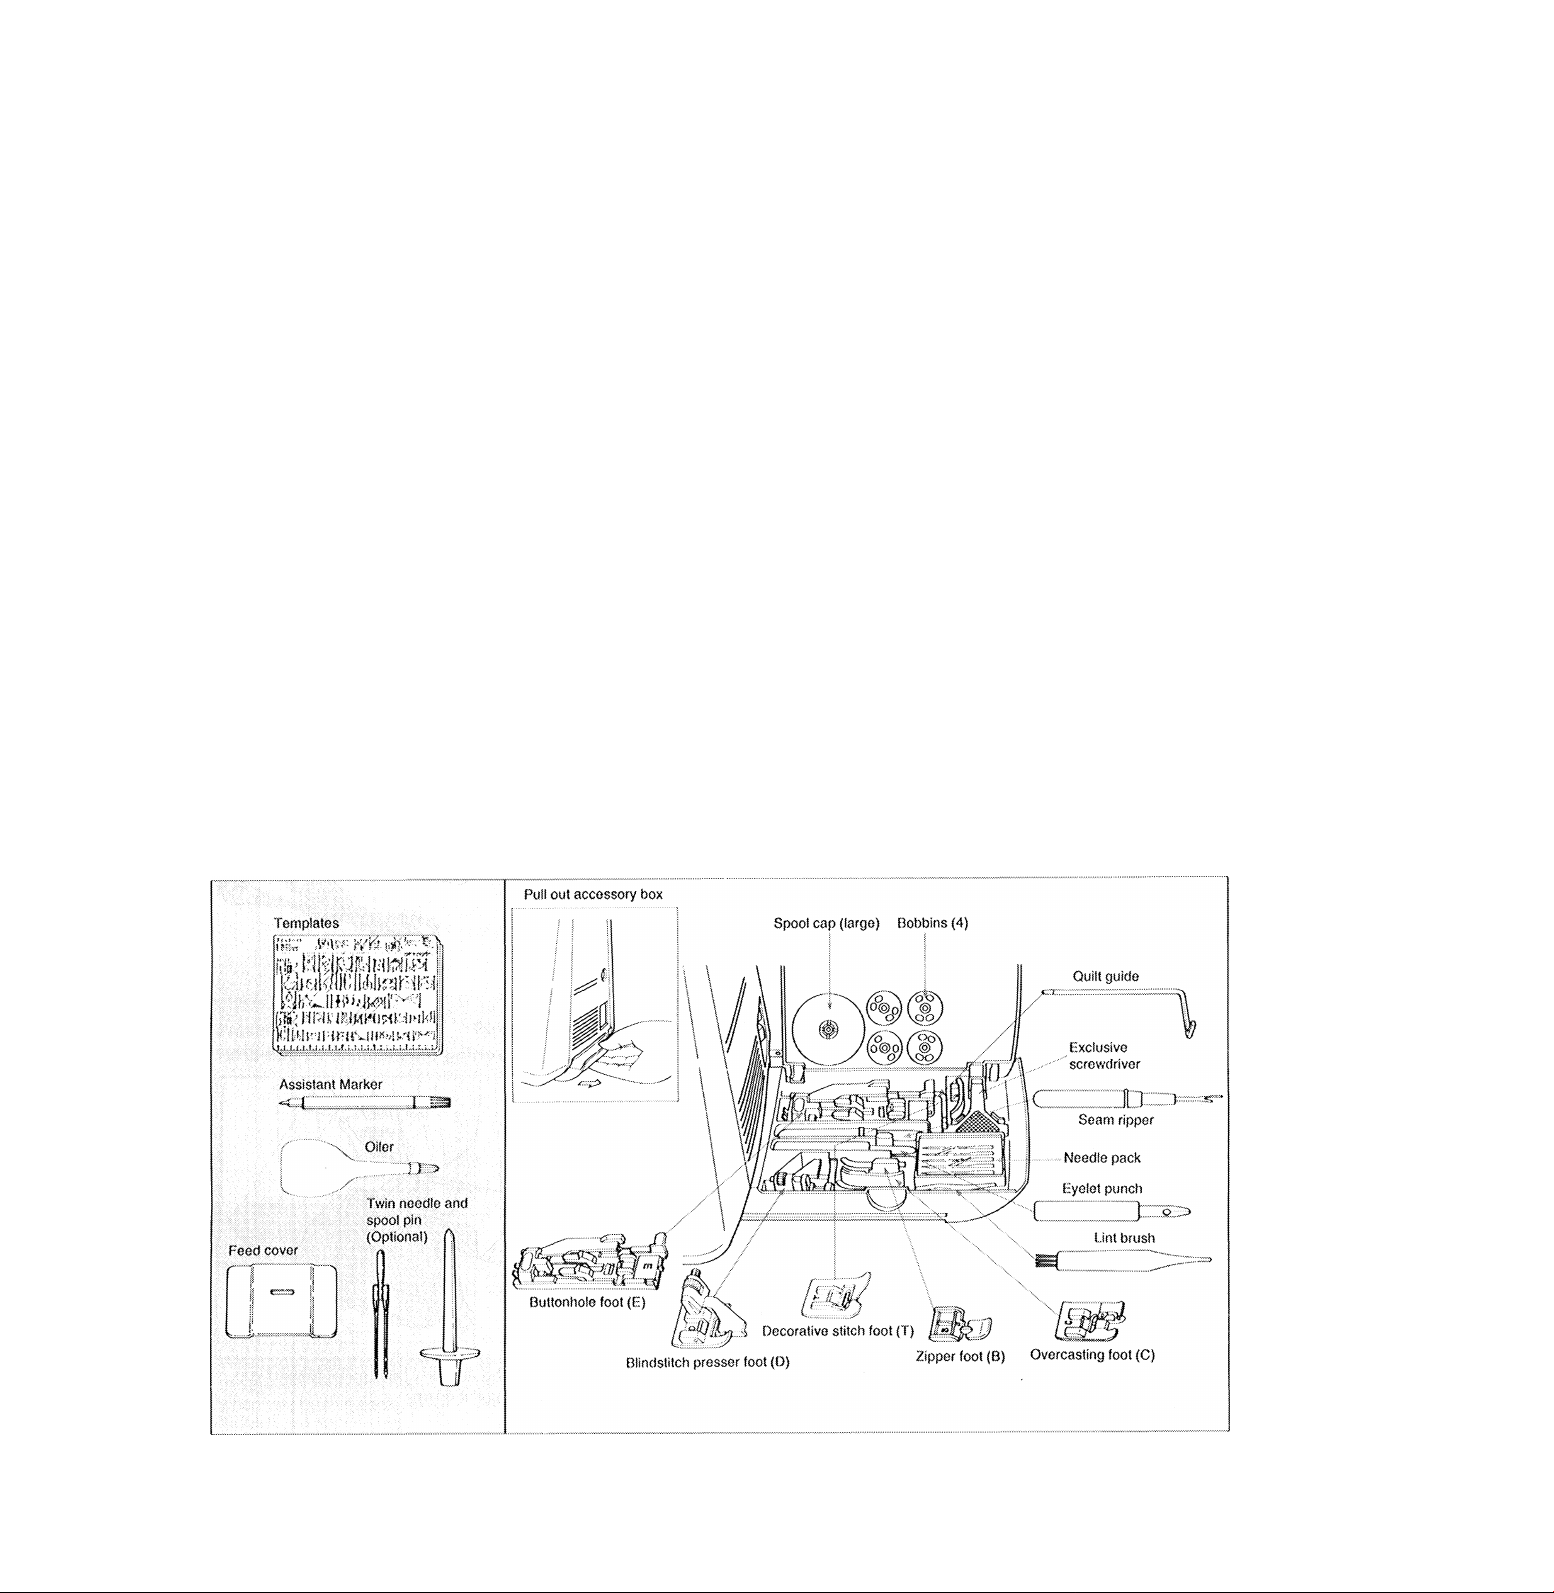
Accessories
Note; Standard presser foot (A); The sewing machine is shipped from the factory with this presser foot attached.
Page 4
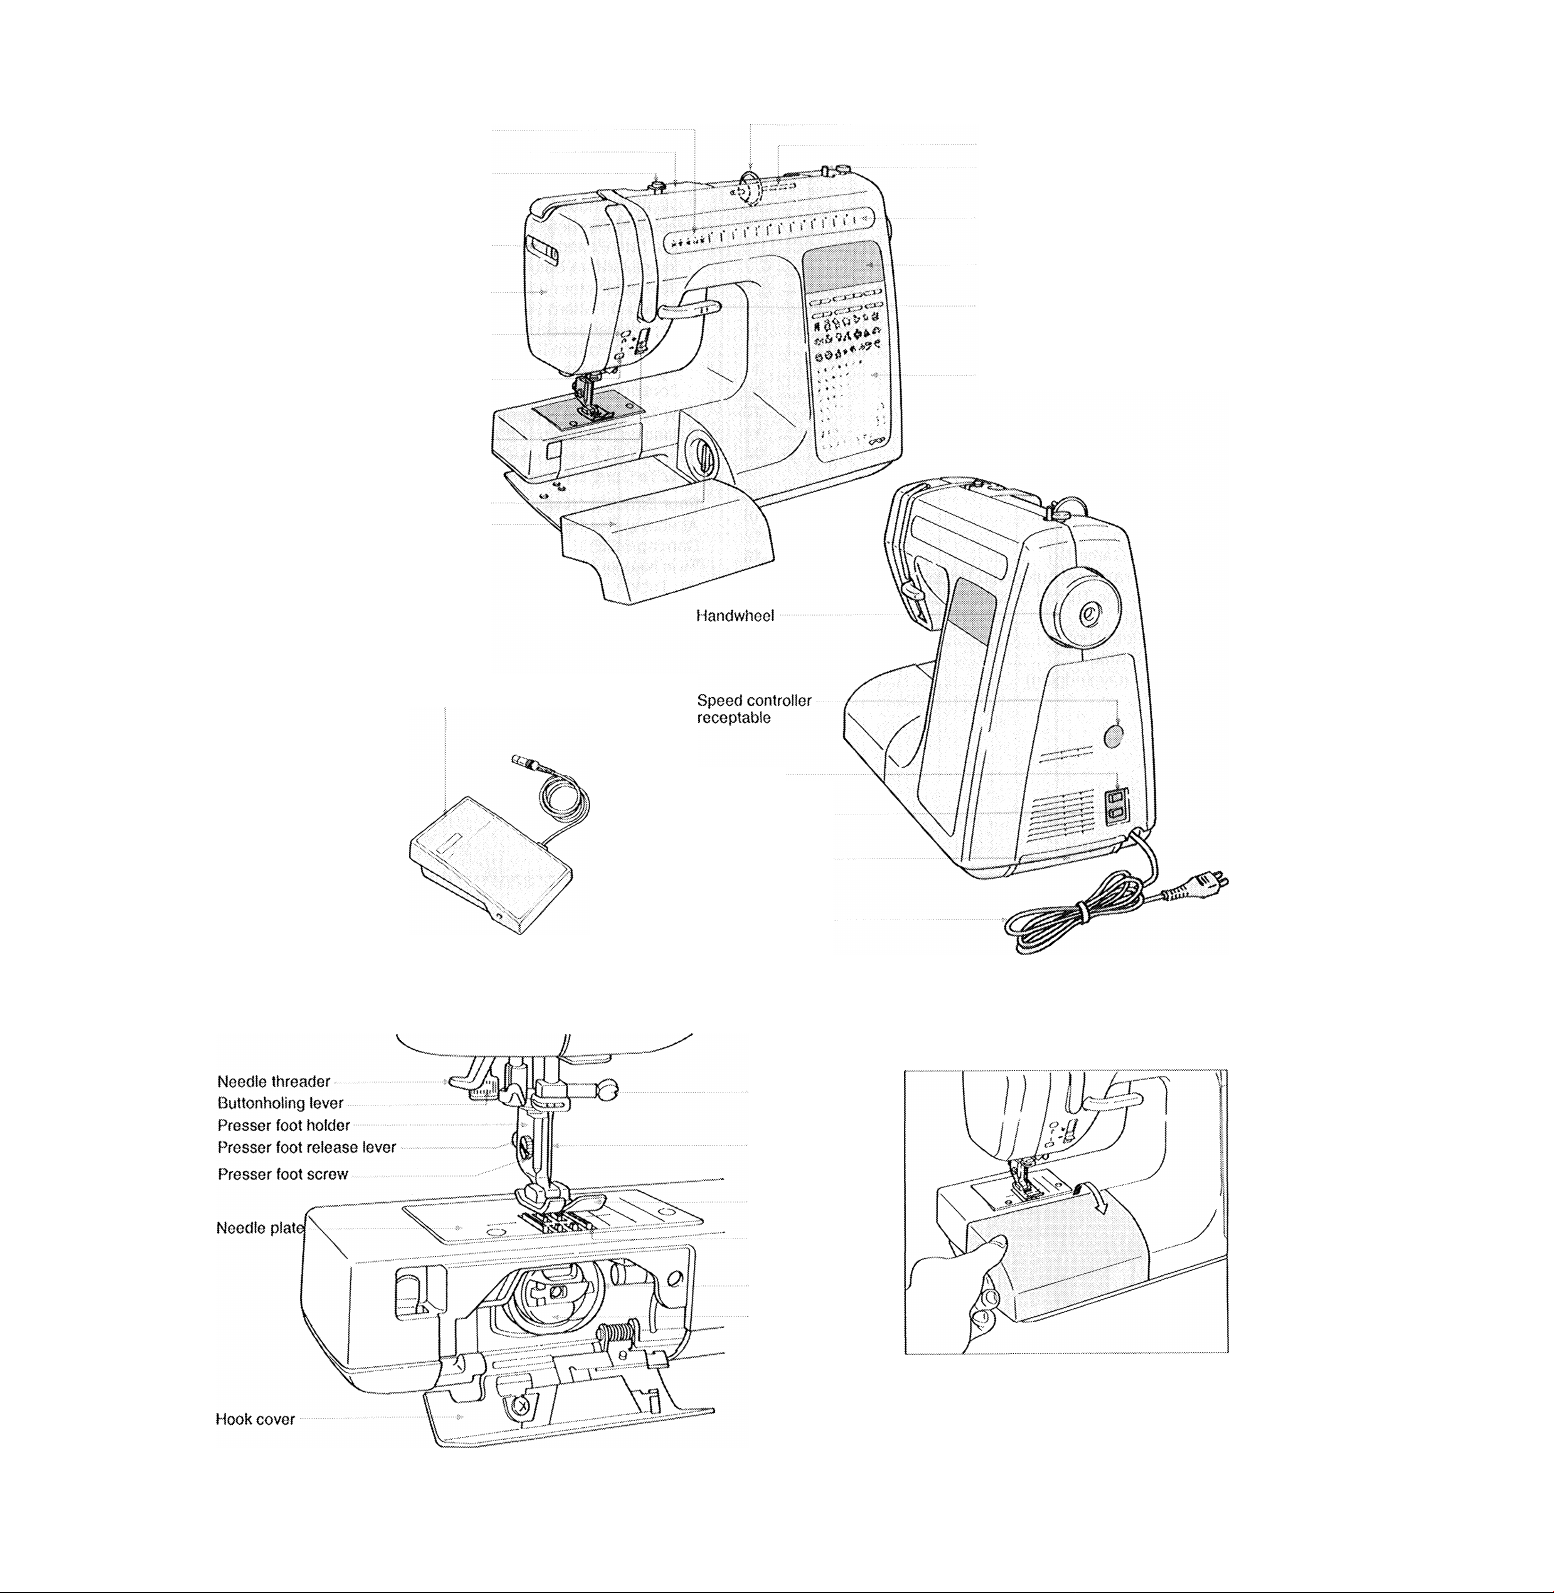
Principal Parts
Indicator lights
Thread sensor guide
Bobbin winder thread guide
Pressor foot adjusting lever
Face plate cover
Reverse stitch button
Start/stop button
(When speed controller Is not used.)
Sewing speed setting lever
(When speed controller is not used.)
Stitch balance control
Auxiliary bed
Thread spool cap
Spool pin
Bobbin winder
Instant pattern button
Liquid crystal display
Presser foot lifter/thread cutter lever
Pattern display panel
Speed controller
Light switch
Power switch
Accessory box
Electric power cord
Converting the machine to free-arm
Needle clamp
Needle
Presser foot
Feed dog
Hook
Bobbin case
Lift the auxiliary bed, pull it toward you.
and pull it down.
Page 5
Major Functions
Indicator lights:
One or more of those will light up to indicate
cause of problem.
F^attern (Number) selector buttons:
Use this button to select a desired pattern. I he
left button is for the tens digit of the patterns.
The figtit button is for the units digit of the
patterns.
Presser foot symbol
These buttons are for selecting the
functions for pattern stitching;
Iteducing the siito of patterns, to reverse
patterns, to memorize patterns selected, to
clear the patterns memorized, and to repeat
stitct) patterns.
Instant pattern buttons:
When you press the desired stitch pattern button
the light beside the pattern will come on to indicate
your selection.
<
Í
<
Liquid crystal display:
When you press the button below, the following information can be
monitored on the liquid crystal display: (1) Mark symbolizing the size of
patterns, (2) f teduced size, (3) Reverse pattern, (4) Pattern repeat, (5)
Memory, (6) Stitch length, (7) Indication of thread tension by MANUAL
override or AUTOMATIC.
. ■?
. i
B
a:
K]
;u.
Tí'’
1 C ) ■
3
X •M
31 iz
Y iW; Ixí
t\
T7 'a'’
a"
► Ï W I
<> T ( ^ 1
I, :
..
LMKJ C 'il..Tí:..
■ iî
l
í • ;
'ív
a
;;./
í< ■
.o]
'Û
« ’ 55
. \
./
17
n '
•'■■15
PiXLH!
ly.
0
'2S'
u
n
’Ni
XT
P:.
iVj
a
Xt '
.Q\
â.
a/
i-i iy
T'
n î-î '>7 i'i 5î
n
\zí XT
a
O
' îi
n ■
n] ■XI
X
'tï
Í ,í.
11
15
n
\u\
H iî'
'u ■f5‘
a
n
[d]
n
rr]
■ , :
55'
Indicator light
Pressor foot symbol
Stitch length override buttons:
fTessing increases the upper thread tension,
and pressing decreases it.
Thread tension override buttons:
Pressing ^ increases the stitch length, and
pressing sx decreases it.
Pattern panel
Patterns on A or B sl|fe will appear in
openings of panel/ ^
Presser foot lifter/threac) cutting lever
Pressor foot
goes up.
/ / Y
/ /\ \
Presser foot
/ / \
comes down.
I Thread
cutting
When you push the lever up,
the presser foot goes up,
when you push it down, both
threads are cut and the
needle will automatically go to
its highest position.
'n'
n
fi"
é-:
i
íí
íí 51
;>;
V:
a
ÎÎ
T
i "'i
53 U
Reverse stitch button
The reverse stitch is engaged
only while you continue to
press the button.
XT
/5'
XT Xi'
'75'
U
a
'a'
J.
55
35
j>'
X.t"
.KK
XT
« a
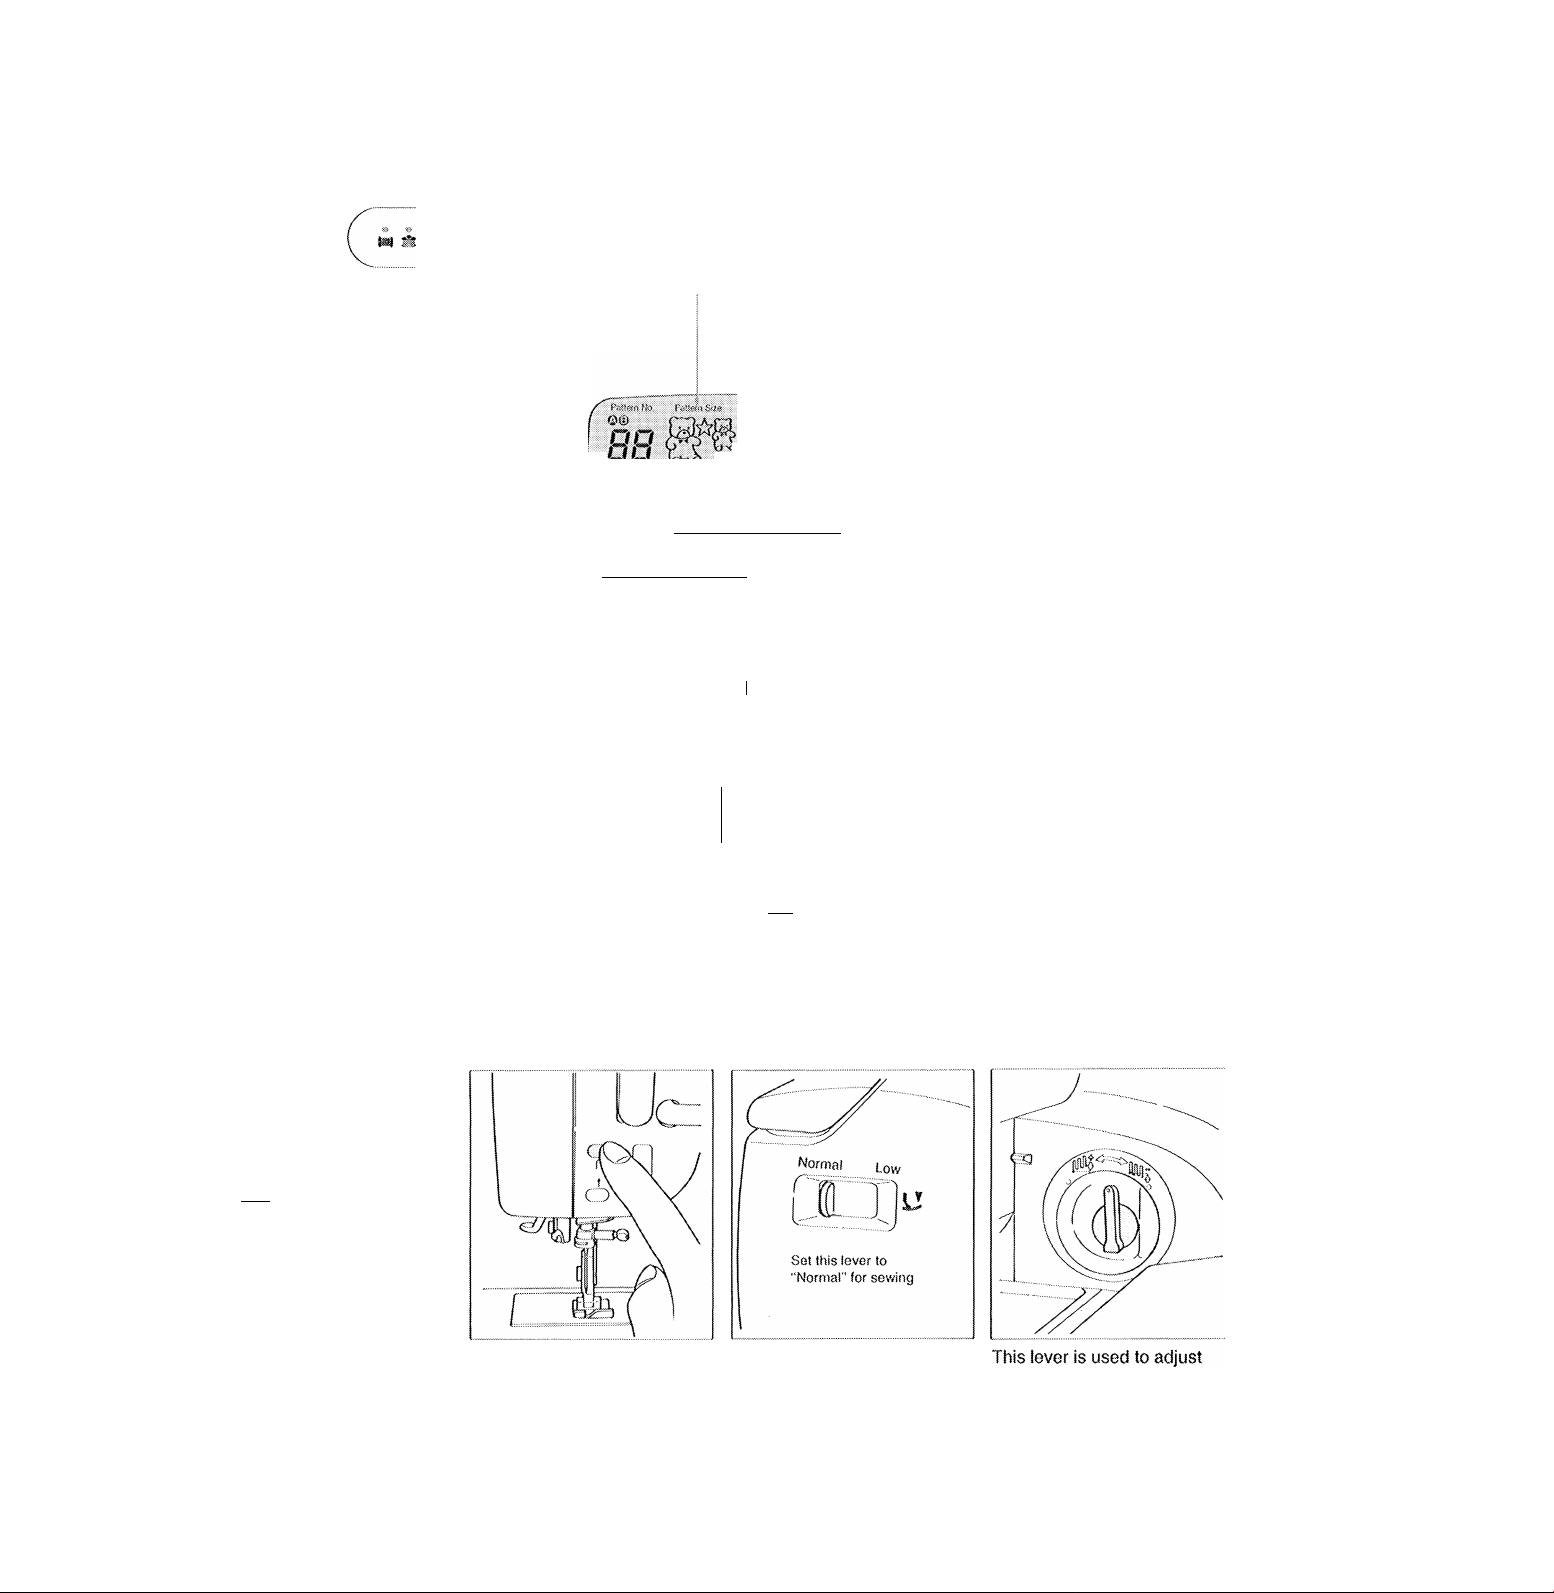
Presser foot pressure
This lever is used to adjust
the pressure of the presser
according to the type and
thickness of the material.
A, B side selection lever:
o When you shift the lever to the left, patterns
on A side will appear.
o When you shift the tever to the right, patterns
on B side will appear.
Stitch balance control
the shape of patterns. (Please
see page 30 and 31.)
Page 6
Important Safeguards
Disconnect the powerltne plug from the electrical outlet when changing needles, feet, or needle plates, or when leaving
machine unattended. This eliminates the possibility of starting the machine by accidentaliy pressing the speed controller.
Before removing the bobbin case, disconnect the powerline plug from the electrical outlet.
2,
Because of the up and down movement of the needle, work carefully and watch the sewing area when operating the
3.
machine.
Do not pull the fabric while stitching as this may deflect the needle, causing it to break.
4.
Before cleaning the machine, disconnect the powerlino plug from the electrical outlet.
5.
Do not attempt to adjust the motor belt. Contact the nearest service center or an authorized dealer should any adjustment be
6.
required.
Before changing the light bulb, make sure the poweriine plug is disconnected from the electrical outlet. Be sure to replace the
face plate which covers the light bulb before operating the machine.
This machine is designed to use a 5 watt maximum light bulb only.
8.
This machine is double insulated. When servicing product, use only identical replacement parts.
9.
This product is suppressed for radio and television interference with the International Electro-technical Commission requirements
of the CISPR.
Be sure to turn the power switch OFF before
replacing the sewing machine needle, or lubricating
the machine.
Do not use thinner or other similar solvents to clean the machine.
When not In use, be sure to turn the power switch OFF and unplug the machine.
Do not expose the machine to direct sunlight or humid atmosphere.
This sewing machine uses a micro computer and precision electronic circuits consisting of semiconductor components, so
please observe the following precautions;
• Keep the room temperature at 40T to 100T, If the temperature of the room where the machine is used is too low, the
machine may present problems such as failure to reach its normal sewing speed.
• The motor used in this sewing machine is eiectronically controlled. When the machine is operated for an extended period of
time at tow speed, the safety device will automatically turn the machine OFF preventing the motor from overheating. If the
motor should stop while sewing, turn the power switch OFF, and wait about 20 minutes. This will reset the safety device.
Page 7
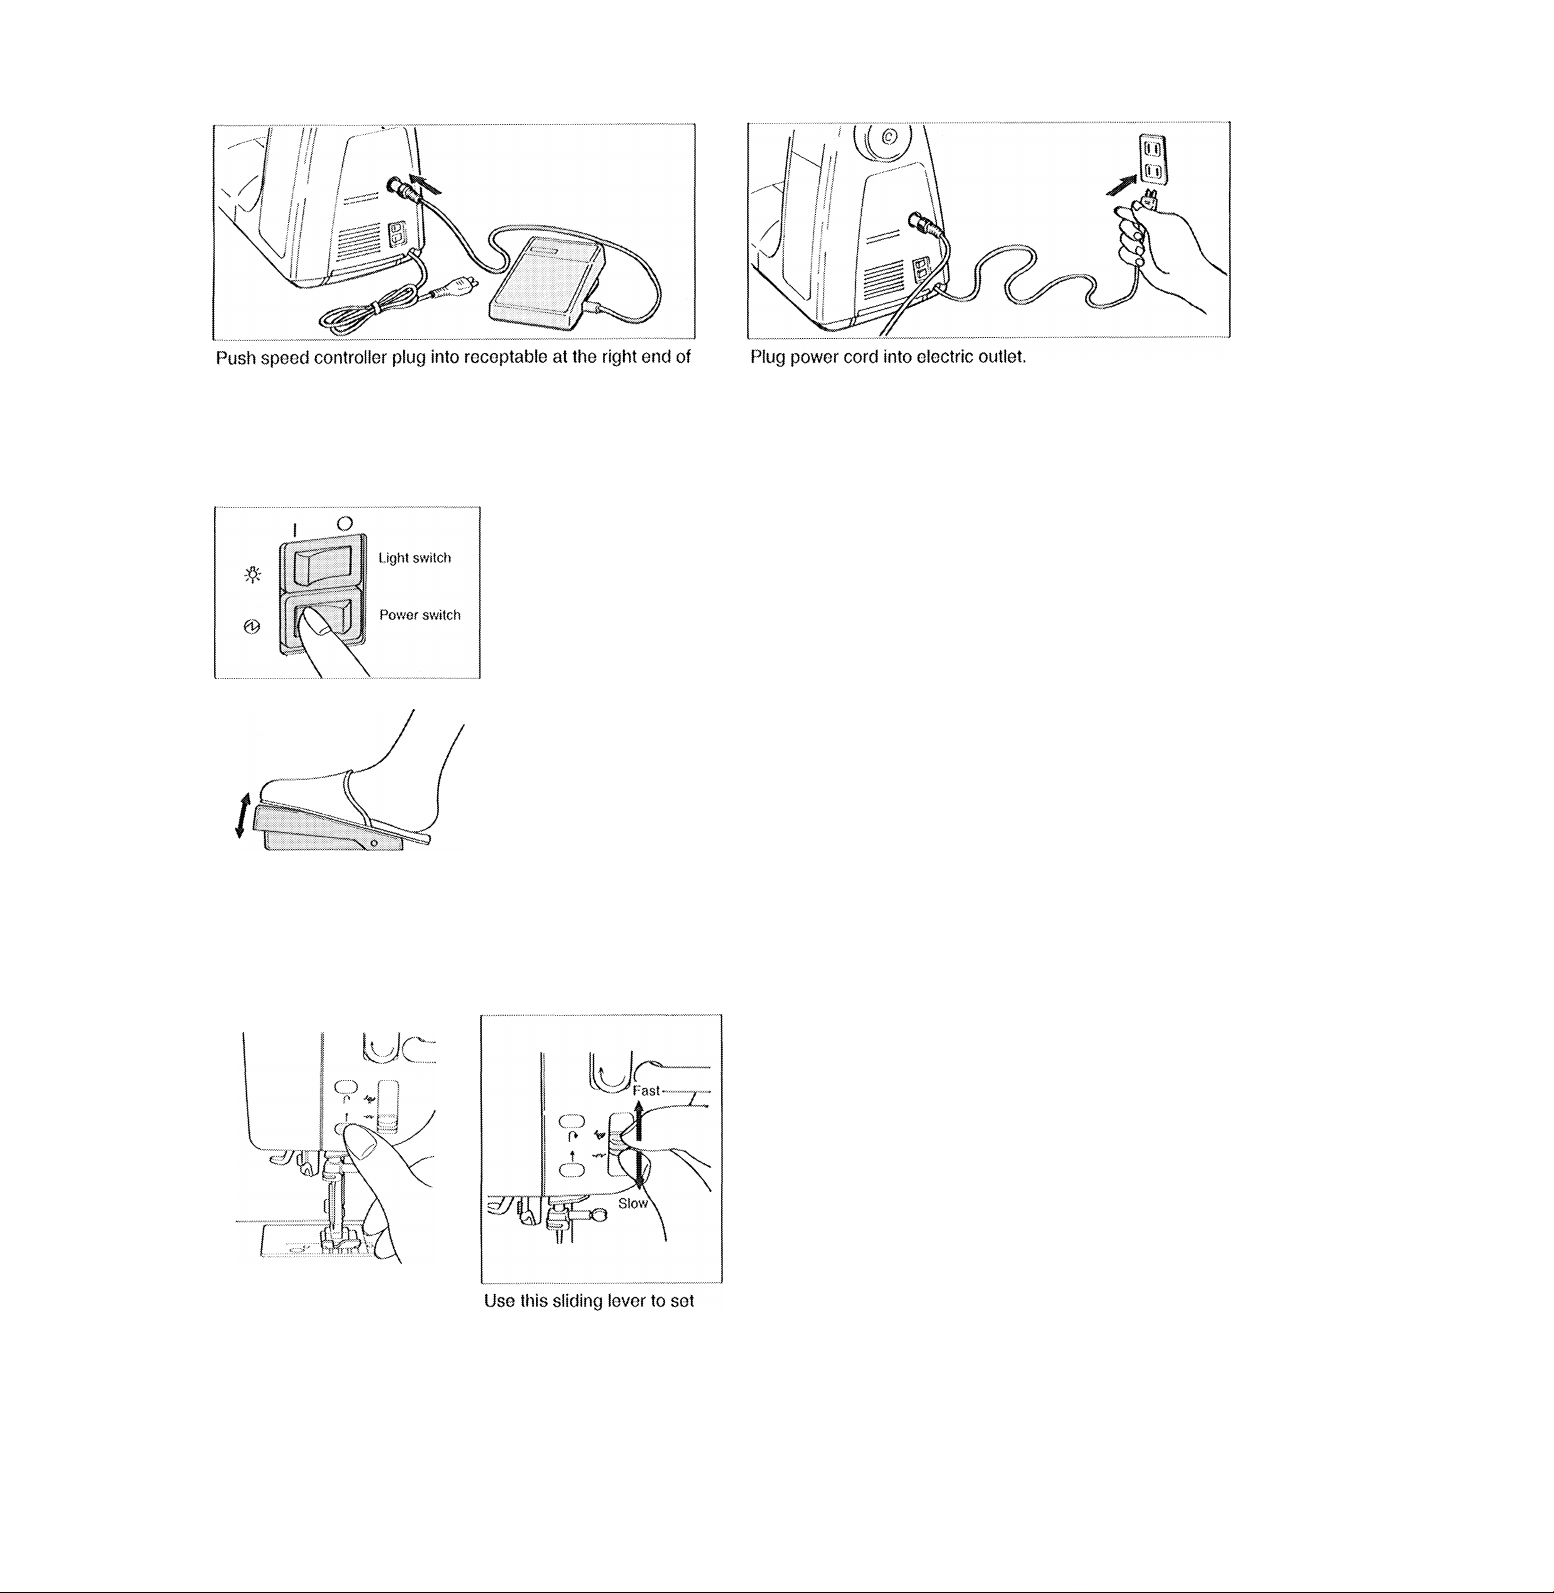
Connecting The Machine
the machine.
Running The Machine
Power/Hght switch
■■ When the “1" side of the power switch is pressed the machine will be turned on.
- When the “O” side of the power switch is pressed the machine will be turned off.
Note: The power switch must be on before the light switch will operate.
To run the machine depress the foot-operated speed controller. The harder you press,
the faster the machine will sew.
To stop the machine, remove your foot from the controller.
Running the machine without foot control
The foot control must be unplugged for the starf/stop switch and sewing speed setting lever to operate as described.
Start/stop switch Sewing speed setting lever
One press on the switch
starts the sewing machine,
and another press on the
switch stops the sewing
machine.
the desired sewing speed.
Note: #1. When the foot control is plugged in, the start/stop switch can only be used to stop the machine.
#2. When the foot control is plugged in, the sewing speed setting lever will not operate.
Page 8
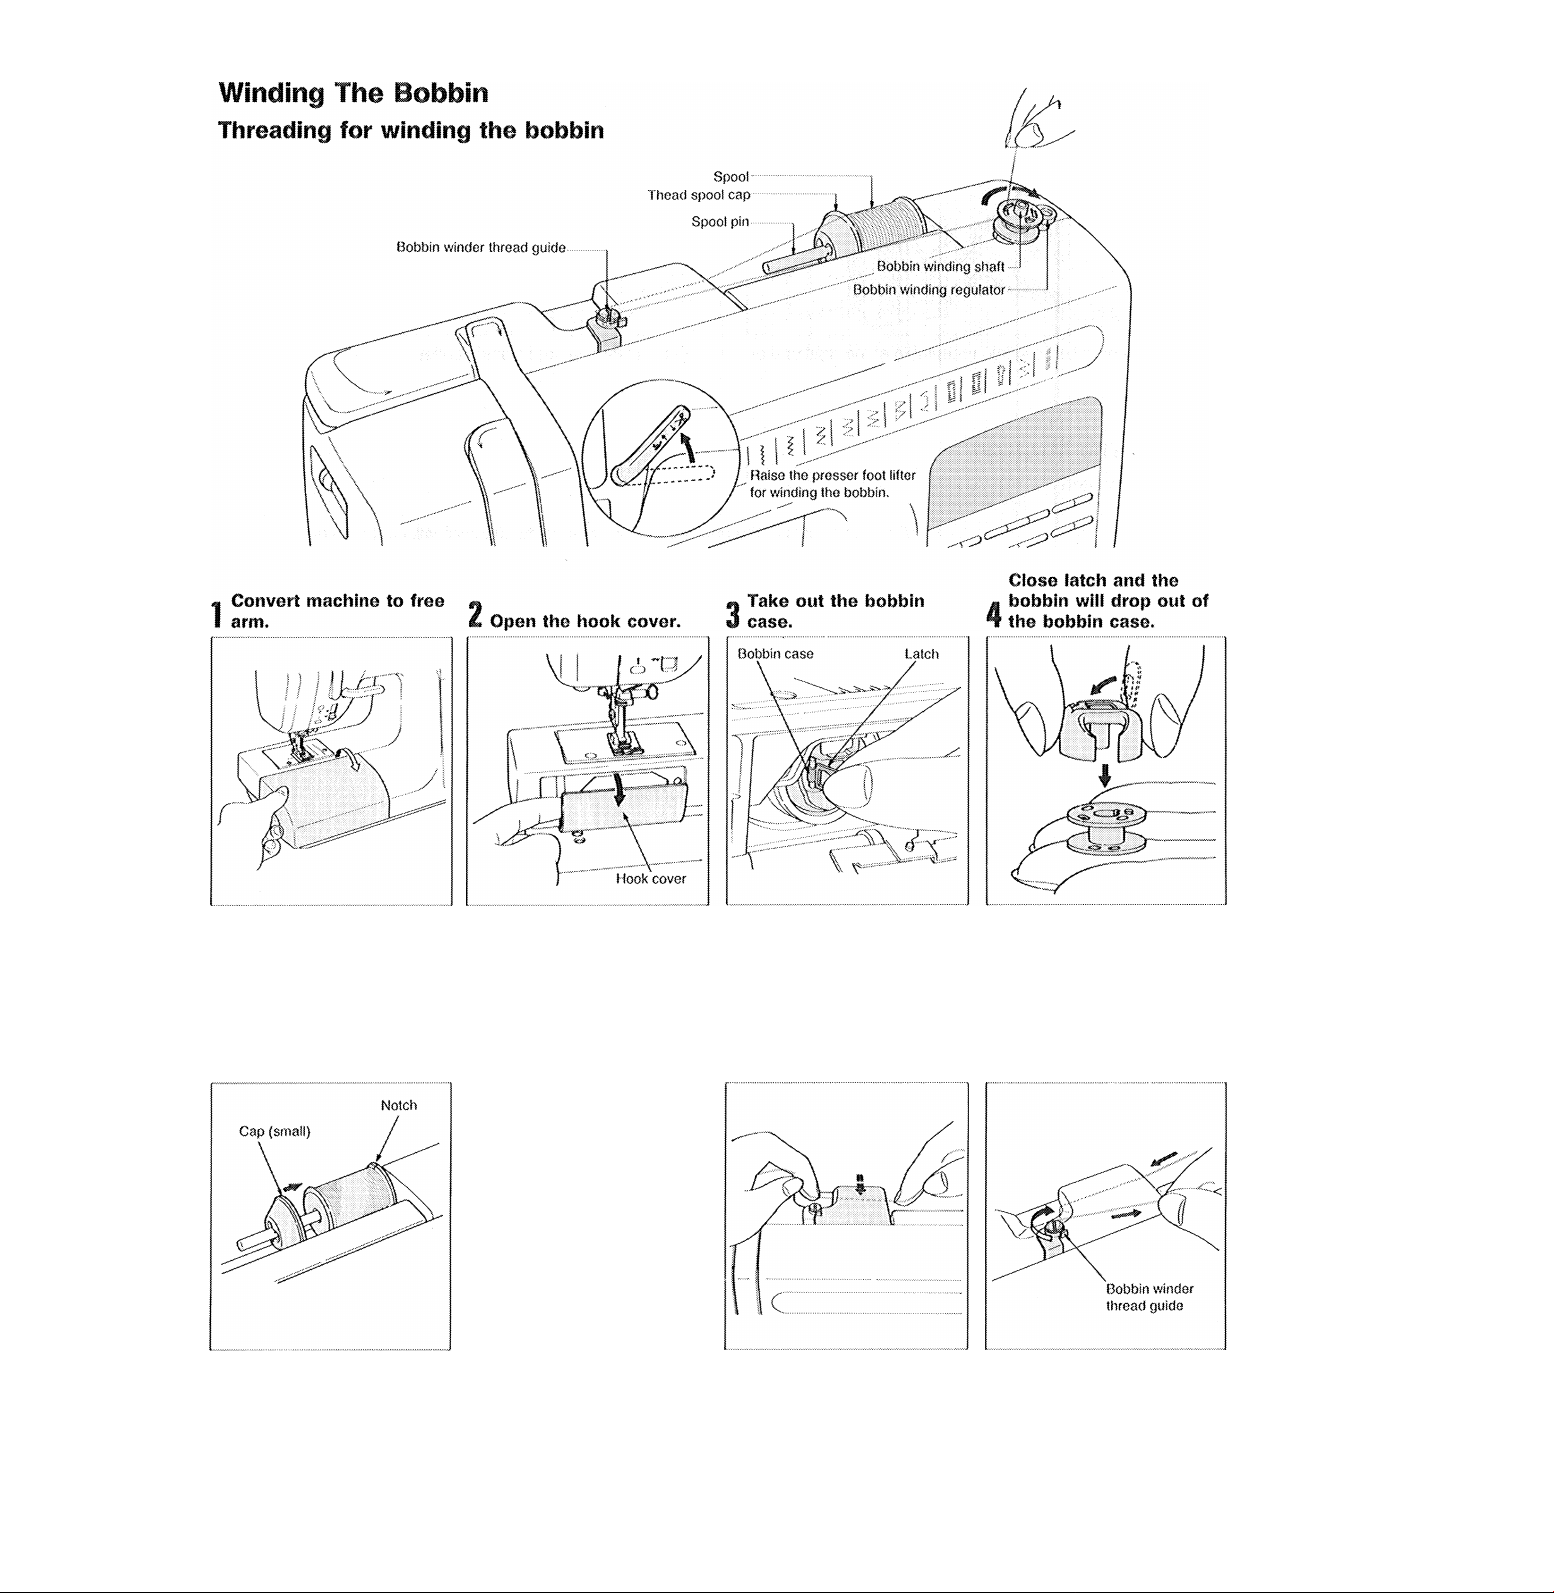
(1) Bo sure that the needle is up.
(2) Open the latch of the
bobbin case, and remove.
Piace the spool onto
5
the spool pin.
(1) Be sure that the notch on
the spool is on the right
side.
(2) Use the cap to hold the
spool in place.
(3) Refer to the following
instructions for the proper
use of the large and small
thread spool cap.
Puli the thread into the
groove of the thread
sensor guide.
Hook the thread onto
the bobbin winder
thread guide.
Page 9
Thread spool cap (small) spool
i
c.
Thread spool cap (large)
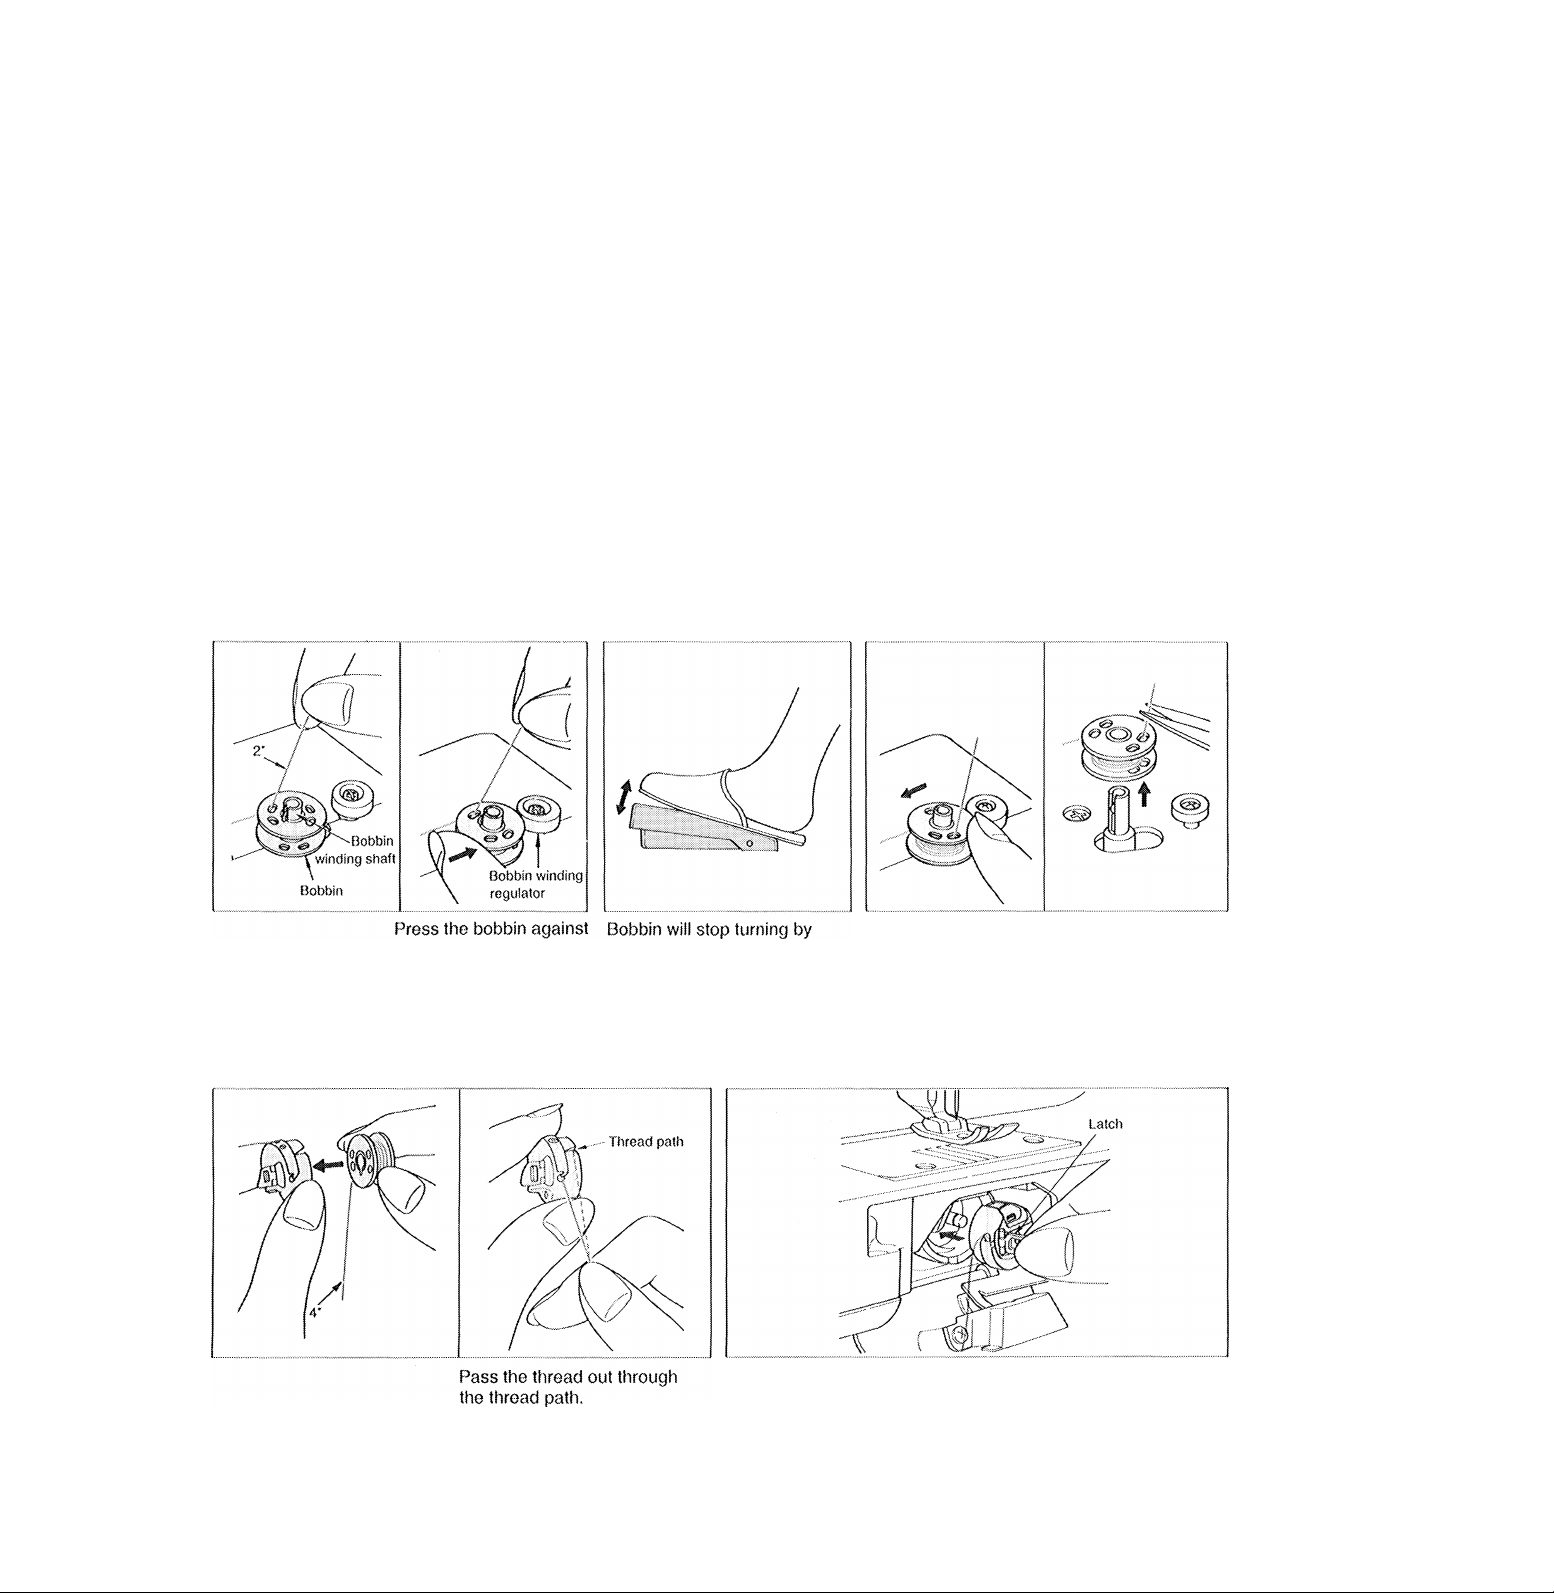
Place the bobbin on the bobbin
8
winding shaft.
targe spool
I
Use the smait cap for
a small spool, anci the
large cap for a large
spool.
Depress speed controller
9
to wind bobbin.
Tension screw ^ l^fdad path
Thread tension spring
The bobbin case furnished with the
machine is factory-adjusted to provide
the proper thread tension, so do not
tamper with the tension screw.
10
'
....
Push the bobbin back to the left.
the winding regulator. itself when full.
Place the bobbin in bobbin case.
11
Cut the thread and take
the bobbin off the shaft.
Replace the bobbin case into machine.
12
(1) Fully open the latch, and securely fit the bobbin case into
the hook.
(2) Snap the latch closed on the bobbin case.
(3) Close the hook cover.
Page 10
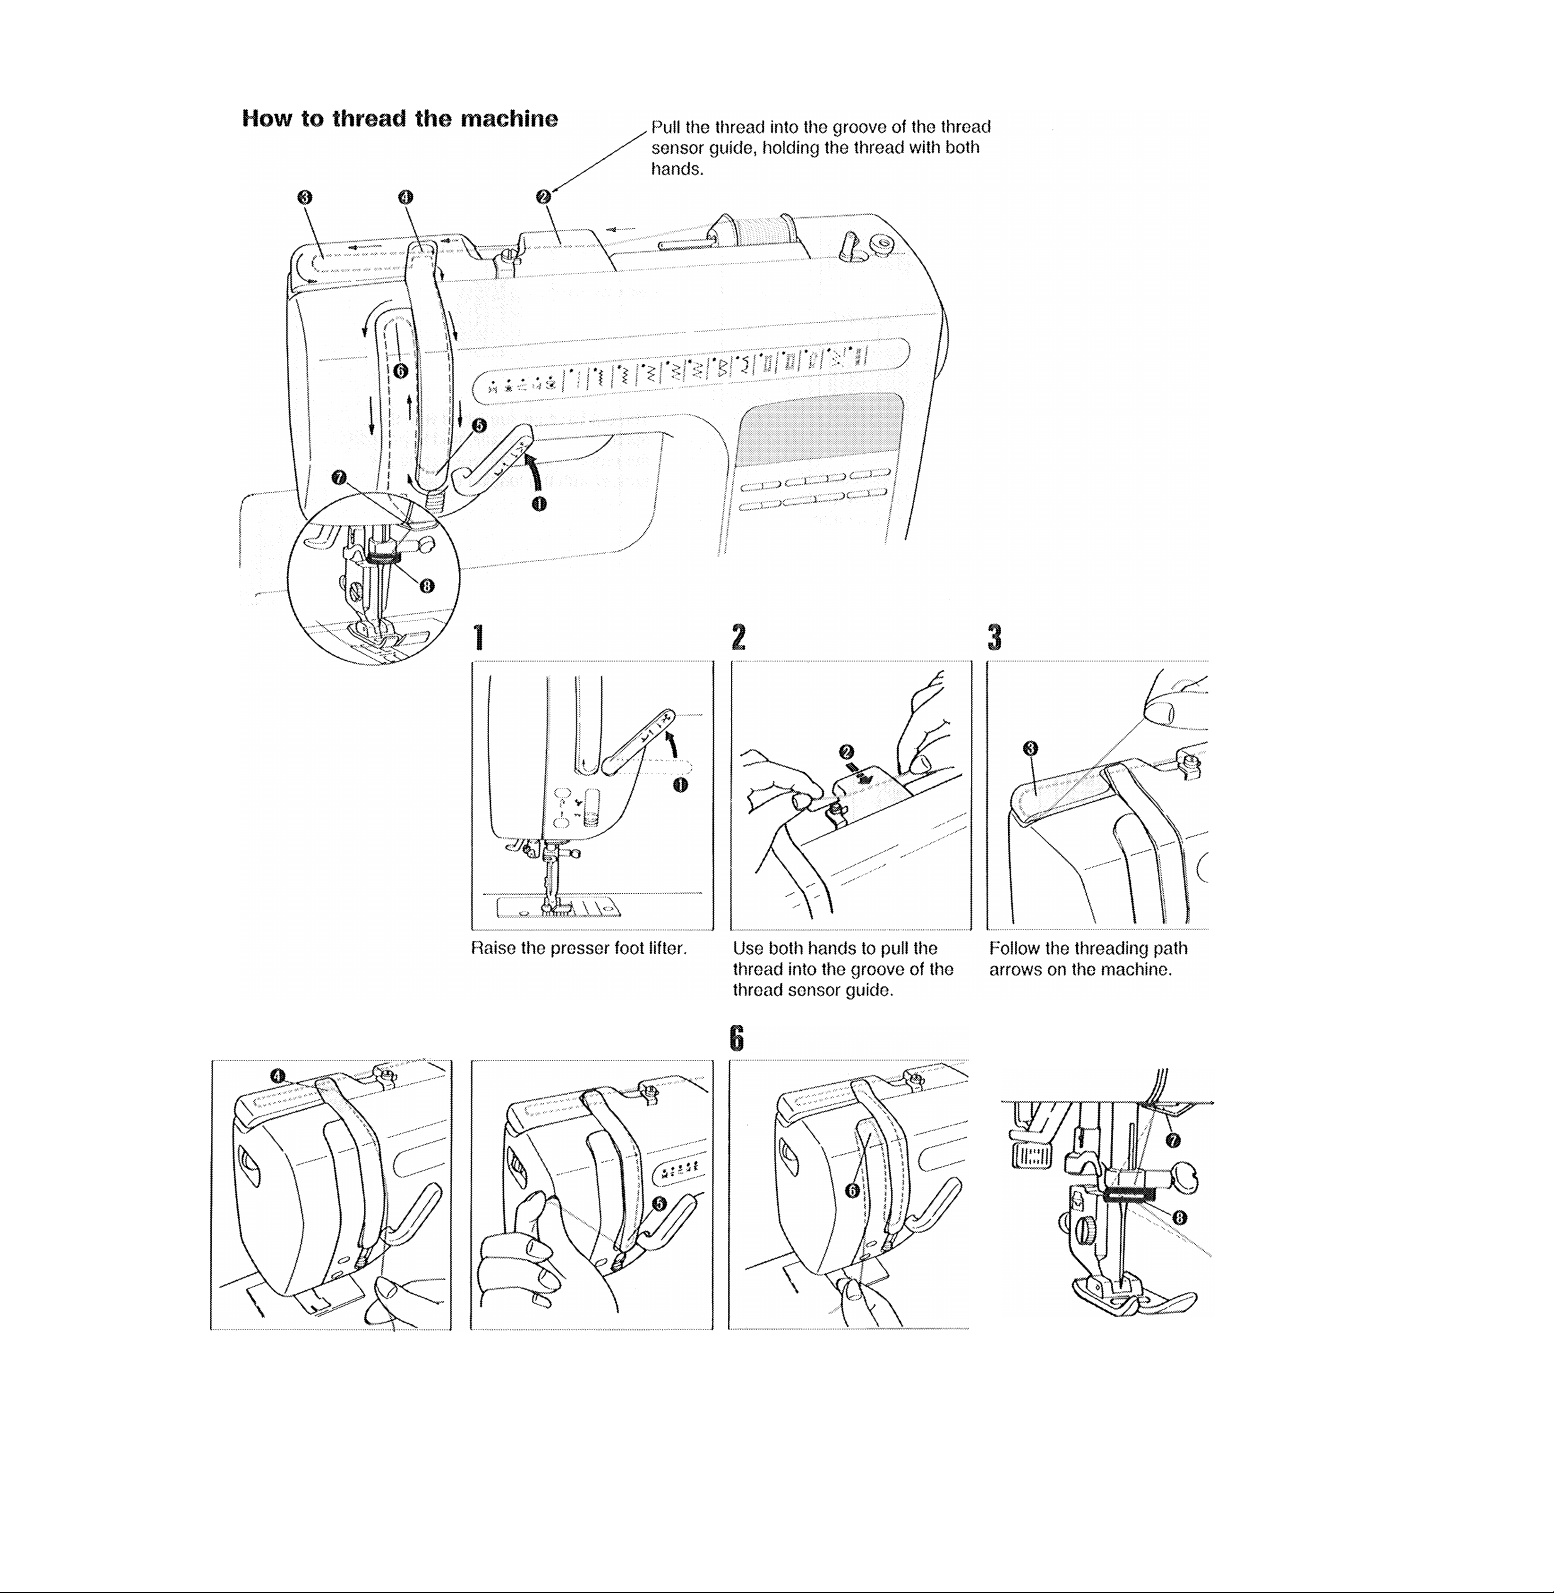
Threading The Machine
Pass the thread down from
e
8
Hook the thread onto ®
before routing the thread
upward.
1
Turn the handwheel to move Hook the thread in © and @
the needle to its highest from the left,
position before passing the
thread over ®.
Page 11
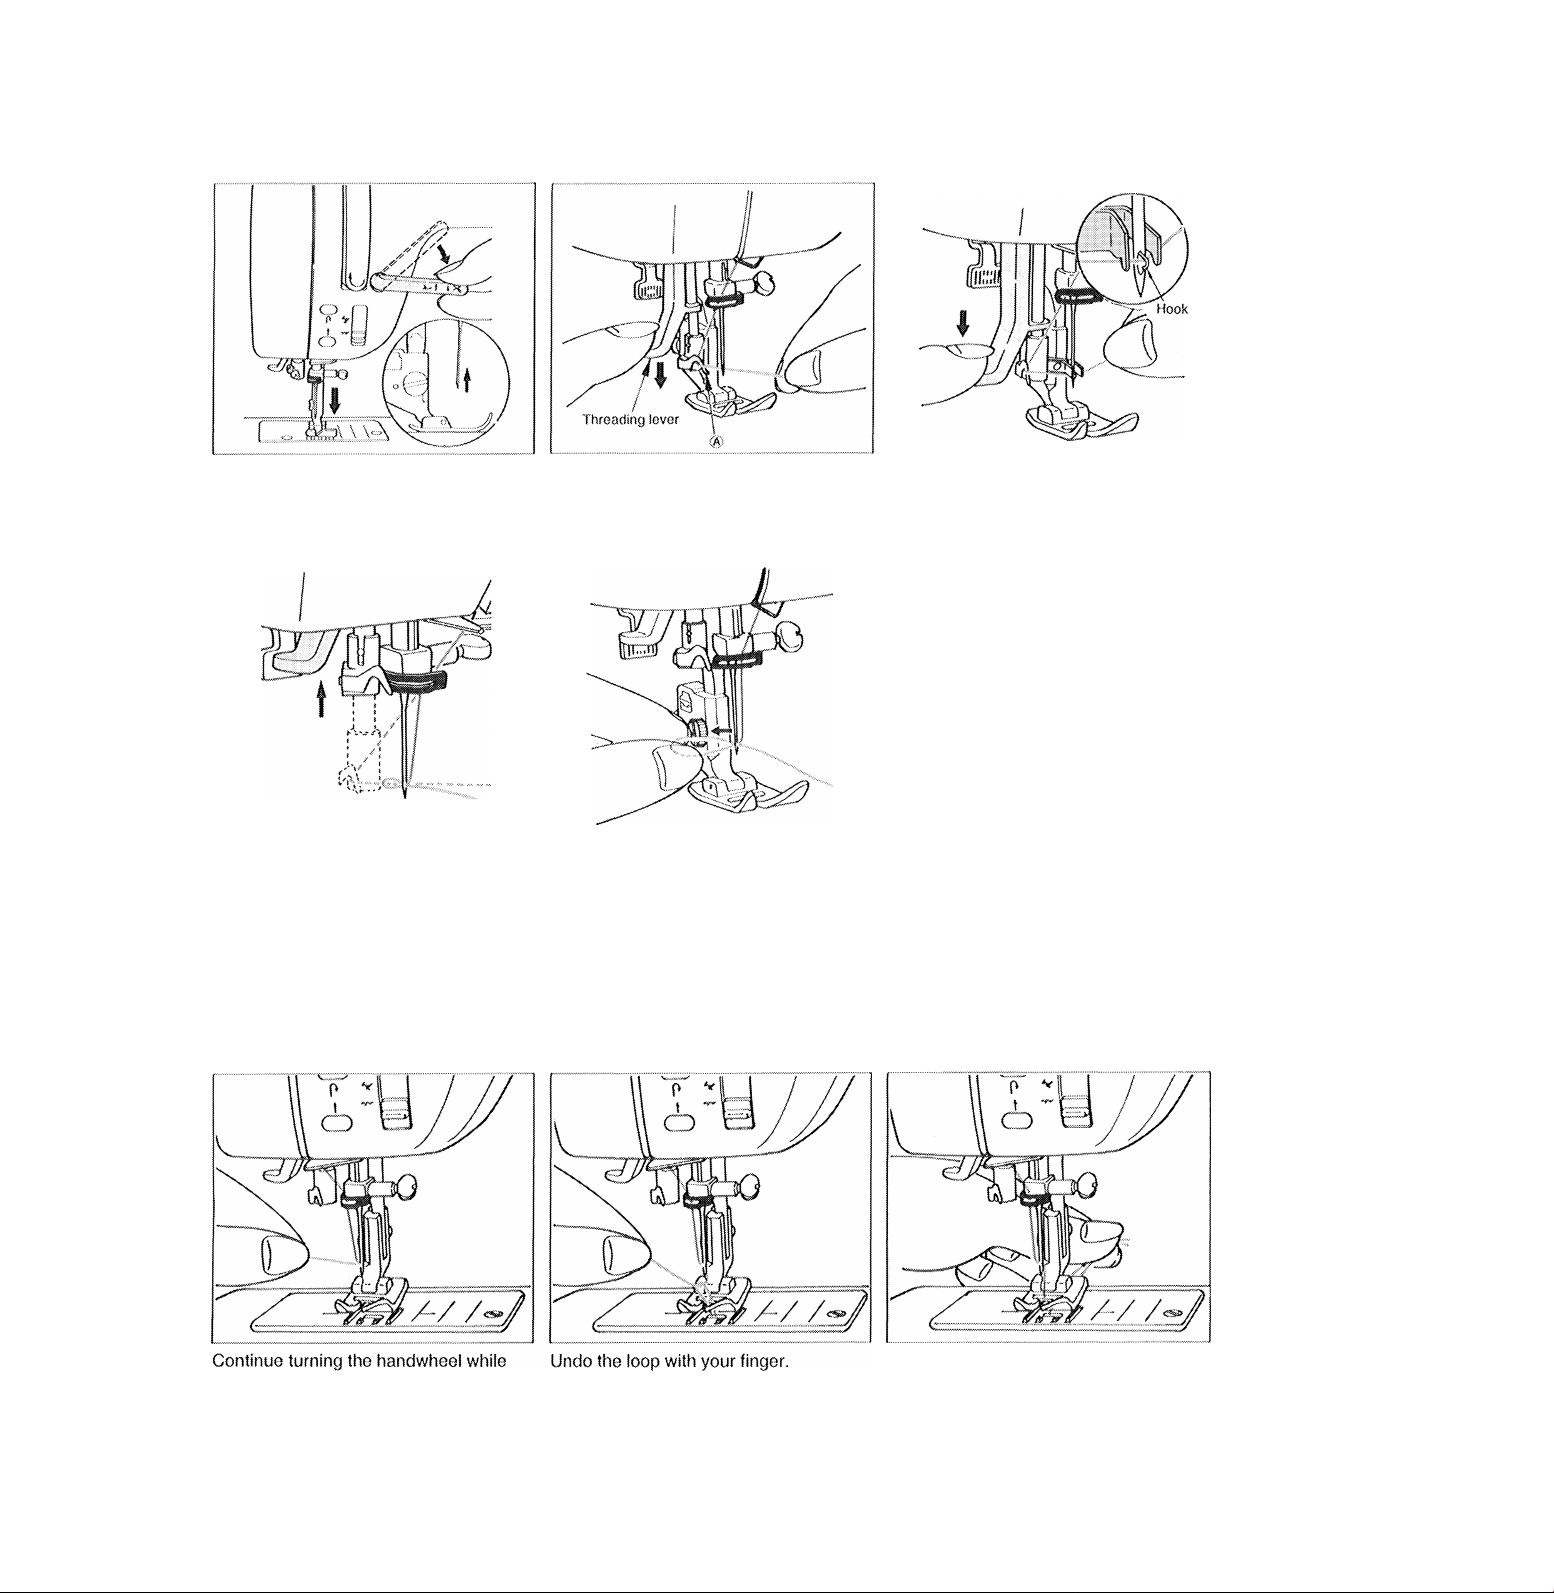
Automatic Needle Threading
Lower the presser foot lifter.
Push the threading lever down.
Push the threading lever all the
way down and a hook will go
10
through the eye of the needle.
The needle should be in the highest
position.
n
Release the needle threader and it will Pull the loop of thread that is at the
return to its original position back of the needle out about 4".
Lower the threading lever and hook the Pass the thread in front of the needle
thread onto (a). and below the hook.
12
Pulling Up Th© Bobbin Thread
Hold the needle thread lightly
with the left hand and turn the
handwheel toward you until
« m the needle enters the needle
IJ plate.
Drop the bobbin thread and
tighten the hold on the needle
»m thread until the bobbin thread
Is pulled up.
Caution:
1. Do not lower the threading lever
while the sewing machine is in
operation.
2. The automatic needle threader will
not work on twin needles.
Pull both needle and bobbin
threads out about 4" and pass
• I. them under the pressor foot to
13 the back of the machine.
holding the needle thread until the
needie rises.
Page 12
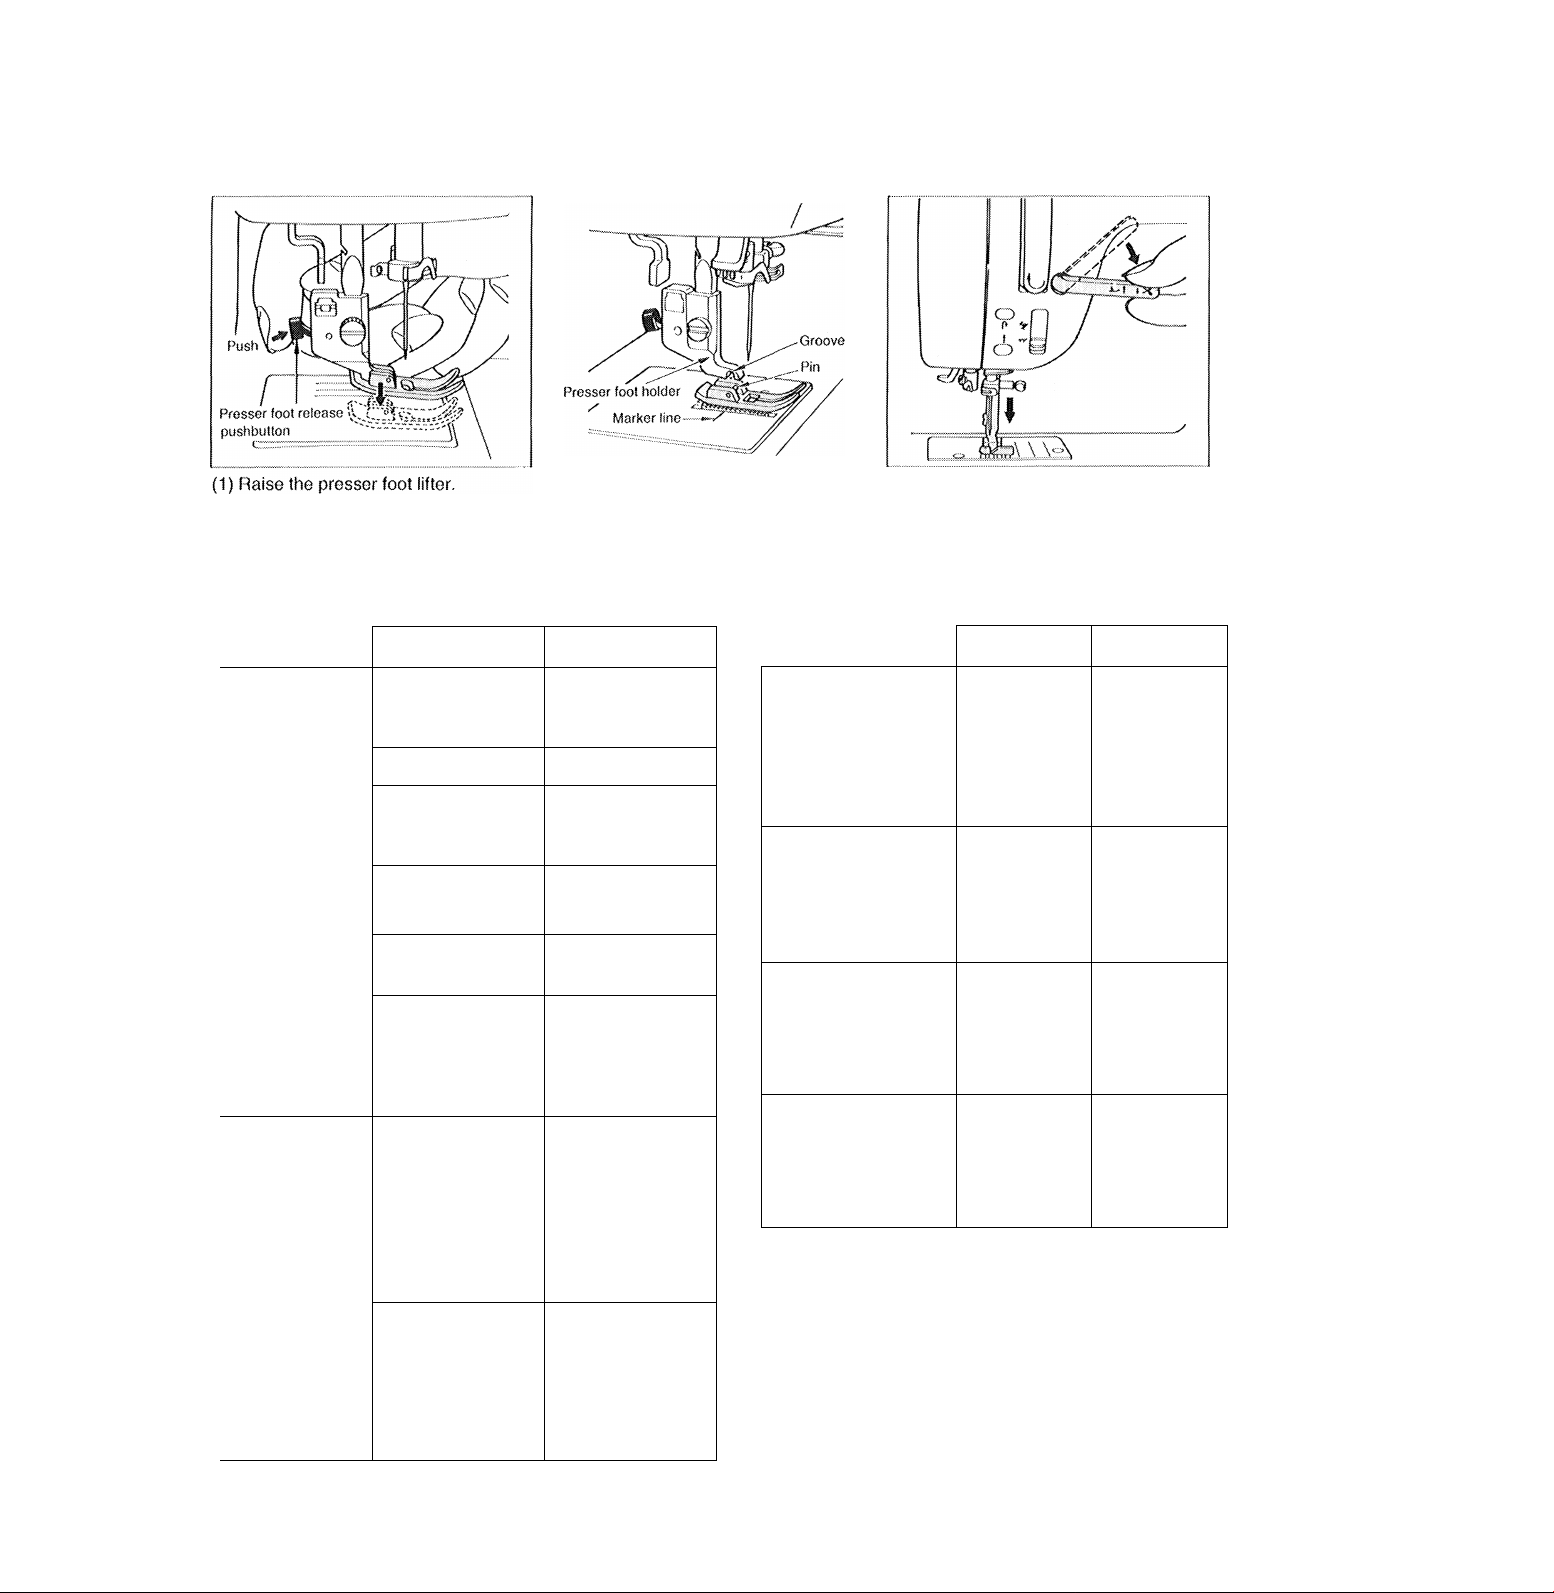
Changing The Presser Feet
Align the presser foot pin with
1 Remove the presser foot.
2
the marker line.
(2) Push the presser foot release push
button in the direction of the arrow.
Types Of Feet And Their Application
Standard presser foot
A
Typical
applications
Straight stitch
Quilting
Pintuck
Stretch
reinforcing stitch
Zigzag stitch
Applique
Quilting
Overcasting
3~step zigzag stitch
(elastic stitch)
Overcasting, etc.
Pattern stitch,
patchwork, etc.
Stitch pattern
!
*
H
Mill
Patterns on A side
1
93 97
Move the presser foot lifter
down to the horizontal position
and the new foot will snap on.
3
(When the presser foot lifting lever is set
in the horizontal position, the presser
foot is lowered.)
Zipper foot
B
Overcasting
c
Biindstitch presser foot
D
Buttonhole foot
Typical
applications
Setting zipper
Overcasting
(Overlocking)
Biindstitch
Stitrfi pattern
1
Stitcti width 5
Decorative stitch fool
T
10
Large size pattern figure
stitch
Large size alphabetical
stitcti
Large size continuous
pattern stitch
Standard pattern stitch
Patterns on A side
No. 00-19
Patterns on A side
No. 47-75
76-79
86-89
Patterns Ofi A side
No. 20-47
80-86
90-97
Patterns on B side
No. 20-79
82-97
Automatic
buttonlwling
If ü Û
vS M U
E
Page 13
stitch Length Of Each Stitch Pattern
The machine’s stitch patterns have been preset to an optimum length,
can be changed to suit your needs.
By using the manual override buttons the pattern length
Stitch pattern
\
%
\
\
1
1
1 1 fl
3
i ^
Patterns on A side
) I ^ >
80 81 U 83
Patterns on B side
Stitch length
Programmed
3 n
CXJ
in
in
IS
¡5
nn
Bartackod Eyelet
03
0.5
nn
in
0.S nn
Manual override
nn - on
on - on
nn - on
nn - on
nn - on
nn - on
on - in
nn - on
on
--
on
-
on
* The two lines (-----------) indicate that the
pattern cannot be altered using the stitch
length button.
nn
ao 81
i^atte rn f Igu re s 00--19
Patterns on A side ^4,9-^
Patterns on B side 02->97
20-79
20-79
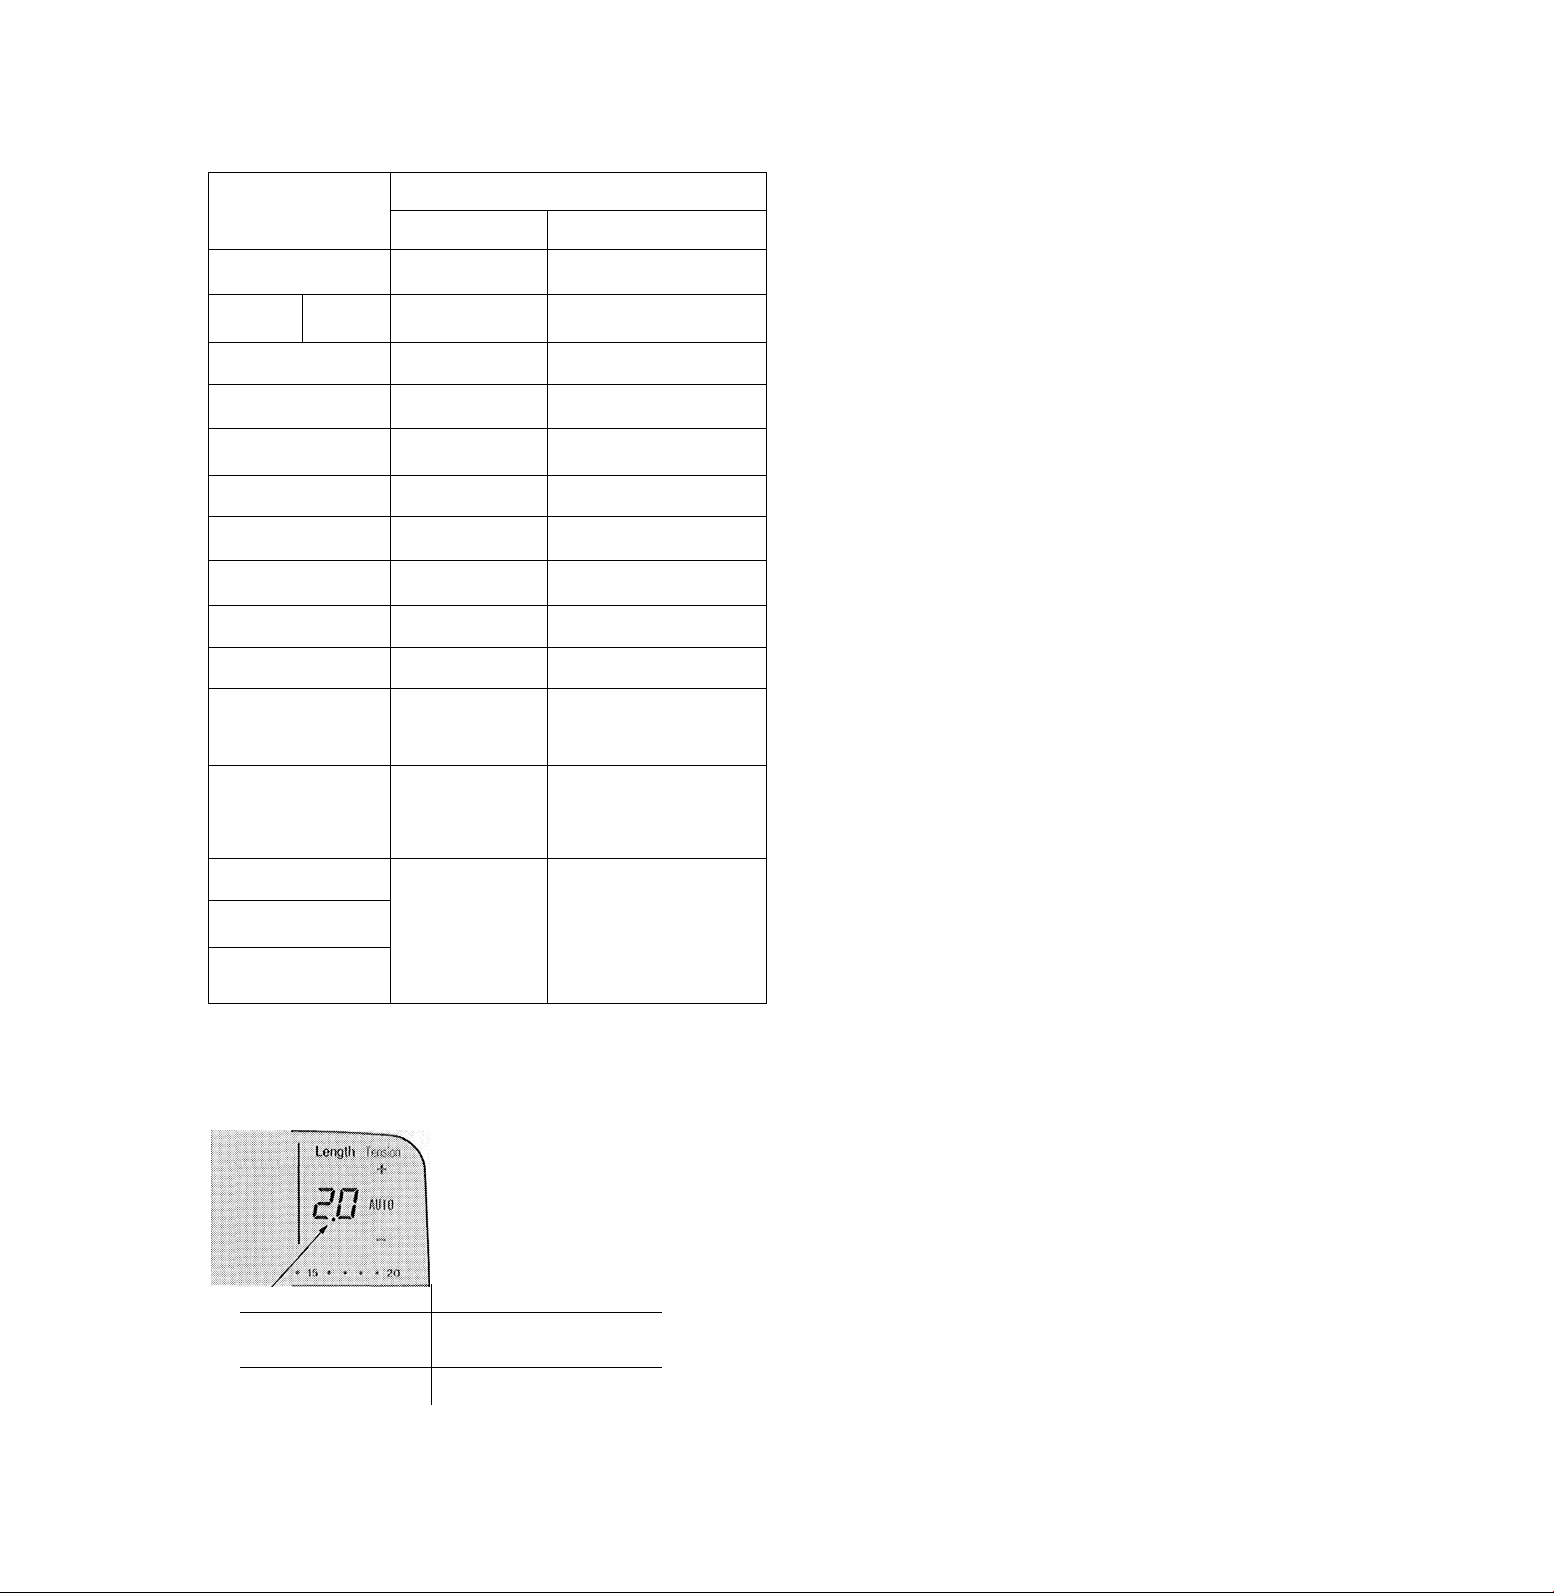
How To Adjust The Stitch Length
Digital display
..
'^'1
■jf
How to use the stitch length manual override buttons
Manual override range
nn un f 0.0, 0.2. 0.3. 0.4, 0.5, 0.6, 0.7, 0.8, 0.9,1.0,1.'
U.U --- 'T.u ^t.5^2.0, 2.5,3.0,3.5, 4.0
on - on
Press this button to increase the stitch length.
Press this button to decrease the stitch length.
11
Page 14
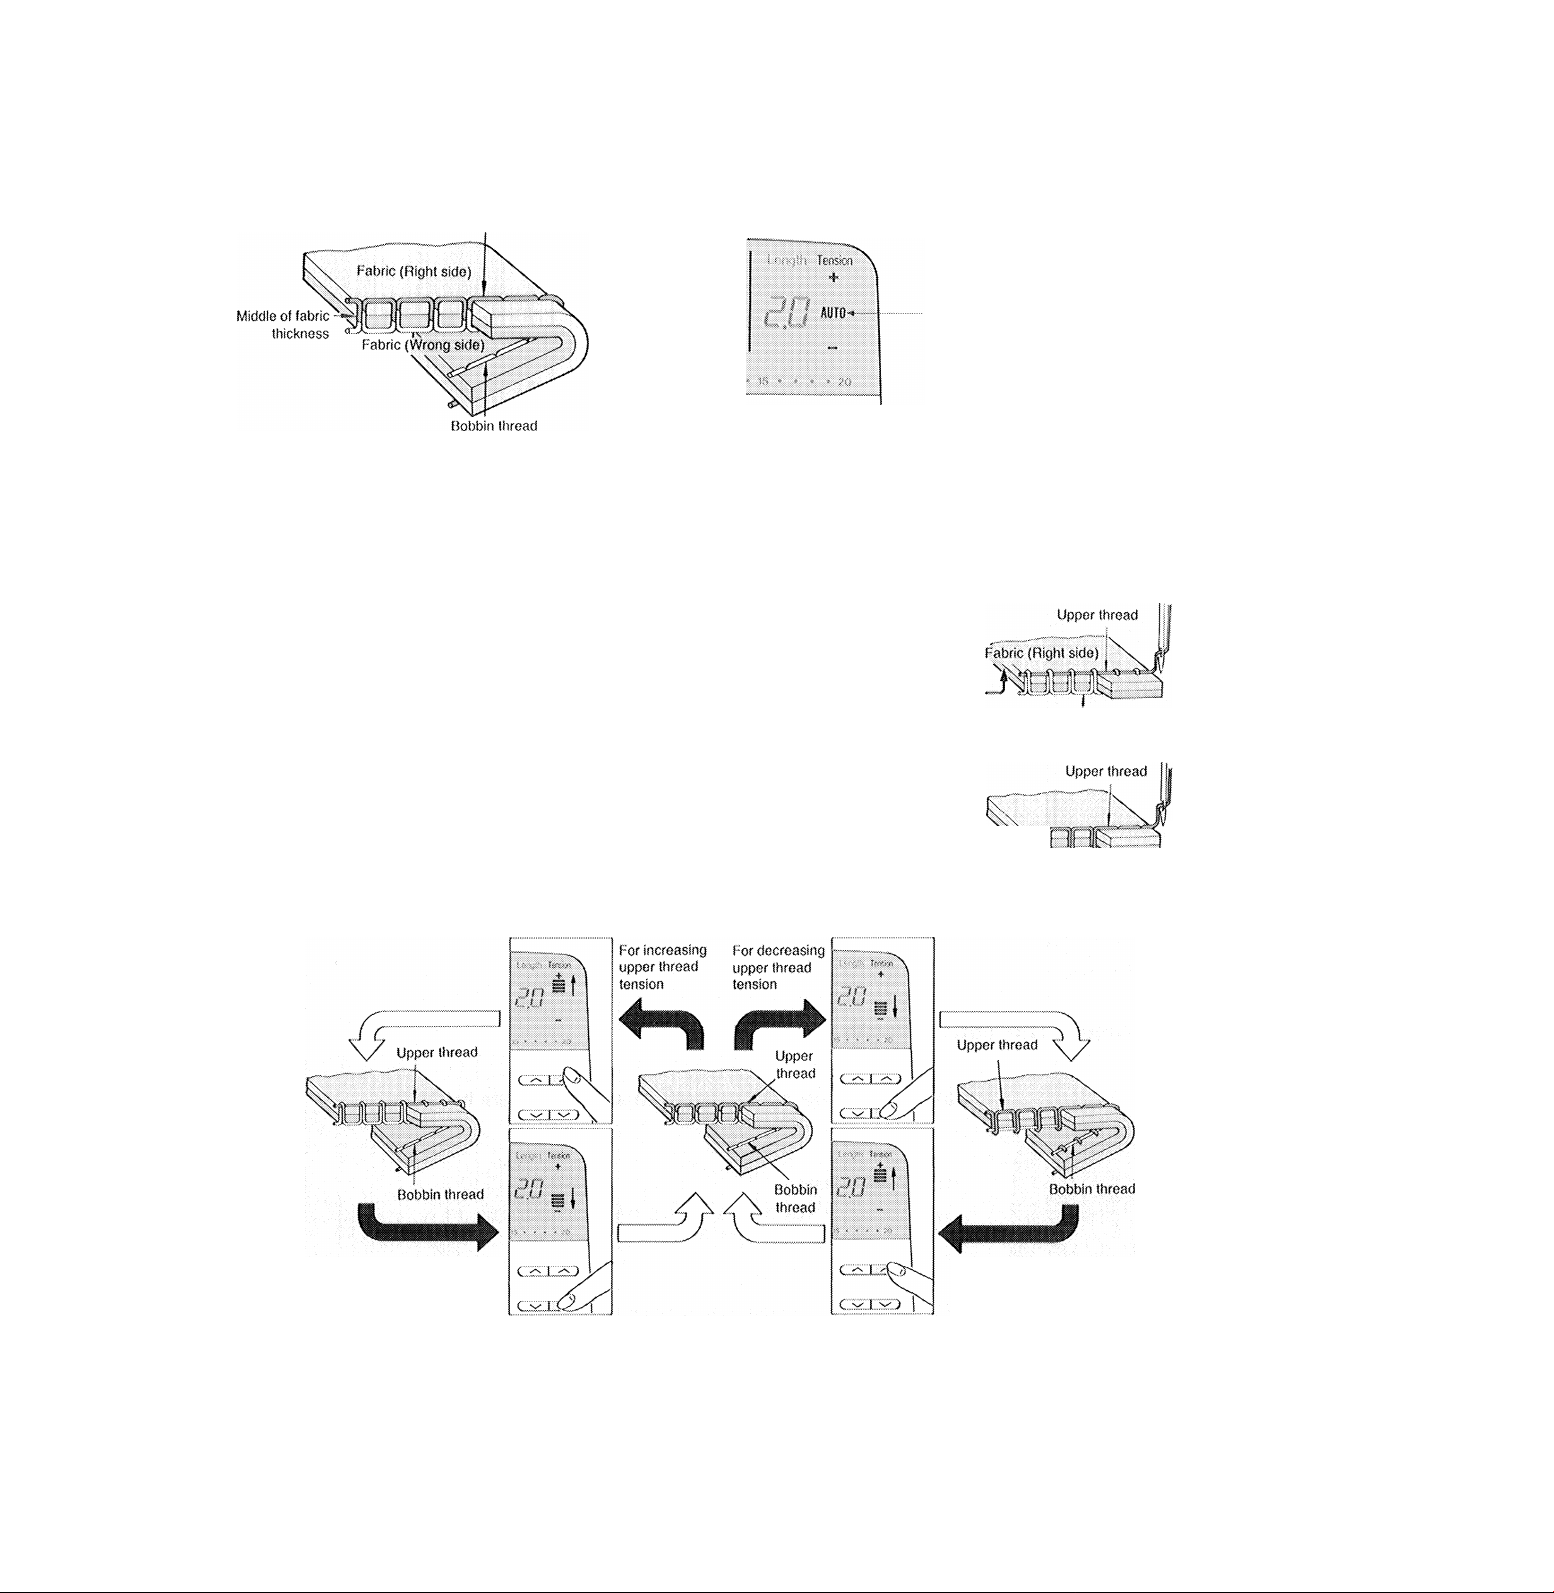
Automatic Thread Tensiori Control
The thread tension is automatically computer controlled.
The upper thread and bobbin thread should interlock at the middle of the fabric thickness as shown bellow.
The thread tension control is set to “AUTO” whenever the power switch is turned ON or a stitch pattern is selected.
Upper thread
■Indicates that the automatic tension control is on.
How to adjust thread tension
Use the thread tension manual override buttons to change the thread tension.
if the bobbin thread of the
ao g
-----
Press this button to increase
thread tension.
Press this button to decrease
thread tension.
formed stitches is seen on the
right side of the cloth as
illustrated, it means that the
upper thread tension is too
high.
If the upper thread of the
formed stitches is seen on the
wrong side of the cloth as
illustrated, it means that the
upper thread tension is too low.
Bobbin thread
1» . V
Bobbin thread Fabric
(Wrong side)
For decreasing
upper thread
tension
For increasing
upper thread
tension
Note: When you select a combination of patterns from No.OO to No.98, use the thread tension override button on the first pattern.
The thread tension which has been set once will automatically apply to the all of the following pattern stitches.
12
Page 15
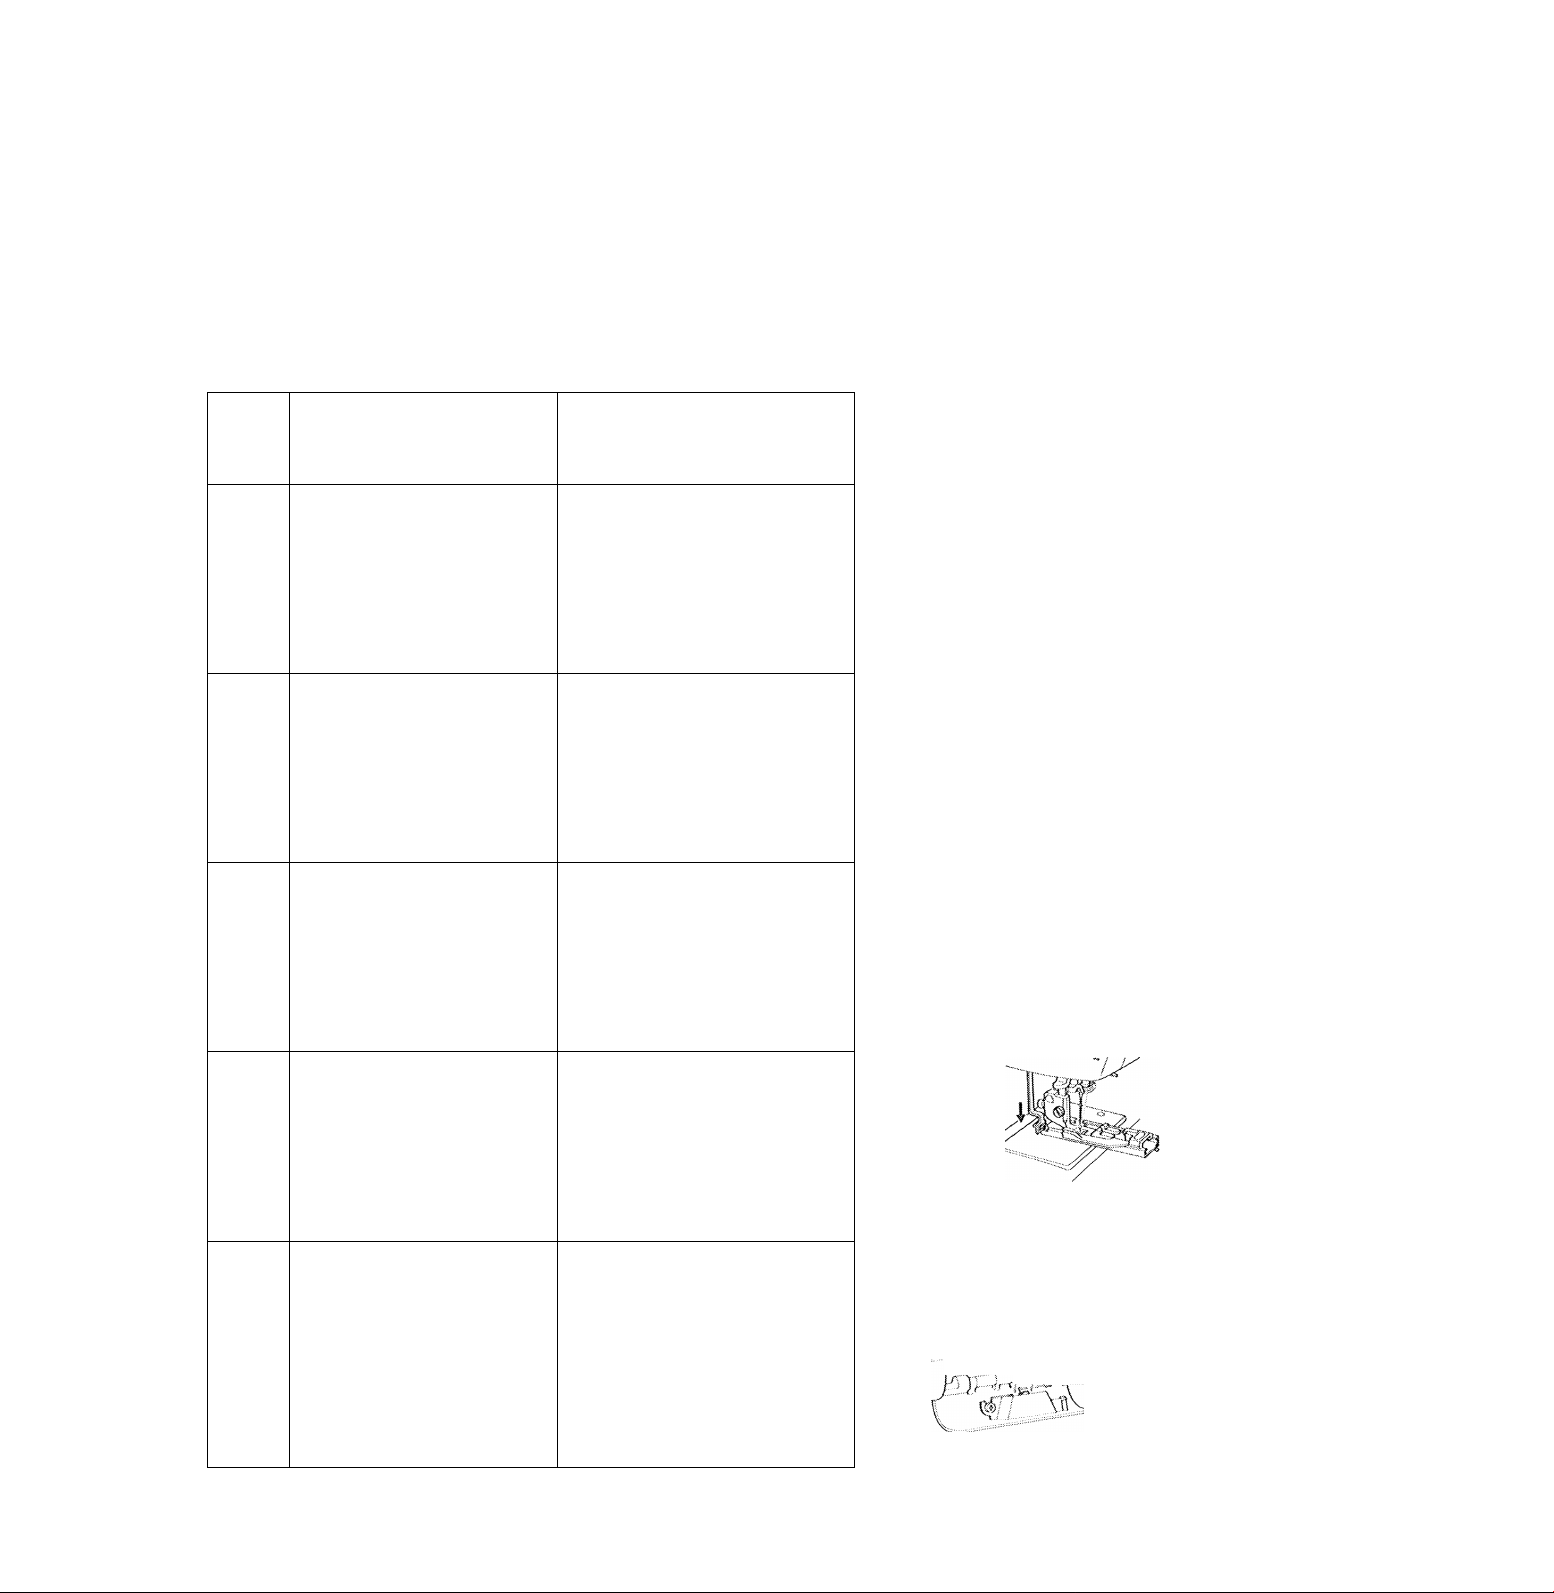
Indicator Lights
If the machine has not been properly set to sew, an indicator light will come on to tell you where the problem is located.
Upper thread indicator light
Bobbin winder indicator light
Prosser foot lifter/thread cutter lever indicator light
Buttonholing lever indicator light
Low bobbin thread indicator light
Solution
Indictor
light
Problem
Cause
(When the following corrective
action is taken, the indicator light
will go OFF.)
1
№■)
When the speed controller or
start switch is pressed and the
machine will not sew.
The machine forms one stitch
then stops.
Mote: The bobbin winder is
turning.
The indicator light flashes ON
and OFF, and the machine
stops after it produces only one
stitch.
1 -'ff ^ \
1) The upper thread has run out or
broken,
or
2} The thread is not in the thread
sensor guide.
Bobbin winding shaft
The bobbin winding shaft was loft in
the right position after winding.
The presser foot is up, and the
thread cutter is in position.
____
\
V
1) Replace the empty spool arid
rethread machine.
2) Place thr'ead correctly in thread
sensor guide.
Move the bobbin winding shaft back
to the left position.
„iCCX
О
‘î; у
-i ^ '■
..
Push the presser foot lifter/thread
cutter lever down to the horizontal
position.
w
.f )
The indicator light flashes ON
and OFF, and the machine will
not sew a buttonhole.
The indicator light will blink
when the bobbin thread is low.
The thickness of thread
detemiines the remaining
amount on the bobbin.
Bultonhofing leverAi yii T X '"
The buttonholing lever has not been
pulled down.
Note; When using transparent
thread the machine cannot detect
i the remaining amount of thread on
the bobbin and the indicator light
will blink even when the bobbin Is
full.
о
Bring the buttonholing lever down.
(See page 20.21)
UH Wind a new bobbin.
Important
Please Keep
^*tis area of the
j machine clean
' fhK. vV to allow the low
bobbin thread
sensor to work
properly.
13
Page 16

Fabric, Thread And Needle Table
Your fabric will determine the choice of a needle and thread. The following table is a practical guide to needle and thread
selection. Always refer to it before a new sewing project. And be sure to use the same size and type of thread in the bobbin as in
the top thread supply.
Fabric
The fabrics below can be of any fiber, cotton,
linen, silk, wool, synthetic, rayon, blends. They
are listed as examples of weight. sewing performance.
Very Lightweight • Bastiste, Chiffon, Organza,
Voile, (extra fine) red orange
Cotton-Wrapped polyester core 2020 9/70 or 11/80
Long fiber polyester (extra fine) shank
Thread Needles
Failure to use a Singer brand needle
may result in skipped stitches or poor
TYPE SIZE
band
Lightweight • Challis, Chambray, Carmeuse, Cotton-wrapped polyester core 2020 11/80
Crepe de Chine, Gauze, Handkerchief Linen, (all purpose) red
Silk, Taffeta, Tissue faille.
Medium»w@lglit» Brocidcloth, Brocade, Chino, Cotton-wrapped polyester core
Chintz, Corduroy, Flannel, Linen, Poplin, Satin,
Synthetic, Suedes, Taffeta, Terry, Velvet. Long fiber polyester (two spun)
Medium to Heavy-weight • Coating, Damask,
Denirn, Drapery Fabric, Fake Fur, Gabardine,
Ticking, Woolens. Long fiber polyester (two spun) shank band
Heavy-weight • Canvas, Duck, Sailcloth,
Upholstery Fabric. (ail purpose)
Leather
Knits * Jersey, Tricot, Single Knit.
Sweatshirt • Double Knit, Swimwear, Sweater Cotton-wrapped polyester core
Knit. (all purpose)
*Use with standard sowing thread in bobbin.
Long fiber polyester (two spun)
(all purpose)
Cotton-wrapped polyester core
(all purpose)
Cotton-wrapped polyester core
Long fiber polyester (two spun) shank
Cotton-wrapped polyester core
(all purpose)
Long fiber polyester (two spun)
Long fiber polyester (two spun)
shank band
2020
red
shank
2020 16/100
red purple
2020
red
2032
leather
2045
yellow
shank band
2045 14/90
yellow blue
shank
orange
14/90
blue
band
18/160
11/80
orange
band
How To Remove And Insert The Needle
Attaching the needle.
Removing the needle.
highest position.
(2) Loosen the needle clamp screw.
2
(The needle cannot he inserted unless it is correctly positioned.)
fully until it touches the stopper pin.
CAUTION: Make sure the power/lighi switch is off
before inserting the needle.
screwdriver furnished with the
machine.
14
Page 17

Various Types Of Stitches
You can perform various types of stitching such as straight stitcii,
buttonhole, applique, blindstitch and free arm sewing.
/vWxA
ilililllll
Ty/in Needle (Oi)tioiial)
iiiii
■
i:|i 8
i ■■ A
lii-ill'
16
Page 18

straight stitch
„,L„
When the power switch is turned on, the straight stitch is automatically selected and the needle will
be in position at the left of the pressor foot (A).
To move the needle position use patterns 80, 81 on B side of pattern display panel.
Needle entry position
(left needle position)
Stitch produced in
automatic setting.
The straight stitch is
the basic stitch.
Begin sewing.
Select
a stitch pattern.
{ndicator light
Make sure that the presser foot
2
is correct.
Presser foot
symbot
Standard presser foot A
Use the presser loot bearing the symbol
indicated on the instant pattern button,
*See page 10 for how to attach the
presser foot.
Ig Lightly hold the material with
3 your hands.
Set the material, and lower the
3
presser foot.
Place the material under the pressor
foot so the needle will enter the sewing
start point of the material. Pull both the
upper and bobbin threads to the rear of
the machine and lower the presser foot.
Adjust the sewing speed.
6
7
Stop sewing.
16
Be careful not to apply excessive pulling
force to the material while sewing.
Cut the thread.
(For the automatic thread cutter
g
see page 18.)
thread cutter lever until the needle
moves. This will cause the upper and
bobbin threads to be cut at the same
time.
Lift the presser foot and remove
9
the material.
position, raise the presser foot lifting/
thread cutter lever and remove the
fabric.
Page 19

Reverse stitch
I he reverse stitch is used at
the beginning and end of a
seam to secure it<
Press the reverse
W stftoh button.
@ Begin sewing.
Press the reverse
® stitch button.
e The sewing machine performs reverse stitching only while the reverse stitch button is
being pressed.
# The sewing machine runs at low speed when sewing in reverse,
o When sewing pattern stitches such as a zigzag stitch, the machine will perform
tacking stitching instead of reverse stitching.
Changing sewing direction.
Stop the machine in the desired
position. Lower the needle into the
fabric. Lift the presser foot, and turn the
material in the desired sewing direction.
How to select needle entry
position.
Center position
Select B side No.BO
stitch pattern
night side position
Select B Side No.81
stitchpattem
See page 24-31 tor how to select pattern stitch.
Lower the presser foot and start sewing.
17
Page 20

Shirring And Gathering
How to perform shirring and gathering
When shirring an arriihoie or skirt waist, or gathering cuffs or yokes, sew with a leng thread length, then pull the bobbin thread by
hand to gather the rnateriaL
Reduce the ypp0f 1 3 4
thread tension. Tension Tension Tension Tension
How To Operate The Automatie Thread Cutter
Note: it is advisable to use the automatic thread cutter at the end of a seam. Use the thread cutting groove located at the back of
the presser foot for cutting thick threads or special types of thread.
tivnCii-:-
Upper thread tension
decreases gradually
between four steps.
Lower the thread cutting fever.
At the end of a seam pusii tho thread
cutting lover completely down.
The indicator will light up.
★ After tho automatic thread cutter Is used, you can begin sewing oven if the bobbin thread is not on the needle plate.
Needle up.
Release tho thread cutting lever and the
needle will go up, and the upper and
bobbin threads are cut. The needle
stops in the up position.
How To Use The Thread Cutting Groove (How to knot the threads)
Remove the material from the machine.
Cut the threads, using the thread
cutting groove.
rhroad cutiinp
groove
Raise the thread cutting lever.
After confirming that the needle has
completely stopped, lift the thread
cutting lever all the way up and the
presser foot will be raised.
Knot the two threads on the
wrong side of the fabric.
After finishing a seam, rai,se tho needle
and the presser foot, and slowly pull tho
material from under the presser foot.
18
I iold tho upper and bobbin threads
together, pull them out about 4" and cut
them with the tliread cutting groove
located at the rear of the presser foot.
Pull the upper thread to the wrong side
of the fabric, and knot the upper and
bobbin threads. Cut the threads as
close to the knot as possible.
This technique is useful for securing the
pattern stitches.
Page 21

Zigzag Stitch
I
Stitch width vs. stitch length
Stitch
pattern
selection
button
Select the desired stitch pattern.
Indicator light
y
\ ;; <
Presser
fool
symbol
Select from the zigzag stitch
patterns.
Check that the presser
2
foot is the correct one.
Be sure to use the foot
indicated on the instant
pattern button.
* See page 10 for how to
attach the presser foot.
3
The sowing method is the same as for
straight stitch.
Refer to pages 16 and 17.
Stitch
width
Automatic
stitch
length
( n I /
f.U i>
I n <
I.U )
Manual
override
stitch
length
n J
u.c
u n
n.i -
u
ü£ HD
n ^ Lj n
Use the thread tension manual override buttons when you need to change the thread tension.
upper tliread
V
To decrease the
upper thread tension
Bobbin thread
To increase the upper
thread tension.
19
Page 22

Automatic Buttonholes
® When sewing knit or other stretchy
materials, apply interfacing to the
material, and set the presser foot
pressure adjustment dial to “LOW’’.
# Be sure to sew a test buttonhole first.
For sewing small buttonholes in shirts,
blouses, children’s clothing, etc.
For sewing large buttonholes in coats, etc.
For sewing large buttonholes in thick
feibrics, etc.
Select the desired stitch
pattern.
Indicator light
Change the foot.
n
Pressor foot
symt)ol
Of the three types of
buttonholes, select the one
suited for your particular need. ‘Refer to page 10 for how to attach the
Place the button in the buttonhole foot.
Attach the buttonhole foot with its symbol
located away from you.
presser foot.
F*uil out the upper and Bobbin
3
threads.
Pass the upper thread under the buttonhole
foot.
Remove the button. U Mark the material.
6
20
Mark
has been determined, take indicate the buttonhole
the button out of the foot. placement.
Page 23

Automatic buttonholo stopé
Lower the buttonhole foot.
7
1
1
2 3
« i v <
it •*
I
Lower the buttonhole lever
5
ti
Tacking stitch
Tacking stitch
At the end of the buttonhole the machine will
sev/ a tacking stitcti, then stop automatically.
Begin sewing.
9
If the indicator
light comes on the
buttonhole lever
has not i s
been
lowered correctly.
Lower the buttonhole foot so that the mark is at When the buttonhole lever is fully lowered, the
the center of the needle hole in the foot. indicator light will go OFF,
* If you try to start sewing without lowering the buttonhole lever, the indicator light will flash ON and OFF, and the machine will not
start.
‘ If you set the buttonhole length wrong, or the upper or bobbin thread runs out, you can restart the buttonhole from the beginning
by pressing the stitch pattern selection button once.
At the end of the buttonhole cut
Ш
the threads.
« I Open the completed buttonhole,
I I using the seam ripper.
Barfacked
buttonholes
Keyhole I ! Byelel
\ buttonhole
O
i
punch
Straight pin
c: .V
:.=C
Seam upper
Cut the middle of fhe
buttonhole open using the
seam ripper, being careful
r
not to cut the threads. It is
advisable to place a straight
pin at the end of the
buttonhole to help prevent
overcutting.
1/
Lower the thread cutting lever to cut the
threads.
* Lift the presser foot, and then lower it
so that the second buttonhole mark is
set at the center of the needle hole in
the presser foot.
21
Page 24

Sewing Corded Buttonholes
If you use cording for buttonholing, it will prevent them from becoming loose and they will last longer. Buttonhole twist thread may
be used for cording.
How to set the cord.
n rr: : : |
f Ì
/
"Cord
(front) (back)
Free Arm Sewing
Application examples
When you sow buttonholes with cording, pass the cord through the end of the
buttonhole foot and knot the ends of the threads at the front. Then, attach the
buttonhole foot to the presser bar and sew the buttonhole. Pull the cording tight
into the sewn buttonhole and cut off the excess cord.
Sewing harcf"tO“reach garment areas is
made easier by using the tree-arm sewing
capability of your sewing machine.
Note: See page 2 for converting the
machine to free-arm.
Topstftchlng
M-f-
22
Collar sowing
Cap
/■■■
Hemming
Page 25

Overcasting (Overedging)
Used to prevent fabric from fraying.
1
Select the desired stitch pattern.
Stitch width 3
Presser toot
symbol
Stitch width 5
c
Pressor foot
symbol
There are four stitch types that can be
used for overcasting.
Select the one that is best suited for
your material.
Replace the presser foot.
2
• Be sure to use ihe standard
pressor foot for Ihe stitch width
3 and 3“Step zigzag sewing.
Standard pressor foot A
# Stitch width 5
# OverlocK/overcasting
Overcasting foot C
Use the presser foot which is indicated
on the instant pattern button.
* See page 10 for liow to change the
foot.
Used for overcasting light-weight material with curly
edges.
Used to prevent cloth edges from fraying. Place the
fabric against the foot guide so that the needle sews
close to the edge.
Used for stretchy material or fabrics which tend to fray.
For overcasting the edge of a fabric to prevent it from
fraying. This stitch may also be used to sew a seam that
will not be pressed open.
23
Page 26

Pattern Sewing
Uguid Crystal
And Name Of Each Button
liquid crystal display
i^altef« No.
©d)
00
Paiten) Size
'iM
OS
'm
1 II I
ERROR
F^ress this button once and 00
will appear in the liquid crystal
display under pattern No. unit.
Information Indicated On The Liquid Crystal Display Window
/N j .A. y C^’** F ### I ^ ^ ✓ V ¡ ^ )
< >", I N/ ) (. Mm.)
lens unit One unit
Pattern No. selector clear a pattern that has
button
F^atteff) clear button
been niernofized)
AUTO
Reduced size button
Re()eat pattern button
Iteversed in>age button
l-^attern rnernofy button
(to memorize the pattern
selected)
owhen you select a pattern number.
Í When you change the number or the
display to patterns on A side.
^When you change the numbers or the
display to patterns on B side.
A
You can stitch "A".
^ When you select a large ® When you press the reduced size button # Wtien you select a standard ® When you press ttie reverse image
size pattern. alter you have selected a large size size patterr) stitch, button,
Paiiem Size Paitern Size
A large bear will appear. A small bear v/ill appear to indicate that the A star will appear to indicate the The ()atiern will be sewn ir> reverse,
^ When you press the repeat button the ^ When you press the
pattern or pattern sequence will continue memory button,
to sew until the machine is stopped.
pattern stitctc
€S
pattern will be sewn smaller. pattern cannot be altered in size.
^When a pattern is
rnomorized
® When you make a selection that the machine will
not accept the word El tF^OF^ will appear.
ERROR ' When you select a pattern which cannot
This indicates that
The above symbol will
appear.
patterns are storert
in the memory.
be reduced or reversed.
*When you attempt to memorize more
than 21 patterns.
^Ttu) {Uimber of patterns stored in memory is indicated by the pointer.
» 9 B * • ♦ 10 ♦ * * ♦ 15 ♦ * * * 20
To clear any pattern selection from the liquid crystal display press any of the instant pattern button or turn the power switch off
then on.
24
Page 27

Relationship Between Patterns And Buttons
Large Size Patterns
Patterns on “A” Panel.
Pattém Figuras
Block Alphabet
Large Script
n
Ü
06
13
(Al
21
20
(Kl
31
30
lui [Vi
41
40
1 1
! 1
50
51
f 1
:-J
61
60
1 ''1
71 72
70
iBi
[Q
i 1
1 ]
1 j
00 ' '01 ■'
07
14
: [D]
22
H El
32 38
11 [X]
42 43
I'i
52
f ' !
i -j
62
{
...
1
^02
/ i i.. i
' 09 10
08
1?
16 •
15
1 (Fi
lE'
24 25 26
28
1 (Pi (Ql
[Ql
34 35 36
[y 1 [ZJ
45
44
M581 1
! "1
73
[ 1
54
55
f-yyi
i '1
i
[' 1
64
65
f
...
i 1
1
i 1
|y
74 '?5 47
t
(Gl El
46
ÎU
58
! 1 66i '1
Function Buttons
04
11
19
[I] yj
26 29
(S|
48
l-''l
5$
!n]
46
05
^ i
12
39
i ■' ]
59
^69^
49
C
...
i
m
i ;
[ ]
............1....
c
....
i:LH ! MEM 1
r
.....
CiU' r MEM 1
MEM 1
03
18
27
[R]
37 38
lui
i
...
I
47
!U
57
67 66
! i
Patterns on “B” Panel.
Large
Continuous
Patterns
Continuous
Patterns
Standard
Patterns.
' I i '' i
76 77 78
86 8? 88 89
80 8i 82 83 84 85
M M 1*11*1 111 I“11
50 81 92 33 94 95 9$ 97
I
iP] [IJ fa] (3j (41 (51 [B] (7) [8J (9j
20 21 22 23 24 25 26 27 28 23
m m
ffj m Wi (1 1^1 1^1 (il 0 13 0
ao
(fi ill [s @ (11 11 ti] 0
30 3Ï 32 33 34 35 38 37 38 39
1 41 42 43 44 45 46 47 48 49
50 51 52 53 54 55 58 57 58 59
60 61 62 63 64 65 66 6?
m |t
J
70 71 72 73 74 75 76 77 78 79
ia
...................
81 82 83
\P
i.a;i
3 iHi
ÿ y 0 § S E
85 86 87
5j (01 111
^ n
?3
C, .ill: I MEM 1
69
1 01 92 93 34 35 96 9?
See page 30 on how to adjust. If pattern you are sewing is not balanced see page 30.
OCC5ZZD®
25
Page 28

Large Size Pattern Sewing (1)
It is recommended to make a sample using the same fabric and interfacing
or backing materia! before sewing on the garment.
Large size patterns
When you sew pattern stitches or alphabet stitches,
be sure to use the decorative stitch foot (T).
Select a pattern, and check the pattern number.
Select a pattern, and check the
pattern number.
To determine the pattern placement use
the assistant marker and templates
provided with the machine.
Position the fabric under the decorative
stitch foot (T) where the needle will
begin sewing the pattern.
Patterns are stitched sideways, this
allows for easier sewing with the free-arm.
Note: See template for additional
instructions.
m Select a pattern, and check the
I pattern number.
Select a pattern, and check the
pattern number.
26
Page 29

2
Select pattern No.
button, the pattern number and bobbin thread together, the machine will stop
will appear on the liquid
crystal display.
Select pattern No.
2
Begin sewing.
lower the presser foot, begin automatically,
sewing.
Press reverse button, nt Begin sewing.
Completion.
Completion.
Select pattern No.
Select pattern m Press repeat
sen
2
No. button.
The reverse symbol will
appear on the liquid crystal
display.
Press reduce button.
appear on the liquid crystal
display.
4
Begin sewing.
the machine will stop
automatically.
Begin sewing. Completion.
When the pattern is complete,
the machine will stop
automatically.
Completion.
The repeat symbol will appear
on the liquid crystal display.
The machine will continue to
sew the pattern until you stop
the machine.
27
Page 30

Large Size Pattern Sewing (2)
^Alphabet Stitch
Types Of The Large Sisge Alphabet
Set the pattern display panel to patterns on A side.
47
-1
50 51
[:;1 l-l
60 61
70 71 72 73 74 75
The reverse stitcli button will not function on the alphabet pattortrs.
53 54 55 56
52
[^l
62
63 64 65 66
V,
5?' 58
67^
Pi
48
I - I
1 1
(' ■]
68
1 i
f .
l-:_
69
49
59
Select a pattern, and check the
1
pattern No.
Select a pattern, and check the
1
pattern No.
Continuous Pattern Stitch
Types Of Large Size Continuous Pattern Stitch
Set the pattern display panel to the patterns on A side.
76 77 78 79
86 87
The reverse, reduce size and
memory buttons will not function
on these patterns.
Select a pattern, and check the
1
pattern No.
28
Page 31

Select the pattern No. y Begin sewing.
Select pattern No. 50 of
patterns on A side.
Press reduced size
3
Select the pattern No.
button.
Completion.
completed, the machine will
stop automatically.
Begin sewing.
Completion.
The reduce symbol will
appear on the liquid crystal
display.
Select the pattern No. «1 Begin sewing.
4
Completion.
The machine will continue to
stitch the pattern until you
stop the machine.
When the pattern is complete,
the machine will stop
automatically.
29
Page 32

How To Combine Patterns (Example)
Check the pattern
1
Select a combination of pattern.
2
numbers.
Select the number
for PJ (69).
Press memory button.
For example (combination of two
alphabet stitches)
For example (combination of the large size pattern figures)
Reverse
Pauern No. 06
Patterns on A side
69 49 74
Reduced size
Pattern No, 07
Reduce and
reverse
1x
cso... J
Regular direction
Pattern No.
nr
nn*
MEM
)
..
:>
For example (combination of large size pattern figure and patterns on
A or B side)
I I:
l.„ Q V
Pattern No. t4
A Side B Side A side A side
31 66 41 24
13
Balancing The Shape Of A Pattern
I Select the trial sewing m
I pattern No. 98. L Begin sewing.
It is recommended that a test sample of
the pattern is sewn using the same fabric
and interfacing or backing before sowing
on the garment.
Depending on the type of material, its
finish, thickness and interfacing used, the
shape of the pattern may be altered. If the
pattern is out of shape sew the trial sowing
pattern to balance the machine.
Pattern No.
Completion.
Correct balance
The normal
stitching.
•' '' Horizontal
30
The pattern can be
selected from A side or
B side.
The machine will continue to
sew the pattern until you stop
the machine.
Page 33

1» Select the number
3 for y (49)
» Press memory
D button.
^ Select the number
I for ^ (74).
Press memory
button.
8
9
Begin sewing.
/ © ^
No. Si20
o ®
U€3 cPi
.♦*♦$**** to*»* *t
& * —»
1 1 T ^ >
r^”rr^ cw^rm
1
With using the memory button
you may stitch the same
pattern up to 20 times.
Reverse
06 will be on the liquid crystal
display window.
I O
Reduced size
Pattern No.
n
I#. PoUem Suo
IH o
S -----------------------
................
(S-I
■ ^ pn
--
When the patterns ^ ^
are complete, the machine
will stop automatically.
Reduce & Reverse
Begin sewing
07 and reduce will be on the
liquid crystal display window.
Pattern No.
«»I I ©fiMeM
on A side
a How to adjust the right side
4
~ I up stitching.
Turn the stitch balance control to the
left.
Pattern No.
©
ii ti
on B side
V
Pattern No.
Q
Lj ¡.^
on A side
©CSSHI)©
M How to adjust the right side
4
down stitching.
Turn the stitch balance control to the
right.
Begin sewing.
Pattern No.
'
...
N ~ •’
How To Cut The Cross-Over Stitch
Unnecessary cross-over
stitches on the right side
of the fabric should be
cut with a pair of
scissors.
31
Page 34

How To Correct Patterns in Memory
When an undosired pattern has been placed in memory in a combination of pattern stitches.
* The clear button will operate only when the memory button has been pressed.
* Pressing the clear button will clear the pattern numbers which have been selected.
* Memory of the undesired patterns will be cleared in order from the pattern which was selected last.
‘ Continue to press the clear button and all the patterns which have been selected will be cleared one at a time.
* Turning the power switch OFF, or selecting a pattern from the instant patterns, will clear tire memory.
‘ To clear the reduced size or reverse pattern press the button again.
When the last selected pattern number ttiat has been
placed in memory is not a desired one.
Press the clear button once.
1
i O !
{
.........
A
20
21
are the desired patterns.
/r J
^ 22 *
t
___
r::... ...i
f
..................
I
The last pattern number selected (24) Is cancelled.
A
20
mmS
21
1
.....
are selected by mistake
...........
]
Pattern No. 21 (B) which has been set in the second place
will be on the liquid crystal display.
When an undesired pattern number is selected in the middle.
V
...
.............
1 t
A
20
A
1 }
1 21 i
t ^
20
}
c
i {
1 j
1
22
Ip 1
f i
1 22 ^
u .......... j
.
...... ..... ...t
are the desired patterns.
are selected by mistake.
1 Press the clear button twice.
32
Pattern No. 20 (A) which was selected first will be on the
liquid crystal display.
Page 35

Liquid crystal display.
PiiUcm Ho. PaUefo
©
☆
czo::5D csMiTiD
C2:i::^ oiia:j5M.3 CNi..i..v>
Select the correct pattern number (22).
2
4-
«* «. iBTO
Press the memory button.
• When the memory is not full, it will be indicated on the
display and you can continue to add patterns.
• When you select a new set of patterns, be sure to dear all
of the memorized pattern numbers including the memory
indicator from the liquid crystal display.
number of patterns stored in memory is indicated hero.
When the % mark is not indicated on the scales of theEP, the
pattern number displayed is not stored in memory.
Select the correct
2
pattern number (21)
.......
P I
☆
t
► »0 * * ♦ « » X
imuD c
c:v.;
Press the memory
3
button.
Select the pattern
4
number (22) or C.
Pattern C was cancelled and
has to be placed in memory again.
Press the memory button.
I
33
Page 36

Four Direction Sewing
Those four stitches allow
you to sew sideways and
forward or backward,
without pivoting the fabric.
Right side
O straight stitch.
© feed stitch.
O Reverse straight stitch.
Check that the presser
foot is the correct one.
O Left side feed stitch.
34
Page 37

Attaching Feed Cover
For darning and frec-motion
embroidery, ttic food cover prevents the
feed from moving the material.
Attach it as follows:
Remove the presser holder
and set the feed cover
in place.
Set the feed cover on the needle Select a zigzag pattern from the five
plate while aligning the pin of the different patterns available,
feed cover with the hole in the
needle plate.
‘Before removing the presser holder,
be sure to turn OFF the power to the sewing machine.
Set the stitch length to 4.0.
Select the pattern
2
as desired.
A < A
Set the embroidery hoop in
4
place.
Set the stitch length to 4.0 using
the manual key.
Lower the presser bar lifting lever
and start sewing.
35
Page 38

Darning Stitch
Push pattern panel to
I
side B.
Select the pattern No.
Attach the decorative
3
stitch foot (T).
* See pages 30 & 31 for how to balance the shape of a pattern.
Begin sewing.
Patterns on B side
75 pattern No.
Select pattern No. 75 from
patterns on B side.
To sew 8 wider darning stitch, begin sewing after
the needle entry position has been set so that the
pattern can be continued after the previously
5 stitched pattern.
Needle entry •
\ position I
’"11--
H
n
Starling position
/
Siitch foot symbol
:.T„
Decorative stitch foot (T)
The machine will stop automatically
when the sewing of one pattern is
complete.
Use four direction sewing for free-arm sewing.
Select pattern No.94 Begin sewing and
from the patterns on n stop at the desired
I
A side. £ point.
Set right direction cross-feed.
Select pattern No.93
from the patterns on
3
A side.
Set left direction cross-feed.
Begin sewing and
stop at the desired
point.
A part is fed manually.
Sew as illustrated
1« in the Fig. 1 and
3 Fig. 3 alternately.
limi]
f • U 4 i ' f f » * j
i X i i i. i
% i M i M
1 4 i i i : J 1 n 4 i
i i V i i i ¥ i
4 ' i i i ! 4 . i > i
4 4 4 i i : 4 : : # i 4
’ < i i n • i
i 4 4 i < : 4 : ¡fit
4:444:4:4 4 4
i i i 1 1 Ä i
% i ¥ t % Ä i
¥ i i
> i . ¥ ¥ i i
^ i ! i i i i
i • i > : i i
4 4! 4 4 4 i 4 4: 4: 4 4 4
444 4 4:4 4 4 44
4 4 4 4 4 : 4 : Ì 4 4 4
4 4 4 ;4 .4 4i 4 4: 4: 4 4
4 ^ j > 4 4 . w > 4
i 4 i 4 S ? i 4 4 i 4 I
4 > 4 : : 4 4 4 4 4 4
4 4 4 i i 4 4 4 4 4 4
4 4 4 4 4 4 4 4 4 4 4 4
? % i i t ¥ Ä i
36
Page 39

Twin Meedle Sewing (Optional)
Twin needie sewing produces two parallel lines of closely-spaced straight stitching. You must sew with
center position straight stitch No. 80 8 side. Any other stitches will cause breakage of the needle.
- With machine turned off, insert twin needle (optional) into needle clamp, and thread machine as for
single-needle sewing and through right needle eye.
- Attache extra spool pint (optional) to bobbin winder shaft, place second spool of thread on it; and,
again, thread machine as usual. Pass second thread through eye of left hand needle.
Check that the
presser foot is the Attache extra
correct one.
Attaching
the twin
I
needie.
I
t %
2
Select
pattern
No.80 of
patterns on
B side.
Patterns
on B side
ec <D
Pin Tucks
.. i.
.......i.....
A type of fabric decoration.
It is commonly used in
French sewing.
Traditionally, pin tucks are
formed by stitching very
near a folded edge, as
shown in steps 1 through 5.
You can also sew pin tucks
with a twin needle.
Twin needle tucks are
always even as they are
formed by two parallel
needles.
Increasing tension will result
in a more pronounced pin
tuck.
*You cannot use the automatic needle threader
and the thread cutter.
Select the pattern you
1
wish to make.
Inclicator lamp
■ Symbol forth©
presser foot
When the power to the Use standard presser foot (A) or
sewing machine is turned ON, biindstitch presser foot (D).
the machine automatically *Refer to page 10 on how to attach
selects runstitching. the presser foot.
5 Application examples
Check the presser foot
2
selected.
® Blouse
Symbol for the
Make folds on the
3
material for the pin tuck
using an iron so that
they are neatly finished.
Sew the folds taking
care not to stretch
them. A biindstitch
pressor foot guide will
help finish the folds
more beautifully.
# Apron
After you have finished sewing, till the
pin tuck to one side and press them to
make them neat.
37
Page 40

Blindstitch
Select the bllndhem stitch
pattern on the instant pattern
1
panel.
Indicator light
■ ^ <
Change the presser foot.
Blind stitching providens a durable way
to finish a hem and is presented as an
instantly selectable pattern as a
convenience. It takes practice, however,
so a tost sample is suggested.
When the desired stitch pattern
selection button is pressed, the
stitch pattern is selected and the
indicator light is ON.
0<i
For blindstitching general fabrics or heavy-weight materials
Position the folded edge
1Overcast the material, and fold the edge.
against the guide.
- Presser foot symbol
Use the presser foot which has the
symbol indicated on the instant
pattern selection button.
‘Refer to page 10 for how to attach
the presser foot.
Turn the fabric over.
3
For blindstitching light-weight fabrics
1
Fold the fabrics.
7/16'~5/8'
1/8'~5/32*
38
presser foot guide, and sew the
material.
Position the folded edge against
2
the guide.
Place the folded edge against the
presser foot guide, and sew the
material.
fabric over.
Turn the fabric over.
Fabric
{wron^ eide)
After sewing the seam, turn the fabric
over.
Fabric
(right side)
Page 41

How to adjust the guide of the biindstitching presser foot
If the stitches fall to reach the folded edge:
if the stitches cover the folded edge too much:
........................£=
Turn the screw toward you.
This will move the guide to the right.
Place the folded edge snugly against
the repositioned guide.
Turn the screw away from you.
This will move the guide to the left.
Place the folded edge snugly against
the repositioned guide.
J
39
Page 42

Patch Work
Select a pattern.
Make sure that the correct foot
2
is attached.
With pattern stitches 90 and 92 from A
side and 93 and 97 from B side of the
pattern display, fabrics can be joined
together to form a strong seam.
Overlapping Patch
1
Basting stitch h
........................____
Fabric (wrong skle)
5/B'
L
\ ;
N
Fabric (wrong side)
Patterns on A side
©C£sx:>©
90 ^
Choose one of tho four patterns.
patterns on B side
0
93 97
rabric (right side)
Use standard presser foot (A).
‘See page 10 for how to attach a
presser foot.
,!><J
Fabric (right side)
illllllilliiiiiiiiiiiiiiilllll
Soam
Place two pieces of fabric right sides together and sow a
basting stitch. Press the seam to one side.
Open Patch
1
Place two pieces of fabric right sides together and sew a
basting stitch. Press the seam open.
ii
Sew a pattern stitch on top of the seam.
>1-
Pabric (fight side)
Sew a pattern stitch on top of the seam.
l><=
l><
N
Fabric (fight side)
40
Page 43

Inserting Zippers
Zippers may be Inserted In
several ways. The type and
location of the zipper will help you
choose the right method.
Lapped zlppQts usually are
inserted in the side seam of the
garment.
Centered zippers are centered in
the opening, and are suitable for
almost all fabrics.
Lapped Insertion
#
Select a stitch pattern.
Indicator light
' Pressor foot
symbol
When the power switch is turned
ON, the straight stitch is selected
automatically.
M Change the presser
L foot.
Attach zipper foot В to machine.
The zipper foot can be used
either to the left or right of the
needle, depending on where the
bulk of the garment is placed.
#
3
‘If the zippers is left of the needle, the
loft side of the zipper foot goes on the
shank.
*lf the zipper is right of the needle, the
right side of the foot goes on the
shank.
A zipper is lapped when one edge of the
fabric opening overlaps and conceals it,
allowing only one stitching line to show.
*Machine-baste the zipper opening together
on the seamline, and press open the seam
allowance.
^Attach the left side of the zipper fool to the
shank.
0
*Pin or machine-baste the zipper to the
garment from the wrong side, through
zipper tape, the seam allowance, and the
front of the garment.
*Turn the garment right side out.
‘Attach the left side of the zipper foot to the
shank.
‘Stitch across the lower end of the zipper
and up to the waistline. Use the basting
stitches as a guide.
‘Remove the basting and press.
*Open the zipper and flatten the back seam
allowance, as shown, with the zipper face
down and the edge of the teeth following the
seam line. The zipper's top should fall
between 1 /8" and 3/8’ below the garment
top seam.
‘Stitch the zipper to the seam allov/ance from
bottom to top.
Centered Insertion
n
‘Machine-baste the zipper opening to the
seamline, and press open the seam
allowance.
‘Place the open zipper face down on the
seam allowance with the teeth against the
seamline.
‘Stitch the zipper to the seam aliov/ance from
bottom to top.
shank.
^Close the zipper and turn it face up.
‘Smooth back the seam allowance at the
edge of the zipper.
‘Stitch the zipper from bottom to top, as
shown, near the seam allowance folded
edge.
‘Baste through the zipper tape, seam
allowance and garment exterior.
‘Turn the garment right side up and top-
stitch it to the zipper, sewing through ail
layers.
‘Remove the basting and press.
41
Page 44

Optional Accessories
Transparent buttonhole foot
For sewing buttonholes and
overlapping seam allowances.
Cording foot
For attaching embroidery floss,
buttonhole twist and other cords to
clothing or craft items.
Invisible zipper foot Rolled hemming foot
For sewing invisible zippers.
Even feed foot
For even feeding of hard-to-feed
materials such as knits, jersey,
quilting, vinyls, leathers, and for
matching of plaids.
For narrow hemming the bottoms of
shirts and blouses, and the edges of
scarves and ruffles.
Twin needle/Spooi pin
For stitching parallel rows of
straight stitching.
ir
How To Adjust The Bobbin Case
The bobbin case furnished with the sewing machine is
factory-adjusted to give the proper bobbin thread tension.
Therefore you need not adjust it. However, if it is necessary
to adjust the bobbin case, do as follows:
42
incroaso
Turn the tension screw of the bobbin
case clockwise to increase the bobbin
thread tension or counter-clockwise to
decrease it.
Page 45

,'\i-
‘ CAUTION: Be sure to disconnect the plug from the wall outlet before opening the cover.
How To Remove The Face Cover
Using the exclusive screwdriver, loosen Remove the lamp cover. Push the lamp upward and
the setscrew at the rear of the face
cover by about two turns, and pull the
cover off sideways.
'> CAUTION: Be sure to disconnect the plug from the wall outlet before cleaning
Cleaning
Removing the lint and dust
Accumulation of lint or dust may cause
problems. Always keep your sewing
machine clean.
turn in the direction of the
arrow.
and lubricating the machine.
CAUTION: Contact the
dealer in your area for the
correct light bulb
replacement.
The power consumption of
the light is 5 watts.
and clean the area between the feed clean,
dog teeth and the slots in the throat
plate, using the brush furnished with the
machine.
Lubricating The Machine
Be sure to only use sewing machine oil on the machine.
This sewing machine uses special bearings, and requires no lubrication in normal use. However, if the machine is operated for an
extended period of time or if it has not been used for a long time, lubricate the points indicated by the arrows shown below.
1. Open the hook cover, remove the bobbin case, and
lubricate the hook.
2, Open the face cover, and lubricate the tops and bottoms
of the needle bar and the presser bar as indicated by the
arrows.
43
Page 46

Performance Checklist
If sewing difficulties occur, make sure the instructions are correctly followed. If a problem still exists, the reminders belew may
help solve it.
—'U
f.fV
lihl |:5*i
,:rJ
Problem
The sewing machine suddenly
stops during sewing.
The light is on, and the
handwheel can be turned by
hand smoothly.
The needle will not move.
The sewing machine will not
run.
The thread breaks.
Skipped stitches.
Stitches are not formed
properly.
Cause (Reason)
The sewing machine has been Turn the power switch OFF, and
run at low sewing speed for an
extended period of time.
The machine is designed to
automatically turn the motor
power OFF to prevent it from
overheating.
The upper thread has run out.
The pressor foot lifter/thread
cutting lever is up.
--Tho bobbin winder shaft was left
in the v/inding position.
■ The buttonholing lever v/as not
lowered when the machine was
placed in the buttonholing
mode.
- The remaining amount of the
bobbin thread is not enough.
The pressor foot is not to the
correct one, and the needle hits
the pressor foot.
The needle has come out and is :
In the hook of the machine.
The sewing machine was
started without the bobbin case.
(The thread is entangled onto
the hook shaft.)
The thread has been caught in
the hook.
Threading is not correct.
The thread has a knot in It.
The thread tension is not
correct.
The needle is bent or Is blunt. Replace the needle. 14
The needle has been inserted
wrong.
The bobbin base has not been
fully inserted in the hook.
The bobbin case has been
incorrectly threaded.
The bobbin does not turn
smoothly in the bobbin case.
The needle and the threads do
not match.
The thread take-up lever has
not been threaded.
The thread has not been pulled Fully pull the thread Into the
into the thread sensor guide.
Threading is not correct.
The bobbin case has been
threaded wrong. case.
The bobbin case has been
adjusted wrong. case.
The spool cap is the wrong size Replace the cap with the correct
for the thread spool.
Action to be taken
wait for about 20 minutes. The
safety device will be reset,
making and the machine will be
ready to operate.
Replace the empty spool, and
thread the machine.
Lower the pressor foot lifter/
thread cutting lever to the
horiiiontal position.
Move the bobbin winder shaft 13
back fully to the left.
Lower the buttonholing lover.
Wind a new bobbin.
Replace the pressor foot with
the correct one.
Remove the needle and insert a
nev/ one.
Cut the thread entangled on the
shaft and remove It before
inserting the bobbin case In the
hook.
Lubricate the hook, turn the
handwheel back and forth
several times, and remove the
thread.
Correctly thread the machine. 8,9
Remove the knot.
Correct the thread tension.
Properly insert the needle.
Securely set the bobbin case
into the hook.
Correctly thread the bobbin 7
case.
Check to see that the bobbin
has been wound evenly.
Use proper thread or needle.
Check the threading order.
thread sensor guide.
Correct the threading.
Correctly thread the bobbin
Correctly adjust the bobbin
size.
Page
13
13
13
13
10
14
7
6,7
14
8
8
8,9
8,9
42
7
44
Page 47

' ii M
{V VjH V V
/ .
u
Problem
Fabric puckers.
Cause (Reason)
The stitch length is too long for
the material.
The needle point Is blunt.
Action to be taken
Decrease the stitch length.
Replace the needle.
Page
11
14
ÍF
::Q
........
()
The needle breaks.
l.oud noise is heard.
.if Ì
4
The handwheel cannot be
turned.
The machine does not feed the
material.
A thin needle was used for
sewing heavy~v/eight material.
The needle has not been fully
inserted into the needle bar.
The needle clamp screw is
loose.
The presser foot is not the
correct one.
Dust has accumulated on the
feed dog.
The machine is in need of
lubrication after an extended
operation.
The machine has been
lubricated with an oil other than
machine oil.
Lint is in the hook.
The hook is entangled with
thread.
The stitch length has been set
to zero.
The presser foot pressure is too
low.
Use the correct size needle.
Properly insert the needle.
Securely tighten the needle
clamp screw.
Use the correct presser foot.
Clean the machine.
Lubricate the machine.
Use the machine oil.
Clean the machine.
Turn the handwheel back and
forth several times to help
remove the thread.
Reselect the desired stitch
pattern, and the proper stitch
length will be set.
Set the presser foot pressure
adjustment lever to
“Normar.
14
14
14
10
43
43
43
11
Threading cannot be done.
tvis;'*\55
niiW'-
If any of the above problems should still remain after you have tried the above suggestions. Please contact a service center or the store
where you purchased you sewing machine.
The needle threader will not
turn.
The threading hook will not
enter the needle eye.
The needle threads cannot be
returned, and the sewing
machine stops.
The threading hook is left in the
needle eye.
The sewing machine will not
start when the start button is
pressed.
The sewing speed remains
unchanged even when the
sewing speed adjusting lever is
moved while sewing.
The needle is not in the highest
position.
The needle threader is designed
not to turn to protect itself if the
needle is not up.
The needle has not been fully
inserted into the needle bar.
The sowing machine was
accidentally started while the
threading hook was still in the
needle eye (during threading).
The speed controller has been
plugged in.
Turn the handwheel until the
needle reaches its highest
position.
Properly insert the needle.
Slightly turn the handwheel by
hand av/ay from you (In the
reverse direction).
Unplug the speed controller.
14
45
Page 48

Pari No. 283433 Png.
Pftnled In Japan
 Loading...