

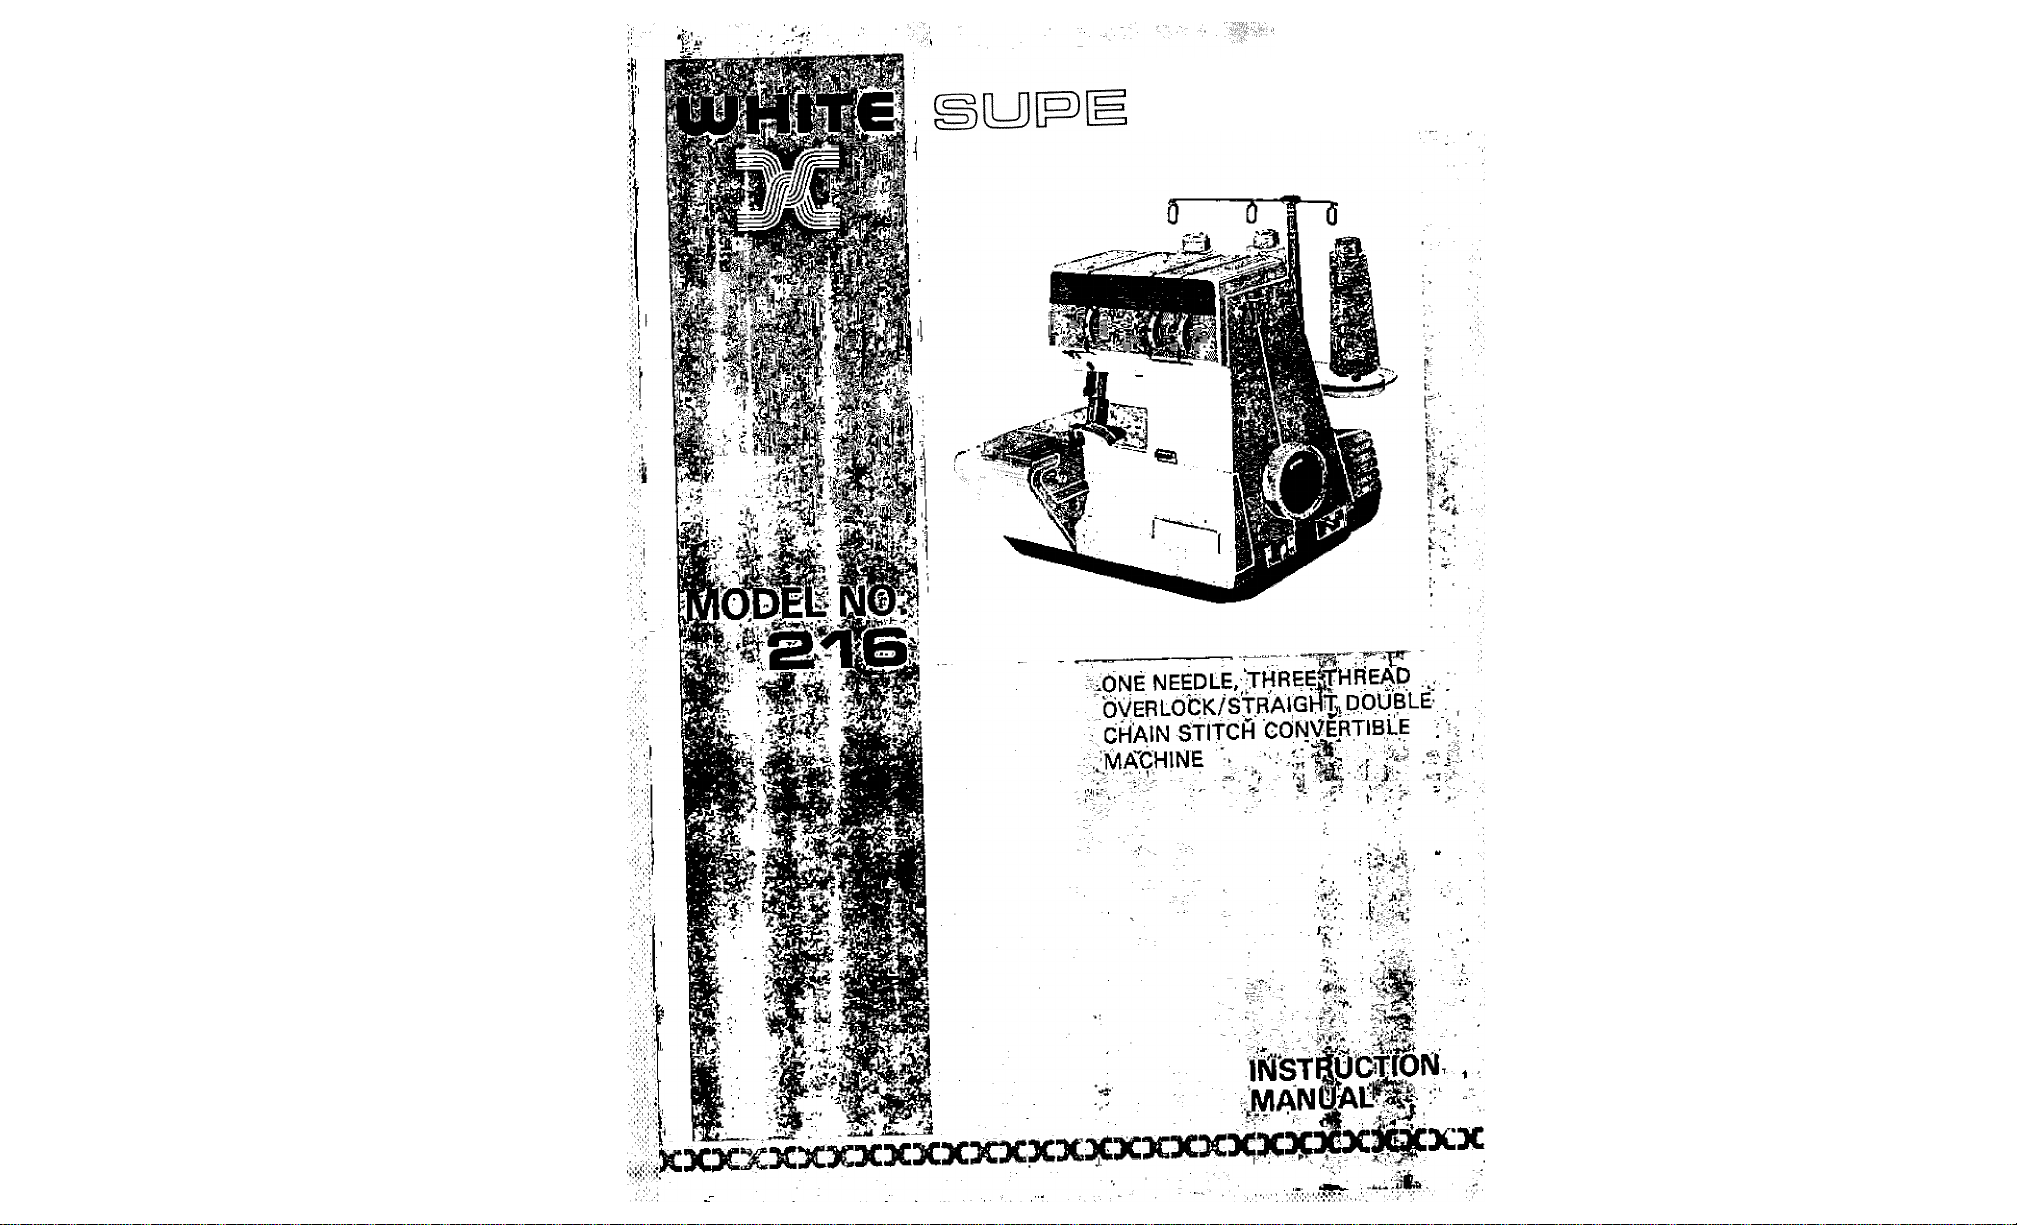
Page 1
[LOO[}C
Page 2

This booklet has been written for you, to help you use and
enjoy fully your overlooking machine.
Before you start to use this machine, please take a few
minutes to study this booklet. You will find it will be time
well spent in understanding your machine.
If you have any questions regarding the use of your
overlooking machine please do not hesitate to contact
your dealer or ourselves.
WHITE SUPERLOCK SEWING MACHINE
Record in space provided below the Serial No. and Model
No. of this appliance.
The Serial No. is located Rear of arm.
The Model No. is located Rear of arm.
Serial No
..................
——
------------—-------------------------
--
Model No. 216
Retain these numbers for future reference.
WHITE SEWING MACHINE CO.
Cleveland, Ohio 44111
TABLE OF CONTENTS
1. KNOWING YOUR MACHINE
Identification chart................................................................
Specification of machine
Foot control, Power/light switch, Adjusting machine
balance ^ y
Preparation for threading.........................‘
Opening front cover. Opening side coyer, Thread
guide pole. Spool holders. Spool caps,^ Spool nets
Fitting the needle, Needle, thread and fabric chart
.........................................................
..................
2. STARTING TO SEW
Threading your machine i { ^
Threading upper looper.......................................................
Threading lower looper............................— ■ • • ■ ■ v—
Threading needle.................................................................
Changing threads. Cutting off needle thread _
Testing stitch
Overlook stitches. Double-chain stitches with
trimming fabric ,g -y
Adjusting thread tensions
Adjusting stitch length............................................................... „
Needle plate.............................................................
Changing needle plates
Presser foot..............................................................................
Changing presser foot
Stitch applications „„
Overlockstitches
Hem stitching. Pin tucks. Decorative braids.
Narrow hems. Rolled hems. Shell hems oa
Double-chain stitches without trimming fabric
Safety stitches
Basic techniques „g
Outside corners....................................................................
Inside corners.......................................................................„„
Inward curves
Outward curves....................................................................
Finishing seam ends
Removing stitches from fabrics............................................
3. CHECKING PERFORMANCE PROBLEMS....................29
..........................................
...............................................
.......................................
......................................................................
...........................................................
....
.........
....................
.....
..............
......
“ 18
................
4. CARING FOR YOUR MACHINE
Replacing moving cutter
Changing light bulb
Cleaning and oiling........................................
5. OPTIONAL ACCESSORIES
..........................................................
..........................................
.........................
......
................32 -33
^
o
....
■ “
11
^i
..
_
..
Page 3
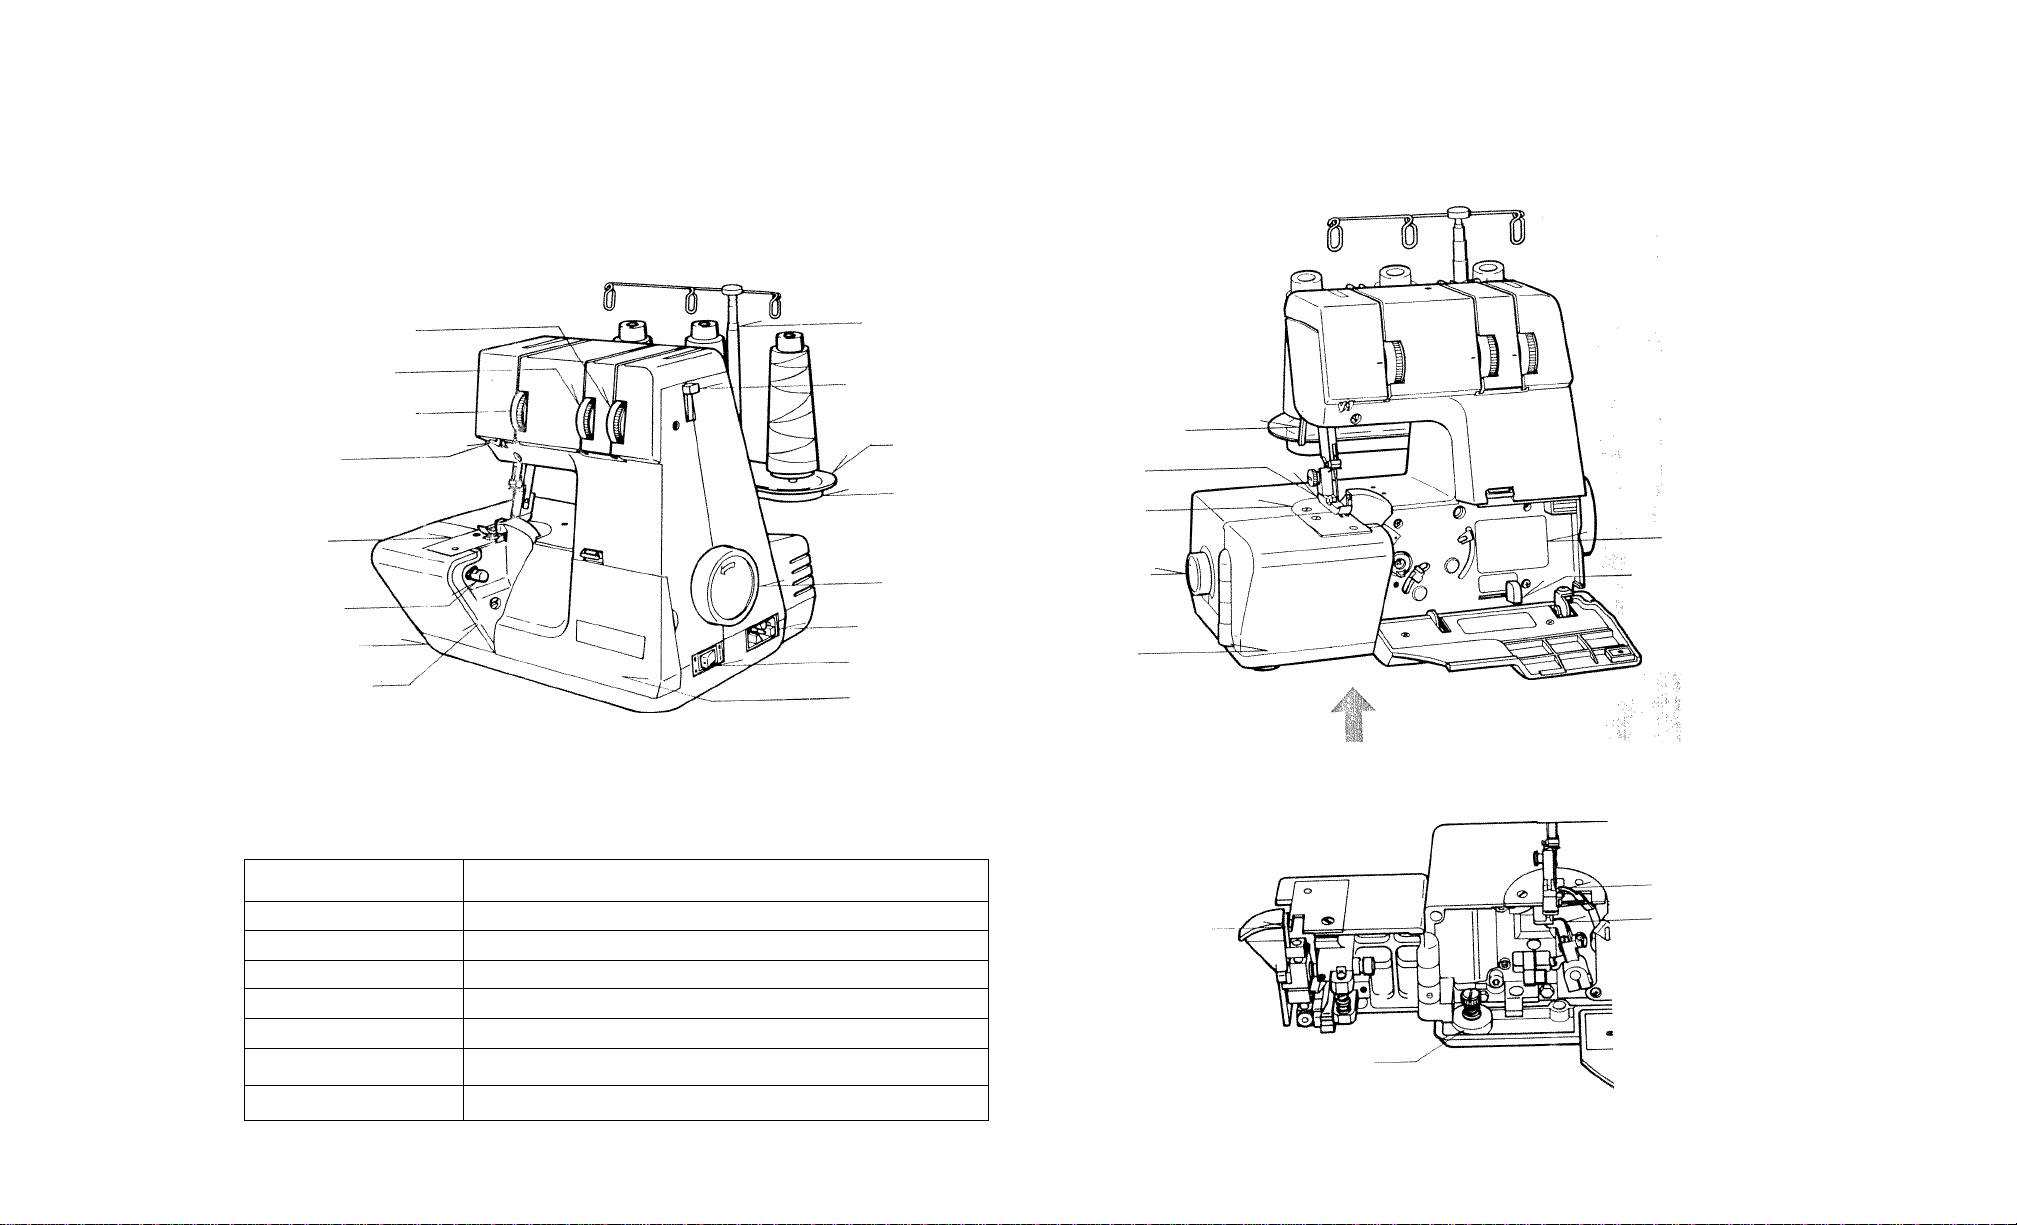
dentification chart
Lower looper thread
tension dial
Upper looper thread
tension dial
Needle thread tension
dial
Thread guide
Cover plate
Release lever
Base
Protection cover
____
SPECIFICATION OF MACHINE
ITEM
Number of Threads
Overedge Stitch Width
Needle
Stitch Length
Stitching Speed
Dimensions
Weight
SPECIFICATION ..............................................................^
2 or 3 Threads
3 5 mm Narrow 12 mmi and Rolled Hems
HA X ISP, HA x 1 (130/705 H)
1 — 5 mm
Ud to 1500 stitches per minute
325 mm(W) x260 mm(D) x275 mm(H)
9.2 Kg. ..............................................................
Thread guide
pole
Tension release
lever
Extension
plate
Spool pin
base
Hand wheel
Plug connector
socket
Light and power
switch
Front cover
----------------
_________________________________________
_____________________________________________—
......................................
Presser foot lever
Presser foot
Needle plate
Stitch length
dial
Side cover
FRONT COVER OPENED
Moving cutter
Bolt for adjusting machine balance
Threading char
Stitcfi selector knot
Upper looper
Lower looper
Page 4
CCESSORY
1 parts listed may be obtained from your
¡arest dealer.
hen ordering, please give;
1. Part number and description.
2. The model and serial number of your
machine, which you will find on the
identification plate, at the back.
;
SETTING UP YOUR MACHINE
Set your sewing machine on a sturdy, fiat
surface.
Your sewing machine has been thoroughly
2.
oiled at the factory. Be sure to wipe off
the needle plate area and bed plate
carefully before sewing a garment. It is
wise to practice on a scrap of fabric so
any surplus oil is absorbed.
3. FOOT CONTROL
Push foot control plug into the connector
socket at the bottom right-hand side of
the machine.
4. POWER/LIGHT SWITCH
Your machine will not operate unless the
power/light switch is turned on. This
same switch controls both the machine
power and sewing light. When leaving
your machine unattended, the machine
MUST be switched off or the plug
removed from the socket-outlet.
When servicing the sewing machine, or
when removing covers or changing
lamps, the machine MUST be discon
nected from the supply by removing the
plug from the socket-outlet.
5. ADJUSTING MACHINE BALANCE
In order that you may be able to
compensate for any uneveness on your
working surface, the machine is fitted
with an adjustable rubber stud.
(1) Push release lever towards you to
open side cover.
(2) Adjust the height of the rubber stud
by turning the bolt.
In order to withdraw the rubber stud,
turn the bolt counter-clockwise.
Power/light
switch' : ■ ',jj ;i fi. ■ 'i?
Page 5
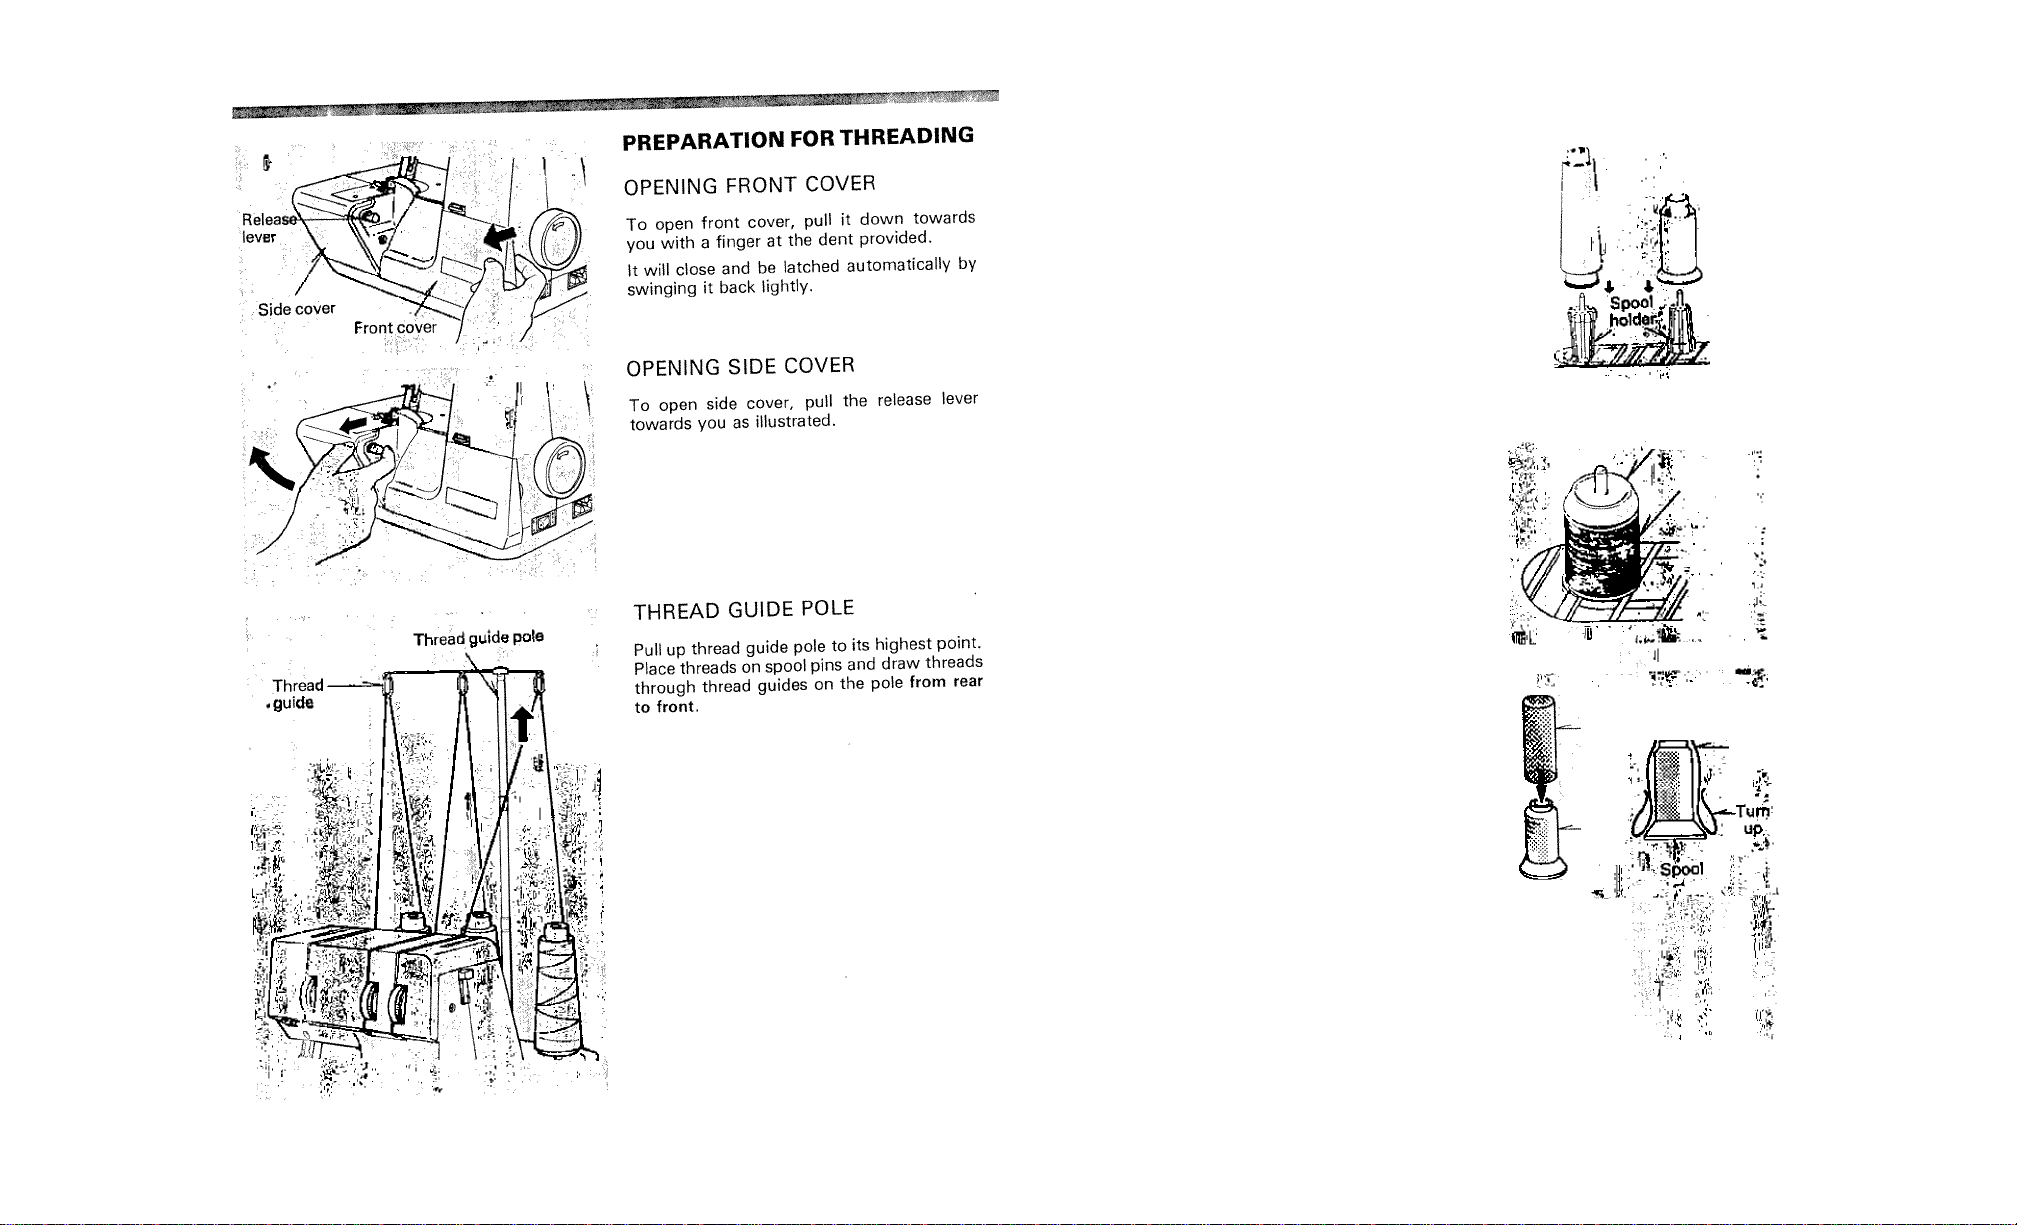
SPOOL HOLDERS
For large diameter cone spools use the
rubber spool holders with the large end at the
top, and for small diameter ones, use the
same rubber spool holders with small end at
the top.
Always use the extension plate with spool
holders.
Cone type thread '■
Extension
plate
SPOOL CAPS
When using reel type thread spools, remove
the spool holders and place spool caps over
the thread spools.
SPOOL NETS
Polyester (filament) threads, or bulk nylon
threads are likely to loosen off the spool while
unwinding, causing thread tangling or inter
mittent irregular thread feeding. To keep
consistent unwinding of such threads, hence
constant balancing of thread tensions on
stitches, utilize the spool net supplied in the
accessories, by sleeving it over the spool as
illustrated.
Reel type thread
"T ■ ' *
TSpopl cap V
, ThPWd comes;-
,. ..voff^e.top ,i¡^.
Net
■ ■" Net'
Spool
'*5!
rííJW'
Page 6
Needle clamp
screw
FITTING THE NEEDLE
Raise needle bar to its highest point by
turning hand wheel towards you, but leave
presser foot down.
Loosen needle clamp screw to remove old
needle. Place new needle with FLAT SIDE
AWAY FROM YOU, up into the groove of
the needle bar, ensuring that it is inserted as
far up as it will go. Re-tighten the needle
clamp screw securely.
THREADING YOUR MACHINE
Wrong threading may cause skipped stitches,
breaking threads, or other problems.
Try to learn the correct threading at this stage
before moving on to test the machine
stitches.
Threading must be carried out in the
sequence of Upper Looper — Lower Looper—
Needle, in this order.
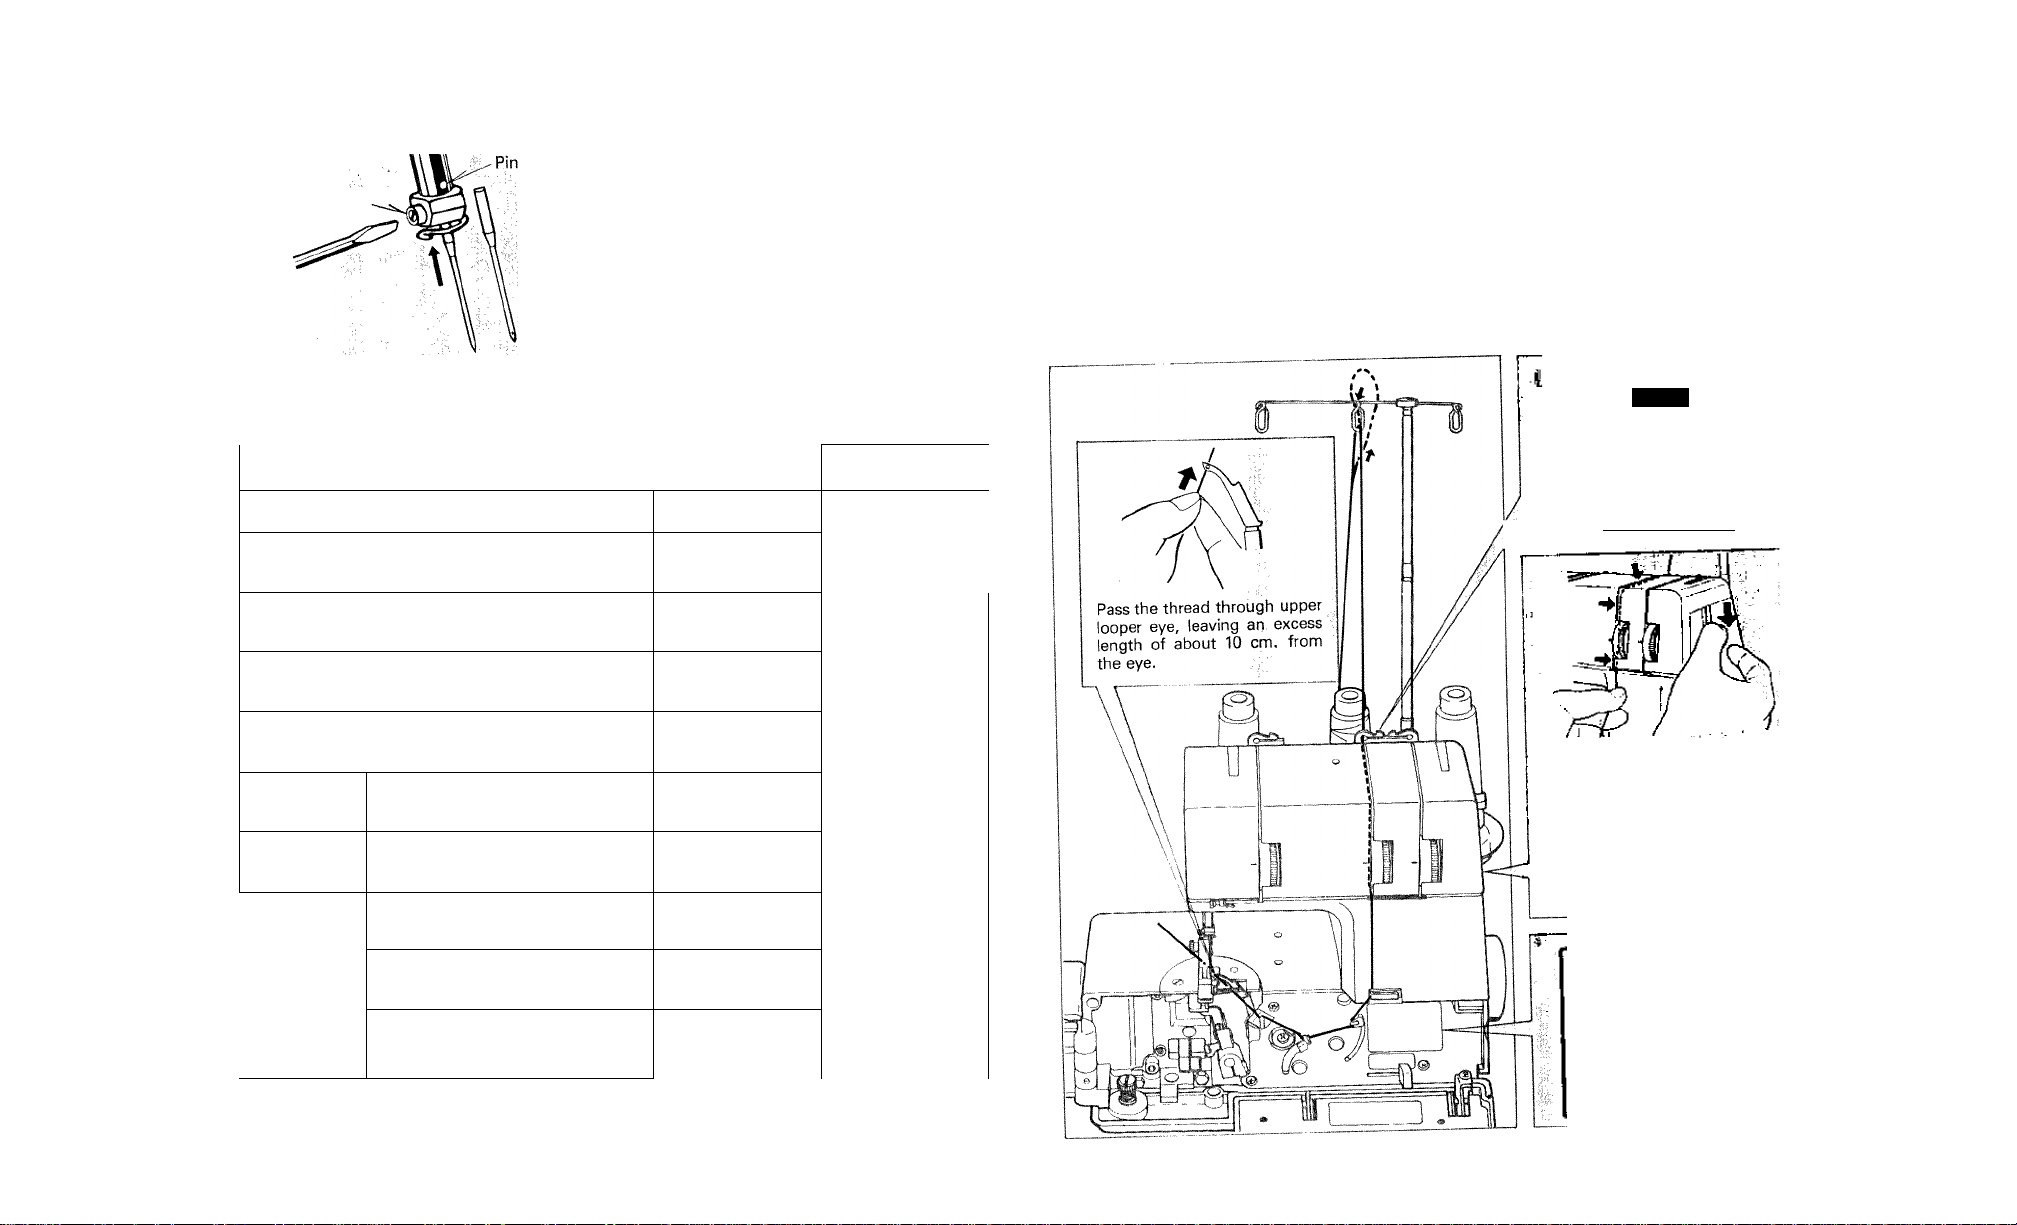
THREADING UPPER LOOPER
Whenever it becomes necessary to re-threac|
lower looper while sewing, remove needlq
thread out of the needle eye first, and
re-thread the lower looper, in order to keed
the threads from tangling each other.
Open the front cover and the side coverj
beforehand.
Raise needle bar to its highest point by
turning hand wheel towards you by hand.
NEEDLE, THREAD AND FABRIC CHART
Use HA X 1 bP, P
'T ' M:!
!■ :,v.
AX ! UOU//UDn/ i>iccuico.
Light Weight:
Oroandie, Lawn, Gingham
Heavy Weight:
Oxford, Denim, Cotton Gabardine
Light Weight:
Tropical, Wool, Poplin
Serge, Gabardine, Flannel
mm
Heavyweight:
Velours, Camelhair, Astrakhan
Lightweight:
Georgette Crepe, Voile, Satin
Heavyweight:
Taffeta, Twills, Denim
Tricot
.H
Jersey
»'1
Wool
f'. ;;t
■ ! U.'
1 .V: . - ■ fu
byninetic mredub die
very useful for different types of fabne.
Cotton No. 100
Polyester
No. 60 - 50
Cotton No. 60
Polyester
No. 80
Cotton No. 60
Polyester
No. 80-60
Cotton No. 60
Polyester
No. 60 - 50
Cotton No. 60
Polyester
No. 100-80
Cotton No. 120-80
Polyester
No. 60
Cotton No. 60
Polyester
No. 80-60
Cotton No. 80 - 60
Polyester
No. 60 - 50
Cotton No. 60
Polyester
No. 60 - 50
Bulk Nylon
100(16)
for heavy weight
fabrics: denim
90(14)
for general sewing
75(11)
for light weight
fabrics
J
».ss
r
Feed . the ■Mlipótìti ’ the
PL gutdd|a^;Illu5tfàtBd;
Press: dowii;'‘tension- rtìease
lever with ^irr righfc-.thuftib.
Holding th0,;i^er et its' down
position, lead the uppar'tiiifd«d
through th&i cenere’slot by
pulling it bet^n theTte^ton
disMto roceiya^tdnsta^pmjiBr
. tension while séwing.y
j
_______
tSJ I
I
I
1
Page 7

HREADING LOWER LOOPER
Pass the thread
through lower
looper eye, and
hook it around
part A as indh
cated by an arrow
on illustration.
Leave about 10
cm. extra thread
from looper eye.
w
/7
Feed the thread through the
thread guide as illustrated.
I -♦?
/
While pressing down and hold^
ing tension release lever with
your right thumb, pull the
lower thread passing through
right-hand tension slot with
your left-hand.
THREADING NEEDLE
.‘•I
7v-lni
-■V .It*- I
Feed the ,
thread ouidé;iis“Ìlltistratecirn r^;.
While pressing down and hold
ing tension relaase/léver^t its
dowp position, draWtha lieodle
thread passing ;
hand tenslori sldji' to ta^sure
positive engagement of the..it
thread with tension fdiscs
inside.
1
Raise the needle to its
highest position. Thread
the needle from front to
back through needle eye,
pull the thread backwardly
together with looper
threads passing along the
right side of presser foot,
and turn around towards
left under the rear edge of
the foot, leaving an extra
length of about 10 cm.^
Dravy the thread over
thread guide as illustrated.
ÜSiSi?
the
Page 8

HELPFUL HINTS
REPLACING THREAD SPOOLS
When replacing thread spools, the following
steps may be helpful for guick changeover.
Cut off existing threads in the vicinity of
1.
spools and tie-connect the cut ends (not
spool side) with the threads from new
spools.
Raise presser foot.
2.
Lower needle bar to its bottom position
3.
by turning hand wheel counter clockwise
by hand. Pressing down and holding
tension release lever, carefully pull the
existing looper threads until the connect
ing knots come under the presser foot.
As for the needle thread, stop pulling the
thread when the knot approaches to
needle eye, cut off the knot and thread
the needle with new thread.
TESTING STITCH
OVERLOCK STITCHES
After threading is completed, test the the
machine stitch in the following order.
1. Lower the presser foot. Lightly pulling all
the threads towards left, rotate the hand
wheel towards you a few times by hand,
and see if the lock stitches are properly
formed.
Check and confirm balance of thread
2.
tensions through test sewing with spare
fabric that you plan to sew. Start to run
the machine at low speed and feed in test
fabric under the presser foot, by slightly
pushing it forward. (This can be done
with the presser foot down on most
fabrics except bulky materials,) Guide the
fabric with light touch of your hand, as
machine automatically feeds the material.
CUTTING NEEDLE THREAD
Raveled, or loose end of the thread may
cause difficulty in needle threading. To
obtain clear-cut end, draw the thread passing
under the moving cutter and cut it by turning
hand wheel manually towards you, or by
using scissors.
3. On reaching fabric end, continue running
machine at low speed, gently pulling the
fabric rearwardly, until extra lock stitches
in length of about 5 to 7 cm are produced
without fabric.
Cut it off at the center with a pair of
scissors, or using thread cutter on the
presser bar.
13
Page 9

DOUBLE-CHAIN STITCHES
Double-chain stitching can be
performed either with trimming
the fabric or without trimming.
Double-chain stitches with
trimming fabric
ADJUSTING THREAD TENSIONS
Thread tensions will vary according to the
type and thickness of both thread and fabric.
Turning tension dial upwards gives a tighter
thread tension.Turning tension dial down
wards gives a looser thread tension. The
higher the number, the tighter the tension.
Test each thread tension on a spare piece of
the fabric you propose using.
* Set up each thread tension according to the chart provided below
MACHINE SETTING
1. Open the front cover and the
side cover.
2. Manually turning the hand
n
1
—
J
(
wheel towards you, set lower
thread guide at its lowest point.
Set the stitch selector lever at
its extreme left-end position for
double-chain stitching.
3. Close the front cover and the
side cover.
1. Set the stitch length control at 3. Raise
the presser foot, place a spare piece of
fabric under the foot, and lower the foot.
Attention: This model does not produce
chain stitches without fabric.
Be sure that fabric be placed
under the needle before start
ing to run the machine. The
upper looper thread is not used
to form double-chain stitches,
so remove the thread from
upper looper.
Start sewing at low speed, lightly guiding
the fabric by hand as machine feeds it.
2. On reaching fabric end, stop machine and
bring needle bar to its highest point by
manually turning hand wheel towards
you. Raise Presser foot. Pressing down
and holding tension release lever, remove
the fabric by left hand.
For double-chain stitches without trim
ming fabric, see page 24 - 25.
Try test -sewing with a piece of actual fabric you use and find the best
dial settings.
Page 10

"I
ADJUSTING THREAD TENSIONS
ust right.
If threads do not appear as above, identify it and make the correction to obtain the correct tension,
referring to the illustrations below.
1. Upper looper thread pulled 2. Lower looper thread pulled
to under side. to top side.
OVERLOOK STITCH
UPPER LOOPER THREAD should lie flat on the
top^side of fabric and lock with the lower looper
thread on the edge of the material.
LOWER LOOPER THREAD should lie flat on the
underside of fabric and lock with the upper
looper thread on the edge of the material.
NEEDLE THREAD acts as a 'safety stitch' and
should lie mainly on the top side dike a row of
normal straight sewing! on the left hand side of
the upper looper thread, and just visible in the
lower looper thread on the underside of the
fabric.
3. Needle thread loose and
visible on under side of
fabric.
" . i.'O'
Lower
looper
thread
DOUBLE CHAIN STITCH
* If threads do not appear as illustrated on the left, adjust tension as described below.
Just right.
NEEDLE THREAD should lie mainly on the top
side (like a row of normal straight sewing) and
just visible on the underside of the fabric. Needle thread too loose.
Adjustment:
Increase needle thread tension.
vll:
U ft
Adjustment;
Increase upper looper thread
tension and/or decrease lower
looper tension.
Adjustment:
Increase lower looper thread
tension and/or decrease upper
looper tension.
Adjustment:
Increase needle thread tension
and/or decrease either or both
looper threads.
,y|:
"■V ■
W-
«' I
it
1:
-A ,
Page 11

ADJUSTING STITCH LENGTH
Turn the stitch length dial with your left hand
until it comes to your required length at the
guideline.
The higher the number, the longer the stitch.
This dial allows for adjustment of stitch
length from 1 to 5 mm.
RECOMMENDED STITCH LENGTH SETTING
Regular hem
Narrow hem
Rolled hem
1 to 5 mm
3 mm ¡standard setting)
1.5 to 2 mm
1 to 1.5 mm
NEEDLE PLATE
When first delivered, your machine will be
fitted with the standard 3.5 mm needle plate,
which will be found suitable for most general
stitching requirements.
Your machine is also supplied with another
needle plate for narrow and rolled hems. This
will be found in your accessory box.
Needle plate for narrow jjiS i;.
and rolled herns,' ^ ^
Shell hem
Double Chain
Stitch
When sewing on 'stretch fabrics' or 'knits' it
may be advisable to adjust the stitch length
to quite different settings to those shown
above. Because of the wide range of these
fabrics which are now available it is not
possible to give specific settings. It is
suggested, therefore, that you make several
sewing tests, with various settings to
determine the most suitable for the particular
job in hand.
3 to 4 mm
2.5 to 5 mm
CHANGING NEEDLE PLATES
First disconnect machine from power supply
by removing plug from socket outlet.
1. Lift up presser foot, and raise needle bar
to the top position by turning hand wheel
manually towards you. Open side cover.
2. Using screw driver(L) in the accessories,
remove set screw and take out needle
plate sliding away from you as illustrated.
3. Place new needle plate in position, by
sliding it towards you, and secure it with
the set screw.
Page 12

.........
PRESSER FOOT
Your machine is equipped with standard
presser foot for general use when delivered.
Specially designed blind hem foot and an
elastic foot are available as optional extra.
(See page 32, 33)
CHANGING PRESSER FOOT
1. Lift up presser foot, and raise needle bar
to the top position by turning hand wheel
towards you by hand.
2. Loosen set screw by turning it anticlock
wise with screw driver (L), and remove
the existing foot as illustrated.
3. Set new foot in position and tighten set
screw with the screwdriver by turning it
clockwise.
CAUTION: In the case a blind hem foot, or
an elastic foot is set on the
presser bar, the following care
must be exercised when you are
going to open machine side
cover.
(1) Lower needle bar to the bottom
position, by turning hand wheel
towards you by hand.
(2) Raise presser foot. Lift up and
hold front edge of the foot with a
finger, and open the machine side
cover.
STITCH APPLICATIONS
OVERLOOK STITCHES
The basic stitches applicable on wide range in
variety of fabrics from shear textiles upto the
heavy duty bulky webs. Among its versatile
applications, pin tucks and decorative braids
are well accepted, besides the professional
hem stitching work.
Remove the extension table, if
assembled for double-chain
stitching, by pulling it off the
machine base. Remove the
thread from lower looper,
thread upper looper according
to the instructions on page 9,
and re-thread the lower looper.
Manually turning hand wheel
towards you, bring the lower
thread guide to its lowest
point. Bring the needle to its
lowest position.
Set the selector knob at its
extreme right end for over
looking position.
To change machine settings from double
chain stitching (without trimrning) into over
looking, follow the instruction below.
...
OJ \
V
-
k
■f:f
mm
. 'fev
21
Page 13

1. НЕМ STITCHING
Machine trims and overlooks
fabric edges simultaneously,
to' produce neat, reinforced
hem.
PIN TUCKS
Pin tucks are used for
decorative appearance, or,
purposely applied in the area
necessary to reduce fabric
width partially. When sewing
along the pre-folded line, pay
attention to keep fabric off the
moving cutter blade to avoid
damage on fabric.
decorative braids
Sew over the braid in width
suitable for overlook stitch
width, giving it proper tension
with your hands.
Triple-twisting of the finished
braids in selected color
combination will add fabulous
decorations to your garment.
4. NARROW HEMS
Narrow hems are formed by overlooking
in width of about 2 rnm over the
automatically turned-up edges, and are
widely accepted for finishing edges on
shear fabrics, like georgette de Chine
silk etc... not recommended for use on
heavy materials on account of its limited
stitch width.
* Replace regular needle plate with
narrow/rolled hem needle plate.
* Set stitch length control at 1.5 to 2 mm.
* Use Tetron No. 50 thread for needle
and woolly nylon (less stretchable;
threads for both loopers.
5. ROLLED HEMS
With the same stitch width of about
2 mm, as for narrow hems, fabric edge is
further rolled in by more concentrated
stitches, which produce additional
strength to the edges and provide
different decorative appearance best
suitable for finishing edges on frills.
* Replace regular needle plate with
narrow/rolled hem needle plate.
* Set stitch length control at 1 to 1.5 mm.
* Use Tetron No. 100 thread for needle,
and woolly nylon threads (less stretch-
able! for both loopers.
SHELL HEMS
Sewing on shear fabrics with the same
thread tensions as for roll hemming, but
with a longer stitch length, will produce a
shell-tuck effect, so-called PIQUE, which
is most suitable for edge decorations on
scarves and others made of thin materials.
* Replace needle plate with the narrow/
rolled hem needle plate as supplied with
other accessories.
* Set stitch length control to produce 3 to
4 mm stitches.
* Use Tetron No. 100 thread for needle
and woolly nylon, or bulky nylon thread
(less stretchablel for both loopers.
* See page 15 and 16 for adjusting thread
tensions.
z
Page 14

7j^-rriwggam«aa^M>:'~
..................
double-chain stitches
The double-chain stitches present
appearance like conventional
straight stitches on surfaceof fabric,
and chain effect on the back
-suitable for sewing a single, or
multiple layers of stretchable fabrics.
Upper looper thread is not used in
forming the stitches.
Double-chain stitching can be
performed either with trimming the
fabric, or without trimming.
Double-chain stitches without
trimming fabric
MACHINE SETTING
1. Open the front cover and the side
cover. (See page 6.)
2. Manually turning the hand wheel
towards you, set lower thread
guide at its lowest point. Set the
stitch selector lever at its extreme
left-end position for double-chain
stitching.
3. Assemble the extension table
onto the machine.
ASSEMBLING TO MACHINE BASE
Assemble the extension table with turned-up
legs, by pushing in the two studs on the rear
edge to the holes provided on machine base.
Attention: When assembling the extension
table to machine base, care must
be exercised to keep both upper
and lower looper threads un
touched and free from any ob
struction on thread paths.
Use the cloth guide to be attached to the
extension table.
The cloth guide helps feed the fabric straight,
or when sewing along at a fixed distance
from the fabric edge.
Graduations are marked on extension table
for guide reference.
Place the cloth guide at the desired positioti,
and secure it tightly onto the extension table
with thumb screw.
CHANGING SEWING DIRECTIONS WHILE
DOUBLE-CHAIN STITCHING
To change sewing directions while sewing
with double-chain stitches, stop the machine
with needle at its lowest position piercing
through the fabric, raise presser foot,
carefully turn around the fabric to the desired
direction, lower the foot, and start sewing in
the new direction.
Connecting holes,
1
Pins
■; '.i • 1 (,* ■ . 1
'ft:*
№
1 %
-1
■■ f i
i;y'
ii
-’’■TV;
24
Jo’nt
PUTTING UP THE LEGS
Pushing up support links at the joint
with a finger, as illustrated, will turn
up the front legs and lock them in
position.
SAFETY STITCHES
So-called safety stitches are formed in
combination of double-chain stitching and
overlooking, for the purpose of reinforcement
on seams.
Finish the double-chain stitching first, and
overlock the seam preferably 2 or 3 mm apart
from the double-chain stitching line.
Page 15

BASIC TECHNIQUES
Sewing off and back on creates extra thread
which must be disposed of and tied off.
INSIDE CORNERS
You may either cut your fabric to desired size
or mark your fabric and carefully follow your
line and trim off excess.
OUTSIDE CORNERS
To attain a neat outside corner, do the
following:
1. Sew one side of the fabric to end.
2. Carefully raise the needle and presser
foot.
3. Grasp the fabric gently and rotate the
cloth.
4. Slide the threads off the seam forming on
the tongue of the needle plate, while
pressing the tension release lever down
with your right hand.
5. Realign the edge of the fabric and put the
cut edge of the fabric against the cutter.
6. Align the needle back into the needle line
instead of the edge of the fabric.
7. Overlook the edge as needed, repeat for
other corners.
Align the fabric edge with the inside edge
1.
of cutter.
Overlook stitch to the inside edge,
2.
allowing your cutter to make one cut into
the inside corner.
3. CAUTION: Your cutter is approximately
4. Raise up presser foot and needle, pivot
in front of the needle, so you must
fold your material away from the cutter.
Sew to the corner and stop.
material, align the fabric edge against the
inside edge of cutter.
5. Slide the thread off the seam forming
tongue of needle plate.
6. Align needle to form a square corner and
sew the balance of your seam.
UNCUT MATERIAL: Follow the same
procedure, but you must carefully follow
your mark. Always consider that you will
have excess cut-away material to handle.
Page 16

I:
INWARD CURVES (Concave)
When sewing on inward curve, guide the
fabric gently in the way that the seam line is
passing through under the front right edge of
presser foot (or a bit inward towards left),
constantly applying light pressure by left
hand at point A and by right hand at point B,
in the directions as indicated by arrows on
illustration.
OUTWARD CURVES (Convex)
Do the same way as for sewing on inward
curve, but applying pressures in the opposite
directions at points A and B respectively, as
indicated by arrows.
FINISHING SEAM ENDS
When sewing work has been done, it is
recommended that both ends of the seams
be finished with a little extra work.
3. CHECKING PERFORMANCE PROBLEMS
iirPRdfeLEM ' Ü' .
Irrediilar,
S -BfeaKing.j i
[t- Skipping'*':
%
y^S'raoking', ^
vThfeads-^- w
■ lncPr№c.t\f™
' l'ncôïfècwz^^eeaw,,.
iliTipropdr
l.Ldos'e PriK^^QOtiJ
^Incorrect
: Incorrect¿.r
ihfelii. ft Reset Thread Tension(s). : ' ^ .
Loosia Pres^.E^PO^»''
’I nbdtreclSri^icf _
I'irdjpropor fhrMdlngiw-
.i-THrééd TwaM^ltP^B^^
’il hcOirect Mtd™ 9,f
Tlviedd'Si№!;Mh9l^i^
iThread, Sujÿe'Pbtelr^B^de^
t- - - ÇOWWËCTION
■'fe Choose correct size Needle for Thread
' v-W '■ Pahrin
and Fabric.
Re-thread Maichinaii.^
Do not pull Fabric; guloeft gently.
Reset Presser Foot. ■
Do not pul! Fabric; guide it gently.
Choose correct size Needle for Thread:
and Fabric.
ResetNeedle. , n "■
Reset Presser Foot.
Reset Thread tension'ls).;,;
insert new Needle. ‘ v
Reset Presser Foot. ,
Re-thread Machine. . (
Choose correct size Needle for Thread
and Fabric. .t' ,,
Insert new Needle. _
Reset Needle;
Re-thread Machine: ^ " ’^111
1 nsert new Needle.. ^ ^
Reset ThreadTenaionlsV. ■ >1,^'■
„ResetNeedle.- .'iiV
Reset Spool properly.,, I
Fully extendpuide Pole-: ?(: ■ .a-iK
LOCK STITCHES
Using an embroidery needle, bring back 2 or
3 cm of extra chains through the lock stitches
already made on the fabric as illustrated.
DOUBLE-CHAIN STITCHES
Make a knot with lower looper thread and
needle thread at both ends of the seam.
REMOVING STITCHES FROM
FABRICS
To remove the stitches already sewn on
fabrics, wherever necessary, snip off needle
thread at intervals and pull off looper
thread(s).
Page 17

4. CARING FOR YOUR MACHINE
REPLACEMENT OF MOVING CUTTER
Should it become necessary to replace
moving cutter, due to it becoming blunt,
apply the following procedure. A spare cutter
will be found in your accessories.
NOTE: You should not need to replace fixed
cutter, which is made of a special
hard alloy material.
FIRST REMOVE THE POWER PLUG FROM
THF SUPPLY^SOCKET^OUTLET.
Side cover
Release lever
Open side cover. Loosen set screw for
protection cover with screwdriver in the
accessories. Loosen release lever with
spanner in the accessories, and take out
protection cover.
While keeping set screw of moving cutter
from rotating with screwdriver, loosen
nut on the other side with spanner, and
take out moving cutter.
Set the replacement cutter in positon,
and secure it with screw and nut.
Assemble protection cover in the reverse
way as described in step 1 above.
CLEANING AND OILING
To keep you machine running smoothly, it is
necessary to keep it clean and lubricated at
ail times.
FIRST DISCONNECT MACHINE FROM
POWER SUPPLY BY REMOVING PLUG
FROM SOCKET-OUTLET.
1. Open both front and side covers. Using
the brush provided, remove dust and lint
that have accumulated around the whole
exposed area.
2. Lay the machine on its back and take off
the lint tray by removing the single
securing screw.
Using the brush provided, remove any
dust and lint that may have accumulated
in the tray and bottom of the machine.
Replace the tray and secure by re-tighten-
ing the screw.
3. Apply a few drops of oil to the points
indicated by arrows.
ALWAYS USE A GOOD QUALITY
SEWING MACHINE OIL.
4. Wipe off any stains with a soft cloth.
30
Light cover
CHANGING LIGHT BULB
The sewing light is located under the
machine arm, as shown, and illuminates the
sewing area only.
DISCONNECT MACHINE FROM THE
POWER SUPPLY BY REMOVING PLUG
FROM SOCKET-OUTLET.
DO NOT REPLACE BULB OF MORE THAN
15 WATTS MAX.
To change bulb, pull down light cover,
remove old bulb by unscrewing. Replace
with new bulb.
Page 18

5. OPTIONAL ACCESSORIES
Optional Accessories described in this section
are not supplied with this Machine as
standard equipments, but can be obtained
from the Dealer who supplied your Machine
or by contacting us direct.
ATTACHING ELASTIC TAPE
USING ELASTIC FOOT
1. Replace regular foot with elastic foot.
2. Set stitch length to about 4.
3. Slightly raise the roller portion of the foot
and insert elastic tape between the roller
and the lower support bar as illustrated,
until the edge of elastic reaches the feed
dog teeth. (It may be necessary to loosen
the Tension Control Screw on the Roller
to feed the Elastic through).
4. Sew the elastic tape for about one inch or
so to confirm the tape is being properly
sewn.
5. Place the fabric under the foot and sew
together with the elastic tape.
6. Check that the Stitch formation is
uniformally balanced and if necessary
adjust the Thread Tension Controls.
7. Adjust the Tension Control Screw of the
Roller so that the desired finish can be
obtained.
a. Tighter tension of the Roller gives more
elasticity of the fabric after it is sewn.
b. Looser tension of the roller gives less
elasticity of the fabric.
32
 Loading...