

Page 1
REX
BLINDSTITCH
SEWING MACHINES
INSTRUCTION
BOOK
MODELS
lOl-l • 101-2 • 101-3 • 101-1 PB
REX TRADING CORPORATION
278 — I5lh AVENUE, NEWARK, N. J. 07103
Afe« Corfa 2§| —. 242-84SS Cabk Arfdrcni REX . NEWARK, N. i.
Page 2

INDEX
PAGE
Changing 1-1 and 2-1 Ratios........................................................ 3
Knee Lifter Adjustment..................................................................... ^
Mounting Machine ........................................................................... 5
Oiling Instructions ............................................................................ ^
Threading Chart ...........................................................................
Needle Setting ................................................................................. 8
Needle Changing ............................................................................. 8
Hew to Sew.................................................................................... 10
Tension .......................................................................................... 10
Proper Stitching ........................................................................... 1 1
Part Numbers and Illustrations
.....................................................
12
Hemmers ....................................................................................... 80
Copyrighted 1964
By Rex Trading Corporation
Printed U.S.A.
Page 3
REX BLINDSTITCH RATIO DIAL
¡LOCATED IN REAR OF MACHINE)
RATIO 1-1 to catch every stitch
RATIO 2-1 to catch every other stitch
WHEN CHANGING FROM 1-1 TO 2-1 RATIO
TURN RATIO DIAL
lllh. '*
FROM
TURN PENETRATION DIAL
ONE COMPLETE TURN
TOWARD LESS
1-1
TO
llll.....
2-1
-
WHEN CHANGING FROM 2-1 TO 1-1 RATIO
TURN RATIO DIAL
FROM
TURN PENETRATION DIAL
2-1
TO
1-1
RATIO
RATIO
ONE COMPLETE TURN
TOWARD MORE
Page 4
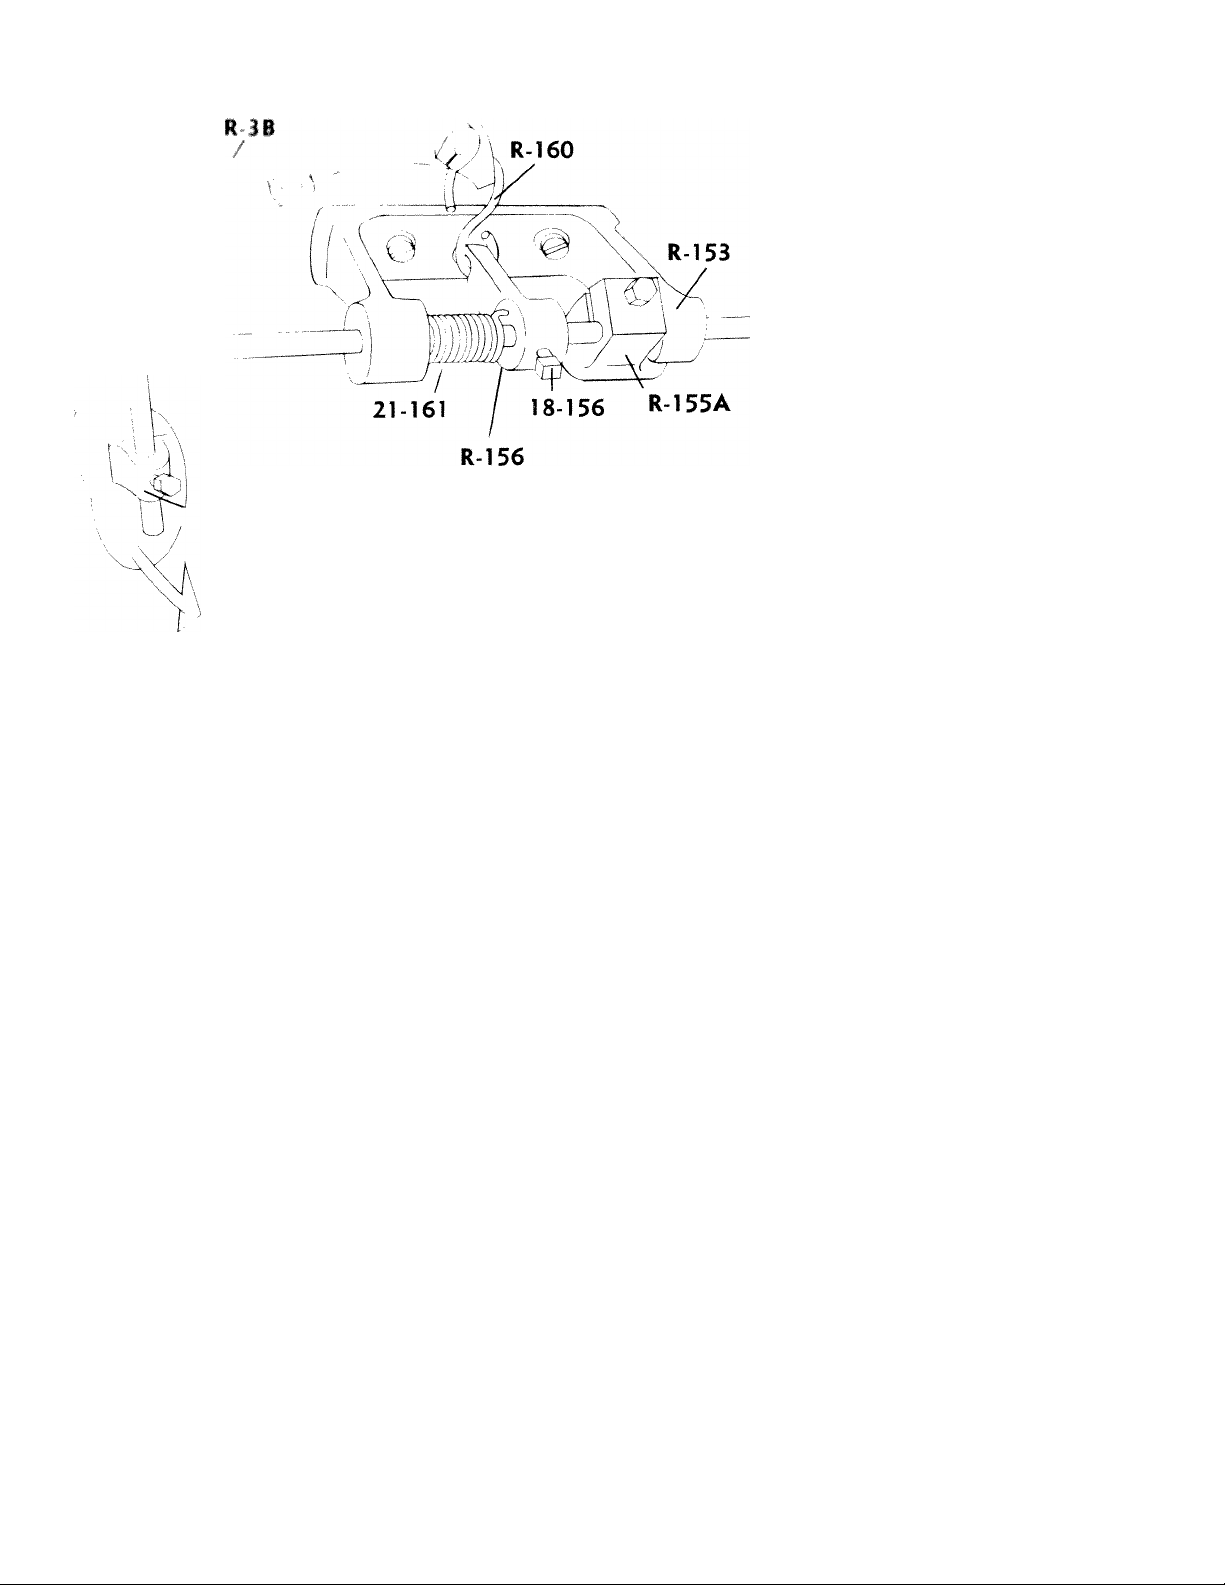
iviNCi: LiricK Mwjua I mcM I
r R-152
If spring
place . . .
1 Loosen set screw ( I 8-156) and disconnect "S"
hook (R-160) from lever IR-156).
2 Wind spring 121-161) by turning lever
(R-1 56) when machine is not fastened to table.
2 When spring is wound, tighten lever set screw temporarily,
^ Attach “S" hook (R-160) back to lever (R-156).
5 Adjust knee lifter to comfort of operator by loosening lever set screw. When
in desired position, tighten set screw (18-156) securely,
g With knee, press knee lifter to right to bring lever (R-1561 down to bottom
of "S" hook (R-160). While in this position, loosen screw on stop bracket
(R-155A), bring stop firmly up to bottom of knee lifter bracket (R-153)
and tighten screw securely. If properly done, it should look like illustration.
-] IMPORTANT STEP:
For the final operation, tap knee lifter (R-152) slightly to the LEFT, This
little “give" should relieve tension of hook (R-160) allowing it to ploy
freely between feed frame (36) and lever (R-156). Keeping this slack is
all important for proper operotion.
WHEN MACHINE IS WORKING, KNEE LIFTER (R-152) WILL NOT SWING
BACK AND FORTH, IF PROPERLY ADJUSTED.
(At no time, should the operator's knee be in contact With the knee lifter when
machine is in operation).
(21-161) is out of
rewind as follows:
Page 5

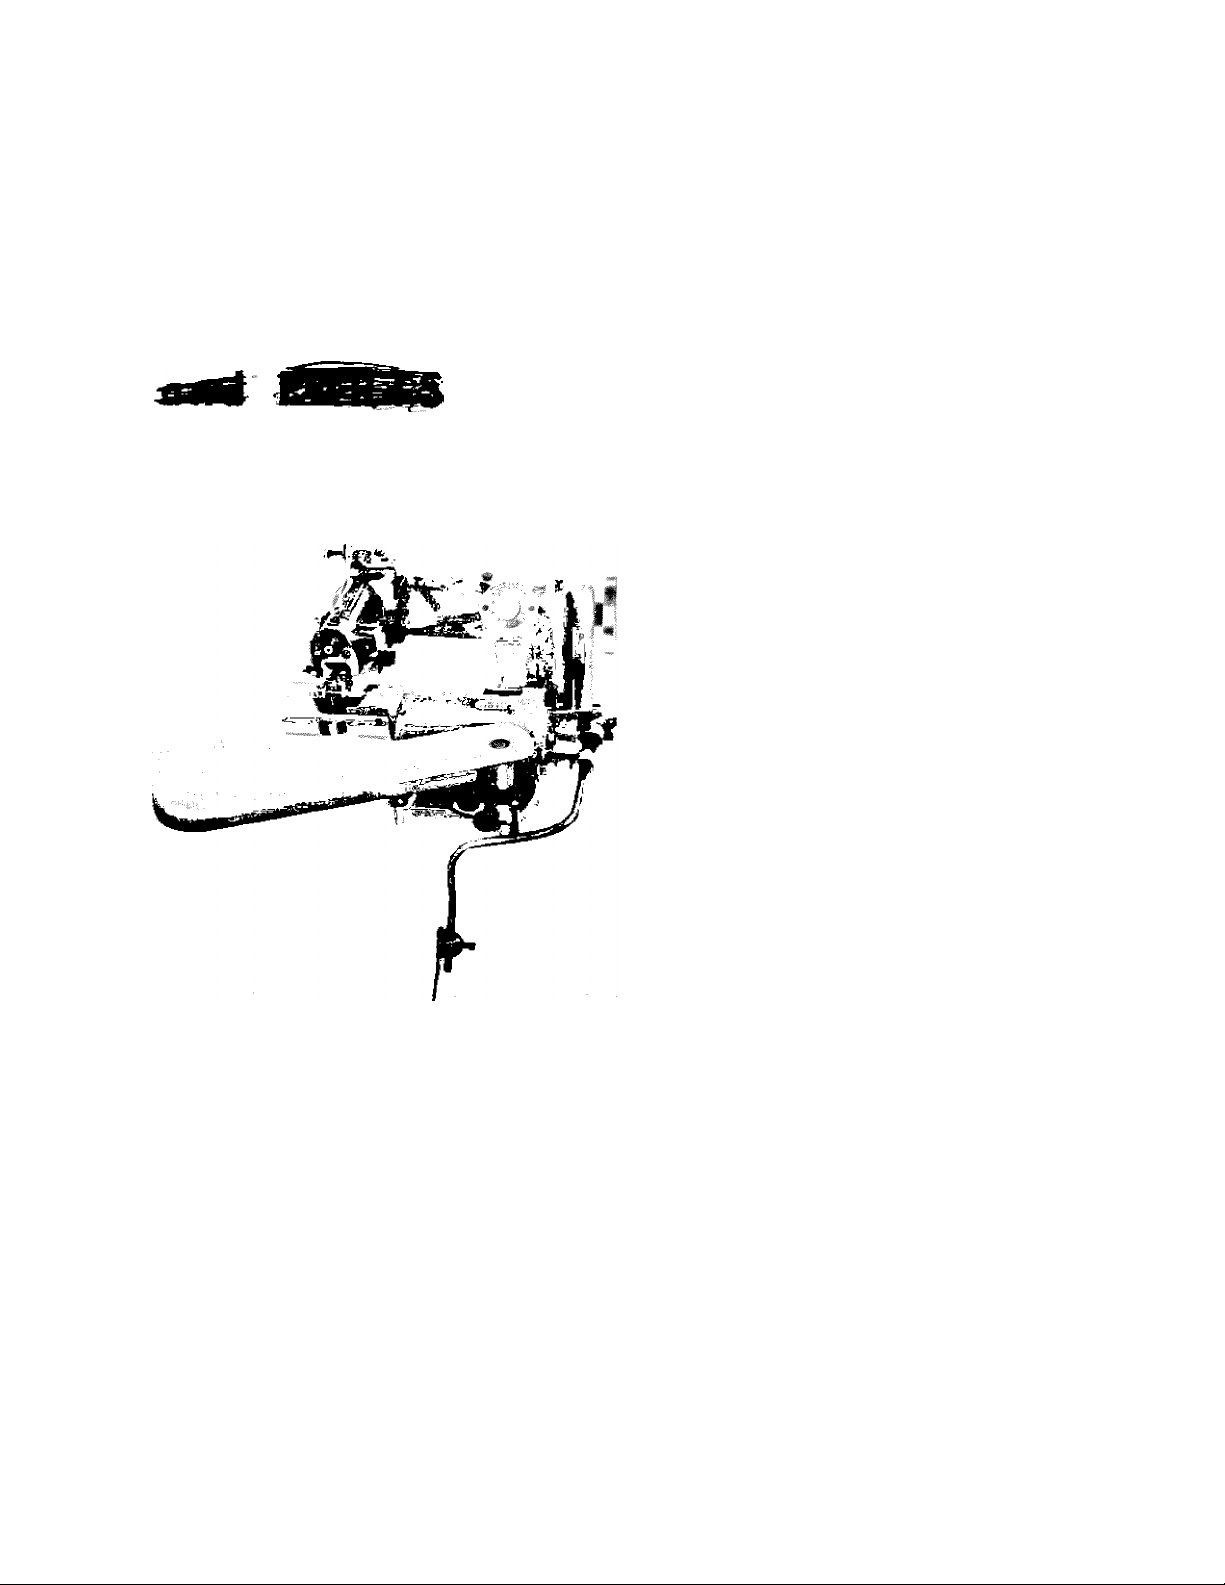
MOUNTING MACHINE
I ^ Fasten machine to table using felt pad. Tighten screws
evenly, turning each a little at a time.
When an individual motor and clutch unit is employed,
it is recommended that the motor be rated at 13 HP and
1725 1750 RPM. On all standard models, use a 3’/2"
outside diameter pulley. On models intended for altera
tion, use a 2’/2" outside diameter pulley.
When the machine is mounted on a power table, a 4"
pulley should be used. If possible, when using such
stands, the machine should be mounted TO AVOID
CROSSING THE BELT.
The maximum machine speed recommended for any
installation is 3000 RPM, unless otherwise specified.
2 The handwheel's direction of rotation is away from the
operator. It rotates in a clock-wise direction when looking at
the face of the wheel pulley, as shown by the arrow.
Either V-belting or round leather belting may be used. Ex
cessive tension of belt will cause over-heating and freezing
of bearing at handwheel.
Page 6

OILING INSTRUCTIONS
CAUTION: BEFORE operating machine, lubricate
' IN ACCORDANCE WITH INSTRUCTIONS.
REFER TO OIL CHART.
Place a few drops of oil at all points shown on the oiling
chart. All moving parts MUST be oiled.
2 In production use, the machine should be oiled twice daily
Page 7

THREADING CHART
1 Use any type thread which is suitable for the fabric being
’ sewn. This includes mercerized, 00, silk and synthetic
threads.
2 The thread is passed through rear thread guide A, then slides
between two tension discs, B under pin C, through front
thread guide D , . . then down through needle clamp guide
hole E . . . and entering from the underside of needle hole F.
3 Leave thread about 2 to 3 inches past needle hole.
THREADING NEEDLE
I To thread needle at point F
Swing work plate out of way
a.
Depress cylinder out of way
b.
with knee lifter (R-152)
Hold thread between index
c.
finger and thumb
End of thread must be stub
d.
not feather edge.
Page 8

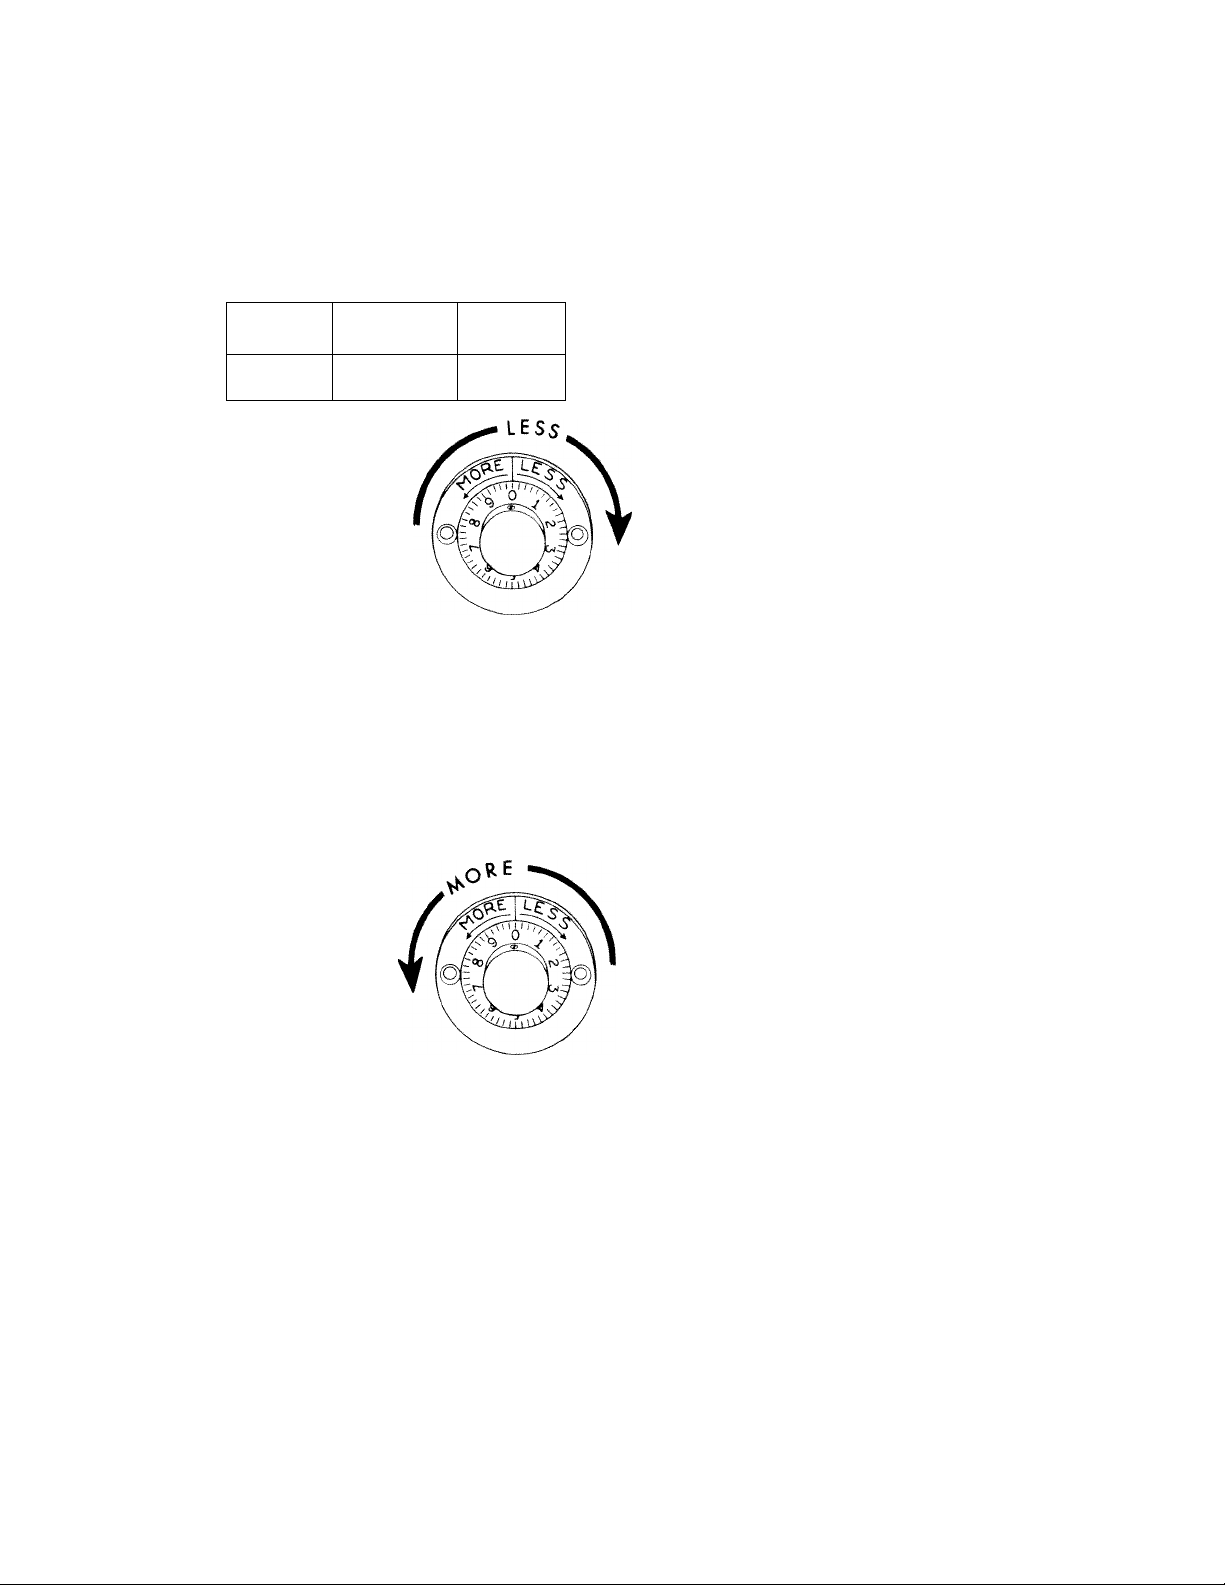
NEEDLE SETTING AND CHANGING
THE MACHINE SHOULD BE CHECKED TO INSURE CORRECT
NEEDLE SETTING TO PREVENT DAMAGE TO NEEDLES.
Depress knee lifter (R^152).
2 Turn hand wheel CLOCKWISE until eye of needle is at slot
in presser foot shoe (R-49A).
3 Slowly release knee lifter . . . the rib (R-612) should JUST
' TOUCH THE NEEDLE.
4. If rib IS pressing up against needle iFig. 1), turn dial
(R^57N) toward "LESS" until rib just touches needle.
If rib is away from needle (Fig. 2), turn dial toward
"MORE" until rib just touches needle.
Fig. 1
47...
v'i.
Fig. 2
Page 9

When needle just touches rib (Fig. 3), machine is set
to test.
“7, To test machine, when ratio is set 2 to 1 ratio — take single
layer of materiel, place in machine and turn machine by
hand. If machine catches once, then does not catch on
next stroke, machine is ready to work.
Keep dialing "MORE" or "LESS" until above results are
obtained on silk or any thin goods.
9. On heavy goods, it should catch on each stroke of needle.
10. You ore now ready to thread machine. Refer to threading
instructions.
CHANGING NEEDLES
If, after turning your dial several times, you experience difficulty
in catching the lower layer of goods, examination may disclose
a BENT or BURRED NEEDLE ... The needle should be changed
immediately.
IMPORTANT — To test if needle is bent, needle must rest on
needle guide R-47. To test if needle is burred, rub fingernail
across point of needle.
THE MACHINE SHOULD BE CHECKED TO INSURE CORRECT
NEEDLE SETTING TO PREVENT DAMAGE TO NEEDLES.
VERY IMPORTANT
Use only genuine REX needles. Accept no others. REX needles
cost no more than cheap imitations, and are ALWAYS available.
Standard Si*e Needles: #10 - #15 - #20 - #25 - #30
Mochines equipped with #25
Page 10

HOW TO SEW
1 With hands 12 inches or so apart, hold hem firmly. Depress
knee lifter, place hem in machine parallel with, and up under
presser foot.
2 Place edge of hem in slot of R-49A, and at edge of gauge
■ (R^125).
3 Start sewing. IMPORTANT: Keep edge of hem lightly, but
' firmly against gauge, keep material parallel to gauge by
KEEPING EYES ON GAUGE ONLY , , . NOT ON NEEDLE
OR SEWING.
TENSION
If material puckers, loosen tension.
If thread is loose, make sure thread is down in tension, then
tighten accordingly. Do not hesitate to turn tension nut several
times as needed.
On thin goods, a light tension is required. On heavier goods,
a tighter tension is necessary.
IMPORTANT: Unlike a regular machine, this machine requires
very little tension.
CHANGING FROM RATIO 1-1 TO 2-1
1 Turn Ratio Dial to 2-1 ... to CATCH every other stitch when
' working with silk or other thin fabrics.
2 Turn Penetration Diol (R-57N) one complete turn toward
■ LESS.
CHANGING FROM RATIO 2-1 TO 1-1
1 Turn Rotio Knob to 1-1 to catch EVERY STITCH.
2' Turn Penetrotion Dial (R-57N) one complete turn toward
■ MORE.
10
Page 11

START SEWING
1 On thin goods or ribbon gauge (R-125) should be set utmost
' at extreme right side of machine and should obtom results
shown in Fig. 1 ,
2 For heavier goods, bring gauge to the left as necessary,
3 Do not pull material to help feeding, do not hold material
back, just hold firm but lightly.
PROPER STITCHING
I Proper stitching.
^ Catches on thin fabric every
other time. (Provided needle
is good.)
2 Material running
off. Bring gauge
over a little to left.
3 Gauge too for to
left, Move gouge
over to right.
5^ If catching each time on light
fabric, turn dial to "LESS" until
it looks like Fig. 4.
1 1
 Loading...