

Page 1
Page 2

Page 3

INDEX
* SEN6RAL INSTRUCTIONS
Nam* of Part* ' / , /
Introduction ..........
Saf* ©uard th* Action of'Your MacWnO'
To Wind tho Bobbin
To Roplac* tho. Nosdio
Noodle» and Thread ■••••..........................
To Thread the Bobbin. Caie '
Removing and Inierting the Bobbin Ca»e
Threading Machine
To Prepare for Sewing
Thread Teniion
Adjuating Preature on Material
Adiuating the Stitch
To Regulate the Zigtag ititch
Adiuating the Dropleeder
To Oil the Machine
Sewing Mint* —
* OPERATING INSTRUCTfONS ☆
..............................
........
....................
..........
......................
..............
.....
.....................■.........
.........
..........................................
......
......
...............................
.....*...................
.......
....................
.............................
..........................
.......
......................
................................
Operating Initruettona ..................................
Straight Stitching
Zigaag Stitching
.......
............................
......
..............
For Faac^ Embroidery Work*
Embmideriog end AAeoograBining '>•
Darning
........................................
Sewing on Suttoni
.......
....................
Hemming with Zigttag Stitche* -•
Blindititcbirrg
Quilting
Cording
Button Hole*
....
.........................................
.......................................
........................................
....
....................
.
Adju*table Cloth Stitching Guide
..........
...........
.
Page
.
2
S'
4
6
".■*
.
>
J
t
ID
11
12
.
■ 1«
. IS
•IS
.
■ U
■ 19
. 21
ft;
24
24
25
25
29
29
21
29
30
30
31
31
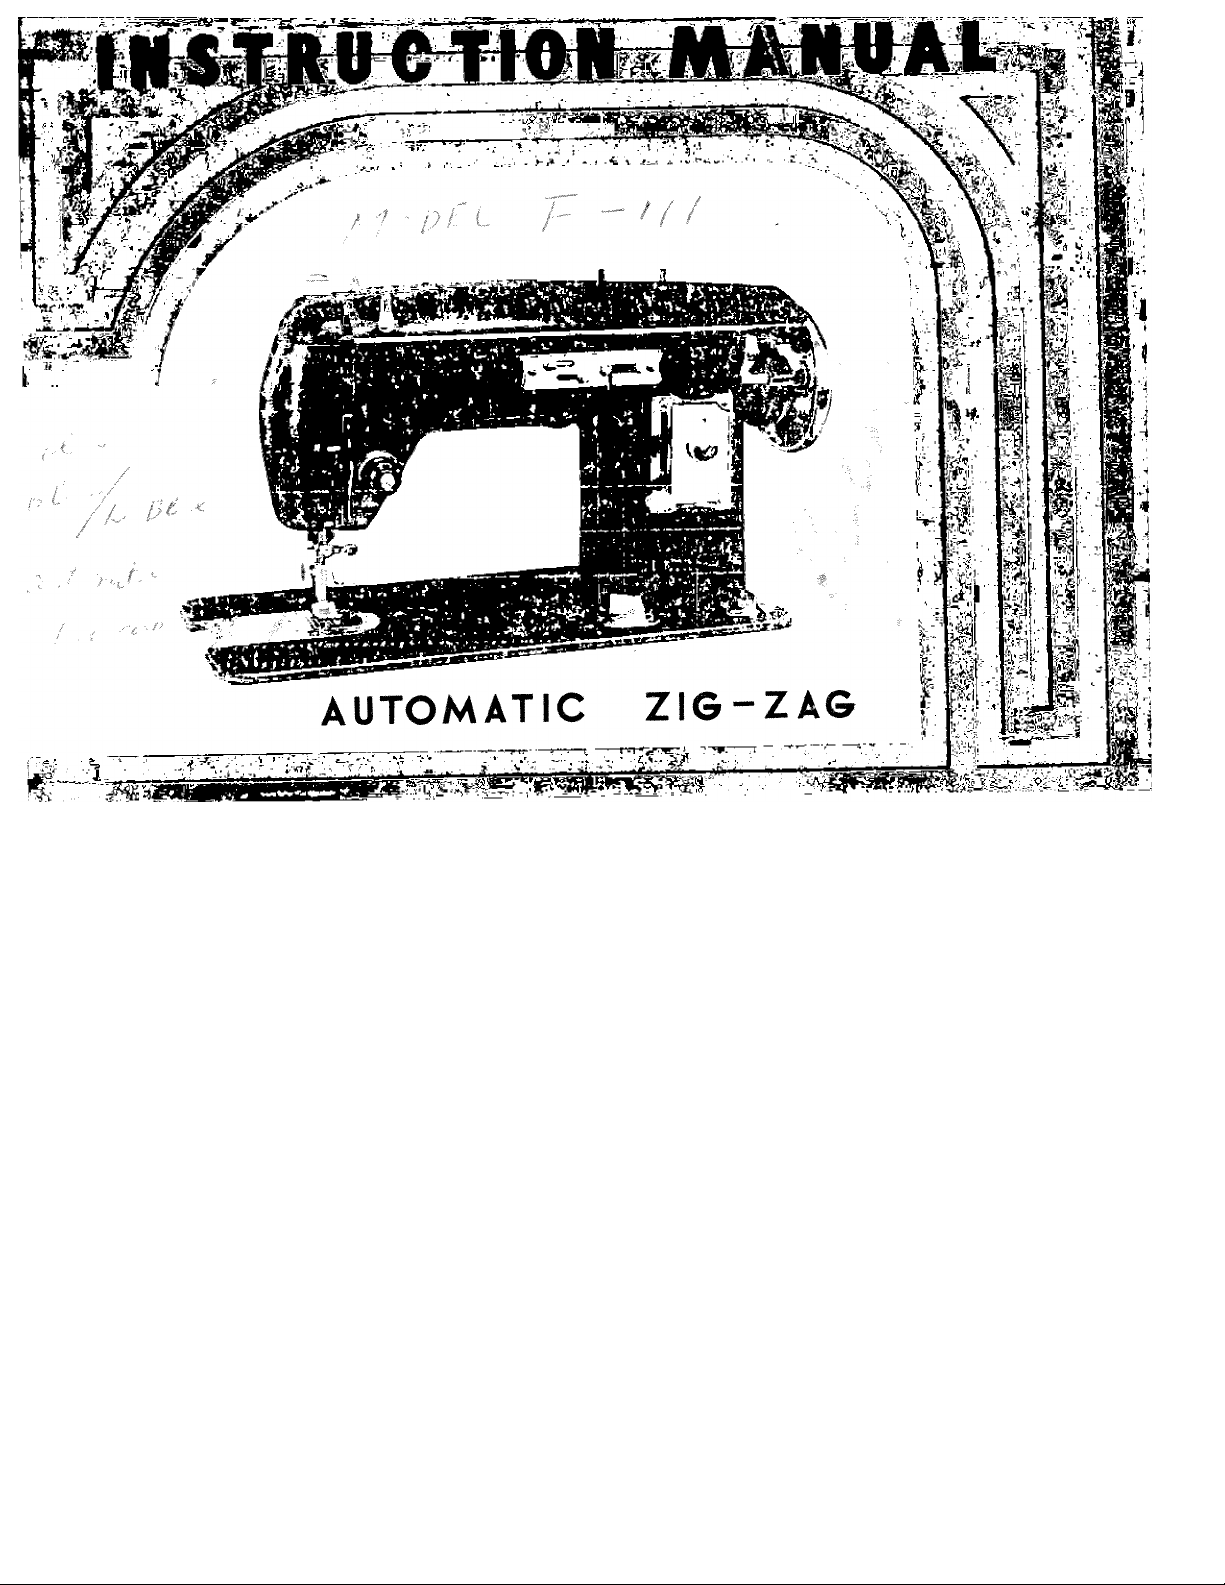
Page 4
Patch-O-Matic Darner
Take up Lever
Arm Thread Guide
4
Cam Holder
Zig-zag Width Regulator
Spool Pin
Balance Wheel
Automatic Bobbin Winder
Stitch Length Regulator
Bobbin Winder Thread
Guide
Drop Feeder
Needle Plate
Feed Dog
Hinged Plate
11
Presser Foot
i5
14
\x
Presser Foot Thumb Screw
Needle Clamp Thread
Guide
Retaining Thread Bar
18,
Thread Guide
19.
Wire Check Spring
20
Thread Tension Dial
21.
Needle Clamp Screw
22.
Page 5

INSTRUCTION MANUAL FOR ZIGZAG
INTRODUCTION
Your Zigzag sewing machine is the product of many years of research and development m
the field of household sewing machines. It b also the ultimate in efficiency, quality and
design, yet its moving and wearing parts such as needles, bobbins, bobbin cases, hooks and so
forth are standard and interchangeable with parts immediately at sewing machine stores throughout
the world.
This precision sewing head, with its simplified design and many labour saving extras, is the
result of our incessant exertion and each machine is built to the most exacting specifications
under our rigid quality control program.
You have made an excellent choice and you are deserved of the proud owner of Super De
Luxe sewing machine.which wiU surely lead to your happy life. You will soon realize how
quickly you will become attached to your new machine as a friend of the family who really
lends you a hand. The ingenious construction makes it possible to do many jobs on the new
machine which until now had to be done by hand.
Page 6

SAFE GUAEP THE ACTION OF YOUR MACHINE
Make sure the balance wheel always turns toward the operator. ^ ^
Never run the machine with the presser foot in the down position without cloth between the
presser foot and the feed dog.
Never run machine when the bobbin case and the needle are threaded without first placing
material under the presser foot. ^ ^ '
Caution, never try to help the machine feed by pulling the material through the feed. This will
create a bent needle condition. The machine’s feed is entirely automatic.
Never operate the machine without the hook race cover the bobbin case in the closed position.
Keep a small piece of doth underneath presser foot whenever machine is not in use. This will
prevent damage to feed dog and presser foot.
Do not operate machine when presser foot lever is raised.
Keep slide or hinged dosed when operating machine.
Page 7

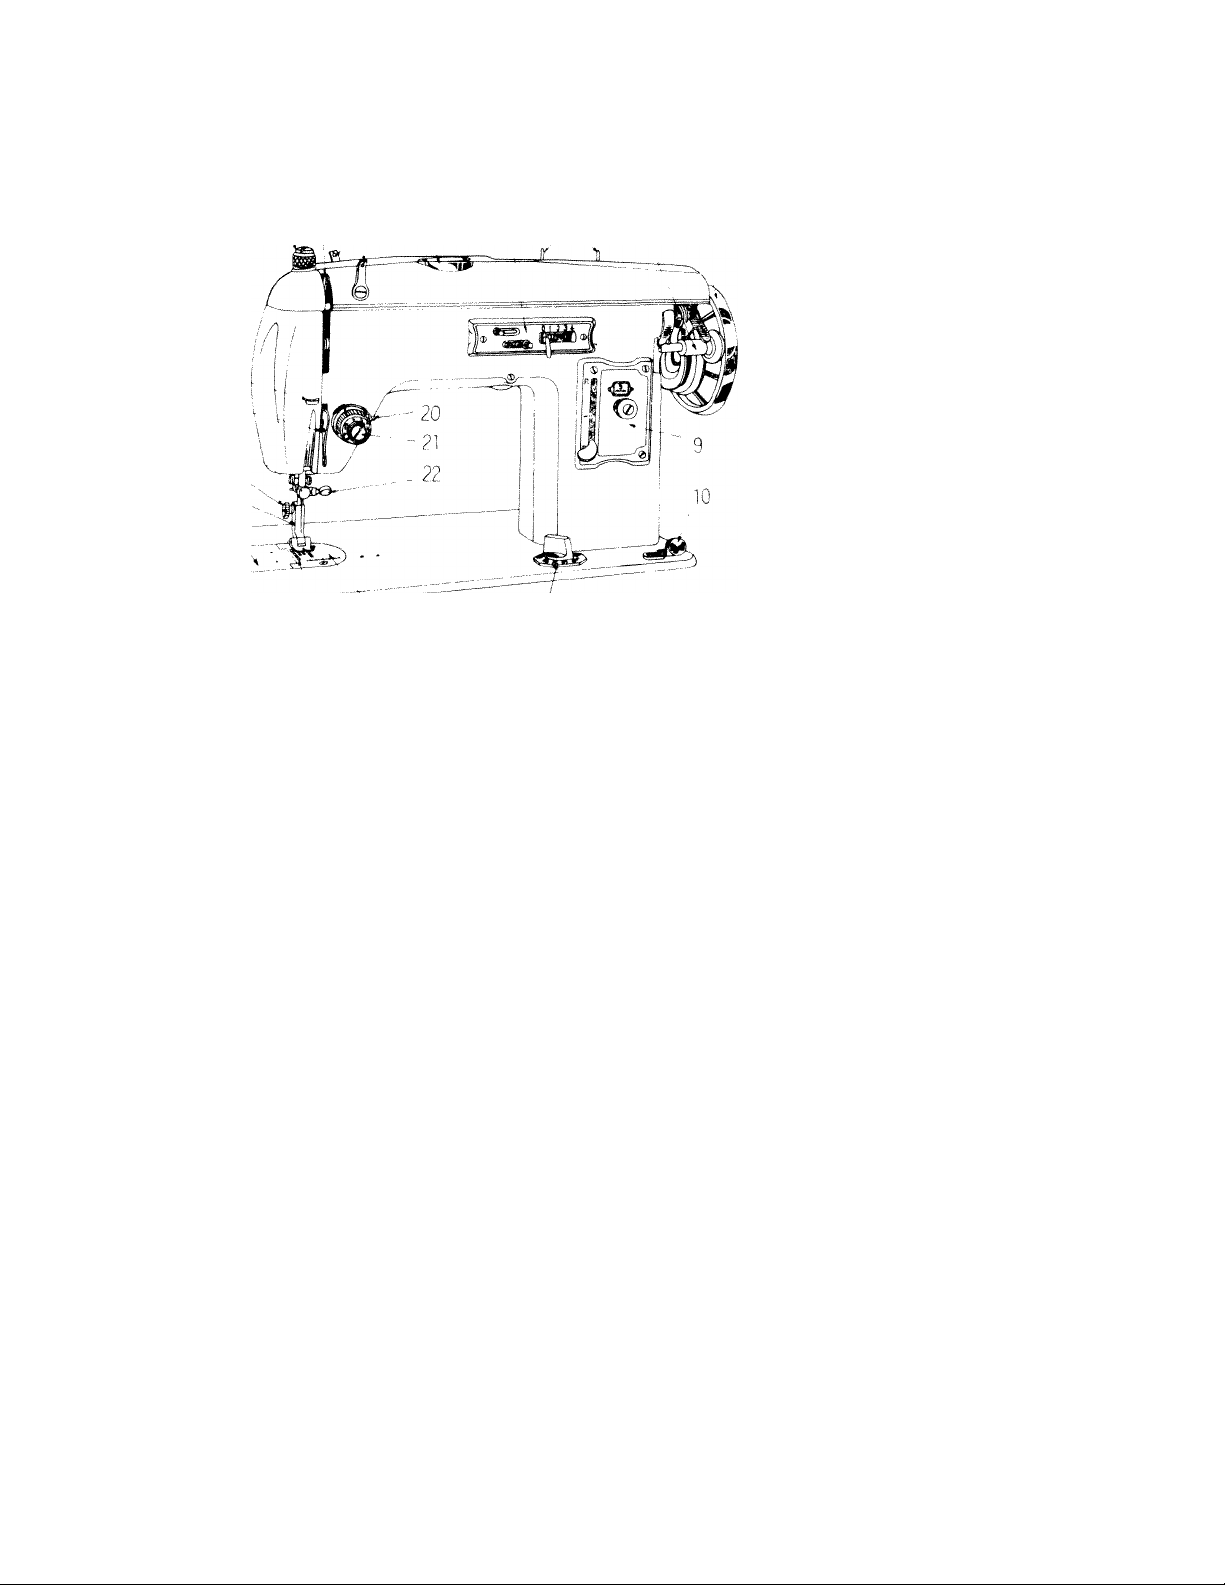
TO WIND THE BOBBIN
It is necessary to understand the function of the Stop Motion by means of which the balance
wheel is disconnected from the sewing mechanism, when required, thus permitting the winding
the bobbin without sewing. , , , u i vt, ft,,. hand
a) Turn the stop motion knob toward you while holding the balance wheel with the left hand^
This will then permit the balance wheel to turn freely while the needle bar remains mo
nicss.
Place a spool of thread on the spool pin at backside of arm.
b)
Pass the thread through the notched thread guide (3).
c)
Draw the thread down through the bobbin winder thread guide (16) at right corner of the
d)
Now iiS'in'nd of the thread around an empty bobbin seven or eight times and place
e)
threaded bobbin on the spindle (C) of the bobbin winder. , ^
Press the bobbin into the spindle with the left hand, making sure that the Pm on the spind
f)
fits into the slot in the bobbin. . ,
Push the bobbin winder levever (D) down until the small rubber wheel presses against the
g)
Lb of the balance wheel and the clasp (E) falls between the sides of the bobbin holding it
TuL'AeLalance wheel toward you and run the machine as in sewing. When bobbin is full,
h)
the bobbin winder will automatically stop.
Break off the thread and detach the bobbin from the spindle. ■ i u
i)
Hold the balance wheel firmly with left hand and with right hand turn the
j)
away from you until the machine is tight and then the needle bar moves with the turning of
You ct ptToLti'operation also when the machine is workingMn this case you will operate
in the same way as explained above, but without disconnecting the balance wheel.
Page 8
knob
Page 9

TO REPLACE THE NEEDLE
To replace the needle, raise the needle bar to its highest
point by turning the balance wheel toward you by hand.
Loosen the needle clamp screw on the right hand side
and the needle clamp will open, allowing the old needle to
fall out.
Remove the old needle and slide the new needle up
(FLAT SIDE TOWARD THE BALANCE WHEEL) as
far as it will go. When the needle hits the stop it is in
position correctly. Now fasten the needle clamp securely.
For best results change needles frequently.
NEEDLES AND THREAD
Never use a bent needle, nor one with a blunt point, since this cause imperfect stitches and may
cause the needle to break. Unless the needle is in dear to the stop, flat side toward the balance
wheel, the machine will be out of "Time", and skipped or imperfect stitches wjU result and
needles may break. ....... • ui .
The siae of the rteedle should conform to the sir.e of the thread and both should be suitable to
the material. Use a needle sufficiently large to permit the thread to pass freely through the eye.
In general sewing, use the same siae thread in the bobbin as is used on top.
Page 10
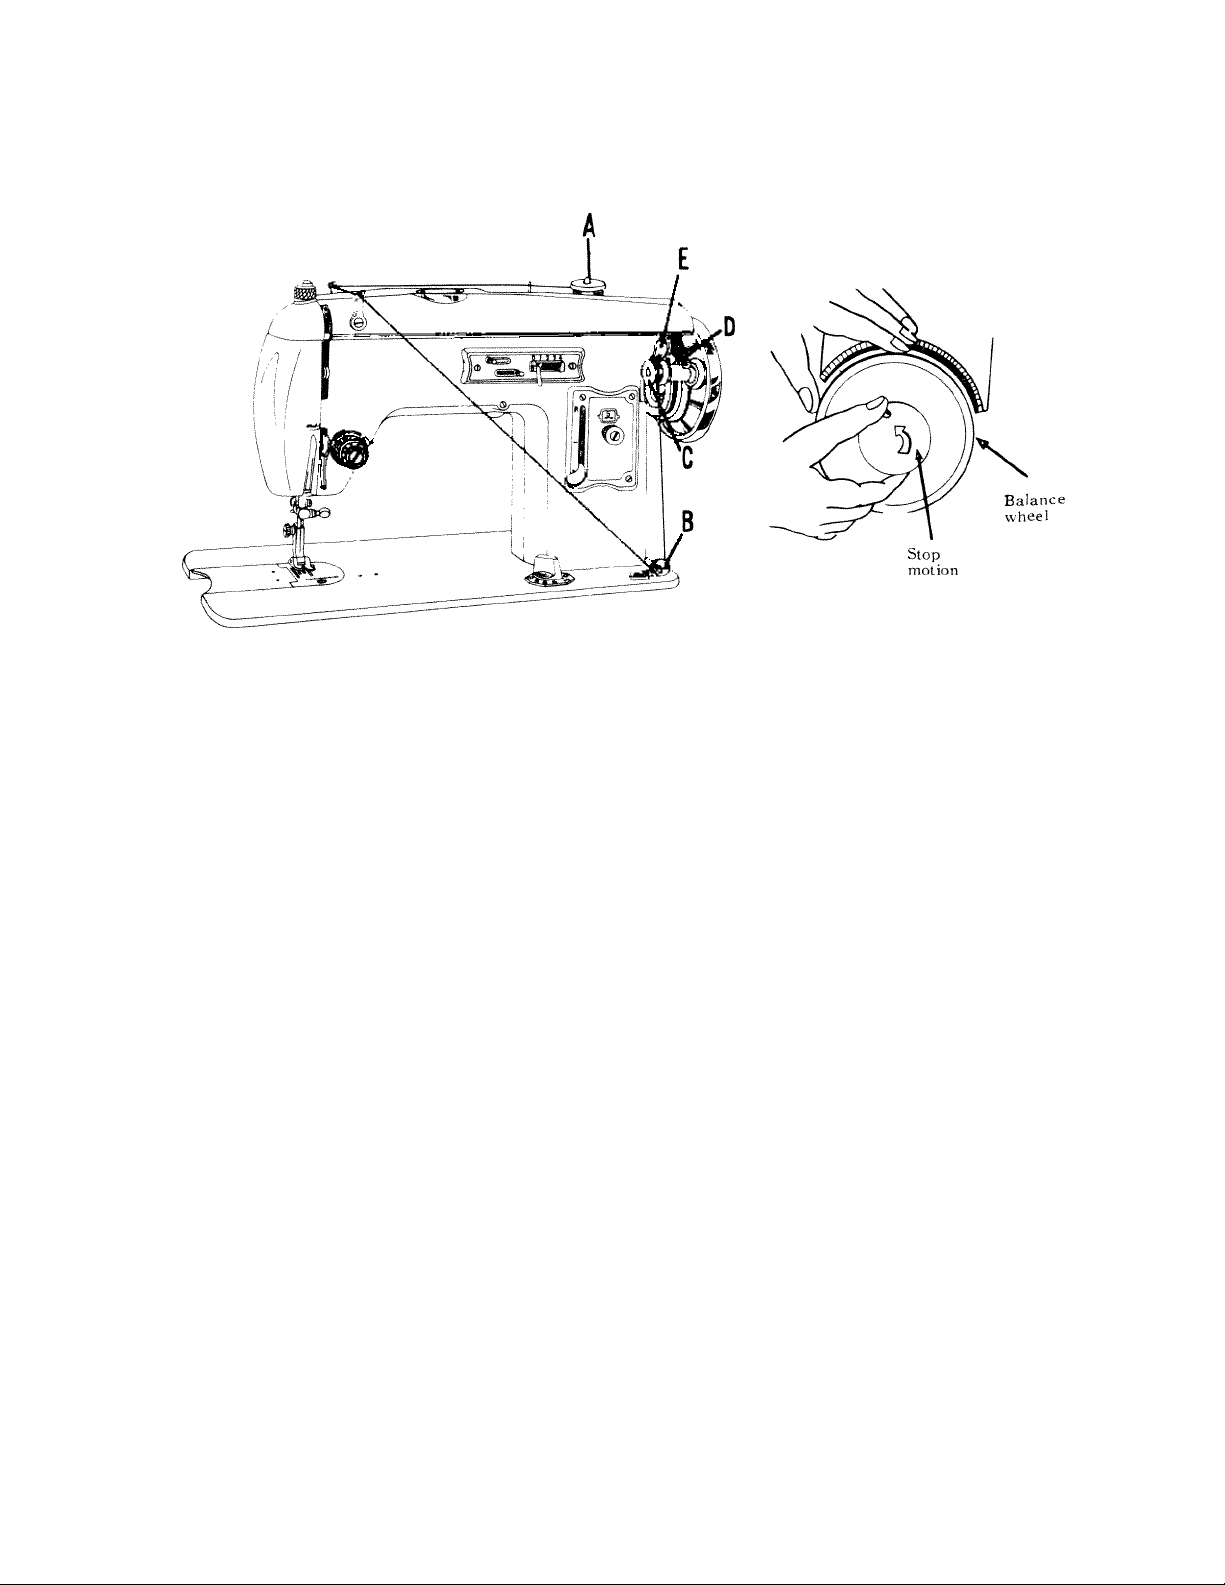
TO THREAP THE BOBBIN CASE
(A)
(B)
Hold the bobbin case between the left thumb
and forefinger with the slot up. With 5 or 6
inches of thread trailing in the palm, hold
the bobbin between the thumb and first two
fingers of the right hand. Fig. (A)
Insert the bobbin into the bobbin case and
pull the trailing thread into the slot, down
and to the left until it enters the delivery eye
under the tension spring. (A, Fig C)
Fig. (B)
Page 11

rhen- should he a sliKdit tension on the thread as it
IS pulled through the delivery eye and the bobbin
should unwind freely. The tension may be increased
by lurning the tension siTew i B) to the KK.Hl and
decreased bv turning the screw to the Llvl 1 .
Fig. iC'
REMOVING AND INSERTING THE BOBBIN CASE
1, the following operations the nee.lle must always be ABOVE the surface of the machine.
Raise the nee.lle bv turning the balance wheel d'OWARD YOU by hand.
Raise the hinged slide plate, with left thumb an.l htrefinger, open the hinged latch t A , at the
front of the bobhin case and hold securely as you withdraw bobbin case fr.mi arouiu t re to c e r
post When held in the above manner the bobbin will not fall out of the bobbin ca.se.
After winding a fresh bobbin and threading the bobbin case latch (At with left thumb and
forefinger, to prevent the bobbin from falling out.
Page 12

Keeping the protruding finger (C) top side
toward the delivery eye (B), pass the bobbin
case around the holder post (D) until the finger
enters the delivery eye. When in correct position
a stud on the holder post will catch the latch
mechanism holding the bobbin case firmly in
place.
This operatioo is easy - NEVER P'ORCE IT.
The three or four inches of thread hanging free
frem the bobbin case will be brought up through
the needle plate stitch hole.
Page 13

THREADING MACHINE
To prevent breaking of the upper thread, it is essential to thread the machine as described below:
a) Bring needle to its highest position by turning the balance wheel toward you.
Place the spool of thread on one of reel holder pin at the back of arm, and lead the thread
b)
to the notched thread guide ( 3 ) .
Draw the thread down throngh the Tension Discs i26) from right to left.
c)
Draw the thread up over the Wire Check Spring (27) and through the eye of the Retaining
d)
Thread Guide Bar (28) from right to left.
e) Now take the thread up through the eye of Take Up
Lever ( 2 ) and down through the thread guide (24) .
f) Then hook into Wire Guide (24) attached to the
Needle Clamp and finally pass it from right to left
through the eye of the needle, leaving about four
inches of thread hanging free.
The machine is now ready for sewing. It is important
once the machine is threaded, to make certain that the
presser foot is down, and that there is fabric between
presser foot and needle plate. Failure to observe this
precaution may cause the threads to get tangled underneath
the needleplate, jam the shuttle hook and damage or break
the needle.
Note : Refer the Numbers to P. 1.
GO-
Page 14

TO PREPARE FOR SEWING
NEEDLE THREAD PICKS UP BOBBIN THREAD AS H)LLO\\ S.
Holding the loose end of the needle thread m your
left hand, turn the balance wheel toward you by hand
„pril the needle moves down and up again to its
highest point. Pul the needle thread gently and the
bobbin thread wil come up with' it through the
needle hole. ^ ^
If the bobbin thread does not rise, check to see if at
least 3 or 4 inches of bobbin thread' is hanging
loosely from the bobbin case. Then place both ends
of the thread back between the two presser foot toes.
Page 15

THREAD TENSION
For perfect stkch.ng, the tension on the upper and under threads should be equal, and ju«
sufficiently strong to lock both threads in the center of the work lA).
If rhe tension on the needle thread is too tight, or if that on the bobbin thread is
needle thread will lie straight along the upper surface of the material making an imperfect s
(B).
If .1,. of .he b„bb.„ .breed .> .00 ..»h., o. ,f .ha. o„ .he needle .brer.d L, .00 looee ,b.
bobbin .bread will lie e.raigb. al.n.g under side ol ihe mater,al, maknig an .mperfec, ..... I b
isirefisfigteira
^12-
Page 16

Regulating the needle tension: Minor imperfections in
the stitch can usually he corrected by varying the
Decrease
Tension •
needle tension onlv.
I'o increase the tension, turn the thumb nut clockwise and to lessen the tension, turn the nut in
the opposite direction. The tension ttdjust from 0 to in one 3B0 turn, with 0 being the lightest
tension and 9 being the tightest. All tuljustnieiits should be made gradually, not ttbruptly, and the
required tension setting will vary with the size of thread being used. A little practice will mtike
instant tension adjustments possible. .All atljustments should be made while the presser foot is
down since tin automatic release does not permit adjustments to be made when the fot)t is up.
If a perfect stitch cannot he tibtained by adjusting the needle thread tension, it may be necessary
to adjust the bobbin thread tension as explained on page 6. Fig. C.
This machine is correctly adjusted before letiving the f.ictory tind checked and readjusted before
the dealer delivers it to you. A careful regulation of the tensions on this machine will assure you
of the finest seams that mechanical design will produce.
-13
Page 17

ADJUSTING PRESSURE ON MATERIAL
This is located on the top of the machine directly
over the presser bar and presser foot. Pressuie on
material must be varied according to the materials
to be sewn. Instead of ordinary Presser Regulat
ing Thumb Screw', this machine is equipped
with Darner (Patch-O-Matic) for quicker and
easier adjustment of pressure of presser foot on
material. The pressure wall be increased simply
by pressing downward on the top of regulator
until the desired tension is obtained. When the
regulator is at its bottom, the maximum pressure
shall be given. To lessen the pressure, turn the
body clockwise by which will automatically jump
up inside part of regulator reducing the pressure
to the minimum. In this position, mending,
darning, monogram work et4, may be done by ^
moving material slowly by hand while running I; '
machine at a fair speed. It is worth remembering
that the heavier the material, the heavier the
pressure and the lighter the material, the lighter the pressure. When, however, is applied more
than necessary, it will cause heavy running of the machine, hence pressure must alw'ays be
adjusted within the suitable limit.
14-
Page 18

ADJUSTING THE STITCH
In order to change length of stitch, this machine can
be adjnsted to make to ”5” indicated by the
nnmerals on the stitch indicating triew-finder, with
”1” being the smallest stitch and ”5” bong the
longest. ^ ^
To set the stitch properly, turn the dial until the
desired number appears in' the view-finder and the
number corresponds todesired stitch length. ;
A little experience witt teach you which number giyes
you the proper stitch for whatever material you are
working with.^
15
Page 19

TO REGULATE THE ZIGZAG STITCH
ZIGZAG width lever
B. Stopper lock
C. ZIGZAG width stopper
Loosening the stopper lock screws GL, set tne /
move
sewing in an ordinary manner. By simple operation of ZIGZAG w
patterns can easily be made at your will.
, 1 P -rrews iBì set the ZIGZAG wiath stopper (C) to ”0” position and
ZIGZAG «id.h feve. GO » *. „ fc, » » -« K»' «•
16 -
idth lever (A), fancy stitch
Page 20

Fifbi of all, loüstu tbt luck screws tBi and set liic stopper (C) at desired width position respec
tively. Tighten the lock screws (B) setting the zigzag width stopper (C) at the number desired.
Thus, a running zgzag stitching is made.
The lock screws move the width stoppers (C) right and left at the same time.
Set the width stoppers fCi at the number graduated on the plate. The numbers indicate the
width of zigzag stitches in MILLIMETERS when the Zigzag width lever (A) set to “4”, the
width of Zigzag stitches become the largest and when the lever (A) is set to "O", to extreme
left, the stitches will be straight as in an ordinary manner.
T7
Page 21

ADJUSTING THE DROPFEEDER
When knob is regulated to P2MBR i Embroidery ) on indicating
plate, the feed dog will be dropped and enable material to glide
freely without any interference from feed dog. I his device
is specially designed for an aid in darning, inonogramming,
embroidery, crocheting and other sewing aids. Feed dog can be
varied by moving knob to EMBR, SILK and NORM.
NORM is position for sustaining ordinary sewing. When sewing
fine material as silk and flimsy, it may be adjusted to SILK on
indicating plate.
08
Page 22

SEWING HINTS
SEE THAT THE PRESSER FOOT is securely clamped by the screw and snug against the
presser bar so that the needle may pass through the opening in the foot without any interference.
SKIPPED STITCHES may be caused by a bent or blunt needle; by incorrect setting of the
needle: the wrong size needle: by a thread too heavy for the size of the needle.
BREAKING NEEDLES are usually due to pulling on the work, causing the needle to get out of
line and strike throat plate, thus breaking or bending the needle.
It may be due to presser foot or attachments not being securely fastened to presser bar.
Be sure to use the correct size needle and thread for material.
BREAKING THE UPPER THREAD may be
caused by:
( 1 ) Incorrect threading.
Not bringing up bobbin thread correctly.
(2)
Upper tension too tight.
(3)
Needle imperfect, or set incorrectly.
(4)
Needle rubbing against attachments or
C 5 )
presserfoot.
Needle eye too small for thread.
(6)
Starting the machine at full speed.
C 7 )
Starting without take-up lever at highest
(8)
point.
BREAKING THE LOWER THREAD may be
caused by:
( 1 ) Incorrect threading of bobbin case.
Too tight a tension.
( 2 )
Bobbin wound too full to revolve freely.
( 3 )
Not bringing up under thread correctly.
( 4 )
Hole in the needle plate rough, caused
(5)
by needle striking the plate.
UNEVEN STITCHES may be caused by;
( 1 ) Presser foot not resting evenly on material.
Feed not high enough.
(2)
Too short a stitch.
(3)
Pulling the cloth.
(4)
Too fine a needle wnth too coarse or poor
( 5 )
a thread.
-21-
Page 23

OPERATING INSTRUCTIONS
M-TOM \'Г1(' yui-ZACj MECHANISM .
sutches and embroidery automatically. 1 his can lx done
cam, which ecc l„.c„ccl in ihc Саш HoMcc ,ш ю» " »
The Cam is to tie sel . • correspontling number ,n the design chart.
specially made pattern and num x , , _ , the z.igzag width lever to the point
In order to insert cam in the holder, open t e cove c ц„,п. In accordance
of extreme right. After setting the desired cam reverse the hw r ^
..th your Idea, each desired pattern can e obtained in 'b ^
control of the Stitch Length Dial, you can also vary the baste design as „h
a) Normal Straight Stitching.
C. 0^;“й!шьГ‘л,р1к,с,с. Me
di Darning.
e) Sewing on Button.
f i Hemming with '/igZag Stitches.
g) Blind Slitchiug.
h) Quiltiug.
i) Cording (Braiding)
j) Button Holes.
k) Adjustable Cloth (fuide.
7 , ^ Meehan,sm,U ,s poss.ble to pertonn vanoub
. 1 Ico-h In accordance with the desired design. IcaUr cam i
.......................... C.C, by .„.ссшшп,
22 -
Page 24

DIS C
NO S.
P
A
T
T
E
R
N
S
Len gt h
of
stit ch es
0.1 1 2
1
0.1 1 2
2
0.1 1 2
3
0.1 1 2
4
i
5
0.1 1 2
Page 25

STRAIGHT STITCHING
In order to sew an ordinary manner, it is necessary to disconnect the Automatic Mechanism by
taking off the cam from the Cam Holder.
Remove zigzag stitch hinged presser foot and attach straight stitch presser foot to presser bar. It is
advisable to use straight stitch presser foot when sewing flimsy fabric such as silk, summertime
fabrics, but when sewing such as cotton dresses, other house dresses, zigzag stitch hinged presser
foot can be used.
Follow the below procedure :
a) Turn the Zigzag Regulating Dial clockwise as far as it goes,
b ) Open the Lid of the Cam Holder on top of machine and remove the cam.
e ) Push back the Dial to its normal position.
d) Regulate the ZigZag Stitch Dial in zero position and set the stitch length at the desired stitch
length.
ZIGZAG STITCHING
To set the machine for desired ZigZag stitch width follow the below procedure.
a) Loose the two nuts (B) at Page 15.
b) Move the zigzag stitch dial along the graduated scale until it reaches the desired width and
hold the dial by hand in this position.
c) To fix the zigzag stitch dial in this position, tighten the nuts firmly, and commence sewing.
..-..
24 -
...
-
Page 26

FOR FANCY EMBROIDERY WORKS
1) Zigzag stitch.
Regulate the zigzag stitch dial at No. 4, the
largest zigzag width, and the stitch dial at
No. 5. (Fig. Pattern A)
2 ) Scallops stitch.
.Move zigzag stitch dial Irom 1 to 4 in a
regular manner. The stitch regulating dial p
must be set to between 0 to 1. (Fig. Pattern
B)
3) Triangular stitch. Pattern C
By moving the zigzag dittl rhythmical ;tnd
regular movement, this Pattern can be form
ed. (Fig. Pattern C) Patte« D
4) Satin stitch.
Set the zigzag stitch dial to the widest stitch
adjust the stitch regulating ditil close to 0
position. Ne%mr set on dead center because
material will not feed. (Fig. Pattern D)
EMBROIDERING AND MONOGRAMMING
Place the material in an embroidery hoop. Make sure that you choose a needle and thread suitaMy
for working the material to be used. Drop the feed dog, place the material underneath needle ai.,|
lower the presser toot bar. The upper tension should be decreased. .Ts for the zigzag width you cnti
set accoring to your own design. After making the first stitch, pull up the lower thread thrmigli
material. Move hoop slowly and make certain to move it only when needle is out of fabric.
Pattern A
.......
25-
.....
-
Page 27

f^,-'
I
darning
Mech»i,m. Sü.ch Di.t Move .o ex.,e™.l,
1« « ‘°”“'“’“
M, 1 pper Teirsiovr: Normal. Fee t,„ .tticle lo be darned.
■ s™'"' , „J „„ .ewirrg, moVmg ,he f.br.e Irom lef.
i..o norilon ot fabric ro be darned, coder nee e a Neat starting again at the left
. . ..aim nottl tbe boles ot fabrie is IcUed wttb P“* ™ ^ .be first Imes o,
... o, .be bole, move tbe ^rlcbes, Tbe bole is then fnlig darned.
. ,1.« ,re fully covered crosswise with the other lines
T r.
Do,- To be dropped. Presser FooP Remove rrgea« «d.
SEWING ON BUTTONS
r-V
fli, ,hc «gzag stuch be
fjitiîUintc lx,‘tween hoes pMRR oosition Remove zigzag
’ ' jn raised position. While lowering presser foot
' ■ "T'l Tbole »rborron. conrinue mrning balance wbeel by band.
u.-
' -e V, dial between 4 and 5 or in accordance with the
‘‘ “ t r e wheel slowly toward you so that needle goes
.....
'• 1, „„die erners .he cen.er of buitor, bole properly
, I .Ir«-» not hit button. It neeuie
of needle by readjusting zigzag stitch dial.
' ------------------------------------------------------------------26
I, „eedle does no. ele.r burton, change
------
Page 28

Run machine at medium speed, making about five to six stitches. Bring zigzag stitch dial to ex
treme left, making a few straight stitches in the same hole.
(Four-Hole Button with Parallel Stitching)
Machine Setting and Procedure are the same as for sewing on Button in this part. After stitching
between first two holes of button, lift button sewing foot slightly and move fabric underneath foot,
to line up remaining two holes with needle, then stitch between second pair of holes.
(Four-Hole Button with Cross Stitching)
Machine setting and procedure are the same as for sewing on button mentioned above. After
stitching between first two holes of button, lift button sewing foot slightly, then turn fabric at a
right angle so that remaining two holes are in proper position under the needle. Proceed to stitch
between remaining two holes then bring the zigzag stitch dial to the extreme left, making a few
straight stitches through the same hole.
- - 27 -
Page 29

HEMMING WriH /.IG
Use zigzag hemmer. _
Regulate the stitch length at the longest ami m1 /,«/..« ..... h
dial just as wide as the hem made by the hermmng 1.»..
Fold the hem edge and slide the folded hem into the I,, g
foot, which is still raised.
lower the needle into the cloth. If necessary, push the . .
of the cloth well mto the roll and lower the hemming lool.
Then, start sewing.
Mill HI
■ il.
'X
BLINDSTITCHING
„a a ,aaana, .ha. .ha .«a™ »
Thara ..a ,wa way. al .h„ «• '► * ' ’ ,„„a,
W Shaw. ... .........PC ... P„. a. .ah,a h.
the folded part runs along the right c Ig Secondlv, ml|ust
h..haa, a ha.,.ah wah.h. .aaaaaP a aawa.P
ZIG-Zi\G width and arrange the needle so .. ■ .
........... ........
-
sewing.
28
Page 30

Fig. A
^ Wrong side
\ \ oi material
Fig. B
(B) Illustrates another way of blindstitching.
Firstly, place the fabric under the presser foot so that the folded part runs along the right
edge of the foot. Adjust the machine so that can do a straight sewing as in an ordinary
manner. This way of blindstitching is to perform four to six straight stitches and one ZIGZAG
stitch to right in succes.sion. By moving ZIGZAG lever, regulate the width of the ZIGZAG
stitch so that in making ZIGZAG stitch to the right, the needle just penetrates the crease of
the folding. Having completed the seam, unfold by removing the tacking and turn back. A
fine thin needle and thin thread are preferable for this work.
-29-
Page 31

QUILTING
Set machine as for sewing without Automatic Mechanism.
ZigZag Stitch Dial: At 0 position.
Stitch Length Dial: Any desired length.
Upper Tension : Normal.
Fresser Foot: Zigzag Stitch Hinged Foot Quilting
Attachment. .
First of all, attach adjustable quilting stitchguide to presser
foot bar, as shown. Place fabric under presser foot and line
it up under needle on line to be stitched.
Move curved guide bar to right as far as necessary to
mark desired line of parallel stitching. Stitch first
Move material to right until curved guide bar is direct >
over the first stitched line. Needle will then be directly
over point where second line of stitching will be made.
CORDING
Remove zigzag stitch hinged foot and attach cording foot
to presser bar. Insert cord into the hole in the base of
cording foot, then pull it, from front to back, through the
hole and guide it afterwards underneath the presser foot.
— 30
Page 32

BUTTON HOLES
Use Buttonhole* foot. Set zigzag stitch dial to 2 to 2.5
position. Start sewing to be desited length and stop with
needle on the leftside, leaving
fabric half a turn anticlockwise. . Raise needle and zigzag
stitch dial at twice width.. Hold fabric in its place and with
a few stitches, make bar. Take needle out of fabric and
place zigzag stitch dial hack on previous number. Sew again
length of buttonhole, then move zigzag dial at 0 position
and make a few stitches to finish off. Cut buttonhole open
with button hole cutters. In case you want to make very
strong buttonholes, it can be done by using a length of cord
and follow its procedure as sewing CORDING as previously
stated.
needle in the cloth and give
ADJUSTABLE CLOTH STITCHING GUIDE
With the aid of this guide the operator is able to sew as
close to the edge of the material as desired, and to keep
the stitches at a uniform distance from the edge.
1) Attach cloth guide to bed of machine by means of
thumb screws which fit into the screw holes in the bed
of the machine.
2) After having adjusted cloth guide to desired distance,
tighten thumb screws securely and commence sewing.
-3U
Page 33

Page 34

 Loading...