

SINGER W915 User Manual [en, es]

Instruction Book
UIHITE

POLARIZED PLUG CAUTION
oduce the risk of electric shock, this appliance has a polarized plug (one blade is wider
; dne other). Ttiis plug will fit in a polarized outlet only one way. If the plug does not fit fully
in the outlet, reverse the plug. If it still does not fit, contact a qualified electrician to install the
orooer outlet. Do not change the plug in any way.
.aFWING MACHINE.
Record in space provided below the Serial No.
and Model No. of this appliance.
The Serial No. is located Rear of arm.
The Model No. is located Rear of arm.
Serial No.
Model No. 915
Retain these numbers for future reference.
Foot Control Model 4C-316B for use with sewing machine
Model 915
This sewing machine is tor “Household Use"

English
IMPORTANT SAFETY INSTRUCTIONS
When using an electrical appliance, basic safety precautions should always be followed, including the following; ™
Head all instructions before using (this appliance).
------
To reduce the risk of electric shock:
An appliance snould never be left unattended when plugged in. Always unplug this appliance from the electric outlet immediately
after using ana before cleaning.
^ N AR HI H G - — To reduce the risk of burns, fire, electric shock, or injury to persons:
1. Do not allow to be used as a toy. Close attention Is necessary when this appliance is used by or near children.
2. use tms appliance only for its intended use as described in this manual. Use only attachments recommended by the
manufacturer as contained in this manual.
3. fJever operate this appliance If it has a damaged cord or plug, if it is not working properly, if it has been dropped or damaged or
dropped into water. Return the appliance to the nearest authorized dealer or service center for examination repair electrical’ or
mechanical adjustment. ’
4. Never operate the appliance with any air openings blocked. Keep ventilation openings of the sewing machine and foot controller
tree irom the accumulation of lint, dust, and loose cloth.
5. Never drop or insert any object into any opening.
6. Do not use outdoors.
Do not operate where aerosol (spray) products are being used or where oxygen is being administered,
io disconnect, turn all controls to the off (“0“) position, then remove plug from outlet.
Do not unplug by pulling on cord. To unplug, grasp the plug, not the cord.
DANGER
1. Always unplug before relamping. Replace the bulb with same type rated 15 watts.
2. Do not reach for an appliance that has fallen into water. Unplug immediately.
___
3- Do not place or store appliance where it can fall or be pulled into a tub or sink. Do not place or drop into water or other liquid.

English
from all moving parts. Special care is required around the sewing machine needle.
Always use proper needle plate. The wrong plate can cause the needle to break.
iiiSS
r::J”=alt,le. »hen removing covers, luCricaring, or wOen nr*i„g an, Cher cser
“™"ie1rnT':™~r: ,0e a,ropenmgs ™, Ce.pCeP,
SAVE THESE INSTRUCTIONS

■■ ■■ 'Щ
CONTENTS
1. NAME OF PARTS................................................................. 1
2. ACCESSORIES.....................................................................3
3. BEFORE SEWING ................................................................5
DETACHABLE EXTENSION TABLE
CONNECTING FOOT CONTROL AND POWER CORD
BOBBIN WINDING.................................................................7
INSERTING BOBBIN.............................................................9
THREADING UPPER THREAD
BRINGING UP BOBBIN THREAD
4. STARTING TO SEW............................................................13
TEST SEWING
....................................................................
ADJUSTING THREAD TENSION
CHANGING PRESSERFOOT..............................................17
CHANGING NEEDLE
..........................................................
FABRIC, THREAD AND NEEDLE TABLE...........................20
STITCH SELECTION DIAL..................................................22
TURNING A SQUARE CORNER.........................................23
REVERSE SEWING
............................................................
THICK FABRIC SEWING.....................................................25
EXTRA PRESSER FOOT LIFTER
5. SELECTING THE STITCH...................................................27
STRAIGHT SEWING
..........................................................
ZIGZAG SEWING................................................................27
Thread Tension For Zigzag Stitch
BLIND HEM STITCH
...........................................................
.....................................
.......
..........................................
.......................................
........................................
......................................
.....................................
11
12
13
16
18
23
26
27
28
28
English
OVERCASTING........................................................................ 30
OVERLOOKING........................................................................31
STRETCH STITCHING.............................................................31
5
6
MAKING BUTTONHOLES.........................................................32
Determine Length....................................................................32
Cutting Buttonholes
Buttonhole Density
ZIPPER SEWING.......................................................................36
MENDING..................................................................................37
Patching...................................................................................37
Mending a Rip
APPLIQUÉ ................................................................................38
SMOCKING
FREE HAND EMBROIDERY
Darning Plate...........................................................................43
Removing Presser Foot Holder...............................................43
6, MAINTENANCE.........................................................................44
CLEANING.................................................................................44
OILING.......................................................................................45
7. TROUBLE CHART.....................................................................46
BOBBIN THREAD TENSION ADJUSTMENT
CLEANING SHUTTLE CASE
CHANGING LIGHT BULB
...............................................................................
.................................................................
..................................................................
.........................................................................
....................................................
....................1......
....................................................
.........................................................
35
35
33
40
41
50
52
53

..-a,--
INSTRUCCIONES IMPORTANTES DE SEGURIDAD
Cuando utilice un aparato eléctrico, se deben respetar siempre ciertas precauciones básicas de seguridad, incuyendo las siguientes:
Lea todas las instrucciones antes de utilizarlo (este aparato),
:5^ÜGRO - — Para reducir el riesgo de descargas eléctricas:
Nunca se debe dejar desatendido un aparato que esté enchufado a la corriente eléctrica. Desenchufe siempre este aparato de la
toma eléctrica immediatamente después de su utilización y antes de limpiarlo.
jV'Ef:
Para reducir el riesgo de quemaduras,
incendios, descargas
eléctricas, o lesiones personales:
No permita que sea utilizado como un juguete. Cuando este aparato es utilizado por, o cerca de, niños, es necesario prestar
1.
especial atención.
Utilice este aparato sólo para el uso al que se la destina,tal como se describe en este manual. Utilice únicamente los
accesorios recommendados por el fabricante que se incluyen en este manual.
No utilice nunca este aparato si el cable o el enchufe están dañados, si no funciona correctamente, si se ha dejado caer o ha
3.
sufrido algún daño, o si ha sido sumergido en agua. Devuelva el aparato al concesionario autorizado más cercano para que
sea examinado, reparado o ajustado mecánica o eléctricamente.
No utilice nunca el aparato si los orificios de ventilación están bloqueados. Mantenga los orifcios de ventilación de la máquina
4.
de coser y del pedal control sin acumulaciones de hilo, polvo y fragmentos de tela.
Nunca deje caer o introduzca ningún objeto en ninguna abertura.
5
No lo utilice al aire libre.
6
No utilice nunca este aparato en lugares donde se estén utilizando productos en aerosol (spray) o donde se esté administrando oxígeno.
Para disconectarlo, apague todos los controles (posición “O") y después desconecte el enchufe de la toma de corriente.
Q
No desenchufe el aparato tirando del cable. Para desenchufar, tire del enchufe, no del cable.
. ■■ÍÜÜhO
1. Desenchufe siempre el aparato antes de cambiar la bombilla. Reemplace la bombilla con una del mismo tipo, homologada para 15 watt.
2. No intente coger un aparato que haya caído al agua. Desenchúfelo immediatamente.
3. No coloque o guarde el aparato en un lugar donde pueda caerse o ser empujado dentro de una bañera o lavabo. No ponga o
deje gotear agua u otro líquido sobre el aparato.

ADVP.RTEMCIA
Mantenaa los dedos alejados de las piezas en movimiento. Se debe prestar especial atención en las proximidades de la aguja.
Utilice siempre una placa de aguja adecuada. Una placa incorrecta puede causar la ruptura de la aguja. -
No utilice agujas dobladas.
No tire de la tela o la empuje mientras cosa a máquina. Puede desviar la aguja y romperla.
Apague (“O") la máquina de coser cuando haga ajustes en el área de la aguja, por ejemplo, cuando enhebre le aguja, cuando
cambie la aguja, cuando coloque la bobina o cuando cambie el pedal, etc. ^
Desenchufe siempre la máquina de coser de la toma eléctrica cuando retire las cubiertas, lubrique el aparato, o cuando realice
cualquier otro ajuste mencionado en el manual de intrucciones. ^ ^
No utilice nunca el aparato sobre una superficie blanda, tal como una cama o un sofá, donde los orificios de ventilación pueden
7.
Quedar bloqueados.
....................

1. NOMBRE OE LJkS PARTES
................................................
2. ACCESORIOS.......................................................................3
3. ANTES DE EMPEZAR A COSER..........................................5
TABLERO DE EXTENSIÓN RETIRABLE..............................5
CONEXIÓN DEL PEDAL Y CABLE DE CORRIENTE.............6
BOBINADO............................................................................7
COLOCACIÓN DEL CARRETE EN LABOBINA....................9
SNHE8RAMIEMTO DEL HILO SUPERIOR........................11
CÓMO LEVANTAR EL HILO INFERIOR
4. COMENZAR A COSER
.......................................................
.............................
12
13
COSTURA DE PRUEBA......................................................13
AJUSTE DELA TENSIÓN DEL HILO...................................16
CAMBIO DEL PIE PRENSATELA
CAMBIO DE LA AGUJA
......................................................
TABLA DE TELAS. HILOS Y AGUJAS
CONTROL PARA SELECCIONAR LA PUNTADA
CAMBIO DE DIRECCIÓN DE PESTUNTE
COSTURA EN REVERSA
COSTURA EN TELAS GRUESAS
.......................................
.................................
..............
.....................................
...................................................
......................................
17
18
22
23
25
DOBLE ACCIÓN DEL ELEVADOR DEL PIE PRENSATELA
T ESCOGER LA PUNTADA.....................................................27
COSTURA RECTA
..............................................................
27
COSTURA EN ZIG-ZAG......................................................27
Tensión del Hilo para Costura Zig-Zag..............................28
COSTURA INVISIBLE Y DOBLADILLO
..............................
28
Español
INDICE
1
21
.....
26 7.
SOBRE COSTURA..............................................................30
COSTURA "OVERLOCK”
................................
.T.
................
COSTURA ELÁSTICA DE DISEÑOS AUTOMÁTICOS
CONFECCIÓN DE OJALES................................................32
Determinación del Largo
...................................................
Corte del Ojal.....................................................................35
Equilibro de los lados derechio y izquierdo del ojal
COSTURA DE CIERRES
....................................................
..........
COSTURA PARA REMENDAR...........................................37
Parchado...........................................................................37
Remiendo de una Rasgadura
...........................................
COSTURA DE APLICACIÓN (PARCHES DE ADORNO)
FRUNCIDO..........................................................................40
COSTURA PARA BORDAR
...............................................
La Placa de la Aguja para el Bordado...............................43
Para Quitar el Soporte del Pie Prénsatela
MANTENIMIENTO
23 6.
..............................................................
........................
LIMPIEZA............................................................................44
ACEITADO
..........................................................................
TABLA DE PROBLEMAS....................................................48
AJUSTE DE TENSIÓN DE LA BOBINA
..............................
LIMPIEZA DE LA CAJA DEL CANGREJO..........................52
CAMBIO DEL FOCO...........................................................53
........
....
31
31
32
35
36
38
38
41
43
44
45
50
^9ЛЭ
: faction
1<
у

Page 2
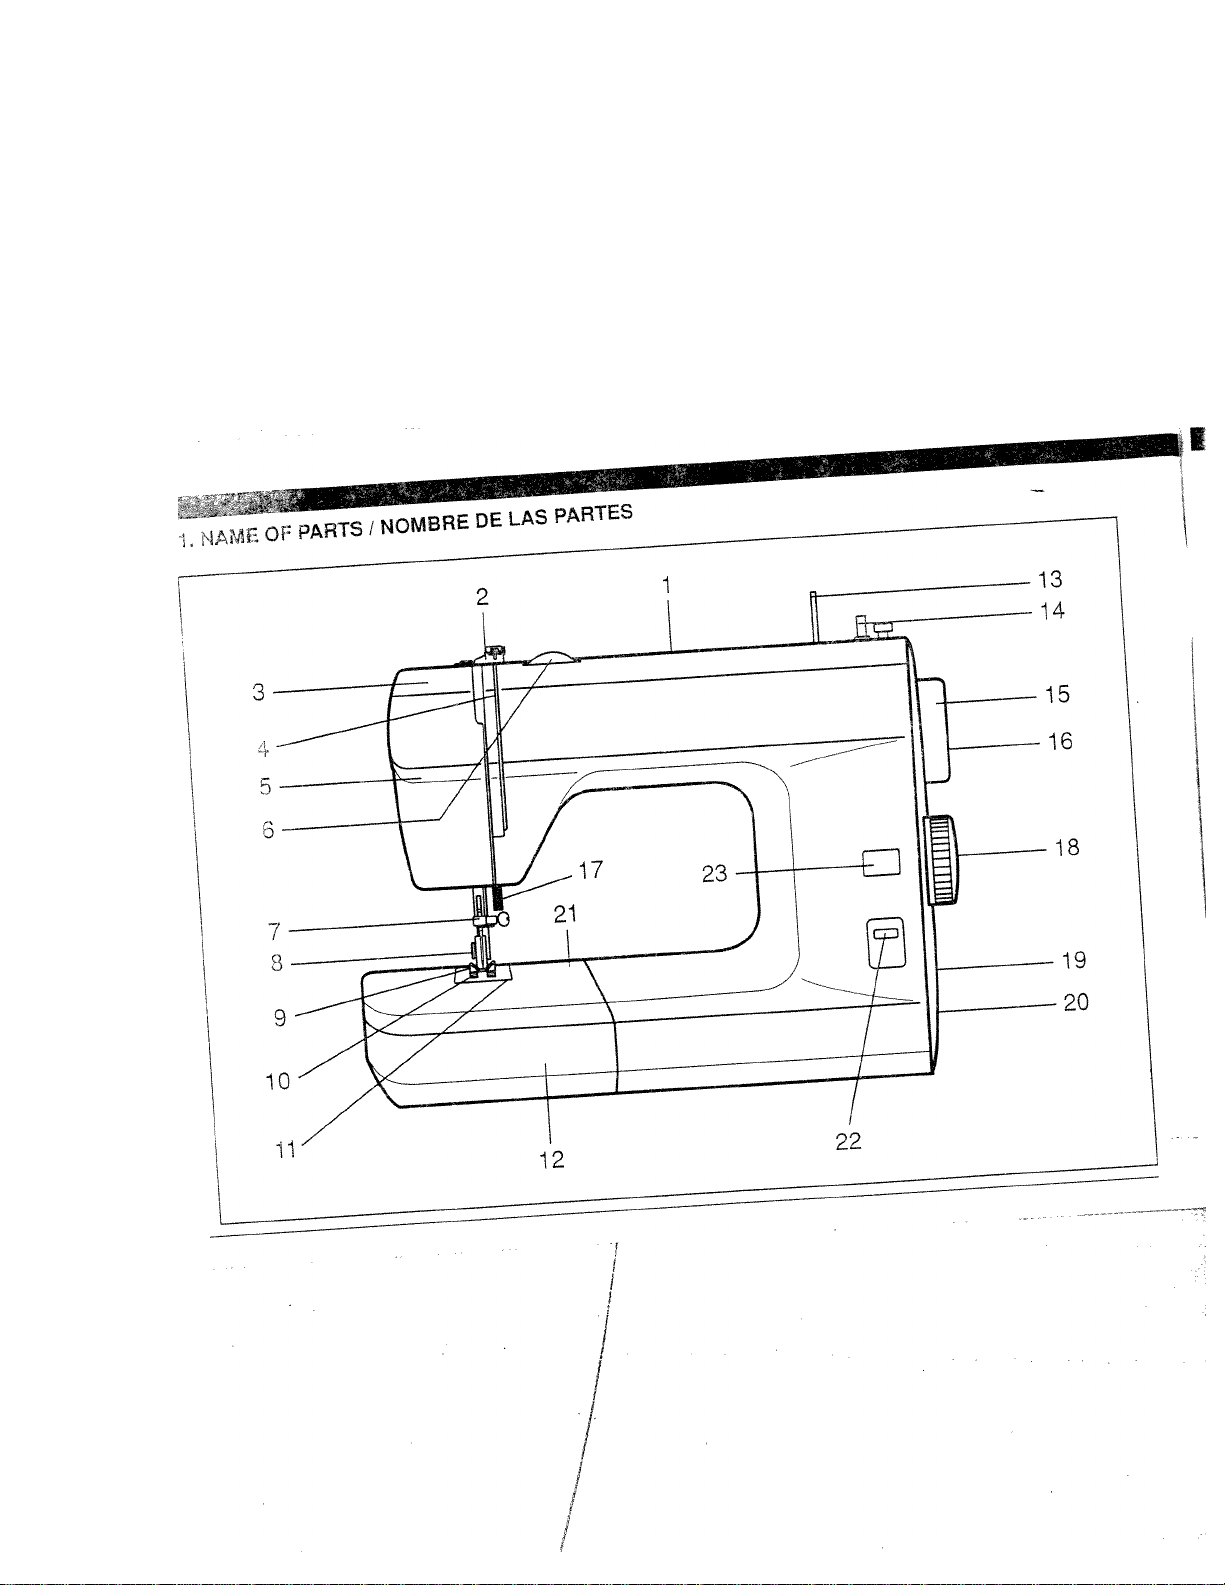
English
Handle
Thread guide for bobbin winding
Take-up lever
Upper tension plate
Face cover
Upper thread tansion dial
Thread guide for upper threading
Presser foot holder screw
Presser foot
Feed teeth
Needle plate
Extension table (Accessory box)
12
Spool pin
Bobbin winding spindle
Handwheel
Declutch knob
Presser foot lifter
Stitch selection dial
Socket
I у
Switch
20
Free arm
21
22
Reverse sewing lever
23
Stitch picture
Español
1. Manija
2. Guía para enhebrar el hilo
3. Tira hilo
4. Guía del hilo superior
5. Tapa frontal
6. Control de la tensión del hilo superior
7. Guía del hilo superior
8. Tornillo del pie prénsatela
9. Pie prénsatela
10. Dientes
11. Placa de la aguja
12. Tablero de extensión (Caja de accesorios)
13. Porta carrete
14. Devanador
15. Volante
16. Seguro del volante
17. Elevador del pie prénsatela
18. Control para seleccionar la puntada
19. Enchufe
20. Interruptor
21. Brazo libre
22. Palanca para coser en reversa
23. Pintura de puntadas
í-
2. ACCESSORIES / ACCESORIOS

English
Zigzag sewing foot (on machine)
Zipper foot
Buttonhole foot
Buttonhole cutter
Needle plate screw driver
Oiler
Bobbins (3 pcs.)
Standard needles (3 pcs., #14)
Ball point needle (1 pc.)
10
Darning plate
11
Screw driver (1 pc., small)
ì2
Extra spool pin (For twin needle sewing)
i 3
Tv/in needle 41
Id
Blind hem foot 4i
Español
1. Pie de costura zig-zag (en la máquina)
2. Pie para cose cierres
3. Pie para ojal
4. Cortador para ei ojal
5. Llave para desatornillar la placa de la aguja
6. Aceitera
7. Carretes (3 pzas)
8. Agujas normales (3 pzas)
9. Aguja de punta redonda (1 pza)
10. Placa de la aguja para el bordado
11. Desarmadores (1 pza, pequeño)
12. Porta carretel extra (para costura con dos hilos)
13. Aguja doble ir
14. Pie de costura invisible ir
Optional accessories not included.
Accesorios opcionales no están incluidos.
Page S |
'!*■
ïution
O
áiiii
rei
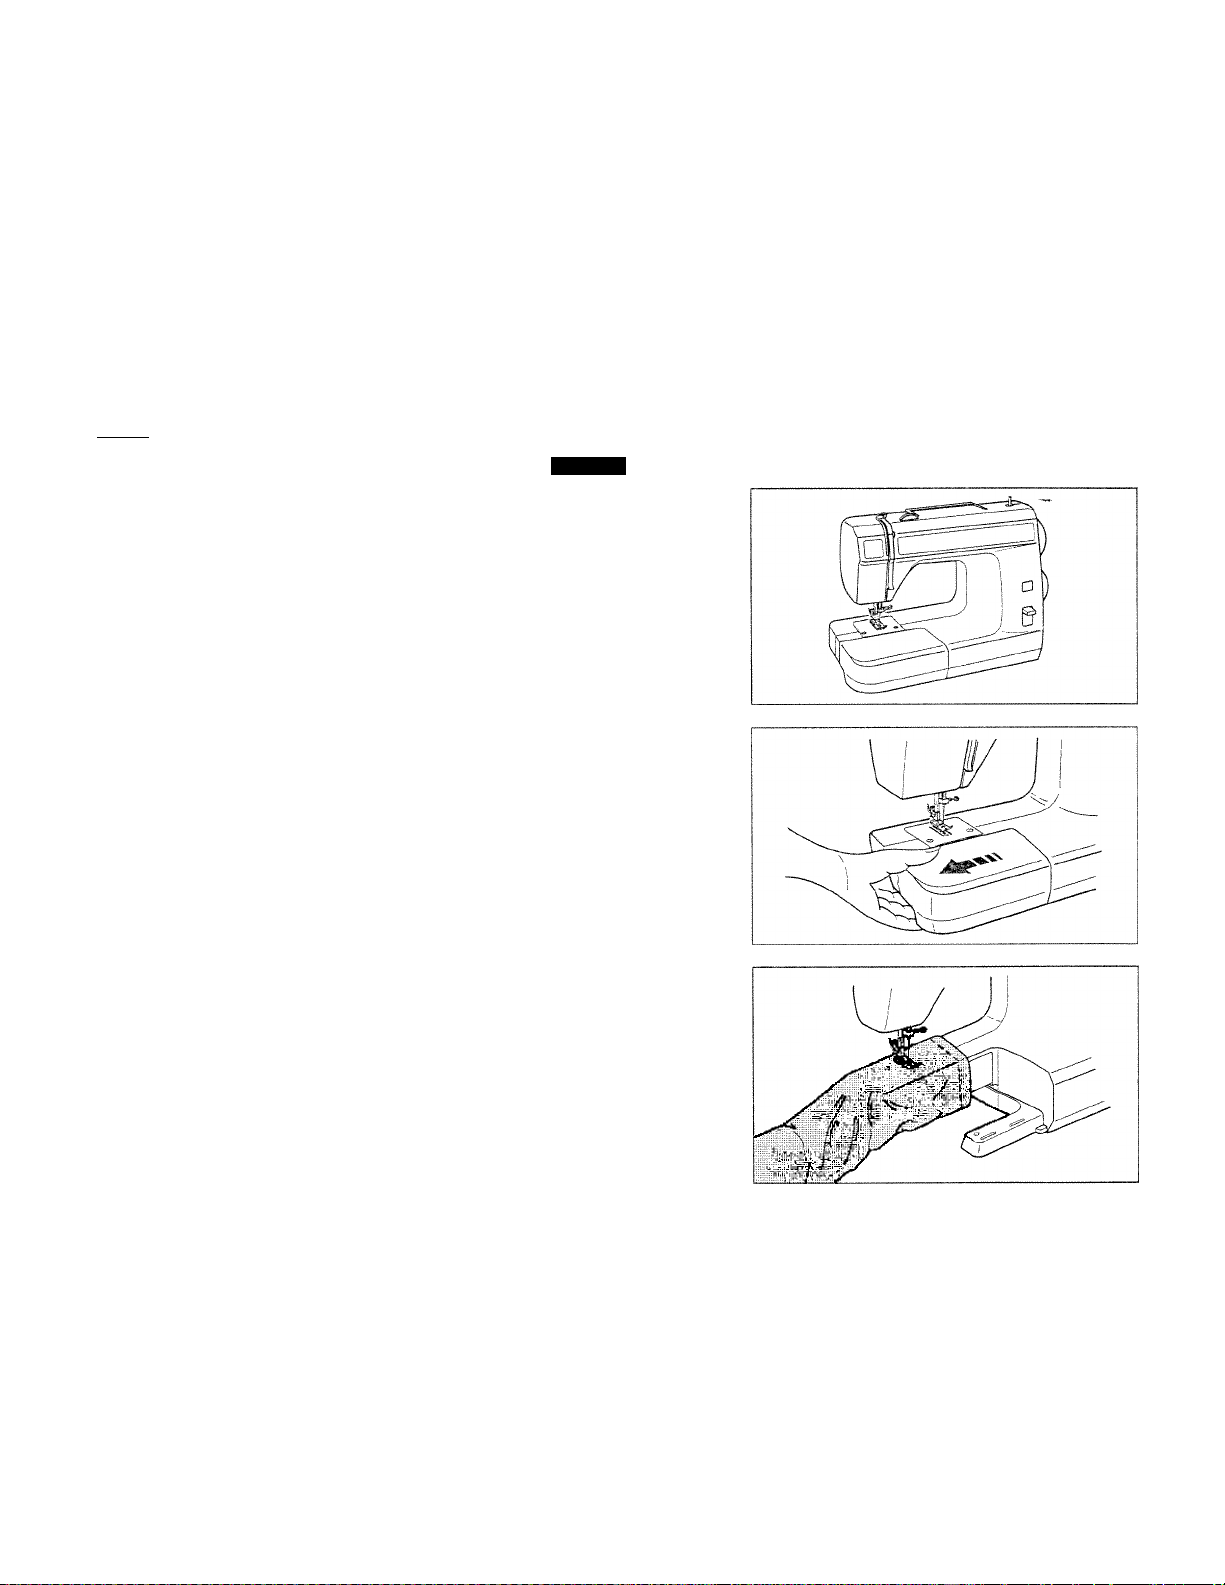
3. BEFORE SEWING
The machine is equipped with
a detachable extension table,
which provides a flat surface
for standard sewing.
DETACHABLE EXTENSION
TABLE
By 'emoving the table
(accessory box), the machine
converts to a free-arm
machine.
The free-arm is convenient to
sew or embroider, trousers,
sleeves, cuffs of T-shirts or
blouses.
Reverse above steps to
attach the extension table.
English
Español
3. ANTES DE EMPEZAR
A COSER
La máquina se presenta en
forma plana para hacer más
fácil su labor en la costura
normal.
TABLERO DE EXTENSION
RETIRABLE
Quitar esta parte (conteniendo
accesorios) y la máquina se
puede usar con el brazo libre.
EI brazo libre es recomendable
para coser o bordar pantalones,
mangas, puños de camisas o
blusas.
Colocar nuevamente la caja
de accesorios.

Accessories may be stored
inside of the extension bed.
Español
Para abrir la tapa de la caja
de accesorios, colocarla
como se indica.
arUon
fWi
fiii
CONNECTING FOOT
CONTROL AND POWER
CORD
Connect the foot control ®
and the power cord (2).
Before plugging in the
machine, check the voltage
and make sure it is same as
what is indicated on the plate
on the back of the machine.
The machine will not operate
until the power/light switch is
turned on. ^
The same switch controls
both the power and the light.
Note; „ ,
Always turn the power off and
unplug the machine when not
in use, servicing/cleaning, or
changing needles or lamps.
CONEXIÓN DEL PEDAL Y
CABLE DE CORRIENTE
Conectar el pedal ® y e
cable de corriente siguiendo
los pasos @. ,,
Antes de conectar la clavija
de la máquina, asegurarse de
que el voltaje de la máquina
sea igual que el de su toma
de corriente
el voltaje está escrito
sobre una placa en la parte
posterior de la máquina.)
Accione el botón de la máquina,
para el funcionamiento del
pedal y del foco.
OFF - Apagado
ON - Encendido
Page 7
toe lion
.. ; Vi
BOBBIN WINDING
Set the needle in its highest
position by turning the
handwheel toward you.
Ooen the shuttle cover.
Español
BOBINADO
Colocar la aguja en su
posición más alta girando 9
volante hacia Ud.
Abrir la cubierta de
cápsula.
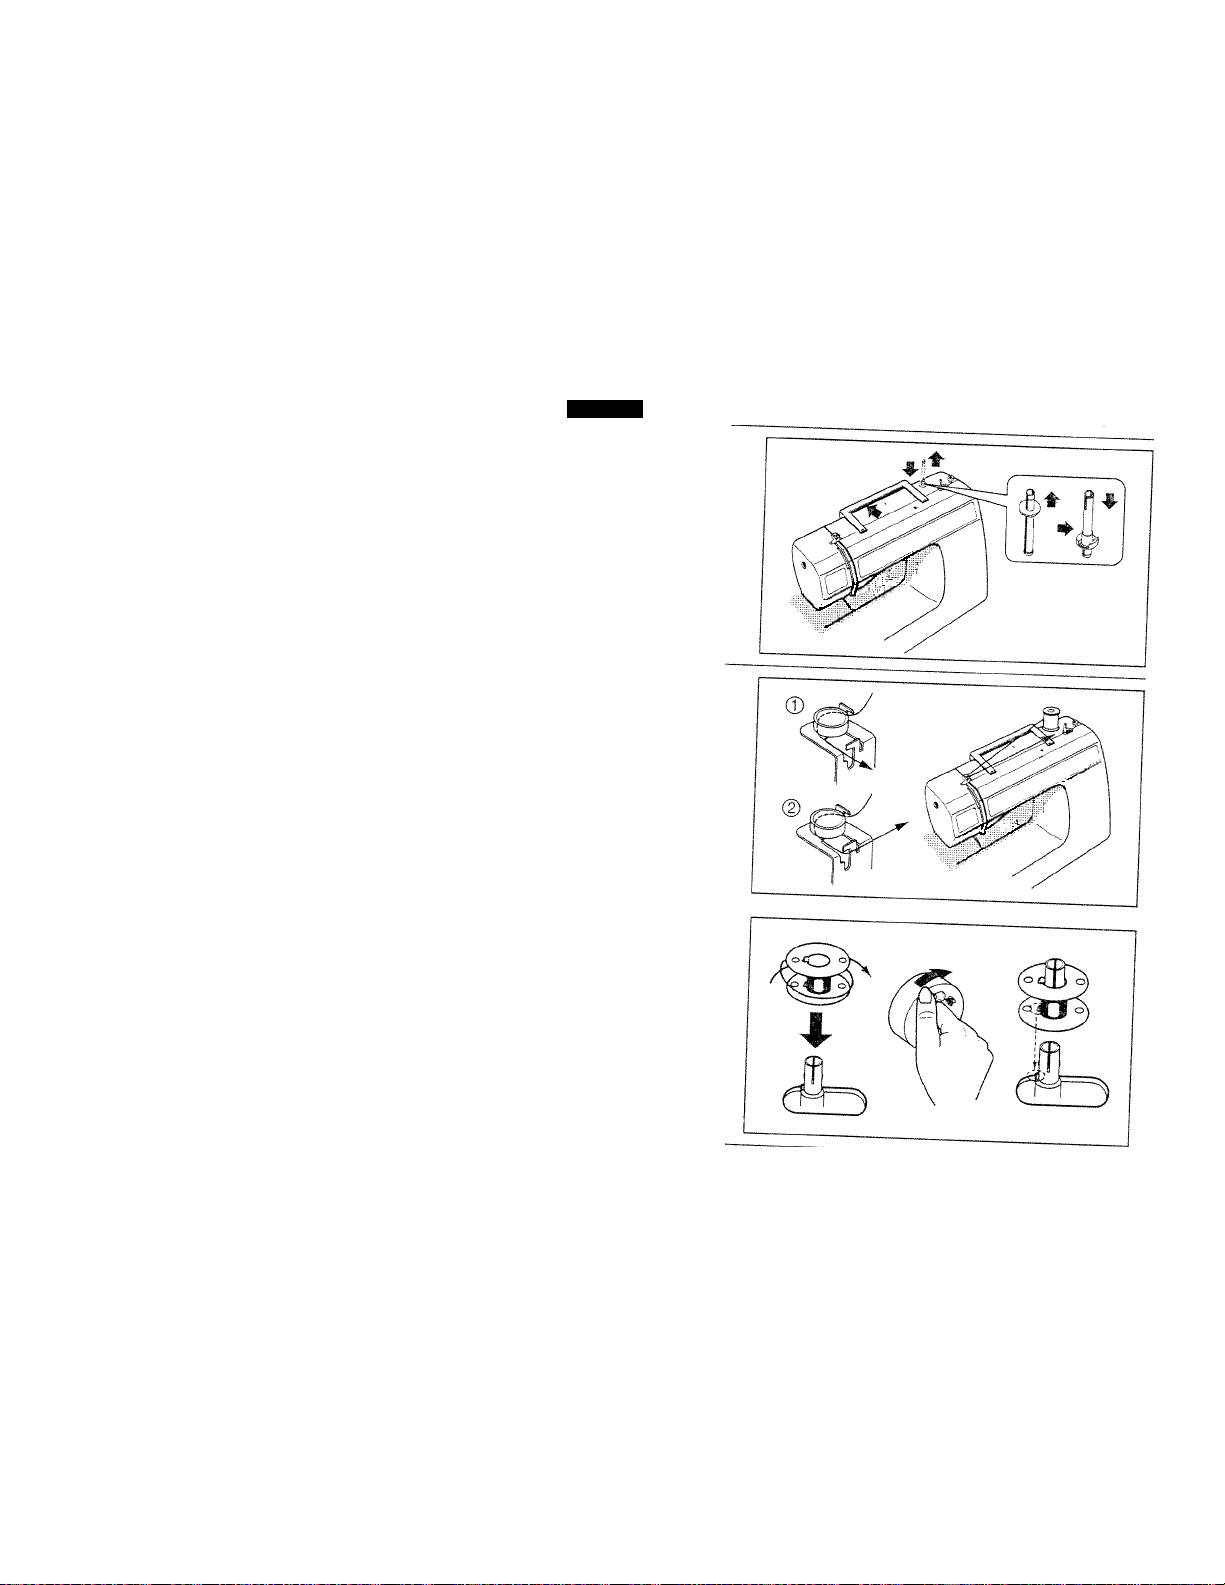
rold the handle and Insert the
pool pin.
Радев
Español
Levantar el porta carrete
hacía arriba.
:tion
Put a spool of thread on the
spool pin.
Draw the thread from the
spool pin to the thread guide
and then to the pretension
disc. Follow the order (T) and
@ as illustrated.
Wind the thread clockwise
around the bobbin several
times.
Push the bobbin onto the
spindle.
Turn the declutch knob in the
handwheel to the bobbin
winding position (J).
Note: Do not switch the declutch
knob while sewing.
Colocar un hilo en el porta
carretes.
Pasar el hilo del porta
carrete como se muestra en
el dibujo, (pasos® y®)
Enredar el hilo varias veces
alrededor del carrete en
dirección a las manecillas del
reloj.
Colocar el carrete sobre el eje.
Mover el botón que se
encuentra en el volante hacia
el dibujo ( J , indicando el
carrete).
Nota: No togue nunca ci
botón de desembrague
automático al coser
(uede ser peligroso)
-age
■ÍÜ ■■■>,■;■:
En^tfsh
Push the bobbin in the
direction of arrow (§).
Press down the foot control to
wind the bobbin. The bobbin
winding will stop when the
bobbin is fully wound ®.
Release the foot control and
push the bobbin to the left as
shown © to remove the
bobbin.
Note: Watch the bobbin
carefully to wind the
_ correct volume of thread,
lake the bobbin off the
spindle and cut the thread.
Turn the declutch knob in the
handwheel to the sewing
position { J,).
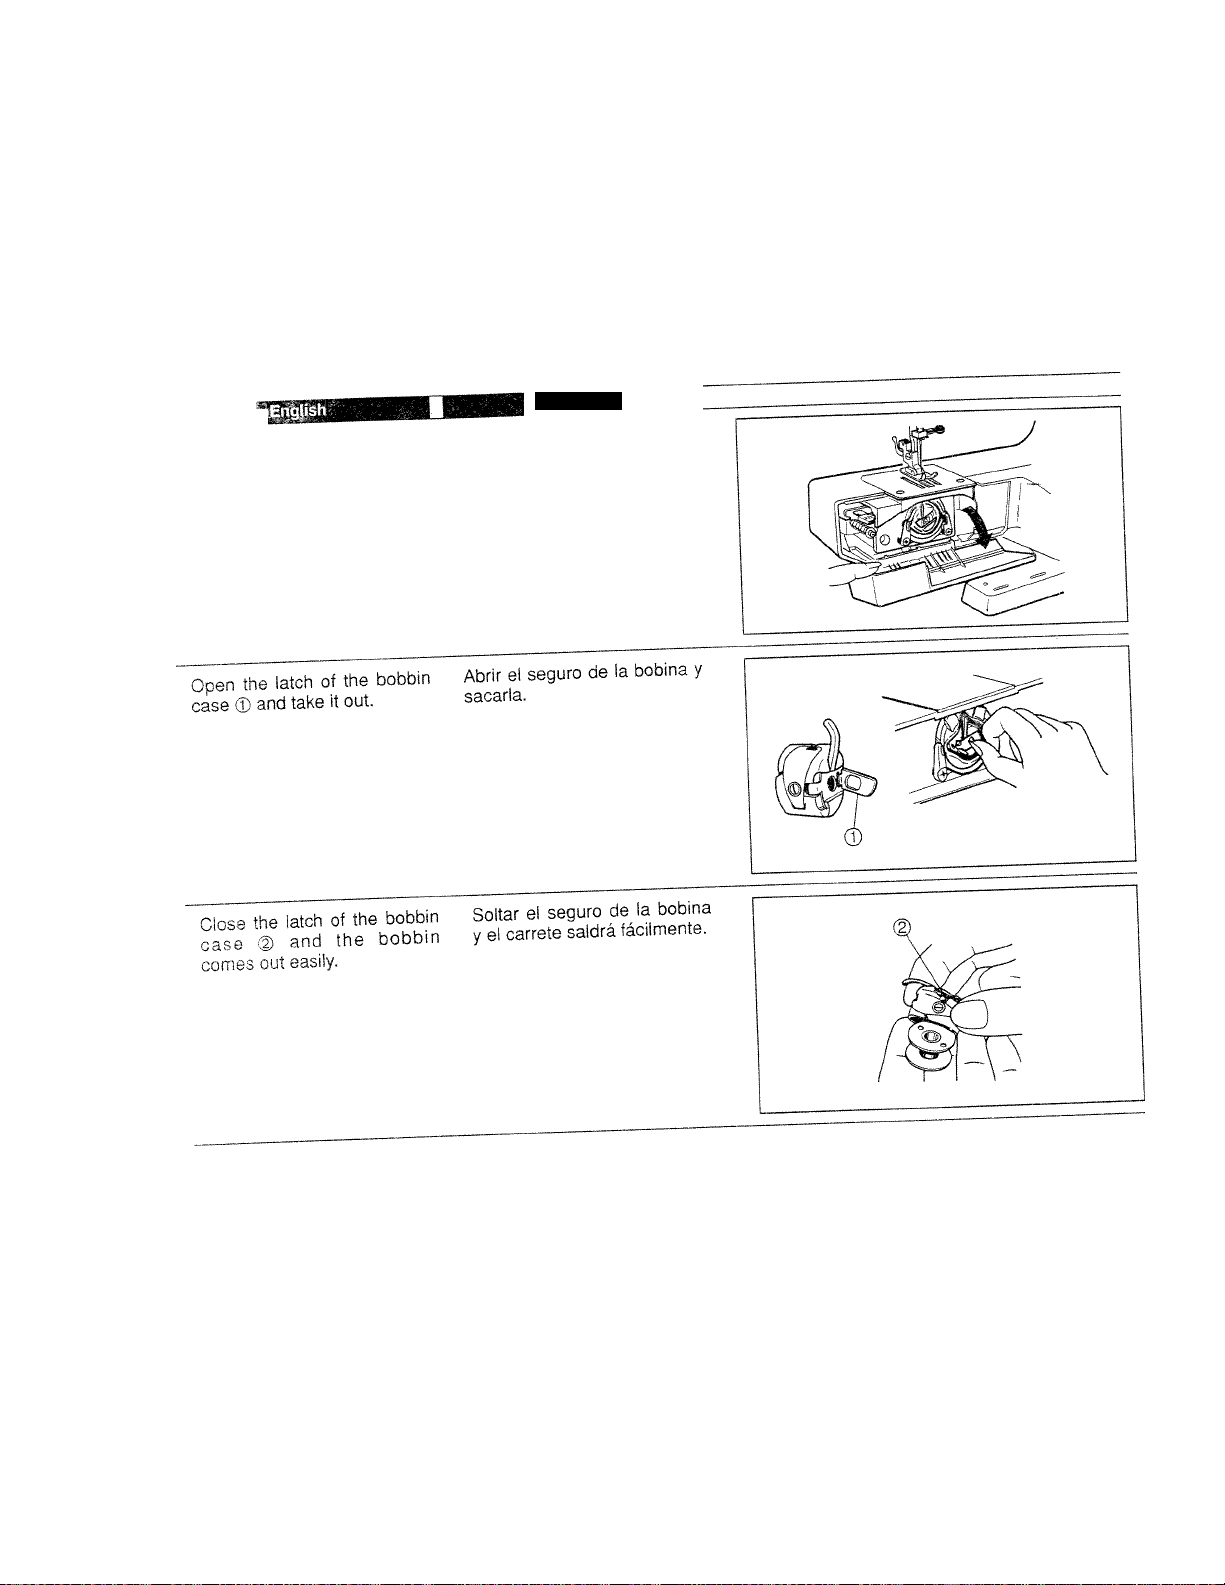
INSERTING BOBBIN
Place the bobbin in its case
with the thread running in the
direction of arrow (clockwise).
Español
Mover el carrete come se
indica en la flecha @.
Presionar el pedal para
devanar. Cuando el carrete
está como se indica en la
figura ®, pare la máquina y
mueva el carrete hacia la
izquierda como se indica en
la figura © para desprenderlo.
Nota: Al devanar cuide que el
volumen del hilo no
exceda la capacidad
del carrete.
Quitar el carrete del eje y
cortar el hilo.
Mover el botón del volante en
dirección a la aguja. ( )
COLOCACIÓN DEL CARRETE EN LA BOBINA
Colocar el carrete dentro de
la bobina con el hilo en
dirección a la flecha.
Guide the thread into the slot
(|) of the bobbin case.
Page 10
Ef (lañol
Guiar el hilo por la ranura
de la caja porta bobina.
■JC'CliOf!
ill
iraiwiiifi
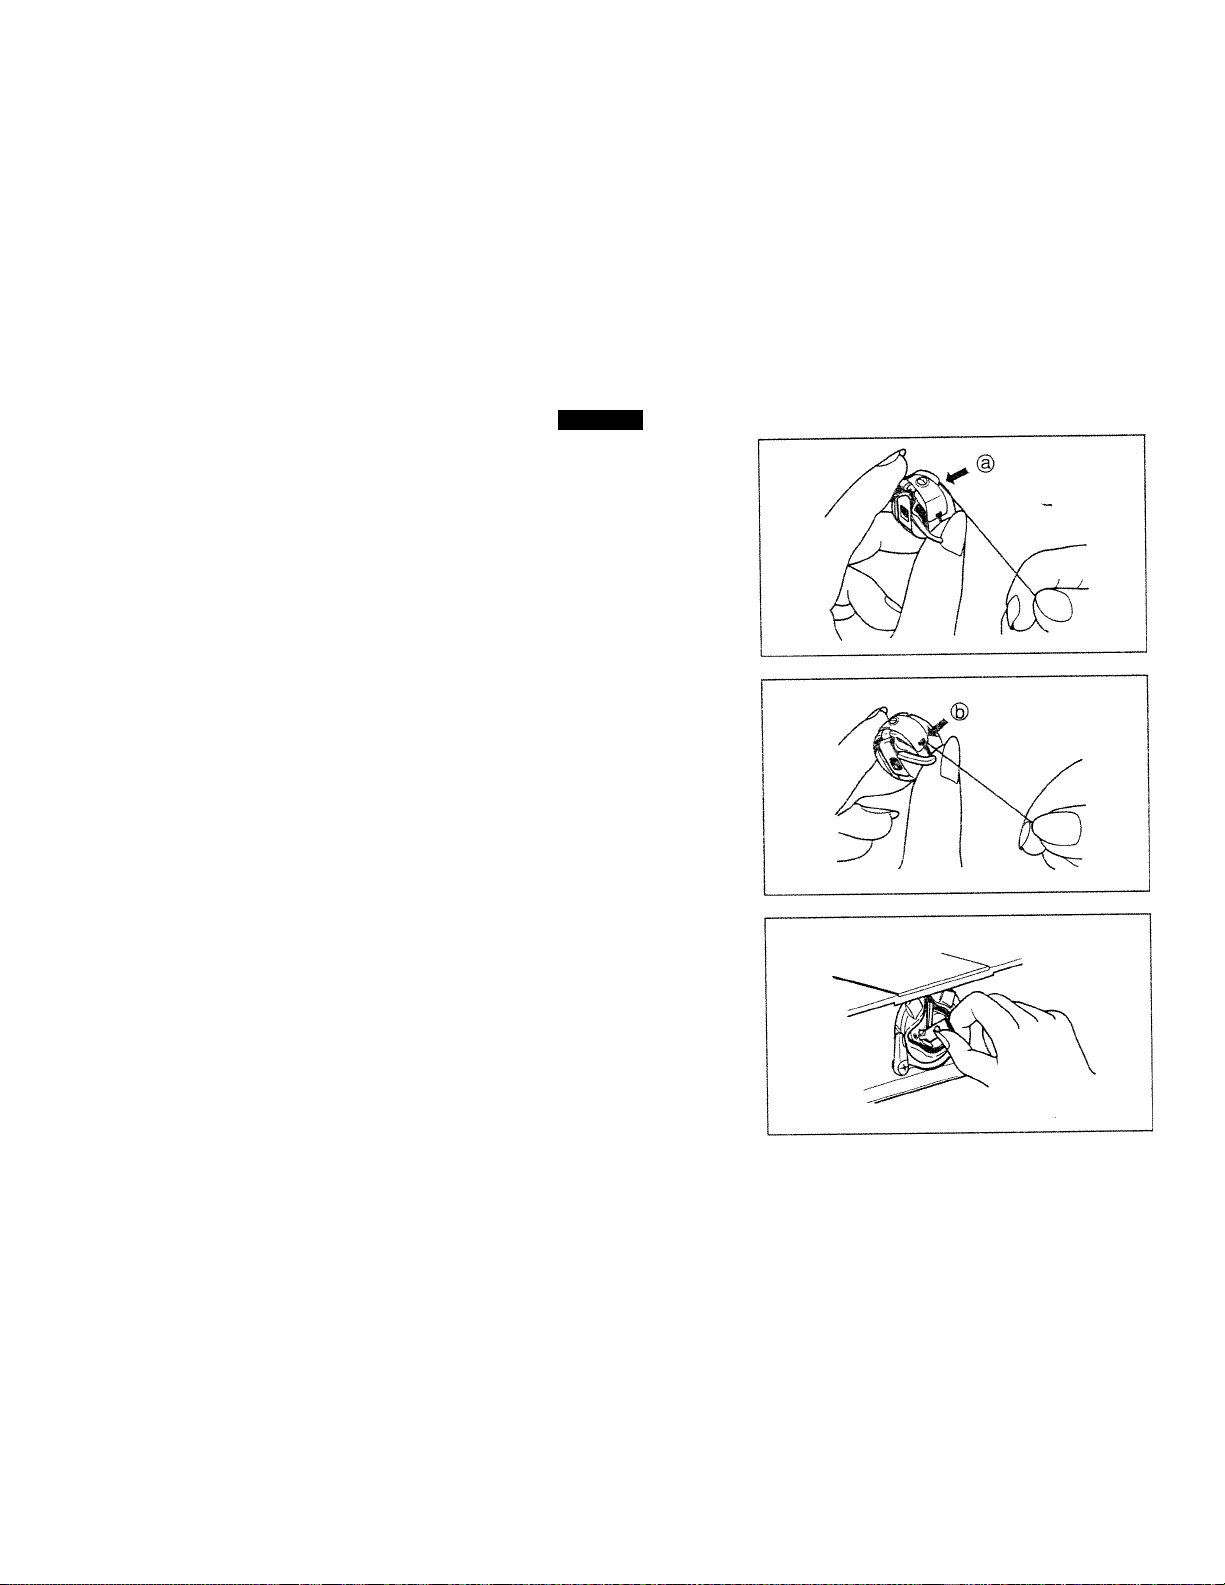
Pulling the thread to the left,
and bring it under the tension
spring then to the delivery slot
Raise the needle to its highest
position.
Leave about 10 cm (4”) of extra
thread from the bobbin case.
Hold the latch and push the
bobbin case into the shuttle as
illustrated.
Release the latch when the
bobbin case is fully inserted.
Note:
Press firmly when inserting the
bobbin case and be sure that
it is locked in its place.
Extraer el hilo hacia la
izquierda, conducirlo hacia
abajo del resorte de tensión y
luego pasarlo por la ranura
Levantar la aguja a su
posición más alta.
Dejar en el extremo del hilo
unos 10 cm fuera de la
bobina.
Tomar el seguro de la bobina
y empujarla hacia adentro de
la cápsula, como se indica.
Soltar el seguro cuando la
bobina esté completamente
dentro del canillero.

i>ection
3^
THREADING UPPER
THREAD
Raise the presser foot.
Raise the take-up lever to its
highest position by turning the
handwheel toward you.
Thread the machine in the
order as illustrated.
Pass the thread through the
guide (j).
Guide the thread through
either side of the tension disc
Hook the thread under the
guide @ as shown.
Español
enhebramiento del
HILO SUPERIOR
Levantar el elevador del pie
prénsatela.
Levantar el tira hilo a su
posición más alta girando el
volante hacia Ud.
Para enhebrar seguir los
pasos del® al®.
Pasar el hilo a través de la
guia ®.
Guiar el hilo hacia el frente y
pasarlo por cualquier unidad
de la guia @.
Erihebrar el hilo en la guía @
y llevar el hilo hacia arriba
p3f3 ¡nS0rÍ3.rIo 0n 0Í r0SOft©
i hread ih© take-up lever
Pass the thread through the
needle guide ® (use one on
the left), then through the
needle eye ® from front to
back.
Leave about 15 cm (6”) of
extra thread and place it
under the presser foot.
Enhebrar el hilo en la guía®
Pasar el hilo a través de la
guia ® (usar izquierda).
fw la aguja de
adelante hacia atrás ®.
Dejar aproximadamente 15
cm de hilo extra.
 Loading...