

SINGER W8910 User Manual
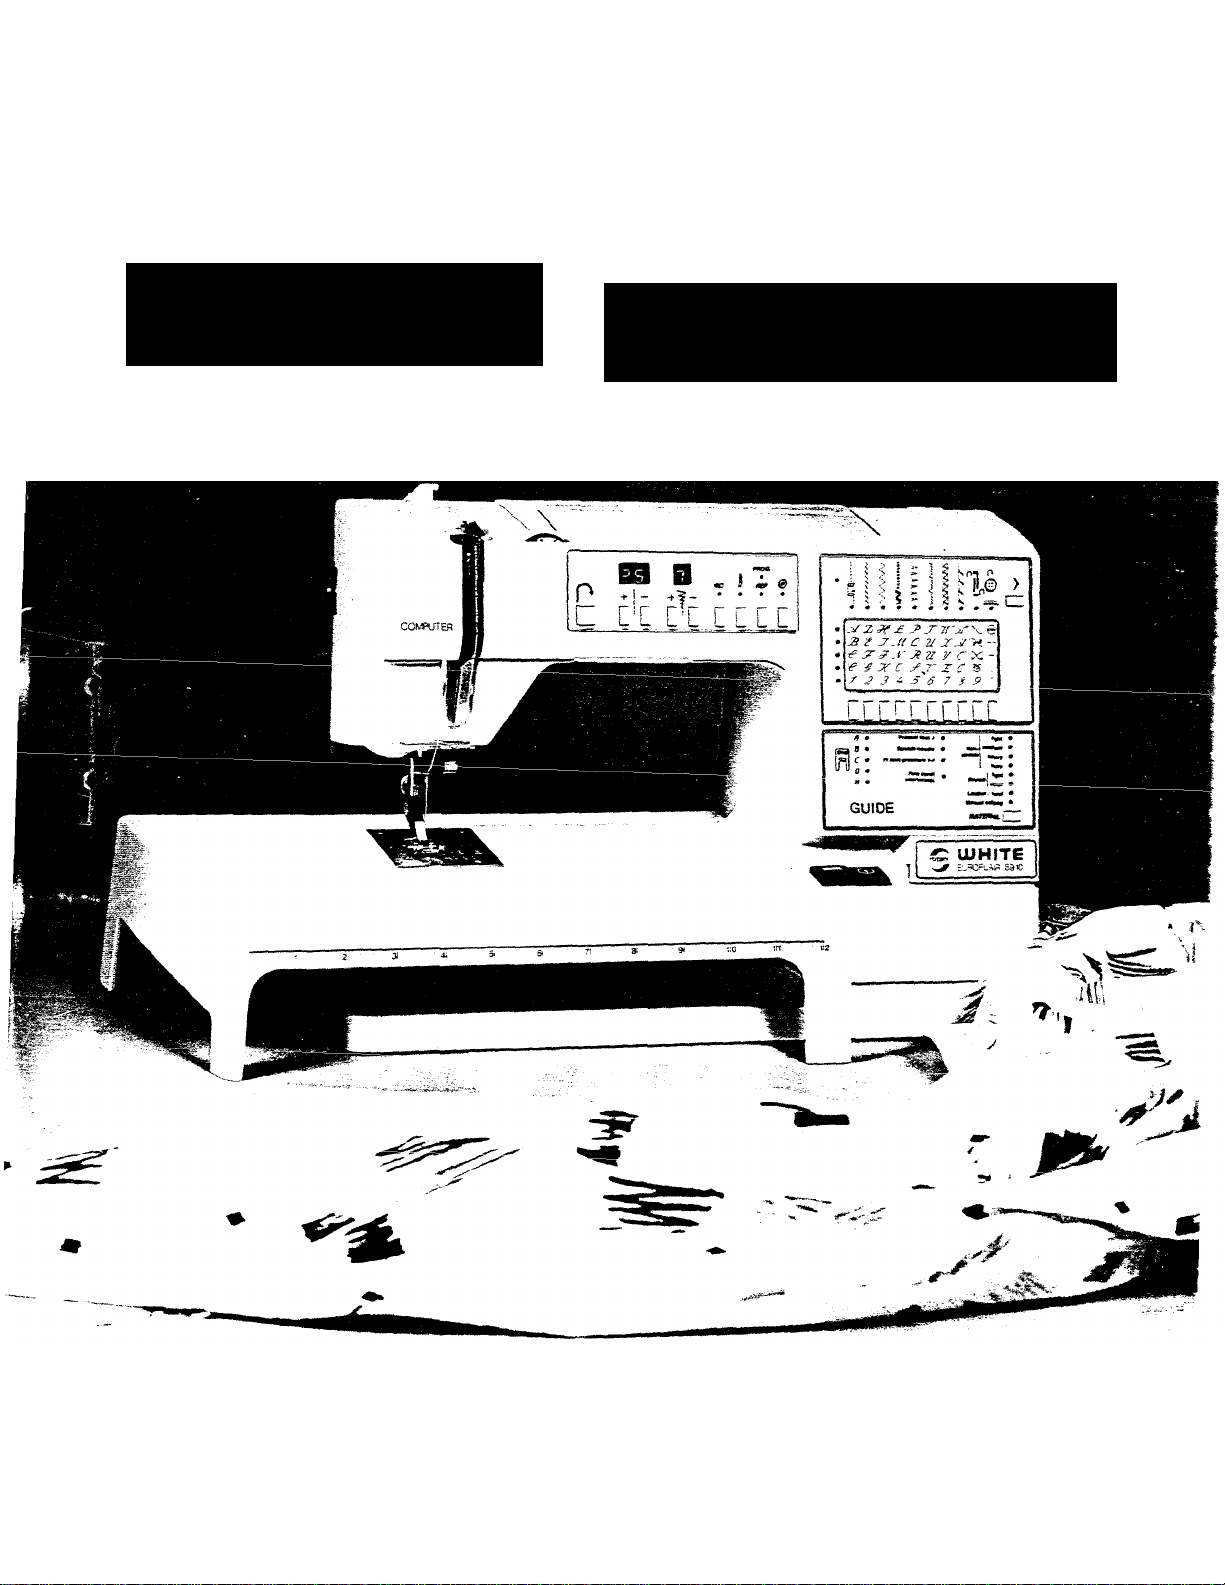
UIHITE
OPERATING MANUAL
EUROFLAIR 8910
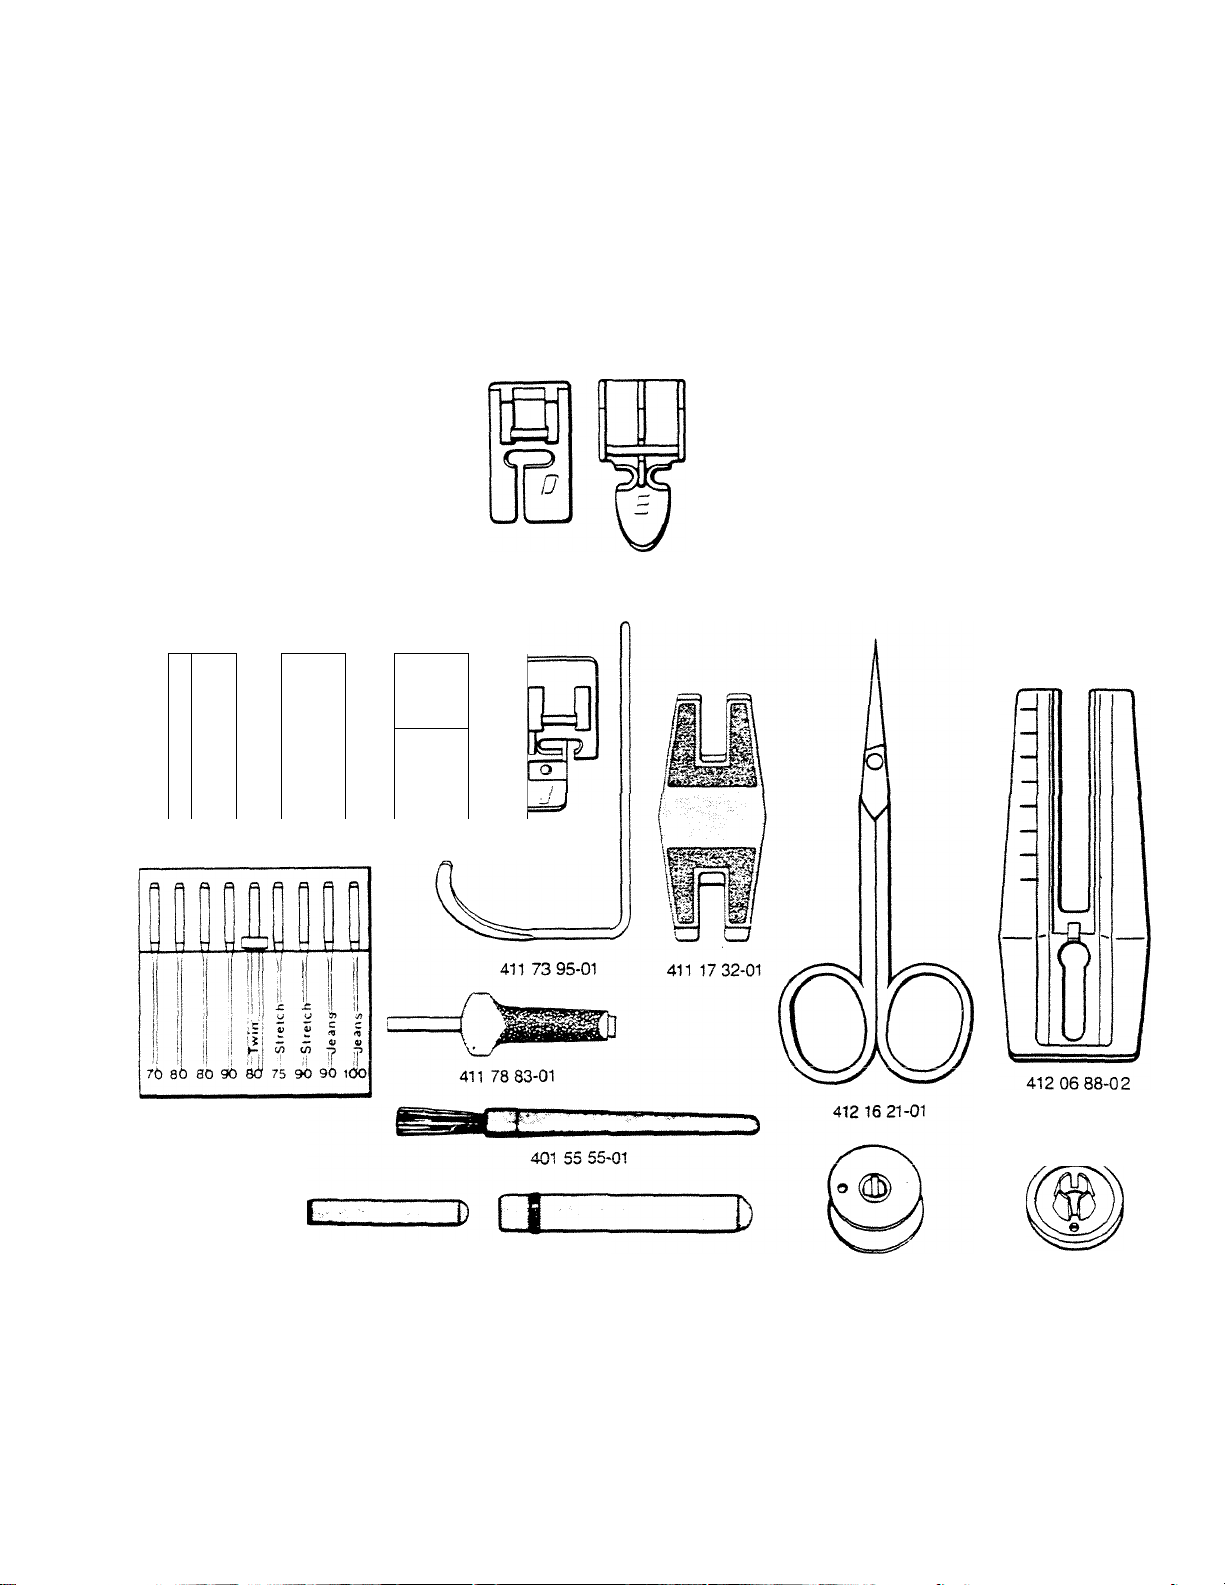
Standard accessories delivered with the machine
412 03 73-01 412 03 74-01 41173 89-01 41173 91-01 41173 93-01 41177 93-01 41185 87-01
f.
--------
f-T...m
^
411 39 25-01
LUJ
fUl
l-T—'
dL
L
412 00 16-01 411 73 99-01 411 85 30-01 411 85 27-01
411 64 14-01
-W
JL
401 53 99-01
412 06 12-01
411 87 78-01

For you and your new sewing machine
This booklet has been prepared to let you know how
to operate this sewing machine and how to make use of
all its sewing possibilities.
You will, for sure, get many pleasant hours with your
new sewing machine and be successful in obtaining many
fine results.

We reserve the right to change the machine equipment
and the assortment of extra accessories without prior
notice, or make modifications in the design or appear
ance of the machine, which do not negatively affect the
function.
Table of contents
Sewing Stitches of personal choice
Joining
Overcasting
Joining and overcasting
Topstitching
Hemming...........................................................
Buttonholes
Clearance plate.................................................
Sewing on buttons
...............................................................
.......................................................
...................................
......................................................
.......................................................
Ordinary/repeated buttonholes, edges, appliqués
adjustment possibilities, corded! Three-step zig-zag
reinforced/keyhole buttonholes. Sewing terry cloth, mending
buttonhole plate, cutting the Stretch stitch, reinforced straight
buttonhole stitch, reinforced zig-zag..................................
............................................
..........
23
..........
23
..........
24
..........
24 pin tucks
..........
25-26 Zig-zag...............................................................
..........
27-31
..........
40 Overcast stitch, overlock
..........
41
Straight stitching
Topstitching, edge stitching.
gathering, sewing in zippers,
Attaching lace, gathering, bound
..............................................
............................................
.................................
Flatlock..............................................................
Pattern cassette.................................................
Bridging stitches, edging. Point
de Paris hemstitch
Programming of decorative stitches
Mirroring, pattern combinations,
cross-stitching
Sewing letters, monograms
..............................
...............
.........
.........
.........
.........
.........
.........
.........
.........
32-35
36-37
38
39
43
44-47
46-47
48-50
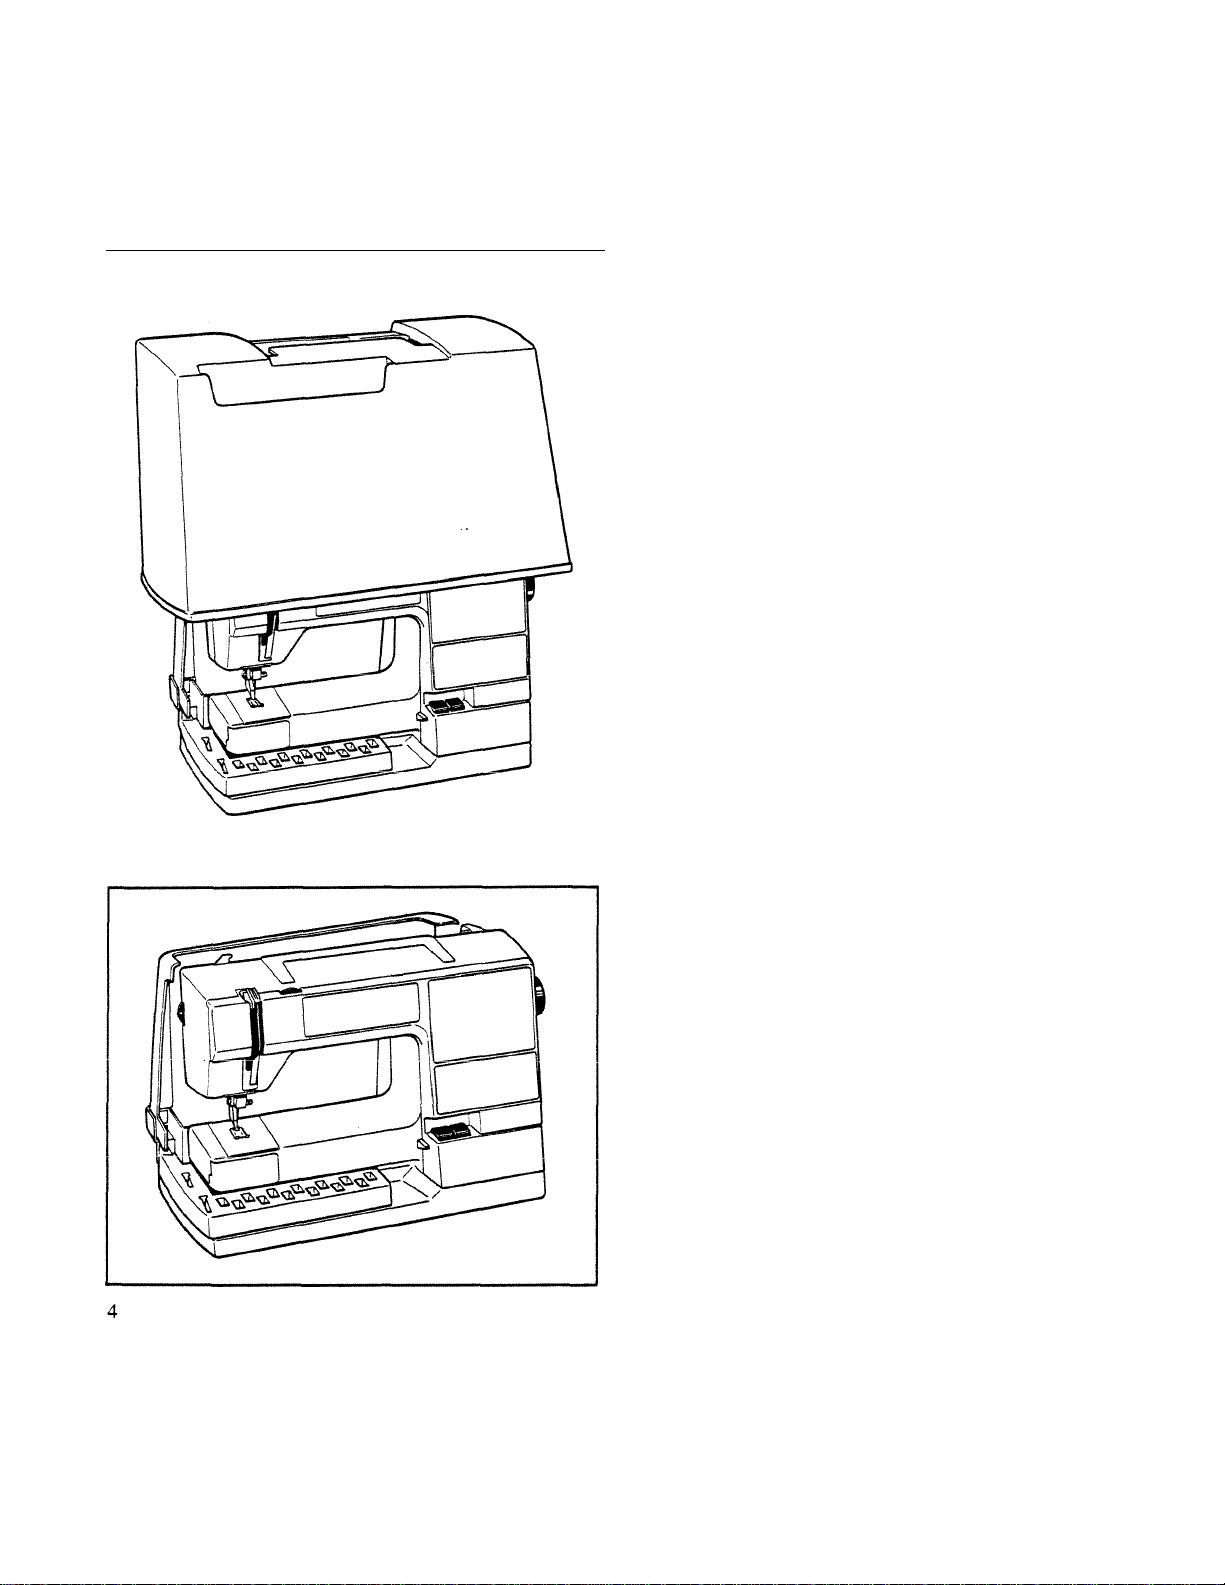
Unpacking and putting away the machine
Unpacking
Place the machine on the table, with the recess for the
handle furthest away from you, and fold down the
handle. Lift off the cover and put it aside. Remove the
extension table and the foot control and sHde the acces
sory box to the left from the machine.
Wipe the machine clean before you start sewing and
be especially careful with the stitch plate and the space
around the needle. The machine is equipped with a
number of presser feet and these are packed in two
plastic bags. Regarding the placing of the accessories,
please refer to page 14 imder “Accessory box”.
Putting the machine away
Pull the plugs out of the wall outlet and the socket of
the machine. Wind the cords around your hand, starting
at the foot control and push them into the control com
partment.
Place the control in the rear compartment of the acces
sory box, with the wider end downward. The bottom of
the foot control should be turned toward the machine.
Lower the presser foot. Make sure that all accessories
are correctly placed in the box. Slide the accessory box
into place and put the extension table into the box.
Fold down the handle and put on the cover.
n
_____
V^UllllCV-LXilS LX1& xvjvxx v,v^xxi-iC!i
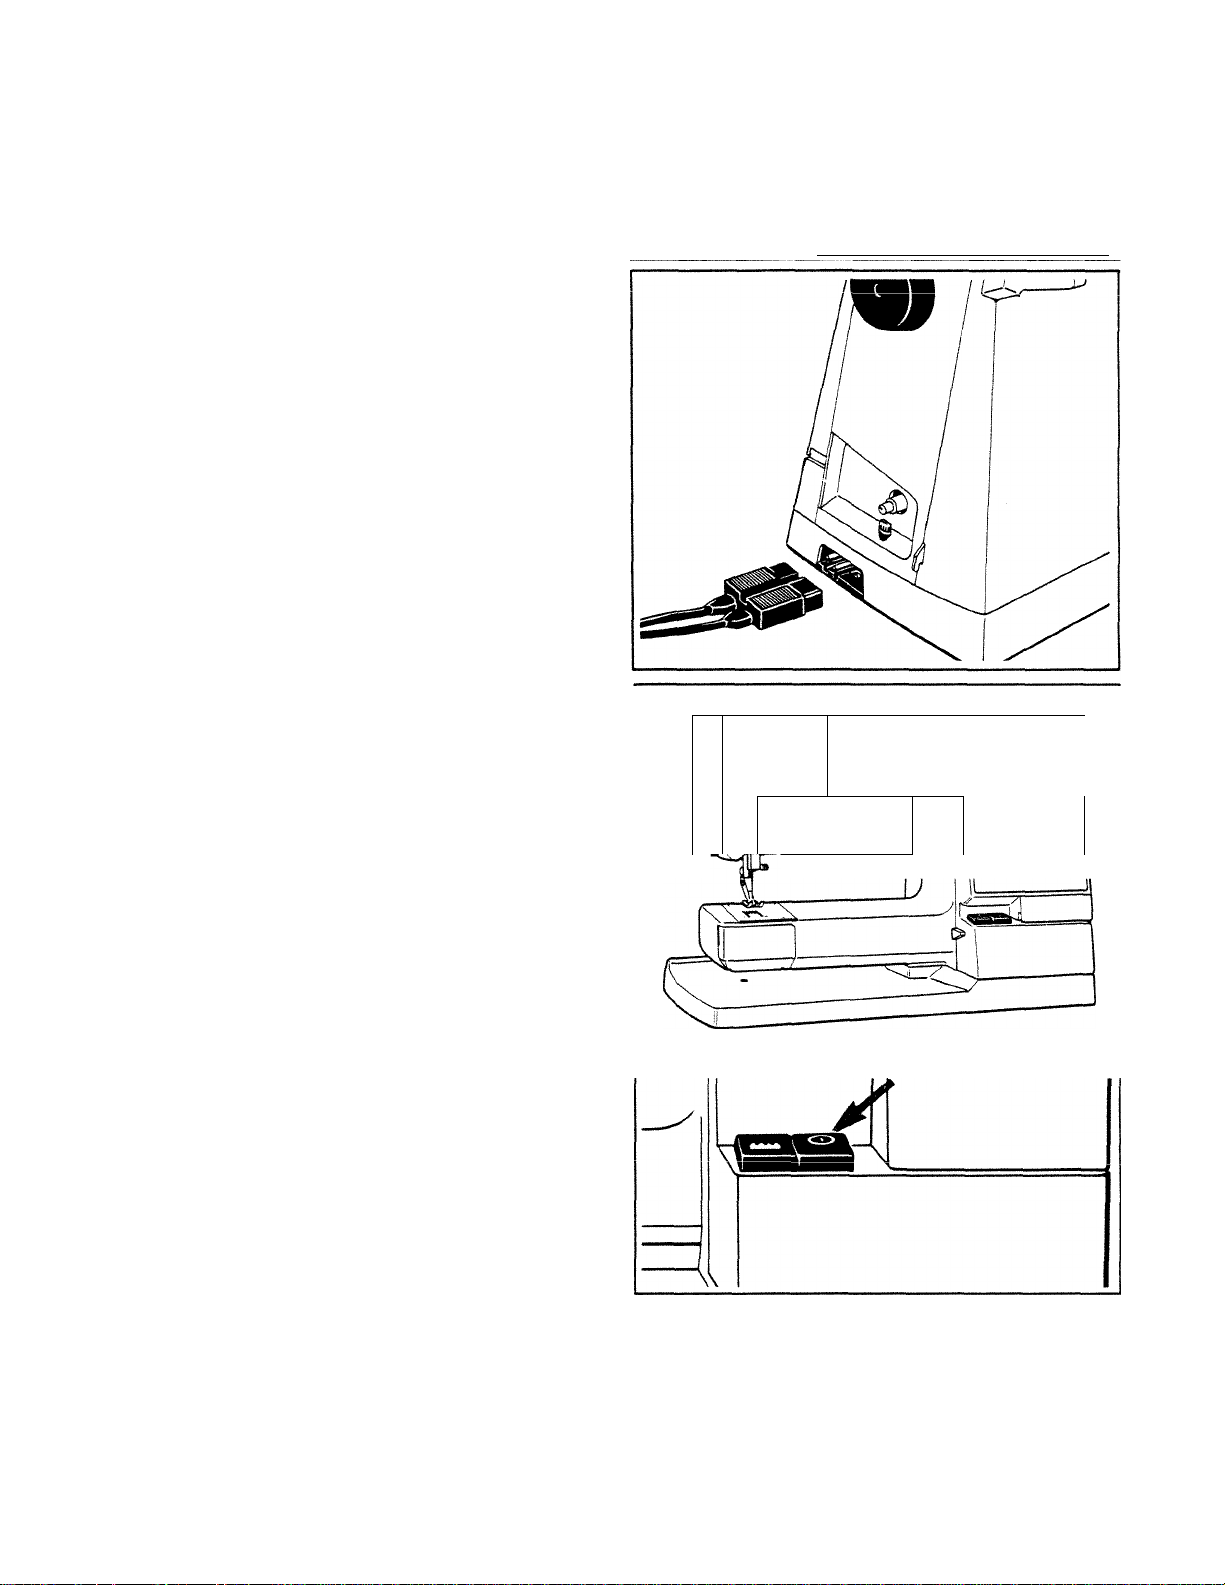
Remove the cord from the foot control and place the
control under the table. Insert the foot control plug into
the socket on the right side of the machine.
Connecting to the wall outlet
The voltage (V) and frequency (Hz) are indicated
under the base of the machine. Check that these values
correspond to those of the electricity source before con
necting the machine.
Main switch
The light and the machine are turned on by pressing
the main switch. This makes it easy to see that the
machine is ready for sewing.
Speed control and needle stop-right
The speed is controlled by means of the foot control.
Press the foot control down lightly and the machine will
start sewing at the lowest stitch speed. This speed is
suitable for precision sewing and if you wish to manoeuver the fabric by hand.
When you depress the foot control further the
machine will run faster. The needle has full penetration
power all the time.
When you lift your foot from the control the needle
will always stop at its upper position so it is not necessary
to think about the needle position at the start or finish of
a seam. If you wish to turn the fabric when sewing
around a comer for example, it is easy to get the needle
to stop down in the fabric. Just press the foot control
down quickly and release it again.
I I
----II----
mmmm
Connecting the machine
Ir^l
■' N
—
^ 1
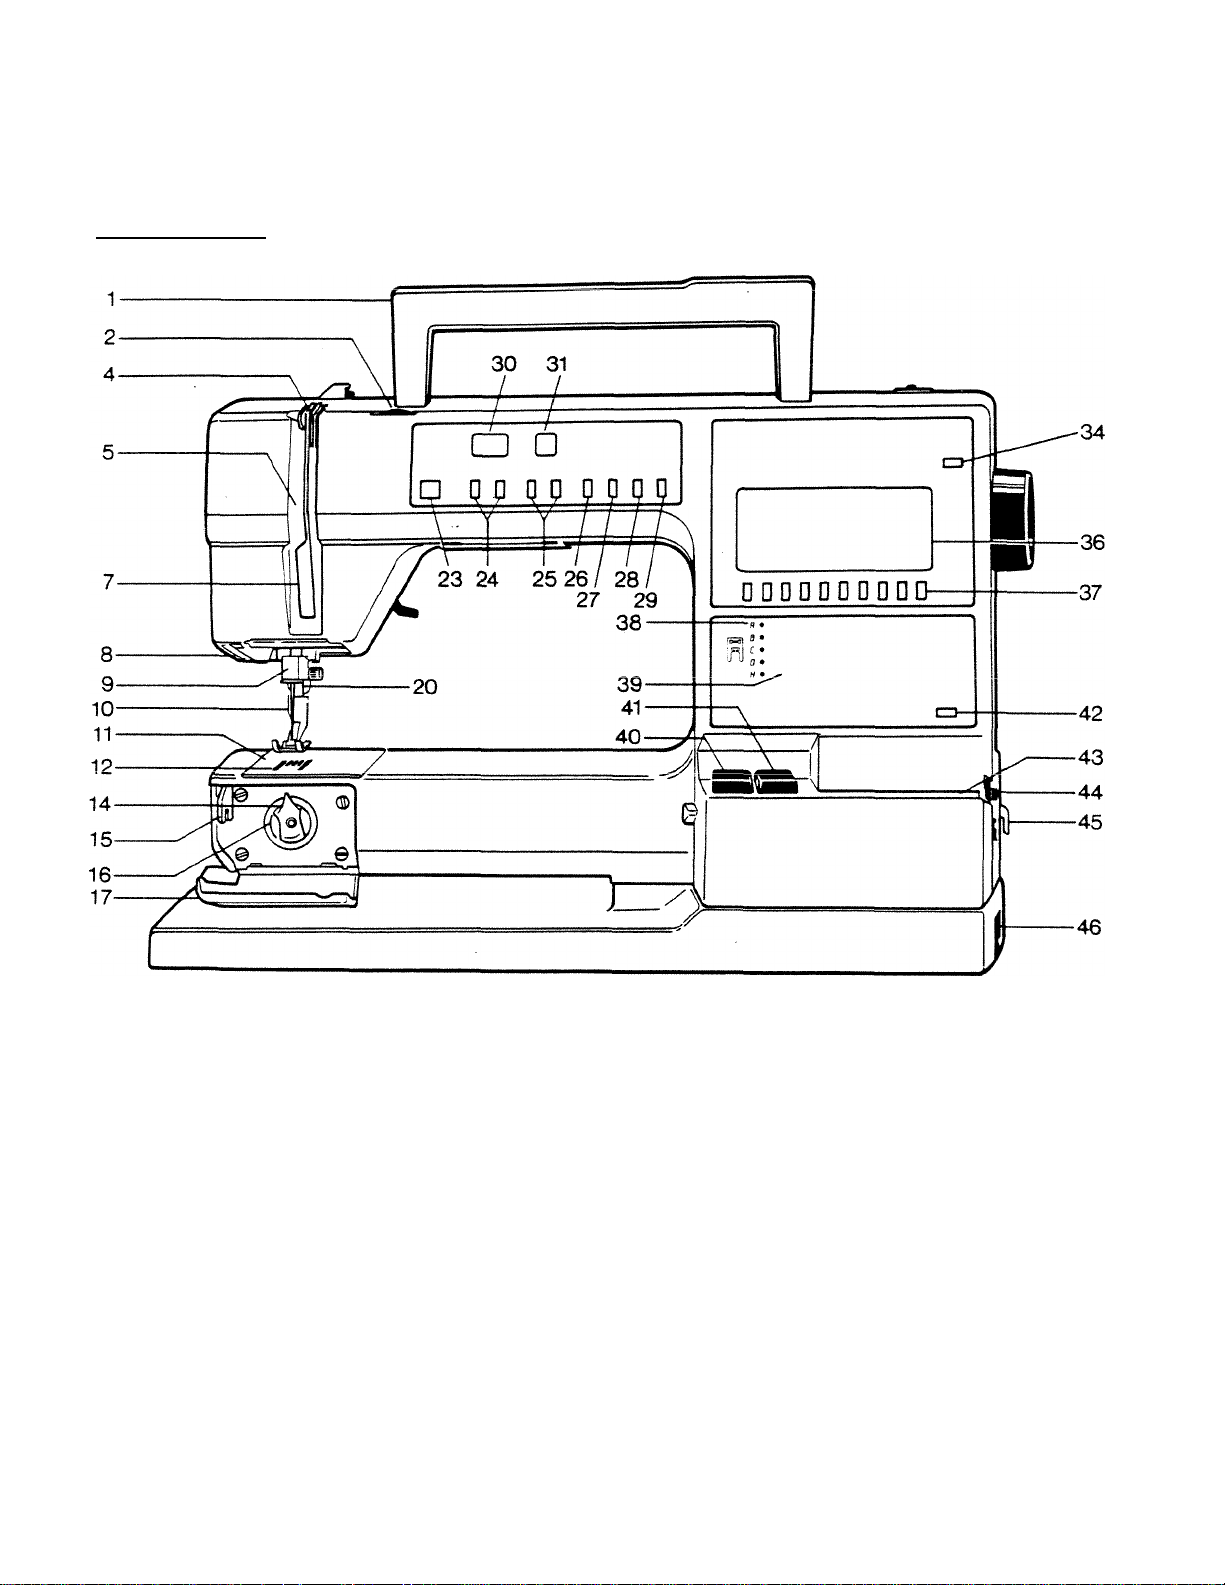
Machine parts
1. Handle
2. Thread tension dial
4. Thread tension discs
5. Thread take-up lever
7. Front thread guide
8. Sewing light
9. Needle bar with needle clamp
10. Presser foot ankle
-IXT_31-
AJL. INCCUIC pi<UC pidkc;
12. Feed dog
14. Bobbin case
15. Thread cutter
16. Shuttle (hook)
17. Door for shuttle (hook)
20. Presser bar
23. Reverse feed button
24. Push-buttons for changing the stitch
length
25. Push-buttons for changing the stitch
width
26. Push-button for mirroring the stitch
pattern
27. Push-button for limiting the stitch wi^
28. Push-button for programming and
repeating
29. Finishing button
30. Stitch length indicator
31. Stitch width indicator
34. Push-button for utility stitch setting
36. Exchangeable cassette
37. Push-buttons for selection of embroidery
38. Recommended presser foot
39. Other recommendations
40. Drop feed switch
41. Main switch
42. Pusii~fcnitton for ssttin^ of fM.?ric
43. Thread guide for bobbin winding
44. Bobbin winding spindle
45. Thread cutter
46. Socket for foot control

Machine parts
3. Thread guide
6. Presser foot pressure dial
8. Sewing light
A iCCi CIAA4A
18. Base plate
19. Needle clamp screw
21. Presser foot
22. Presser bar lever
32. Extensible thread reel holder
33. Horizontal thread reel holder
35. Handwheel
47. Thread cutter
48. Screw for edge guide

Function
Extension table
When you need a larger working surface, use the
extension table.
Fit the extension table into the holes at the rear of the
free arm. The projections shall fit into the back part of
the recess. Push the table onto the free arm.
When you want to check the amount of thread on the
bobbin, or some similar operation, lift the table to the
front and fold down the shuttle cover.
Free arm
Pant legs and sleeves can be drawn onto the free arm,
making it easy to sew, mend or patch these parts.
The free arm also makes it much easier to attach
collars and cuffs as well as sew children’s clothes, or dam
socks and stockings on the machine.
Presser bar lever
By means of the presser bar lever at the rear of the
machine, the presser foot can be raised and lowered.
When raising, the presser foot wu remain in the raised
position, but the height can be increased by 3 mm by
pushing the presser bar lever upward and holding it in
this position. This is useful when you want to put gar
ments with thick seams under the presser foot.
The presser foot should be lowered while sewing.
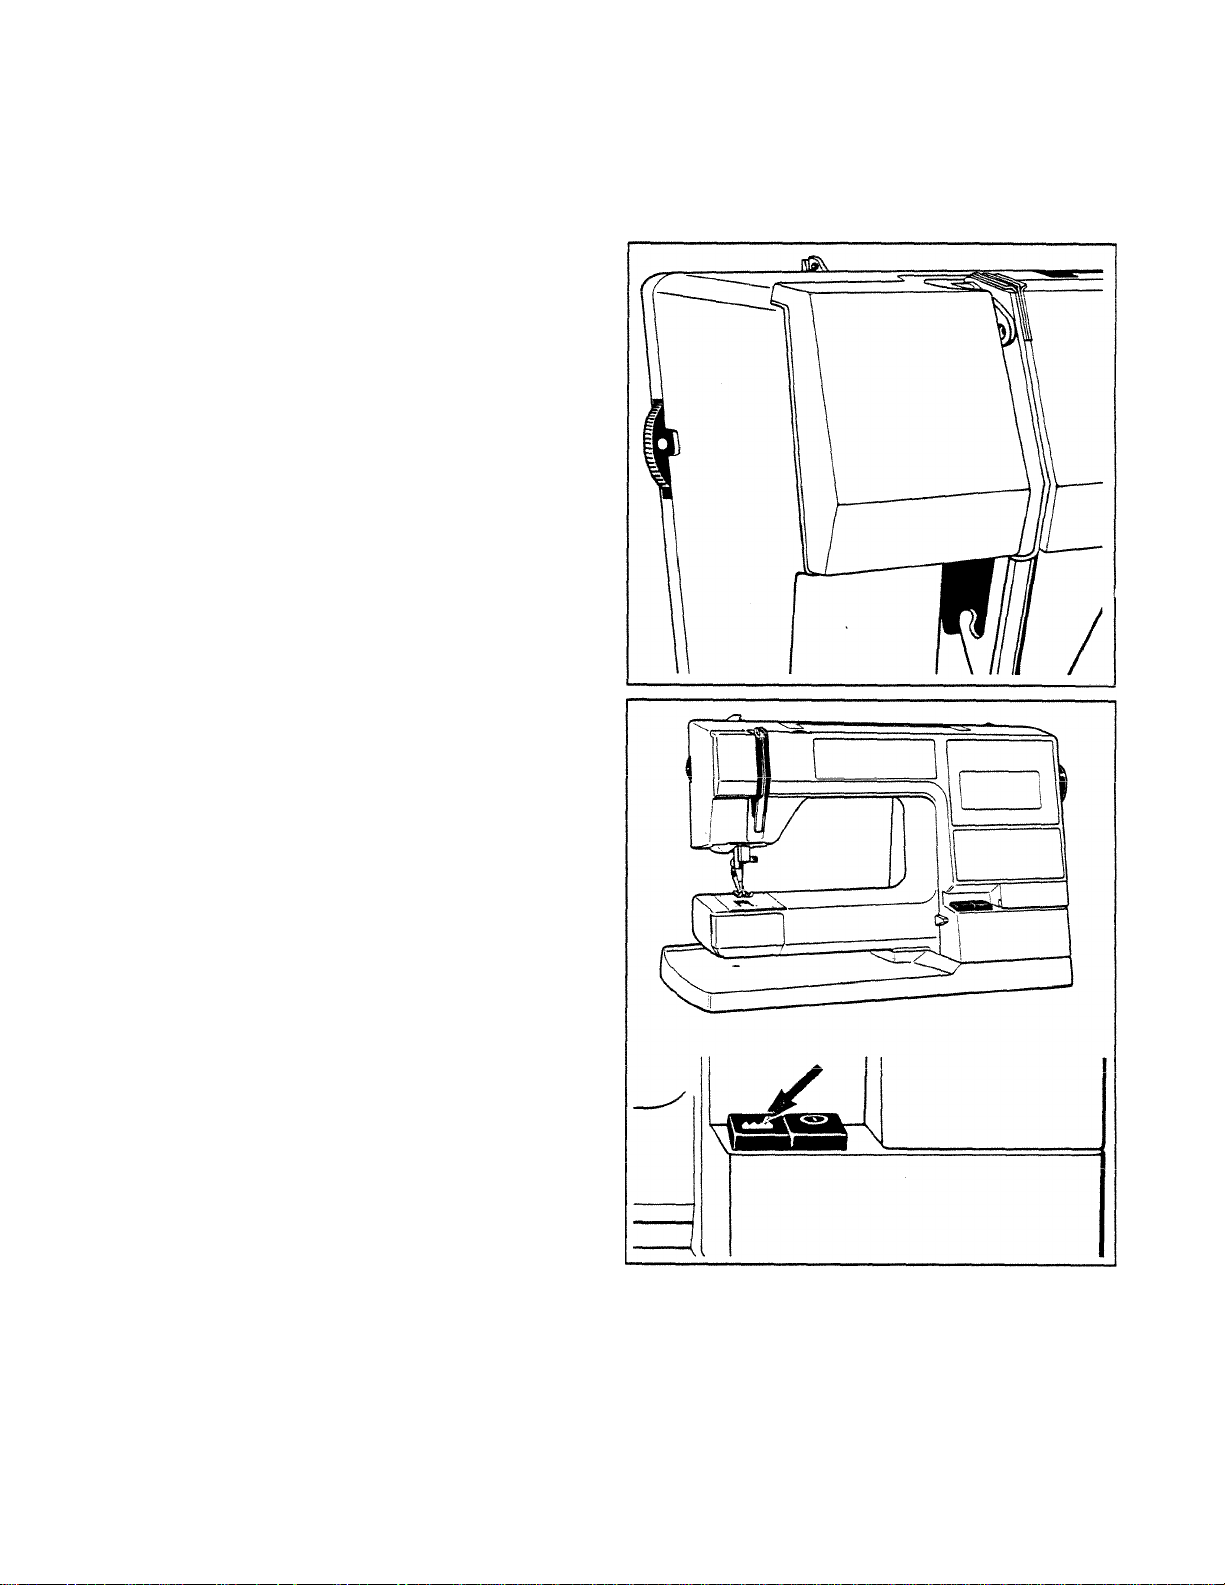
Presser foot pressure
The presser foot pressure can be adjusted by means of
the graded dial on the left side of the machine. Adjust
ment will be easier if you lower the presser bar lever
first. Normal pressure is obtained by setting the dial at
the white dot but for some fabrics it may be better to
reduce or increase the pressure. The higher the number
the greater the pressure.
By setting the dial at the symbol iPl the presser
foot pressure is completely released. This setting should
be used when free-hand sewing with the darning foot.
You will find the darning foot under “Extra acces
sories” on page 57.
If you turn the graded dial for the presser foot pressure
to the lowest number, it is possible to darn with presser
foot A. Lower the feed teeth and move the fabric for
ward, backward and sideways by hand.
Function
Lowering the feed teeth
Lower the feed teeth by pressing the push-button
down and raise them by re-pressing the push-button. The
feed teeth will raise when you resume sewing.
The feed teeth should be lowered for a certain type of
darning and when sewing on buttons. It is also easier to
get thick garments under the presser foot if the feed teeth
are not above the level of the stitch plate.
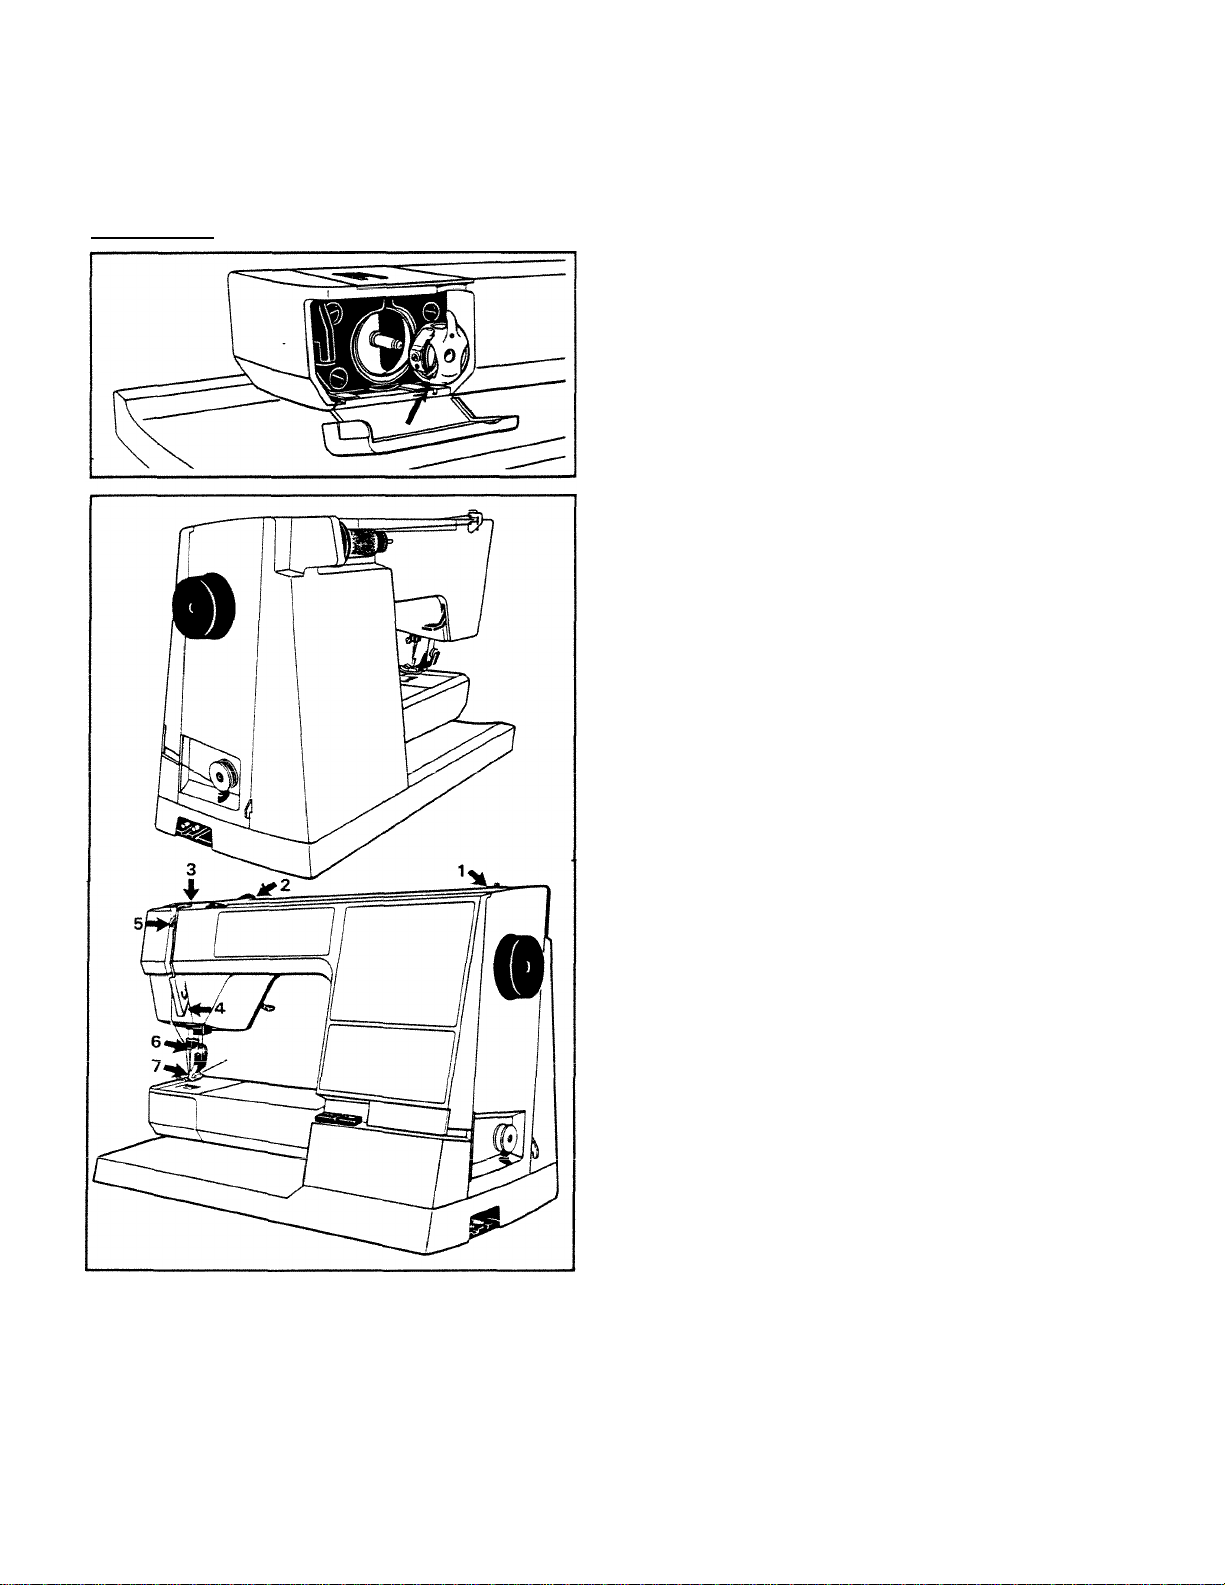
Threading
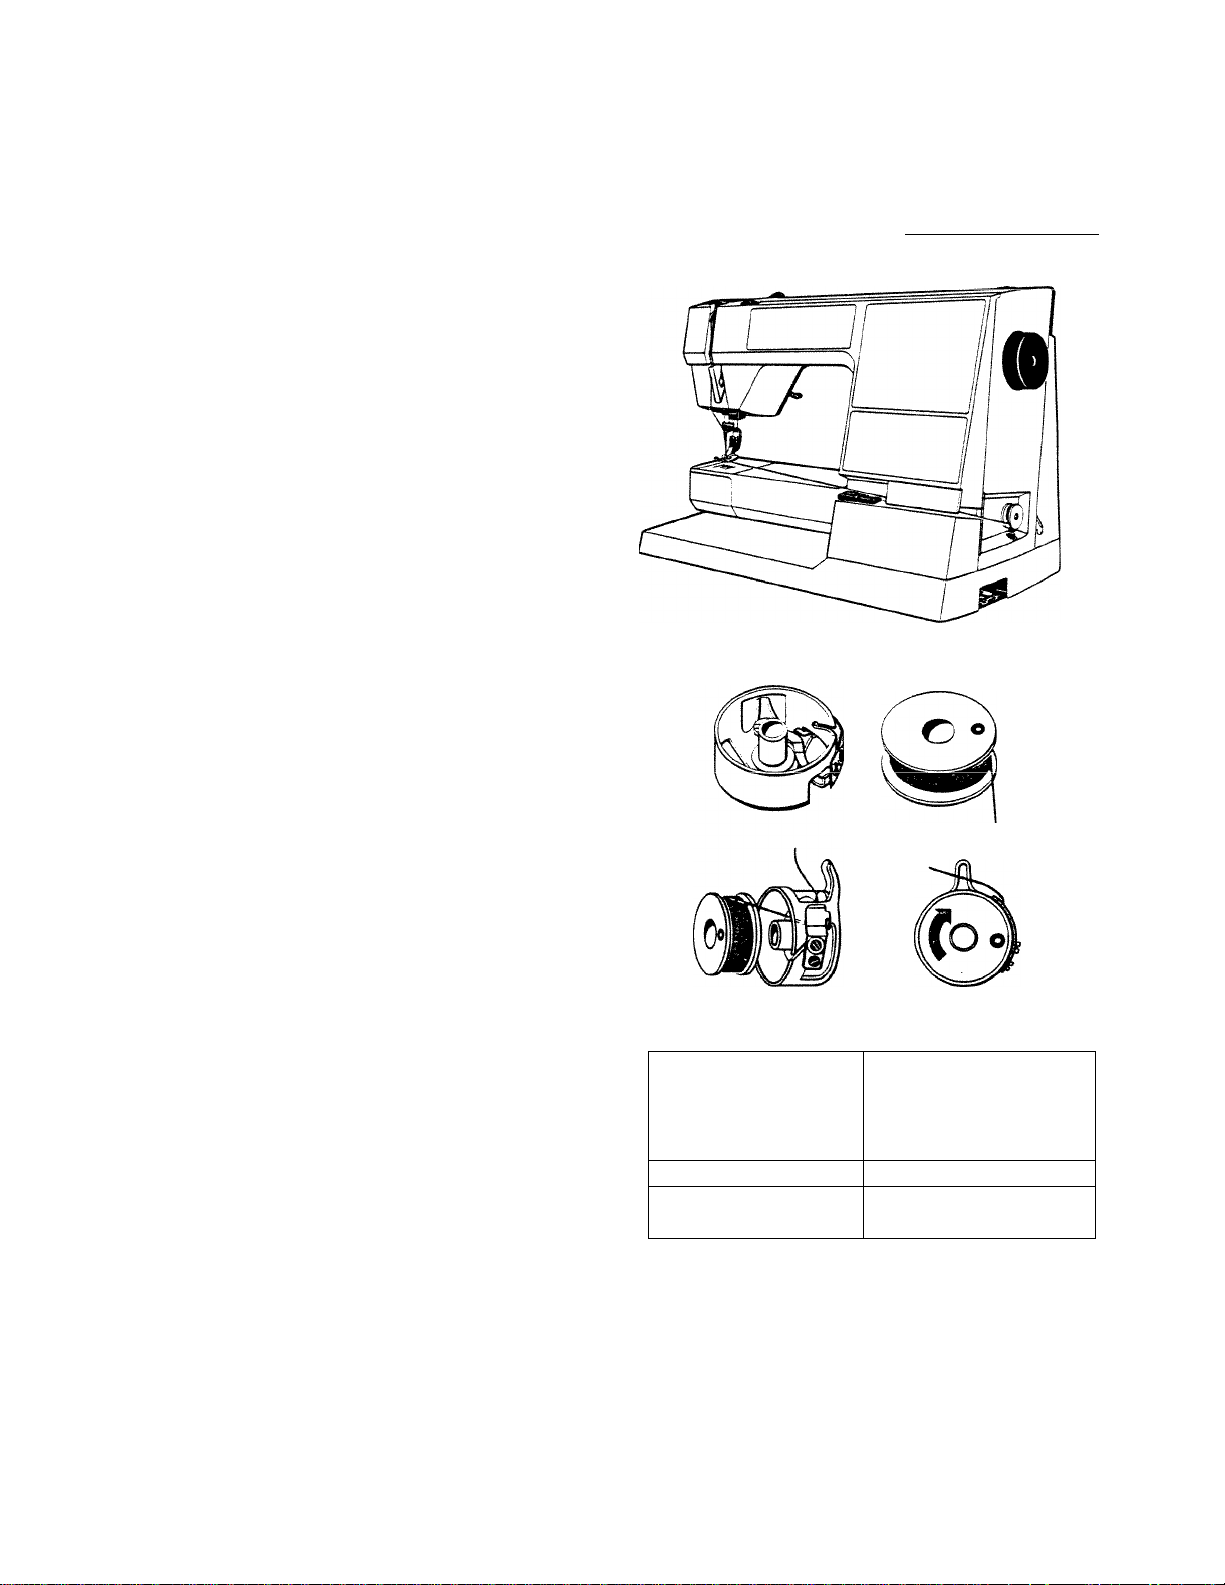
Removing the bobbin case
open the door in front of the shuttle by means of the
small recess on the left side.
Grip the bobbin case with the thumb and index finger
so that the latch is depressed and pull the bobbin case
out. The bobbin will remain in the case as long as the
latch is depressed. When you release the latch, the bob
bin will be released.
Threading the upper thread
Raise the presser foot. Check that the needle is at its
highest position.
The machine is fitted with a horizontal and an exten
sible thread reel holder. As a rule the horizontal holder is
used for ordinary sewing and the smaller disc is placed
outside the thread reel, as illustrated, but if the edge of
the thread reel is uneven, it is advisable to place the
larger disc outside.
The extensible holder is used when sewing with the
twin needle, the small washer, 411 87 78-01, which you
will find in the accessory box is placed under the thread
reel to minimize the friction.
10
Slide the thread into thread guide 2 on the upper arm
and draw it upward. Then draw the thread to the front
between the tension discs 3 and down around thread
guide 4. Continue threading by drawing the thread from
the right into the slot on thread take-up lever 5 and draw
it down to the needle, ensuring that it goes through
thread guide 6.
Thread the needle from the front. Due to the white
color of the presser foot ankle the needle-eye is clearly
seen and the threading of the needle, 7, is easier. Pull the
thread under the presser foot about 15 cm (6") toward
the rear.
Bobbin winding
Turn the empty bobbin until the small round dot on
one side is outward. Slide the bobbin onto the bobbin
spindle, which is located on the right side of the machine.
Raise the presser foot and thread the machine as
described on the previous page, but pull the thread from
the needle through the presser foot and the slot at the
front of the machine. Never run the thread direct from
the eye of the needle because it may result in a bent
needle.
Start from underneath and wind the thread around the
bobbin a few times. Pull the thread backward and insert
it up through the thread cutter until it is cut. Depress the
foot control. The machine will stop automatically when
the bobbin is full. Remove the bobbin and cut the thread
in the thread cutter.
Threading the lower thread
When the bobbin winding is finished, place the bobbin
beside its case with the marking upward. The thread
should run as shown in the figure. Place the bobbin in its
case without turning it around.
Slide the thread into the slot on the edge of the bobbin
case. Pull the thread in under the tension spring. Check
that the bobbin rotates in the direction of the arrow
(clockwise) when the thread is pulled.
The thread must be pulled in the direction of the
spring, otherwise the spring will be overloaded.
Bobbin winding
Insertion of the bobbin case
bJlAW WJkX.1 WUUl Im'V.'XXXXXU UXX^ ^X WJwVoUWXX V/X UXW i./vyw/u/xxx
case and to the right. Put the bobbin case into place.
Press the bobbin case until it clicks to ensure that it fits
properly.
The thread cutter is located to the left of the bobbin
case. Hold the thread end and draw the thread from
underneath and up toward the thread cutter. By doing so
the thread will be cut off and kept in place. Shut the
door.
^
11
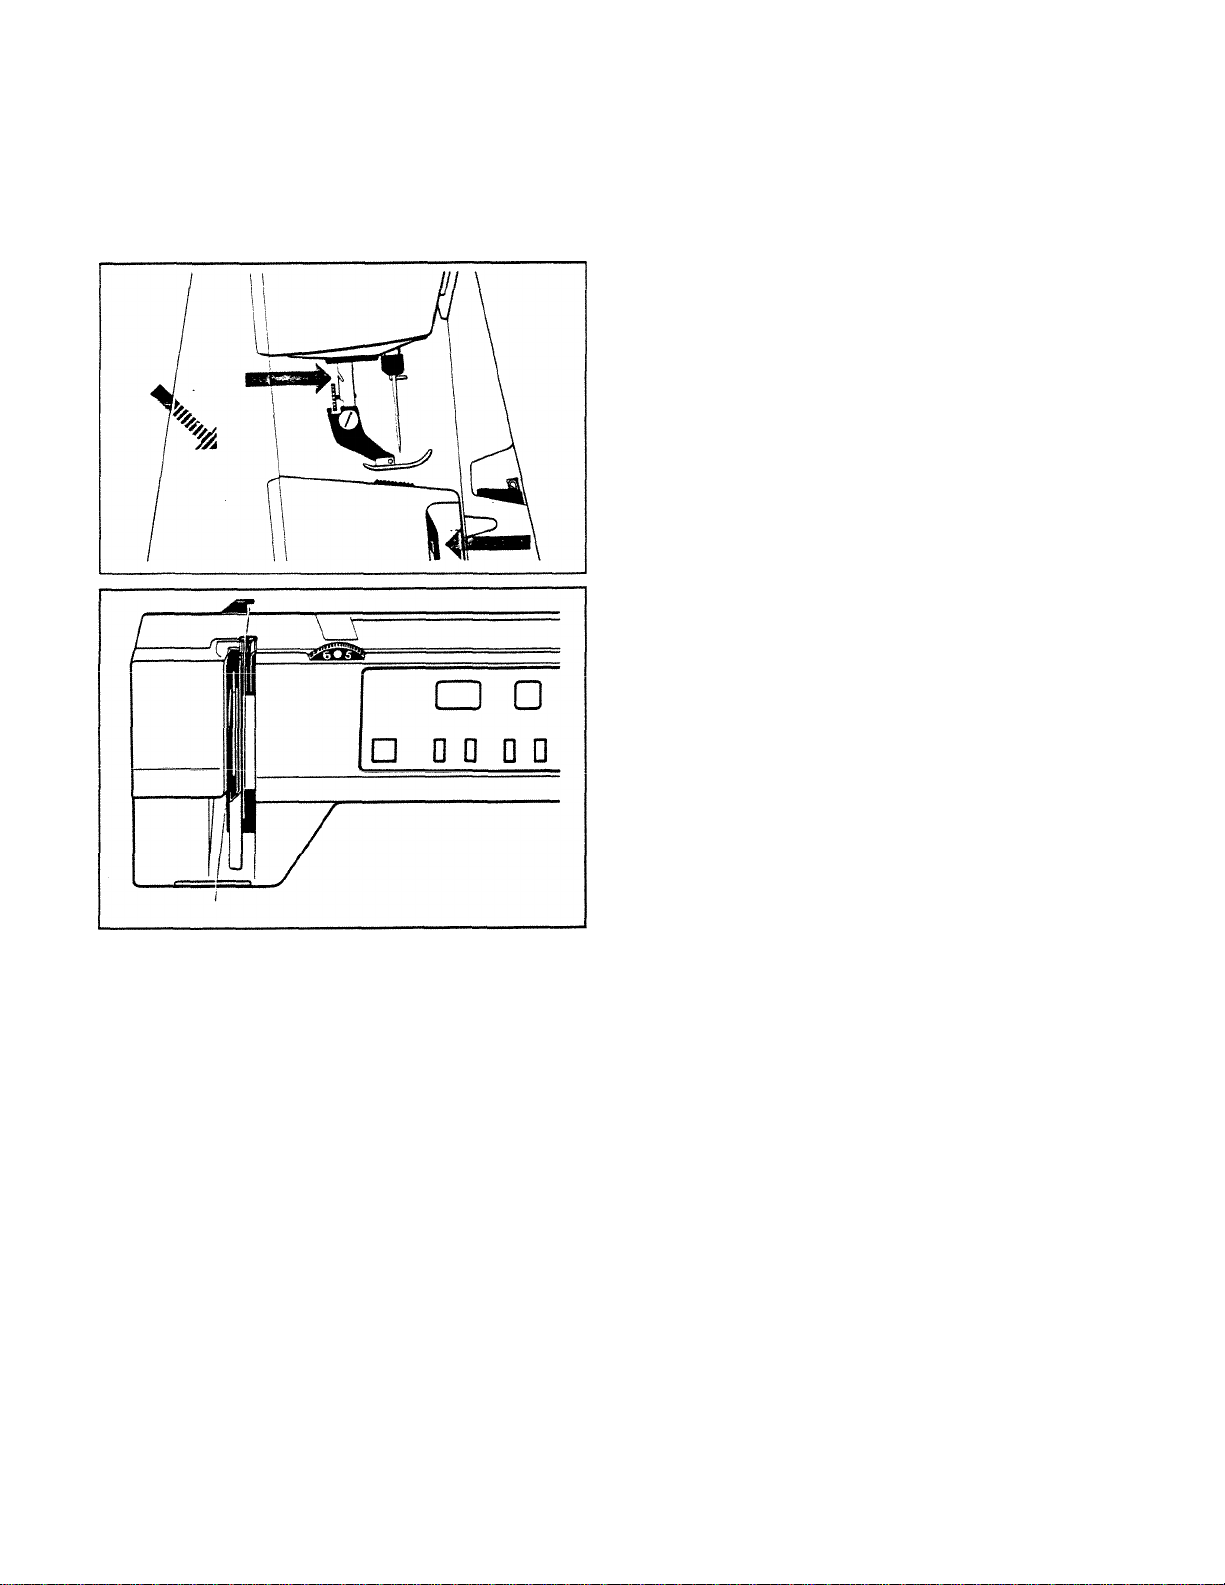
Thread tension
Thread cutters
The notch on the back of the presser bar is the thread
cutter. Threads can easily be cut off when you have
finished sewing.
There is also an additional thread cutter for use when
bobbin winding and one for cutting the bobbin thread
after insertion of the bobbin case. See page 11.
Tension of the upper thread
The dial which regulates the tension of the upper
thread is graduated from 0—10. The higher the number,
the tighter the tension. Normal thread tension is
obtained by setting the dial within the white area. Your
machine has been tested using the thread which accom
panies it and with the thread tension dial within the
white area.
If using a coarser thread, it may be necessary to alter
the thread tension slightly. Also the type of fabric may
require the tension to be adjusted.
When sewing buttonholes and decorative stitches the
thread tension is decreased automatically. When return
ing to regular sewing the normal thread tension is set
again.
12
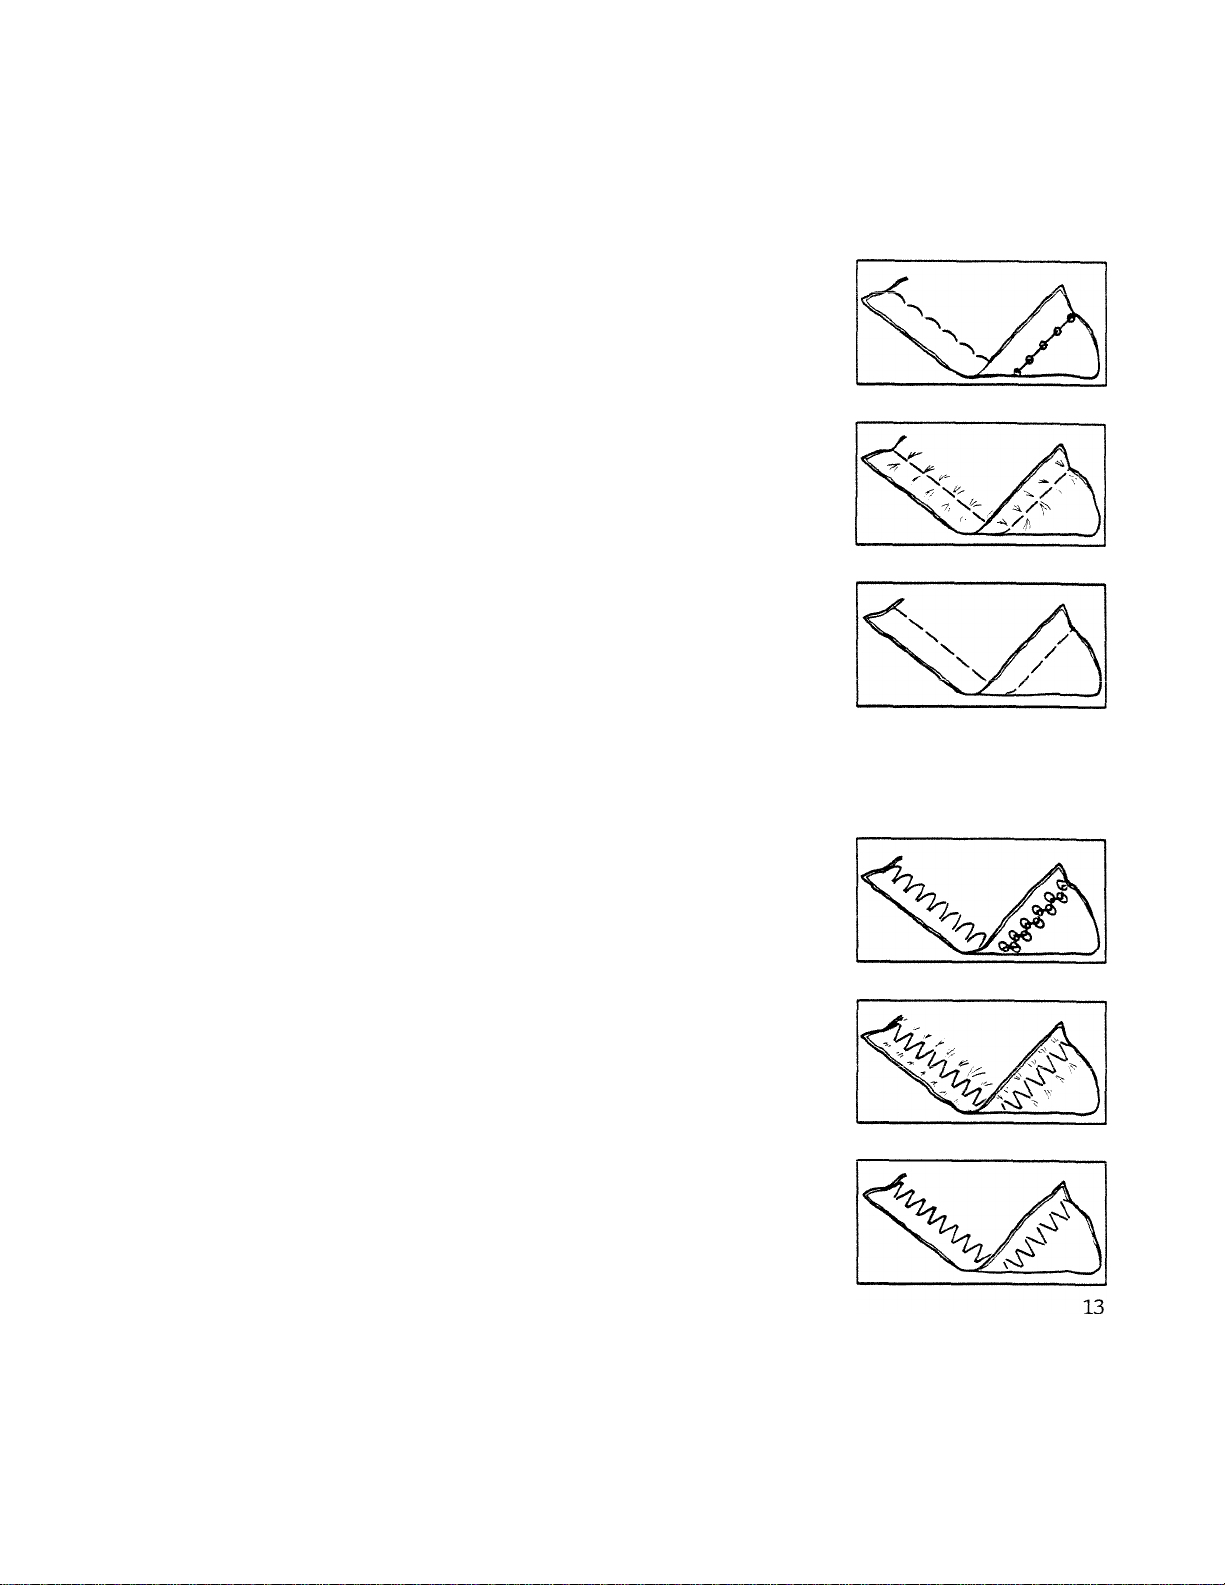
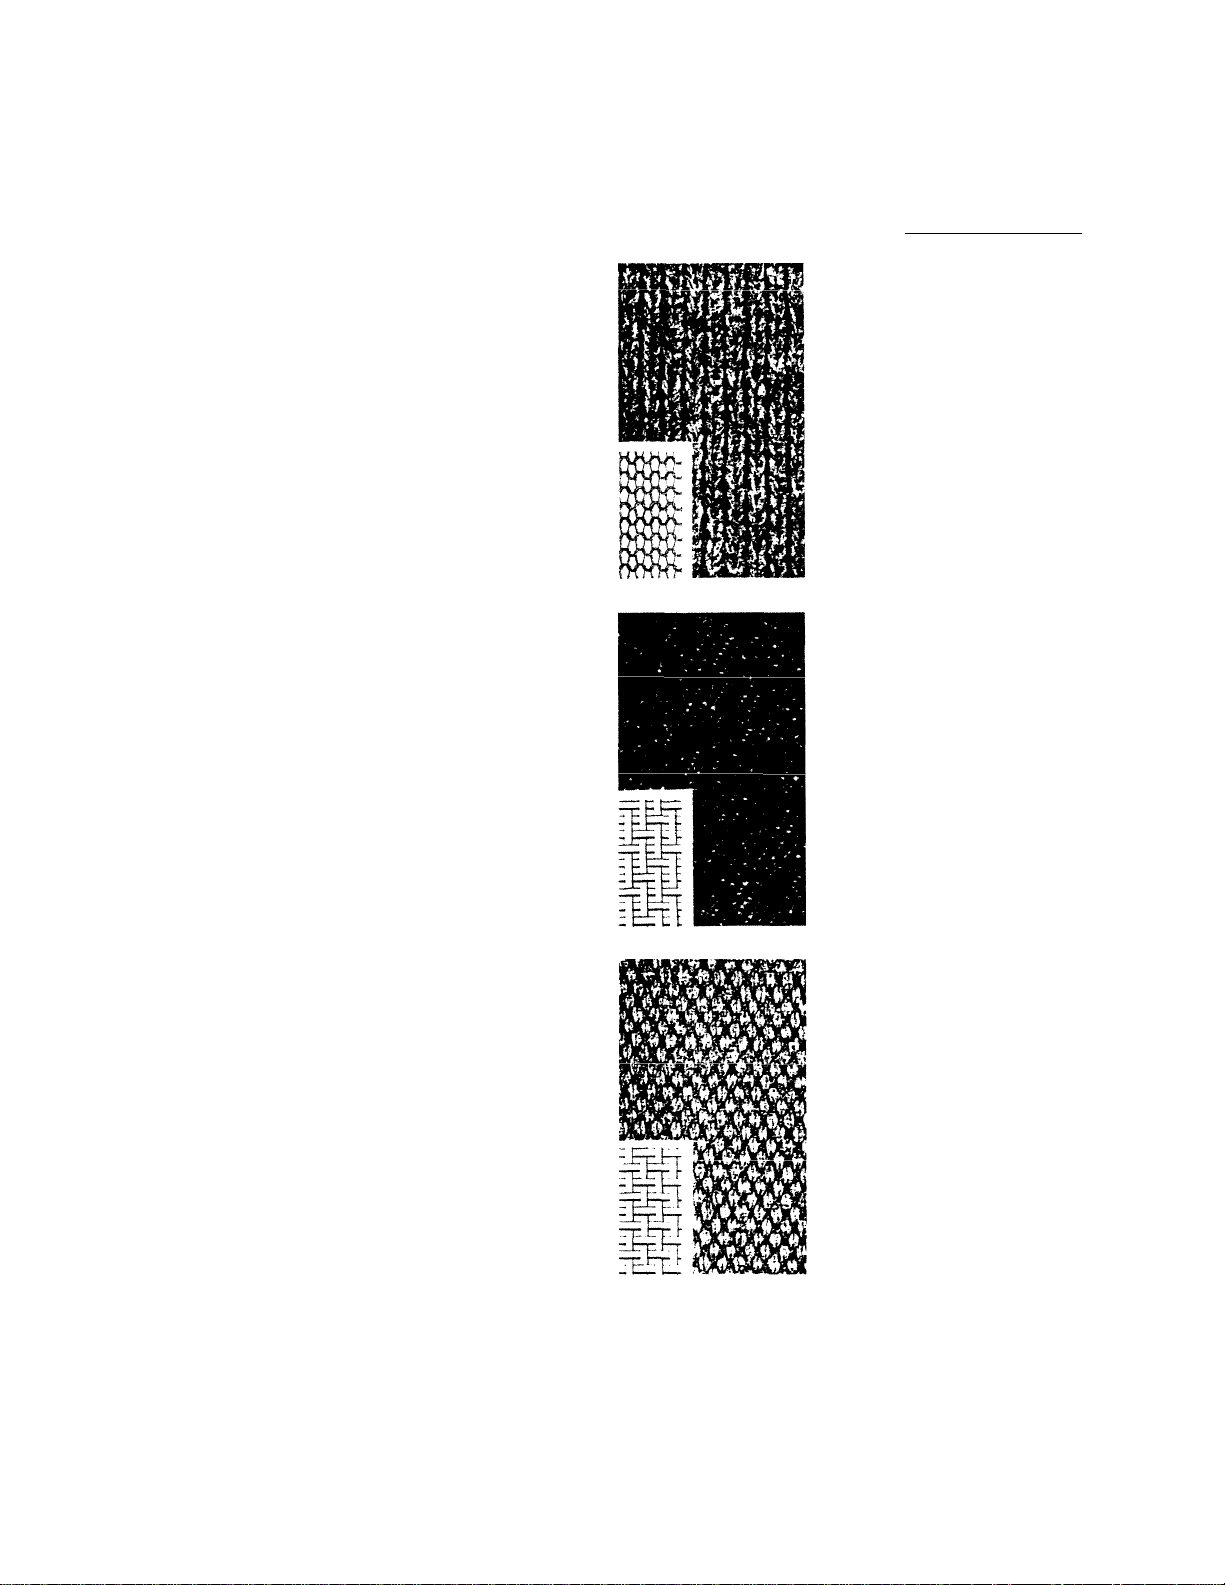
Correct and incorrect thread tension
In order to easily imderstand the importance of correct
thread tension, you can try different thread tensions by
sewing on a scrap of fabric. Begin by using an excessively
loose tension, i.e. set the tension dial near “0”. Look at
the fabric and you will find that the lower thread lies
straight and the upper thread is drawn underneath the
fabric. If, however, you set the dial at the highest
number, the opposite will occur, or the seam may
pucker.
The thread tension is correct when the threads inter
lock in the middle of both layers of fabric.
Please note that even the best quality thread may vary
in thickness. When sewing in fine fabrics, the knot may
sometimes be'visible.
Thread tension
Always check that the thread tension is correct by first
sewing on a scrap of the same fabric, folded double, that
you intend to work with.
If you set the stitch length to less than 1 mm yourself
for sewing close zig-zag stitches, you should also
decrease the thread tension by setting the dial at 4.
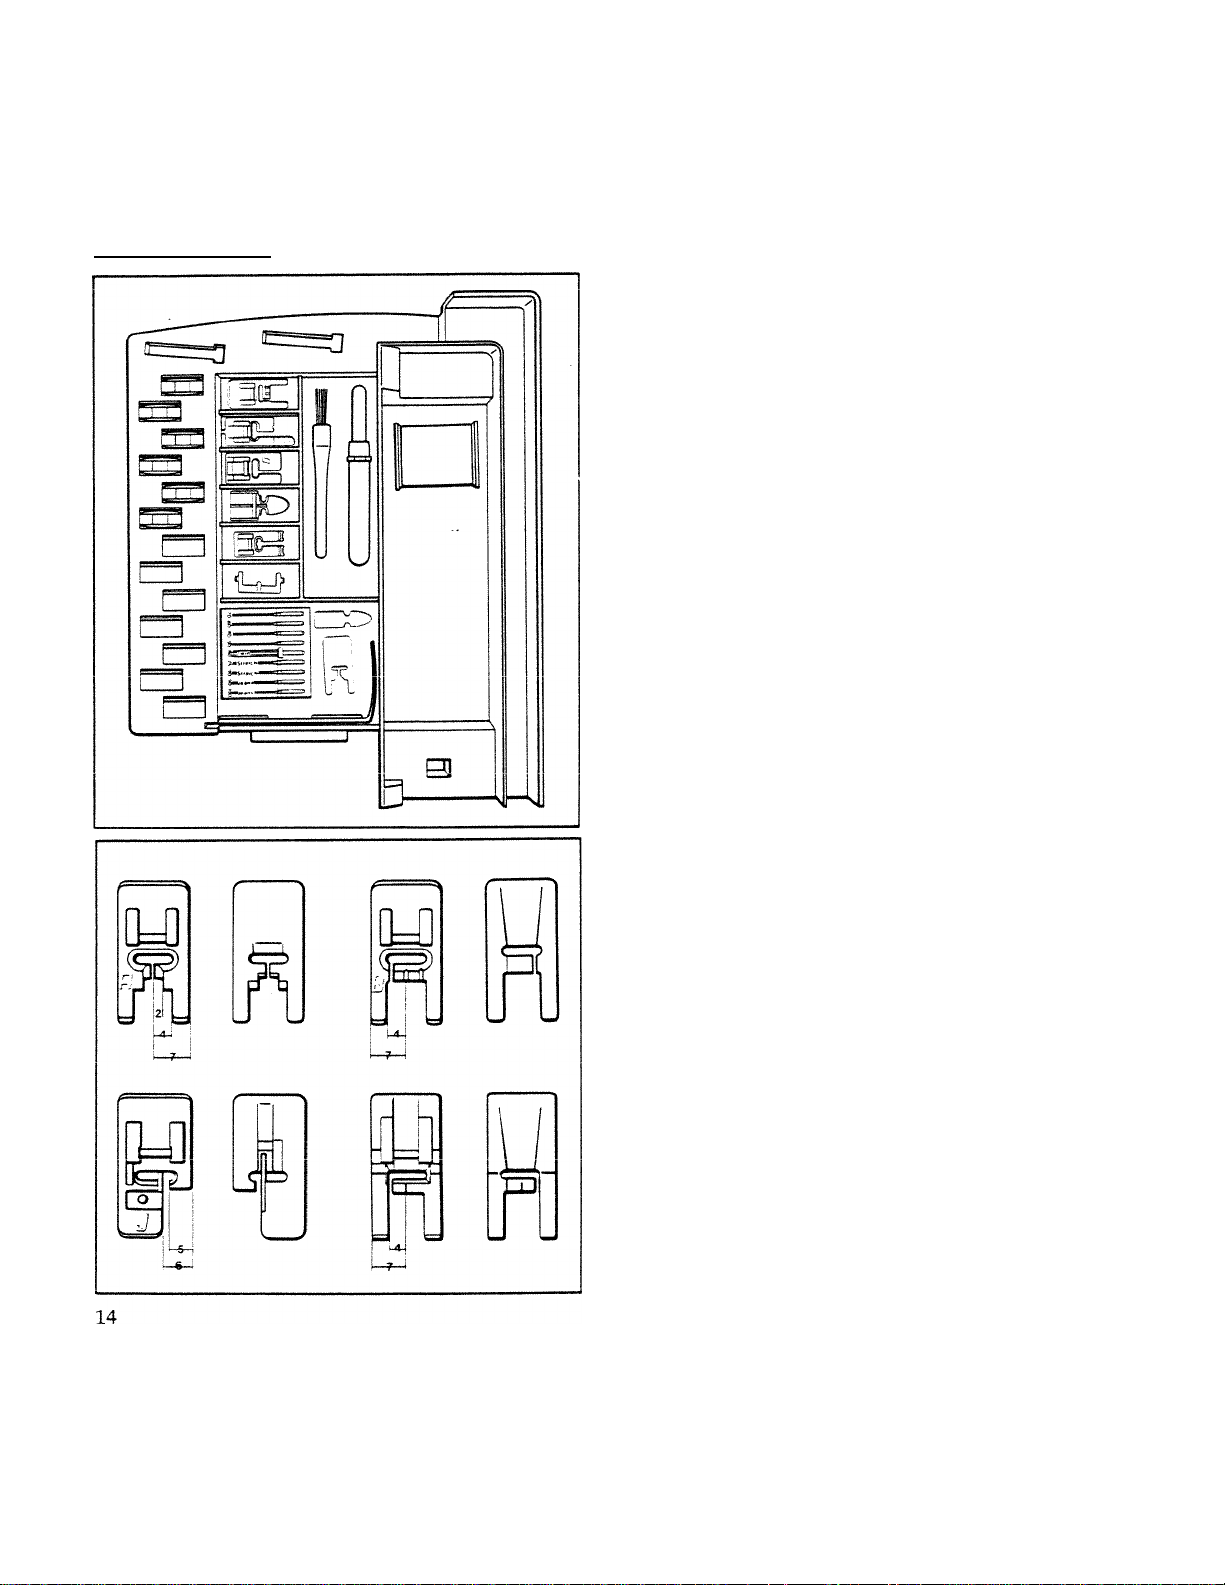
Accessory box
A r*ac'cr*T 7
■1 xvwwaav-fi y ukj^
To obtain the best sewing results you should select the
correct presser foot for the type of sewing you are doing.
The presser feet are marked with letters and the lights on
the lower panel indicate the suitable presser foot for the
type of work you have chosen.
By means of these feet you will be able to carry out
practically all types of sewing work. There are additional
accessories to assist you with special work. These will be
foimd under “Extra accessories” on pages 55—58.
Store the accessories in the accessory box. By placing
them as illustrated, it will be easier for you to remove
and replace the box.
We reserve the right to change the equipment of the
machine and the assortment of extra accessories without
prior notice.
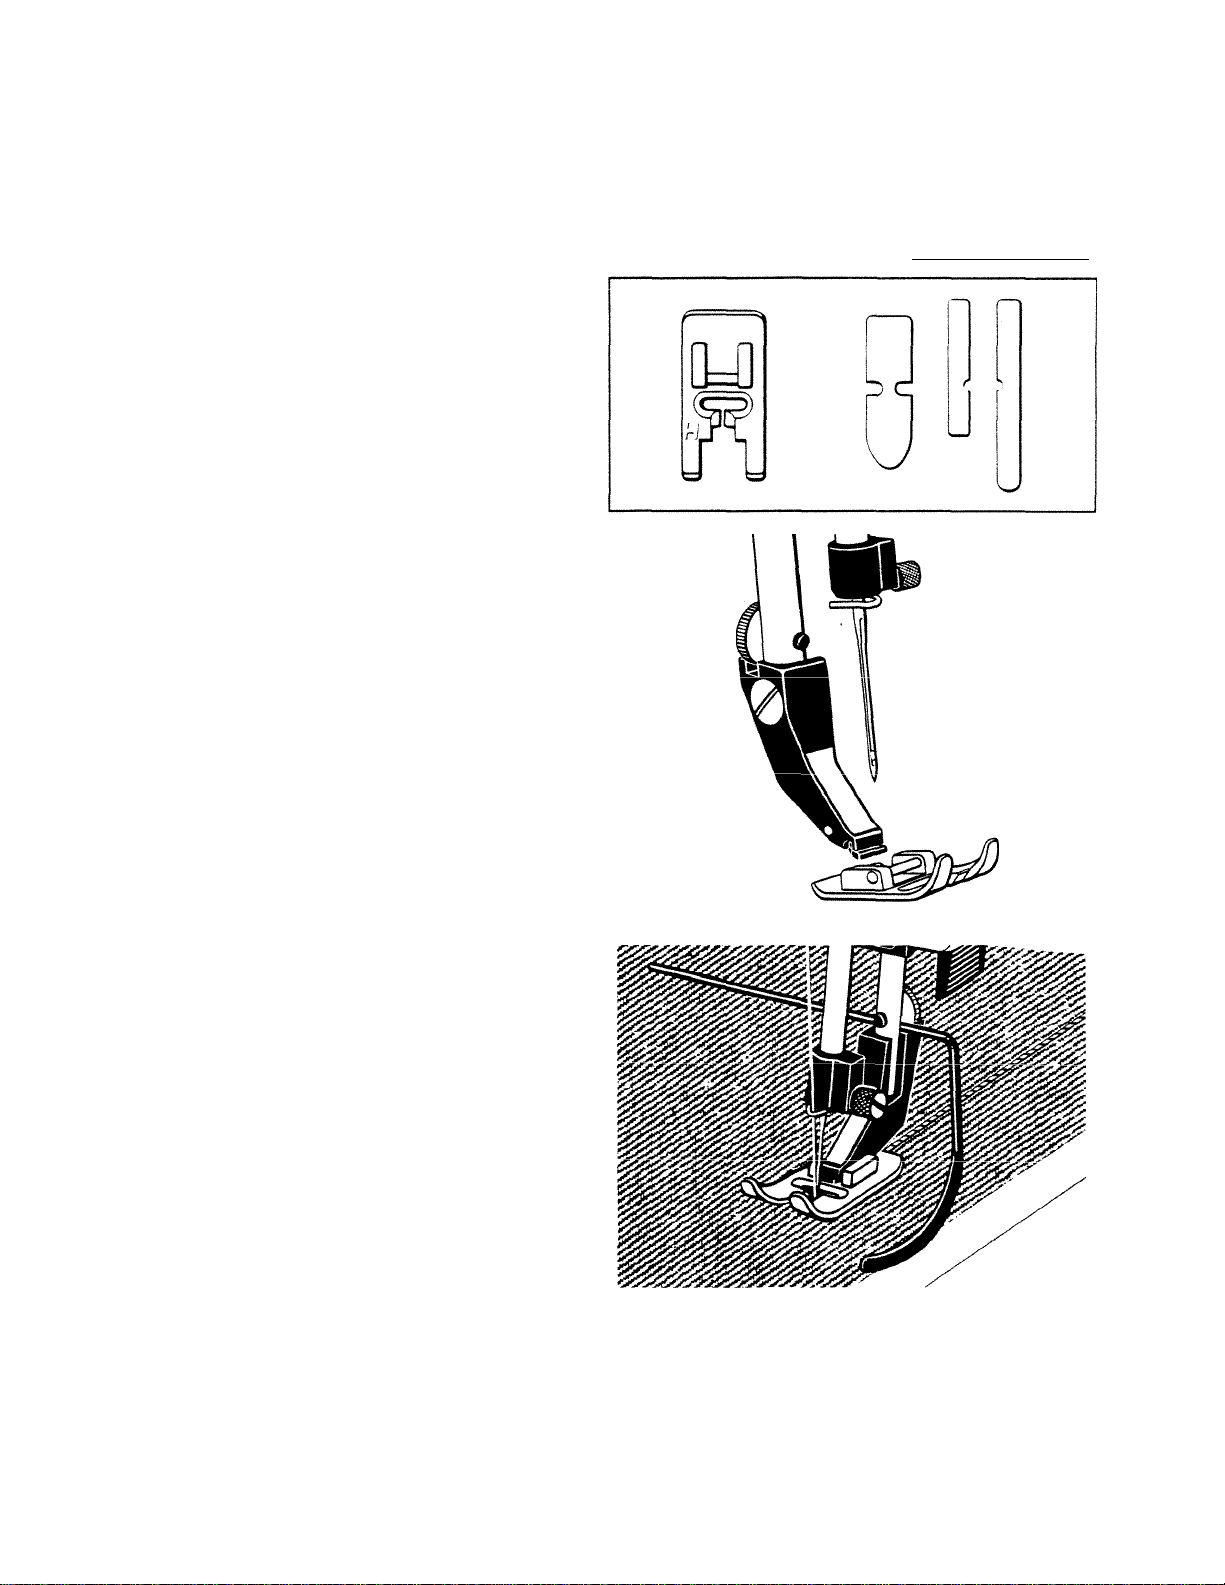
Presser foot A
The presser foot which is fitted on the machine on
delivery is marked A. This foot is used mainly for
straight stitching and zig-zag stitching with a stitch length
longer than 1 mm.
Presser foot B
When sewing close zig-zag stitches with less than 1
mm stitch length; other utihty stitches or decorative
stitches; you should use presser foot B. The bottom of
the foot is designed to give more space for the stitches.
Presser foot J
This foot is used for overcasting, joining and overcast
ing, i.e. stitches which have a stitch width of 5 and 6 mm.
The pin prevents puckering at the edge of the fabric.
Decorative presser foot
Use this foot for decorative stitches. It is completely
transparent, making it possible to match stitch patterns.
Various markings
As you can see from the illustration, the above presser
feet have notches or markings which can be used as
guides when sewing. When straight stitching with the
needle in the center position, you will have a 7 mm (1/4")
seam allowance if you guide the fabric even with the
outer edge of the foot; 4 mm (3/16") at the iimer edge
and 2 mm (3/32") at the innermost notch on presser foot A.
rresser root n, giiae piates
Presser foot H corresponds to presser foot A, with the
exception of the teflon coating underneath. The glide
plates can be adhered to presser feet E and C. Remove
the protective paper and press the self-adhesive side
against the underneath of the presser foot.
Both presser feet may then be used when sewing foam
plastic, vinyl-coated fabric and leather imitations, thus
minimizing the risk of these materials sticking to the
foot.
Changing the presser foot
If you wish to change the presser foot, check that the
needle is at its upper position Remove the presser foot by
drawing it toward you while pressing slightly downward.
Insert the new presser foot in such a way that the
round, horizontal pin fits in between the spring and the
presser foot ankle. Press slightly downward and back
ward and the foot will snap into place.
Accessory box
Edge guide
The stitch place has markings for 1.0,1.5, 2.0,2.5,3.0
and 3.5 cm, to simplify sewing seam allowances. If you
require an even wider seam allowance, use the edge
euide.
First loosen the screw at the rear of the presser bar as
far as it will go. Insert the guide into the groove under
the screw and adjust it to the required seam allowance.
Tighten the screw, using the screwdriver.
15

Accessory box
Needle and thread
The machine is delivered with a spool of synthetic
thread, which can be used for all t3rpes of fabrics and
most stitches. Mercerized cotton can also be used.
As a rule it is, however, shghtly coarser and therefore
requires increased thread tension.
Use a finer neddle and thread when sewing lighter
fabrics. Embroidery thread, which is more loosely
twisted and finer, produces more attractive and even
stitches than ordinary thread. It also produces attractive
buttonholes and may even be used for darning.
You can produce a more pronounced seam in thicker
fabrics by using a coarser needle and thread, e.g. synthe
tic buttonhole thread or double upper thread. Metalhc
thread or extra coarse thread which cannot be threaded
through the needle can be wound on the bobbin and used
as the lower thread. Sew on the wrong side of the fabric.
You can also use the twin needle for decorative
stitches. Insert the twin needle, press the | -pushbutton, which limits the stitch width to prevent die
needle from striking the stitch plate.
N.B. After removing the twin needle, press againt the
I -push-button until the light goes out. Increase the
stitch width again if you are going on using the same
stitch with the ordinary needle.
16
Changing the needle
Even if the needles look alike there can be slight
variations which can affect the sewing result. Be sure to
use the right type of needles.
Only a completely undamaged needle will give perfect
sewing results. Therefore, change the needle if you have
the slightest reason to beheve that it is bent or that the
point is damaged. To remove the needle, loosen the
screw in the needle clamp. With the flat side of the shank
away from you, insert the new needle into the needle
socket as far as it will go. Tighten the screw firmly.
Needle design
In most cases the standard needle is the most suitable
and the thickness of the needle should be adapted to the
type of thread and fabric. However, when sewing certain
fabrics, another design of the needle point can produce
better results.
You will find two needles in the needle case with the
description “Stretch” (completely blue). These needles
have rounder tips and should be used when sewing light
elastic fabrics, '^en a needle of this type contacts a
thread in the weave, the thread is pushed aside, without
it being damaged. It is also suitable for sewing corduroy
and soft leather.
If, on the other hand, you are using a rigid fabric, like
denim, sewing will be easier if you use the needle
described “Jeans” (top part blue).
This has a sharper tip, enabling it to pass through thick
seams more easily.
Accessory box
There is a twin needle in the needle case. It consists of
two standard needles, size 80, and is intended to be used
when sewing decorative or raised seams, as described on
pages 16 and 33.
When you use the twin needle, first press the button
marked t . The machine will then automatically
limit the stitch width for all stitches and the twin needle
can be used without any risk of it striking against the
stitch plate.
N.B. After removing the twin needle, press again the
I -push-button until the light goes out. Increase the
stitch width again if you are going on using the same
stitch with the ordinary needle.
Regarding special needles, please refer to “Needle
Assortment” on pages 54 and 55.
n
V
 Loading...