

Page 1
MODEL 811
Page 2

SEWING MACHINE
Record in space provided below the Serial No.
and Model No. of this appliance.
The Serial No. is located on Base plate
The Model No. is located on Base plate
Serial No
-------------------------------------------------------
Model No. —§_i
Retain these numbers for future reference.
---------------------—.--------------------
-
Page 3
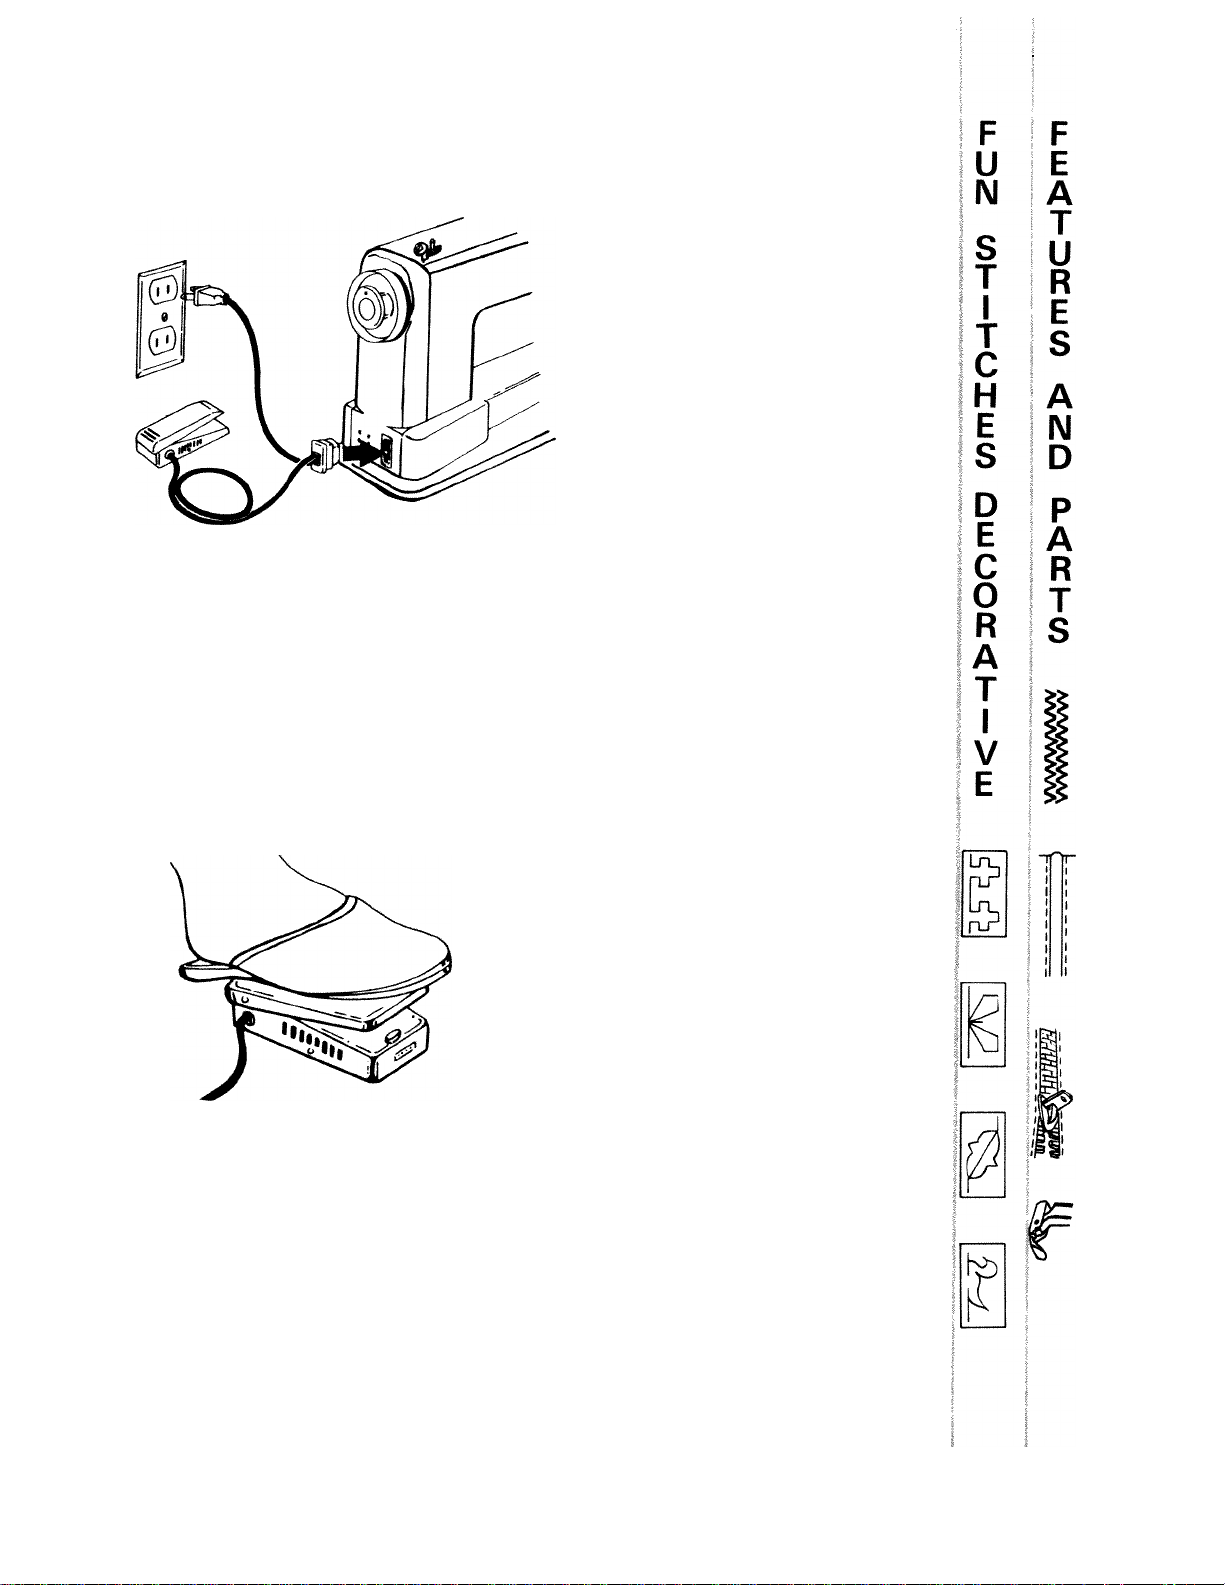
USING THE FOOT CONTROL
TO CONNECT THE FOOT CONTROL WIRES:
• Connect special plug to block on machine as shown in diagram
above.
• Connect outlet plug to electrical outlet.
• When sewing, keep children's hands away from foot control and
wiring.
• After sewing, disconnect plug from electrical outlet.
W
T
T
N
G
A
D
Y
T
O
S
E
I
R
E
B
u
T
T
o
N
H
O
L
E
S
S
T
R
E
T
C
H
U
T
I
IL
I
T
Y
S
T
I
T
C
H
E
S
TO USE THE FOOT PEDAL:
• Begin sewing by turning the hand wheel toward you and apply
gradually increasing pressure to foot pedal.
• Sewing at a constant speed will give best results.
111%
mg
l!!S
ic: I
k
Page 4
Re(
anc
Th(
Th(
Ser
Mo
Ret
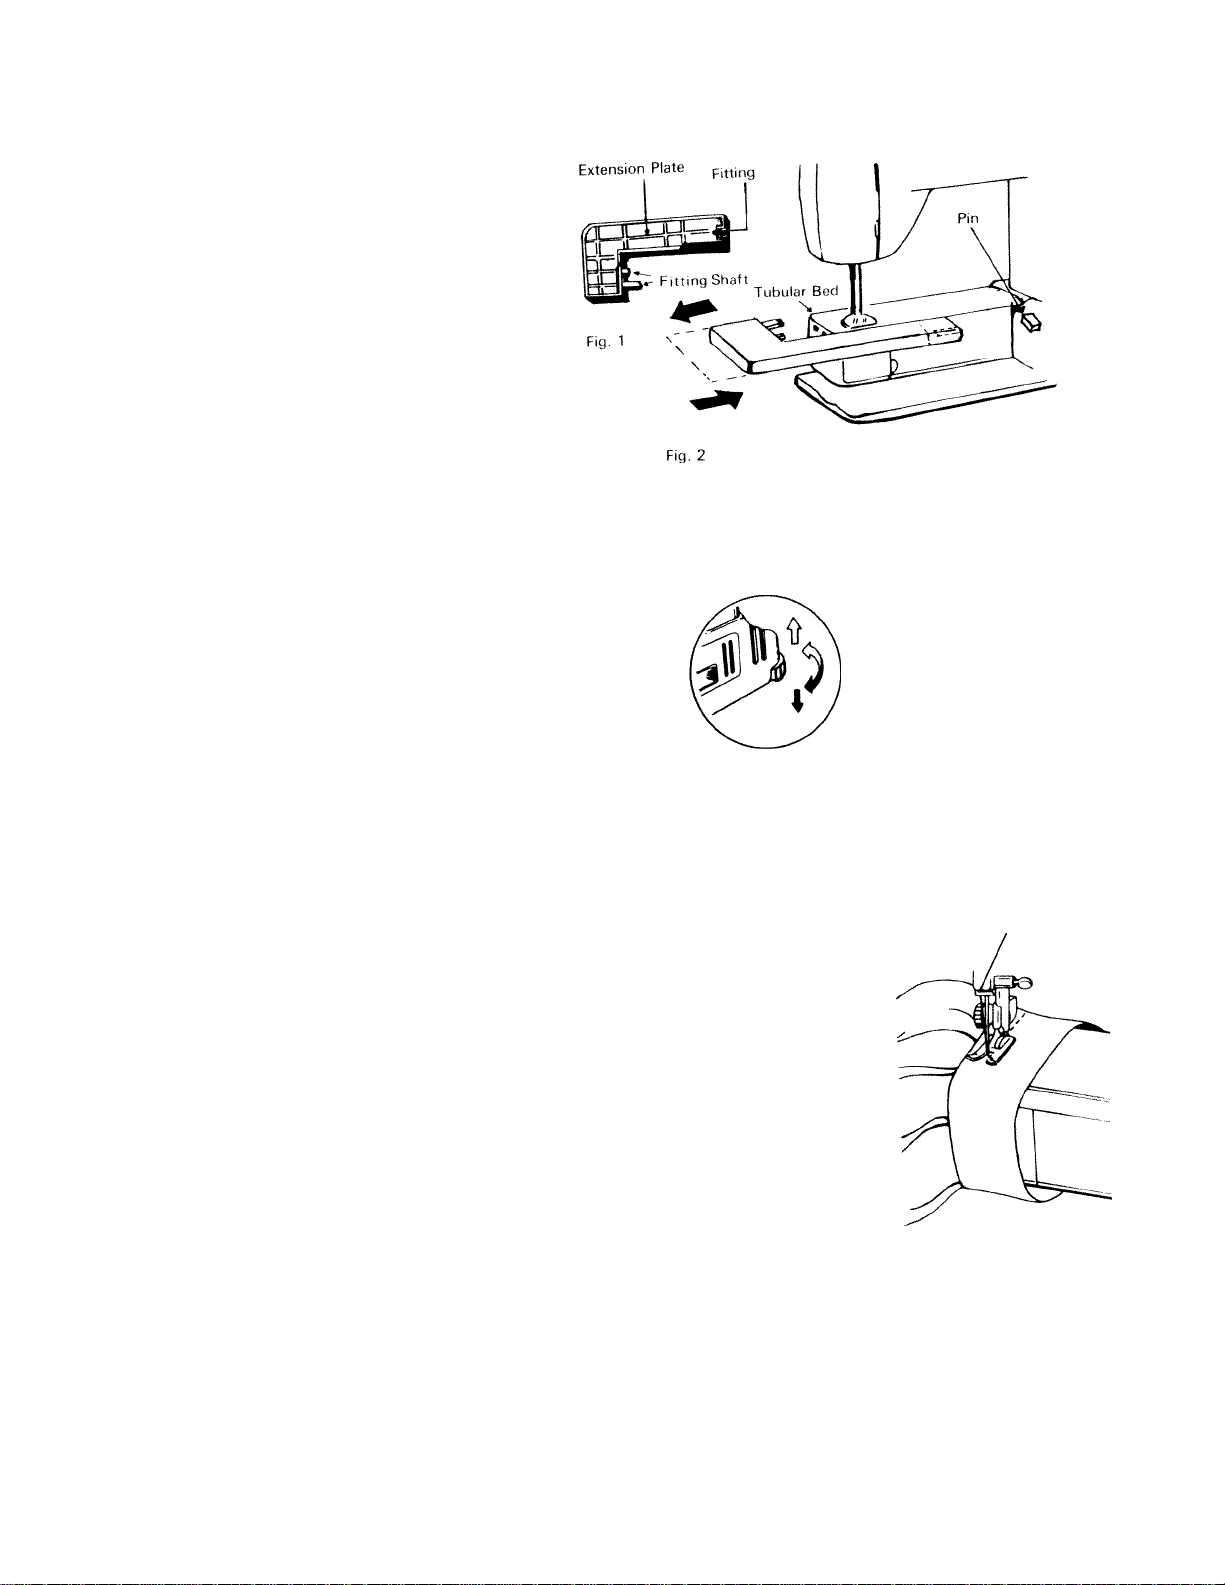
USING THE EXTENSION PLATE
3 ATTACH AND REMOVE THE
remove the extension plate.
LEVELING THE MACHINE ^
Level your sewing machine when you use it on the table or install it
into the cabinet.
UP: Counter Clockwise
DOWN; Clockwise
FREE ARM FEATURES
TUBULAR SEWING , . . ^
• The free arm design simplifies the sewing of tubular items such as
pant cuffs, shirt and blouse cuffs and socks.
Simply position these items over the tubular bed of the machine and
sew.
Page 5
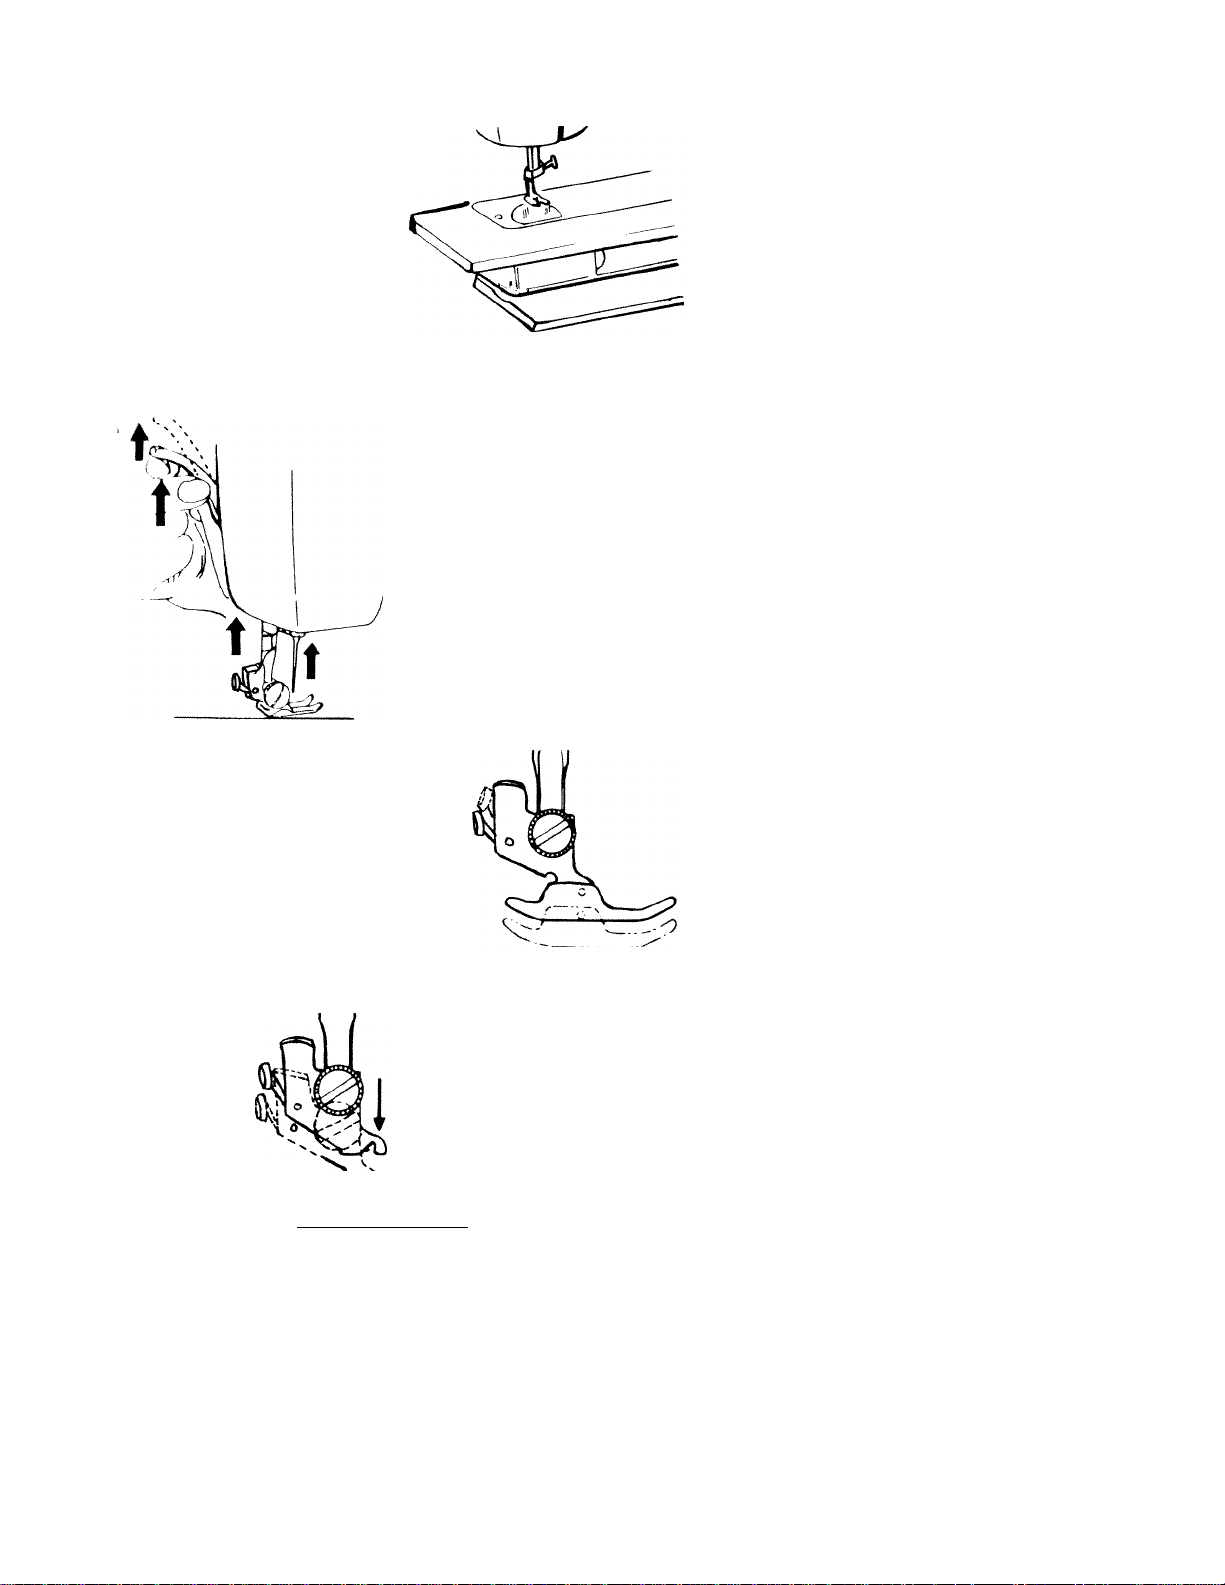
Al IlfcD SEWING
/viti'ii (he uxtension plate is attached
,..u ii.ive.ill the advantages of aflat
I..11 imii* tor sewing flat items,
tiitl for sitwing large tubular
itiHi'. !.u(;h as flared pant legs.
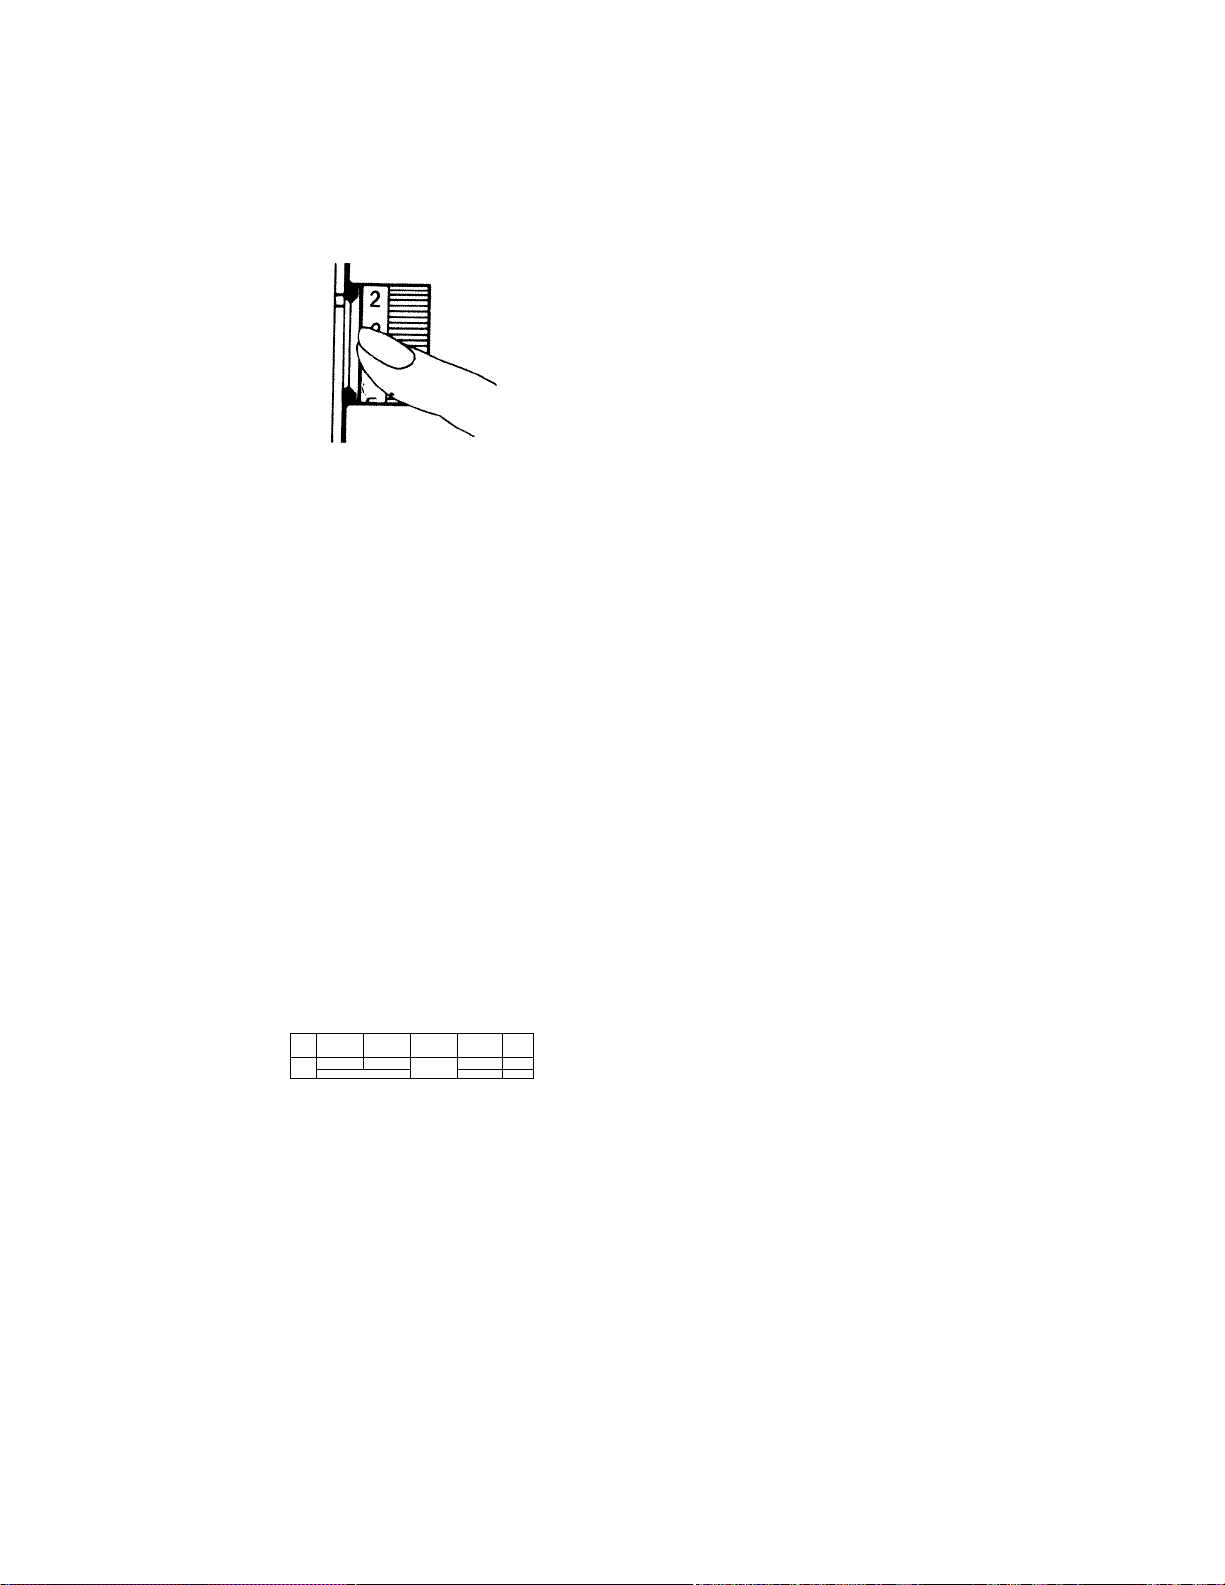
HANGING THE PRESSER FOOT
bed
Raise needle bar to highest
position and raise presser
foot as shown.
The extra lift for heavy fabric
makes it easier to place fabric
under the presser foot.
s
T
R
A
G
H
T
A
N
D
Z
A
G
B
U
S
T
R
T
I
O
N
H
O
L
E
S
E
T
C
H
U
T
I
L
I
T
Y
S
T
I
T
C
H
O REMOVE THE PRESSER FOOT: ■
■ Pri.'ss button on back of presser foot
shank and foot will drop from shank
as shown above.
' It (s not necessary to loosen the thumb
screw to change presser foot.
.
..................................
TO ATTACH THE PRESSER FOOT:
• Align desired presser foot to shank as shown above.
• Lower presser foot lever and shank will automatically attach to foot
as shown above.
iiiÿ
111%
iii^
k
Page 6
Re(
anc
Th(
Th(
Set
Mo
Rel
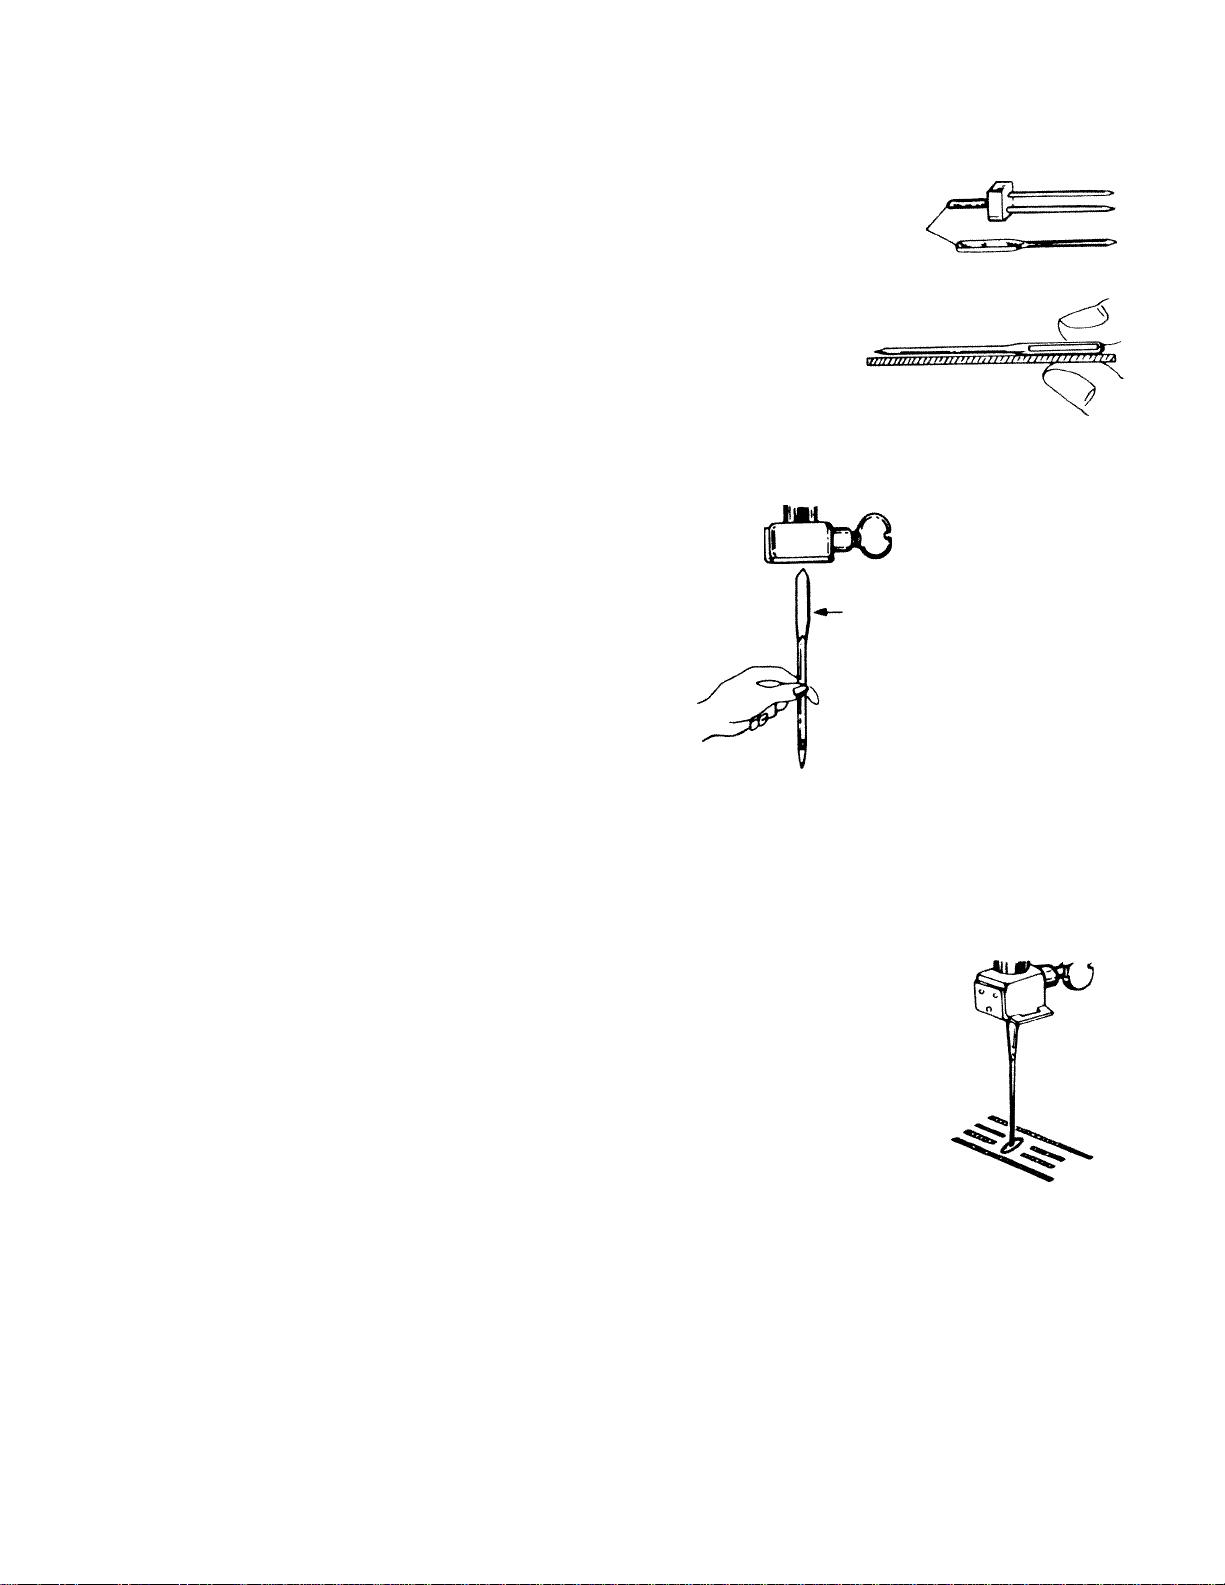
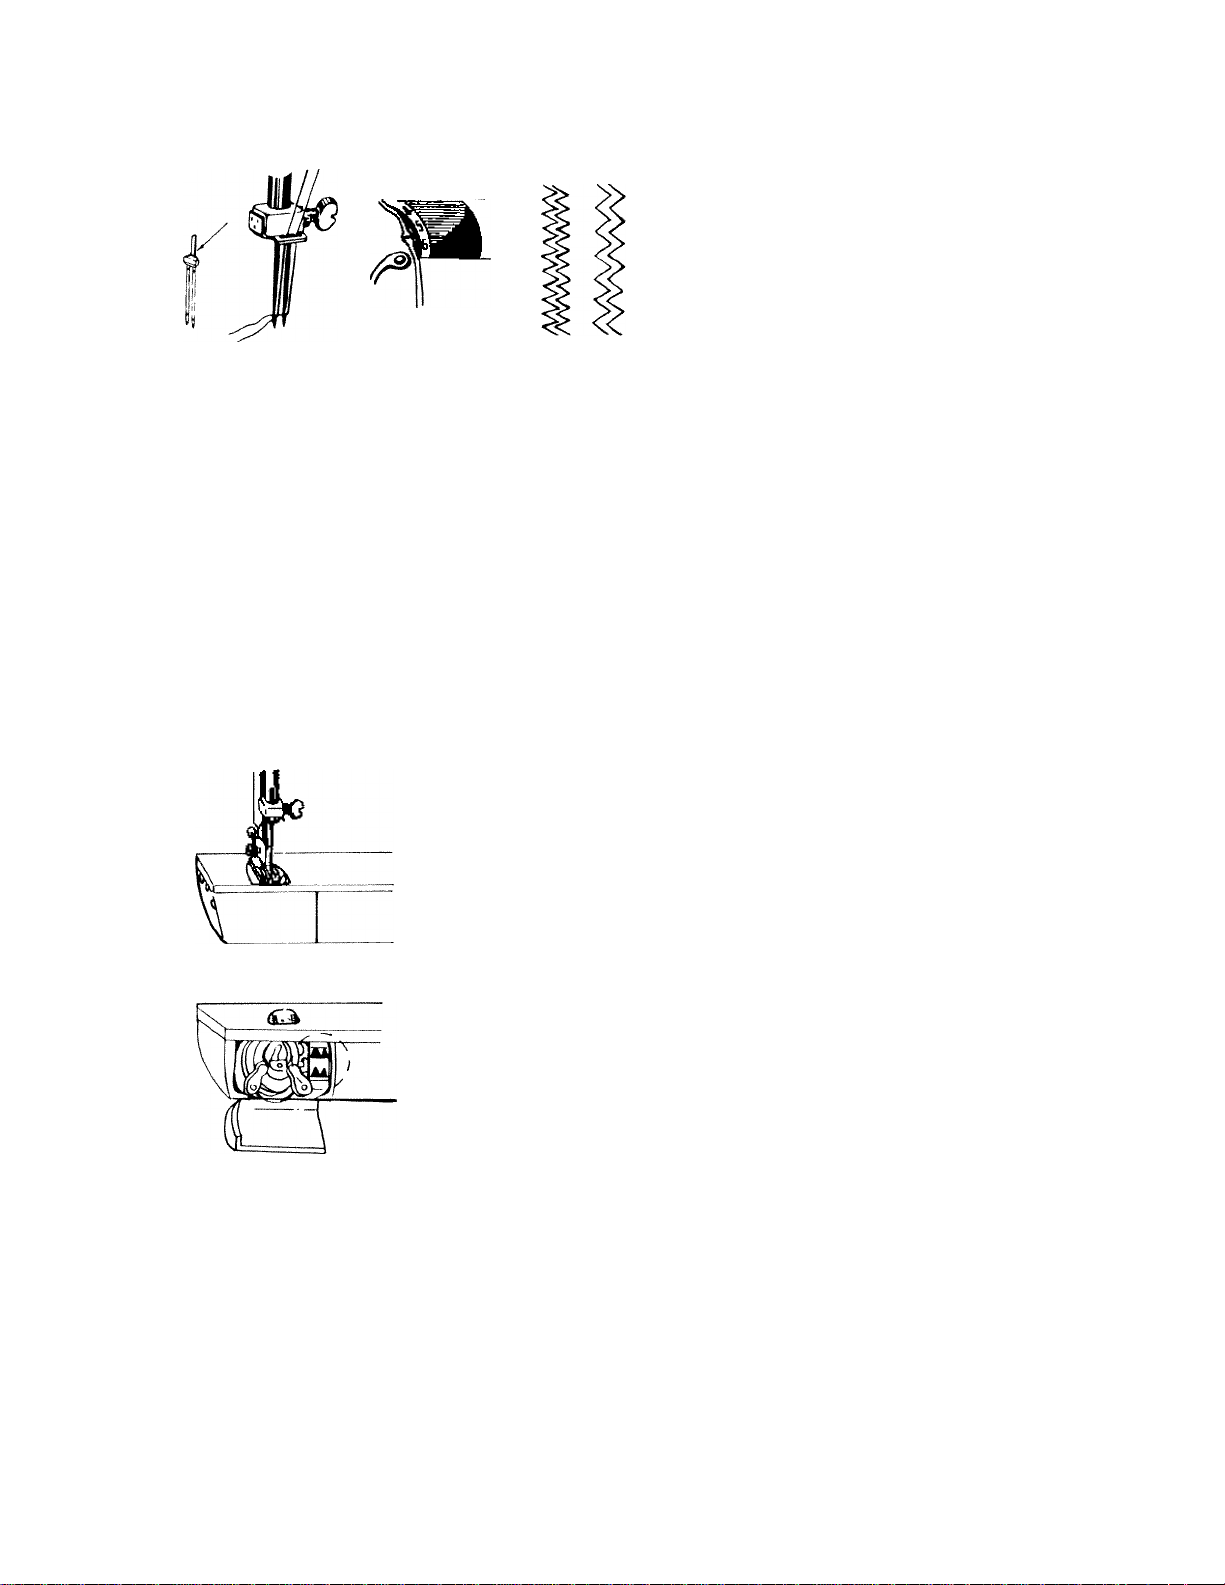
CHANGING THE NEEDLE
Flat side
Always make sure needle is straight.
To check straightness of needle, lay needle on a flat surface and see
thafneedle is straight and parallel as shown in above diagram.
. Needle
Clamp Screw
- Flat side towards
back of machine
Turn hand wheel toward you to raise needle bar to its highest posi
tion.
Loosen needle clamp screw and insert needle upward as far as it wif
go, making sure flat side of needle is towards back of machine as
shown in the above diagram.
Tighten needle clamp screw with screwdriver.
Follow the same procedure for insertion of twin needle.
To make sure that needle has been inserted correctly, turn hant
wheel toward you and see that needle comes down through thi
center of the needle hole in the needle plate as shown in the abovi
diagram. . .
Stitch selector dial must be set in straight stitch needle positioi
when checking needle alignment.
If skipped stitches occur, needle may be incorrectly inserted.
Page 7
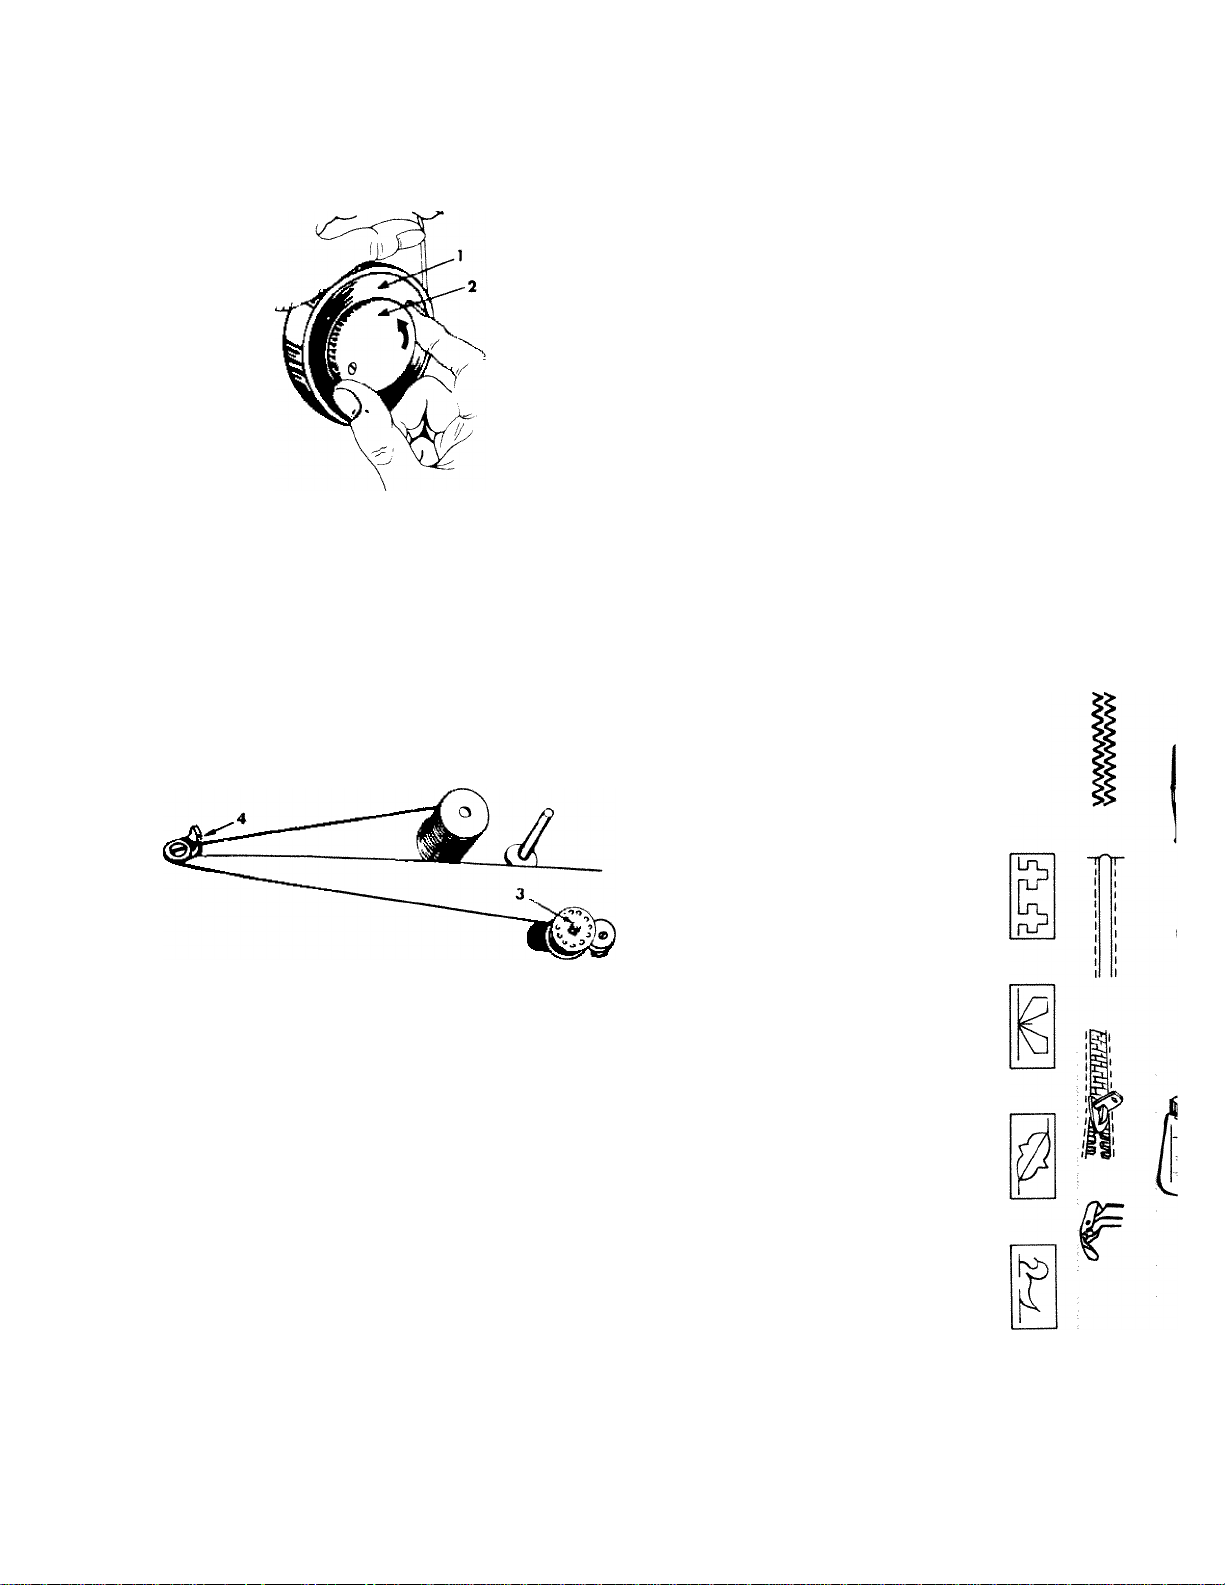
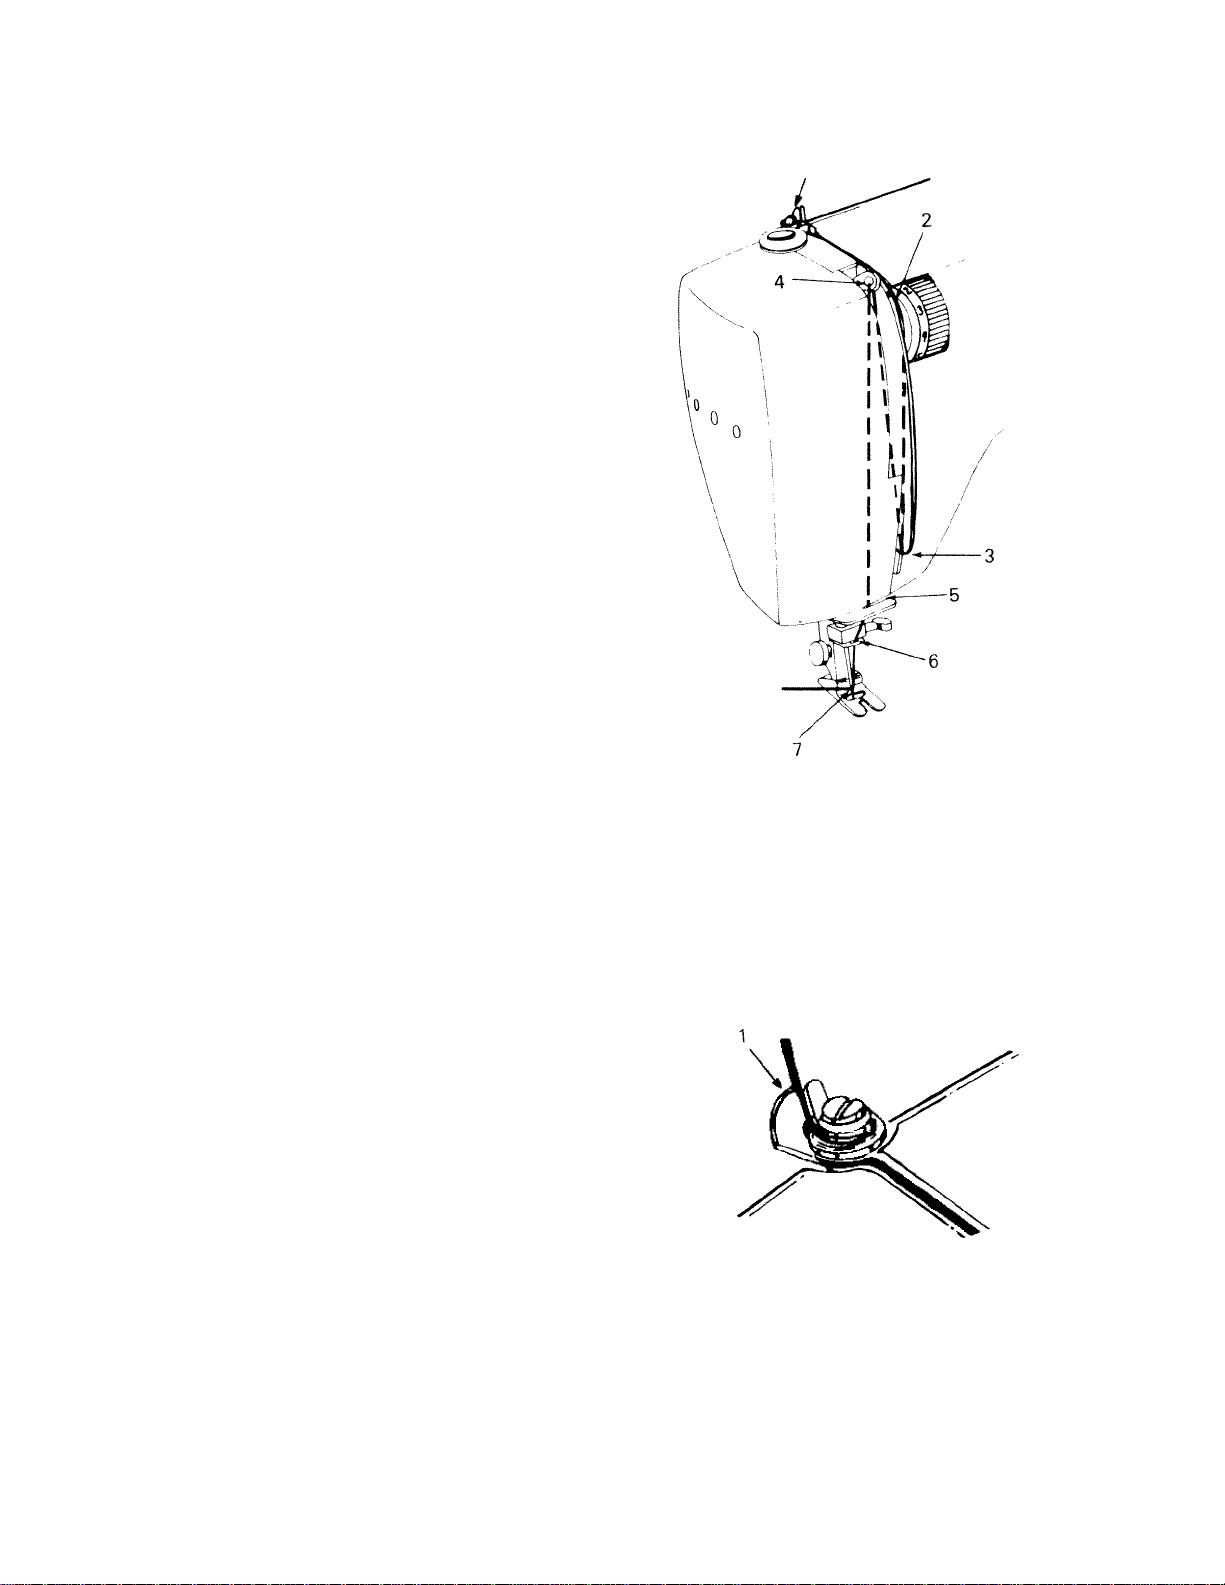
WINDING THE BOBBIN
3 DISENGAGE THE HAND WHEEL:
Hold the hand wheel 11) with left hand, turn clutch
counterclockwise with right hand to disengage as shown.
12)
s
T
R
A
G
H
T
A
N
D
Z
G
Z
A
G
B
U
T
T
I
O
N
H
O
L
E
S
s
T
R
E
T
C
H
U
T
I
L
I
T
I
Y
S
T
I
T
C
H
F
U
N
S
T
I
T
c
H
E
S
D
E
C
0
R
A
T
1
V
E
F
E
A
T
U
R
E
S
A
N
D
P
A
R
T
S
E
S
TO WIND THREAD ONTO BOBBIN:
• Lead thread through spring thread guide (4) and through the hole in
your bobbin from the inside out.
• Place the bobbin onto the bobbin winder shaft (3).
• Push the bobbin winder to the right.
• Hold loose end of thread firmly and turn hand wheel to make thread
tight. Apply gradual pressure on foot pedal until automatic shut off
disengage bobbin winder.
• Cut off loose end of thread.
If
k
Page 8
Re(
anc
Th(
Th(
Sei
Mo
Ret
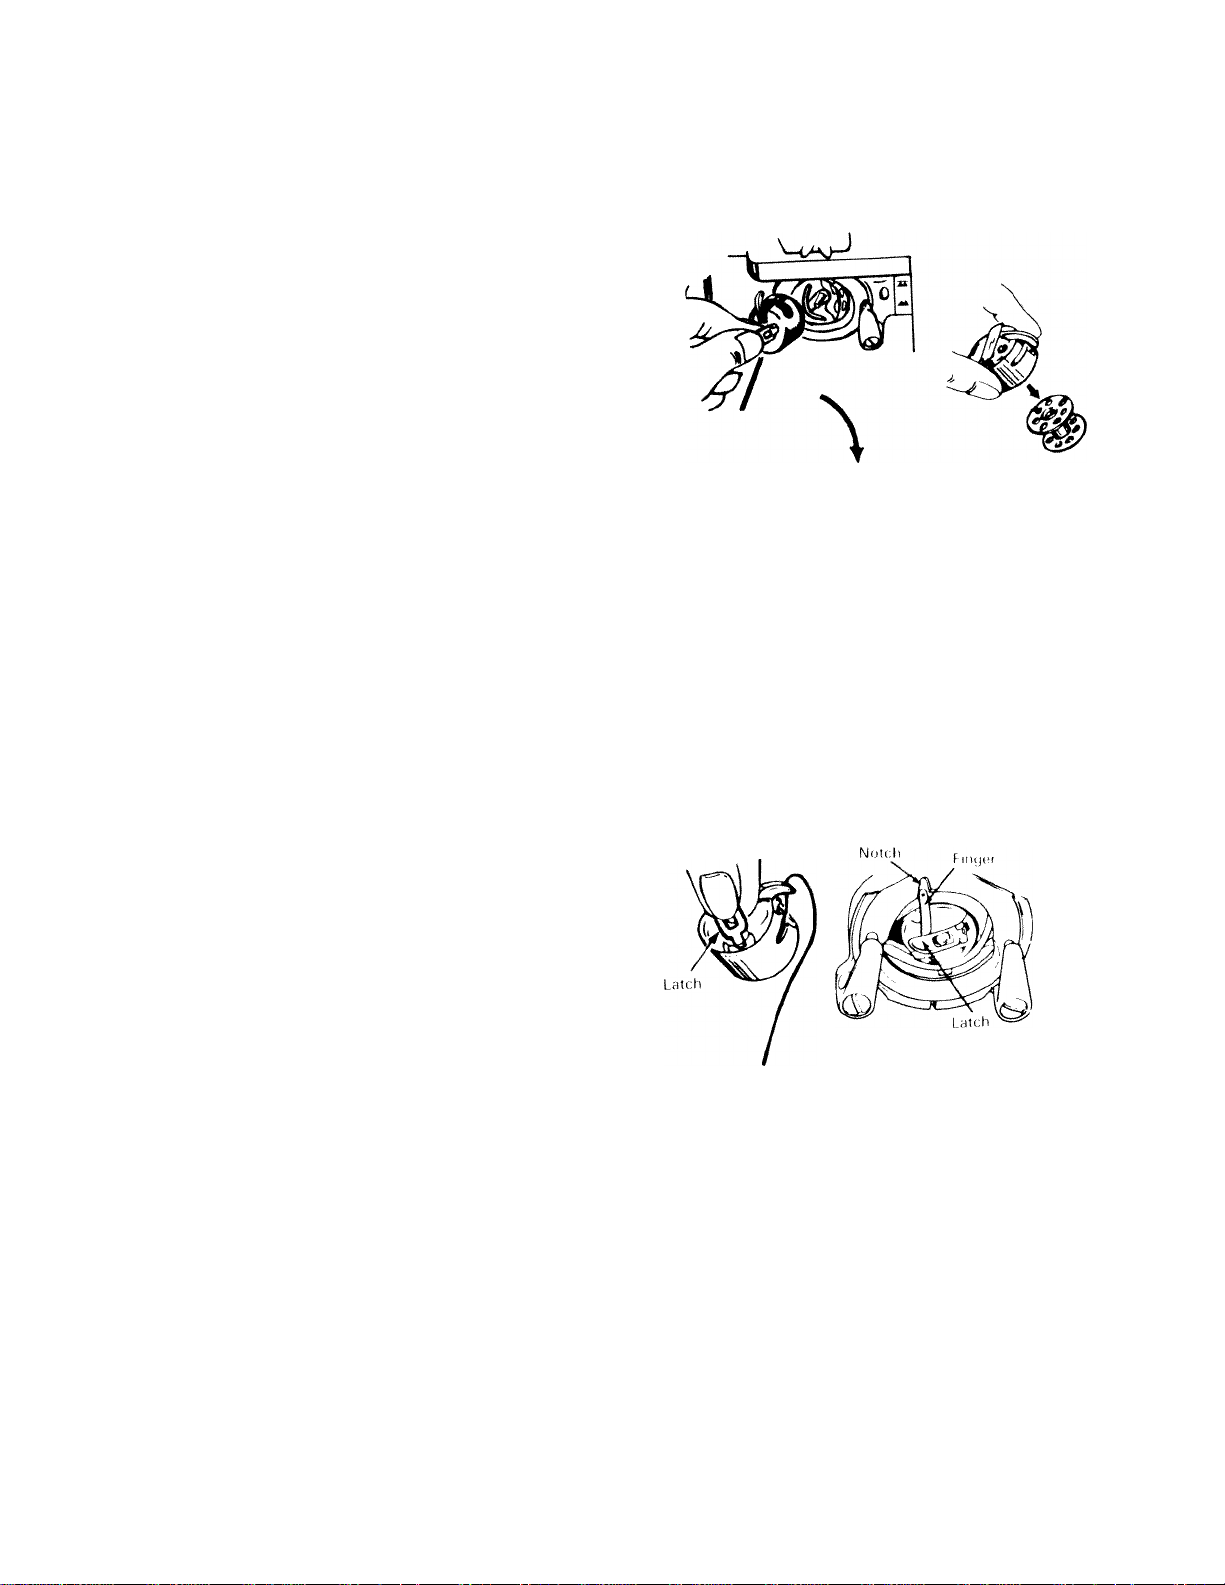
CHANGING THE BOBBIN
TO REMOVE THE BOBBIN FROM BOBBIN CASE:
• Raise needle bar to its highest position. Bobbin case cannot be
removed when needle bar is at low position.
• Open shuttle race cover, pull bobbin case latch with two fingers and
remove bobbin case as shown above.
• Remove bobbin from bobbin case by releasing latch.
TO ATTACH THE BOBBIN CASE:
• Pull thread at least 3 inches from bobbin.
• Thread bobbin as shown on page) 7 ).
• Making sure that needle bar is at its highest position, insert bobbin
case into shuttle race by holding bobbin case latch. Make sure bob
bin case finger is inside shuttle notch. Press bobbin case into shuttle
as far as possible until latch catches on center post of the shuttle.
Page 9
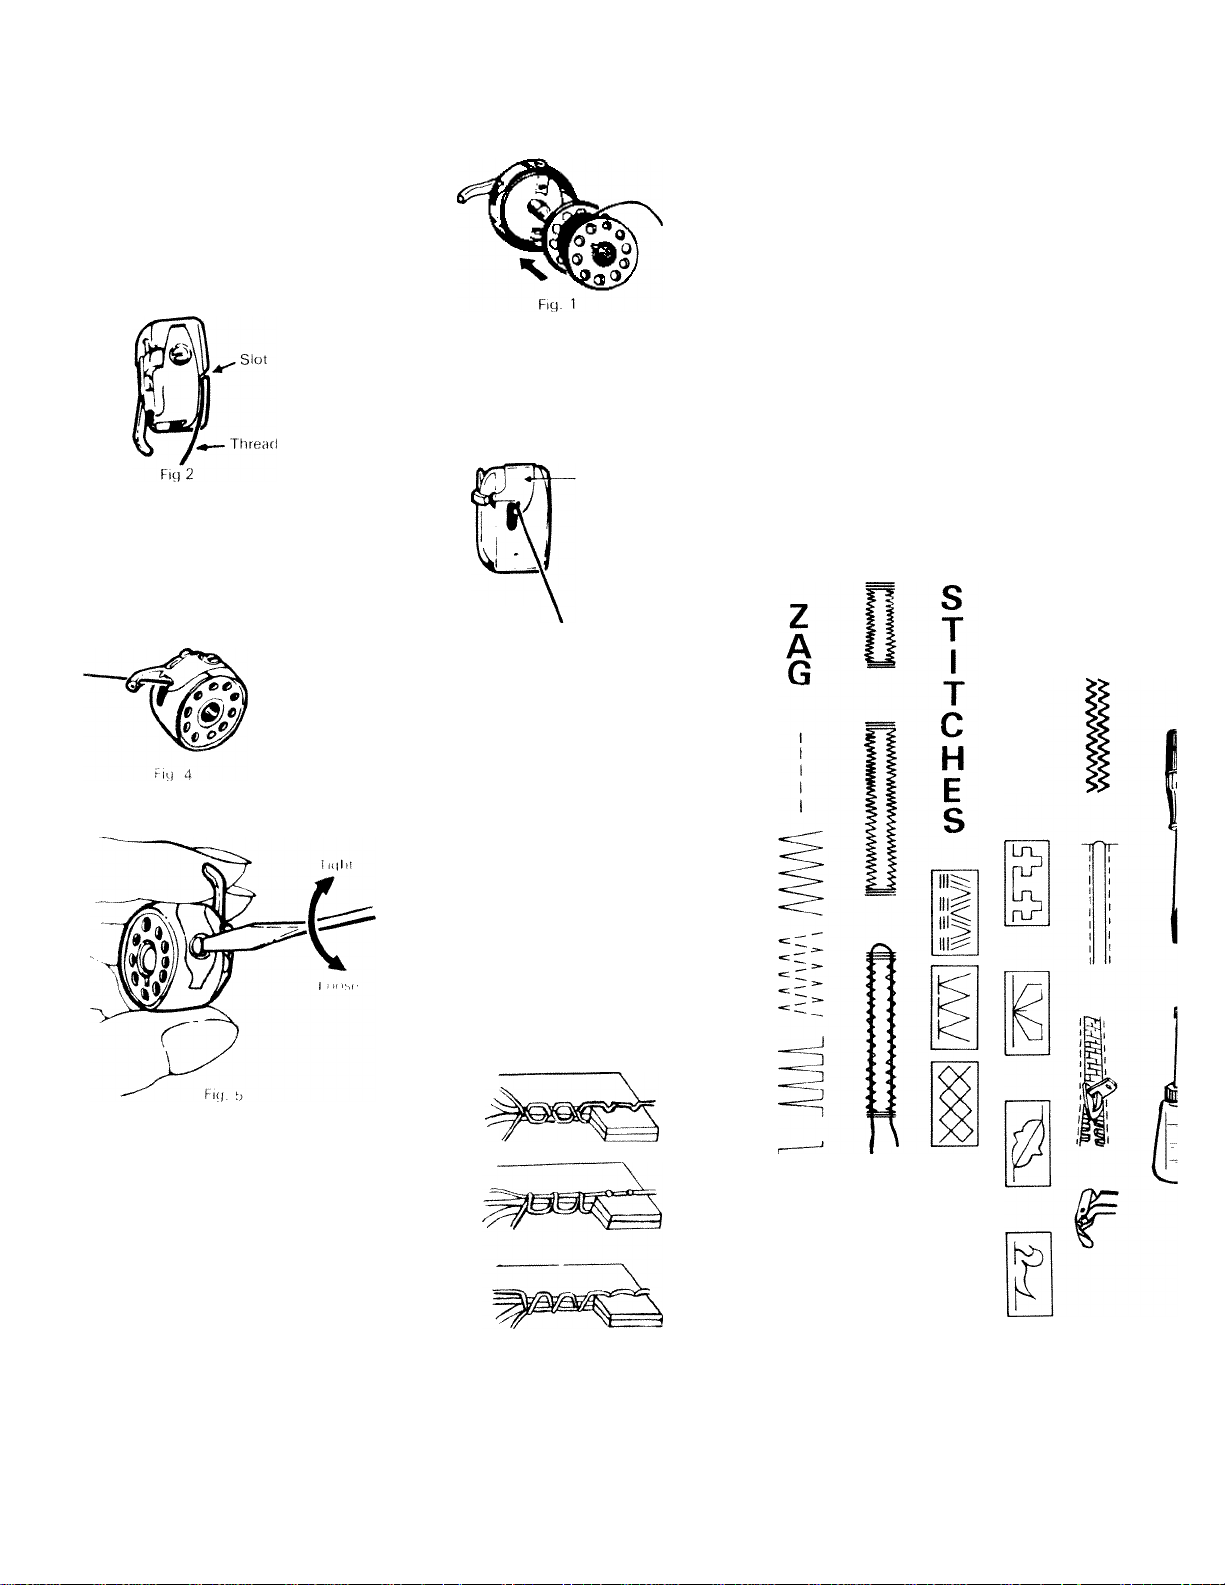
THREADING THE BOBBIN CASE
Pull |[ire;i(l at least 3 inches from bobbin,
hu.uti bobbin in bobbin case so that
ihtu.id will unravel clockwise.
Pull thread into slot of bobbin case
as shown in Fig. 2.
Draw thread under the tension spring and
into the fork'Shaped opening of the spring
• IS sliown in Fig. 3.
Pull thread through hole in bobbin case
finger as sliown in Fig. 4.
(Recommended for /ig/ag sewing only)
}-it). 3
Tensfon Sprint)
s
T
R
A
I
G
H
T
A
N
D
Z
I
G
B
U
T
T
o
N
H
O
L
E
S
S
T
R
E
T
C
H
T
Y
U
T
I
L
I
F
U
N
S
T
I
T
c
H
E
S
D
E
C
0
R
A
T
1
V
E
F
E
A
T
U
R
A
N
D
P
A
R
T
S
P
(
INCORRECT
TOP TENSION TIGHT
BOTTOM TENSION LOOSE
INCORRECT
TOP TENSION LOOSE
BOTTOM TENSION TIGHT
TO ADJUST BOBBIN TENSION.
• Turn screw Oft side of Itobbin
case clockwise to increase!
tension.
• Turn screw on side of bobbin
case counterclockwist! to
decreast! tension.
CORRECT
CT_.
k
Page 10
UPPER THREADING
Rei
anc
Th(
Th(
Set
Mo
Rei
Raise needle bar to its highest position^
SthrSd'through top plate thread guide (1 ) and between tensiot
Puli'tead down a.ound am, thmad guido 13: and up lo take-u,
LOM ‘.hiead through evelet on rake-up lave, from ugh. ro lei, an,
[¡rn’rm^gh laca^ Plata guida (hi, ¿rirn^r'm.o,,,,
Pull thread down through needle elamp gui ^
needle hole from front to rear (7),
Always use the same type of thread on top and bottom as differet
sizes or types of thread will cause tension problems. ,
Example Polyester thread on the bobbin and cotton thread on to
will result in poor tension quality.
8
Page 11
TWIN NEEDLE UPPER THREADING
• Follow threading instruction for single needle with these exception.
• Place thread, matching or contrasting in color, on both spool pins.
• Draw threads through thread guides as normal, but separate the
ilireads at the tension.
• Pass on thread through the left disc and one thread through the right
disc.
• Now treat both threads as one until you reach the needle eyes.
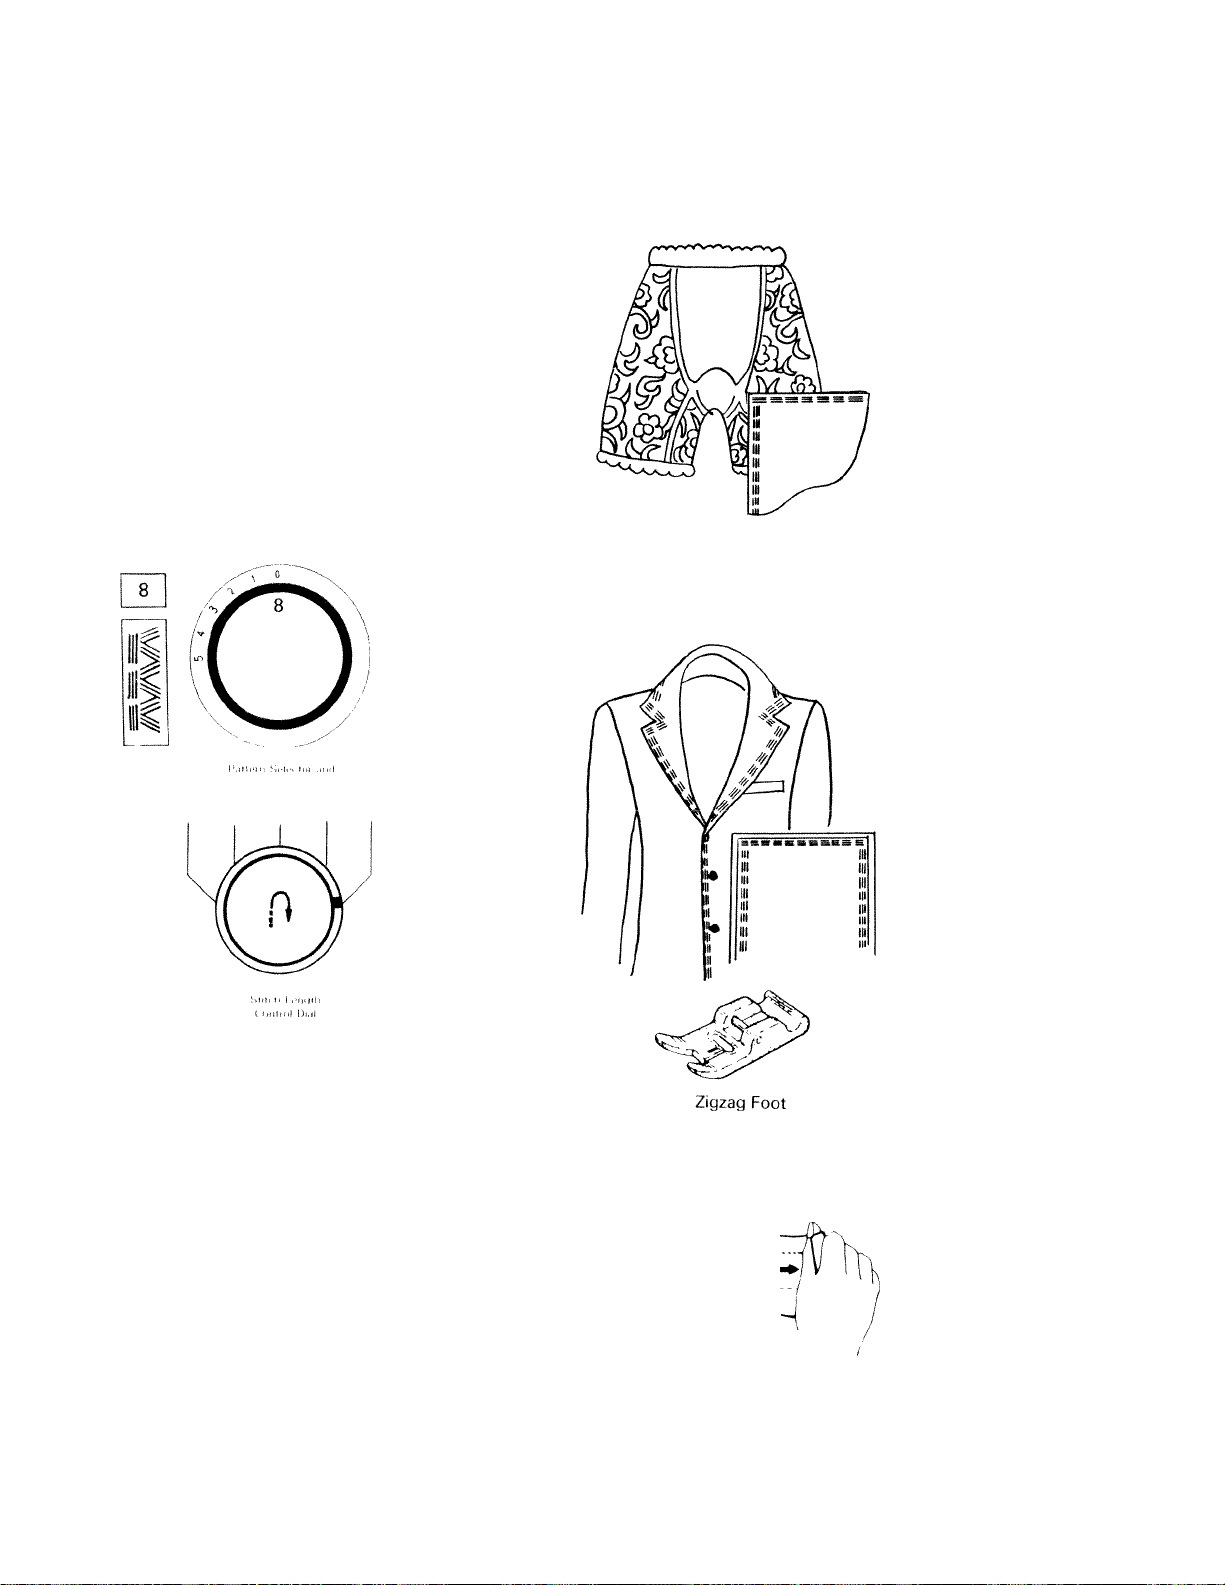
ZIGZAG DIAL: Set at desired width between "O" and "3," if you set
ImI higher than 3, the needle will hit the needle plate and break.
STITCH LENGTH; Set at desired stitch length.
ADJUSTING FEED DOG HEIGHT
s
T
R
A
G
H
T
A
N
D
Z
G
Z
A
G
B
U
T
T
I
O
N
H
O
L
E
S
s
T
R
E
T
C
H
U
T
I
L
I
T
I
Y
S
T
I
T
C
H
F
U
N
S
T
I
c
H
E
S
D
E
C
0
R
A
T
1
V
E
A
T
U
R
A
N
D
P
A
R
T
S
E
S
/
U|)per position of feed dog is used for normal sewing. To raise feed
I log.
I’ress drop feed button " 4A " located under shuttle cover to upper
position.
1
ower position is used for Embroidering, Mending or Sewing on
ihitton. Press drop feed button "HT" to lower position.
ml
' ► *
in;
k
Page 12
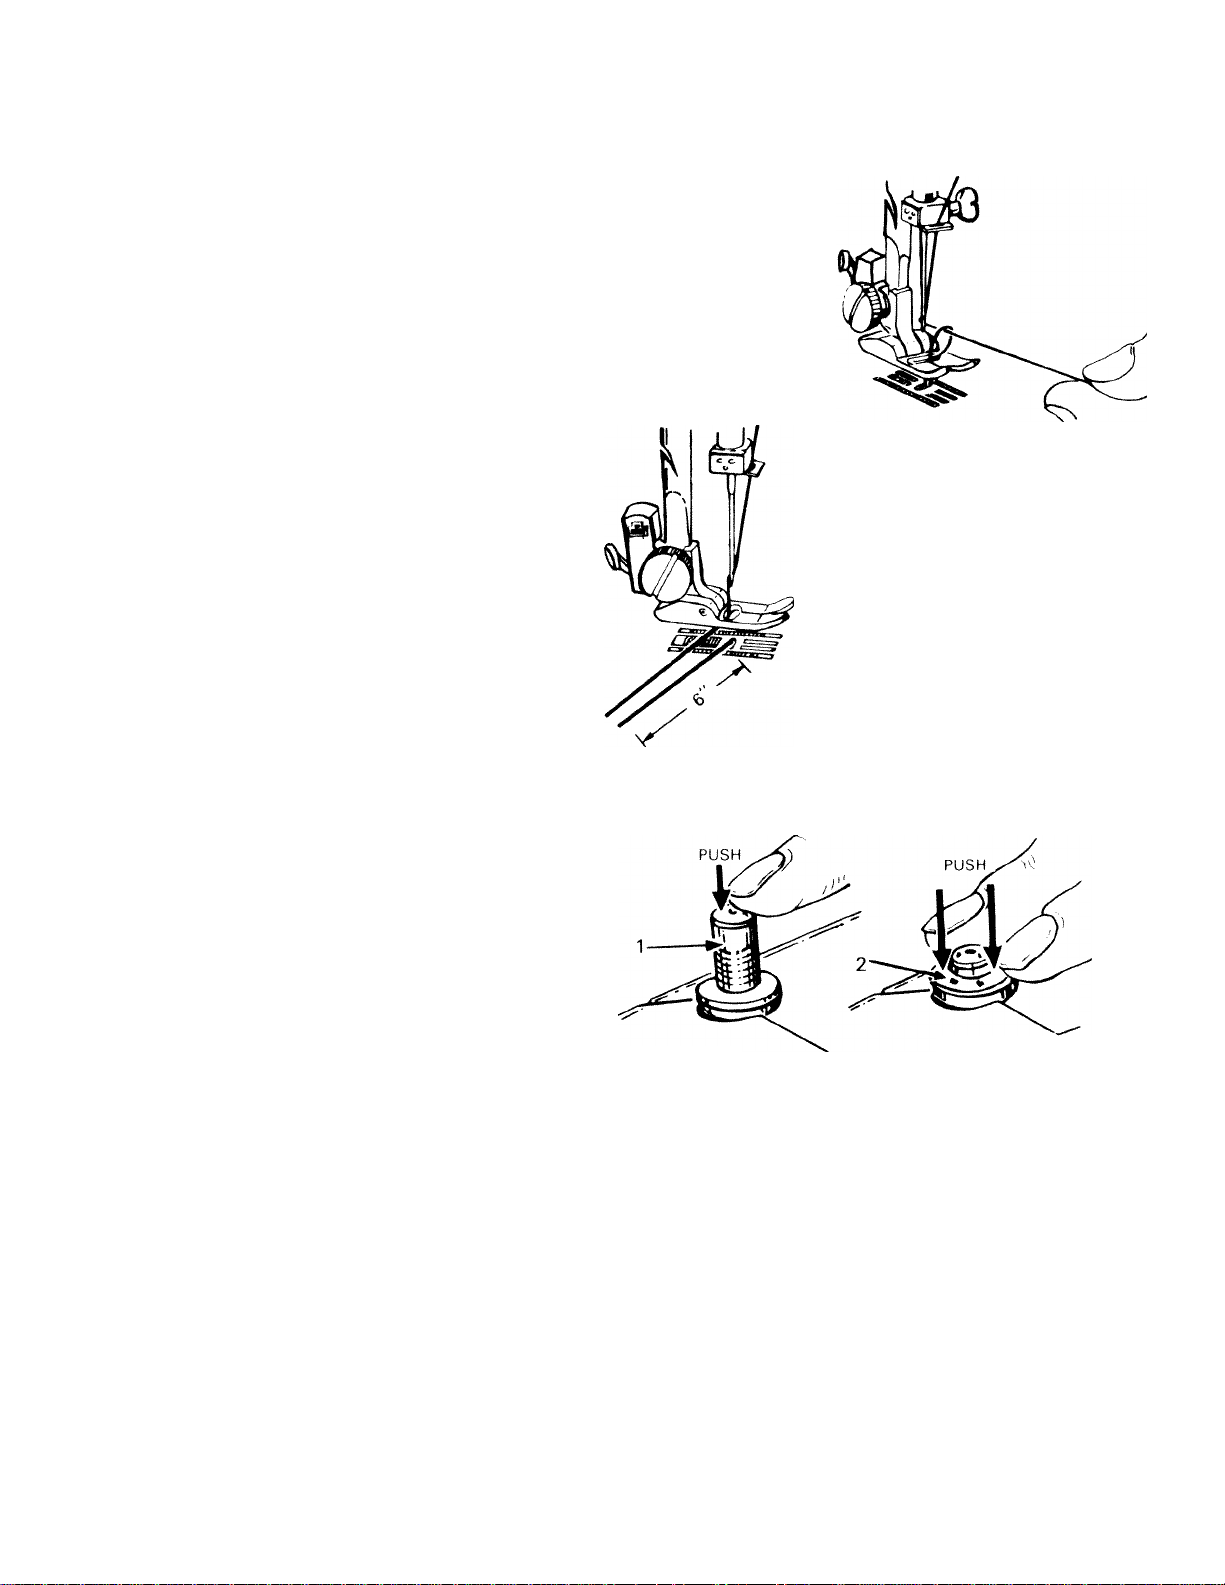
PICKING-UP LOWER BOBBIN THREAD
Raise presser foot.
Holding upper thread, turn
hand wheel toward you
one rotation.
When take-up lever is at its
highest position, pull thread
to pick up loop of lower
bobbin thread.
Pull both upper and lower thread
"to the left of" presser foot ap
proximately 6 inches.
This will prevent jamming.
Re(
anc
Tht
Tht
Sei
Mo
Rel
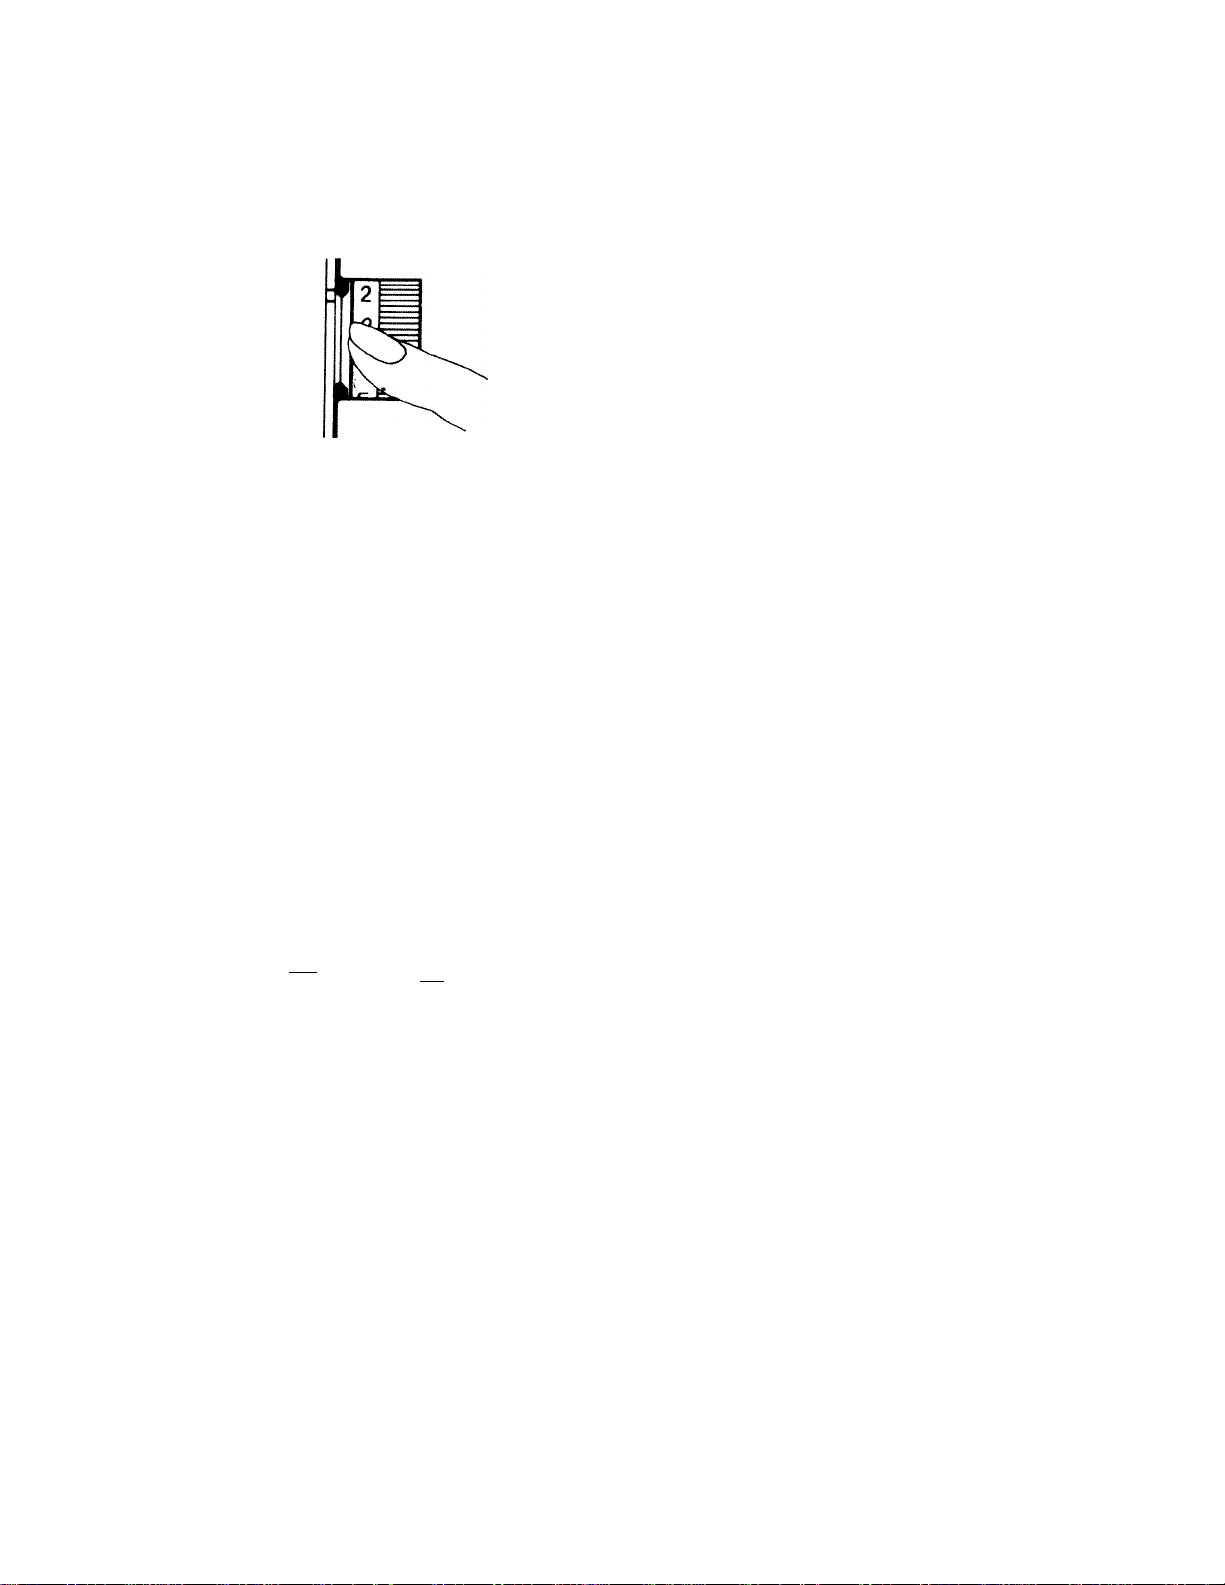
REGULATING PRESSURE
Fig. 1
The amount of pressure that is applied to the fabric by the press(
foot is adjusted by the pressure cap (1). The upper position gives th
least amount of pressure while the lowest position gives maximui
pressure.
To increase the pressure, push down on the pressure cap to obta
the desired setting. To decrease the pressure, press down on tf
snap lock ring (2) to allow the pressure cap to return to its maximu
height. Then reset to the proper pressure.
Normally the pressure cap will be in the lowest position. If the tc
layer of fabric tends to push out further than the bottom layer
fabric. Pressure should be decreased. This often happens on bull
fabrics, such as wools, and on knits.
Fig. 2
10
Page 13
ADJUSTING UPPER TENSION
To increase upper tension, turn upper tension regulator to higher
number.
To decrease upper tension, turn upper tension regulator to a lo
wer number.
Turning tension regulator from ”0" to "9" will increase tension. Nor
mal sewing is performed between "4" and "5".
Note: Normal stitches will be performed on the red zone at 4, 5 and
6 for regular cotton threads.
s
T
R
A
G
H
T
A
N
D
Z
A
G
B
U
T
T
I
O
N
H
O
L
E
S
S
T
R
E
T
C
H
U
T
I
L
I
‘"7*'
Y
S
T
I
T
C
H
E
S
Fi<). 1.
Proper Tension
Fig. 2
Fig- 3
A perfect straight stitch will be formed with both threads interlock
ing in fabric as shown in Fig. 1,
When using the zig zag stitch for embroidery (satin stitching),
decrease upper tension so that top surface will look smooth at the
expense of the bottom surface.
^ №
Upper Thread Tension Too Loose
Upper Thread Tension Too Tight
11
-c/~
.....
g
5
III;
hi
Page 14

33 ^ C/) H H 5
<t) CD IT ^ 5 5
FABRIC, THREAD AND NEEDLE CHART
FABRIC
DELICATE - tulle, chiffon, voile, fine lace, organdy, lawn, crepe, taffeta
Knits — sheer tricot
LIGHTWEIGHT - batiste, organdy, voile, taffeta, silk, crepe, chiffon, velvet
KNITS - tricot, brushed tricot, jerseys, synthetic leathers, power net
LEATHERS — plastic film, vinyls
MEDIUM WEIGHT - gingham, percale, linen, chintz,faille, satin, corduroy, velvet, suitings, wools,
pique, terry _
KNITS - jersey, double knit power net, bathing suits
LEATHERS - vinyls, plastic film
MEDIUM HEAVY ^ gabardine, tweed sailcloth, denim, duck, coatings, wools, drapery. 16
KNITS - double knit, power net
LEATHER — vinyl, rubber backed drapery fabric
HEAVY — overcoatings, canvas, upholstery, awning
KNITS - fake furs, velours, sweater
LEATHERS - vinyls, plastics
light ball point
light ball point
Wedge point
light or medium
Wedge point
! heavy ball point
Wedge point
Wedge point
I
NEEDLE (Long Scarf)
HA X 1
11
14
______
130/705H
Eu ropean
bai jjaq^m t_
100
18 110
heavy ball point
Fine mercerized 60
70
Eu ropean 50 — 70
"A” Silk
Fine Synthetics
80
Fine mercerized 60
European 50 — 70
Fine Synthetics
"A” Silk
Mercerized 50
90
European 30
"A” Silk
Synthetic
Mercerized 50
Heavy Duty Mercerized
j European 30
I
"A" Silk
! Synthetic
Heavy Duty Mercerized
European 30
Synthetic
STITCH
THREAD
LENGTH
1-1/4 - 1-3/4
1- 3/4 ^ 2
2- 1/2 -3
Page 15
ADJUSTING UPPER TENSION
To increase upper tension, turn upper tension regulator to higher
number.
To decrease upper tension, turn upper tension regulator to a lo
wer number.
Turning tension regulator from “0" to "9" will increase tension. Nor
mal sewing is performed between "4" and "5".
Note: Normal stitches will be performed on the red zone at 4, 5 and
6 for regular cotton threads.
s
A
G
H
A
N
D
Z
A
G
T
R
I
T
U
T
T
O
N
H
O
L
E
S
B
S
T
R
E
T
c
H
u
T
L
T
Y
S
T
T
C
H
E
S
F
U
N
F
E
A
T
S
T
I
T
U
R
E
S
c
H
I
E
S
I
D
E
C
0
R
I
A
T
1
V
E
A
N
D
P
A
R
T
S
Fig, 1.
Proper Tension
Fig, 2
Upper Thread Tension Too Loose
......
f
> ... ,......
•>...
4
Fig. 3
A perfect straight stitch will be formed with both threads interlock
ing in fabric as shown in Fig. 1.
When using the zig zag stitch for embroidery (satin stitching),
decrease upper tension so that top surface will look smooth at the
expense of the bottom surface.
^ ^_________
Upper Thread Tension Too Tight
_
11
iii^
111%
iii^
■ i;
k
Page 16

Tn ^ co H ~l ?
£ o ^ ? S' 2 ®
FABRIC, THREAD AND NEEDLE CHART
NJ
FABRIC
DELICATE - tulle, chiffon, voile, fine lace, organdy, lawn, crepe, taffeta
Knits - sheer tricot
LIGHTWEIGHT - batiste, organdy, voile, taffeta, silk, crepe, chiffon, velvet
KNITS — tricot, brushed tricot, jerseys, synthetic leathers, power net
LEATHERS - plastic film, vinyls
MEDIUM WEIGHT - gingham, percale, linen, chintz,faille, satin, corduroy, velvet, suitings, wools
pique, terry
KNITS - jersey, double knit power net, bathing suits
LEATHERS - vinyls, plastic film
MEDIUM HEAVY ^ gabardine, tweed sailcloth, denim, duck, coatings, wools, drapery.
KN ITS - double knit, power net ^ ^
LEATHER - vinyl, rubber backed drapery fabric
HEAVY — overcoatings, canvas, upholstery, awning
KNITS - fake furs, velours, sweater
___________
HA X 1
3
11
14
(Long Scarf)
130/705H
Eu ropean
NEEDLE
light ball point
light ball point
Wedge point
r~Iight or medium
I
_____ balLjsoiriX^
I Wedge point
16
heavy ball point
Wedge point
18 ^ 110
heavy bali point
m/oHnp nnint
THREAD
Fine mercerized 60
70
Eu ropean 50 — 70
A Silk
Fine Synthetics
80
Fine mercerized 60
European 50 — 70
Fine Synthetics
"A" Silk
Mercerized 50
90
"A" Silk
Synthetic
Mercerized 50
I Heavy Duty Mercerized
1 European 30
^ "A" Silk
j Synthetic
I Heavy Duty Mercerized
i European 30 I 2-1 /2 — 4
Synthetic
_____________
STITCH
LENGTH
1-1/4 - 1-3/4
1-3/4 - 2
2-1/2 -3
2-1/2
2 --2-1/2
2-1/2 - 3
Page 17

Point Eye
Shaft
Body
CiO
r^
/ Round
Flat
Short Groove Long Groove
(Flat Side of Needle) (Round Side of Needle)
Regular Sharp All purpose Medium Ball
Needle Needle Point Needle
A A A A A
r
l\l\l\l\l\
I y 'I y 'i \
MT
Long Groove -
Elongated Scarf -
Short Groove-
Eye -
Wedge Point
Needle
0>N O-N OZ> HIO->3JHCn
inr fflZ ^5^ AAA
mmm
P|K |WWWVVVVAAAAAWIAAWV^ ||WWww*yv^
Jr llvHvvvvvwvwviAwwwvwJl wwwimmmJII
\\V/A\V//
C/)miOH-------------------------------------¡(/) <H —r------------------------------------1C lOHm33HO)
rn<----------------------l>30OOmD 0)mIOH
COH30>-0 OZ> cnm30CH>m-n
--------------------------------------------------------------------
0)mr-OIZOHHCD3
1C/) ZCti
Page 18
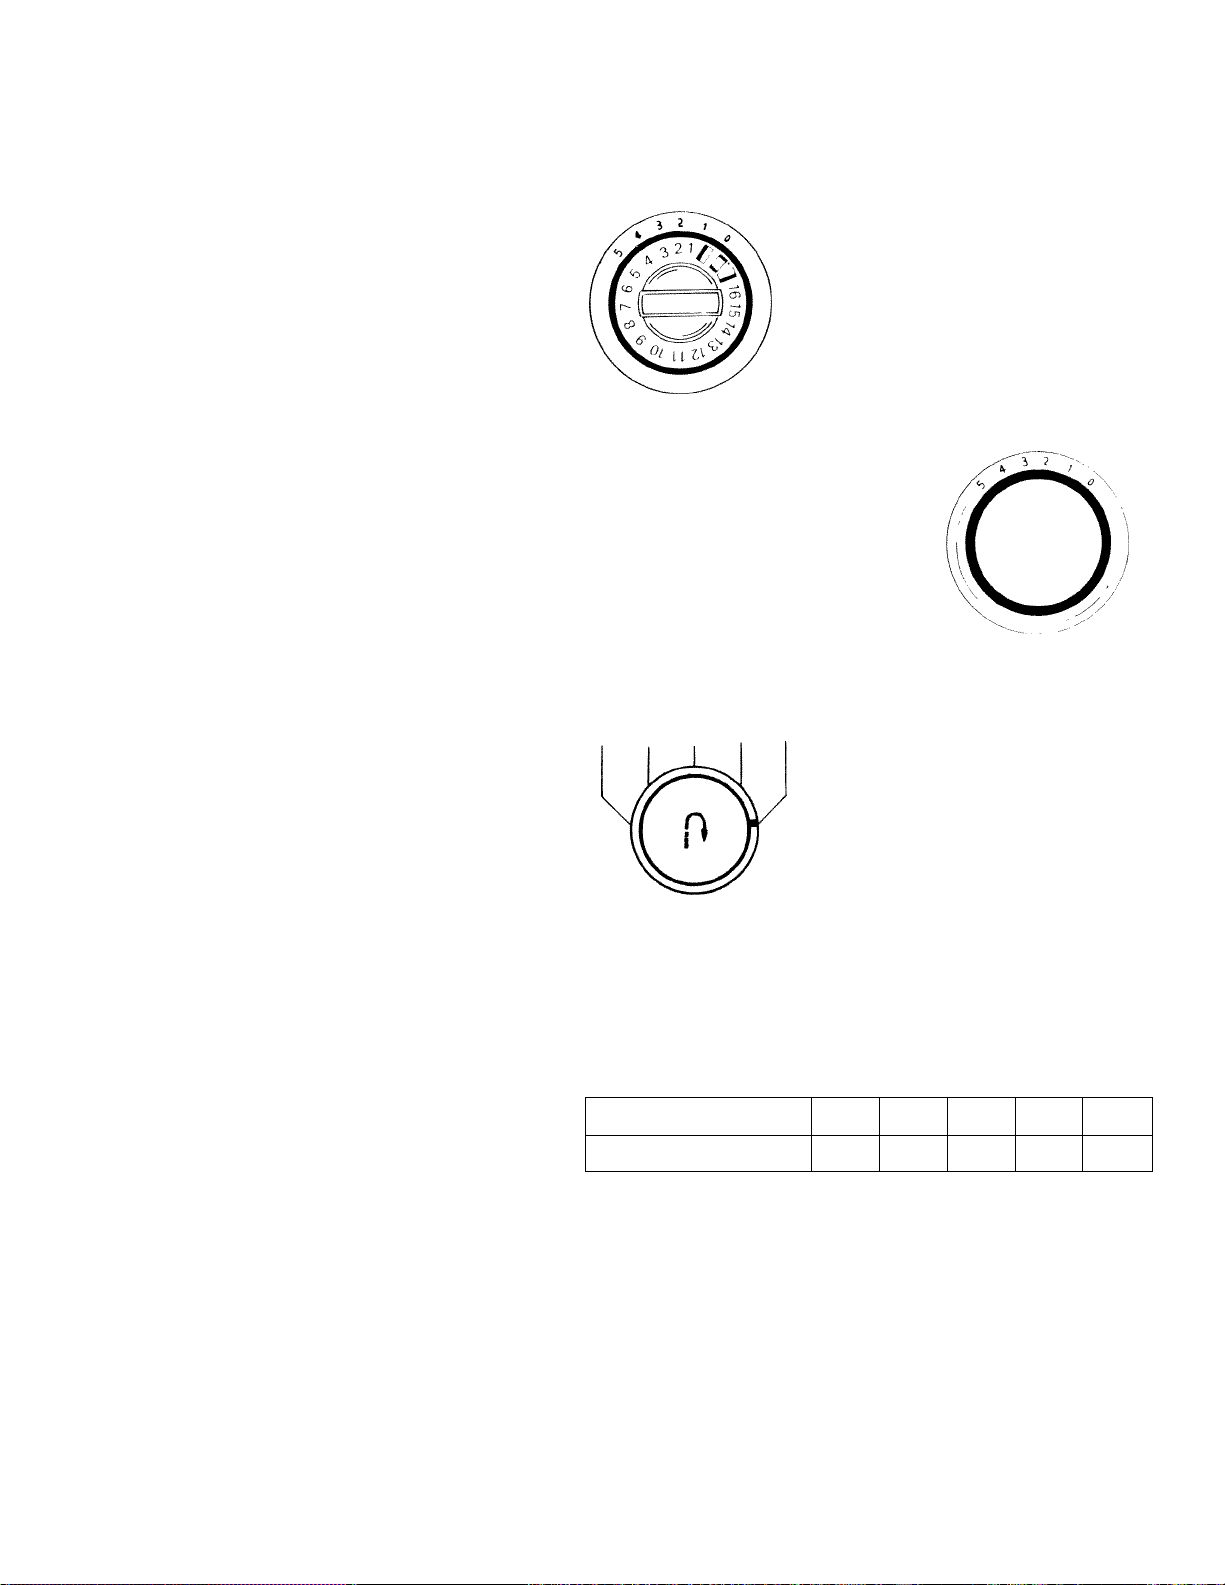
FUNCTIONS OF CONTROLS
NEEDLE POSITION AND PATTERN
SELECTOR DIAL
• Raise needle bar to highest position b'
turning hand wheel toward you.
• Select desired pattern and needle
position.
• Selector dial can be turned either
clockwise or counterclockwise.
ZIGZAG WIDTH CONTROL DIAL
• For wider zigzag stitch, select a higher
number.
• When twin needle is used, zigzag must
be limited between positions "0" and
"3" on the dial (use of twin needle
in position higher than "3" will result
in needle striking needle plate).
Rei
am
Th(
Th(
Sei
Mo
Rei
nr~l 1 2 3 4 111*
STITCH LENGTH CONTROL DIAL
• Numbers on dial denote length of stitches.
• To increase length of stitch, turn dial to higher number.
STITCH LENGTH GUIDE
Numbers on dial
Stitches per inch
0
No Feed 24
1
REVERSE STITCH BUTTON.
• Use for reverse stitching or tacking.
• Keeping button pressed in will allow you to sew reverse stitch
same length as forward stitch.
2
12
3 4
8 6
14
Page 19

APPLICATIONS OF THE STRAIGHT STITCH
SEAMS
The normal stitch length for most fabrics is 3, but the length chosen
depend on the fabric and area of usage. Usually, heavier fabrics
longer stitches, and lighter weight fabrics require shorter stitches.
For curved seams and bias cut areas use a shorter stitch length to
strength and elasticity to the seam.
Pattern:
.......
Length: 2
Width: 0
Feed Dog:.
Pressure: Normal
Foot: All Purpose
Needle Position: 2
BASTING/TOPSTITCHING
Sewing a seam with a longer stitch is useful for temporary seams prior
to fitting. Basting stitches also may be used when gathering in fullness.
Topstitching can be done very effectively with the long straight stitch.
For a bolder stitch, two threads of the same type can be threaded
through one needle (size 14 or 16). A heavier thread such as buttonhole
twist may be used for topstitching, but be sure to use a larger needleisize
16 or 18). Left needle position may be used for more support of fabric.
Pattern:
Length: 4
Width: 0
Feed Dug:
Pressuie: Nnrmal
Foot: All Put|)Ose
Needle Position: 2 or 1
DARNING
Worn spots or small holes can be darned very easily. Use of an
embroidery hoop is optional depending on the fabric. A fine thread
is recommended so that the fabric and thread will blend together invisibly.
Trim the ragged edges from the area to be darned, Hold the threads to
start, then move the fabric slowly back and forth while running the
machine very fast to fill the area. More professional results will be
attained by moving the fabric in a figure eight pattern while sewing.
After filling in the area lengthwise, reweave with crosswise stitches in the
same manner.
should
require
add
s
T
R
A
G
H
T
A
N
D
Z
A
G
B
U
T*
T
I
o
IM
H
S
T
R
E
c
H
o
L
u
T
I
L
I
T
Y
S
T
I
T
C
H
E
S
I,I
'¡¡S
Pattern: Length: 0
Width: 0
Feed Dog:
Pressure: Darn
Foot: None or All
Purpose
Needle Position: 2
k
15
Page 20

ELASTIC THREAD SHIRRING
Wind elastic thread onto bobbin, as shown, let^
ting the thread pass through your fingers. The
thread should be wound smoothly without stret
ching. Place bobbin in case as usual, being sure
that the elastic is drawn through the tension. Use
regular thread on the top of the machine. Do a
trial run on the chosen fabric to test length of
stitch. Lay a piece of paper under the fabric to
keep it from gathering up as you sew. This will
enable you to sew many parallel rows of stitching
without difficulty. Afterwards tear out the paper
and the fabric will be gathered.
P.ifUif n:
Luntjfh: 3
WidtlrO
FotMt n.ur A.A
F’rcssuM!; Nomiai
Foot: All F’(if|)!)So
NtM-’filtt Position: 2
4
• HOLDING THE FABRIC
For most fabrics, it is not
necessary to hold the fabric in
both front and back. Merely
guide the fabric with one hand
R
a
T
1
from the front.
For the fine delicate fabrics,
such as chiffon, geogrette, and
tricot, the best resits will be at
tained by holding the fabric in
front and back of the needle
without pulling on it.
. TURNING CORNERS
To pivot at a corner, leave the
needle in the fabric while on the
upswing so that the stitch is
almost completed, thus preven
ting the possibility of skipped stit
ches in the corner. Lift the
presser foot and pivot the fabric.
Then, lower the presser foot and
continue sewing.
•
• CURVED SEAMS
On a curved seam use a slightly shorter stitch length than you are using
for the rest of the seams. For example, if length 2 is being used for the
seams, a 1-1/2 stitch length would be preferred for curves. A smaller
stitch length will add strength and elasticity to the seam.
When guiding the fabric, keep your fabric edge on the etched seam
guide line directly across from the needle rather than on the forward part
of the line. The seam guide may be used on an angle as shown.
16
Page 21

• ENDING SEAM/REMOVAL OF FABRIC
Stitch to the edge of the fabric, then press the reverse stitch button and
backstitch for a few stitches to reinforce the end of the seam.
Turn the hand wheel until the take up lever is in its highest position so
that the stitch is completed and the threads will pull freely. Lift the
presser foot and remove the fabric by drawing the threads to the left and
back, keeping them under the foot so as not to bend the needle. Cut the
threads with the thread cutter on the back of the presser bar. Leave the
thread ends three to four inches long.
APPLICATIONS OF THE ZIGZAG STITCH
OVERCASTING
Place the edge of the material underneath the
opening of the sewing foot and guide raw edge
along the center groove of the foot, allowing
stitch to form half on and half off the fabric.
The multiple stitch zigzag is a wiser choice for
most fabrics. See page(21).
Pattern: AAA
Lenght: 2 4
Width: 4-5
Feed Dog:
Pressure: Normal
Foot: All Purpose
Needle Position: 2
B
u
T
T
o
N
H
O
L
E
S
S
T
R
E
T
C
H
U
T
I
L
I
T
Y
S
T
I
T
C
H
E
S
Hip
siS
V
SEAMING KNITS
The narrow zigzag can be used in seams of firm
knits for added strength. After sewing, open
seam and press flat. Tiny zigzag stitches can
hardly be seen and the seam will give when stret^
ched.
Pattern: /Wy
Lenght: 2
Width: 1-2
Feed Dog: A A
Pressure: Normal
Foot: All Purpose
Needle Position: 2
17
k
Page 22

SEWING ON BUTTONS
Zigzag stitching is a very easy and convenient
method of sewing on button without a shank.
Place the button so its left hole comes directly
under the needle, then gently lower the button
sewing foot. Take a stitch in the hole.
Raise the needle and move zigzag width dial to
the right until the needle comes down exactly
over the right hole in the button.
Note: Be sure the needle dears the holes of the
button by moving the hand wheel by hand
before running the machine fast.
Usually 6 to 8 stitches are adequate for securing
a button in place. Stop with the needle in the left
hole. To lock the threads, set the stitch width at
0, and take a few stitches in the left hand hole.
Pattern; A/V\
Lenght: 0
Width; 2 5
Feed Dog; J[S
Pressure; Normal
p
a
Foot; Button Foot
Needle Position; 1
1
1
c
r
FORMING THREAD SHANK ON BUTTON
Buttons sewn on coats or jackets should have
thread shank to make them stand away from th
fabric. To form a thread shank, sew over a pin c
rounded toothpick which can be inserted directI
into the button sewing foot.
After stitching the button to the fabric, remov
work from under the presser foot leaving threat
about six inches from fabric. Remove pin c
toothpick. Pull the threads to back of button an
form a shank between button and fabric b
winding threads tightly around the attaching sti
ches. Pull threads to back of the fabric and the
tie thread ends securely.
18
Page 23

• ENDING SEAM/REMOVAL OF FABRIC
Stitch to the edge of the fabric, then press the reverse stitch button and
backstitch for a few stitches to reinforce the end of the seam.
Turn the hand wheel until the take-up lever is in its highest position so
that the stitch is completed and the threads will pull freely. Lift the
presser foot and remove the fabric by drawing the threads to the left and
back, keeping them under the foot so as not to bend the needle. Cut the
threads with the thread cutter on the back of the presser bar. Leave the
thread ends three to four inches long.
APPLICATIONS OF THE ZIGZAG STITCH
OVERCASTING
Place the edge of the material underneath the
opening of the sewing foot and guide raw edge
along the center groove of the foot, allowing
stitch to form half on and half off the fabric.
The multiple stitch zigzag is a wiser choice for
most fabrics. See page(21).
Pattern: AAA
LeiKjtil: 2 4
Width: 4 5
Feed Dog:
Pressure: Normal
Foot: All Purpose
Needle Position: 2
В
и
т
т
о
N
Н
О
L
Е
S
S
т
R
Е
Т
С
Н
и
Т
I
L
I
Т
Y
S
Т
I
с
н
Е
S
III#
iii^
SEAMING KNITS
The narrow zigzag can be used in seams of firm
knits for added strength. After sewing, open
seam and press flat. Tiny zigzag stitches can
hardly be seen and the seam will give when stret-
"ched.
Patterii: АЛЛ
Lenght: 2
Width: 1-2
Feed Dog: A A
Pressure: Normal
Foot: All Purpose
Needle Position: 2
17
К
Page 24

SEWING ON BUTTONS
Zigzag stitching is a very easy and convenient
method of sewing on button without a shank.
Place the button so its left hole comes directly
under the needle, then gently lower the button
sewing foot. Take a stitch in the hole.
Raise the needle and move zigzag width dial to
the right until the needle comes down exactly
over the right hole in the button.
Note: Be sure the needle dears the holes of the
button by moving the hand wheel by hand
before running the machine fast.
Usually 6 to 8 stitches are adequate for securing
a button in place. Stop with the needle in the left
hole. To lock the threads, set the stitch width at
0, and take a few stitches in the left hand hole.
PatU!fn: A/V\
Lenijht: 0
Wiiltl); 2 5
Fef?d Dog: jBE
Prffssurf;;
p
a
1
1
c
r
Button Font
Nfitfcilu Position: 1
FORMING THREAD SHANK ON BUTTON
Buttons sewn on coats or jackets should have
thread shank to make them stand away from th
fabric. To form a thread shank, sew over a pin c
rounded toothpick which can be inserted directI
into the button sewing foot.
After stitching the button to the fabric, remov
work from under the presser foot leaving thread
about six inches from fabric. Remove pin c
toothpick. Pull the threads to back of button an
form a shank between button and fabric b
winding threads tightly around the attaching sti
ches. Pull threads to back of the fabric and the
tie thread ends securely.
18
Page 25

s
I
SATIN STITCHING
This is useful for decoration such as tapering,
manual designed embroidery, monogramming,
and applique.
The satin stitch, which is a very close zigzag
stitch, is obtained by setting the stitch length as
near to "0" as possible without stopping the
feeding action. The setting will vary for different
fabrics. It may be desirable to loosen the upper
tension slightly to cause the threads to lock
underneath, in order to make the top surface
look especially smooth. For lightweight fabrics,
place paper underneath the fabric while sewing
for best results.
TAPERING/CREATIVE EMBROIDERY
Tapering is done by gradually increasing and
decreasing the stitch width while sewing. By this
method, tapered monograms and other in
teresting designs can be created. For tapered
monograms run the machine fast while turning
the width dial slowly from narrow to wide and
back.
First, learn this stroke by letting the fabric guide
straight. Then, learn to pivot the fabric as you
are tapering by holding the fabric at one point.
Various strokes can be combined to form letters
and designs. Variegated thread can give attrac
tive results.
P,ytlem: AAA
Longhl: '/2 ’/3
Width: 0 5
Fetxi Dog: AA
Prtissiirfo Normal
Foot: All Purpose
vb'
Needle Position: 2,1 or 3
Pattern: /\AA
Length: % ’/3
Width: 15
Feed Dog:
Pressure: Normal
Fool: All Purpose
Needle Position: 2
B
u
T
T
o
N
H
O
L
s
T
R
E
T
c
H
u
T
I
L
I
T
Y
S
T
I
T
c
H
E
S
!!S
F
U
N
S
T
I
T"
c
H
E
S
D
E
C
0
R
A
T
1
V
A
T
U
R
A
N
D
P
A
R
T
S
nCrr
r
<
MANUAL EMBROIDERY DESIGNS
Different designs can be made by turning the
stitch width dial between 0 and 5. By running the
machine at a constant speed and turning the dial
in a definite rhythm, various designs can be
created.
19
Pattern: A/NA
Length: !4 1/3
Width: 0 5
Feed Dog:
Ptssuie: Notmttl
Foot: All Puipo.se
Needle Position: 2, 1 01 3
i a !
k
k
Page 26

PiilK-ni /\ДД
1 О
WkIHi 1 Ь
Frril Г)<«|: ЖЖ
Nni II'
Ne.
FREE HAND MONOGRAMMING
For giving garments and linens a personalized touch, first transfer the design
the right side of the fabric. An embroidery hoop is recommended especiall’j
for soft fabrics and toweling.In order to monogram, you must move the fat
slowly and run the machine rapidly. Monogramming is like writing by movii
the paper under a stationary pen. Guide the fatrric slowly so that ilie zigzag f
close togetlier like a satin stitch, but be careful tltal the stitches do not pile ii|
When guiding from side to side, move fabric slightly faster to avoid a heavy
area.
Practice try foiming loops. Once this is accomplished any lettr-r is easy,
Somrnimes the use of paper or non woven interfacing uii(iei the fabric
may makr; guiding the fabric easier. Tfte ¡taper or interfacing may be torn
cut away iit tlu; completion of the monogram. Wfien iTKtnogramming towe
cellopltane ¡tiaced on tfie top will Itelt) cover loojts and make the monograi
smooth. Pull oi cut away remaining cellofthane when finisht.af.
11 i .c-yy\
h 1
vViiMli 0-1
1 n<0' -A
Pi i?( ' Nidi
\ 1 и ¡1 ,Afi PiM [ n
Ni n -f Ih ■ P; I
St eft 2
ЛЛЛ
'A %
P\jl u ■( lit ■ [ ’( c.ll h >1 I P
APPLIQUE
Applying decorative shaftes of falrnc sciaps to household articles and dotiti
is a very interesting wtiy of trimming an otlirti wise ¡jlam ai tidit. First, h
the design on fabric to (te applicjutid, thiai ¡tin or ttaste it securely in (tktce
garment. With a small straight stitch or narrow zigzag, sew around the
transferreci design. After excess ftilrric is trimmeti away, srtw aiound the
applique with a satin stitcft. For a sntootli curve, sto[) frequently at the insic
edge of the curve to pivot lite fabric slightly. Corners look mudt better wh
the point is stitched by pivoting rather than just turnrrd.
As with all decorative stitches, paper may he used to give more body to tht
fabric wften stitching and can be torn away wlten the ap|)liqiie is completi;
20
Page 27

GATHERING OVER CORD
Ordinary gathering with a basting stitch often
breaks while pulling in fullness. A small zigzag
across a cord such as crochet thread or carpet
thread, gives a much stronger cord for gathering
fullness into fabrics. Once the gathers have been
stitched in place, the cord can be pulled out in
order to eliminate bulk.
fY
Pattern: /SAA
Lengtii: 2
Width: 3
Feed Dog:
Pressure: Normal
Foot: All Purpose
Needle Position: 1
AA
APPLICATIONS OF THE MULTIPLE STITCH ZIGZAG
OVERCASTING
The multiple stitch zigzag is an excellent choice
for overcasting. It keeps the fabric flat and
prevents raveling. For most fabrics, this stitch is
better than the zigzag stitch for overcasting.
The stitch should fall right at the raw edge of the
fabric. Feed the fabric under the presser foot by
guiding the raw edge along the right hand side of
the hole in the presser foot.
Pattern:
Length: ’/4 1J4
Width: 4 5
Feed Dog:
Pressure: Normal
Foot: All Purpose
Pattern Selector: 5
A A
A
IW
A 'iIIil
B
u
T
T
o
N
H
O
L
E
S
s
T
R
E
T
C
H
U
T
T
Y
s
T
I
T
c
H
E
S
iii^
ksA
........
A A A * A R K K JC
V VVV V V V«
<
>
I
Pattern:
Length: ’A 1
Width: 4 5
Feed Dog: A.A.
Pressure: Normal
Foot: All Purpose
Pattern Selector: 5
PATCHING
The multiple stitch zigzag is an excellent stitch
for patching. It is stronger than the zigzag and
the tiny stitches bury into the fabric to make an
almost invisible stitch when using matching
thread.
Place the patch over the right side of the worn or
damaged area. Sew around the patch with the
multiple stitch zigzag letting the last stitch to the
right overcast the edge of the patch. When turn
ing corners leave the needle in the fabric at the
corner. Usually this will be the furthest stitch to
the right or left. In this way, the corners are
doubly stitched and very strong. When the patch
is stitched in place, trim away the excess worn
fabric on the wrong side of the patch.
Note: Try Smocking Stitch for knits.
21
iii^
k
Page 28

PhUciii /V'/'
i l'!U|ttr NiMF 0 ^2
Width 4 h
( IM.(I l)n(,, aA
f’tdSSUH! Ndiintil
( not, Alt h’lUiKibf
P;itK;m Sfilf.’ctor; 5
MENDING A TEAR OR INSTANT DARNING
The multiple stitch zigzag provides a strong an
easy repair for torn garments. It gives an almo;
invisible mend, especially when a fine darnin
thread is used.
To mend a tear, hold the torn edges clos
together and stitch down the middle.
If the tear is guided under the slot in the micid
of the presser foot, stitching will Ire equal c
both sides. If necessary, sew again on either sic
of the first row of stitching making sure tl
needle catches the stitch in the center. With vt:i
worn or frayed falrric, place a ¡liece of ligh
weight interfacing or cotton batiste under tt
tear for reinforcement.
Note: Try Smocking Stitch for knits.
LACE APPLICATIONS
Attaching laces or trims adds a special touch to
lingerie, dresses, or linens. Pin or haste lact;s In
place easitrg or mitering corners where neces
sary.
A straight edged lacr; or braid has a convenitait
line to follow when sewing. Wlien using a
scalloped edged lace follow the design of the
lace for an almost invisilrle application.
Note: Try Multiple Stitch Zigzag, Overlook,
Elastic Edge Stitch, Smocking stitch,
Stretch Overlook or Rick Rack for differ
ent effects.
22
t..|M|lh I
WhIiIf I ?
Pi.-.snn- Ni
(iH,| AM Pm
Nr..(IM' P.mil
AAA
I On,I ^
Page 29

FLUTTER HEM
An unusual way of hemming or finishing edges
of tricot or soft knits is by a flutter edge. Hemm
ing in this manner is just like overcasting an
edge, but the fabric is stretched in back and in
front of the needle as you sew. For best results,
pull the fabric equally, making sure the needle
goes over the edge. When you stop to reposition
your hands, keep the needle in the fabric.
ELASTIC APPLICATION
Applying elastic to lingerie or soft knit fabrics is
easy when using the multiple stitch zigzag. Cut
the elastic 2 inches smaller than your waist
measurement. Overlap the raw ends to form a
circle and stitch with a tiny zigzag to form a box
as shown. Fold the elastic into quarters or eighths
and mark with pins. Do the same with the waist
line of the garment. Place the elastic about 1/2
inch from the top edge of the fabric, matching
the pins. Place under the presser foot and begin
stitching. As you stitch, place the forefinger of
each hand on the fabric at either side of the
presser foot. Pull the fabric out exactly at the
point where the needle is sewing over the elastic
and the fabric. This will ease your fabric and
elastic together as you sew. The amount of ease
Pattern: ,"v v".
Length: % V/2
Width; 4-5
Feed Dog: AA.
Pressure: Noirnal
Foot: All Purpose
Pattern Selector: 5
is dependent on how much you ease the fabric.
In this way you never need to stretch the elastic,
which can be damaged and stretched out of
shape. Trim off excess fabric above elastic near
the stitches.
A/ote: Try Overlock stitch or Smocking stitch for
girdles.
Pattern: /\/V\
Length: %
Width: 4-5
Feed Dog: A.A
Pressure: Normal
Foot: All Purpose
Needle Position: 2
В
и
т
т
о
N
Н
О
L
Е
S
■..
S
т
R
Е
Т
С
Н
и
Т
I
L
I
Т
Y
S
Т
I
Т
С
Н
Е
S
111^
к
F
и
N
S
Т
I
с
н
Е
S
D
Е
С
0
R
А
Т
1
V
Е
А
Т
и
R
А
N
D
Р
А
R
Т
S
Г
(
23
Page 30

UNDERSTITCHING FACINGS
The multiple stitch zigzag is an excellent choice
for understitching and eliminating bulk in facing
seam allowances.
After attaching the facing to the garment, trim
and clip the seam allowance as usual. Press the
seam allowances toward the facing and use the
multiple stitch zigzag close to the seam, stitching
through the facing and the seam allowances.
Using a matching thread, the stitch will blend in
to the fabric and prevent excess bulk. This is
much more successful than a straight stitch for
understitching. It really helps to keep the facings
from rolling.
Note: Try Smocking Stitch for knits.
PitUiirn: /‘v'vT
L urujlit: 1 2
Wtdth: 4 5
FfffMi Dog:
F’fffssuM.*: Nomiul
Foot; Ail Purpose
Pattern Selector: 5
Stei
Ste
/ X
< >
\ /
\/
/\
/ \
< >
\ /
N/
/\
< >
Ч /
\/
/N
Л
о
ж
A V
/ / / / /
/ / / / /
<<<< <
\ \ \ \ N
>>>>>
/ / / / /
<<<<<
\ \ N \ X
>>>>>
/ / / / /
<<<<<
чЧ \ \ X
>»>>
DECORATIVE EFFECTS
As with the irlind hem stitch, the tiiultiple sti
zigzag can be used for many decorative con
nations. If the stitch is pivoted when thr; net
reaches the far left or right of its swing, and
points are carefully matched, a tracery cJiamc
shape results.
On the other hand, if rows of the multiple sti
zigzag are sewn with the points falling direr
under each other, a wavy pattern is produce
Flowers may also be produced. Start in cen
pivot at points shown. Add four more petal
desired.
Partem: ,'VV
Lirngtli: 1
Wiilth: 3 5
Feed Dog:
Pressure: Normal
Foot: All Purpose
Pattern Selector: 5
24
Page 31
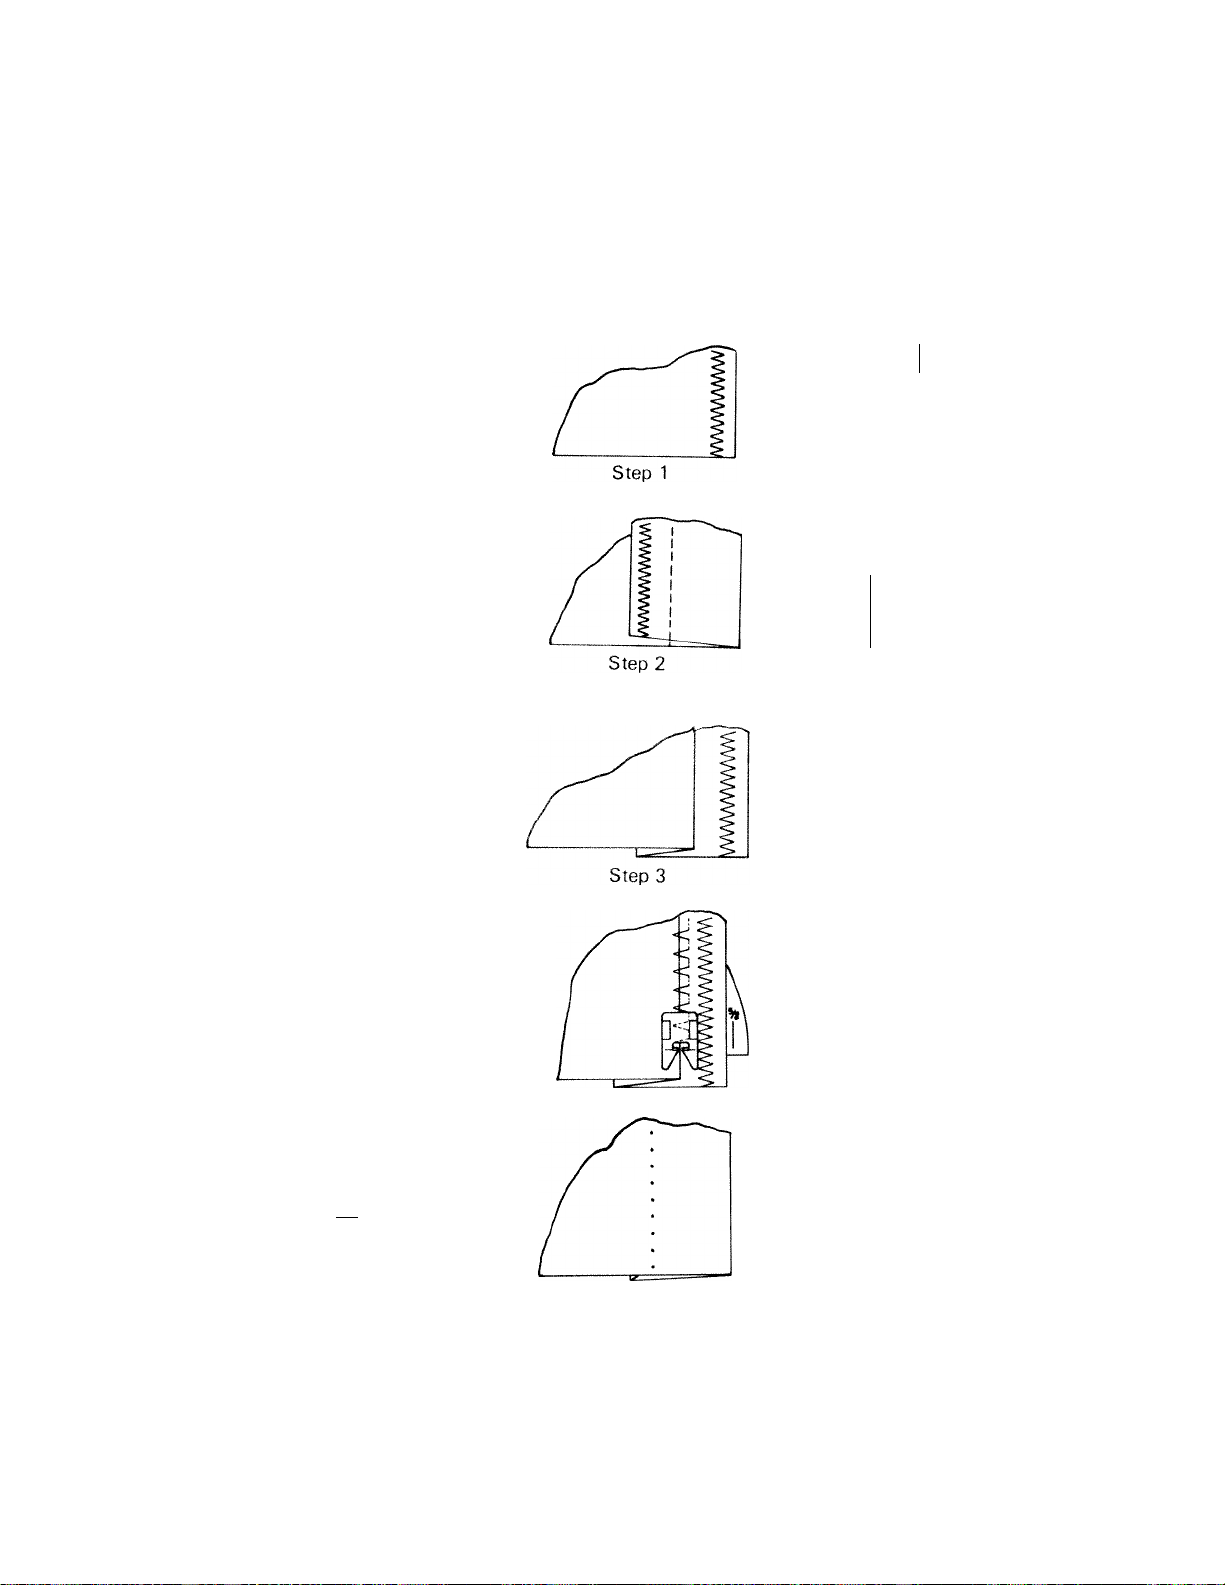
APPLICATIONS OF THE BLIND HEM STITCH
BLIWD HEMMING
The blind hem stitch provides a durable hem
linish that is almost invisible on garments, drapes,
.ind curtains. It is done easily with straight or
slightly curved hems. With a little practice it will
be a very quick and easy hem application and the
tiem will never need repairing.
Procedure:
• Prepare raw edge of hem in desired manner,
such as overcast, 1/4 inch stitched under,
pinked, hem tape, or just plain. (Step 1)
• Fold hem up desired length. Baste or pin 1/2
inch from upper edge. Press in place. (Step 2)
• Fold hem back toward right side of fabric leav
ing about 1/4 inch extended. (Step 3)
• Adjust your stitch width and needle position
so that the zigzag bite of the stitch just slightly
catches the fold of the fabric. The straight
stitches should be formed on the single
thickness of fabric, and the zigzag bite should
catch just barely into the, fold of the fabric at
the left.
• When stitching is completed, remove fabric
from machine and turn to right side. Press
completed hem.
_A__A_
B
u
T
T
0
N
H
0
L
E
S
[|
s
5 T
R
f E
: T
c
H
: 1 1
u
’ T
1
L
1
T
Y
S
T
T
c
H
E
S
F
U
N A
S
: T
1
' ■‘Hj'*
c
H A
E
S
D
E
C
0
R
5 A
F
E
T
U
R
E
S
\
N
D
P
A
R
? T
s
When hemming an A-line skirt, place a machine
h.istmg stitch along the raw edge of the hem. At
ir, ironing board, fold up the hem, matching the
.cums. Ease in the excess fabric by pulling on
hasting thread. Press with steam, then apply
iicrn tape. Baste or pin hem 1/2 inch from taped
• then continue into step 3.
Pattern: _h _ _ A .
Length: 1-2
Width: 3-5
Feed Dog: AA.
Pressure: Normal
Foot: All Purpose
Pattern Selector: 4
25
mg
111%
iii^
k
Page 32

SHELL TUCK
The blind hem stitch gives a very effective and
easy way to make a shell tuck for lingerie, pillow
cases, and decorative finishes. This works well
on knits or on the bias of soft, woven fabrics. A
single folded bias tape may be tucked in this
manner, and then applied under a fold for a
decorative hem on pillowcases or applied with
the facings at the neckline or armhole for a
decorative finish.
Set the upper tension dial to a little bit tighter
position than normal. Fold under the edge where
the shell tuck is to be created. Place the bulk of
the fabric to the right of the needle with the fold
ed edge to the left. Place the fabric so that the
folded edge will be guiding into the center cut
of the foot. The straight stitches will form on the
fabric, and the zigzag bite will swing to the left
off of the folded edge. The shell edge is created
as the needle swings back onto the fabric. The
size of the "shell" can be varied by changing the
stitch length.
DECORATIVE EFFECTS
By sewing two adjacent rows of blind hem i
1—6—1
ching on lace or ribbon attractive decorations
created. The stitch may be pivoted when
<i>
zigzag bite swings to the left and the points n
ched in the second row.
Another variation alternates the zigzag bite;
the center of the straight stitched segment,
stitch may also be pivoted after two straight;
ches to form a snowflake-like pattern
Pattern:
_/\_A_
glh: P2
Width 4 b
Feed
Piossuri!’ Normal
Foot: All Purpose
:x:x;i:xxx
Pattern Selector: 4
TOPSTITCHING EFFECTS
A new kind of topstitching effect can be proc
ed by couching a strand or two of pearl coi
embroidery floss, or yarn with the blind I
stitch. Simply guide the cord through the
groove of the embroidery foot so that the b
hem stitch sews over the cord and not thro
it. The straight stitches of the blind hem st
will bury themselves along the right side of
cord. The sewing thread should match as do
as possible to blend into the fabric.
P<»'«"'- -A_7L
Lriiigtli: 12
Width: 2 4
Feed Dog: A.A.
Pressure: Normal
Foot: All Purpose
Pattern Selector: 4
Pattern: J\_A_
Length: 1’/2-2y2
Widtii: 4 b
Feed Dotj:_JtAPressure: Norma!
Foot: All Purpost!
Pattern Selector; 4
26
Page 33
DECORATIVE STITCHES
-0——
DOOC
applications of the interlock f\J\
INGERIE SEAM
or a very fine, delicate seam in nylon tricot or
;fsey, the interlock is used. Lingerie or tricot
earns should only be about 1/8 inch in finished
vidth.
t your pattern has wide seams, trim them down
u 1/4 inch while cutting out the pattern. Guide
t ie raw edges of the fabric into the center slot of
tie presser foot. On the right, the needle will
iitch over the edge resulting in a finished 1/8
Jttern: JXJXTL
• ■ ngth : 1-1/2
./idth: 4-5
-i!d Onn- A A
•essure: Normal
.int: All Purpose
Littern Selector: 6
nserting lace
I very fine lace insertion can be made with the
iterlock. As in applying lace with the zigzag
titch, follow the straight line or the design of the
1. e. (See page 22). Sew so that the straight
titch of the interlock is on the fabric and the
■ nail zigzag catches into the lace.
Combining rows of decorative stitch patterns is
an easy, inexpensive way to create your own
braids and trims for garments and household
articles. Blending or contrasting colors of thread
may be used to compliment the color of the
fabric. Illustrations will give some of the attrac
tive stitch combinations.
Pattern: As desired
Length: As desired
Width: As desired
Feed Dog: A.A
Pressure: Normal
Foot: All Purpose
Needle Position: 2
PJTJWjmnimimj
B
u
T
T
0
N
H
0
L
E
S
n
Là
S
T
R
E
T
C
H
1 1
u
T
T
Y
s
T
T
c
H
E
S
iii^
iiij
iii^
L
1
1
F
U
F
E
N A
T
S
T
1
T
U
R
E
S
c
H
E
S
D
E
C
0
R
A
N
D
A
T
S
P
R
c
/
F
E
C
F
\
C
L
F
IV
/
C
I-
Pattern: _A_A_ALength:1 —IVa
Width: 2
Feed Dog:j|ulL
Pressure: Normal
Foot: All Purpose
Pattern Selector: 6
njlAiinjmAAaAAAAAAAA
k
27
Page 34

APPLICATIONS OF THE STRETCH BLIND HEM
HEMMING
The stretch blind hem stitch gives a stretcliy,
durable hem finish to knit fabrics. Tlie two tiny
zigzag stitches enable the hem to stretch with
the fabric. It may also prevent woven fabrics
from raveling. Proceed as for the regular blind
hem stitch on page (25).
/AwV\
lrnyih.1-2
VVtiHlr 4-5
fPMTl DiH|: MA.
Plt'SSlIft:. Nmnn-il
Foot AH FHiiptisi-
Pattefn Seiectijc: 7
EDGING
The stretch blind hem stitch can Ite used as an
edging, like the blanket stitdr clone by hand. By
using a fairly short stitch length, die stitches he
very close together. It can be used for over
casting and finishing the edges of tableclotns,
napkins and ruffles. The edge may be turned u|)
about T./2 inch and then overcast with the
stretch blind hem. Cord or pearl cotu.m may Ite
used to give a raisrrd effttcl to itic stiti.lies
Simply place 2 4 strands of pearl cotton or cm
broidery floss unt.lef tfie fool and stitoh over ii.
Fcnir-n,
PatliMU Seitictitf. 7
EYELASH BUTTONHOLE
A unique way of reinforcing buUt)nfi(.)les on
loosely woven fabrics or buttonholes in which
tfre stitches have been accidently cut, is to over
cast them with a short stretcfi blind hem stitch.
Overcast each side of the buttonfiole so the far
right stitch falls into the opening of the Itutton
hole and the small zigzag stitclies covet Hie
previous buttonhole side. On completion of one
side of the buttonhole, pivot the fabric with the
needle at the far right in tfie opening of th.e
buttonhole at the bartack. Sew up the other side
in the same manner,
Pciilftm' aAwV
LciKith: Ti
Widlli: 4 !.)
Fet'd DiMj- .AA.
(deesiiri!: Noim.il
Foot: AH Pu(|)ose
Pattern Selector: 7
28
Page 35

BUTTONHOLES
Various fabrics require various methods of
sewirig buttonholes. Four different methods
are given below, with suggested uses. If you
are in doubt as to which method is best for
your fabric, test the methods in question and
choose the best according to the finished
appearance.
PREPARATION
For the best results, a good quality merceriz
ed cotton thread should be used. Polyester
threads often result in puckered or heavy
unattractive buttonholes. The finer your
fabric is, the finer your cotton thread should
be. An interfacing should be used under the
buttonholes to give body, to strengthen, and
to help them withstand wear. To establish
the correct length of the buttonhole, add the
diameter of the button (A), plus the thick
ness of the button (B), plus 1/8 inch for the
bartacks. The length may be marked on the
garment with a basting stitch, tailors chalk,
or transparent tape, as shown. Another way
to make sure that all buttonholes will be the
same size is to cut a piece of cardboard as
wide as the buttonhole foot and long
enough to make the distance between the
toe of the white slide and the cardboard the
size buttonhole needed. This method works
for buttonholes up to 1-1/8 inches long.
Horizontal buttonholes should extend 1/8
inch beyond the center line of the garment.
Vertical buttonholes are placed so that the
cutting space of the buttonhole is directly on
the center line. Always make a practice
buttonhole on a scrap of the garment fabric
before making any buttonholes on your gar
ment. On your test sample, duplicate the
thickness found in the garment and be sure
to include the interfacing. The test sample
should help determine the length needed for
the button to pass through easily, and the
stitch length for the particular fabric. As with
the satin stitch, the stitches should be close
together, but not so close that they pile up.
Be sure to use the buttonhole foot.
F
U
N
S
T
I
T
c
H
E
S
D
E
C
0
R
A
T
1
V
E
F
E
A
T
U
R
E
S
A
N
D
P
A
R
T
S
29
Center line of Garment
Page 36

fl
--1 j L-i"
Mm)
¡Ri -
Paitorn /V\A
Length:
Width: 4 5
Feed Doy: AA
Pressur: Normal
Foot; Buttonhole
Pattern Selector; D-D-a
PiitfeiH Sclfictof and
ZiQ/ay Width Contiui Ditil
Pallnfn SeltM-!iu and
Ziy/ay Wi(hh Contiiil Dia!
PatUan Sidi-ctn'
itj/ay Witilh Dial
BUILT IN BUTTONHOLER
This buttonhole eliminates the need for
pivoting the fabric. It is used most often on
light and medium woven fabrics.
1. Set the buttonhole control dial at the
(#2) buttonhole picture. Lower the
needle into the mark at the top end of the
buttonhole. Lower the presser foot. A
few stitches will be made for the bartack,
# 2, turn to # 1 than the stitching will sew
the left side in forward.
Stop when the stitching reaches the bot^
tom end of marked buttonhole. At this
position the machine will be sewing in for^
ward.
2. With the needle up, select the (#4) four
buttonhole picture. A few bartack stit
ches will be made, turn to 3 than the stit
ching will sew the right side in reverse.
If using cardboard the white nylon slide
will run into the carboard to prevent sew
ing into the bartack.
3. To lock the stitch, make sure the needle is
out of the fabric. Make sure the pattern
control dial is at straight stitch and take a
few stitches.
4. Score the buttonhole with the back edge
of the seam ripper several times. To pre
vent cutting through the bartack, insert a
straight pin through the bartack. Cut
buttonhole open with the s<jam ripper.
Note: Stitch Width Control should always
be at “0" while sewing this button
hole.
Adjustment of stitch density;
Check the stitch density on a scrap of fabric.
If density is too open or too close, re adjust
by turning stitch length dial.
30
Page 37

TURN-AROUND BUTTONHOLES
It is possible to make small and dainty
buttonholes if you desire or repair damaged
buttonholes. This entails a slight shifting of
the cloth but with some practice, good
buttonholes can be achieved.
1. Mark the length of the buttonhole on the
cloth as shown in figure.
2. Set the needle position to the left and
your stitch length dial near "1/4" or the
density your desire.
3. Choose the desired width of your botton-
hole.
Example: if you want a buttonhole with a
width of # 3 setting on the stitch width
dial, divide this setting in half, or V/z
4. Start at your marked position, sew down
on the left side of buttonhole to the other
end of marking. Leave the needle in the
cloth at the right side of stitches and
rotate your cloth. Lift the presser foot and
slide the bottom of the foot back to the
front.
5. Lower the foot and raise the needle.
Reset your stitch width dial to bartack, in
this case the # 3 setting, set your feed to
▲A sew several stitches.
6. Raise the needle, raise feed to, AA reset
the zigzag width to the initial setting, in
this case #V/z and sew the other side of
buttonhole to your mark, then repeat your
bartack 15).
7. Lock threads by stitching a few stitches at
0 witdh. Cut buttonhole as indicated
previously.
When using this method over a buttonhole
which has already been slit or damaged, be
sure to hold the buttonhole open and allow
the needle to go off the edge of the fabric.
Step 4 is all that may be needed to repair
damaged buttonholes.
Pattern: /\/V\
Length:
Width: 2%-5-2K-5-0
Feed Dog: AA-XZ
Pressure: Normal
Foot: Buttonhole
Needle Position: 1
Step 1 Step 2
Step 3
31
Step 4
Page 38

CORDED BUTTONHOLES
Cording gives a reinforced raised button
hole. It IS excellent for use on bulky, wovei
fabric, oi knits in which the stitching otter
gets buried and makes (tutting difficult. Oi
knits, a cordtHl buttonliole will helji keep th<
fabric from stretching out of shape.
Choose a fujavy cotton crocfiet tfiread o
buttonliole twist to us(! for the cording. Pro
ceed as fot either builtan buttonhok; tpagi
30) or the turnaiound buttonhole (page 31)
having the cord undet the (iresset foot ii
such a way that llie /ig/ag stitcli covers th
cord. When pivoting the buttonhole, als<
swing tlie cord arouncJ to f(,)ll<)w undet th
second side.
At the completion of tlie buttonhole suit) th
excess cord close to the bartack on wovi;
fafincs. For knitted gaim»;nts, always pu
the cords to the wiong side bv using a dan
ing nettdie oi needle thieadta, tind knot th
con) ends liefore dipping
Built in Buttonholoi
(■.Ilonr /VV\
CZl
Wniili 4 ;>
tn,.,, f)o<,
h'il’wSUfd Nidiijd'
! nt M Pu lift mi It sii ■
Pfittc-! f! SdlddiOi U D^[l
Turn-around^Buttonfityle;
P.illi’in /Vd\
Iciujlh
VViflltt 2y>-5-2’A-6-0
Fyi'SsuH*: Nnttii.li
F'ool. F^uUnfiiioln
Nni'illr* F-’osiiin!i. 1
32
Page 39

STRETCH BUTTONHOLES
This buttonhole is used on knit fabrics when
it is desirable to omit interfacing or cording.
This buttonhole will stretch and return to
shape unlike an ordinary zigzag buttonhole.
The v/v\7\. pattern of the stitch makes the
buttonholes nearly invisible when using mat
ching thread. It is excellent to use on jerseys,
double knits, and sweater fabrics.
1. Mark the length of the buttonhole on the
cloth as shown in.
2. Select the overlook stitch (# ii).
3. Set the needle to the left and the stitch
length dial to 4.
4. The width should be set at 2'A .
5. start at the marked position, sew down
the left side of the buttonhole to the other
end of the marking. Leave the needle in
the cloth at the right side of the stitches
and rotate your cloth. Lift the presser foot
and slide the bottom of the foot back.
6. Lower the presser foot and raise the
needle. Reset your stitch width to make a
bartack at width 5. Set your feed dog to
XX sew a few stitches.
7. Raise the needle, raise the feed dog to
XX , reset the width to 2% and sew the
second side of the buttonhole, to the end
of the buttonhole mark, reset the width to
5, the feed dog to XX and sew a few stit
ches for the second bartack.
8. Lock threads by stitching a few stitches at
0 width. Cut the buttonhole as indicated
previously.
Step 1
Step 3
Step 2
/1
J
Step 4
Pattern: tTWV
Length: 4
Width: 2’/r5-2'/j-5-0
Feed Dog: aa-X1^Pressure Normal
Foot: Buttonhole
Pattern Selector: 11
A4-XS
33
Step 5
Step 6
Page 40
APPLICATIONS OF THE STRAIGHT TRIPLE STRETCH STITCH
SEAMS
This stitch may be used on knits and woven fabrics,
in areas of stress as a reinforcement stitch. It is ex
cellent for curved seams such as armholes and
crotch seams. For active wear such as ski pants and
girdle fabrics which endure a lot of stress in bending
and stretching, this stitch may be used for seaming
throughout the garment.
CAUTION: It is difficult to remove this stitch from
fubni. PreUit garment before using this
stitch.
’ Feed Dog: M J k -
____
Pattern: =
Length: 4
Width: 0
Pressure: Normal
Foot: All Purpose
Pattern Selector: 8
TOPSTITCHING (STRETCH STITCHES)
Because this stitch is heavier than an ordinary
straight stitch, it is ideal for topstitching, particu
larly on knits.
s
T
R
E
T
C
H
U
T
L
T
Y
S
T
T
C
H
F
U
N
F
E
A
T
S
T
U
R
I
T
c
H
I
E
S
I
D
E
C
0
R
I
A
A
N
D
P
A
R
T
S
C
/
F
E
C
F
\
C
L
F
IV
/
C
F
I
IN
E
T
1
V
ori 1
Pal
|tli: 4
I er
III 0
Wl(
Fee
I I )og:
Piessuie: Normal
foul All Purpose
Panelli Selector:8
PROCEDURE;
• The elastic triple straight stitch is used when a
straight line of stitching is desired so that seams
may be pressed open (slacks for example).
• This stitch is especially useful where the tiny
zigzag seam will not hold its shape and the
straight stitch will break.
• Apply this stitch to areas of stress on both
wovens and knits (crotch seam and under arm
for example).
• Use this stitch for tightly fitted garments that
need a lot of stretch, such as ski pants, girdles
and bathing suits.
• If puckering becomes a problem, use the straight
stitch foot.
ifir
Elastic Triple Straight Stitch
Regular Straight Stitch
34
Page 41

APPLICATION OF THE RICK-RACK
TOPSTITCHING/RICK-RACK
A decorative topstitch can be produced with the
rick-rack stitch. Stitch around the structural lines of
the garment for a special effect. Topstitch braid or a
decorative inset to add an additional creative flair.
Pattern: //AW/AW
Length: 4
Width: 4 5
Feed Dog: AA
Pressure: Normal
Foot: All Purpose
Pattern Selector: 8
TAPERING/RICK-RACK
The rick-rack stitch may be tapered to form creative
stems and petals of flowers, embroidered pictures
and wall hangings. As in tapering the zigzag, See
Page (19), slowly turn the stitch width dial from 0
to 5 and back to 0. A group of these tapered rick
rack stitch will from a bouquet-like effect.
Pattern: /Ш М
Length: 4
Width: 0 5 0
Feed Dog: AA.
Pressure: Normal
Foot: All Pirrpose
Pattern Selector: 8
oa 1
The elastic rick-rack stitch is a zigzag line of stit
ching that is desired so that seams may be press
ed open.
Apply this stitch to areas of stress on both
wovens and knits.
Use narrow width of zigzag as a heavy duty triple
stitch for seams.
Use medium and wide widths of zigzag for over
casting edges of seams, facings and hems of
heavier weight fabrics such as terrycloth, and for
attaching elastic. Use also for decorative stit
ching.
3 4 HO
35
Ziy/fjy F-()0!
Elastic Tiiph; Zicj/ay Stitch
/ ' МЛЛЛЛЛл1чЛ^^ЛА^
AAA^ZN/y''
/Recjular Ziyzaq SiiicFt /
Guide your fabric from the front.
Do not pull or push as it will
cause poor stitching.
^ ' I /
hv
Page 42

APPLICATION STRETCH OVERLOCK
On fabrics that are bulkier or heavier, tf^e stretch
overlock is a better choice than the overlock. In all
methods proceed as you would for the overlook,
see page (37), except feed the fabric with the bulk
to the right. The stitch is less dense and will prevent
soft stretchy knits from rippling.
Pattern: yyv
Length: 4
Width: 4 5
Feed Dog:
Pressure: Normal
Foot: All Purpose
Pattern Selector: 9
APPLICATIONS SMOCKING STITCH
This stitch is very versatile and can be corded or
used as a topstitch as other reverse stitch patterns.
vw
F
U
N
S
T
I
T
c
H
E
S
F
E
A
T
U
R
E
S
A
N
D
SEAMING SMOCKING STITCH
The smocking stitch can be used to seam fine
gauze type fabrics or bulky sweater knits, this
results in less bulk for a finished 1/4 inch seam.
Follow the directions for overlook seam on Page
(37).
Pattern:
Length: 4
Width: 4-5
Feed Poo: AA
Pressure: Normal
Foot: All Purpose
Pattern Selector: 10
ELASTIC THREAD SHIRRING
Cuffs and bodices of little girls dresses can be shir^
red easily with the smocking stitch. Place the right
side of the garment down on the bed of the
machine. Place two strands of elastic thread under
the foot. Stretch the elastic thread while sewing
with the smocking stitch to gather cuffs or bodice
for a feminine effect.
PROCEDURE:
• The smocking stitch is a very useful special ultra
stretch stitch.
• Lingerie or tricot seams should only be about 1/8
inch finished width.
• Fagoting can be achieved by joining the folded
edge of two piece of fabric together with a gap
between them. Use a sheer flesh colored piece of
fabric underneath to make the fagoting much
stronger and prettier.
• Do the fagoting with a piece of paper underneath
and remove the paper by hand washing.
Paitern Selector and
Zigzag Width Control Dial
Overlap seam
Paper
D
E
C
0
R
A
T
1
V
E
P
A
R
T
S
36
Page 43

APPLICATIONS OVERLOOK STITCH
SEAMING OVERLOOK STITCH
This stitch gives a finished 1/4 inch seam in one
step. For knits, it gives strength and elasticity to the
seams and prevents the curling of the fabric that
often occurs with 5/8 inch opened seams. It is most
applicable to soft, thin knits such as nylon or
acetate knits, but may be used on other fabrics as
well. Always make test seams with this stitch.
For woven fabric, the overlock stitch gives strength
and prevents raveling. It can tte used on woven
goods to replace flat felled or French seams.
For patterns with 1/4 inch seams. Place the raw
edge of the fabric under the presser foot so that as
the needle swings to tfit; right, it comes down at the
raw edge. This will result in an raiclosed seam
allowance.
For patterns witli 5/8 inch t
The seam allowances ntay
either before or cfior c.iwi
sewing, proceed as aturvt
seam wllfi the raw edgr' ot tire falrnc on the etcherl
guide line "1/2" (Any time you use the full widtii of
a particular stitcli, you shouiri retidjust the raw edge
of the fabric 1/8 inch to the left.) Afterward, trim
the excess fabric near the stitching. This metliod is
actually easier than thrr overedge metfiod for fabrics
that curl.
Note: On soft, loose knits, the fabric may seem to
wave or ripple. If this occurs, reduce the
pressure. (Page 10 ).
■ams:
:■ trimmed to 1/4 inch
■j. If irimmmg before
wise, sew tire
tool: ли РшПиы;
p.illcrm SiiUicloi I'
HEMSTITCHING EFFECT
By using a very large needle and a fine thread an
openwork effect can Ire attained winch is beautiful
for sewing tfie hems into tafrleclrrths, napkins,
placemats, handkerchiefs, etc. Use a large needle,
size 18 or 20, and a fine cotton thread. Tighten the
upper tension slightly, until the stitch looks bott(;r
on the underside tfian on top. (You will be sewing
with your fabric faci! side down.)
Turn u,. 1 inch then turn up 1 inch again to form a
hem of a double tliickness of fabric. The bulk in cor
ners can be eliminated by trimming away tfie ex
cess, as shown, after having folded the fabric orr all
sides. Stitch from the wrong side, so that the
straight stitch forms on the single layer and tfie
zigzag bites on the double layer. Stitch all the way
to the edge of the fabric along all sides.
37
x:
H
о u
c
.£
T
t
inch
1
i
A"
inch
1
3
D.
3
О
!l
Page 44

TOPSTITCHIIMG OVERLOOK
The overlook stitch can be used to topstitch non
raveling fabrics such as felt or leather into place for
appliques or pockets.
Stitch so that the straight part of the stitch is form
ed over the edge of the leather, and only the zigzag
part holds it in place.
Pattern: ZyVS
Length: 4
Width: 3-5
Feed Dog: AA
Pressure: Normal
Foot: All Purpose
Pattern Selector: 11
f'tilloin St'IncIct cimi
/iti/at) Widlfi Didl
OfT
PROCEDURE:
• Overlock stitching is used for sewing overlapping
seams, decorative hems, binding and edges on
woven and elastic fabrics.
• To sew an overlapping seam, place one piece of
fabric 1 cm over the other piece and sew the
flatlock stitch over the fabric edge on the right
side.
• You can produce a decorative hem by folding a
single hem on the wrong side and sewing the
flatlock from the right side.
• Use knit trim or bias binding when binding
curved edges, like round necks and armhols.
38
Page 45

APPLICATIONS ULTRA STRETCH
JL JL
SEAMING ULTRA STRETCH
On most knits, a 1/4 inch finished seam, such as
stitch and overcast or the overlook stitch, is more
desirable than a 5/8 inch opened seam allowance.
These stitches can create a neater, more profes
sional finish, eliminate bulky seams, prevent curl
ing, permit the garment to "give" under stress, and
at the same time they cut down on the amount of
work involved in making a garment. If ever in doubt
as to which of the two stitches to use, test both on
the particular fabric in question and choose accor
ding to their performance.
The stitch and overcast stitch is excellent for
stretch fabrics such as sweater knits, bathing suit
knits, and cotton knits. It has the greatest strength
and elasticity of all.
For patterns with 1/4 inch seam allowances: Feed
the fabric such that the needle goes over the raw
edge of the fabric when it swings to the right.
For patterns with 5/8 inch sgam allowajices: Feed
the raw edge of the fabric along the etched guide
line "1/2", then trim away the excess fabric close
to the stitching.
Pattum: AL
LtMKph: 4
WuSth- 4 1)
FfHui D(ur
Piassuu*' Nutmal
Fof)i; A!! iAuptisi.’
Patttfm SflaciDf VJ
e
r-'
k""
..
P.itttni) Soli-i
Ziii/.U) Width la
PROCEDURE:
• Overlock stitching is used for seaming and
finishing the cut edge of knit fabrics, all in one
operation.
• This overlook stitch is especially good for stretch
fabrics such as double knit and jersey and will
give a firm, neat edge finish.
39
Zlgгag Foot
Overcasting
Page 46

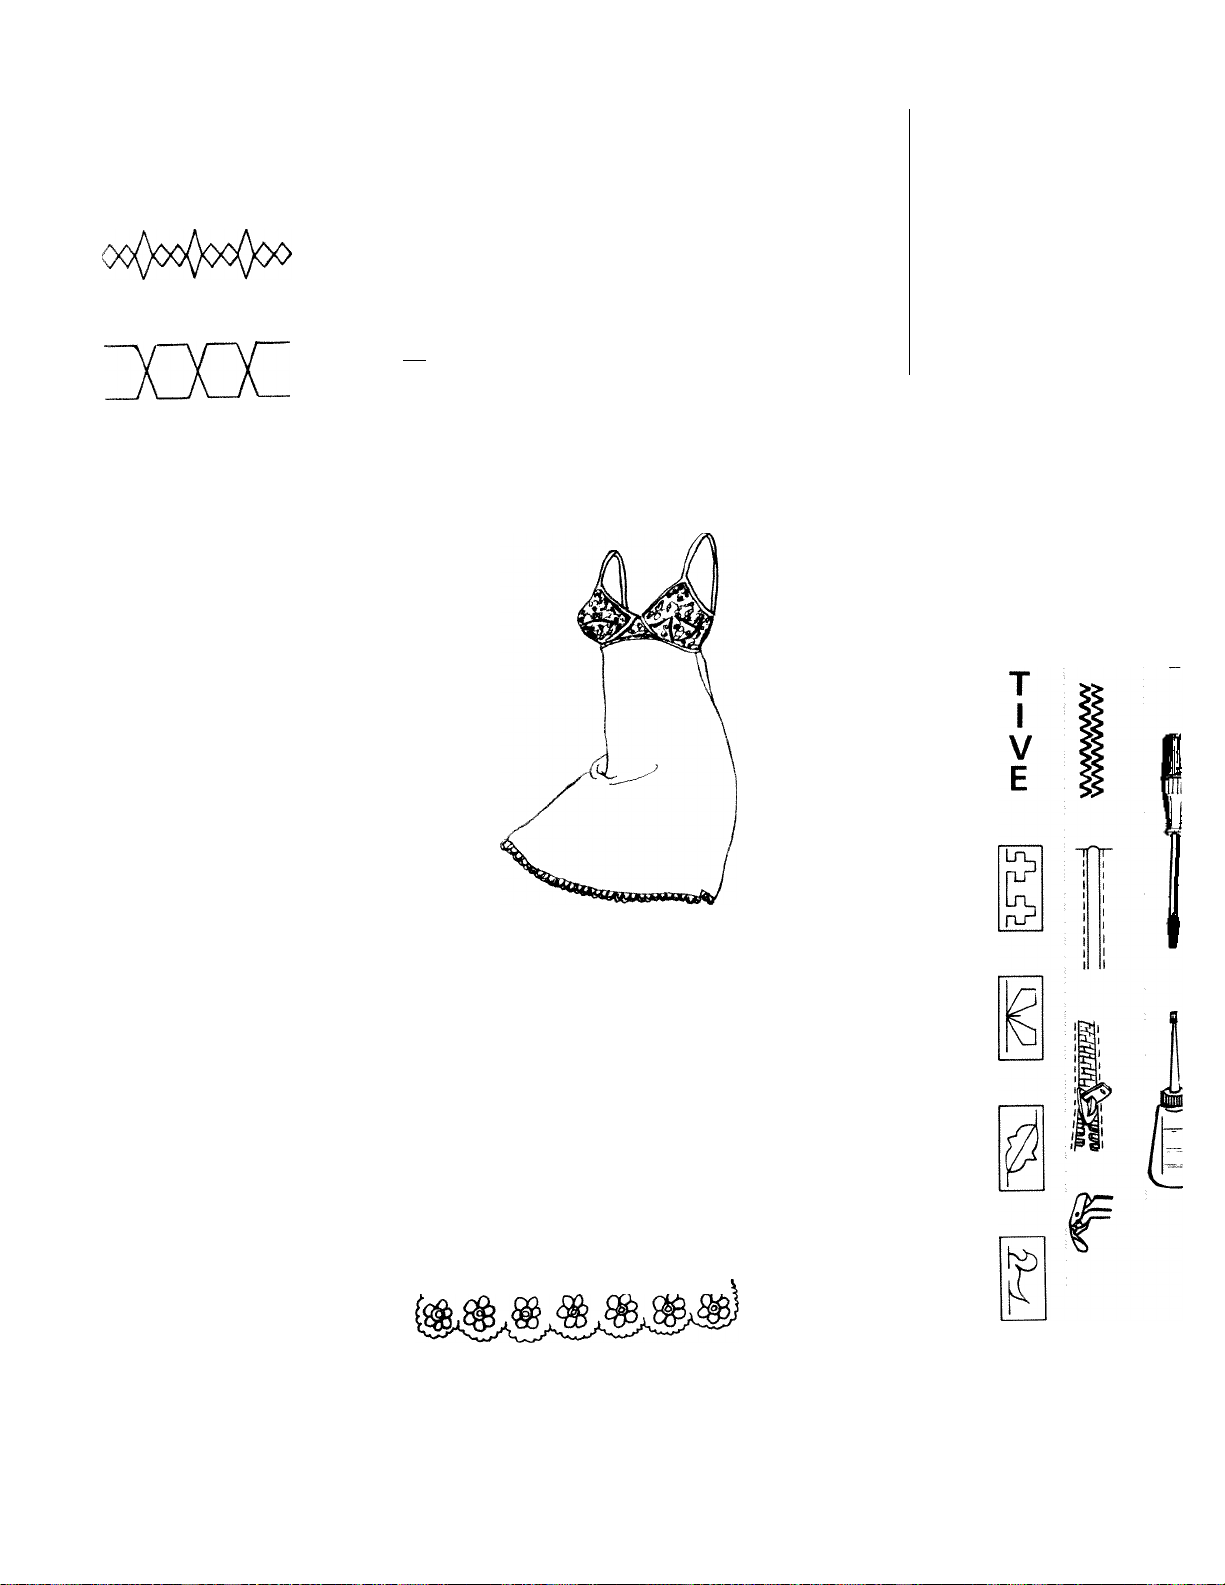
APPLICATIONS OF THE DECORATIVE FUN PATTERNS
DECORATIVE EFFECTS
The reverse stitch patterns produce duck swiss
cross, leaf and butterfly designs for use on house
hold linens and children clothes. These reverse
stitch patterns can ht! used to sew in hems as tlie
scallop stitch. See Page (23).
Tlie reverse stitch patterns can also be used for
topstitching bindings and ribbons for decorative
effect. This is done in the same manner that lace is
applied with the zigzag stitch. Sec Page (22). The
straight stitched edge of the reverse stitch patterns
on the left shoukJ be sewn on t)u; left edge of the
landing or ribfron. This decorative effect can be
used on towels and placemats for a pleasant ap
pearance.
The reverse stitch patterns can also be corded for
stronger decorative edges on placemats and
tablecloths. Simply place four strands of pt;arl
cotton, embroidery floss or yarn under the presser
foot.
The lr;)ns()arent fool will help guide thr; cord (¡vtrnly
while sewing the reverse stitch patterns.
The reverse stitch patterns can be sewn with two
threads through one пегкИе for ;r more (tffective
decorative stitch. Simply thrt;ad two sriwinij
thrrrads through Iht; ufrper thr<;;iding Systran. A
larger needle should btr used to accommodatt! the
two threads. Use this decorative irrchnirjur; for
enhancing labkicloihs, pkicranais, naftkins, and
curtains.
eTìeìÌcL
F
U
N
S
T
I
T
c
H
E
S
D
E
C
0
R
A
T
1
V
E
A
T
U
R
S
A
N
D
A
R
T
S
F
E
E
P
(
(
I
f
/
(
40
1
1
¡K
1
1
Page 47
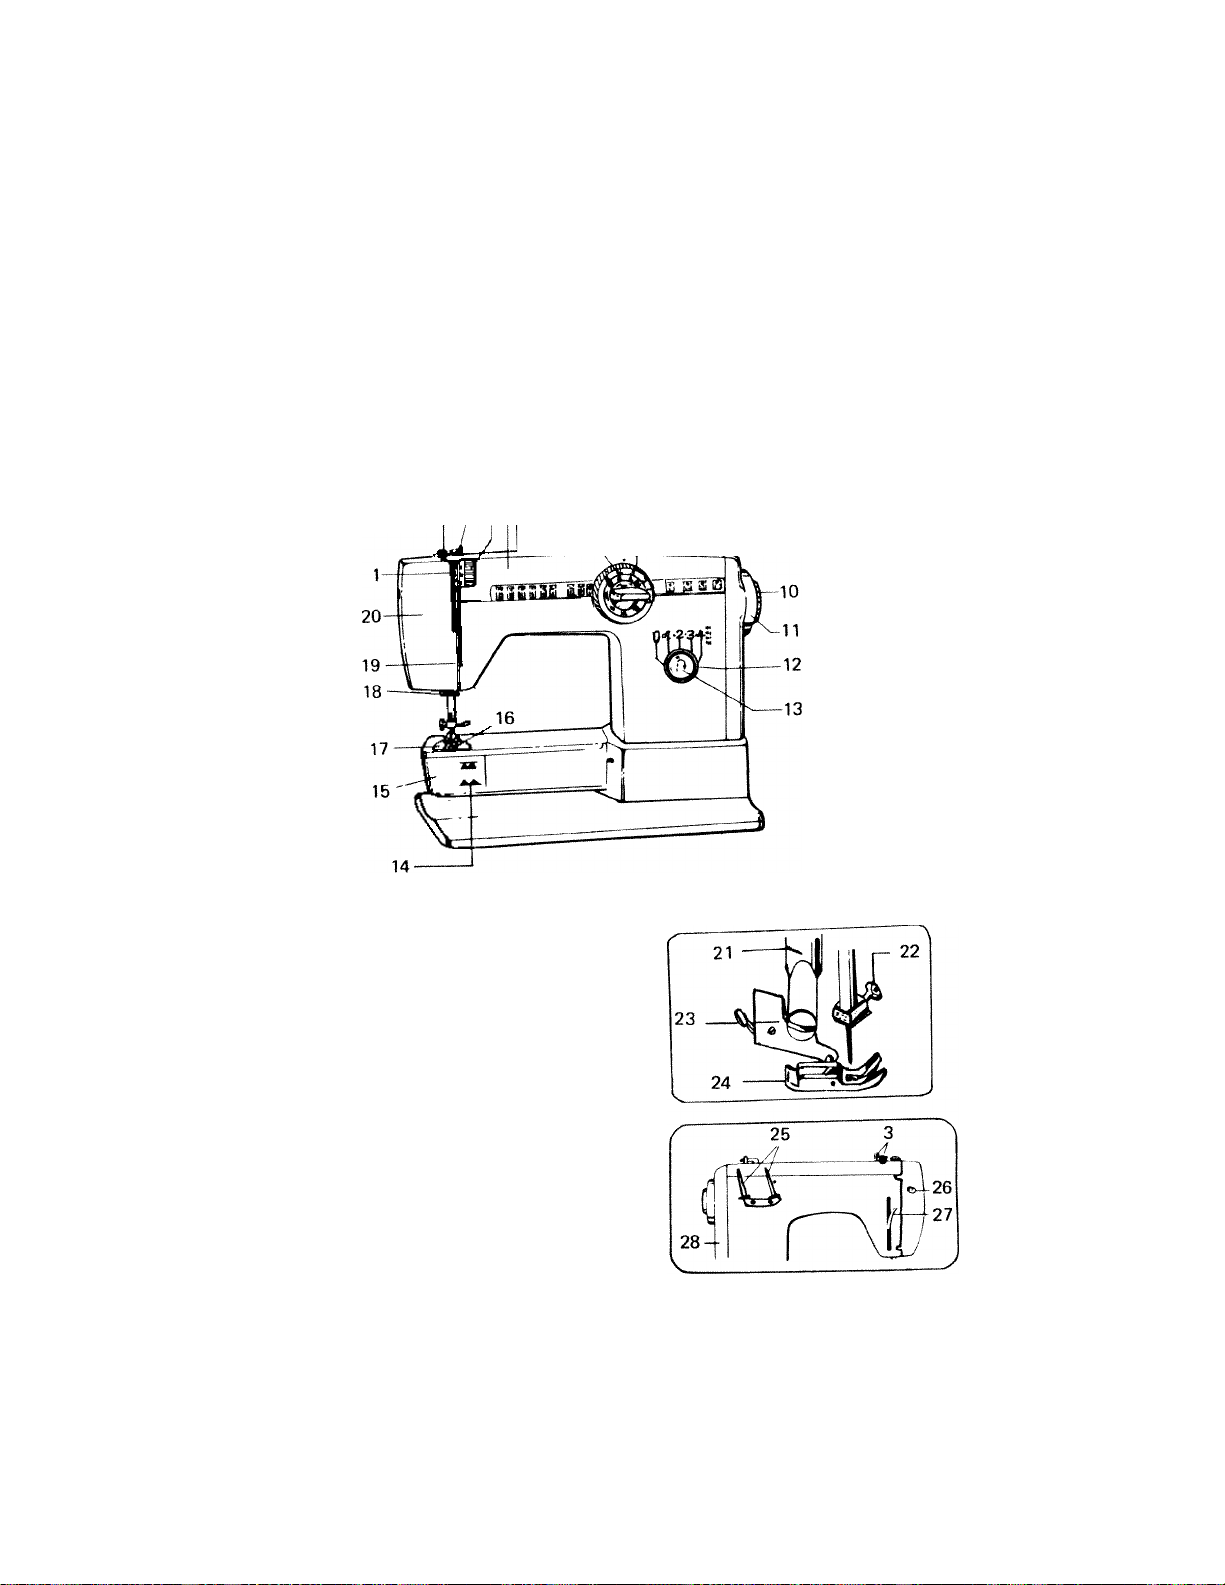
PARTS DESCRIPTION
1. Thread Take-up Lever
2. Pressure Release (Darning)
3. Top Plate Thread Guide
4. Tension Regulator
5. Top Plate
6. Handle
7. Needle Position and Pattern Selector Dial
8. Zigzag Width Control Dial
9. Bobbin Winder
10. Fly Wheel Clutch
2 3 4 5
11. Fly Wheel
12. Stitch Length Control Dial
13. Reverse Button
14. Drop Feed (under Shuttle Cover)
15. Shuttle Race Cover
16. Feed Dog
17. Needle Plate
18. Thread Guide
19. Thread Guide
20. Face Plate
6 7 8 9
L
......
Dll L
F
E
A
T
U
A
R
E
S
N
D
P
A
R
T
S
C
/2
F
E
C
F
\
C
L
F
IV
/
C
F
I
E
21. Thread Cutter
22. Needle Clamp
23. Presser Foot Thumb Screw
24. Presser Foot
25. Spool Pins
26. Light Switch
27. Presser Bar Lifter
28. Motor and Belt Cover
41
Page 48

ACCESSORIES
Straight Stitch Foot
Zigzag Foot (In Machine)
Quilting Guide
O
Felts
Accessory Box
:iiajil
Button Fool
Regular ZiptJer Foot
if ^ ii
Boirbins
Seam Ripper
Oiler
Scrow Drivrrrs
H K tr 0 L- € S
C=^
Needitrs
Twin Needle
42
Page 49

TWIN NEEDLE SWING
ААААА/\Л
aaaa/nAA
TWIN NEEDLE SEWING EFFECTS
To use a twin needle in the machine, remove the single
needle, and insert the twin needle into clamp with the flat
side to the back. Threading of the machine when using a
twin needle is the same as normal with these exceptions:
1. Place thread, matching or contrasting in color, on each
spool pin.
2. Hold both threads together as you follow through
thread guides as normal, but separate the threads at the
tension. Pass on thread through the left disc and one
thread through the right disc.
3. Then pass threads through arm thread guide.
When using a twin needle, set the stitch width dial at 2 or
less to prevent needle breakage with a wide stitch.
Be sure to use the Middle Needle Position.
Note: Be sure zigzag needle plate and zigzag presser foot
are in place.
Pattern: Any
Length:
Width: 0-2
Feed Doa: AA
Pressure: Normal
Foot: All Purpose
Needle Position: 2
c
A
R
E
О
F
Y
О
U
R
M
A
C
H
I
N
E
DECORATIVE TUCKS OR DESIGNS
Any stitch can be used with the twin needle for decorative
effects.
Most attractive are the multiple stitch zigzag and blind hem
stitch for fancy tucks. The satin stitch or tapered zigzag
designs in two colors are effective for creative trims.
Note: Remember to use no more than a 2 zigzag width for
twin needle sewing.
)>
»
> >
>>
i: ?/
11
11
n
11
11
a
< <
<<
<<
' /
t /
\ \
* /
\ \
/ >
43
Page 50

PIN TUCKS
Narrow tucks, sewn with thread that matches the fabric,
produce subtle decoration on plain fabrics. Using the twin
needle, sew straight lines on the fabric guiding the edge of
the presser foot along each successive tuck to make
parallel rows. Soft fabrics will be pulled to form a soft
crease. To achieve a tuck on a fabric, increase the lower
tension slightly. Heavier fabrics will produce two lines of
straight stitching. Attractive pin tucks are made with the
multiple stitch zigzag as well as with a straight stitch.
Note: Trans/jdrent tape makes straight lines easy to sew.
Just sew with the presser foot guiding along the
edge of the tape. When sewing is completed pee!
off tape.
Pattern:
---------
Length: 2 4
Width: 0 2
Feed Dog: .Aa
Pressure: Normal
Foot: All Purpose
Needle Position: 2
Pattern Selirctor: 5
'S ' j'J
FREE-ARM SEWING
For sewing tubular and hard-to-reach areas, use your
machine as a free-arm. Stitching buttonholes or sewing
buttons on a cuff or neckband; topstitching a sleeve; edge
finishes on sleeves, pantlegs and waistlines; darning and
patching knees, elbows; and other areas of wear on
children's clothing become as easy as sewing a common
seam when you have the free-arm at your fingertips. Il
lustrations show some examples of sewing with the free
arm.
44
Page 51
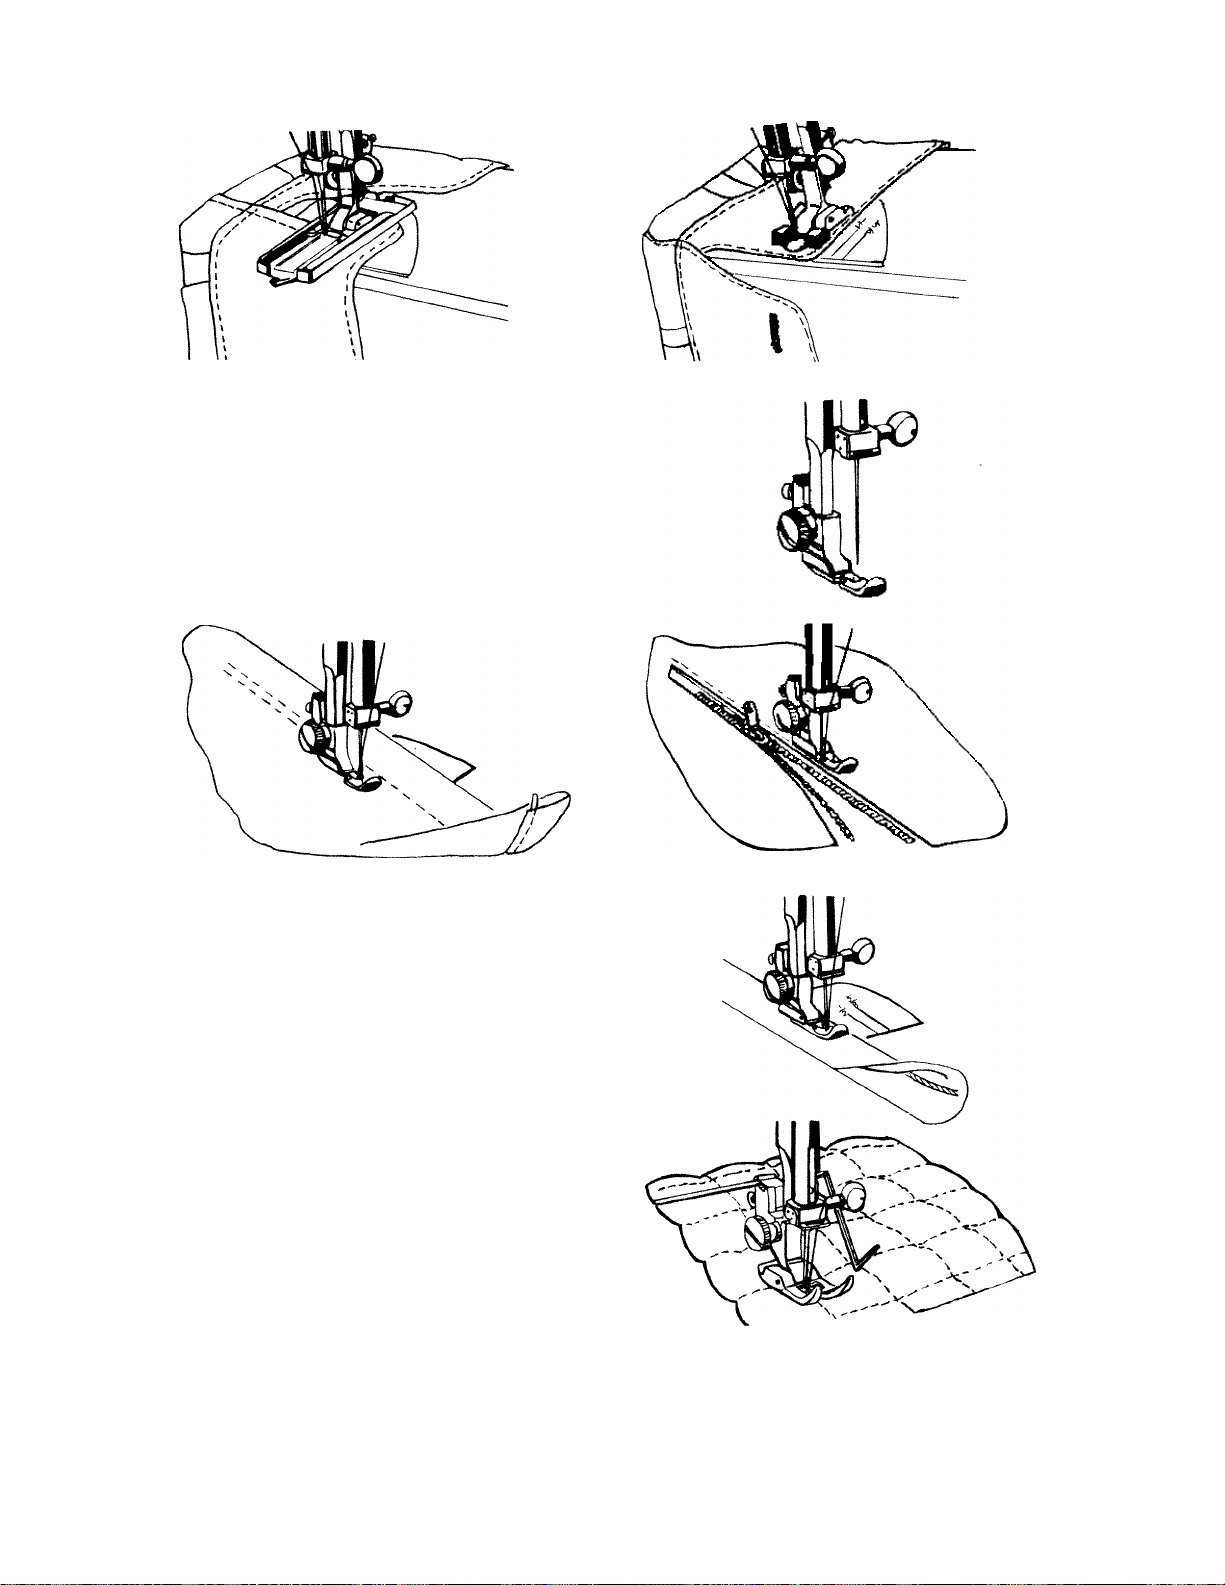
USE OF THE ACCESSORIES
CORDING AND ZIPPER FOOT
The cording and zipper foot is used to sew in zippers and
insert cording.
Zipper:
Set the needle position at "1" or "3" as needed to sew the
right side or the left side of zipper respectively, so that the
foot sews very close to the zipper teeth.
c
A
R
E
O
F
Y
0
U
R
M
A
C
H
1
N
E
To insert cording:
• Set the needle position at "3" and make the welting by
sandwiching the cord into a bias strip of fabric. Stitch
close to cord.
• Set the needle position at "1" Sandwich the welting
between two layers of fabric with right sides together.
Stitch a second time. The needle stitches close to the
cord through all thicknesses.
QUILTING GUIDE
Parallel straight lines are easy to sew with the quilting
guide. To attach the guide, slide it into the black clip at the
back of the presser foot shank. Adjust the curved bar to
the desired distance from the needle. Sew the first line of
stitching as desired, and then for the succeeding rows let
the guide follow along the previous line of stitching. A
straight stitch, zigzag, or any other stitch may be used.
45
Page 52

The All Purpose Foot
This foot is flat on the bottom and has a wide hole to ac
commodate wide stitches. This foot should be used for all
normal sewing.
The Straight Stitch Foot
This foot is flat on the bottom and has only a small hole to
accommodate only straight stitching. It may be used on
sheer or soft fabrics for more control when the all purpose
foot allows the fabric to be pulled with the needle.
- The Buttonhole Foot
This foot has a frame which holds the fabric taut enough
to produce a good buttonhole. The markings on the side
allow exact buttonhole length to be made.
• Cording and Zipper Foot
This foot is very narrow, with needle opening cuts at its
right and left sides to sew in zippers and insert cording.
• CHANGING THE FOOT
Press the presser foot shank button toward you to remove
the foot (Step 1). To attach place the desired foot under
the shank and lower the presser bar (Step 2). Foot will be
locked automatically (Step 3).
46
Page 53

ADDITIONAL SPECIAL ACCESSORIES
ROLLER FOOT
Ideal for use on vinyls, imitation leathers, jerseys, syn
thetics, velvets and denim. This foot helps keep both
layers of fabric feeding the same. On very slippery fabrics,
the roller foot helps prevent skipped stitches.
OVERCAST FOOT
Zigzag overcasting may tend to roll the edge of some
fabrics causing bulky edge. The overcast foot helps to pro
duce a flat edge. The bar behind the needle hole holds the
threads firmly in a full width zigzag or overlook stitch to
keep the stitches from drawing tightly together.
BLIND HEM FOOT ...
For all those who find machine blind hemming difficult,
this foot gives a clear guide for the fold of fabric to follow.
The blind hem foot is a fine accessory for those who like
the strength and durability of machine hemming.
#353701
#79634
#3710
c
A
R
E
О
F
Y
О
U
R
M
A
C
H
I
N
E
ROLLED HEM FOOT
Recommended for narrow rolled hems on scarves, shirts,
linens, and linings. This foot makes a very tedious hand
sewing job very easy to do on a sewing machine.
FRINGE-FOOT
Thick chenille type loops can add interest to appliqued
flowers and animals. Used with a satin stitch this foot
gives a plush texture to a design. Also used for hemstit
ching and tailor tacking.
47
#7066
#10570
Page 54

Caution: Before cleaning the machine, be sure to disconnect
the power cord from the wall outlet.
BOBBIN CASE BOBBIN
NOTCH
SHUTTLE RACE
c
A
R
E
LATCH
CLEANING HOOK ASSEMBLY
1. With take-up lever in highest position, and remove bobbin
case.
2. Turn clamps outward and remove shuttle race cover.
3. Remove shuttle body.
4. Clean thread and lint from all parts, including shuttle race.
5. Run a drop of oil along rim of shuttle body.
6. Replace shuttle body, then shuttle race cover. Snap clamps in
to place. .
7. Grasp threaded bobbin case by latch and replace, fitting
SHUTTLE
RACE COVER
SHUTTLE
BODY
CLAMPS
O
F
Y
O
U
R
M
A
C
H
I
N
CLEANING FEED DOGS
• Lint or dust accumulated between the needle plate and the
feed dogs must be removed to maintain good operation of the
machine.
• Raise the needle bar to the highest position and remove the
needle and presser foot.
• Loosen screw on the bed cover plate and remove the plate.
• Clean lint and dust from the bottom of the needle plate and the
feed dogs with a lint brush.
• Turn the hand wheel slowly and be sure to clean all areas.
• Replace the removed plate.
Check the needle plate area, if there are scratches and marks
around the needle hole opening, your machine is not being clean
ed properly. Always remove the needle plate and clean the feed
dogs periodically. Improper and lack of cleaning will cause an ac
cumulation of lint which hampers the feeding mechanism, this in
turn will cause the operator to impatiently pull or push the cloth
causing the needle to bend and strike the plate, foot or hook,
causing a slip in the timing mechanism. Continuous striking will
cause defects making it necessary to call a serviceman.
48
Page 55

[CHANGING LIGHT BULB ^ ^
Open
the face plate by pulling towards the left. Turn the light buib
I counterclockwise to remove. Replace the bulb by turning
I clockwise.
A majority of service calls could be avoided by following these
procedures and by first checking to see that the machine is:
1. Threaded properly top and bottom.
2. That the bobbin is wound evenly.
3. That the needle is in the machine correctly.
14. Proper cleaning and oiling.
OILING (GENERAL)
OIL
OIL
OIL
OIL
Swing open hinged face plate. Apply one
drop of oil at all points indicated by arrows.
OIL
OIL OIL
Using the large screw driver in the accessory box, remove
the two screws on the top plate and remove plate.
OIL
OIL OIL OIL
Remove screw on the bed cover plate and
apply oil while turning the hand wheel.
49
Page 56
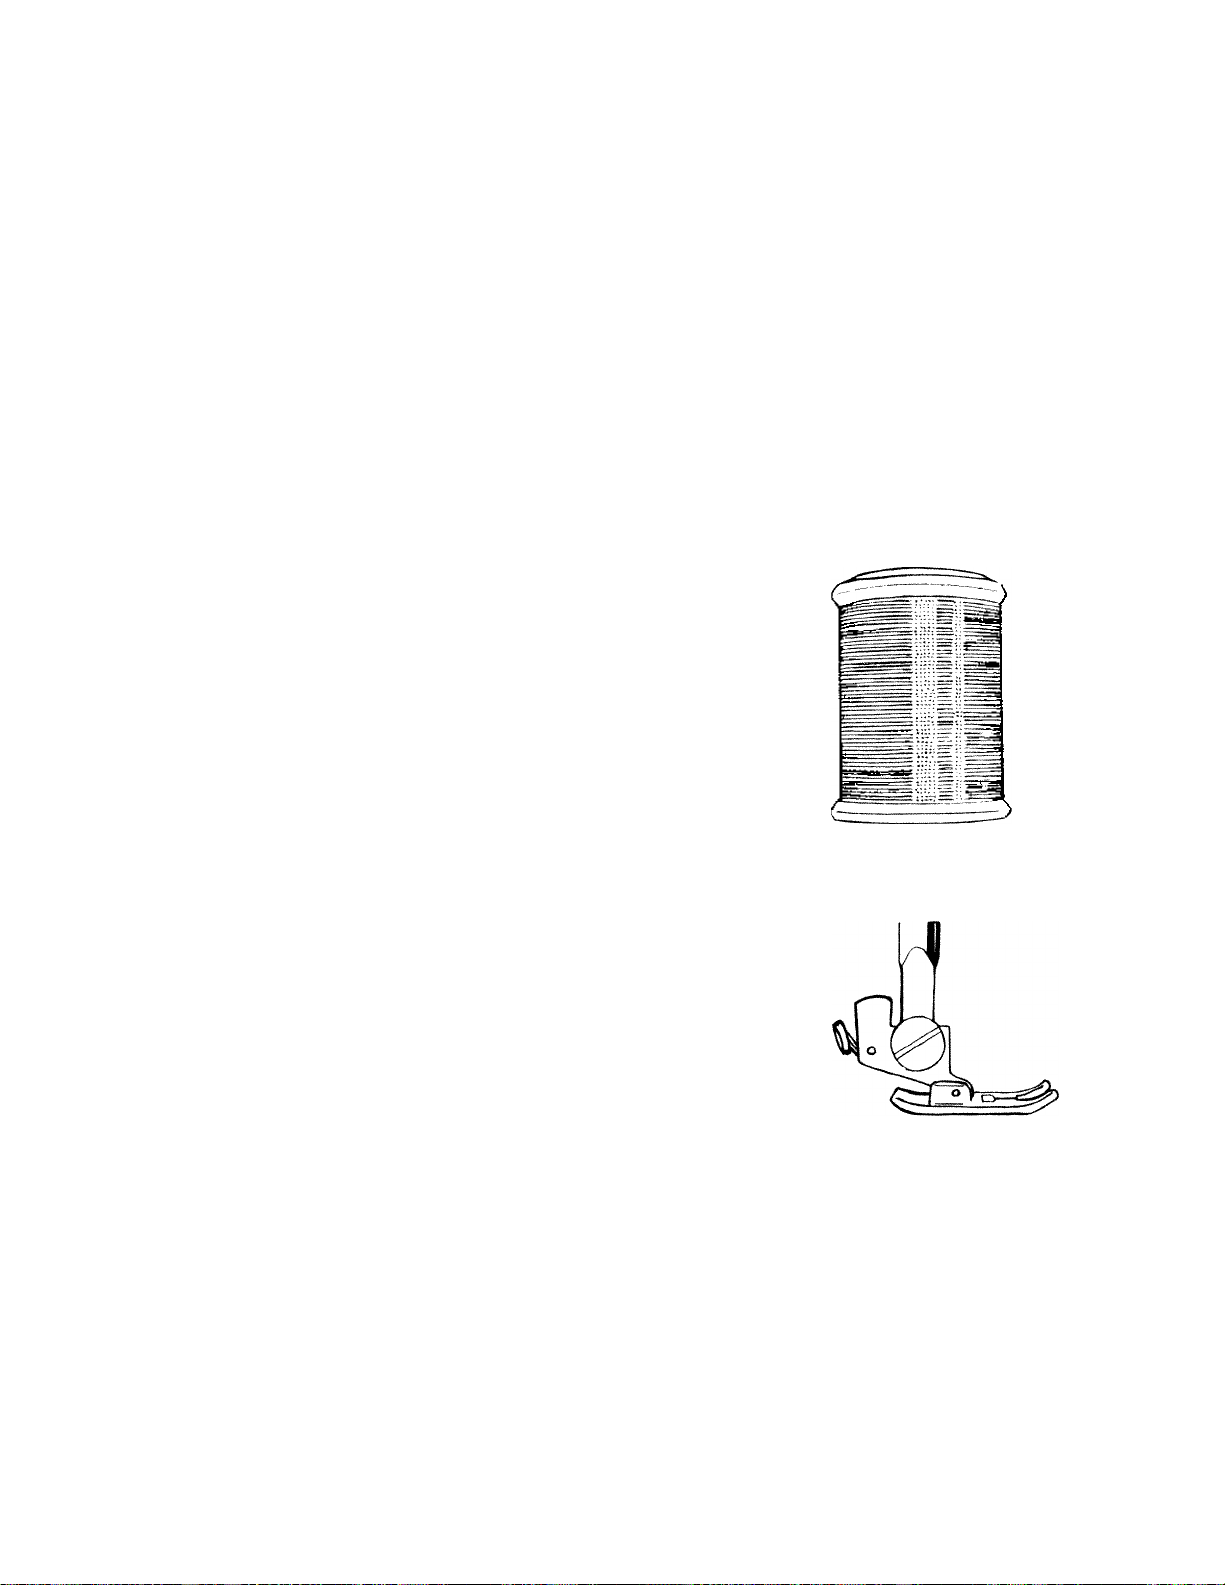
MINOR PROBLEMS AND SOLUTIONS
1. SKIPPED STITCHES
Skipped stitches have become a problem in recent years,
especially with the appearance of knit fabrics and polyester
threads on the market. Skipped stitches normally can be traced to
four basic causes:
A. The Needle
The needle is dull or bent. Change it.
(1)
The needle is placed incorrectly in the needle clamp. It is
!2)
either backwards or is not up in the needle clamp all the
way.
The wrong type of needle is being used for the fabric.
!3)
Use ball point needle on knits and wedge point needles
for leathers and vinyls.
the thread is too thick for the size of needle being used.
(4)
Use a large needle.
The Thread
The machine is threaded incorrectly.
!1)
Many brands of polyester thread are too stiff and coarse
!2)
thus making loop formation difficult or impossible.
Change brands or use a cotton thread.
The Presser Foot
C.
¡1) The foot being used is not holding the fabric taut enough
over the needle plate hole, thus the fabric is being pulled
up and down while stitching. Use the foot which gives
the most control possible for the particular job being
done.
12) There is not enough pressure on the presser bar to hold
the fabric firmly. Increase pressure on the pressure con
trol
The Fabric
D.
The fabric has a heavy finish on it which deters stitch for
mation. Wash the fabric thoroughly before sewing.
THREAD BREAKING
2.
Machine improperly threaded.
A.
Thread is caught in a slit of the spool or under
B.
the spool
Thread is dry or of poor quality.
C.
Tension is too tight.
D.
Starting the machine with take-up lever in the
E.
wrong position. Always start and end sewing
with take-up lever in highest position.
Needle is bent, blunt, or has a burr on it.
F.
Needle is not inserted correctly.
G.
Thread is too coarse for needle being used.
H.
Needle plate has been nicked by the needle, thus
is sharp and cuts the threads.
50
Page 57

3. NEEDLE COMES UNTHREADED
A. Take up lever is not in correct position as you
start sewing. Always start and end with your
take up lever in its highest position.
4. NEEDLE BREAKS
A. Pulling on fabric while sewing bends the needle,
this may cause breakage if needle hits the plate.
B. Needle is inserted incorrectly.
C. Needle is too fine for the type of fabric.
D. Needle is hitting pins.
Presser foot is improperly fastened.
F. Machine is improperly threaded.
5. MATERIAL PUCKERS
A. Tensions are too tight.
B. Improper threading.
C. Thread is too heavy for fabric.
D. Stitch is too long for fabric.
E. Needle is dull so it is difficult to seam fabric
F. The presser foot being used is not holding the
fabric taut enough.
G. If all else fails, try sewing over paper.
6. THREADS JAM AT START OF SEWING
A. Hold the threads tightly for the first few stitches.
B. Place thread ends under and to the side of
presser foot instead of to the back.
C. Be sure the presser foot is down on thick fabrics.
7. MACHINE IS NOISY
A. Clean and oil it.
B. If it is a punching sound, changing the needle.
C. Stitch length dial is not at 4 when stretch
stitching ^ Set is at 4 .
8. BOBBIN DOES NOT WIND PROPERLY
A. Machine is improperly threaded.
B. Rubber wheel on bobbin winder is worn or not
making contact.
C. Bobbin winder tension disc is not in position.
enjoy your new
51
Page 58

TING READY TO SEW
INDEX
ng the Foot Control
ng the Extnesion Plate......................................................................2
i! Arm Features..................................................................................2
iiigingthe Presser Foot.....................................................................3
inging the Needle.............................................................................^
iiding the Bobbin................................................................................5
ringing the Bobbin..............................................................................6
I eading the Bobbin Case
per Threading ....................................................................................3
on Needle Upper Threading
iiusting Feed Dog Height
king Up Lower Bobbin Thread .......................................................10
gulating Pressure..............................................................................lO
ljusting Upper Tension ....................................................................11
ibric/Thread/Needle Chart.............................................................12/13
,notions of Controls ...........................................................................14
rRAIGHT AND ZIGZAG
.
...............................................................
isting/Topstitching
lining..........................................................................^5
astic Thread Shirring
..........................................................................
..................................................................
...............................................................
....................................................................
........................................................
.....................................................
15
16
lolding the Fabric..............................................................16
Liming Corners..................................................................16
urved Seams
tiding Seams/Removal of Fabric
.....................................................................
...............................
16
1 /
ivercasting............................................................................
earning Knits .....................................................................
ewing on Buttons ............................................................
orming Thread Shank on Button
................................
;atin Stitching......................................................................
apering/Creative Embroidery
......................................
danual Embroidery Designs...........................................19
ree Hand Monogramming
..........................................
2U
Applique.................................................................................
Sathering Over Cord
Overcasting
Patching
...............................................................
....................................................................
Mending a Tear or Instant Darning
.............................................
............................
Lace Applications....................................................
Flutter Hem
...............................................................
Elastic Application...................................................
Understitching Facings
Decorative Effects
Blind Hemming
Shell Tuck
...............................................................................
....................................................
..............................................................
....................................................................
Decorative Effects..............................................................2b
Topstitching Effects
............................................................
Decorative Stitches.............................................................
Lingerie Seam
Inserting Lace .
.....................................................................
I
^
9
9
15
21
21
.22
.23
44
24
2/
21
23
27
Hemming
.............................................................................
28
Edging......................................................................................
Eyelash Buttonhole............................................................20
BUTTONHOLES
Buttonhole Preparation
...................................................
29
Built In Buttonholer...........................................................30
Turn Around Buttonholes
.................................................
31
Corded Buttonholes............................................................32
Stretch Buttonholes ...........................................................33
STRETCH UTILITY STITCHES
Seams.......................................................................................34
Topstitching (Stretch Stitches)
......................................
Topstitching/Rick Rack ....................................................35
Tapering/Rick Rack
.............................................................
35
Application Stretch Overlook..........................................36
Application Smocking Stitch
Seaming Smocking Stitch
...........................................
..............................................
36
36
Elastic Thread Shirring .....................................................36
Application Overlook Stitch ............................................37
Seaming Overiock Stitch
.................................................
Hemstitching Effect............................................................37
Topstitching Overlock
Application Ultra Stretch
.......................................................
.................................................
38
Seaming Ultra Stretch.......................................................39
FUN STITCHES DECORATIVE
Duck Swiss Cross Leaf Butterfly
FEATURES AND PARTS
....................................
40
Parts Description.................................................................41
Accessories............................................................................42
Twin Needle Sewing Effects
Decorative Tucks or Designs
...........................................
........................................
43
43
Pin Tucks ...............................................................................44
Free Arm Sewing.................................................................44
Cording and Zipper Foot.................................................45
Quilting Guide......................................................................45
All purpose Straight Stitch Buttonhole-Zipper
Foots........................................................................................46
Changing the Foot
Additional Special Accessories
CARE OF YOUR MACHINE
.............................................................
......................................
Cleaning Hook Assembly ................................................48
Cleaning Feed Dogs...........................................................48
Changing Light Bulb
..........................................................
Oiling (General) ...............................................................^- 49
Minor Problems and Solutions...............................50/51
OO
34
37
39
46
47
49
 Loading...