

Page 1
01/30/2008
:^i
- V’ ■
"Í Í ■ ■
0 : <’>i -1'
-■:Щ
:i Щ
■^í k 'lr
Page 2

CONTENTS
Name of each part................................................................
Principal features
How to use selective knob (dial) .............................................
To regulate the stitch length....................................................
Manual operation of zig zag sewing
Automatic operation of zig zag sewing
To wind the bobbin ..............................................'
..............................................................
..................................
.............................
How to remove and replace bobbin case
To thread the bobbin case ...........................................
How to remove the shuttle.........................................
How to insert the needle
Threading the machine
Preparing to sew..................................................
Removing the work .........................................
How to adjust tensions
How to use the automatic darner .............................................f4
.........................................
.........................................
..............................................................
Page
•• 1
.... 2
...........
Drop-feed adjustment
How to embroider with a hoop.
How to use attachments ............................
Narrow hemmer
Quilting guide
Sewing on buttons
Making buttonholes
Gathering
9
■10
Applique........................................
Sewing knitwear.........................
■10
......
11
.......
12
......
12
13
....................................
.....................................
.......................................
.............................
.........................
.......................................
Lighting equipment ■■
Needle-thread-fabric-stitching guide
Check up for smooth sewing
Oiling and cleaning .........................................
Page
■■•14
......
.........
...........16
..............
...............
............
.....................
......................
.........................
...........................
............................
16
16
17
18
19-20
21
22
22
23
•23
■■■24
—25
00
o
o
Page 3
01/30/2008
Page 4

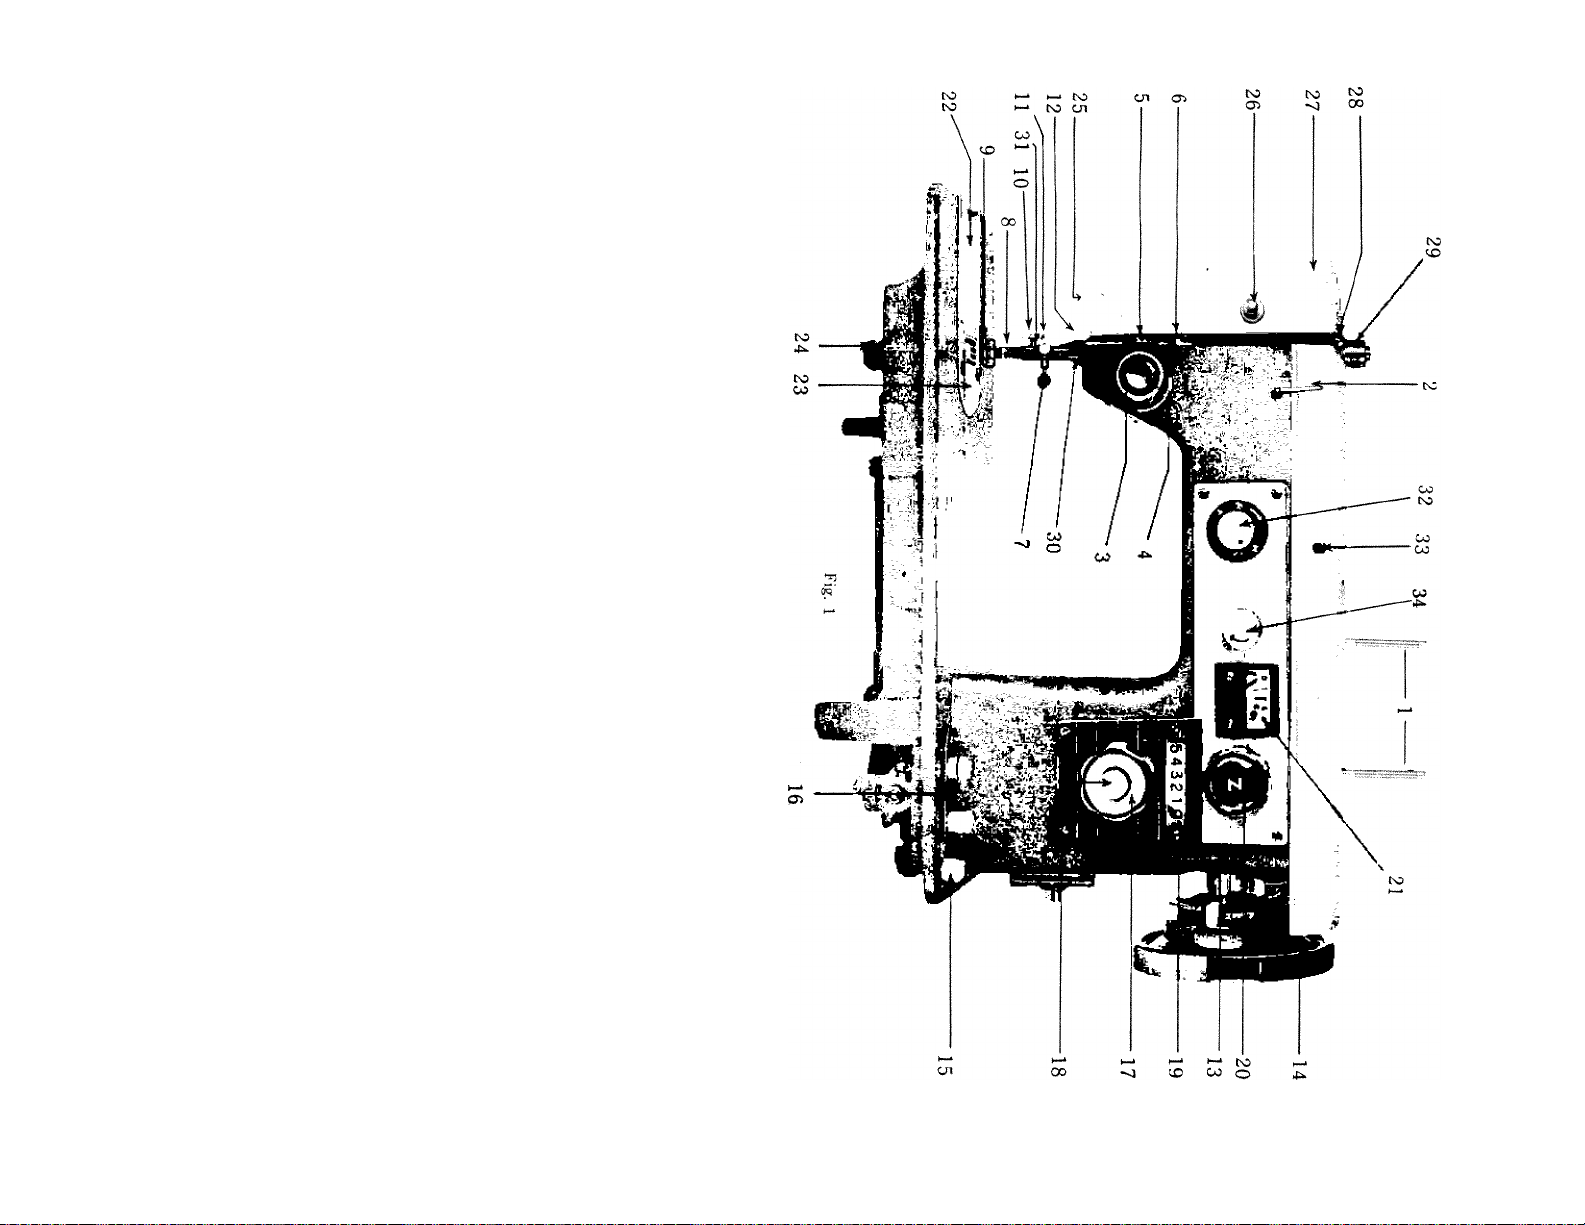
Name of Each Part
Arm spool pin
Thread guide <upper)
.....................................................
..........................................
CJ)
,2)
Thread tension ......................................................(s)
Thread take up spring
Thread guide ¡under)
Thread guide mediate)
Needle Clamp Screw
...........................................
.........................................
.........................................
...........................................
T
5)^
(ji)
,7)
Needle ...................................................................¡D
Presser foot ..........................................................9)
Presser foot clamp screw ....................................,i(j)
Presser bar .............................................................li;
Needle bar thread guide.......................................12)
Automatic bobbin winder
...................................
lis)
Balance wheel........................................................ij
Bobbin winder tension disc
.................................
Drop-feed regulator ¡push button;.......................@
Stitch length regulating knob ...............................ip
Push-button for reverse stitch
Zig Zag stitch length indicator
.............................
...........................
ig)
19)
Zig Zag stitch regulating knob.............................'2}
Zig Zag stitch indicator ......................................2ji
Cover plate (hinge type;
......................................
22)
Needle plate...........................................................(||
Shuttle race
Lamp
Lamp swich
Face plate
Thread take up lever
...........................................................
..................................................................
............................................................
..............................................................
..........................................
A
25)
g)
ig)
Patch-o-matic darner ...........................................§)
Thread cutter ........................................................§)
Needle bar thread guide......................................3i)
is
Selective knob
......................................................
ag
Key-button for Zig Zag disc chamber - (g)
Restrictor knob .....................................................3|
( 1 )
CO
O
O
fN
Page 5
Principal Feahjre«
Restrictor knob
Zig Zag
Stitch indicator
Zig Zag Stitch
regulating knob
Stitch lermtfi
regulatin!^
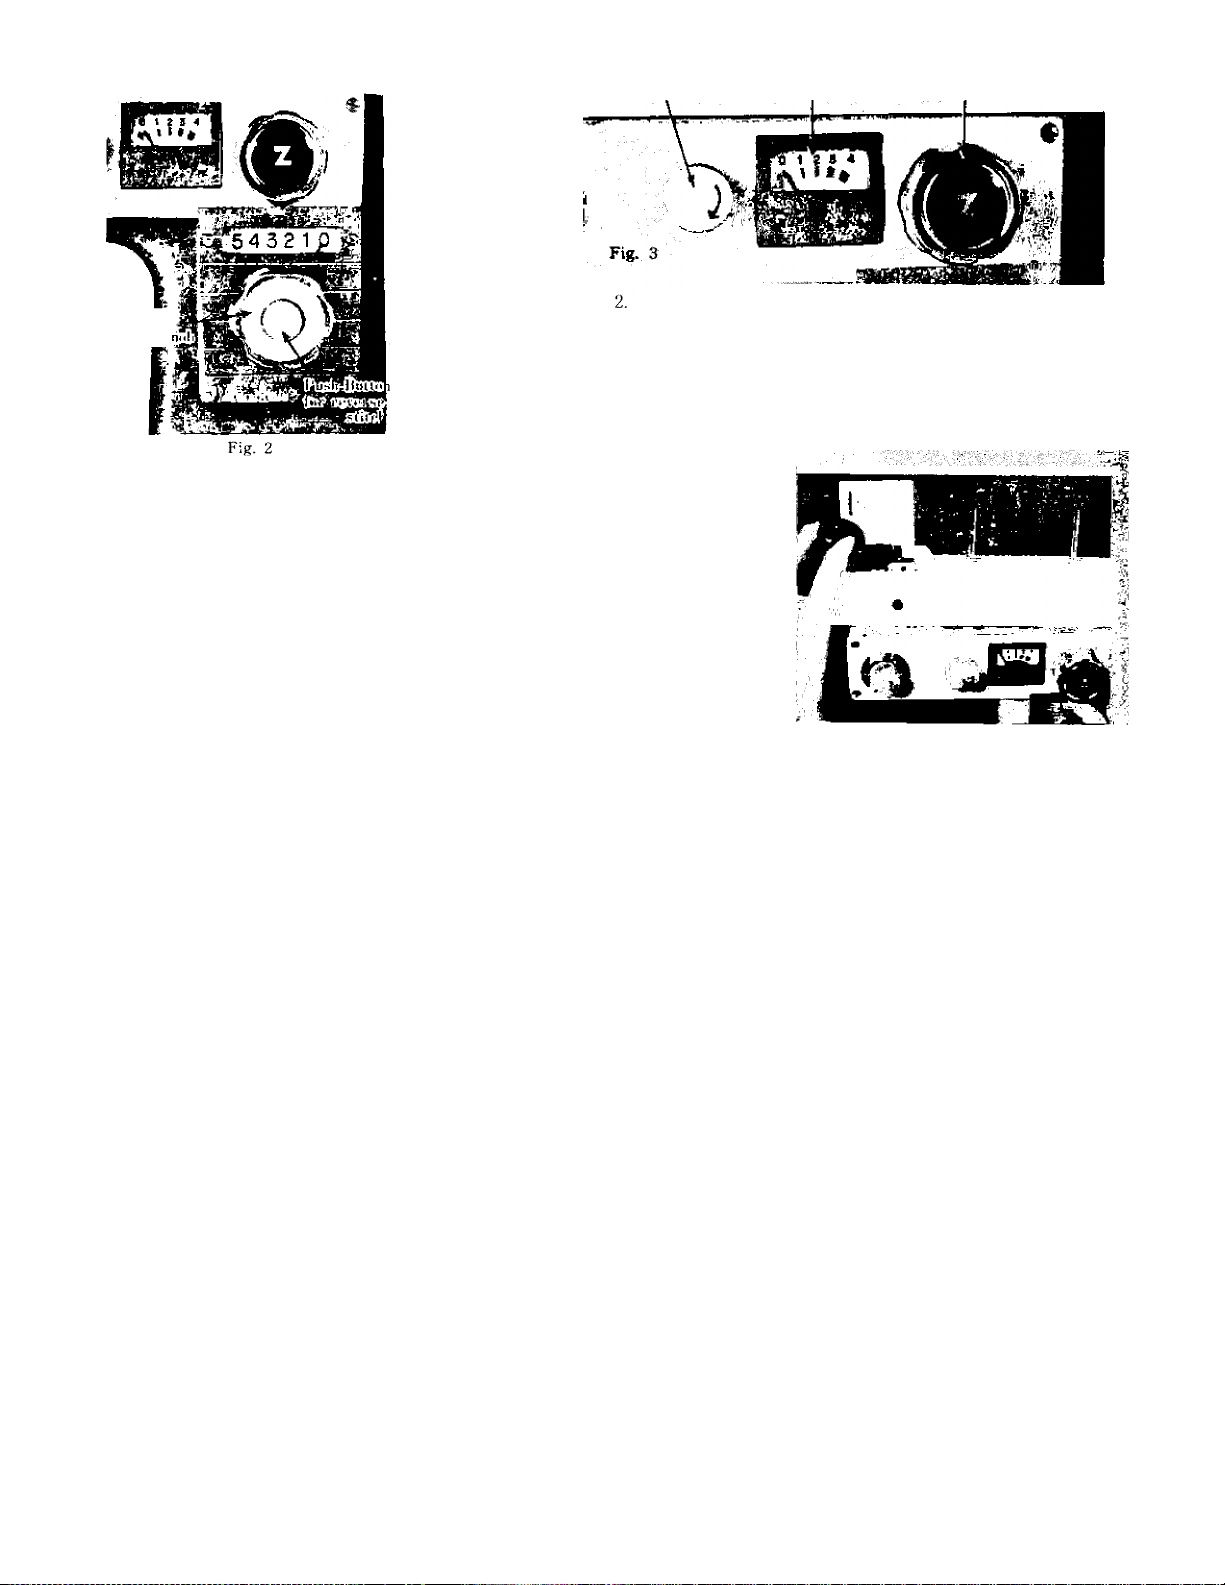
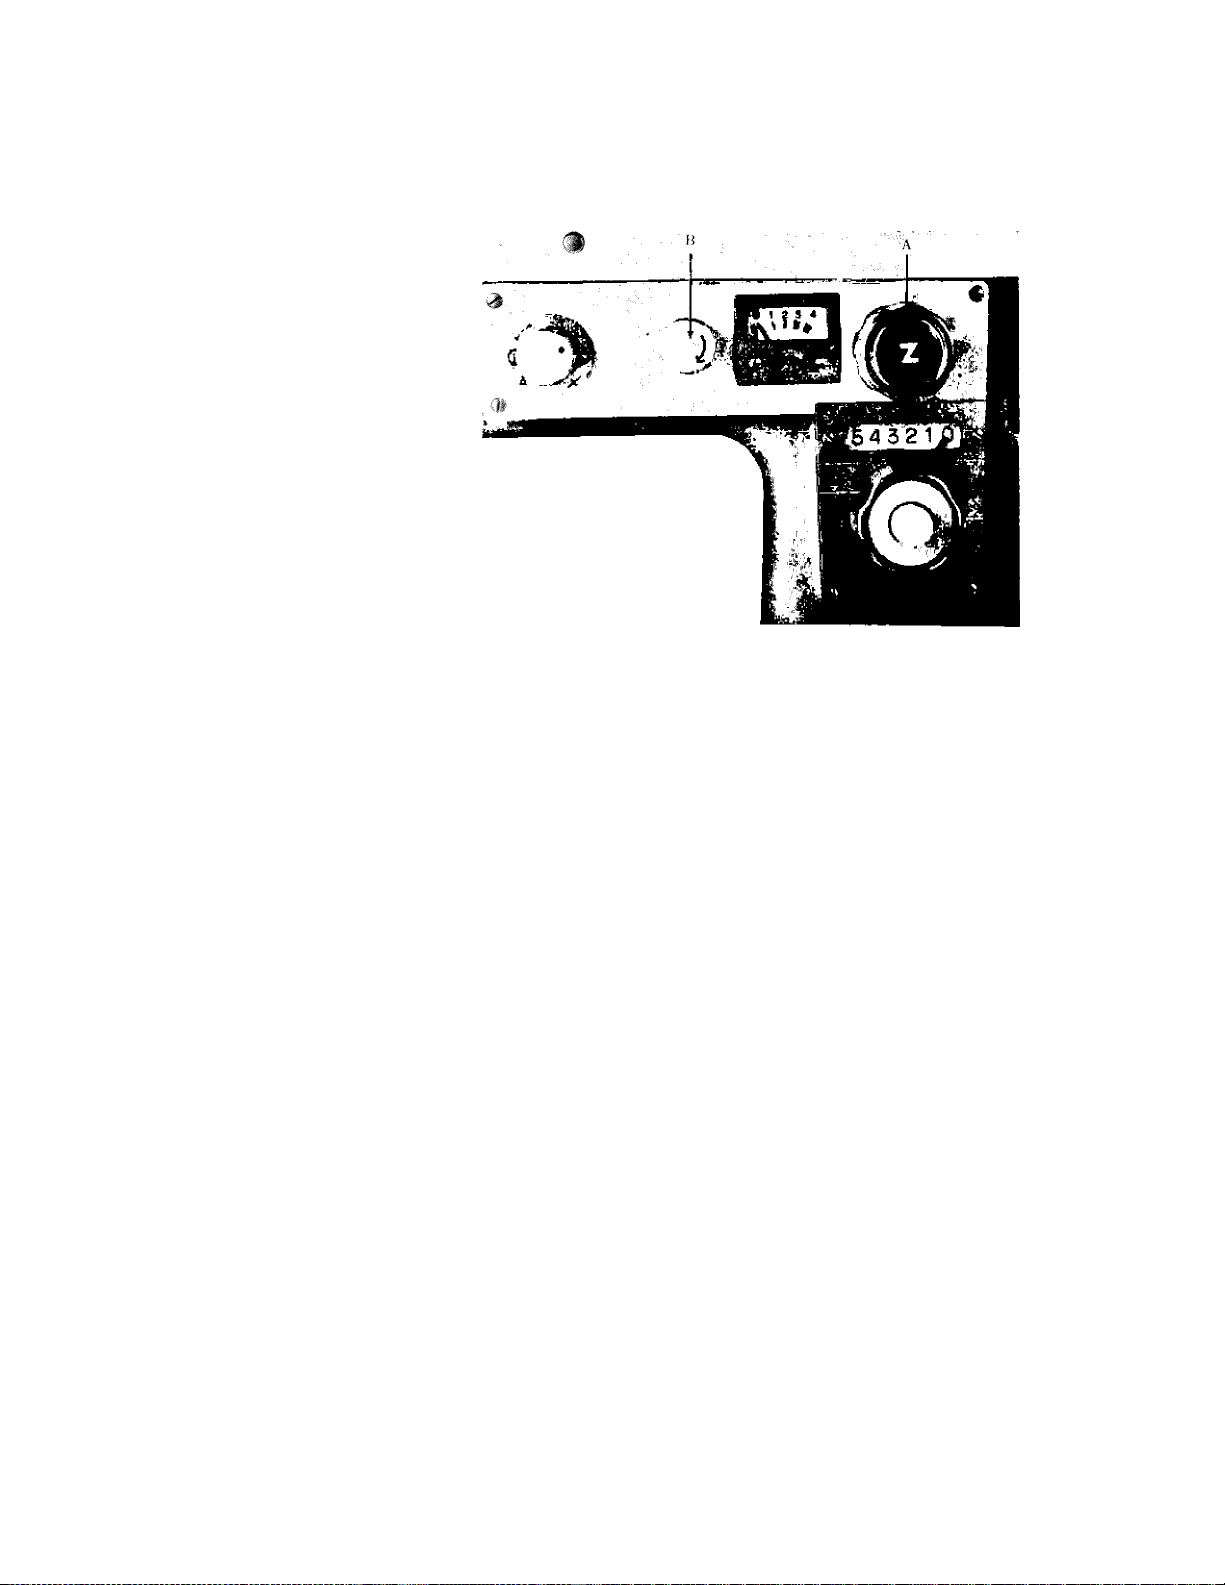
1. Stitch length regulation. The length of the stitch
is controlled by a dial located on the right of the
arm. Turn it right is shorten the stitch and left
to lengthen. The correct stitch length is shown by
numbers in the plastic window just above the
dial. Near zero is the shortest stitch, 5 the long
est. To sew in reverse, just push, the button
marked R in the center of the dial. When the
button is released the machine will automatically
sew forward again (Fig. 2).
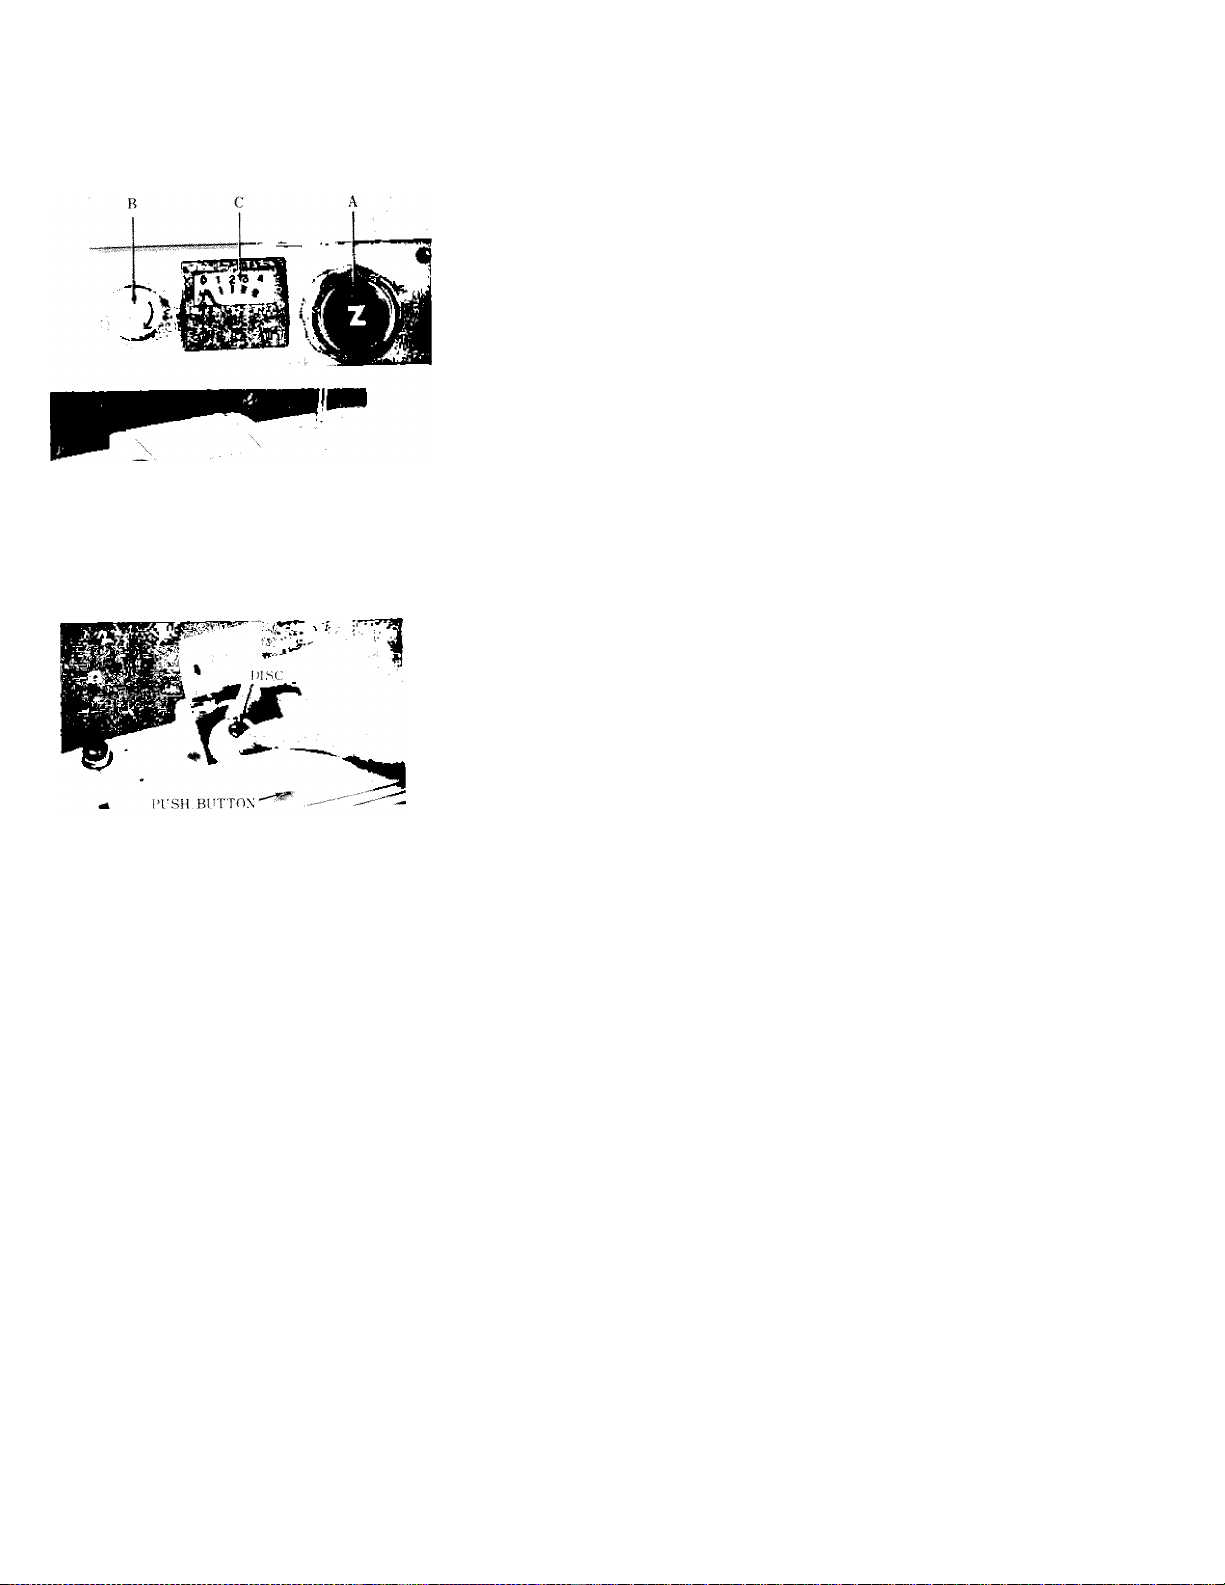
3. Decorator discs for automatic sewing. Select
one of 20 discs and insert in the disc chamber
to do embroidery designs automatically (Fig. 4.).
Rotating the Restrictor knob (Fig. 3) in the dire
ction of the arrow on knob, makes it possible to
lock into position any zig zag width from point
0 to 4 on the dial, and is especially desirable in
making buttonholes.
Fig. 4
( 2 )
CO
o
o
Page 6

Fig. 5
5. Patch-o-matic darnen
Provides instantaneous
pressure release on
presser-foot to permit
easy and quick darning
and mending.
Fig. 6
Lighting equipment
Position of sewing light, moun
ted in the face plate, directs a
beam of soft light where it
is needed most, "right on the
material being sewn".
6. Selective knob : Fig.7 Provides
method for instantly switching
from automatic to straight sti
tch sewing without necessity
of removing decorator disc.
Fig. 1:
{ t )
CO
o
o
Page 7
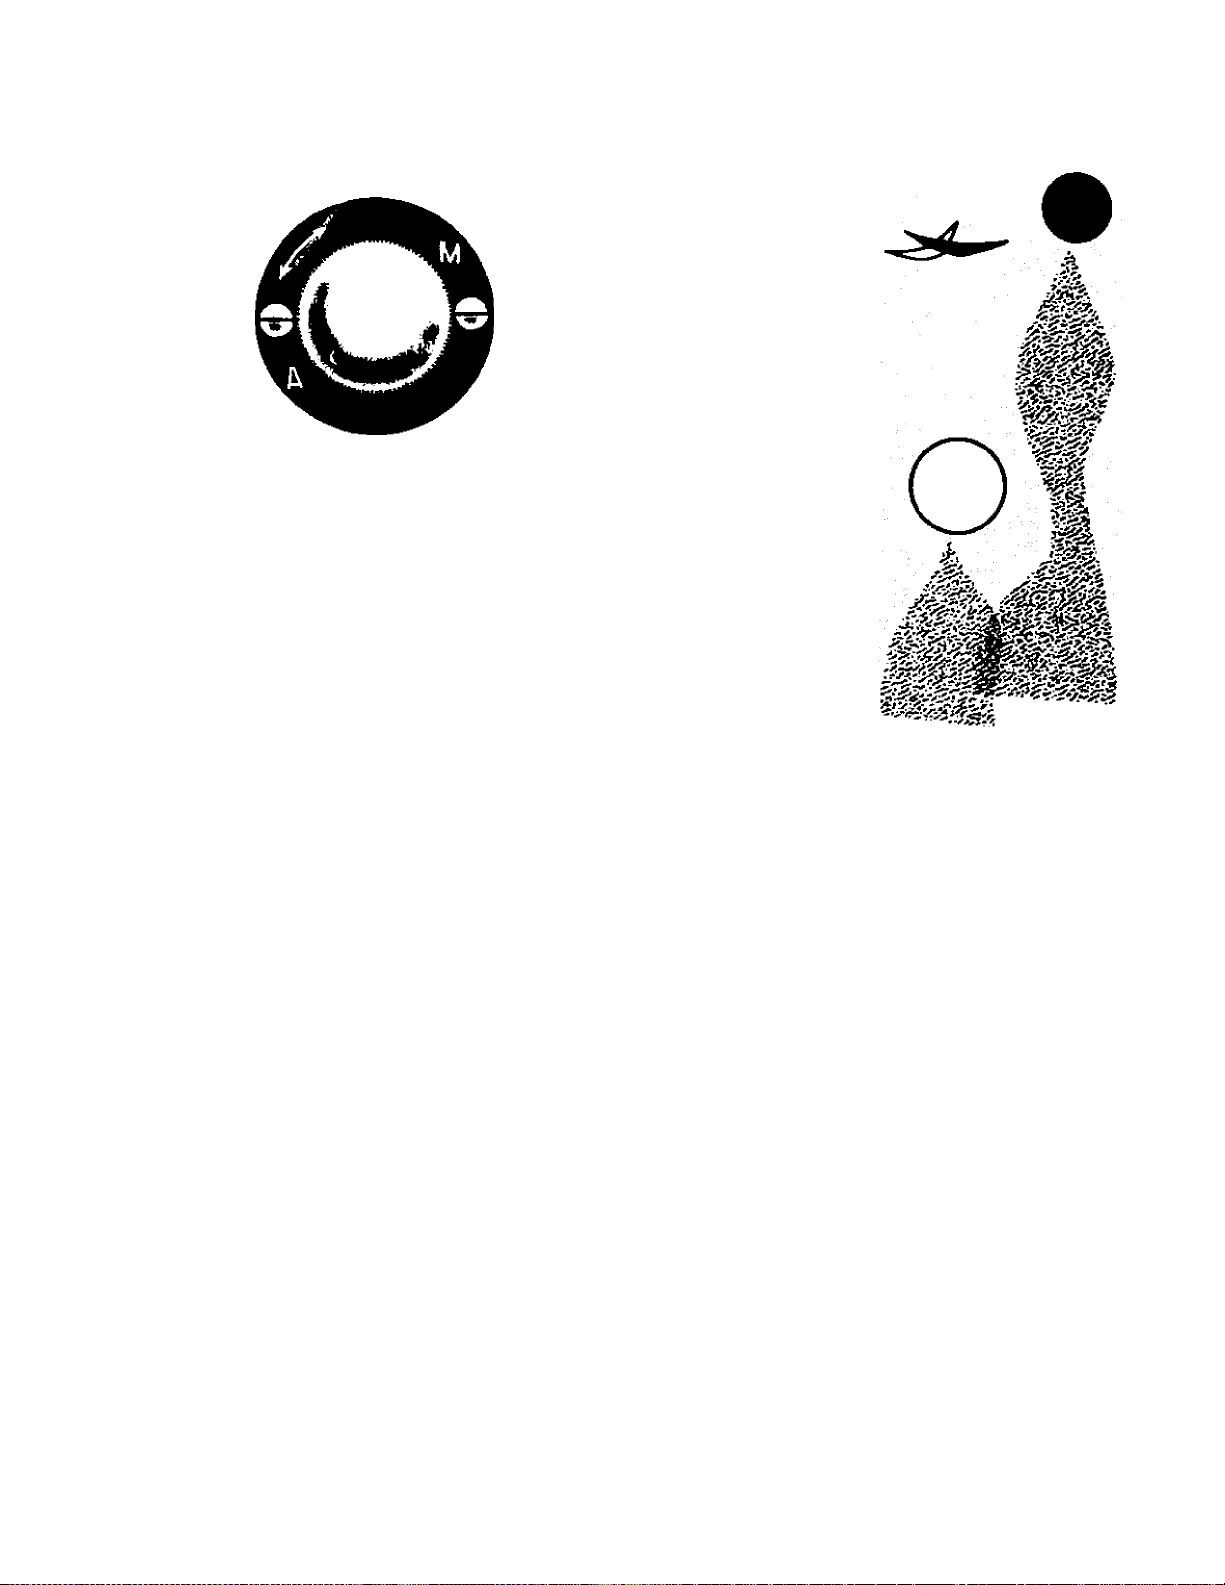
How to Use Selective Knob (Dial)
Fig. 8
Turn hand wheel until needle is out of material.
The selective knob should not be moved at any time
with the needle in the material, which would result
in bent or broken needles. Having inserted a designer
disc in the machine, turn selective knob so that the
red dot is next to "A". Your machine will now sew
the design of the disc, automatically.
By returning the selective knob so that the red dot is
now at "M" the machine will now do regular straight
stitching, without the necessity of removing the disc
first. When sewing, the red dot should always be at
either the "A" or "M" point, never in between.
C 4 )
CO
o
o
rg
Page 8

o Regulate the Stitch Length
543^1
w
r-—Tb '|
i mm^
Fig. 9
Figures in the dial
■' Wj
The stitch length is regulated simply by turning the knob shown
in Fig. 9. To lengthen the stitch turn knob to left, to shorten,
return to right. Refer to chart below for approximate number of
stitches per inch obtained at various settings.
1. To sew forward. Turn knob until marker on stitch indicator
points to figure corresponding to the number of stitches per
inch required for the work you are doing.
2. To sew backward. Push the button *R" jn the center of the
stitch length knob and the machine will sew the same length
stitch in reverse. When the button is released the machine
automatically returns to forward stitching. This "backtacking" locks the seams and eliminates tying of threads.
Stitch Length Chart
Numbers of stitches
per inch
(no feeding)
32
( 5 )
16
11
00
o
o
Page 9
Manual Operation of Zi§ Zag Sewing
1) The zig zag regulating knob (A Fig. 10) is used to vary the
stitch width, when you are doing embroidery manually.
Turning this knob back and forth, rhythmically, while the
machine is running, will cause the needle to swing freely
from wide to narrow zig zag widths.
2: The restrictor knob (B Fig. 10) is used to restrict the width of
zig zag stitching. With needle out of material,turn the re
strictor knob in the direction of the arrow. Note that the
pointer in the dial indicates the zig zag width. Turning the
knob back again, will bring the pointer in dial back to "O".
Fij;. 10
C 6 )
00
o
o
Page 10
Automatic Operation of Zig Zag Sewing
Fig. 12
ii #
Fig. 13
Fig. 11
To lose« Decorator Disc
1. Turn restrictor knob ;B Fig. 11) till pointer on dial is
at "O".
2. Press push button < Fig. 13) and cover of disc chamber
will pop open.
3. Turn zig zag knob {A Fig. 11) so that pointer of dial
is at "4", and while holding it at this position, insert a
disc as in figure 13. Make sure that the disc is inserted
properly, by placing disc on spindle, and turning the disc
by hand until the notch on the underside of disc fits
over the small pin on spindle base. When this is done,
you will find that it is not possible to further rotate the
disc by hand.
4. Permit knob "A" to return.
,3. Close the chamber cover.
6. Set selective knob (Fig. 8) with the red dot at "A".
7. Proceed to sew, with complete automaticity.
To remove disc from chamber, first be sure that needle is
out of material, turn zig zag knob (A Fig. 11), till pointer
in dial is at "4". Hold in this position and simply lift disc
straight up and out to remove.
( 7 )
00
o
o
rsj
Page 11

To Wind the Bobbin
Good
No Go od
Fig .1.5
No Go od
Fig. 14
Turn the clutch nut in the center of
the hand wheel toward you to disen
gage the sewing mechanism. Place a
spool of thread on the spool pin, and
slip the thread through the upper arm
thread guide and across to the tension
disc as shown in Fig. 14.
Insert thread through a hole on edge
of bobbin and place bobbin on spindle
of winder. Be sure that the notch in
the bobbin fits over the small pin on
the spindle. Press down on lever mar
ked "push" and set machine in motion.
When the bobbin is fully wound, the
action of the winder stops automati
cally. Remove from spindle and cut
■ ( 8 )
off loose thread end.
If the bobbin winds unevenly (see Fig.
L5), adjust the bobbin winding tension
disc to the right or left by loosening
the screw holding it to the bed of the
machine. Then tighten.
Before starting to sew again, tighten
clutch nut by turning it away from
00
o
o
rsi
Page 12

How (o Remove and Replace Bobbin Cate
Fig. 16
Raise the needle bar to its highest position
and lift up the hinged cover plate. Grasp the
bobbin case by the latch and pull out (see Fig.
16). When the latch is closed, the bobbin
falls out of the case readily.
To replace, hold case by latch and place it
on spindle in center of shuttle race. Press fir
mly before closing latch, making certain that
the tongue of the case fits into notch on the
upper edge of the race cover.
To Thread (he Bobbin Cate
Refer to Figs 17, 18, 19 and 20 to familiarize yourself
with the procedure. Hold the bobbin case in your left
hand with tongue pointing up.
Let about two inches of thread hang free from the bo
bbin, and insert bobbin into case, so that thread will be
rotating counter-clockwise.
Fig. 18
Guide the thread end through the slot on the side of the
case and under the tension spring until it enters the
small notch on the edge of the spring.
( 9 )
00
o
o
Page 13

How to Remove the Shuttle
Fig. 21
i¥hen thread becomes tangled in the hook and shuttle
■ace it is necessary to take the under thread mechanism
ipart and clean it.
:iaise the needle bar to its highest position and tilt the
read back. Remove the bobbin case. Push the screws
>n either side of the race cover to the outside and the
;over can be removed easily. (See Fig. 21), Lift the
rook out.
Brush away all thread and lint from the race, hook and
•ace cover. Then, holding hook by the center pin, place
t in rase so that it fits firmly against driver.
?it cover over pins on each side of the race, with the
rotch at the top. Pull latch screws back over side open,
ngs of the cover.
How to Insert the Needle
Turn hand wheel toward you to raise needle bar to its
highest point. Loosen needle clamp screw and insert
needle with its flat side to the right or toward the screw.
Push needle up as far as it will go, and tighten screw
securely.
Always use the type of needle recommended by the
supplier of your machine. Test on a flat surface to be
sure it is not bent (Fig. 22).
( 10 )
00
О
о
Page 14

Threading the Machine
Fig. 23
Turn the hand balance wheel
: (14) toward you until the
thread take up lever (28) is
raised to its highest position,
i Place a spool of the. thread on
I the spool pin (1) on the top of
I the Machine. (Fig. 23)
' Draw thread through the first
14 ; thread guide pin (2) then
: downward to thread tension
) regulator ( 3) and under the
I same lead the thread from the
I
right to the left between the
I two tension discs. Then pull
upward passing over the thread
I
) take-up spring (4) from right
to left.
Lead thread downward again
around underside of thread
; guide (5) and upward through
); thread guide.
Now draw thread from right
; to left through guide (6) and
i needle clamp screw i 1) right
) above needle. Finally thread
I needle (8) from left to right
- through its eye.
C 11 )
00
o
o
Page 15

Preparing to Sew
Hold the end of the upper thread loosely and revolve
hand wheel toward you slowly until loop of bobbin
thread (Fig. 24) is drawn up through the needle holp.
Draw both threads to the right (Fig. 25
presser foot toward back of machine.
Fig25
1 and under
Fig. 24
Removing the Work
Stop machine w'ith take-up at its highest point. Raise
presser foot. Pull fabric toward back of machine,
keeping thread in presser foot slot to avoid bending the
needle. Hold both threads taut and cut on thread
cutter, leaving machine thread ends about four inches
long. Never operate the machine when it is threaded
unless there is material under the presser foot.
( 12 )
CO
o
o
Page 16

Automatic ZigZag
00
o
o
CM
Page 17

be made with the respective discs. By experimenting with changing the stitch length
and zigzag widths, contless numbers of designs can be made with each disc.
r f
<( )f
00
o
o
fM
o
m
o
Page 18

How to Adjust Tensions
Always adjust the upper tension with the presser foot down,
as the tension is automatically released when it is raised.
To increase the the tension onupper thread, turn dial (Fig. 29)
to the right, or clockwise. To decrease, turn to the left.
The higher the number on the dial the tighter the tension.
Before adjusting lower tension be sure that the machine is
threaded properly. When necessary to change the bobbin te
nsion, turn small screw (Fig. 30) on side of bobbin case clock
wise to tighten, counter-clockwise to loosen.
When the upper and under tensionl are properly balanced, a
perfect stitch will be formed with both threads interlocking in
fabric (Fig. 26).
When the upper tension is too tight, the lower thread is pulled
up over the upper thread which is lying flat on the fabric
(Fig. 27).
When the under tension is too tight, the upper thread forms
loops over the lower thread lying flat on the fabric (Fig 28).
Fig. 26
Fig. 27
Fig. 28
Perfect choin stitch
Ml
Wh
Tension too tight with upper thread
1.
Tension too tight with under thread
wm
M
Hi
m
iBTOl
ff BOeSN TENSION
^AOIUSTMENT SCREW
^
........
■
Fig. 29
Fig. 30
( 13 )
CO
o
o
Page 19

How to Use the Automatic Darner
To release the pressure from the presser foot so that the material can
be moved freely for darning and mending, push the release lever ( B
Fig. 31) and darner will pop up. To return pressure to normal, push
"A" all the way down. For a lesser pressure, when sewing thin mate^
rials, push darner part way down. Test for best pressure on scrap of
fabric.
Drop Feed Adjustment
The height of the feed dogs can be adjusted to suit the fabric or type of work
being done. Push the button on the left (Fig. 32) to "S" position to sew on
thin materials, or all the way down to "E" position for darning or embroil
dering with a hoop. Push button on the right to return feed to *N" or
normal.
Consult the following chart to determine the position of the drop feed
buttons and darner for various types of .sewdng.
Type of Sewing
Sewing thin material
Darning, embroidery with hoop
Sewing thick material
Drop Feed
S ;Silk)
E (Embroidery)
N (Nomai)
Darner Po.sition
Partially down
All the way up
Completely down
Mg. 32
( 14 i
00
o
o
fM
Page 20

( 15 .)
00
о
о
гм
о
го
о
Page 21

How to EmbroiJer with • Hoop
It is easy to follow a stamped design or to work free hand when
embroidering or monogramming. (See Figs. 33 and 34.)
Release the pressure from the foot by turning the burled nut
on the automatic darner in the direction of the arrow, or clock
wise. Push the drop feed button down so that "E" appears
between the two buttons. Stretch the fabric in an embroidery
hoop, and place under the needle after removing the presser
foot. Set the stitch width at the size you prefer and lower the
presser bar lifter. Then operate the machine at a rather high
speed while moving the hoop slowly with both hands. Work
carefully and be sure to keep fingers out of the path of the
needle.
1. Narrow hemmer. With the needle in its highest position
replace regular presser foot with narrow hemmer (Fig. 35).
For a plain narrow hem, make a 1, 8 inch double fold for about
two inches along edge of fabric. Hold each end of the twoinch fold, slip underneath hemmer. Bring fold up into the
scroll of hemmer, draw forward to end and fasten with point
of needle. Lower presser bar lifter. Gently pull ends of thread
as you start stitching.
Guide material slightly to right, and it will automatically take
Fig. 35
a double turn through scroll.
Fig. 33
J2345e7S9
Fig. 34
How to Use Attachmonts
( 16 )
00
o
o
fN
Page 22

Lace Trimmed Hem
To attach lace to hem, insert lace in the slot next to
needle. Sew hem as above, guiding lace under needle
and hem into scroll.
Lacc Edge with Invisible Stitching
Hold lace 1 8 inch from raw edge on right side of
fabric. Insert both in scroll as for plain narrow hem.
Let hem roll over and sew in lace. Press lace out flat
along edge with hem turned up. For a little fullness
in lace, feed it freely under scroll.
French Seam
With right sides together, place top piece of material
1 8 inch inside edge of lower piece.
Insert in hemmer scroll, allowing hem to roll over and
sew in top fabric, making French seam.
Flat Felled Seam
Open out P'ranch seam and insert rolled edge in scroll
of hemmer. Edgestitch to lay seam flat.
2. Quilting Guide. This guide for making parallel
rows of stitching is attached by placing the pronged
holder between the presser foot and the presser foot
clamp screw (Fig. 36). Adjust the curved bar to press
lightly on the faiaric. By letting the guide ride on the
first stitching line, successive rows will be an equal
distance apart. When the bar is attached so that the
curved part is to the right of the needle, it may also
serve as a seam width guide.
( 17 )
Fig. 36
00
o
o
Page 23

3. Sewing on Buttons. Exchange the regular presser foot for the one provided to sew on
buttons. I See Fig 37.) Drop the feed to "E" position. Place button and fabric under
presser foot. Determine the width of the stitch needed to enter each hole of the button
by turning the hand wheel slowly toward you as you adjust the zigzag regulating knob.
Then lock at that width. Take six or seven stitches to fasten the button securely. Then
turn the knob to 0 and take two or three more stitches in one hole to lock the threads.
Repeat' the procedure when sewing on four-hole buttons.
Snaps and hooks may be stitched on in the same manner.
18
Fig. ,37
00
o
o
Page 24

4. Making Buttonholes. Replace the regular presser foot
with the buttonhole foot which is equipped with a measure
ment gauge (Fig 38). Set the stitch lenght near 0 for a very
short stitch. The width of the stitch should be set at 2 or
slightly under for a daintier buttonhole. If a heavier button
hole is required, cord may be strung through the hole in the
foot.
Mark the desired length of buttonhole on the labric or set the
gauge so that the distance between the curved marker and the
needle is equal to that of the buttonhole. Sew the first side
of the buttonhole, stopping the machine with needle in the
material at right side of stitching.
Lift the presser foot, and using the needle as a pivot, turn the
fabric end for end or 180 degrees (see Fig 39). Before lowering
the presser foot make sure that the first row of stitching is
lined up straight. Lower presser foot and turn wheel by hand
just enough to raise needle out of fabric.
Fig. 38
Drop the feed to "E" position and turn zigzag knob to No. 4
width. Take about five or six stitches to make a bar tack.
Stop the machine with the needle out of the fabric, but leave
the presser foot down. Raise the feed to "N" and return stitch
width to 2 or original setting.
Proceed to stitch the second side of the buttonhole. When
you have reached the end of the first row of stitching, stop
the machine again with the needle out of the fabric.
( 19 )
00
o
o
Page 25

Leave the presser foot down, drop the feed to "E" and take five or six stitches to close the buttonhole.
Stop the machine with the needle out of the fabric, but do not raise the foot.
Return stitch width to 0 and take two or three stitches, which will fasten the bar threads and prevent
ravelling.
Cut the buttonhole opening with the seam ripper, being careful not to cut the stitching.
If you plan to make buttonholes on sheer or soft material, place tarlatan or paper, which can be torn
away after stitching, under the fabric. And it is always wise to make several buttonholes on scraps
of fabric before working on the garment.
Fig.
( 20 )
m
00
o
o
Page 26

Fig. 40
6atlieriiif
Simple gathering stitches should be rather long and the upper
thread tension sufficiently light to enable the lower thread to be pulled.
Sew as usual, but preferably stitch two rows.
Use the presser foot as guide. When both rows have been stit
ched, pull the lower thread so as to form gathers in the fabric. (Fig. 40).
CSatliering witib, dkstic tbireadi.'
By using latex thread you can make elastic gathers. Wind the
elastic thread by hand on the bobbin, and use ordinary thread for the
upper thread. The kind of gathering is especially suitable for under
wear, children’s clothes, beach wear, etc. (Fig 41).
Fig. 41
( 21 )
00
o
o
Page 27

Fig. 42
AppKque
Many beautiful and decorative effects are obtained with this "easy
to do operation". Cut out the applique design and simply zig zag
stitch it around the outer, on to the material to which the design is to
be appliqued.
Sewing Knitwear
Use a small stitch (approximately 1 ) and zig zag width at 5.
( 22 )
00
o
o
Page 28

Lighting Equipment
To replace light bulb, open face plate, removing old bulb as in
Fig. 44.
Heedle-Thread-Eahric-Stitching Guide
Fabric
Extremely heavytarpaulin, sacking
canvas, duck, etc
Heavy-upholstery
fabric, ticking.
denim, leatherette, etc
Medium heavydrapery fabric, velveteen,
suiting, felt, terry, etc
Medium-broadcloth,
percale, gingham, linen,
chintz, taffeta, sheer
wool, shantung, etc
Sheer-voile, lawn.
dimity, crepe.
handkerchief linen,
plastic film, etc
Very sheer-chiffon.
batiste, lace, organdy,
ninon, net, marquisette, etc
Machine
Needle Stitches Cotton
6 10
4
3 to
2
1 to
0
00
to
8
8
10
10
to
12
12 60
14
14 80
to
16 100
(Plastic film)
8 to 10
16
to
20
100
150
FACE PLATE ,
Mercerized or
Thread N ylon
to
30
30
to
40
40
to
60
to
80
to
to
Heavy Duty
Heavy Duty
Heavy Duty
50
50
50
Silk
—
■
A
A
A
LAMP
-
Fig. 44
( 23 )
CO
o
o
r\i
Page 29

Check Up for Smooth Sewing
Although your sewing machine is designed for maximum efficiency, should any of the following difficulties occur
they can be remedied with minor adjustments.
Upper Thread Breaks.
Be sure needle is inserted properly.
Check on correct way to thread machine.
Use correct needle size for thread.
Do not have upper tension too tight.
Lower Thread Breaks
Check correct method of threading bobbin case.
Be sure lower tension is not too tight.
Needle Breaks
Do not tug or pull on the fabric while sewing as this will bend and eventually break the needle.
Skipped Stitches
Do not use a blunt or bent needle.
Insert needle correctly.
Use correct needle size for thread.
Be sure pressure on foot is sufficient when sewing heavy fabrics.
Stitches Loop
Make sure tensions are properly balanced and that machine is threaded correctly.
Machine Binds
Clean thead, dust and lint from hook, shuttle and race. If condition continues, it may be that the machine
is gummy with oil. Apply kerosene to oil holes, run rapidly for a while, and wipe dry. Then lubricate
again with fine sewing machine oil.
( 24 )
00
o
o
rsj
Page 30

Oiling and Cleaning
Bef ore s tar tin g to o il the u pp er p art o f th e mac hin e, tu rn ha nd w he el
unti l ta ke mp is a t it s low e st p oi nt. Ap ply a d rop of oil to p oin ts
indi ca ted b y a rro w s i n F ig s 4 5, 46 a nd 47 .
Fig. 45
To reach the areas requ iri ng oil on th e u nd ers id e
of the mac hi ne iF ig . 46) tilt the head bac k on
its h in ge s.
OIL 8U
Fig. 46
How f req ne ntl y t he m ach in e is us ed de ter mi ne s th e
oili ng req ui rem e nts . M o der at e u se calls fo r o nly an
occ asi on al o ili ng . A fte r a pp lyi ng the oil , ru n th e m a
chin e a t hi gh spe ed so t ha t all par ts w il l be pen et rat ed
bv t he oi l.
Fig. 47
25
00
o
o
Page 31

■ ■■ ' Ч.
A -- " .^jí= ; ■. . _ -i* í .
. '■< .
i 'Kíi-X
^ - ■
ífi w ' ■;- "
'Æ' ■
Ч ■ ‘í ' ' .
■V
■ 4 ' 1 'U w^,
». -1
^--v4Y/*y
,fJíi4ÍLÁ.-* . -Ч*.-
• . ' ■ ' .1"* :
■■ ^r'v.4 Ч V .■•■ J ■ ;•' =ÍvJl'-'‘V ^
■ ^.' ' ' '''
'•
, . . 4. ^
■ '” ‘ ■ * .. ' ' -P* 1
1: r* -- '• -VIJ. *J 4. :í:í
/Л ffci' '*
r^.‘'-“;- - V'"Ч a.V‘--^ ■ '■ ■ J-'',
■ ■>'-■'-
Lj—■■' •' - Lj .
'-Ж
-■i*'.'' ■ -'‘‘í"' ■ ■ '. •■ -•" . ' ■ - . V. Ч ■ * .Г- -; . -Ч. • . ... 3
^ V
Ч-
__________
'-..Л
---------------
-.;ч :■ ■'■ '. ■■■;,.r^’- ■
. ■ ' • ' 1 V Î ■ . ► ’ Ч.- ■ " •■ '
* * . . . . f . . .■ ' ■ ^ - j. ■ V
------
’ ’-\r—. f ■ V-V——r—^
.. -e't _____________■ . Г, ..■j.-_, __•: ■-'■ ■ .. -e.' ! .■>:-' - . V ■■ . . - A. _____________J
------
j*:-—
------------------
r™ —3
, Ч;., >’ 'f cA
00
o
o
ГМ
o
CTi
o
 Loading...