

Page 1
V l*i-^ii-^ ' «-rf-f
OPERATORS IN
The UIHITE FUp-Top
i
Page 2

[. FEATURES AND PARTS
Principle Parts................................................................................................................4—5
II. ACCESSORIES.................................................................................................................. 6
Contents of Accessory Set..................................................................................................6
III. YOUR SEWING MACHINE AND CASE..........................................................................7-8
Portable Case..................................................................................................................... 7
Setting the Extension Flaps for Sewing on Flat Sewing Surface
Setting Flaps for Free-Arm Sewing.................................................................................... 7
Electrical Connections.........................................................................................................8
Sewing Light...................................................................................................................... 8
IV. PREPARING THE MACHINE TO SEW...................................................................... 9-11
Winding the Bobbin.
Lower Threading.............................................................................................................. 10
Threading the Bobbin Case..................................................................................... 10
Placing Bobbin Case in Shuttle................................................................................. 10
Upper Threading............................................................................................................ 11
V. CHOOSING THE RIGHT NEEDLE..............................................................................12-14
Types of Needles................................................................................................... 12—13
Needie-Thread-Fabric Chart................................................................................... . 12—13
Changing the Needle...................................................................................................... 14
Changing the Needle Plate.............................................................................................. 14
VI. GETTING TO KNOW YOUR SEWING MACHINE.....................................................15-21
Adjusting the Stitch................................................................................................... 15—17
Stitch Length Dial...................................................................................................... 15
Reverse Lever....................................................................................................... 15
Stitch VA/idth Dial.................................................................................................... 15
Relating Stitch Length to Stitch Width
Pattern Selector Dial......................................................................................... 16—17
Pattern Selector Release Button........................................................................16—17
Pattern indicator Window
One Step Buttonhole Control Dial............................................................................. 18
Stitch Density Control................................................................................................ 18
Needle Position..................................................................................................... 19
Adjusting for the Fabric.................................................................................................... 19
Feed Dog Control...................................................................................................... 19
Pressure Control , ................................................................................................. 19
Tension........................................................................................................................... 20
Adjusting the Thread Tensions................................................................................ 20
The Proper Presser Foot
Changing the Foot................................................................................................... 21
The AH Purpose Foot................................................................................................21
The Straight Stitch Foot
The Buttonhole Foot................................................................................................ 21
The Embroidery Foot............................................................................................. 21
The Cording and Zipper Foot....................................................................................21
VII. HOW TO SEW............................................................................................................22-23
Pinning......................................................................................................................... 22
Placement of Fabric/Starting a Seam..............................................................................22
Guiding the Fabric......................................................................................................... . 22
Etched Seam Guide............................................................................................... 22
Cloth Guide.......................................................................................................... 22
Presser Foot as a Guide.......................................................................................... 22
..............................................................................................
.......................................
...
.................................................................................................... 9
....................................................................
.................................................................................
.............................................................................................
........................................................................................... 21
16—17
4-5
7
15
21
Page 3

Holding the Fabric...................................................................................................... 23
Turning Corners..........................................................................................................23
Curved Seams........................................................................................................... 23
Sewing Across Heavy Seams.................................................................................... 23
Ending Seam/Removai of Fabric................................................................................23
Vm. APPLICATIONS OF THE STRAIGHT STITCH
Seams
Basting/Topstitching. . . ¿T4T . 24
Darning........................................................................................................................ - ■ 24
Elastic Thread Shirring......................................................................................................24
IX. APPLICATIONS OF THE ZIGZAG STITCH.........................................................25-29
Overcasting................................................................................................................... 25
Seaming Knits...................................................................................................................25
Sewing on Buttons
Satin Stitching. ................................................................................................................ 26
Tapering/Creative Embroidery......................................................................................... 26
Freehand Monogramming................................................................................................27
Applique.................................................................................-
Gathering Over a Cord.................................................................................................... 28
Lace Applications........................................................................................................... 29
Flutter Hems. .................................................................................................................. 29
X. BUTTONHOLES.....................................................................
Preparation ................................................................................................................... 30
Built-in One Step Buttonholer......................................................................................... 31
Turn-Around Buttonholes............................................................................................... 32
Corded Buttonholes....................................................................................................... 33
Stretch Buttonholes
XI. APPLICATIONS OF THE BLIND HEM STITCH
Hemming..................................................................................................................... 35
Decorative Effects........................................................................................................... 36
Topstitch Effects............................................................................................................... 36
Decorative Stitch Combinations..................................................................................... 36
XII. APPLICATIONS OF THE STRETCH BLIND HEM
Hemming..........................................................................................................................37
Edging.......................................................................................................................... 37
Eyelash Buttonholes....................................................................................................... 37
XIII. APPLICATIONS OF THE MULTIPLE STITCH ZIGZAG
Overcasting.................................................................................................................... 38
Patching........................................................................................................................ 38
Mending a Tear or Instant Darning................................................................................. 38
Elastic Application........................................................................................................ 39
Understitching Facings............................................................................................ ..39
Decorative Effects.......................................................................................................... 39
XIV. APPLICATIONS OF THE SCALLOP STITCH...........................................................40
Hemming. ........................................................................................................................40
Decorative Effects............................................................................................................40
XV. APPLICATIONS OF THE REVERSE BLIND HEM STITCH
Shell Tuck ........................................................................................................................40
XVI. APPLICATIONS OF THE INTERLOCK
Shell Tuck........................................................................................................................41
........................................................................................................................... ‘
...
...................................................................................................... 25
Forming a Thread Shank.......................................................................................... 26
Manual Embroidery Designs................................................................................... 27
........................................................... -............................................34
...................
Lingerie Seam..................................................................................................................41
Inserting Lace.............................................................................................................. 41
.........................................................
........................................
...
............................
..................................................
...................................................
....................................
.....
...........................40
..............................................
30-34
35-36
38-39
24
28
37
41
Page 4

XVI!.
XVII!.
XIX.
XX.
XXI.
XXM.
XXIII.
XXIV.
XXV.
XXVI.
XXVII.
XXVII!.
XXIX.
XXX.
XXXI.
APPLICATIONS OF THE CHECKER STITCH
AND THE DOMINO STITCH........................................................................................... 42
Decorative Effects........................................................................................................... 42
Corded Decorative Effects............................................................................................. 42
APPLICATIONS OF THE REVERSE STITCH PATTERNS
Decorative Effects .......................................................................................................... 43
APPLICATIONS OF THE CROWN STITCH ....................................................................44
Decorative Effects.......................................................................................................... .44
APPLICATIONS OF THE CROSS STITCH.................................................................... 44
Decorative Effects. ,
APPLICATIONS OF THE OVERLOOK STITCH....................................................... 45-47
Seams........................................................................................................................... 45
Nylon Tricot Seams...........................................................................................................46
Applying Elastic.................................................................................................................46
Ladder Stitch................................................................................................................... 46
Hemstitching................................................................................................................... 47
Topstitching...................................................................................................................... 47
APPLICATIONS OF THE STITCH AND OVERCAST......................................................48
Seams........................................................................................................................... 48
Applying Ribbing............................................................................................................. 48
APPLICATIONS OF THE FAGOTING STITCH................................................................48
Decorative Effects.............................................................................................................48
APPLICATIONS OF THE SMOCKING STITCH...............................................................49
Seams............................................................................................................................... 49
Elastic Shirring.............................................................................................................. 49
Decorative Effects — Baseball.........................................................................................49
APPLICATIONS OF THE ELASTIC EDGING STITCH
Topstitching.......................................................................................................................50
Edging...............................................................................................................................50
APPLICATIONS OF THE STRETCH OVERLOOK
APPLICATIONS OF THE STRAIGHT STRETCH STITCH
Seams...............................................................................................................................51
Topstitching..................................................................................................,. . ..............
APPLICATIONS OF THE RICK-RACK STITCH...............................................................52
Topstitching..................................................................................................................... 52
Tapering............................................................................................................................52
TWIN NEEDLE SEWING......................................................................................... 53-54
Twin Needle Sewing Effects............................................................................................ 53
Pin Tucks.................................................................................................................... 54
Decorative Tucks or Designs............................................................................................54
FREE ARM SEWING....................................................................................................... 55
USE OF ACCESSORIES............................................................................................... 56
Cording and Zipper...........................................................................................................56
...
......................................................................................................44
.........................................................
............................................
....................................................
.............................................
43
50
51
51
51
XXXII.
xxxm.
XXXIV.
ADDITIONAL SPECIAL ACCESSORIES........................................................................ 57
Roller Foot........................................................................................................................57
Overcast Foot...................................................................................................................57
Blind Hem Foot................................................................................................................ 57
Roller Hem Foot............................................................................................................ 57
Fringe Foot..................................................................................................................... 57
CARE AND MAINTENANCE OF YOUR SEWING MACHINE
Changing Needle............................................................................................................ 58
Cleaning
Oiling ....
Changing the light bulb.....................................................................................................59
MINOR PROBLEMS AND THEIR SOLUTIONS
...........................................
........................................................................................................................ 59
....
................................................................ 58
....................................................
............................
58-59
60-61
Page 5

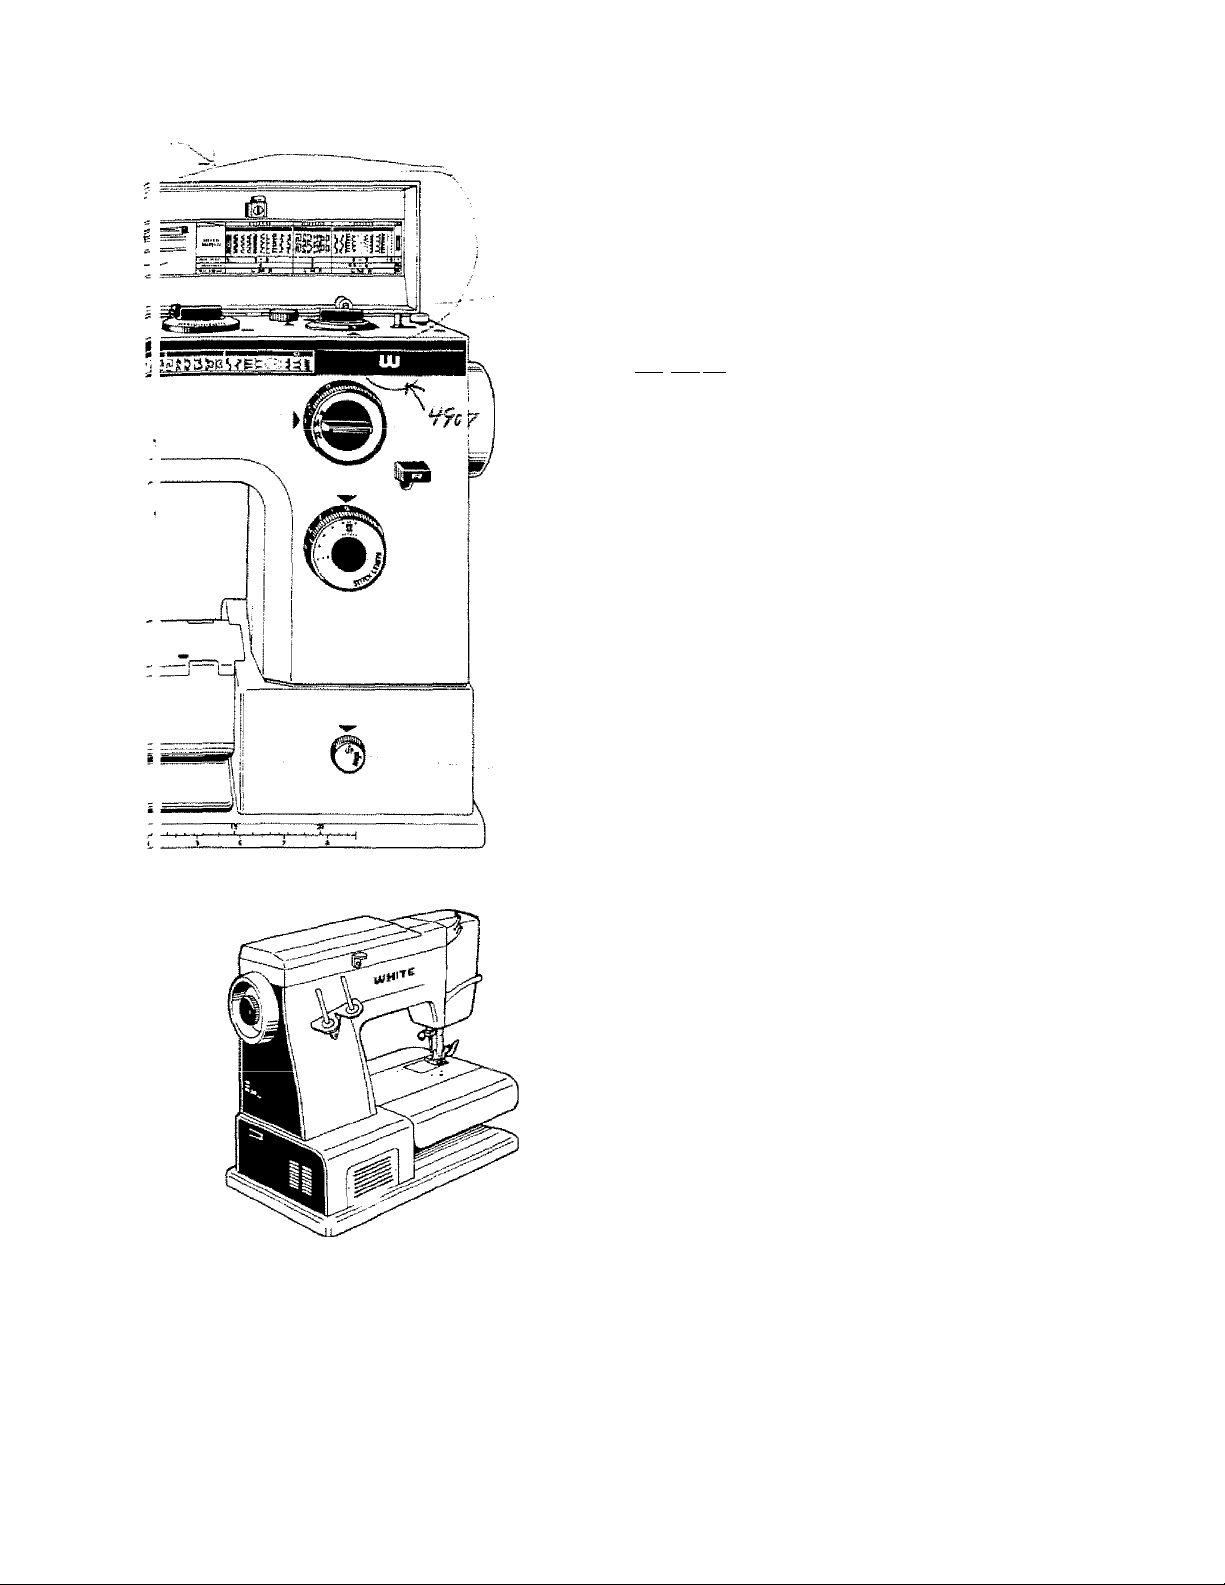
PRINCIPLE PARTS
Controi Panel Cover ,. ^
covers pattern selector dial, release button, one-step buttonhole
control dial, stitch density controi, bobbin winder and bobbin
winder guide.
Pattern Selector Dial
selects pattern desired. May be turned in any direction.
Pattern Selector Release Button
is pushed down to release pattern selector dial.
<■" Pattern indicator Window
shows all the stitch patterns available. Relative stitch length
setting is color coded for each stitch pattern. Yellow indicator
shows the stitch chosen.
Tension Dial
has two discs which regulate the amount of tension on the
needle thread.
Take-up Lever
regulates the flow of thread through the needle. It has an
open eyelet to simplify threading. The take-up lever should
always be in the highest position when beginning or ending
sewing.
Face Plate
opens to the left to allow for easy changing of the light bulb.
Check Spring
helps control the flow of thread through the needle.
t-'t-C ,■ t 'i -
releases flaps for flat sewing surface,
holds the presser foot in place,
holds the needle in place.
holds the fabric in place for sewing. Snap-on feet are provided
with the sewing machine. Various interchangeable soles are
included in the accessory box. The front of the presser foot
shank is white to make needle threading easier.
Needle Plate Release Lever
pushes the needle plate up for easy removal.
moves the fabric after each stitch is formed, The diamond
points give a gentle feed for delicate fabrics as well as an
accurate feed for heavy fabrics.
has guide lines on the left and right for greater sewing
accuracy. It snaps off for easy cleaning.
Flat Sewing Surface Brace
holds flaps up for flat sewing airface.
Flat Sewing Surface Flaps
are released and braced whenever a flat sewing surface is
desired or access to the bobbin is needed.
controls the amount of pressure on the fabric. The illustrated
plate indicates the proper position for various fabrics.
Flap Release Knob
Thumb Screw
Needle Clamp Screw
Presser Foot
Diamond Point Feed Dog
Needle Plate
Pressure Control
Page 6
Bobbin Winder Tension Discs
controls the tension on the thread as the bobbin is being
wound.
Stitch Density Control
regulates the closeness or openness of the buttonhole side
and stretch stitches,
One Step Buttonhole Control Dial
Selects buttonhole length for automatic one-step buttonholes.
"^Bobbin Winder
□ lui'naL'iitafly'^topswindTnf~ii^en the bobbin is filled,
Hand Wheel
controls the up and down movemertt of the needle bar.
Always turn it toward you.
Stitch Width Dial
allows for precise adjustment of zigzag stitch width as well as
tapering.
Needle Position Dial
Is turned for needle position change.
Reverse Lever
allows for easy back-tacking to lock thread ends.
Stitch Length Dial
allows for precise adjustment of stitch length from very fine to
very long.
Feed Dog Control
adjusts the height of the feed dog for special sewing
applications.
Presser Foot Lever
controls the raising and lowering of the presser foot.
With the lever down, the presser foot holds fabric for ^wing.
With the lever up to its first position, the fabric can be turned
freely without release of upper thread tension or slack of
upper thread, for changing sewing direction or turning the
corner.
With the lever up to the second position, the upper thread
tension is completely released to remove fabric after sewing.
An extra lift is also available for placement of heavy, bulky
fabrics under the presser foot by holding the lever up to its
extreme top position.
Thread Cutter
is located on the back of the presser bar for convenience.
Spool Pins
hold all types of spools effectively.
Power Switch
turns on both motor and light simultaneously. Allows
selection of high and low speed.
Coupling Wheel
releases the movement of the needle bar in order to wind a
bobbin.
Page 7
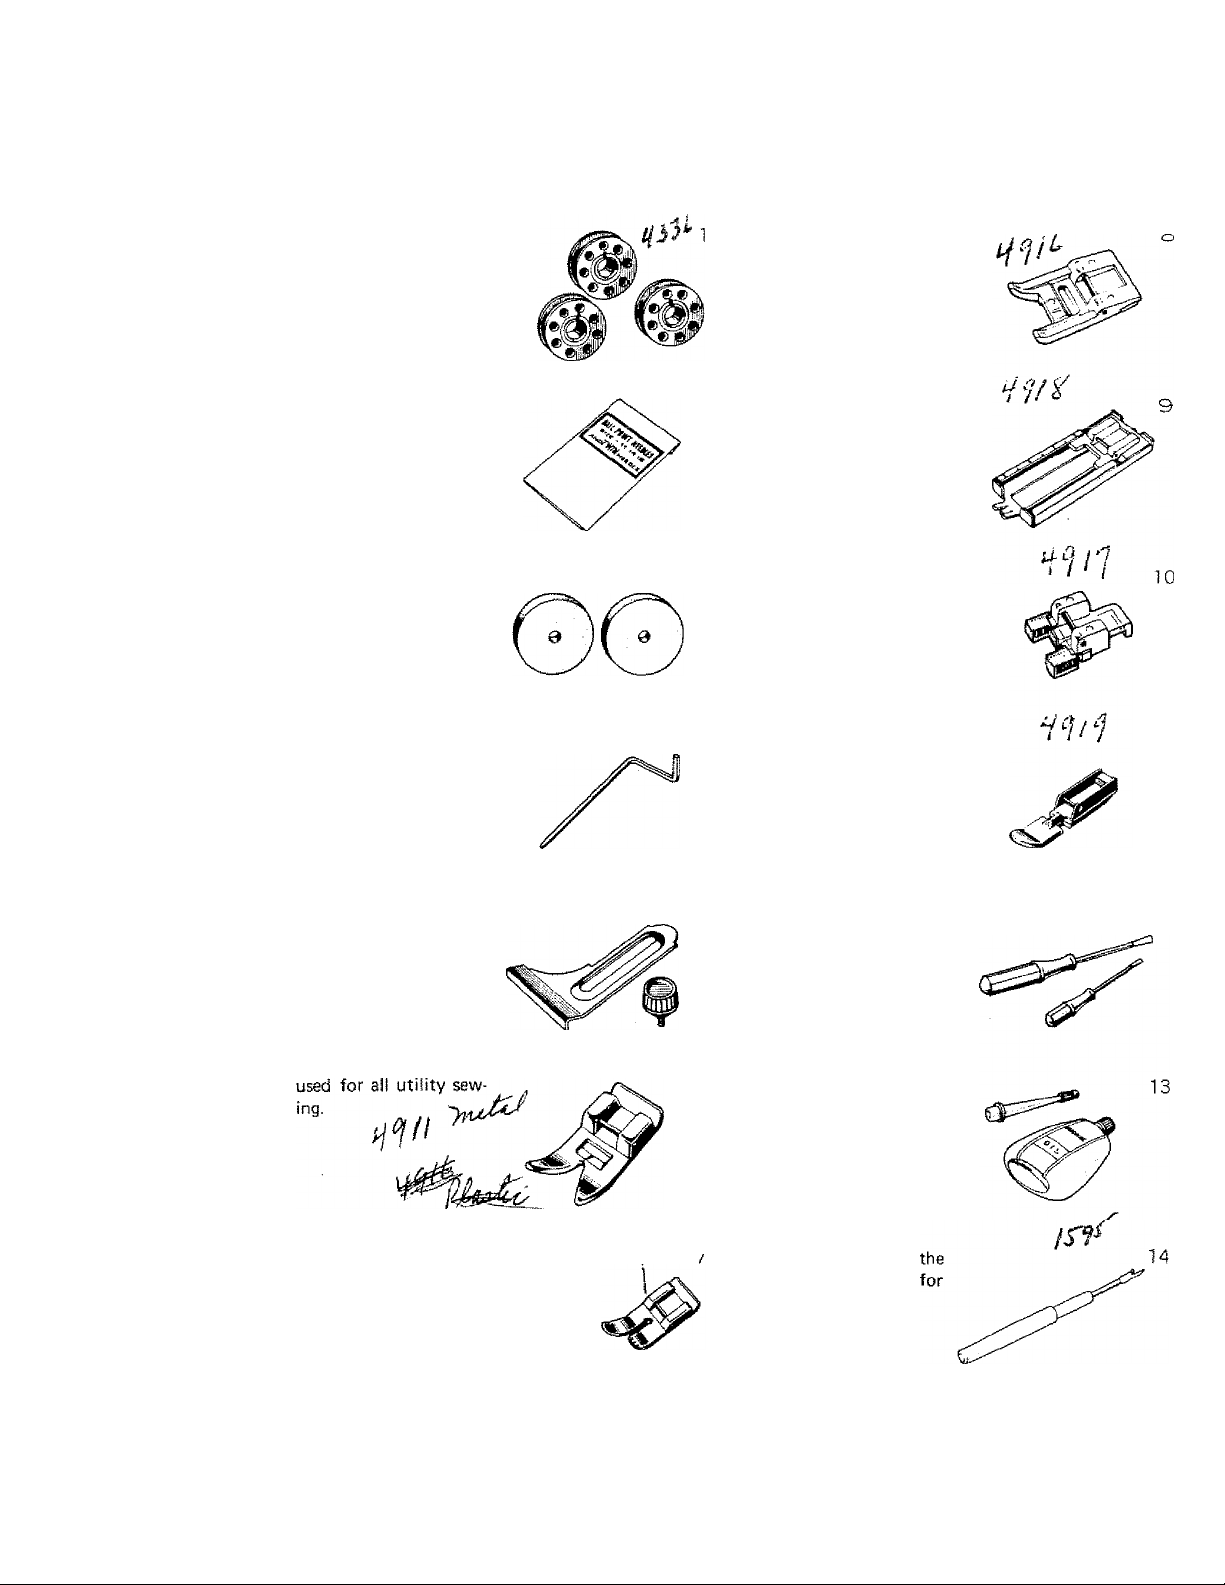
Your new White Rotary sewing nnachine comes equipped with the following set of acces
sories to make your sewing easier.
Three Metal Bobbins
The bobbins are made
of metal and hold
about 80 yards of
thread.
Needles / J 5^' '5
All-purpose needles sizes
11, 14 and 16 are
included. Twin needle
is also provided.
Two Felt Washers
Place the felt washers
under the spools for
best stitching results.
Quilting Guide
helps . make parallel
rows of stitching.
7^73 /
Embroidery Foot
has a wide groove on
the bottom which
allows the foot to pass
over dense stitches.
Also has two small tun
nels in front to accom
modate cord.
Buttonhole Foot
2
4-
has measuring lines to
insure exact buttonhole
length needed.
Button Sewing Foot
to hold button in place
for stitching.
Cording and Zipper Foot
for stitching very dose
to the edge of a cord or
zipper.
n
Cloth Guide and Screw
aids in sewing straight
seams.
All Purpose Foot
Straight Stitch Foot and
for straight sewing on
sheer and very light
weight materials where
extra support is needed.
7
Plate
Screw Drivers
Small one for use on
bobbin tension. Large
one for use on thumb
screw, needle clamp
screw, etc.
Tubed Oiler
for use in oiling the
machine. See page 59.
Seam Ripper
for cutting open
buttonholes and
removing stitches.
12
Page 8
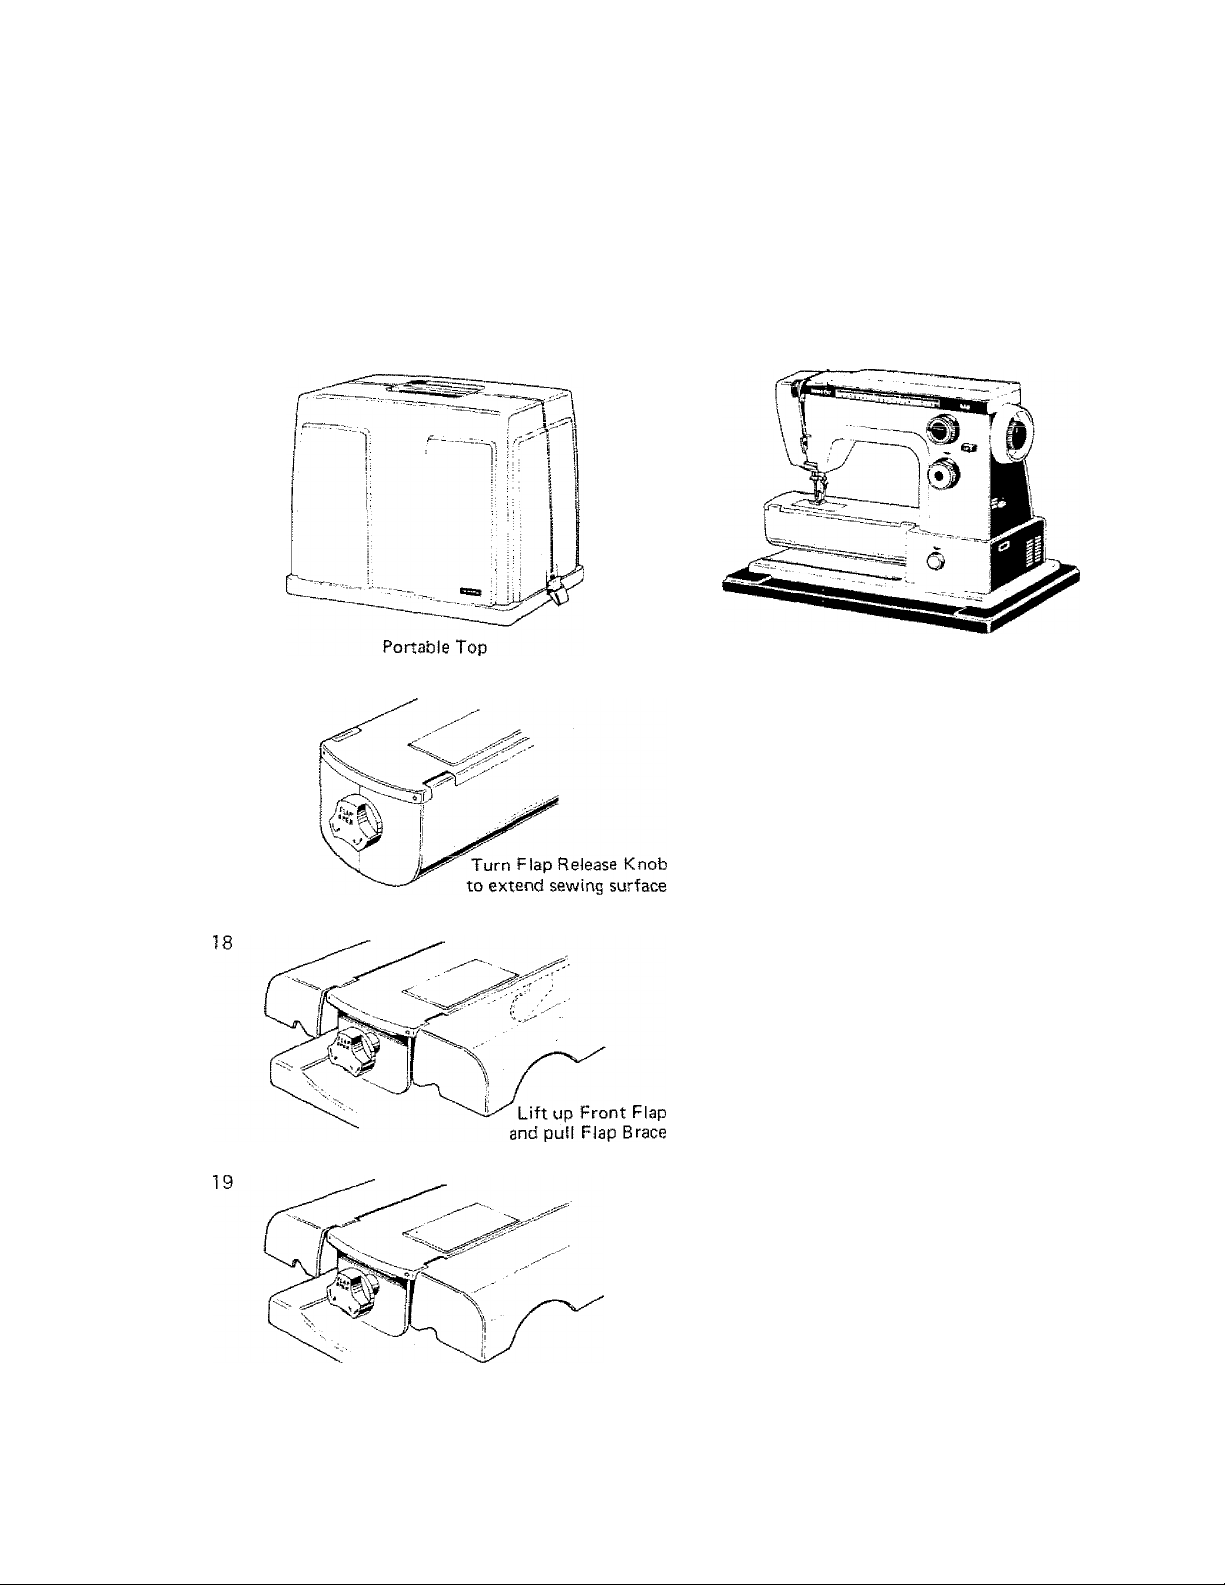
Portable case cover is fixed to the base with two latches at each narrow side of the cover, For
opening the case, press the latches out and down to release them from the hooks on the
bottom base of the case.
For closing, hang the latches to the hooks on the bottom base and press them up.
Unless installing machine into cabinet, it is not necessary to remove the bottom base of the
case from machine.
15
17
16
Sewing Machine and Base
SETTING THE EXTENSION FLAPS
FOR SEWING ON FLAT SEWING
SURFACE
Turn flap release knob counter-clockwise
to release the front flap and clockwise for
the back flap. Pul! the flap brace to out
nnsitinn
SETTING FLAPS FOR FREE-ARM SEWING
Press the flap brace into the lower arm,
then, press both flaps down until they
click on the stopper latches of flap release
tM tuu*
Note: Free-arm setting of machine is for
simple handling of tubular and
hard-to-reach garment areas. (See
Page 55,1
Page 9
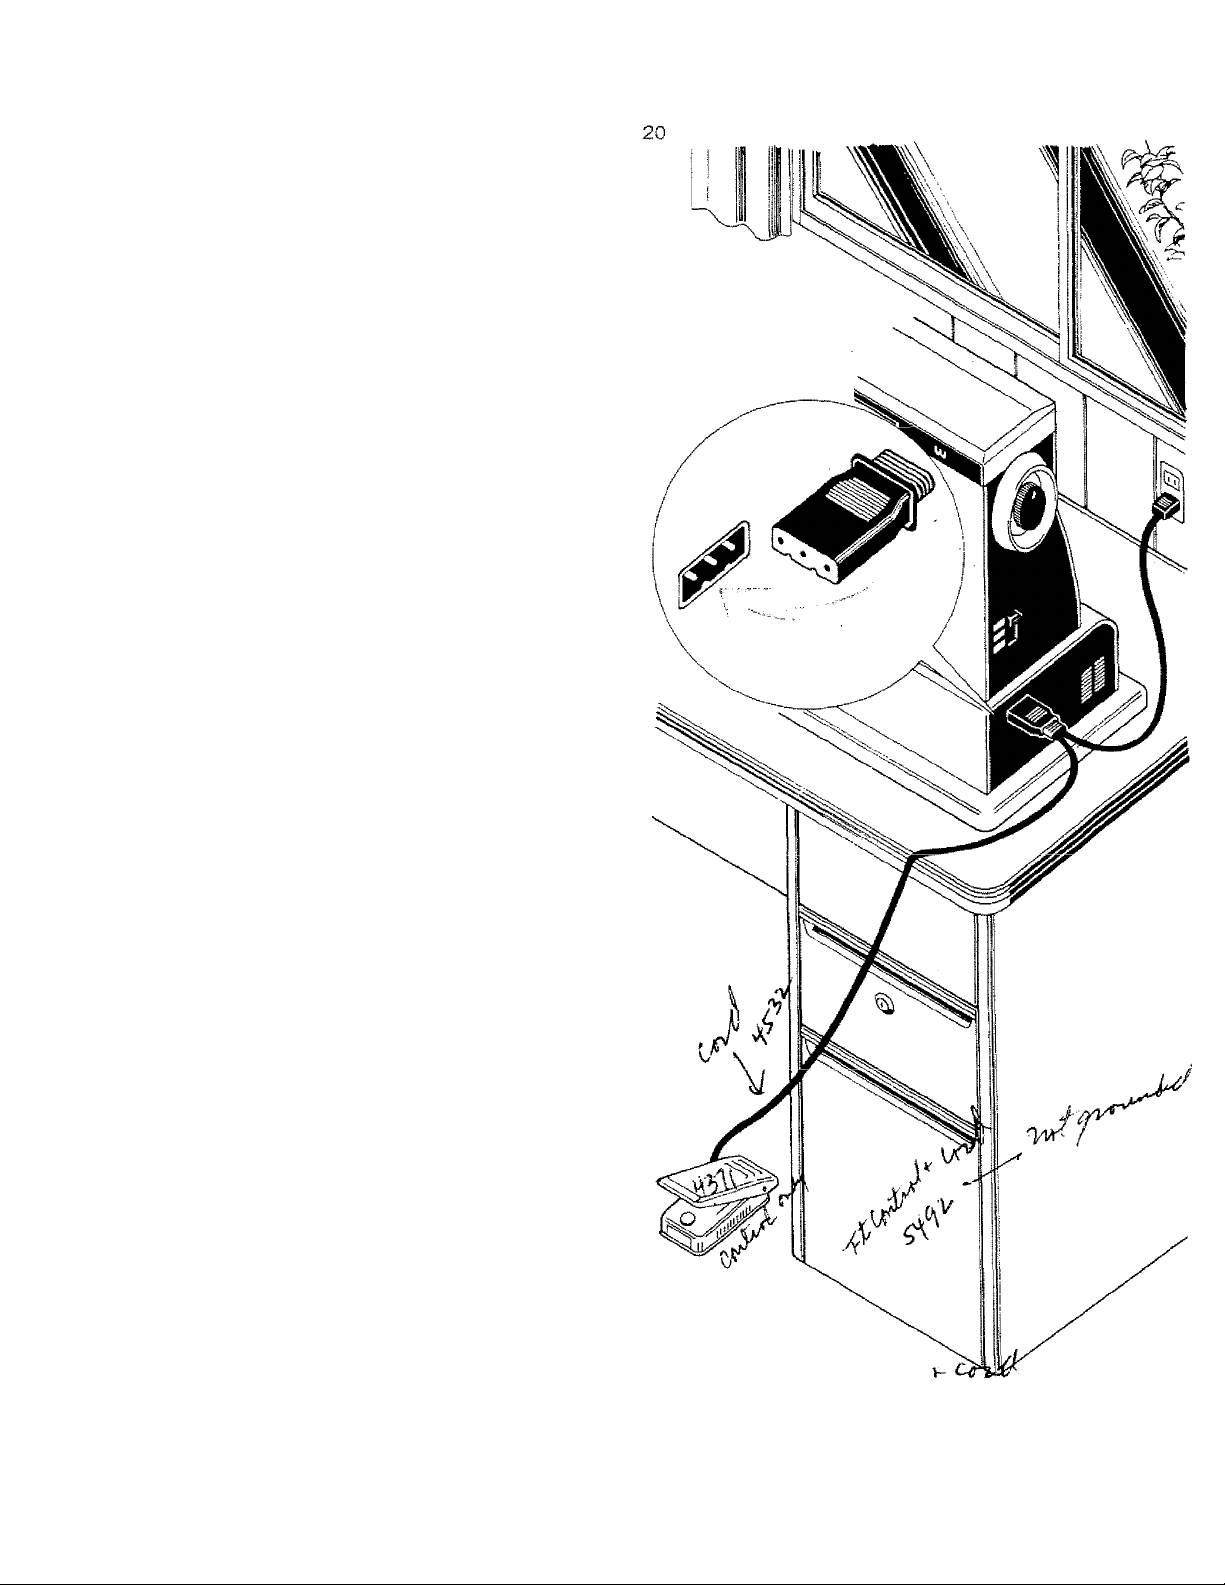
ELECTRICAL CONNECTIONS
Insert the plug with the indenta
tions on the underside into the
socket on the right side of the
machine. The plug will only go
in one way. Place the foot con
trol in such a position that your
foot rests comfortably on it.
insert the plug into a wall outlet,
110-120V.
SEWING LIGHT
The switch at the right side of
machine is the master switch for
on-off of both the light and the
motor. It is also for selection of
speed between fast and slow
sewing.
With the switch at "LOW" posi
tion, powerful slow speed sew
ing, less than 650 rpm is possible.
At "HIGH", sewing speed
reaches upto 950 rpm maximum.
The tight is turned on when the
switch is set at these positions.
At the lower range you may en
counter a noticable hum or in
crease in motor noise. This is
common due to the increased
power or torque needed to
operate your machine.
With the switch at "OFF" posi
tion, the electric circuits for both
light and motor are completely
shut off. When machine is not
in use, always turn the switch off
for safety.
Ths S6wiri3 iigHt is !oc3t6d in
face cover directly over the
needle to better illuminate the
stitching area.
With the power switch at the
right side of machine on "HIGH”
or "LOW” speed position, The
light simultaneously turns on,
and with the switch on "OFF"
the light also turns off.
TTC;.
Tt-
Page 10
21
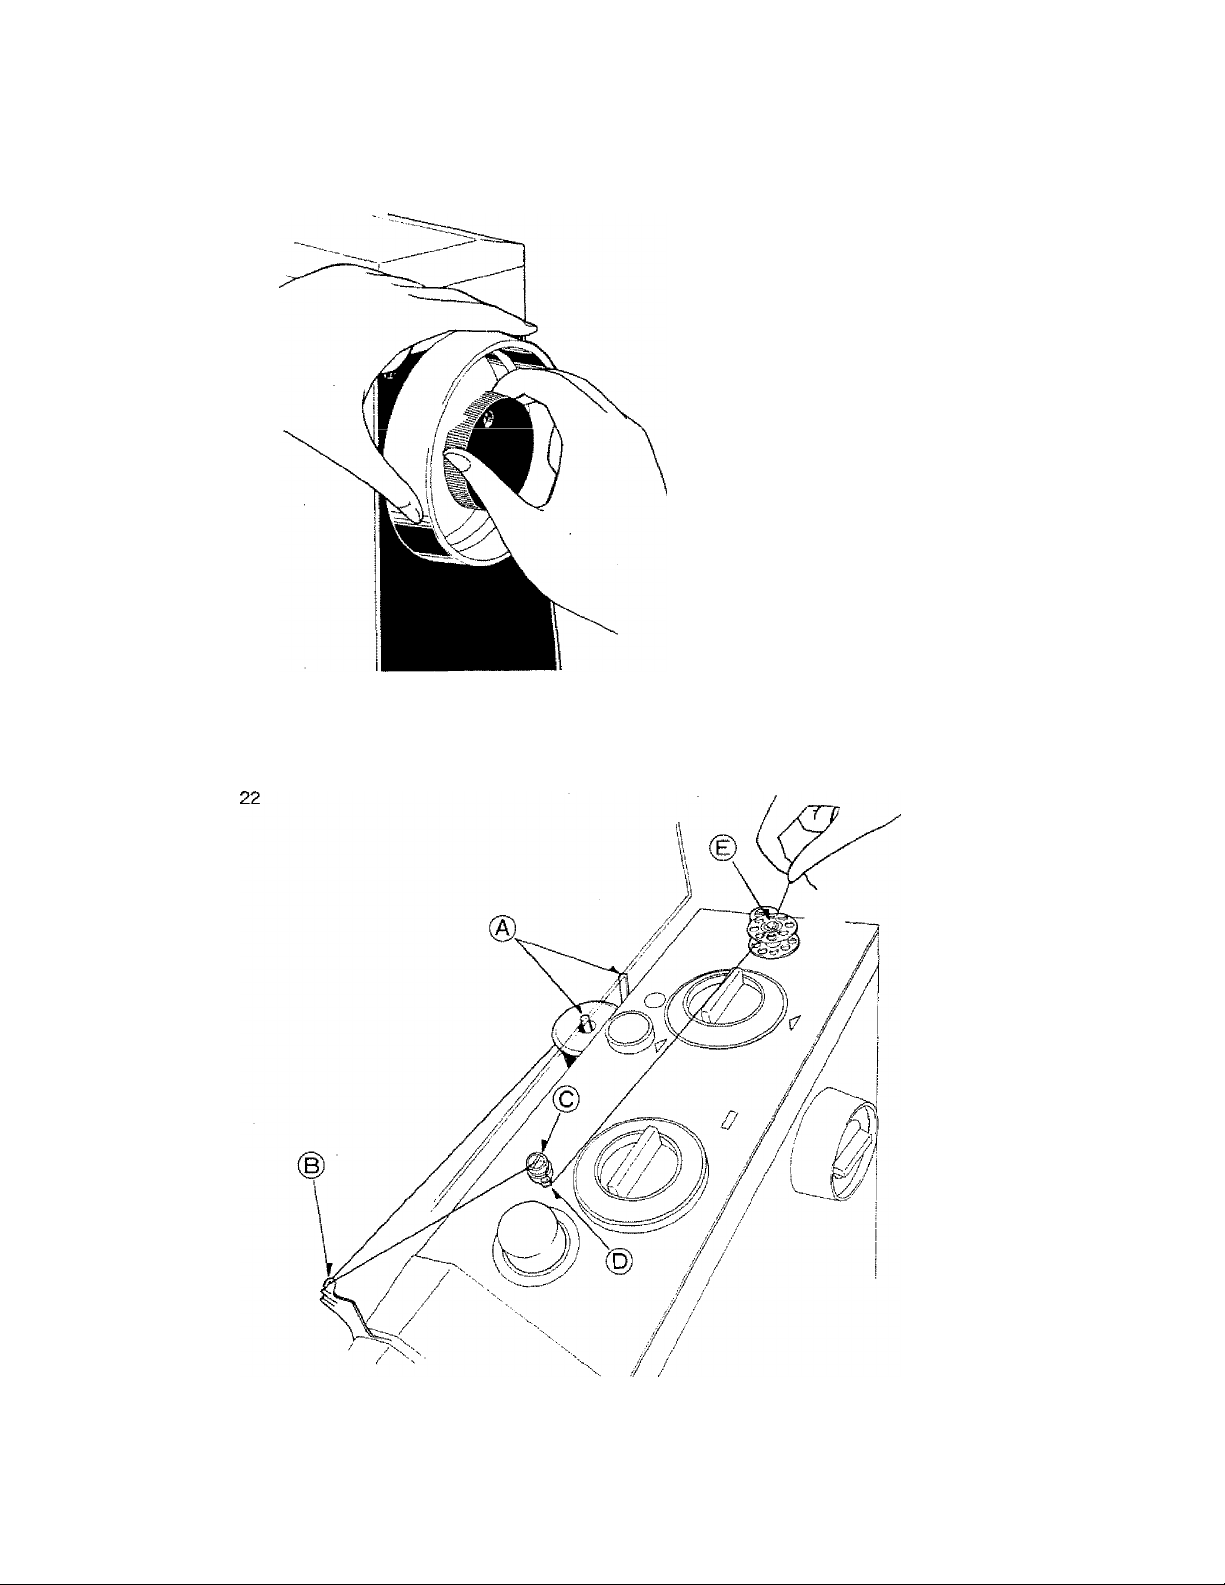
WINDING THE BOBBIN
Disengage the hand wheel by holding it
tightly with your ¡eft hand and turning
the coupling wheel toward you with your
right hand (Fig, 21), Place the spool
on spool pin (A), leaving about one foot
of thread free. Lead the thread around
the top thread hook of the guide (B) on
the left back of the machine and around
the bobbin winder tension disc (C). Then
thread guide (D) as illustrated (Fig, 22).
Run the end of the thread through a hole
on the riiTi of the bobbin on the spindle,
(E) and push the bobbin winder to the
right. Hold the thread end securely and
run the machine slowly. Bobbin will stop
\
turning when filled. Cut thread and push
bobbin winder to the left. Remove
\
bobbin from spindle. Tighten the coupl
ing wheel by turning it away from you as
you hold the hand wheel in place. The
needle should now move when you turn
the hand wheel.
Note: If the bobbin is winding unevenly,
adjust bobbin winder thread guide
(D) up or down as needed.
9
Page 11
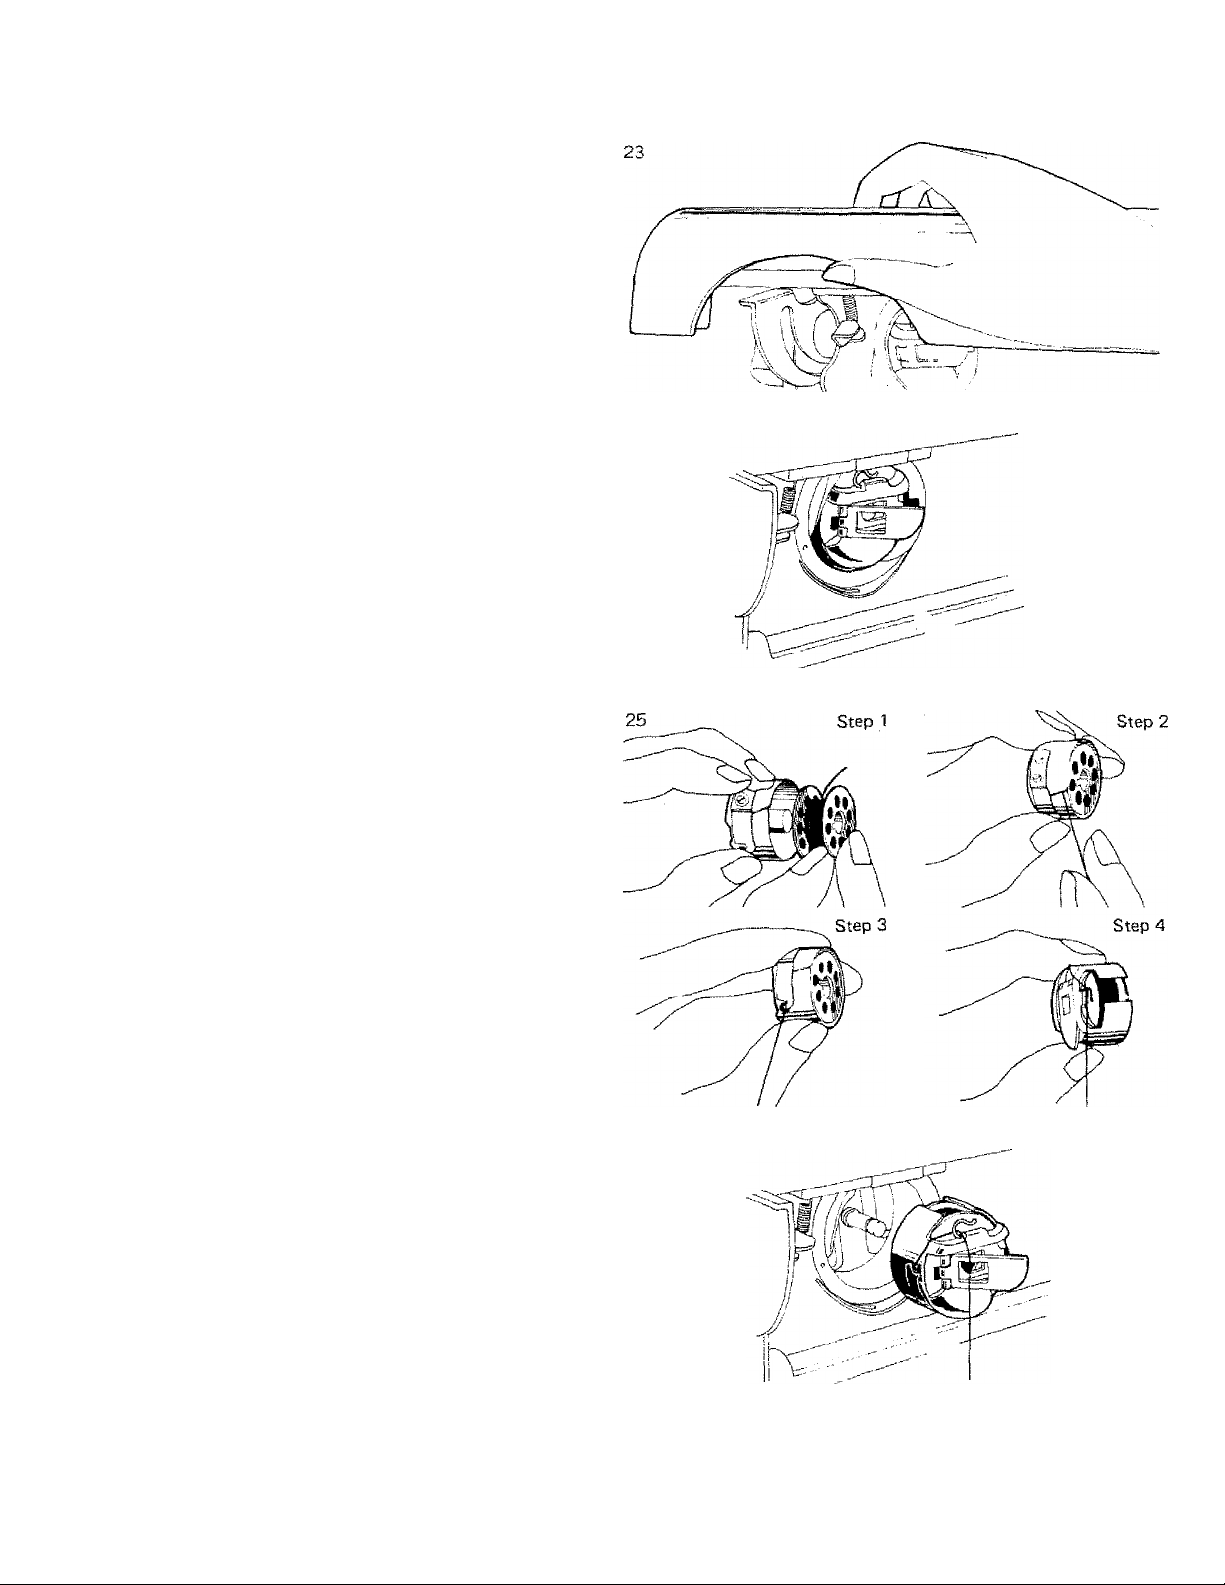
LOWER THREADING
• Threading Bobbin Case
Turn flap release knob back to
release the front flat sewing
surface flap. {Fig. 23) Raise the
front flap upward fully. Make
sure that the take-up lever is in
its highest position. Remove the
bobbin case, by opening the
bobbin case latch and pulling the
bobbin case out. (Fig. 24) Hold
the bobbin case between the
thumb and forefinger of the left
hand, so that the slot in the edge
of the bobbin case is on top.
Take the bobbin between the
thumb and forefinger of the right
hand so that the thread on top
leads from left to right. Insert
the bobbin into the bobbin case.
Draw the thread into the slot of
the bobbin case and then under
the tension spring into the fork
shaped opening of the spring.
(Fig. 25) Then lead the thread
through the thread guide on top
of bobbin case.
• Placing Bobbin Case in Shuttle
Hold the threaded bobbin case
in your left hand. Raise the
bobbin case latch with your
finger and hold open. Insert and
center the bobbin case on the
stud of the rotary hook. Be sure
the square opening of the bobbin
case is on top. Press the bobbin
case into the rotary hook as far
as possible until the latch catches
on the center post of the rotary
hook. Then release the bobbin
case latch. Press the bobbin case
to be sure the bobbin case is
locked securely, in place. (Fig.
26)
10
26
Page 12
27
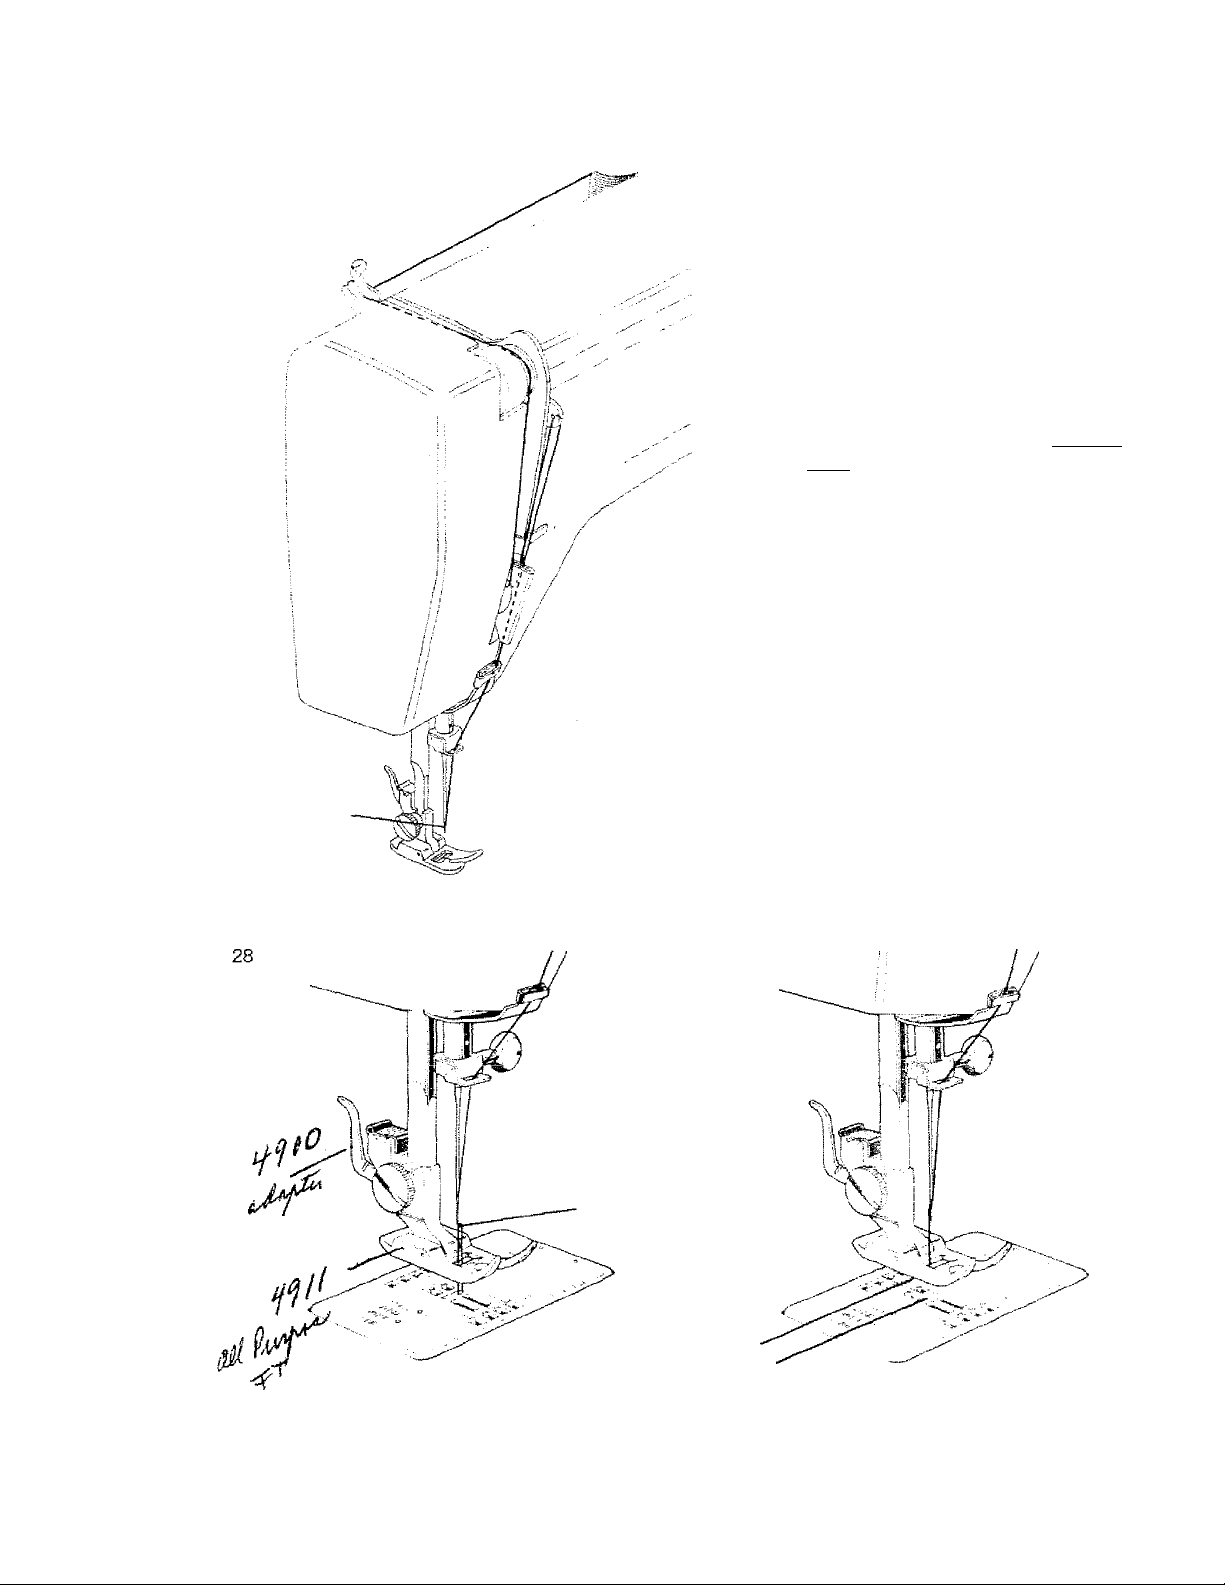
UPPER THREADING
Turn the hand wheel toward you
to raise the take-up lever up just
above red mark. The presser
foot should be in a raised posi
tion. Lead the thread from the
spool as illustrated. Draw the
thread through the rear thread
guide, then forward between the
tension discs, down and around
the check spring, up and around
the take-up lever, down through
thread guide on needle clamp.
Thread the needle from front to
back and leave the thread about
three to four inches long. (Fig.
27) Hold end of upper thread
N
\v.-
\
N
to the left of needle plate and
turn the hand wheel toward you
one complete revolution. Pull
the loop which has been formed
with lower thread through to the
upper surface. (Fig. 28) Place
both thread ends under the
presser foot and draw them to
the side leaving both threads
about four inches long. (Fig. 29)
29
11
Page 13

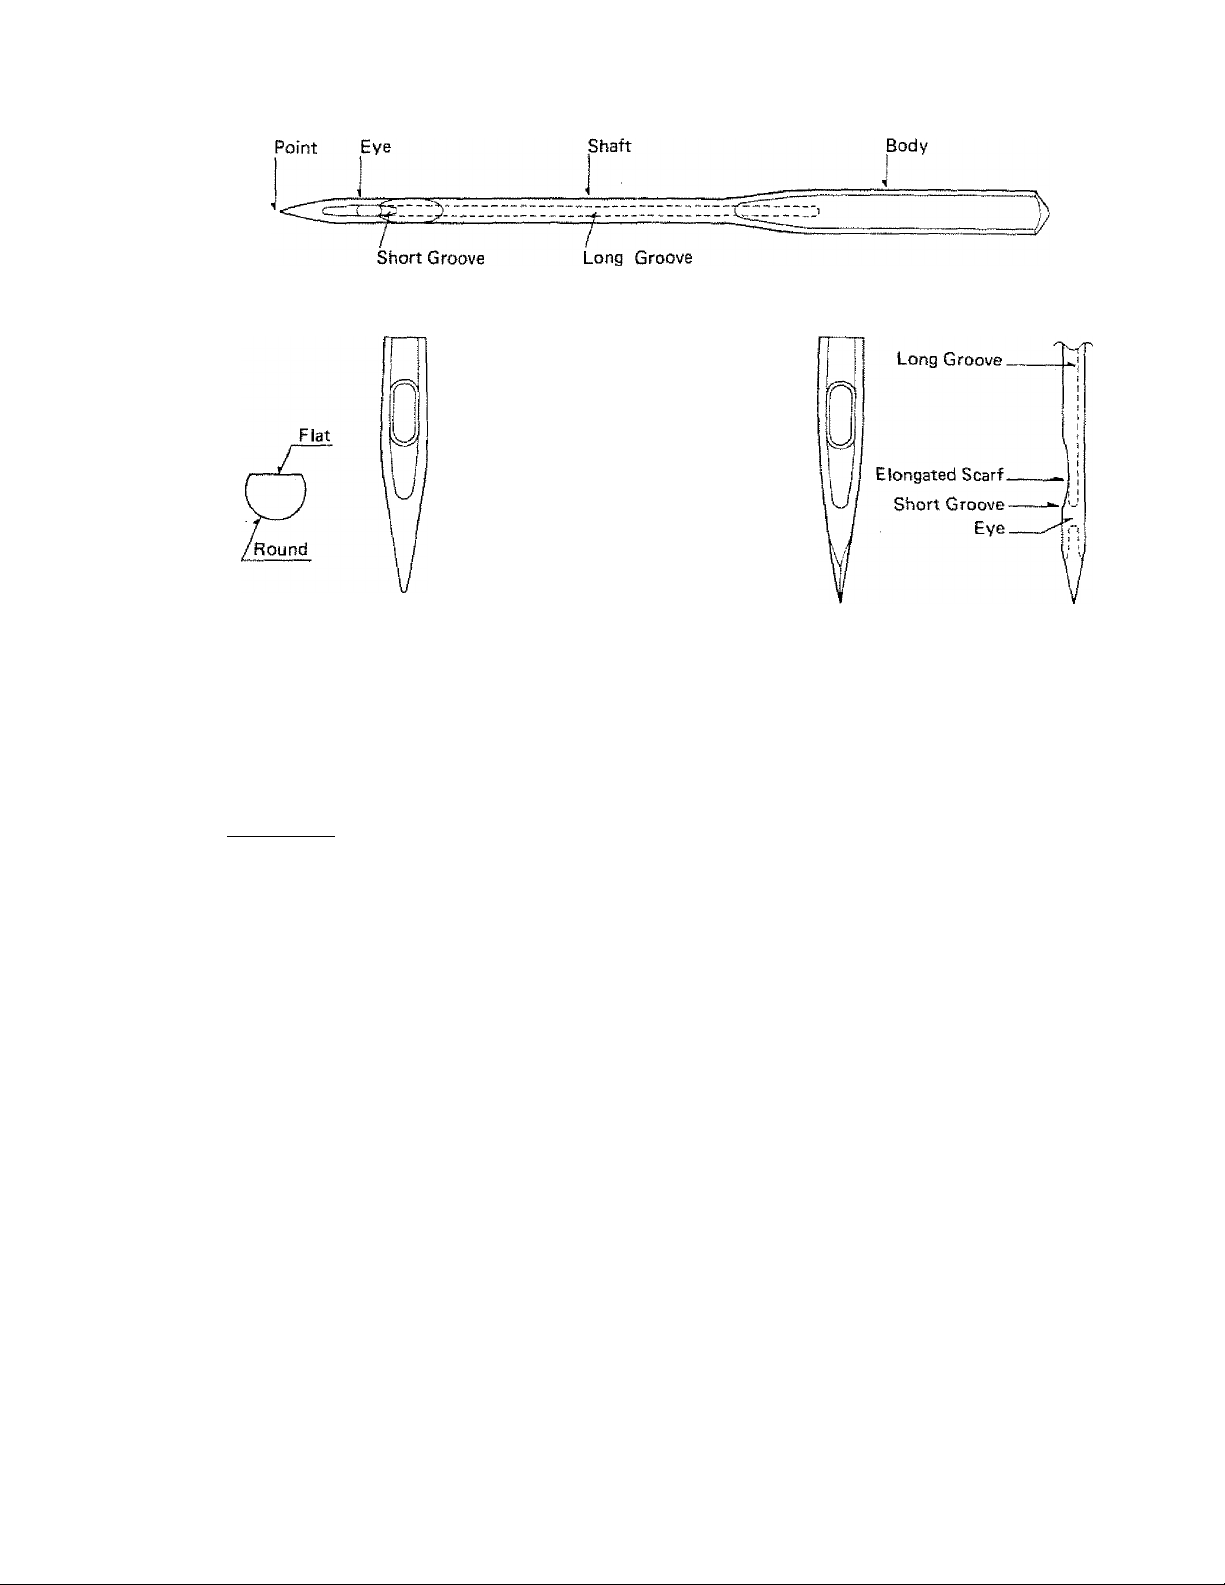
TYPES OF NEEDLES
The correct selection of needle to suit the thread and fabric being sewn gives the best stitching
results. Fine fabrics should be sewn with fine needles, heavier fabrics with heavier needles.
For best results, sewing machine needles should be replaced when they become even slightly
dull or bent or at the completion of every other garment.
______
_______ is suggested for use with woven fabrics. Needles, style 15 x 1, (European
equivalent System 705) are used on the majority of household sewing machines. They range
in sizes from 8 to 20 with the lower number indicating the finer needle. The most commonly
used sizes are 11 and 14.
________________
• is designed to handle knits as well as woven fabrics. It eliminates
skipped stitches and the slight ball will not damage delicate fabrics. This is the needle provided"
with your sewing machine and will be used for most of your sewing. A larger ball point may
still be necessary for certain knits, such as bathing suit fabric or power net.
_
____________
- is recommended for use with tricots, jerseys, lingerie and power nets.
Unlike sharp, pointed needles, which pierce fibers of knit fabrics, destroying elasticity, the
ball point slips between fibers, preventing damage to fabric and skipped stitches. These are
available in fine, medium, and heavy ball points,
__________________
is recommended for use with leather and leather-look vinyls. A wedge
cutting point pierces leather more easily than ordinary sewing machine needles, resulting in
more satisfactory stitching.
NEEDLE, THREAD, FABRIC & STITCHING GUIDE
The correct selection of needle and thread to suit the fabric will result in more satisfactory
stitching. Fine fabrics should be stitched with fine needles, fine thread and short stitches.
For best results on heavier fabrics, use coarser needles, heavier threads and longer stitches.
Replace the machine needle when it becomes even slightly dull or bent.
KNITS
WOVEN
LEATHER
DECORATIVE
STITCHING
12
LIGHT WEiGHT:Tricot, Power Net g
MEDIUM WEIGHT; Jersey, Double Knit, Power Net
HEAVY WEIGHT: Double Knit, Power Net 11-14
FAKE FURS-VELOURS
VERY SHEER;'Lace, Net, Chiffon, Voile
SHEER: Lawn, Taffeta, Blouse Crepe, Organdy
DRESS WEIGHT:Crepe, Woot, Brocade, Velvet
MEDIUM: Woo!, Silk, Linen, Pique, Faille,
Velveteen, Terrycioth
HEAVY: Denim, Duck, Sailcloth
EXTRA HEAVY: Canvas, Upholstery, Awning
VINYLS-FILMS
LIGHT TO MEDIUM WEIGHT: Leathers & Suedes
HEAVY LEATHER
MACHINE EMBROIDERY
TOPSTiTCHING
METALLIC EMBROIDERY
9-10
14-16
9-11
11 80 Sharp
16 100 Sharp
19 120 Sharp
14 90
14-16
16-18
9-11
16-18
11 80
70 Light Ball
70-80
80-90
90-100
9 70 Sharp
9 70
70-80 Sharp
90-100 Leather (Wedg
100-110
60-80
Light Ball to
Medium Ball
Medium Ball t
Heavy Bail
Ball or Shaft
Sharp
Leather {Wedo
Leather (Wedg
100-110
Page 14
30
(Fiai Side of Needle} (Round Side of Needle)
Regular Sharp All-purpose Medium Ball Wedge Point
Needle Needle Point Needle Needle
20
12
10-14
10
9
4-5 50
60
50
10 4-5 Heavy Duty
16-18
14-16 10
t 4.
12
10
8 3-4
10
8
6-8
10 60 70
60
9 50
7-8
6-7 Heavy Duty
7-8
3-4
3
50
Heavy Duty
50 30
50 30
Heavy Duty
Cotton Embroidery Thread Size 50—70
Silk Buttonhole Twist Size D
Metallic Thread
50-70 NO
30 YES
30 YES
30
50-70 NO A-Silk/Nyton
30
30 NO A-Silk
30 YES
30 YES
30
YES NO
NO A-Silk/Nylon
NO
YES
YES NO
YES NO
A-Si!k/Nylon
A-Silk/Nylon Roller Foot
A-Silk/Nyton
A-Si!k
NO
NO
NO
Roller Foot
Roller Foot
Roller Foot
Roller Foot
Roller Foot
Roller Foot
13
Page 15
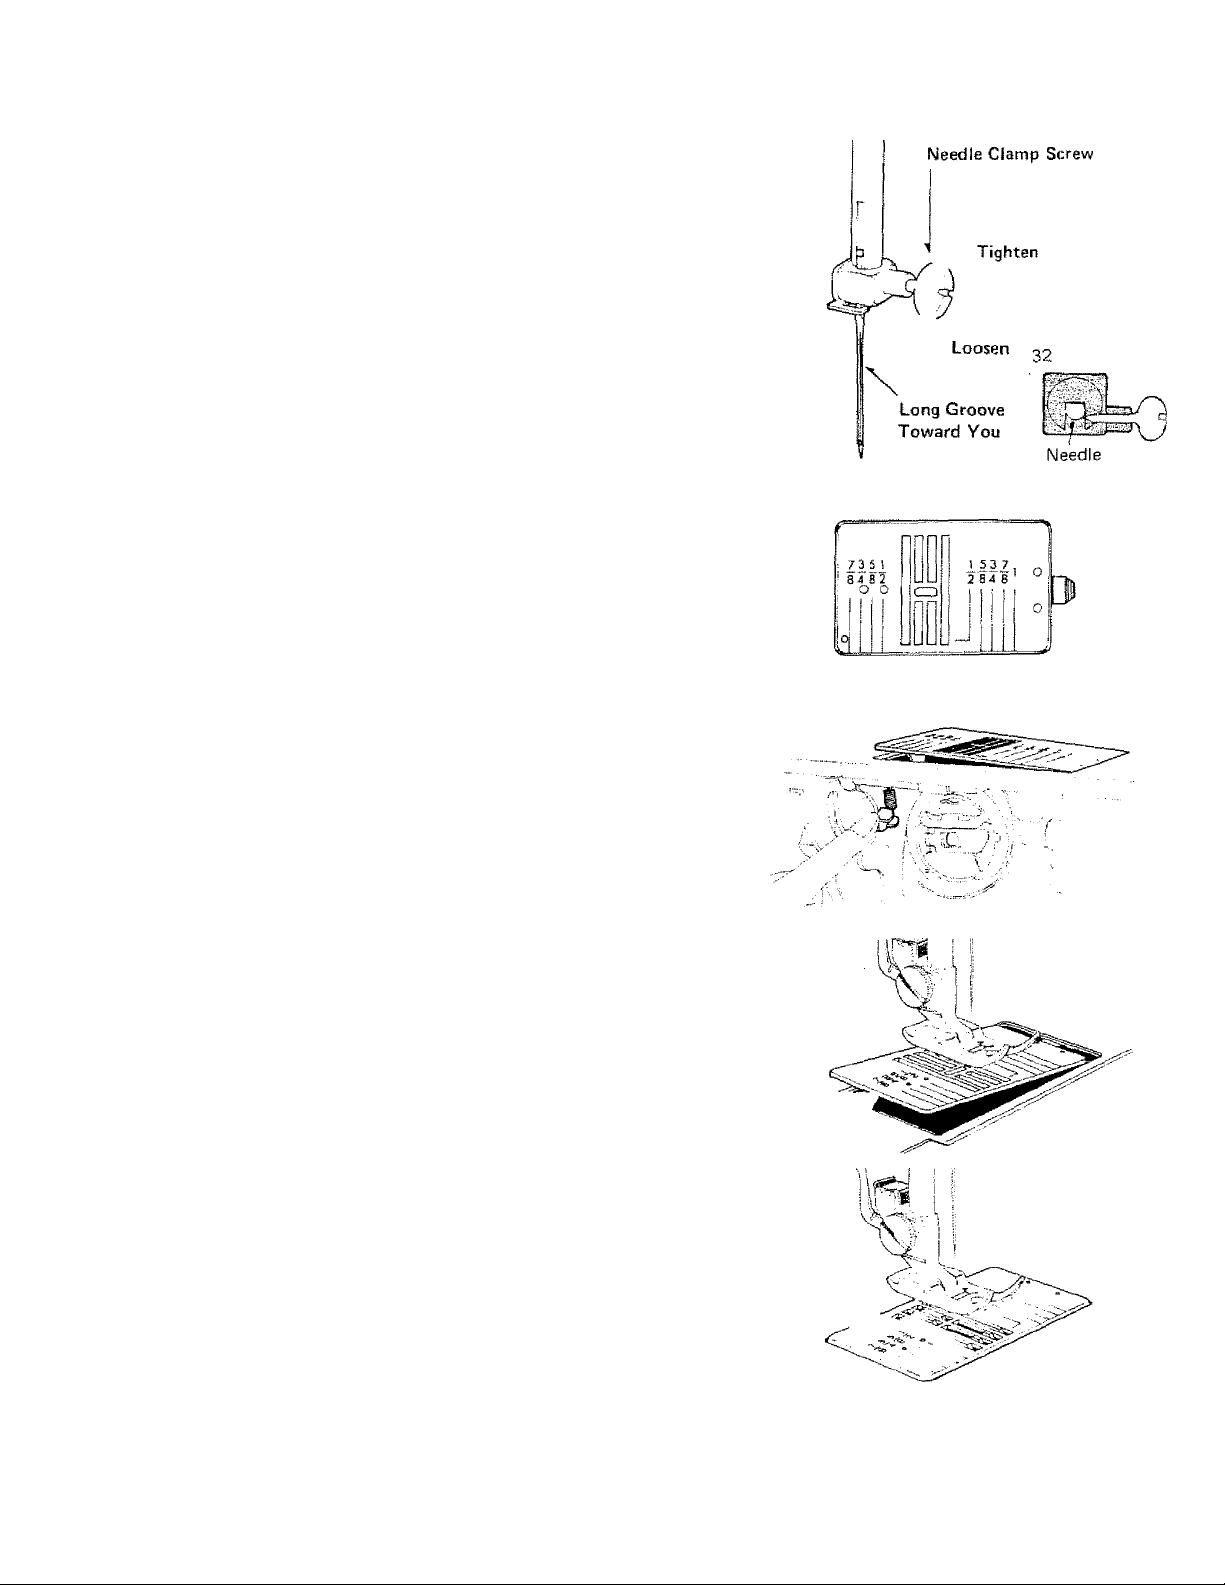
CHANGING THE NEEDLE
• To Change the Needle
1. Raise the needle bar to its highest position
by turning the hand wheel toward you.
2. LooSen needle clamp screw to remove the
needle. {Fig. 31)
3, Place needle (flat side to the back and
long groove toward you) (Fig. 32) in the
needle clamp and push it upward as far as
it will go, tighten clamp screw.
4, After changing the needle, make one
complete revolution of the hand wheel by
hand to be sure the needle is clearing the
needle plate.
31
33
34
CHANGING THE NEEDLE PLATE
To change the needle plate, release front flap
sewing surface and turn flap up. Push the
button on the left side of the bobbin case
and the needle plate will automatically raise.
(Fig. 34) Lift the needle plate. Replace the
needle plate by sliding the clip on the right
of the needle plate under the opening and
pressing the left side of the needle plate
down into place. (Fig. 35, 36)
The needle plate is removed for cleaning the
lint which may pile up between the needle
plate and the feed dogs. The straight stitch
needle plate is used for sewing very fíne or
soft materials. The zigzag needle plate can
be used for all of the norma! sewing. Care
should be taken to clean lint from the feed
dogs to insure smooth operation of the feed
mechanism.
35
36
14
Page 16
37
39
|U
Lr~
1
Li
1
1 U
o I
0 :
O
0
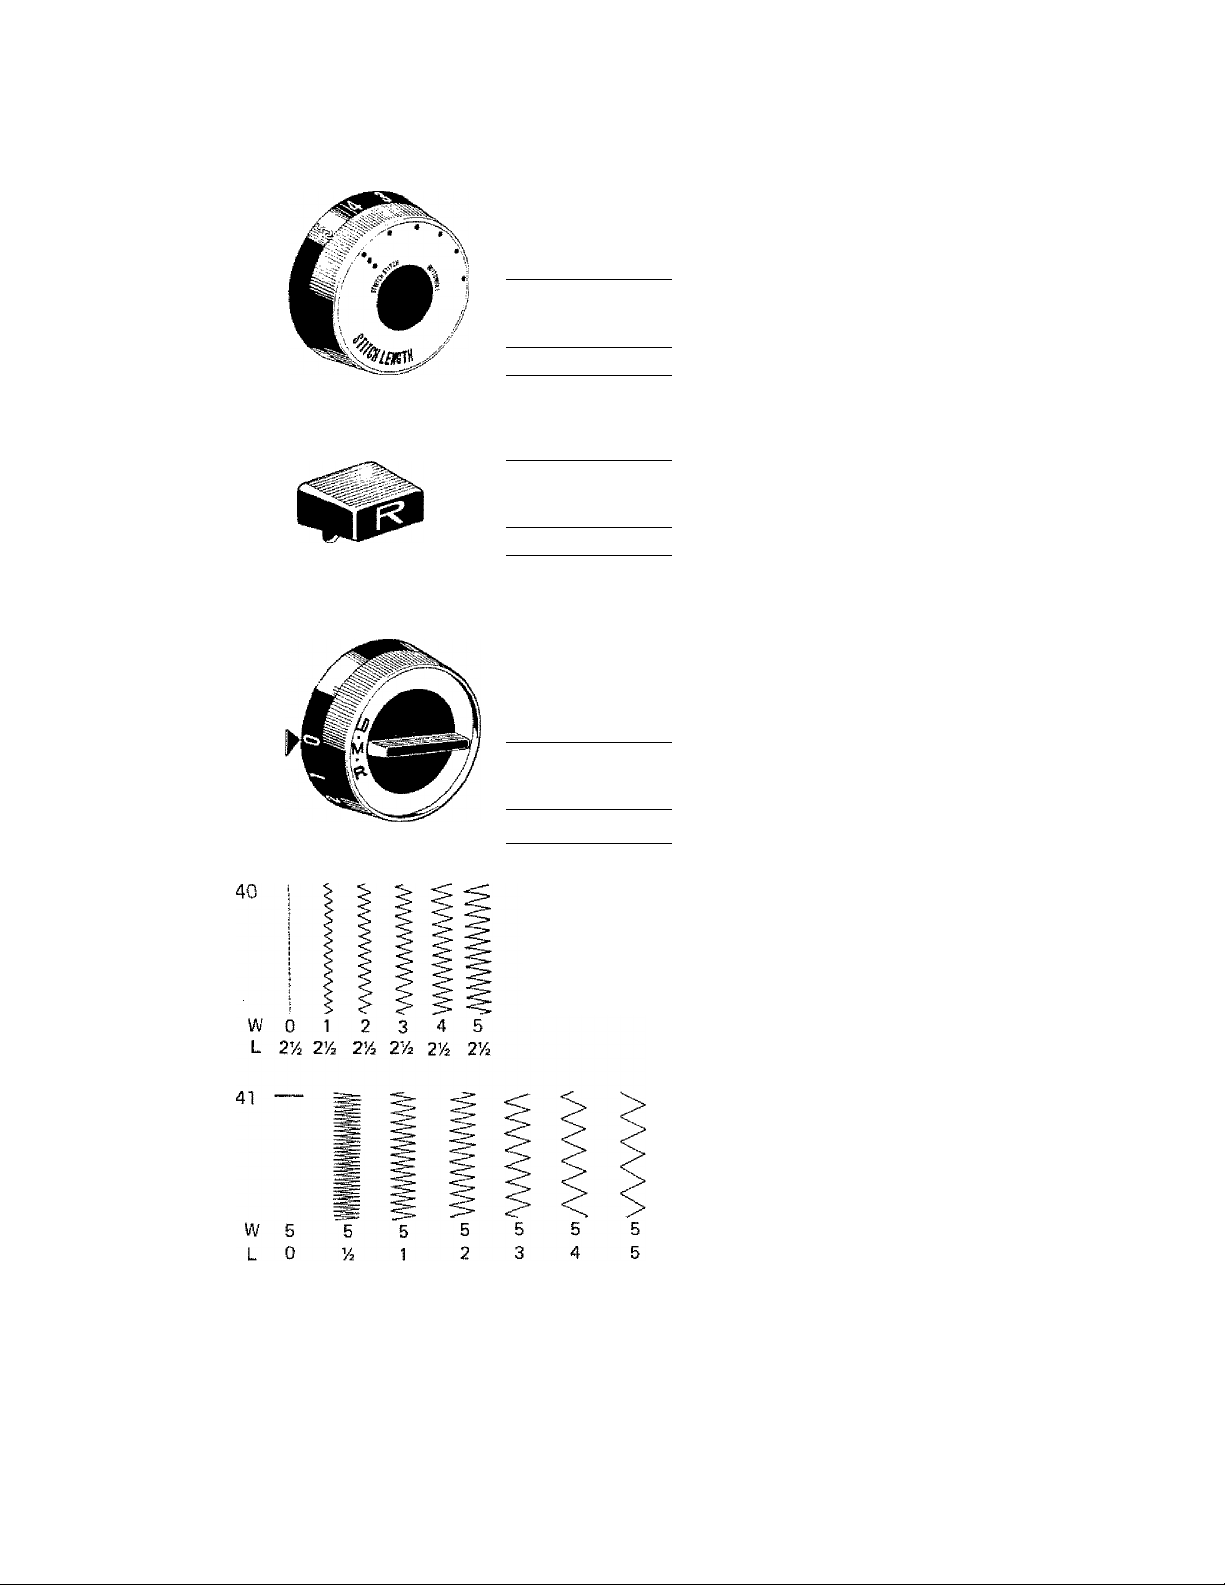
ADJUSTING THE STITCH
• Stitch Length Dial
This dial {Fig. 37) controls the forward
feeding of the fabric. At 0, the fabric does
not feed at all. As the numbers increase so
does the length of the stitch. Turn the blue
dial so that the desired number is below the
blue indicator.
• Reverse Lever
The "R" marked blue lever (Fig. 38} above
and to the right of the stitch length dial will
cause the machine to sew in reverse when
depressed. This lever may be used at the
beginning and end of sewing to lock the
threads.
To backstitch, simply push the lever down
and hold for the desired number of stitches.
It is advisable to tie the thread ends instead
of backstitching on soft sheer fabrics to
avoid puckering.
1 o
o
=J L_
Pattern;
Length: 2%
Width: 0-5
Feed Dog; Up
Pressure: Normal
Foot: AM Purpose
Needle Position: IV!
Pattern:
Length: 0—5
Width: 5
Feed Dog: Up
Pressure: Normal
Foot; Allpurpose
Needle Position; M
• Stitch Width Dial
This dial (Fig. 39) controls the swing of the
needle right and left for various widths of
stitches. At 0, the needle does not swing,
therefore, a straight line of sewing results no
matter which stitch is selected.
At 1, the needle takes a narrow swing result
ing in a narrow column of stitching. At 5,
the needle takes a large swing resulting in a
wide column of stitches. (Fig. 40)
• Relating Stitch Length to Stitch Width
When the width dial is engaged at one par
ticular width (such as 5), the stitch length
dial will now control how close those
stitches come together. At length 0, the
fabric does not move, resulting in a ball of
stitches formed one on top of the other, as
is used in button sewing. At about 1/4, the
feed pulls the fabric through slowly, result
ing in a dense column of stitches called a
satin stitch. At length 5, a very long open
zigzag results. (Fig. 41)
15
Page 17
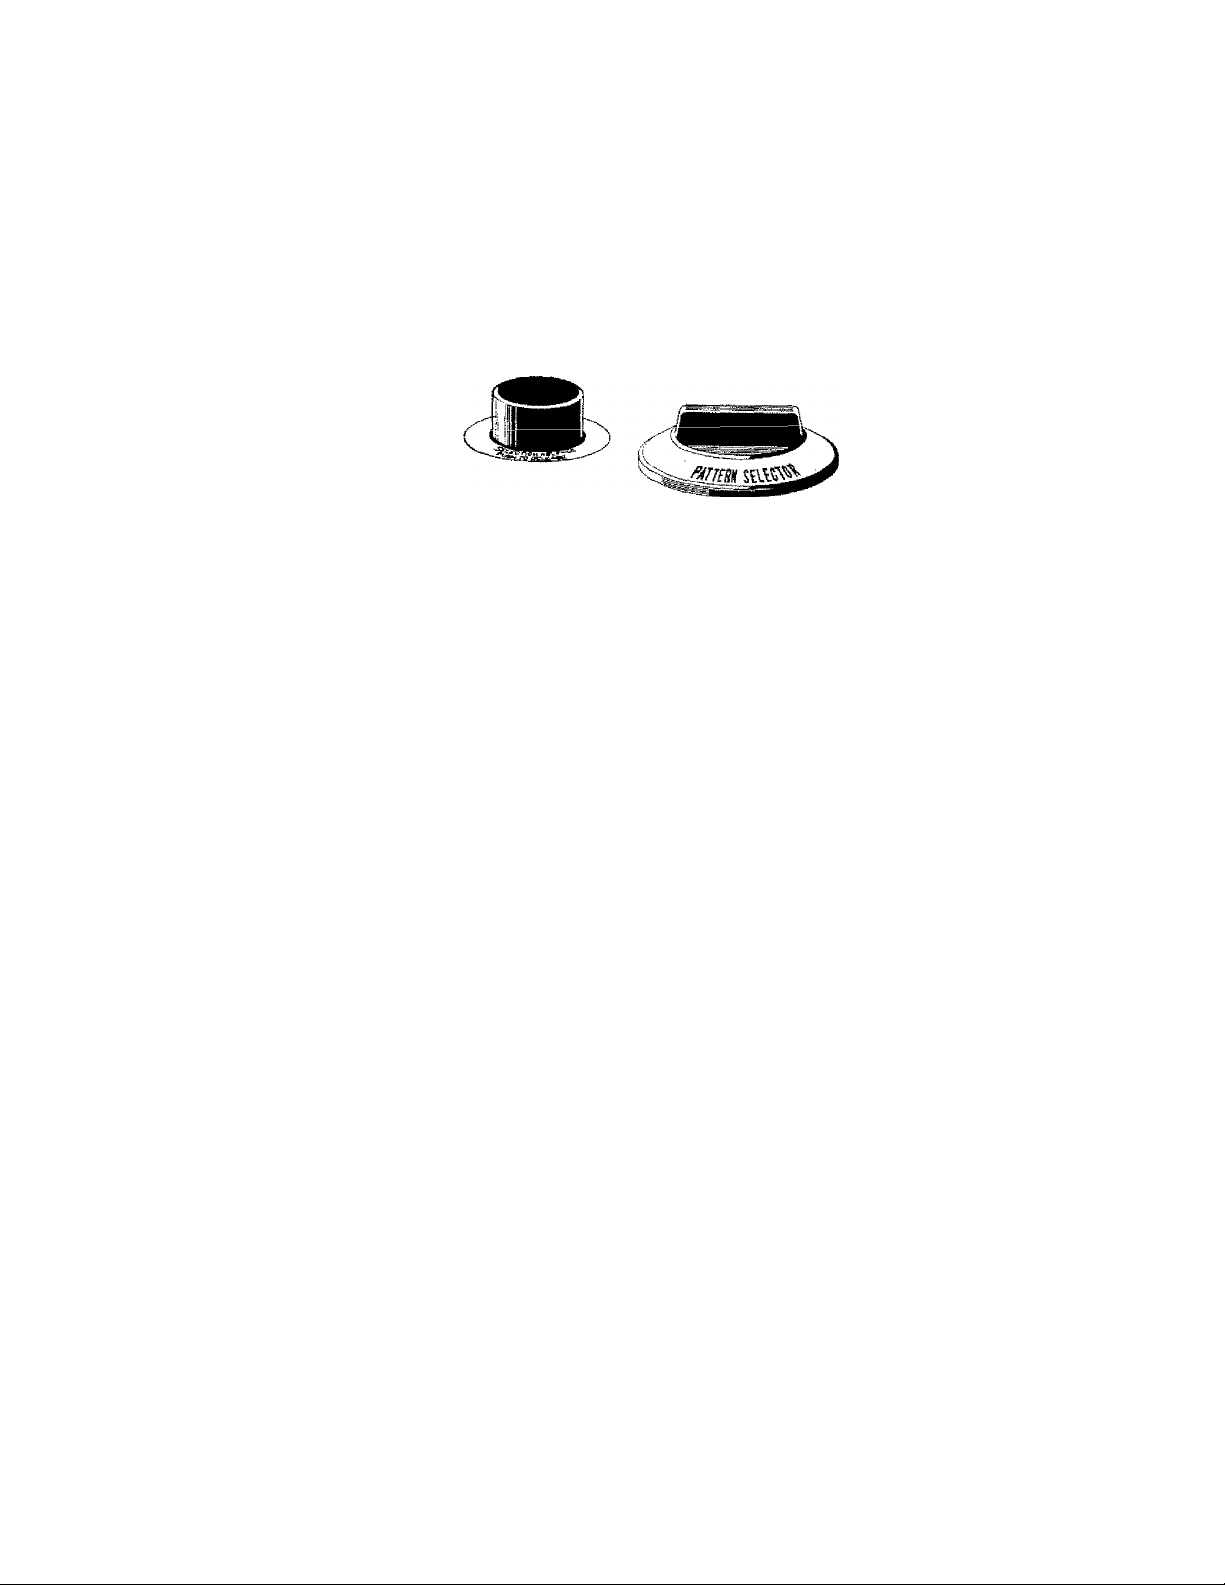
• Pattern Selector Dial, Pattern Selector Release Button and Pattern Indicator Window
Pattern Selector Dial selects the stitch pattern to be made according to the picture shown at
the yellow indicator in the pattern selector window. With the pattern selector release button
pushed down, the dial can be turned in any direction to the desired stitch. Release the button,
and the selected stitch is locked in place.
42
I ■
The stitches shown are as follows:
Forward Stitch Patterns {shown in blue)
1.
AAjVvV Results in a straight stitch when the width is at zero and a zigzag when the
width is engaged. Set the dial at this position for buttonholes.
2.
3.
4.
5.
6.
7.
8.
9.
A A Blind Hem, stitches forward then a zigzag bite to the left for use in
hemming, topstitching, and other applications. See Pages 35—36. Width 0 will give a
straight stitch, ail other widths will produce the blind hem stitch.
Stretch Blind Hem, takes two small zigzag stitches then a larger zigzag to
the left for blind hemming soft, stretchable knits. When used on a very short length,
an excellent edging stitch is produced. See Page 37, A straight stitch is obtained at width
0, All other widths produce the stretch blind hem stitch.
/\/\ Multiple Stitch Zigzag, takes three stitches from side to side for use in
overcasting, applying elastics, and mending as shown on Pages 38—39, Width 0, results
in a straight stitch, width 5 is the best choice for use of the multiple stitch zigzag.
/' Scallops, perfectly shaped half circles, are formed to the left for decorative
pin tucks and edging. Width 0 results in a straight stitch. Width 5 produces the widest
scallop. See Page 40,
~\f^f Reverse Blind Hem is similar to the regular blind hem (2) except that the
zigzag bite is toward the right and the straight stitch is to the left, for easier shell tucking.
Straight stitch is produced at 0 width, the reverse blind hem at all other widths. See
Page 40.
_AlAA. Interlock, one straight stitch is formed then a zigzag bite to the right for
seaming lightweight jersey and tricot as on Page 41. Width 0 results in a straight stitch,
ail other widths produce an interlock.
Checker Stitch takes small zigzag stitches in left, middle and right positions
for decorative effects as on Page 42. Width 0 will give a straight stitch alt other widths
produce the checker stitch.
Domino Stitch takes zigzag stitch in the left and right positions for
decorative effects as on Page 42. Straight stitches are produced at 0 width, while width 5
results in a domino stitch.
16
Page 18

4^'
V,.
V >
Decorative Reverse Stitch Patterns {shown in brown)
10.
11.
12.
13.
14.
15.
Reverse Action Stretch Stitches (shown in green)
16. ' The Crown Stitch forms a crown shaped pattern for decorative effects on
17. The Cross Stitch produces a hand embroidered replica of the cross stitch for
18. Overlock, takes a stitch to the left, then backwards, and then one stitch right
19.
20. ' This Decorative Stitch can be used for fagotting and borders on household
21. 3 ; ' Smocking Stitch is a honeycomb type pattern useful in seaming gauze and
22. Elastic Edging Stitch takes one stitch to left then forward, then a rick-rack
23. _ _ ' _ Stretch Overlock takes a stitch to the left and right then two straight stretch
24. l! e"":\ Rick-rack takes stitches forward and backward to form a triple reinforced
Note: For Decorative Reverse Stitch Patterns shown in brown and Reverse Action Stretch
__.__
Heart Stitch produces even shaped heart designs with the straight edge to the
left for trimming collars and cuffs of little girls dresses as shown on Page 43. Width 3
produces a small heart design with the widest heart shape at width 5.
Tuiip Stitch produces a straight stitch at left and a tuiip design toward the
right for border designs on guest towels and children wear. The widest tulip design is
produced at width 5,
1..,.. Swan Stitch results in swan shaped patterns to the right with a straight stitch
to the ieft for decorative effects on towels and children clothes. Width 5 produces the
largest swan design.
^ 21 Fish Stitch forms a fish pattern at the right with the straight edge to the
left for decorative effects on towels and children wear at a width more than-3. The
widest fish pattern is formed at width 5. See Page 43;
Leaf Stitch forms alternating leaf designs for decorating household linens
and garments. The largest leaf design is produced at width 5.
”^2. Greek Key Design is a traditional fashion pattern for decorative borders and
hems of household linens and garments. Width 5 produces the widest pattern. See Page
43.
table-clothes and napkins. See Page 44, Width 5 produces the widest pattern and width 0
produces the straight stretch stitch.
highlighting drapes and household linens. See Page 44. The straight stretch stitch is
formed at width 0. AM other widths produce the cross stitch.
to iform a straight seam and overcast all in one operation. This is excellent on both knits
and wovens for finished % inch seams on width 5, and for the straight stretch stitch at
width 0. See Pages 45—47,
____
The Stitch and Overcast for a straight stitch on the left and a stitch
diagonally to the right for stitching and overcasting Va inch seams on woven and knit
fabrics. See Page 48. Width 5 is best for seaming and overcasting in one step while
width 0 is used for straight stretch stitching.
linens at width 5. Width 0 produces the straight stretch stitch. See Page48.
sweater type fabrics as well as decorative effects. See Page 49. Width 0 results in a
straight stretch stitch while other widths produce the smocking stitch.
stitch, tor decorative uses. At width 0 the straight stretch stitch is produced and all
other widths results in the elastic edging stitch. See Page 50.
stitches for seaming softer, bulkier stretchy knits. Use at width 5 for completed 14 inch
seams and width 0 for the straight stretch stitch. See Page 51.
zigzag for decorative uses. Width 0 produces the straight stretch stitch, all other widths
result in the rick-rack stitch. See page 52.
Stitches shown in green, always set the stitch length dial at 5 at the brown and green
dots.
17
Page 19
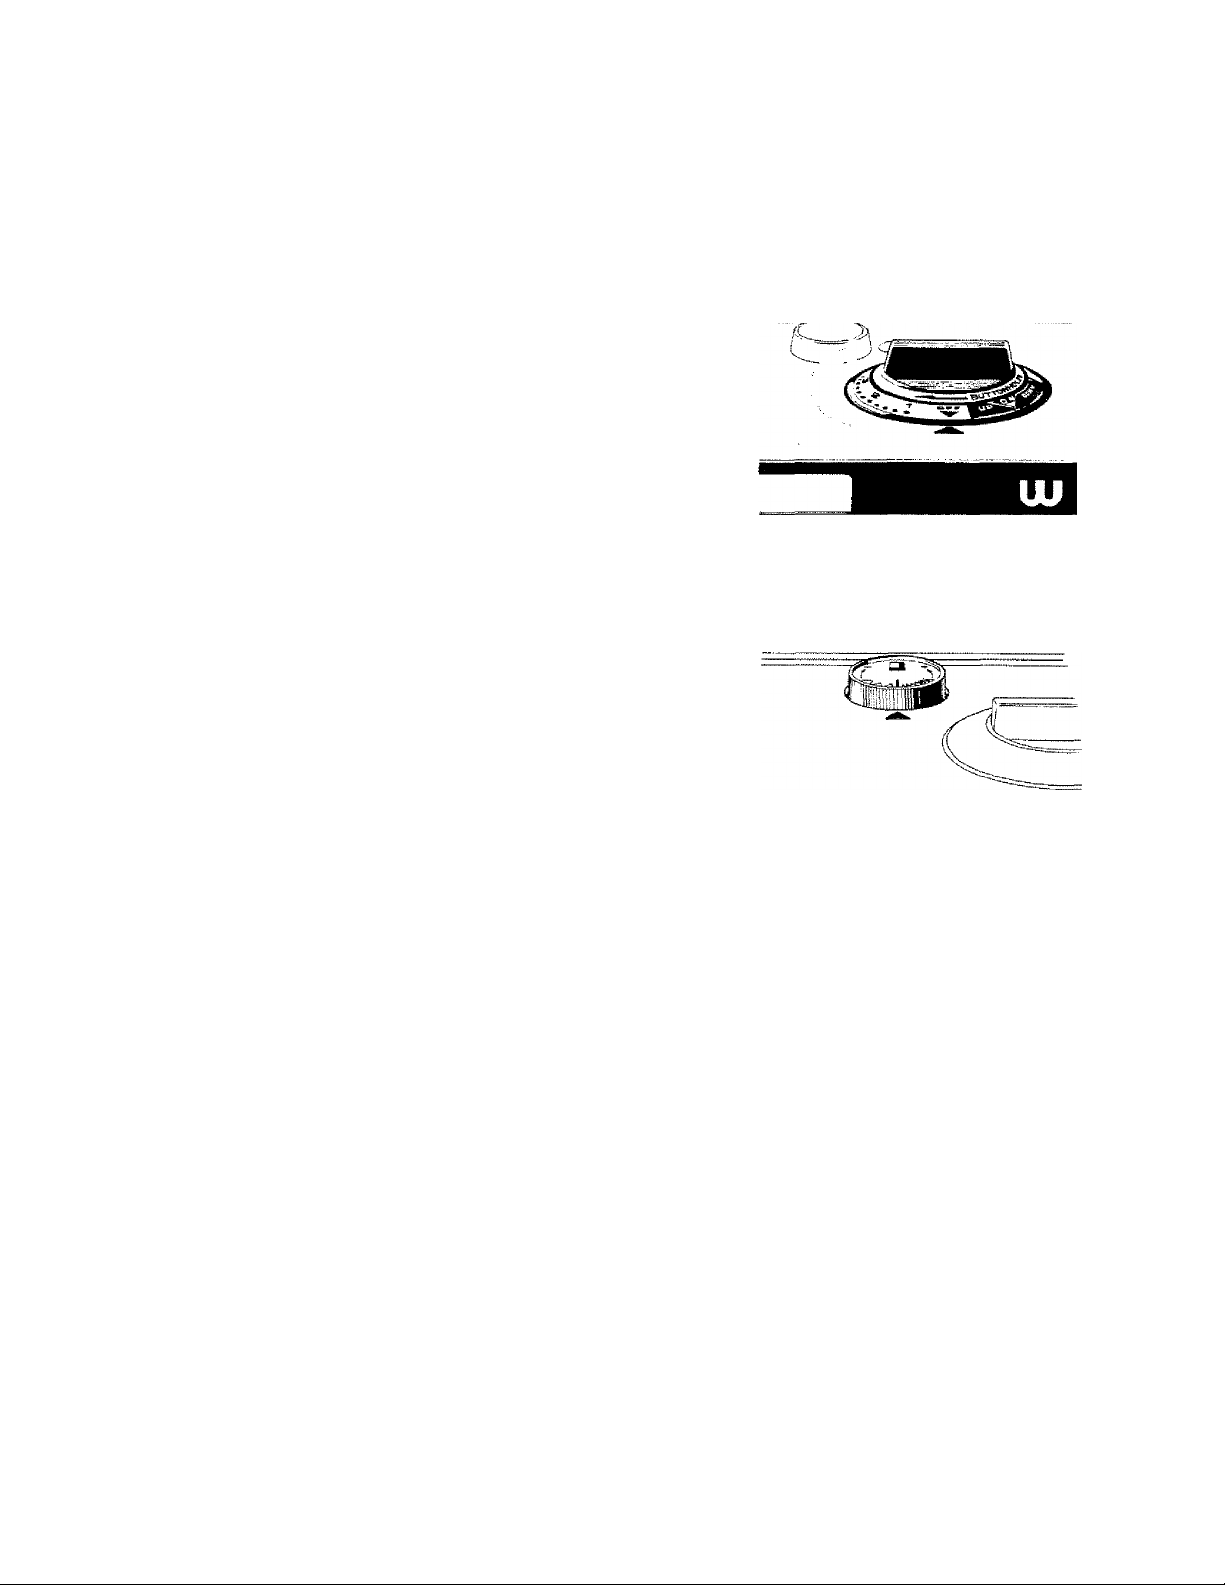
• One-Step Buttonhole Control Dial
This dial (Fig. 43j is used for automatic,
one step buttonholes. The length may be
automatically set by selecting a number
or point on the dial between 1 and 5.
Normally, Number 1 produces a button
hole of about Vi inch in length on stiff
cotton, while Number 5 results in a V/i
inch buttonhole. Size will vary on
different types of material due to
stretching of the fabric. Once the number
or position has been selected, the button
hole size is produced automatically.
Each buttonhole can be made the same
size without any measurement on the
fabric. For normal sewing this dial ts set
at OFF, Further details are explained on
Page 31.
43
— SIZE —
• Stitch Density Control
This control is mainly used for fine tuning
the stitch density of the right side of the
buttonhole and the shape of decorative
reverse stitch patterns. A clockwise turn
of the knob increases the openness of the
right side of the buttonhole.
Conversely, a counter clockwise turn
makes the right side of the buttonhole
closer together and makes the reverse
stitch portions of decorative reverse stitch
patterns longer. Reverse stretch stitch
patterns may be a altered as to closeness
or openness of the stitch by turning the
dial counter clockwise for a more open
pattern and clockwise for a closer stitch
pattern. However, most sewing will be
done in the neutral position of the stitch
density control. (Fig, 44)
44
18
Page 20

45
46
o
V
Pattern:
Length: 2-5
1
Width: 0-5
Feed Dog: Up
Pressure: Normal
Foot: All Purpose
Needle Position:
u
1
Pattern
Length: 2—5
Width; 0—5
Feed Dog:
Pressure; Normal
Foot; All Purpose
Needle Position: M
0
• Needle Position Dial
This dial (Fig. 45) is used for changing needle posi
tion.
Three different needle positions, L-left, M-middle
and R-right can be selected. Also, those intermediate positions between left and middle and
between middle and right can be selected with the
dial at the middle between L — M, and IVl — R,
With the dial at L, M and R, the straight stitch line
is formed at left, middle and right respectively.
The etched guide lines on the needle plate are
measured from the needle in the middle position.
Never change the needle position while the needle
is in the fabric because it will bend or break the
needle.
Set the needle position at the left (Li when using
the one-step buttonhole.
ADJUSTING FOR THE FABRIC
• Feed Dog Control
This dial (Fig. 46) will raise and lower the feed
dog as indicated. Since the feed dog moves the
fabric through the machine, this dial allows the
]
feed to be regulated for various types of sewing,
UP -- for the greatest height of the feed dog
0
and the best grip on the fabric. This is
the position used for most sewing,
DOWN — in this position, the feed dog is com
pletely below the needle plate surface
and therefore does not move the fabric
3t 3!!.
Down position is used for sewing on but
tons, darning, and free hand embroidery.
♦ Pressure Control
This control (Fig. 47) regulates how heavily the
presser foot rests upon the fabric. To completely
release the pressure for freehand work, push the
pr6ssur8 r0!s3S6 button backwsrd until ths upp6r
plate pops up. To set half pressure for heavy bulky
fabrics, push the upper plate halfway down as
indicated on the picture panel inside the face
cover. Push the upper plate all the way down for
regular sewing. Light weight fabrics need more
pressure for better hold against the feed, whereas
heavier, bulkier fabrics require less pressure to
eliminate pushing of the top’layer of the fabric.
Pattern:
Length; 2—5
Width: 0-5
Feed Dog: Up
Pressure:
Foot; Allpurpose
Needle Position: M
19
Page 21

TENSION 48
The top tension (Fig. 48) consists of discs
between which the upper thread passes.
The numbered tension dial regulates how
tightly the thread is being held. When
necessary, adjust the top tension dial in
relation to the red line, turning to a lower
number to loosen and to a higher number
r
Iji
ii.
1.h
___
..........
1
.
^ @
i ■
. 'w'
to tighten the upper thread tension. The
top tension is engaged only when the
presser foot is down for sewing. Normal
top tension is usually about 5.
49
The bobbin thread tension is controlled
by a small screw on the side of the bobbin
case. (Fig. 49) This screw may be turned
with the small screw driver to the right
\
to tighten and to the left to loosen the
bobbin tension.
• Adjusting the Thread Tensions
The tensions may have to be adjusted for
Balanced tension
certain fabrics. . u;.
■ :c: :i Use a new
needle the correct size for the thread and
fabric being sewn. (See chart page 12)
It is best to test the tension on a scrap of
the fabric you are using for construction.
Always use a double thickness and always
sew on the bias when testing tensions.
The tensions are correct when the upper
thread and lower thread interlock be
tween the two layers of fabric with the
loops not showing on top or bottom.
(Fig. 50—A)
Adjust as follows:
1. If the seam is puckered both top and
bobbin tensions are too tight. Loosen
both tensions slightly.
2. If top thread lays on the fabric with
bottom thread looping over it, the top
tension is too tight,(Fig, 50—B)Loosen
the top tension slightly.
3. If the bottom thread lays on the fabric
with the upper thread looping over it,
top tension is too loose.(Fig. 50—C)
Tighten top tension slightly.
(B)
(C)
Top tension too tight
Top tension too loose
20
Page 22

51
55
56
THE PROPER PRESSER FOOT
• Changing the Foot
Pui! the presser foot shank iever
toward you to remove the foot.
(Fig. 51 — Step 1) To attach
place the desired foot under the
shank and lower the presser bar.
(Step 2) Foot will be locked
automatically. (Step 3)
• The All Purpose Foot •F‘77'/
This foot (Fig. 52} is flat on the
bottom and has a wide hole to
accommodate wide stitches. This
foot should be used for all
normal sewing.
• The Straight Stitch Foot
This foot (Fig. 53) is fiat on'the
bottom and has only a small hole
to accommodate only straight
stitching. It may be used on
sheer or soft fabrics for more
control when the all purpose
foot allows the fabric to be
pulled with the needle.
• The Buttonhole Foot ifR/ S
This foot (Fig. 54) has a frame
which holds the fabric taut
enough to produce a good
buttonhole. The markings on
the side allow exact buttonhole
length to be made.
• The Embroidery Foot
This foot (Fig, 55) has a wide
groove carved out on the bot
tom, This groove allows the foot
to pass over dense stitches such
as the satin stitch without
catching on the stitch. It is
transparent to make the stitch
more visible. It has two small
grooves in the front to make
cording easier. Do not use this
foot for normal sewing of light
weight fabrics. Since it is groov
ed it will not hold the fabric taut
enough to produce a good
straight stitch.
• Cording and Zipper Foot
This foot (Fig. 56) is very narrow,
with needle opening cuts at its
right and left sides to sew in
zippers and insert cording.
21
Page 23

Pinning may be used as a time saver instead of
hand basting. Place your pins at right angles
to the edge of the fabric with the pin head at
the raw edge. It is possible to sew over pins,
but for best results it is recommended that the
pins be removed as you approach the presser
foot. Sewing over pins can result in damaged
needles.
PLACEMENT OF FABRIC/STARTING A SEAM
Before placing fabric under the presser foot,
make sure that the take-up lever is at its
highest position. Place your fabric so that its
raw edge is even with the back edge of the
presser foot.
When "placing a heavy, bulky fabric under the
foot push up on the presser foot lever for extra
lift while you are positioning the fabric. Place
the thread ends, which are 3—4 inches long,
under the presser foot and either to the left or
to the right. Be sure that both thread ends are
under the presser foot. Always lower presser
foot before sewing. {Fig, 57)
Push the reverse lever down so that the machine
sews a few stitches backwards to the edge of
the fabric to backtack, then release the lever
allowing the machine to continue forward.
58
57
59
GUIDING THE FABRIC
• Etched Seam Guide
The etched seam guides on the needle plate are
graduated in 1/8 inch divisions measured from
the middle needle position, (Fig. 58) In order
to use the etched guides effectively, let the
edge of the fabric follow the line selected for
the seam. Therefore, for a 5/8 inch seam, place
the raw edge of the fabric on the line marked
"5/8". In order to sew a straight line, let your
eye follow the etched lines, not the needle.
• Cloth Guide
This guide may be placed on the machine for
extra help in keeping seams straight. It will
allow you to guide seams from 1/4 inch to
1-1/2 inch in width, so that it is useful for
seams of unusual widths. (Fig. 59)
• Presser Foot as a Guide
Straight Stitch Foot — for a 1/4 inch seam,
guide the fabric along the right side of the
foot. (Fig. 60)
All Purpose Foot — for a 1/8 inch seam,
guide the fabric along the right side of the
needle hole. (Fig. 61)
60
Jill
il,
silg'
61
J
ix
1
J II °
22
Page 24

63
• Holding the Fabric
For most fabrics, it is not necessary to hold the
fabric in both front and back. Merely guide the
fabric with one hand from the front.
For the fine delicate fabrics, such as chiffon,
georgette, and tricot, the best results will be
attained by holding the fabric in front and back
of the needle without pulling on it.
• Turning Corners
To pivot at a corner, (Fig, 62) leave the needle
in the fabric while on the upswing so that the
stitch is almost completed, thus preventing the
possibility of skipped stitches in the corner.
Lift the presser foot and pivot the fabric. Then,
lower the presser foot and continue sewing.
• Curved Seams
On a curved seam (Fig. 63} use a slightly shorter
stitch length than you are using for the rest of
the seams. For example, if length 2 is being
used for the seams, a 1-1/2 stitch length would
be preferred for curves. A smaller stitch length
will add strength and elasticity to the seam.
When guiding the fabric, keep your fabric edge
on the etched seam guide line directly across
from the needle rather than on the forward part
of the line. The seam guide may be used on an
angle as shown.
64
• Sewing Across Heavy Seams
When approaching a heavy seam, (Fig. 64) hold
the fabric upwards on an angle so that the heavy
seam falls under the upward curve of the foot.
This will help feed the heavy seam through the
machine.
• Ending Seam/Removal of Fabric
Stitch to the edge of the fabric, then press down
the reverse lever and backstitch for a few
stitches to reinforce the end of the seam.
Turn the hand wheel until the take-up lever is in
its highest position so that the stitch is complet
ed and the threads will pull freely. Lift the
presser foot and remove the fabric by drawing
the threads to the left and back,keeping them
under the foot so as not to bend the needle. Cut
the threads with the thread cutter on the back
of the presser bar. Leave the thread ends three
to four inches long.
23
Page 25

SEAMS
The normal stitch length for most fabrics is
3, but the length chosen should depend on
the fabric and area of usage. Usually, heav
ier fabrics require longer stitches, and lighter
weight fabrics require shorter stitches. For
curved seams and bias cut areas use a shorter
stitch length to add strength and elasticity to
the seam.
65
Pattern
Length: 2-4
Width: 0
Feed Dog: Up
Pressure: Normal
Foot: All Purpose
Needle Position: M
BASTING/TOPSTITCHING
Sewing a seam with a longer stitch is useful
for temporary seams prior to fitting. Basting
stitches also may be used when gat.hering in
fullness.
Topstitching can be done very effectively
with the long straight stitch. For a bolder
stitch, two threads of the same type can be
threaded through one needle (size 14 or 16).
A heavier thread such as buttonhole twist
may be used for topstitching, but be sure to
use a larger needle (size 16 or 18). (Fig, 65)
Left needle position may be used for more
support of fabric.
DARNING
Worn spots or small holes can be darned very
easily. Use of an embroidery hoop is option
al depending on the fabric. (Fig. 66) A fine
thread is recommended so that the fabric
and thread will blend together invisibly.
Trim the ragged edges from the area to be
darned. Hold the threads to start, then
move the fabric slowly back and forth while
running the machine very fast to fill the
area. More professional results will be
attained by moving the fabric in a figure
eight pattern while sewing. After filling in
the area lengthwise, reweave with crosswise
stitches in the same manner.
Pattern
Length: 5
Width: 0
Feed Dog: Up
Pressure: Normal
Foot: Straight Stitch
or All Purpose
Needle PositionrM or L
Pattern
Length: 0
Width: 0
Feed Dog: Down
Pressure: Darn
Foot: Norse or All
Purpose
Needle Position: IVl
66
67
ELASTIC THREAD SHIRRING
Wind elastic thread onto bobbin, (Fig. 67) as
shown, letting the thread pass through your
fingers. The thread should be wound
smoothly without stretching. Place bobbin
in case as usual, being sure that the elastic is
drawn through the tension. Use regular
thread on the top of the machine. Do a trial
run on the chosen fabric to test length of
stitch. Lay a piece of paper under the fabric
to keep it from gathering up as you sew.
This will enable you to sew many parallel
rows of stitching without difficulty. After
wards tear out the paper and the fabric will
be gathered. (Fig. 68)
24
Pattern
Length: 3—5
Width: 0
Feed Dog: Up
Pressure: Normal
Foot: All Purpose
Needle Position; M
Page 26

OVERCASTIWG
Pattern:
Length: 2—4
Width: 5
Feed Dog: Up
Pressure: Normal
Foot; Embroidery the fabric. (Fig, 69)
Needle Position: M
Place the edge of the material underneath
the opening of the sewing foot and guide
raw edge along the center groove of the foot,
allowing stitch to form half on and half off
The multiple stitch zigzag is a wiser choice
for most fabrics. See page 38.
71
Pattern:
Length: 2
Width: 1
Feed Dog: Up
Pressure: Normal
Foot: All Purpose
Needle Position: M
Pattern:
Length; 0
Width; 2-5
Feed Dog; Down
Pressure: Normal
Foot: Button Foot
Needle Position: L
SEAMING KNITS
The narrow zigzag can be used in seams of
firm knits for added strength. After sewing,
open seam and press fiat. Tiny zigzag
stitches can hardly be seen and the seam will
give when stretched. (Fig. 70)
SEWING ON BUTTONS ^f/7
Zigzag stitching is a very easy and conve^
nient method of sewing on buttons without
a shank. (Fig. 71)
Place the button so its left hole comes
directly under the needle, then gently lower
the button sewing foot. Take a stitch in
the hole.
Haise tne neeaie ana move zigzag wiotn aiai
to the right until the needle comes down
exactly over the right hole in the button.
Usually 6 to 8 stitches are adequate for
securing a button in place. Stop with the
needle in the left hole. To lock the threads,
set the stitch width at 0, and take a few
stitches in the left hand hole.
25
Page 27

• Forming a Thread Shank
Buttons sewn on coats or jackets should
have a thread shank to make them stand
away from the fabric. (Fig, 72) To form a
thread shank, sew over a pin or rounded
toothpick which can be inserted directly
into the button sewing foot.
After stitching the button to the fabric,
remove work from under the presser foot
leaving threads about six inches from fabric.
Remove pin or toothpick. Puli the threads
to back of button and form a shank between
button and fabric by winding threads tightly
around the attaching stitches. Pull threads
to back of the fabric and then tie thread
ends seburely. (Fig. 72)
73
SATIN STITCHING
This is useful for decoration such as taper
ing, manual designed embroidery, mono-
gramming, and applique. (Fig. 73)
The satin stitch, which is a very close zigzag
stitch, is obtained by setting the stitch
length as near to "0" as possible with
out stopping the feeding action. The setting
will vary for different fabrics. It may be
desirable to loosen the upper tension slightly
to cause the threads to lock underneath, in
order to make the top surface look especial
ly smooth. For lightweight fabrics, place
paper underneath the fabric while sewing for
best results.
TAPERING/CREATIVE EIVlBROtDERY
Tapering is done by gradually increasing and
decreasing the stitch width while sewing.
(Fig. 74) By this method, tapered mono
grams and other interesting designs can be
created. (Fig. 75) For tapered monograms
run the machine fast while turning the width
dial slowly from narrow to wide and back.
Pattern;
Length: Vi—14
Width; I—5
Feed Dog: Up
Pressure: Normal
Foot: Embroidery
Needle Position; M
Pattern: (VA
Length: Vi—14
Width: 0-5
Feed Dog: Up
Pressure; Normal
Foot: Embroidery
Needle Position; M, 75
Lor R
First, learn this stroke by letting the fabric
guide straight. Then, learn to pivot the
fabric as you are tapering by holding the
fabric at one point. Various strokes can be
combined to form letters and designs. Varie
gated thread can give attractive results.
26
Page 28

76
Pattern:
Length: 'A—A
Width: 0-5
Feed Dog: Up
Pressure: Normal
Foot: Embroidery
Needle Position: M, LorR
• Manual Embroidery Designs
Different designs can be made by turning the
stitch width dial between 0 and 5. By run
ning the machine at a constant speed and
turning the diai in a definite rhythm, various
designs can be created. (Fig. 76)
Pattern:
Length: 0
Width: 1—5
Feed Dog: Down
Pressure: Darn
Foot: Embroidery or None
Needle Position: M, L or R
FREEHAND MONOGRAMMING
For giving garments and linens a personaliz
ed touch, first transfer the design to the
right side of the fabric. An embroidery
hoop is recommended especially for soft
fabrics and toweling. {Fig. 77)
In order to monogram, you must move the
fabric slowly and run the machine rapidly.
Monogramming is like writing by moving the
paper under a stationary pen. Guide the
fabric slowly so that the zigzag falls close
together like a satin stitch, but be careful
that the stitches do not pile up. When guid
ing from side to side, move fabric slightly
faster to avoid a heavy area.
Practice by forming loops. Once this is
accomplished any letter is easy.
Sometimes the use of paper or non-woven
interfacing under the fabric may make
guiding the fabric easier. The paper or
interfacing may be torn or cut away at the
completion of the monogram. When mono
gramming towels, cellophane placed on the
top will help cover loops and make the
monogram smooth. Pull or cut away
remaining cellophane when finished.
27
Page 29

applique
Applying decorative shapes of
fabric scraps to household articles
and clothing is a very interesting
way of trimming an otherwise plain
article. First, trace the design on
fabric to be appliqued, then pin or
baste it securely in place on gar
ment, With a small straight stitch
or narrow zigzag, sew around the
transferred design, (Fig. 78)
Aftar
■f aKr
away, sew around the applique with
a satin stitch. For a smooth curve,
stop frequently at the inside edge
of the curve to pivot the fabric
slightly. Corners look much better
when the point is stitched by pivot
ing rather than just turned.
As with all decorative stitches,
paper may be used to give more
body to the fabric when stitching
and can be torn away when the
applique is completed. (Fig. 79)
GATHERING OVER A CORD
Ordinary gathering with a basting
stitch often breaks while pulling
in fullness. A small zigzag across a
cord such as crochet thread or
carpet thread, gives a much stronger
cord for gathering fullness Into
fabrics. (Fig. 80) Once the gathers
have been stitched in place, the
cord can be pulled out in order to
eliminate bulk. (Fig. 81)
79
Step 1
Pattern;
Length: 1
Width: 0-1
Feed Dog; Up
Pressure: Normal
Foot; All Purpose
Needle Position; M
80 81
Step 2
Pattern:
Length; %—’/3
Width; 2-4
Feed Dog; Up
Pressure: Normal
Foot: Ail Purpose
NIoorMa Pricl+ir^n* IV/l
or Embroidery
28
Pattern;
Length: 2
Width: 3
Feed Dog; Up
Pressure: Normal
Foot: Embroidery
Needle Position; L
Page 30

83
Pattern:
Length: 1
Width: 1-2
Feed Dog: Up
Pressure: Normal
Foot: All Purpose
Needle Position; M
LACE APPLICATIONS
Attaching laces or trims adds a
special touch to lingerie, dresses, or
linens. Pin or baste laces in place
easing or mitering corners where
necessary,
A straight edged lace or braid has a
convenient line to follow when sew
ing. (Fig. 82) When using a scallop
ed edged lace follow the design of
the lace for an almost invisible
application. {Fig. 83)
Note: Try Multiple Stitch Zigzag,
Overlook, Elastic Edge
Stitch, Smocking stitch.
Stretch Overlock or Rick-
Rack for different effects.
84
Pattern: fZZi:
Length: %
Width: 5
Feed Dog: Up
Pressure: Normal
Foot; Embroidery
Needle Position; M
FLUTTER HEM
An unusual way of hemming or
finishing edges of tricot or soft
knits is by a flutter edge. Hemming
in this manner is just like over
casting an edge, but the fabric is
stretched in back and in front of
the needle as you sew. For best
results, pull the fabric equally,
making sure the needle goes over
the edge. (Fig. 84) When you stop
to reposition your hands, keep the
needle in the fabric. (Fig. 85)
29
Page 31

Various fabrics require various methods of sewing 86
buttonholes. Four different methods are given
below, with suggested uses. If you are in doubt as
to which method is best for your fabric, test the
methods in question and choose the best according
to the finished appearance.
PREPARATION
For the best results, a good quality mercerized
cotton thread should be used. Polyester threads
often result in puckered or heavy unattractive
buttonholes. The finer your fabric is, the finer
your cotton thread should be. An interfacing
should be used under the buttonholes to give body, 87
to strengthen,and to help them withstand wear.
To establish the correct length of the buttonhole,
add the diameter of the button (A), plus the
thickness of the button (B), plus 1/8 inch for the
bartacks. {Fig. 86) The length may be marked on
the garment with a basting stitch, tailors chalk, or
transparent tape, as shown. (Fig. 87) Another way
to make sure that ail buttonholes will be the same
size is to cut a piece of cardboard as wide as the
buttonhole foot and long enough to make the
distance between the toe of the white slide and the
cardboard the size buttonhole needed. This
method works for buttonholes up to 1-1/8 inches
long. Horizontal buttonholes should extend 1/8
88
inch beyond the center line of the garment. (Fig.
88) Vertical buttonholes are placed so that the
cutting space of the buttonhole is directly on the
center line. (Fig. 89) Always make a practice
buttonhole on a scrap of the garment fabric before
making any buttonholes on your garment. On
your test sample, duplicate the thickness found in
the garment and be sure to include the interfacing.
The test sample should help determine the length
needed for the button to pass through easily, and
the stitch length for the particular fabric. As with
the satin stitch, the stitches should be close
together, but not so close that they pile up. Be 89
sure to use the buttonhole foot.
A+B+1/8 inch
1/8 inch
Center line of Garment
Center line of
Garment
Page 32

X
v>
BUILT IN ONE STEP BUTTONHOLES
With this buttonholer, you can produce as many buttonholes as desired which will be exactly
the same size simply by selecting the proper number or position. Automatically the button
hole will be produced. This buttonholer is used most often on light and medium weight
fabrics. The buttonhole lengths are relative to the numbers on the buttonhole control dial.
The lengths of the buttonholes are as follows;
NUMBER; 12345
LENGTH; 1" VA"
Most medium weight, stable fabrics will produce buttonholes of this length when the cor
responding number is chosen. In the case of slippery or sheer materials a smaller buttonhole
may result, which will require a slightly bigger number. It is best to test the buttonhole on a
scrap of fabric before making buttonholes on the garment. At this time you can also balance
the buttonhole density and adjust as necessary with the Stitch Density Control Dial for the
right side, and stitch length dial for left side.
90
1. Turn the Buttonhole Control Dial clockwise
from the OFF position to the ON position.
At the ON position press the dial down and
turn through the DOWN position. Release the
dial and turn to the desired buttonhole length
position. If the dial is turned past the desired
buttonhole length number, turn to the OFF
position and then turn the dial one more
complete turn to dear the mechanism and
repeat as above for buttonhole.
2. Lower the needle into the fabric at the
bartack marking line. Lower the presser foot
and start to sew. First, the bartack will be
made, then the right side of the buttonhole
91
will be sewn in reverse. The second bartack
will be made automatically when the desired
length is completed. Finally the left side of
the buttonhole will be made. Stop the
machine when the left side of the buttonhole
reaches the first bartack,
3. To lock the stitch, make sure the needle is out
of the fabric. Turn the dial to the OFF posi
tion and take a few stitches.
4. To make succeeding buttonholes, proceed as
above for an many buttonholes as necessary,
always turning to OFF and repeating steps 1
thru 3.
5. Score the buttonhole with the back edge of
the seam ripper several times. To prevent
cutting through the bartack, insert a straight
pin through the bartack. Cut the buttonhole
open with the seam ripper,
Length: Buttonhole
Width: 1
Feed Dog: Up
Pressure; Normal
Foot: Buttonhole or
Embroidery
Needle Position: L
NOTE: Stitch Width Control should always be
set at "V' while making buttonholes. For a
narrower cutting space, you may turn your
zigzag control knob close to 2’A for desired
cutting space. To turn the buttonhole
mechanism off, when the length has been set
and no buttonholes were made, turn the dial
one complete turn without pressing the dial
down to complete the cycle and dear
mechanism.
31
Page 33

TURN-AROUMD BUTTONHOLES
it is possible to make small and dainty
buttonholes if you desire or repair
damaged buttonholes. This entails a slight
shifting of the cloth but with some
practice, good buttonholes can be
achieved.
1. Mark the length of the buttonhole on
the cloth as shown in figure 93.
2. Set the needle position to the left and
your stitch length dial near "1/4" or
the density you desire.
3. Choose the desired width of your
buttonhole.
Example; if you want a buttonhole
with 3 width of #3 setting on the stitch
width dial, divide this setting in half, or
r/i.
4. Start at your marked position, sew
down on the left side of buttonhole to
the other end of marking. Leave the
needle in the cloth at the right side of
stitches and rotate your cloth. Lift the
presser foot and slide the bottom of the
foot back to the front.
5. Lower the foot and raise the needle.
Reset your stitch width dial to bartack,
in this case the #3 setting, set your
feed to DOWN, sew several stitches.
6. Raise the needle, raise feed to UP, reset
the zigzag width to the initial setting, in
this case #V/2 and sew the other side
of buttonhole to your mark, then
repeat your bartack (5).
7. Lock threads by stitching a few stitches
at 0 width. Cut buttonhole as indi
cated previously.
When using this method over a buttonhole
which has already been slit or damaged,
be sure to hold the buttonhole open and
allow the needle to go off the edge of the
fabric. Step 4 is all that may be needed to
repair damaged buttonholes.
93
_.L
step i
Pattern:
Length: Buttonhole
Width: 2%-5-2y2-5-0
Feed dog: Up—Down—Up—Down
Pressure: Normal
Foot: Embroidery or Buttonhole
Needle Position: L
step ¿.
Step H
32
Page 34

94
CORDED BUTTONHOLES
Cording gives a reinforced raised button
hole, It is excellent for use on bulky,
woven fabric, or knits in which the stitch
ing often gets buried and makes cutting
difficult. On knits, a corded buttonhole
will help keep the fabric from stretching
out of shape.
Choose a heavy cotton crochet thread or
buttonhole twist to use for the cording.
Proceed as for either built-in buttonhole
(page -31) or the turnaround buttonhole
(page 32), having the cord under the
presser foot in such a way that the zigzag
stitch covers the cord. When pivoting the
buttonhole '(Fig. 94), also swing the cord
around to follow under the second side.
At the completion of the buttonhole snip
the excess cord close to the bartack on
woven fabrics. For knitted garments,
always pull the cords to the wrong side by
using a darning needle or needle threader,
and knot the cord ends before clipping.
Ilf.. .
Built-in Buttonholer;
Pattern: AiY)
Length: Buttonhole
Width: 1
FppH Hnn • [ in
■
------------
—'-S’ “ r-
Pressure; Nortnal
Foot: Buttonhole
Needle Position: L
Turn-around Buttonhole:
Pattern: C^.
Length; Buttonhole
Width: 2%-~5-~2%-5-0
Feed dog: Up—Down—Up—Down
Pressure; Normal
Foot: Buttonhole or Embroidery
Needle Position; L
,..A..,(I^
33
Page 35

STRETCH BUTTONHOLES 95 Step 1
This buttonhoie is used on knit fabrics
when it is desirable to omit interfacing or
cording. This buttonhole will stretch and
return to shape unlike an ordinary zigzag
buttonhole. The XXXX pattern of the
stitch makes the buttonholes nearly
invisible when using matching thread. It
is excellent to use on jerseys, double
knits, and sweater fabrics. (Fig. 95)
1. Mark the length of the buttonhole on
the cloth as shown in Fig, 95,
2. Select the overlook stitch.
3. Set the needle to the left and the stitch
length dial to 5.
4. The width should be set at 2Vz.
5. Start at the marked position, sew down
the left side of the buttonhole to the Step 3
other end of the marking. Leave the
needle in the cloth at the right side of
the stitches and rotate your cloth.
Lift the presser foot and slide the
bottom of the foot back.
6. Lower the presser foot and raise the
needle. Reset your stitch width to
make a bartack at width 5. Set your
feed dog to DOWN, sew a few stitches.
7. Raise the needle, raise the feed dog to
UP, reset the width to 2V2 and sew the
second side of the buttonhole, to the
end of the buttonhole mark, reset the
width to 5, the feed dog to DOWN
and sew a few stitches for the second
bartack.
8. Lock threads by stitching a few stitches
at 0 width. Cut the buttonhole as Steps
indicated previously.
Step 2
Step 4
Step 6
34
Pattern:
Width: 2%-5-2y=-5-0
Feed Dog: Up—Down—Up—Down
Pressure: Normal
Foot; Buttonhole or Embroidery
Needle Position; L
Page 36

96
97
Step 1
HEMMING
The blind hem stitch provides a durable
hem finish that is almost invisible on
garments, drapes, and curtains. It is done
easily with straight or slightly curved
hems. With a little practice it will be a
very quick and easy hem application and
the hem will never need repairing.
Procedure;
(1) Prepare raw edge of hem in desired
manner, such as overcast, 1/4 inch
stitched under, pinked, hem tape, or
just plain. (Fig. 96—Step 1)
(2) Fold hem up desired length. Baste or
pin 1/2 inch from upper edge. Press
in place. (Fig. 96—Step 2)
(3) Fold hem back toward right side of
fabric leaving about 1/4 inch extend
ed. (Fig. 96—Step 3)
(4) Adjust your stitch width and needle
position (Fig. 97} so that the zigzag
bite of the stitch just slightly catches
the fold of the fabric. The straight
stitches should be formed on the
single thickness of fabric, and the
zigzag bite should catch just barely
into the fold of the fabric at the left.
(5) When stitching is completed, (Fig. 98)
remove fabric from machine and turn
to right side. Press completed hem.
When hemming an A-line skirt, place a
machine basting stitch along the raw edge
of the hem. At an ironing board, fold up
the hem, matching the seams. Ease in the
excess fabric by pulling on basting thread.
Press with steam, then apply hem tape.
Baste or pin hem 1/2 inch from taped
edge, then continue into step 3.
98
Pattern: AA
Length; 2—2%
Width: 2-4
Feed Dog: Up
Pressure; Normai
Foot: Ail Purpose
Needle Position; R or M
35
Page 37

DECORATIVE EFFECTS
By sewing two adjacent rows of blind hem stitching
on lace or ribbon attractive decorations are created.
(Fig. 99) The stitch may be pivoted when the zigzag
bite swings to the left and the points matched in the
second row.
Another variation alternates the zigzag bites in the
center of the straight stitched segment. The stitch
may also be pivoted after two straight stitches to
form a snowflake-like pattern.
Pattern: jvA
Length: 2—3
Width; 5
Feed Dog; Up
Pressure: Normal
Foot: Ail Purpose
Needle Position; M
99
r I
I r
X
I (
f i
><:
I i
i I
X
i
I .
! •
>
i ■
.
<:
I
I
rH^-l
<j>
k
<
1
—i
TOPSTITCH EFFECTS
A new kind of topstitching effect can be produced by
couching a strand or two of pearl cotton, embroidery
floss, or yarn with the blind hem stitch. Simply guide
the cord through the left groove of the embroidery
foot so that the blind hem stitch sews over the cord
and not through it. The straight stitches of the blind
hem stitch will bury themselves along the right side
of the cord and the small zigzag bite will swing over
the cord. The sewing thread should match as closely
as possible to blend into the fabric. (Fig. 100)
Pattern; j\J\,
Length; 2—3
Width; 2
Feed Dog: Up
Pressure: Normal
Foot; Embroidery
Needle Position: L
DECORATIVE STITCH COMBINATIONS
Combining rows of decorative stitch patterns is an
easy, inexpensive way to create your own braids and
trims for garments and household articles. Blending
or contrasting colors of thread may be used to com
pliment the color of the fabric. Illustrations will
give some of the attractive stitch combinations.
(Fig. 101)
100
101
36
Pattern: As desired
Length: r/ tr
Width: IT ir
Feed Dog; Up
Pressure; Normal
Foot; Embroidery
Needle Position; M
DOOC
Page 38

102
Pattern;
Length; 2
Width: 2-3
Feed Dog; Up
Pressure: Normal
Foot: All Purpose
Needle Position: M
or R
HEMIVIING
The stretch blind hem stitch gives a
stretchy, durable hem finish to knit
fabrics. The two tiny zigzag stitches
enable the hem to stretch with the fabric.
It may also prevent woven fabrics from
raveling. Proceed as for the regular blind
hem stitch on page35. (Fig. 102)
103
104
Pattern
Length: 14
Width: 5
Feed Dog: Up
Pressure: Normal
Foot; Embroidery
Needle Position; W!
Pattern
Length: %
Width: 5
Feed Dog: Up
Pressure: Normal
Foot: Embroidery
Needle Position; W!
EDGING
The stretch blind hem stitch can be used
as an edging, like the blanket stitch done
by hand. By using a fairly short stitch
length, the stitches lie very close together.
It can be used for overcasting and finish
ing the edges of tablecloths, napkins and
ruffles. The edge may be turned up about
’/2 inch and then overcast with the stretch
blind hem. Cord or pearl cotton may be
used to give a raised effect to the stitches.
(Fig. 103) Simply place 2—4 strands of
pearl cotton or embroidery floss under
the foot and stitch over it
EYELASH BUTTONHOLES
A unique way of reinforcing buttonholes
on loosely woven fabrics or buttonholes
in which the stitches have been accidently
cut, is to overcast them with a short
stretch blind hem stitch (Fig. 104) Over
cast each Side of the buttonhole so the far
right stitch falls into the opening of the
buttonhole and the small zigzag stitches
cover the previous buttonhole side. On
completion of one side of the buttonhole,
pivot the fabric with the needle at the far
right in the opening of the buttonhole at
the bartack. Sew up the other side in the
same manner.
37
Page 39

OVERCASTING
The multiple stitch zigzag is an excellent
choice for overcasting. (Fig. 105) It keeps the
fabric fiat and prevents raveling. For most
fabrics, this stitch is better than the zigzag
stitch for overcasting.
The stitch should fall right at the raw edge
of the fabric. Feed the fabric under the
presser foot by guiding the raw edge along
the right hand side of the hole in the presser
foot.
Pattern ;,\V.
Length;
Width; 5
Feed Dog; Up
Pressure; Normal
Foot: All Purpose
Needle Position; M,
L or R
106
PATCHING
The multiple stitch zigzag is an excellent
stitch for patching. It is stronger than the
zigzag and the tiny stitches bury into the
fabric to make an almost invisible stitch
when using matching thread.
Place the patch over the right side of the
worn or damaged area. Sew around the
patch with the multiple stitch zigzag letting
the last stitch to the right overcast the edge
of the patch. (Fig, 106) When turning corners
leave the needle in the fabric at the corner.
(Fig. 107) Usually this will be the furthest
stitch to the right or left. In this way, the
corners are doubly stitched and very strong.
When the patch is stitched in place, trim
away the excess worn fabric on the wrong
side of the patch. (Fig. 108)
Note: Try Smocking Stitch for knits.
MENDING A TEAR OR INSTANT DARNING
The multiple stitch zigzag provides a strong
and easy repair for torn garments. It gives
an almost invisible
nd, especially when a
fine darning thread is used.
To mend a tear, hold the torn edges close
together and stitch down the middle. (Fig.
109) If the tear is guided under the slot in
the middle of the presser foot, stitching will
be equal on both sides. If necessary, sew
again on either side of the first row of stitch
ing making sure the needle catches the stitch
in the center. With very worn or frayed
fabric, place a piece of lightweight interfac
ing or cotton batiste under the tear for
reinforcement.
Note: Try Smocking Stitch for knits.
Pattern; ,\\\
Length:
Width: 5
Feed Dog: Up
Pressure; Normal
Foot: All Purpose
Needle Position: M,
L or R
108
Pattern:
Length: Near O—’A
Width; 5
Feed Dog: Up
Pressure; Normal
Foot; All Purpose
Needle Position: M,
L or R
109
ft
38
Page 40

ELASTIC APPLICATION
Applying elastic to lingerie or soft knit fabrics is easy when using the multiple stitch zigzag.
Cut the elastic 2 inches smaller than your waist measurement. Overlap the raw ends to form a
circle and stitch with a tiny zigzag to form a box as shown. Fold the elastic into quarters or
eighths and mark with pins. Do the same with the waistline of the garment. (Fig. 110) Place
the elastic about 14 inch from the top edge of the fabric, matching the pins. Place under the
presser foot and begin stitching. As you stitch, place the forefinger of each hand on the fabric
at either side of the presser foot. (Fig. 111) Puli the fabric out exactly at the point where the
needle is sewing over the elastic and the fabric. This will ease your fabric and elastic together
as you sew. The amount of ease is dependent on how much you ease the fabric, in this
way you never need to stretch the elastic, which can be damaged and stretched out of shape.
Trim off excess fabric above elastic near the stitches.
Note: Try Overlook stitch or Smocking stitch for girdles.
no
Pattern:
Length: %— 1 Vi
Width: 5
Feed Dog: Up
Pressure; Normal
Foot: All Purpose
Needle Position; M
UNDERSTITCHING FACINGS
The multiple stitch zigzag is an excellent
choice for understitching and eliminating
bulk in facing seam allowances, (Fig, 112)
After attaching the facing to the garment,
trim and clip the seam allowance as usual.
Press the seam allowances toward the facing
and use the multiple stitch zigzag close to
the seam, stitching through the facing and
the seam allowances. Using a matching
thread, the stitch will blend into the fabric
and prevent excess bulk. This is much more
successful than a straight stitch for under
stitching. it really helps to keep the facings
from rolling.
Note: Try Smocking Stitch for knits.
Pattern: AV-,
DECORATIVE EFFECTS
As with the blind hem stitch, the multiple
stitch zigzag can be used for many decora
tive combinations, (Fig. 113) If the stitch is
pivoted when the needle reaches the far left
or right of its swing, and the points are
carefully matched, a tracery diamond shape
results.
On the other hand, if rows of the multiple
stitch zigzag are sewn with the points falling
directly under each other, a wavy pattern is
produced.
Flowers may also be produced. Start in
center; pivot at points shown. Add four
more petals if desired.
113
/\
< >
\ /
X/'
/\
/ \
< >
\ /
\/
/\
/ \
< >
\ /
X/
/\
X \
X \
X X X X X
^ / / / /
<<<< <
XX \ \ \
>>>>>
X X X X X
<<<^<
\ X \ \\
>>>>>
X X XX X
<<<<<
\ X X \ \
>»>>
X' XX X X
X XX/ X
Pattern: ,“vV,
Length: 1—2’/=
Width: 3—5
Feed Dog: Up
Pressure: Normal
Foot; All Purpose
Needle Position; M
A
>
/ \
V
39
Page 41

HEMMING Pattern;/' 1-J4
Hemming soft knits and tricot can be made w^^tm 5
very easy and decorativeiy with the scallop Feed Dog: Up
stitch. Simply turn up the hem the desired Foot; AH Purpose
amount and press. Then from the right side
of the garment sew with the scallop stitch
Needle Position: M
about 14" from the edge. Additional rows can
be sewn above the initial row if desired. Trim
the excess fabric away carefully. (Fig. 114)
DECORATIVE EFFECTS
As with the blind hem stitch, the scallop can
be used for many decorative combinations.
(Fig, 115) If the stitch is pivoted when the
needle reaches the far right of its swing, and
the points are carefully matched, a tracery
oval shape results.
On the other hand, if rows of the scallop
stitch are sewn with the points falling directly
under each other, a wavy pattern is produced.
Flowers may also be produced. Start in
center; pivot at points shown. Add four more
petals if desired.
SHELL TUCK
The reverse blind hem stitch gives a very
effective and easy way to make a shell tuck
for lingerie, pillowcases, and decorative
finishes. (Fig. 116} This works well on knits
or on the bias of soft, woven fabrics. A
single folded bias tape may be tucked in this
manner, and then applied under a fold for a
decorative hem on pillowcases or applied
with the facings at the neckline or armhole
for a decorative finish.
Set the upper tension dial to a little bit tighter
position than normal. Fold under the edge
where the shell tuck is to be created. Place
the bulk of the fabric to the left of the needle
with the folded edge to the right. Place the
fabric so that the folded edge will be guiding
into the center cut of the foot. The straight
stitches will form on the fabric, and the zig
zag bite will swing to the right off of the
folded edge. (Fig. 116) The shell edge is
created as the needle swings back onto the
fabric. The size of the "shell" can be varied
by changing the stitch length.
Pattern:
Length; 1-2%
Width; 3-5
Feed Dog: Up
Pressure: Normal
Foot: All Purpose
Needle Position: M
c;j>c
Pattern: W
Length: 2-3
Width; 5
Feed Dog: Up
Pressure: Normal
Foot; Alf Purpose
Needle Position;
M or R
115
116
'• '
\ \ \
v>>
V
\
z' "s
/ \
i
1
t f
40
Page 42

117
119
LINGERIE SEAM
For a very fine, deiicate seam in nylon tricot
or jersey, the interlock is used. Lingerie or
tricot seams should only be about 1/8 inch
in finished width.
If your pattern has wide seams, trim them
down to 1/4 inch while cutting out the
pattern. Guide the raw edges of the fabric
into the center slot of the presser foot. On
the right, the needle will stitch over the edge
resulting in a finished 1/8 inch. (Fig. 1171
Pattern: AAA
Length; 1
Width; 5
Feed Dog: Up
Pressure: Normal
Foot: Ail Purpose
Needle Position; IVl, L or R
INSERTING LACE
A very fine lace insertion can be made with
the interlock. As in applying lace with the
zigzag stitch, follow the straight line or the
design of the lace. See page 29. Sew so that
the straight stitch of the interlock is on the
fabric and the small zigzag catches into the
lace. (Fig. 118)
Pattern; JJJi
Length: 1
Width; 2
Feed Dog: Up
Pressure: Normal
Foot; All Purpose
Needle Position: M, L or R
SHELL TUCK
The Interlock stitch can produce a very fine
delicate shell tuck, especially nice on soft
knits. It is not necessary to work with the
bulk of the fabric to the right. Simply fold
under the edge where the shell tuck is to be
created. .Place the fabric, with the bulk to
the left, so that the folded edge will be
guided into the center cut of the foot.
The single straight stitch will form on the
fabric, and the zigzag will swing to the right
of the folded edge. The shell edge is created
as the needle swings back into the fabric.
(Fig. 119)
Pat ter n: A M
Length; 2
Width: 5
Feed Dog; Up
Pressure: Normal
Foot: All Purpose
Needle Position; M, L or R
41
Page 43

DECORATIVE EFFECTS
120
Decorative borders can be made with the
checker and domino stitches. The checker
stitch may be matched like the blind hem
and multiple stitch zigzag stitches. See
Page 36 and 39. This results in a
geometric type design. The domino
stitch may be used along the edge of the
border to complete the geometric effect.
These stitches may be sewn on ribbon and
then applied to table clothes, towels, or
curtains for a dynamic decorative effect.
\ t i £.KJ i
Pattern;
Length; Ya
N
V
V...
\
Width: 5
Feed Dog: Up
Pressure: Normal
Foot: Embroidery
Needle Position; M
CORDED DECORATIVE EFFECTS
The domino and checker stitches may be
corded for an even prettier and stronger
finished edge effect. Simply place four
strand of pearl cotton, embroidery floss,
or yarn under the presser foot. The
grooves of the embroidery foot will help
guide the cord evenly. Sew with either
the checker or domino stitch for a strong,
three color decorative effect. (Fig. 121)
Pattern:"Sa
Length: %
Width; 5
Feed Dog: Up
Pressure: Normal
Foot; Embroidery
Needle Position; M
121
42
Page 44

122
DECORATIVE EFFECTS
The reverse stitch patterns produce heart,
tulip, swan, fish, leaf, and Greek key
designs for use on household linens and
children clothes. These reverse stitch
patterns can be used to sew in hems as
the scallop stitch. See Page 40. (Fig, 122)
The reverse stitch patterns can also be
used for topstitching bindings and ribbons
for decorative effect. This is done in thesame manner that lace is applied with
thp 7in7iin ctitnh Ppno OQ -Thp
straight stitched edge of the reverse stitch
patterns on the left should be sewn on the
left edge of the binding or ribbon. This
decorative effect can be used on towels
and placemats for a pleasant appearance.
(Fig. 123)
The reverse stitch patterns can also be
corded for stronger decorative edges on
placemats and tablecloths. Simply place
four strands of pearl cotton, embroidery
floss or yarn under the presser foot as
the domino and checker stitches are cord
ed on Page 42. The transparent foot will
help guide the cord evenly while sewing
the reverse stitch patterns. (Fig, 124)
125
^ /'n
NJ Sj ■"
Thp raxtarQd c^itrh rvattornc r-an ho cotA/ri
1 , .w, V-W1 I »-'V.
with two threads through one needle for
a more effective decorative stitch. Simply
thread two sewing threads through the
upper threading system. A larger needle
should be used to accommodate the two
threads. Use this decorative technique
for enhancing tablecloths, placemats,
napkins, and curtains, (Fig, 125)
Pattern:
Width: 5
Feed Dog: Up
Pressure: Normal
Foot; Embroidery
Needle Position: M
Note: You can alter the shape of every
reverse stitch pattern and adjust
as necessary with the Stitch
Density Control, particularly, for
the Heart Shape pattern.
43
Page 45

XÌX . AP PLIC ATIO NS OF THF CRO WN STI TCH
DECORATIVE EFFECTS
The crown stitch may be used in many of
the same ways which the other reverse
stitch patterns were used. See Page 43,
The crown stitch may also be matched so
that the design is much larger and
dominant for decorating pillows or
curtains. The embroidery foot is trans
parent to provide a better view. (Fig. 126)
Pattern: wxA
vviaiti; D
Feed Dog: Up
Pressure; Normal
Foot: Embroidery
Needle Position; M
XX. Api CJCA TIO NS O F T HE C RO SS S TITC H
DECORATIVE EFFECTS
The cross stitch is a pretty imitation of
the hand embroidery stitch which can be
used to enhance placemats, napkins, and
curtains. Transparent tape can be used
as a guideline for straight decorative
stitched lines. (Fig. 127)
Pattern:
126
127
Width: 5
Feed Dog: Up
Pressure; Normal
Foot; Embroidery
Needle Position; M
44
Page 46

128
129
■ Pattern:
Width; 4—5
Feed Dog: Up
Pressure; Normal
Foot: Alt Purpose
Needle Position: M, L or R
5 3 7
84 8
SEAMS
This stitch gives a finished 1/4 inch seam
in one step. For knits, it gives strength
and elasticity to the seams and prevents
the curling of the fabric that often occurs
with 5/8 inch opened seams. It is most
applicable to soft, thin knits such as
nylon or acetate knits, but may be used
on other fabrics as well. Always make
test seams with this stitch.
For woven fabric, the overlook stitch
gives strength and prevents raveling, it
can be used on woven goods to replace
flat felled or French seams.
For patterns with 1 /4 inch seams;
{Fig. 128) Place the raw edge of the
fabric under the presser foot so that as the
needle swings, to the right, it comes down
at the raw edge. This will result in an
enclo^d seam allowance.
For patterns with 5/8 inch seams; (Fig.
129) The seam allowances may be trimm
ed to Vi inch either before or after sewing.
If trimming before sewing, proceed as
above. Otherwise, sew the seam with the
raw edge of the fabric on the etched guide
line "Vi". {Any time you use the full
width of a particular stitch, you should
readjust the raw edge of the fabric 1/8
inch to the left.) Afterward, trim the
excess fabric near the stitching. This
method is actually easier than the over
edge method for fabrics that curl.
i> i ... lii-
45
Page 47

NYLON TRICOT SEAMS
The overlook stitch is excellent for use on
fine fabrics such as nylon tricot. Lingerie
or tricot seams should only be about 1/8
inch finished width .
If your pattern has wide seams, trim them
down to Va inch while cutting out the
pattern. Guide the raw edges of the fabric
into the center of the presser foot. On the
.right, the needle will stitch over the edge
resulting in a finished rolled seam of 1/8
inch, if a pucker results when stitching,
a looser tension is needed.
Stitching in this manner can also be used
to form a rolled hem on the raw edge of
a scarf.
APPLYING ELASTIC
The overlook stitch gives a very finished
appearance to elastic application. (Fig.
130) See instructions for elastic applica
tion on Page 39, but use this stitch instead
of the multiple stitch zigzag.
Pattern:
Width; 4—5
Feed Dog; Up
Pressure; Normal
Foot; All Purpose
Needle Position; M, L or R
130
LADDER STITCH
This stitch gives a very effective means of
sewing fake furs and soft leathers to
produce a seam with no bulk. It is also
very effective in a contrasting color as a
decorative accent for special seams, such
as raglan sleeves or for applying an edge
trim. (Fig. 131 )
Place the bulk of your fabric to the right
of the needle and the raw edge so that the
needle will swing off the fabric at the left.
(Fig. 132) The left side of the stitch will
be formed off of the fabric to provide a
very strong seam with only a tiny seam
allowance. For better results loosen up
per tension. Pull the seam open from the
right side until the "rungs" of the ladder
appear. The "rungs" become a decorative
accent if a contrasting thread is used. On
fake fur, the nap can be pulled up with a
needle to hide the stitches and create an
invisible seam.
Pattern:'
Width: 5
Feed Dog: Up
Pressure: Normal
Foot: All Purpose
Needle Position: M, L or R
Page 48

133
134
1 inch
1 inch
•c
Cut out
Pattern:
Width; 3-5
o
Feed Dog: Up
Pressure: Normal
Foot: Ali Purpose
Needle Position: M
HEMSTITCHING
By using a very large needle and a fine
thread an openwork effect can be attained
which is beautiful for sewing the hems
into tablecloths, napkins, placemats,
handkerchiefs, etc. Use a large needle,
size 18 or 20, and a fine cotton thread.
Tighten the upper tension slightly, until
the stitch looks better on the underside
than on top, (You will be sewing with
your fabric face side down.)
Turn up 1 inch then turn up 1 inch again
135
to form a hem of a double thickness of
fabric. The bulk in corners can be elimi
nated by trimming away the excess, as
shown, (Fig. 133} after having folded the
fabric on all sides. Stitch from the wrong
side, so that the straight stitch forms on
the single layer and the zigzag bites on the
double layer. (Fig. 134) Stitch all the
way to the edge of the fabric along all
sides. (Fig. 135)
The overlook stitch can be used to topstitch non-raveling fabrics such as felt or
leather into place for appliques or
pockets.
Stitch so that the straight part of the
stitch is formed over the edge of the
leather, and only the zigzag part holds it
in nlprp iC'in
.. . ,y. f sJU;
Pattern;
Width: 3-5
Feed Dog: Up
Pressure; Normal
Foot: All Purpose
Needle Position: M, L or R
47
Page 49

SEAMS
On most knits, a % inch finished seam, such
as stitch and overcast or the overlock stitch, is
more desirable than a 5/8 inch opened seam
allowance. These stitches can create a neater,
more professional finish, eliminate bulky
seams, prevent curling, permit the garment
to "give" under stress, and at the same time
they cut down on the amount of work
involved in making a garment. If ever in
doubt as to which of the two stitches to use,
test both on the particular fabric in question
and choose according to their performance.
The stitch and overcast stitch is excellent
for stretch fabrics such as sweater knits,
bathing suit knits, and cotton knits. It has
the greatest strength and elasticity of all.
For patterns with ’'A inch seam allowances;
Feed the fabric such that the needle goes over
the raw edge of the fabric when it swings to
the right. (Fig. 137)
For patterns with 5/8 inch seam allowances:
Feed the raw edge of the fabric along the
etched guide line ''yi", then trim away the
excess fabric close to the stitching. (Fig, 138)
Pattern:
____
137
138
a
g'
P
6« a
i 0
IX]
Width; 5
Feed Dog; Up
Pressure; Normal
Foot; Embroidery
Needle Position; M
DECORATIVE EFFECTS
An open work effect can be made with fagott-
ing. Slit the fabric where fagotting is desired.
Overcast the edges of the fabric and turn
back about Va inch. Press. Sew so that the
stitches to the far left and the far right catch
into the folded edges alternately and the
stitches in the center catch into the space
between the folded edges. (Fig. 139)
Pattern;
Width: 5
Feed Dog: Up
Pressure: Normal
Foot; Embroidery
Needle Position: M
139
dp
Page 50

140
141
This stitch is very versatile and can be corded
or used as a topstitch as other reverse stitch
patterns.
SEAMS
The smocking stitch can be used to seam fine
gauze type fabrics or bulky sweater knits,
this results in less bulk for a finished % inch
seam. Follow the directions for overlook
seam on Page45. (Fig. 140)
Pattern: '
Width: 5
F6sd Do9- Up
Pressure: Normal
Foot: Embroidery
Needle Position: M
ELASTIC THREAD SHIRRING
Cuffs and bodices of little girls dresses can be
shirred easily with the smocking stitch. Place
the right side of the garment down on the
bed of the machine. Place two strands of
elastic thread under the foot. Stretch the
elastic thread while sewing with the smocking
stitch to gather cuffs or bodice for a feminine
effect. (Fig. 141)
Pattern:
143
144
Width: 5
Feed Dog; Up
Pressure: Normal
Foot: Embroidery
Needle Position: M
DECORATIVE EFFECTS - BASEBALL
1. Decide on the radius of the baseball to
determine the placement of the cello
phane tape and thumbtack.
2. Pierce a piece of tape with a thumbtack
so the sticky side of tape, and flat side
of tack will be against the bed of the
machine,
3. Place tape with tack the desired dis
tance from the needle as determined in
step 1. (Fig. 142)
4. On fabric, mark two perpendicular lines
to mark the center of the baseball. (Fig.
143)
5. Pierce center of baseball with tack.
6. Begin sewing and complete perfect
circle creating the outline of baseball,
7. This is great way to outline any circular
shape. Try some of the other patterns,
and make your own coasters and other
decorative uses. (Fig. 144)
49
Page 51

This stitch is very effective for overcasting,
edgestitching, etc. on knits and very stretchy
fabrics, also, for decoration,
TOPSTITCHING
A decorative topstitch can be produced with
the elastic edging stitch. Stitch around the
structural lines of the garments for a dramat
ic effect. Topstitch a braid or decorative
inset with the elastic edging to add an addi
tional decorative flair, (Fig. 145)
Pattern:
Width; 5
Feed Dog; Up
Pressure: Normal
Foot: Embroidery
Needle Position: L or R
EDGING
As with the stretch blind hem, the elastic
edging stitch can be used for a decorative
edge on place mats, napkins and tablecloths.
Proceed as you would with the stretch blind
hem stitch, see page 37, but use the elastic
edging stitch instead. (Fig. 146)
Pattern:
145
146
Width; 3~5
Feed Dog: Up
Pressure; Normal
Foot: Embroidery
Needle Position: M, L or R
Page 52

147
On fabrics that are bulkier or heavier, the
stretch overlock is a better choice than the
overlock. In all methods proceed as you
would for the overlook, see page 45, except
feed the fabric with the bulk to the right.
The stitch is less dense and will prevent soft
stretchy knits from rippling. {Fig, 147)
Pattern:7.
Width; 5
Feed Dog: Up
Pressure; Normal
Foot; Ai! Purpose
Needle Positlor.: M, L or R
SEAMS
148
Pattern:
Width; 0
Feed Dog: Up
Pressure; Normal
Foot: All Purpose
Needle Position; M
This stitch may be used on knits and
woven fabrics (Fig. 148) , in areas of
stress as a reinforcement stitch. It is
excellent for curved seams such as arm
holes and crotch seams. For active wear
such as ski pants and girdle fabrics which
endure a lot of stress in bending and
stretching, this stitch may be used for
seaming throughout the garment.
TOPSTITCHIMG
Because this stitch is heavier than an
ordinary straight stitch, it is ideal for
topstitching, particularly on knits. {Fig,
i /in'!
1 “l-Oi
Pattern:
Width: 0
Feed Dog: Up
Pressure: Normal
Foot; Ail Purpose
Needle Position: M
51
Page 53

TOPS! ITCHING
A decorative topstitch can be produced with
the rick-rack stitch. Stitch around the
structural lines of the garment for a special
effect, Topstitch braid or a decorative inset
to add an additional creative flair. (Fig. 150)
Pattern:.
Width: 4-5
Feed Dog: Up
Pressure: Normal
Foot; All Purpose
Needle Position: M, L or R
150
TAPERING
The rick-rack stitch may be tapered to form
creative stems and petals of flowers,
embroidered pictures and wall hangings. As
in tapering the zigzag, See Page 26, slowly
turn the stitch width dial from 0 to 5 and
back to 0. A group of these tapered rick-rack
stitch will from a bouquet-like effect. (Fig.
151)
Pattern;
Width: 0-5-0
Feed Dog: Up
Pressure: Normal
Foot: Embroidery
Needle Position: L, M or R
151
An
Page 54

152
154
TWIN NEEDLE SEWING EFFECTS
To use a twin needle in the machine,
remove the single needle, and insert the
twin needle into clamp with the flat side
to the back. (Fig. 152) Threading of the
machine when using a twin needle is the
same as normal with these exceptions:
(Page 11)
1. Place thread, matching or contrasting
in color, on each spool pin.
2. Hold both threads together as you
follow through thread guides as
normal, but separate the threads at
the tension. Pass on thread through
the left disc and one thread through
the right disc. (Fig. 153)
3. Then pass threads through arm thread
guide. (Fig. 154}
When using a twin needle, set the stitch
width dial at 2 or less to prevent needle
breakage with a wide stitch. Twin needle
settings are marked in white and red on
the stitch width dial — Do not use red
marked numbers when using twin needle.
Be sure to use the Middle Needle Position.
53
Page 55

PIM TUCKS
Narrow tucks, sewn with thread that
matches the fabric, produce subtle decora
tion on plain fabrics. Using the twin
needle, sew straight lines on the fabric
guiding the edge of the presser foot along
each successive tuck to make parallel
rows. Soft fabrics will be pulled to form a
soft crease. To achieve a tuck on a fabric,
increase the lower tension slightly. Heavier
fabrics will produce two lines of straight
stitching. Attractive pin tucks are made
with the multiple stitch zigzag as well as
with a straight stitch. {Fig. 155)
Hint: Transparent tape makes straight
lines easy to sew. Just sew with
the presser foot guiding along the
edge of the tape. When sewing is
completed pee! off tape. (Fig.
155}
Pattern;
Length: 2—4
Width; 0
Feed Dog; High
Pressure: Normal
Foot: Embroidery or
AH Purpose
Needle Position: M
155
DECORATIVE TUCKS OR DESIGNS
Any stitch can be used with the twin
needle for decorative effects. {Fig. 156)
Most attractive are the multiple stitch
zigzag and blind hem stitch for fancy
effects. The satin stitch or tapered zigzag
designs in two colors are effective for
creative trims.
Pattern: Any
Length: 14—5
Width: 0-2
Feed Dog; Up
Pressure: Normal
Foot: All Purpose or
Embroidery
Needie Position: M
54
156
/ /
<<
/ /
< i
\ \
/ /
\ N
//
V)
>>
/ /
\ \
)>
r /
>>
s' i
i {
/ /
Page 56

For sewing tubular and hard-to-reach areas, use your machine as a free-arm. Stitching button
holes or sewing buttons on a cuff or neckband; topstitching a sleeve; edge finishes on sleeves,
pantiegs and waistlines; darning and patching knees, elbows; and other areas of wear on
children's clothing become as easy as sewing a common seam when you have the free-arm at
your fingertips. I llustrations show some examples of sewing with the free-arm.
157
Page 57

CORDING AND ZIPPER FOOT
The cording and zipper foot is used to
sew in zippers and insert cording.
Zipper: ¿./9/*9
Set the needle position at "L" or "R"
as needed to sew the right side or the
left side of zipper respectively, so that
the foot sews very close to the zipper
teeth. (Fig. 159)
To insert cording:
1. Set the needle position at "R" and
make the welting by sandwiching the
cord into a bias strip of fabric.
Stitch close to cord, (Fig. 160)
2. Set the needle position at "L".
Sandwich the welting between two
layers of fabric with right sides
together. Stitch a second time. The
needle stitches close to the cord
through all thicknesses. (Fig. 161)
158
161
UUILI li\iU ijUlUC
Parallel straight lines are easy to sew
with the quilting guide. (Fig, 162) To
attach the guide, slide it into the black
clip at the back of the presser foot
shank. Adjust the curved bar to the
desired distance from the needle. Sew
the first line of stitching as desired, and
then for the succeeding rows let the
guide follow along the previous line of
stitching. A straight stitch, zigzag, or
any other stitch may be used.
56
Page 58

163
164
ROLLER FOOT
Ideal for use on vinyls, imitation
leathers, jerseys, synthetics, velvets and
denim. This foot helps keep both
layers of fabric feeding the same. On
very slippery fabrics, the roller foot
helps prevent skipped stitches. (Fig.
163)
OVERCAST FOOT
Zigzag overcasting may tend to roil the
edge of some fabrics causing a bulky
edge. The overcast foot helps to
produce a flat edge. The bar behind
the needle hole holds the threads
firmly in a full width zigzag or overiock
stitch to keep the stitches from drawing
tightly together, {Fig. 164)
166
167 ¡€£^70
BLIND HEM FOOT
For all those who find machine blind
hemming difficult, this foot gives a
clear guide for the fold of fabric to
follow. The blind hem foot is a fine
accessory for those who like the
strength and durability of machine
hemming. (Fig. 165)
ROLLED HEM FOOT
Recommended for narrow rolled hems
on scarves, shirts, linens, and linings.
This foot makes a very tedious hand
sewing job very easy to do on a sewing
machine. (Fig. 166)
FRINGE-FOOT
Thick chenille type loops can add
interest to appliqued flowers and
animals. Used with a satin stitch this
foot gives a plush texture to a design.
Also used for hemstitching and tailor
tacking. (Fig. 167)
7 7/6
7
57
/
Page 59

1. CHANGING NEEDLES a. Always use the correct type of needle for
your machine.
b.
Always use the appropriate size needle for
the thread and fabric you are using.
Always change the needle after every
c.
other garment.
Needles dull easily and when dull, will
damage both your fabric and your
machine. Many service problems are the
result of rough spots on the needle plates
and hook.
a.
Always put needle in machine correctly.
It will cause stitches to be skipped if it is
inserted incorrectly.
Pulling on fabric while sewing will bend
e.
the needle, which will subsequently
damage the needle.
168
2. CLEANING After each garment is completed, a light
a.
cleaning is recommended. Use a lint
brush to remove all lint from the open
areas in the bed of the machine, especial
ly in the grooves of the feed dog. Push
the needle plate release button. The
needle plate will pop up to remove. The
area around the feed dog is one of the
most important areas to dean. Lack of
maintainance may cause serious damage
to your machine,
b. Keep machine covered when not in use to
prevent accumulation of dust and dirt
particles.
Page 60

169
170
3. OILING
a. Use a pure oH, one that has no detergents,
!t is best to buy oil manufactured specifi'
cally for sewing machine use, Other oils
will eventually cause the mechanisms to
lock up.
b. Your machine should be oiled often.
Using a sewing machine oil, piace a single
drop on each oiling point as illustrated,
specifically those points marked in red on
your machine, (Fig. 169, 170) Run the
machine to allow the oil to penetrate.
Your machine cannot be overmlled but
excess oil may drip and stain your
garment.
c. Before oiling the machine remove the
following:
(1) The needle
(2) The presser foot
(31 The needle plate.
After you have finished oiling the machine
replace the bobbin case. The needle plate
should then be placed into its normal
position, followed by the presser foot and
needle.
171
4. CHANGING THE LIGHT BULB Open the face plate by pulling towards the left.
Turn the light bulb counterclockwise to remove.
Replace the bulb by turning clockwise, (Fig. 171)
A majority of service calls could be avoided by
following the above procedures and by first
checking to see that the machine is:
1. Threaded properly top and bottom.
2. That the bobbin is wound evenly.
3. That the needle is in the machine correctly.
4. Proper cleaning and oiling.
Loose
59
Page 61

1. SKIPPED STITCHES Skipped stitches have become a probiem in recent years,
especially with the appearance of knit fabrics and poiyester threads on the market. Skipped stitches normally
can be traced to four basic causes:
A. The Needle
(1} The needle is dull or bent. Change it,
(2) The needle is placed incorrectly in the needle
clamp. It is either backwards or is not up in
the needle clamp all the way.
(3) The wrong type of needle is being used for the
fabric. Use bail point needle on knits and wedge
point needles for leathers and vinyls.
(4} The thread' is too thick for the size of needle
being used. Use a larger needle.
B. The Thread
(1) The machine is threaded incorrectly.
(2) IVlany brands of polyester thread are too stiff and
coarse thus making stitch formation difficult or
impossible. Change brands or use a cotton
thread.
C. The Presser Foot
(1) The foot being used is not holding the fabric taut
enough over the needle plate hole, thus the fabric
is being pulled up and down while stitching. Use
the foot which gives the most control possible for
the particular job being done,
(2) There is not enough pressure on the pres^r bar to
hold the fabric firmiiy. Increase pressure on the
pressure control.
D. The Fabric
The fabric has a heavy finish on it which deters
stitch formation. Wash the fabric thoroughly
before sewing.
✓ X
\
\ \ y y y
''X \
s X \ X .
' N
z
X V
z ‘Cj*' X >.
Xx<.X
RO
\
\>iv;
X s
z''
if your machine skips stitches only on certain fabrics, try
all of the above procedures before calling a repairman.
Check the needle plate area, if there are scratches and
marks around the needle hole opening, your machine is
not being cleaned properly. Always remove the needle
plate and dean the feed dogs periodically. Improper and
lack of cleaning will cause an accumulation of lint which
hampers the feeding mechanism, this in turn will cause
the operator to impatiently pull or push the cloth causing
the needle to bend and strike the plate, foot or hook,
causing a slip in the timing mechanism. Continuous
striking will cause defects making it necessary to call a
serviceman.
 Loading...