

Page 1
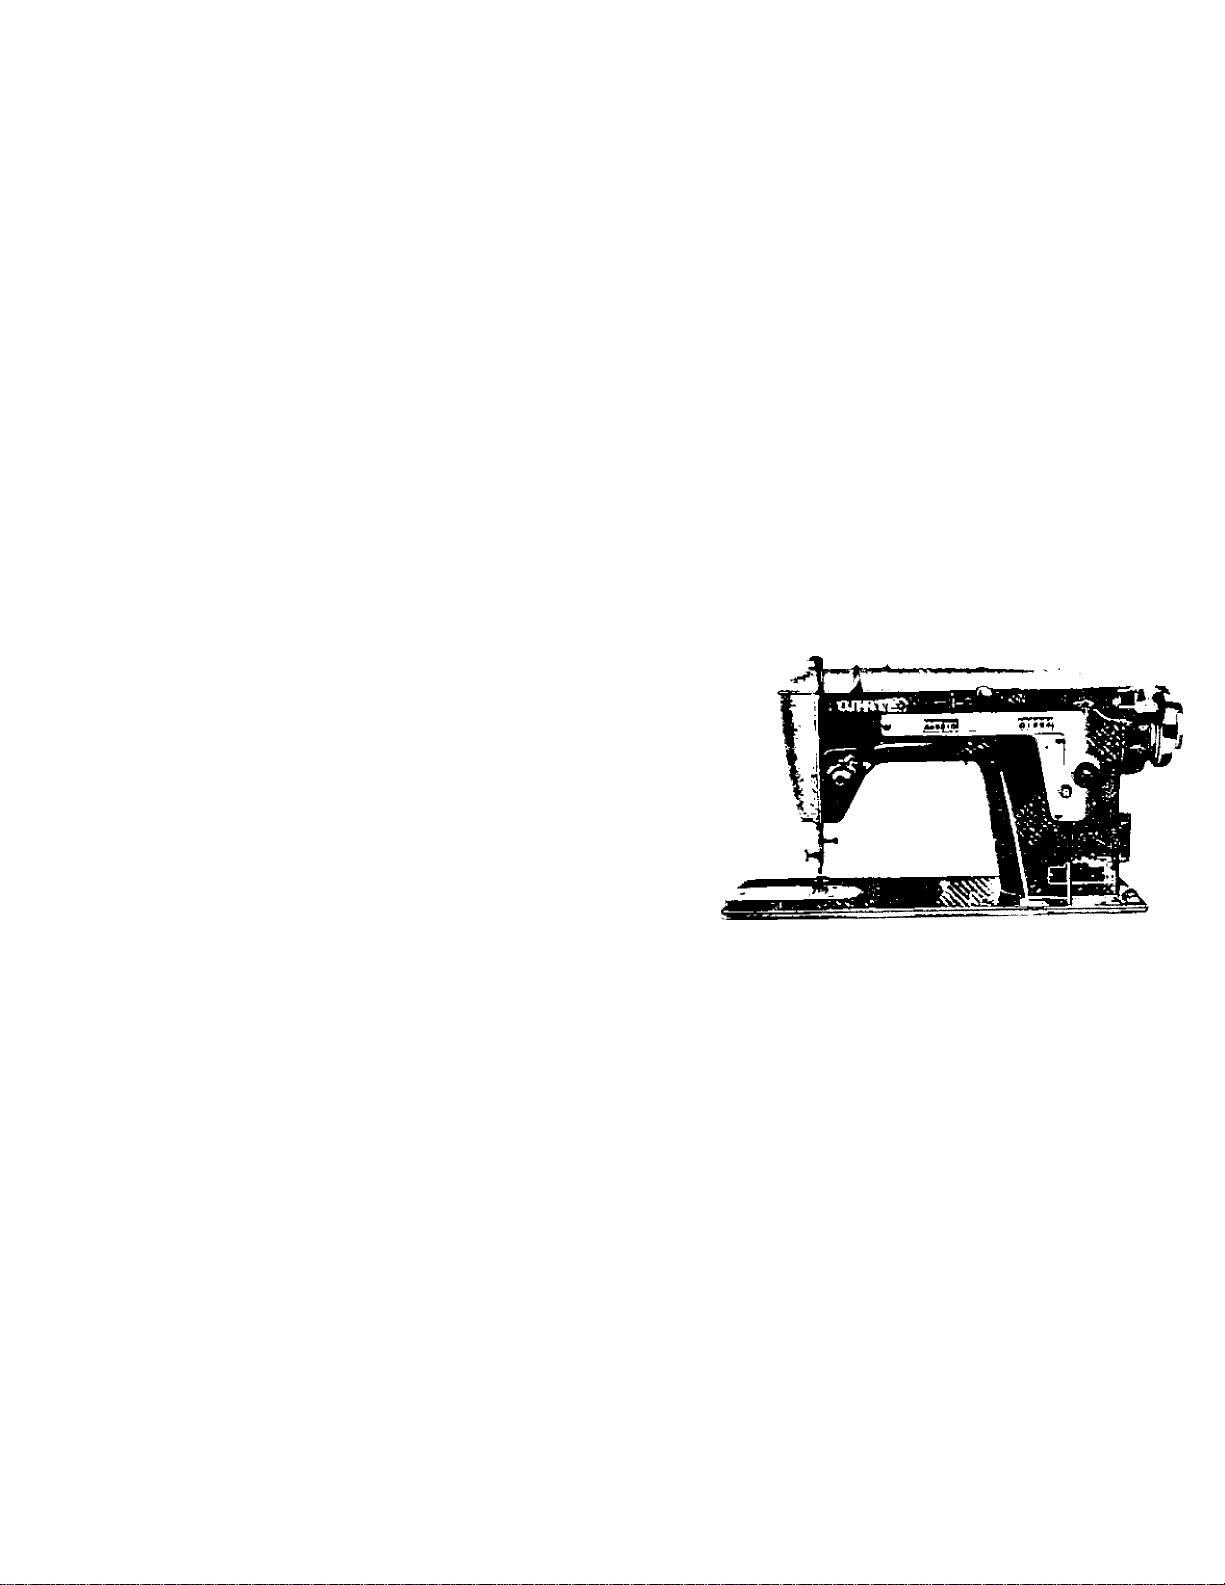
WHITE
INSTRUCTION BOOK
FOR WHITE MODEL 671
ZIGZAG SEWING MACHINE
Page 2

!
CONTENTS
Name of Each Part
Accessories
Preparing to Sew
To Start Sewing
To remove the work.............................................................................................
Decorative Stitches
Zigzag sewing..................................................................................
Button sewing
Buttonhole sewing —
Braid sewing ..............................................................................
Darning and Embroidery.....................................................................................
Hemming .......................................................................................
Quilting...................................................................................................................
' Cloth (juide .................................................................................................
Maintenance
To open the Shuttle Race
To oil the machine................................................................................................
Check-up for smooth sewing ........................................................................................
NeedIc-thread-fahric-stItching guide
..................
Bobbin :
Needle ; To insert the needle ........................................................................................
Needle Plate : To change the Needle Plate ....................................................................
Presser Foot : To change the Presser Foot.....................................................................
Automatic Darner
Built-in Sewlight......................................................................................
To regulate the tensions ....................................................................................
To regulate the direction of feed and stitches .............................................................................
To remove the Bobbin Case .............................................................
To wind the Bobbin ..........................................................................
To thread the Bobbin Case ...............................................................
To insert the Bobbin Case ................................................................
To thread the needle
..........................................................................................
...................................................................................
...................................................................................
.................
...................................................................................................
...........................................................................
.
.......................................................
.........................................................
1
.
■13
•13
■1-1
■ir>
16
17
18
19
■19
■20
■21
■23
■ 8
8
9
9
10
11
If
Page 3
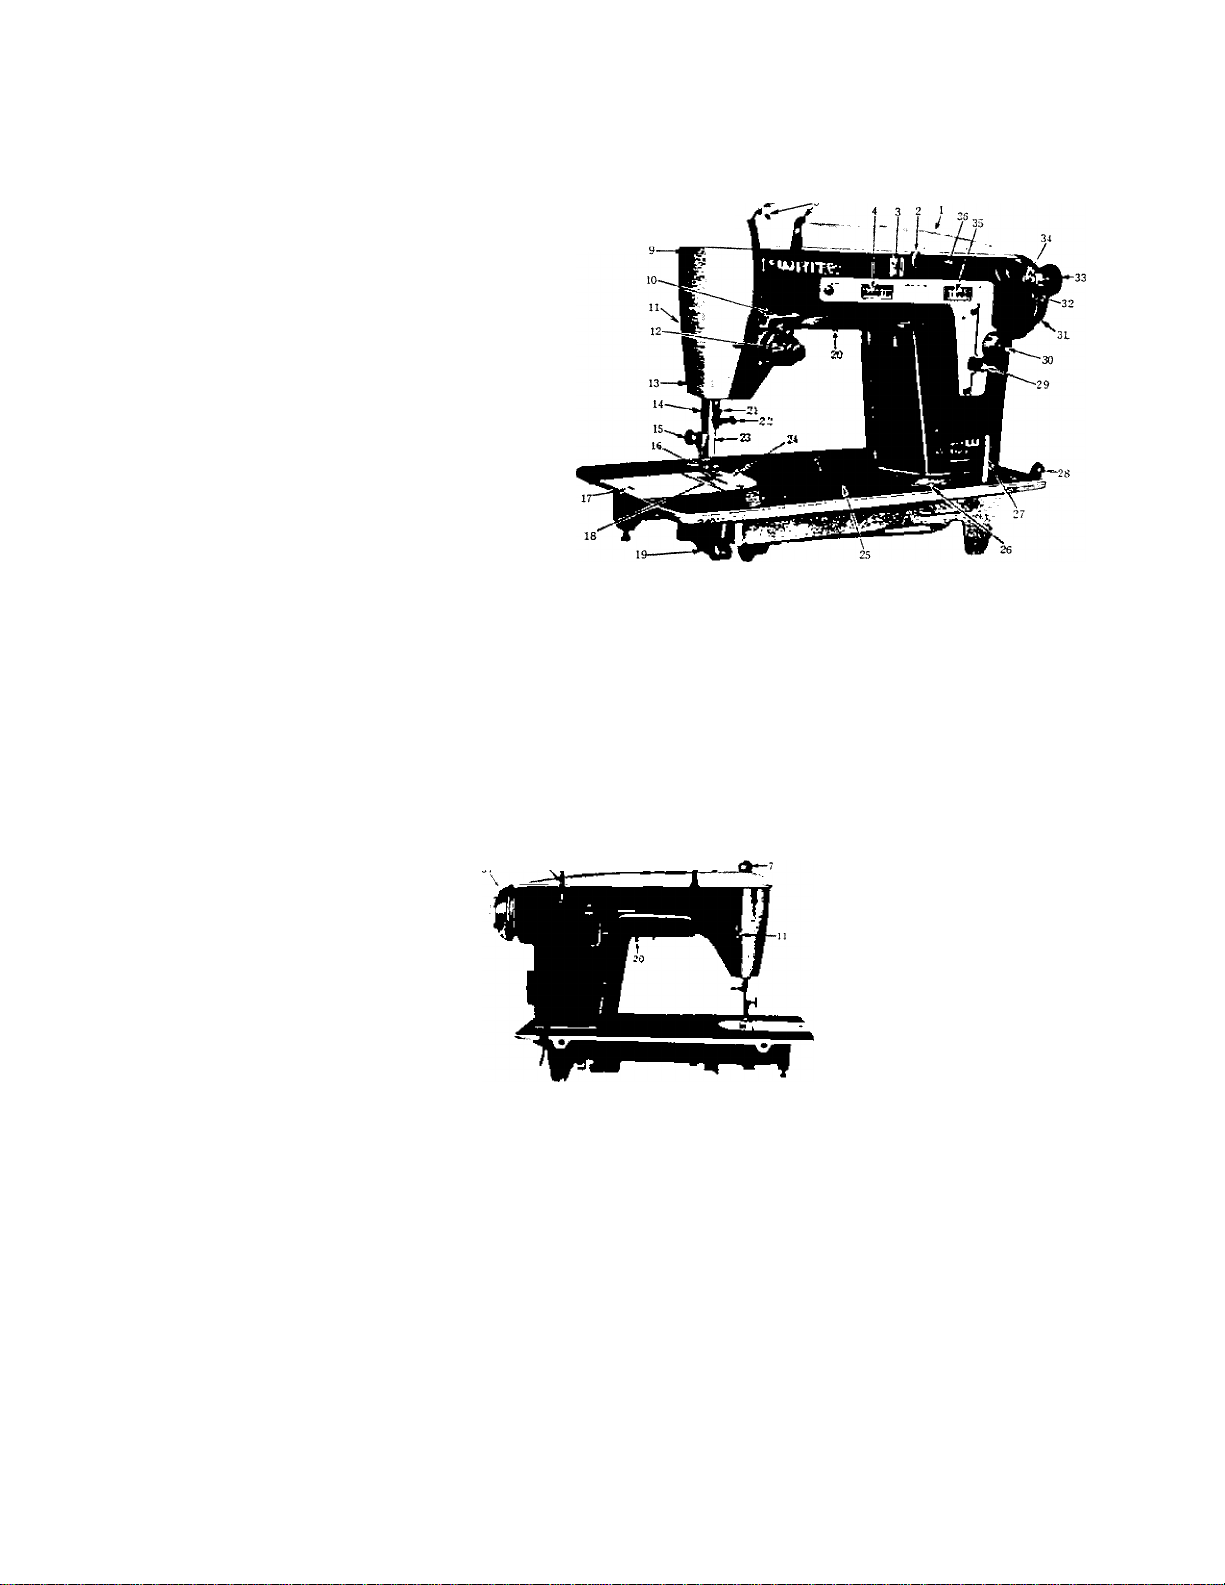
1. Arm spool pin
2. Zigzag width stop lock
3. Zigzag width regulating lever
4. Zigzag width indicator
5. Upper arm thread guide
6. Thread take-up lever
7. Automatic darner
8. Top cover
9. Face plate
10. Lower arm thread guide
11. Presser bar lifter
Name of Each Part
12. Thread tension regulator
13. Face plate set screw
14. Presser bar
15. Thumb screw
16. Presser foot
17. Slide plate
18. Feed dog
19. Shuttle race
20. Switch for light
21. Needle bar
22. Needle clamp
23. Needle
24. Needle plate
25. Bed
26. Drop feed buttons
27. Bed spool pin
28. Bobbin winder tension bracket
29. Reverse button
30. Stitch length regulating dial
31. Hand wheel
32. Bobbin winder push button
33. Bobbin winder wheel
34. Bobbin winder spindle
35. Stitch length indicator
(Pig. 1-B)
36. Arm
(Fig. "I—A)
Page 4
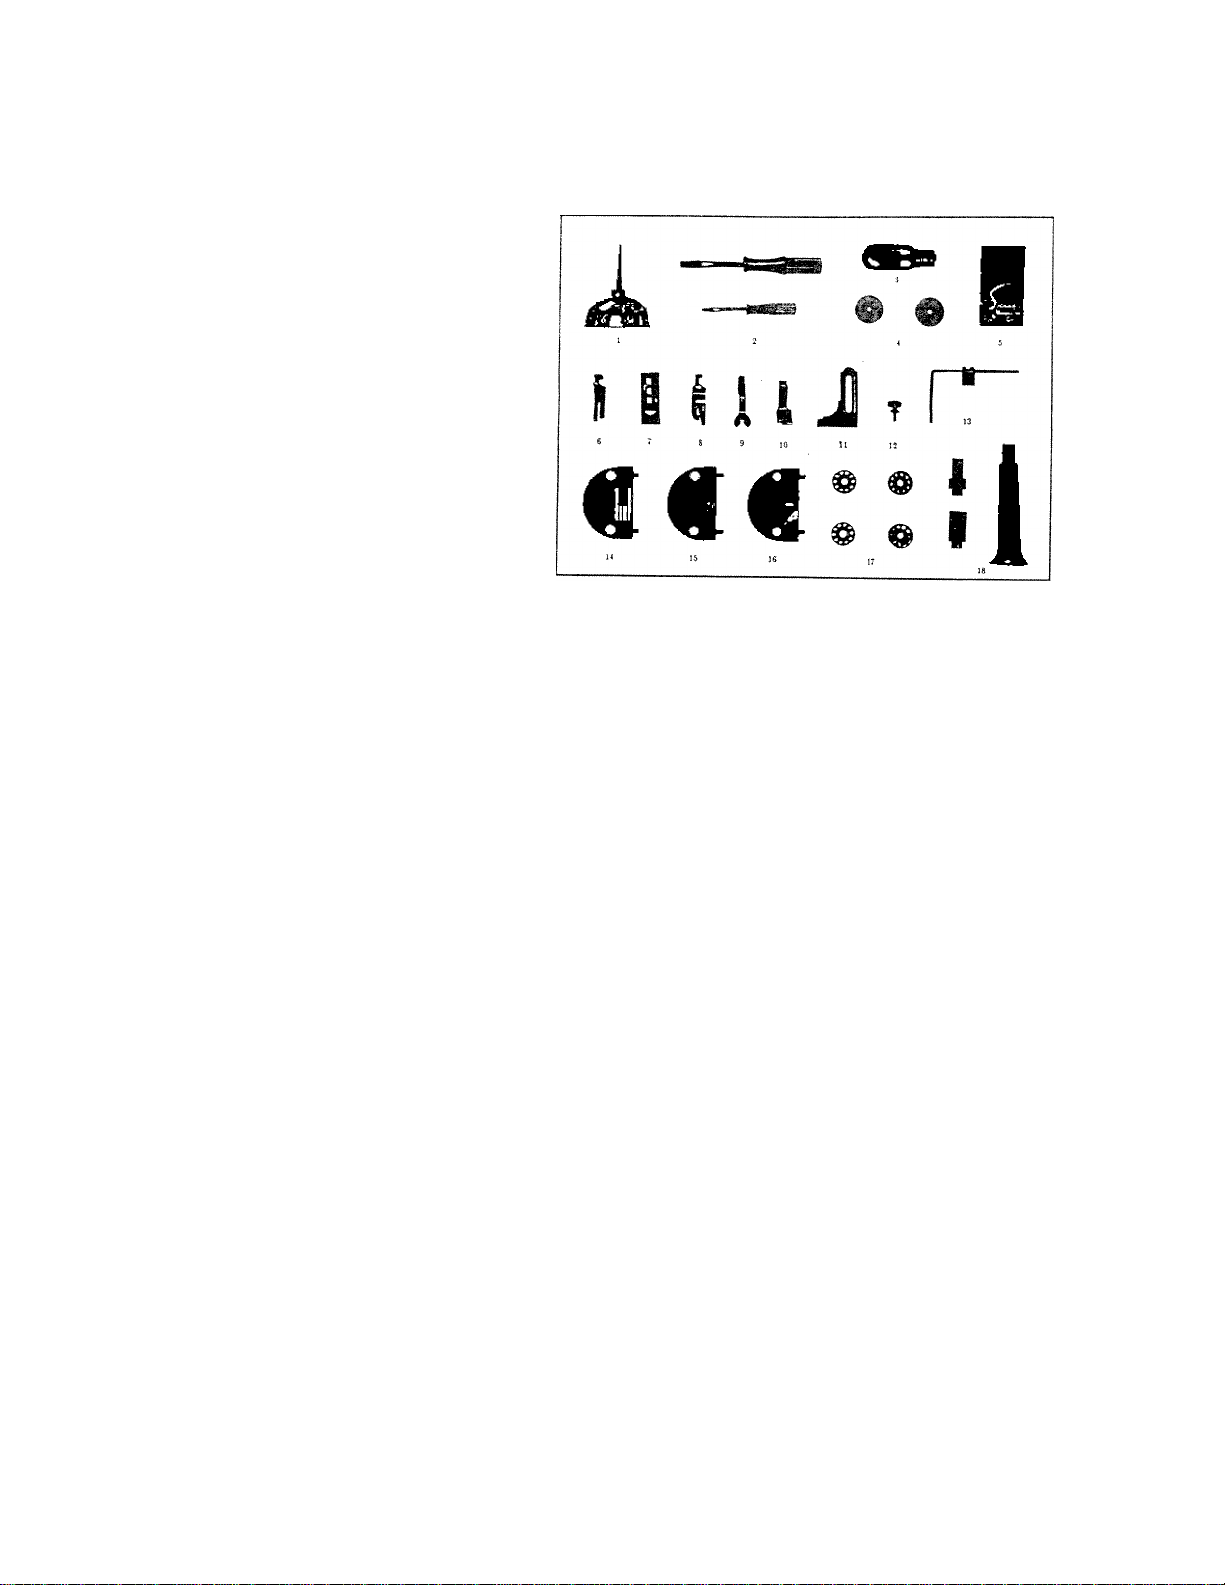
Accessories
(Fig. 2)
1.
2.
3.
4.
5.
6.
7.
8.
9.
10.
11.
12.
13.
14.
15. 16.
17.
18.
Oil can
Screw drivers
Electric-bulb
Spool pin washers
Needles ■
Straight stitch foot
Buttonhole foot
Hemmer foot
Button foot
Braider foot
Cloth guide
Cloth guide set screw
Quilting attachment
Needle plate for straight stitch
Needle plates for embroidery
Bobbins
Buttonhole cutters
Page 5

PREPARING TO SEW
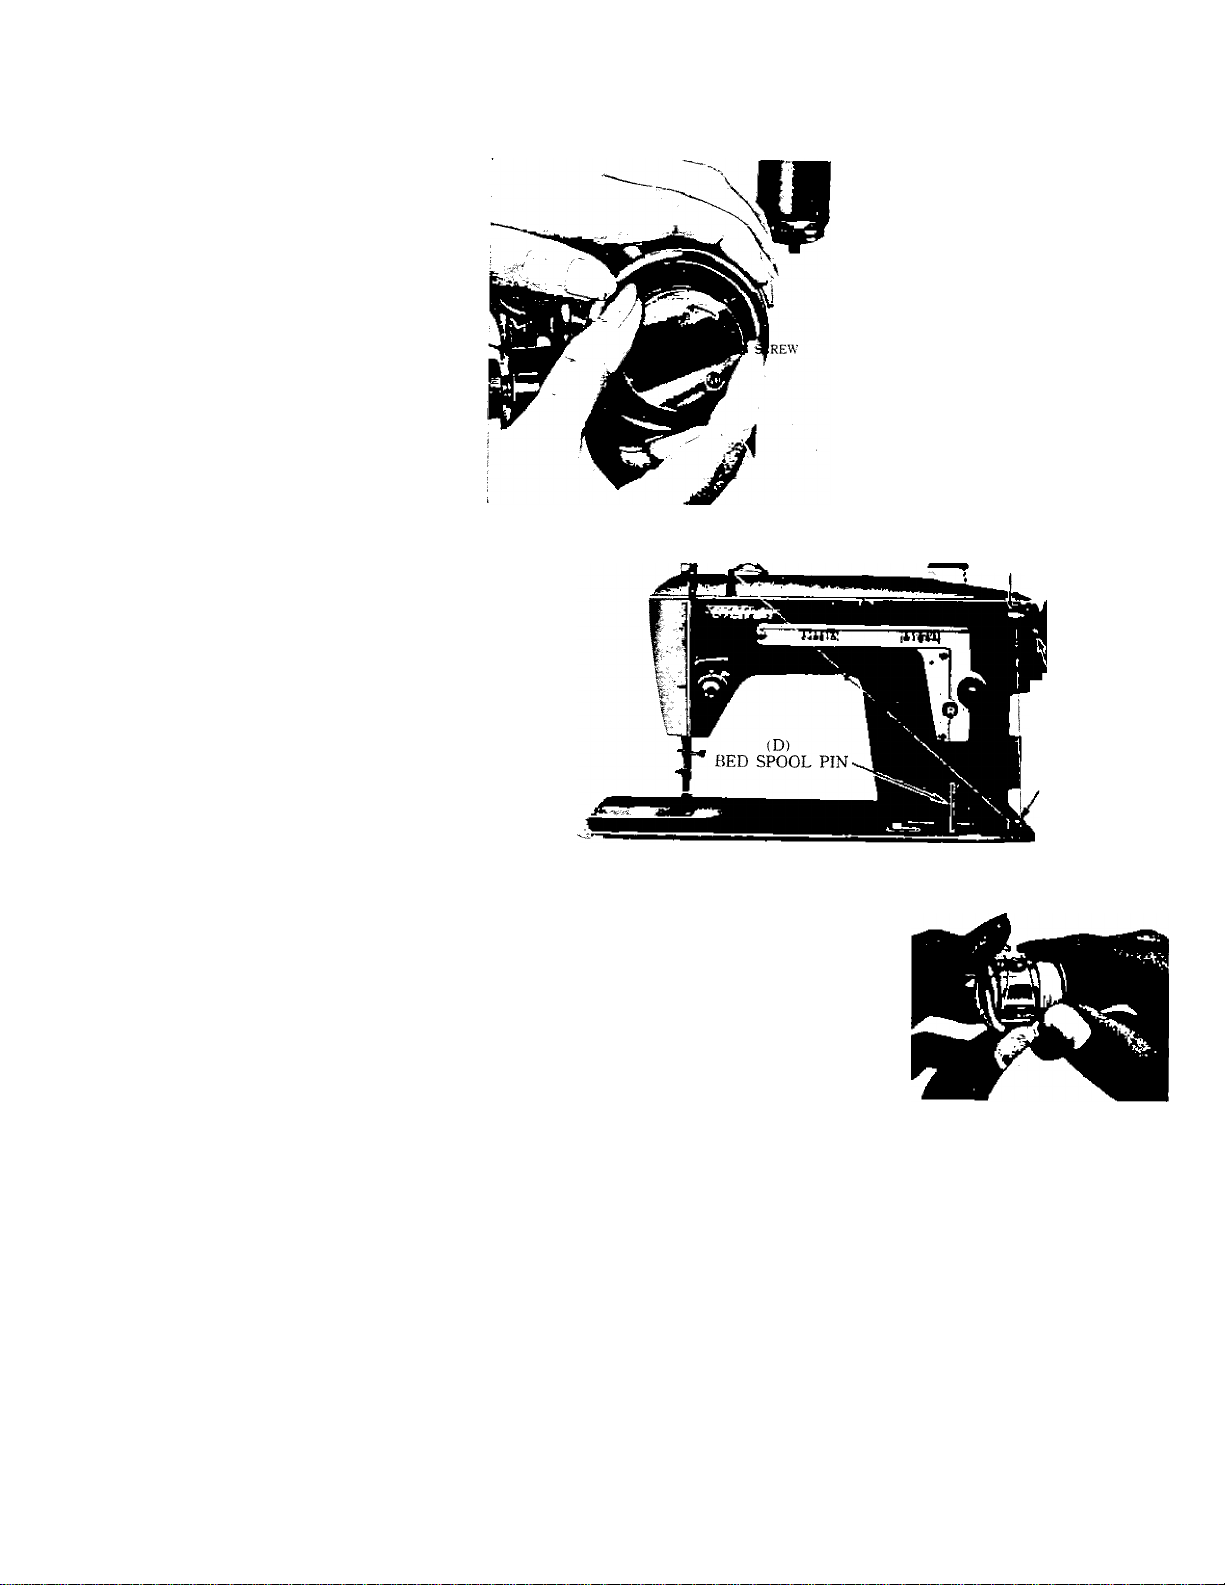
To remove the Bobbin Case
Turn the hand wheel toward you until
BOBBIN CASE FrNGER
SUDE PLATE
(Fig. 3)
On releasing the latch and turning the bobbin case downward, the bobbin will
drop out.
The bobbin case must never be removed when the needle bar is in the lower
position. ■
the needle bar is at its highest point.
Open the slide plate in the bed of the
machine so that bobbin case can be
reached. (Fig. 3)
Insert the thumb and forefiinger to
open the latch and withdraw the bobbin
case.
While the latch is held open the bobbin
is retained in the bobbin case and will
not drop out.
Neither should a bent needle be used, as it is liable to damage the bobbin case
or the shuttle.
To wind the Bobbin
Disconnect the hand wneel by holding it in the left hand, while turning the stop
motion screw over toward you with the right hand, as shown in Fig. 4.
Wind the free end of the thread several times round the bobbin and press it oniu
the spindie (.4.), passing the thread through the tension bracket (B).
Press the push-button (C) until the latch fits securely into the bobbin. When the
Page 6
bobbin is filled, the latch automaticallr
disengages and stops the winding
operation. (Fig. 5)
By using the spool-pin on tlte machine
bed vD) spare bobbins can be wound
and prepared without interfering with
your sewing.
(Fig. 4'i
ARM SPOOL
P1N_,
(Fig. 5)
ARM THREAD
GUIDE
To thread the Bobbin Case
Hold the bobbin between the thumb and fore
finger of your right hand and pull out two or
three inches of thread.
Holding the bobbin case in your left hand, turn
the open side up and place the threaded bobbin
into it. (Fig. 6) g)
(A)
BOBBIN
WINDER
SPINDLE
(C)
PUSH
BUTTON
(B)
BOBBIN
WINDER
TENSION
BRACKET
Page 7
With the right hand guide the thread into the
slot in the edge of the bobbin case. tFig. 7)
Then pull the thread to the right, under the
tension spring and into the slot. (Fig 8)
In order to keep the bobbin from dropping out
(Fig. 7)
of the case when turned with the open side
down, always keep the hinged latch on the
SLOT
bobbin case open.
tFig- 8)
To insert the Bobbin Case
Hold the l)obbin case by the latch and place it on the center po.st ot me snuttle
with the finger of the bobbin case opposite the notch at the top of the shuttle.
Release the latch and press the bobbin case into the shuttle until the latch catches
on the canter post of the snuttle with a click. (Fig. 9)
FltvGhK .
LATCH ' ~
' Permit the bobbin thread to
CENTER POST
hang down freely a few
inches.
(Fig. 9)
Page 8
To insert the needle
Raise the needle bar (A) (Fig. 10) to
its highest point by turning the hand
wheel with your right hand.
Loosen the needle clamp screw (B) at
the end of the needle bar, and insert
the needle iC). with the flat side .
(Fig. 11 > to the right, into the slot of
the needle bar.
Insert the needle as far as it will go
until it touches the pin which is
visible in the slot above the needle
clamp and tighten the needle clamp
screw tirmlv.
(Fig. 10)
GROOVED SIDE
FLAT-SURFACED SIDE
(Fig. 11)
(Fig. 12)
To thread the needle
Raise the take-up lever (6) to its
highest point.
Place a spool of the thread on the
spool pin on the back of the machine
arm.
Pass the thread through the upper
arm thread guides (1, 2). thrcugh the
lower arm thread guide (3i downward
Page 9

between the tension discs from the back, up over the tension thread guard (4)
from behind, down into the hook of the take-up spring. (t>t, up and through the
hole in the end of the take-up lever (6 .-. down through the face plate thread guide
(7 and into the wire thread guide (8), at the lower end of the needle bar; then
from left to right through the eye of the needle (9 .
Draw about four inches of thread through the eye of the needle with which to
commence sewing. (Fig. 12) .
To change the Needle Plate
Raise the needle to its highest point by turning the hand wheel, and raise the
presser foot by lifting the presser bar lifter.
Move the slide plate to the left and lift the needle plate out, as shown in Fig. 13.
Place another needle plate on the guide
screws and press it down.
Note : There are four different needle
plates for various purposes.
Needle plate for zigzag stitch,
i regular).
Needle plate for straight stitch.
Two needle plates for embroidery.
To change the Presser Foot
Raise the needle to its highest point, and raise the presser foot.
Loosen the thumb screw and remove the presser foot.
Attach another presser foot and tighten the thumb screw.
Note : There are six feet for different purposes.
8
(Fig. 13)
Page 10

Presser foot for zigzag stitch. (regulari>
Presser foot for straight stitch.
Presser foot for hemming.
Presser foot for button sewing.
Presser foot for buttonhole sewing.
Presser foot for braid sewing.
Automatic Darner
For releasing pressure on the foot, press
down the ring (A) (Fig. 14), which
will allow the darner to spring up to
its highest position and leave the
material free from any pressure from
the presser foot.
For sewing thin or light fabrics, press
the top of the darner (B) down lightly
to get the required slight pressure on
the fabric.
(Fig. 14)
For sewing thicker or heavier fabrics, push the top of the darner down further,
in order to get a stronger pressure on the presser foot.
Built-in Sewlight
To insert the electric-bulb, pull the
knob (A) (Fig. 15) until the socket is
tilted at an angle enabling you to
screw the bulb in.
(Fig. 15)
Page 11

Always push the socket back into position before sewing.
The light is turned on and off by means of the switch (B). (Fig. 15)
TO START SEWING
Pull the upper thread through the needle eye and hold it loosely with the left
hand. Turn the hand wheel toward you with the right hand until the needle
moves down and up again to its highest point, thus catching the lower (bobbin)
thread.
Now pull the end of the upper
thread you are holding and the
bobbin thread will be brought up
with it through the needle hole in
the needle plate, as shown in Fig. 16.
Place both ends of thread back under
the presser foot.
Place the fabric to be sewn beneath
(Fig. 16)
ing to the directions already given.
Note : For straight sewing, the zigzag width regulating lever (Fig. 1-3) must be
set to the right, so that the zigzag width indicator points to “ O ”. '
the presser foot, lower the foot upon
it and then start the machine accord-
10
Page 12

To regulate the tensions
For ordinary stitching, the tension on the upper and lower threads should be
equal so as to lock both threads in the center of the fabric.
thus :
If the tension on either thread is stronger than on the other, imperfect stitching
will be the result.
If the tension on the upper thread is greater than that on the lower thread,
it will lie straight along the upper surface of the fabric.
thus
If the tension on the lower thread is greater than that on the upper thread,
the lower thread will lie straight along the under-side of the fabric,
thus :
Tension i'n the upper thread
The sewing machine will give perfect per
formance when the upper thread tension
is correctly adjusted.
A) The tension on the upper thread be
comes stronger when the tension-dial
is turned in the direction marked
(+). (Fig. 17)
(Fig. 17}
11
Page 13

B) Contrariwise, the upper thread tension becomes weaker when the dial is
turned in the direction marked ( — ).
C) Once the tension has been adjusted satisfactorily, the dial can be returned to
the same dial-number to obtain the same results.
Tension on the lower thread
The tension on the lower thread is regulated
by the screw on the bobbin case tension
spring. (Fig. 18) Use the small driver and
tighten the screw slightly to increase the
tension, or loosen it to slacken the tension.
(Fig. 18)
To regulate the direction of feed and stitches
STTTCH LHNiiTH
rOiDiCATOit
Hirrrtw
For reverse stitching, keep pressing
reverse button "R" until the desired
length of stitches are sewn.
To regulate the length of stitch, turn
the stitch length regulating dial to the
required length, as shown in the stitch
length indicator window. (Fig. 19i
(Fig. 19)
12
Page 14

, To remove the work
Raise the needle bar to its highest point, lift the presser foot, draw the fabric
back and cut the ends of threads. Leave the machine threads about four inches
long for resuming sewing. -
DECORATIVE STITCHES
Zigzag sewing
ZIGZAt; WIDTH
REGUL.ATING LEVER
1 Ap .
s^apiol
(Fig. 21)
Make sure the needle plate and the presser foot
ZIGZAG FOOT & PLATE gj.g £pj. zigzag use. (Fig. 20)
(Fig. 20) ■
The controls for zigzag stitch are located on the arm of the machine, as shown
in Fig. 21.
Notice the lever A which adjusts width of the zigzag .seam. By moving this
13
Page 15

lever gradually to the left toward “5” the machine will sew a zigzag seam of
increasing width, depending on the position of the lever. (Fig. 21)
When sewing buttonholes, the stopper ‘"B" will be found useful. This stopper
serves as a stop for the lever “A”.
To set the stopper “ B ”, loosen the stop lock "C", move the stopper to the
desired position, tighten the stop lock “ C ”,
Button sewing
(1) Raise the needle bar to its highest point.
Raise the presser bar, remove the regular
presser foot, and attach the button sewing
presser foot. (Fig. 22)
(2) Drop the feed by pressing down the drop
feed button “DARN” on the right hand
corner of the bed. (Fig. 23)
(Pig. 22)
(3) Set the zigzag width lever
“ A” to 5 or less, according to
the distance between the holes
in the button.
(4) Place the fabric under . the
presser foot
(5) Place the button between the
presser foot and the fabric, (Fig- 23)
with the holes in a horizontal line and lower the presser foot.
14
Page 16

(6) Turn the hand wheel slowly toward you, making sure the needle enters the
holes in the button. Slowly start the machine, making about six or seven
stitches. To knot the thread, set the lever “A’' to “O" and make three
or four stitches.
When sewing four-hole buttons, first sew one set of two itoles, then stitch into
second set of two holes and lock thread with three or four plain stitches in last
hole in same way as described above.
Buttonhole sewing
(1) Remove the regular presser fcot
and attach the buttonhole presser
foot. (Fig. 24)
(2) Set the zigzag width lever “A" gauge
to a little less than 2.5. (Tig. 21)
(3) Set the stitch length, dial (Fig.
19) to obtain closely spaced
forward stitches. , BUTTON
(Fig. 24)
(4) Mark with pencil or chalk the position and e.xact length of the buttonhole
on the fabric.
(5) Place the buttonhole foot on one end of the marking, commence sewing the
left buttonhole seam until it reaches the end of the marking.
(6) To close the end, drop the feed by pressing down the drop feed button,
set the zigzag width lever “A” to “5” and sew three or four stitches.
(7) Now to sew the other side of the buttonhole, turn the fabric around 180
15
Page 17

degrees, and repeat the procedure as before.
(8) Remove the fabric from the machine and open the buttonhole with a button
hole cutter included in the accessories.
Note : It is sugguested that you make one or two sample buttonholes on a clipping
of fabric to test adjustments of the machine and to make corrections.
Braid sewing
Remove the regular presser foot from the machine
and attach the braider foot, as shown in Fig. 25.
Insert the braid through a small hole at the front of
the foot.
Adjust width of zigzag seam and length of stitch to
obtain a covering of the braid which appears the
(Fig. 25) most desirable for the material you are sewing.
Using a needle thread of a contrasting color will enhance the beauty of your
braiding.
Darning and Embroidery
Raise the foot lifting lever and remove the
presser foot.
Drop the feed by pressing down the drop feed
button, remove the regular needle plate and
attach the needle plate for darning and embroi
dery*. (see page 3)
Now* your machine is ready for embroidery and
darning.
Embroidery will be done most successfully when the fabric is stretched and fixed
16 "
(Fig. 26)
Page 18

in an embroidery hoop. (Fig. 26^
Hold the hoop closely on the machine bed with both hands, press the mtiterial
with your left forefinger in the vicinity of the needle. This will help in holding
down the material and will prevent the machine from making skipped stitches.
Manipulate work carefully and be sure to keep fingers out of the path of the
needles.
Adjust thread tensions for the best appearance of embroidery work and slightly
increase the bobbin thread tension to avoid the lower thread from being pulled up.
Hemming
Raise the needle to its highest point.
Raise the presser bar, remove the
regular presser foot, and attach hem
mer foot.
(1) Fold over the edge of the fabric
approximately 1 8 inch wide, then
fold it over again in the same
way for a length of about 2 inches.
Insert this folded end into the
spiral formed opening (scroll) of
the hemmer foot. fFig. 27)
Move the fabric back and forth until the hem forms itself in the scroll.
(2) Pull the fabric toward you until the beginning of the hem is just below the
needle.
(3) Guide the fabric into the hemmer foot while proceeding.
17
(Pig. 27)
Page 19

Note : Do not crowd fabric into the scroll, nor leave the scroll only partly filled
with fabric.
Instead of a straight stitch, you can also use a zigzag stitch for this hemming
operation. Be sure, however, to adjust the width of the zigzag stitch so that it is
as wide as the hem itself. '
Using a very long stitch and tight tensions will produce a SHELL STITCH.
Quilting
The quilting attachment
(Fig. 28') will enable you
to sew equi-distant lines
on padded fabrics without
the necessity of marking
them in advance.
To attach the quilter to the
presser bar of the machine,
raise the presser bar, loosen
(Pig. 28)
the quilter by the thumb screw'. (Fig. 28)
the thumb screw and clamp
Adjust the curved hook to the desired distance from the needle and adjust it to
press into the fabric.
When sewing, the hook should follow' the preceeding line f'f stitching.
Zigzag stitch quilting is done the same as straight stitch quilting except that the
zigzag width lever “A” (Fig. 21) should be set for the desired width of the
zigzag stitch.
18
Page 20

Cloth Guide
When you wish to sew close to the
edge of fabric or to make a wide hem
up to 1 h', inches in a straight (or
zigzag) and uniform line, the cloth
guide will be of help.
To attach the cloth guide, place it
over a hole to the right of the •
needle in the bed of the machine.
(Fig. 29) Attach with the thumb screw,
adjusting the guide to the desired dis
tance, then tighten firmly.
(Fig. 29)
MAINI'ENANCE
To open the Shuttle Race
To assure the best results with your sewing machine, it is necessary that the
shuttle race be cleaned out from time to time.
Moreover it will sometimes be necessary to open the shuttle race in order to
remove loose pieces of thread that have been
caught in the. hook.
The design of the shuttle race enables you
to do this most easily and efficiently, with
out sacrificing the precision which is so
essential to these parts.
SHUTTLE ^HU^RACF.
'■p'9- 30) needle bar to its highest point and remove
19
Page 21

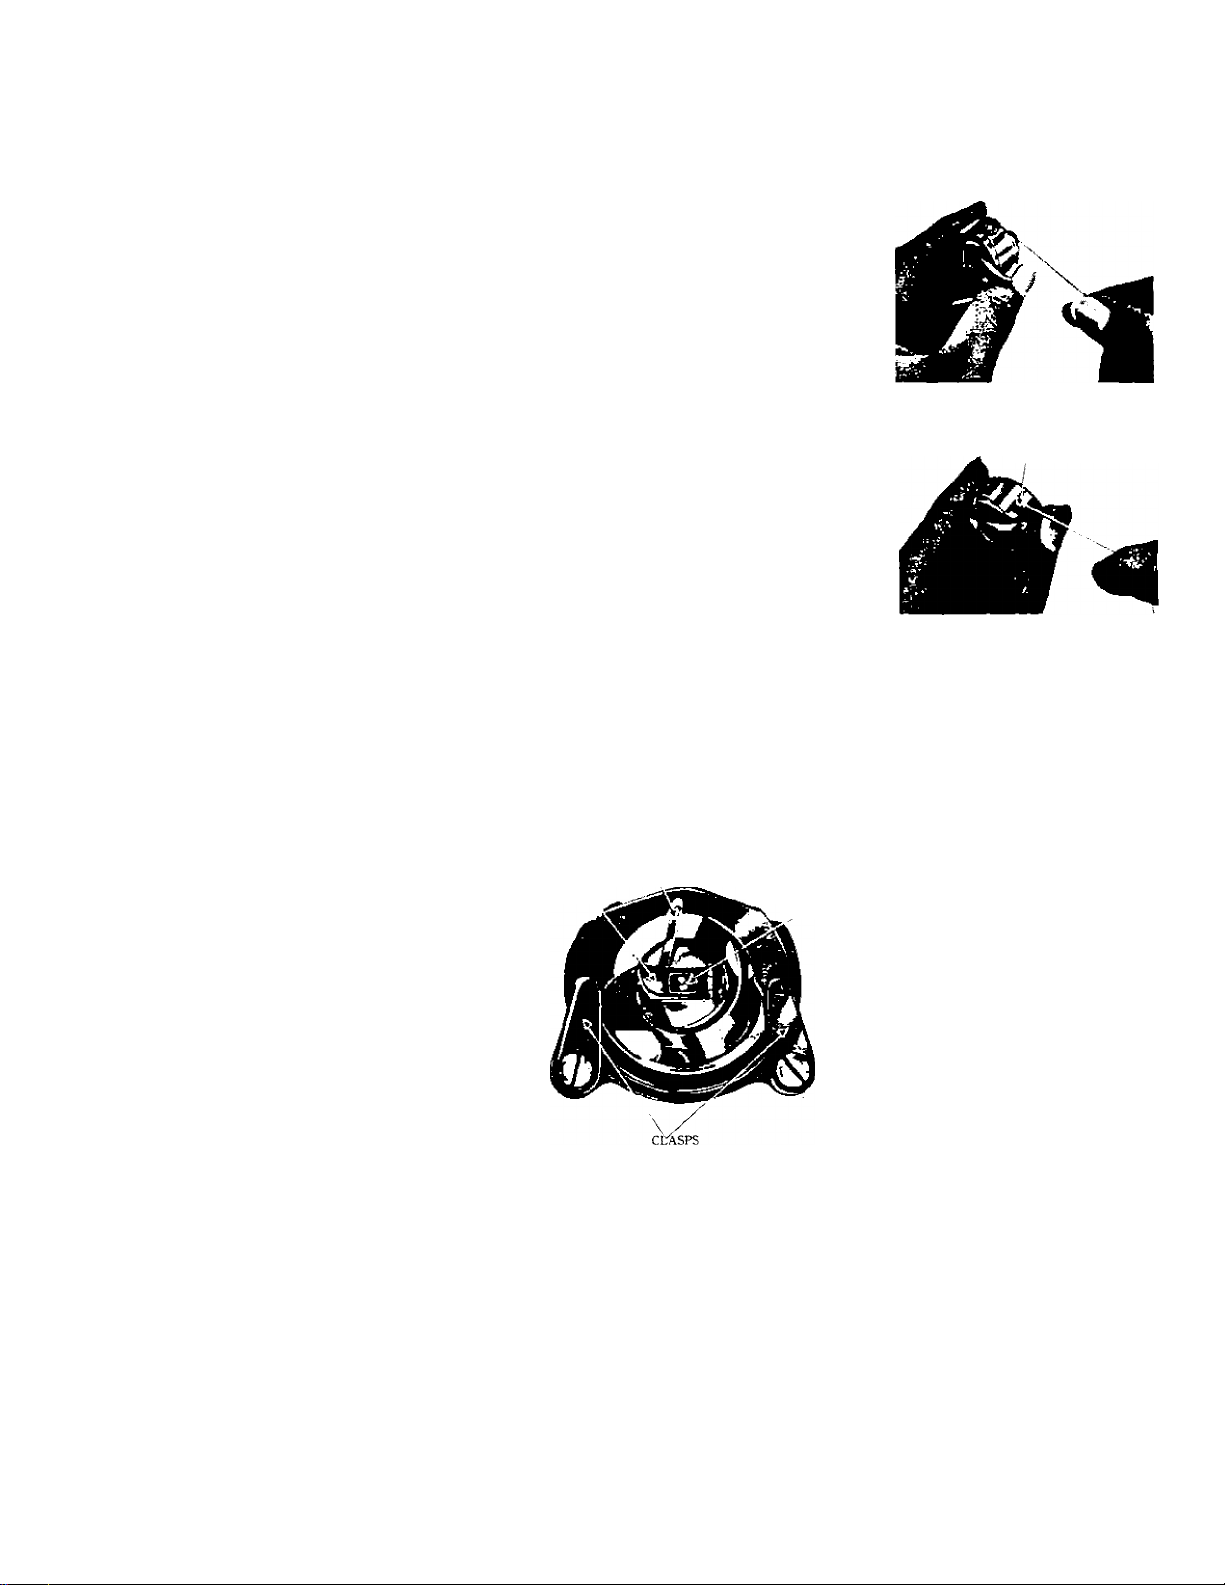
the bolibin case. (Fig. 30)
Next, twist the shuttle race ring clasps outward
(Fig. 31). then take out the shuttle race ring.
Carefully remove the shuttle and clean out
the shuttle race.
Replace the shuttle, the shuttle ring, and lock
with the clasps. Be careful not to drop or
(Pig. 31)
otherwise damage the shuttle. (Fig. 31)
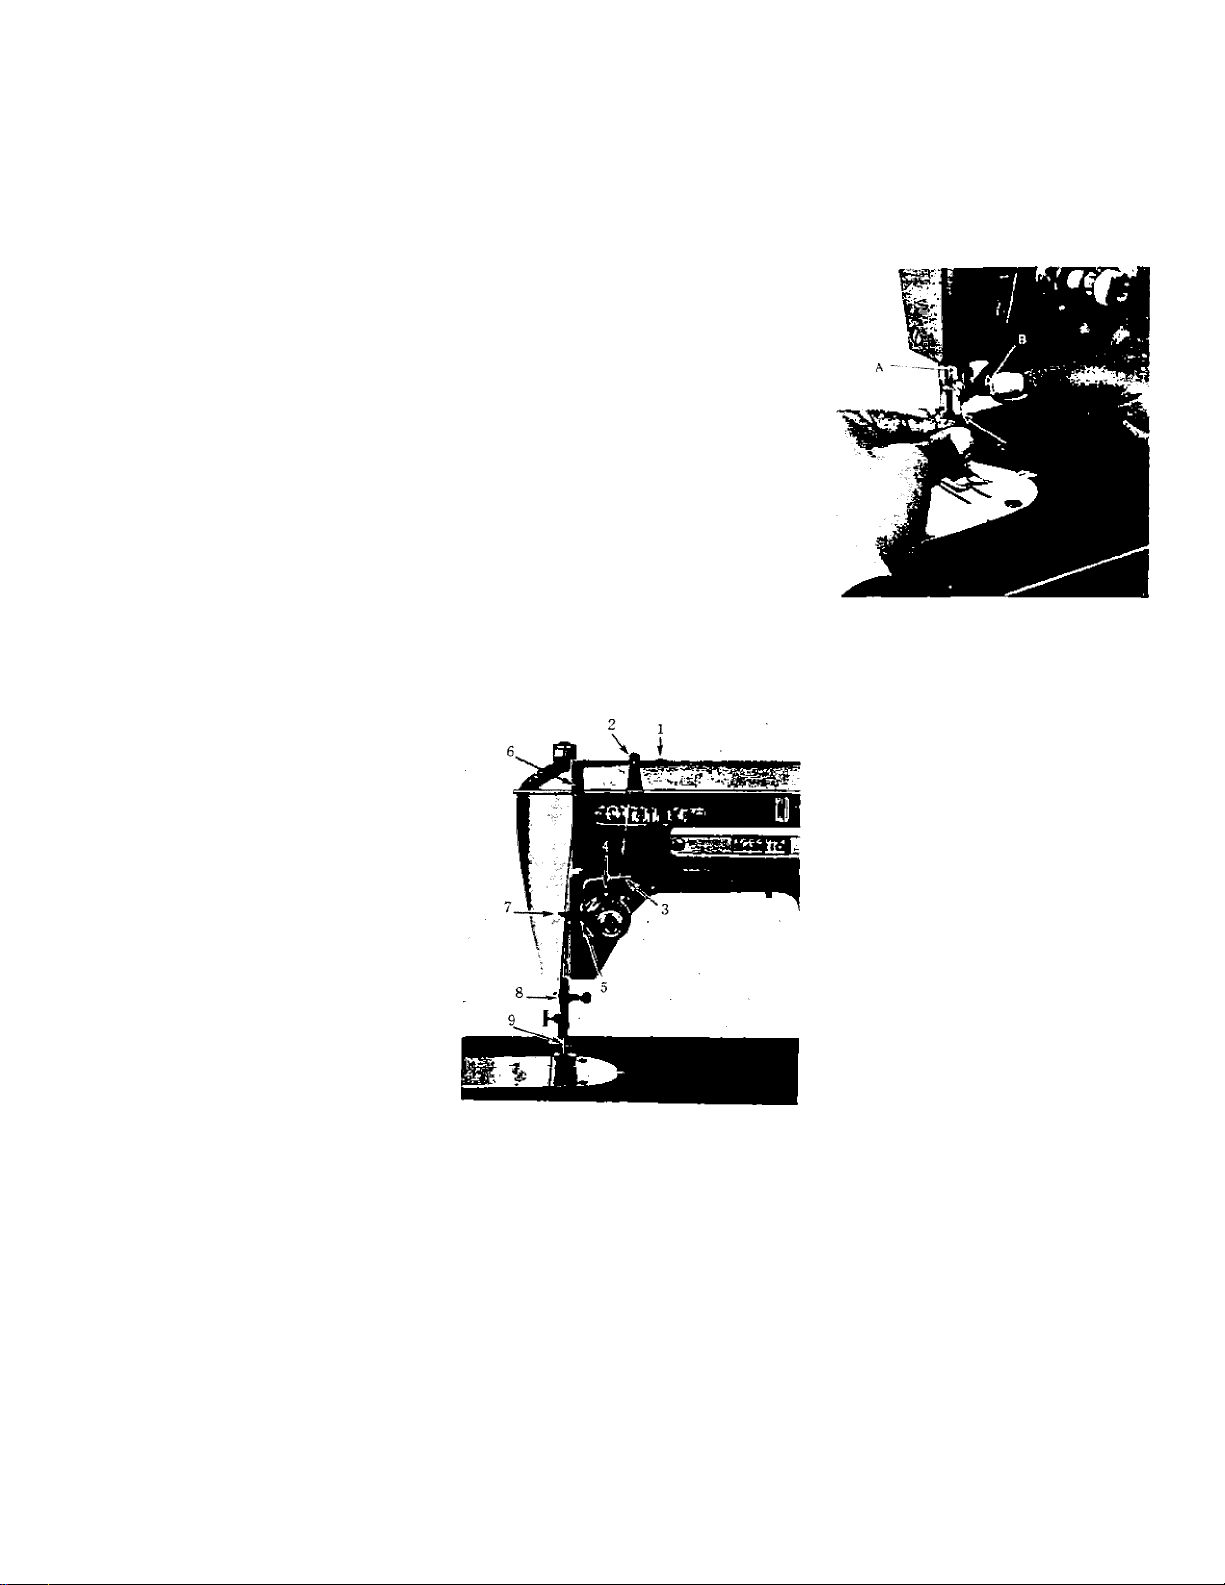
To oil the machine
To ensure easy and free working of the
machine, it is necessary that all moving
parts be covered with a film of oil and
not be allowed to become dry.
The shuttle race should also be oiled
frequently.
The machine should be oiled at the
places indicated by arrows in Fig. 32 and
Fig. 33.
To remove the face plate, loosen the face
plate set screw. (Fig. 1—13)
After oiling, run the machine
rapidly for a few minutes to
■work the oil into the bearings.
When in constant use the machine
should be oiled two or three
times a week.
(Fig. 32)
(Fig. 33)
20
Page 22

CHECK-UP FOR SMOOTH SEWING
MACHINE WORKING HEAVILY
If the machine works hard after standing idle for some time, apply a little kero
sene in place of oil. Then run the machine rapidly to clean the bearings, and
oil with sewing machine oil.
The use of inferior oil is usually the cause of the machine working heavily.
THREAD BREAKS
If the needle thread breaks, it is probably due to one of the following causes:
The machine being improperly threaded.
The tensions being too tight.
The needle being bent or having a blunt point.
The thread being too coarse for the size of the needle, (.see page 23)
The thread take-up spring broken.
If the lower thread breaks, adjust the bobbin tension (Fig. 18) ; also see that the
inside of the bobbin case and the underneath part of the tension spring are free
from lint.
21
Page 23

SKIPPED STITCHES
A bent or blunt pointed needle is often the cause of this. See that the needle
plate is accurately inserted, (see page 8) Remove the needle plate and after
ascertaining that the feed is clean and working freely, replace the needle plate. ^
NEEDLE BREAKS
See that the needle is not bent and avoid pulling the material when stitching ;
either condition will cause the needle to strike on the needle plate and break.
MATERIAL PUCKERS
This is generally due to incorrect tension. See that both the bobbin case and
the needle are properly threaded : that the thread used is of good quality and the
correct size for the needle, (see page 23)
STITCHES LOOP
This is regulated by the tensions, (see page 11) See that both the bobbin case
and the needle are properly threaded ; that the thread used is of good quality
and the correct size for the needle, (see page 23)
22
Page 24

NEEDLE-THREAD-FABRIC-STITCHINQ GUIDE
Fabric
Ext rem el y he avy t arp au - 6
lin. sa cki ng . c an va s.
duc k, etc . 8
Hea vy up ho ls ter y f ab ric .
tick ing , d en im , l ea the re tte .
etc. 10
Me diu m -he av y dra pe ry
fabr ic , v elv ete en , s ui tin g.
felt , te rry , e tc . 12
Me diu m br oa d c lot h, pe r-
cale . g in gh am . l ine n,
chin tz . ta ff eta . s he er
woo l, sh ant un g, etc .
She er voi le, lawn, dimit y,
crep e, ha nd ke rch ie f li ne n,
plas tic hi m . et c.
Needle
No.
4
3
2
! 1
1 0
(Pla sti c F ilm
8 to 10 )
Machine
Stitches
Per Inch
i to
i
! 14
i
i 16
Cotton
Thread
to to
8
to , to
10
to
12
i to
1 ' 8 0
1
80
; to
to
10
30
30
40
40
to
60
60
100
Mercerized
Thread
Hea vy du ty
Hea vy du ty
Hea vy du ty
50
50
Sillc
or
Nylon
-
A
A
Ver y s he er ch iff on , b alisle . lac e. org an dy ,
nino n. ne t, ma rq uis et te,
I et c.
. to
1 15 0
100
50
A
= 1 6
00
i
; 20
1
to
23
 Loading...