

Page 1

How to use and care for your
SUPER ZIGZAG SEWING MACHINE
MODEL 219R
Page 2

WHITE
SEWING MACHINE
Record in space provided below the Serial No. and
Model No. of diis appliance.
The Scerial No. is located on Bed Plate.
The Model No. Is located on Bed Plate.
Serial No. _____________________
Model No. 2 1 9
Retain these numbers for future reference.
.
..................
.....................
............
IPegel
...... 3
......
.... 7
.....
ig
Features and Parts ............................................
Winding the Bobbin...........................................
Upper Threading
Placing Bobbin Case..........................................
Adjusting the Tensions....................................................... g
Adjusting Pressure and Feeding of Fabric
Preparing to Sew ................................................................. j
Applications of the Smocking Stitch
Twin Needles Upper Threading and Stwing
Samples of Creative Embroidery
Creative Embroidery............................................................ jg
Embroidering With a Hoop..............................................
Making Buttonholes
To Regulate the Length of Stitch
Sewing in Reverse
..............................................
....................................
......................................................
.............................
...............................................................
INDEX
6
8
.10
12
13
..
g
{Item)
Straight and Zigrag Sewing
Sewing on Buttons
Straight Stretch Stitch........................................
Multiple Zigzag Stitch
Blind Stitch Hem...................................................
Manual Operation
The Adjustable Cording and Zipper Foot
Quilting Guide
Seam Gauge or Cloth Guide
Cleaning and Oiling the Shuttle..........-
Care and Maintenance of Your Machine....................28
Accessories
Trouble Chart
For Portabile......................................
Installing sewing Head.....................................................
................................................................. 20
...........................................................................
............................................................. '
............................
.............................................
........................................
...............................................
...................
............................................
.......................
{PageJ
■•■19
■ 20
■ -21
■■ 22
--23
••■24
25
26
27
..
Page 3
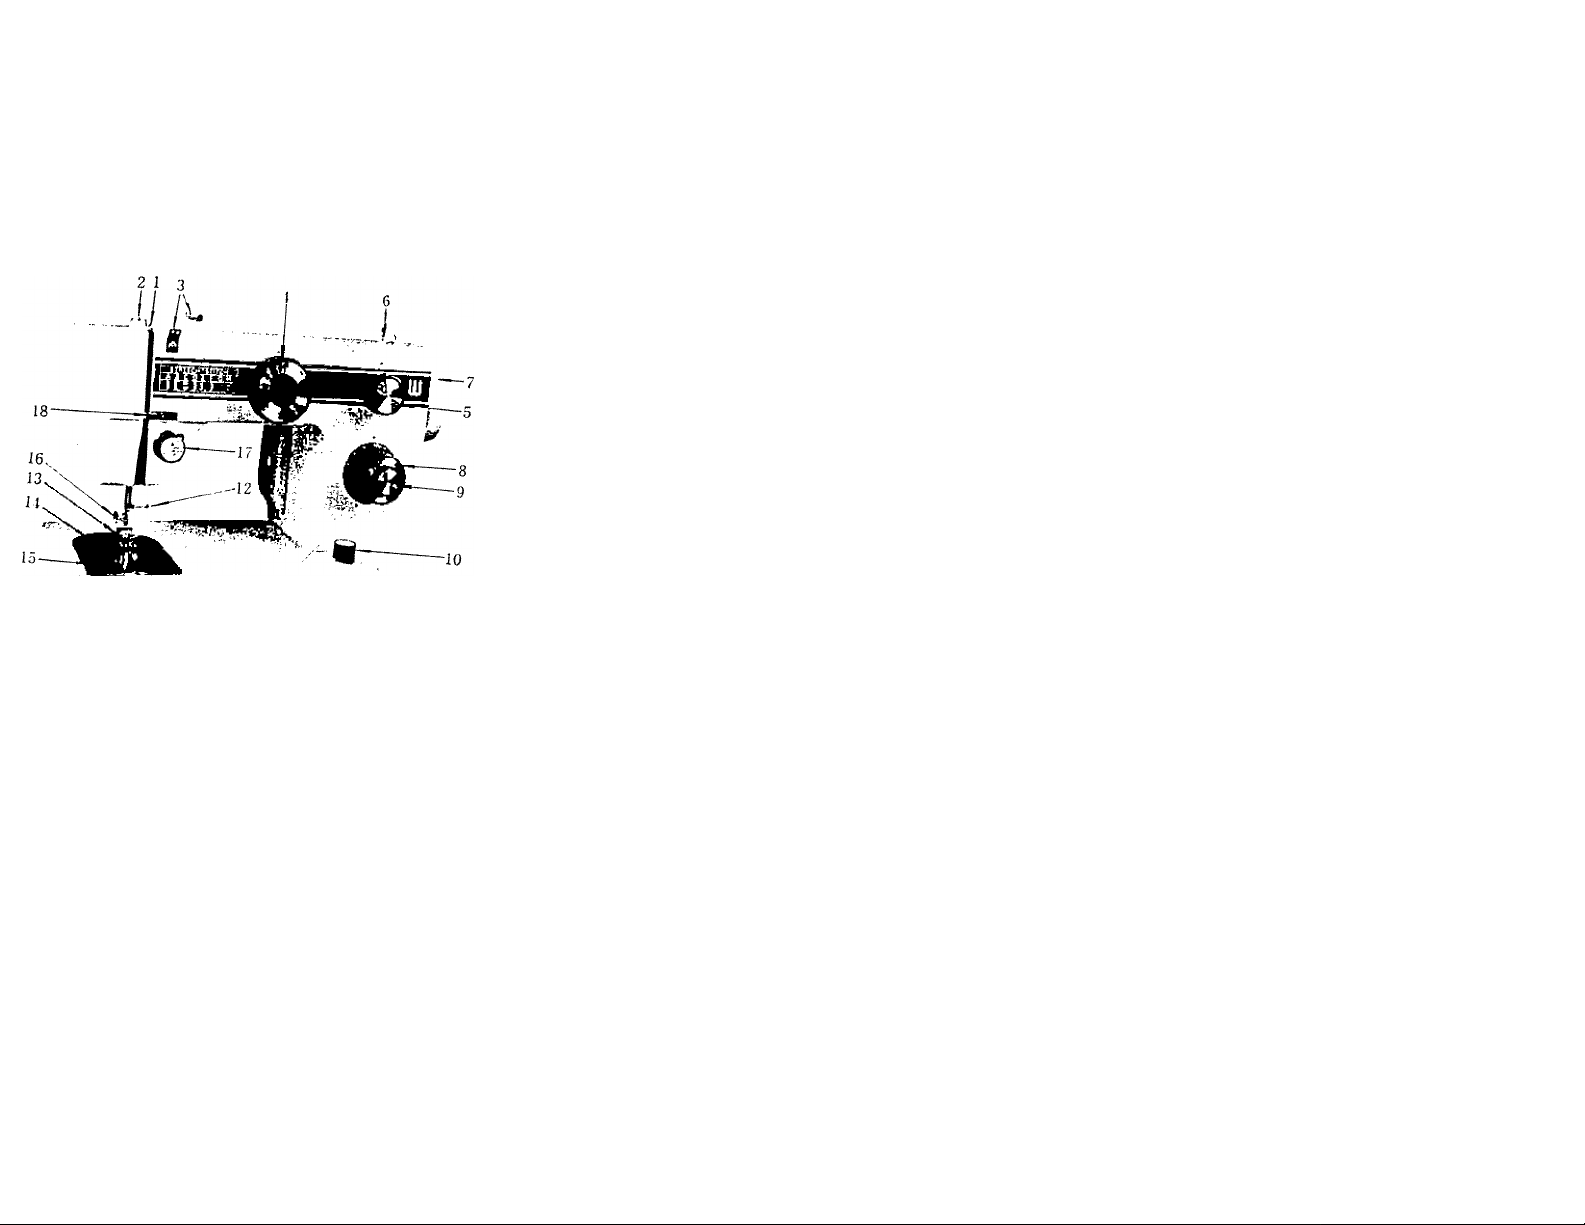
features AND PARTS ¡Front View)
Fig. 1
1. Take up Lever
2. Pressure Release (Darning)
3. Arm Thread Guides
4. Pattern Selector Dial
5. Zigzag Stitch Width Control
6. Bobbin Winder
7. Hand Wheel
8. Stitch Length Control
9. Reverse Stitch Button
10. Drop Feed Control
11. Model/Serial No. Plate
12. Needle Clamp Screw
13. Presses Foot
14. Needle Plate
15. Cover Plate
16. Attachment and Foot Thumb Screw
17. Tension Control
18. Thread Guide
Page 4

I ,
Fig. 2
19. Sew Light Switch
20. Spool Pins Bar Lifter
21. Bohhin Wioder Tention .Thread Guide,
2a. Head Hinge Mounting Holes
NEEDLE-THnEAD-FABRIC-STITCHING GUIDE
Fabric
txtremely heavy tarpaulin,
sacking, canvas, duck, etc.
Heavy upholstery fabric,
ticking, denim, leatherette
Medium heavy drapery fabric,
velveteen, suiting, felt, terry, ¡tc.
Medium broadcloth, percale,
gingham, linen, chintz, taffeta,
sheer wool, shantung, etc.
Sheer voile, lawn, dimity, crepe,
handkerchief linen, plastic film,
etc.
Very sheer chiffon, batiste, lace,
organdy, ninon, net, marquisette
etc.
Needle
No
3 1181
2 116)
1 114)
0111)
00
4
Machine Stitches
Per Inch
8to8
8 to 10
10 to 12
[
---------
-----------
12 to 14
14 to 16
IPIsttic film)
8 to 10
16 to 20
..
~
Cotton
10 to 30
30 to 40
40 to 60
60 to 80
80 to too
100 to 150
----------
---
————- ‘
Mercerized
1>’read
Heavy Duty
Heavy Duty
Heavy Duty
50
50
50
Silk or
Nylon
A
A
A
Page 5
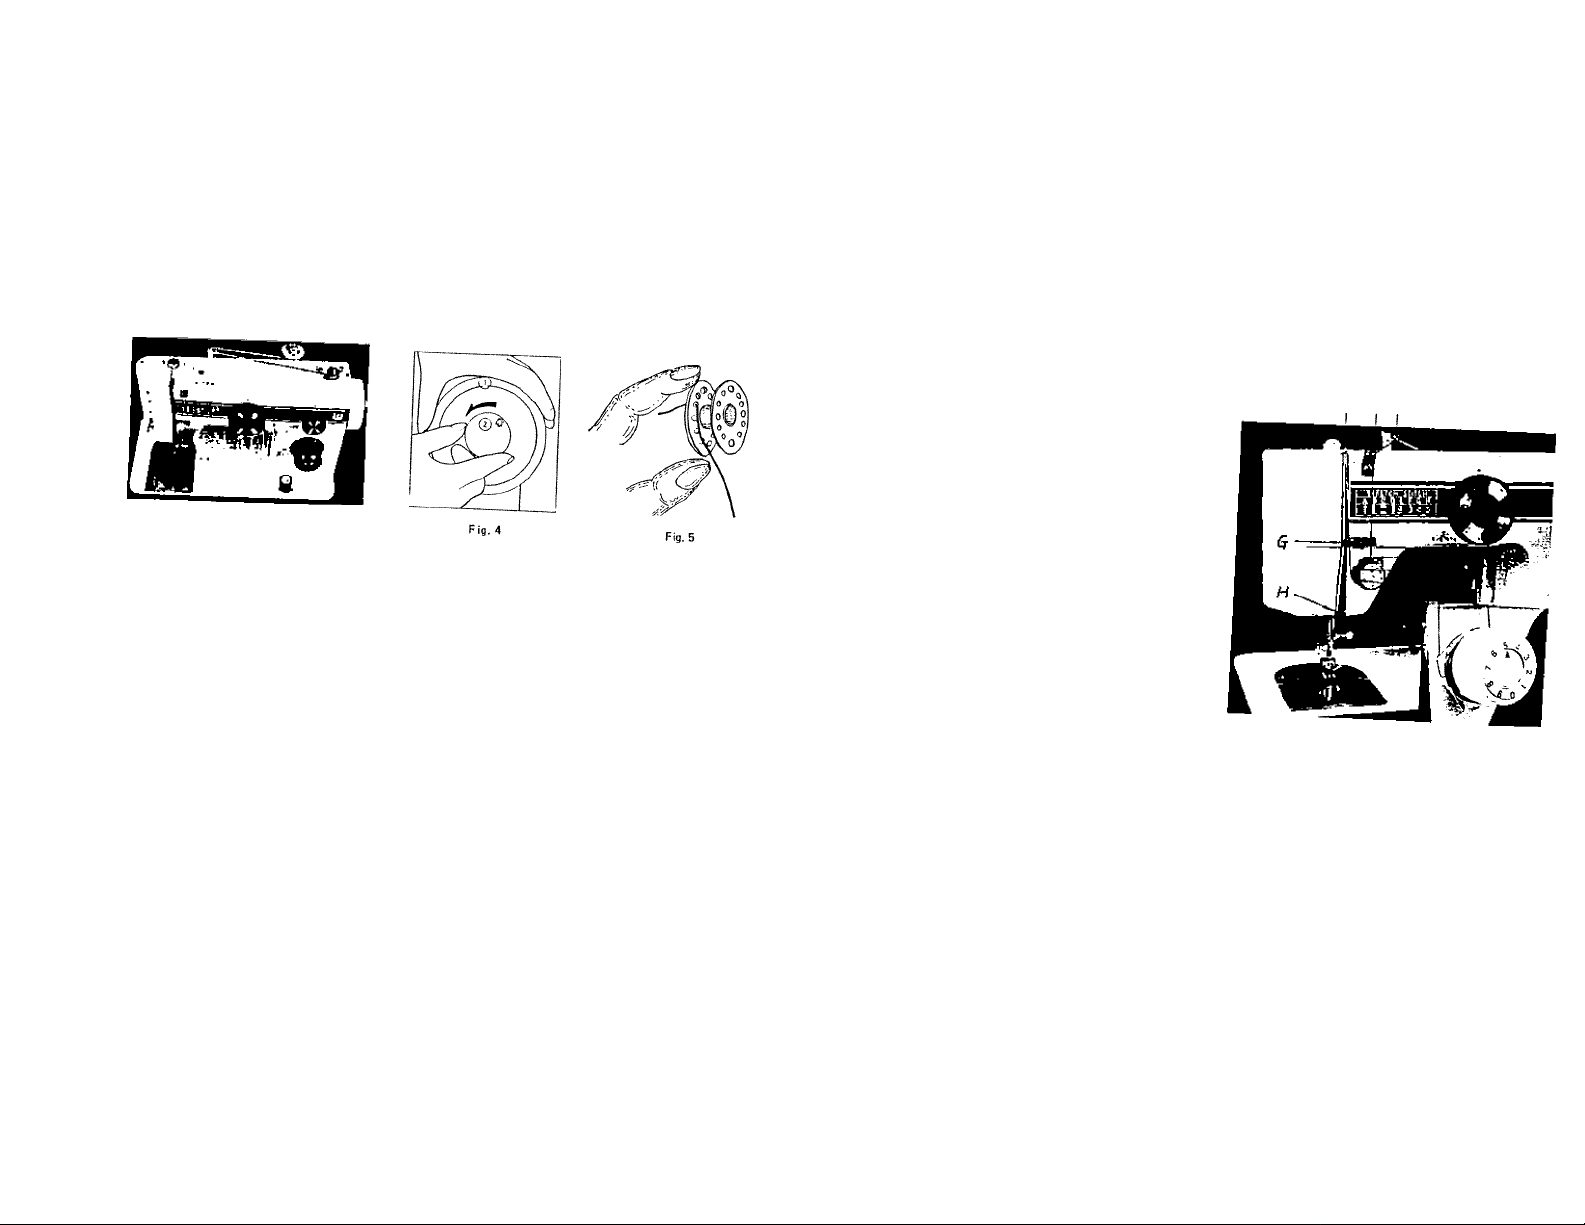
WINDING THE BOBBIN
Fig. 3
Disengage the hand wheel (I, Fig 4| from the cin^hi i. ■
Fig. 4) toward you or counter clockwise PlTc a It ^7
Icad thread through the arm thread guide (3 Fig Ttl 7 f T
bobbin edge and place bobbin on spindle of bobbin winder nuing‘'tr''t I
over small pin on spindle. Push bobbin (5 Flo ai i ,i u '“'"8‘^e notch on bobbin
!U„ ,l™„. ' ' -"I ll»“ «.'•« .»J looKi, ,h.n
UPPEFi THREADING
Turn the hand wheel toward you to raise the take,
up lever to its highest position.
Place a spool of thread on the spool pin
t.",
4.
S” “¿ft""" «'’™
Draw the thread up through the check spring (0
Fig 6^ ^ (E,’
Then up through the eye of the take-up lever (F
h»g-6) from right to left. ' '
Lead thread down, through the thread guide (G, F
ig. 6) then through the needle bar guide (I, Fig 6)’
Thread needle from front to back, drawing it
through about 3 or 4 inches. Hold the end of
he upper thread Ic-sely and turn the hand wheel
toward you until the needle goes all the way down
and comes back up. Aloop (Fig. 7) will be formed
over №e upper thread which then can be pulled out
traight. Place both thread ends under the pressed
foot and draw toward the back of the machine
leaving both threads three or four inches long.
Fig. 6
F B A
F«g. 7
Page 6
7A
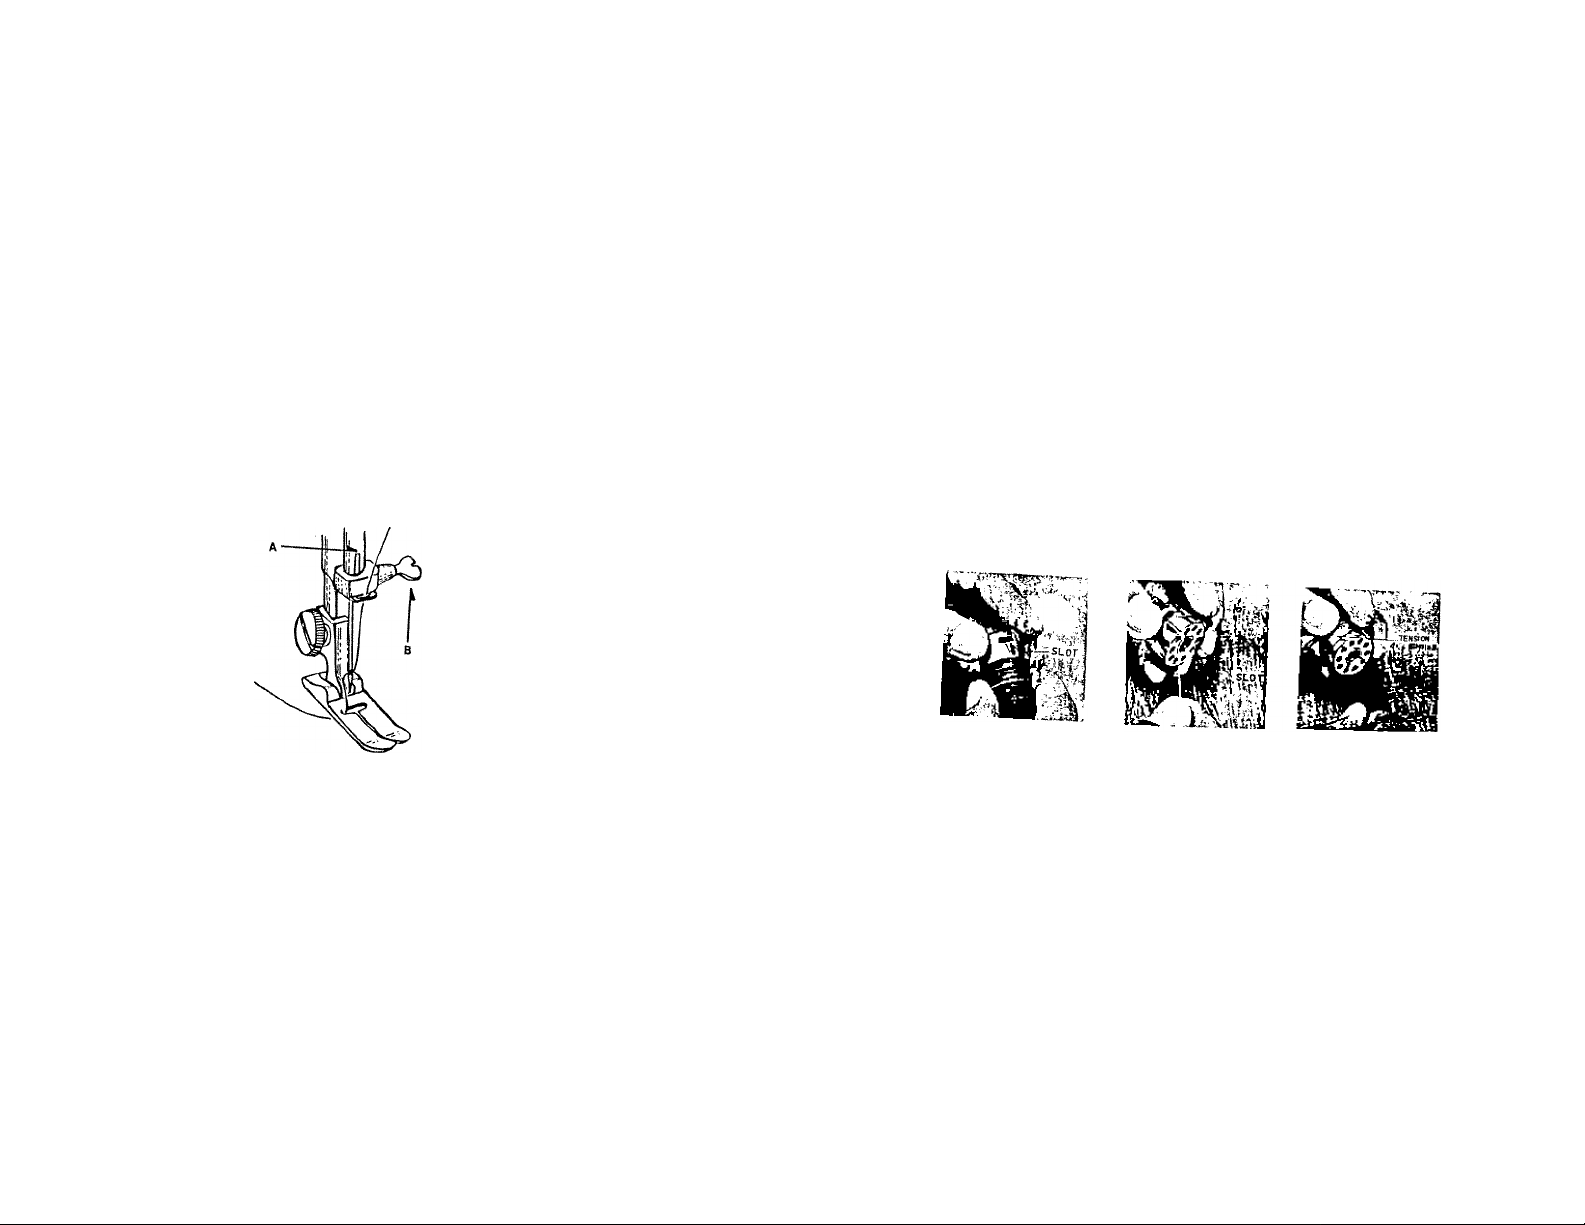
SETTING THE NEEDLE
TbI ‘aid ITneZle'c^n IT'
{Flat Side to BACKl in needle clamp push it uplTaTir « 7'^'
Tighten the Needle clamp sctew secutel, with a sctew Ihv“ *
THREADING THE BOBBIN CASE
.“:^L't”т;“ ;”.2 “• ‘."<'..0
forefinger of right hand so that the th '* bobbin between thumb and
1.» b..«„ ..i, r, ; r“iv:oi;;*r '•'■» t-
....
.......... ■“ - - »
78
Fig. A
Fig. B
Fig.C
Page 7
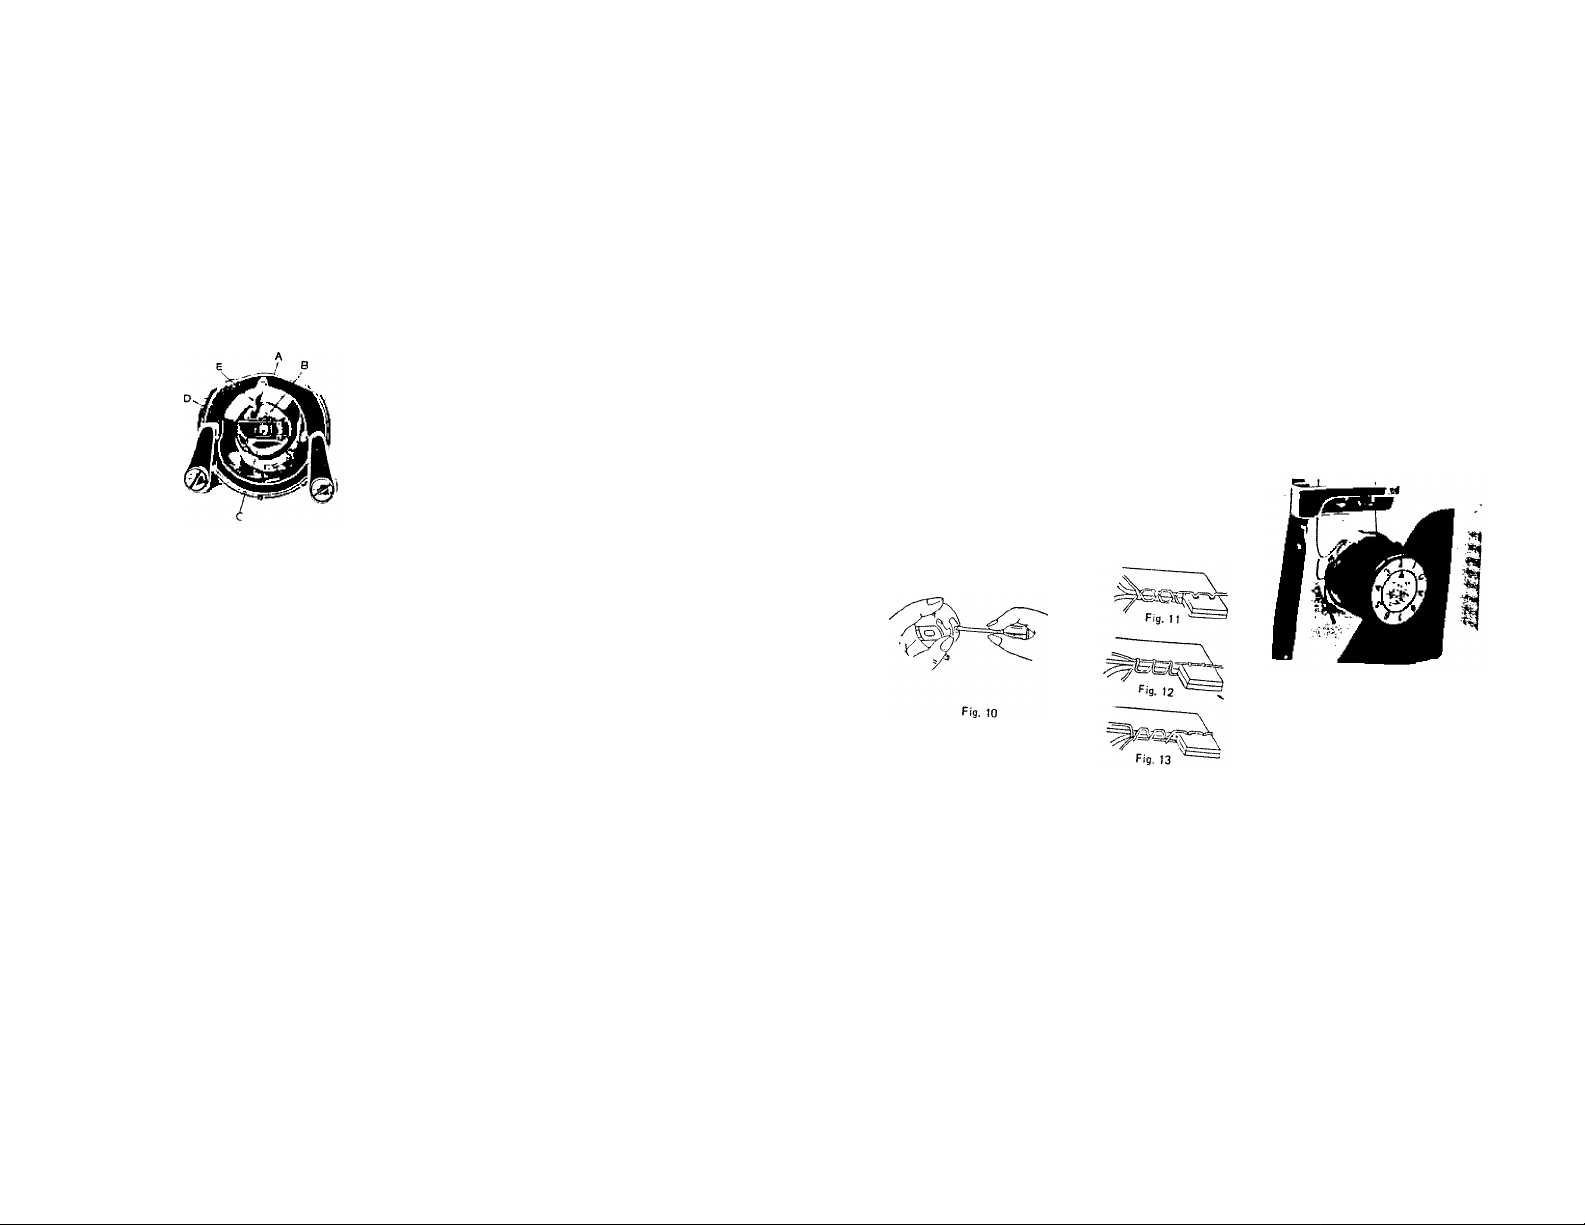
placing bobbin case
Fig. 8
Raise needle bar ,o highest position, and lif, hinged
atch p F,g. 8), between the thumb and forefinger of
‘he left hand, with at leas, three inches of .lead
running from the top of the bobbin case to the right
nser, and center the bobbin case on the stud of the
shuttle body, (C). Be sure the bobbin case finger (E)
.s opposite the Shuttle race notch, (A,. Press the Lbin
a e (B) into the shuttle as far as possible until latch
atches on the center post of the shuttle. Then release
the bobbin case latch, (D), Press bobbin case again
lie J I k T '"hhin
case IS locked securely.
Close the cover plate.
adjusting the tensions
«sSsHiSr=
perf«7s".i.fh win'be for"'n” balanced, a
ing in fabric (Fig. 11) threads interlock-
is plied ul oT thruo" " ‘r ‘bread
on the fabric (Fig. 2) V№en the
loose, the upper thread '’P" *s 'oo
lying flat on the fabric (Fig™3)°°^* ‘'’read
Fig. 9
Page 8

10
adjusting pressure and feeding of fabric
»»I...,1A
preparing to sew
n
Sewing Thin or Light Weight Fabrics. When lighter
requtred to sew satisfactorily on thin silk
pressure cap should be about halfway down L a'rairr""’
pressing the snap lock, (A, Fig. 141 and the '
to halfway spot. '' down again
Darning and Mending. In order to move the fabric r , ■
direction for darning and mending release the n ''
completely by pressing down on th; snap lock,
Turn drop feed control (Fig. 15) to •’ TTOT " •
Win drop the feed well below the needle pl^Tr
normal position, turn knob to ” ^ •• ">
Fig. 14
Fig. 15
Place materiarand thr;! inToshi
to “>ward you until the needle Tlut'h° h
to begin sewmg. By having the needle at its hiehes n • are now ready
wheel to start the machine. You merely press fte contrT Vh "°‘,'’"f’*^ry to touch the hand
by increasing or decreasing the amount 'of^ressure
removing THE WORK
Page 9

12
applications
Pattern :g
Length: 5
Width: 5
Feed Dog:
Pressure: Normal
Foot; Zigzag Foot
(51
OF THE SMOCKING STITCH
e -^rth '"^“’od is actually
easier than the overedge method for fabrics that curl
SEAMS
sre ^ inch seam in one
seams and I,"''’ " <he
seams and prevents the curling of the fabric that
often occurs with 5/8 Inch opened seams It is most
applicable to soft, thin knits such as nylon or acetate
kmts, but may be used on other fabrics arweil
Always make test seams with this stitch
strenaTh a*n7'" ^‘¡‘ch gives
Strength and prevents raveling. It can be used on
woven goods to replace flat felled or French seams.
rh P^llcrns with 'A inch seams: (Fig A ) Place
at the r!w i‘ comes down
allowan« ^cam
For patterns with 5/8 inch seams; (Fig 8 ) The
seam allowances may be trimmed to % inch either
prtred" T before sew ng
proceed as above. Otherwise, sew the seam with the’
raw edge of the fabric on the etched guide line ”¡5”
r1, I f"" '^Wih of a particuL;
VS inTt ,r'‘‘i 7'?’“"' '‘'S' fi>bHc
abri near°,h tcin’ the excess
TWIN NEEDLES UPPER THREADING AND SEWING
Be sure zigzag needle plate and presser foot are in place
Follow threading instructions for single needle with these exceptions-
b.
ead bl t?'
Lead both threads through arm thread guides.
Bring threads down and around tension discs with one thread
passing between the back discs and the other between the front
dtscs. "L/Mi
Now treat both threads as one until you reach the needle eye
d.
Pass one thread through each needle eye (Gid 18)
The maximum zigzag stitch width that can be sewn when using
A r . " 'I -n'™'
needle ^ ‘be twin
Straight stitching and decorative stitch designs can be produced
m the same manner as for single needle sewing except for the
maximum zigzag width.
13
spool pin.
Fig. 18
Page 10

14
SAMPLES OF CREATIVE EMBROIDERY
"A" Sew a few stitches at 5 width then turn knob back to O for a short period. Count if
necessary, to establish a rhythm. (A, Fig. 20) '
' '''' 2 and number 0
"C" Gradually move the zigzag width control from 0 to 5 and instantly return to O Then
repeat likewise. (C, Fig. 20). 'u lo u. men,
"D’
Set zigzag width at 5,^ch length at 2. Sew a few zigzag stitches. Turn the drop feed
no ( ig. 5)to " position for 3 or 4 stitches then normal position again By
ojraung the drop feed knob rhythmically it is not necessary to count stitches. (D
”E’
Set drop feed knob at " 222£ ..
width control at the number 5 position. Take 3 or 4
stitches, leave needle in fabric and pivot fabricon
needle to make next daisy petal. Continue until
flower design is completed. Lock threads by setting
stitch width at O and sewing 3 or 4 stitches in center
of design. (E, Fig. 20).
D WWWrtWA\VVWirW#AWWAWi'A1
Fig. 20
'"1'^
15
CREATIVE EMBROIDERY
Be sure zigzag presser foot and zigzag needle plate are in place.
1. Set pattern selector (C, Fig. 17) at "1 ” position.
2. With the zigzag width control {D, Fig. 17) set at the Number 5 and stitch length control
{A, Fig. 17) as near O as possible without stopping the feeding action, a sating stitch is
produced (Fig. 19).
4. With the machine set for a short stitch length, different designs can be made by turning the
zigzag width control back and forth between 0 and 5 or any other combinatio"s of widths.
Try setting the zigzag width control (D, Fig. 17) at the first line and the various other lines.
Set a rhythm for yourself and then proceed. After a while you will become quite skillful,
varying your designs by the speed of the machine, stitch length and manipulation of tiie
zigzag width control.
Fog. t9
Page 11

16
embroidering with a hoop
It is easy to follow a stamped design or to work free
hand when embroidering or monogramming. (Fig 21)
Release the pressure from the foot by pressing down the
«k on the darner. Turn the drop feed knob to
position (Fig. 15).
Stretch the fabric in an embroidery hoop, and place
under the needle after removing the presser foot. Set
t e stitch width at the size you prefer and lower the
presser bar lifter.
Then operate the machine at a rather high speed
while moving the hop slowly with both hands. Work
shi:::r:::::: t::" "r"" -u encounter skip
--bie from Tour dealer!,
MAKING BUTTONHOLES
3.' lerthfsmcMe^th 3'"°^ i:'?,o!i toT " T 'T
It is suggested that the stitch leng 1 d a be s^t Tn d" "
.. =r rirr"
the line the length of the buttoUoirdLh^eT's/V'-IM^ bottonhole and also mark on
the button. ' the outside diameter of
'■ blrontole "ol" cloth in the center of the
Fig. 23
17
Page 12

18
6- Turn the pattern selector (C, Fig 17) to marltin„ " t •>
along the line. 2 position, and start to sew left side
7. Stop with the needle on the left side of the stitch (Step 1 Fig
*'"""" S ■“ ■'».«..H. »
’■ .p ;:r -
NOTF L r u'"'" ‘’“»othole with the seam'ripper
■ e sure that the pattern selector is firmly positioned in every marking "2” -'S" or
stop here •
(STEP 1)
I Stop here
(STEP 2)
: Stop here
(STEP 3)
Fig. 23
finish here!
(STEP i ^
TO REGULATE THE LENGTH OF STITCH
longest. " "5" is the
Figures on dial g ^
Number of stitchs per inch No Feeding 36 20 12 9 7
SEWING IN REVERSE
^egInning“or'"tt end'of i'’se'am"pres°s tt*' ‘"''h*
Fis. 171 as far as if II t?' button (B,
aslongL^Ltuoi^ptfs^ed"'’'
STRAIGHT AND ZIGZAG SEWING
is set^at "straight & zigaag” shth^aNem P'“"" (C, Pig. 17|
increa^.^and by Tu^rlg'it runTel'<l«'f ° -HI be
machine .will sew^tra,"ghfs'titcher.‘"‘''“'‘"‘^'=’ and at "0 ’* position, the
Stitch Length Chart (Approximate!
Fig. 17
19
Page 13

20
SEWING ON BUTTONS
p«.» ,.p "■
and the needle enters the left hand hole of the button
’ ZdZ "r® T''“’ “"‘il ‘he
needle enters the „ght hand hole of the button. Turn the
bjance wheel slowly by hand to be sure the needle clears both
holes in the button. Correct width if necessary
5.
When needle goes into the center of each hole.'run the machine
at a medium speed, making five or six stitches, stopping with
the needle in the left hole. *
l^f you wish you may place a rounded toothpick over the
willTh M . ‘°°‘hPick and
wind thread under button forming a shank to fasten.
Fig. 24
to "1"
STRAIGHT STRETCH STITCH
Pattern: g ¡Sj
Length: 5
Width: 0
Feed Dog: ^
Pressure: Normaf
Foot: Zigzag foot
21
This stitch may be used on knits and wovens in areas of
tress as a reinforcement stitch. It is excellent for curved
seams such as armholes and crotch seams. For active wear
such as ski pants and girdle fabrics which endure a lot of
stress ,n bending and stretching, this stitch may be used
for seaming throughout the garment.
CAUTION - It IS difficult to remove this stitch from fabric
Pre-fit garment before using this stitch.
• TOPSTiTCHING
Because this stitch is heavier than an ordinary straight stitch.
Ideal for top-stitching, particularly on knits.
Page 14

22
MULTIPLE ZIGZAG STITCH
Pattern; ;i,' (7)
Length: 5
Width; 5
Feed Dog:
Pressure; Normal
Foot: Zigzag foot
aa>\
This stitch IS useful when replacing worn blanket bindings
or both a decorative and durable finish, and when
overcasting an edge to prevent fraying.
When applying elastic waist bands to skirts and dresses be
sure to stretch the elastic as it is applied to insure fullness
required in the garment. When sewing a zigzag stitch on soft
or sheer material it will prevent puckering.
There are hundreds of other uses which will become apparent
as you use the machine.
BLIND STITCH HEM
Pattern; ^ (sj
Length; 3-4
Width: 4-5
dog: ^
Pressure: Normal
Poot; Zigzag Foot
Step 2.' t1 Lm to teZl Sre/and basul/T.^
Prepare the garment in the same manner as for hand hemming.
st^i tt“ir
and make a side wise stitch about 'eve; oNn
23
COMPLETED
Fig. 27
Page 15

23A
SCALLOP STITCH
Pattern; ) |6i
Length: 0.5-1.5
Width: 5
Feed Dgo:
Pressure: Normal
Foot: Zigzag Foot
The scallop stitch particularly works out nice stitches to
decorate table cloth, sleeve fringe, stole and the like. And,
when sewing on the edge, it is easy to have a neat trimming
with removal of redundant material just close to those
Stitch«.
MANUAL OPERATION
in place and machine is set for manual operation. Use for:
Overcasting Worn Edges
Zigzag stitch along the worn edges, catching the fabric as
the needle swings to the left, and allowing the needle to just
pass over the edge of the fabric on the right (Fig. 29).
Patching
Machine bastes patch into place by placing fabric under hole
or worn area which has been cut away. Then zigzag stitch
the patch into place by overcasting around edge of hole
Applique
s'!!™ of ffollowing the
Ларе of the design outlining it entirely and remove excess
materia on the outer edge by trimming it away afterstitching.
around the design outlining it entirely
Hundred of other uses will become apparent as you continue
fpertifn:
operations. Also, for best result set speed control slower
when sewing around contours and faster for straight lines.
foot and zigzag needle plate are
to fabric and overcast a zigzag stitch
24
Page 16

25
THE ADJUSTABLE CORDING AND ZIPPER FOOT
This attachment is used to make and insert
covered cording and to sew in zippers. Loosen
thumb screw to slide foot to either right or left
of needle.
CORDING. Fold bias strip of fabric over cord.
Loosen thumb screw and set foot so needle is
centered in needle hole. Machine bastes cord in
place (Fig. 31).
To sew covered cord to material, reset adjus
table foot so needle stitches closer to cord, and
on edge of base fabric.
SEWING IN ZIPPER
Loosen thumb screw and slide foot so needle enters center of
needle hole. Guide metal of zipper along edge of foot
(Fig. 32). Stitching should be close to zipper to allow easy
opening and closing. Adjust to sew from either right or left
side, whichever is more convenient.
Fig. 31
quilting guide
Use this gtnde for making parallel rows of straight or decorative
stitching Attach standard presser foot. Slip U shaped holder on
screw (Fig. 34) Adjust the curved bar for the distance desired
Bv riRn'T ‘he fabric.
By letting the guide ride on the previous stitching line, successive
rows will be an equal distance apart (Fig. 34),
‘''9- Fig. 36
SEAM GAUGE OR CLOTH GUIDE
top stitching along edge of fabric (Fig. 33),
threaded hole in bed of machine. Adjust to desired width*
^ u'®’ 3'^eompanying screw (Fig. 36) in
'“=«ht seams and even rows of
Fig. 34
Page 17

27
CLEANING AND OILING THE SHUTTLE fSee Fig. 37 and 38|
^'°8ged with loose threads and Mnt, This
Mfeguard the performance. To remove the shuttle assembly, proceed as follows-
■ h7nges " Tilt head back on its
2. Remove bobbin case (A , Fig 37)
'■ JnTsh'u^le'rody Sr "" --- -e cover ,C,
A B
Fig. 37
; p:":rr ;:rr^—^
. lace shuttle body, (D), against shuttle driver and adjust into position
3.
'r* ri'*;r:,iS' !m7 ■'
into position. ^"^pped securely
4.
Put bobbin Into bobbin case.
CARE AND MAINTENANCE OF YOUR MACHINE
How to Oil Your Machine
your machine should be oiled occasionally to keep it
operating smoothly, how often depends on the amount
of sewing you do.
Before oiling the upper part of the sewing unit at points
indicated by arrows in Fig. 39 turn hand wheel
toward you until the take-up lever is at its lowest point
28
Page 18

23
Fin. 40
Fig. 41
HOW TO REPLACE THE LIGHT BULB
Open Face (Fig. 40). Unscrew bulb and insert new one.
ACCESSORIES
30
Page 19

31
TROUBLE CHART
Trouble
If Machine
Binds
Probable Cause
Thread or lint in
raceway
Correction
1~ With take-up lever in highest position, tilt head
back on hinges and rempve bobbin case.
LINT CLEANER
BOBBIN
race cover CLAMPS
Turn clamps outward and remove race cover.
3~ Remove hook.
4— Clean thread and lint from all parts, Including race.
5— Run a drop of oil along rim of hook.
6- Replace shuttle, then race cover.
Snap clamps into place.
7- Grasp threaded bobbin case by latch and replace,
!
fitting tongue into notch of race cover.
Trouble
Skipping
stitches
Irregular
stitches
Uneven
stitches
Probable Cause
Bent needle
Needle placed
incorrectly in clamp
Too fine a needle for
thread being used
Upper thread tension-
too loose
Improper threading
Bobbin not wound
evenly
Pulling or holdiftg
materia!
Not enough tension
on upper thread
Poor quality thread
Needle too fine for
thread being used j
Correction
Discard and replace.
See instruction, page 10.
See needle and thread chart, page 5.
Tighten upper tension.
See threading instruction, page 8 and 9.
Rewind bobbin.
Avoid pulling or holding material, just guide it.
Increase tension.
Try different thread.
See needle and thread chart, gage 5.
33
Page 20

33
34
Trouble
Upper
thread
breaking
Material
puckering
Probable Cause
Improperly threaded
Too much tension
Starting with take up
in incorrect position
Improper setting of
needle
Bent or eye of needle
to sharp
Bent or blunt needle
Tensions too tight
Dull needle
Stitch length too long
Correction
Refer to threading Instructions, see page 8 and
rethread machine.
Loosen tension on upper thread by turning
thread tension knob to lower number.
Always start sewmg with take up lever in highest
position.
Refer to needle setting instructions, see page 10.
Try a new needle.
Discard all blunt or bent needles and replace with
new.
See tensions adjustment, page 14.
Change needle.
Reduce stitch length.
FOR PORTABLE INSTALLATION
Please read these important instructions
which were written to aid you In placing your
new sewing machine on its portable base.
First, remove the nail which holds the foot
control inside the base to avoid damage in
shipping. If a small plastic clamp is fastened
to the back and not to the top of the partition
at one end of the base, remove it, too.
After unpacking the sewing machine unit,
being certain to take out the instruction book,
guarantee and accessory box, lay the unit face
down on a table. You will see two clamping
screws "A" entering head hinge holes "B" on
the underside of the back.
On the base you will find two head hinges
'C" which will fit into holes "B". Lower the
baw onto the sewing machine fitting hinges
C into holes B. Tighten screws "A" securely
with a screw driver.
Vyith machine In sewing position attach
plastic clamp "D" to top of partition with
screw provided so that it may be turned across
the bed of the machine, to hold it down.
(On some bases the clamp may be positioned
in the proper spotl.
To make the electrical connection draw
the two wires through the slot in the partition
of the base. Plug the cord labeled "Motor"
into the receptacle marked "Motor" on the
block attached to the outer section of the base
Then insert the other cord into the "Light"
receptacle.
Place the foot control on the floor, insert
plug into a wall outlet (110-115 voltsj and
you are ready to sew. But Brst read the
instruction book to become familiar with the
threading of the machine, tension adjustments
and all the other features designed to make
sewing a pleasure.
Page 21

35
36
INSTALLING SEWING HEAD IN CABINET
1. Loosen both head hinge set screws until
head hinge hole is clear.
2.
Tilt head hinge fingers up and back as far
as they will go.
3.
Carefully slip head onto head hingesmaking sure fingers are inserted as far as
they can go into head hinge holes.
4.
Allow the head to rest in its tiltedback
position.
5.
Tighten both set screws securely with screw
driver.
6. Plug electrical leads into sockets located
inside cabinet. Cord atUched ‘'motor"
tag must be plugged into socket marked
"motor”. Untagged cord goes to "light"
socket.
Page 22

MEMO
■ Head Measurement
56
Bust Measurement
Waist Measurement
Hip Measurement
 Loading...