

Page 1

How To Use and Care For Your
Zigzag Sewing Machine
MODEL 1563
Page 2

LET’S SEW Perforating Plain Paper
Ycxir new vvonderfull machine was delivered ready for ZIGZAG siiiching. Certain, kinds
of STRAIGHT stitching can also be done with the same NEEDLE PLATE and PRESSER
FOOT which were on the machine when you received it. A NEEDLE was also properly
installed, along with a partially filled BOBBIN underneath.
Without threading needle "sew" on a piece of PLAIN PAPER for a few minutes while you
become well acquainted with the few easy-to-use CONTROLS pictured and briefly ex
plained on pages 2 and 3; also 4 and 5. Later on you are urged to study all the operat
ing details indexed on page 1 which you should skip for the time being.
Time saving wonder working sewing aids such as rufflers, binders, zipper sewing foot and
many other are available at modest prices and sold by the dealer from whom you purchased
your new machine.
e
c
&
it
is
is
e
e
e
c
c
c
Page 3

Contens of This Book Indexed
As you have time, study all these instructions carefully to obtcdn the -wanderful
performance your machine -was designed and built to give. Constant reference
to these instructions will reward you with troublefree sowing satisfaction.
Subject Page
Attachments - - sewing aids
Automatic (with cams) fancy stitches
Bobbin--removal, threading, replace
Button--sewing on with machine
..................
.........................
..............................
14,15,16,17
........................
12
Buttonhole making by machine ................................ 11
Darning on machine
............................................
4, 12
Embroidery - - stock designs and creative ■ • • 2,5
Guarantee--parts warranty--service
........................
24
Light Bulb replacement ............................................. 18
hionogramming on machine ............................... 4, lid
Needle--proper one for the job
•••installing in machine
■ *■ tlxTwSciincf . .
...................................
............................................
...
..............................................
Needle Plates --proper for job; changing ••• 3,15
Subject Page
Oiling Machine--important
2
9
Other care and maintenance................................. 19
Good sewing habits ............................................ 4, 9
......................................
18
Parts cmd functions controls..........................3, 4, 15
Pressure-bar and Feet ................................... 2, 4, IS
Reverse stitching--sewing backward
..........................
4
Stitch adjustments--Z2 and straight stitch - -
stitch length per inch-ZZ width
.............................
3
Take-up Lever .............................................................. 4
Tensions--upper and lower threads ......................... 10
6
7
7
Threading machine--needle--bobbin
case ....................................................................... 7, 9
Troubles and remedies
.......................
20, 21, 22, 23
Two simple precautions--start and finish
make these a habit
.............................................
4, 9
Page 4
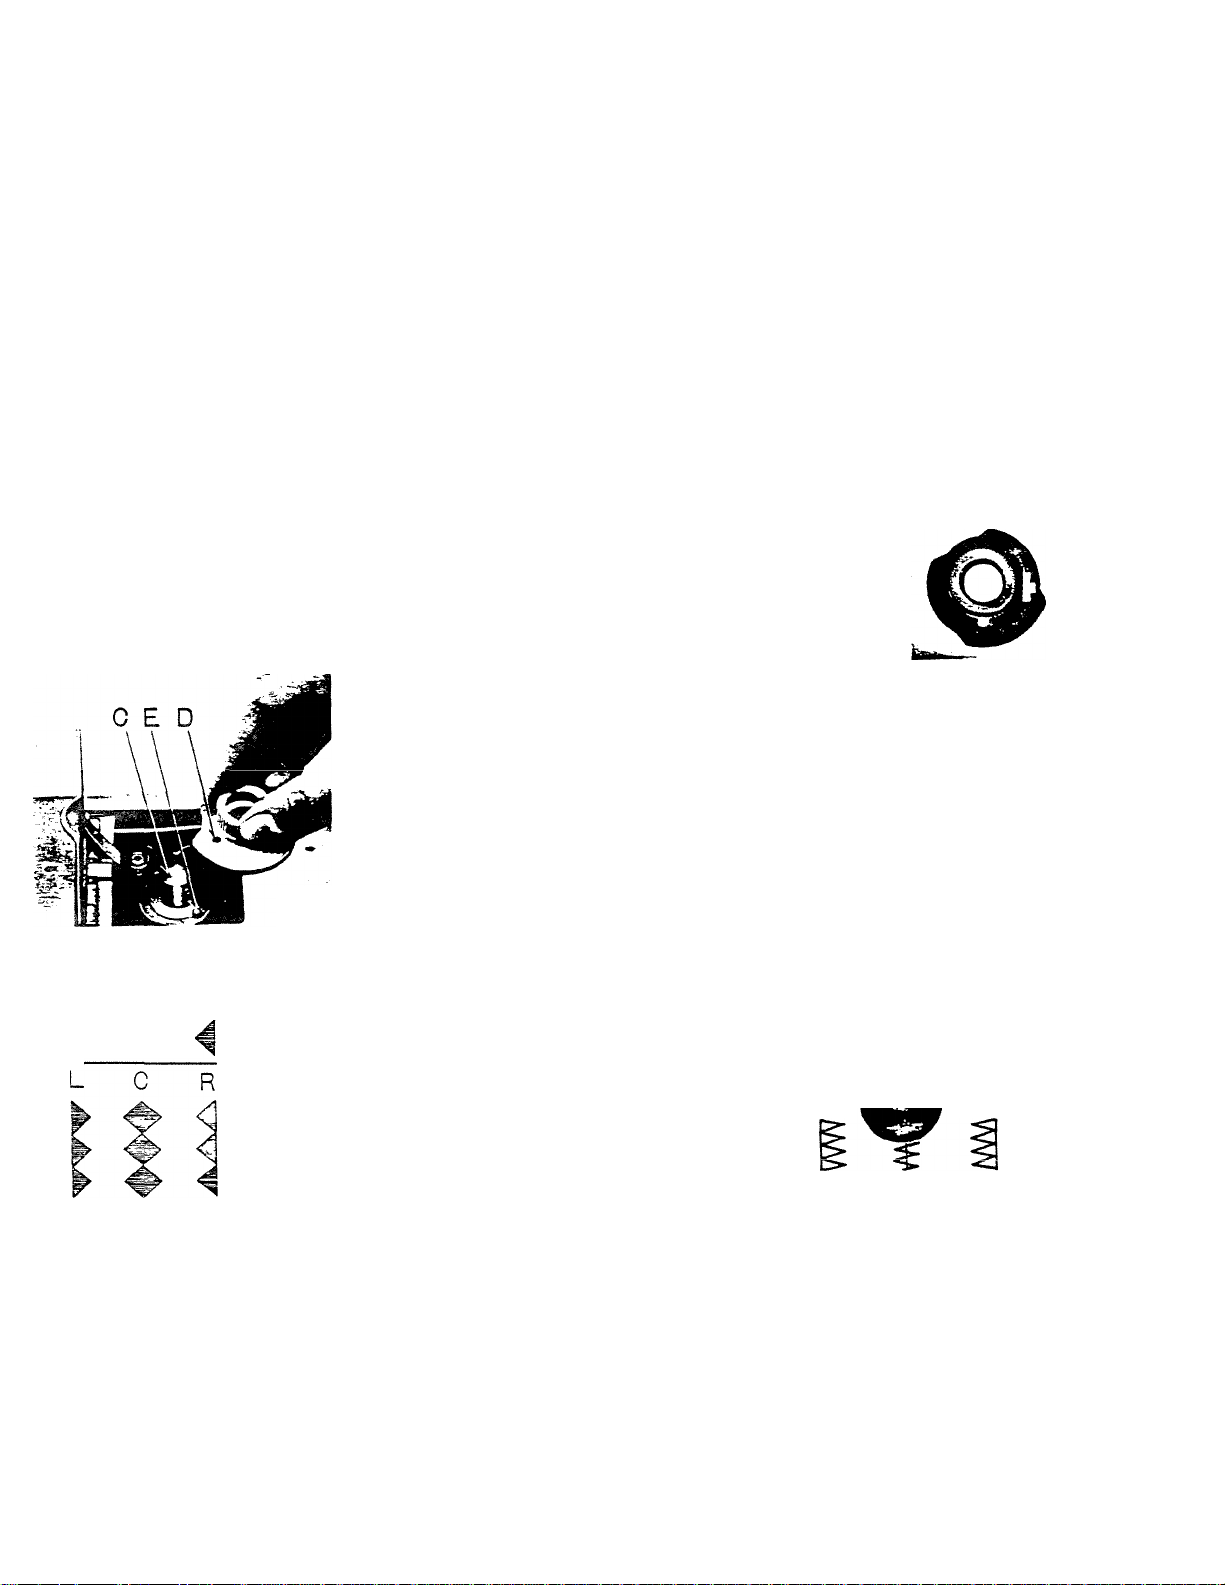
To Saw Fancy Stitch Pattarns AUTOMATICALLY Use the Cams
Look over your large assortment of molded plastic cams. Their color or
colors do not affect function. ■ A basic design sucb as diamond, half-moon,
triangle, (as examples), is embossed on top flat side of each. The cam used
automatically guides needle to repeatedly reproduce its jjattem.
- To Place A Replaceable Cam In Machine
Do two things before selecting a cam. (1) Look directly below
needle. Be sure presser foot and needle plate are those pictured
at TOP LEFT next page. (2) turn controls BOTTOM RIGHT-next
page tintil hanging lever can be sewing from 0 to 5 on dial. Now
lift open small cam chamber cover on top of machine. While hold
ing ZZ Width Lever (next page) at extreme left (5), drop selected
cam on spindle C. While still holding 22 Width Lever, revolve
cam, pressing down lightly, until hole a its bottom surface slides
over pin E. Close cam chamber lid. Run machine slowly while
• you adjust Stitch Length Dial at MIDDLE LEFT next page. Most
cam patterns appear best on Stitch Length Dial setting between
and 1-V2-
Changing Path of Needle Multiplies Variety of Designs —
Lever NP can be set at Left, Center or
IF CAM IS
DESIGNED
Right. Each different position alters basic
stitching line and therefore the appea
rance of most all zigzag stitch designs.
r NEEDLE_POSITION
Set lever NP at LEFT for straight stitch
ing. Pull lever NP toward you and it
clicks when sliding into the three posi
tion notches. Pushed in, lever NP avoids
the notches, moving freely for hand con
trolled creative embroidery explained
page 5; without a cam in machine.
e
im
t0
y
y
c
e
e
e
e
e
e
c
c
r
Page 5
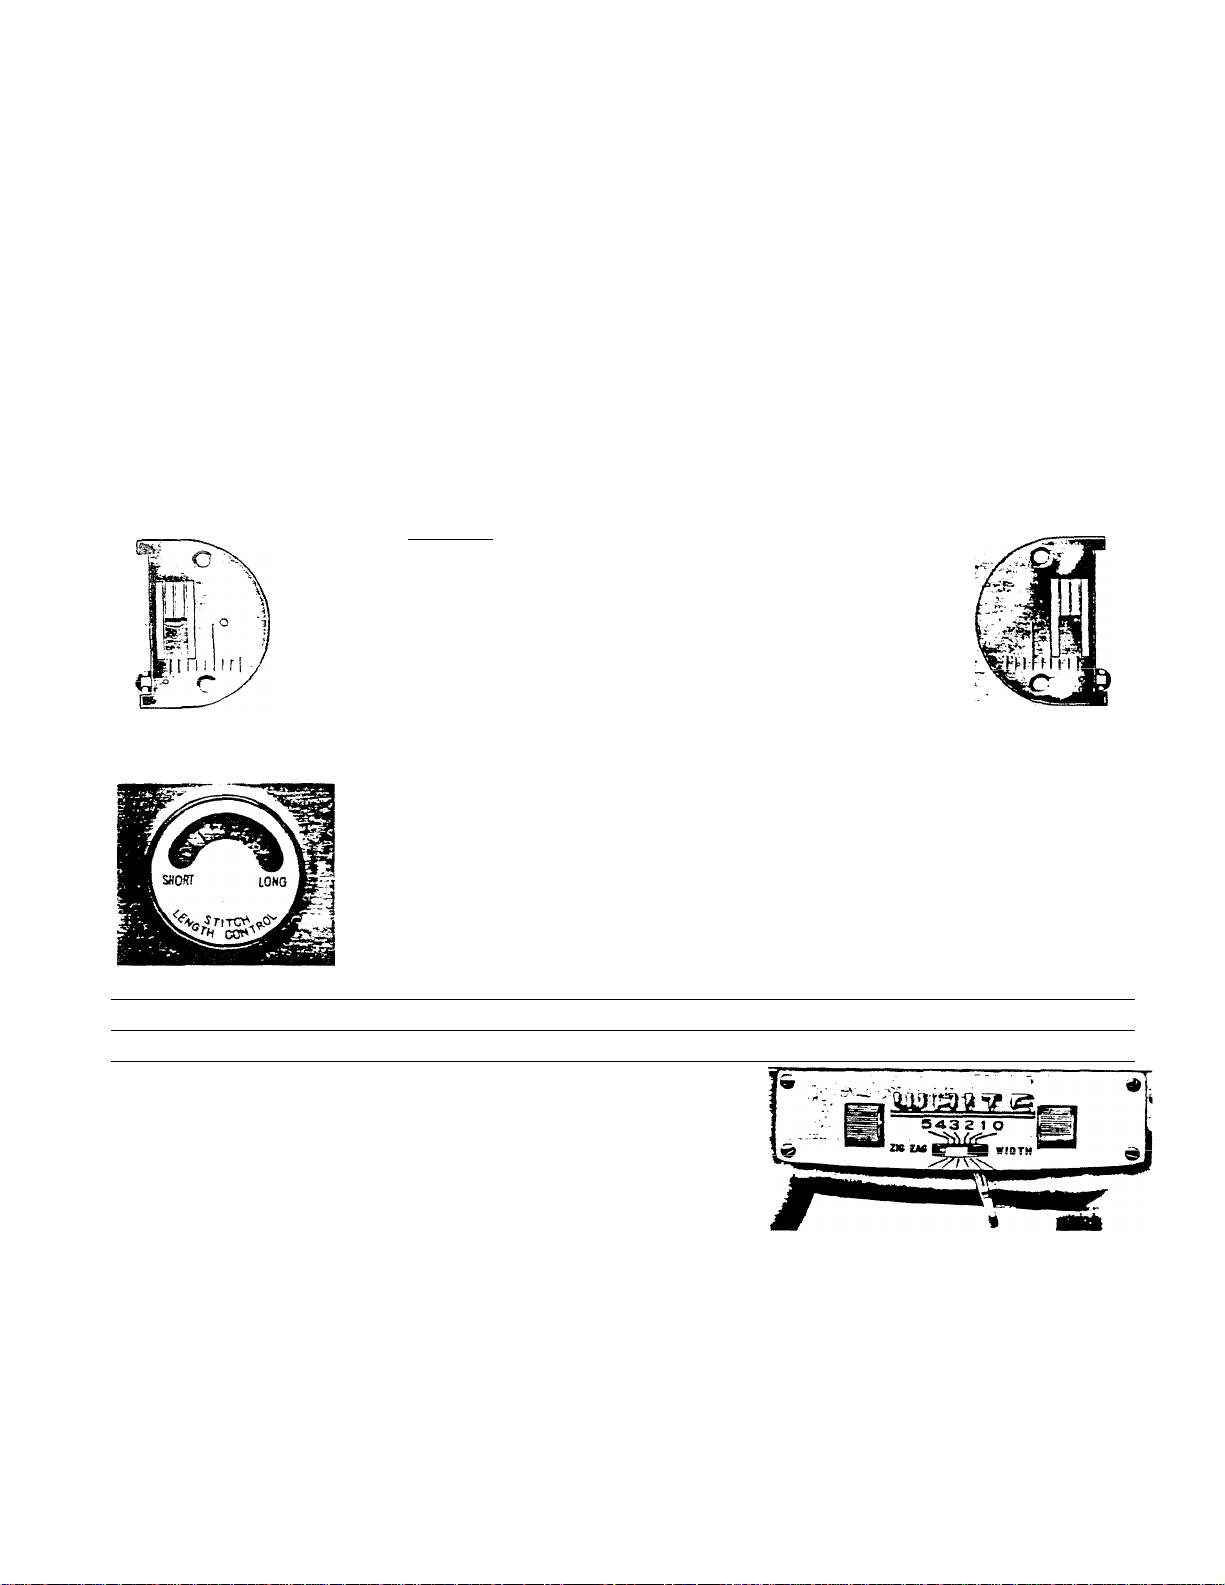
BE SURE - For Zigzag Stitching
- Use This Needle Plate and Presser Foot
These two parts are slotted crosswise to
allow for needle swinging sideways while
moving up and down. Slots are about %
inch wide.
Later On-For Straight Stitching Some Fabric—
Presser foot and needle plate with small -
round hole instead of wide slot-best for finest STRAIGHT stitching in sheer, fine or very soft
materials. For changing this standard equipment see page 15.
— Setting Stitch Length - For Zigzag or Straight Sewing
Turn this speedometer type died CLOCKWISE to lengthen stitch COU
NTER-CLOCK-WISE to shorten, for more stitches per inch. Refer to
chart just below and find your favorite settings. Note the numbers for
quick and easy duplication any time. Remember that material must
move along or "feed" under presser foot in down position. Whenever
it does not, stitch must be lengthened slightly.
Dial Settings For Approximate Number of Stitches Per Inch
Figures on
Number of
Setting Width of Hand Controlled Zigzog Stitching -
For Straight Stitching and Cam Controlled Zigzag Keep
Lever at O
indicator 0
stitches per inch
No Feeding 60
1 2
40
3 4
20
16
12
5
10
Adjust by turning horizontal finger rollers to number on
dial or in between. To make the sides of buttonholes for
example you may set left side number at 4; right side at 2.
6
8 9
7
7
8
6
Page 6
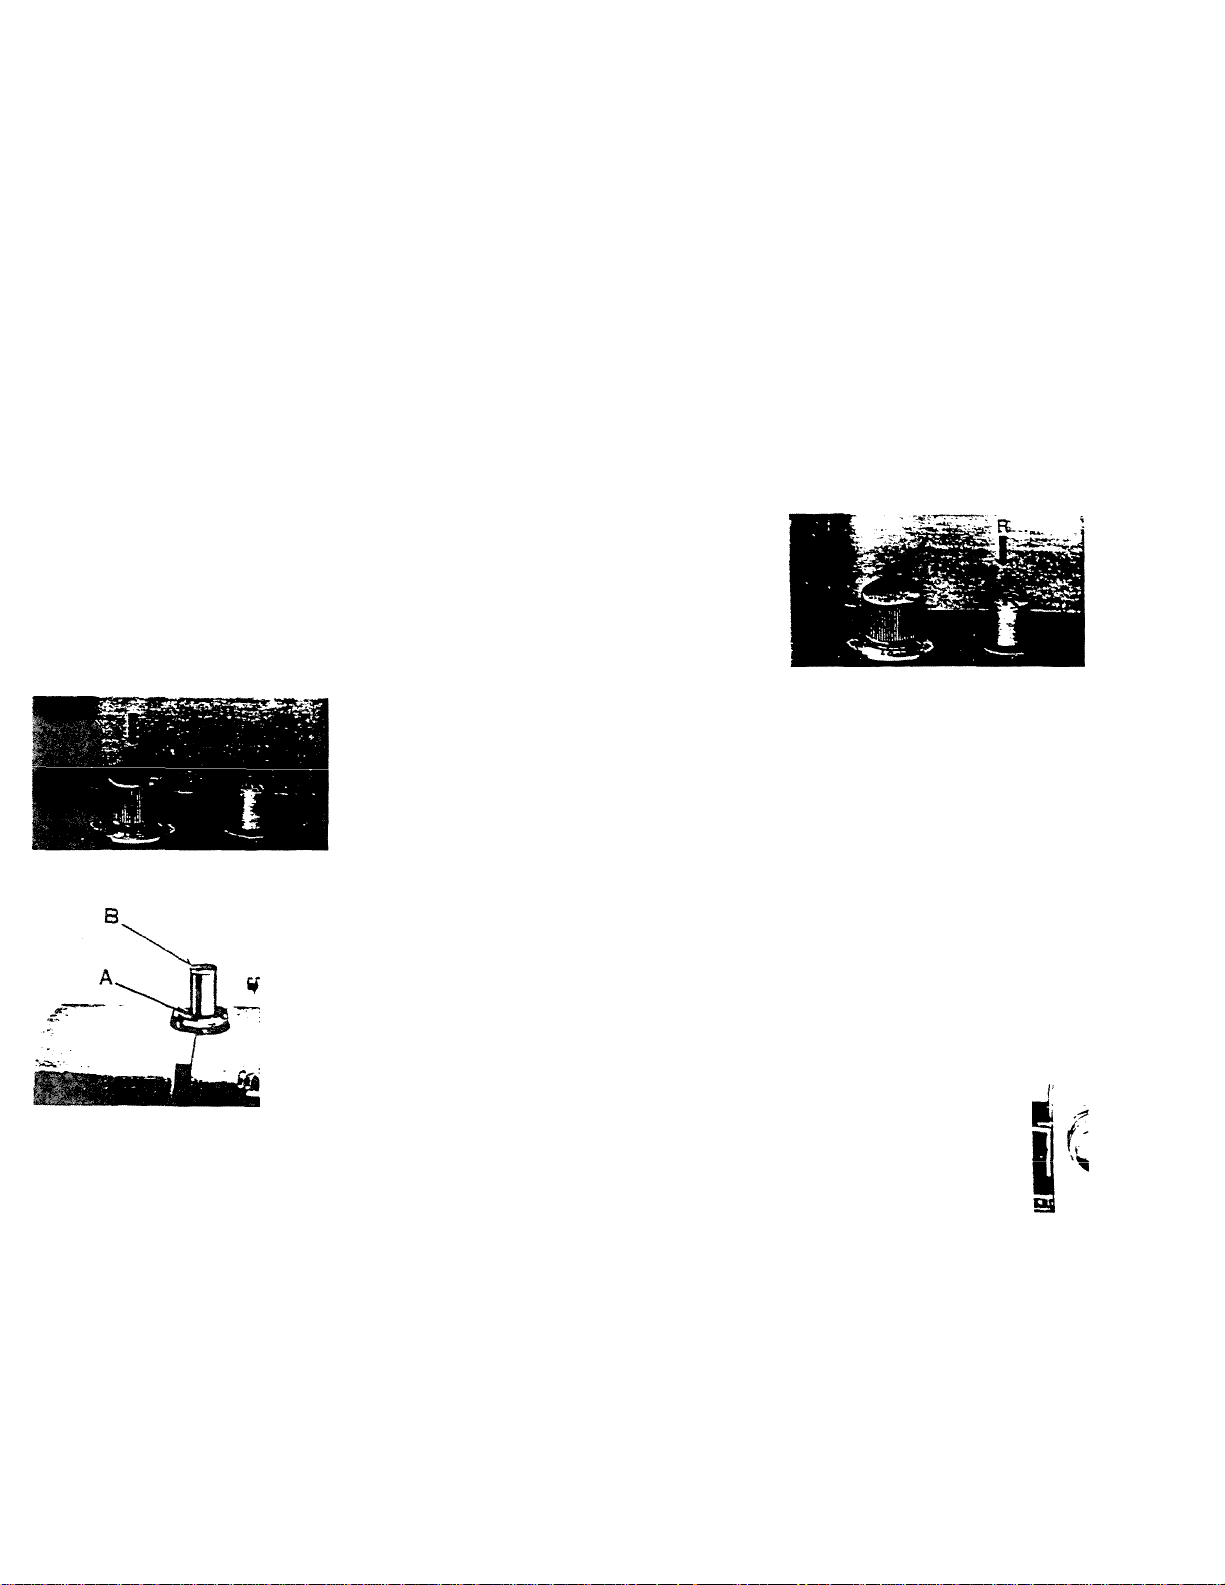
To Sew Backward - - Zigzag or Straight Stitching —>
Reverse siitcii push bution marked. R is in base of maciiine
directly below Stitch Length Dial. To sew backward, push
button down and feeding teeth will move material in reverse to
normal sewing direction as long as push button is held down.
It's foolproof. When comfortably placed R button is released
material sews forward again.
To Drop Feeding Teeth for Darning or Mo nog ramming
Control knob is just to left of Reverse feed button. To drop
feed teeth entirely below needle plate surface, turn knob clock
wise to extreme left position marked DN. For most normal
sewing jobs knob will be in extreme right position marked HI.
Occasionally the middle position (LO) will be ideal for very
delicate filmy fabric - providing enough grip to feed material
without tearing or scraping.
— Adjusting Pressure on Feed Teeth
For normal sewing. Bar (B) should be pushed down-its top
about even with automatic locking ring (A). Single finger
pressure on edge of ring will release bar causing it to pop
all the way up. That is position for most darning and
monogrcim work with Feed Teeth in DN position. When
sewing on delicate materials with Feed Teeth in LO posi
tion, the presser bar should be pressed down about half way.
A Good Sowing Habit - - The Take-Up Lover -
As each sewing operation is finished - - before starting machine - - while
threading it--ALWAYS when machine is not running be sure Take-Up
lever is at top end of slot. Every time you stop machine turn the wheel
by hand to position lever at highest point. The only exception is to oil.
Never Run Threaded Machine Without Sewing In Fabric - - Be Kind - - Use Oil
■
c
c
€0
'
e
e
e
e
c
e
e
e
c
c
c
Page 7
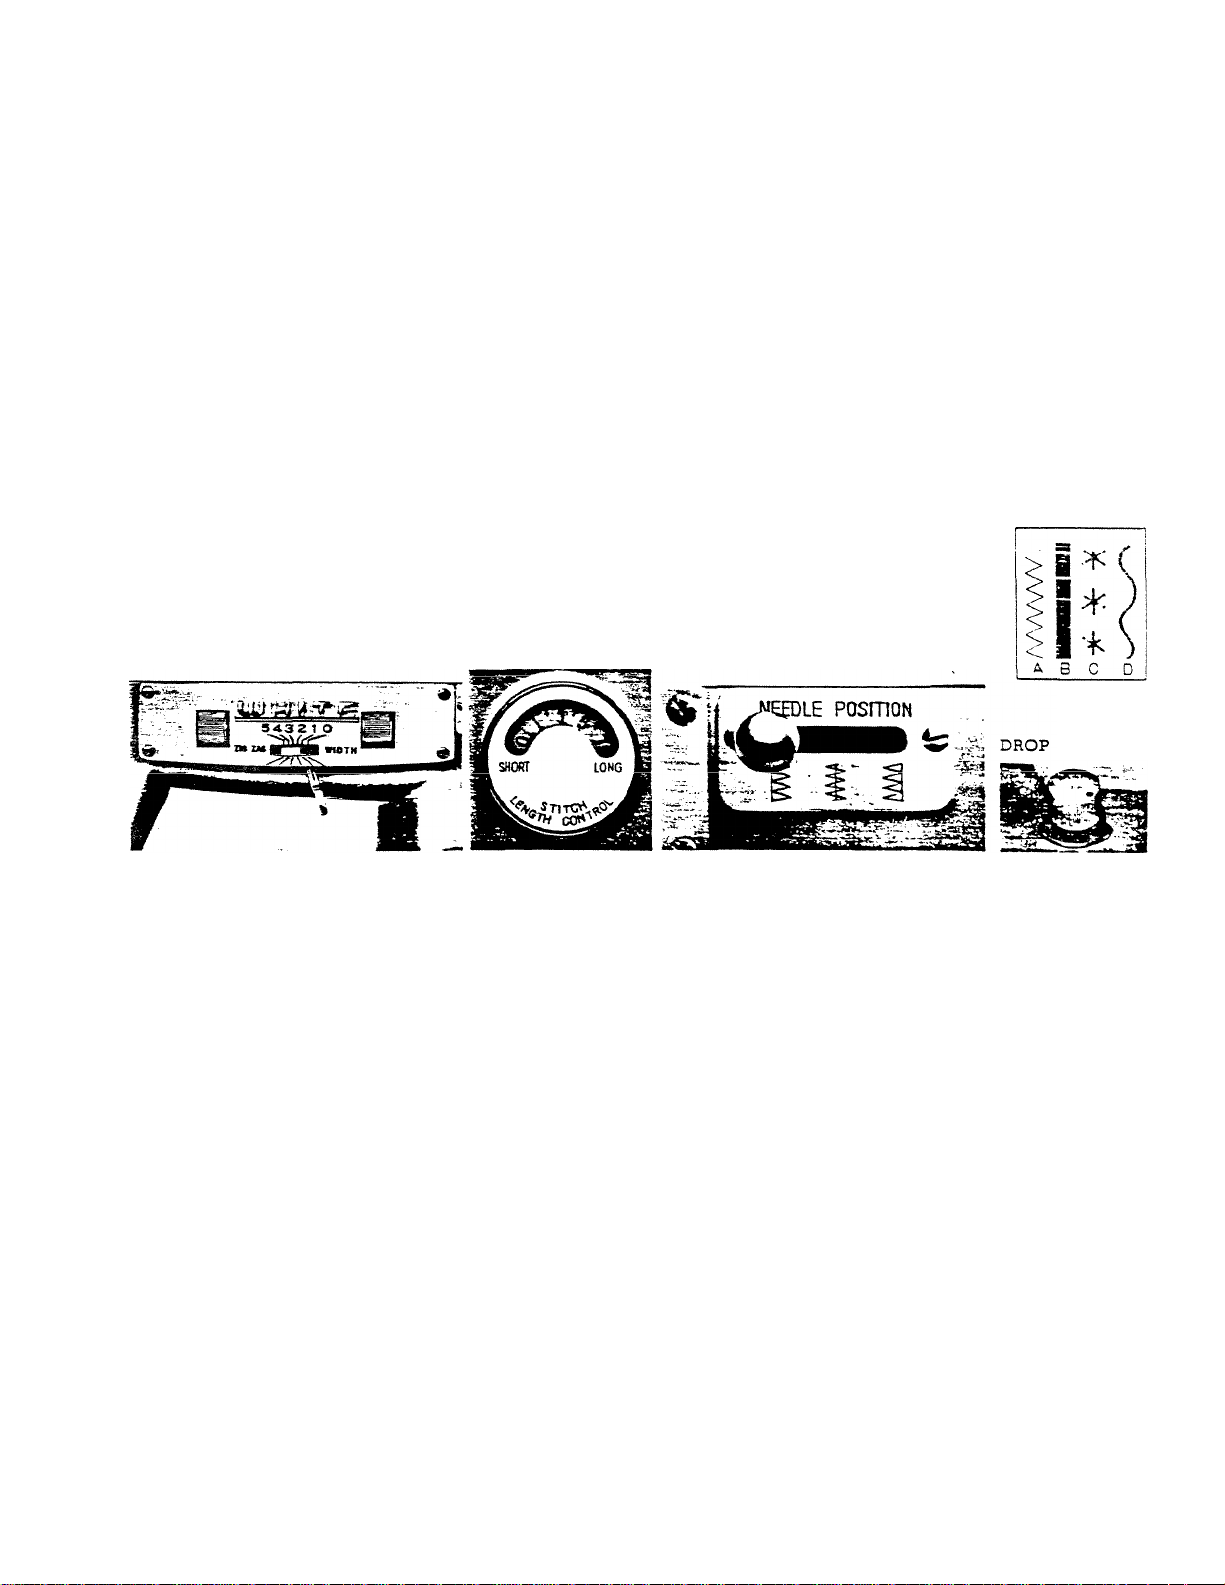
You Move Some Levers For Plain Zigzag—Satin Stitch--Creative Embroidery
There is no limit to the variety of stitch patterns you can sew WITHOUT ANY
CAM in machine. Get well acquainted with the use and effect of the four
controls pictured below. Practice moving zigzag Width Lever from side to side
while running machine. Do likewise with Needle Path Selector after pushing it
in toward machine.
ZIGZAG STITCH WIDTH LENGTH OF STITCH NEEDLE PATH SELECTOR
FEED DIAL
Plain Zigzaging (A'l Set Stitch LENGTH Dial at 4--after a few stitches very length as desired.
Set Zigzag WIDTH so dial white area extends from 1 to 5. Now sew, holding Zigzag
Width lever the LEFT side.
For Satin Stitching ( B) Set Stitch LENGTH Dial at marked MP. (about halfway between 0 and 1:.
Set Zigzag. Dial white area for width of stitch desired. Now sew, holding zigzag lever to
LEFT. For variations move Lever right, left, right while sewing.
Make Flower Petals (C) Turn drop feed knob to DN. Set ZZ Width Dial white area to extend
from 1 to 4. Sew three or four stitches holding Zigzag lever to LEFT. Stop machine with
needle down in cloth at center of petal design. Pivoting on needle, turn fabric to next
petal and repeat steps to complete. Turn right side roller on ZZ Width Dial so Lever
goes right to 0. Put three or four stitches in center of design to lock threads.
Serpentine Stitching (D) Set ZZ Width Dial white area to extend from 2 to 5. Press Needle
Path Selector Lever in toward machine - - then as you run machine move that lever alternately
from left to right continuing the motion back and forth in rhythm.
Page 8

Match Needle
! Size dnd
Thread To Your
Fabric - - Sew Like "A
Pro”
Approximate Stitches Per Inch
Also important
Machine
Stitches Cotton
Per Inch
Thread Thread
6 iU
8 30
8 30
to to Heavy Duty
Fabric
Extremely heavy
tarpaulin, sacking,
canvas, duck, etc
Heavy upholstery
ladric, ticking.
Needle
No.
4 to to
3
denim, leatcherette 10 40
Medium heavy drapery
fabric, velveteen.
suiting, felt, terry, etc.
Medium broadcloth.
percale, gingham, linen,
chintz, taffeta, sheer
wool, snantung, etc.
Sheer voile, lavm.
dimity, crepe.
handkerchief linen.
plastic film, etc.
2 to to
1
n
u
10 40
12 60
12 “
to
14
14
to
16
(Plastic iiim)
60
80
100
8 to 10
Very sheer chiffon.
batiste, lace, organdy.
ninon, net, marqtiisette,
00. - to to
etc. 20 150
16 100
to
80
to
Mercerized
Heavy Duty
Heavy Duty
50
50
50
Silk
or
Nylon
A
A
A
Page 9
Selection of Needle
A high proportion of home sewing is done with No. 1 size needle.
' For best results on all fabrics from sheer chiffon to canvas, see page 6 chart.
Putting Needle In Machine
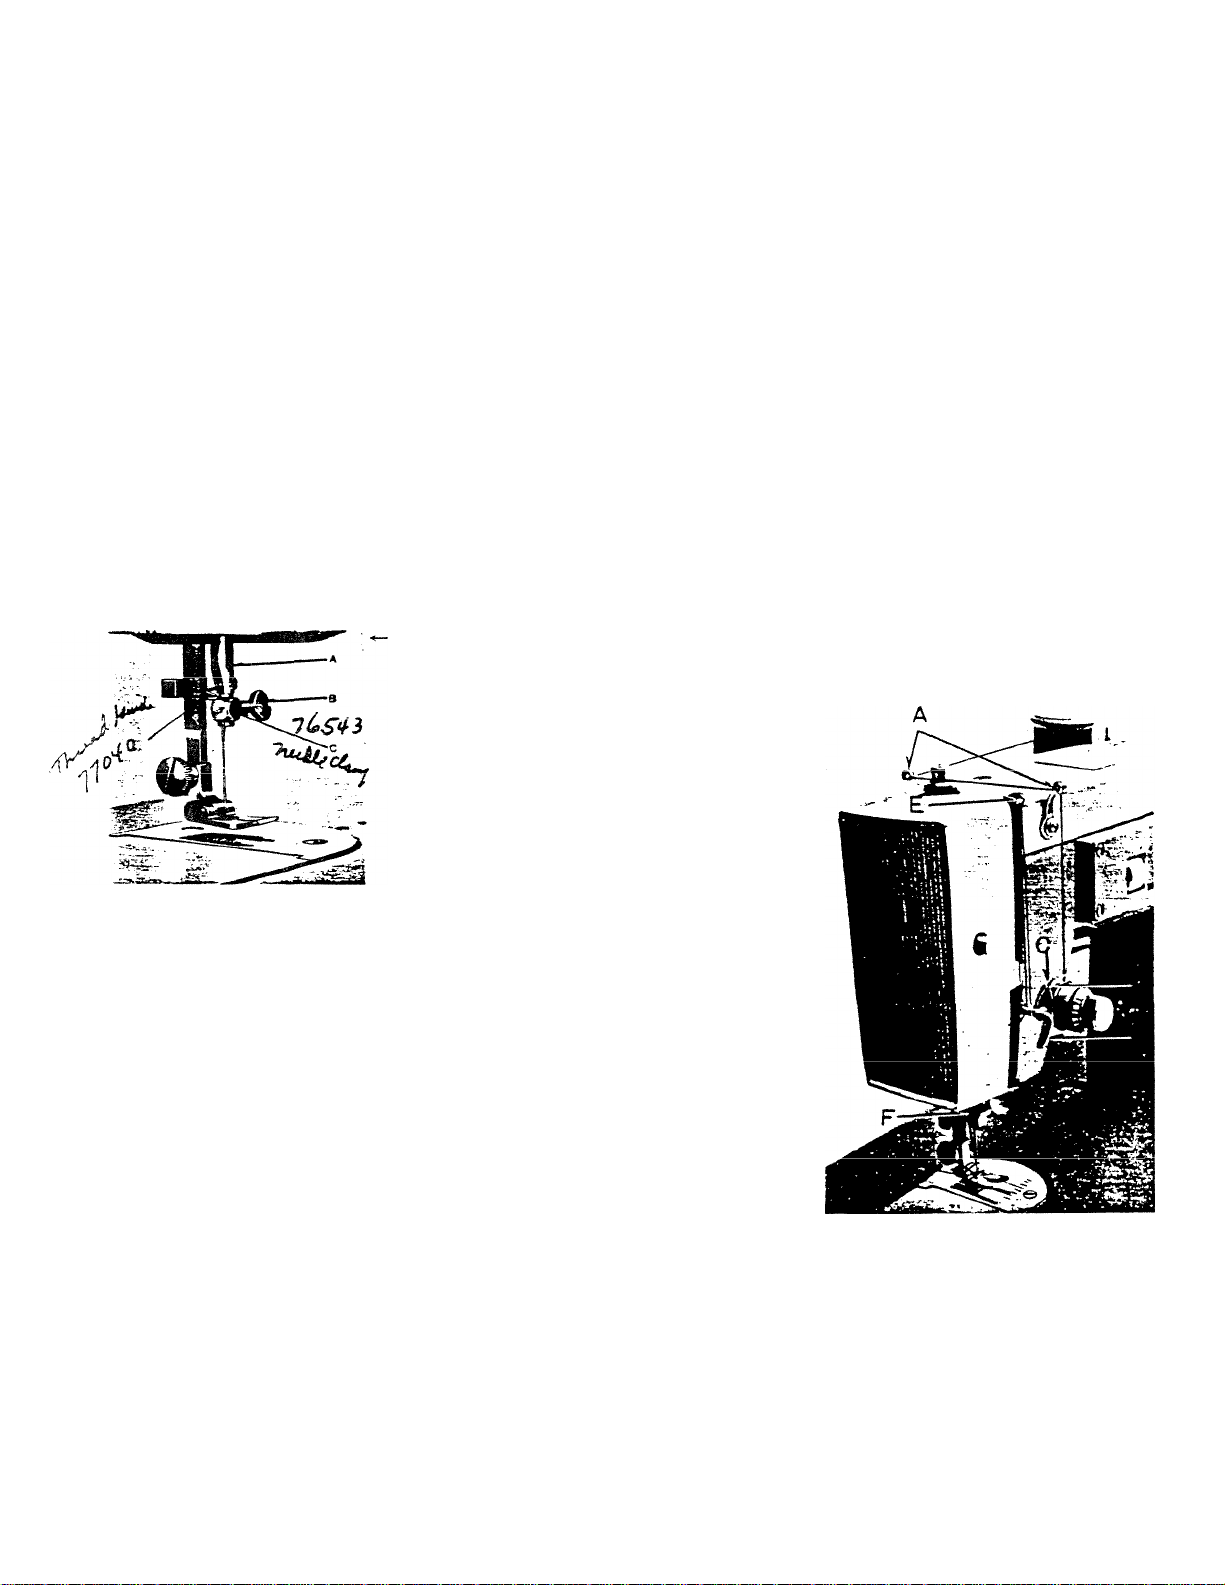
Turn machine wheel until needle bar
(A) is at top position. Loosen needle
clamp (B) with screw driver. When
old needle drops out new one can be
inserted. Find the one flat side on
needle SHANK and hold that FLAT
SIDE TO RIGHT as you push needle
upward into clamp (C) as far as pos
sible. While holding needle up there
tighten screw (B) with screw driver.
Threading Machine (Top Thread) and Needle —
Place thread spool on spool pin closest to needle. Lead thread
through back, then front thread guides (A) - -then down BETWEEN
tension discs (B) from RIGHT to LEFT - - and around to RIGHT
again until thread enters check spring arm notch (C). Then pull
thread leftward and down slightly UNDER large bar (D) - - then
immediately upward, and thread will enter rectangular opening
in bar (DL Continue pulling thread upward and into take-up
lever eye E) From RIGHT to LEFT. Now down into bar (D)
rectangle opening again-continuing down into needle bar thread
guide (F) and then into needle eye from LEFT to RIGHT - - pull
ing three to four inches of thread through eye of needle.
Page 10
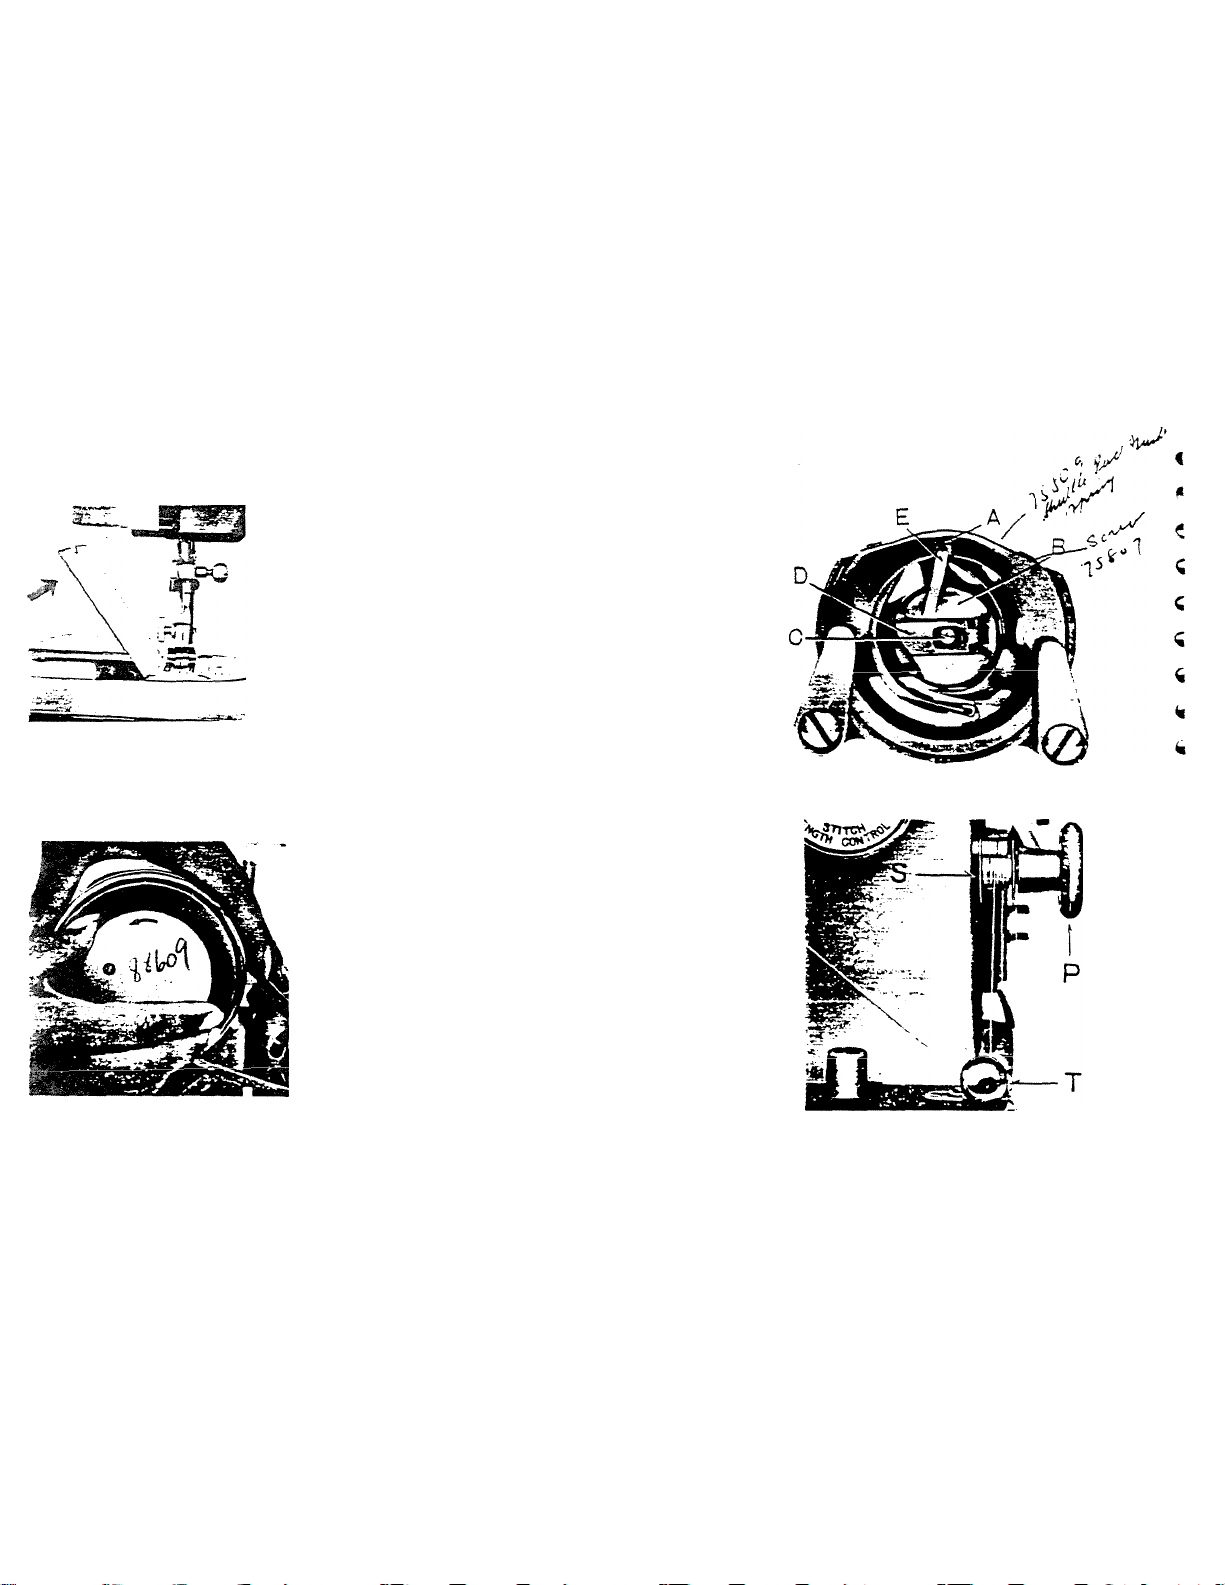
Removing Bobbin Cose From Machine
Lift kinged plate at left end of mackine bed
plate. Look down and sligktly right: You
will see the assembly pictured (right). With
fingernail of left hand first finger under rear
edge of latch (D), pull straight out and use
raised latch as finger grip to remove bobbin
case contciining bobbin.
To Replace Bobbin Case in Machine
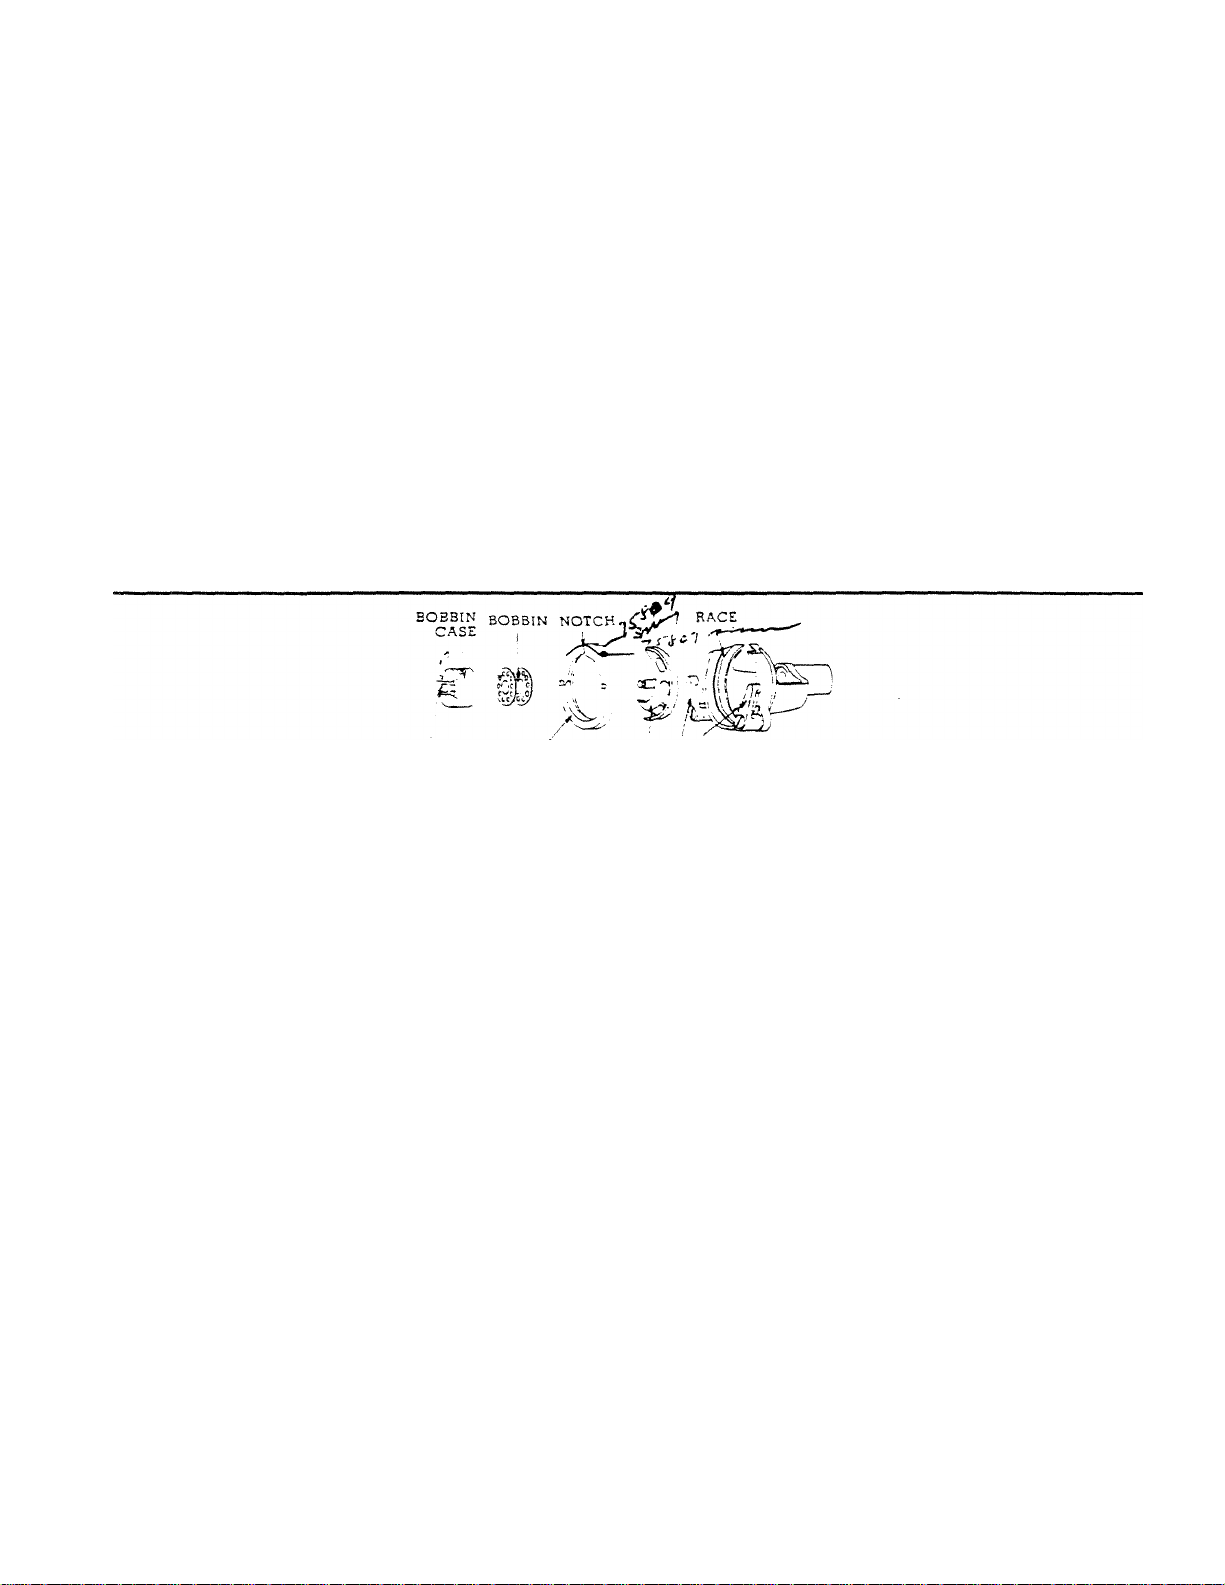
Reverse above procedure. When sliding case onto shuttle center
stud {.C( be sure that threaded finger (E) is directly upright so it
will enter shuttle race notch (A) as you push case (B) into sewing
position, finally releasing latch (D) to hold it.
«-Winding (Refilling) A Bobbin
Turn balance wheel clutch counter-clock
wise so wheel turns freely without runing
entire machine. From a spool on machine
lead thread through rear and front guides
atop machine - -then diagonally right- -down
between tension discs ( T) as shown ( right ).
Holding empty bobbin in other hand, lead
thread through hole in side of bobbin near
edge. Slide bobbin onto spindle (Si, fit
ting notch in hub of bobbin over small
pin on spindle. Push rubber pully (P) against machine wheel and run machine slowly, holding
thread end loosely until winding action pulls it from your fingers. Winder shuts off automati
cally when bobbin is filled. Remove bobbin from spindle and break off thread end you held
at start. Turn wheel clutch clockwise and firmly to reengage sewing machanism.
4
C
€
e
«
c
e
e
e
c
c
Page 11
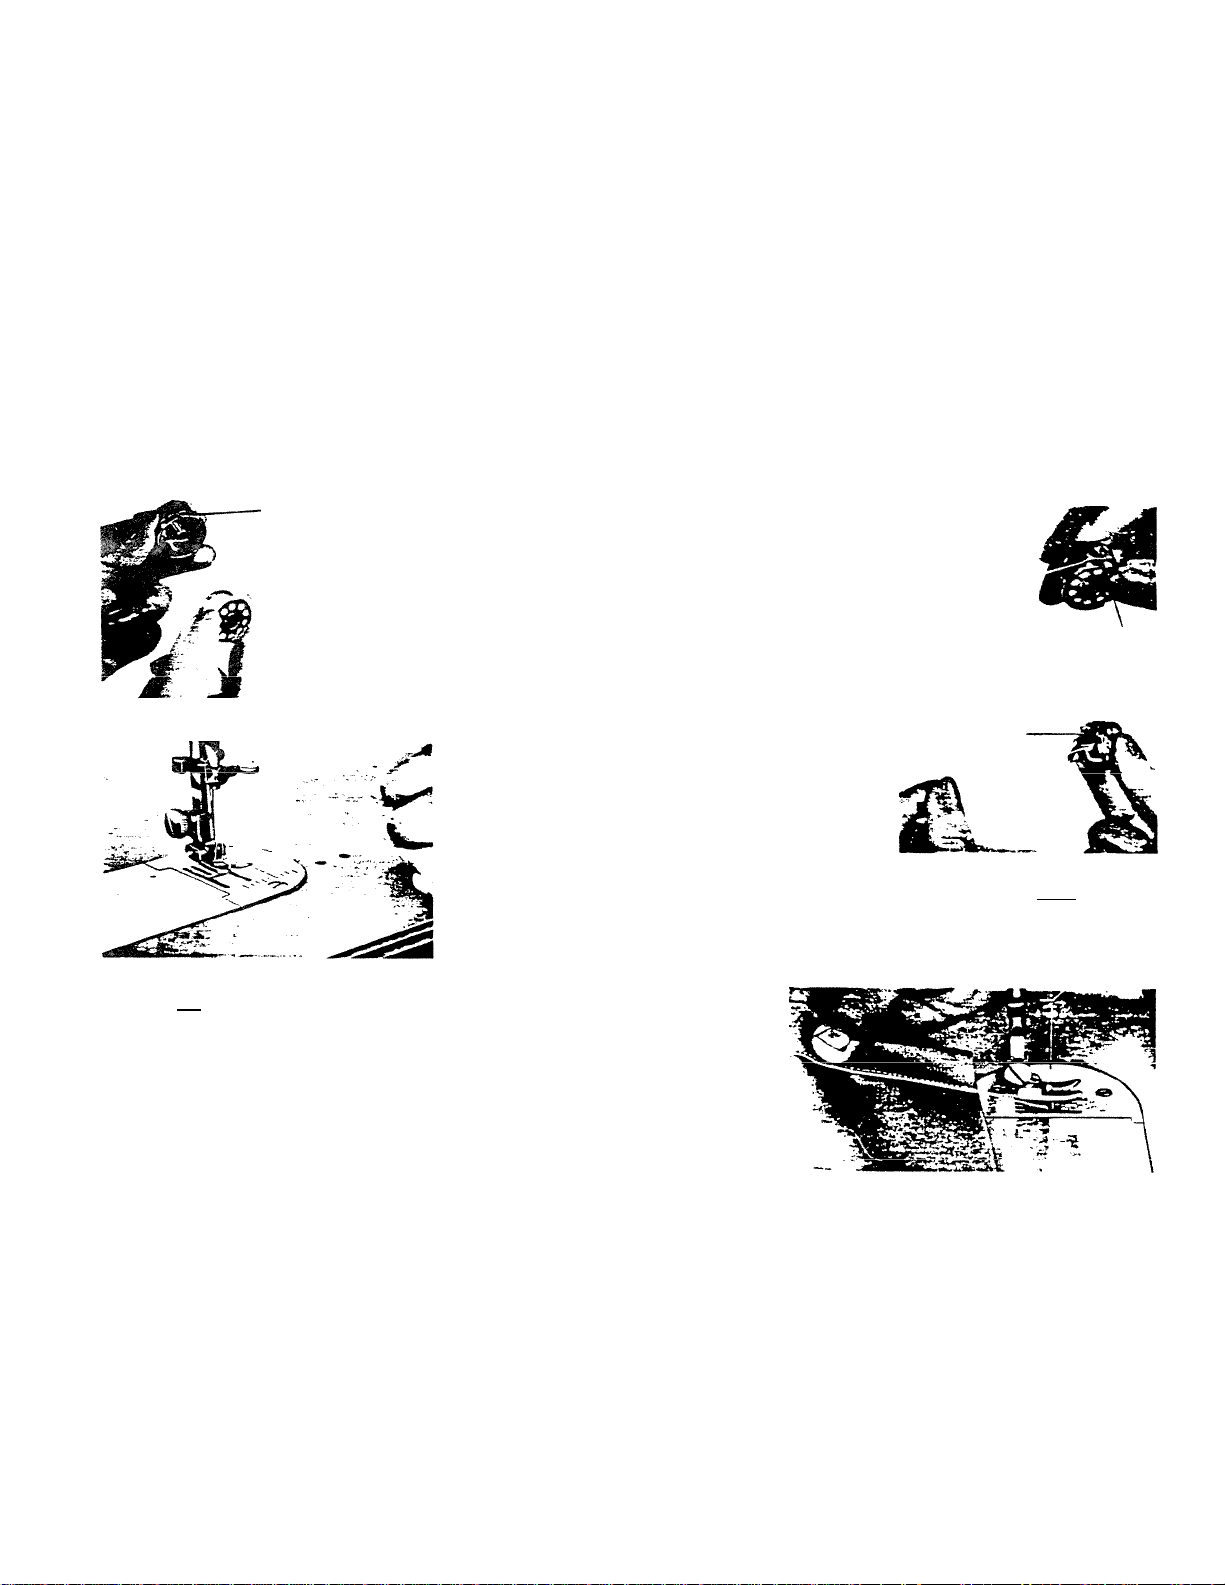
SLOT
Hold bobbin case with, slot in its edge up
(left). Hold bobbin with, fingers of other hand
so that end of thread points in CLOCKWISE
direction. Insert bobbin in case eind pull thread
into case edge slot (RIGHT). Then continue
pulling thread under tension spring and into
fork-shaped opening of spring (RIGHT), until
about three inches of thread protrudes.
Put Bobbin Case Back In Machine By Reversing Procedure Page 8
Installing Filled Bobbin and Threading The Bobbin Case
The Last Step Before Sewing
loosely in left and turn machine wheel
COUNTER-CLOCKWISE until needle
goes down and comes back up. The
needle thread you hold will be looped
by bobbin thread from below. Pull loop out straight anH place
BOTH threads under presser foot slot. Continue pulling them
toward back of machine forthree to four inches.
Finish Every Sowing Step The Right Way -
At end of each sewing operation turn machine wheel
COUNTER - CLOCKWISE by hand until Take-Up Lever and
Needle are at highest position. Rciise Presser Foot and draw
fabric toward back and sHghtly left, keeping threads UNDER
presser foot. Clip threads with sharp scissors or by raising
them over top of Machine Thread Cutter just above the
presser foot. Then pull down to cut threads using both
hands to avoid bending needle. Leave ends of both cut
threads under presser foot.
SLOT
TENSION SMINO
Page 12
10
Adjusting the Tensions for Properly Balanced Stitching
The shaded portions of drawings below represent the fabric enlarged many, many times to
illustrate the lock-stitch principle--how and where both threads should entwine WITHIN fabric
thickness.
Hold finished side of material upward when inspecting stitching.
--------
!|l_
■ NEITHEH THREAD PERFECTLY FLAT
, STITCHES PROPERLY LOCKED WIHIN
■■
TOP THREAD FLAT OR LOOSE
TOP TENSION TOO TIGHT
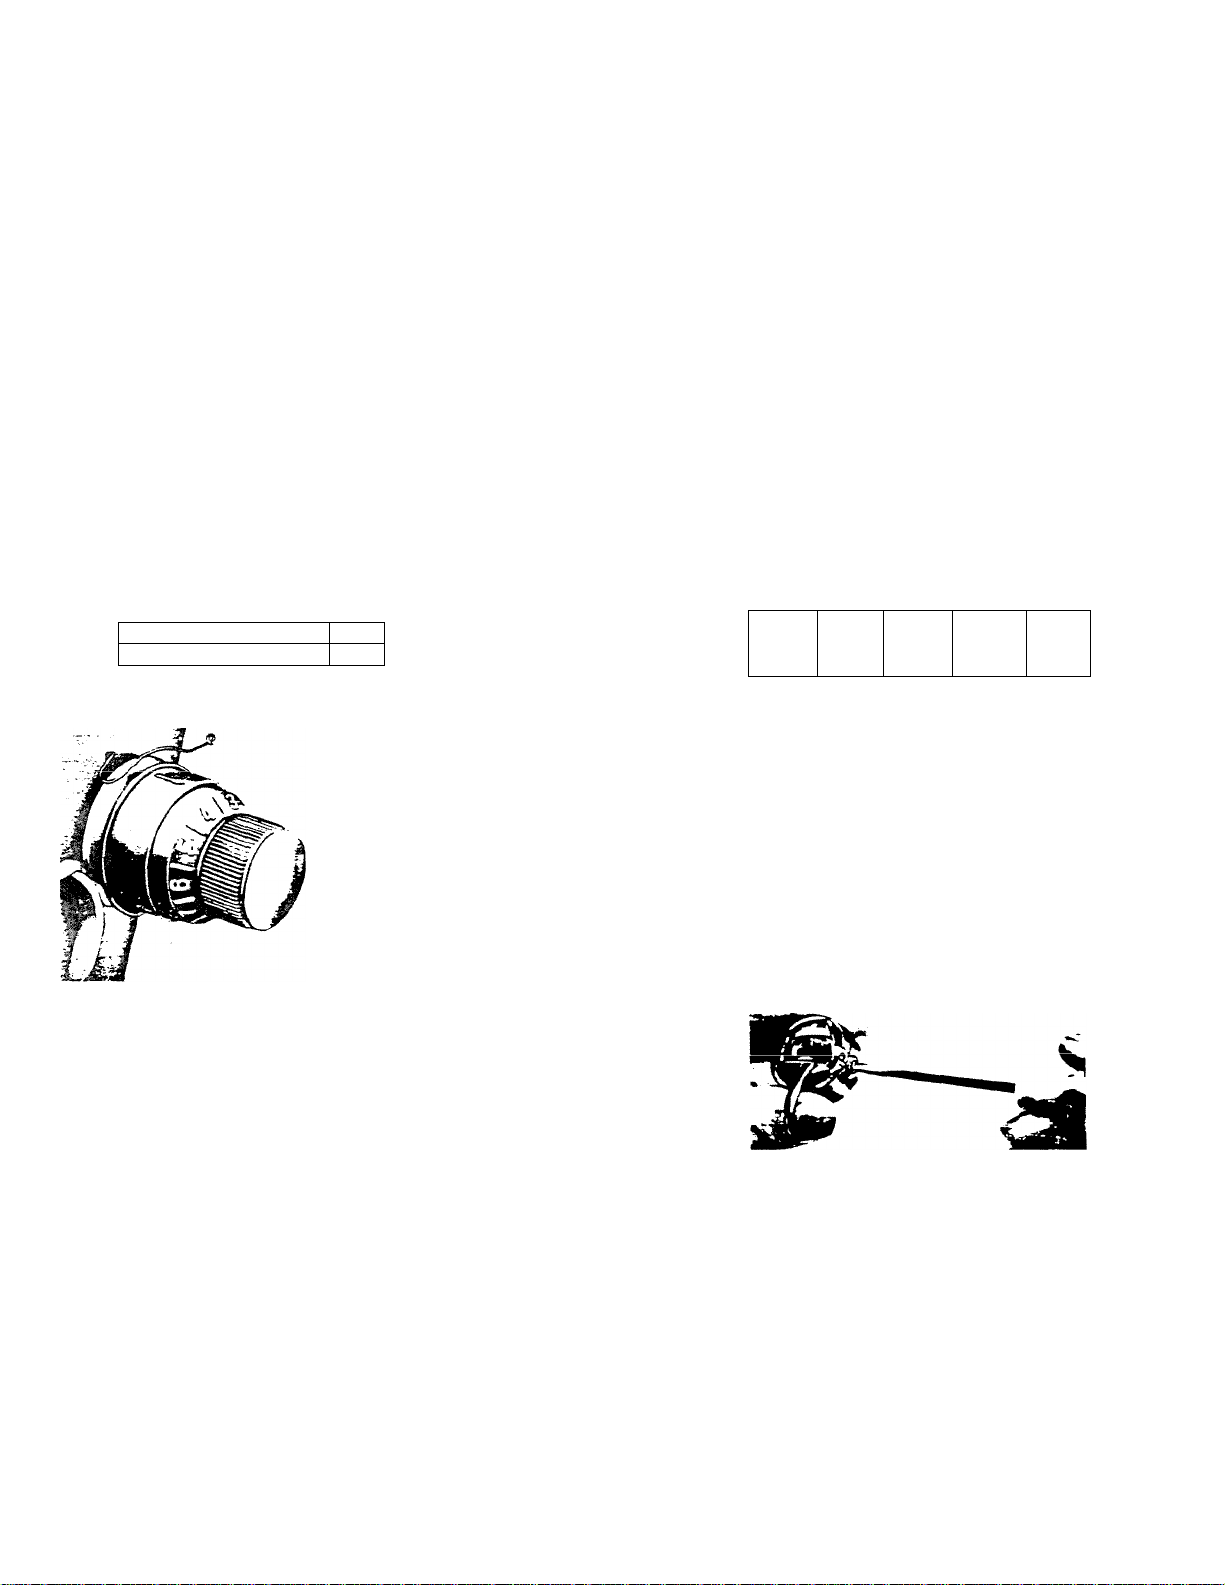
- To Tighten or Loosen Top Tension
First be sure that Presser Foot is DOWN--resting o
raised, top thread tension is automatically released). To TIGHTEN
needle thread tension turn numbered dial (left) CLOCKWISE. To
relieve tension turn dial counter-clockwise. The higher the number
at which dial is set, the heavier the tension on needle thread. Before
attempting any tension adjustments be doubly sure that machine
is completely and properly threaded and that Presser Foot is DOWN.
If tension adjustment of needle thread does not produce properly
balanced stitching - - only then do you consider adjusting tension on
bobbin case (lower) thread.
To Loosen or Tighten Bobbin Thread Tension —
This adjustment is rarely neccessary unless you have sawing
project calling for very unusual thread in the bobbin - - i,e.
elastic. To adjust tension cn bobbin thread merely turn the
small screw in outer rim of Bobbin Case (right). Turn
screw a little at a time as you pull thread to test tension
on it. Turn screw CLOCKWISE to INCREASE tGHSIOH - - tiiG
otiier way ease it.
mw/M
BOTTOM THREAD FLAT OR LOOSE
TOP TENSION TOO LOOSE
i- -
m
Page 13
11
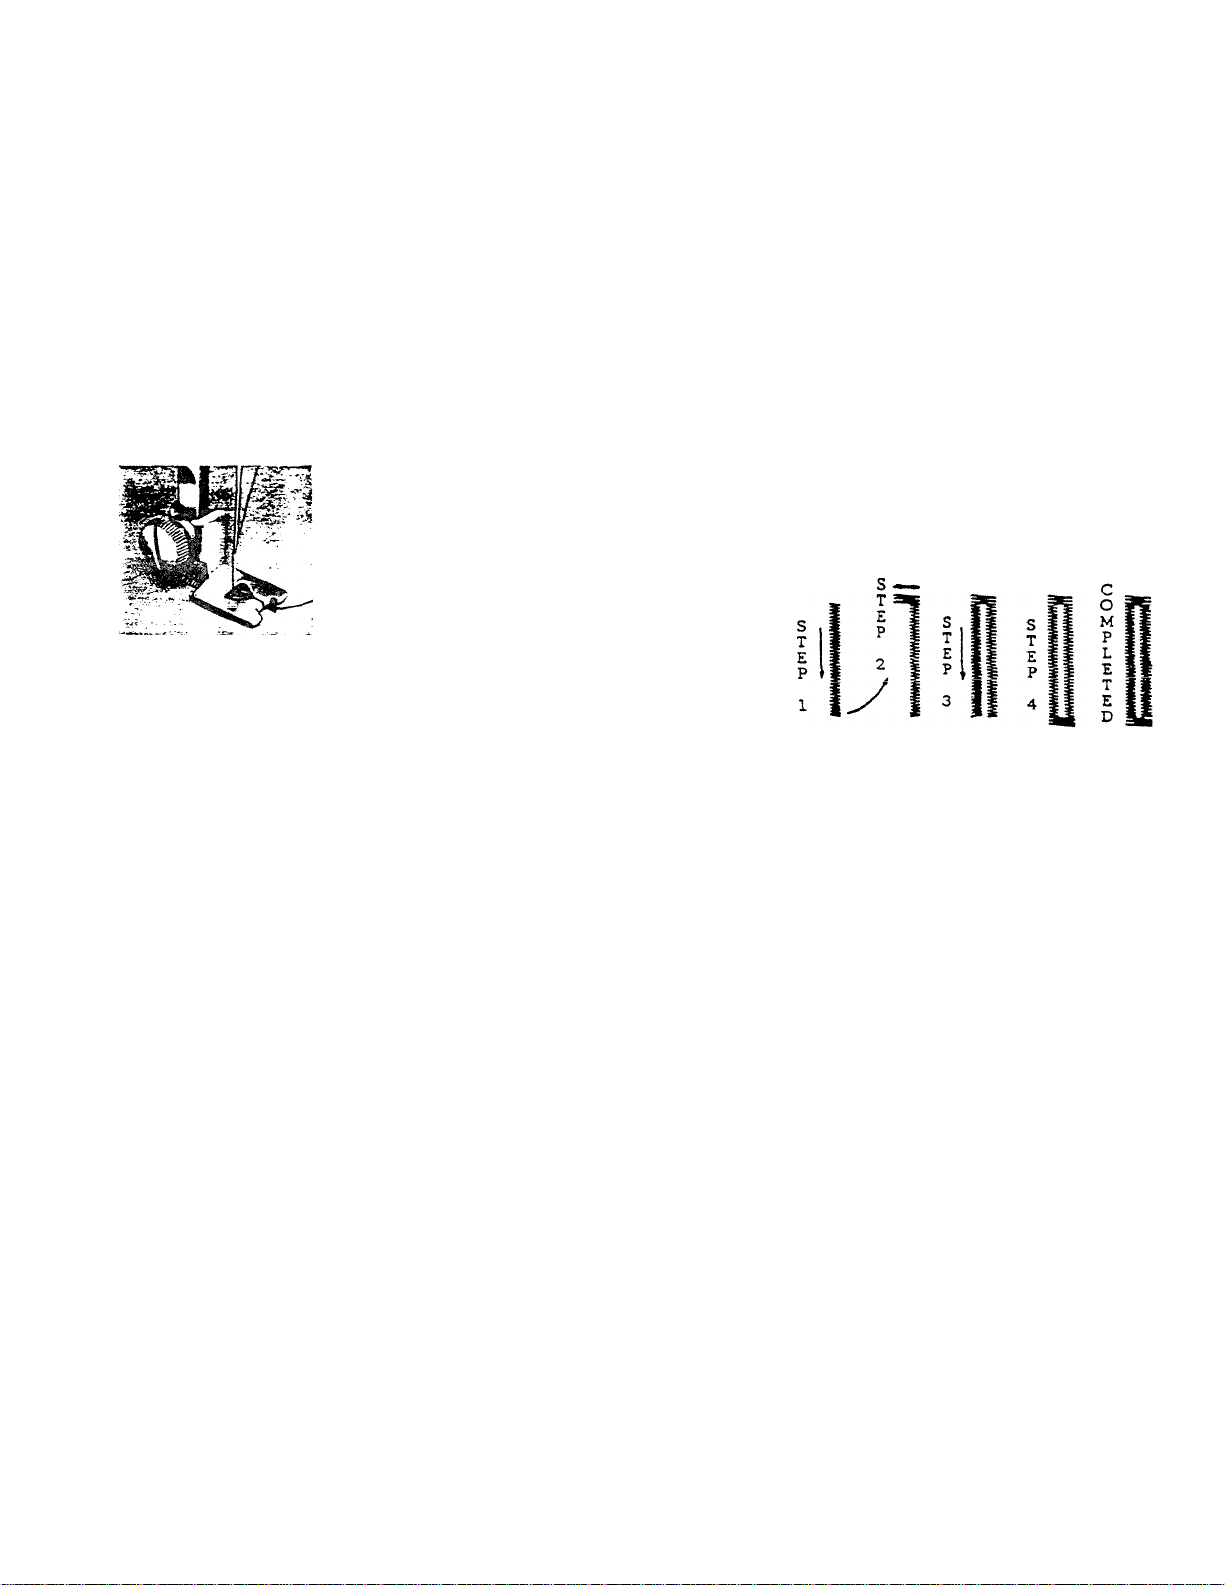
Make Buttonholes With Your Machine
First bo sure ZIG21AG Needle Plate is on maciune. Next replace any other
Foot ■with, the BUTTONHOLE Foot (look left.) Then follow these directions
in making a test buttonhole in scrap fabric.
Start by marking fabric ■with tailor chalk
or basting stitches, both ends of button
holes you want to make, exactly where
you want them.
To make buttonholes in sheer or very soft fabrics place
tarlatan or blank newsprint type paper under fabric. Tesur
away the paper after buttonhole is completed.
STEP 1. Set Needle Path Selector at LEFT
position. Set ZZ Width (white area at 5 on left
side - - about 2 on right. Set Stitch LENGTH
dial at .'iWVWWi .. (not far around from its 0
marking). Turning machine wheel by hand,
lower needle into fabric where you have mar
ked the starting end of buttonhole. Now sew
slowly to your mark at the other end and you
■will have made one side of buttonhole. Stop
machine -with needle do-wn in fabric at right
side of ZZ stitching completed.
STEP 2. Raise Presser Foot and using needle
in fabric cis a pivot turn the fabric completely
around, end for end. Now turn Feed Teeth
Knob to DN position. Then lower Presser Foot
and raise needle. Next move ZZ Width Lever
to left and hold it at S on dial while sewing
T
four or five stitches.
STEP 3. Raise needle out of fabric and turn
FEEDING teeth Knob back to HI position. Now
sew second side of buttonhole until it reaches
mark on fabric at right side of ZZ stitching
just finished.
STEP 4. Turn Feed Teeth Knob to DN position.
With Presser foot still do'wn RAISE needle out
of fabric. Move ZZ Width Lever to left and
hold on 5 while you sew four or five stitches
to complete bar-tacking. Leave Presser Foot
do-wn and raise needle out of fabric.
STEP 5, Spin right side ZZ Width roller to 0
on dial. Then make two or three stitches to
tie threads securely and prevent ravelling.
Cut buttonhole open with a buttonhole cutter
or seam ripper, being very careful to avoid
cutting any stitching. Turn Feed Teeth Knob
to HI position ready for you next project.
1
Page 14
12
Your Machine Will Sew On Buttons —*
(Another operation which takes longer to explain than to do)
Put Button-Sew-On Foot on machine. Turn Feed Elnob to DN. Set Needle
Path Lever in LEFT position. Set left of ZZ Width Control at 5. Place
fabric and button so its LEFT hole is directly under needle and gently
lower foot to hold button. Txim machine wheel slowly by hand until needle
goes down and back up through left hole. Continue tmming wheel until
needle moves to right and starts down again. Now aim it at hole on RIGHT
by turning right side Roller in ZZ Width Control Peinel.
Continue turning wheel by hand to be sure needle clears button as it moves in and out both
holes in button. Then slowly sew five or six stitches and stop machine with needle down in
LEFT hole. Turn ZZ Width Control (right side roller) until Lever slides back to 0. Take a few
stitches in left side hole only, to tie threads. To provide buttoning space for heavier materials
place a rounded toothpick atop button between the two holes while sewing it on.
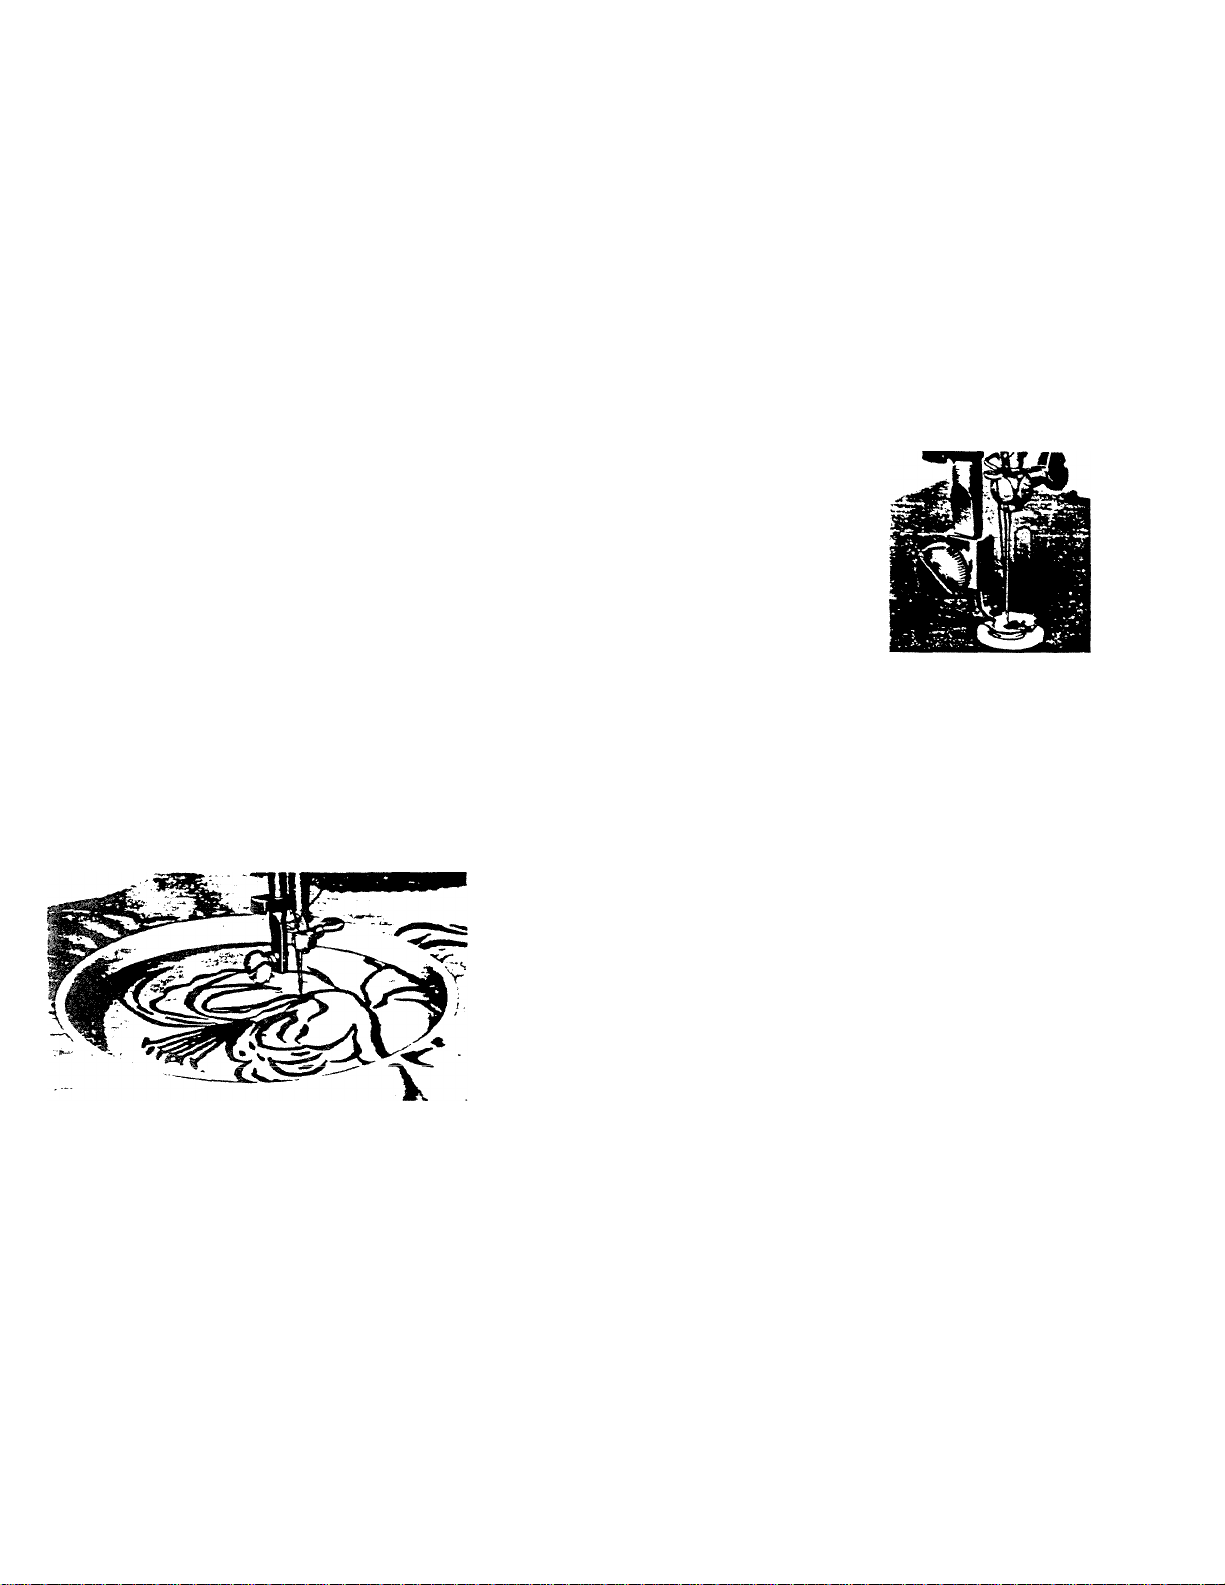
Embroidery - Monogramming - Darning
•^For Finest Results Use A Hoop
Remove Presser Foot from machine. Turn Feed Knob
to DN. Release Presser Bar pressure i.page 41. Stretch
fabric tautly in an embroidery hoop and angle hoop
edge under needle. Set Stitch Length Dial as desired
(■usually at a low number). Lower Presser Bar Lever
('otherwise there is no tension on thread), and begin
sewing. R\m machine at fairly high speed while mov
ing hoop around rather slowly, using both hands to
keep fabric flat on machine at all times. With care
you can follow a stamped or traced design, or close
a hole or tear effectively. Keep fingers away from the
needle.
Page 15
о
13
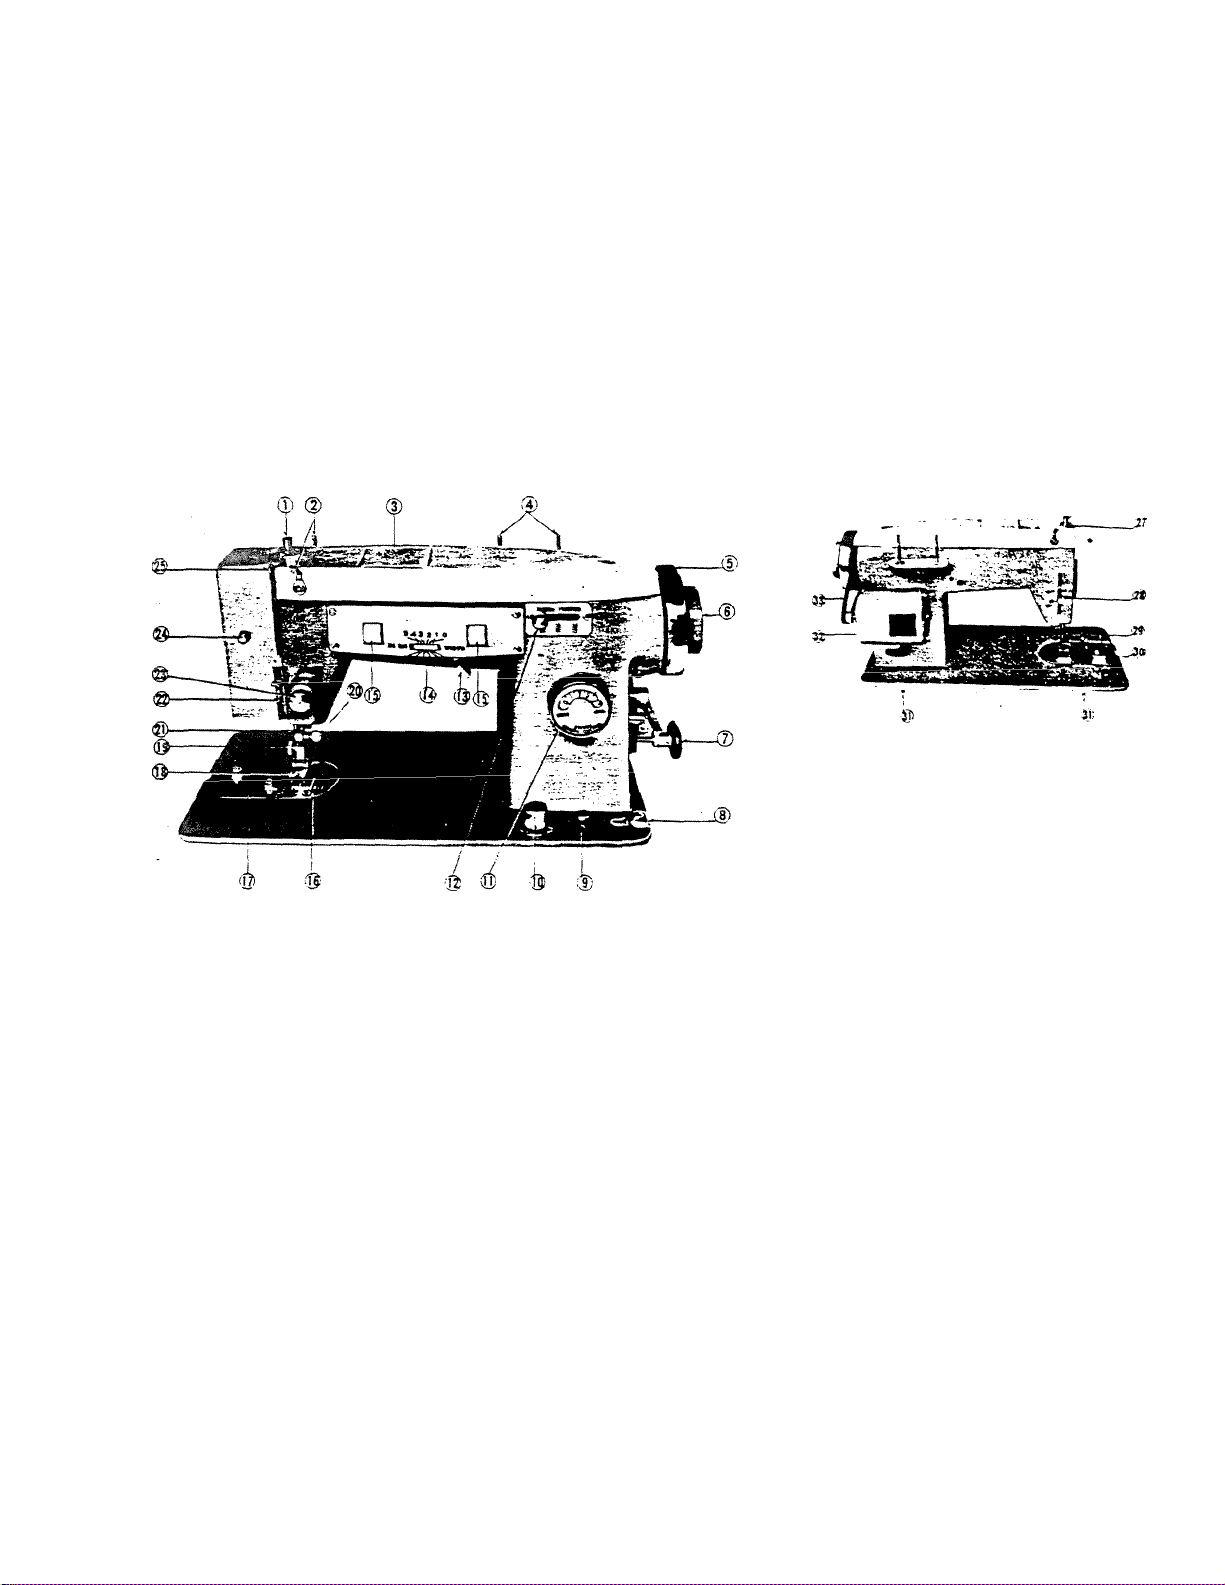
Know Your Machine - - Its Functional Controls and Components
>
19 Foot Holding Screw
20 Needle Clamp and Screw
21 Thread Guide to Needle
22 Rectangular Thread Guide
23 Tension Regulator
24 Light Switch
25 Take-Up Lever
1 Presser Bar
2 Thread Guides
3 Cam Chamber
4 Spool Pins
5 Wheel
6 Wheel Clutch
7 Bobbin Winder
8 Bobbin Wind Tension
9 Reverse Sewing Button
10 Feed Teeth Knob
11 Stitch Length Dial
12 Needle Path Selector
13 ZZ Stitch Width Lever
14 ZZ Stitch Width Panel
15 ZZ Width Control Rollers
16 Needle Plate
17 Hinged lift Plate
18 Presser Foot
26 Pressure Bar
27 Bar Release Ring
28 Presser Foot Lifter
29 Thread Cutter
30 Feed Teeth
31 Cabinet or Portable
Hinge Pin Holes
32 115 Volt Motor-AC or DC
33 Driving Belt
Page 16
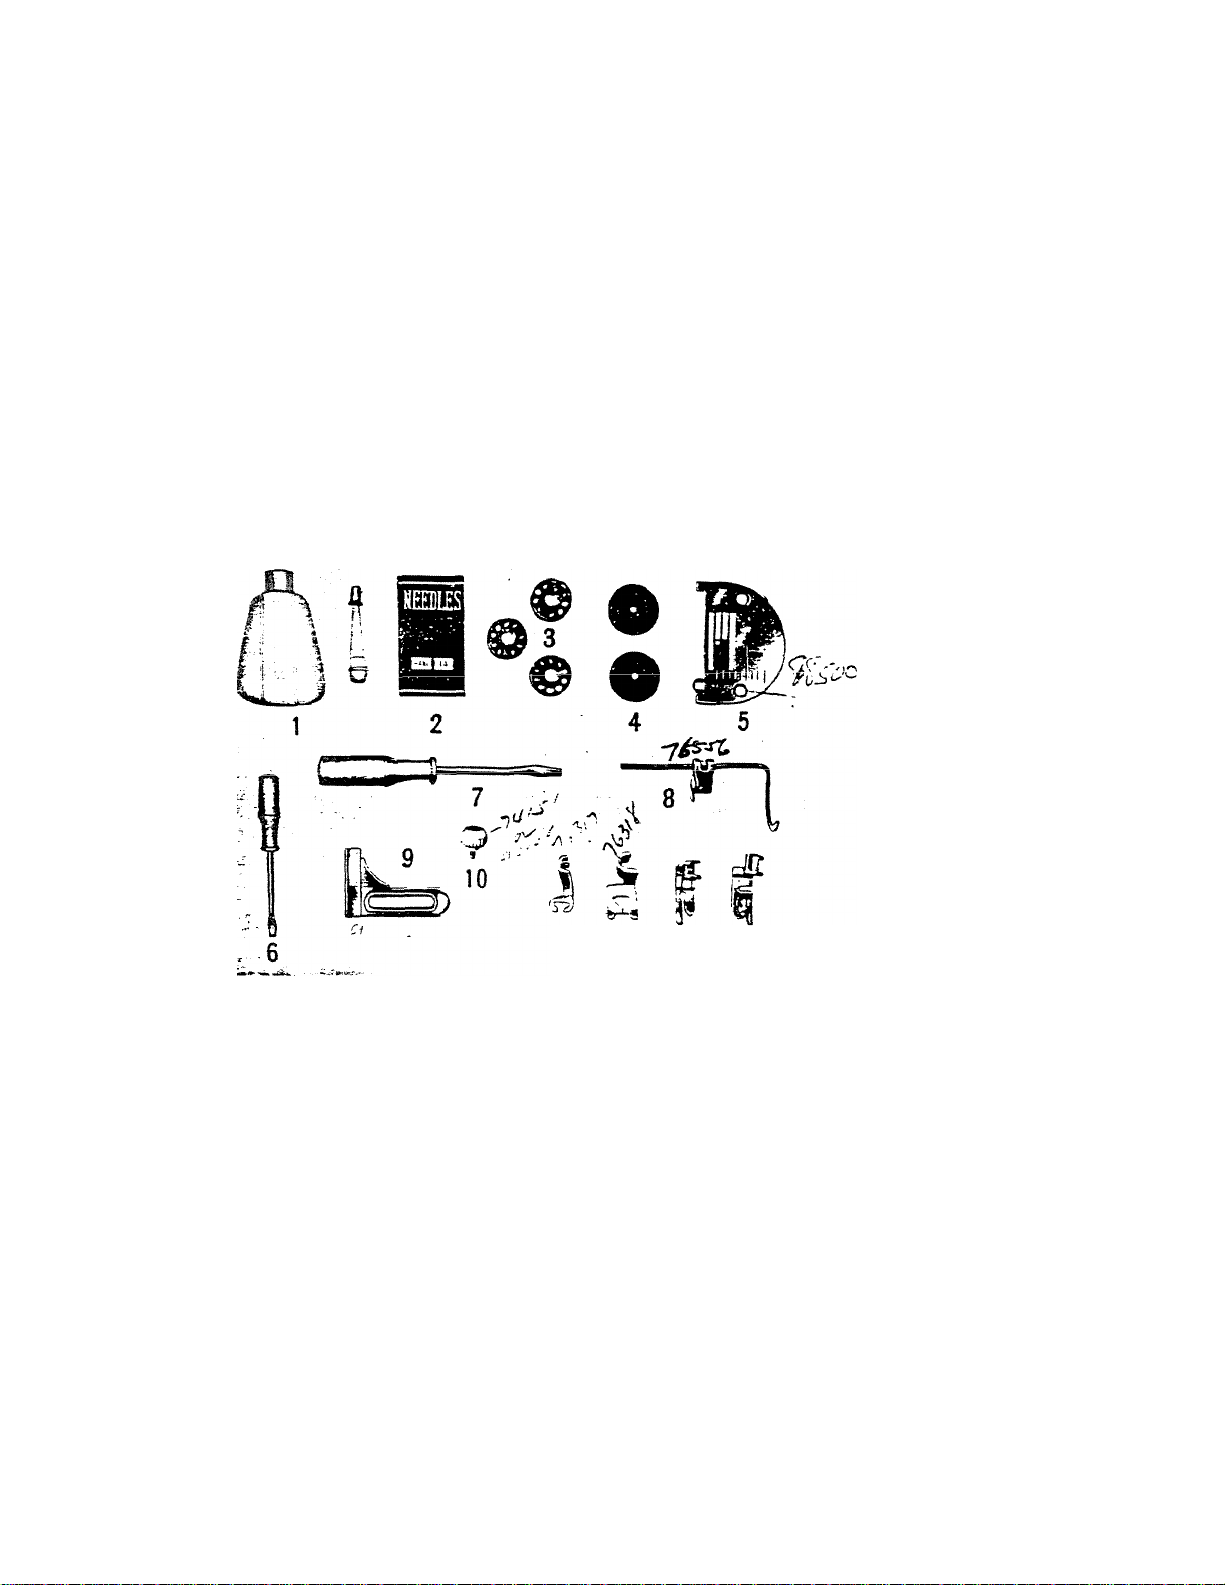
Standard Equipment Accessories
. Plastic Oiler
\ Needles (5)
i Bobbins (3)
1 Felt Washers(2) - side over spool pins
5 Needle Plate for Straight Stiching only
5 Small Screw Driver
! Large Screw Driver
77
-u
r
Q
p
«« .
<
<a
«
k
k
C
II 12 13 14
8 Quilting Rows Spacer
9 Stitching Guide - assures even seams
10 Thumb Screw for Stitching Guide
XI Sutton Ssw-On Soot
12 Buttonhole Foot
<
€
<
€
<
i
f
t
t
t
e
0
13 Presser Foot for Straight Stitching only
14 Narrow Hemming Foot
c
(
Page 17
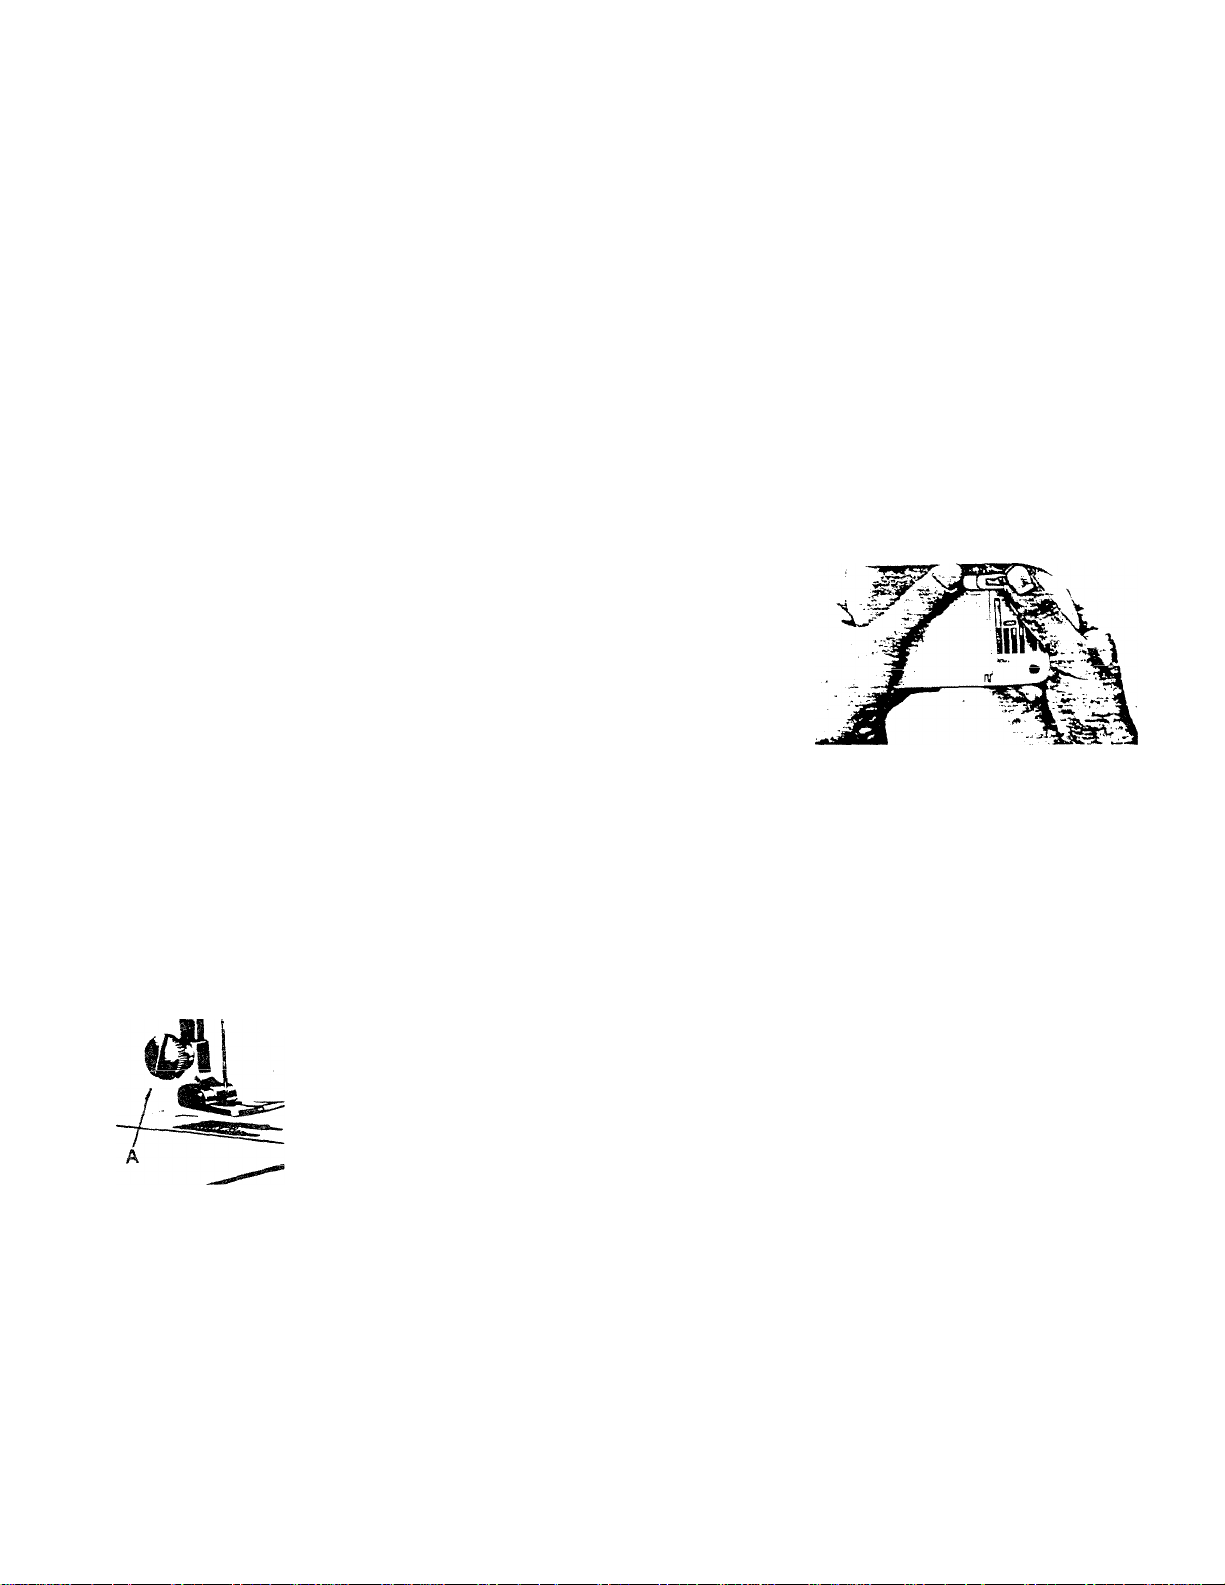
To Change Needle Plate —
Be sure Presser Foot is UP and needle at top position.
Raise hinged cover plate (attached to needle plate) and
leave UP. Carefolly remove screws holding needle plate-and gripping the raised cover plate slide entire assembly
off machine. Set Stitch WIDTH Lever at 0.
Turn assembly over - - under side upward - - holding needle
plate in one hand, hinged cover plate in the other. Notice
that two small pins - - one at each side of cover plate - - fit
into grooves at each end of assembly. One pin is under
spring-hinge at one end--the other pin is unobstructed. Lift
that pin out of groove - - then the other pin can be freed as
the tongue on cover plate is separated from the spring latch on needle plate. Just reverse
the entire procedгlre to attach another type of needle plate to the hinged cover plate and re
install the changed assembly on machine.
CAUTION - - After Changing A Needle Plate or Presser Foot Always Turn
Machine Wheel by Hand While Needle Goes Down and Comes Back Up.
Such a Production Avoids Breaking Needle and Damaging Machine.
15
- To Change Presser Foot
Be sure Presser Foot and needle are both UP. Loosen thrunb screw A with
fingers or screw driver xintil Presser Foot slips down and off. To replace
with another foot merely reverse the procedure. After changing a foot
always hand-turn machine carefully to be sure needle does not strike foot.
Page 18
.¿¿LuÜü, '
A-^.í ■
! I?.
“áS ÍK
- Use The Norrow Hemmer To Sew Like A Pro
Practice first with scrap material. 'With fingers, crease a fine
(Ys" wide) DOUBLE fold from starting edge for about two inches.
Take a couple hand needle fine stitches to hold fold at starting
■ Ti.
edge, leaving at least two inches of threads dangling. Holding
‘-4
both ends of the hand creased fold, slide it underneath the
Narrow Hemmer Foot. Slip the middle portion of FOLD into
'r^
the SCROLL of Hemmer. (Moving it back and forth slightly you
will observe how the scroll rolls the fine narrow hem into
position.) Keeping the scroll just barely FILLED with fabric, finally pull creased portion
toward you until starting edge is under needle, then lower Narrow Hemmer onto fabric. As you
slowly run machine iset at fairly short stitch length), gently pull on the hand needle thread
ends through a few starting inches of your entire hem. Keep on guiding fabric with SLIGHT
pressure to the RIGHT and it will continue making a double turn through the scroll.
To Moke A French Seam
With finished sides of fabric face to face place edge of top piece i« inch inside the edge of
bottom piece. Follow same steps as for plain narrow hem in a single piece of fabric.
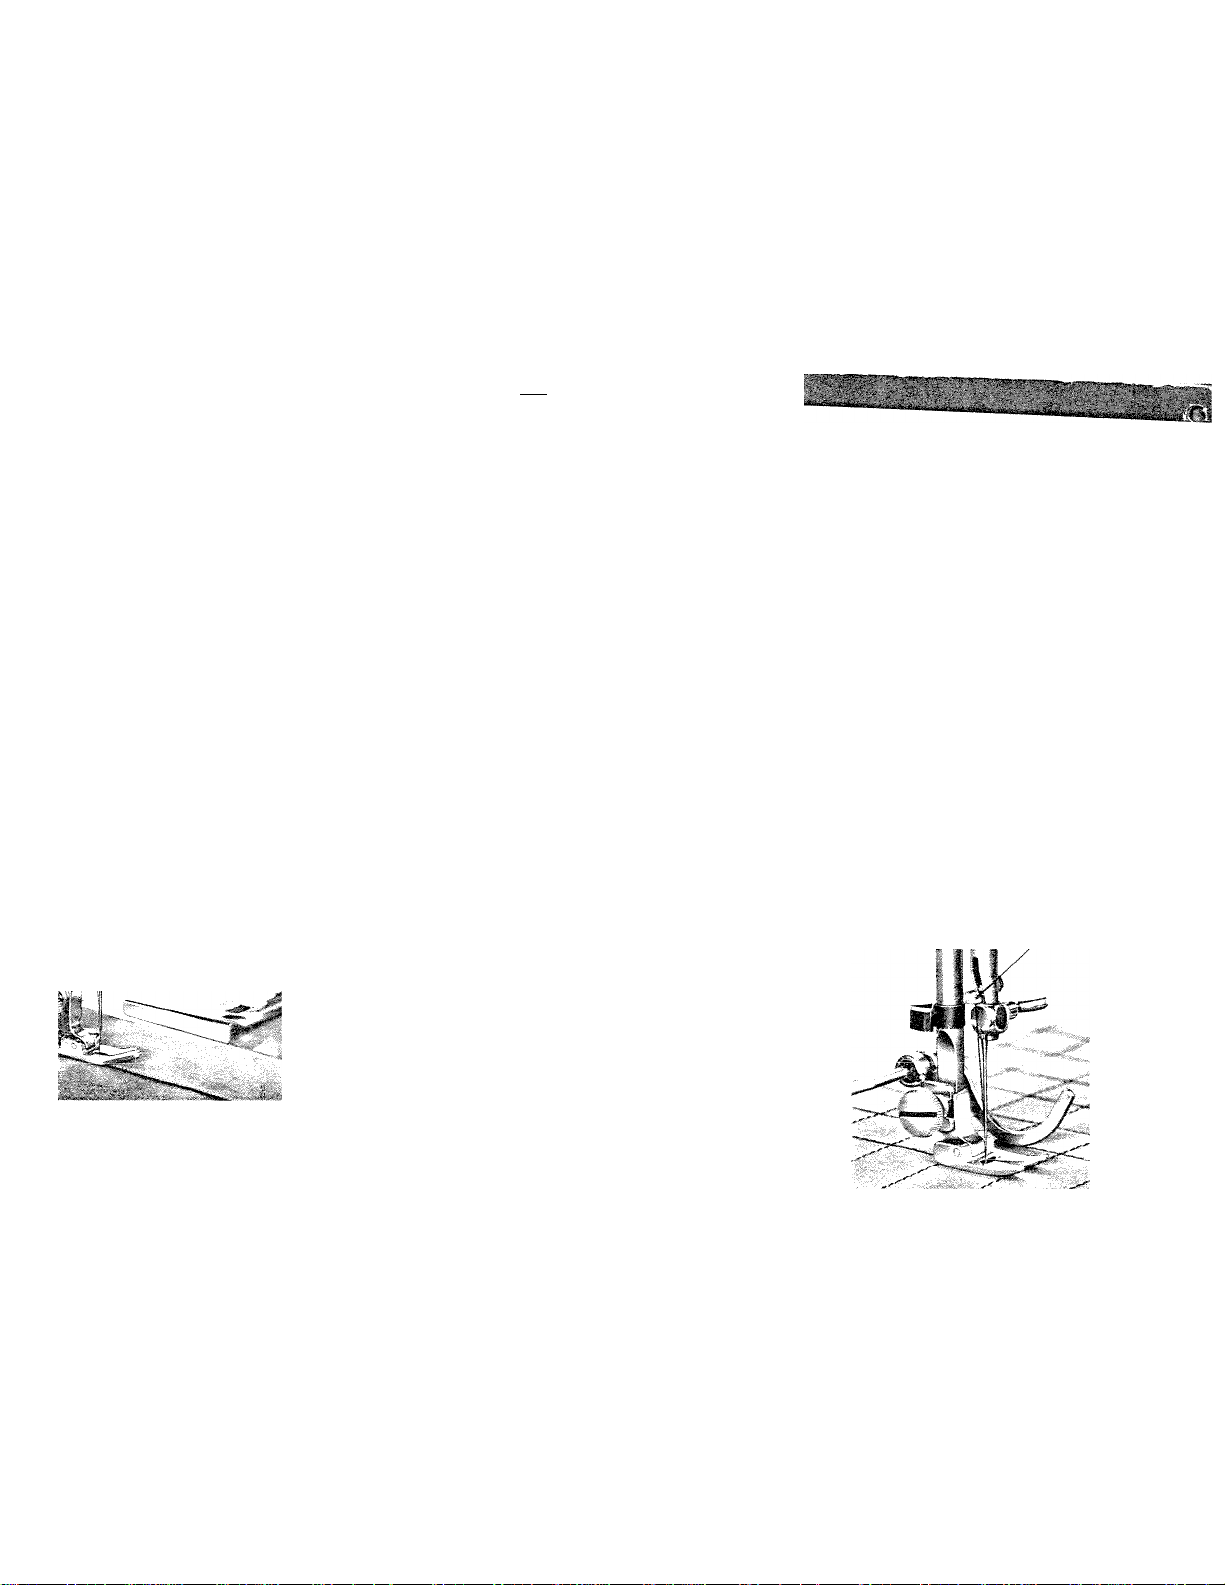
T i| - Stitching Guide--Quilting Rows Spacer •
■ ' For perfectly straight and even stitching about
Y2 inch OR MORE from any edge of fabric, use
the Guide (left). Fasten it to machine bedplate,
witli its tliu-nit) scrsw in t}ir©3.cÍ0ci liol© aiDont 2
inches to the right of needle. Attach Quilting
Guide by placing its pronged holder between
upper portion of presser foot and its clamp thumb screw-by first
loosening and then re-tightening screw. Ad.just curved bar of guide
to barely rest on a row of stitches previously sewed. Then successive
rows will be equally spaced.
9
C
&
S
C*
c;
■
Page 19

Many More Tlmo-Savlng Wonder Working
Available From Your Dealer At Modst Prices - - Here Are Some
Order them by genuine part numbers shown
Ruffier-Pleatar No. 1403
Just on one set of curtains for Üae kouse, you
will save Ixours and kotirs of time and nervewracking tediousness by using your maciiine
and a Huffier. For pleating skirts and slip
covers; marking gift aprons, clxildren's clothes
with ruffled finishing touches; adding fullness
to dress bodices, are just a few of the many
uses for this versatile attachment. Also while
ruffling a trimming you can sew it on the main
fabric simultaneously. Despite its wide range
of practical applications it is amazingly simple
to use.
Zipper Sew-in and Cording Foot No. 1 873
Needed to sew in zippers by machine. Per
mits stitching very close to the metal fastener
for smooth, secure results in a jiffy. Adjustable
for stitching on either side of foot - - left or right.
Also needed for Cording.
Darning Spring No. 4990
Of great assistance when Darning or Monogramming with Presser Foot removed from
machine--especially when using a hoop. It
justs slips over the needle and hooks onto
needle clamp.
17
Edgestitcher No. 76554
The fast, foolproof aind fine-finish way to sew
pipings, edgings amd lace insertions. Easy to
use--with a range of slots to guide the fabrics
and the operator.
Binding Appiler No. 74159
Another tremendous time-saver. This attach
ment folds plain, flat bias binding from a roll;
also hand-cut bias binding, AND applies it to
edge of material at the same time. Also does
a fine job of applying standard sizes of folded
and two-tone (two different colors) bindings
simultaneously. Almost a must for making
children's garments fast and easily.
Hemmers for Four Popular Hem Widths
To go with the Narrow Hemmer which came
with your machine. Order by number accord
ing to the width of hems wanted: ^4 inch-No.
76550; % inch-No. 76551; % inch-No. 76552;
vg inch-No. 76553.
Attachment Holder No. 82528 -
NECESSARY FOR ATTACHMENTS ABOVE
To use the Edgestitcher, Binding Applier, or
wider Hemmers on your machine you must
first install the Attachment Holder in place of
any Presser Foot.
Page 20
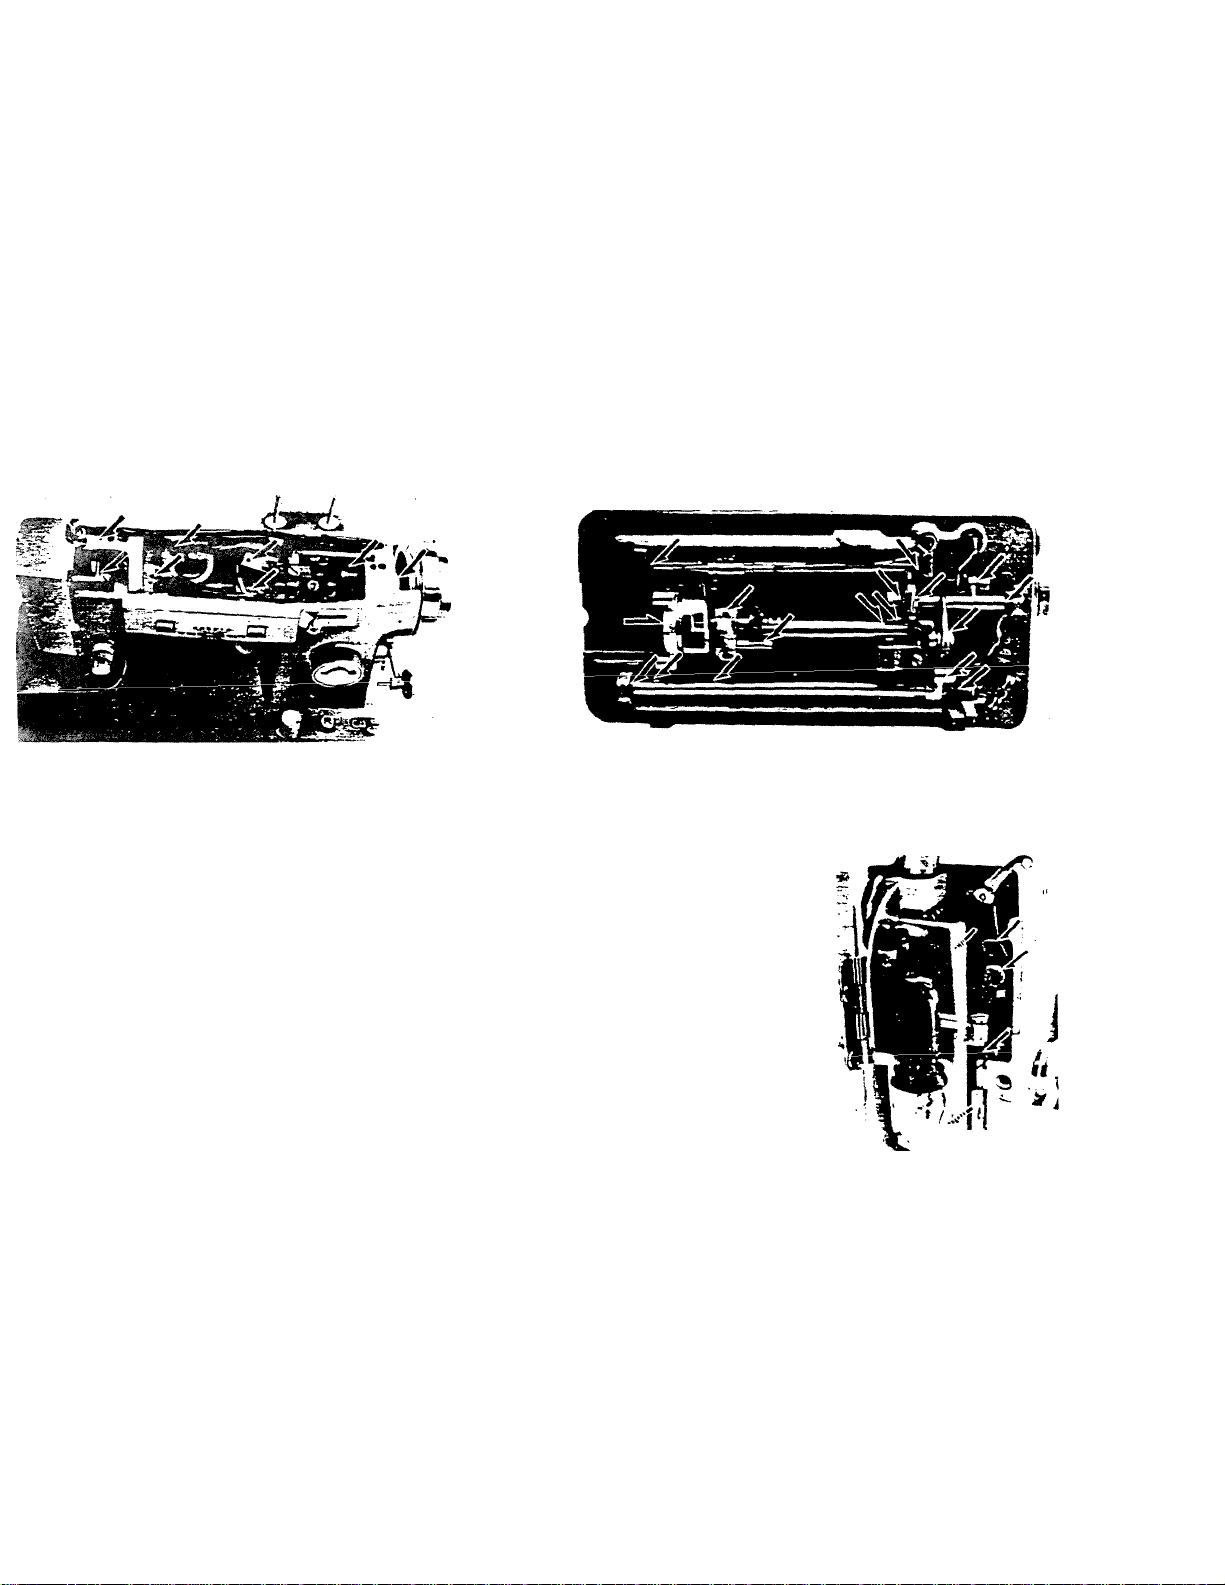
To Oil Machine - - Have Take-up Lever In LOWEST Position
'se only Sewing Machine Oil avadlable from your dealer - - avoid other
rades. Never over-oil. ONE DROP at the points indicated by arrows
bove is sufficient. Oil machine when starting a sewing project - - or
uring such. NEVER oil machine before putting it away for a few
eeks or longer. When and how often to oil is a matter of good judg.ent because nobody but you knows how much and for how long your
.achine will be operating. Just remember your machine is a mechaniil device with many moving parts.
e
Qr
<0
(0
c
€
ft
c
€
ft
€
ft
%
%
%
4
t
c
€
c
t
t
C
Oiling Points Inside Face Plate >-Replacing Light Bulb-
lese four points normally reguire oiling only every third or fourth
ne the average machine is oiled elsewhere. For access to them
ereiy pull face-plate cover open as show--which also gives access to
e screw--socket type light bulb, available from your dealer. It is
wise precaution always to keep an extra new bulb on hand in the
icesscry box.
JP3* W.
e
i
e
M
e
i
w
<
c
(
Page 21
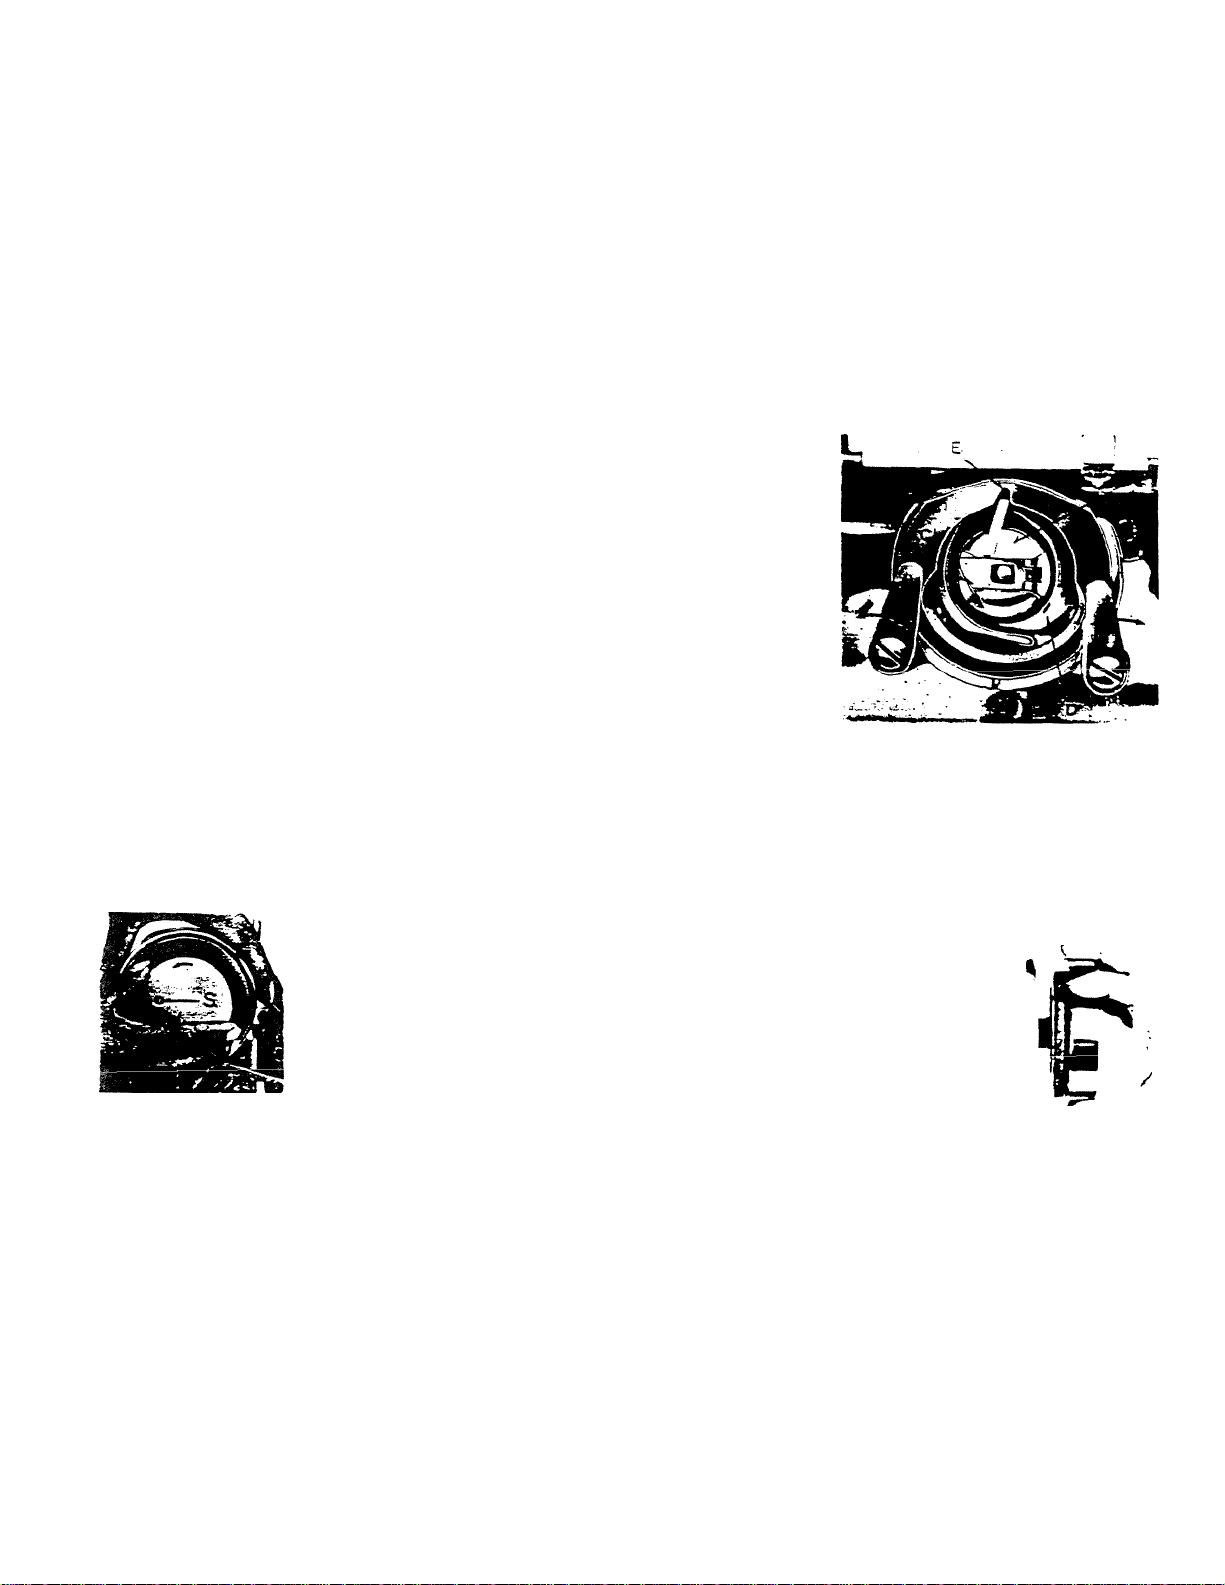
To Clean and Oil Shuttle--Lift and Tip Machine Backward
Occasionally the shuttle assembly gets clogged with lint, loose
threads or fabric dressings. Running machine threaded without
fabric under presser foot can also clog and tightly jam the
shuttle. Cleaning this assembly is simple. Cabinet or portable
hinges will hold machine at an angle. Underneath machine at
its left end you will see the assembly pictured here.
With needle at its TOPMOST position--remove Bobbin Case
(Page 8). Push top end of BOTH cl2Lmps (B) outward--premitting removal of shuttle race covering (C) and shuttle (D)--hold
ing latter by its center pin. Thoroughly clean and polish ring
(C) and shuttle (D)--ALSO the shuttle race, the cavity IN THE
MACHINE where shuttle functions. If any scraping is necessary
be sure to cloth-cover the screw driver blade.
Before re-assembly put one drop of oil on a finger-tip and run
shnttle (D). Holding shuttle (D) by its center pin and its hedi'
in and wiggle it slightly until you feel it fitting firmly against
stay put.
both clamps (B) inward xintil they snap onto their holding pins. Last insert Bobbin Case (Page
8) and your machine should be ready for sewing.
Then replace race cover ring (C)--fitting pin in its LOWER edge into notch. Push
it aronnd the outer edge of
moon body toward you, push
shuttle driver, where it will
To Replace The Motor Beit
Remove circular clutch nut from wheel by turning it
COUNTER-CLOCKWISE after removing screw (S). Pull
wheel CAREFULLY away from machine ONLY FAR EN
OUGH to expose its grooved belt pulley. Then change
belts--the new for the old. If the large washer which must
fit between wheel and clutch nut has fallen off--BE SURE to
replace it with its protruding lips OUTWARD--away from
wheel. Replace and tighten clutch nut and screw (S).
19
Page 22

Fix-lt-Yourself Hints To Avoid Costly Home Calls
Long experience has established the absolute fact that their users rather
than sewing machine necessitate approximately three-fourths of all service
calls. To know the cause of any trouble usually makes correction of it
relatively simple. .rT ‘ !
Damaged, defective, or the wrong needle for the job--incorrect threading - faulty tension adjustment--thread or lint in the shuttle and its race-way--
cause more difficulties with a sewing machine than all other sources of
trouble combined.
Re-check with this manual before going to the telephone to request ser
vice. A little time spent with this book, plus some patience might save
you money time after time.
I
i
.i»-
IF YOUR MACHINE IS NOT SEWING PROPERLY LOOK THROUGH
THE FOLLOWING PAGES.
Page 23

21
Trotible
Skipping
Stitches
IrxegTxlar
Uneven
Stitches
Probaile Cause
Bent needle
1 ;
Needle placed incorrectly
in clamp
Too fine a needle
for thread being used
Upper thread tension
too loose
Improper threading
Bobbin not wotind even
Pulling or holding
material
Not enough tension
on upper thread
Correction
Discard and replace
See instruction page 7
See needle and thread chart, page 6
Tighten upper tension
See threading instruction, page 7
Rewind bobbin
Avoid pulling or holding material, just guide
it.
Increase tension
Poor quality thread
Needle too fine for
thread being used
Try different thread
See needle and thread chart, page 6
Page 24

22
Trouble
Upper tbxead
breaking !
Material
puckering
1
Improperly threaded
Too much tension
i
i
Starting with take up
■
in incorrect position higher position
Improper setting of
needle
Bent needle eye of needle
too sharp
Bent or blunt needle
Probable Cause
Refer to threading instructions page 7
and rethread machine
Loosen tension on upper thread by turning
thread tension dial to lower number.
Always start sewing with, take up lever in
Refer to needle setting instruction page 7
Try a new needle
Discard all blunt or bent needles and replace
with new
Tensions too tight See tension adjustment page 10
Dull needle
Change needle
e
Correction
%
€
C
e
c
c
s
•
Stitch length too long
Reduce stitch length-some fabrics cannot be
sewed with, a long stitch
c
c
Page 25
23
Trouble
Probable Cause
Tixread or lint in race.
If MacKine
Binds or Locks
Likely machine was run
witbout sewing fabric.
LATCH
RACE COVER KOOK CLAMPS
-shuttle race cover--shuttle
(book) - - must cdl be removed from the shuttle
race, which is built in to the machine.
Move needle and take-up lever to their high
est points. Next, lift and tip machine backword. It will remain at an upright angle rest
ing on its cabinet or base hinges - - making the
parts underneath bedplate readily accessible.
Lift fingernail latch on bobbin case and re
move from machine. Push top ends of both
race clamps outward (in opposite directions).
Now the shuttle race cover can be removed
--usually dropping into your hands.
Finger-grip the center pin of shuttle (hook)
and remove from machine. Thoroughly clean
shuttle race (in Machine)race cover and shuttle
Correction
Understandcibly, many users think their machines
have broken down the first time they experi
ence a clogged shuttle, or hook, as sometimes
described. However, such jamming is easily
corrected.
itself. Of some scraping is necessary to get
every bit of thread and lint removed from
edges or comers, be sure to cover screw
driver with soft cloth. Before reassembling all
parts into machine put one drop of oil on a
finger-tip; then run the finger tip around outer
edge of shuttle (hook). Avoid excessive oil
on shuttle rim. Any more than a film of oil
may cause some to run into the bobbin case;
soaking and discoloring the bobbin thread.
When lovering machine into sewing position
grasp it with both hands ABOVE the bedplate.
Thusiy you will not be risking scraped or
bruised fingers should the machine slip and
drop too fast and hard.
Page 26

Tilis book is
Part No. 88868
D.E.B. 1262
^^CERTIFICATE OF AUTHORIZATION"
Only dealers franciiised by White possess such
numbered certificates and are authorized to issue
White warranties.
To obtain the best performance from your new
White be sure the cabinet or portable case or
other items used with it axe White designed,
engineered or approved products.
WHITE SEWING MACHINE CORPORATION
CLEVELAND 11, OHIO
WHITE SEWING MACHINE PRODUCTS LTD.
Copyright © by White Sewing Machine Corp. 1963
TORONTO 16, CANADA
Printad in Japan
 Loading...