

Page 1
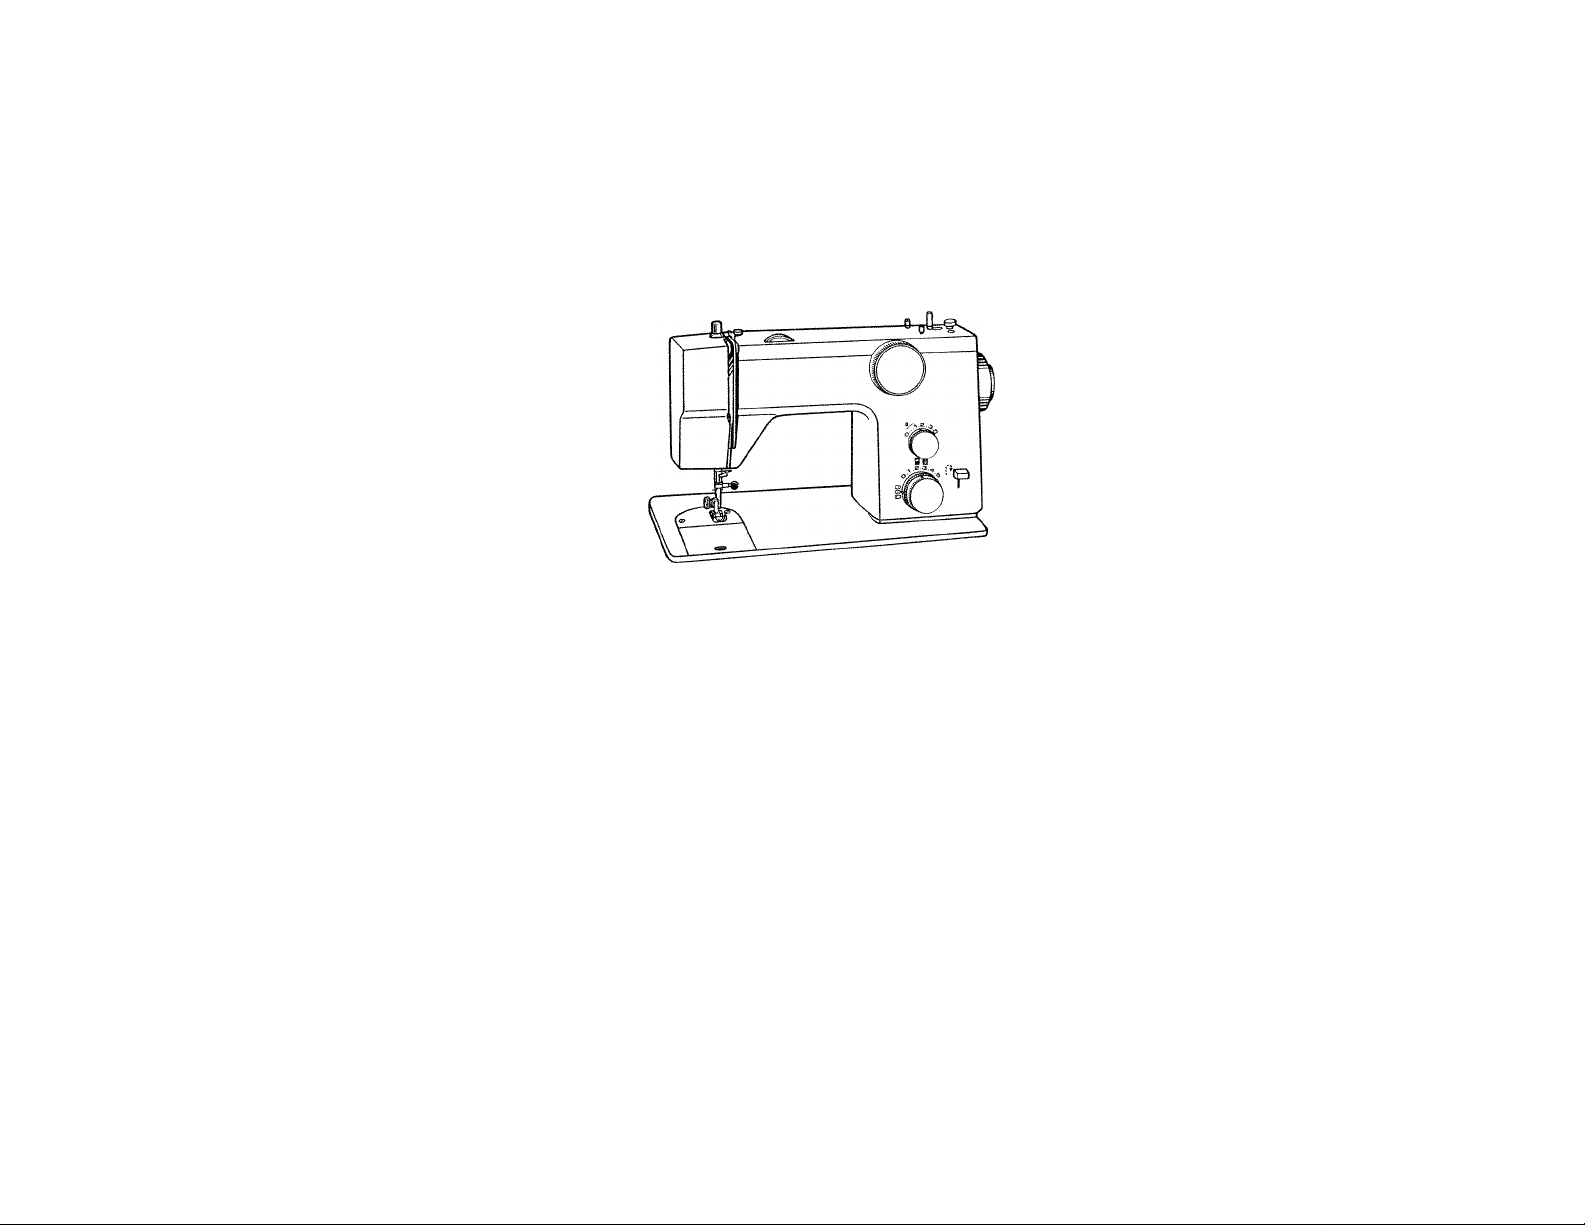
Blue
Jeans ^
Machine
WHITE
MODEL ^
5 B B
Page 2

WHITE SEWING MACHINF
Record in space provided below the Serial No
and Model No. of this appliance. ’
The Serial No. is located Rear of arm.
The Model No. is located Rear of arm.
Serial No._........
Model No. 1588
Retain these numbers for future reference.
.
Page 3

CONTENTS
1. NAMES OF PARTS.
2
. ACCESSORIES
3. BEFORE SEWING
Connection Foot Controller and Power Cord
Changing Foot................................................... .............................................
Changing Needle
Bobbin Winding..............................",
Inserting Bobbin
Adjusting Lower Thread
Drop Feed Lever
Threading Upper Thread.....
Twin Needle Threading
Drawing Up Lower Thread
Foot Pressure..............................
4. STRAIGHT SEWING.......................... ...............................................................
5. ZIGZAG SEWING
6
. MAKING BUTTONHOLES
7. SEWING ON BUTTONS.
8
. OVERCASTING
9. OVERLOCKING .......................................................................................
10. BLIND HEM stitch”””.!!"."".^"."""................................................................
11. STRETCH SEAM
12
. ZIPPER SEWING... ................................................................................
13. MENDING...................................................................................................................
14. PIN TUCKING
15. QUILTING
16. SHELL STITCHING
17. LAPPED SEAM SEWING...............................................................................
18. applique WORK........................... ........................................................................
19. EMBROIDERY
20
. MAINTENANCE ...............
21
. TROUBLE CHART
Fabric, Thread and Needle Tabie...................................................
Pattern Selection Dial
Stitch Length Dial...............................
Double Presser Foot Lifter..............................................................
Cloth Guide
Adjusting Thread Tension ................................................................!!?
Zigzag Width Control"
Needle Position Control
Thread Tension for Zigzag Stitch
Determine Length
Determine Width
Cutting Buttonholes
Corded Buttonholes
Elastic Blind Hem Stitch........................................................................
Patching......................................... ...................................................................
Mending a Lip...............................................................................................
Darning
.............................
Cleaning
Oiling
Changing Light Bulb
...............
.............
...........................
......................
.........
...................
........................................................................................................
..........................................
..................................................................................................
.........................................................................................
............
......................................................................................
...........................
.........................................................................................
............................................................
............................ ...............................................................
........................................................................................
..................................
......................................................................................
..........................
.................................................................
..........................................................................................
......................................................................................
.............................................................................................
................................
....
..........................................................................................
........................................................................
...............................................................
..........................■ ..........................................
..............................................................
................................................................
.
............................................................................
.........................................................................
....................................................................
...............................
.................................................................................
.................................................................................о
..........
....................................................................
..............................................................................
..............................................................................
................................................................
-
......................................................
...............................................................
..........................
.........
on
............................................
..............................................................
.....................................................
...............
IZ
„о
..
42
...
...
=
...
...
...
...
...
It
...
...
...
...
...
...
...
...
..
...
Page 4
Page 5

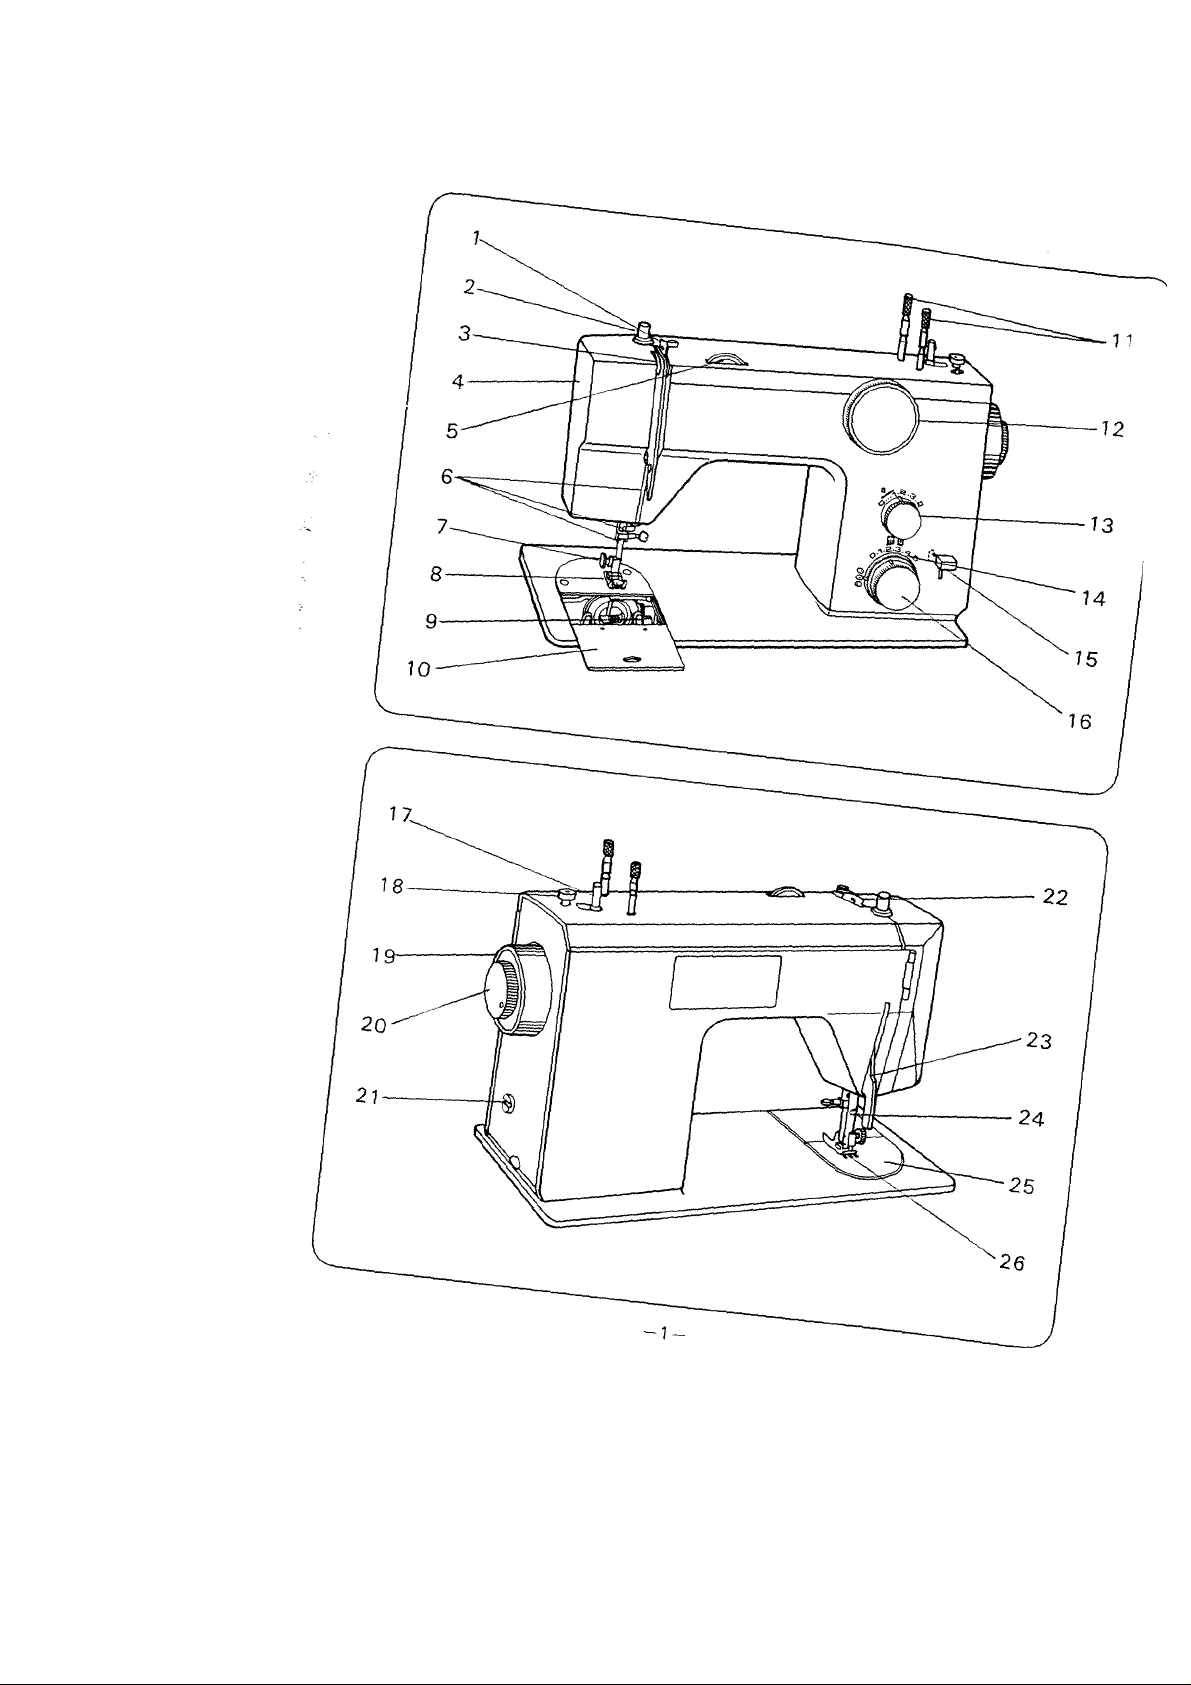
I. NAMES OF PARTS
1. Thread guide for bobbin winding
2. Pressure regulator
3. Take-up lever
4. Face cover
5. Upper thread tension dial
6. Thread guide for upper threading
7. Presser foot thumb screw
8. Presser foot
9. Drop feed lever
10. Slide plate
II. Spool pins
12. Pattern selection dial
1 3. Stitch length dial
14. Needle position control
15. Reverse sewing lever
1 6. Zigzag width control
1 7. Bobbin winding spindle
18. Bobbin winding stopper
1 9. Handwheel
20. Stop motion knob
21. Special buttonhole adjustment
22. Thread guide for upper threading
23. Presser foot lifter
24. Thread cutter
25. Needle plate
26. Feed dog
Page 6
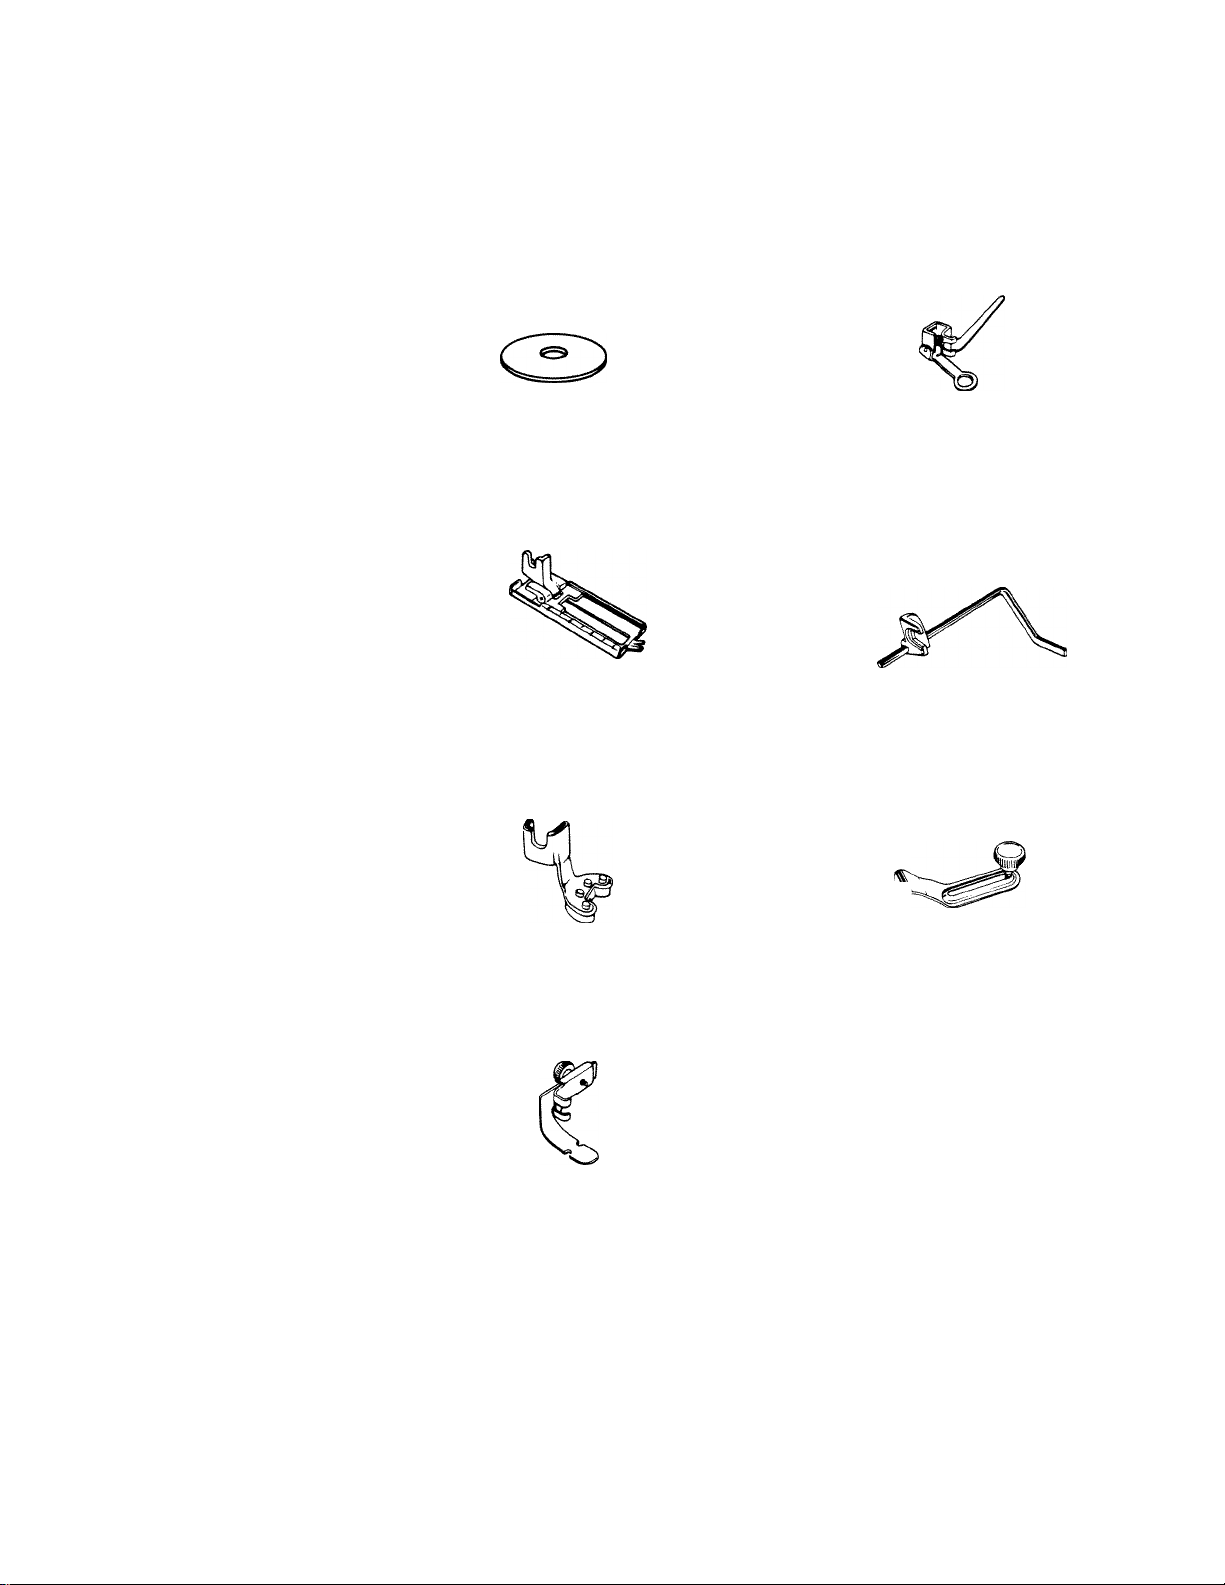
2. ACCESSORIES
Felts (2 pcs.;
Buttonhole foot
Button sewing foot
Darning foot
Quilting guide
Cloth guide
Zipper foot
Buttonhole cutter
Page 7
Page 8
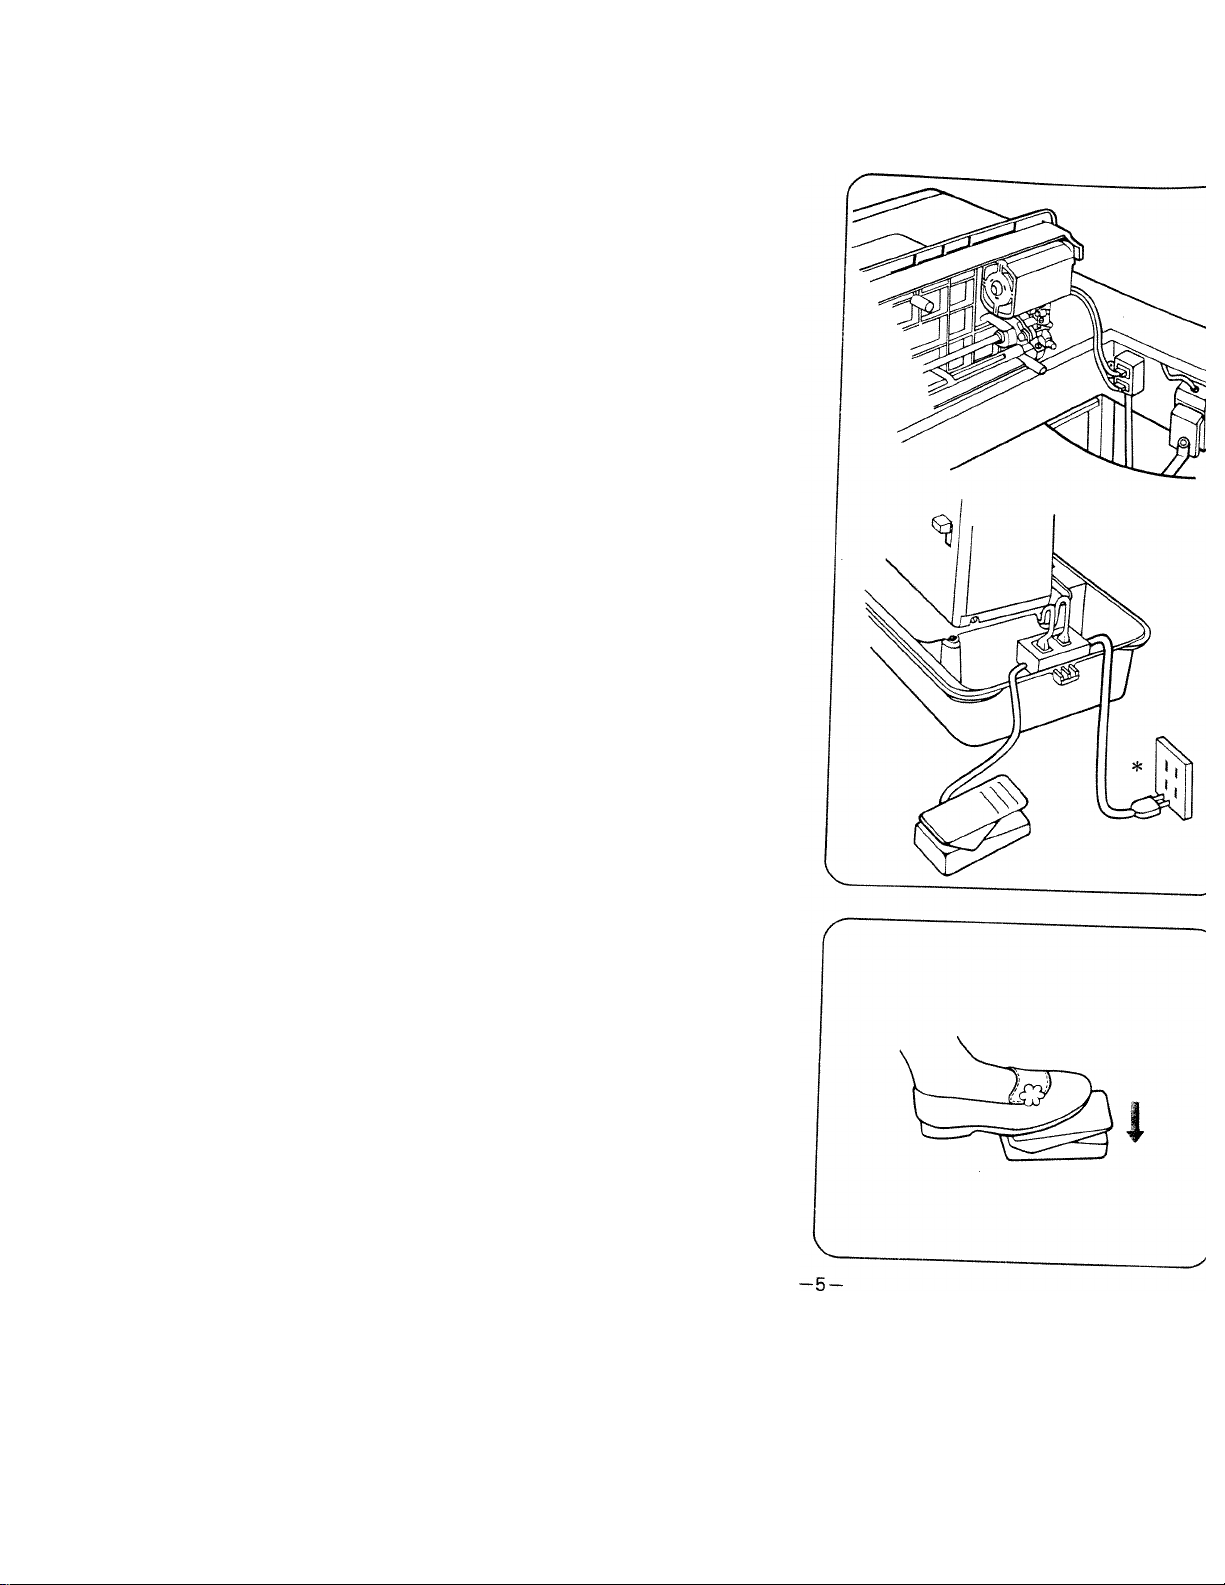
3. BEFORE SEWING
Connecting Controller and Power Cord
Conn6ct controllsr 3nd pow6r
cord.
Before pkigging in your machine,
be sure that voltage is same as
that of your machine, (written on
a plate at back of machine)
* Always unplug machine when not
in use.
The more you press foot controller,
the faster the machine runs.
Page 9
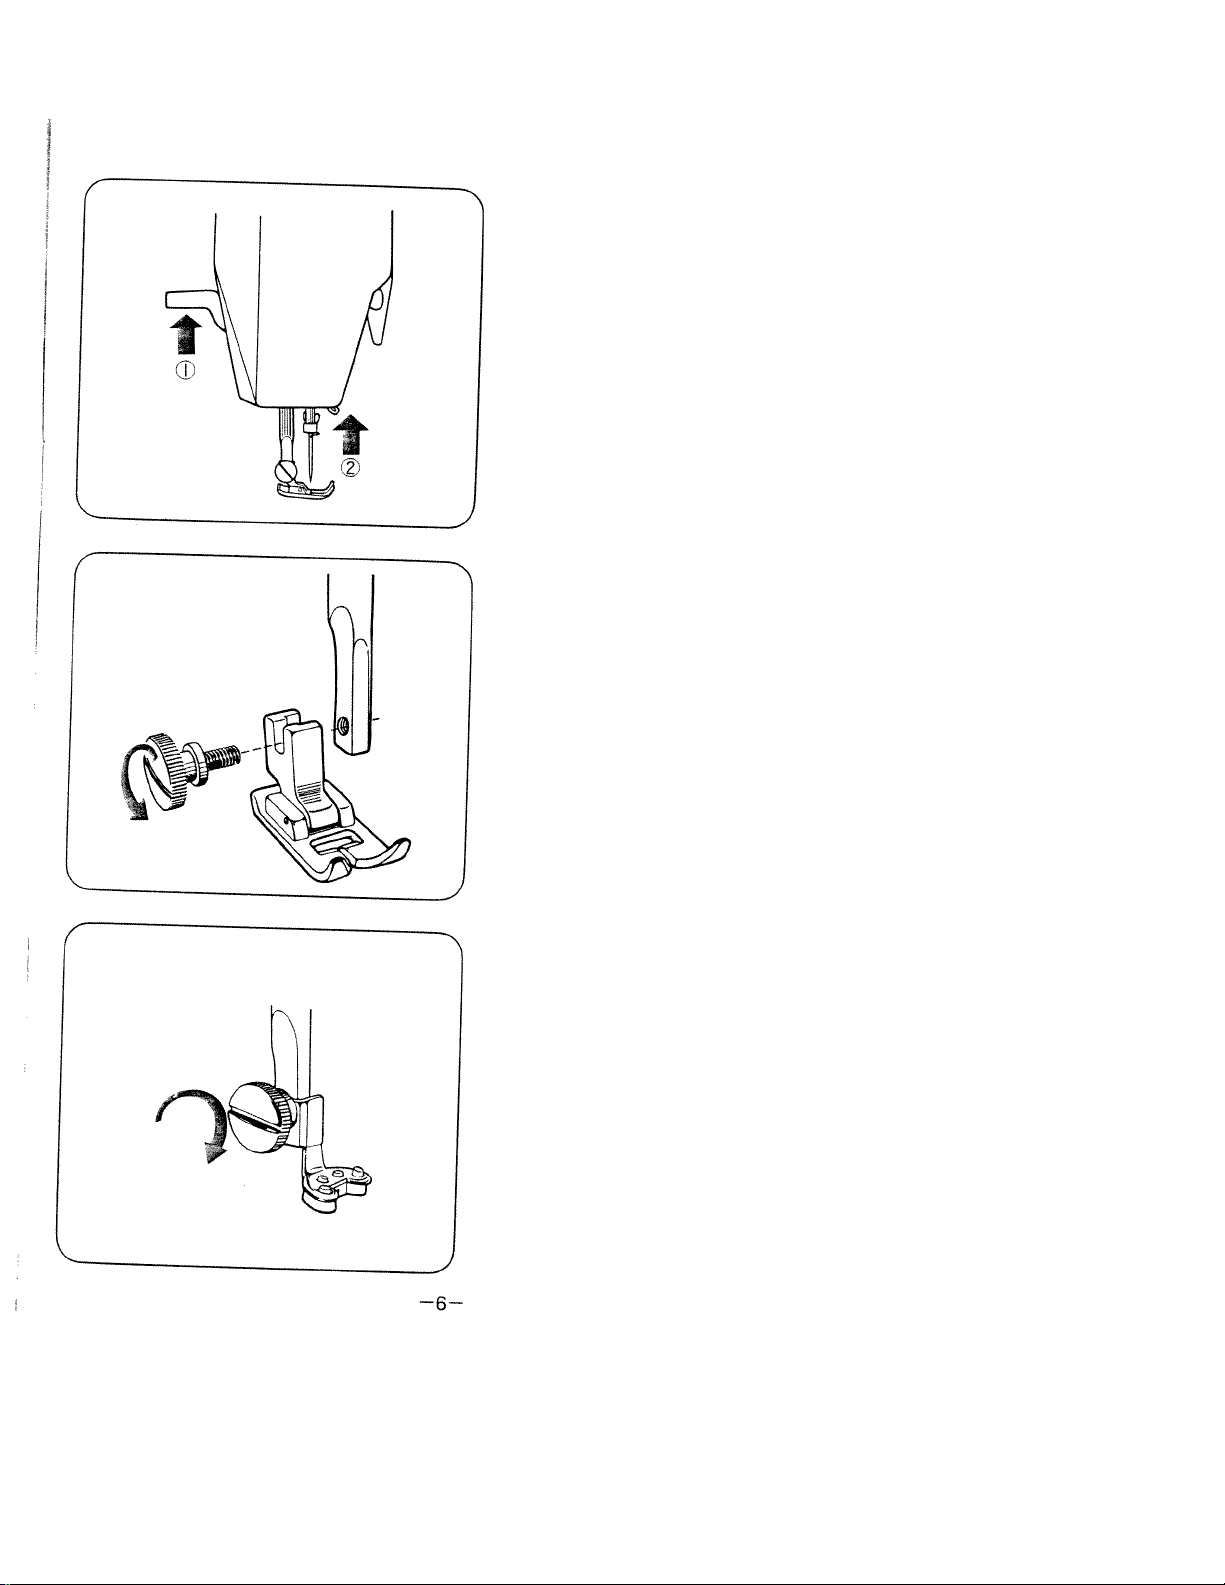
Changing Foot
Raise presser foot lifter © .
Set needle in the highest
position by turning handwheel
towards you (D.
Remove foot by loosening screw
with screwdriver.
Replace new foot and tighten
screw.
Page 10
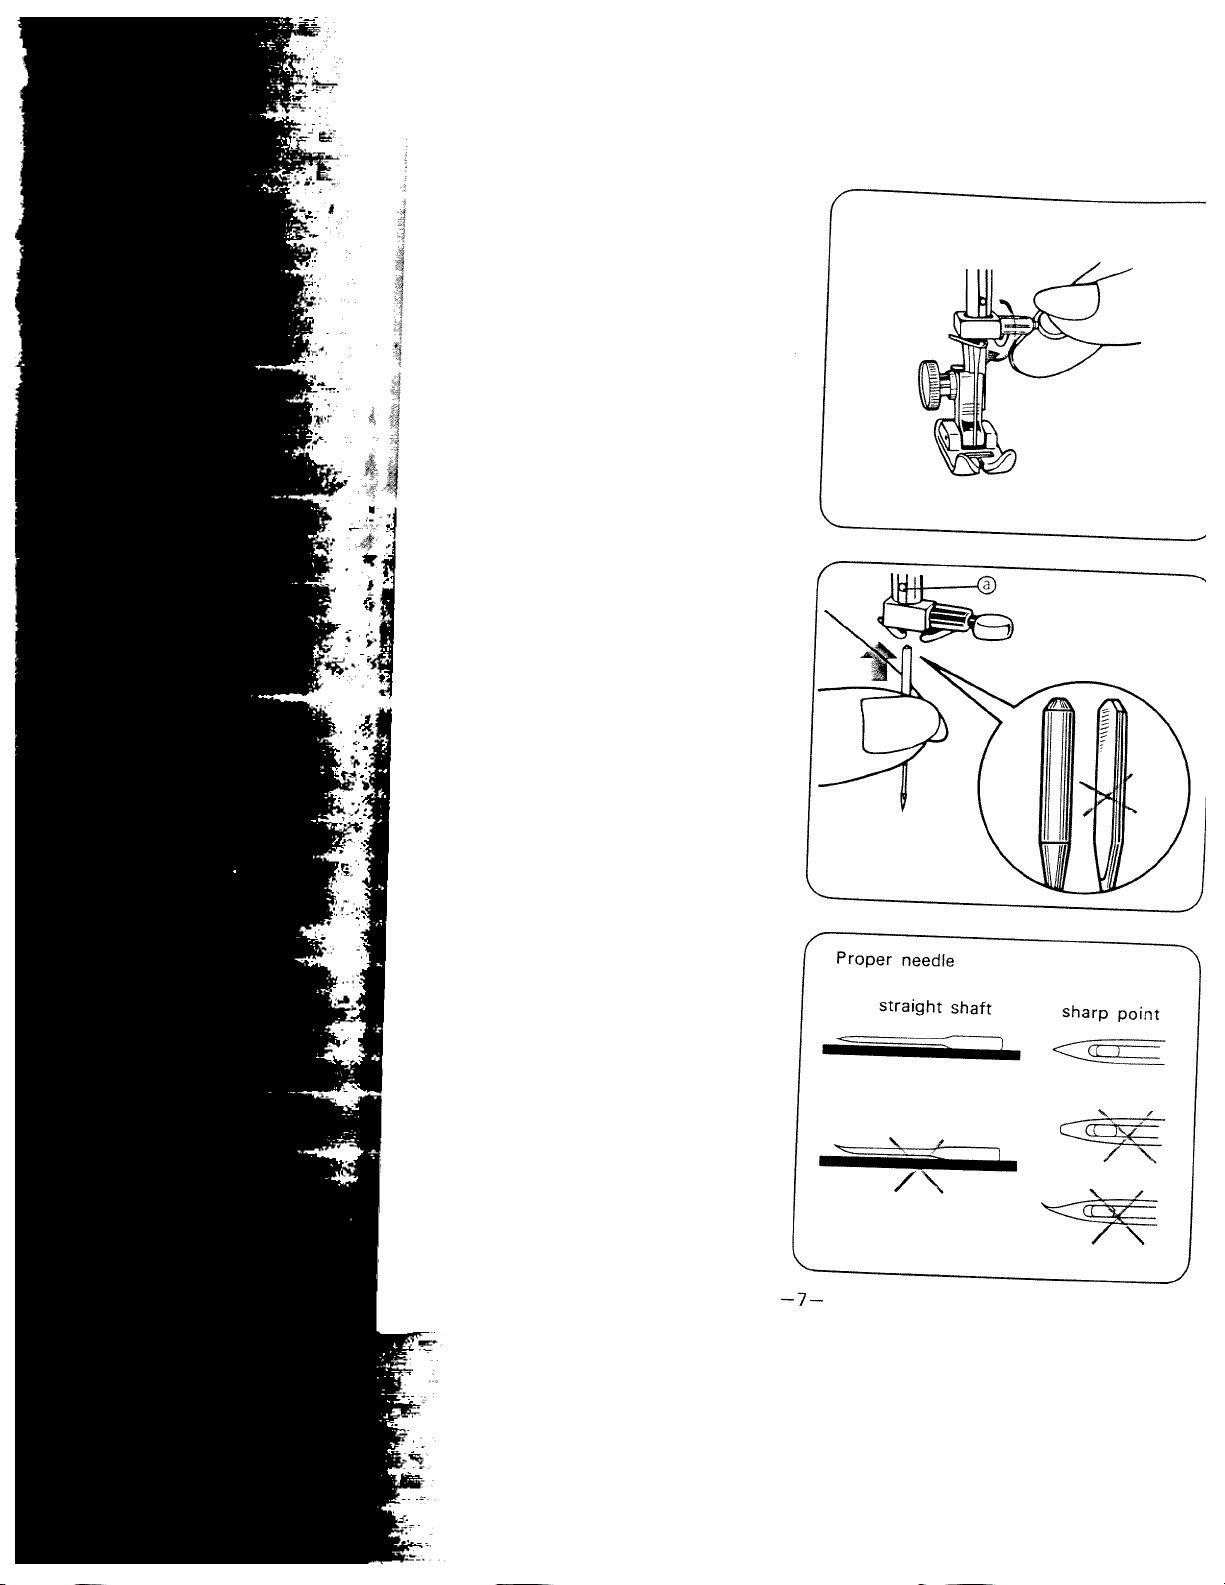
Changing Needle
Set needle in the highest
position by turning handwheel
towards you.
Loosen needle clamp screw and
take out needle.
With flat face away from you,
insert a new needle into groove
of needle bar.
Push needle until it reaches
stopper vl" and tighten needle
clamp screw firmly.
Always use a straight needle with
a sharp point.
Using defective or worn needles
not only causes stitch skipping,
breakage of needles or snapping
of thread; it also can damage
hook and needle plate.
Page 11
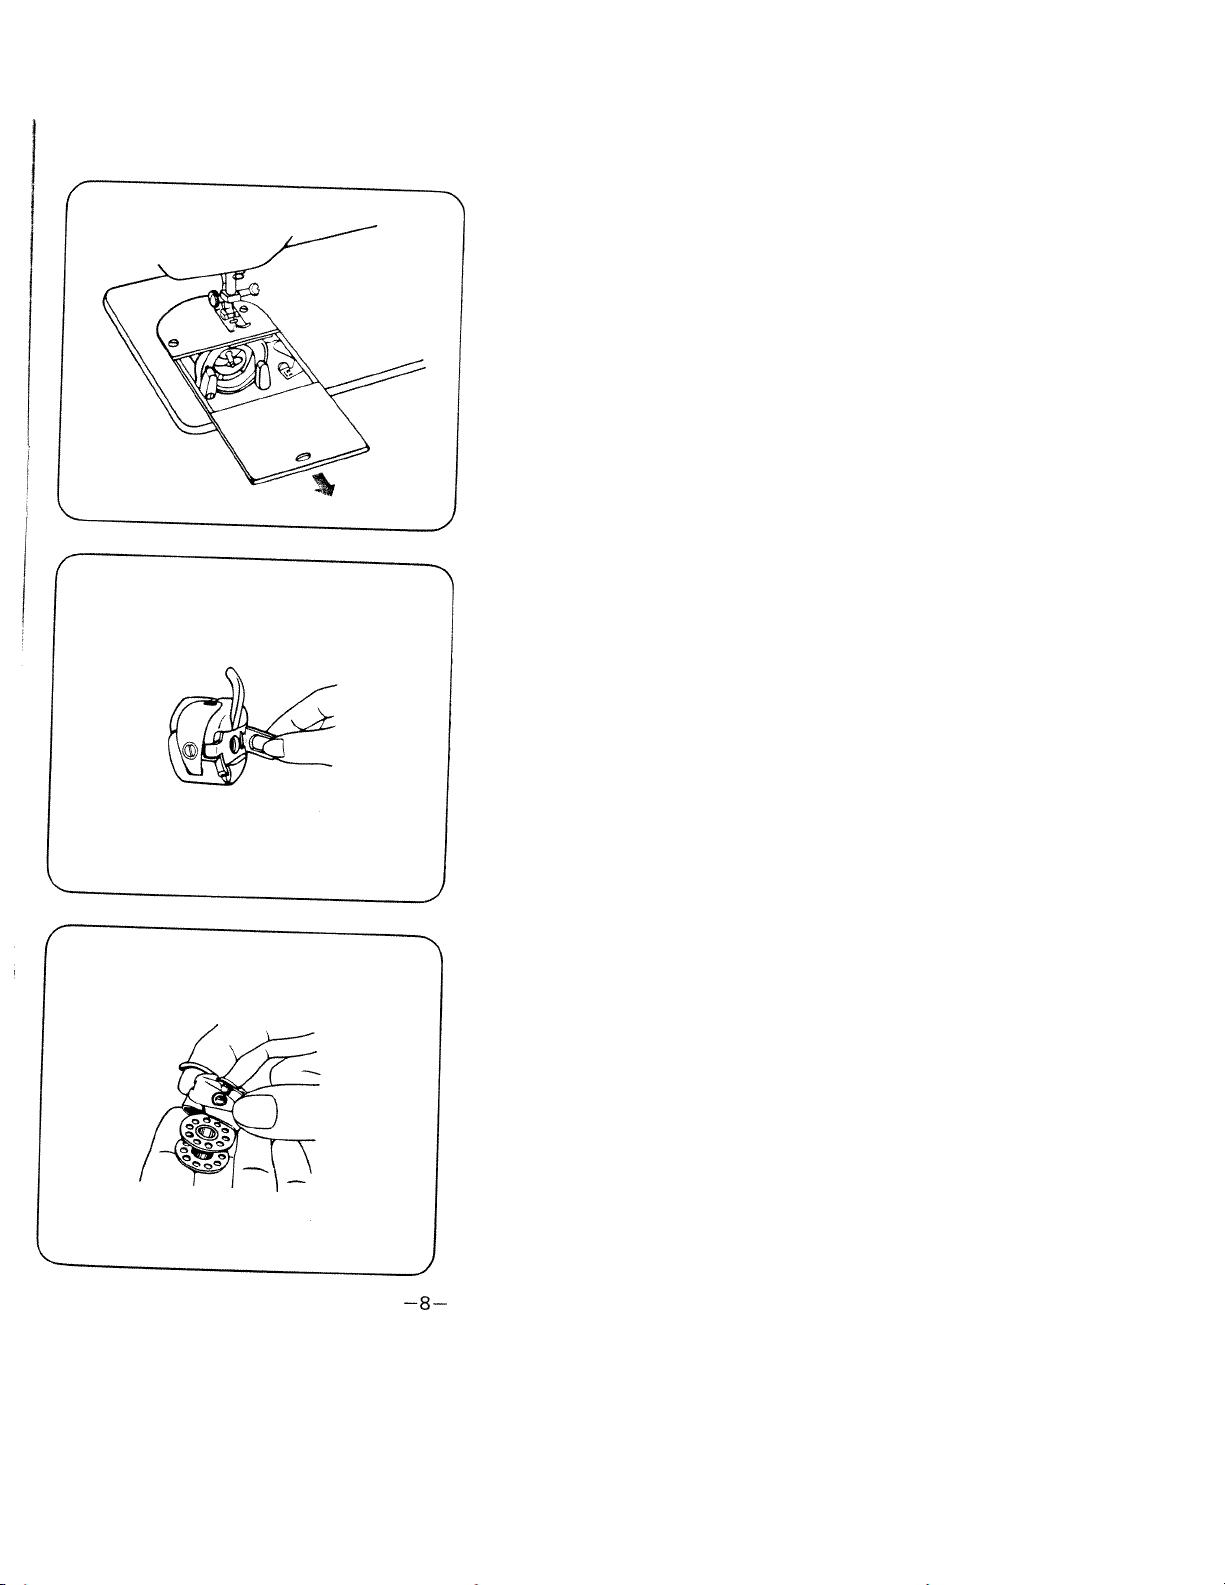
Bobbin Winding
Set needle in the highest
position by turning handwheel
towards you.
Pull slide plate as illustrated.
Open latch of bobbin case and
take it out.
Close latch of bobbin case and
bobbin comes out easily.
Page 12
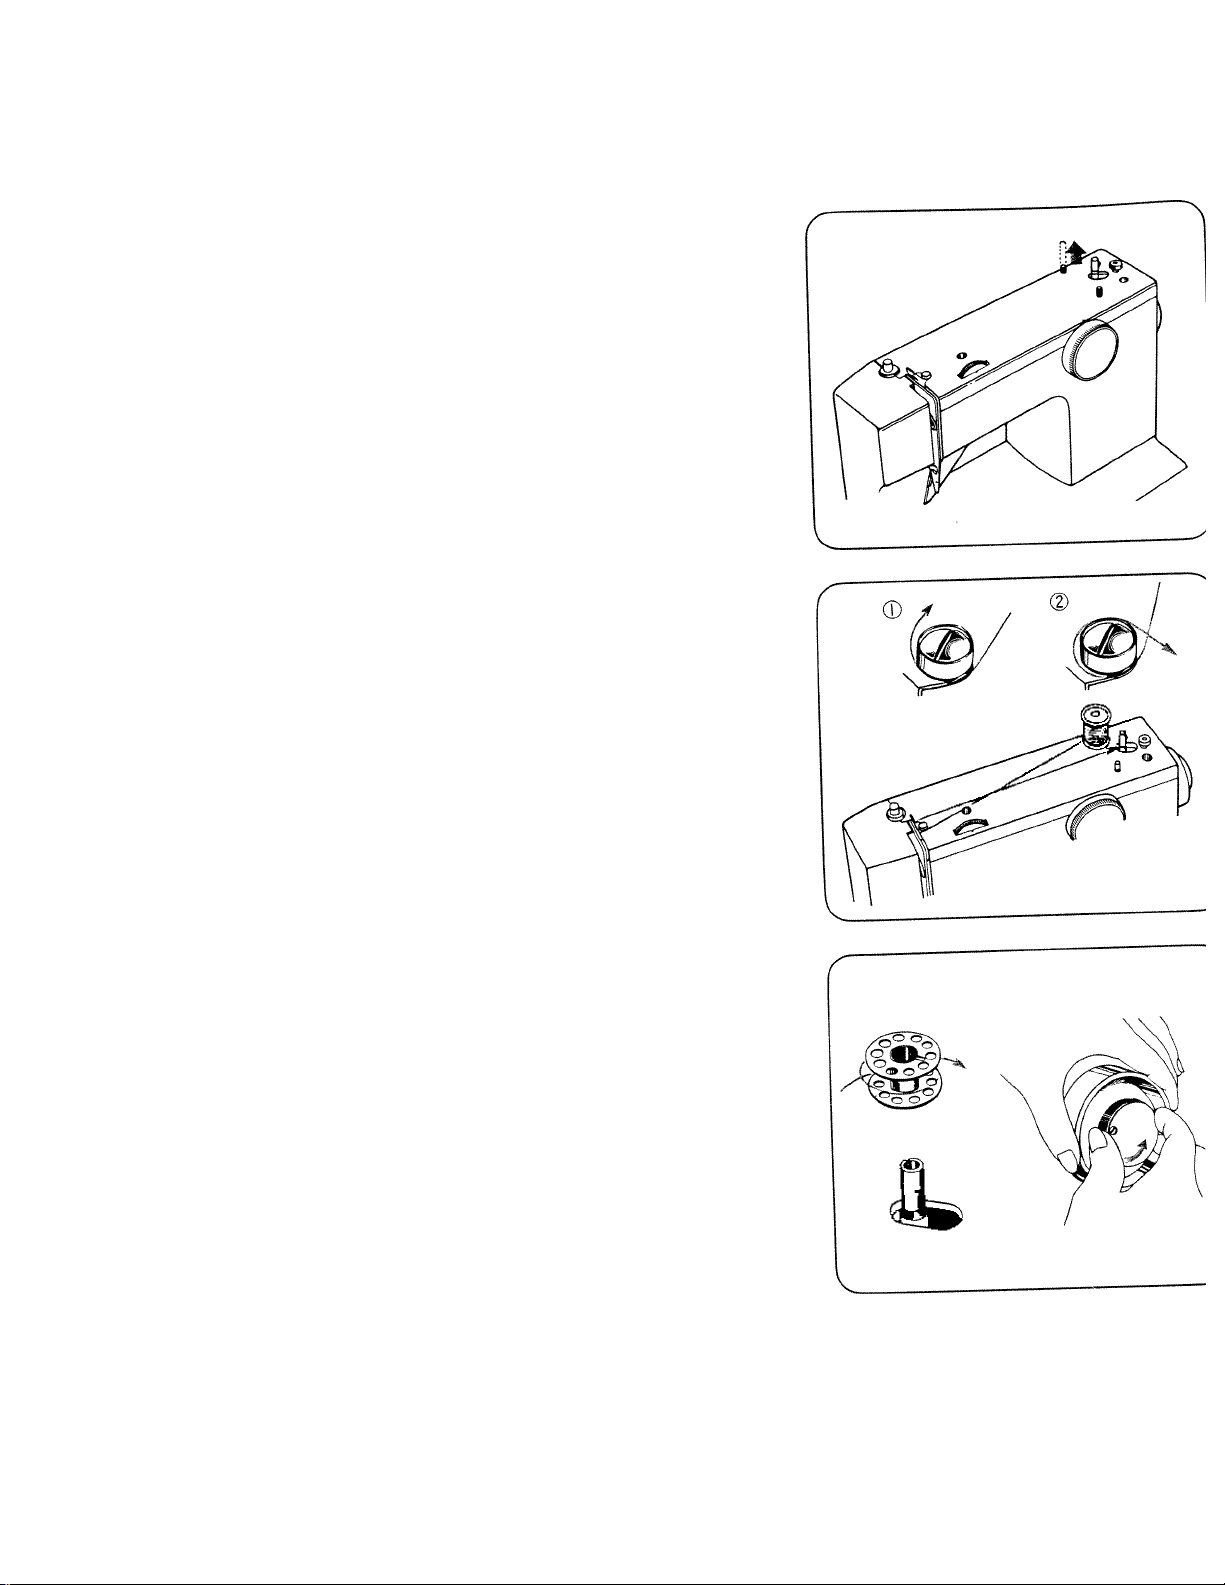
Pull out spool pin.
Put a spool on spool pin.
Draw thread from spool pin
through thread guide and pre
tension device, following numb
ers © (D and
Wind thread clockwise around
bobbin several times.
Push bobbin on to spindle.
Holding handwheel with your left
hand disengage handwheel by
unscrewing stop motion knob.
Page 13
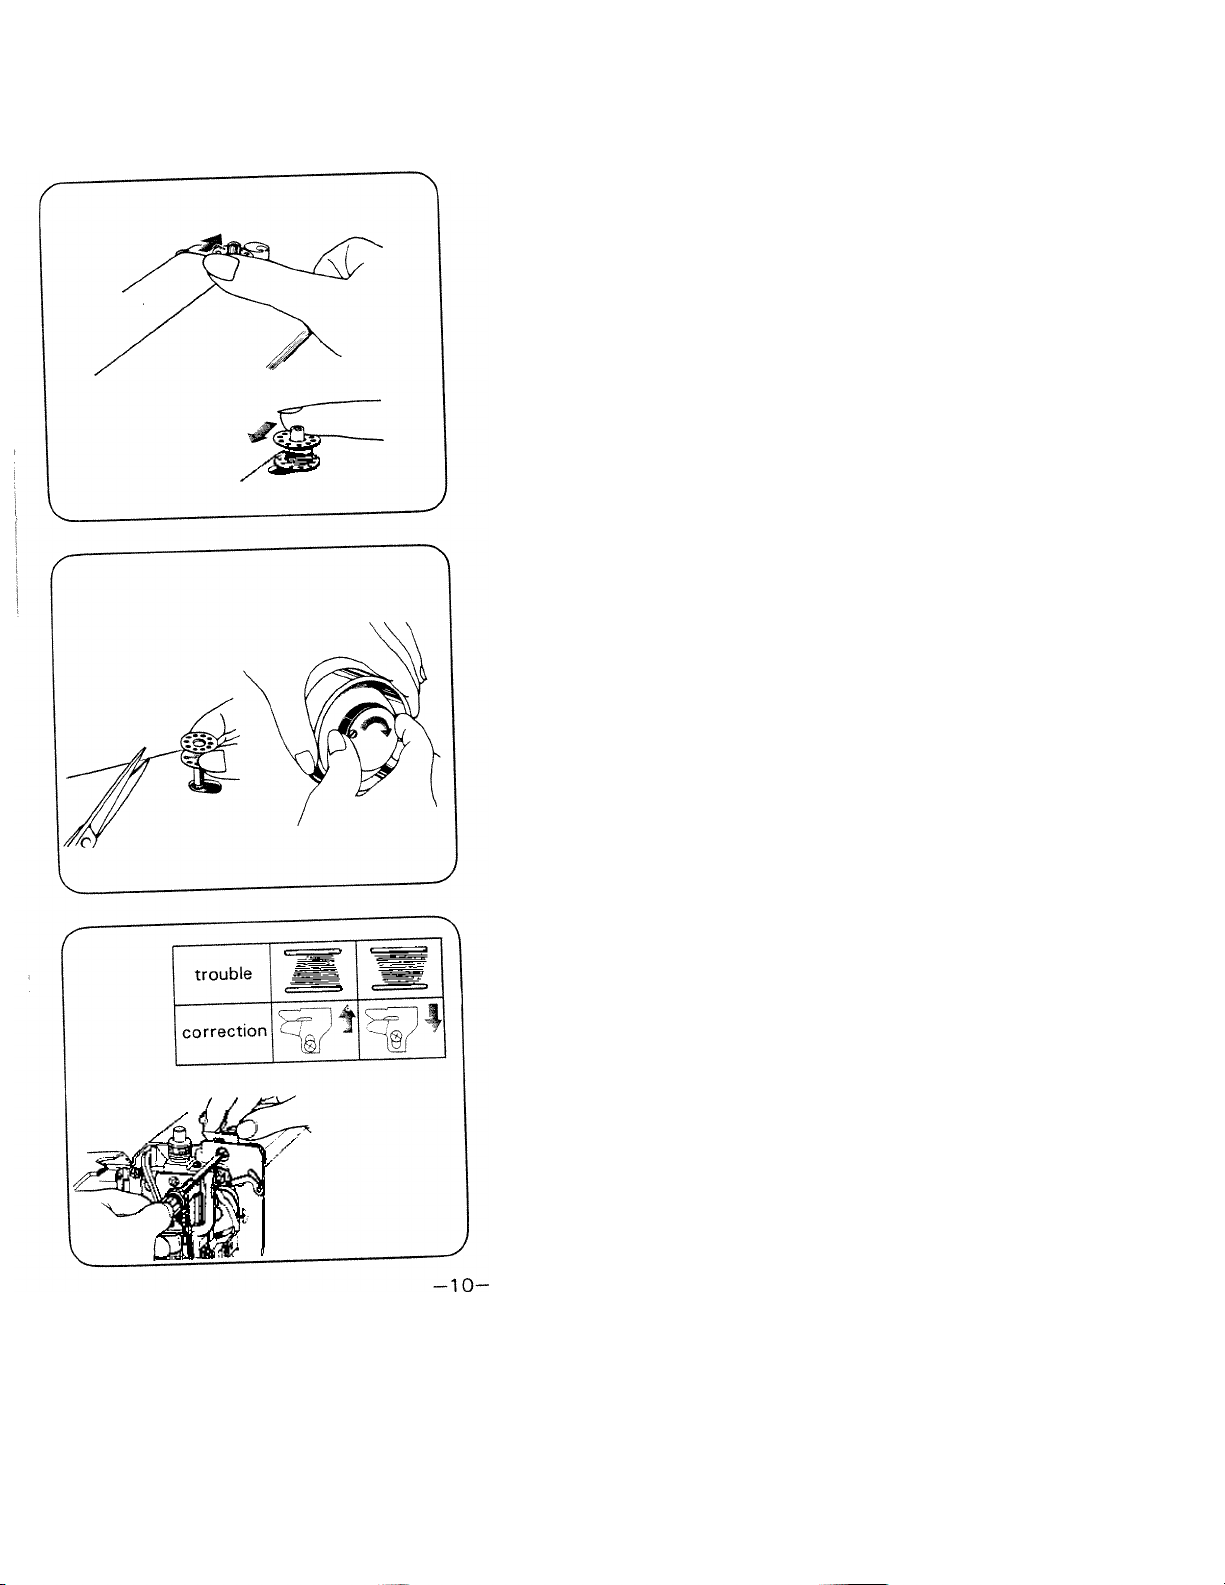
Push bobbin to right and press
down foot controller.
Machine stops automatically
when winding is full.
Push bobbin to left.
Take off bobbin from spindle
and cut thread.
Retighten stop motion knob.
If bobbin is wound unevenly
as shown, open face cover and
loosen set-screw of the guide for
bobbin winding, by using screw
driver and adjust height.
Page 14
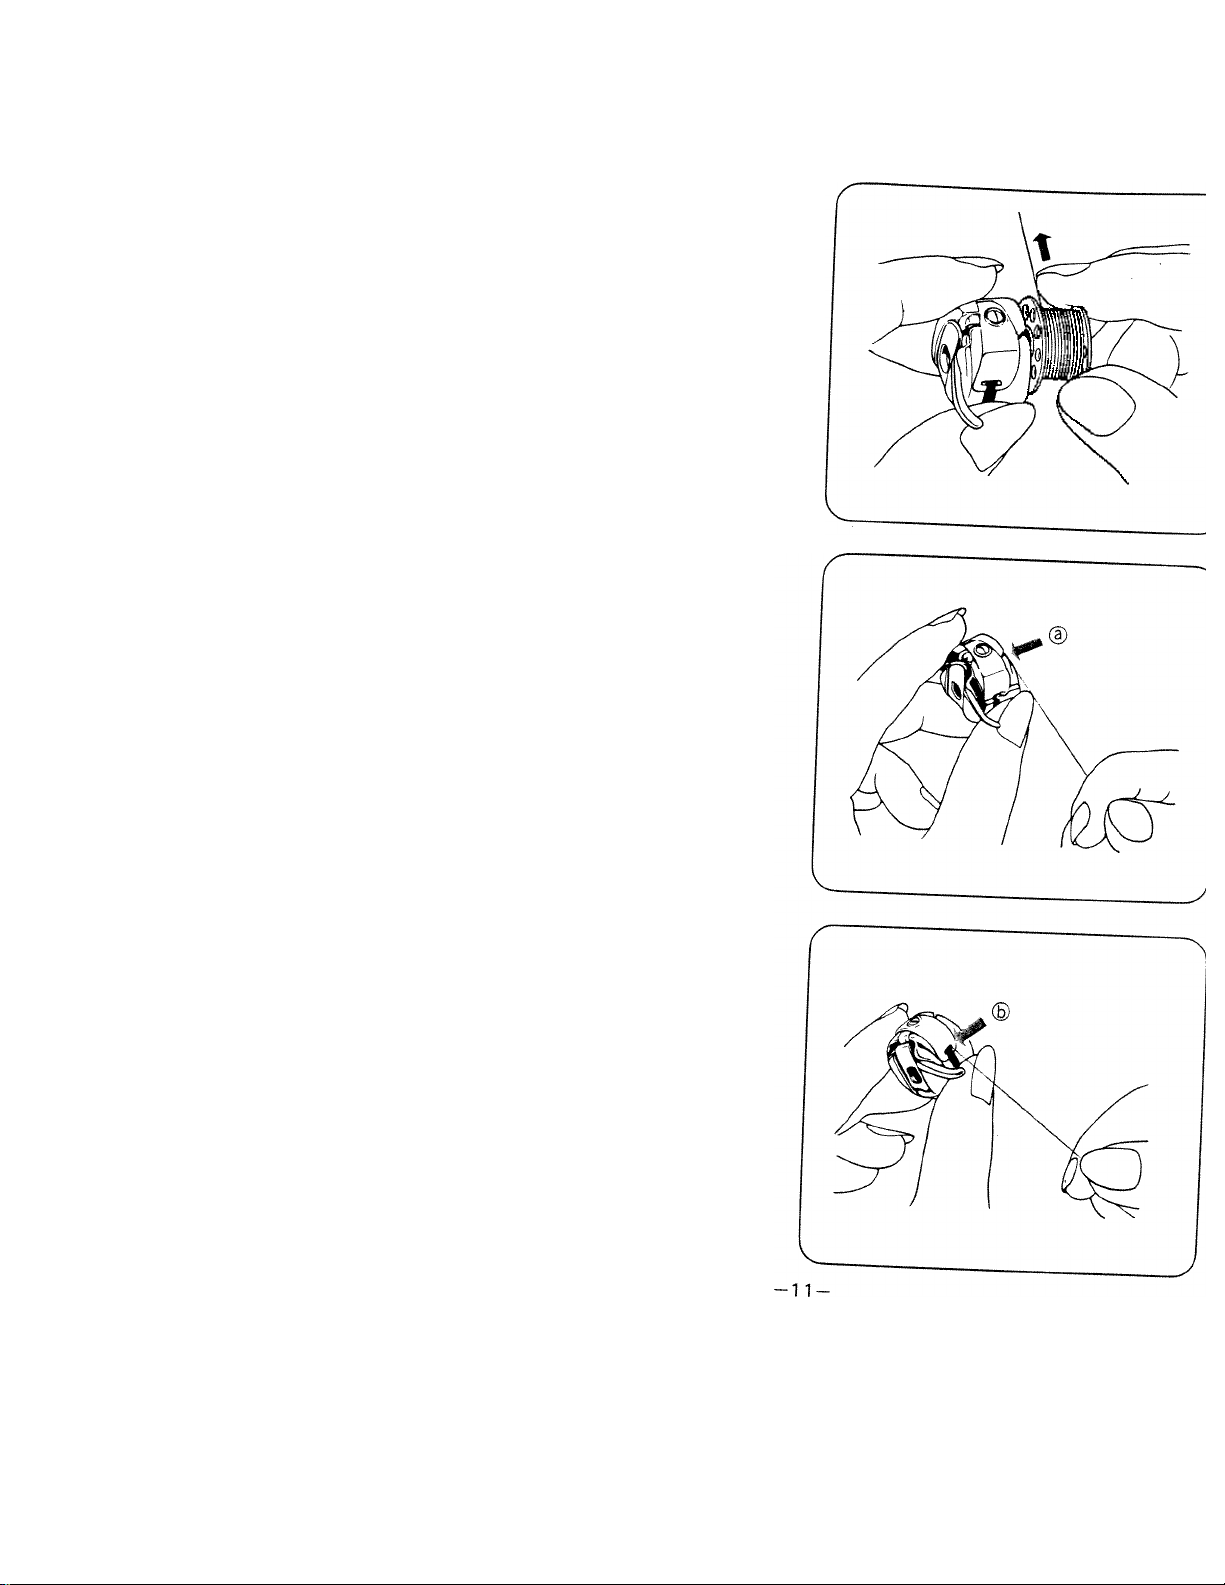
Inserting Bobbin
Place bobbin in its case with
thread running in direction of
arrow.
Guide thread into slot (D of
bobbin case.
Pulling thread to left, bring it
under tension spring then to
delivery eye (b).
Page 15
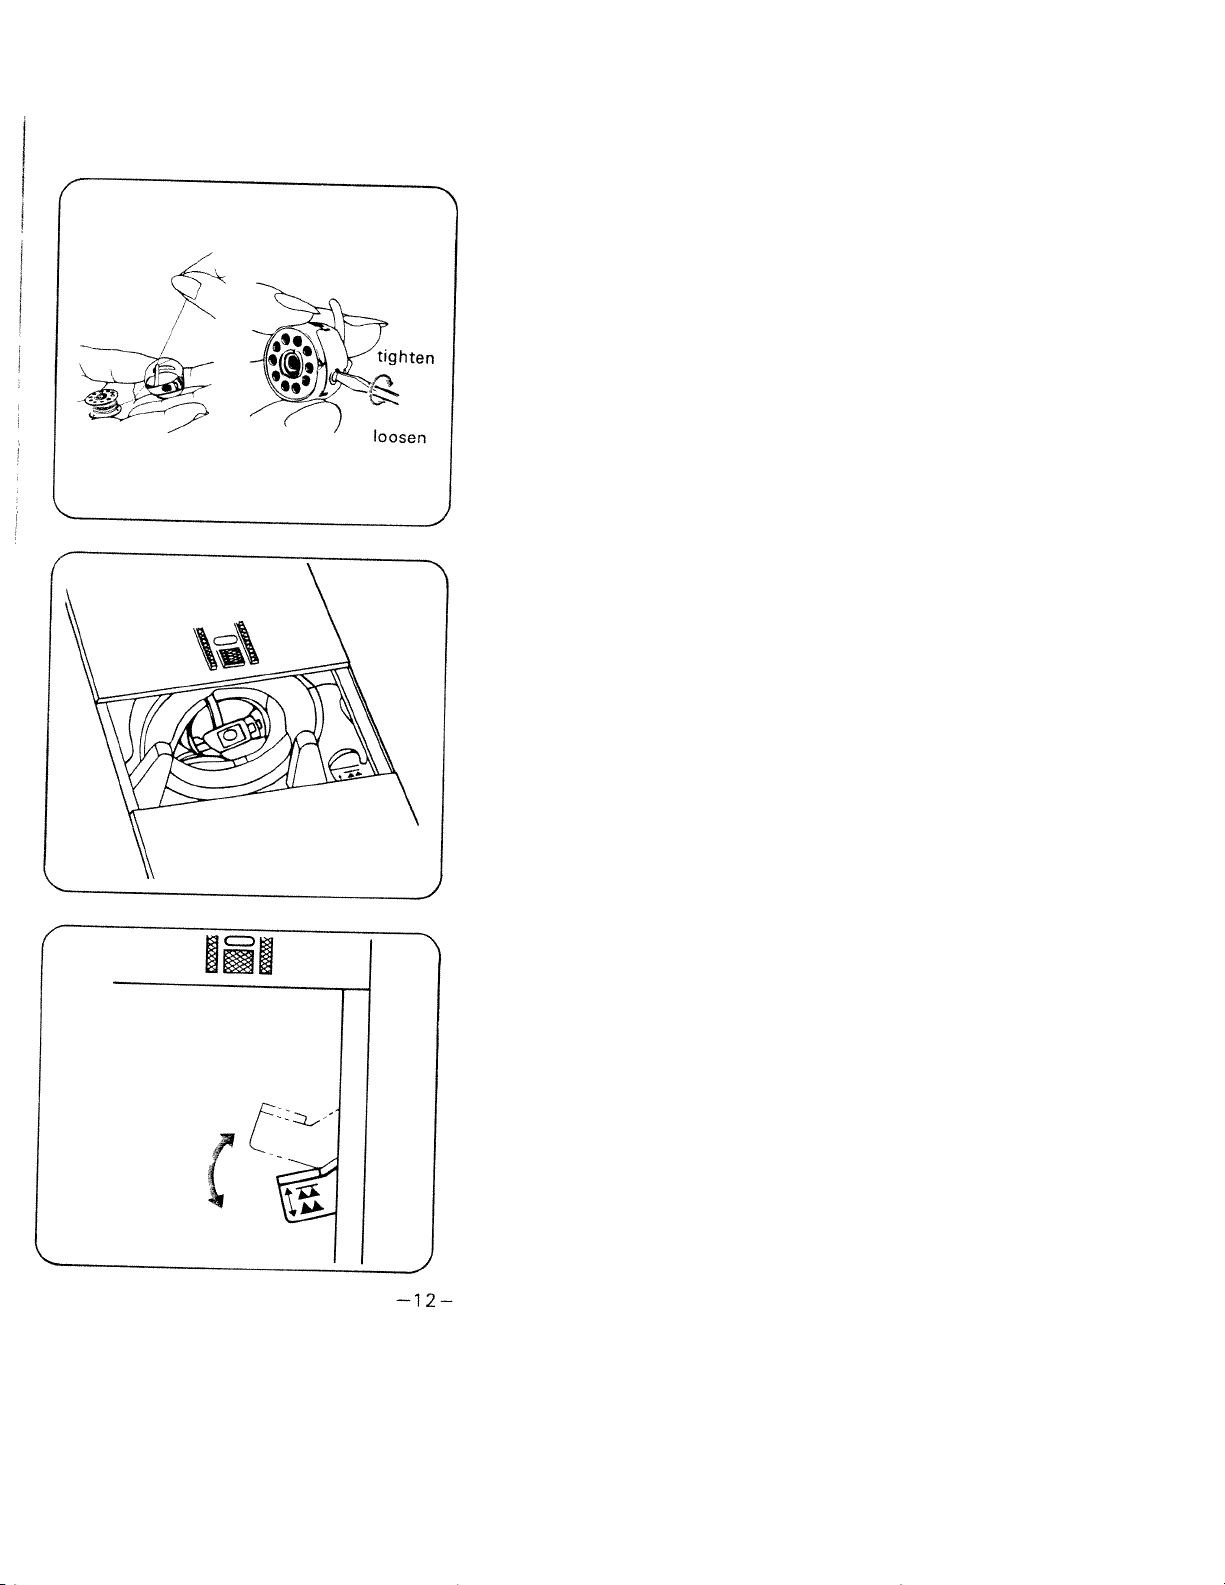
Adjusting Lower Tension
To test bobbin tension, hang and
shake bobbin case as shown.
At proper tension bobbin case
will gradually drop a small
amount.
To adjust tension, turn adjusting
screw with small screwdriver.
Raise needle in the highest
position.
Leave end of thread of about 10
cm (4") from bobbin case.
Take hold of latch and push
bobbin case into hook.
Release latch when bobbin case
is fully inserted.
Drop Feed Lever
The lever is under the slide plate.
To lower feed dog, move lever
1:0 Ü position.
This position is for button sewing
darning and embroidery.
For normal sewing, move lever
to AA position.
Page 16
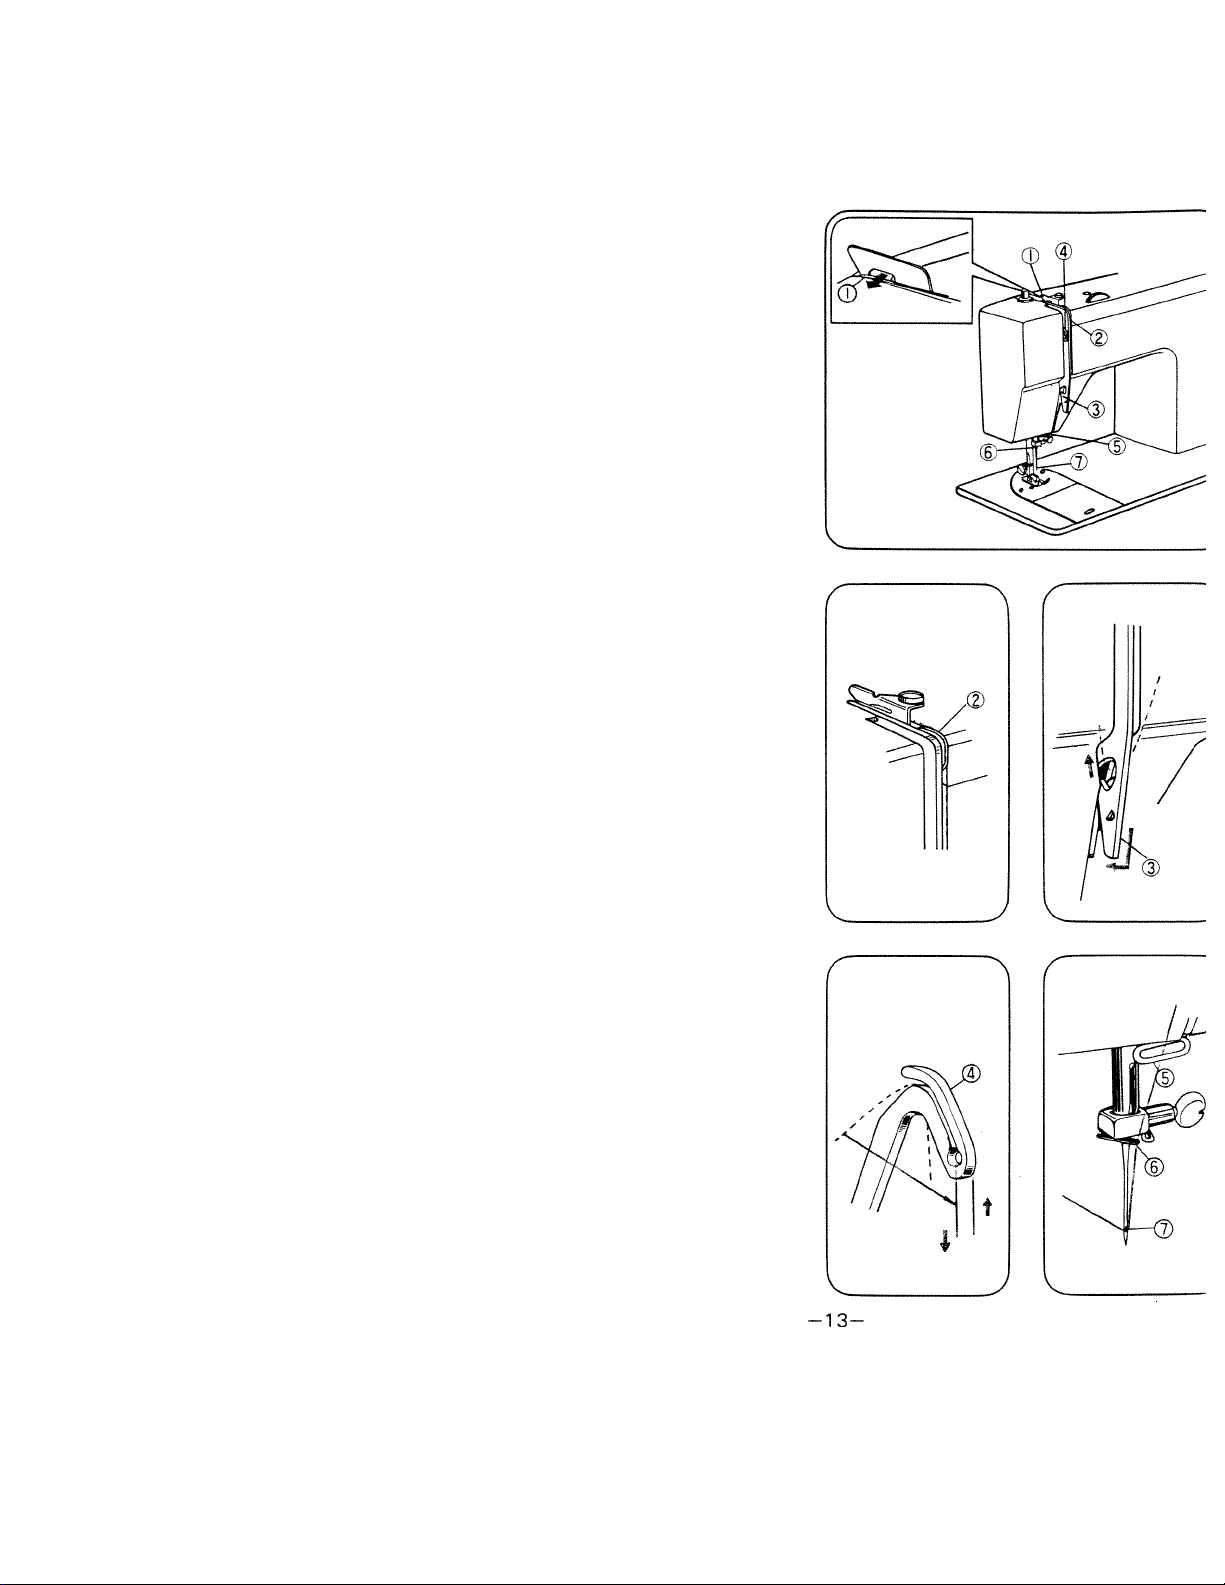
Threading Upper Thread
Raise presser foot lifter.
Raise take-up lever to the highest
position by turning handwheel
towards you.
Thread following numbers ©-©.
Pass thread through guide ©.
Lead thread either side of tension
disc d).
Hook it to guide @ from down to
upwards.
Thread take-up lever @.
Pass thread to guide (5) from right
to left, and guide © (left one)
then needle eye ©.
Leave end of thread of about 1 5
cm (6").
Page 17
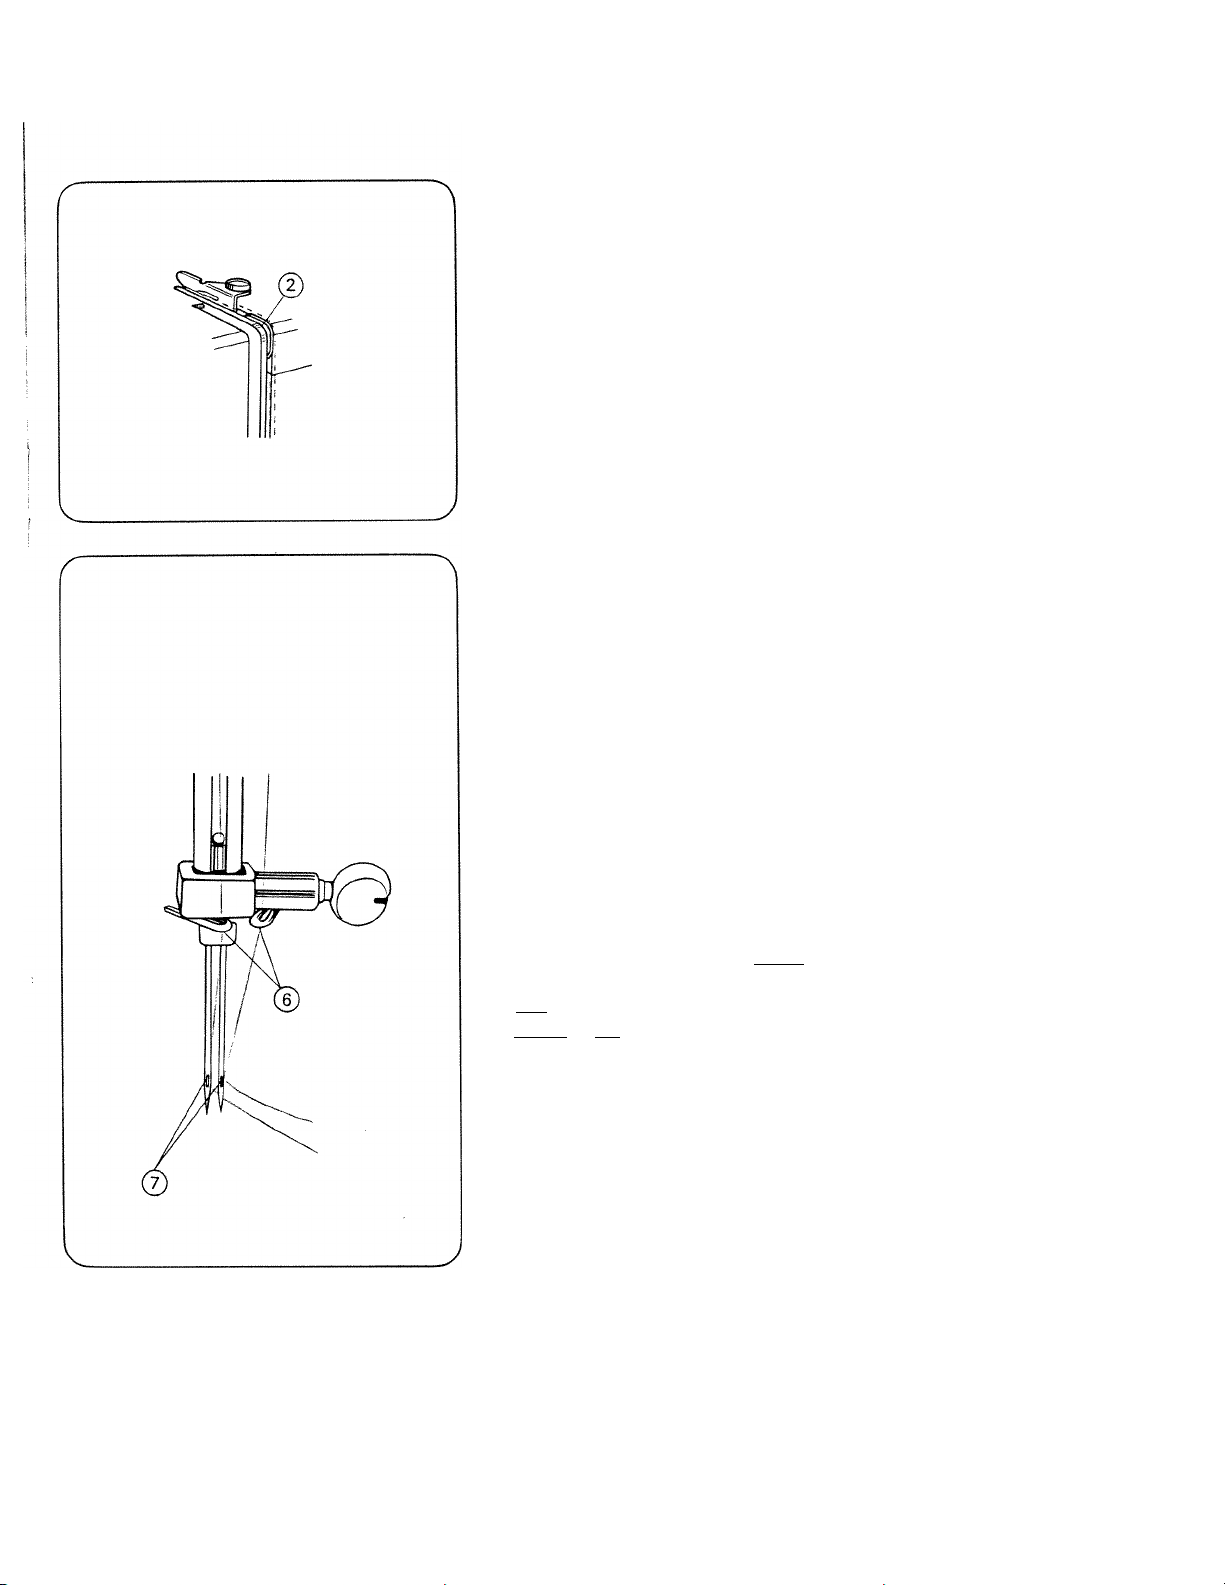
Twin Needle Threading
Thread in the same way as
normal threading, except at
points (D, ® and ®.
At point (2), pass threads sepa-
ratly to right and left of tension
disc.
At guide ®, pass one of threads
to right guide and the other at
left guide.
At point thread from right
guide should be lead to right
needle eye, and from left guide
to left needle eye.
-14-
Leave ends of threads of about
1 5 cm (6").
When using twin needle sewing
be sure zigzag width control
setting between 0 and 2.5, and
needle postion control at( • ).
If zigzag width control above 2.5
and needle postion control at
(* ) or ( •)will cause needle
break.
Page 18
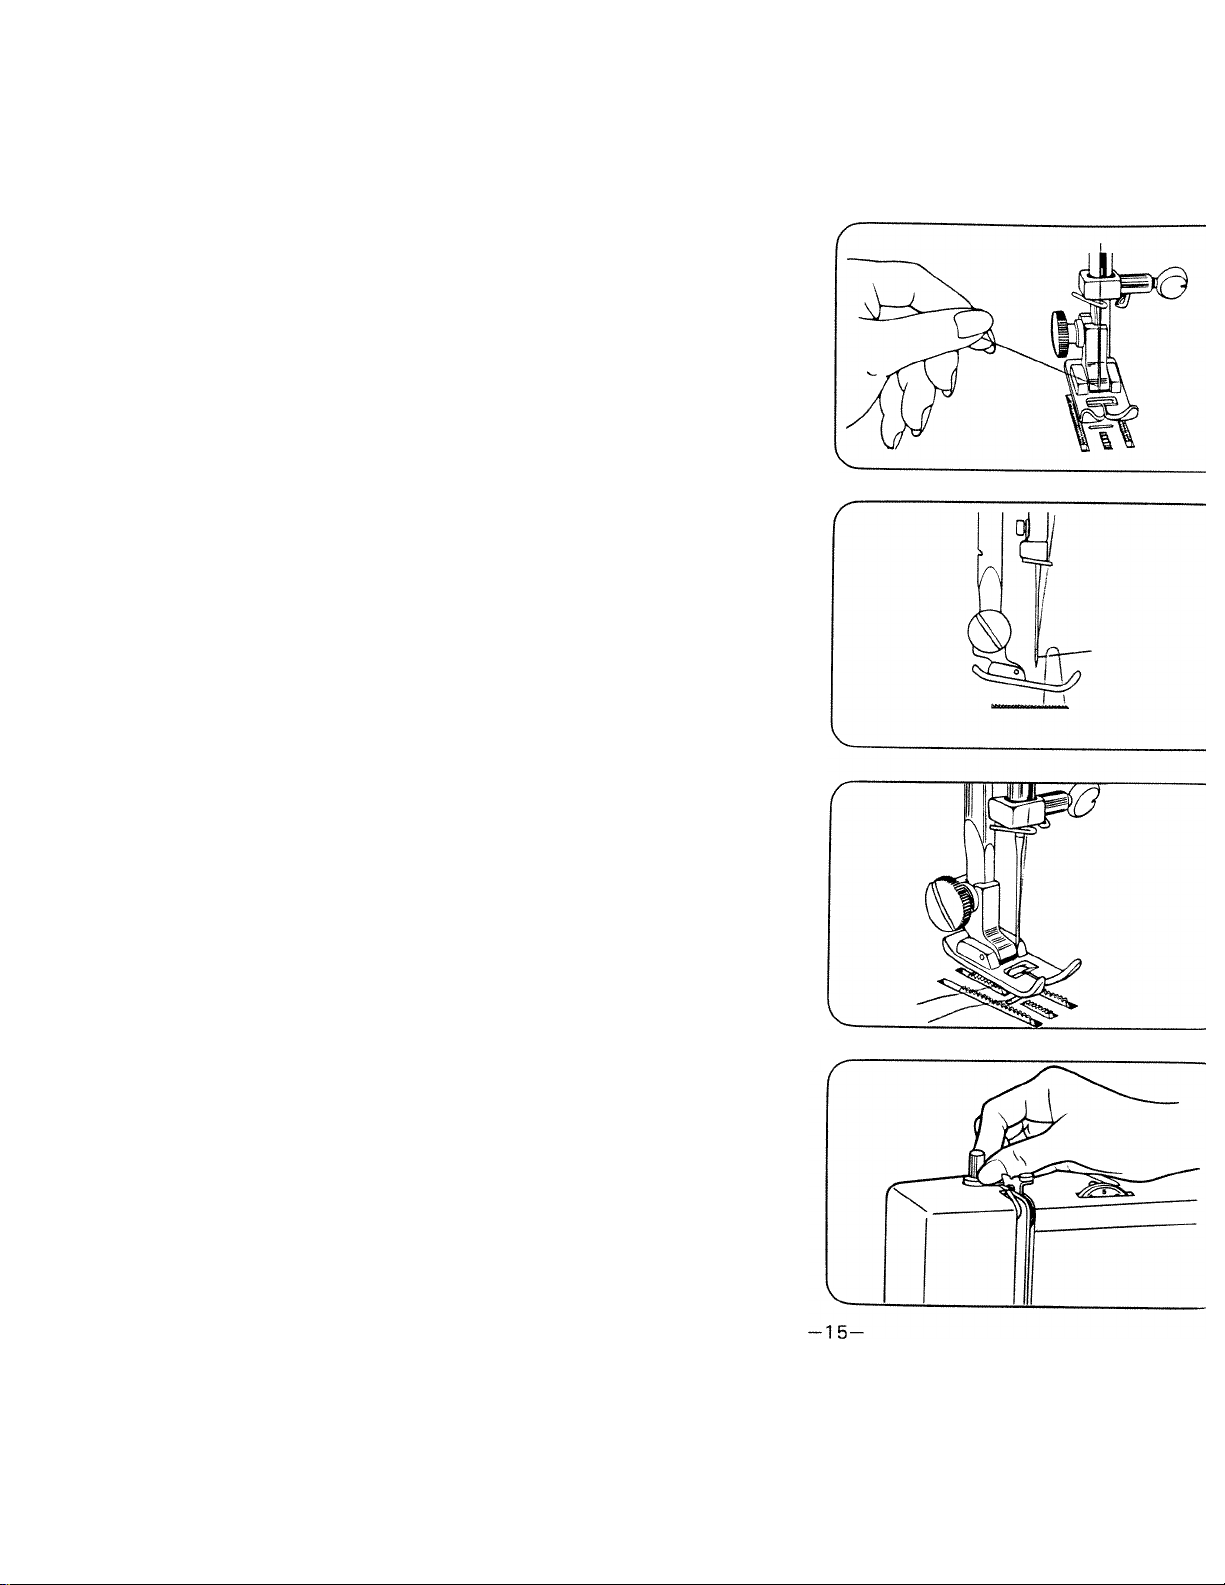
Drawing Up Lower Thread
Hold end of upper thread with
left hand.
Turn handwheel slowly towards
you until needle moves down and
up again.
Pull upper thread slowly and
lower thread will be brought up
in a loop.
Pull out both threads to about 15
cm (6”) and place them together
under presser foot on left.
Foot Pressure
Push down the outer ring of the
pressure regulator. This will re
lease the pressure on the presser
foot. To increase the pressure,
push down inner pin until suitable
pressure is obtained.
Insufficient pressure may cause
poor feeding of the fabric, skipped
stitches, or difficulty in guiding
the fabric. If feed dogs or presser
foot marks appear on the fabric,
reduce the pressure.
When sewing multiple thickness
or heavy fabric, reduce the
pressure. Increase pressure when
sewing lighter weight fabrics.
Page 19

Fabric »Thread and Needle Table
FABRIC
VERY SHEER: Lace,
Voile, Chiffon, Net
SHEER; Blouse Crepe,
Lawn, Organdy, Taffeta
LIGHT-WEIGHT; Crepe,
Wool, Brocade, Velvet
MEDIUM; Wool, Silk,
Linen, Velvetten, Pique,
Faille, Terrycloth
HEAVY; Denim, Duck,
Sailcloth
EXTRA HEAVY;
Upholstery, Canvas,
Awning
[KNITS]
LIGHT-WEIGHT; Tricot
Power net
MEDIUM-WEIGHT;
Jersey, Double Knit,
Power Net
HEAVY-WEIGHT; Double
knit. Power Net
FAKE-FURS, VELOURS
[LEATHER]
VINYLS FILMS
LIGHT-TO-MEDIUM-
WEIGHT
HEAVY LEATHER
[DECORATIVE TOUCHES]
TOP STITCHING
MACHINE EMBROIDERY
European
Cotton
70
50-70
30
30
30
30
50-70
30
30
30
30
30
30
Silk twist
Size 50—70
THREAD
Mercerized
Cotton
60
60
50
50
Duty
Heavy
Duty
60
50
50
Heavy
Duty
50
50
Duty
Cotton
Covered
Polyester,
Silk, Nylon
Rilk
Nylon
Silk
Nylon
Silk
Silk
C.C.Poly.
C.C.Poly.
Silk
Nylon
Silk
Nylon
C.C.Poly.
Silk
Nylon
C.C.Poly.
C.C.Poly.
C.C.Poly.
C.C.Poly.
C.C.Poly.
European
705
65-70
65-70
75-80
80-90
100
120
70
70-80
80-90
90-100
90
90-100
100-110
100-110
65-80
NEEDLE
U.S.Size
15x1
9
9
1 1
11-14
16
19
9
9-10
11-14
14-16
14
14-16 Wedge
16-18 Wedge
16-18
9-1 1
Point
Style
Regular
"
Light
Ball
Light
Ball
Medium
to Heavy
Ball
Ball or
Sharp
Wedge
Regular
Regular
REMARKS
Loosen up
per tension
one or two
points
-16-
Page 20
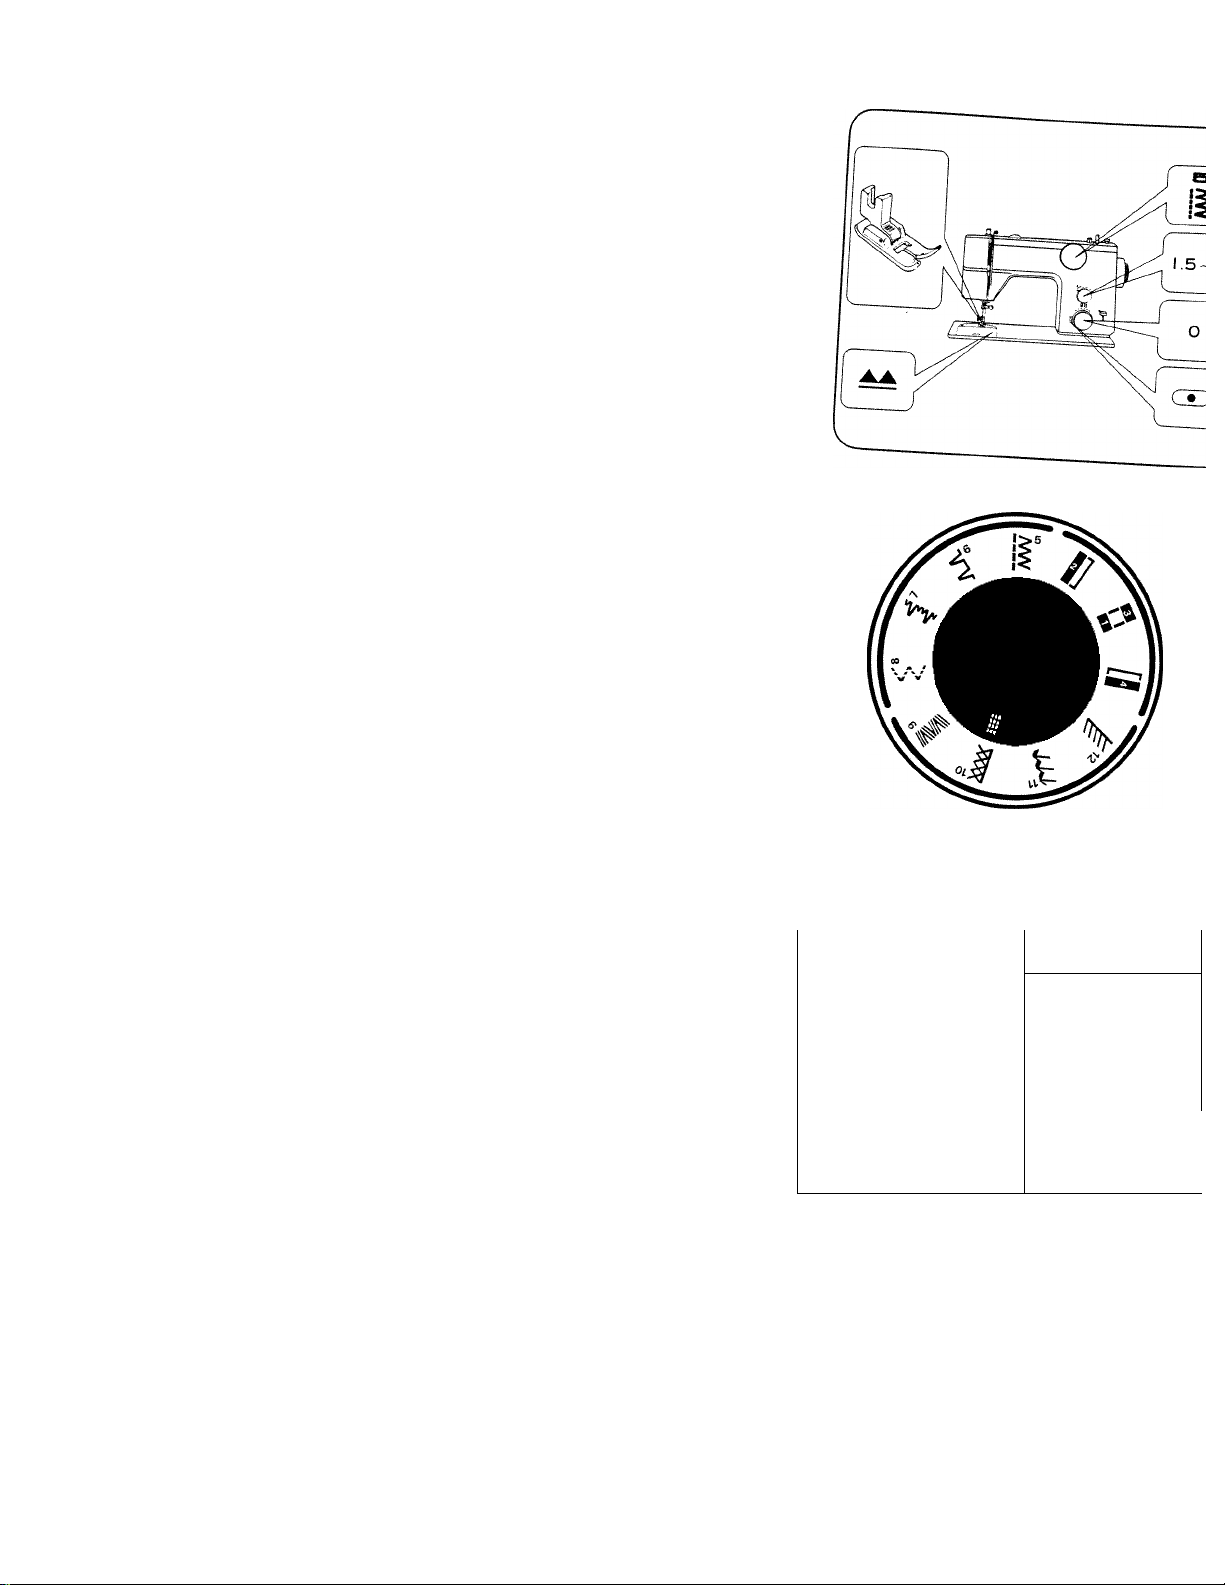
4. STRAIGHT SEWING
Set machine as shown.
Pattern Selection Dial
Turn dial to choose pattern.
! Straight & Zigzag Stitch
6 Blind Hem Stitch
^ Elastic Blind Hem Stitch
8 Multiple Zigzag
9-12 Super Automatic Reverse
Stitches
0 Buttonhole
n.b. Always make Sure needle is
- the highest position when
operating dial.
Stitch length dial
For a longer stitch, turn dial in
clockwise. For a shorter stitch
turn It in counter-clockwise
For normal sewing it is
between 2 and 3
set
'( )
-
-----
V
____
-17-
o i S 3 4
1 ' 1 1
1 1 1
i '> ! ‘
• i ! 1
I t
i ' !
i i 1
1 1 1 1
Page 21
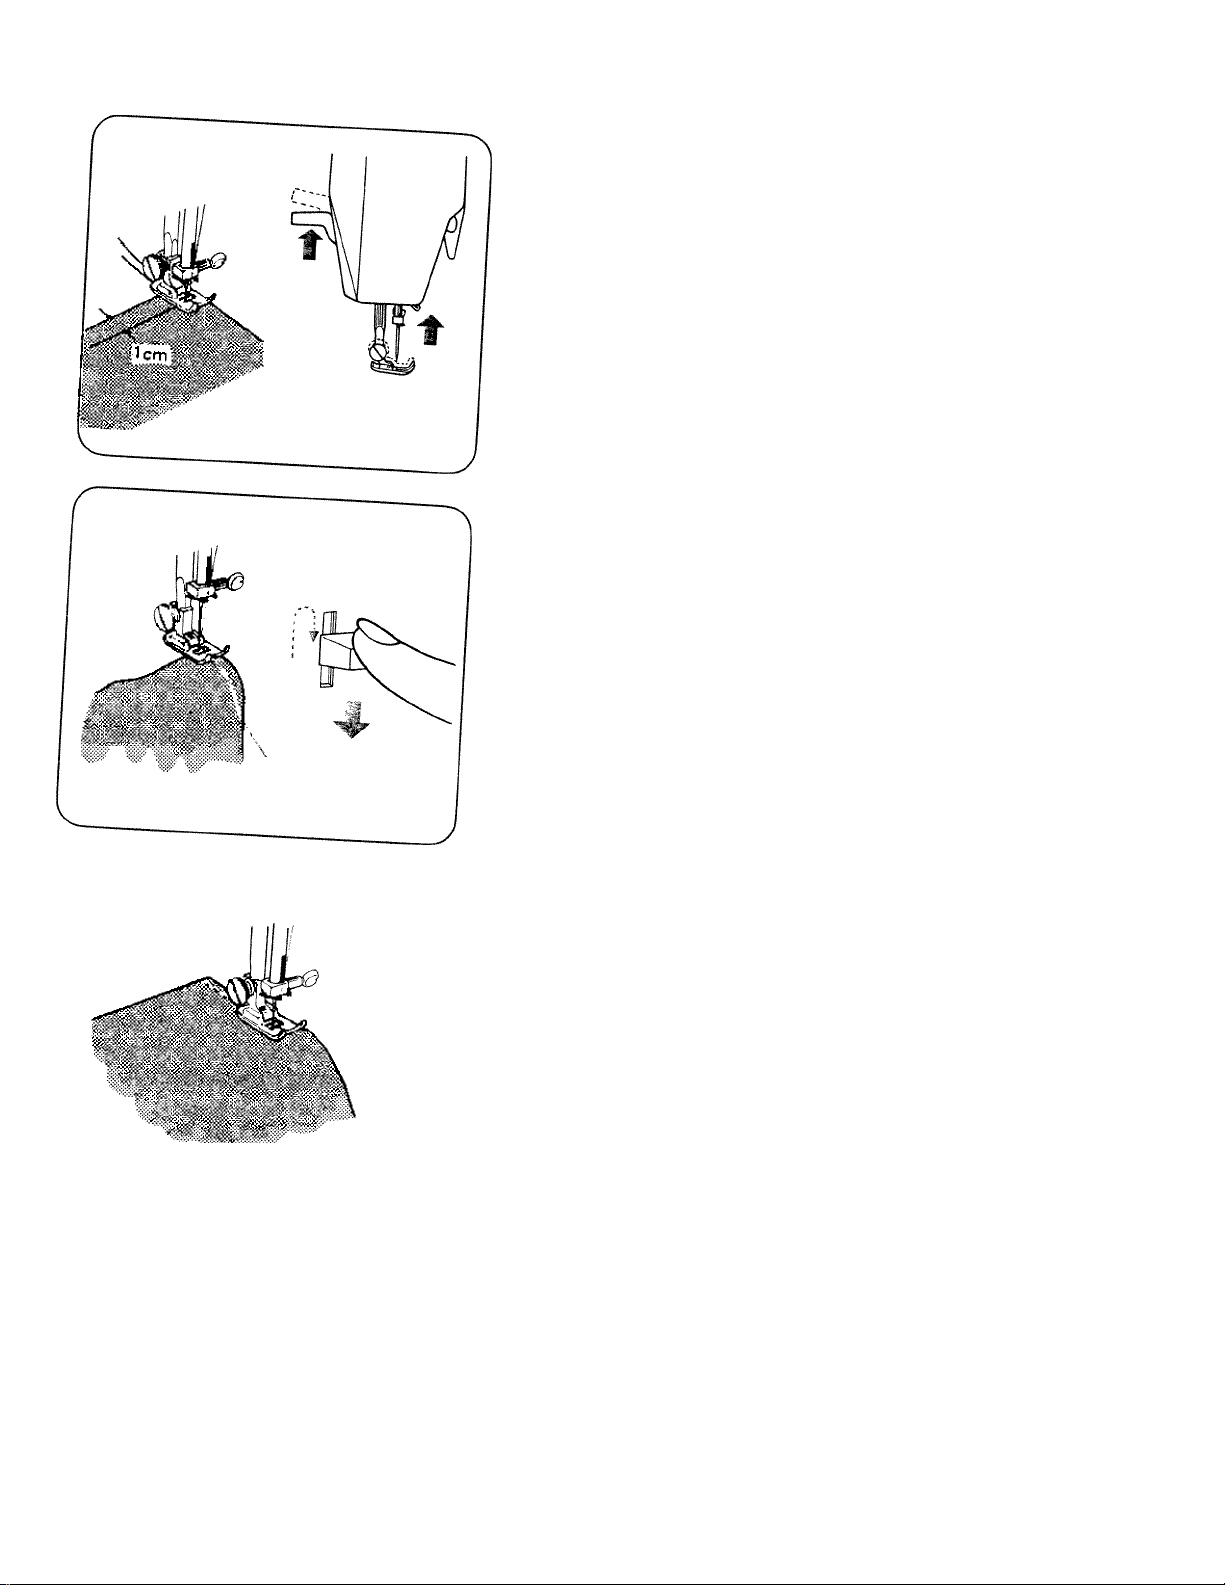
cm (0.4 ) inside the edge.
Lower presser foot lifter.
Double Presser Foot Lifter
In order to obtain wider gap
when using very thick materials,
irmly push presser foot lifter up
as far as it will go.
To reinforce seam, sew back
wards to the edge of fabric by
pushing down reverse sewing
lever.
-18-
Release lever and commence
forward sewing guiding fabric by
nand as it is fed.
Never pull material.
Page 22
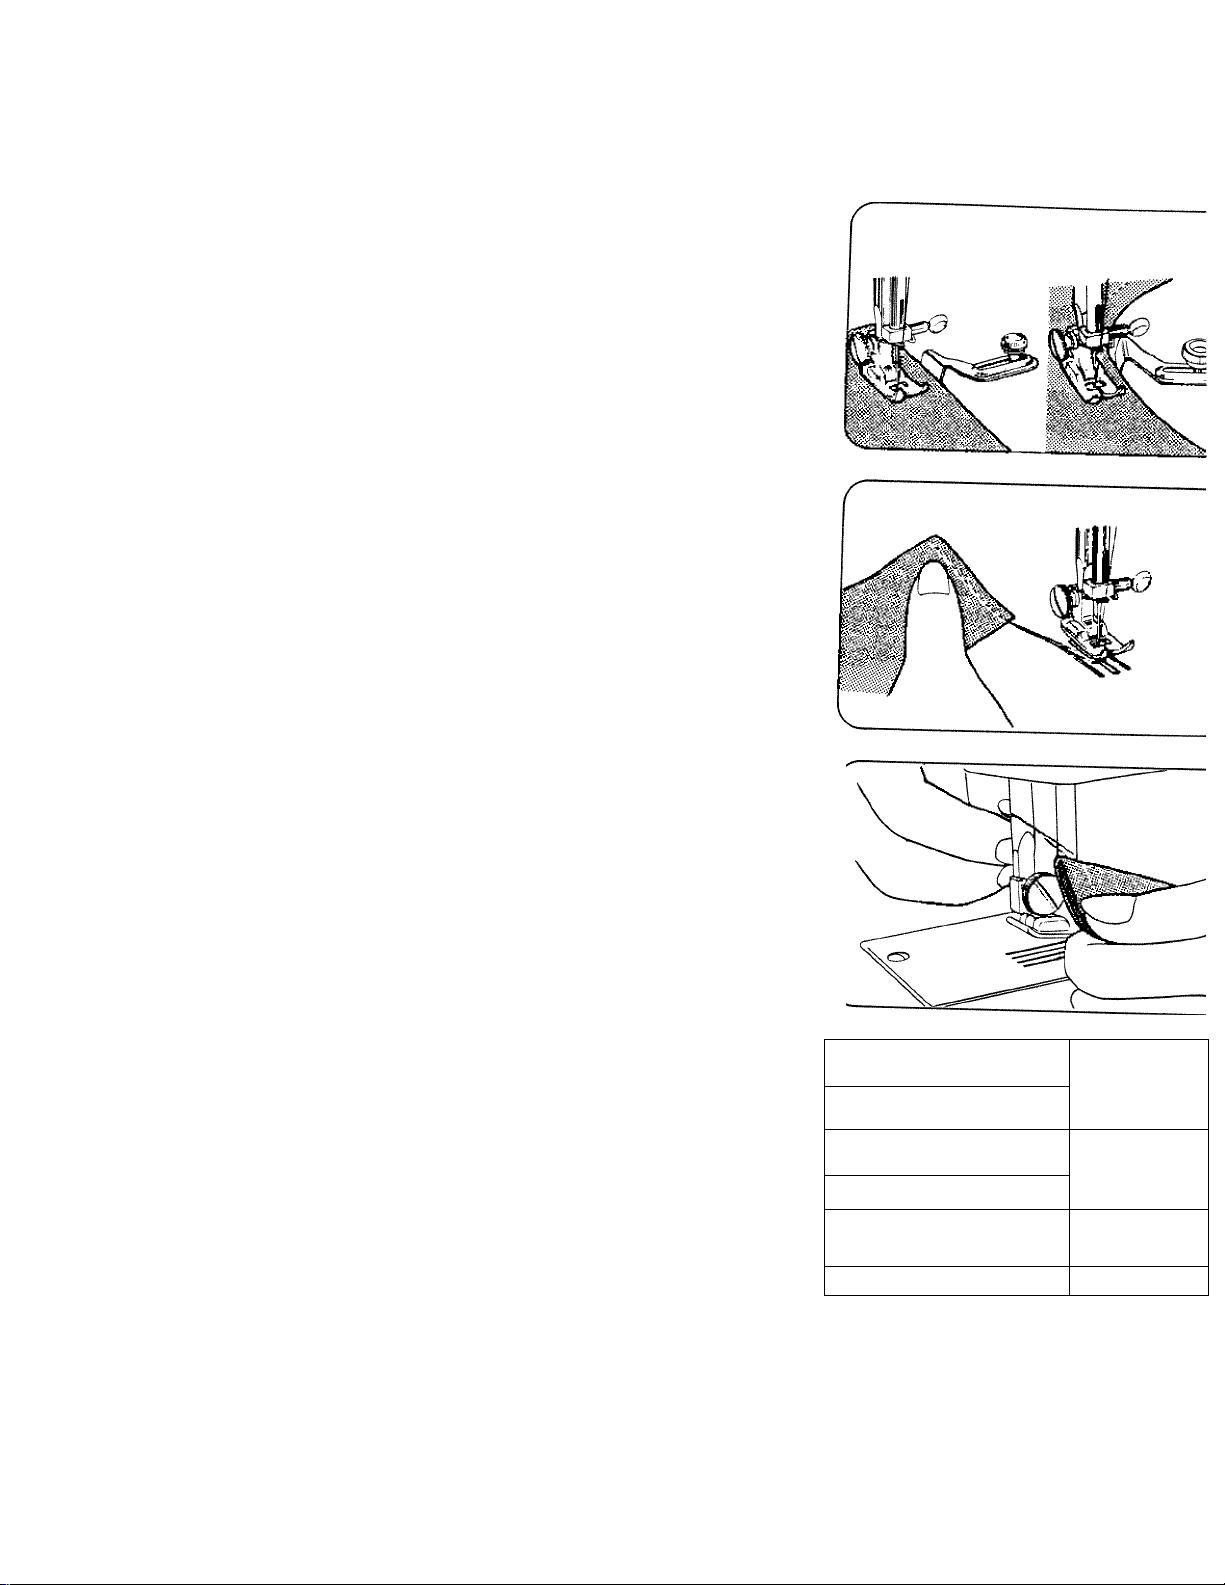
Cloth Guide
Use cloth guide when sewing a
long seam of regular distance
from edge of material.
Set guide in hole on arm, at right
of needle plate, and adjust
distance.
Run machine with edge of fabric
touching guide.
Position cloth guide at an angle
to sew a curved seam.
Sew reverse stitches for rein
forcement at end of seam.
Draw fabric to left when sewing
is finished.
Cut threads with thread cutter
behind presser bar.
Adjusting Thread Tension
Test stitch performance on a
scrap of material you are going
to use.
With correct tension ((D), upper
and lower threads tension is
eflual and strong enough to lock
both threads in center.
If upper tension is too tight
(loose), upper (lower) thread lies
straight along upper (lower)
surface of fabric (®.(Ci). Correct
by turning tension dial.
^
-19-
.......
^
......................
(Î
....................
© ”..............
Page 23
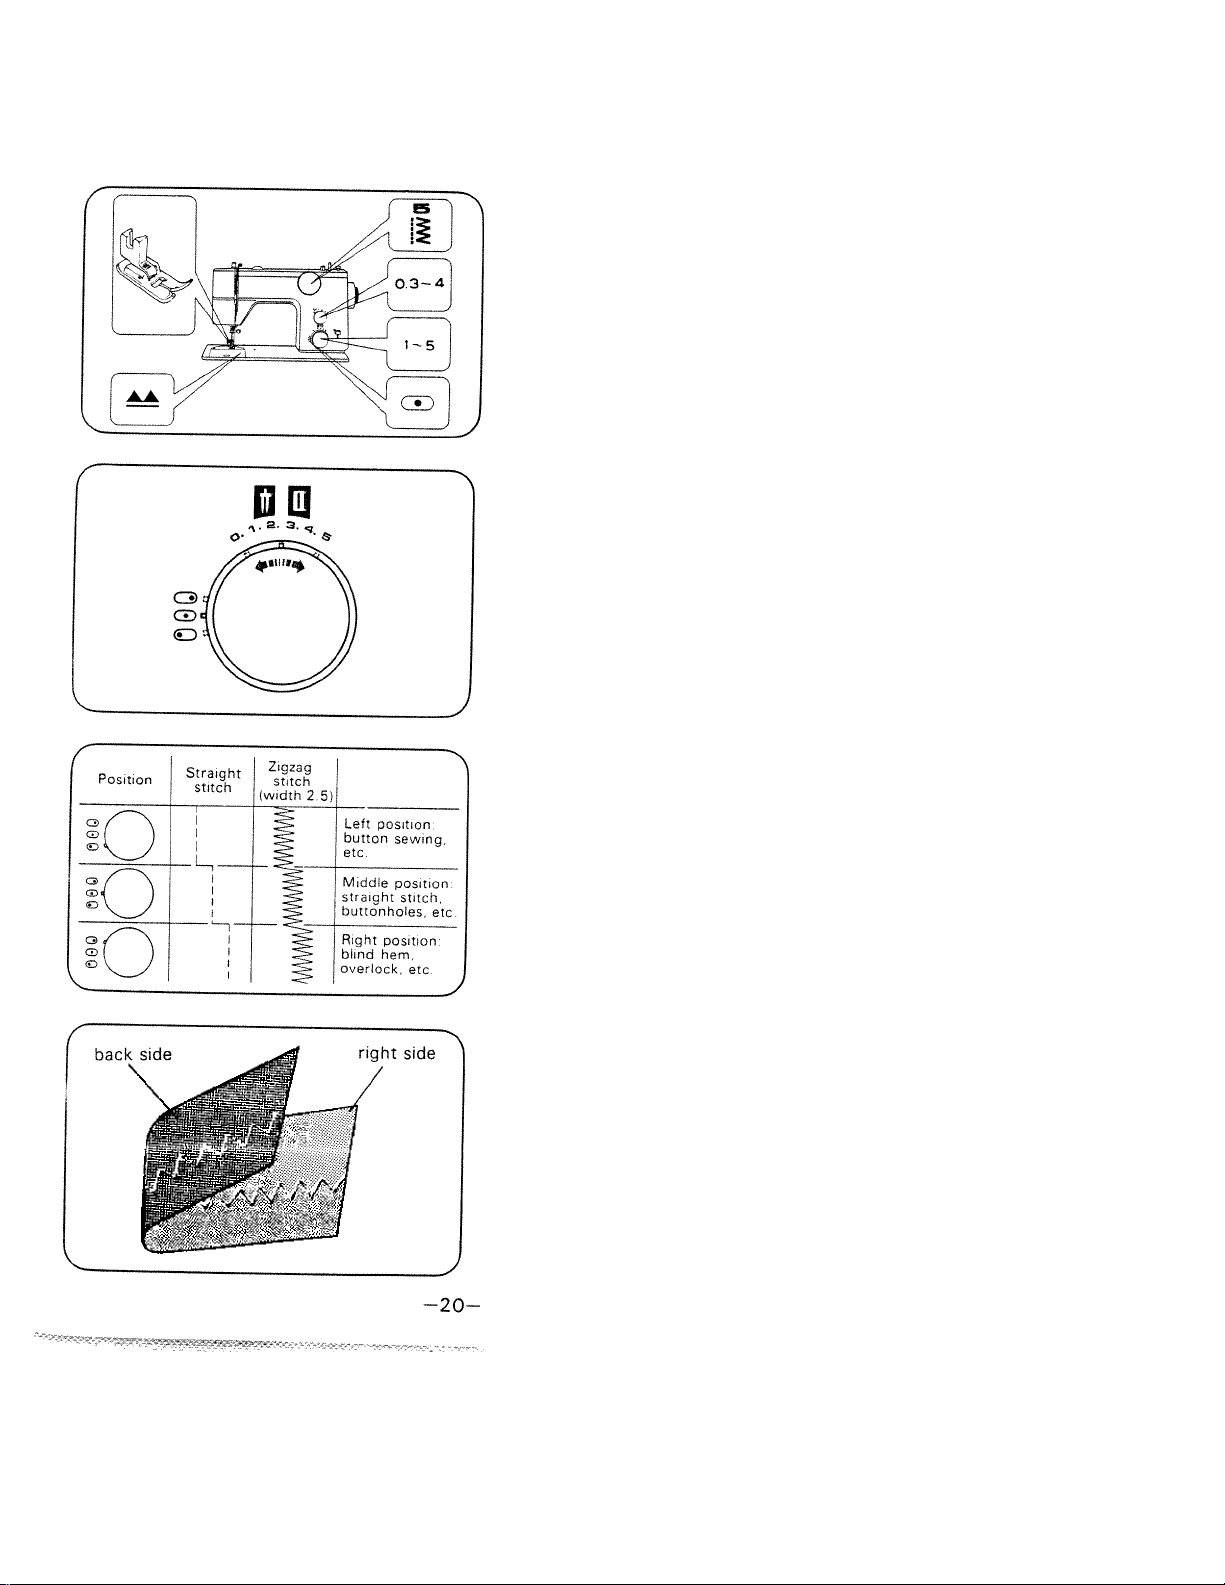
5. ZIGZAG SEWING
Set machine as shown.
To prevent seam ends unravell
ing, set machine for straight
stitch and sew in reverse at
beginning and ending of seam.
Zigzag Width Control
Set control at required number.
Larger the number, wider the
stitch.
Set it at 0 for straight sewing.
Make sure needle is in upper
position when you set control.
Needle Position Control
Needle position can be changed
by turning needle position
control.
When selecting position, make
sure needle is in upper position
to avoid tearing material or
bending needle.
Thread Tension for Ziqzaq Stitch
Better-looking zigzag stitching
requires less upper tension than
straight stitching.
Loosen upper tension slightly.
Page 24
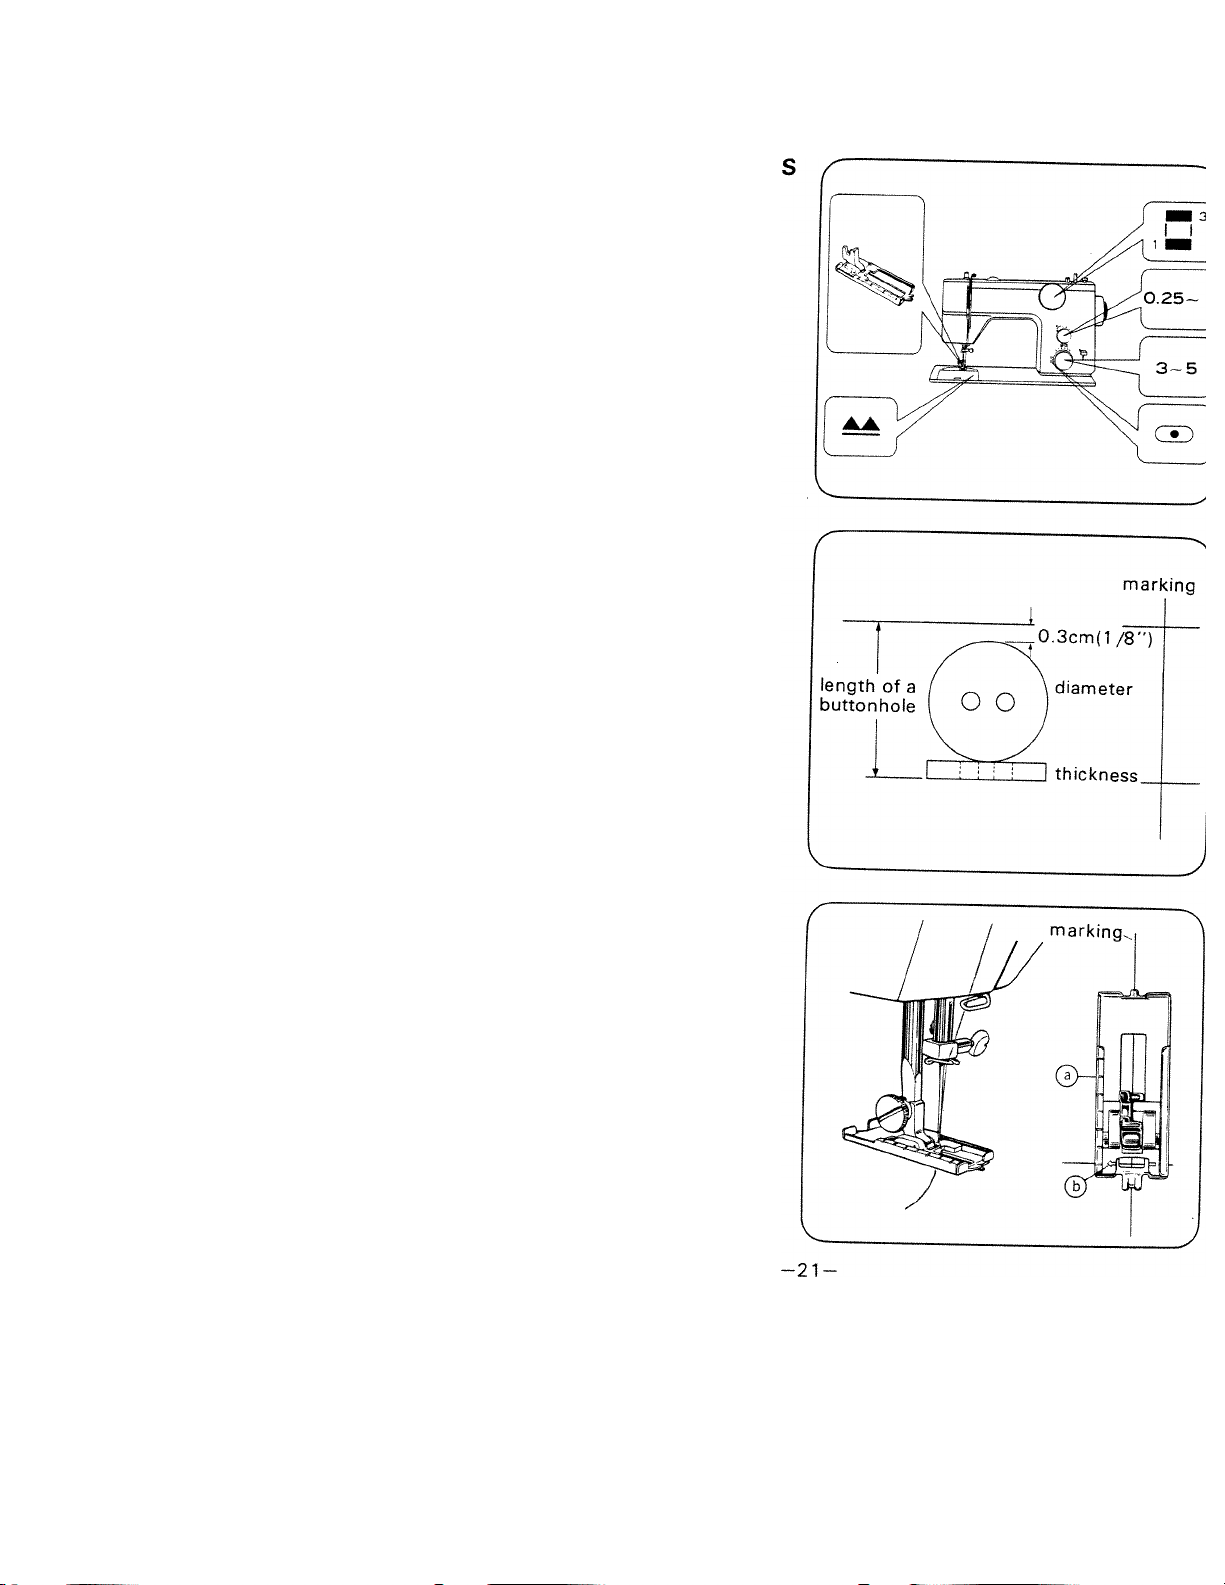
Set machine as shown.
Determine Length
Measure diameter and thickness
of button and add 0.3cm (1/8")
for bar tacks.
Mark buttonhole size on material.
Determine Width
Determine width according to
diameter of button, its thickness,
and kind of material.
Attach buttonhole foot.
Completely push back sliding part
@ of buttonhole foot.
Place material under foot so that
marking of buttonhole passes
through center of foot and arrow
(b) of foot indicates beginning line
of marking.
Page 25
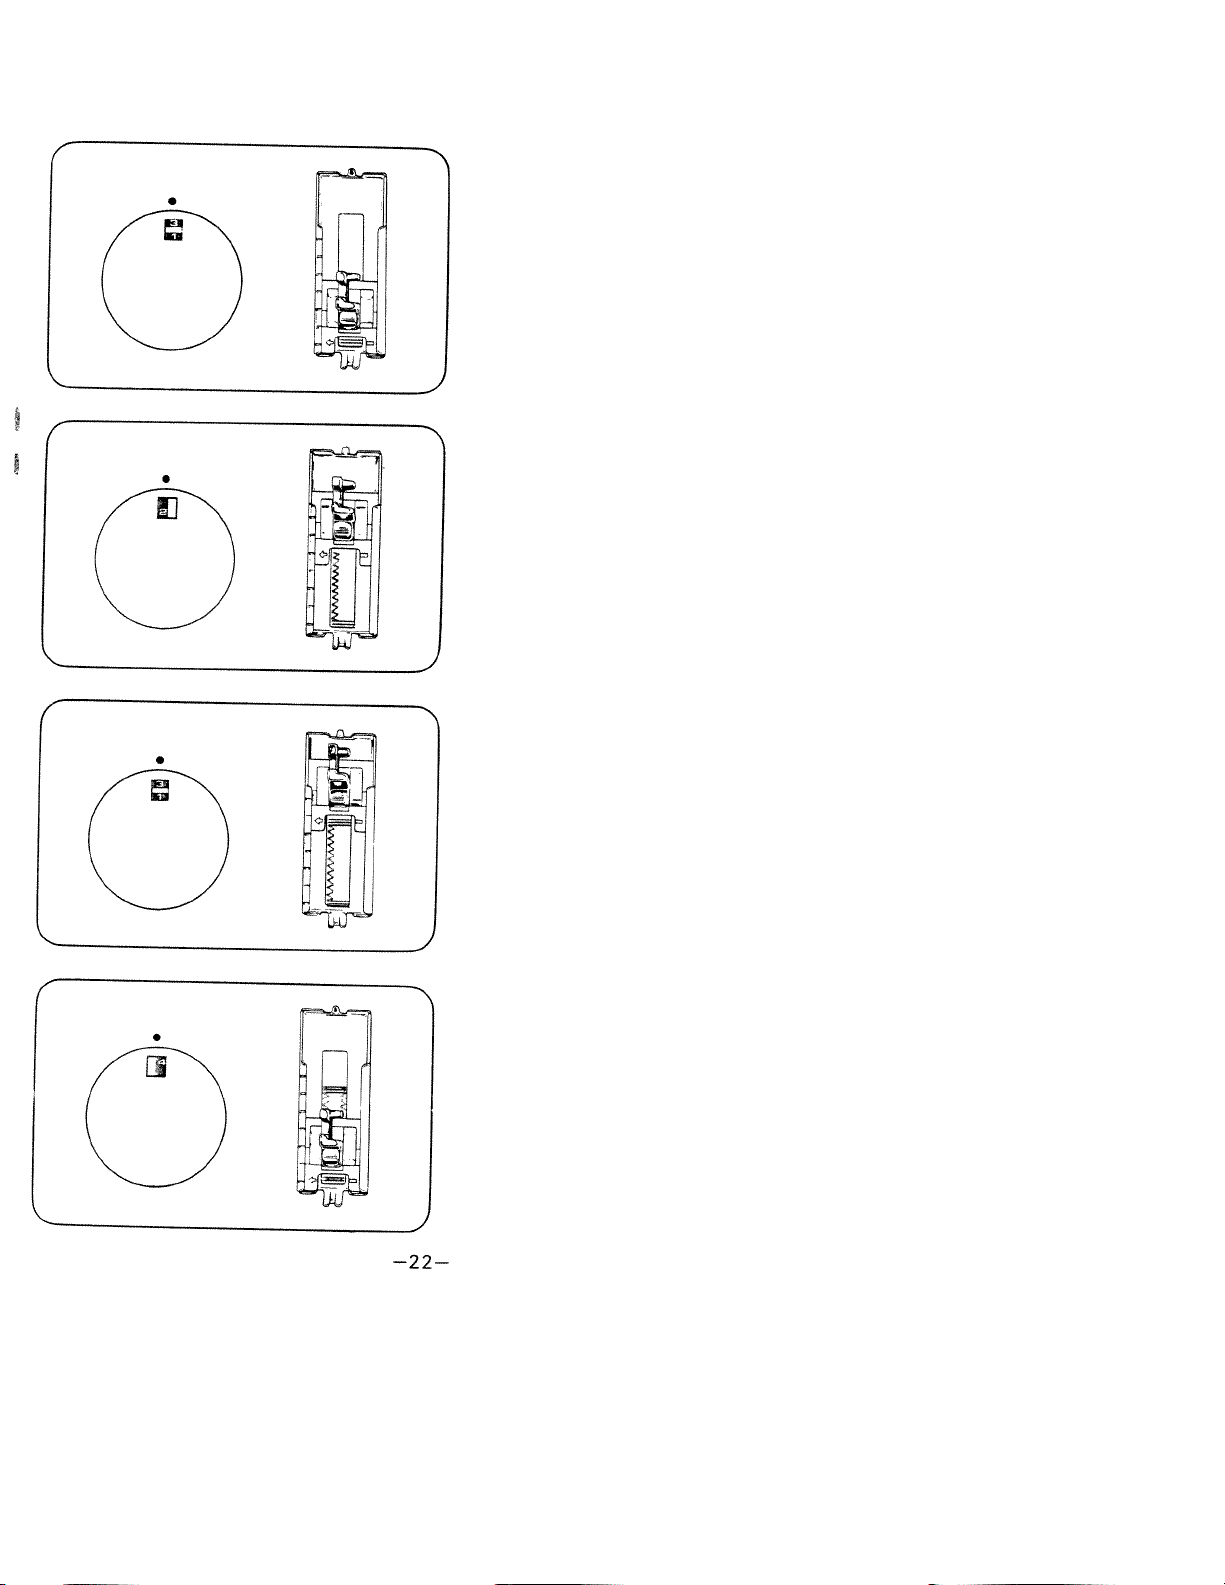
Ваг tacking; Set pattern selection
dial to 1 ( g ) and sew 5-6
stitches.
Left side: Change pattern to 2
( B ). Sew left side from front to
back until it reaches end line.
Remember the point where arrow
shows so that it is not necessary
to mark end lines for all
buttonholes.
Bar tacking: Change pattern to 3
{ ) and sew 5-6 stitches.
Right side: Change pattern to 4
( U ) and sew right side until it
catches first bar tack.
Quick finish; To prevent
unstitching, set zigzag width at
0 and proceed for a few stitches.
Page 26
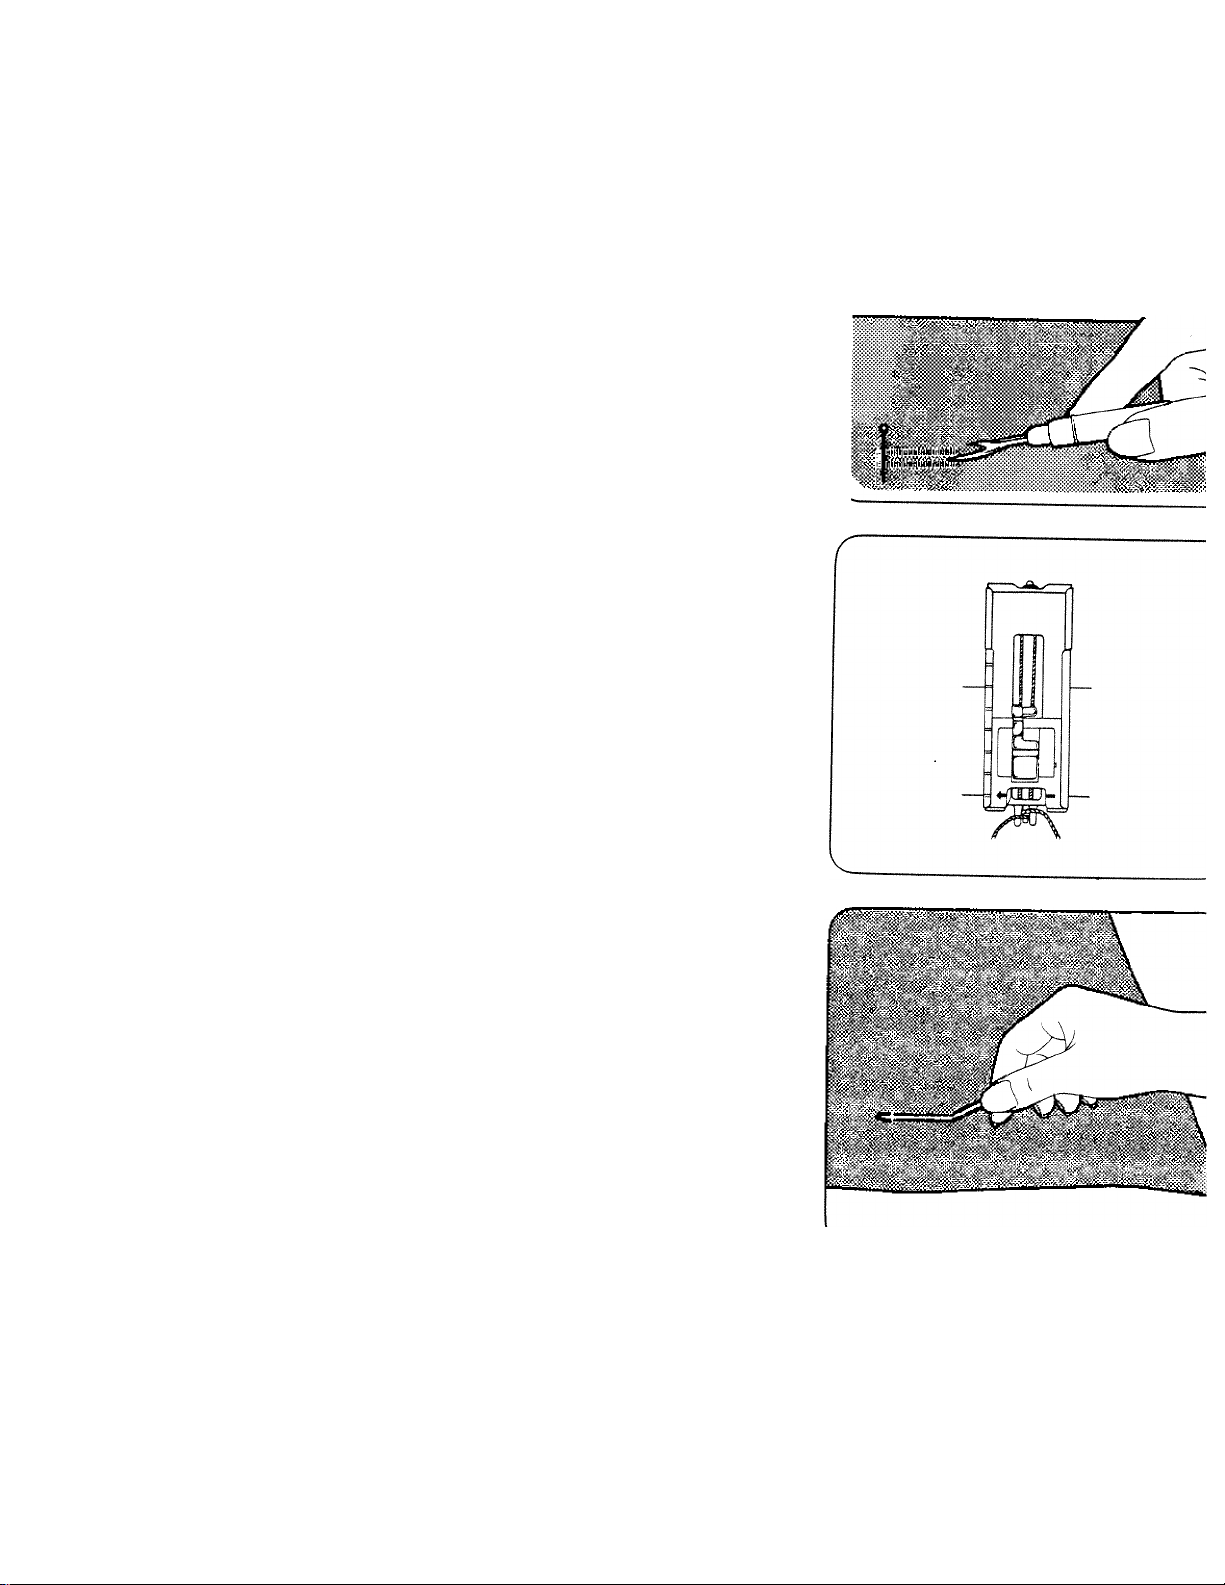
Cutting Buttonholes
Stick a needle through bar tacks
to prevent over-cutting.
Cut buttonhole along center with
buttonhole cutter.
Corded Buttonholes
For stretch fabrics such as knits,
3 corded buttonhole is effective
to keep finished buttonhole
in shape.
Hook filler cord on top spur and
lead ends of cord under foot, pull
taut, and hook them to bottom
notches as shown.
Proceed with stitching as for
regular buttonholes.
When buttonhole is completed,
pull filler cord ends so that loop
on the other end disappears into
buttonhole stitching.
Thread ends of cord to reverse
side and tie, or cut both ends of
cord.
-23-
Page 27
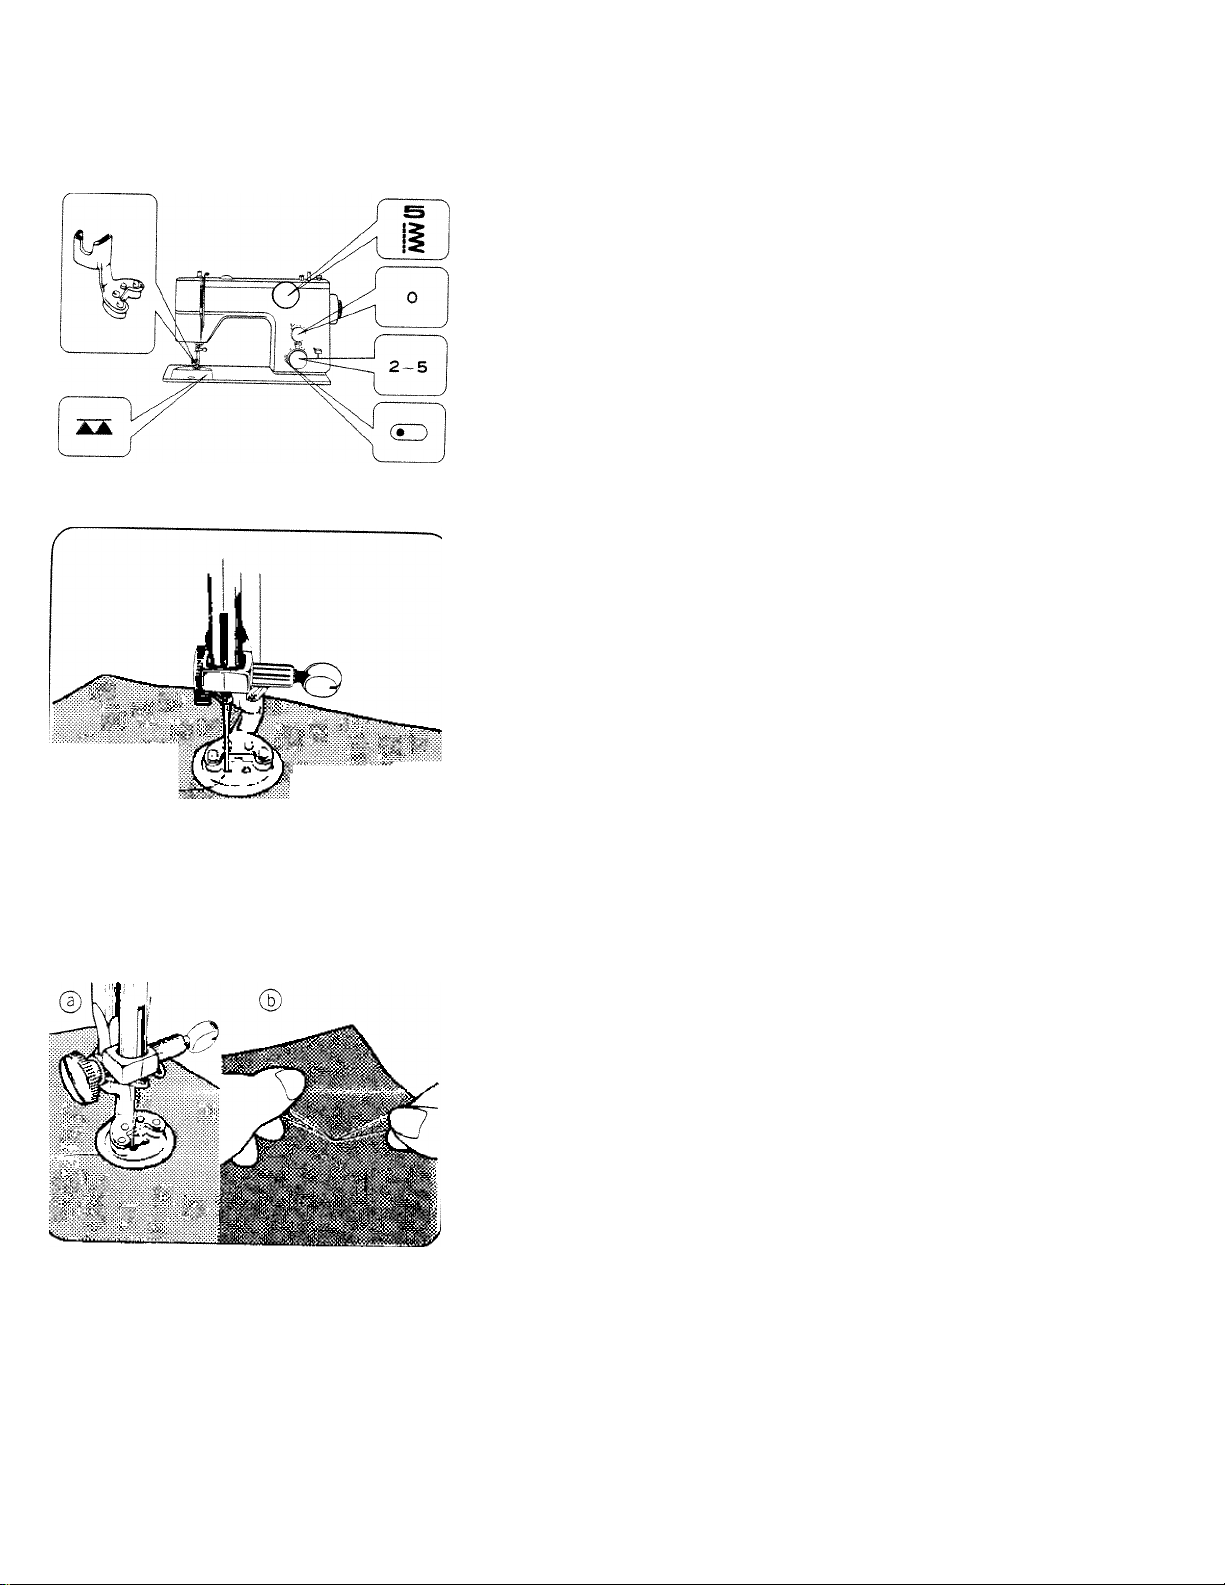
7. SEWING ON BUTTONS
Set machine as shown.
Position a button and material
under foot. When needle comes
to left side of stitch, lower foot.
Raise needle and adjust zigzag
width so that needle comes to
right hole of button.
Run machine at medium speed
and sew 5-6 zigzag stitches.
■ lillB
Stop machine when needle is in
upper position.
(§j Set zigzag width control to 0
and sew 3-4 stitches to prevent
unstitching.
OR
® Draw out work and cut off
threads.
Draw thread ends through to
wrong side and tie a knot.
-24-
Page 28
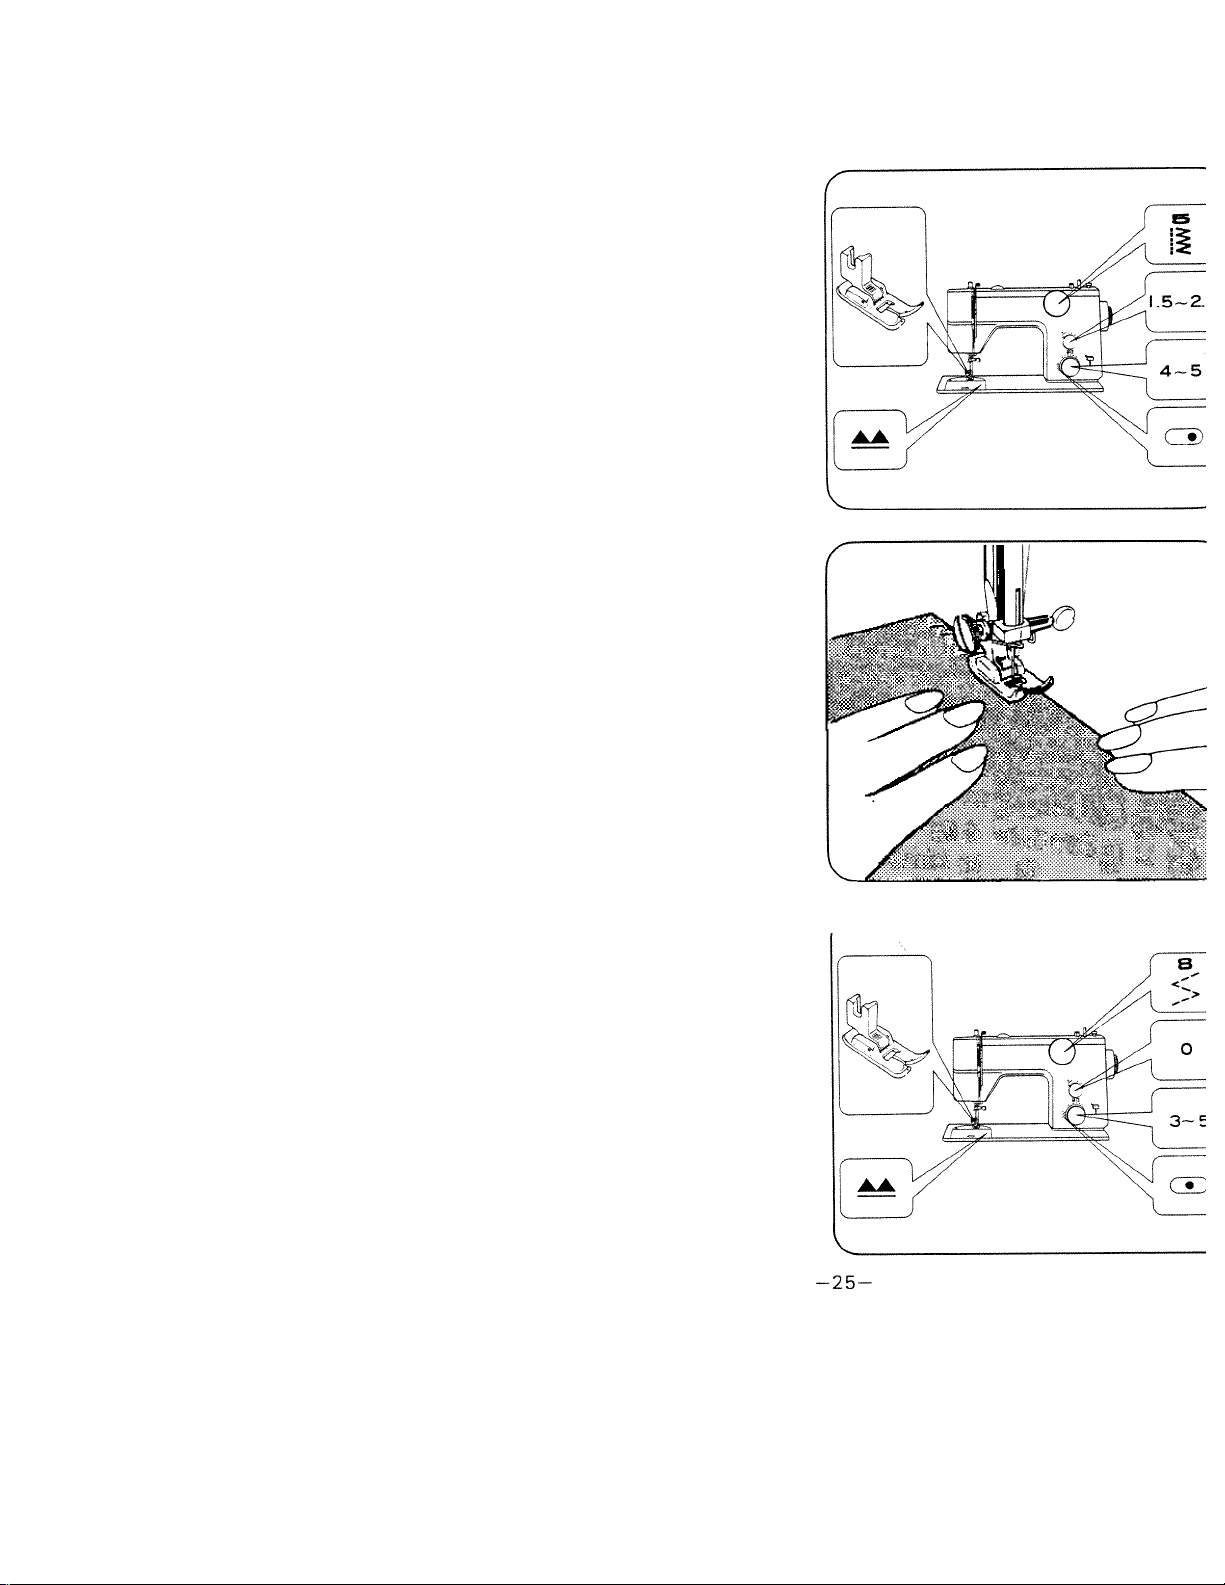
8. OVERCASTING
For light weight material:
Set machine as shown.
Sew carefully so that all stitches
on right side are flush with edge
of fabric.
For thick and elastic material:
Set machine as shown.
Sew in the same way above.
Page 29
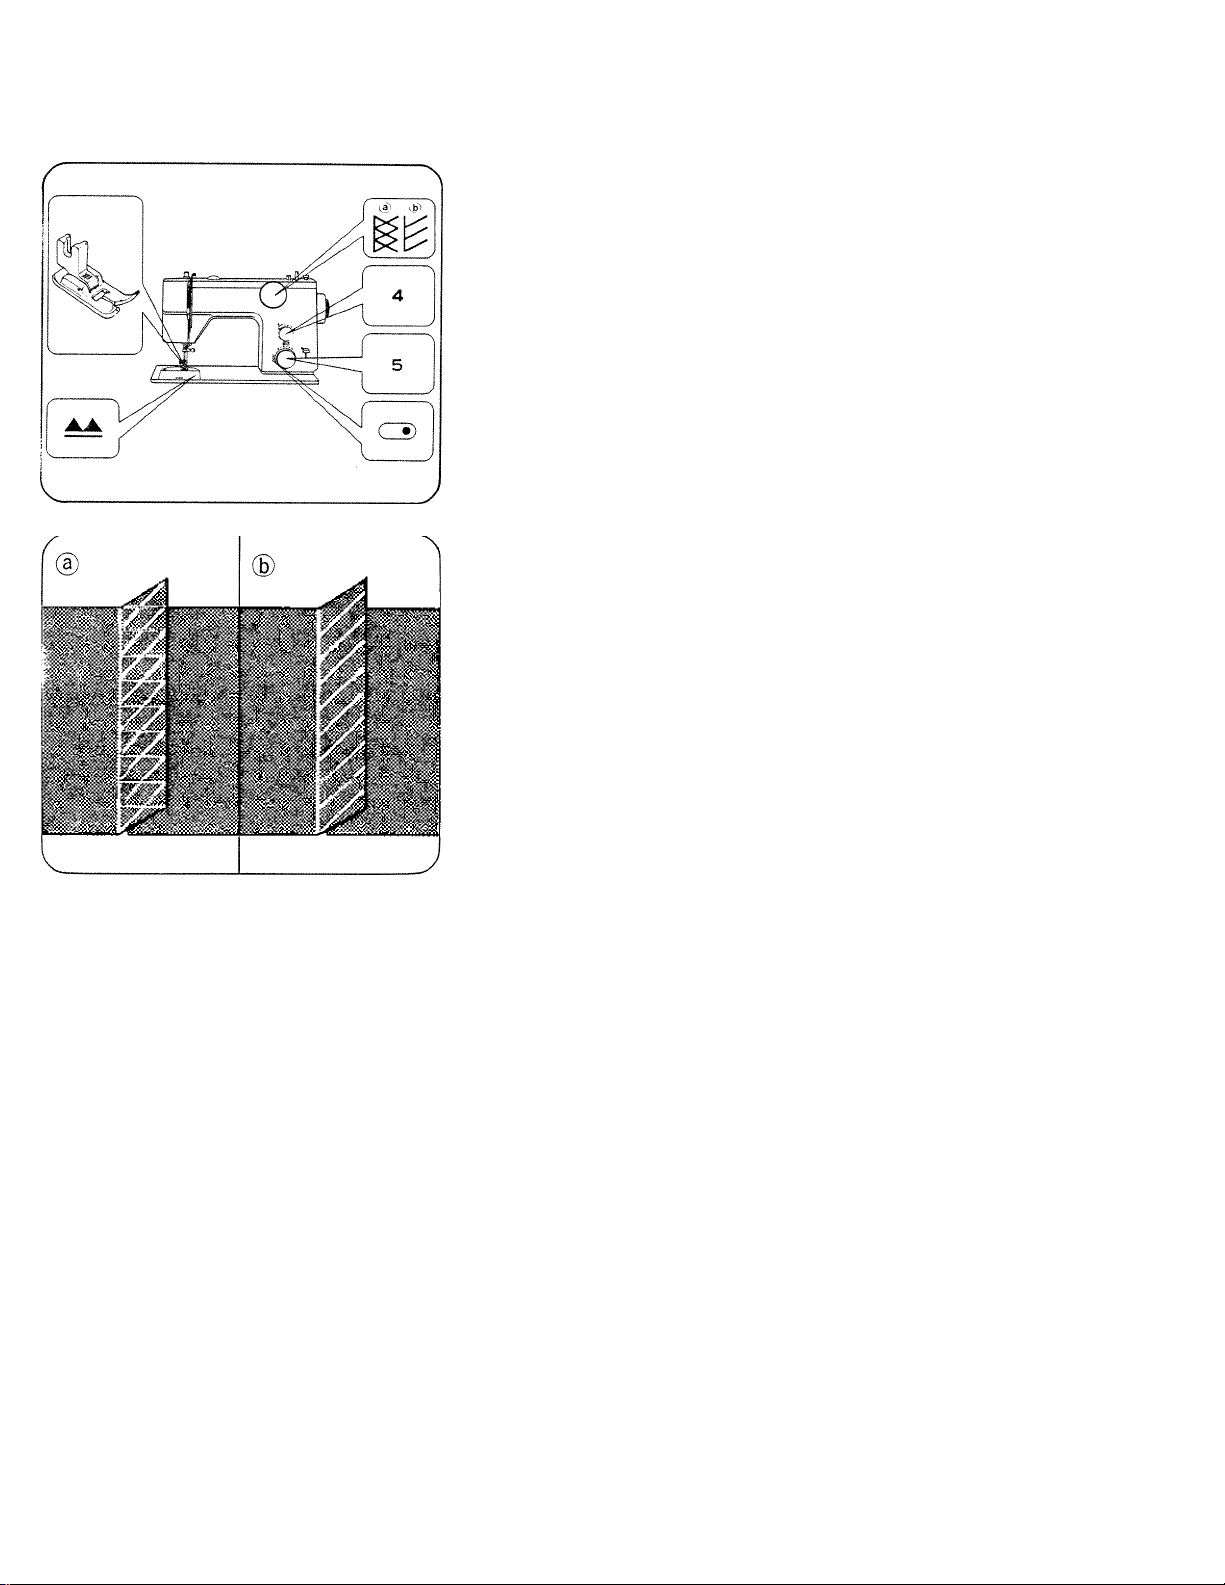
9. OVERLOOKING
Overlocking stitches make it
possible to sew and overcast
seams at the same time.
Set machine as shown.
@ For medium, thin material
® For medium, thick material
Put two pieces of cloth together
with right sides facing and sew.
To prevent edges from fraying,
sew so that right side stitches
drop outside the edge of material.
In some cases overiocKing
stitches can be used for
overcasting.
-26-
Page 30
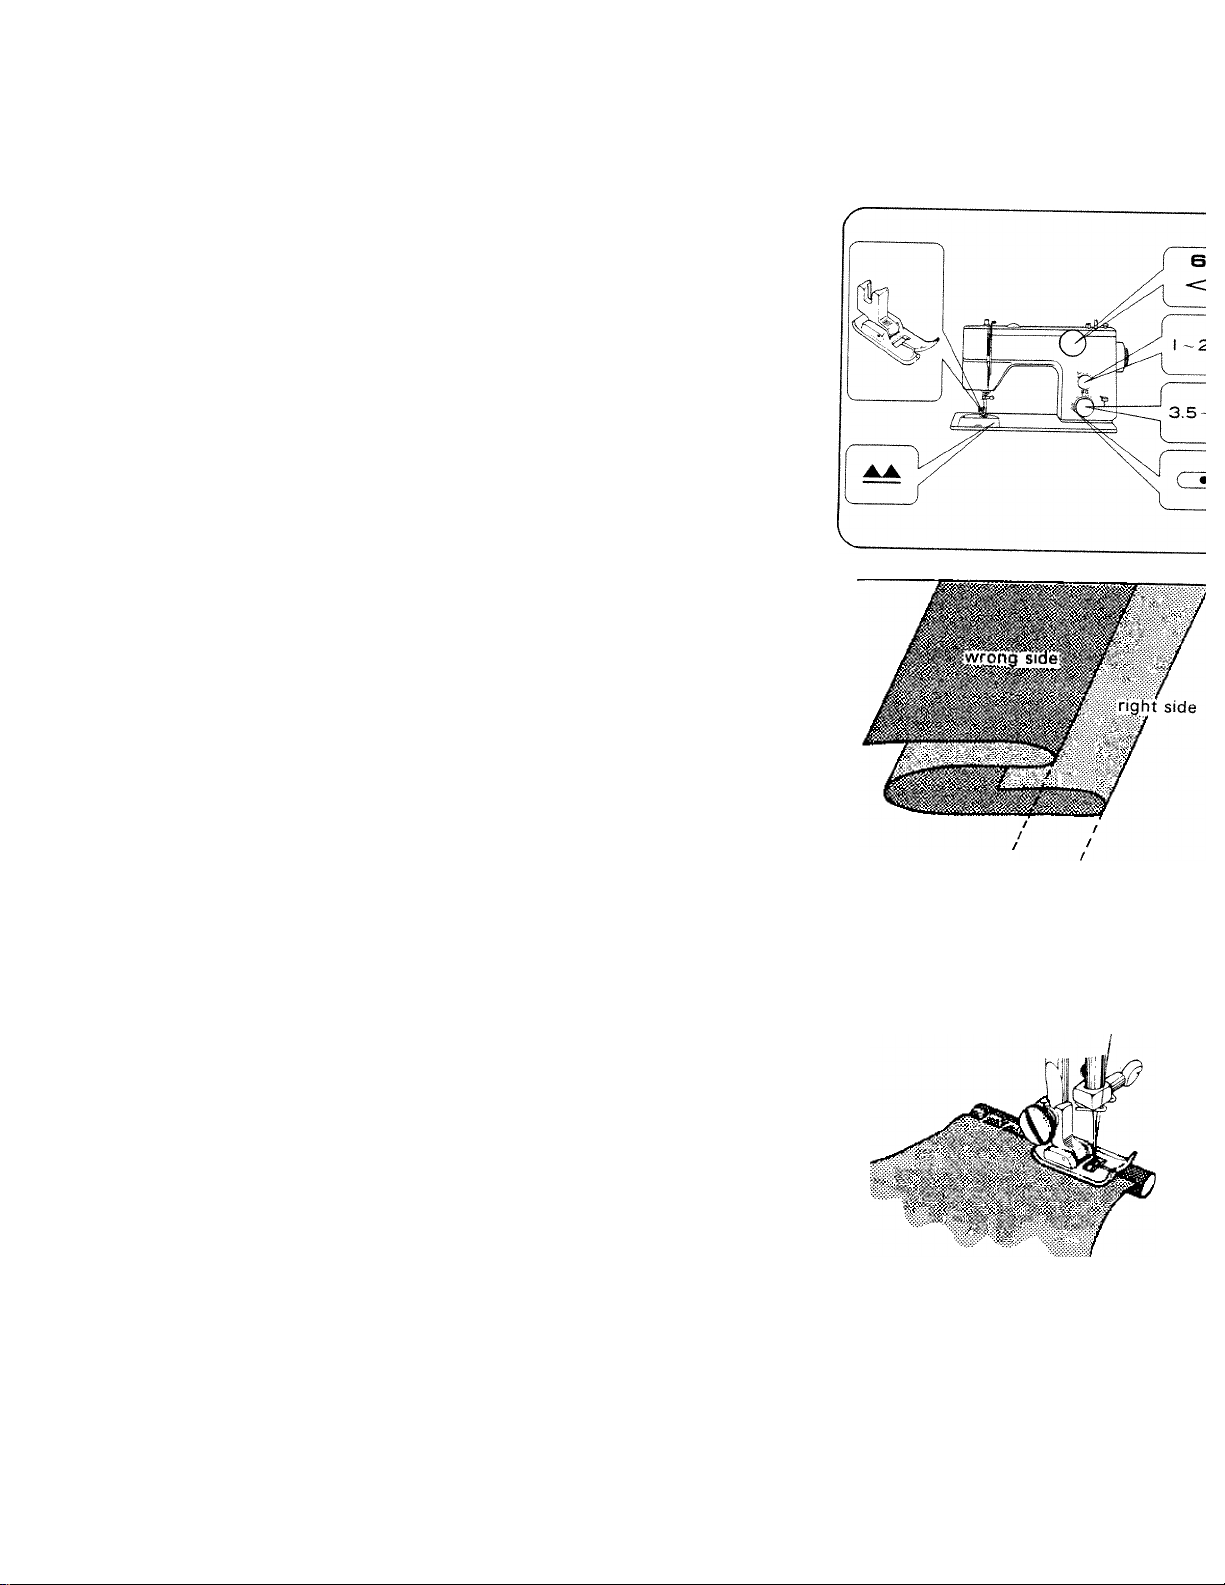
10. BUND HEM STITCH
Set machine as shown.
Fold material as shown and place
it under foot.
For a neater finish, it is preferable
to baste or iron hem beforehand.
Sew carefully, so that straight
stitches are made on hem edge,
and slanting stitches pierce only
one or two threads of fold.
3~5mm(0.2'')-*-''
-27-
Page 31
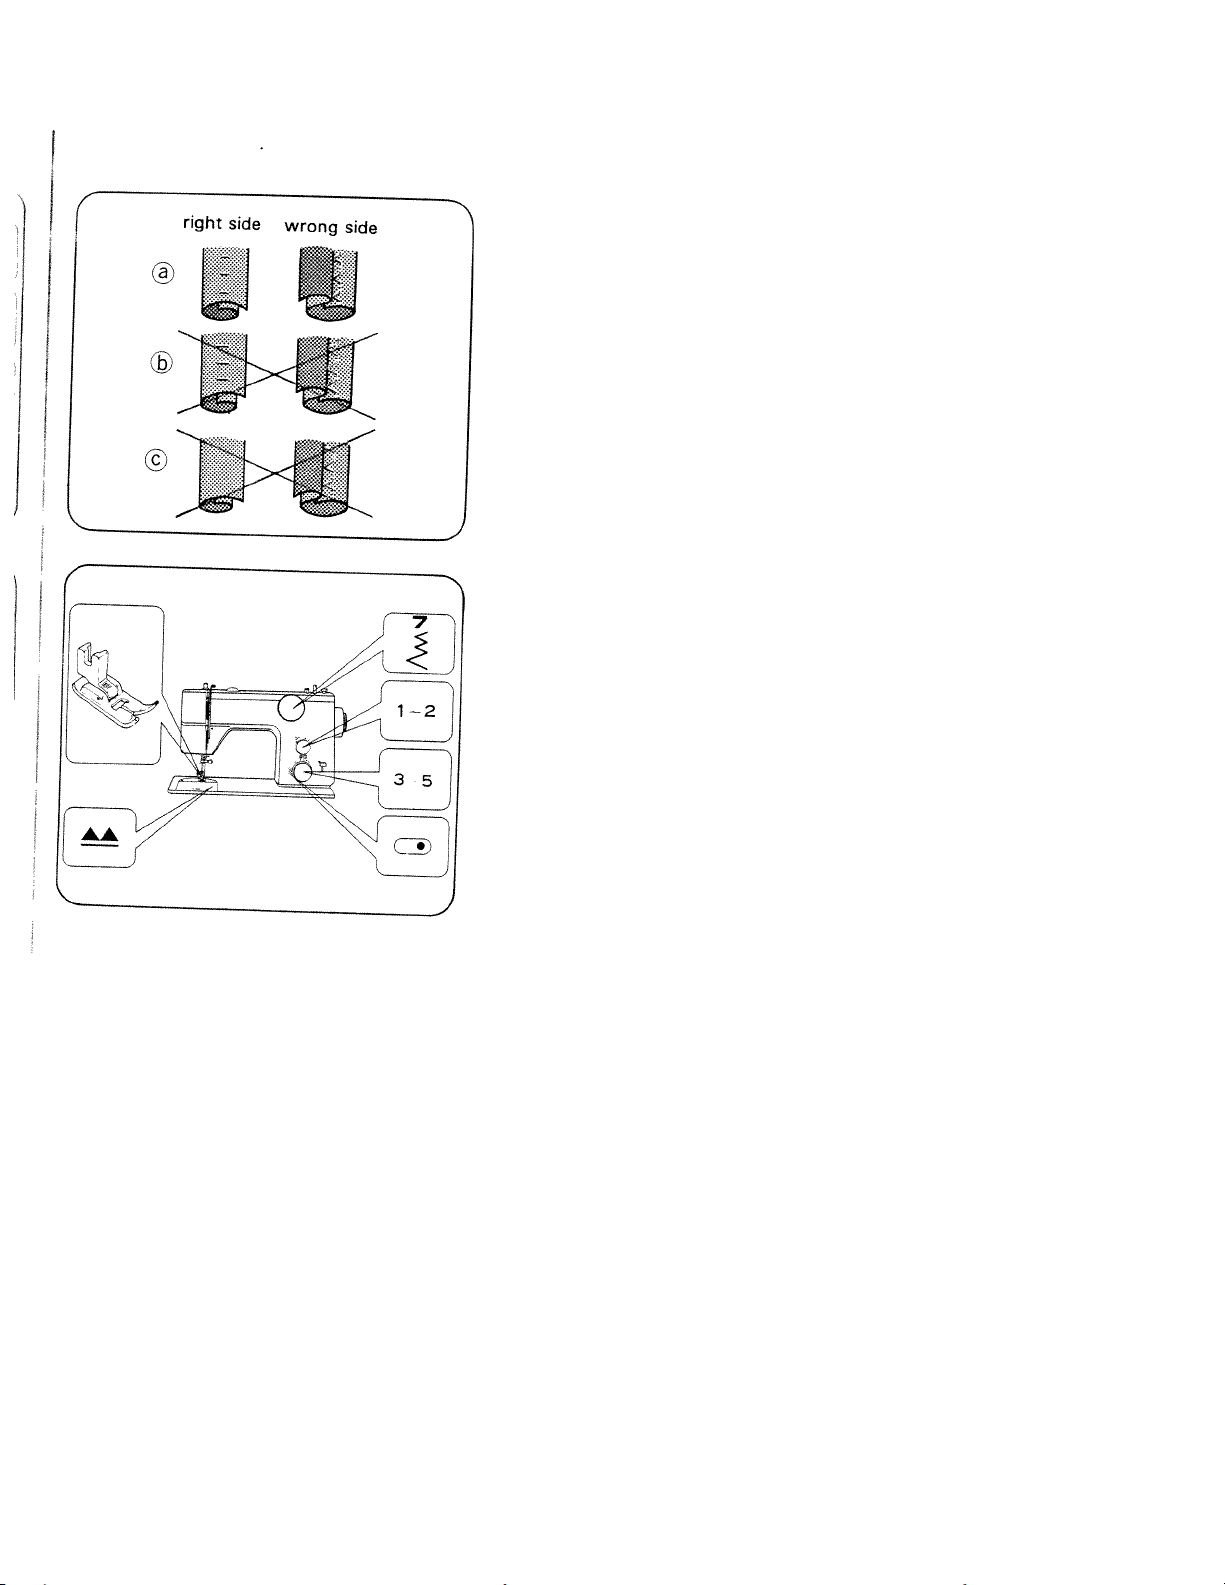
d) Correct seam.
® Needle is catching edge of fold
too much.
© Needle is not catching edge of
fold at all.
Elastic Blind Hem Stitch
For elastic materials, set machine
as shown and sew in the same
way as for normal blind hem
stitch.
-28-
Page 32
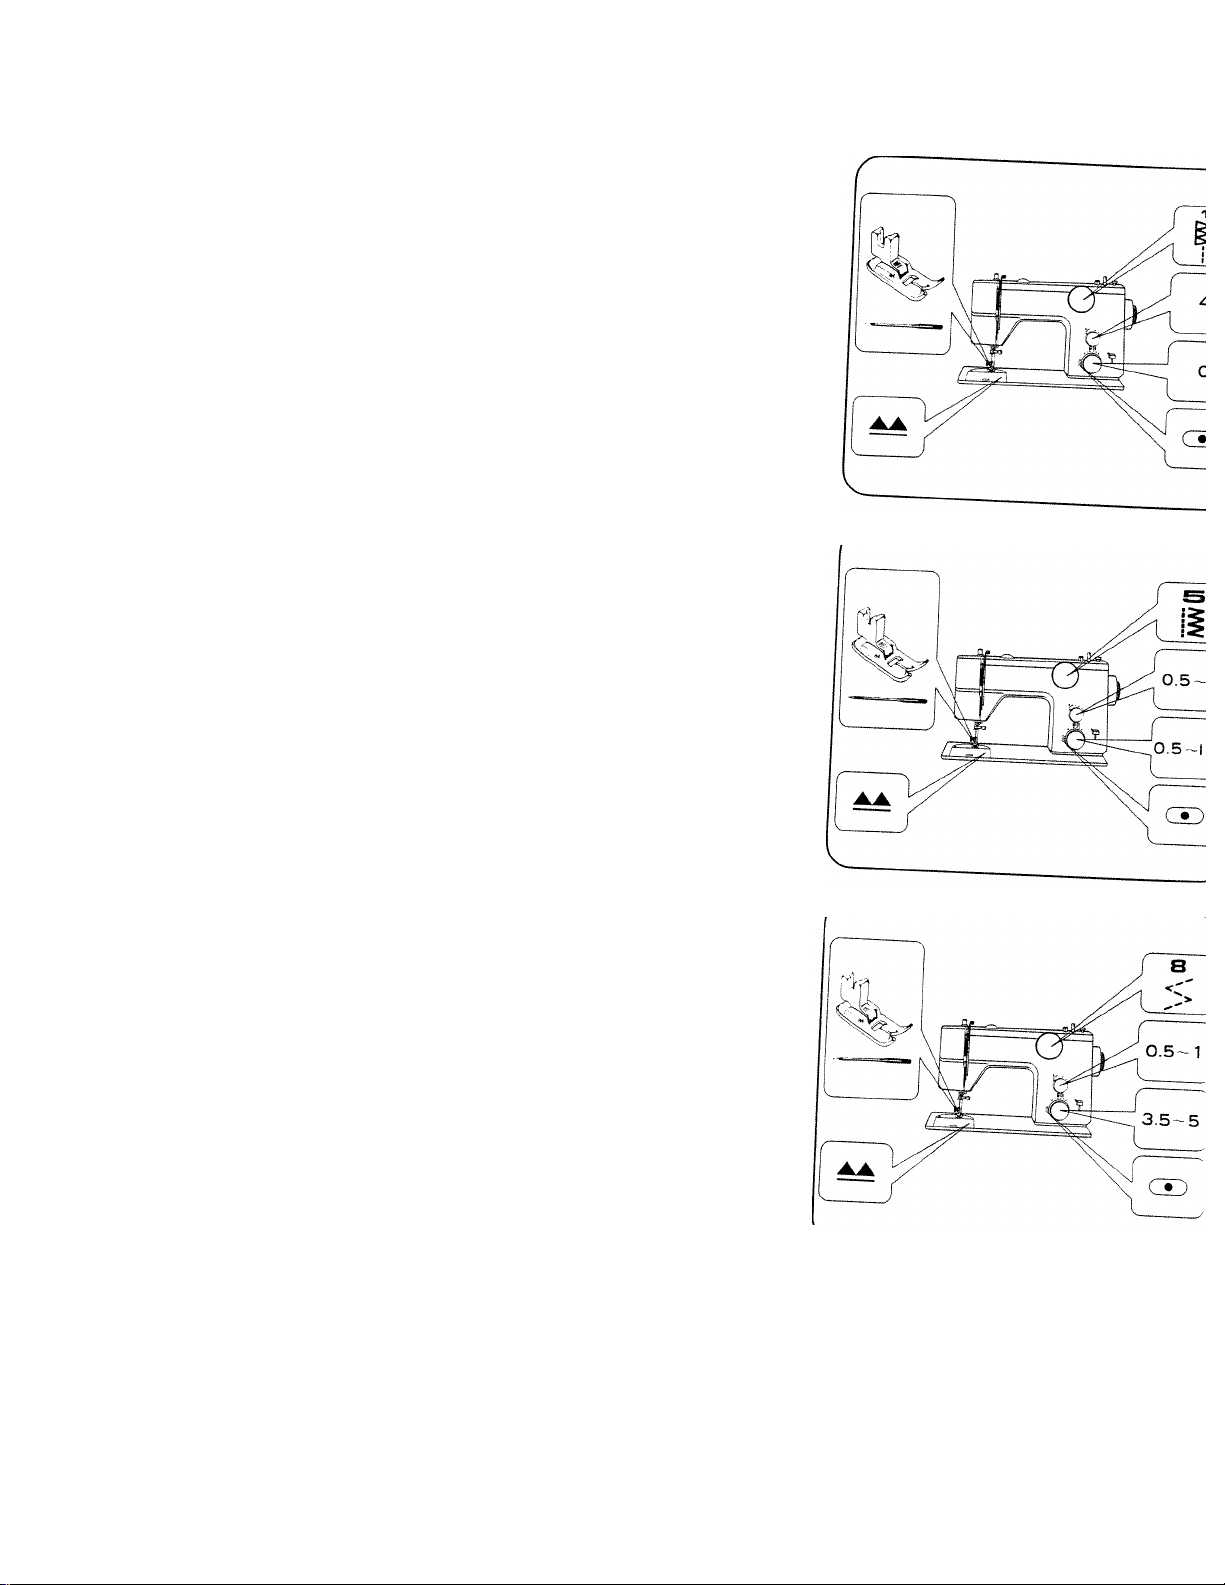
n. STRETCH SEAMS
A ball-point needle is essential.
Paper may be laid under knits for
smoother feeding.
©Medium-weight fabrics
double knit, jersey.
Apply elastic triple stitch.
(b) Light-weight fabrics
Apply small zigzag. Reduce upper
and lower thread tension.
©For Very elastic fabrics
spandex (power net)
Use lapped or abutted seam.
Apply multiple zigzag.
-29-
Page 33
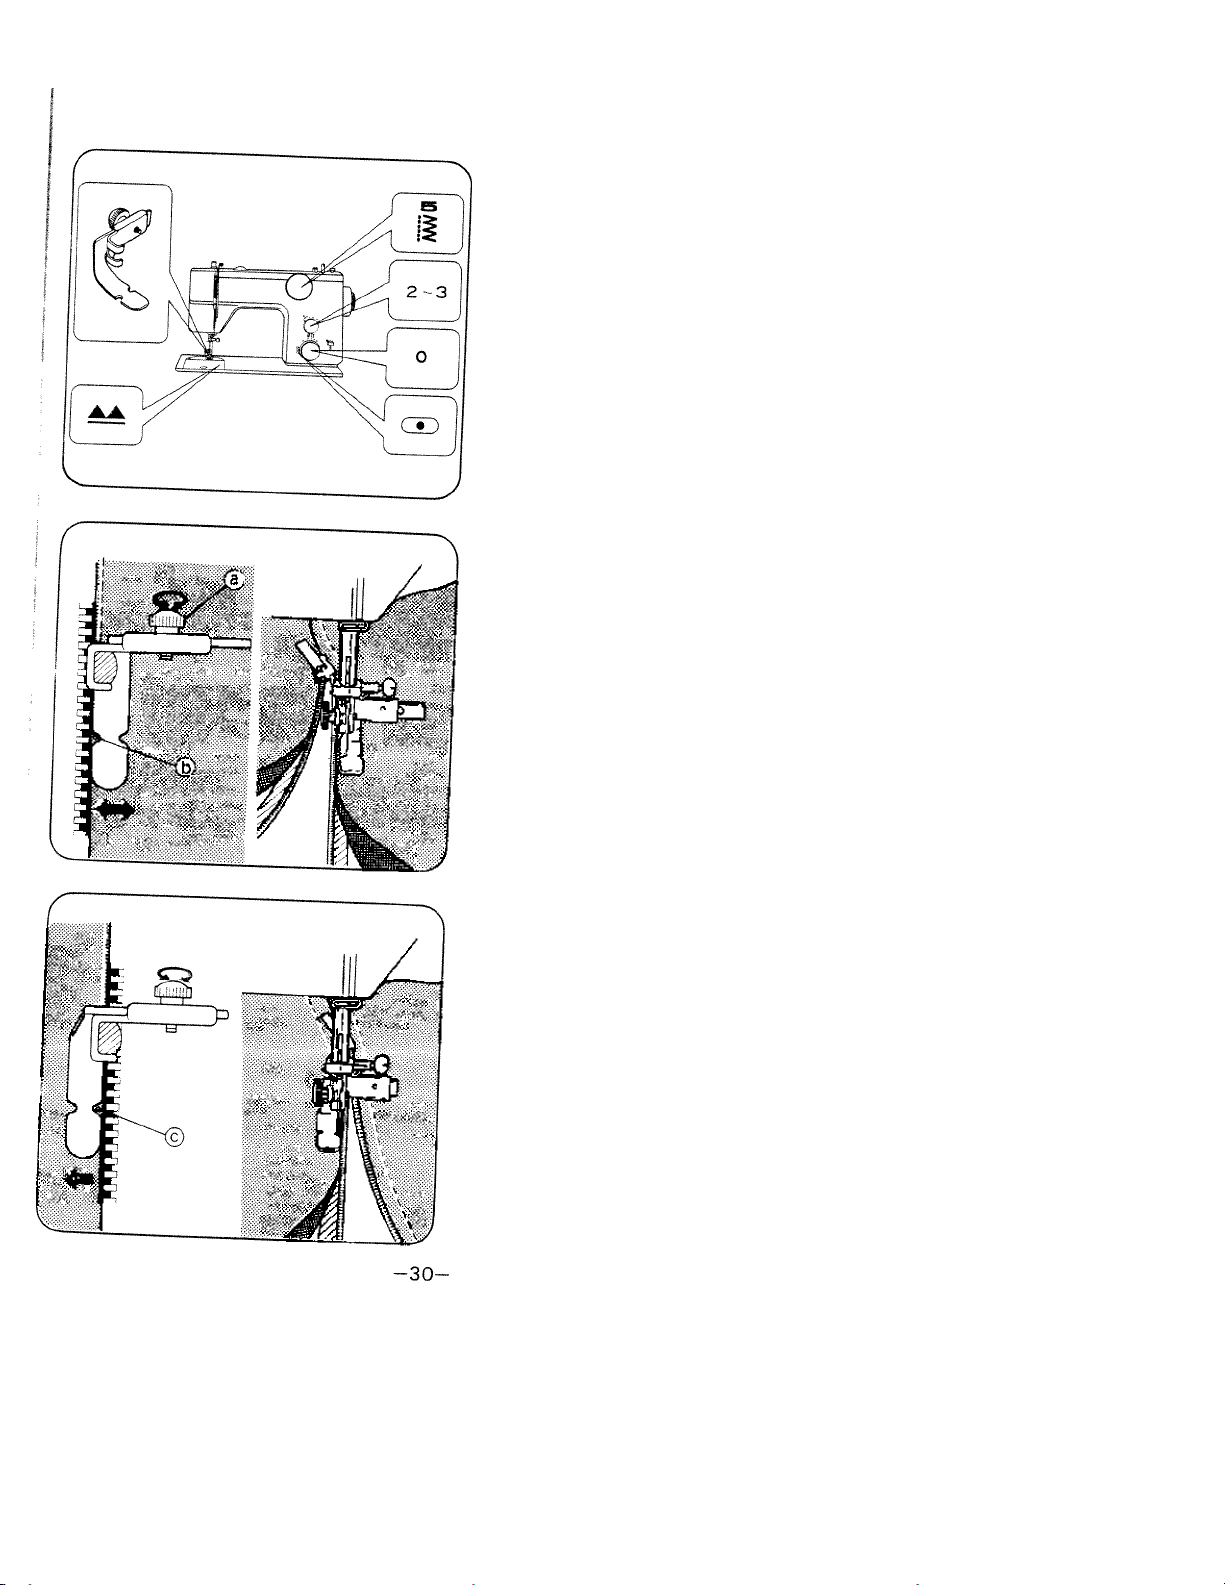
12. ZIPPER SEWING
Set machine as shown.
By using special zipper foot with
sliding adjuster, zipper sewing
can be easily done without
turning fabric.
Loosen screw @ and set foot so
that needle comes into position
(B). Tighten screw.
Sew right side of zipper guiding
fabric carefully so that right side
teeth of zipper are parallel with
left edge of foot.
Re-set foot so that needle comes
into position ©,
Sew left side of zipper in the
same way.
Page 34
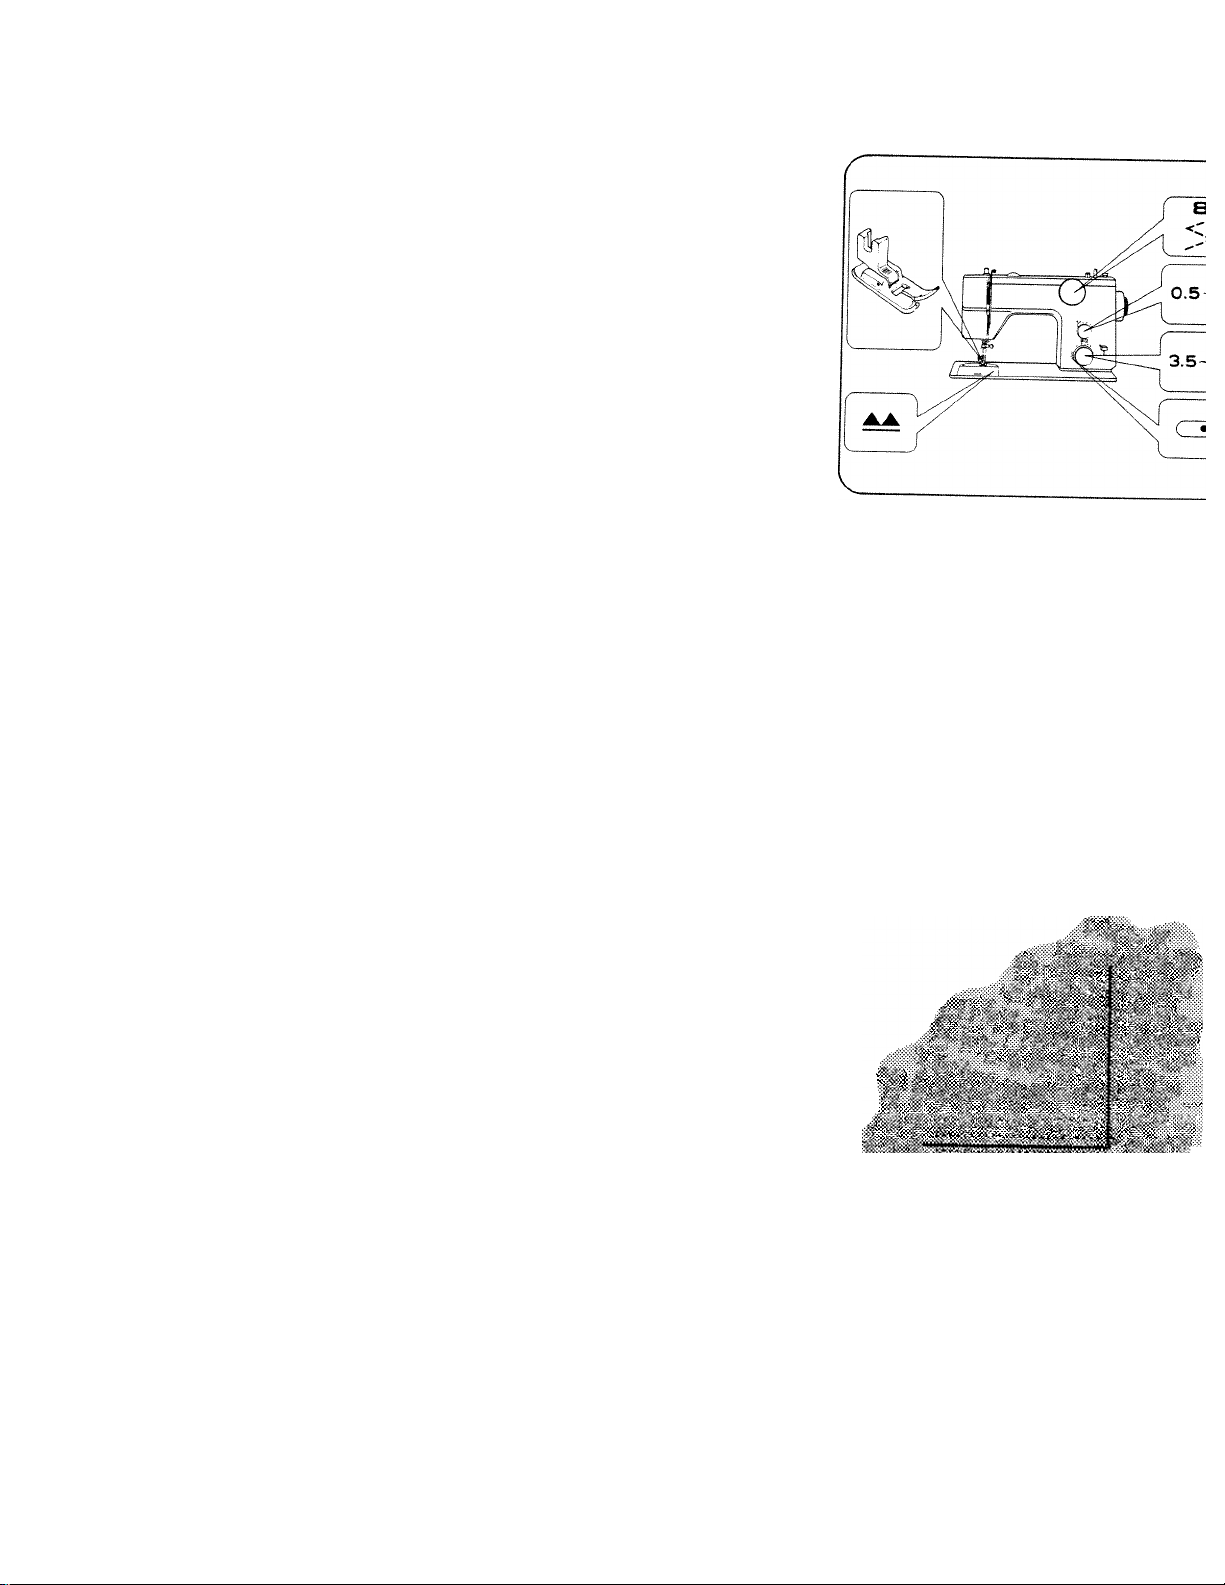
13. MENDING
Patching
Set machine as shown.
Place the patch over the worn
part.
Sew along the edge of the patch
on the right side. Trim away the
worn part close to the seam on
back side.
Mending a Rip
Set machine in the same way
as for patching.
Sew the edges of tear together
first.
Then sew two more seams on
either side.
A piece of gauze can be placed
underneath to reinforce the rip.
-31-
Page 35
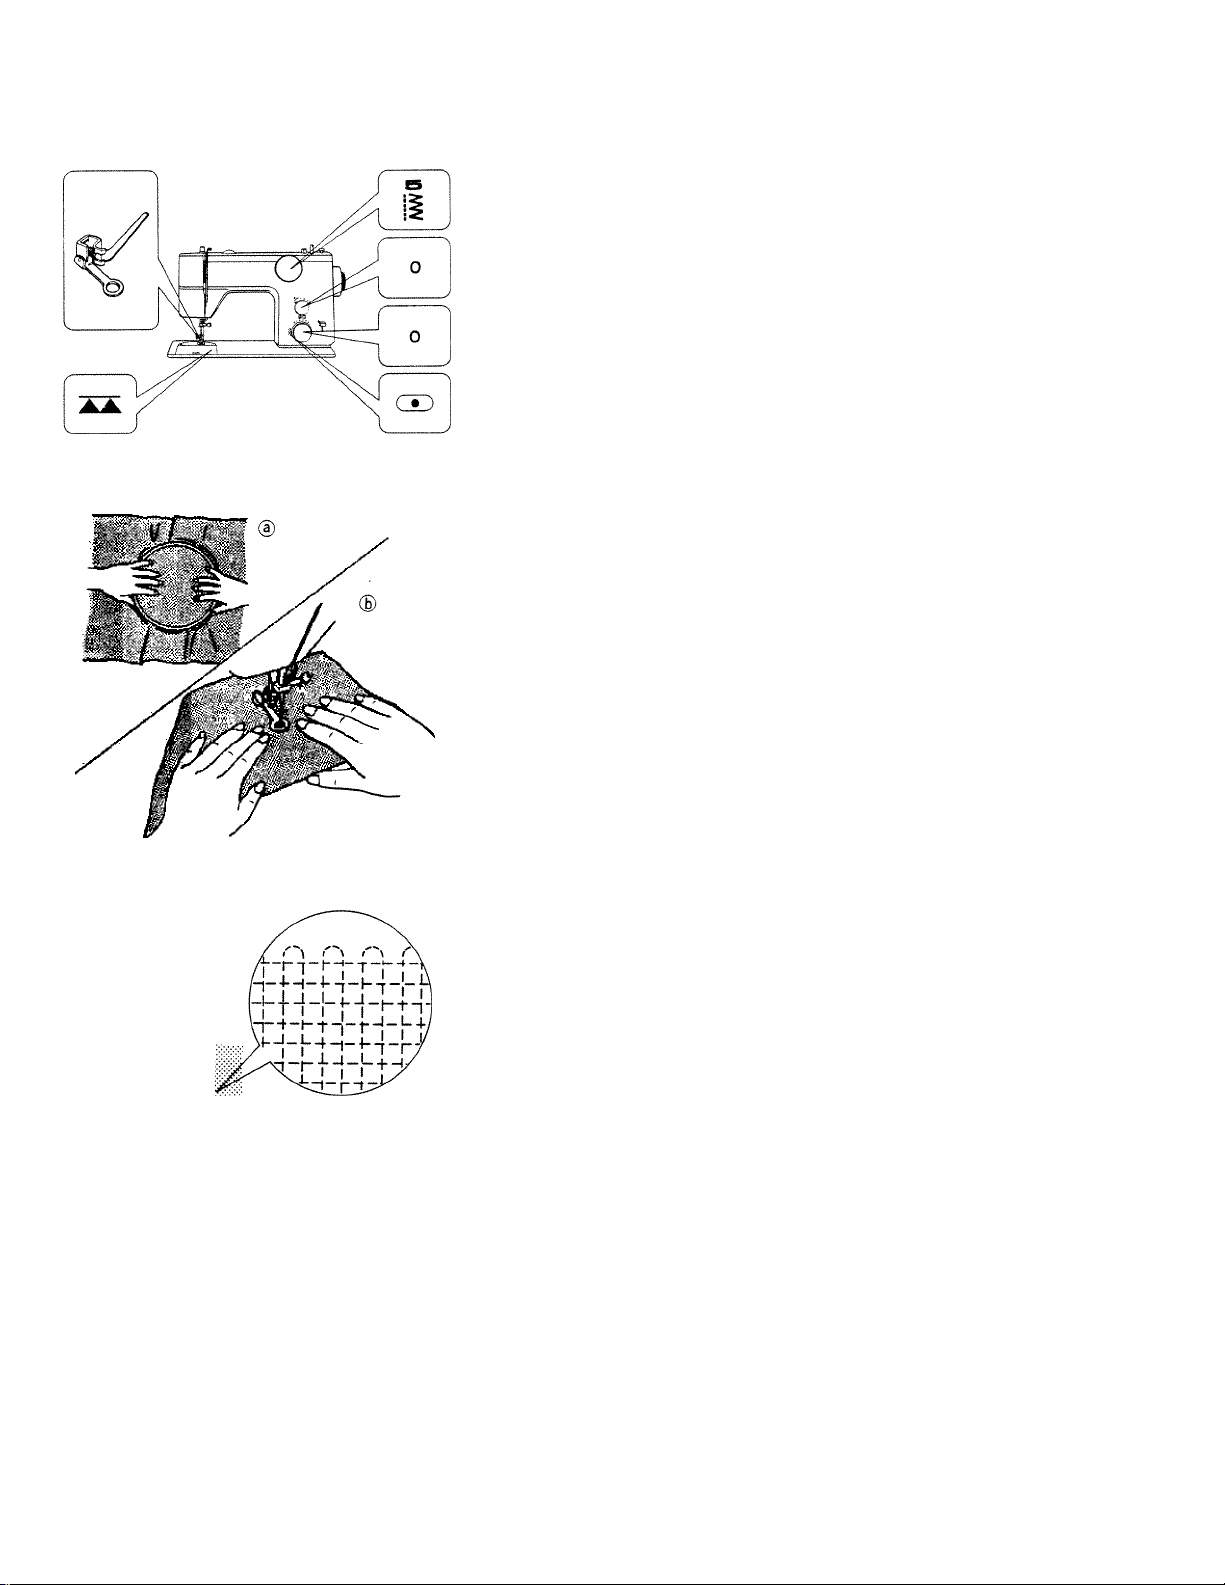
Darning
Set machine as shown.
Stretch fabric over the hoop (f)
or sew with free arm® according
to the part you are going to darn.
-32-
Sew over the worn-out part with
closely spaced, stiches guiding
material back and forth by hand.
By making turning points blunt,
the darned part becomes softer
and more flexible.
Page 36
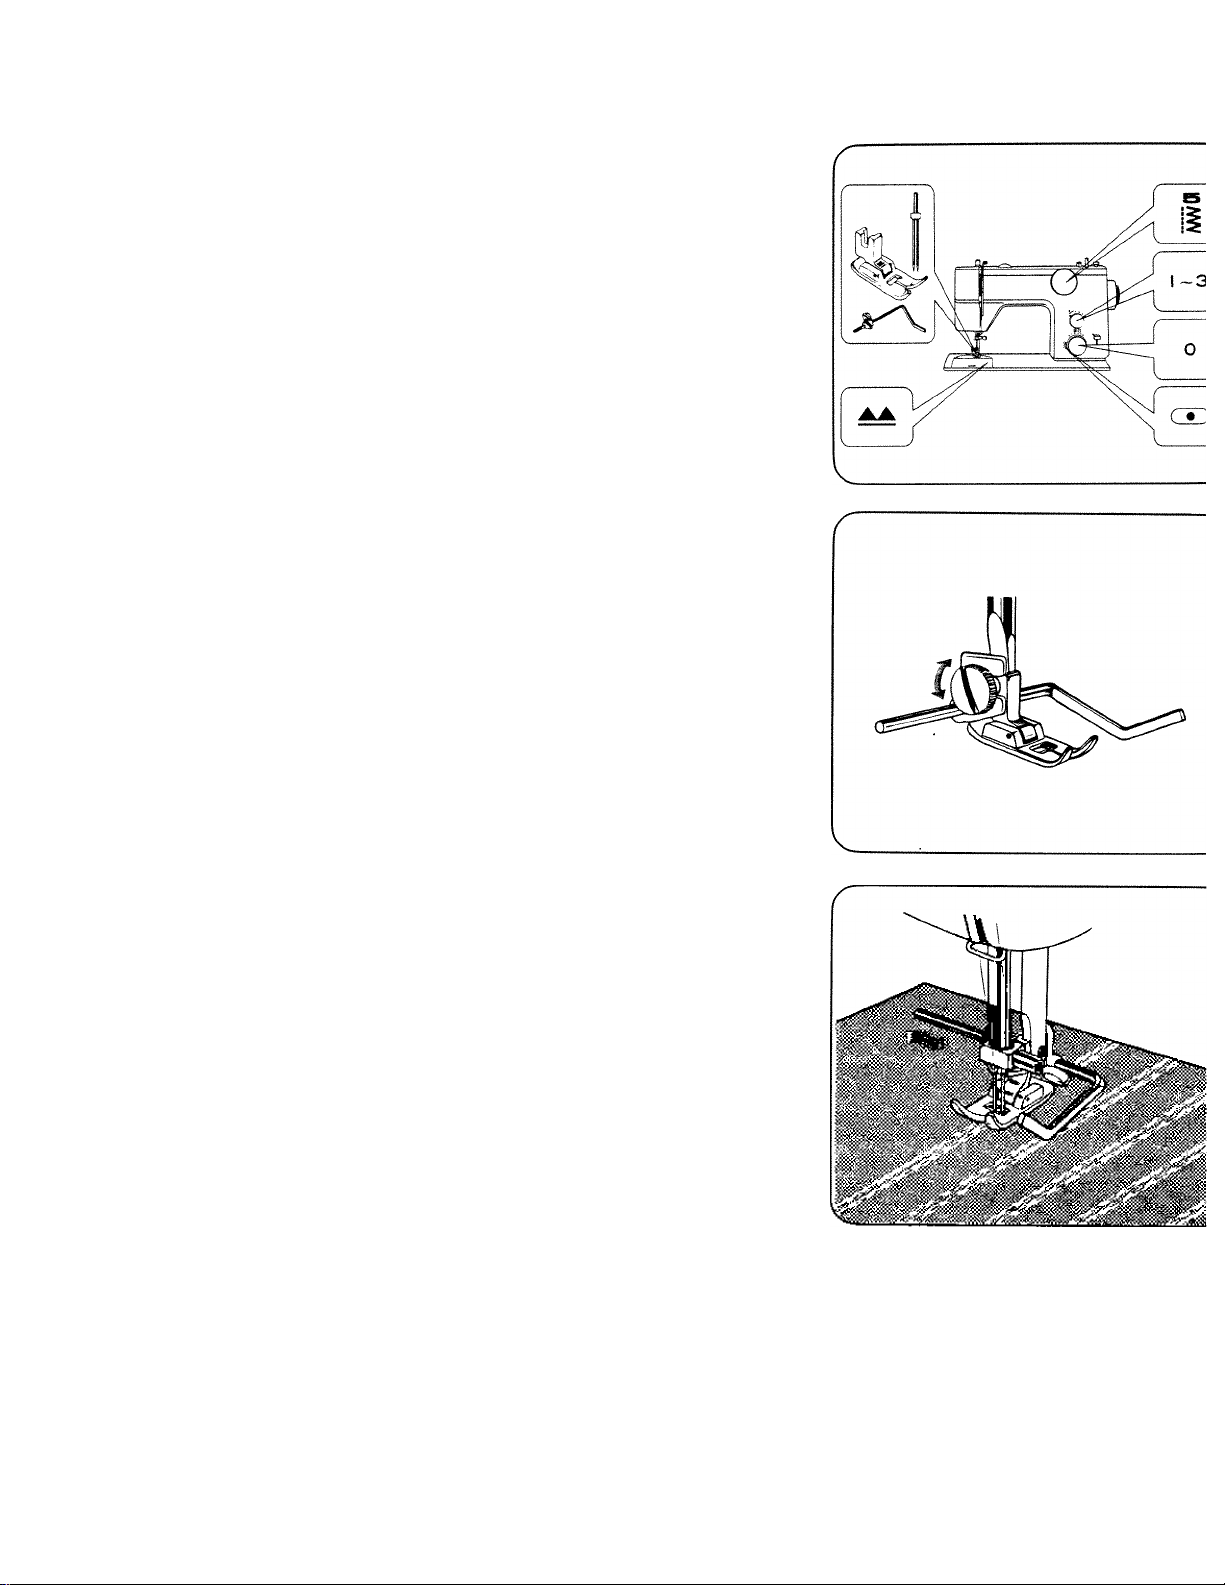
14. PIN TUCKING
Set machine as shown.
For better appearance, use sheer
material and tighten lower thread
a little.
For twin needle threading, see
P- 14-
Loosen presser foot thumb screw
and insert square cut of quilting
guide holder between screw
and foot.
Tighten screw.
Mark first line with pencil or
tailor's chalk, and sew.
From second line, just sew,
following seam of first line using
guide.
Interval between seams can be
adjusted by moving guide in
direction of arrow.
-33-
Page 37
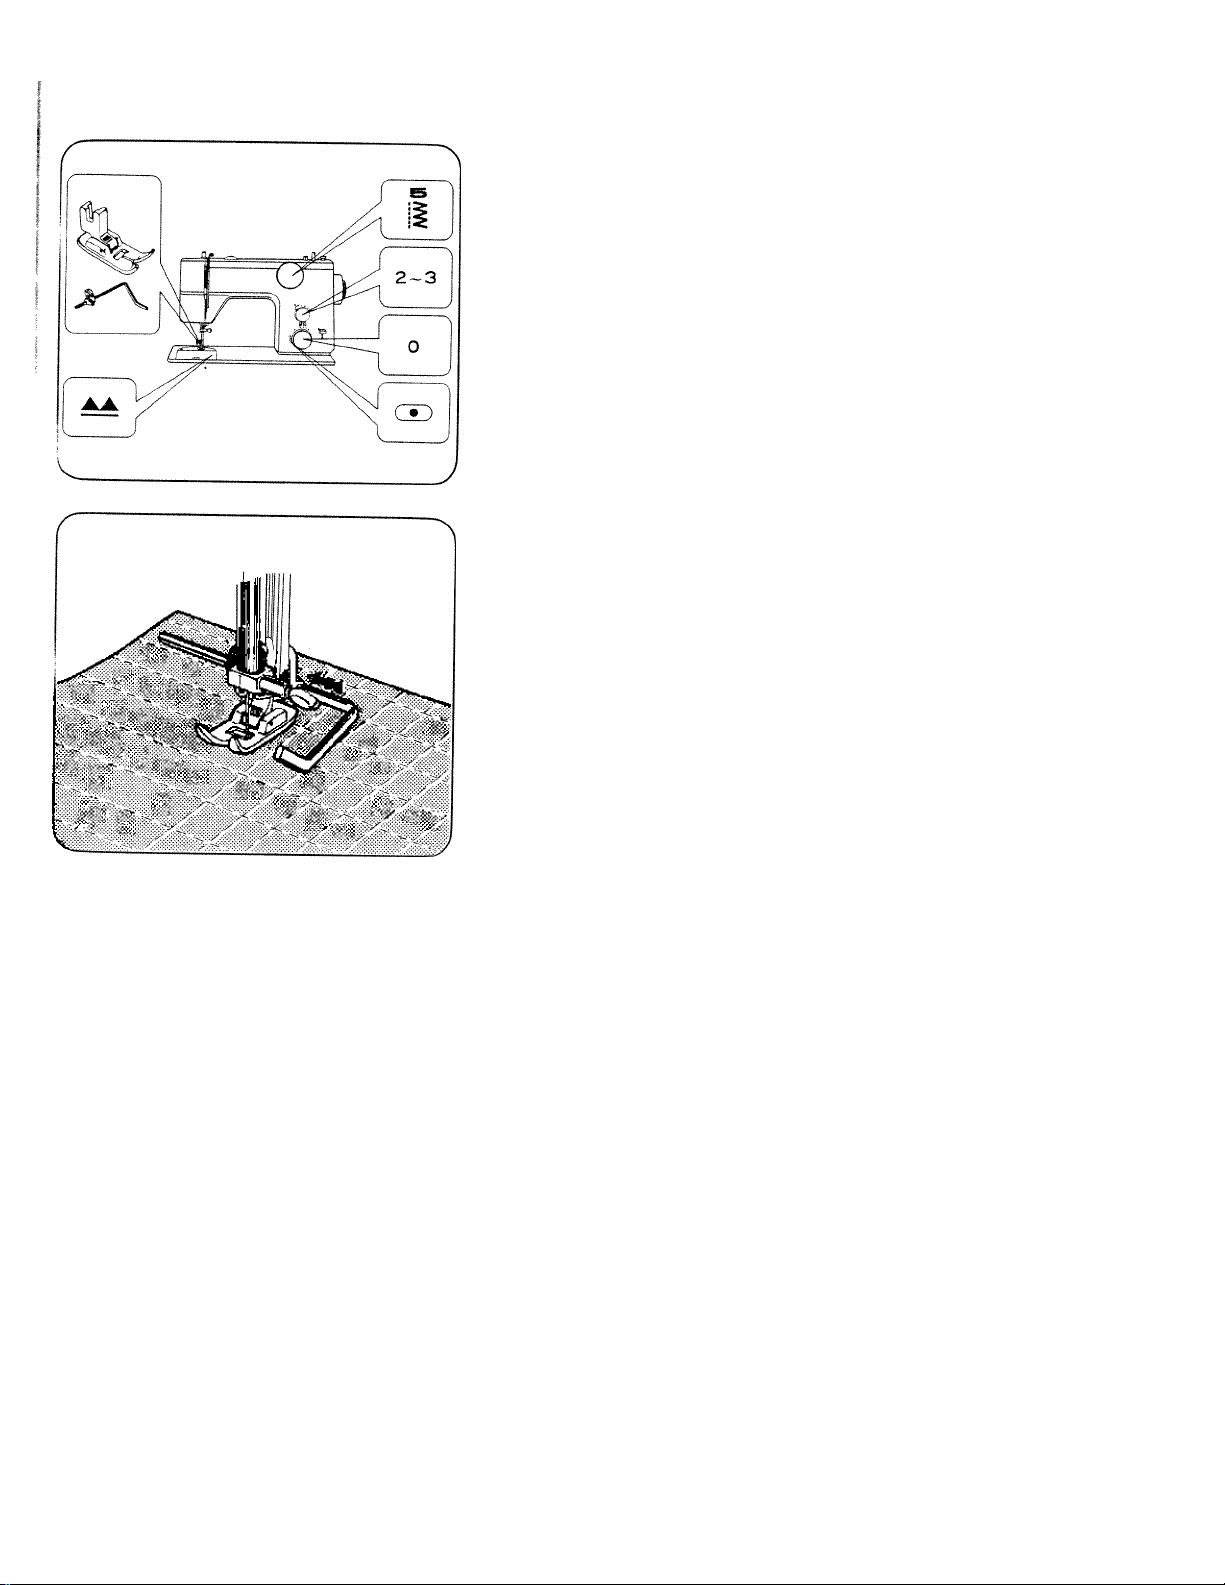
15. QUILTtNG
Set machine as shown.
Baste layers of material to
prevent them from slipping out
as you sew.
Attach quilting guide and sew in
the same way as pin tucking.
-34-
Page 38
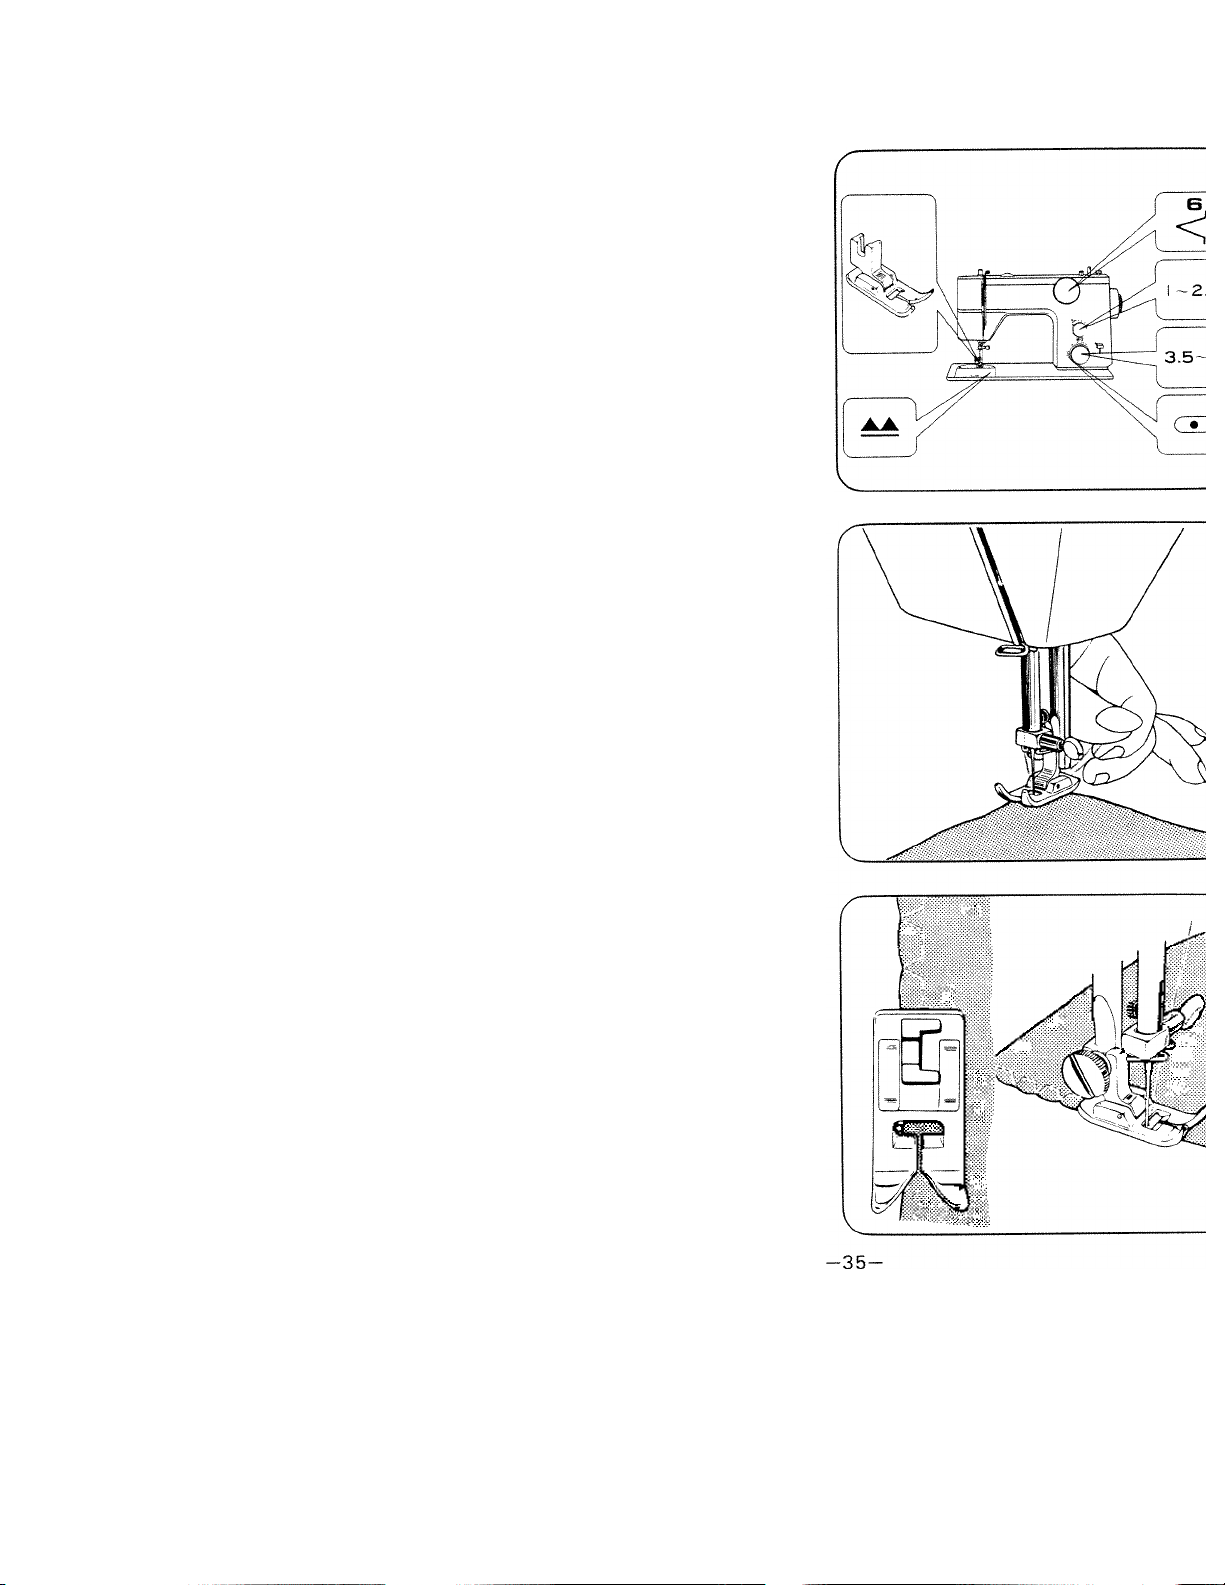
16. SHELL STITCHING
Silk, nylon organdy or similar
sheer fabrics are suitable.
Set machine as shown.
Fold edge of material. With
folded edge to left, place it under
presser foot.
Pull thread ends towards back
when starting sewing.
Make sure needle misses raw
edge of fold when it moves side
ways.
Page 39
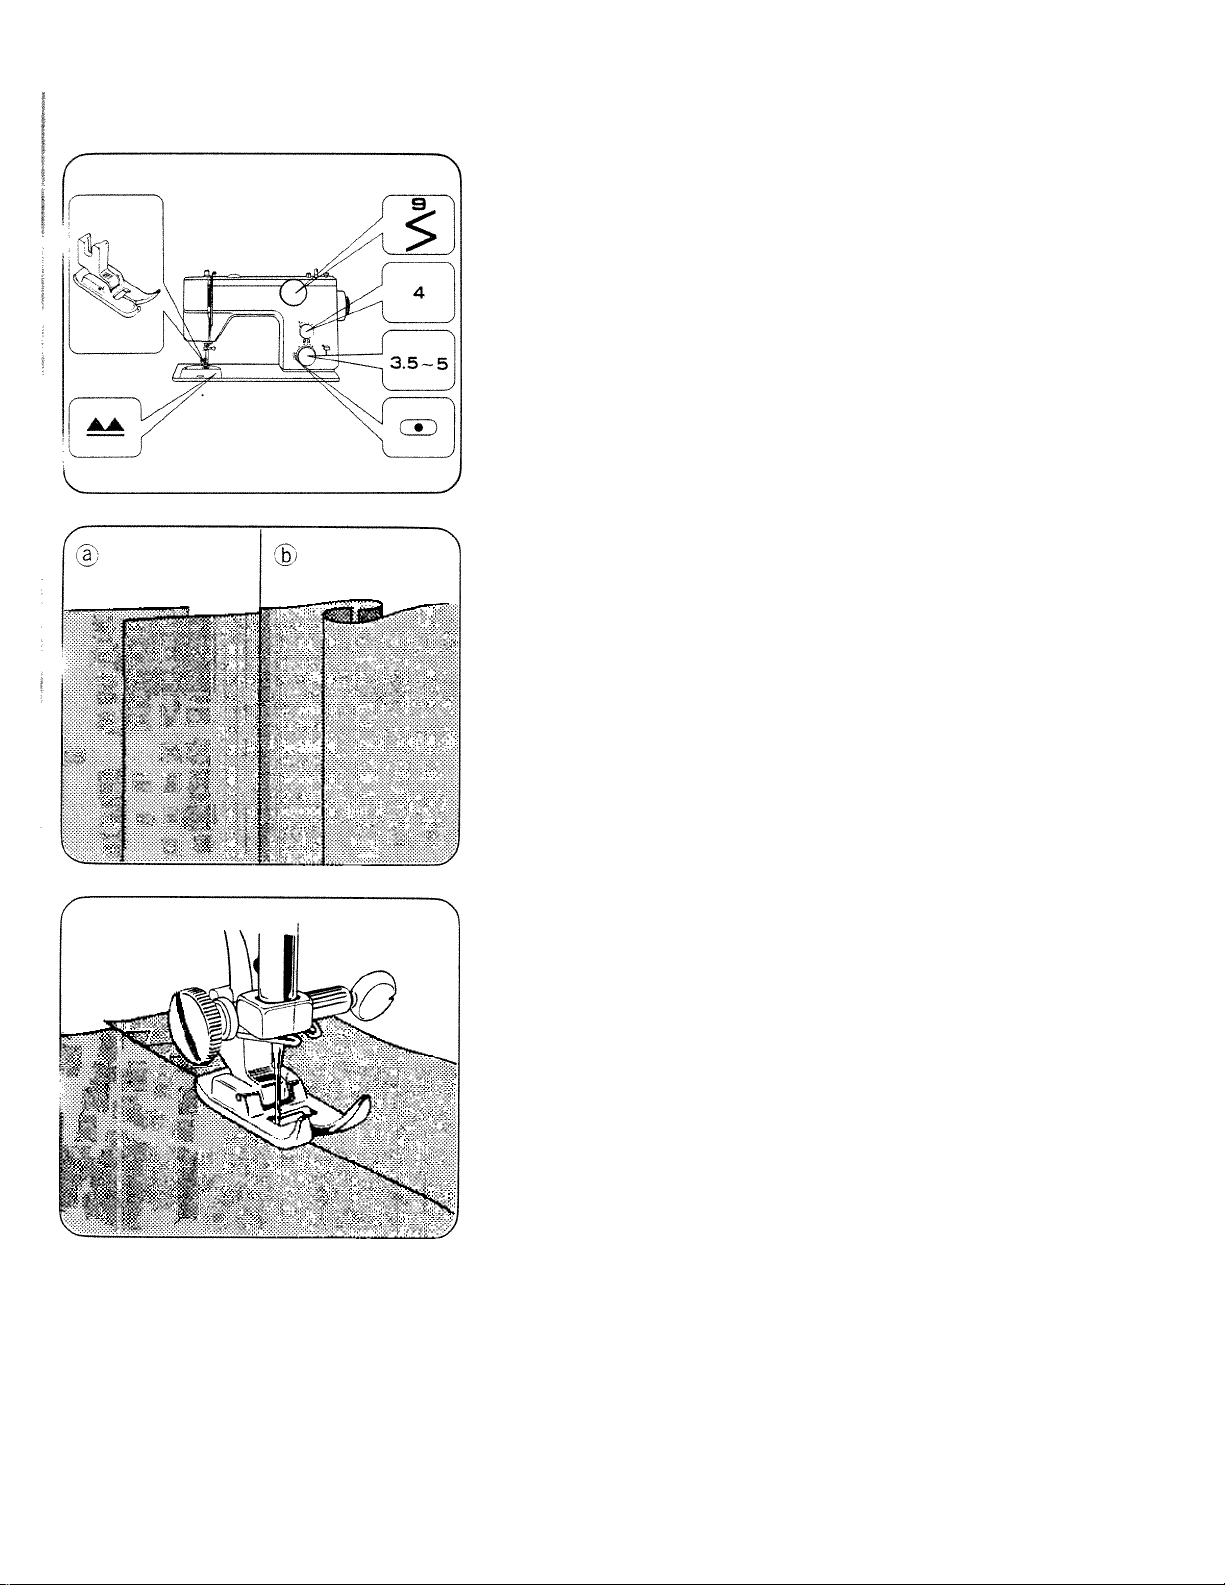
17. LAPPED SEAM SEWING
Set machine as shown.
Place one piece of fabric over
another according to the width
of stitch size.
(a- For non-fray fabrics.
(b) For easy to fray fabrics.
-36-
Sew over folded area from right
side.
Page 40
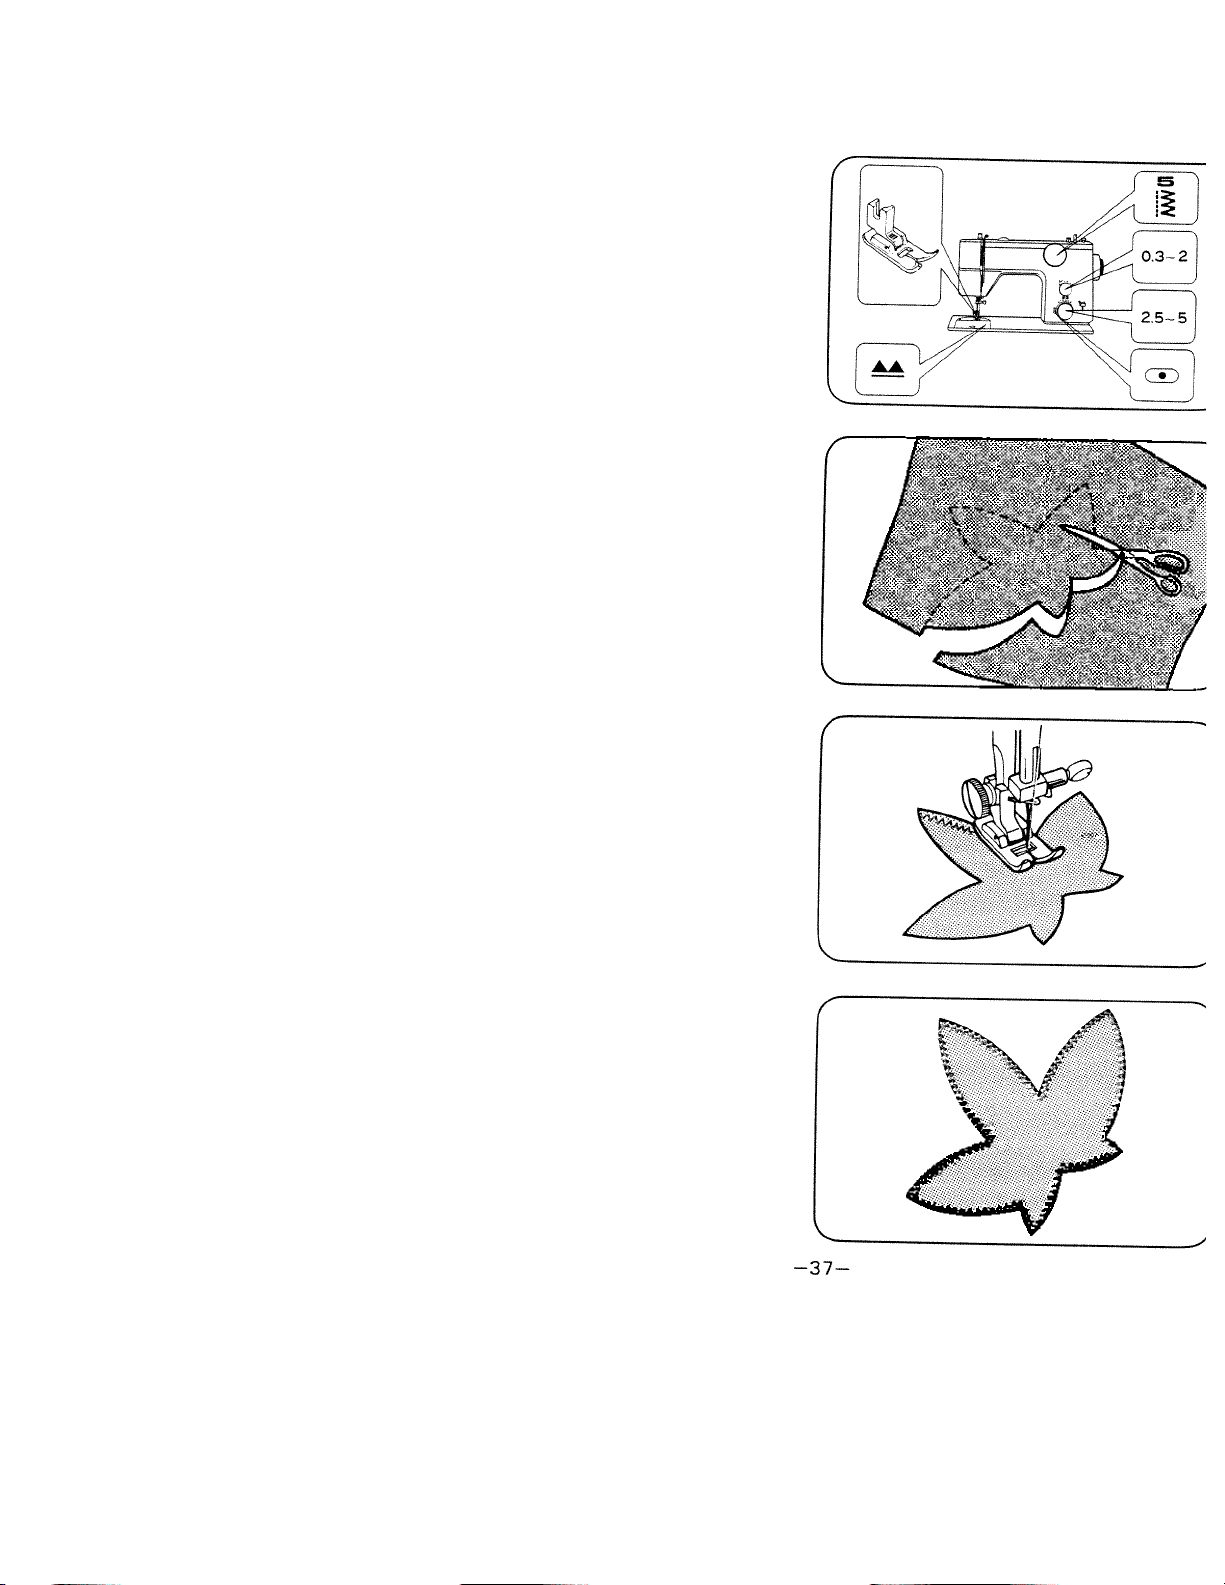
18. APPLIQUE WORK
Set machine as shown.
Draw design on material to be
used as an applique and cut it out.
Place cut-out on base material
and baste it.
Sew around outline with zigzag
stitch adjusting stitch length and
width according to shape and
size of cut-out and type of base
material.
To change direction at corners,
or to sew very small circles, stop
machine, positioning needle Just
away from edge of cut-out, lift
presser foot and turn material.
Lower presser foot and continue
sewing.
Sew a few stitches at end with
zigzag width at 0.
This is to prevent unstitching.
Page 41
,/
-----------------Needle
No. 9
No. 1 1
No. 14
Thread
120-100
100-80
60-50
______________________________'.......
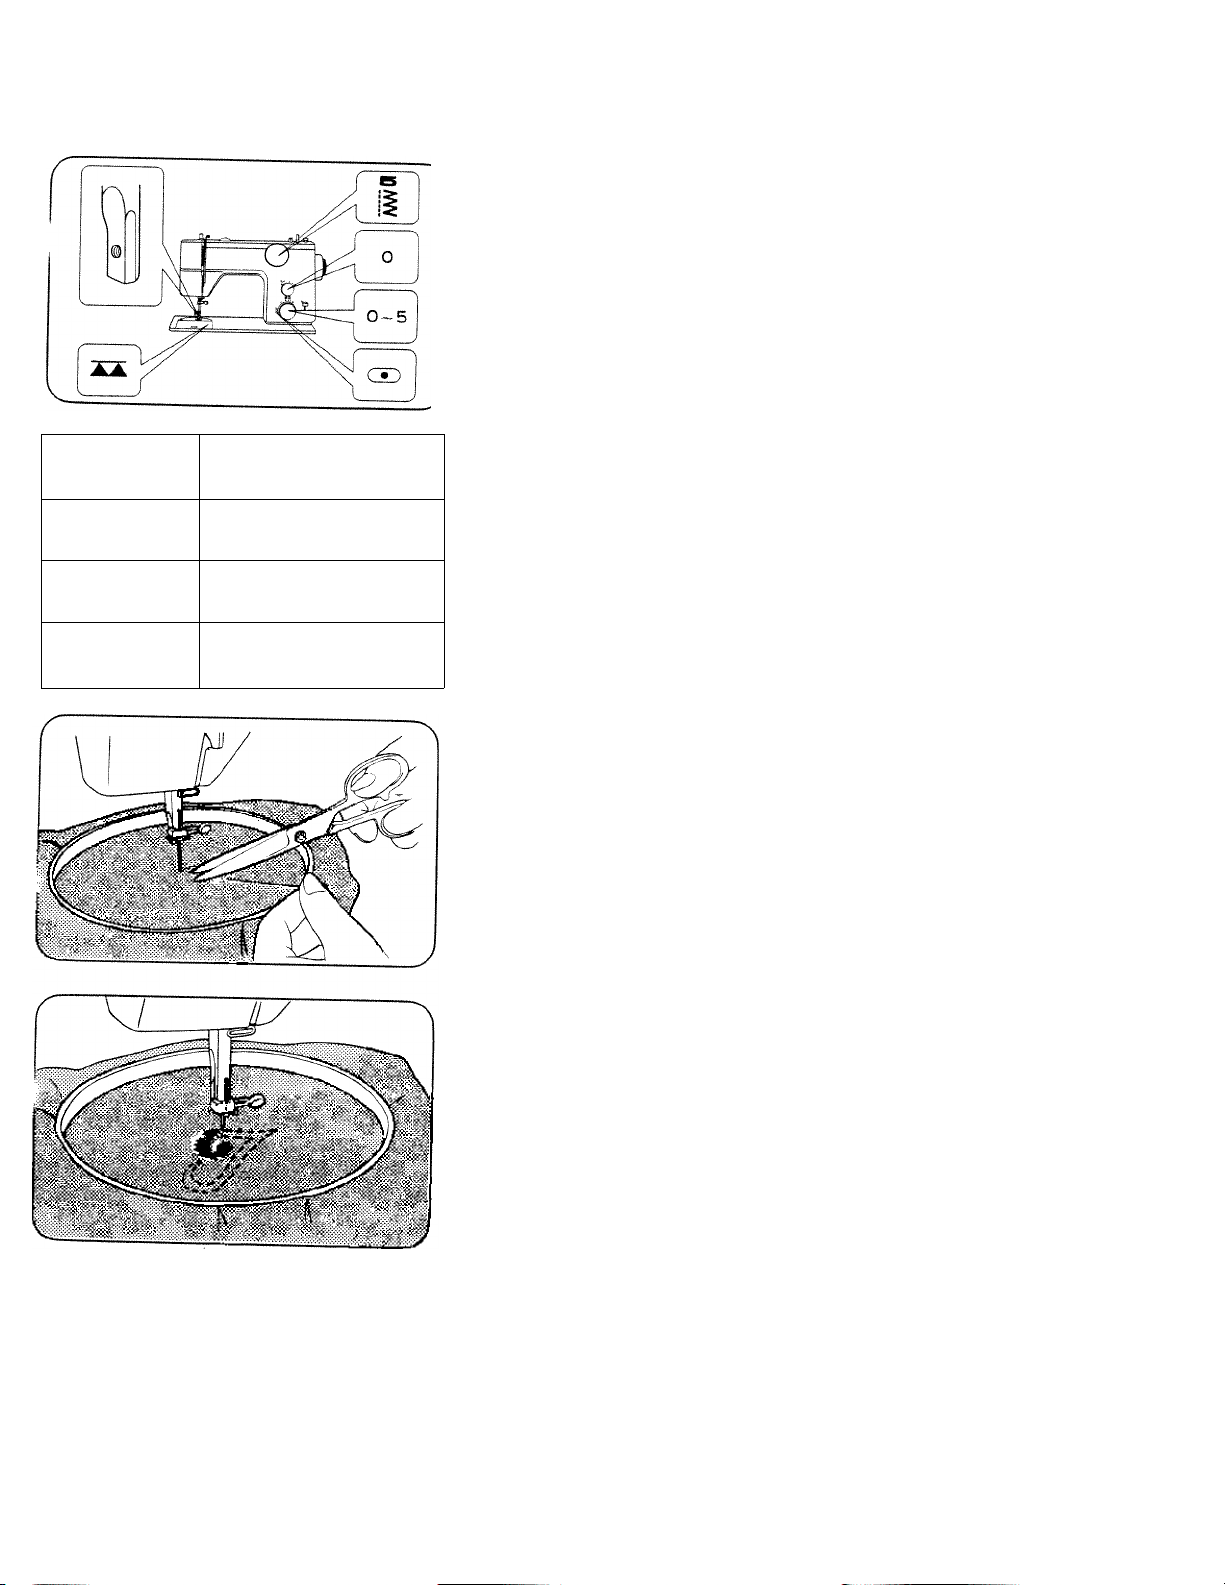
19. EMBROIDERY
Set machine as shown.
Remove foot, and holder screw.
To avoid lower thread being
pulled up, reduce upper thread
tension.
For good embroidery, it is
important to use correct needles
and thread.
Use thin embroidery silk for
upper thread and a thinner silk
of same kind and color for
lower thread.
Trace your design on material
and center it in embroidery hoop.
J
Make sure material is taut.
Puli out lower thread by turning
hand wheel towards you while
holding upper thread lightly.
-38-
Lower presser foot lifter.
Hold both threads and start
sewing along outline of design
with satin stitch.
Continue sewing guiding hoop
by hand.
To finish filling, sew several
stitches with zigzag width at 0.
Lay typewriting paper underneath
when embroidering sheer fabric.
Page 42
20. MAINTENANCE
Your machine requires regular
cleaning and oiling for satis
factory sewing performance.
A machine which is used for a
few hours a day needs to be
cleaned and oiled once a month.
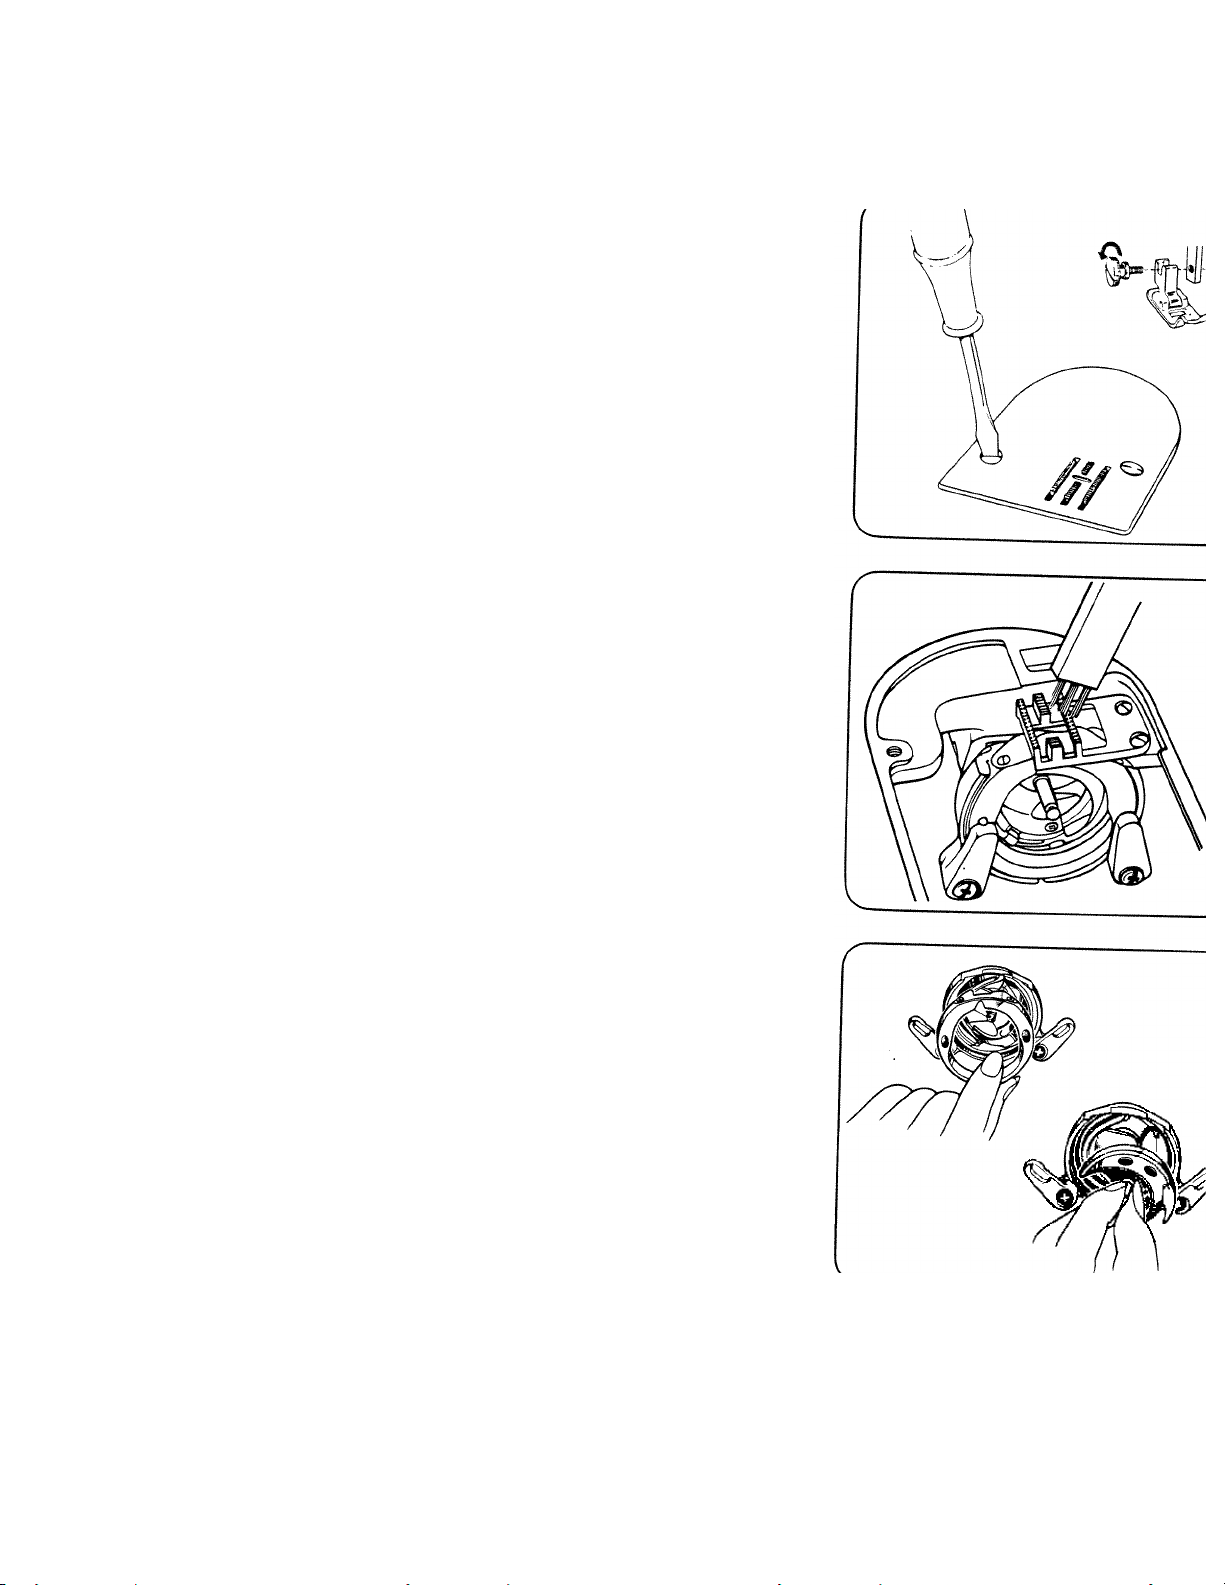
Cleaning
Remove foot and needle.
Remove needle plate.
Brush off all dust and lint on feed
dog with cleaning brush.
Turn latches outwards.
Remove hook race cover.
Remove hook. Clean hook race
with a cleaning brush and a soft
cloth.
-39-
Page 43
^ r
Oiling
Use oil manufactured specially
for sewing machine use. Other
oils will eventually cause
mechanism to jam.
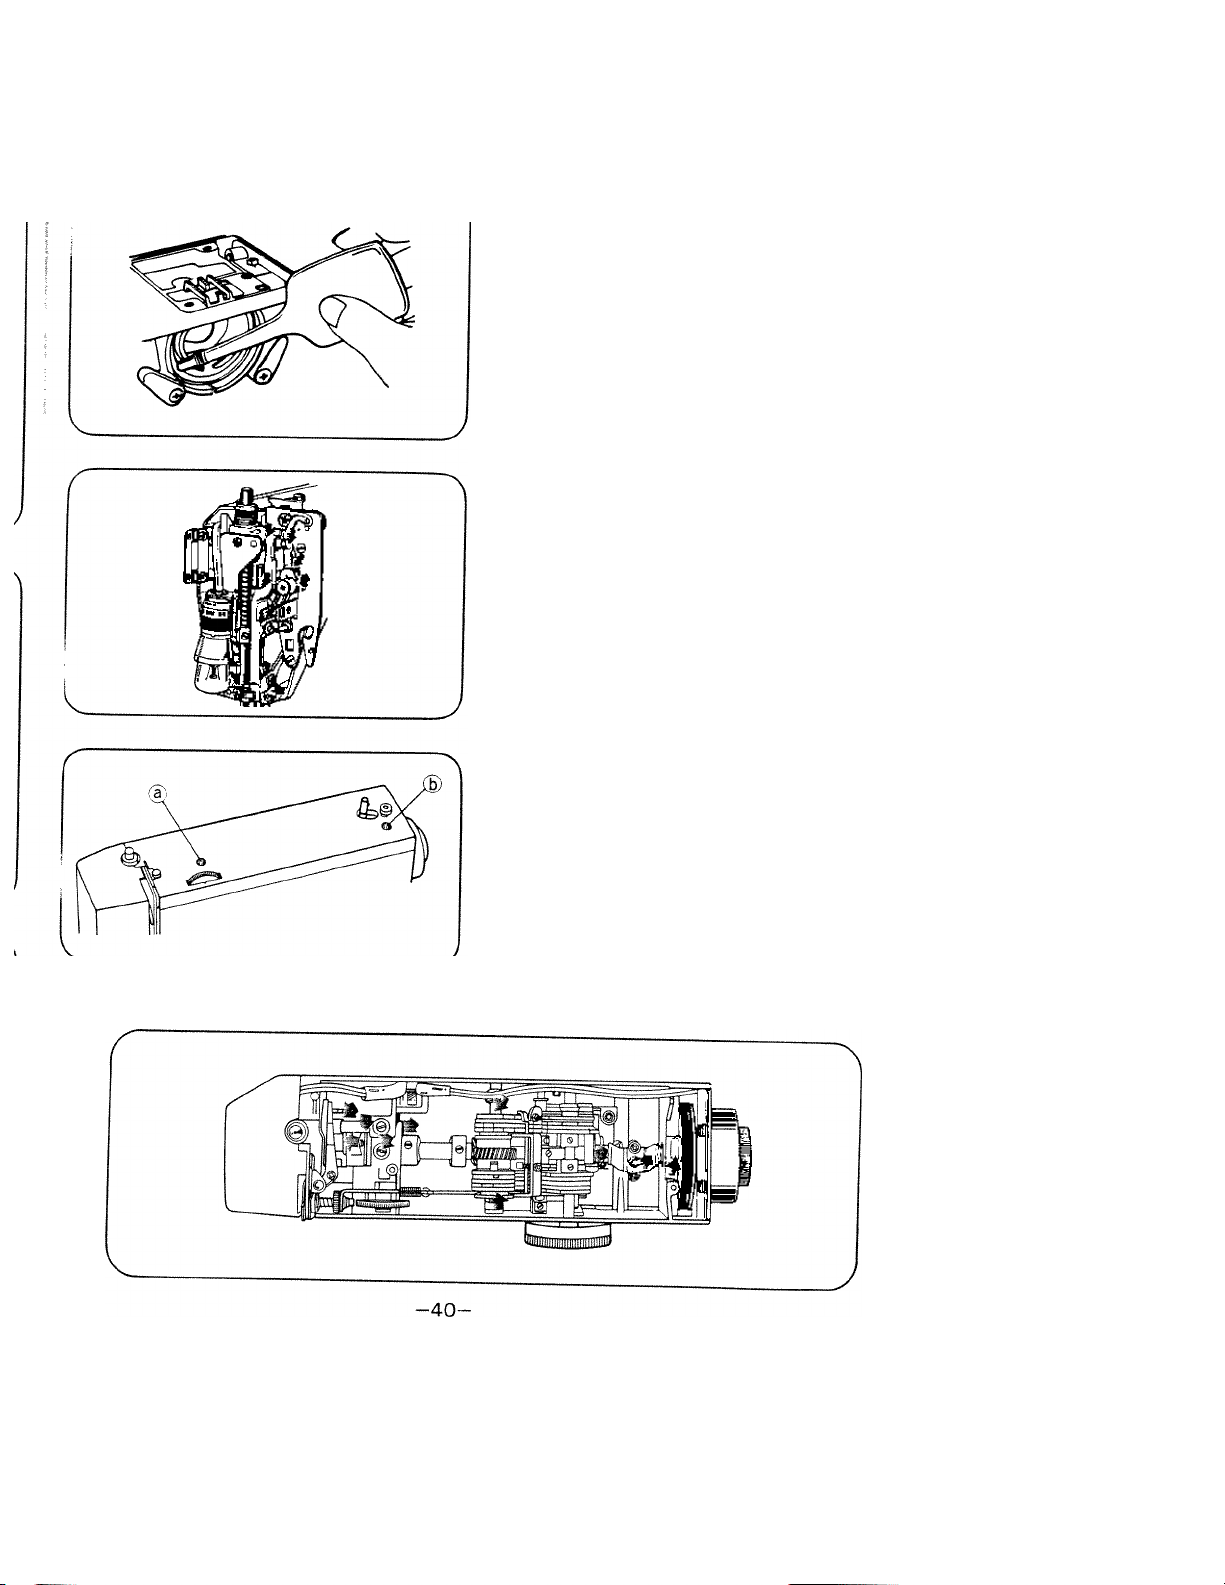
Apply one drop of oil to part of
hook where friction occurs.
Open face cover and apply oil in
the same way.
Be careful not to apply too much
oil or it may stain your material
and cause some sewing difficulty.
After oiling, run machine for 1 -2
minutes to allow oil to penetrate
to every part.
Remove top cover by loosening
screws (a) and (g) with large
screwdriver.
Apply one drop of oil to lubricating points indicated by arrows.
Page 44

21. TROUBLE CHART
PROBLEM
Breaking lower
thread
Skipping stitches
Irregular stitches
The material not
fed correctly
PROBABLE CAUSE
Thread not wound evenly on the bobbin
or not drawn up correctly
Lower thread tension too tight
Lint stuck in the bobbin case and inside
the tension spring
Needle not fully inserted
Needle bent
Size or type of needle and thread not
suitable for the material
Incorrect upper threading
Too much oil on the hook
Incorrect size of needle for the material
Upper thread tension too loose
Incorrect lower tension
Pattern selection dial not set correctly
Incorrect feed dog height
Lint stuck on the feed dog
CORRECTION
P.10, P.15
P.12
Remove lint
and fluff with a
cleaning brush
P. 7
P. 7
P.16
P.13
P.40
P.16
P.19
P.12
P.17
P.12
P.39
-41.
Page 45
PROBLEM PROBABLE CAUSE
CORRECTION
The material
puckers
Breaking needle Needle not correctly inserted
n.b. If trouble is still apparent in the machine, please consult your nearest
dealer.
Do not try to correct fault by yourself.
Upper or lower thread tension too tight
Stitch too long for material
Thread too thick
Incorrect threading of upper or lower thread
Needle bent
Needle clamp screw too loose
Upper thread tension too tight
Needle too fine for the material
Dials and levers have been changed while
the needle was down in the material
Zigzag width set more than 2.5 while twin
needle was attached
P.12, P.19
P.17
P.16
P.13, P.1 1
P. 7
P. 7
P. 7
P.19
P.16
P.17, P.20
P.14
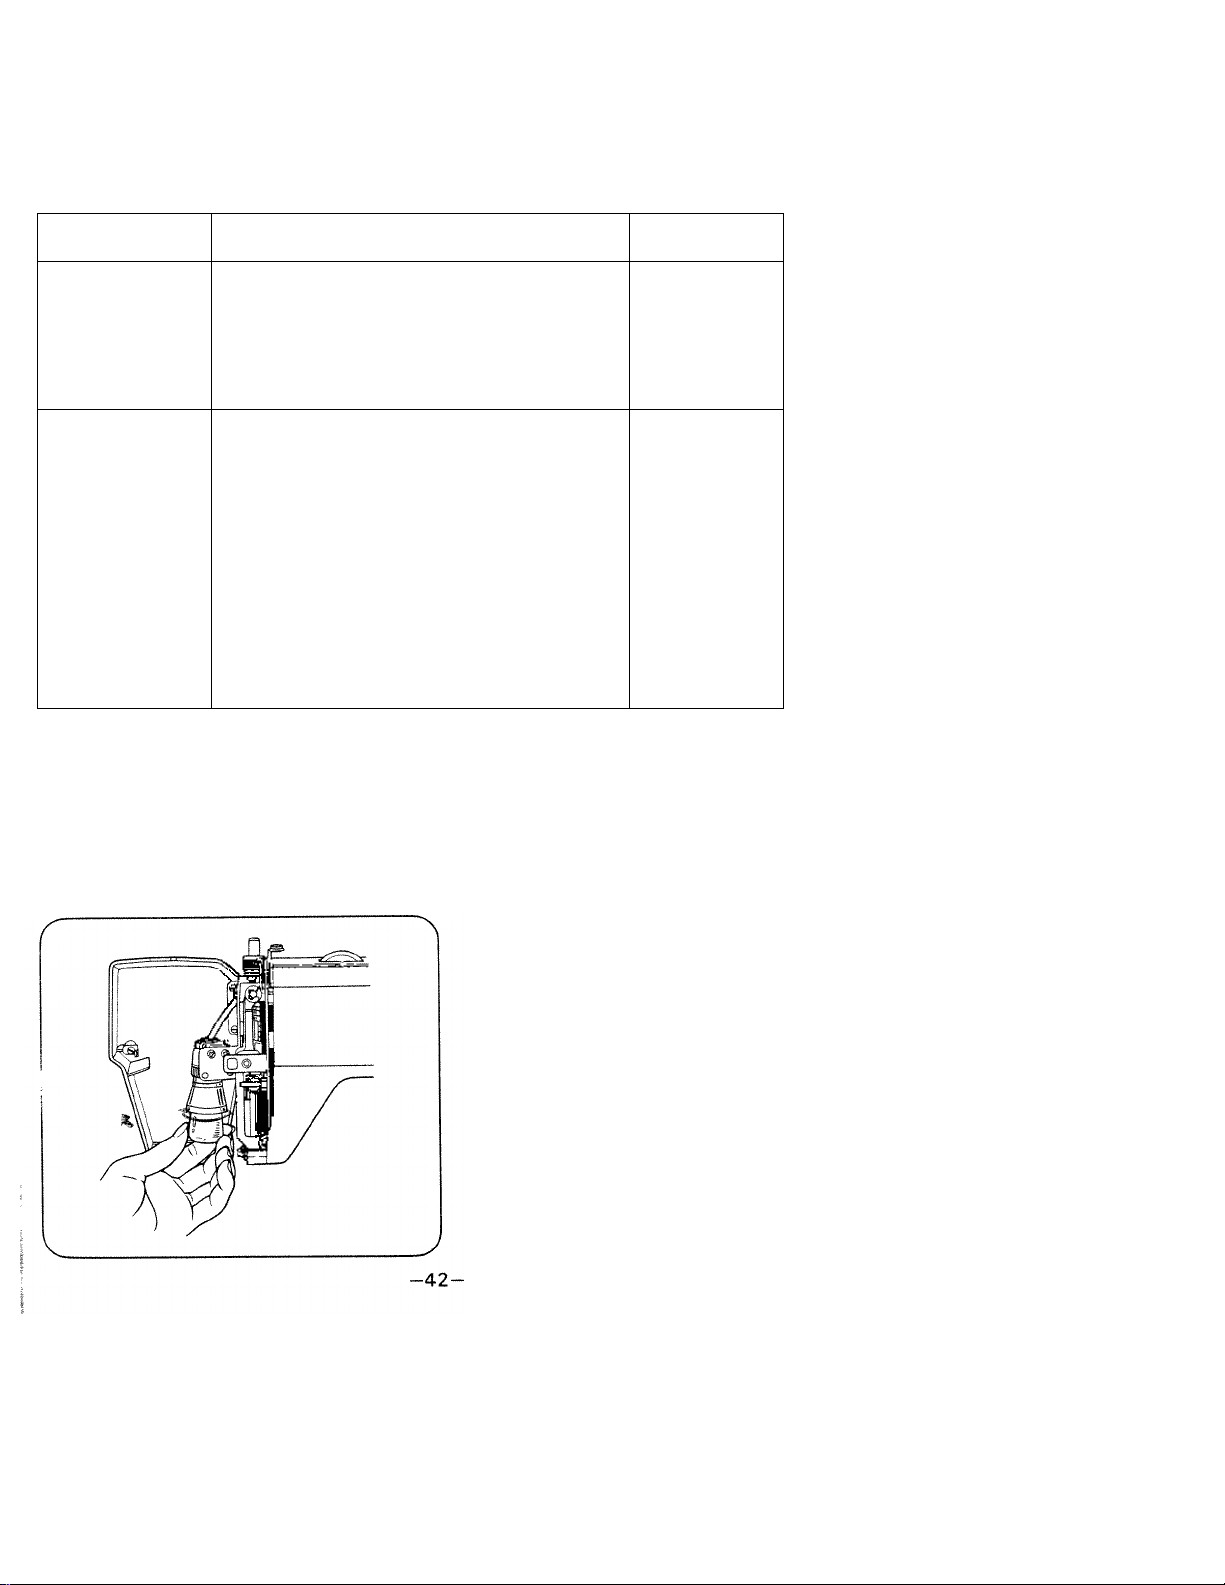
Changing Light Bulb
Unplug the machine.
Open face cover as shown.
Remove bulb by unscrewing it
in counterclockwise.
Install a new bulb by screwing it
in clockwise. '
 Loading...