

Page 1

DELUXE i/-7s:ftss
ZIC ZAC SEWING MACHINE
Page 2

CONTENTS
Welcome
Description of machine-Model , . ' ^ . 3
Replacing the Needle
Needle arid Thread ...........................................................................,' ' '
Winding the Bobbin, How to wind the Bobbin evenly
Threading the Bobbin cast'................................................................................
Ad|ustinq the Bobbin tension...........................................................................
Removing the Bobbin case................................................................................
Inserting the Bobbin case...................................................................................
Threading the machine
Straight stitching
To Remove the work.........................................................................
To Regulate the length of stitch
Reverse sewing
To Regulate the stitch foimation
To Regulate the needle tension...................................„ a
TO Remove accumulated lint or clean Hook & Race ■
................................................................
......................................................
.....
......................................................................
.....................................................
......................................................................
....................................................
9
9
10
10
n
11
12
To make zigzag stitch
To make satin stitch.................................................................................
To make zigzag stitch ............................................................................
To sew vanous pattenis ■ • •
Needle position lever ....................................................................................
To sew various patt6irns....................
To change the presser foot
To make Buttonholes
To make over lock stitch
To turn a corner...............................................................................
To blind stitch
To hem (Hemrner foot)..............................................................................
To make a felled seam
To use cloth guide and thumb screw
Zippers ............................................................................ ■
Three positions of feed dog, Adiusting the pressure. To do
embroidery, darning and for sewing on buttons
Embroidery ........................................................................................................
Darning ....................................................................................
Buttons sewing ..........................................................................
Stretch stitching
Sewing light. To replace the bulb
To oil the machine...........................................................................................
Do not oil the motor......................................................................................
Operating hints...................................................................................
................................................................
...
■
............................................................................
............................................................
.................................................................
...........................................
..................................................................................
...
' '
...................................................................
..............................................
....................
...............
'
13
14
14
14
15
15
16
17
18
18
18
19
20
20
■ 21
22
■ 23
24
25
■ 26
28
28
29
Page 3
WiLCOMi
W»lcc»Tit to the growing family of h<^y ov¥n«rs of this new model zigzog
mochine.
You now hove one of the finest modern fcncy zigzog mochines mode, wirti oil
these wonderful features.
★ Tension Dial-allows the tension of the upper
thread to be easily and accurately adjusted to
suit the material.
★ Instant Reverse Sewing-by pushing the reverse
button in,
★ Zig-Zag Pattern-can be easily changed while
sewing by moving the zigzag lever.
ir Modern disc Balance Wheel.
★ Snap out Race-for convenient cleaning of race
and hook.
★ Automatic Zig-Zag Petterns-can by easily
replaced.
•k Stretch Stitching-by selecting lever.
MODEL
217EDSS
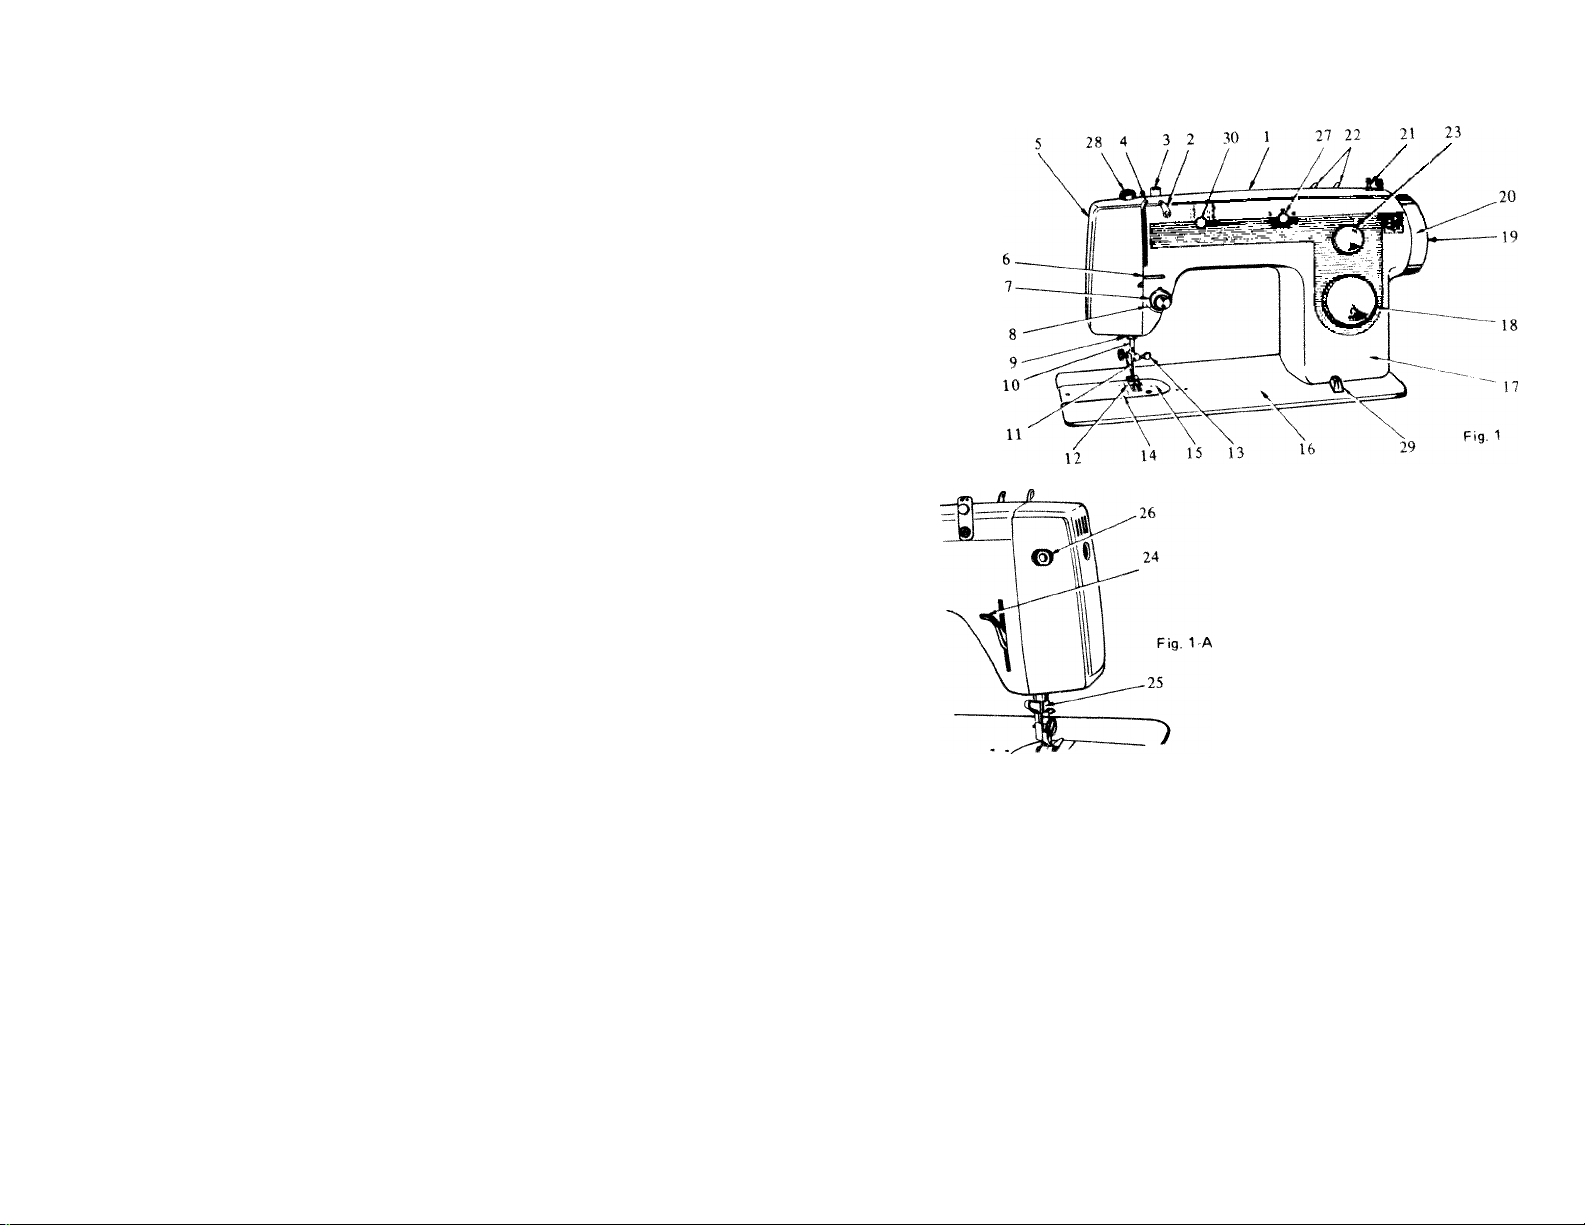
DiSCRIPTION OF MACHIN!
1. Arm cover
2. Arm cover thread guide
Bobbin winder thread
3.
guide
Thread take up lever
4.
Face plate
5.
Armthread guide A
6.
Tension dial
7.
Check spring
8.
Arm thread guide B
9.
Needle bar
10.
Needle
11.
This mochin« is precision built for o lifetime of sewing pleosure It will reqtrire
o mlnimimt omount of molnlenonce and will give the moxitnum in first clots
service.
This mortual provides oil the informotion necessory to operate the mochine ond
we suggest you reod the following instructions very carefully in order to get
the most from your mochine.
Page 4
REPLACING THE NEEDLE
MODEL
207EDSS
1 2. Presser foot
13. Needle damp
14. Slide plate
15. Needle plate
16. Bed plate
17. Arm of machine
18. Stitch Regulator dial
(Reverse button)
19. Stop motion knob
20. Balance wheel
21. Bobbin winder
22. Spool pins
23. Zigzag dial (lever)
24. Presser bar lifter
25. Thread cutter
26. Sewing light switcli
27. Needle position lever
(Reset lever)
28. Pressure regulator
29. Drop feed
30. Stretch stitch selector lever
NEEDLE
CLAMP
Note; Use standard 15 X 1 needles,
ovoiloble at all sewing mochine stores. (For
correct size consult chort on page 4).
-FLAT
SIDE
To replace the needle, raise the needle (11)
to its highest point by turning the balance
wheel (20) TOWARD YOU by hand.
Loosen the needle clamp screw (A)
F,9. 3
Remove the present needle ond slide the new needle up into the needle clomp
(13) I flat side toward the balance WHEEL 'i as for as it will go.
When the needle hits the top it is m correct position, then fasten the needle
clomp securely. For best sewing results chonge needles frequently.
Page 5
NEiDLI AND THREAD
Never use a benf needle, nor cxie with o blunt point, since this couses imper
fect stiJehes ond moy couse the needle to breok. Unless the needle is in
CLEAR TO THE TOP, FLAT SIDE TOWARD THE BALANCE WHEEL, the
machine will be out of "time", ond skipped or imperfect stitches will result
end needles moy break.
The size of the needle should conform- to the size of the thread ond both should
be suiloble to the material. Use a needle sufficiently lorge to permit the
threod to poss freely through the eye. In general sewing, use the some size
threod in the bobbin as used on top. For detoiled informotion consult follow
ing chort,
NEEDLE AND THREAD SIZES (USE 15x1 NEEDLE ONLY) CHART
Sizes & Grades
of Needles
( Medium-Fine)
Type of Fobric
ond
Work to be Done
Medium light.weight & summertime fobnes.
For house dresses. children 's dresses
woshoble cotton dress, oprons, light-weight
cur toms.
SIZE OF THREAD
“
Cotton Silk
80
to
Twist
100
..........
Linen
0
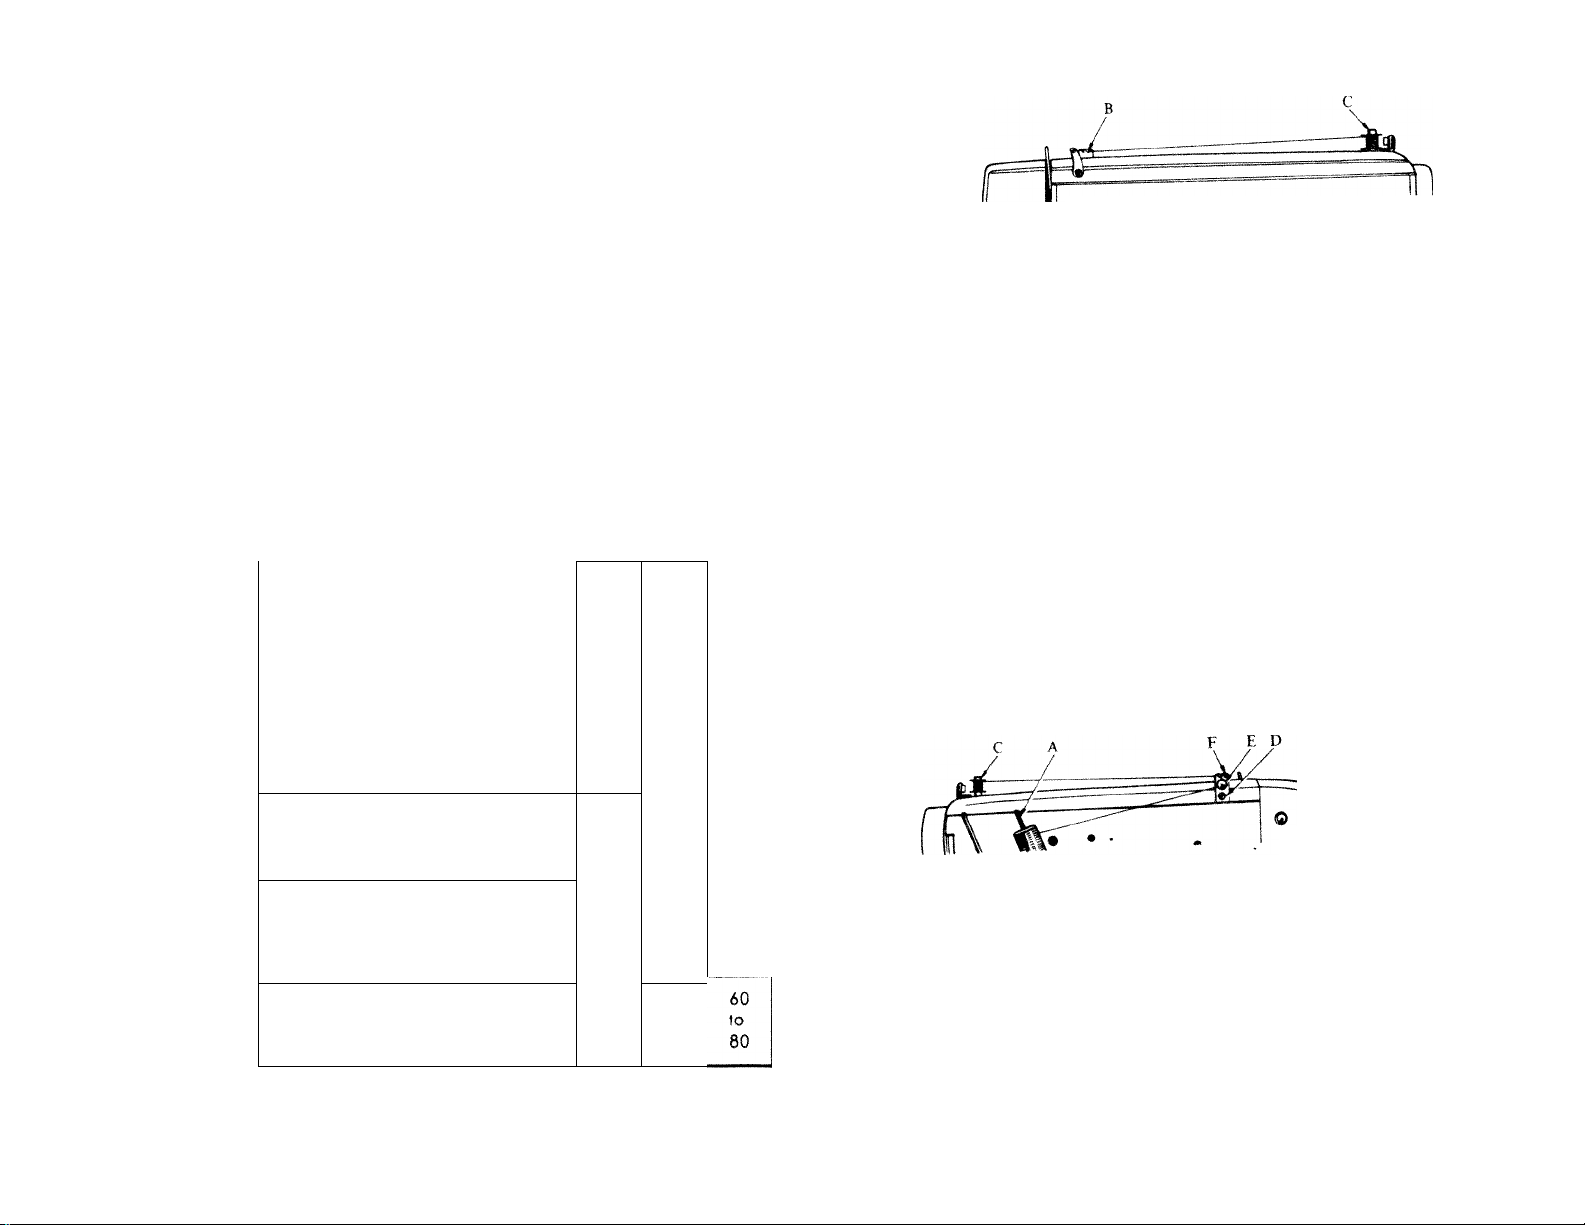
WINDING THE iOBBIN
Fig. 5-A
1, Hold the balance wheel (20) with your left hand, and with your right hand loosen
the stop motion knob (19) by turning it toward you. You can now turn the
balance wheel without the needle bar and other sewing mechanism moving.
2 Place the bobbin on the bobbin winder spindle (C) and push it down firmly. Press
the bobbin winder spindle (C) to right until a "Click" is heard. This engages the
bobbin winder with the balance wheel.
3, Place a spool of therad on the spool pin (A), run the thread under the tension disc
(E) and then through the left slot of thread guide (B) and back to the bobbin on the
spindle.
4 Bun the end of the thread through any hole in the top side of the bobbin from the
inside out, leaving 3 to 4 inches of thread projecting from the bobbin. Thread
should not be allowed to catch over the edge of the bobbin.
5. Now, you can operate the machine as in ordinary sewing and the thread will be
wound. Operate the machine slowly to wind the bobbin evenly.
6. The loose end of the thread which is threaded through the hole in the bobbin should
be held by hand until a few coils are wound. Then break off the loose end.
7. When the bobbin is completely wound, stop the machine and press the bobbin
winder spindle (C) to left so that the bobbin winder disengages the balance wheel.
Do not wind the bobbin so full that the thread extends beyond the sides of the
bobbin.
8. Break off the thread, and remove the bobbin.
9. Hold the balance wheel with your left hand and with your right hand tighten the
stop motion knob by turning it away from you. (See Figs. 5-A, 5-B & 5-C)
14
(Medium )
16
( Light. Heovy)
18
(Medium-
Heavy)
19
(Heovy)
Dress silks ond coMon. iighl-weight woolens,
draperies, fobric furnishings. For genero!
household sewing, fine men’s shuts, smocks,
window droperies and fobric decorations.
Heavy cretonne, modros, m usfm, brocodes
and, qu’lts.
For men’s wo rk shirts, smocks ond oprons.
heovy quilling ond fobne furnishings.
Heavy woven cooling, light-weight convos.
bed ticking, upholstery ond owning moterials, slipcover fob rics.
For work or sports uniforms, suits mode
of strong linen or cotton fo brics. ownmg
slip covers ond mottre sses.
Heavy woven suiting, coating duck, tick,
ing. drilling, convos and socking, for heovy
wash uniform s, bedding supplies for hospilois ond comps.
60
to
80
40
60
30
40
______
10
to
30
A & B
Twist
C
Twist
D
Twist
E
Twist
HOW TO WIND THE BOBBIN EVENLY
Rear view
of machine
Fig. 5-B
To correct uneven winding of the bobbin, proceed as follows.
1. If more thread winds at the top of the bobbin, loosen screw (D) and shift thread
guide (£) siightiy downward.
Repeat as necessary until bobbin winds evenly. (Fig. 5-B).
2. If more thread winds at the bottom of the bobbin, loosen screw (D) and shift
thread guide (E) slightly upward.
Repeat as necessary until bobbin winds evenly. (Fig. 5-B).
3. When winding the bobbin, be sure that the thread goes under the tension disc and
through right slot (F), and then to the bobbin winder. (Fig. 5-C).
Not* : This machine uses standard 15 class bobbin.
5 -
i'
Fig. 5-C
Page 6
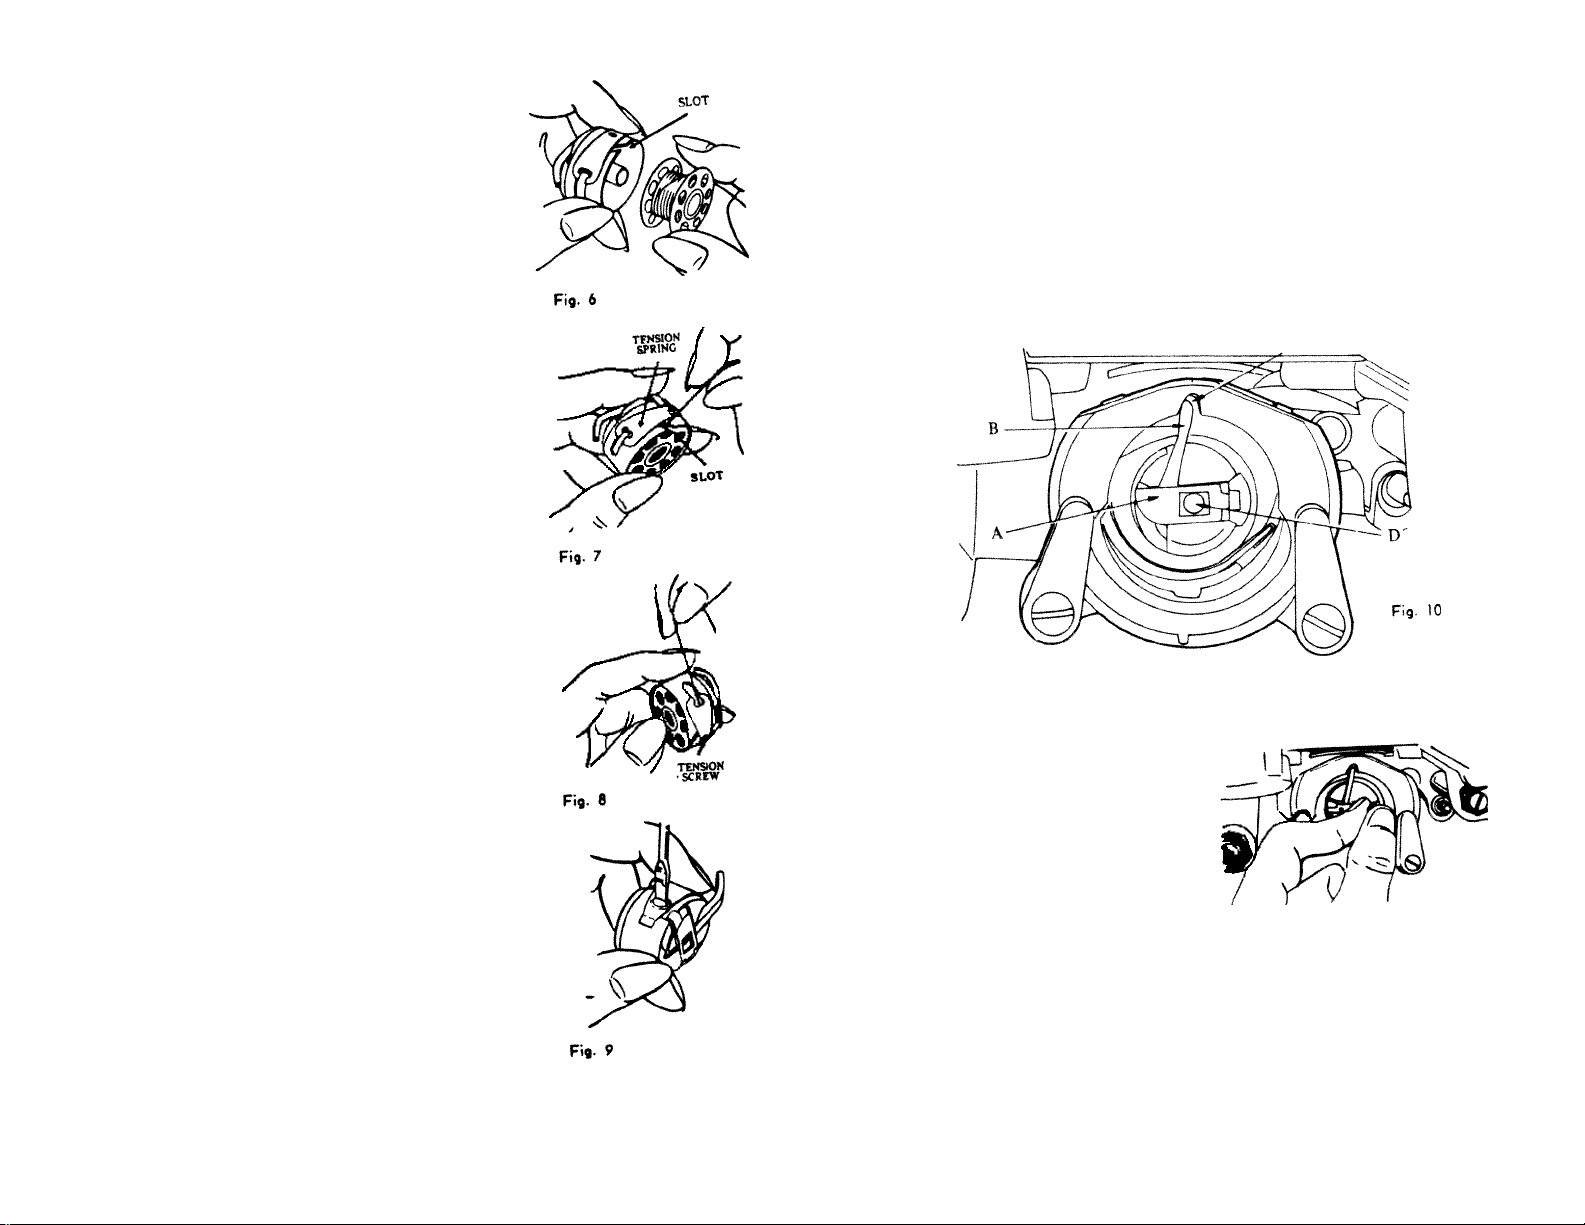
THREADING THE BOBBIN
CASE
Hold the bobbin cose between the thumb
Old forefinger of the left hcnd with the
slot focing upword. With 3 or 4 inches
of thread trolling in the pdm, hold the
bobbin between the thumb end first two
fingers of the right hend. (Fig. 6)
Insert the bobbin into the bobbin cose ond
pull the (roiling threod into the slot,
down ond to the left until it enters the
long opening under the tension spring.
(Fig. 7)
There should be a slight tension on the
threod -s It IS pulled through the spring
ond the bobbin should unwind freely,
(Fig, 8) Bobbin rotates counter-clock
wise if, inserted correctly,
ADJUSTING THE BOBBIN
TENSION
All mochines ore correctly odjusted before
leaving the factory, therefore it is seldom
necessory to alter the BOBBIN tension.
Should it become necessary, however,
to do so. tighten the tension spring screw
slightly to increose the tension ond
loosen the screw slightly to lessjn the
tension, using the smoll screw driver
provided for the purpose. (See Fig. 9)
Make sure to turn the screw o quarter
turn or less in one adjustment ond test
•he tension.
- 6 -
INSERTING THE BOBBIN CASE
After winding о bobbin ond plocing it in the bobbin case (see родеs 5 ond
6) hold %e bobbin cose lotch with left thumb and forefinger (os expióme
bove) to prevent the bobbtn from falltng out. Keeping the protruding
finoer (ВТ stroight up toword the notch (C) of the roce ring, press the
ьГып cose into the holder post (D) until the protruding finger enters he
notch When in correct position, the mechonism of bobbin cose
the holder post of shuttle hook holding the bobbin cose firmly m ploce^
This operotion is eosy-.. NEVER FORCE IT. Leove three
thread hanging free. This will be brought up through the needle plote hole
os shown on роде 8.
REMOVING THE BOBBIN CASE
Turn the bolonce wheel (20) toword
you until the needle is at its high
est position.
Slide the Slide Plate (14) to the left.
With left thumb ond forefinger, grasp
the hinged latch (Fig. 10-A) at
the front of the bobbin case, hold
ing it securely as you withdrew
the bobbin cose from the holder
post (D) toward you and out of
the machine, (As long os you hold
the hinged lotch (A) as exploined
above, -the bobbin will no. foil out of the bobbin cose.) To
bobbin from the bobbin cose, hold the bobbin cose downword ond permit
the lotch to snap bock .into ploce.
Fig. 11
7
Page 7

THREADING THE MACHINE
STRAIGHT STITCHING
Turn the balance wheel
is at its highest point
Place a spool of thread on the spool pm
through the upper thread guides (A) and (
disc (C') from the Right to Left.
Now bring the threod up, pulling up the check spring
threod guide (D'l and in the thread guide (F'),
4.
and f J'). , I j
Now'thread the needle (Ki from the LEFT to RIGHT ond drew the threod
out about six inches.
Holding end of the thread, turn the bolonce wheel toward you until the
6.
needle moves down ond up again, thus catching the under thread.
When the take-up lever (4) is ot its highest point, puli the end of the
Carry the thread up to and into the eye of the threod take-up lever
(20) by bond toword you until the needle (K)
(22) and pass the thread
S'), down between the tension
possing over
RIGHT to LEFT and down through the threod guides fH"), (I)
needle threod you are hold
ing and the under thread
will be brought up with it
through the needle hole in
■the needle plate (15), os
shown (Fig. 12)
8. Lay both ends of threod
under ond to the bock of
the presser foot (12), os
shown in Fig. 13.
till
) f '
/
23
Fig. 14
Thread the machine. The machine wiU
ft, ,.gz,9 d,., 123) a, I 1 > as show" F,,. 14 The
™,hes„ai9h,s,,.ch.
T„,„ *= hdlonc. wh. 20
t
„ „ ed-habl. .0 1.0 ih. ..™od on -he 0 I. 9
breok. The machine feeds without ossisionce.
Never operate .he moc „„rhine will lock ond connot
,S His IS no. strictly odhered to, your moch.ne will o
be operoted until the thread is cleoned out o*
.............................
he ,d,e,a, ,F. holddc. .heel .0^4,20.
,h h.h.h „0,»
....
::eG:.:rrr:rd:.i.. .h.n..di.ond 00™ „ .o
NOTE f
. ,1,» mnrhine without motenoi under the presser foot.
_______________
..
Fig. 12
TO REMOVE THE WORK
Stop stitching. Turn the bolonce wheel whh He nght ^
you .0 roise the threod toke up lever (4 o s ^ e P
threods.
Fig. 13
8 -
Page 8

TO REGULATE THE LENGTH OF STITCH
The "STITCH REGULATOR DIAL" (18) mokes it possible to obtain different
stitch lengths by a simple turn. Numbers (Bi around the dial lAI and the
Indicotor vC) ore your stitch length guides. The higher the number the
longer the stitch. For heovier materials, use the high numbers. For silks,
nylons and thin moteriols, use the low numbers.
To regulate the stitch, turn the Dial (A) until the Indicator ¡C
stitch length you wont.
if too close to 0, the machine will not feed ot o
in one spot.
NEVER SEW OR USE THE MACHINE
IN ZERO POSITION
and wilt continue sewing
points to the
REVERSE SEWING
The stitch regulator dial (A) is also used to stitch in reverse.
When reverse stitching is wanted for tacking seams, push the Reverse button
(A) in until it stops. The stitch length will remain ttie same because this is
controlled by ttre mechanism.
TO REGULATE THE STITCH FORMATION
(A)
( B)
(C)
Flfl. 16
For perfect stitching, the tension on the upper ond under threads should be
equal and just sufficiently strong to lock both threads in the centre of the
moteriols os shown above (A).
If the tension of the needle threod is too tight, or if that of the bobbin thread
too loose, the needle threod will lie straight along the upper surfoce of the
moterial, thus moking on imperfect stitch, os shown in (B).
if the tension of the bobbin threod is too tight, or if that of the needle is too
loose, the bobbin threod will be stroight olong the under side of the materiol,
thus making on imperfect stitch, os shown above (C).
Note: Be sure to uso the threod suitable to the material. (See page 4)
TO REGULATE THE NEEDLE TENSION
A correct stitch ccn usually be obtained by varying the tension on the needle
threod.
sion of thread. Hence, it is necessary for the user to become fully fomiliar
with the correct tensions through proctice.
All adjustments should be made while
the presser foot is down since an
releose does not permit odjustments
to be made while the presser foot
is up.
To increose the tension, turn the thumb nut
on the tension dial (7) clockwise. To
decrease the tension, turn the nut in the
opposite direction. The thumb nut should
not be turned abruptly but regulated little
by little until the desired tension is ob-
toined.
The quality of sewing depends on the ten
10
^ 11
Page 9

TO REMOVE ACCUMULATED LINT OR
CLEAN HOOK AND RACE
K Turn the bolonce. wheel (20! by hand loword you untM needle ¡s ot us
highest point,
2. Remove bobbin cose,
3, Turn levers (A) & (B) one half turn sideward owoy from pm
4, Remove rjloming ring (O, and hook (D). by grasping stud of hook 'Do
5, Remove accumulated Imt and thread from race ring, hook and race body.
6, Replace hook (D> m race body, with stud focmg ouiword forming perfect
circle with driver i E ),
7. Reploce retoinmg ring (C), polished side out, with pm ot bottom ploced
TO MAKE ZIGZAG STITCH
I
i I I I t I
O D Y Y r' C
Fig. 19
in notch of the roce body,
8. Lock retaining ring with levers (A) ond (Bf.
9. Reploce bobbin and bobbin cose, and commence sewing,
DO NOT ATTEMPT TO FORCE ANY OF THE ABOVE OPERATIONS,
itili
■Y Y h r r"
Fig. 20
1! The Zigzag dial (23) controls the width of the stitch. By moving the
dial from right to left you can widen the stitch from STRAIGHT to
MAXIMUM ZIGZAG WIDTH.
2) When the dial is set at the extreme right position, the machine will make
straight stitch, {See Fig. 19)
3! The further you move the dial to left, the wider zigzag stitch will be.
The widest zigzag stitch is obtained when the lever is set to the extreme
left. (See Fig. 20)
4) By moving the dial, you can select the zigzag width you desire and sew
the various zigzag stitches.
12
13
Page 10

To make the "Satin" stitch (See 3-page 14
NEEDLE POSITION LEVER
1 Set zigzag dial (23) at the widest position.
2. Bring the stitch regulator dial (18) gradually to closest stitc ,
No?e;^Adjust thread tension so that lower thread stould not appear on
surface of material, and you can get a perfect satin stitch.
To make zigzag stitch V\AA/W
1. Set zigzag dial (23) at the widest position.
2. Set the stitch length at 2 to 4.
3. Commence to sew.
To sew various patterns
By moving zigzag dial (23) as follows, you can sew the various patterns as
shown or by use of zigzag
Pattern to be sewn
1
---------------------------------
3
‘ jiÊÊèK^ JÊ.
7 ttWWL JiWL-
cams
Move zigzag dial (23)
Set lever (23) at the extreme
right position.
Set lever (23) at the widest
zigzag stitch length at 4.
Set the stitch length at Fine,
At slow, even, speed from the
extreme right to left and from
the extreme left to right.
Repeat from the extreme right
to left and from the extreme left
to right at fast speed. To get
uniform curve, the moving speed
must be controlled.
Repeat from the extreme right
to left and from the extreme left
to right at fast speed and rest.
~'Riit~¥t~tHe^l!x and
change to the extreme right
quickly and rest. Repeat this
_stee,
____
_______________________________
Rest at the extreme left and
change to the narrowest zigzag
quickly, and rest. Then change
to the extreme left quickly and
rest.
Slow, even speed from the ex
treme right to left then quickly
back to the extreme right,
_______
Illustration ,
Fig, 19 1
Fig, 20 i
Fig, 20
When selecting needle position, tte needle Set nLdl
position in order not to tear t - respective needle position
position lever (27) to left, center or right for respective
Noi 'ooTorchange needle position while sewing. Otherwise it w.l, caus
the needle breaking.
dZZ)
CH3
dZË)
TO SEW VARIOUS PATTERNS (OR USE OF ZIGZAG CAMS)
Needle position
lever (27)
◄
♦
►
fi
11
i i
1
1 f
"slow, even speed from the extreme right to left, then
i
Position of Zigzag Dial (23)
Best at zigzag and change to the widest
zigzag quickly, and rest.
Then change to the narrowest zigzag quickly, and
to left and from the
“Cl ,o ..0> .. »»7
curve, the moving speed must be controlled,________________
quickly back to the extreme right.
At slow, even speed from the extreme right to left
and from the extreme left to right.
15
_________
- 14 -
Page 11

TO CHANGE THE PRESSER FOOT
1, Roise the needle to ds highest point by turning the bolonce-wheel (20)
toward you,
2, Roise the presser foot (12) by lifting the presser bor lifter (24)
3, loosen me presser foot thumb screw ond remove the foot,
4, Place the grooved side of the selected presser foot ogoinst the Pot of
the presser bar,
TO MAKE BUTTONHOLES
u
1. Set Zigzag dial (23) to the narrow zigzag and Stitch regulator dial (18) to
fine stitch between 0 and 1. (Fine)
2. Sew to desired length (K to L) and stop the machine with Needle in the
material and at left position as shown in Fig. Q.
3. Then, set Zigzag dial to the medium zigzag and turn balance wheel one
rotation so that needle is at right position M (Fig. R) and needle bar at
lowest position, and turn the material 180 degree as shown in Fig. S.
4. Sew a tew stitches (M to N) with the Zigzag dial to the widest zigzag
as shown in Fig. T.
5. Re-set Zigzag dial to the narrow zigzag and sew other-side (N to 0) of
button hole as shown in Fig. U,
6. Sew a few stitches (0 to P) with Zigzag dial to the widest zigzag as shown
in Fig. V.
7. Cut buttonhole using seam ripper, being careful not to cut
stitching on either side. (Fig. 27)
Note ; We suggest you moke lest somples on a piece of the some garment
moteriol, before you sew the -buttonhole on the work you are doing.
Troce length of buttonhole with cholk on the moteriol ond sew slowly
following the markings so that you con perform the buttonhole exoctly
os you desire.
When turning the moteriol 180 degrees, if you pull the moteriol by
force, needle will bertd or breok. Turn it slowly with care.
Needle thread should be slightly tighter than thot of regular sewing
so that you con get belter work.
,5, fosten the thumb screw.
17
Page 12

то MAKE OVER LOCK STITCH
TO HEM (HEMMER FOOT)
r Set stitch regulotor dia! (18) ot 2 or
longer os desired.
2, Set zig/ag dial (23) at desired zigzag
width.
3. Ploce the moterial under the presses foot
and lower the presser bar lifter (24) so
thol zigzag stitching locks over outer edge
of the moterlol. (Fig, 28;i
TO TURN A CORNER
The mochme should be stopped with the needle m the moterial. Roise the presses
bor 'lifter (24) and turn the material m the direction you wish. lower
the presser bar I Tier and start to sew.
TO BLINDSTITCH
Fold the rnateriol to the size of
the bottom fold os shown in A,
Set stitch regulator dial (18) a! 2 or longer os desired.
Set zigzag dial (23) ot desired zigzog width.
Ploce fabric under the presser foot ond lower presser bar lifter (2 i
so that when the machine zigzogs, the stitch will catch mostly on the
hem and will just borely bite into the fold. (B)
After stitching is completed, unfold the moterial os shown in C,
5.
hem desired, with
1/16" overlap on
The spiral formed tongue or scroll of the hemmer foot turns in the edge of
the fobric and forms the hem.
1. Attach hemmer foot.
2. Fold the edge of the fobric over approximately }4 of an inch, then fold
it over again in the some way for a length of about 2 inches.
3. Place the needle ond bobbin threods under the hemmer foot,
4 Insert the fold into the spirol formed opening of the hemmer fool. Move
' the fabric slightly bock and forth until the fold forms scrolled shape.
(Fig, 30-A)
5, Draw the fabric loword you until the start of the hem edge is lUst below
the needle.
6. Lower the hemmer foot ond begin to sew. Guide the fobric into the
hemmer foot while sewing. (Fig. 30-B)
Not* ! Don't push or pull the fabric. Even feeding ts essentiol for good
hemming. The fabric must be kept at the some width in the scroll
of the hemmer foot ot all limes. Prior to 'olding the edge of the
fobric, cut a corner off the edge of the fobric and you can eosily
insert the fabric into the scroll of the hammer foot.
18
19 ■
Page 13

TO MAKE A FILLED SEAM
ZIPPERS
The hemrrmr foot con olso be used for felling. Proceed in the following m^er =
, LOY two pieces of cloth one on top of the other with the.r RGHT
■ sides facing eoch other. The right edge of the tottom p^e must ex-
lend c±>out Vs inch beyond the right edge of the top piece.
2. Sew both pieces of cloth together,
using the hemmer foot like a regulor
presser foot. Use the right edge
of long toe of hemmer fool to
guide the bottom piece of material,
while the left edge of the some toe
serves os a guide for the top piece
of moterial.
3. Open ond spread out motenal ond
place right sides down. Moke sewn
edges of material stand up.
4. Fold the sewn edges over to the
left ond insert them into the scroll of
the hemmer foot. Sew os you would for ordmory hemming.
Use left edge of long toe of hemmer foot os guide, nov.ng ongmol
seom alongside of it, (fig. 3i i
TO USE CLOTH GUIDE & THUMB SCREW
This is on attachment designed os a guide for straight stitching when makmg
wide .hems, pm tucks or when seom widths are wider thon presser foot
ollows.
Fasten the cloth guide to the bed of the mochine (as Hlustroted m
1,
fig. 32) by meons of the thumb screw, inserting the thumb screw into
either one of the two holes in the bed of the machine,
Adiust the cloth guide to the required distonce from the needle and
2.
tighten thumb screw.
Right side of needle
Fig, 34
Machine Setting - |
Zipper foot allows you to stitch right
next to a raised area such as a zipper
or cording. The foot is adjustable so
it can be moved to the left or right side
of the needle without having to turn
the fabric.
Raise needle to its highest position,
attach zipper foot, and set dials for
straight stitching.
To adjust foot for left side of needle;
loosen screw at back of foot and slide
foot to the left so that needle passes
through notch on ri^t side of foot.
Lower needle slowly to be sure it will
not hit zipper foot, and tighten thumb
screw.
For right side of needle, slide foot to
the riglit.
Zipper package will contain easy to
follow instructions for stitching.
Corded tom
Cording gives a professional finish to
slipcovers, pillows, children s clothes
and lingerie.
First, make welting by covering cord
ing with bias fabric and stitching close
to the cord with zipper foot.
Tlien stitch welting into seam using
zipper foot.
20
-- 21 -
Page 14

THREE POSITIONS OF FEED DOG
The drop feed or feed dog moves
fabric forward or backward under the
preser foot. It can be .raised or
lowered by turning(iww ^ icic| )knob
located on the machine base plate.
For ordinary straight or zigzag stitch
ing, turn knob to(-;vvw)' This raises
drop feed to its highest position.
For light weight fabrics, knob can be
moved slightly to the left of^AAAZA )to
prevent feed from marking fabric.
For darning, embroidering and sewnig
Fig 36
on buttons, turn knob to(^ ) to
lower the feed so fabric can be moved
freely by hand
ADJUSTING THE PRESSURE
The pressure of the presser foot (11)
must be regulated for different types
of fabric to obtain proper feeding.
To adjust pressure push down outer
ring (A) Fig. 37-A with thumb and
forefinger. The center button (B)
Fig. 37-A will spring up and then the
pressure can be easily adjusted by
teing pushed down partially for light
fabrics (Fig. 37-B , or all the way
down for medium to heavy fabrics
(Fig, 37-C
EMBROIDERY
Machine Setting-
or
Free-motion embroidery allows you to
move the fabric in any direction under
the needle in order to create your de
sign. Use either a straight stitch or a
plain zig-zag stitch.
Trace design on right side of fabric.
For best results, place fabric in an
embroidery hoop.
Remove all pressure from fabric -
• turn fabric feed to DARN
• press down on outer ring of pressure
regulator to release pressure com
pletely
Place hoop under needle. Run machine
at medium speed, guiding hoop care
fully so needle moves along pattern
lines.
Use straight stitch for outlining and
zig-zag stitch for filling in design. Vary
length of stitch simply by moving hoop
faster or slower under needle. Place
stitches close together for a smooth,
satiny surface. Overlap stitches for an
irregular surface.
TO DO EMBROIDERY, DARNING AND
FOR SEWING ON BUTTONS
Press the fringe (A) of the darner down with thumb and index finger and the
presser knob (B) will pop up. (Fig. 37-A) The pressure will be completely
released. As well, press the "darn” button on the Drop Feed (29)
completely down,
22 --
- 23-
Page 15

darning
BUTTON SEWING
Turn bolonce wheel towards you to get needle to its highest position.
Machine Setting - 1
I
Worn spots on clothing and household
linens can be darned easily with your
machine.
Completely release pressure on fabric
by turning fabric feed knob to DARN
and by pressing down on outer ring o
pressure regulator until center button
pops up.
For greater control, especially when
darning larger areas, place fabric m
embroidery hoop. For large holes
baste a piece of mending material
underneath hole to use as a base for
stitching.
Place fabric under needle. Move fabric
back and forth with an even motion to
cover darning area with closely spaced
rows of stitching. Then turn fabric
and sew another layer of stitching
across first layer of stitching.
Raise presser bar and replace regular presser foot, with button
sewing foot, as shown in Fig. 40. Drop the feed dog os required
for darning and embroidering. Upper and lower threod tensions
remain the same os for ordinory sewing.
Place moteriol or garment together with button under the presser
foot, so that holes in button line up with oWong hole in presser foot.
Adjust width of zigzag stitch to permit needle to pass through
centre of holes in button.
Before sewing with power, turn the balance
wheel by hand towards you to make sure
thot needle will stitch in the centre of the
holes in button. If the needle hits the button
it will break.
Then sew five to six stitches to ottoch button.
When attoching four-hole buttons, first sew one
set of two holes, then stitch into second set of
two holes and lock thread with two or three
plain stitches in lost hole.
24
25
Page 16

STRETCH STITCHING
SEWING LIGHT
When sewing knitted or stretch fabrics, choose one of the stretch stitches which
allows the seam to stretch with the fabric without breaking the thread. Select
polyester or cotton covered polyester thread which has an extra amount of give
and is designed for knits and stretch fabrics. Use a ball point needle, especially
on lightweight knits.
Machine Setting — ¡¡j
il -2
Stitch
pattern
Presser
foot
Zig-zag
STRETCH STRAIGHT STITCH
III
Needle
position
Zig-zag
width
Stitch
length
•
Fabric
feed
Ô
Stretch straight stitch is a triple lock
stitch, combining stretchability and
strength. Use for stitching regular
seams in knits and stretch fabrics.
Use for stitching seams in woven
fabrics that receive a lot of strain when
worn, such as side seams, crotch seams,
and armholes in sportswear and child
ren’s clothes.
Machine Setting - | RICKRACK STITCH
Stitch
length
@
Fabric
feed
Dam Sew
Fig, 42
Needle
position
Zig-zag
width
^3
Rickrack stitch can be used as a heavyduty all-purpose stretch stitch. Each
zig-zag stitch consists of three threads
or stitches, giving strength and perma
nence
II -2
1 f¥
Stitch
pattern
Presser
foot
Zig-zag foot
Rickrack stitch is a triple stitched zig-zag that resembles rickrack trim,
reversible, looking the same on both the right and wrong sides.
It is
If your machine has the sewing light inside the -face plate (A), by turning
pushing in the light switch (C) on the back of the machine the light can '
turned on and off as you wish. Fig. 44-A
To operate the machine, the switch must be turned on.
Î.-
Fig. 44-A
TO REPLACE THE BULB
Turn the light switch (C) off.
2.
Loosen the Screw (B) with a screwdriver or a coin as shown in Fig. 44 1:
3.
Move the face plate away from you (switch (C) passes through the hole which is at the back of the face plat<
and then lift up ( f ) the face plate so that you can remove it from th
machine.
4.
When bulb has the “screw in socket” type base, remove the bulb as you di
a conventional light bulb. Fig. 44-C.
When bulb has the “bayonet socket” type base, push in the bulb and 1/4
turn to the left and the bulb will drop out. Fig, 44-C.
5.
Replace the bulb, and place the face plate in the correct positon b
securing the Screw (B).
...............
) as shown in Fig. 44 A until th
-26-
-27-
Page 17

TO OIL THE MACHINE
Fig. 45
Fig. 46
The mochine will olways work best if properly oiled ond cleoned ot regulor
intervals
Ploce o drop of good grode sewing mochine oil into eoch of the oiling points
on the machine os shown by orrows in Figs. 45 ond 46 once every work
ing doy or after obout 8 hours of use. Should machine stand idle for a
prolonged period, oii it before you start sewing.
Oiling mochine excessively will couse soiling of the moleriol to be sewn.
After oiling mochine. sew a few rows of stitches on o scrop of motenol
be sure thot the mochine sews cleanly. Also wipe off ony excess oil
10
from the top of the mochine.
To Oil needle bor, presser bar ond other ports inside the foce plote. swing
foce plote (5) to the left so moving ports ore accessible. Oil oH moving
ports at friction points, ^
NOTE
Use Sewing Machine Oil
DO NOT OIL THE MOTOR
OPERATING HINTS
SEi THAT THE PRESSER FOOT (12) is securely in ploce ond fits snug
ogoinst the presser bar so thof the needle moy poss through the opening in
the foot without any interference.
SKIPPED STITCHES. May be coused by o bent or blunt needle : by incorrect
setting of the needle ; the wrong size needle ; by threod too thick for the
size of the needle
BREAKING NEEDLES ore usuolly due to pulling on the work, cousing the
needle to get out of line ond 'o strike the needle plote (15), thus breoking or
bending the needle. It moy also be due to presser foot or oltochments riot
being securely fosiened to presser bor. Be sure to use correct size needle
and threod for moteriol. See needle chart.
THE UPPER THREAD BREAKING. Moy be coused by i
( 1 ) Incorrect threoding.
(2) Not bringing up under threod correctly,
(3) Upper tension too tight.
( 4 ) Needle incorrectly set.
(5i Needle rubbing ogoinst ottochmenfs or presser foot,
I 6 1 Needle eye loo smoll for threod,
(7) Storting the machine at full speed.
(8) Storting without take-up 'ever (4) at highest point.
THE LOWER THREAD BREAKING. Moy be coused by :
( ! ) Incorrect threoding of bobbin cose.
( 2 ) Too tight Q tension,
( 3 ) Bobbin wound too full to revolve freely.
(4) Not bringing up under-thread correctly,
(5) Hole in the needle plote being rough, due to needle sinking the plate.
UNEVEN STITCHES. May be coused by,
(1) Presser foot not resting evenly on moteriol.
(2) Feed not high enough. (3) Too short a stitch.
(4) Pulling the cloth.
(5) Too fins a nsedle used with loo coarse or poor threod.
If your machine is equipped with a motor, do not oil the motor because the
motor shaft revolves in permanently oiled impregnated cast bronze
bearings.
No Lubrication is Required.
-28^
BASTING
(1) Reduce the tension of upper threod.
I 2) The stitches may then be easily removed by pulling the lower thread.
-29-
 Loading...