

SINGER W2135 User Manual
.....
■
ШШ^'^?Шуи:т^1т
'H o W T o USE AND <
- "■■'-1 "ß'^i r:r-^
^5 '*»4 I
’i Ф^4 V jii^ -jf
"i ?’^y "I - '■-Ä'S^s^i
Щ
^ ^ODEL 2135

You are now the owner of a new White zigzag sewing machine
machine of its type you can possess.
r.
c
c
(
. tbe most versatile
Buttonholes, monogramming, overcasting ... and creative embroidery
ease and speed.
. are done witb
To md you In obtaining the groulost aohieyement bom your White zigzag maohine, this book
on tts care and use has been written for you. Read the Instruotlons carefully as a thorLh
understandtng of your machine will reward you with many hours of trouble-free, creative sewing
Trme-savrng attachments such as rufflers, binders, edgestitchers and cording feet, ,o comple
pTchat; -- -»ere you
WHITE SEWING MACHINE CORPORATION
CLEVELAND 11, OHIO
WHITE SEWING MACHINE PRODUCTS LTD.
Toronto 16, Ontario, Canada
.‘J
C '
c*
cJ ■
c!
J ■
c! ■
c
€>i
J ;
c4
. . ^ .....г v-j;/ - i '> ^
if"" i';i 1 'yj. i,>
INDEX
Features and Paris .......................................................2~4
Needle and Thread Chart................................................. 5
Setting the Needle ........................................................... g
Winding the Bobbin
Threading Bobbin Case
Placing Bobbin Case in Shuttle
Upper Threading ............................................................. g
Straight Stitching
Changing Foot and Plate
Setting the Stitch Length............................................ H
Stitch Length Chari ........................................... H
Sewing in Reverse ................................................
Adjusting the Tensions
Adjusting Pressure and Feed
General Sewing
Light Weight Fabrics
Darning and Monogramming
Preparing to Sew
Removing the Work
Creative Embroidery............................................. 24
Satin Stitch.................................................... 24
........................................................
..................................................
.........................
..........................................................
.....................................
...................................................
.........................................
...........................................
.........................................
............................
.......................................
.......................................................
jg
8
I3
. 13
Page
g
7
jq
10
H
12
24
Adjusting Stitch Width ......................................... 25
Embroidery Patterns ............................................. 25
Samples of Embroidery................................................. 25
Embroidering With a Hoop .................................' 26
Making Buttonholes ........................................ 27
Sewing on Buttons ........................................................28
How to Use Accessories ............................................... 29
Narrow Hemmer
Lace Trimmed Hem .................................. 29
Lace Edge .......................................... 20
French Seam
Flat Felled Seam
Hand Rolled Effect
Quilting Guide ............................................’ gg
Seam Gauge
Care and Maintenance
Oiling
.........................................................
Cleaning and Oiling Shuttle
Check Up for Smooth Sewing
Accessories .................................................................... „„
...................................................
........................................................
..................................................
................................................
.........................................
...................................
..........................................
.............................
........................................ 26
22
o-i
" 22
24
29
20
20
20
23
Page
hf:;-'--
V*-'
- i ' ■ ■ ■
- ---
■V ‘■’■-t -
*L
V

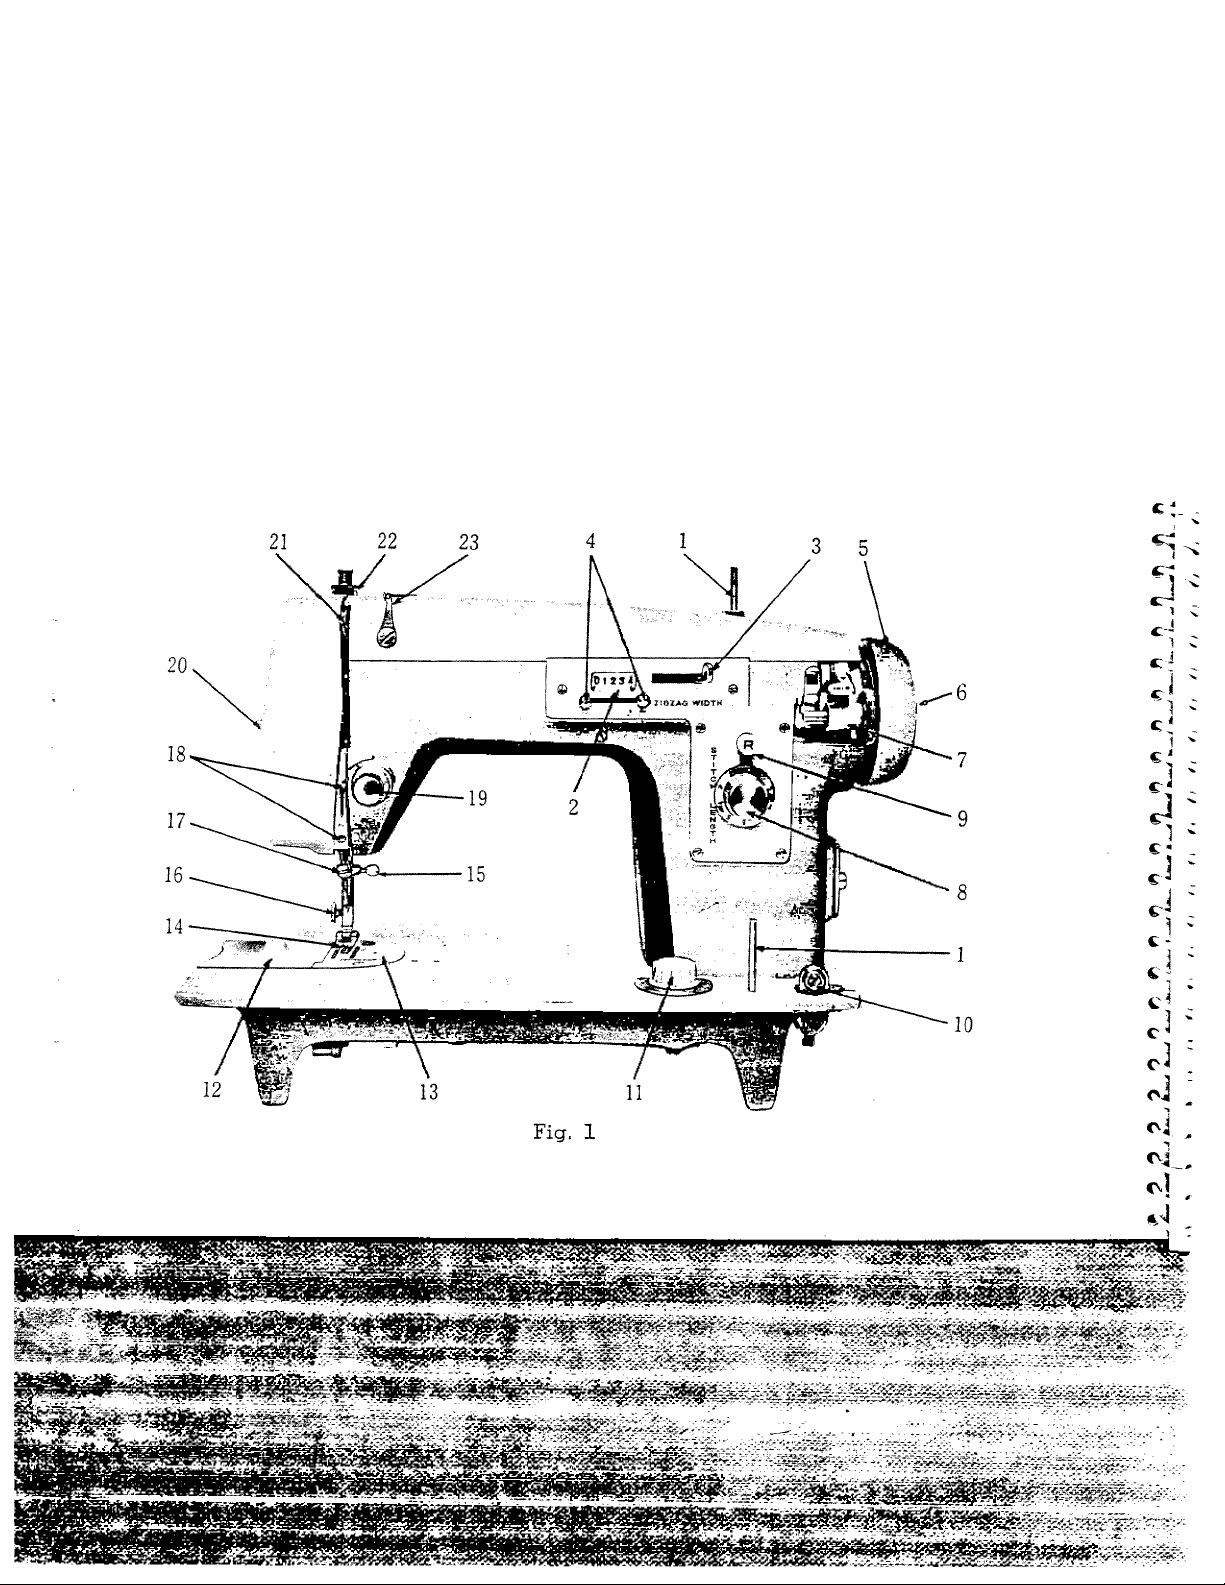
FEATURES AND PARTS
(Front View)
1. Spool Pins
2. Stitch Width Window
3. Stitch Width Lever
4. Zigzag Stop Knobs
5. Hand Wheel
6. Wheel Clutch
7. Bobbin Winder
8. Stitch Length Dial
9. Push Button Reverse
10. Bobbin Winding Tension
11. Drop Feed Knob
12. Cover Plate
13. Needle Plate - Seam Guide
14. Presser Foot
15. Needle Clamp and Screw
16. Attachment and Foot Thumb Screw
17. Needle Bar Thread Guide
18. Thread Guides
19. Tension Regulator
20. Light Switch
21. Take-up Lever
22. Pressure Release - Darner
23. Arm Thread Guide
'c .-»>»6 -Ji
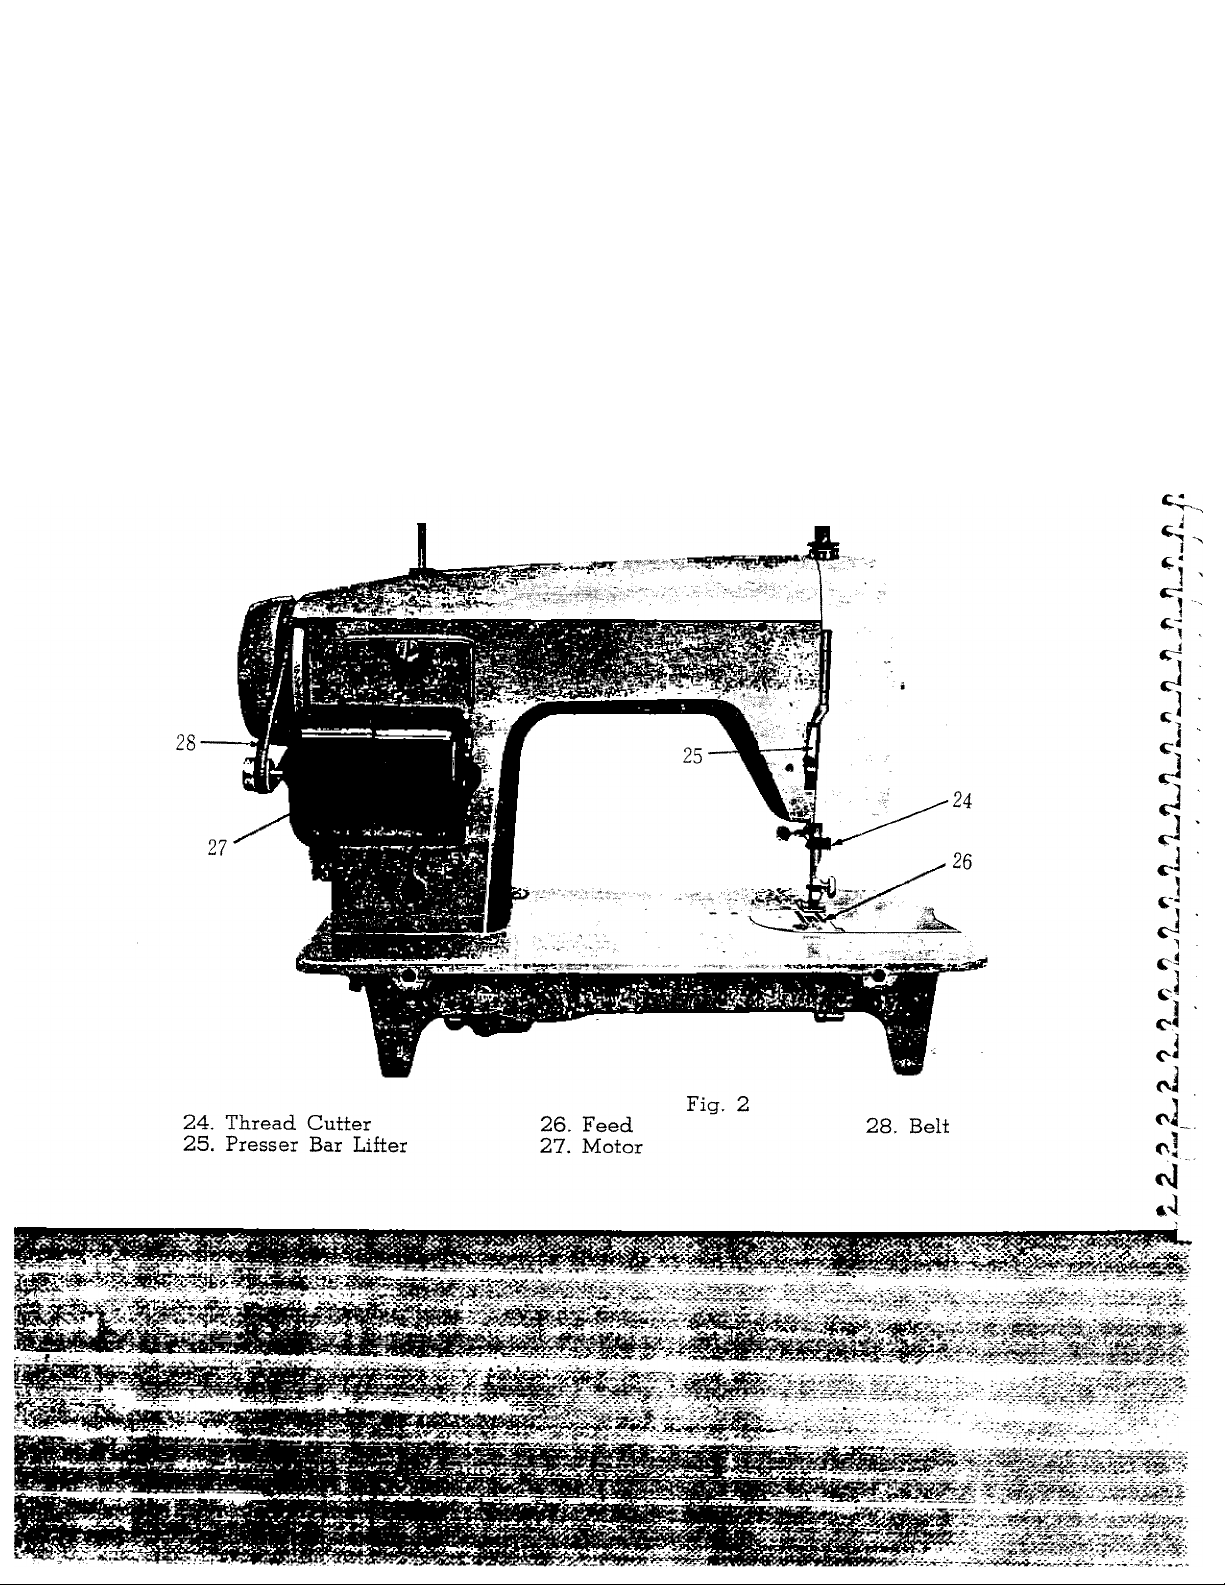
FEATURES AND PARTS
(Back View)
C-,

NEEDLE
- THREAD - FABRIC - STITCHING GUIDE
Fabric
Extremely heavy
tarpaulin, sacking,
canvas, duck, etc.
Heavy upholstery
fabric, ticking,
denim, leatherette
Medium heavy drapery
fabric, velveteen,
suiting, felt, terry, etc.
Medium broadcloth.
percale, gingham, linen.
chintz, taffeta, sheer
wool, shantung, etc.
Sheer voile, lawn.
dimity, crepe.
handkerchief linen.
plastic film, etc.
— J
-------
batiste, lace, organdy,
ninon, net, marquisette, etc.
00
Machine
Needle Stitches Cotton Mercerized
No Per Inch Thread Thread
4
3
2
1
0
■ 16
6
to
8
8
to
10
10
to
12
T o
±j0
to
14
14
to
(Plastic film)
8 to 10
16
to
20
40
40
60
bU
80
80
to
100
100
150
10
30
30
to
to
to
to
to
Heavy Duty
Heavy Duty
Heavy Duty
50
RO
50
Silk
or
Nylon
A
A
..
...........................
. .
■-y* ■ '
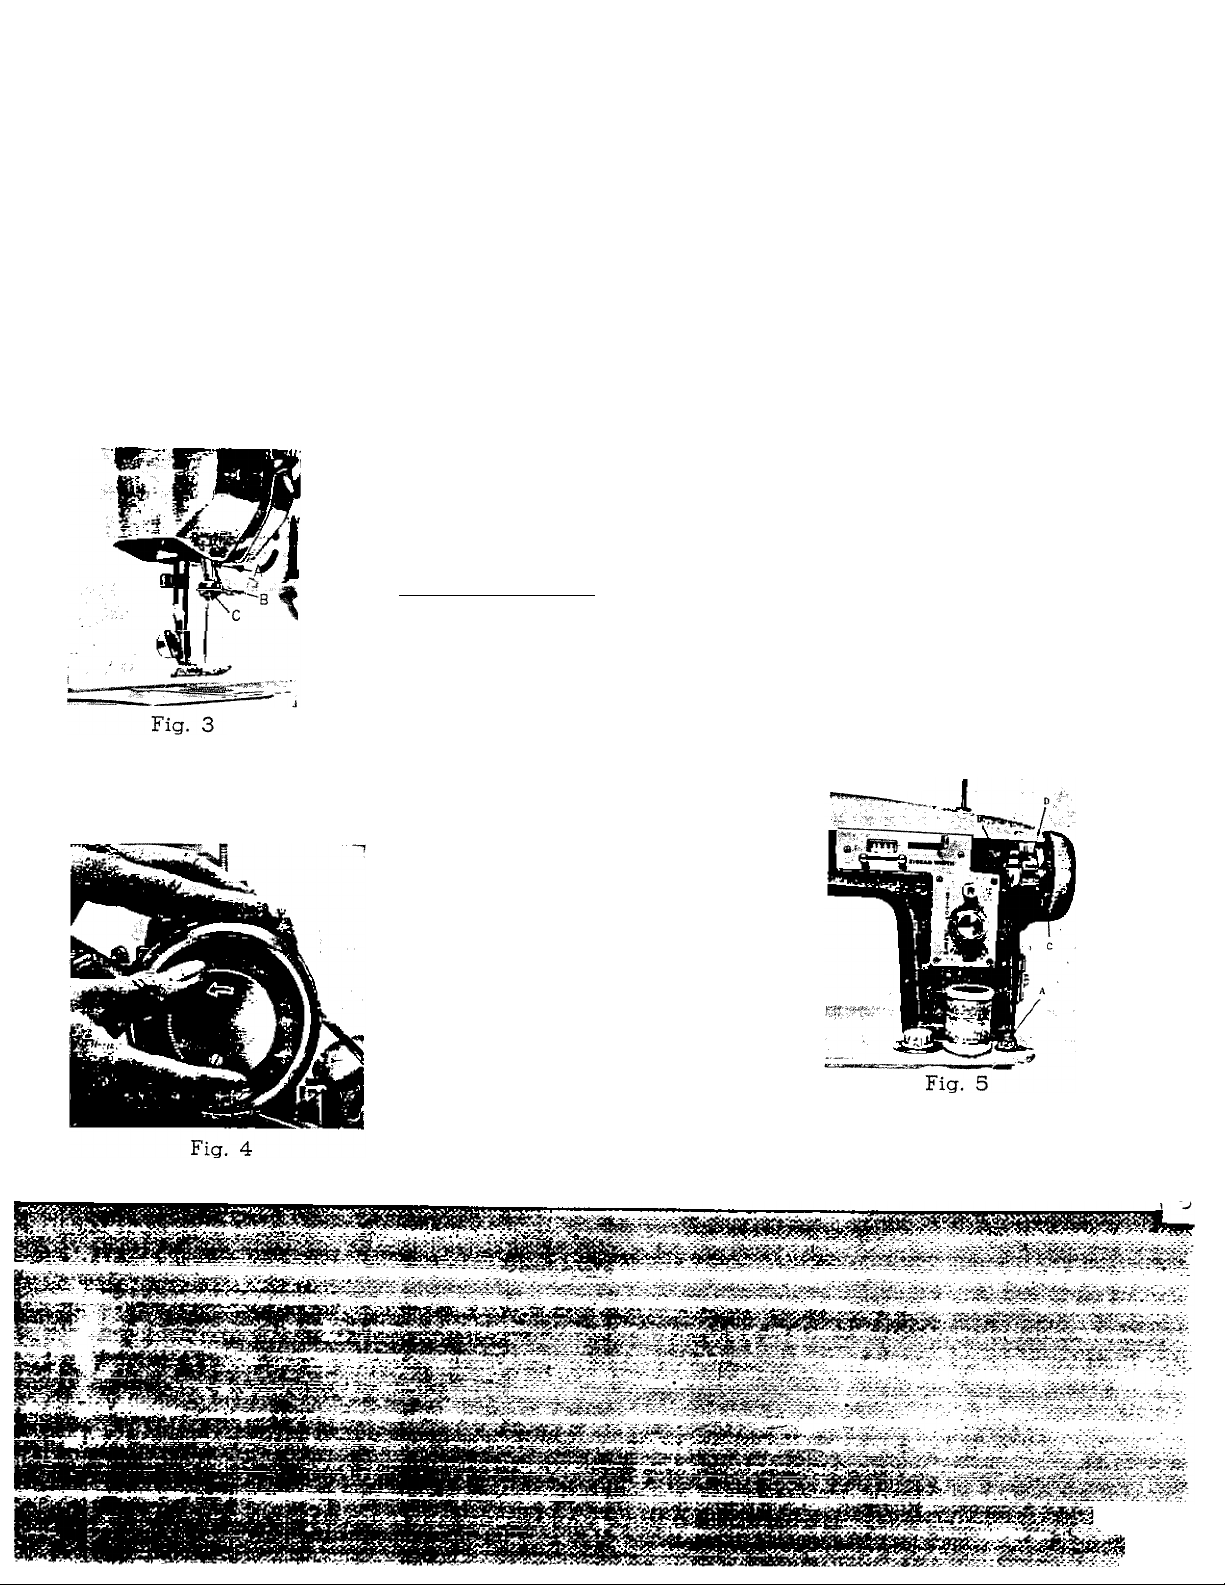
SETTING THE NEEDLE
See Fig. 3. Raise the needle bar A to its
highest point, turning wheel toward you by hand.
Then loosen the needle clamp sc^ew B and
the needle can be inserted into clamp C. Place
needle (flat side to right) in the needle clamp
and push it upward as far as it will go into the
needle clamp hole, tightening the needle clamp
screw securely with a screw driver.
After changing needle make one complete revolution
of balance wheel by hand to be sure the needle is in the
correct position.
HOW TO WIND THE BOBBIN
Turn tne clutch in the center of the hand wheel (Fig. 4) toward ^
you to disengage the sewing mechanism. Place a spool of thread
on the spool pin on the bed of the machine (Fig. 5). Pass thread
through tension disc A. Insert thread
through a hole on edge of bobbin and
place bobbin on spindle (B) of winder.
Be sure that the notch in the bobbin
fits over the small pin on the spindle.
Place pulley (G) against hand wheel
by pressing lever (D) and set machine
in motion. When the bobbin is fully
wound, the action of the winder stops
automatically. Remove from spindle
and cut off loose thread end used to
start winding. Before starting to sew
again, tighten clutch by turning it away from you.
When the disc is in the proper position, tighten screw.
FLAT
SURFACED-
SIDE
GROOVED
SIDE
If the^ bobbin winds unevenly, adjust the bobbin winding
tension disc (A) to the right or left by loosening the screw.

THREADING THE
BOBBIN CASE
Step 1 (illustrated in Fig. 6).
Hold bobbin case between tbumb
and forefinger of left band, so that
tbe slot in tbe edge of the bobbin
case is on top. Take tbe bobbin
between thumb and forefinger of
right band so that tbe thread on
top leads from left to right. Step
2. Insert bobbin into bobbin case,
Fig. 6
> .--vd-
pull tbe thread into tbe slot of tbe
bobbin case as shown in Fig.7, and
draw it under the tension spring
and into tbe fork-shaped opening
of the spring as shown in Fig. 8
r- -X ' . V-:-.«--------
:• -i,- c.
-
- "1^. ft
Fig. 7
Fig. 8
^ ; .. .. . . . . . .. .. . . . . . .. .. . . . . . .
.. . .. . .. .. . .
 Loading...