

Page 1

INSTRUCTION MANUAL
MODEL 211 SEWING MACHINE
Page 2

for safer sewing ,
Please follow these instructions
carefully to avoid unexpected
3ccid6ots‘
1- Always disconnect the elec
trical plug from the outlet when
cleaning, oiling, changing
accessories and after sewing
2. Pay careful attention to your
hands and the movement of
the needle while sewing to
avoid injury to your fingers.
INDEX
Features and Parts
Accessories
Using the Foot Control
Using the Extension Plate ,
Free Arm Features
Changing the Needle
Changing the Presser Foot.
Winding the Bobbin
Changing Bobbins
Threading the Bobbin Case
Upper Threading
Adjusting Feed Dog Height
Picking-up
Adjusting Upper Tension
Fabric, Thread, Needle
and Stitch Length Guide
Preparing to Sew...............
Stitch Length Control Dial
Selecting Needle Position .
.................
................
................
...............
Straight Stitching
Changing Direction of Sewing
3
Removing the Material
Crossing Heavy Seams
Zigzag Stitching
Twin Needle Sewino
6
Buttonhole Preparation
7
Buttonholes on
Lightweight or Knit Fabrics
9
10/11
Sewing on Buttons
Embroidering
11
Darning . .
Monogramm ing
12
Sewing on Zippers
12
Quilting .
13
Care and Maintenance
Cleaning the Machine
14
Oiling. .
15
Trouble-Shooting gujjjg
15
16
. 17
. 18
10
19
20
21
¿1
90
23
25
26
28
Page 3
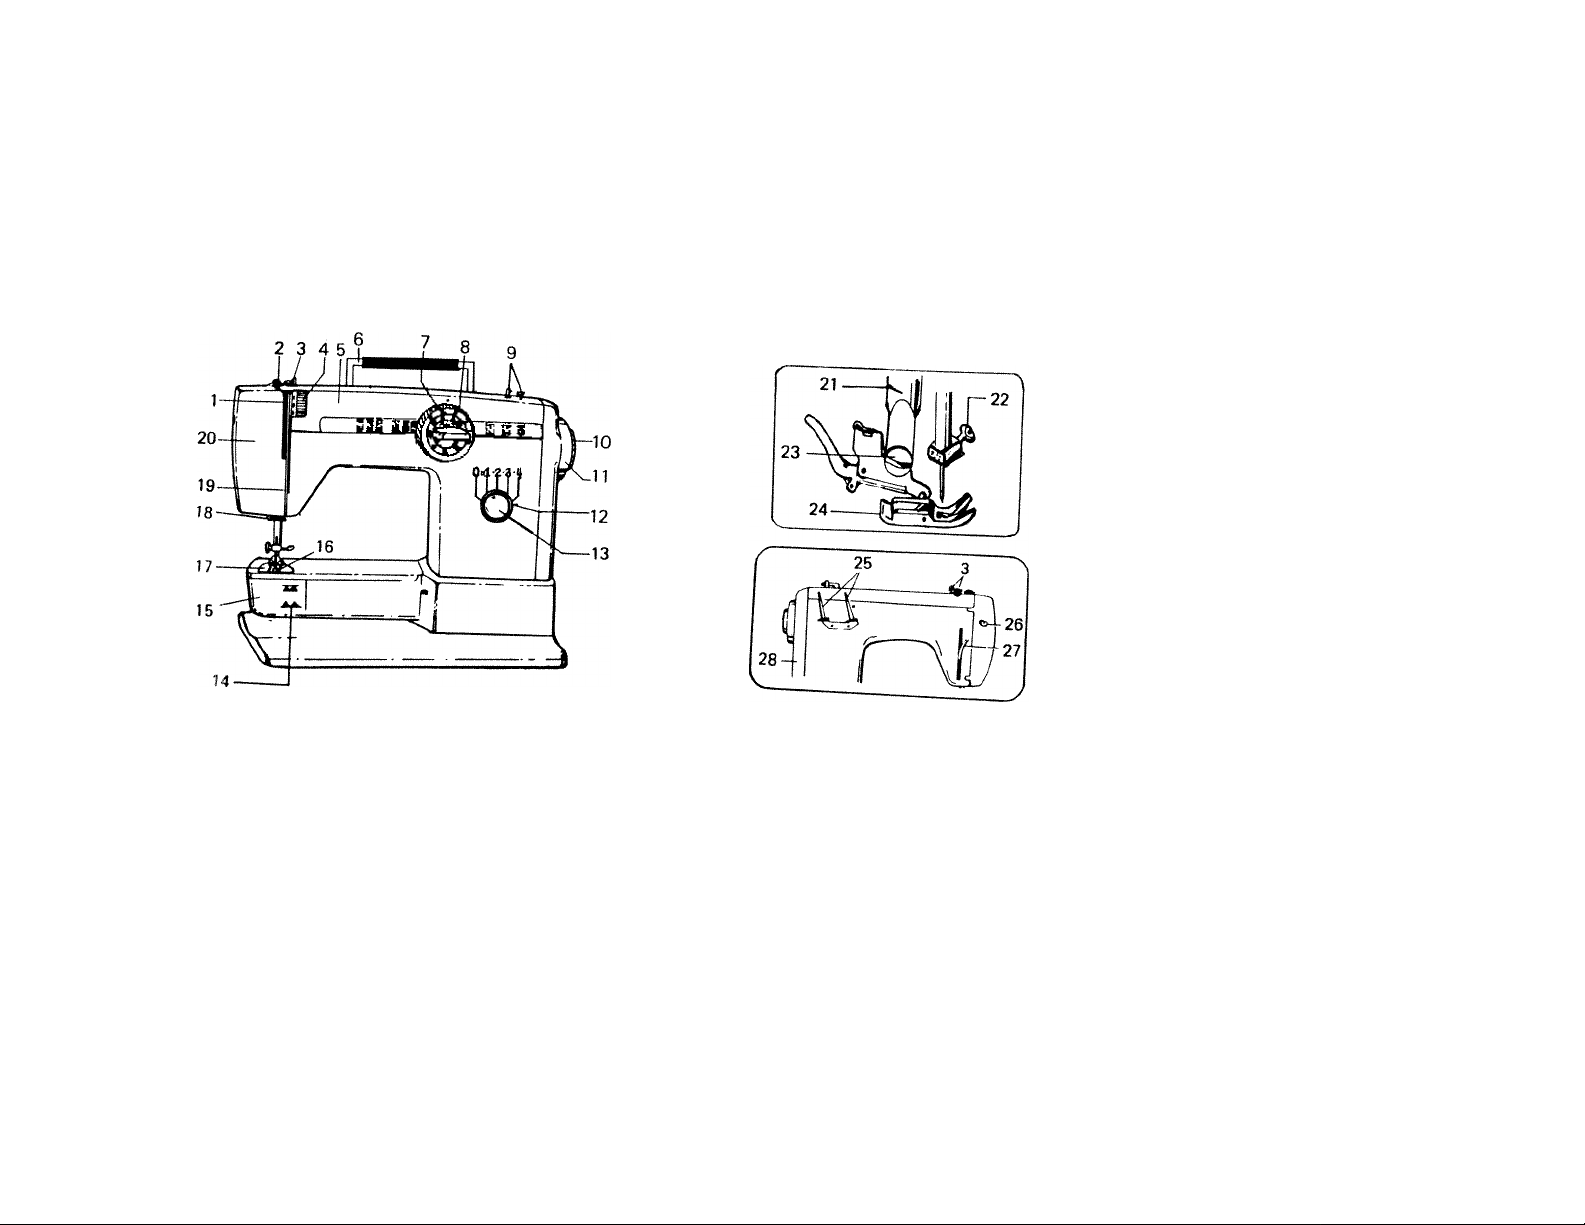
features and parts
1- Thread Take-up Lever
2. Pressure Release (Darning)
3- Top Plate Thread Guide
4. Tension Regulator
5. Top Plate
6- Handle
7. Needle Position Control Dial
8- Zigzag Width Control Dial
9- Bobbin Winder
10. Fly Wheel Clutch
11- Fly Wheel
12. Stitch Length Control Dial
13. Reverse Button
14. Drop Feed (under Shuttle Cover)
15. Shuttle Race Cover
16. Feed Dog
17. Needle Plate
18. Thread Guide
19. Thread Guide
20. Face Plate
21- Thread Cutter
22- Needle Clamp
23. Presser Foot Thumb Screw
Presser Foot
25. Spool Pins
26- Light Switch
27. Presser Bar Lifter
28. Motor and Belt Cover
Page 4
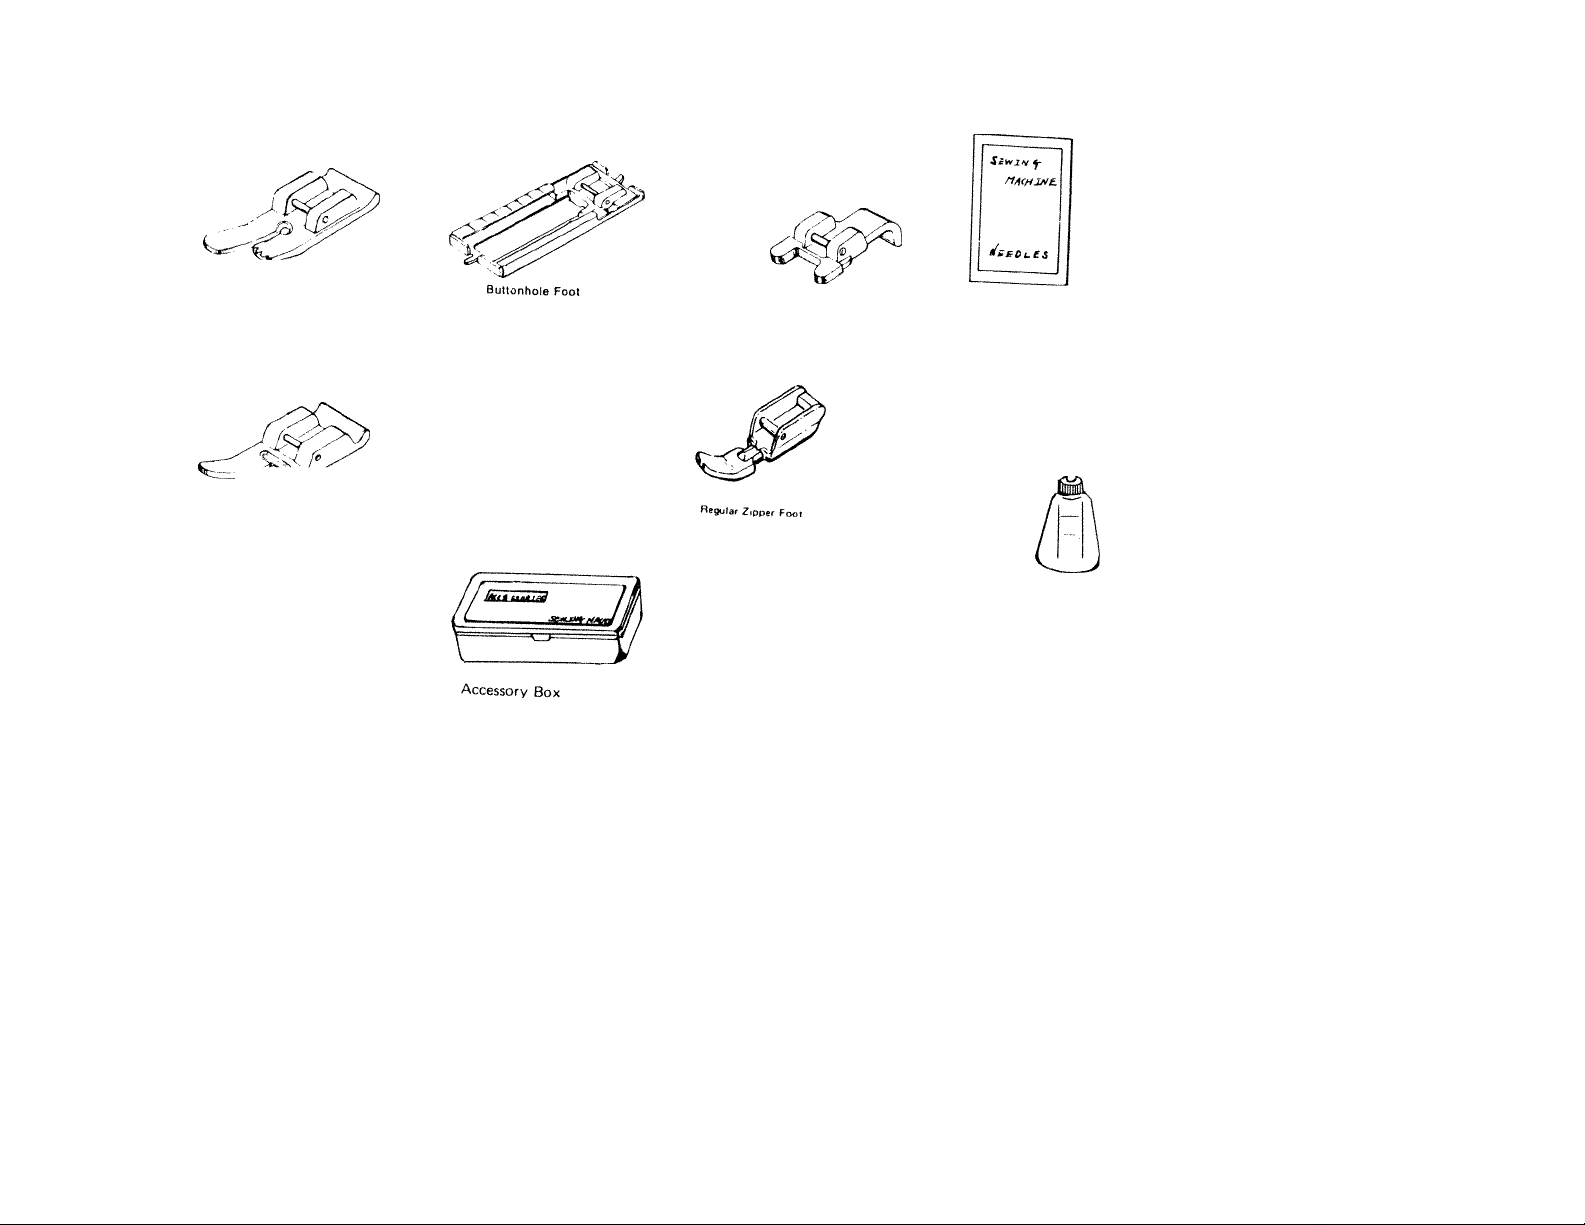
accessories
Straight Stitch Fool
Zigzag Foot {In Machine)
Ouiliiny Guide
Pells
Bobbins
Button Fool
Needles
Seam Ripper
Oiler
Screw Driver.
Page 5
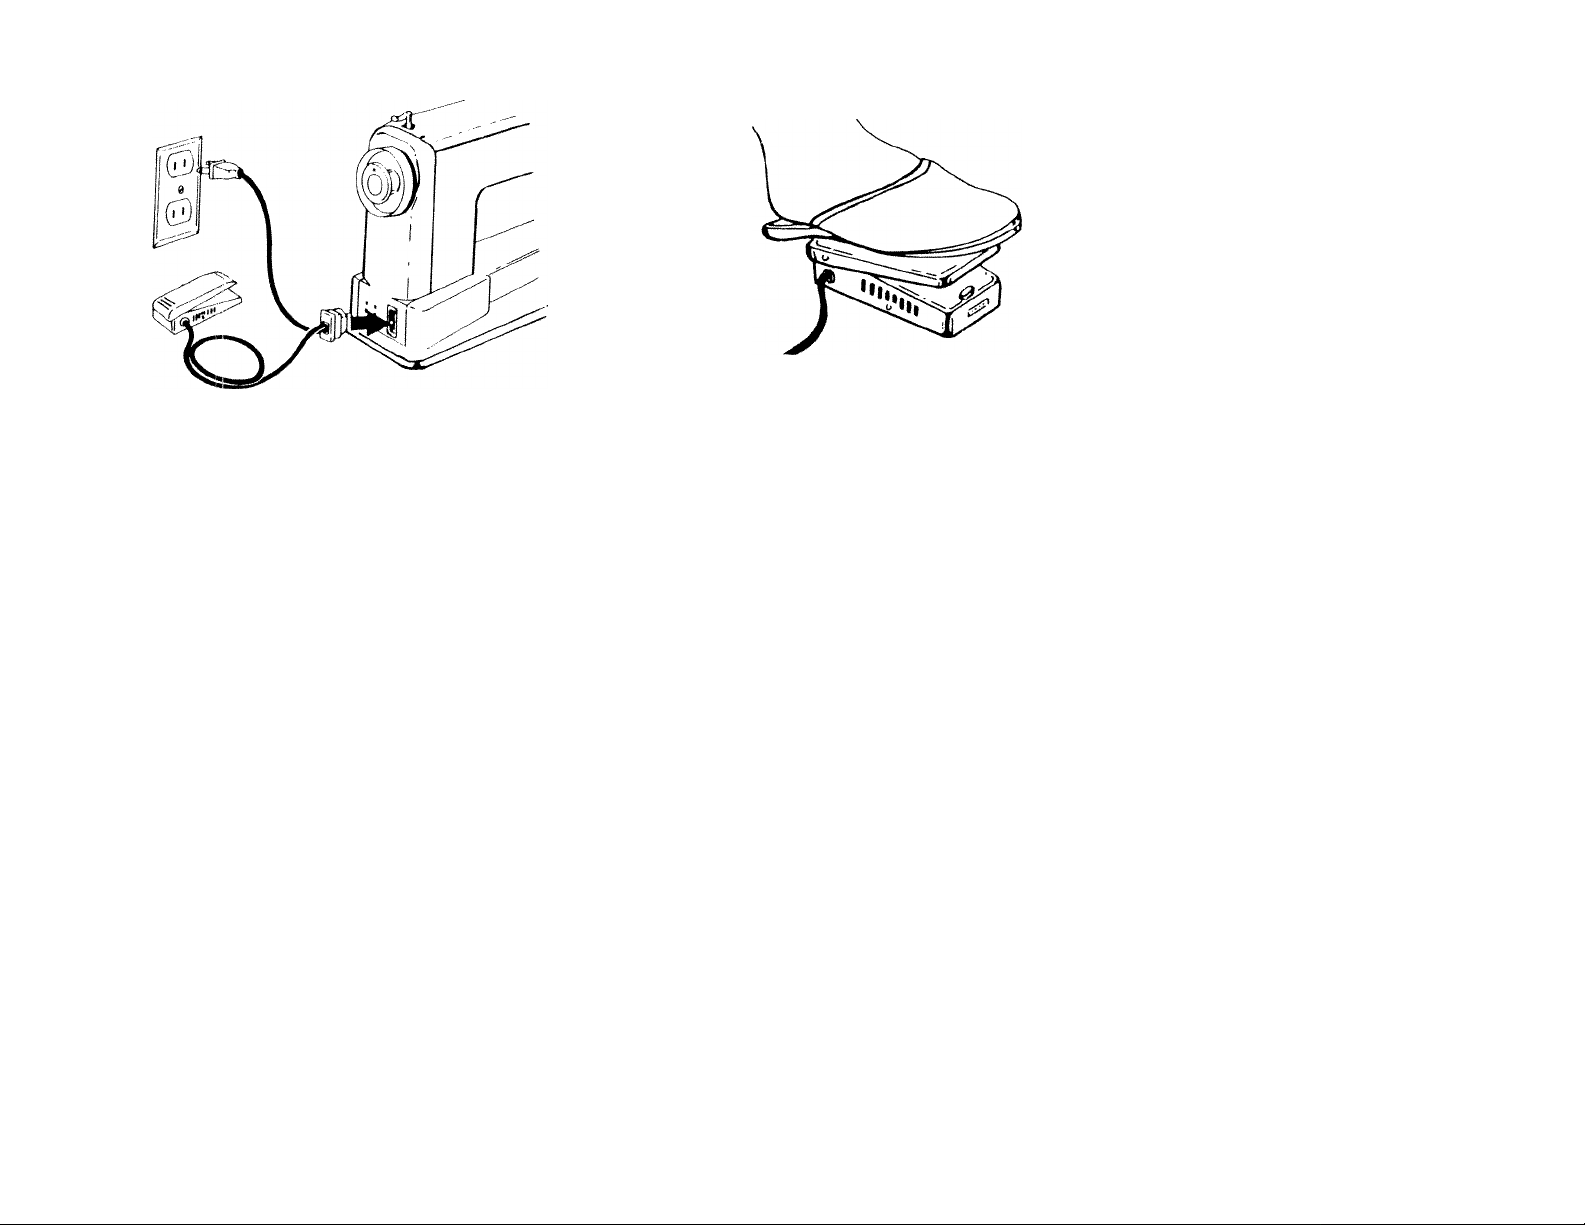
USING THE FOOT CONTROL
TO CONNECT THE FOOT CONTROL WIRES:
• Connect special plug to block on machine as
shown in diagram above.
• Connect outlet plug to electrical outlet.
• When sewing, keep children’s hands away from
foot control and wiring.
• After sewing, disconnect plug from electrical
outlet.
TO USE THE FOOT PEDAL:
• Begin sewing by turning the hand wheel toward
you and apply gradually increasing pressure to
foot pedal.
• Sewing at a constant speed will give best results.
Page 6
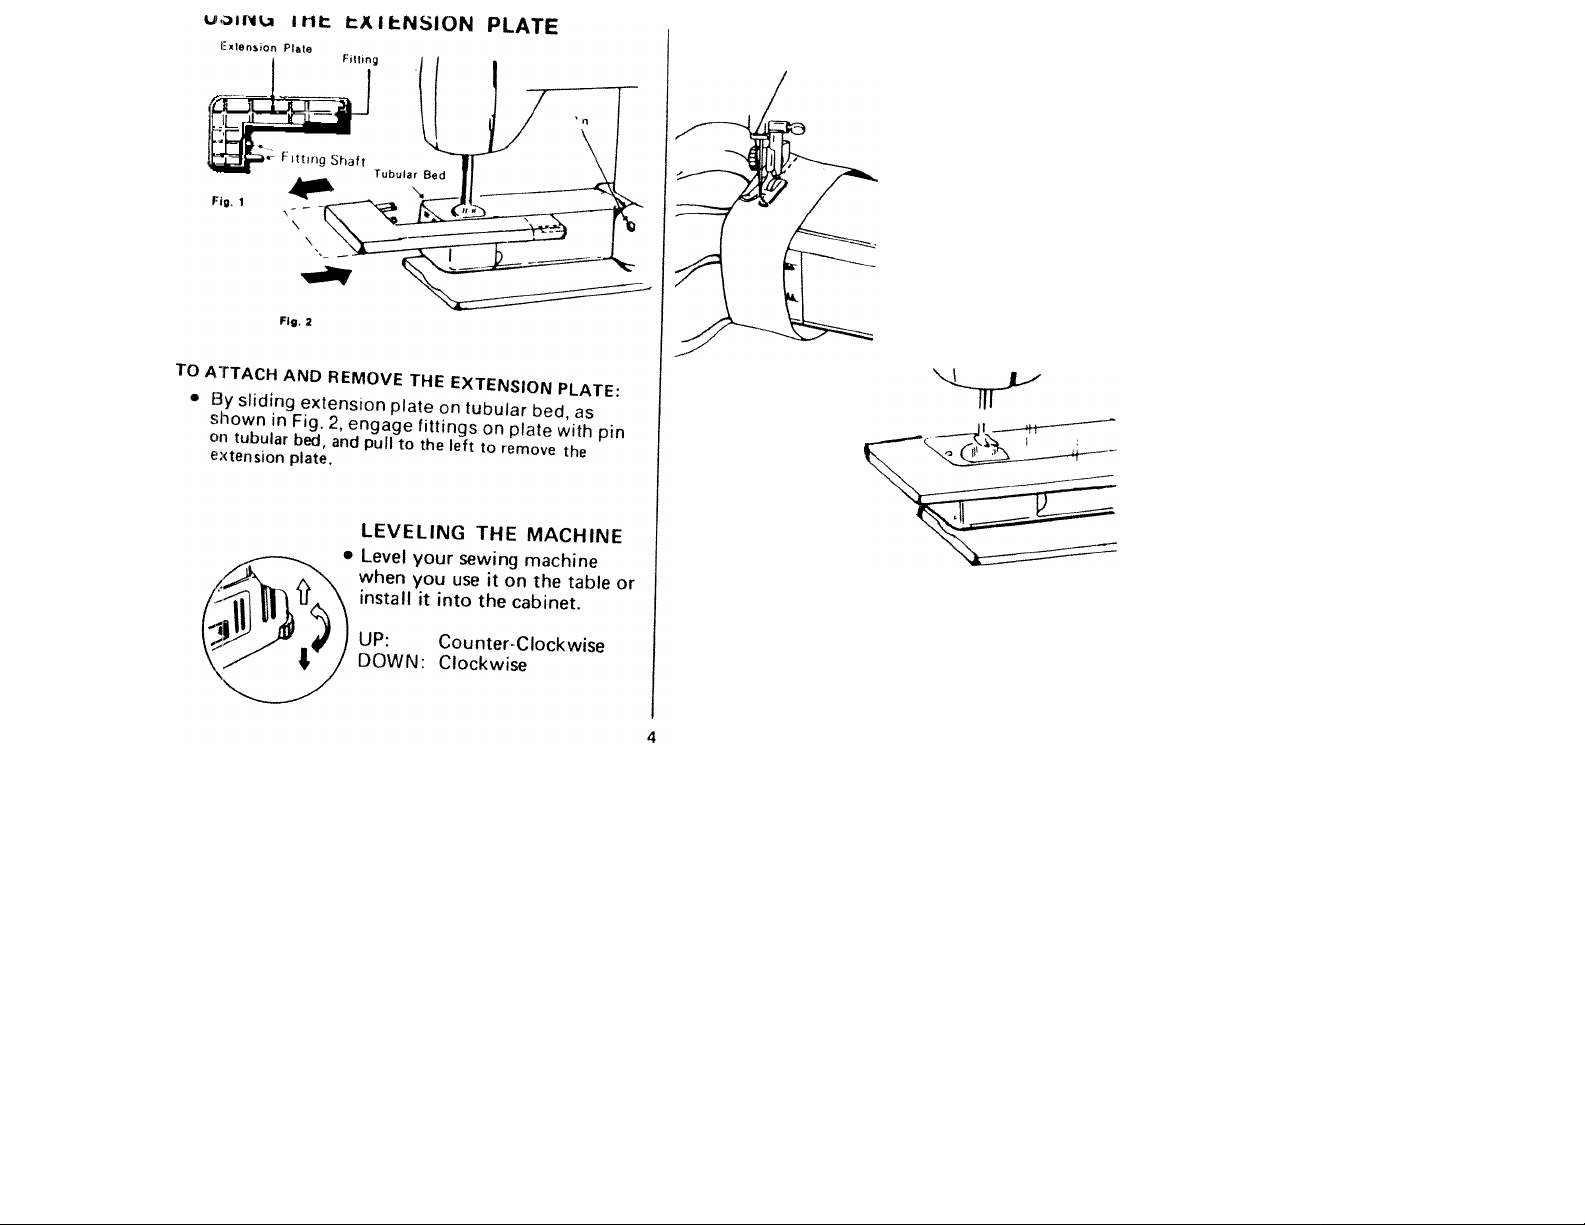
FREE ARM FEATURES
TUBULAR SEWING
• The free arm design
simplifies the sewing of
tubular items such as
pant cuffs, shirt and
blouse cuffs and socks.
Simply position these items
over the tubular bed of
the machine and sew.
FLAT BED SEWING
" e><‘ension plate is attached, you have
all the advantages of a flat bed machine for
sewing flat items, and for sewing large tubular
Items such as flared pant legs.
Page 7
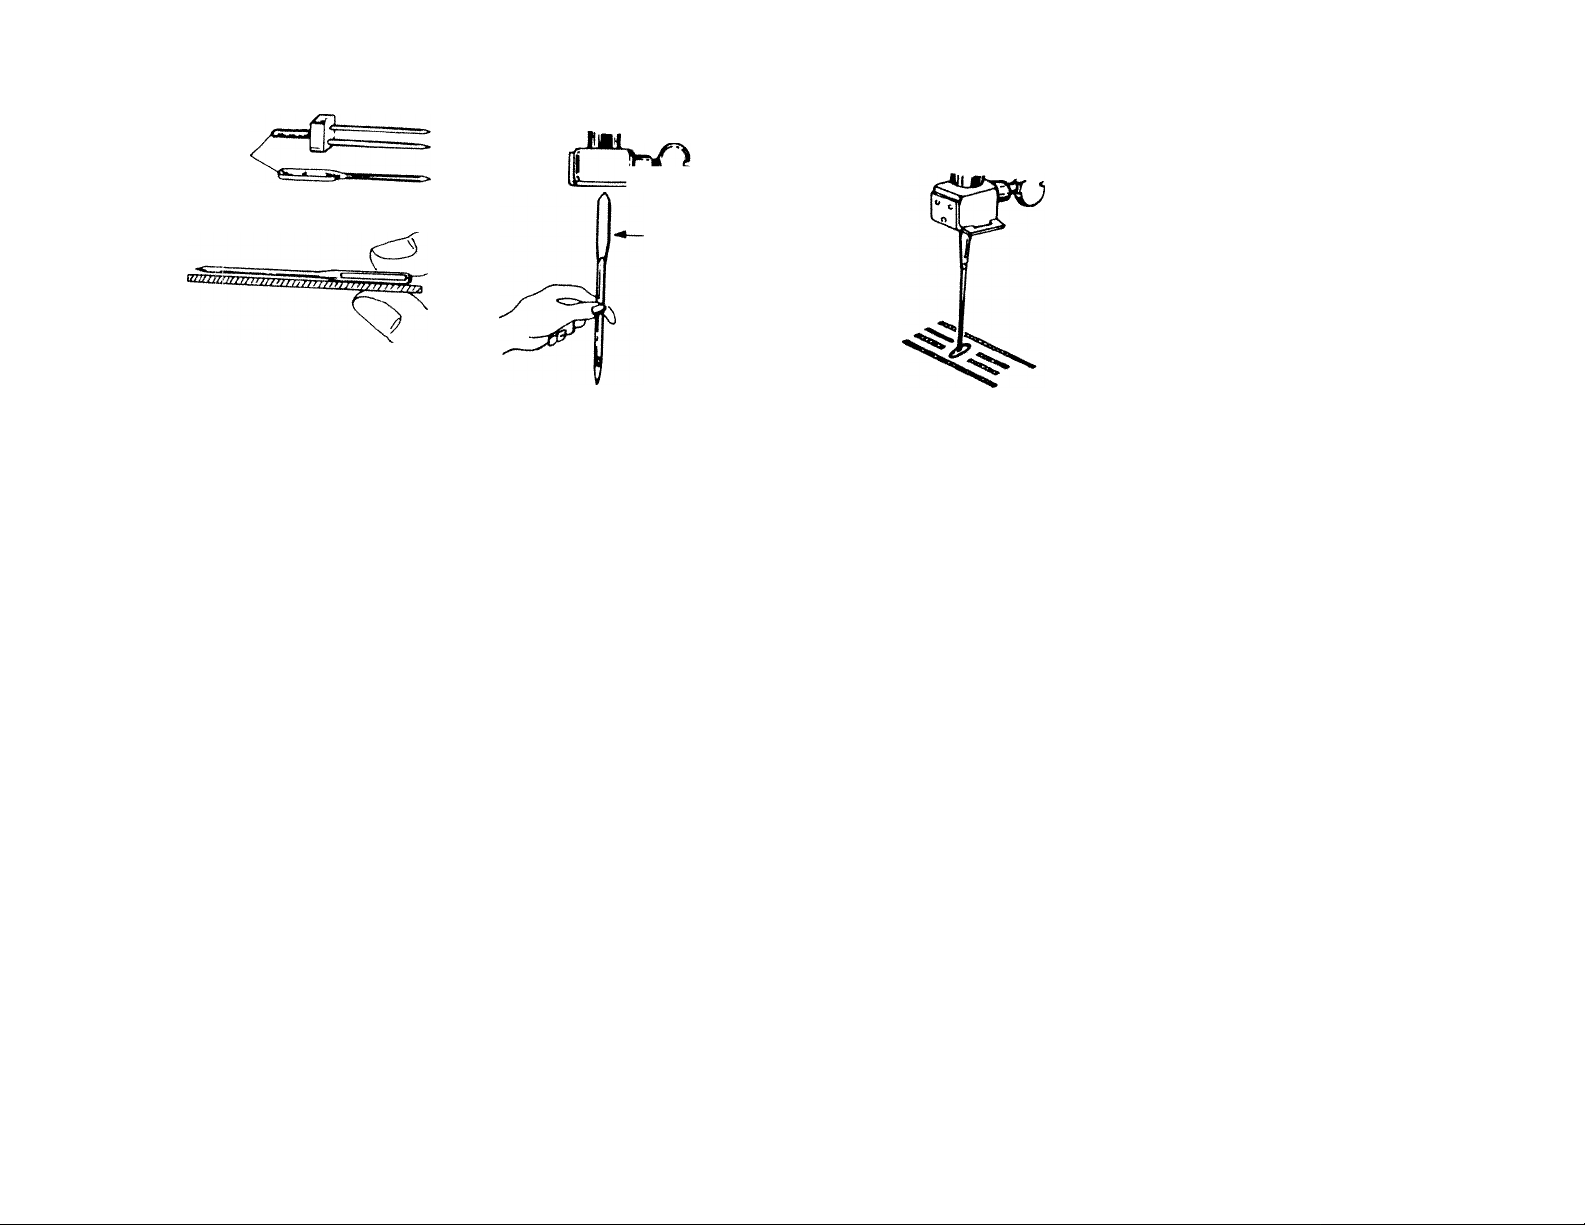
CHANGING THE NEEDLE
Flat Bide
• Afways make sure needle is
sfratghf.
If straightness of
needle, lay needle on a flat
SiM is
fn parallel as shown
in above diagram.
- Needle
Plat side towards
back of machifie
Clamp Screw I
• Turn hand wheel toward you to
posmCr'"‘’"^‘°‘‘^^‘9hest
• Loosen needle clamp screw
f''"«die as
back of ml '® 'awards
P„ .K °fj^3chine as shown
in the above diagram.
Tighten needle clamp screw
With screwdriver.
Follow the same procedure for
insertion of twin needle.
To make sure that needle has
h®®!] '^^^'■ted correctly turn
cfrth^P®®* •°'^ard you and
throlioh ,h®®^'®
nofw|9h the center of the
needle hole in the needle plate
Stitch selector dial must be set
®,f"'9ht stitch needle posi
Xnmem."'’""'^‘"^ ®®®‘^'®
^ skipped stitches occur, needle
may be incorrectly inserted.
Page 8
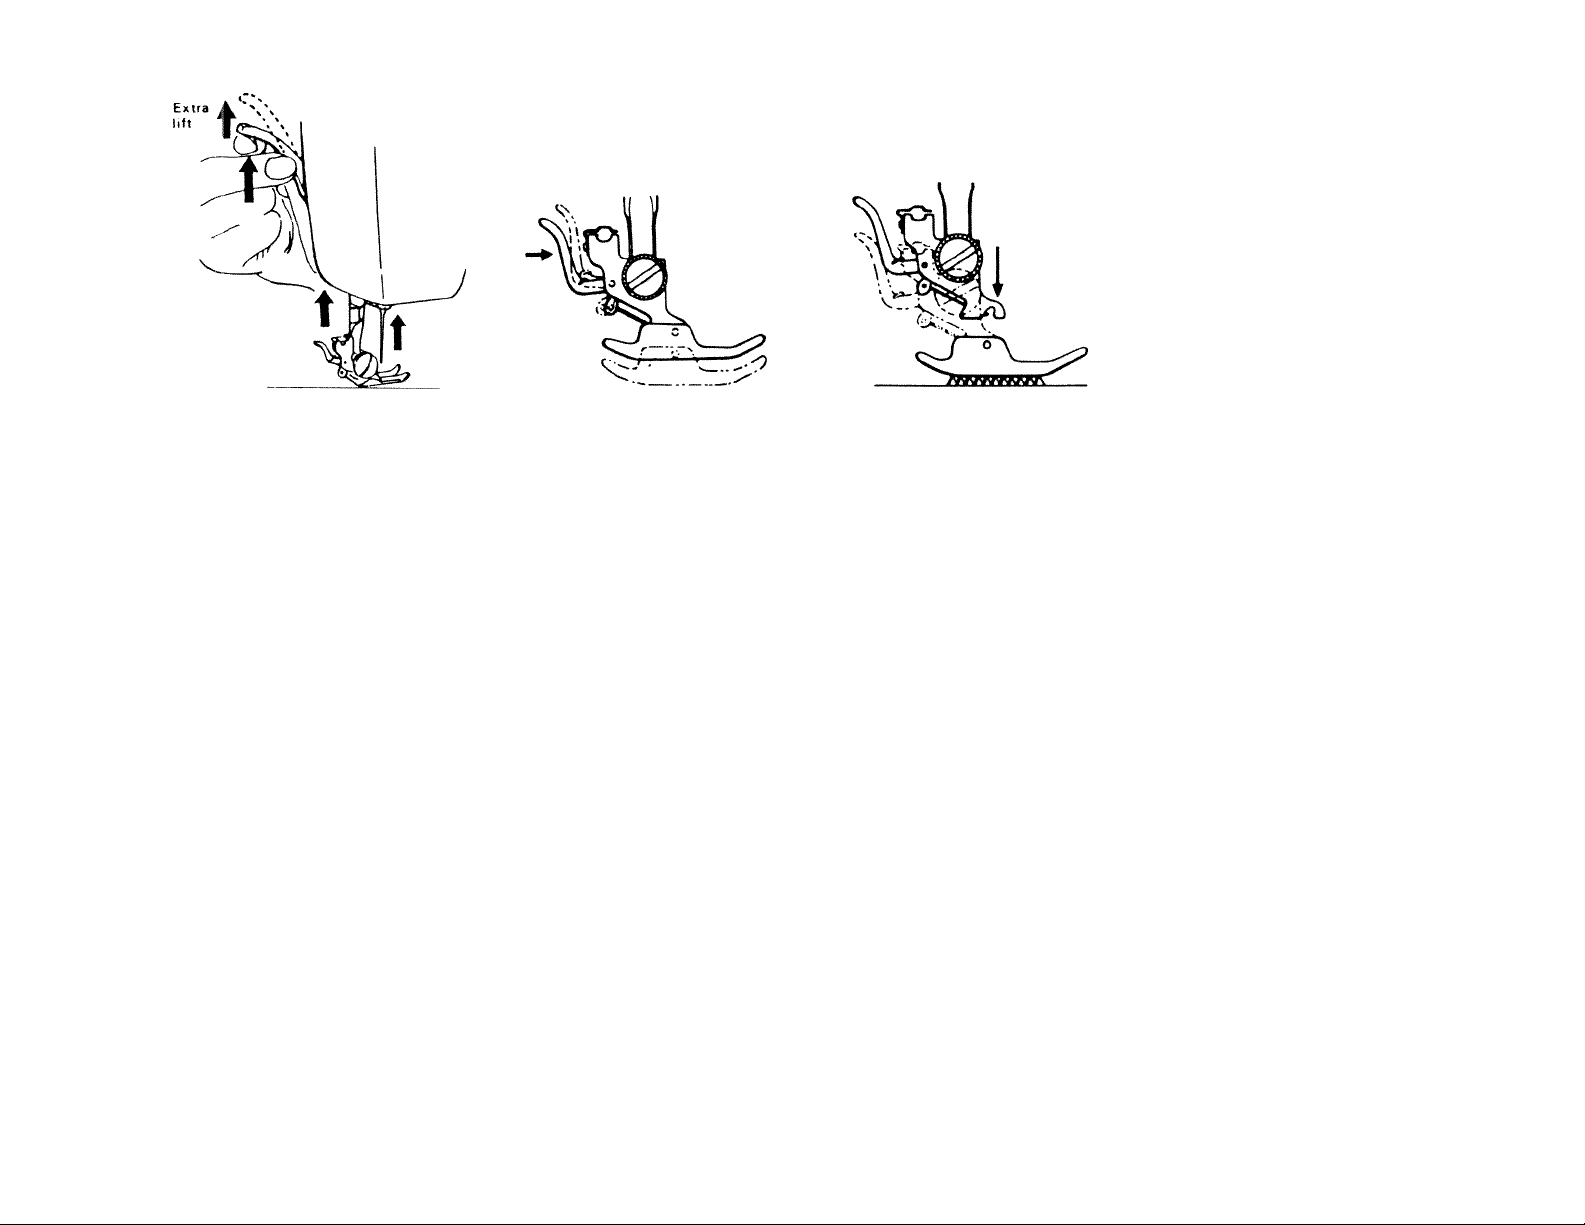
CHANGING THE PRESSER FOOT
Raise needle bar to highest
position and raise presser foot
as shown.
The extra lift for heavy fabric
rriakes it easier to place fabric
under the presser foot.
TO REMOVE
THE PRESSER FOOT:
• Press lever on back of presser
foot shank and foot will drop
from shank as shown above,
• It is not necessary to loosen
the thumb screw to change
presser foot.
TO ATTACH
THE PRESSER FOOT:
• Align desired presser foot to
shank as shown above.
• Lower presser foot lever and
shank will automatically attach
to foot as shown above.
Page 9
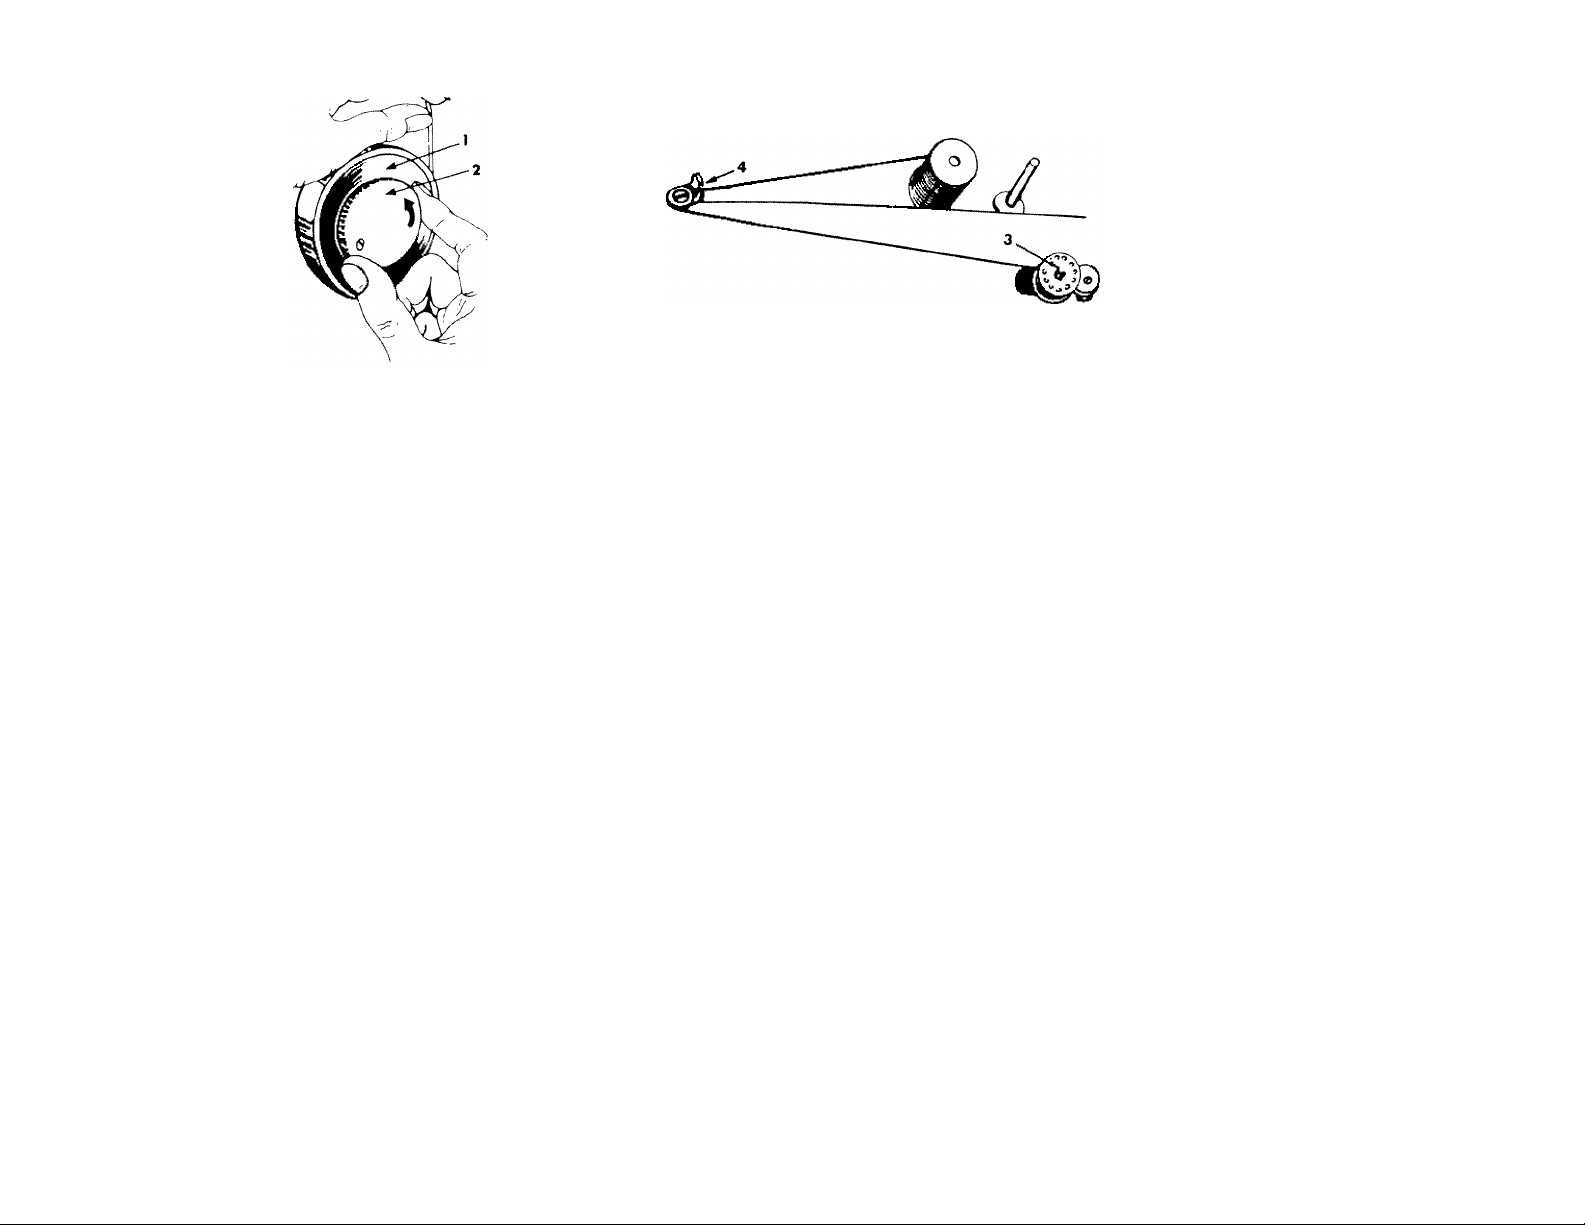
WINDING THE BOBBIN
TO DISENGAGE THE HAND WHEEL:
• Hold the hand wheel (1) with left hand, turn
clutch (2) counterclockwise with right’hand to
disengage as shown.
TO WIND THREAD ONTO BOBBIN:
• Lead thread through spring thread guide (4) and
through the hole in your bobbin from the inside
out.
• Place the bobbin onto the bobbin winder shaft
(3).
• Push the bobbin winder to the right.
• Hold loose end of thread firmly and turn hand
wheel to make thread tight. Apply gradual
pressure on foot pedal until automatic shut off
disengages bobbin winder.
• Cut off loose end of thread.
Page 10

CHANGING BOBBINS
TO REMOVE THE BOBBIN FROM BOBBIN CASE:
• Raise needle bar to its highest position. Bobbin
case cannot be removed when needle bar is
at low position.
• Open shuttle race cover, pull bobbin case latch
with two fingers and remove bobbin case as
shown above.
• Remove bobbin from bobbin case by releasing
latch.
TO ATTACH THE BOBBIN CASE:
• Pull thread at least 3 inches from bobbin.
• Thread bobbin as shown on page 9 .
• Making sure that needle bar is at its highest
position, insert bobbin case into shuttle race by
holding bobbin case latch. Make sure bobbin
case finger is inside shuttle notch. Press bobbin
case into shuttle as far as possible until latch
catches on center post of the shuttle.
Page 11

THREADING THE BOBBIN CASE
Tension Spring
Pull thread at least 3 inches from
bobbin. Insert bobbin in bobbin
case so that thread will unravel
clockwise.
Pull thread into slot of bobbin
case as shown in Fig. 2.
Draw thread under the tension
spring and into the fork-shaped
opening of the spring as shown
in Fig. 3.
TO ADJUST BOBBIN TENSION;
• Turn screw on side of bobbin
case clockwise to increase
tension.
• Turn screw on side of bobbin
case counterclockwise to
decrease tension.
Pull thread through hole in
bobbin case finger as shown in
Fig. 4. (Recommended for
zigzag sewing only)
Page 12

UPPER THREADING
Raise needle bar to its highest position.
Raise presserfoot.
Lead thread through top plate thread guide (1)
and between tension discs (2).
Pull thread down around arm thread guide (3)
and up to take-up lever (4).
Lead thread through eyelet on take-up lever
from right to left and down through face plate
guide (
5), hooking thread into guide.
Pull thread down through needle clamp guide (6)
and through needle hole from front to rear (7).
Always use the same type of thread on top and
bottom as different sizes or types of thread will
cause tension problems.
Example: Polyester thread on the bobbin and
cotton thread on top will result in poor tension
quality.
10
Page 13

(TWIN NEEDLE UPPER THREADING)
• Follow threading instruction for single needle with
these exceptions.
• Place thread, matching or contrasting in color, on
both spool pins.
• Draw threads through thread guides as normal, but
separate the threads at the tension.
• Pass thread through the left disc and one thread
through the right disc.
• Now treat both threads as one until you reach the
needle eyes.
ZIGZAG DIAL: Set at desired width between "O" and
"3", if you set dial hi^er than 3, the needle will hit the
needle plate and break.
STITCH LENGTH: Set at desired stitch length.
ADJUSTING FEED DOG HEIGHT
• Upper position of feed dog is used for normal sewing.
To raise feed dog.
• Press drop feed button ".^"located under shuttle cover, to
upper position.
• Lower position is used for Embroidering, Mending or
Sewing on Button. Press drop feed button “M" to
lower position.
11
Page 14

PICKING-UP LOWER BOBBIN THREAD REGULATING PRESSURE
Raise presser foot.
Holding upper thread, turn hand wheel toward
you one rotation. When take-up lever is at its
highest position, pull thread to pick up loop of
lower bobbin thread.
The amount of pressure that is applied to the
fabric by the presser foot is adjusted by the
pressure cap (1). The upper position gives the
least amount of pressure while the lowest position
gives maximum pressure.
To increase the pressure, push down on the
Pull both upper and lower
thread "to the left of"
presser foot approximately
6 inches.
This will prevent jamming.
pressure cap to obtain the desired setting. To
decrease the pressure, press down on the snap
lock ring (2) to allow the pressure cap to return
to its maximum height. Then reset to the proper
pressure.
Normally the pressure cap will be in the lowest
position. If the top layer of fabric tends to push
out further than the bottom layer of fabric,
Pressure should be decreased. This often happens
on bulky fabrics, such as wools, and on knits.
12
Page 15

ADJUSTING UPPER TENSION
Fig. 1
Fig. Z
Flg.3
'///A
k/zm
Upper Thread Tension Too Loose
Upper Thread Tension Too Tight
kirn
Proper Terulon
To increase upper tension, turn upper tension
regulator to higher number.
To decrease upper tension, turn upper tension
regulator to lower number.
Turning tension regulator from “0” to “9" will
increase tension. Normal sewing is performed
between ”4” and “5”.
Note: Normal stitches will be performed on the red
zone at 4, 5 and 6 for regular cotton threads.
A perfect straight stitch will be formed with both
threads interlocking in fabric as shown in Fig. 1.
When using the zig zag stitch for embroidery
(satin stitching), decrease upper tension so that
top surface will look smooth at the expense of the
bottom surface.
13
Page 16

FABRIC. THREAD. NEEDLE AND STITCH LENGTH GUIDE
NEEDLE (Lons Scarf)
FABRIC
, 130/705H
’ Europaar.
THREAD
STITCH LENGTH
DELICATE — tulle, chiffon, voile, fine lace, oraandv
lawn, crepe, taffeta
Knits - sheer tricot
LIGHTWEIGHT — batiste, orqandv. voile, taffeta,
silk, crepe, chiffon, velvet
KNITS — tricot, brushed tricot, iersevs. synthetic
leathers, p ower net
LEATHER S - plastic film, vinyls
MEDIUM WEIGHT - ainaham. oercale. linen chintz
(eille, satin, corduroy, velvet, suitings, wools, pique,
terry
KNITS — iersev. double knit oower net. barbina
suits
LEATHER S — vinyls, plastic film
MEDIUM HEAVY — gabardine, tweed sailcloth,
denim, duck, coatings, wools, drapery.
KNITS — double knit, power net
LEATHER — vinyl, rubber b acked drapery fabric
HEAVY ~ overcoatings, canvas, upholstery, awning
KNITS — fake furs, velours, sweater
LEATHER S - vinvis, plastics
65/9 70
light bail point
75/11 80
light ball point
Wed^ point
90/14
light or medium
ball point
Wedge point
100/16 100 Mercerized 50
heavy ball point
Wedge point
110/18 110
heavy ball point
Wedge point
Fine mercerized 60
European 50 — 70
•'A" Silk
Fine Synthetics
Fine mercerized 60
European 50 - 70
Fine Synthetics
"A" Silk
90 Mercerized 50
European 30
"A" Silk
Synthetic
Heavy Duty Mercerized
European 30
"A" Silk
Synthetic
Heavy Duty Mercerized
European 30
Synthetic
14
1-1/4 - 1-3/4
1-3/4 - 2
2-1/2 - 3
1-3/4 - 2
2-1/2 -3
2- 2-1/2
2-1/2 -3
2 1/2 - 4
Page 17

Before starting to sew, turn the hand
wheel toward you until the needle is
at its highest point. NEVER run ma
chine without material under presser
foot.
Place material and threads in position
under the presser foot and lower the
presser foot.
You are ready to begin sewing, by
having the needle at its hand wheel to
start the machine.
TO REMOVE MATERIAL, be sure to
stop the machine when the needle bar is
located at the highest point. Now raise
the presser foot with the presser bar lifter,
then draw the fabric back and to the left,
and cut the threads with the thread cutter.
0 a 1 • 2 ■ 3 ■ 4
STITCH LENGTH CONTROL DIAL
• Numbers on dial denote
length of stitches.
• To increase length of stitch,
turn dial to higher number.
STITCH LENGTH GUIDE
Numbers
on dial
Stitches
per inch
0 1 2 3 4
No
Feed
24
6 6
12
REVERSE STITCH BUTTON:
• Use for reverse stitching or
tacking.
• Keeping button pressed in will
allow you to sew reverse stitch
at same length as forward
stitch.
15
Page 18

SELECTING NEEDLE POSITION
Right Middle
• Three different needle positions, left, "4 " middle
and " ◄” right can be selected. Also, those intermediate
positions between left and middle and right can be
selected with the dial at the middle between -■ ►"-"f ",
and "^'"-"4" as shown
► - - • indicates the left hand needle position
A
____
indicates the m iddle needle position
^ - indicates the right hand needle position
>• 1
Page 19

CHANGING
DIRECTION OF SEWING:
REMOVING THE MATERIAL:
CROSSING
HEAVY SEAMS:
• Before changing direction,
stop the machine at the desired
point making sure that the
needle is down through the
fabric.
• Raise ttre presser foot, turn
the fabric to the desired posi
tion, lower the presser foot
and continue sewing.
Note: When sewing with a twin
needle, it is necessary to raise
the needles above the fabric
before turning. Be cautious to
realign the fabric to the position
where the last stitch ends.
After stopping the machine,
turn the hand wheel toward you
until the take up lever is at its
highest position.
Raise the presser foot, then
draw the fabric gently to the
left rear of the machine, making
sure that the threads are under
the foot. This avoids bending
the needle.
With two hands, lift the two
threads up and into the thread
cutter on the presser bar and
pull down firmly to cut the
threads.
17
When crossing heavy seams,
angle the fabric down into the
foot so that the foot can draw
the heavy area into the feeding
mechanism and pass over the
bulk easily.
Page 20

ZIGZAG STITCHING
Zigzag Foot
(single needle sewing)
• Set the needle position dial in the free position
• Set the zigzag width control knob from 1 to 5.
• Set the stitch length control dial from 1 to 4.
• Now you can start sewing as you wish.
SINGLE NEEDLE ZIGZAG STITCH PATI
Patterns
\A^AAVvV
mmwMiism
-----
imnrmn
JiivJiUJiU
Needle Position
Left. Middle
or right
Left, Middle
or right
Left, Middle
or right
Middle ♦
Right
Middle
Left ►
Left ►
Right ^
Stitch Length
Long
Short
Long and Short
{Repeat)
Long
Short
Page 21

BUTTONHOLE PREPARATION
0 ea 1 .
Step!. Step 2. Step 3. Step 4.
Step 5,
Seam Ripper
Needle PosIMon Selector ano
Zigzag Width Control Dial
Stitch Length
Control Dial
PROCEDURE:
• Attach buttonhole foot to machine.
• Before starting to sew, always pull the buttonhole box toward you
until it is fully extended.
• Mark position of buttonhole on fabric to assure proper alignment.
Step 1 ; Set ihe stitch length control dial between 0 and 1, and the
needle position dial at ” Press drop feed button,
take few stitches to bartack the end of marked buttonhole
with the zigzag width control dial "5".
Step 2; Press "MU drop feed button, set stitch width dial between
1 and 2, then sew down the left edge of marked buttonhole.
Step 3: With needle in the fabric on the left side, and repeat as in Step 1
at the left edge position of marked buttonhole.
Step 4: Press "MÈL drop feed button, and set the needle position dial at
"■4 " and between 1 and 2 of zigzag stitch width. Press reverse
button of stitch length for reverse stitching, then sew up the
right edge of marked buttonhole.
Step 5; With down position feed dog height, cut center open space with
seam ripper of buttonhole carefully not to cut into the stitches
19
Page 22

BUTTONHOLES ON LIGHTWEIGHT OR KNIT FABRICS
. • I
- •• •
I ‘
■ Cord String
Place cord string over tab on presser foot as shown.
After finishing the buttonhole, remove the foot from
the fabric, draw the loop of the cord string up to the
bar tack, tie the loose ends and trim the balance.
Position fabric in sewing area and attach button
hole foot to the machine. Sew the buttonhole so
that stitching covers cord string.
20
Page 23

SEWING ON BUTTONS
Button Foot
^ 0
Other Applications
0 a 1 •
SHlch Length
Control Dial
PROCEDURE:
Set drop feed button
" ►" position.
position with the needle position selector
Place button under button foot such that the needle is aligned
directly with the left hole in your button. Check alignment by
turning hand wheel and watching needle.
Bring the needle slightly above the button and turn stitch width
knob until needle aligns with the right hole in the button.
Run machine slowly and make 7—8 stitches.
With needle in left hole return zigzag width knob to the "0"
position and make 3-4 stitches to tie off your button.
Apply the above method to sewing on buttons with four holes, hooKs,
snaps, etc.
21
Page 24

EMBROIDERING
0 a 1
Needle Position Selector and
Zigzag Width Control Dial
Stitch Length
Control Dial
PROCEDURE:
• For free-motion sewing, press 'H" drop feed button,
and press down on outer ring of the pressure regulator
to release pressure completely.
• Place under needle of fabric into an embroidery, a
darning and a monogramming hoop.
• With the width at "O" make 5 or 6 stitches to
reinforce the starting point.
• At the desired zigzag width stitch to outline the
design by moving the fabric and hoop in a side
motion. To fill the design, move the fabric and
hoop from side to side in a rhythmic motion.
• To return feed to normal, press drop feed
button, and push down on the pressure cap to
obtain the desired setting.
22
MONOG RAMMING
Page 25

SEWING ON ZIPPERS
Reguler Zipper Fool
Oo 1 . 2• 3
Needle Position Selector and
Zigzag Width Control Dial
Stitch Length
Control Dial
PROCEDURE;
Set the needle position at " ►" or " as needed
to sew the right side or the left side of zipper
respectively, so that the foot sews very close to
the zipper teeth. (Fig. 1)
Set the needle position at and make the
welting by sandwiching the cord into a bias
strip of fabric. Stitch close to cord. (Fig. 2)
Set the needle position at Sandwich the
welting between two layers of fabric with right
sides together. Stitch a second time. The needle
stitches close to the cord through all thicknesses
(Fig. 3)
Attach zipper foot and adjust position depending on which side
of zipper foot you wish to use.
Open the zipper and place it face down on the back side of the
fabric with the zipper teeth along the fabric edge.
23
Page 26

QUILTING
. 4
Needle Position Selector and
Zigzag Width Control Dial
Stitch Length
Control Dial
PROCEDURE:
• Insert the quilter guide bar into the notch under the spring on the
shank and adjust the position according to the desired distance
between quilting seams,
• Stitches are easily aligned by guiding the quilter guide along the
previous seam line.
94
Page 27

CARE AND MAINTENANCE
A majority of service calls can be avoided by proper care of your machine. This involves three important
steps.
1 Cleaning Give your machine a light cleaning after each garment is completed. For light cleaning -
brush lint from feed dogs, needle bar and hook, and oil hook. A more extensive cleaning and oiling
can be done every two months.
2 Oiling - Use sewing machine oil only. Do not use any other household oils, as they will eventually
cause problems with the machine. Oil every two months, or more often if machine is in constant use.
3 Proper Use of Needles - Always use the proper needle for your fabric and thread.
Change needles often, as they dull quickly especially on synthetic fabrics.
If you are having a problem, before calling the service man;
1. Check to see that the machine is threaded properly.
2. Replace the needle and make sure it is attached correctly.
3. Be sure that the bobbin is wound evenly.
25
Page 28

CLEANING THE MACHINE
Caution; Eilelore cleaning Ihe machine, be sure to disconnect
the power cord trom Ihe wall outlet
CLEANING AND OILING THE HOOK ASSEMBLY
• Raise the needle bar to the highest position.
• Open the hinged shuttle cover and remove the
bobbin case with bobbin.
• Remove lint or dust with a soft cloth or lint brush
• Use only the oil in the accessory box.
• Replace bobbin case (See page 8 ‘or
instructions).
CLEANING FEED DOGS
• Lint or dust accumulated between the needle
plate and the feed dogs must be removed to
maintain good operation of the machine.
• Raise the needle barto the highest position and
remove the needle and presser foot.
• Loosen screw on the bed cover plate and remove
the plate.
• Clean lint and dust from the bottom of the needle
plate and the feed dogs with a lint brush.
• Turn the hand wheel slowly and be sure to clean
all areas.
• Replace the removed plate.
26
Page 29

OILING
-OIL
Swing open hinged face plate. Apply one drop of
oil at all points indicated by arrows.
OIL OIL
OIL OIL OIL
Using the large screw driver in the accessory box,
remove the two screws on the top plate and remove
plate.
Remove screw on the bed cover plate and apply
oil while turning the hand wheel.
27
Page 30

TROUBLE-SHOOTING GUIDE
MACHINE DOES NOT FEED
• Is drop feed up?
• Is needle plate correctly installed?
• Is presser bar pressure too light?
• Is the hand wheel clutch screw tight?
• Is the stitch length control dial set at “0" position?
NEEDLE BREAKS
• Is needle inserted and tightened correctly; is it
straight?
• Is the cloth being pulled excessively but
unknowingly?
• Are proper needle and thread being used for the
type of fabric being sewn?
UPPER THREAD BREAKS
• Is the machine properly threaded?
• Is the needle good?
• Is the thread too heavy for the needle hole?
• Is the upper tension set too tight?
• Is thread jammed somewhere between spool
and needle?
BOBBIN THREAD BREAKS
• Is the bobbin thread jammed in the hook or
bobbin case?
• Is the bobbin tension set too tight?
• Is the thread properly threaded in the
bobbin case?
STITCH SKIPPING OCCURS
• Is the needle inserted correctly and straight?
• Is the needle of poor quality or of the wrong size?
• Is the upper thread properly threaded?
• Is the thread used proper for the material
being sewn?
• Are the bobbin case and feed dogs free from lint?
THREAD LOOPS OCCUR
• Is the upper tension and bobbin tension properly
adjusted?
PUCKERING OCCURS
• Is the tension too tight?
• Is the needle threaded properly?
• Is bobbin thread wound evenly on the bobbin?
• Is the pressure of the presser bar too weak?
28
 Loading...